1
WinTOTAL “Athena”
Generation
User Guide
Copyright 1995-2002 a la mode, inc.
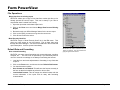
Table of Contents
Click here to go to the online Table of Contents where you can access additional chapters in
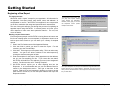
Instructions for Online Guide
About this guide. This online table of contents contains
hyperlinks that take you to all the chapters in our Athena
User Guide. Over 200 pages of valuable tutorials, tips,
and tricks are accessible right here!
Viewing individual chapters. As you move your cursor
over a chapter name, you’ll see it “point”. From there,
click, and the corresponding document will be loaded on
screen for viewing or printing. At the end of each document is a section titled “More Chapters”. There, you will
find a clickable link back to this table of contents.
Printing the user guide. Each of the following chapters
may be printed individually once they are loaded. If you
wish to print the entire user guide (or multiple chapters) at
one time, we have provided a shortcut on your Athena
CD. That shortcut loads a PDF that has all the chapters
combined into one file - current at the time your CD was
produced. Just insert your Athena CD, wait for the main
screen to appear, and click the link for “Full User Manual”.
Searching user guides. Once a chapter (or the full user
manual from the CD) is loaded on screen, you can press
CTRL+F and use Acrobat’s “Find” feature to search for
phrases in the document. The Athena User Guide is also
indexed and searchable from within the WinTOTAL program by clicking “Help” and choosing “Contents”.
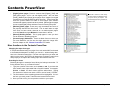
1 - Welcome to Athena
2 - Form PowerView
3 - Contents PowerView
4 - Addenda PowerView
5 - Comps PowerView
6 - Photos PowerView
7 - Apex and the Sketch PowerView
8 - Maps PowerView
9 - E&O and Graphs PowerViews
10 - Worksheet PowerView
11 - Sending and Receiving Reports
12 - Internet Data Connector
13 - Managing Your Files
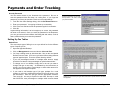
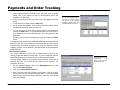
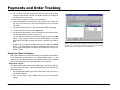
14 - Payments and Order Tracking
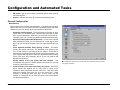
15 - Configuration and Automated Tasks
16 - Networking WinTOTAL
17 - File Conversions
18 - Welcome to Pocket TOTAL
19 - USPAP Compliance in the Digital Domain
20 - Solution Center - Gateway to Self-help
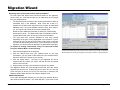
Appendix A - Athena Migration Wizard
WinTOTAL “Athena” Generation
Rev. 11/01
Page 1 of 1
Getting Started
Welcome to Athena
Athena is the 4th generation of WinTOTAL - the software used for more
appraisals than all others combined. This “Getting Started” chapter will
give you an overview of Athena’s features. Go through it sequentially
before diving into the other chapters of this 200+ page manual.
Conventions in These Manuals
Before we get started with the program, let’s cover a few of the
conventions used to describe the instructions in this manual:
•
Click, double-click and right-click. Most items are activated with a
single click. If a double-click is needed, this manual will tell you. To
“right-click”, use the button on the right side of your mouse.
•
Menus. Menus are near top of the WinTOTAL screen. They are
labeled File, Edit, etc. The last one is the Help menu which gives you
access to a searchable index of topics in this guide.
•
PowerView. Functions are arranged in screens we call PowerViews.
When a report is open, you’ll notice buttons labeled Contents, Form,
Addenda, etc. at the top of your screen. Click these once to switch to
a different PowerView.
•
Select. When the manual tells you to select something, it means to
click once on it. A selected item will be highlighted.
•
Window/Dialog. We’ll use the terms “window” and “dialog” when
referring to the presently active screen. There is also a Window
menu with functions to manage multiple reports open at once.
•
Tabbed Dialog. Some dialogs in WinTOTAL have clickable “tabs”
along their top or bottom that take you to other screens and dialogs.
•
Drop-down lists. Often, fields in a WinTOTAL dialog will have an
arrow displayed on the right side of them. By clicking the arrow, you
can access a picklist of items.
•
Hyperlinks and more chapters. Throughout this chapter, you’ll see
other chapter names such as “Sending and Receiving Reports”. If
you are reading this guide on screen, you can click the text to access
that chapter. Likewise, our main “Table of Contents” is linked at the
end of every chapter as well as on the left of the on-screen manual.
Getting Started • Conventions in These Manuals
2/18/2002
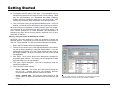
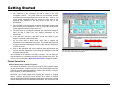
PowerView buttons
give you access to
the different aspects
of your report.
Our PowerView concept arranges features and workflow in your reports. Instead of
menus with commands buried in them, each PowerView puts the functions you need right
on screen in an intuitive and obvious manner.
Page 1.1
Getting Started
Starting WinTOTAL
Instructions we display on screen
By now, you have most likely started WinTOTAL at least once. At various
times, WinTOTAL will need to perform various actions such as updating
system files after a program update or you may be prompted with special
instructions. It’s important to read each screen as it is presented so that
you can be informed and operate more efficiently.
As you work through many of WinTOTAL’s features the first time, a
tutorial will also pop-up and point out certain key elements regarding what
you are about to do. We know you just want to dive in and start using the
program, but time invested in training will pay off many times over.
Network considerations
In multi-user offices with a network server, you do not need to install
WinTOTAL separately on the workstations’ “C” drives. Just install once to
the server, then browse to the server’s drive and run WIN2000.EXE. Be
sure you have mapped a drive letter to the server’s and that your
Win2000 directory is in a sub-folder under that drive (i.e. your path
would be F:\WIN2000\WIN2000.EXE)
Before using WinTOTAL in a networked environment, we recommend
reading our “Networking WinTOTAL” chapter.
Appraisal Desktop Overview
Essential activities in one interface
When starting WinTOTAL, you will typically see the Appraisal Desktop
first. (If it doesn’t start automatically, click Open.)Therefore, we will give a
brief description of its features before diving into report creation in
“Beginning a New Report” on page 6 of this chapter.
The Appraisal Desktop is a central location for file management, billing,
office management, support solutions and even online resources. The
different areas of the Appraisal Desktop are accessible by clicking their
associated icon on the left side of the window.
Snapshot
Want to see, at a glance, how many reports are ongoing and how much
money you still have coming in from finished jobs? The Snapshot does
Getting Started • Starting WinTOTAL
2/18/2002
Page 1.2
Getting Started
this as well as provide information on EDI activity and even an HTML
based “news” section. As a matter of fact, the snapshot is completely
HTML and gets a live feed from us so we can always keep you up to date.
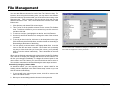
File Cabinet: Gateway to your reports
The File Cabinet is where you go to access your files. It is similar to
Windows Explorer in that you have folders on the left and files on the
right. The purpose of the File Cabinet is to save you the trouble of
manually managing files through Windows Explorer. Some functions you
will find handy are:
•
Search. This lets you search the File Cabinet for specific files based
on the contents of the file. If you are searching for a property at 123
Main Street, all you need to type in the property address field is the
word main. The File Cabinet automatically places wildcards at the
beginning and end of whatever you type. The searching is fast,
because key information you enter in forms is automatically copied to
the File Cabinet’s database.
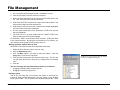
•
Move/Copy. Easily copy or move the selected file(s) to another folder
or disk. You can also drag and drop files into other folders.
•
Info. This displays key information as well as billing data on the
currently selected report in the WinTOTAL “Requester”. Changes
you make in the Requester automatically transfer into forms
contained in the report.
•
Print. Without opening a file, you can send it to your printer.
•
Send EDI. WinTOTAL lets you send files electronically without
opening a separate e-mail program. Just select a file, click Send EDI,
fill in the delivery details and click Send/Receive. EDI is really easy
with WinTOTAL, but be sure to see our dedicated chapter on the EDI
center for details on setting up EDI and becoming an EDI expert.
•
QuickNotes. At the bottom of the file list is a panel that shows
information about the currently selected report. When you click the
QuickNotes tab, you are given an area in which you can jot down
miscellaneous notes about that job without having to open the entire
report. You can use this if you field a phone call about a particular
assignment or need to pass a note to an appraiser about a particular
item in a report.
Getting Started • Appraisal Desktop Overview
2/18/2002
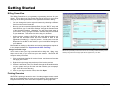
WinTOTAL’s Move/Copy functions make it easy
to transfer reports to a diskette or different folder.
You can also drag and drop reports between
folders and disks.
The Appraisal Desktop
brings together a variety
of management functions
to boost your overall productivity.
Page 1.3
Getting Started
As you can tell, the File Cabinet is extremely powerful. After going
through this chapter, see our dedicated ““Managing Your Files”” guide
for details on other File Cabinet capabilities such as sorting, searching,
printing and customizing.
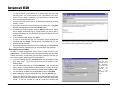
EDI Center
EDI is synonymous with “e-Commerce.” A key feature in WinTOTAL is
the ease with which you can send files electronically. In the previous
section, we briefly explained how to simply send a file. However, our EDI
Center takes sending and receiving files via WinTOTAL to a new level by
giving you one place where you can:
•
Send and receive files in WinTOTAL’s native format or a nonproprietary format like the Adobe PDF.
•
Automatically process certain types of files as they are received.
•
Send and receive plain e-mail messages without having to use a third
party e-mail program.
•
See a log of outbound mail in the Outbox folder or what has been
sent in the Sent Items folder.
If you’ve used an e-mail program like Microsoft’s Outlook®, then you’ll be
right at home in our EDI Center.
The first time you attempt to use our EDI functions, you will be prompted
to configure your Internet settings, if you didn’t do so during the
installation. Be sure to read our “Sending and Receiving Reports”
chapter for assistance with configuring and using the EDI Center.
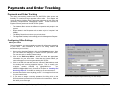
Management
The Management area is centered around billing functions and running
reports. WinTOTAL can automatically assign fees based on the job type
and client as well as assign fee splits based on the appraiser. The
“Payments and Order Tracking” chapter of this user guide is dedicated
to these functions.
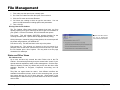
Contacts
WinTOTAL saves you from having to retype the names of your clients and
appraisers for each report. The Contacts section of the Appraisal
Desktop is where you manage your address book. Not only is the
address book a way to eliminate repeated data entry, but it is also
Getting Started • Appraisal Desktop Overview
2/18/2002
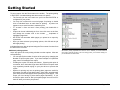
Using the Address Book feature in WinTOTAL keeps you from having to re-enter
contacts repeatedly as well as enables billing and tracking functions.
Page 1.4
Getting Started
essential to all billing and report tracking functions. In other words, if a
particular entity isn’t listed in your Contacts, then you won’t be able to run
reports on them either!
•
The drop-down menu labeled Category lets you filter the list based on
the type of contact.
•
To add a new contact, click Add New and fill out the fields in the Edit
Address Book Entry window. For Appraiser entries, be sure to put in
license and certification information. The ID field is a “code” for your
internal reference. It helps you separate clients with the same name,
but different contact information. The EDI Info tab is described in the
“Sending and Receiving Reports” guide.
•
The Edit Local Office option is where you enter information that
transfers to your invoices. During the installation of WinTOTAL, you
were prompted to fill out this screen as well. If you neglect the
completion of this item, invoices generated through WinTOTAL won’t
have your name on them!
As we’ll see in “Adding contacts on the fly” on page 9, you can add entries
to your address book in the midst of filling out an appraisal request.
Therefore, if someone wasn’t in your contact list, you can add them
without cancelling out of the request.
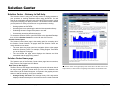
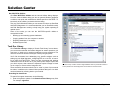
Solutions Center
The Solution Center is your key to getting help with WinTOTAL and
remaining productive. Not only does it have tools that help our technicians
resolve issues, it is your gateway to self help. Loaded with our technical
documents and live information from our support center, it’s a dynamic
part of your Appraisal Desktop.
Your Websites and Education
The Appraisal Desktop also incorporates extra sections that pull
information from the Internet. As the needs of our industry change, we
can update these links and bring the information straight to you eliminating the need for you to do extensive research on your own.
Getting Started • Appraisal Desktop Overview
2/18/2002
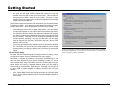
The Solutions Center has a “selfserver” tech doc
library. And, don’t
forget
to
click
Instant Customer
Update to get current additions to
your
WinTOTAL
program!
Page 1.5
Getting Started
Beginning a New Report
The report concept
WinTOTAL uses a “report” concept for your appraisals. All information for
an appraisal - form data, photos, map, sketch, notes, and addenda - is
encapsulated in one file. WinTOTAL even applies its own compression
on the file to maximize disk usage and speed electronic transmission.
The Requester “Quick Clone” lets
you jump start reports without
going through the Requester.
However, we’re going to use the
full Requester screen (shown
below) for this tutorial.
The rest of this guide will take you through the process of completing an
appraisal report using WinTOTAL. In several places, we’ll refer you to
other chapters to learn more about particular features. For now, let’s
cover the basics.
Starting a report from scratch
Even though most people use WinTOTAL’s cloning feature to base a new
file from an existing report or use a template, it’s important to know how to
build a report from scratch so you can work up to a library of template
reports.
1. Start in the File Cabinet area of the Appraisal Desktop.
2. Click the folder in which you wish to create the report.
exercise, go to the Tutorial folder.
For this
3. Click New. This brings up our Requester utility. This is an order entry
module. You get to the various sections of the order/request by
clicking the shortcuts along the left side.
4. Enter a description for this report. Many appraisers use the address,
but you can use anything you like. If you leave this item blank,
WinTOTAL will default it to the address you enter in the Assignment
section. For this exercise, call it “Training Template”.
5. WinTOTAL doesn’t require you to enter anything else into the
Requester. It is recommended that you use the Address Book for
entries in the Assignment section. We’ll get to that later in this
section. Right now, we are interested in showing you how to get the
basic forms in a new file, so click the Open button at the top of the
Requester window.
Getting Started • Beginning a New Report
2/18/2002
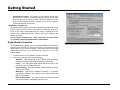
Your report description can be up to 200 characters long and doesn’t necessarily need to be your report address. WinTOTAL can even be set to
name your file, EDI attachment or EDI subject line based off the description you enter here.
Page 1.6
Getting Started
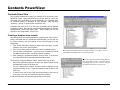
6. Since this is a new request with no forms, WinTOTAL will first want
you to choose the forms. The forms list is split into different folders,
based on the type of form.
•
Most of the forms we're going to use are in the “Most Common
Forms and Addenda” section of the forms list.
•
You can “expand” and “collapse” a folder to hide or display its
forms in the scrolling list by clicking the “+” sign that appears to
the left side of the folder icon. Instead of scrolling up and down
through the list and expanding / collapsing the sections, you can
also find forms using the search function.
•
To add a form, highlight the form and click on the Add button (the
right-pointing arrow in the middle of the screen.) You can also
double click on the form from the list on the left.
•
Major forms - such as the URAR or Small Income form - which
define the type of report as well as “feed” addenda and supporting (or minor) forms, have an “M” in the icon next to them. You
are allowed one major form per report.
7. For now, lets go ahead and add some basic forms such as a Table of
Contents, any “major” form, Statement of Limiting Conditions, Subject
Photos and Comp Photos.
8. Once forms are in your report, you can rearrange them by clicking
them once in the list on the right and then using the Up/Down buttons.
You can also drag and drop the forms to put them in the right
sequence.
Starting new reports from scratch means you must add all the forms into them.
Using our cloning feature saves you this step.
We stress putting the forms in the right sequence because this is the
order in which they will print. It also makes better use of our Table of
Contents form and automatic page numbering, which give your report
a more professional appearance as well as provide a record of what
is in the report so no important addenda are “lost.”
9. If you want to type information into the forms, double-click the form as
listed on the right side and you will be taken to it. For now, we want
to work with report basics. So, click the File menu and select Close.
The entire “Contents PowerView”chapter is dedicated to a tutorial
on the best way to build reports. We recommend going through it at a
later time to become more proficient in this area of WinTOTAL.
Getting Started • Beginning a New Report
2/18/2002
Page 1.7
Getting Started
10. If prompted, enter the status of the report. This information is key to
management reports and the dates here are crucial to billing. While
they are self-explanatory, our “Payments and Order Tracking”
chapter describes in detail the best way to use these items. After
entering any necessary status information, click Save and Close.
11. Then, click Open to bring up the Appraisal Desktop again. In the File
Cabinet, you should see the description of the report we just created.
What we have just accomplished is creating a basic report from scratch.
You could start all your reports this way, but it may become tedious. The
most common practice is to create templates (aka boilerplates or
skeletons) and then use the Cloning feature, described next, to get a
head start on new files.
Cloning - using one report as the basis for another
WinTOTAL has been designed to match the workflow of almost any
appraisal practice. Cloning lets you use an existing file for the basis of a
new one - forms and data. It is the most common way files are started.
1. Start in the File Cabinet area of the Appraisal Desktop.
2. Find the file you wish to clone in the Appraisal Desktop’s File Cabinet.
You can do this by browsing or using the Search feature. If you are
brand new to WinTOTAL, go to the Tutorial Folder and click once on
the sample template. Once you’ve found the file, click it once so that
it is highlighted.
3. Click Clone. You’ll get the Quick Clone dialog that is designed to
streamline report creation. Your system can be configured to either
bring this dialog up or the report details.
4. First, type a report description. This can be anything to help you
identify the assignment.
5. Then, choose the clone method.
•
Clone... with data. This copies the entire report and data into
the new file - clearing items like your signature, borrower,
occupant and other items that don’t need to be copied.
•
Clone... without data. This uses the forms structure of the
cloned report, but clears all information from the Requester and
forms.
Getting Started • Beginning a New Report
2/18/2002
Use the “Clone” feature in the Requester to avoid having to re-enter
repeat information or when you are using “skeleton” templates.
Page 1.8
Getting Started
6. At this point, click the Details button (as opposed to Open) since we
want to demonstrate the Requester and the advantages to using it.
7. This brings up our Requester, which is an order entry module for
WinTOTAL. Everything typed into the Requester is automatically
transferred into your forms. Likewise, anything you type into a form
goes back to the Requester. It’s bi-directional.
8. Click the Filing shortcut on the left side of the screen. This is where
you enter tracking numbers for the file. Instead of clicking in each
field, you may use the TAB key get from item to item.
•
Note that you have options to have WinTOTAL generate an
automatic sequential file number.
•
Next to the fields labeled “Main File # on form” and “Other File #
on Form”, there are drop down boxes that allows you to
automatically use items already entered.
•
One of the printing features in WinTOTAL enables you to put
page numbers on every form. Along with that page number will
be the “Main File # on form” item. This is a great way to get a
tracking number on forms where there isn’t a field explicitly for it.
9. Click the Assignment shortcut.
This is where you type
information specific to this job. This data transfers into the forms into
the report.
10. Once you’ve entered a city, state, zip and county, you can click the
diskette icon next to the county field to save that group of entries,
accessible via the drop-down list in the city field, for future
assignments.
Adding contacts on the fly
As we saw previously, we can add entities through the Appraisal
Desktop’s Contacts area. We can also add contacts into our address
book in the middle of filling out a request. Click on the folder icon located
next to fields like appraiser, lender, client, etc. There, you will be able to
locate existing entries, edit an entry or enter a new one.
Filling in all of the information in the Assignment section of the requester will
save you possibly overlooking important information in your report.
Finishing the request
Lets finish out the request and open up the report. In many fields, note
that CTRL+D will add the current date and CTRL+T adds the current time.
Getting Started • Beginning a New Report
2/18/2002
Page 1.9
Getting Started
1. Click the Inspection shortcut and fill in the applicable fields. The
Occupant, Borrower and Agent fields have drop-downs that enable
you to easily copy entries from one item to another. If you have
Microsoft Office, you can even export the inspection date/time to
Microsoft Outlook and have it remind you of your appointment.
2. Click on the Notes shortcut and enter any other pertinent information
that will be necessary when completing the report.
3. Go to the Billing section and enter a figure in the Base Fee section.
We’ll talk more about this in the “Payments and Order Tracking”
chapter.
4. Click Open and you’ll then be able to edit the report. WinTOTAL
opens the file at the place where you last left off. Notice that items
typed into the requester are automatically transferred to the form.
The Form PowerView
Adjusting the screen view
Depending on the capabilities of your video card and monitor, you may
not be able to see the whole form on screen. By default, the form covers
the entire width of the screen. Here are ways to see the form clearer:
•
Make sure WinTOTAL is maximized by clicking the maximize button
in the top right hand corner of the application window. (It’s the middle
button.)
•
Increase your video display resolution through Windows Control
Panel. Details are available by calling 1-800-211-4513 and following
the voice prompts to request fax document #4302.
•
Click the View menu and choose a setting of 125% or greater. As
you enter text in the fields, WinTOTAL will scroll for you.
•
Toggle the QuickLists on and off by pressing F9. Or float it above
your form by clicking the handle at the top of that panel and dragging.
Data entry basics
When entering data, note the following:
•
WinTOTAL automatically wraps text in comment blocks, so you
shouldn’t press ENTER at the end of a line.
Getting Started • The Form PowerView
2/18/2002
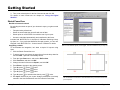
WinTOTAL remembers the last
ten items you typed into a field
and gives you a drop down list
when in the field.
The maximize button will be at the top right hand corner of your WinTOTAL
screen. If WinTOTAL isn’t covering your entire screen, click it and it will.
Page 1.10
Getting Started
•
WinTOTAL will never let you type more into a field than will print. A
green arrow next to a field means the text couldn’t be displayed due
to differences in video and printer resolutions, but will print. A red
arrow means there is more text entered than will fit.
•
Checkboxes may be toggled on/off by pressing the SPACE BAR or
just by clicking in the field.
•
SHIFT+ENTER will back you up one field.
•
TAB emulates a typewriter by moving ‘right’ one field.
•
Pressing F10 while in a field displays an easy to use interface that
lets you customize the cursor movement in the form. Try it!
Changing the default font for all data
The default font for WinTOTAL data is Arial 9pt. If you wish to make this
something different for all data in all reports, do the following:
1. Click the Form menu and select Default Data Fonts.
2. Then, choose Set default form data font.
3. Choose the font and style from the standard Windows font dialog.
Due to limitations in the design of the forms, font size is typically
limited to under 11 points.
4. Click OK.
WinTOTAL will then update your current report. Note that all existing
reports will print and display with this new font as well.
Field formatting and numeric fields
In WinTOTAL forms, the fields are pre-formatted according to how the
most likely appraiser would prefer. The formatting is also customizable.
•
As you move through the form, notice the buttons in the formatting
bar will appear pressed, or up, depending on the formatting in the
current field. For example, if you move to a numeric field such as the
“RE Taxes” item, you’ll see the numeric options appear pressed.
•
While in a field, you can apply/remove justification and formatting by
clicking the buttons on the formatting bar.
•
If you need to enter text in a numeric field, type the text, and click the
“123” button in the formatting bar.
Getting Started • The Form PowerView
2/18/2002
Use WinTOTAL’s Default data font function to change the text appearance for
all forms in all reports. This is a lot easier than selecting all the text!
Page 1.11
Getting Started
•
A field that is numbers only can have that setting overridden by
pressing F6 before ENTER to leave the field.
Permanent field formatting
Format options changed using the formatting bar may be saved as the
default for all new data files by doing the following:
1. Go to each field you wish to customize and apply the necessary formatting by clicking on the formatting buttons.
2. Click the Form menu item and choose Default Field Formats.
3. From the fly-out menu, click Save Formats as New Default.
4. You will be prompted with a confirmation. Confirm by clicking OK.
Accessing other forms
While in the Form PowerView, you can easily jump to other forms. Let’s
go to the Cover Page:
1. Click the Jump to Other Forms button.
2. Now, click on one of the supporting forms in the report.
3. As the page loads, notice information has transferred to it.
4. Jump back to the main form by clicking on the Jump to Other Forms
button and then selecting it.
Instead of continuously overriding formats, save formatting changes for your
forms.
Text Databasing (Standard Comments)
The Text Database is your library of standard comments. It gives you one
click access to your most commonly used entries. It may be used to
complete singular fields, whole sections, or even an entire form. This is
the recommended way to have reusable text in your forms.
Creating single field comments
Comments are created by first typing the information on the form and then
saving the text.
After typing text into a field, double click item 0 in your
QuickList to add the text from that field into your hot keys available by pressing ALT+the number you assign it whenever you are in that field in any future report.
1. Go to the Functional Utility field, and type the word “average”.
2. Double-click a vacant QuickList entry in the QuickList panel.
3. You’ll see the keyname for this new comment. You can change it if
you like. This is just the keyname, not the actual comment itself.
4. Click OK.
Getting Started • Text Databasing (Standard Comments)
2/18/2002
Page 1.12
Getting Started
Now, you should see AVERAGE appear in your quick list for that field.
One bonus Text Databasing offers in comp grids is that it also added
AVERAGE to the Quick Lists for every comparable.
Multi-field comments for entire sections
1. Enter the information you want for a comment in a group of contiguous fields. A good example is the Neighborhood section of the
URAR.
2. Click in the last field of the section, the comment block for market
conditions.
3. Hold down the SHIFT key and click in the first field in the block, the
checkbox for “location.”
4. Now, all of the fields should be highlighted. You can stop pressing
the SHIFT key. (This same result may be obtained by clicking and
dragging your cursor through all the fields you want to save.)
5. Click on one of the blank entries in the QuickList panel.
6. Enter in a more appropriate keyname, such as the name of the
neighborhood, and click OK.
Now, when you move into the first checkbox of the neighborhood section,
you’ll see the name of the neighborhood appear in your QuickList
Text Database wrap-up
As you move from field to field, the list of comments at the bottom of the
Form PowerView changes to reflect entries tied to a particular field.
•
Quick Lists are available for every field of every form. They are listed
in the QuickList panel which, by default, is on the left hand side of
your form. (You can also drag it anywhere on screen, have it snap to
the right side or appear floating above the form.)
•
Your top nine responses are assigned a hot key, ALT+1 to ALT+9.
You may use these hot keys, or you can double-click the individual
comments to apply them.
•
By moving your mouse over the All Comments item in the Form
PowerView, you’ll see a list representing all QuickLists for all fields
plus comments that may not be tied to a particular field. This makes it
easy to use comments in the addenda writer or in a form different
from the one where the comment was created.
Getting Started • Text Databasing (Standard Comments)
2/18/2002
When multiple fields are highlighted, adding a text database entry inserts a QuickList
for the first field in the block. When you use the QuickList item, it fills multiple fields.
Page 1.13
Getting Started
•
The Text Database may be configured to replace, append to or insert
before existing text in the field. Click Tools, then Configure and then
Formfilling for that option.
You can learn more about Text Databasing in the Mastering the Form
PowerView guide.
WinTOTAL remembers your commonly used responses
In addition to Text Databasing and QuickLists, WinTOTAL also
remembers the last ten items you typed into a particular field. Note this is
a much less powerful feature than the actual QuickLists, but it is handy
and automatic.
1. Type something into any field. Then leave the field.
2. Go back to the field, and you’ll see an arrow for a drop down list
appear on the left.
3. Click on the arrow and you’ll see your last entry. You can also press
ALT plus the down arrow key to access the list.
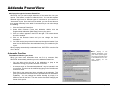
Addenda PowerView
Text addenda linked to your forms
When you enter more information than can fit in a comment field,
WinTOTAL automatically switches you to the Addenda PowerView.
1. Go to the Site section of the URAR and type a few sentences into the
comments section, enough to fill the field and cause the Text Overflow Options Dialog to appear.
•
You can either move the text to the addendum or jump to the
addendum leaving your partial comment on the form.
•
A comment such as “See attached addenda.” may be inserted in
the current field.
•
Each field is also named and given a heading in the addenda.
This gives your extended comments a more professional look
and adds to readability.
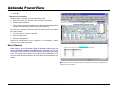
When you’ve entered more text than will fit in
a field, WinTOTAL will automatically jump to
the Addenda PowerView. You have several
options available to determine how text is
automatically carried to the addendum, what
gets left on the form and an automatic heading for the section in the addenda.
2. Now click OK. At that point, your screen will split so you can switch
between the form and the addendum at will.
Getting Started • Addenda PowerView
2/18/2002
Page 1.14
Getting Started
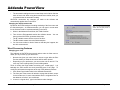
3. Use the Addendum writer just like a word processor. It supports Text
Databasing comments so you can easily insert your favorite verbiage
without retyping. You can also create Text Database comments
while in the Addenda PowerView. With near compatibility with
Microsoft Word 2000, it even supports the pasting of formatted
documents from the word processor into the appraisal addenda.
4. The automatic headings that are created keep track of which field the
block of text is tied to, so when you jump back to the form, it will
remember where you were.
5. To switch back to editing the appraisal form in full screen mode, click
the Form PowerView.
Certain forms in WinTOTAL also use the same word processing engine
as the Addenda PowerView, and you can enjoy full screen editing when
accessing it through your forms list.
More information on creating extended comments as well as custom
addenda is included in the Addenda PowerView chapter.
Comps PowerView
Comparables Database introduction
The first option in the Comps PowerView is the Comps Database. This is
a powerful module that enables you to manage your comparable store too in-depth for just an overview! Be sure to view our dedicated “Comps
PowerView” chapter to learn how to use functions in the Comps
Database such as:
•
Importing reports from your File Cabinet
•
Searching through comparables using our Intelligent Query model.
•
Sorting and customizing
•
Inserting comps from the database into a report.
•
Viewing and cataloging photos with the comps database
Merging comps from existing reports
If you know of a specific report that has a comp in it you wish to use, you
can easily pull it into your current report.
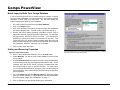
The Comps PowerView centralizes all comp functions into one area.
1. From the Comps PowerView, click the Old Reports button.
Getting Started • Comps PowerView
2/18/2002
Page 1.15
Getting Started
2. Browse the folders until you find the report with the comparable you
need. For this example, go to the Tutorial Folder, and click the
Sample Report.
WinTOTAL makes it easy to pull comps from an
existing report into your current one.
3. When you click the report, it will show you the comparables in it.
4. To merge comparable one from the sample, just double-click it.
5. Then click OK.
Notice that the comparable from the sample is now listed on the comps
PowerView with photos. By double-clicking the stamp-sized “thumbnail”
photo, you can view it in full resolution.
If you need searching capabilities, you should use our Comparables
Database for comp retrieval instead of this method.
Shortcuts in comps grids on the forms
WinTOTAL has special keystrokes in comps sections of appraisal forms
that save you from repetitive data entry.
1. First, we’ll go to the major form. Click the Contents PowerView.
2. Double click the major form in your report - typically the URAR - as it
appears in the right hand column for “Forms in this report.”
3. Once in the form, we can skip straight to the sales comparison
approach by clicking the tab at the bottom of the screen.
4. If you have been following this tutorial, you should have at least one
comparable in your report - comp #1. Let’s copy that entire column to
comp #2. Put your cursor at the beginning of the first line of comp
#2’s address field.
5. Press the = key on your keyboard. A flyout menu will appear
prompting you for the comp to copy. From here, just type the number
of the comp to copy or you could use “=” again to wipe out the whole
column. For now, press 1 and comp one will be copied to that
column.
The Square Footage
Adjuster adjusts all
three comparables at
one time. It may be
triggered from the
Comps PowerView or
from the Gross Living
Area fields of any
form’s Sales Comparison section.
6. The “=” function may also be used on individual lineitems. Put your
cursor in the location item for comp #3. Then, press “=”.
7. This time when you choose a number, it will only copy that one item.
Getting Started • Comps PowerView
2/18/2002
Page 1.16
Getting Started
Square footage adjustments
The Square Footage Adjustment tool allows you to easily adjust for
differences in the square footage of all comps in one easy step.
1. Ensure that the sales price and square footage for all comparables
have been entered.
2. In the Comps PowerView, click on the Sq. Ft. Adjuster button.
3. The first section of the Square Footage Adjustment Calculator shows
you the methods available for calculating the adjustment.
4. As you choose the method and set the parameters, the SF Adjuster
shows you the resultant net/gross percentages.
5. Click OK to merge the adjustment figures into the current report.
If for some reason, you must change the square footage of a comparable,
be sure to reload the SF Adjuster so that it can re-trigger the math.
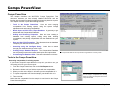
In one grid, the Comps PowerView lets you see how comparable each comp
really is. Our exclusive weighting section rates your comparables and even suggests a value.
Copying, swapping and rearranging comps
In the comparables listing, you can now see comparables with gross
adjustments, indicated value and a relative weight that corresponds to the
comparability of each property.
•
WinTOTAL uses the weighted average to suggest a value. Click on
Use suggested if you wish to put that value into your report.
•
Sort by weight sorts the comps by their relative weight.
•
Move Up and Move Down swap the highlighted comp with the one
above or below it respectively.
•
Add inserts a blank comp below the one selected.
•
Delete removes the selected property and moves the others up one.
•
Copy creates a copy of the currently selected comparable and inserts
it below the current one, pushing the others down one position.
Maps PowerView
Easy access to all sources of maps
Click the Maps PowerView to see how all mapping related actions have
been put in one place.
•
Fast, easy maps available online.
Getting Started • Maps PowerView
2/18/2002
Page 1.17
Getting Started
•
Or, use maps from practically any mapping program such as the
widely available CD-ROM’s.
•
Scan plat and flood maps right into the Maps PowerView using any
scanner supported through Windows and TWAIN.
•
Add annotations such as addresses right on screen, no rub-ons and
no re-typing of addresses.
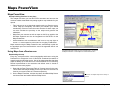
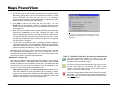
Acquiring a map from the Internet
Your annual membership gives you access to high resolution, up-to-date
location maps online. If you already have Internet access on your
system, the cheapest and fastest way to get an up-to-date street level
map is to let WinTOTAL download one for you.
1. If you haven’t already, enter authentic addresses for the subject and
comparable properties in your report. Then, come back to the Maps
PowerView.
2. Verify the Map source item as the eDomina map server. Use the
defaults for the map page and listing in the table of contents.
3. Click Add. You’ll be prompted with a dialog to specify your map
options for quality, automatic placement of labels and color schemes.
These items should be self-apparent.
4. Then, click OK and stand by as WinTOTAL connects to the Internet
and downloads a map. Depending on your address entries, you may
be prompted to clarify the address info. Be sure that only the street
address (not including unit numbers) with city, state and zip are in
your address fields.
Adding map notes
This is where you can add a comment such as the address to the map.
WinTOTAL’s online maps are one of its most popular features. Save loads of time and
effort with every report by not having to worry about out of date CD’s, low resolution
images and rub-ons.
1. Click on the Annotate tab.
2. Click the text note “balloon” item to make sure it’s active.
3. Place the cursor, which should now look like a cross, where you want
to place the note and click once.
4. After you have verified the address, click OK, and your note will be
placed on screen.
Getting Started • Maps PowerView
2/18/2002
Page 1.18
Getting Started
5. For the next property, just move your cursor over the place where you
want the balloon and click again. It’s automatically ready to place the
next address!
Repeat these steps as many times as needed for all of the comparables
in your report. Then, click OK.
Note: If you prefer using your CD-ROM Maps: Start your CD-ROM
Map program. After finding the map as you normally would, select Copy
from your CD-ROM map program’s Edit menu. Then, switch back to
WinTOTAL and choose the Clipboard option instead of eDomina Map
Server. Then, click OK.
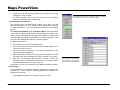
Map Palette - Address Tab
One feature exclusive to maps downloaded from eDomina is the Address
Tab of the Map Palette. Immediately after downloading a map, the Map
Palette will appear on screen floating over the map. The Address Tab will
be activated to let you know the confidence level of addresses it has
marked. You have several options available to you:
•
Add another property. The Add a property button enables you to
enter the addresses of other properties such as listings or rentals
which are not automatically imported into the Mapping Utility. After
adding a new property, it will be sent to our geocoding server and
placed on the map just as the other properties were.
•
Edit a property address. If you notice a property with a question
mark or red x is labeled as such because of a typographical error,
click the property address in the Address Tab, and then click Edit. At
that point, you can enter a new address and click Place; then see if
the property is put on the right place on the map. (We’ll discuss moving the balloon a little later.)
•
Move a caption. If your balloons are overlapping, click the text on
the balloon and drag it to a new location. Notice the anchor stays in
place.
•
Delete a caption. Click the balloon, and then press the DELETE key
on your keyboard. You can always replace the caption by clicking the
address and then clicking the Place button.
Getting Started • Maps PowerView
2/18/2002
The Address section of the Map Palette tells you which properties were “found”
Page 1.19
Getting Started
•
Reposition an anchor. If the anchor is in the wrong spot and not
pointing close enough to the property, carefully click the anchor point
itself and drag it to the correct location. Notice the distance from the
subject is automatically updated. Likewise, if you move the subject,
all comp proximities are updated.
Map Palette - Position Tab
Click the tab labeled Position for functions that pan your map North, West,
East or South as well as zoom in and zoom out. Each time you pan or
zoom, a new map is downloaded from the server. However, this map
should come across faster than the first one since your addresses are
already geocoded.
See our special chapter on the “Maps PowerView” for more details
on all location mapping related features in WinTOTAL.
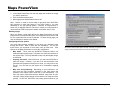
Digital Workfile PowerView
The Digital Workfile is the first feature in appraisal software to address the
concept of your workfile. Its purpose is to keep you from having to store
paper copies of your reports or workfile. Items you insert into the digital
workfile don’t show up in your printed report - they are for your own
internal usage.
A slew of options are available for you to customize how the maps work.
1. To add a document, click Workfile, and then click Add.
2. Then choose the type of file you are inserting:
•
Addenda. Take advantage of WinTOTAL’s word processing
capabilities to write additional notes about the assignment.
•
Image. If you took extra digital photos that weren’t part of the
final report, you could save them here.
•
Scanned Image. Uses the standard TWAIN interface to accept
scanned documents.
•
Worksheet. WinTOTAL’s Worksheet function is a powerful
spreadsheet application that enables you to define models and
perform calculations.
•
External Attachment. Any other file such as a document from
your word processor, a web page you saved, etc.
Getting Started • Digital Workfile PowerView
2/18/2002
Page 1.20
Getting Started
3. Then, enter a description for the list of documents and click OK.
For details on each format see our chapter on “Using the Digital
Workfile”.
Sketch PowerView
Benefits of electronic sketch
By including the sketch as part of your electronic report, you gain several
benefits:
•
Floorplan looks professional.
•
Sketch is saved inside the report file with rest of data.
•
Sketch prints on a WinTOTAL form with the rest of your report.
•
Areas are calculated automatically and transferred to the forms.
Included with WinTOTAL Pro is the Apex IV Windows Sketching Library
by Apex, Inc. If you prefer the WinSketch floorplan product, you can also
integrate it with WinTOTAL Pro. Contact Jammin’ Software for details.
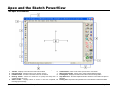
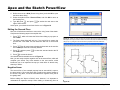
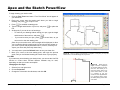
Integrating a sketch
To demonstrate the integration, let’s draw a simple 20’ square using
Apex.
Want to store additional photos, sketch pages, scanned calculations that you may not
1. Click the Sketch PowerView now.
2. To start a sketch, just choose the page format from the drop down list
and click New. Apex will automatically launch.
3. From the Apex Draw menu, and scroll to Define Area.
4. Click First Floor, and then click OK.
5. Change the name of the area to Square, and click OK.
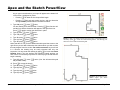
6. Press Enter to change to the drawing cursor.
7. Type 20, press x, press e twice.
8. Type 20, press y, press e twice.
9. Type 20, press z, press e twice.
10. Type 20, press A to autoclose the sketch, press e twice.
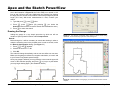
11. Exit Apex. Notice that your square footage calculations are already
entered in the Area Calculations area of the Sketch PowerView.
Getting Started • Sketch PowerView
2/18/2002
The red dimension and red line in these illustrations tell you that those items have
yet to be placed.
Page 1.21
Getting Started
Area transfer options
The Area calculations section of the Sketch PowerView enables you to:
•
Turn transfers from the Sketch PowerView to the form on/off
•
Override calculations generated by the sketch. (This is handy for
things like basements and areas you don’t include with your
floorplan.)
•
Include or exclude “blank” areas from transferring to the form.
Sketching wrap-up
There are a couple of things to remember when using Apex.
•
Draw external walls with the keyboard and not the mouse.
•
When integrating with WinTOTAL, do not use the File|New function or
the File|Save As functions. They will break the link with WinTOTAL.
Although Apex is fairly simple, we recommend reading our dedicated
“Apex and the Sketch PowerView” chapter. You’ll save yourself a lot
of “figuring out” time and learn things the right way with a detailed tutorial
and numerous examples.
Worksheet PowerView
Build-in spreadsheets
The Worksheet PowerView provides spreadsheet functions right inside
your appraisal report. It lets you set up your own custom calculations
inside the form and even reads spreadsheets saved in MS Excel. If you
are familiar with spreadsheets, then you’ll be up and running in no time
with this.
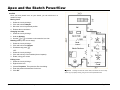
The Sketch PowerView shows the sketch you completed in an integrated sketcher such
as Apex IV Windows or Jammin’s WinSketch, as well as areas that have transferred in.
When you integrate your sketch program into WinTOTAL, the floorplan is transferred
onto one of WinTOTAL’s pages so all the headers remain consistent.
Using the sample
The sample template in WinTOTAL already has a sheet built into it.
Here’s how to use it:
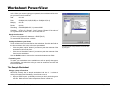
1. Click the Worksheet PowerView. You’ll notice your screen splits.
2. If you don’t see the cells filled on your screen, just load the sample
worksheet by clicking the Open button in the WorkSheet PowerView,
double-clicking on the WRKSHEET sub-folder and then double
clicking on SAMPLE.XLS.
Getting Started • Worksheet PowerView
2/18/2002
Page 1.22
Getting Started
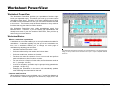
3. The equations in this worksheet are tied to fields in the sales
comparison section. The yellow fields on the worksheet indicate
information that is being pushed back up into the form. Click on one
of the yellow worksheet fields and notice the active field on the
appraisal form switches to the field linked to that cell on the
spreadsheet.
4. The red fields on the worksheet are places where data is being read
from the form into the worksheet. Click on a red field and the cursor
on the appraisal form will jump to its source.
5. The blue fields on our sample worksheet are colored blue simply to
point out that is where you can change parameters for the
calculations.
6. If the sale date, sale price, and room counts aren’t filled for your
subject, enter data in those fields now.
7. As you enter data in those fields, notice how it triggers the
calculations in the Worksheet PowerView. The sample has equations
to trigger automatic adjustments based on sale date and differences
in the room count.
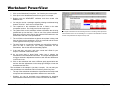
8. Click on the worksheet and enter a different yearly appreciation rate
and see how the adjustments in the comps grid changes in both the
worksheet and the form.
The WorkSheet PowerView gives you the flexibility of spreadsheet formulas to overwrite and enhance WinTOTAL’s calculations.
The worksheet in the sample is just that, a sample. You can add your
own calculations to a worksheet and link it with any field of any form. Be
sure to read our dedicated “Worksheet PowerView” chapter for details.
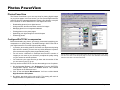
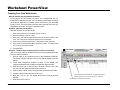
Photos PowerView
Access photos from a variety of sources
The Photos PowerView is your one stop shop for placing digital images
on your photo pages. In this one screen, you can access digital cameras,
read files from the integrated database, browse a file directory or acquire
from a scanner or other TWAIN device.
WinTOTAL can accept images from virtually any camera or imaging
device. However, we have a built-in interface for a variety of cameras
such as the Kodak DC40/50/120/200/210/220/260 as well as the Logitech
Pixtura and Epson Photo PC 500/600/700 cameras. We also have a disk
Getting Started • Photos PowerView
2/18/2002
Page 1.23
Getting Started
interface which treats a floppy disk or folder as a digital camera,
automating the process of file naming and logging photos in the
database.
For this tutorial, we’ll use sample photos. Be sure to read our dedicated
chapter on the “Photos PowerView” for details on digital images and
connecting WinTOTAL to your digital camera.
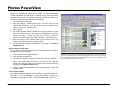
Putting a photo onto a photo page
On the right side of the Photos PowerView is a section labeled Photo
pages in report. From previous sections of this chapter, we’ll assume
you added a couple of different photo pages into your report. If you didn’t,
revisit “Starting a report from scratch” on page 6.
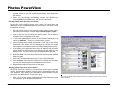
1. Click the Comparable Photos Page, and you’ll see three frames for
three picture slots. WinTOTAL has photo pages that are both legal
and letter sized. They are labeled as [small], [medium] and [large] for
digital photos - corresponding to the size of the photo on the page.
Previously, these were labeled [digital], [3X5] and [4X6] with [digital]
having photos that were slightly smaller than 3X5.
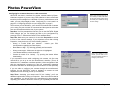
2. In the Photos PowerView, click Database, and you’ll see a list of
sample photos that ship with WinTOTAL or ones that are on your
system already. This list is superior to a mere file listing in that you
can search it as well as filter it on unused photos only.
The Photos PowerView shows your image database as well as provides an easy way
to insert photos onto your report pages.
3. Click a photo in the list.
4. Drag it into a frame that appears at the right of the screen and it is
now in your report.
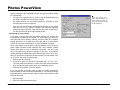
If you access digital photos from a digital camera, diskette or card reader,
we recommend clicking the QuickPix button and accessing them through
QuickPix - even if you read them from A: drive. That way, you can track
them in a database and not worry about their specific file name.
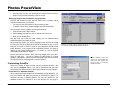
E&O PowerView
Built-in error checking
Why let errors go out in your reports when WinTOTAL can find many of
them for you automatically? WinTOTAL’s Errors and Omissions checker
checks for as many as 1200 different rules on the URAR form alone.
Getting Started • E&O PowerView
2/18/2002
WinTOTAL’s Image Optimizer goes beyond mere
image
enhancements.
We set the DPI for your
photos depending on
how they are going to be
used. This helps conserve disk space and
improve
EDI
performance.
Page 1.24
Getting Started
•
Finds logic errors in the neighborhood section.
•
Finds blank items and when multiple items are checked improperly.
•
Compares comps grid against the neighborhood section.
•
Has review “scripts” for over a dozen forms such as the URAR, 2055,
2065 704, Condo, SRIPAR and others.
Let’s load the sample report and run a review.
1. Click on Open to start the Office Manager.
2. Click the Tutorial Folder, then double click on the sample report. If
asked to save changes in your current report, click Yes.
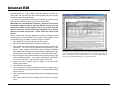
3. Click the E&O PowerView and stand by as it checks the report.
4. Scroll through the output to get a feel for what the guidelines reviewer
detects. (We intentionally left errors in the sample.)
5. Errors are printed in red. When “E&O warnings” is marked, you can
double-click an error and have WinTOTAL take you to that field on
the form.
The E&O PowerView has options to view only the errors and to include
these results in the report. And clicking the Options button enables you to
customize certain percentages it uses when running checks.
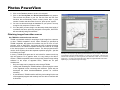
Graphs PowerView
A picture is worth a thousand words
Just like the E&O PowerView, the Graphs PowerView can help point out
inconsistencies in your reports. The graphs can also be useful for
supporting value conclusions.
•
Click on the Graphs PowerView.
•
On the left are seven items for you to compare.
•
On the right, is how you are comparing them.
WinTOTAL’s E&O PowerView provides the most comprehensive guidelines
reviewer in the industry. If your report has errors, you can click them in the review
results and automatically be taken to the corresponding field on the form.
Add flair to your
reports
with
the
Graphs PowerView.
At the top left is an option for you to insert the current graph into your
report. WinTOTAL will automatically add a form with the appropriate
graph on it. If a graph has already been used in your report, the button
will give the option to remove it.
Getting Started • Graphs PowerView
2/18/2002
Page 1.25
Getting Started
Billing PowerView
The Billing PowerView is your gateway to generating invoices for your
clients. This is where you can choose the style of invoice for your report
and jump to the billing information in the appraisal information dialog.
•
You can change the invoice style mid-stream by choosing a different
form from the Invoice format list.
•
Be sure you have used the Address Book for your “Bill To” entry and
have filled our your “Local Office Settings” through the Contacts area
of the Appraisal Desktop. Otherwise, you will have blank areas in
your invoice - even if you type into them - because they are hot-linked
to your database. This saves time in the long run, however.
•
Unlike previous versions, WinTOTAL will retain billing lineitems you
type into the automatic forms and even transfer it back to the
appraisal information (i.e. “request”) screen. Just be sure to use the
Requester for the Bill To and entries in your Local Office Settings for
your address!
More details on setting up fee tables and running management reports is
in our chapter dedicated to “Payments and Order Tracking”.
Using a form with a logo
You’ll need to have your logo scanned before doing this. Many copy
shops can do this, or you could use your own scanner. WinTOTAL will
accept a variety of formats.
WinTOTAL’s [Automatic] invoice forms tie into our accounting module that lets you automatically assign fees and manage splits with the appraisers in your office.
1. Click on the drop-down list for Invoice format. and choose a form that
has [logo] in the name.
2. Right-click in the image area at the top of the Invoice preview.
3. Choose Load Photo From File. Browse through the drives/directories
on your system until you find the one that contains your company’s
logo. Click OK on the directory.
4. Click on your logo in the list of files, then click Open.
Printing Overview
WinTOTAL’s printing is second to none. No other program returns control
back to your system faster or gives you more options. Since printing is so
integral to WinTOTAL, we’ll cover all the aspects of printing right here.
Getting Started • Billing PowerView
2/18/2002
Page 1.26
Getting Started
To print a report, click the Print button on the toolbar. The printing dialog
in WinTOTAL is a tabbed dialog with three screens of options.
•
The first tab you see is the main one you'll use after WinTOTAL is
configured for your printer.
•
You may click on Mark All to mark all pages for printing or double
click on individual forms to mark them for printing. A printer icon
appears next to each form that is marked to print.
•
To “un-mark” a form and omit it from printing, just double-click it
again.
•
Copies can be set individually per form. Just click once on the form
and change the number next to the Include ___ duplicates of
highlighted page label.
•
WinTOTAL will remember which pages you printed on a report-byreport basis.
•
Once you have selected your printing options, click OK and the job
will begin printing.
Individual forms can also be printed using the Print current form item from
the WinTOTAL File menu.
Additional printing options
At the top right of the main printing window are other options. Most are
self-explanatory.
•
You can specify the number of copies of the print job by changing the
Number of report copies option. If you have multiples of a particular
page, note it will multiply those copies.
•
Collating the copies is a handy new feature. Choosing this option is
convenient, but it does take longer since WinTOTAL must spool each
copy separately instead relying on your print driver to process the
copies.
•
Options for printing only are not printing photo pages are useful for
times when you wish to print draft copies. Quite often, appraisers will
print and proof the b&w pages before printing the photo pages. This
keeps you from having to select these pages individually. If you
choose an option such as “Don't print photo pages” be sure to turn it
back off when you want to print photos!
Getting Started • Printing Overview
2/18/2002
WinTOTAL’s printing capabilities are second to none. Whether you create traditional
hard copies, send files via PDF or use a PC faxing system, you can make creating output an effortless task with Athena.
Page 1.27
Getting Started
•
Our print file and page number feature will overlay the main file
number at the top right of each form in the report. This is handy for
forms that do not have a place for a file number. Of course, a page
number gives your report a more professional appearance and keeps
pages from being misplaced.
On the bottom right of the window is an area where you can specify where
to output your report. Your options here will depend on printers you have
setup in WinTOTAL – which is described in Job and Printer Setup.
•
Your traditional printers are for paper hard-copies. You can choose
to output photo pages on your main printer for economical file copies.
•
You may also choose to output your report to the Adobe PDF format if
you have purchased and installed the full-version of Acrobat (not just
the free reader). Note that our EDI functions encapsulate the PDF
creation process; therefore if you use our EDI tools, you will rarely
need to output a PDF this way. WinTOTAL also has a Print to PDF
option in the File menu.
•
If you have purchased faxing software such as Symantec’s WinFAX
Pro. WinTOTAL can also be set up to send straight to your PC faxing
system without you having to adjust your print setup by clicking this
option.
Job and Printer Setup
Click the Job and Printer Setup tab to configure items for printing. Once
you set these options, they are remembered for future reports.
There’s no sense using a switchbox when WinTOTAL will direct output to two different printers simultaneously. All you need is a second LPT port - connected via a
card in your system, USB, or on a network.
WinTOTAL is capable of printing to two printers simultaneously if you
have two ports installed on your system. Installing an extra LPT port is
often cheaper than using a switchbox and more reliable. Why print your
photo pages and forms in separate batches when you can install a
second port for less than $50. Other ways of achieving a second port is
to use a USB to parallel adapter or mapping a printer port over your
network.
•
Click Select Main Printer and choose the printer for your b&w laser
forms. The list that is displayed is a list of printers already installed on
your system.
Getting Started • Printing Overview
2/18/2002
Page 1.28
Getting Started
•
Likewise, if you have a separate photo printer, click Select Photo
Printer and choose the printer you wish to use for pages that contain
digital images. Note that WinTOTAL gives options to send sketch
and map pages to your laser printer since many appraisers prefer
those pages to be printed in black and white.
Net and Gross adjustments may be overlayed in
the sales comparison section through an option in
the Job and Printer Setup tab of your WinTOTAL
Print dialog.
Printing net and gross adjustments
Most forms themselves do not have specific fields for net and gross
adjustments; however, many appraisers prefer to have them overlayed in
the sales comparison approach.
If you wish to have the net and gross percentages printed, check the
option in the Print Setup screen to do so. The “Edit net and gross text”
item enables you to specify how they are labeled.
Overlaying a “summary phrase”
USPAP requires the appraiser to identify the appraisal and report type.
For the URAR and most forms, this means putting “Summary Appraisal
Report” at the top of the form. The Summary Phrase feature in the Print
Setup dialog enables you to specify a different phrase for every form
(since some may say “Limited Appraisal Report”.
Instead of overlaying a summary phrase, you may wish to use our
USPAP identification form. It provides more detail on the appraisal and
report as well as room for comments and other disclaimers.
1. Go to the Contents PowerView.
2. Click Search.
3. Enter USPAP in the search dialog and press ENTER.
4. Then, press F3 until you see the form labeled “USPAP Identification”.
5. Double click the form, and it will be inserted into your current report.
You may wish to do this to any reports you use as templates, too.
Printer adjustments for compatibility
Although not required often, we supply “printer adjustments” to optimize
printing or work around potential problems you may encounter. These
are set separately for each printer. Most people do not need to work with
these items, but they exist to ensure WinTOTAL will be compatible with
practically any of yesterday’s, today’s and tomorrow’s printers. The most
common items that may need to be changed from the default are:
Getting Started • Printing Overview
2/18/2002
The easiest way to have “Summary Appraisal Report on your forms is to
configure it through the Summary Phrase Manager in the Job and Printer
Setup tab of your WinTOTAL Print dialog.
Page 1.29
Getting Started
•
Optimize rectangles for HP Laser Jets. If lines are not printing on
your forms, you may need to enable/disable this option.
•
Optimize sketch printing for HP Deskjets. This overcomes driver
errors that can occur when printing sketch pages.
WinTOTAL also gives options to control the scale of the form and margins
in case your particular printer cuts off part of the form or doesn’t center it
appropriately.
More Chapters
Now that we’ve given you an overview of WinTOTAL, we suggest the
following:
•
Experiment! Click on buttons that you don’t know how to use, try
various features and options (there are many more than we showed
you here), and otherwise “push the envelope”. You won’t learn unless
you try the new things in the program. Learn on “sample” files instead
of real reports. Don’t let a deadline make you “panicky”.
•
Take the time to routinely check for Instant Customer Updates. The
program is updated as often as twice a month. Part of your standard
annual membership includes these updates which provide you with
new forms, new features and more things to make you productive.
Click here to go to the online Table of Contents where you can
access additional chapters in the WinTOTAL user guide. Or, view the
other parts of the manual by selecting Contents from WinTOTAL’s Help
menu. You will find more tutorials on all of WinTOTAL’s PowerViews.
The more you know about the software, the more efficient and
competitive you can be.
Getting Started • Printing Overview
2/18/2002
Although not necessary on most printers, you can adjust scaling and whether or not to
optimize WinTOTAL for low-memory laser printers by clicking Printer Adjustments in
the Job and Printer Setup tab of the WinTOTAL’s Print dialog.
Page 1.30
Form PowerView
Form PowerView
This chapter will take you through the rest of the functions in the Form
PowerView. It will cover:
•
Text Database Options
•
Default Data and Formatting
•
Tab Override feature
•
File Operations
•
Data Transfers
•
Additional Options in the Form
Text Database Options
QuickLists reduce typing
In our “Welcome to Athena” guide, we covered the essentials of using
the QuickLists in WinTOTAL. This section assumes you already know the
basics of creating and using QuickList comments and digs deeper into
more options associated with them.
The QuickLists are the most efficient way to keep from retyping entries
over and over. Many appraisers new to WinTOTAL mistake the common
responses for the QuickList. But those that have taken time to learn
WinTOTAL (or have attended one of our seminars conducted over the
years) enjoy the true power of assigning hot keys to certain responses as
well as having control over what responses are in their list.
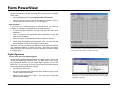
The Form PowerView is where you do data most entry.
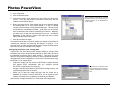
Copy/Paste QuickList
If you have a set of QuickLists setup for one field, you can easily copy
them to another field. WinTOTAL does this automatically for items in the
sales comparison section. Here’s an example using the Heating and
Cooling sections in the URAR:
1. In the condition field for Heating, type the word adeq.
2. Click a blank quicklist entry and confirm the keyname as WinTOTAL
adds that comment to the heating/condition fields quicklist.
3. Go back to the condition field and press CTRL+K to clear it.
4. Type the word new and click another blank QuickList entry to add it.
Form PowerView • Text Database Options
8/10/2001
Page 2.1
Form PowerView
5. Now, go to the Edit menu and choose Copy QuickList.
6. Click in the condition field of the Cooling section.
You can switch to a different
Text Database / QuickList profile by changing the Text Database User name.
7. Click on the Edit menu and choose Paste QuickList.
You should now have an identical set of QuickLists for these fields.
Change to a different set of QuickLists
WinTOTAL allows you to switch to a different Text Database, thus
changing the QuickLists you see for each field. This can be handy on
networks or if you like to have different QuickLists for different forms.
1. Click the Edit menu
2. Choose Change TextDB name.
3. Select a name from the list and click OK.
Moving the Text Database palette
With the release of WinTOTAL version 4.0, we have moved our Text
Databasing and All Comments to the left side of the screen by default.
The Text Database palette can be moved around the screen by clicking
the handle bar at the top of the window and dragging it to another place
on screen. Drag it to the far left or far right to lock it in place.
The Text TB and the All Comments column will appear by default. To hide
the Text DB, press F9. Press F9 again to bring it back.
Using the All Comments area
To activate the All column, click the All tab at the top of the Quick list
column. This is a super-set of all the comments you may have created for
each field. To use a comment from the “All” list, double click it.
Other functions are available when you right click a comment in the All
Comments list.
•
Use places the comment associated with that key into the current
field on your form.
•
Delete will remove that entry from the Text Database altogether.
•
Add to QuickList will add that Text Database entry to the current
field’s QuickList.
Form PowerView • Text Database Options
8/10/2001
Page 2.2
Form PowerView
Other functions in the QuickList area
The QuickList is by far the most common access point to the text
database. Click back to it and lets talk about some other features.
Sorting. The button above the list with the arrow on it enables you to sort
your list alphabetically.
Options. This gives you east access to other QuickList functions.
•
Create new text database. This will create and switch you to a
completely blank text database.
•
Show this forms entries only. The QuickList knows in which form
an entry was created. This option can keep you from using QuickList
items not formatted for the current form and can also make the list
shorter and easier to use.
•
Resequence QuickList. This is a more powerful sorting feature that
enables you to specifically order your comments. Simply click a
comment and use the Up/Down buttons to change its order in the list.
Text Database Shortcuts
• You may press ALT+0 to add the current field’s entry to the QuickList.
•
You can type a Text Database keyname into a field and press
CTRL+Q to insert the comment associated with that keyname.
•
F9 will toggle the QuickLists as visible/hidden.
•
The QuickLists can be configured to chain together multiple
comments in one field. Click Tools, then Configure, then Data
Entry and then Formfilling to see the options.
Tab Override
The Tab Override feature was developed to let users define the
movement of their cursor within individual fields in a report. This time
saving feature can be used in either the entire form or any section of the
form in WinTOTAL. The following description is a step by step guide to
help you in setting your movements through your report using the Tab
Override feature:
Press F10 to see WinTOTAL’s options for letting you configure movement of your cursor when you use the TAB key to go between fields.
Form PowerView • Tab Override
8/10/2001
Page 2.3
Form PowerView
Starting the Tab Override and selecting your movement
Before you launch the Tab Override, make sure that your cursor is in the
location where you would like to begin to define the custom movement s.
Your starting point should be highlighted in yellow.
1. Click the F10 key at the top of your keyboard.
2. From there, you will see the see the Tab Override table appear on the
left side of your screen.
3. Verify that your cursor is in the proper starting location and is
highlighted in yellow.
4. Click which key you would like to use to set the custom options:
•
TAB
•
ENTER
•
TAB or ENTER
5. After you have selected your keystroke, click in the fields using the
same order you would like the key to follow in the report.
6. As you click through the fields, the cell should turn to a grey color
letting you know that the cell has been selected in the movement
pattern.
Saving your selections
Once you have completed your selections, you will want to save the
choices that you have made.
To save your customized movement, do the following steps:
•
Click Accept to lock your choices.
•
Then click Finish
Remember: You can start and stop the Tab Override feature as many
times as you like. To complete multiple sections of a report, repeat the
steps above for each section you would like to customize.
Save time by merging data from existing reports on your system.
Form PowerView • Tab Override
8/10/2001
Page 2.4
Form PowerView
File Operations
Merge data from an existing report
WinTOTAL allows you to copy in form data from another job after you’ve
already opened the current report. This can be handy if you have a
request that wasn’t created from cloning.
1. Open the report that needs data copied into it.
2. Click on the Form menu and choose Merge Data from an Existing
Report.
3. Browse through your Office Manager folders for the source report.
4. Click on the report you want to merge into the current one.
5. Click OK and confirm the action.
Most Recently Used list
WinTOTAL keeps a “Most Recently Used” list in the File menu. This
gives you quick access to your last reports. This is faster than going
through the Office Manager. Just click on the File menu and choose the
report description. It will be opened immediately.
Default Data and Formatting
Save custom formatting
WinTOTAL can store custom formatting such as text alignment, rounding,
commas, etc.… This can come in quite handy if you continually have to
use F6 to override our settings or are always customizing the formats.
WinTOTAL’s File menu remembers the last
10 files you opened. This can be faster than
going through the File Cabinet.
1. Load the form and make adjustments to formatting in any fields that
require it.
2. Click on the Form menu, and choose the item Default field formats.
3. You then have three options:
•
Save formats as new default: This will save the formats currently in
the form as that form's default to preload on all new files.
•
Load default formats: This will merge the default formats with the
current information in the report and do away with formatting
customizations.
Form PowerView • File Operations
8/10/2001
Page 2.5
Form PowerView
•
Restore standard default formats: This will reset the default
formats with the original information that shipped with WinTOTAL.
Setting default data
Default data is information that is automatically loaded into a form the first
time it is used in a report. Default data is useful for changing the
headings on addenda forms or adding terms to your invoice forms.
1. Start with a new report and load the form in which you want to create
some default information.
2. From the Edit menu, select Clear entire form.
everything out of the form.
This will blank
3. From the Form menu, select the item Default field data and then
Load default data. (This is in case we had items in there that you
thought were part of the form, but really data.)
4. Now enter the data into fields that you'll want "pre-filled" for all new
reports.
5. From the Form menu, select Default field data, then Save data as
new default.
Transfers to and from Forms
How transfers work
WinTOTAL incorporates years of experience to make its transfers
intuitive and exactly as you’d expect. This latest version of WinTOTAL
introduces major departures from past transfer schemes.
•
Transfers between the Requester and the major form in your
report are bi-directional. When you click on Save in the Request
screen, that information is pushed into the major form. Likewise,
when you click Save in the report’s major form, that information is
pushed back into the Request screen.
•
Information is transferred to the Request from minor forms, such as
addenda and photo pages, only when the field in the Request is
blank. This is a rare occurrence.
•
When cloning reports created in previous versions, WinTOTAL will
automatically lock non-blank fields on minor forms that differ from
their counterpart in the major form. An option in the Requester gives
Form PowerView • Transfers to and from Forms
8/10/2001
When you choose the menu option
to remove locks from all forms, you
will be prompted with a confirmation.
Page 2.6
Form PowerView
you the ability to automatically remove those locks on the cloned
report without affecting the original.
By default, WinTOTAL doesn’t prompt you when the transfers are taking
place because the vast majority wants all the information between forms
and the request to be consistent. You can change default transfer
settings by clicking on Options and then Configure.
The lock button will appear pressed when the current field is locked from
transfers.
Locking fields from transfers
If you need different information in a field on a minor form than what was
transferred by default, simply jump to the minor form and make the
change. WinTOTAL will automatically lock the field from the transfer.
•
The field will turn a different color.
•
You’ll also see the “lock” button appear pressed.
•
If you click on the Form menu while in that field, you’ll notice the Lock
Field from Transfer item will also be checked.
Removing transfer locks
You can remove locks one field at a time, one form at a time or from an
entire report at one time. At the same time WinTOTAL removes the lock,
it also re-transfers information into the minor form.
•
To remove a lock from one field: First click in the field.
the lock button in the formatting bar.
Then, click
•
To remove all locks in a form, simply choose Remove transfer locks
from current form from the Form menu.
•
To remove all locks on all forms in the current report select, Remove
transfer locks from all forms from the Form menu.
Once again, as you remove locks from fields, WinTOTAL will transfer
information into the fields.
Manually applying transfers to forms
If you have turned off the transfers through the WinTOTAL configuration
options, you may need to use this function to keep all your data consistent
between forms, especially when cloning reports that had previous data in
them. Simply choose the appropriate item from the Form menu to
reapply all transfers to either the current form or all forms.
Form PowerView • Transfers to and from Forms
8/10/2001
Page 2.7
Form PowerView
Note: Previous versions of WinTOTAL may have made it necessary to
use the apply transfers function. You should find the use of this function
rarely needed.
Additional Functions in the Form
By pressing the “=” key in the first field of an item in
the sales comparison section of any form, you get the
option to copy an entry from another column. Press
“=” in the address field and you can copy the entire
Sales comps grid “=” functions
When in the Sales Comparison section of a form, WinTOTAL has several
hot keys which let you copy data from one column to another. All of these
hot keys are tied to the '=' key.
=0, =1, =2, =3,
Copy information from the Subject field into
etc.
the current comp field. Used in the first address
field, it will copy the entire column. Use “0” for
the subject.
==
Used in the first field of a column, it clears all
(Press “=” twice)
data and math from a comparable.
These hot keys work only on sales comps and are not available for rental
comps or listings.
Spell Check
WinTOTAL's spell checker lets you spell check your entire report or just
the form. You can also add words to the spell checker’s dictionary.
•
Click the Spell button in the toolbar to spell check the entire report or
click the Tools menu and select Check whole report.
•
To spell check the current form, click the Tools menu and select Spell
check and then Spell current form only.
•
You can check the current field individually by pressing ALT+S or
clicking the Tools menu and selecting Spell check then Check
current field.
•
As you run the spell check, you are prompted to add unknown words
to the dictionary associated with your user name. To add or remove
words in the dictionary, click on Edit, select Spell check and then
View/Edit user dictionary.
The first few times you run the spell checker, you’ll need to teach it the common abbreviations and non-standard words you use frequently in reports.
Once words are in your dictionary, you can
go to the dictionary editor to modify or edit
them. Just click Tools then Spell check, then
View/Edit User dictionary.
Recalculate form
WinTOTAL does math automatically when you press ENTER in a field, so
this command isn’t really necessary with normal usage. However, under
Form PowerView • Additional Functions in the Form
8/10/2001
Page 2.8
Form PowerView
certain circumstances, like with converted files, you may need to retrigger
all the math.
•
Click the Form menu and choose Recalculate current form.
•
This will redo all math as well as all intra-form transfers such as
carrying data from the site section to the comps grid.
Area Calculator
If you don’t use a sketch program to calculate areas, you have an
interface for entering room dimensions in the Area calculator.
•
To launch the Area Calculator, click the Tools menu and select Area
Calculator.
•
Type your figures in the appropriate fields, specifying the type and
level of area calculating.
•
Check the option to automatically transfer the figures if desired.
•
When using the Building Area Addendum form, you must use the
Area Calculator in order to enter figures onto the form.
WinTOTAL can only use figures from either the Area Calculator OR from
your integrated sketcher; it cannot use both. WinTOTAL will always
prompt for which one to use in the event you attempt to use both methods
in a single report.
The Area Calculator is useful for people that don’t use a sketch program
to draw areas, but still need to calculate square feet.
Digital Signatures
You can scan your own digital signature
We provide the ASB compliant protection for "signed" reports. So you can
use any standard image saved as a GIF, TIF, BMP, PCX or JPG. Using
any off-the-shelf scanner, you can create digital signature for use with
WinTOTAL. Or you may go to a local copy center that provides scanning
services and have your signature scanned.
•
Use 300 dpi at 100% size.
•
We also recommend using either 256 colors, shades of gray or even
"lineart" instead of 24-bit color.
•
Make sure the background is white. You may have to adjust the
brightness and contrast.
Form PowerView • Digital Signatures
8/10/2001
Every time you click the Sign button, you are told the status of the
signatures on the report and subsequently given relevant options
regarding the signatures.
Page 2.9
Form PowerView
•
The GIF and PCX formats work the best. For a digital signature, we
don't recommend JPG since it can be lower quality and blurred.
•
Be sure to crop extra white space from the signature.
For a small fee, you can have us scan your signature for you. Call 1-800ALAMODE for details.
Installing a pre-scanned signature
You must be logged into WinTOTAL as that user for whom you are setting
up the signature.
1. To verify which user is logged into WinTOTAL, click the Tools menu,
and choose Configure.
2. When the Options window appears, click on the User tab.
3. Once you have specified or verified the correct “current user” for
WinTOTAL, you can then set up a digital signature for that user by
going to the Signature tab.
4. To specify which signature file to use, you will need to click on Select
File. You will be presented with the standard Windows Open dialog.
5. From the Open dialog, browse to the folder or drive where your
signature is stored and double-click that file to select it. WinTOTAL
will copy your signature from its original location to an internal
directory.
6. You'll be taken back to the Signature setup dialog. If your signature
isn't quite centered, you can "grab" it by clicking once on it and then
drag it to a better position relative to the sample signature line. Every
form has been aligned identically.
Remember to assign a password to your signature.
7. After you have centered your signature, you will want to assign a
password to it. From the Signature setup dialog, click on Password.
8. For security, the password is never shown on your screen.
WinTOTAL will prompt you for it twice to ensure you typed it right!
To sign a report with a digital signature
This should be the last thing you do before printing or EDI because the
report will be locked.
1. Click the Sign button.
Form PowerView • Digital Signatures
8/10/2001
Page 2.10
Form PowerView
2. Choose to either sign as the Appraiser or as the Supervisor. Earlier
versions of WinTOTAL required you to always sign as the appraiser
first, but now you don’t have to.
3. You will be prompted with a list of profiles that have signatures set up.
Choose a name as well as in what color you want the signature to
print and click OK.
4. If a password has been assigned to the signature, enter it and then
click OK.
Before a report is signed, you have
options to apply an appraiser or
supervisor signature.
Once the
report is signed, you also have
options to remove all signatures.
Clicking on Sign again will give you two options: Sign as the Supervisor
or Remove the Appraiser signature.
•
If you choose to sign as the supervisor, you simply pick the name and
type the password. It's just like signing as the appraiser.
•
You don't need a password to "unsign" a report, since a report without
a signature is useless.
•
After a report has been signed as the supervisor, clicking on Sign
once again will give you the opportunity to remove the signatures.
More Chapters
Click here to go to the online Table of Contents where you can
access additional chapters in the WinTOTAL user guide. Or, view the
other parts of the manual by selecting Contents from WinTOTAL’s Help
menu. You will find more tutorials on all of WinTOTAL’s PowerViews.
The more you know about the software, the more efficient and
competitive you can be.
Form PowerView • Digital Signatures
8/10/2001
Page 2.11
Contents PowerView
Contents PowerView
The Contents PowerView is where you manage all of the forms in your
WinTOTAL report. Since WinTOTAL gives you the ability to “clone” any
report and use it as the basis for a new assignment, you essentially have
an unlimited number of templates at your disposal. (We call them
“skeletons”, “clones” or “boiler plates” sometimes, too.)
Templates can save you a lot of data entry by already having standard
information in them. Many people create dedicated templates for different
neighborhoods, clients and report types. Some people just use old
reports for new assignments. It’s up to you.
Creating a template from scratch
Here are the steps to create a template for a typical report “from scratch”.
Keep in mind that after you create this report/template, you can just use
the “Clone” feature in the “File Cabinet” to use it as the basis for a new
assignment.
1. First, click on the folder in which you want to store the report. For this
example, click on the "Tutorial Folder”.
2. Click on the “New” button near the top of the File Cabinet window.
3. This will start our Requester. Type your name followed by Tutorial
Template into this screen. (ex: Matt's Tutorial Template)
The Contents PowerView is where you manage the forms in your report. You can
add, delete and rearrange forms in your report at any time.
4. After entering the template description, click on Open. In a moment,
you'll see WinTOTAL's Contents PowerView feature start.
The forms list is split into different folders, based on the type of form.
•
Most of the forms we're going to use are in the "Most Common Forms
and Addenda" section of the forms list.
•
You can “expand” and “collapse” a folder to hide or display its forms
by double-clicking on the “+” sign that appears to the left side of the
folder icon.
•
To add a form, click it, then click the arrow pointing to the forms in
your report. (You can also double-click the form to add it.)
WinTOTAL’s forms list is sectioned off into folders to
make forms easier to locate. The folders expand
and collapse when you click on them so that your
can hide sections of forms you may not use.
In the next few steps, we'll step through building a new report.
Contents PowerView • Creating a template from scratch
2/18/2002
Page 3.1
Contents PowerView
1. Click once on the third form in the list “Table of Contents [4X6] Photo”.
Then click Add. You'll then see that form appear on the right side of
the screen.
2. Double click the form named “Invoice [Automatic Lgl]”. You'll see it
appear on the right, below the Table of Contents page.
3. Double click the “USPAP Identification” form, and you'll see it go in
after the Invoice.
4. Click the Preview button to get a closer look at this form. You can
use the Zoom function to see it in more detail. Or, click Print to
generate a hard copy. Click Close when you are through.
5. Double click the “URAR” form to add it after the “USPAP
Identification”.
6. Double click on the “Statement of Limiting Conditions”.
getting the idea?)
(Are you
7. Double click on the “Summary of Salient Features”.
8. Double click the Additional Comparables form. Notice when it is
added to the forms list, it has “4-6” next to it automatically.
9. Double click the Multi-Purpose Supplemental Addendum.
10. Now use the scroll bar on the side of the forms list to make it scroll
and reveal more forms.
11. Double-click the Subject Photo Page and add it.
Use the Preview button to see forms before adding them to reports. From the Preview screen,
you can even print a blank copy of the form without adding it to the report.
12. Do the same with the Comparable Photo Page. When you add a
Comparable Photo page to a report, WinTOTAL will ask you from
which comps on the major form to merge data. In WinTOTAL's
addenda, we try to automatically fill in as much data as we can from
the major forms. It’s quite likely, you’ll never to actually preview photo
pages on screen.
13. On the left side of the screen, double click Comparable Photo Page
again. This time replace the number one with the number 4 because
we want our second Comparable Photo Page to have data for comps
4, 5 and 6 next to the pictures.
Re-arranging forms in a report
We've now added a slew of forms to the report, and they need to be rearranged to be in a more logical order.
Contents PowerView • Creating a template from scratch
2/18/2002
Page 3.2
Contents PowerView
It's important that you use a SINGLE-CLICK the forms when re-arranging
because double clicking on a form is a short-cut to loading the form.
1. First, let's move the Summary of Salient Features form to a spot right
above the URAR. Click once on the Summary of Salient Features
form now.
2. Click the Up arrow button twice (Another way of moving the form up
or down is to click and hold down your left mouse button on the form
that you are trying to move and then dragging the form to its proper
location in the report).
3. Now, let's move the Statement of Limiting Conditions Page so that it
is listed after the Additional Comparables. Just click once on the
Statement of Limiting Conditions, and then click Up.
4. Let's continue to re-arrange the forms. Click on the Multi Purpose
Supplemental Addendum once. Now, click on the Down arrow button
three times to move it to the bottom of your report.
Those are the basics!
In reality, this template we created is no different than any other report in
WinTOTAL. Follow these steps to create more templates for different
neighborhood lenders or situations - perhaps even cloning the one we
just did to make the task a little easier. Here are some additional tips:
•
The Contents PowerView lets you jump between forms just as the
“Jump to Other Forms” item in the Form PowerView.
•
If you want to put some default information in this “template”, just go
to the Form PowerView and type it in.
•
Forms can be added or deleted to this report template at any time.
Just go back to the Contents PowerView. Add forms as we did
previously, or remove them by highlighting the form in the report and
clicking the arrow pointing back to the main list.
Use the Search button to locate forms in the list of
available forms. You only have to type in part of the
form description or the FNMA number preceded by
the # symbol.
Filler pages for non-WinTOTAL forms
Occasionally, you may have to use forms in a report that don't print from
WinTOTAL. How do you make these forms appear in your printed Table
of Contents? The answer is to use "filler pages". With filler pages, you
can add entries into your table of contents and have WinTOTAL reserve a
page number for those pages. The pages you insert manually may not
Contents PowerView • Filler pages for non-WinTOTAL forms
2/18/2002
Page 3.3
Contents PowerView
have page numbers on them, but in case they are between two pages
that do, you can make WinTOTAL skip a number between its pages.
Here's how you can use filler pages in the current report we are setting
up:
1. First, let's find the filler page. Click on the Search button above the
“Available Forms” dialog.
2. Enter the word FILL
in the field and click OK. WinTOTAL will
skip down to the portion of the forms list that has the filler page.
Filler pages are useful when
accounting for pages in your report
that weren’t generated with WinTOTAL. Nothing prints for the filler
page, they are simply a placeholder
and title that goes in the table of contents. They cause WinTOTAL to skip
page numbers in forms so you can
insert extra documents.
3. Double click the Filler Page to add it to your current report. You will
be presented with a dialog asking you how you want that page listed.
For this tutorial, enter Repairs Costs Addendum. Then, click OK.
You will then see this page added to the end of your report.
Now, what if you have to insert a multi-page form into your report. Here is
an example of how to do that. In the same report, we are going to add an
additional Filler Page to represent a resume.
1. Double click the Filler Page again to add another one to your current
report. You will be again presented with a dialog asking you how you
want that page listed. For this tutorial, enter “Blueprints”.
2. Note the field at the bottom of the dialog, prompting for the number of
pages to reserve. Replace the number one with the number two.
3. Then, click OK. Your appraisal report should now have another form
added to the bottom.
It's important to have every page in your report accounted for in the Table
of Contents. Filler pages are a great way of doing that. To include items
in your report that you don’t necessarily want printed or in your table of
contents, see our “USPAP Compliance in the Digital Domain” chapter.
Special use forms
There are several forms we’ve designed that we’d like to point out.
Remember, you can locate any of these by using the Search feature.
•
Services Invoice [Manual]. In case you don’t use our automatic
billing system, you can use one of our manual invoice forms. The
[automatic] forms are designed to pull information from our office
manager database and will not hold entries manually typed.
Contents PowerView • Special use forms
2/18/2002
Page 3.4
Contents PowerView
•
[Digital] photo pages. Previous versions had [Digital], [3X5] and
[4X6] photo pages - all for use with digital photos. We now have
[Small], [Medium] and [Large] photo pages since images from digital
cameras are not really shaped like those from film. These forms also
scale the pictures based on width so that images from different
cameras will appear proportional when printed. [Manual] photo pages
do not accept digital photos and have boxes for framing film prints.
•
[Minimal] photo pages. These carry only the address and none of
the property data like the other forms. This is useful when a major
form does not have certain elements on our default photo pages.
Just click Search and type Minimal to locate them in the list.
•
[Manual] Building Sketch. This is graph paper in case you don’t
use an electronic sketching program
•
[Scanned page] Addendum. These are blank forms on which you
can scan whatever you like into the single page-size image area.
See our chapter on the “Photos PowerView” for details.
WinTOTAL contains a wide variety
of photo pages and additional forms
for you to use in your reports. Just
scroll through the list to get ideas for
forms to use.
More functions in the Contents PowerView
Changing the major form type
If a report was started using one major form, such as the 2005, and needs
to be switched midstream to a URAR, you can do it - without losing data here in the Contents PowerView. Find the new major form you want and
add it into the report. WinTOTAL will detect there is already a major form
and prompt you to replace the existing major form with the new one.
Searching for forms
Browsing through our extensive forms library isn’t always convenient. To
find a particular form, try our Search function.
1. Type just a portion of the name, such as HUD, or VA. If you know the
form number, enter it preceded with a # symbol instead; for example,
#1004 or #442. You don’t need to type the whole name. (Typing
too restrictive of criteria can cause a form to not be found.) Click OK.
2. The first instance of the matching phrase will be highlighted. If it isn’t
the form you need, press F3 and the next instance will be found.
3. Once you find a form, you can preview or add it to your report.
Contents PowerView • More functions in the Contents PowerView
2/18/2002
Page 3.5
Contents PowerView
Multiples and renaming forms
Another handy feature is the ability to add multiples of the same form into
your report - especially with addenda forms.
•
When adding forms to your report, just double-click on the same form
and it will be added again.
•
After a form is added, click on it in the list of “Forms in report”, then
click Rename. Here, you can enter a different description of the form
for the printed table of contents. Renaming the form here doesn’t
necessarily change the header on the form itself. For that, you’ll need
to jump to the form and type in its header.
Customizing “My Most Common Forms and Addenda”
Since there are so many forms in WinTOTAL, we made this list to
facilitate access to those that are the most widely used. While in the
Contents PowerView, click the My List button.
•
Use the arrow button pointing to your list to add the currently selected
form to your most common forms list on the right. Similarly, use the
arrow pointing back to the whole list to take forms out of the list that
aren’t really your “most common”. Double-clicking forms will also add
or remove them from your list.
•
The Up/Down buttons are for customizing the list order.
•
The Default button lets you set the list back to the way it was when
you first installed WinTOTAL.
When in the Contents PowerView, you can click the “My Forms” button and change the
forms listed in the Most Common Forms and Addenda category.
Remember, this list is a subset of the whole forms list in WinTOTAL. Just
because you take a form out of this list doesn’t mean you can’t use it. It
just means that you may have to hunt through the different categories of
forms or use the search feature.
More Chapters
Click here to go to the online Table of Contents where you can
access additional chapters in the WinTOTAL user guide. Or, view the
other parts of the manual by selecting Contents from WinTOTAL’s Help
menu. You can also find more tutorials on all of WinTOTAL’s PowerViews.
The more you know about the software, the more efficient and
competitive you can be.
Contents PowerView • More functions in the Contents PowerView
2/18/2002
Page 3.6
Addenda PowerView
Addenda PowerView
Powerful and flexible addenda features
The Addenda PowerView is where you enter extended comments and
create formatted addenda. You can get to it in three ways:
•
WinTOTAL automatically splits the screen between your form and
addenda when you type too much information into a field. This also
ties the comments you then type to the field on the form.
•
You can click on the Addenda PowerView. This won’t link the current
field to the addenda. Instead, it just places your cursor at the end of
the addendum text.
•
Jump to an addendum form by clicking on the Jump to Other Forms
button. This will launch your addendum in full screen mode.
When in split screen mode, you may switch back to editing the appraisal
form in full screen mode by clicking on the Form PowerView. Split screen
mode also offers some other features as we’ll see in this chapter.
Using Addenda Forms
Two types of addenda forms
There are two types of additional comments pages in WinTOTAL:
•
The “multi-page” addenda forms that have a white background and
act like a word processor are the preferred forms. Examples of these
forms are the Supplemental Addendum [Multi-page] and the addenda
pages that are created by WinTOTAL when you type more
information than will fit in a field. The usage of these types of forms is
the subject of this chapter.
•
Other addenda forms in WinTOTAL, such as the Supplemental
Addendum [Single Page] found in the “Other forms and addenda”
section of the Contents PowerView, are actually a form with one long
data entry field. These forms are identified by having individual lines
visible as a field. The usage of these forms is discouraged. They date
back to early versions of TOTAL that didn’t have advanced word
processing features.
Addenda PowerView • Using Addenda Forms
2/18/2002
WinTOTAL’s new Addenda PowerView gives you more flexibility than ever when it comes
to making professional looking, formatted addenda.
Page 4.1
Addenda PowerView
Add forms through the Contents PowerView
WinTOTAL lets you add multiple instances of the same form into your
reports. This feature is useful for addenda forms. You can add separate
addenda style forms for different types of comments or your resume or
“homemade” forms. Once the forms are added, you can rename them so
they appear differently in the table of contents and you can also change
the heading.
1. Click the Contents PowerView.
2. Under Most Common Forms and Addenda, double click the
Supplemental Addendum [Multi-Page] form to your report.
3. Click on it after it appears in the list on the right. The rename button
should be enabled.
4. Click on the Rename button and you can change the form’s
description.
5. You’ll still need to jump to that form later and change the header if you
want it to be different from other addenda forms you’ve added to your
report.
When jumping automatically to addenda forms, WinTOTAL uses the first
one in the list.
Automatic Overflow
Text addenda linked to your forms
When you enter more information than can fit in a comment field,
WinTOTAL automatically switches you to the Addenda PowerView.
•
You can either move the text to the addendum or jump to the
addendum leaving your partial comment on the form.
•
A comment such as “See attached addenda.” may be inserted in the
current field. This item can be modified by typing in the “Add this note
to the form” field.
•
Each field is also named and given a heading in the addenda. This
gives your extended comments a more professional look and adds to
readability. You can change the default heading by simply in a
different name for the field. The next section discusses changing the
format of this option.
Addenda PowerView • Automatic Overflow
2/18/2002
Before
jumping
to
the
Addenda PowerView, you’re
given several options regarding how text should be moved
to the addenda and an automatic
heading
for
the
addenda form.
Page 4.2
Addenda PowerView
•
The automatic headings that are created keep track of which field the
block of text is tied When using the automatic text overflow, enter you
comments below the automatic heading.
WinTOTAL remembers any changes you make to the defaults and
automatically applies them in the future.
Changing the default section title
By default, WinTOTAL assigns a heading consisting of the form name and
the field description. As mentioned before, you can type in a new name
for the field and it will be used automatically in the future.
Here, you can change the default
section title that gets placed on
your addenda forms.
1. When in the Addenda PowerView, click Field Overflow.
2. Then click the Edit standard section title definition button. You can
then see how WinTOTAL generates these titles.
•
The $F variable means use the name of the form.
•
The $D variable means insert the field description.
3. You can remove either or both of these so that they don’t appear, but
we don’t recommend it.
Word Processing Features
Changing your view
The Addenda in WinTOTAL has several options under its View menu to
assist you as you work up your document.
•
Normal view gives you more room on screen to type while the Print
Preview shows you what the document will like when printed.
•
Depending on your preference, you can turn the ruler on and off. The
ruler may come in handy while you are building tables.
Think of viewing the Page Header as seeing your “master page”. It is
basically the shell around the word processing part of the page. To
modify the information that appears at the top of the addenda printouts:
1. Click Show Page Header when in the Addenda PowerView
2. The form part of the screen will switch to a page that is blank, except
for the header and, in some cases where there is a signature line on
the addenda, a footer if you scroll down.
3. Just as in a regular form, type in the fields to make changes.
Addenda PowerView • Word Processing Features
2/18/2002
Page 4.3
Addenda PowerView
Changing font style
The addenda doesn’t have the same limitations with fonts as your forms
do: To change text appearance in the Addenda PowerView:
1. Select the text first by clicking and dragging your mouse over it.
2. Click the Fonts button (it looks like an A) on the
formatting bar.
3. Make your change in the fonts dialog and click OK.
You'll see your selected text become affected by the change. Similarly,
text appearance can be customized by right-clicking the selected text and
choosing a formatting option from the fly-out menu.
Tab stops
Tab stops are as in a typewriter’s. They help you evenly space things on
screen. Instead of using consecutive spaces, use a TAB to move your
text for a very professional look. To set your tab stops, do the following:
1. Activate your ruler by clicking the Addenda PowerView’s View menu
and choosing ruler.
Click and drag the
arrows to move your
tab
stops
in
the
Addenda PowerView.
2. Click in the paragraph or highlight the paragraphs where you want to
modify the tabs.
3. Above the ruler are arrows pointing down that indicate where tabs
currently are.
•
To move a tab stop, click and drag it.
•
To remove a tab stop, click and drag it off the ruler.
That’s all there is to it. The example on the first page shows tab stops at
1/4 inch.
Paragraph settings
You can give your document a more professional appearance by
indenting sections and using paragraph formatting.
1. Click in the paragraph you wish to change.
2. Click the Paragraph button on the formatting toolbar.
3. Set your options for indents and line spacing and click OK. Note that
the first character/digit must be numeric and not a decimal point.
Addenda PowerView • Word Processing Features
2/18/2002
Use the paragraph button to set indents and other formatting.
Page 4.4
Addenda PowerView
Create bullets and hanging indent
Here is how you create bullets and a “hanging” indent as shown on page
one of the manual.
1. Type the list of items you want in your list.
Use the bullets and numbering items below Win
TOTAL’s PowerView buttons in the Addenda
PowerView.
2. Highlight the list by clicking and dragging.
3. Click the bullets button in the toolbar below WinTOTAL’s menus at the
top of the screen.
Inserting an image
WinTOTAL also gives you the ability to have images inside your addenda.
This could come in handy if you were inserting a logo or a small graphic.
Simply click the Image button and choose the file that contains the
picture.
Once an image has been inserted, you can resize it by double-clicking it
and adjusting the scale via the onscreen slide control.
Copy and paste from Microsoft Word 2000
WinTOTAL’s addenda supports more formatting than it actually grants
access to through its functions. We included a limited set of formatting
and features to keep it simple and match the needs of most appraisal
practices’ addenda habits.
Dedicated word processors like Microsoft Word give you full access to a
wide variety of features to help your documentation. If you prefer to use a
word processor, you can always copy and paste your work into
WinTOTAL - our Addenda PowerView will keep most of the commonly
used formatting commands and render your document properly.
Linking in fields from forms
A new feature in our Addenda PowerView is the ability to place hot links
to fields from your appraisal forms. This is useful for making boilerplate
addenda such as the cover letter that automatically has the address,
value or other information. Here’s how it works.
1. Open a report and go to the Addenda PowerView
2. Since you’re in split screen mode, you should be able to see the form
and the addenda.
3. Click in the addenda where you want that fields contents inserted.
Addenda PowerView • Word Processing Features
2/18/2002
Page 4.5
Addenda PowerView
4. Now, click a field in the form that you want in the addenda.
5. Then, click Insert Selected Field. We’ll talk about the other “Insert
Field” button in a moment.
You’ll see the field from the form transfer into the addenda. To
demonstrate that it is a live link, change the field on the form and watch it
change the addenda when your cursor leaves the field! You can link
fields from multiple forms in the report, too.
If you don’t like scrolling around your forms in the split screen view, we
have an easy way for you to insert fields from your report’s major form.
Instead of steps 4 and 5 above, do the following:
1. Click Insert Field.
2. A menu will appear with the form’s major sections. Click the section.
3. Then, fields from that section will be listed alphabetically. The arrow
at the bottom of the list is for you to scroll. Click the field from that list
and it will be inserted into your addenda.
Saving and loading addenda templates
With the powerful formatting and ability to link live fields, it is likely you will
build up a library of addenda to reuse. Quite often, these may be in the
reports you clone. But, but you can also store them separately in case
the addenda isn’t in the file you’re cloning.
1. Once you have the addenda “finished”, click the File drop down in the
Addenda PowerViews lower toolbar. (Don’t click the File menu at the
top of the screen in other words.)
2. Click Save if you have never saved this particular addenda. Or, click
Save As if this is a modification of a previously saved addenda.
3. Give the Addenda a name so you can identify it and click Save.
Working with tables
Inserting a table
Tables are handy for showing structured lists or creating columns.
1. Click the Table menu and choose Insert Table.
2. Specify the number of rows and columns. Note there is not any way
to change the rows and columns for the table once it is inserted
Addenda PowerView • Working with tables
Save and reload addenda you have already formatted. This keeps you from having to put
them in all of your templates.
2/18/2002
Page 4.6
Addenda PowerView
3. Click OK.
Table and cell formatting
Once the table is inserted, you can customize its look.
1. While your cursor is in the table, click the Table menu again.
2. Choose Table Attributes.
3. Then, specify how thick the borders are, what color the background is
and how much padding is between the text and borders.
You can also customize individual cells with colors borders and space
from other objects.
1. Put your cursor in a cell to customize.
2. Click the Table menu.
3. Choose cell properties.
Notice that customizations can be applied to an individual, a whole
column or row, or the whole table.
More Chapters
Click here to go to the online Table of Contents where you can
access additional chapters in the WinTOTAL user guide. Or, view the
other parts of the manual by selecting Contents from WinTOTAL’s Help
menu. You will find more tutorials on all of WinTOTAL’s PowerViews. The
more you know about the software, the more efficient and competitive you
can be.
Tables may be used for formatting charts and comparisons as well as providing extra formatting for lists and columns.
Addenda PowerView • Working with tables
2/18/2002
Page 4.7
Comps PowerView
Comps PowerView
This chapter describes the WinTOTAL Comps PowerView. This
document assumes you have already installed WinTOTAL and are
familiar with operations regarding building and entering data into reports.
The chapter is broken up into the following sections:
•
Tools in the Comps PowerView.
Here we cover merging
comparables from existing reports, using the square footage
adjustment tool and sorting comparables
•
Batch Import to Build Your Comps Database. A great way to get
started with the Comparables Database.
•
Adding and Removing Properties. Here we cover creating a
database from existing reports, editing comp data, deleting
comparables, and placing comparables from the database into your
reports.
•
Date and Age Field Formatting. This discusses how the database
interprets your date and numeric entries.
•
Searching using the Intelligent Query.
through your database with just a few clicks.
•
Printing Comps Database Reports. The Comparables Database
has a reporting function that creates hard copies and exports data.
•
Customizing the Database View. Sort and customize the columns.
Learn how to search
The Comps PowerView has all comps functions organized into one easy screen.
Tools in the Comps PowerView
Accessing comparables in existing reports
If you know of a specific report that has a comp in it you wish to use, you
can easily pull it into your current report.
1. From the Comps PowerView, click on the Old Reports button.
2. Browse the folders until you find the report with the comparables.
3. When you click on the report, it will show you the comparables in it.
4. To import comparable one from the sample, just double-click on it.
5. Then click OK.
Notice that the comparable from the sample is now listed on the Comps
PowerView with photos.
Comps PowerView • Tools in the Comps PowerView
8/10/2001
You can merge in comparables from existing
reports by clicking on Old reports button in the
Comps PowerView.
Page 5.1
Comps PowerView
The integrated Comparables Database allows you to search for
comparables based on criteria you specify. It is discussed on page 7.
Square footage adjustments
The Square Footage Adjustment Calculator allows you to easily adjust for
differences in the square footage of all comparables in one easy step.
1. Ensure that the sales price and square footage for all comparables
have been entered.
The Square Footage
Adjustment tool enables
you to adjust all comparables at one time and
apply logic to your square
footage adjustments.
2. In the Comps PowerView, click on the Sq. Ft. Adjuster button.
3. The first section of the Square Footage Adjustment Calculator shows
you the methods available for calculating the adjustment. Their
meaning is self-evident.
4. As you choose the method and set the parameters that determine if
the adjustment is relevant, the SF Adjuster shows you the resultant
net/gross percentage as it will appear on the form.
5. Click OK to merge the adjustment figures into the current report.
If for some reason, you must change the square footage of a comparable,
be sure to reload the SF Adjuster so that it can re-trigger the math.
Copying, swapping and rearranging comparables
In the comparables listing, you can now see comparables with gross
adjustments, indicated value and a relative weight that corresponds to the
comparability of each property.
•
WinTOTAL uses the weighted average to suggest a value. Click the
Use Suggested button if you wish to put that value into your report.
•
The Sort by weight button sorts the comps by their relative weight.
•
The Move Up and Move Down buttons will swap the highlighted
comp with the one above or below it respectively.
•
The Add button inserts a blank comp below the highlighted comp.
•
The Delete button deletes the currently highlighted comparable and
moves the other comparables up one position.
•
The Copy button copies the selected comparable to the next slot and
pushes the others down one position.
Comps PowerView • Tools in the Comps PowerView
8/10/2001
The Comparable Management and Weighting section of the WinTOTAL Comps
PowerView is where you may copy and swap comparables. Our exclusive weighting algorithm even suggests a value for you.
Page 5.2
Comps PowerView
Batch Import to Build Your Comps Database
If you’ve been using WinTOTAL for a while and have a library of reports,
you can create a database out of the properties in their market sections,
regardless of what major form was used. You can also catalog the
images used for each property in the database.
1. Go to the Comps PowerView and click Open Database.
2. Click on the Import button.
3. Now, mark the folders from which you want to import the comparable
and subject property data. To mark a folder, just double click on it.
4. Review and select options regarding verification of items such as
date fields and how to handle duplicates when found. For sale date
and age entries, WinTOTAL stores two items -- one formatted for
searching or sorting and another for placement in the form. This
import utility will try to discern properly formatted dates and numerical
ages from the information you entered in the appraisal, but success is
not guaranteed. therefore, it prompts you for the data.
5. Click on OK to begin the import.
Adding and Removing Properties
Import comparables from your existing report with the Import button. Just Mark
the folders you wish to import and click OK.
Type in a comp from scratch:
1. When in the Comparables Database, click on the Add button.
2. Select Manually. You will be given a blank database record in which
to type values.
3. Use the Additional Info tab to specify the name of the neighborhood,
custom tracking items, the actual age and actual date of sale. This is
important since WinTOTAL needs a properly formatted date entry
and numerical age in order to perform searches. For these items,
you can specify different data for what goes in the form and what gets
used in searches. See “Date and Age Field Formatting” on page 6 for
more information.
4. Go to the Images tab and click Manage Images to associate images
from your image database or image directory with that comparable.
See “Associating images with comparables” on page 4.
5. Click on OK when you are through entering your information.
Comps PowerView • Batch Import to Build Your Comps Database
8/10/2001
Page 5.3
Comps PowerView
Hint: In this screen, use the TAB key to move easily to the next item or
SHIFT+TAB to go back one item.
Add comparables from the open WinTOTAL report
If you have comparables already in a WinTOTAL report, you can add
them to the database by doing the following:
1. Open the report and click the Comps PowerView
2. Click the Open Database button
3. Once in the database, click on the Add button.
4. You will be asked if you wish to merge a comparable from WinTOTAL
or if you wish to enter one manually. Click on the WinTOTAL button.
5. You will then be prompted with two options regarding how to handle
duplicate comparables and improperly formatted date/age fields.
Click OK after deciding the action to take for these items.
Associating images with comparables
You are allowed to associate up to 8 images per comparable in the
database. The actual photos are not stored with the comp. They are
merely referenced by the database and they must be located in separate
files on your system. If you were to delete the image from the hard drive
using Windows Explorer or other means, then it would not be available to
the Comparables Database.
1. When adding or editing a comparable, click the Image tab.
2. Click on the Manage Images button to actually associate/remove
images from this comparable.
•
You may pick images from the list of image files on your system or
choose from the image database.
•
Sort the file/database listings by clicking the column on which you
want to sort. Click once for ascending. Click again for descending.
3. Once you find the image you want with the comp, click on its entry.
Then click the Place Image button.
4. Click OK to accept the changes.
Remove an image from a comparable
Up to 8 images may be associated with each comparable in the database.
1. Highlight the comp you wish to modify.
Comps PowerView • Adding and Removing Properties
8/10/2001
Page 5.4
Comps PowerView
2. Click the Edit button.
3. Click the Image tab, then click the Manage Images button.
4. Click in the button for the image preview.
5. Click the Remove Image button.
6. Click OK to accept the changes.
Removing comparables
Finding / removing a batch of comparables older than a specific date:
You can locate and delete comparables in your database that have
expired.
1. Click on the Comps Database File menu.
2. Select Find old comps...
3. Click the Delete all comps item. By default, WinTOTAL saves a
copy of each image used in a report with the report data, so it’s okay
to remove the individual image files associated with properties in the
database. The photo is with the report.
4. Select the month and year from the drop down list.
Select “Find old comps...” from the File menu to search out
comparables older than a particular date.
5. Click the day on the calender.
6. Click OK.
Placing comparables into the current report
Let’s assume you’ve found a comparable in your database that you wish
to use in a report.
1. If photos are saved with the comparable, use the Next / Prev buttons
below the photo preview the photo you wish to use. You can view the
full version of the photo by double clicking on its preview. WinTOTAL
will automatically place the displayed photo onto a comparables
photo page.
2. Double click on a comparable you want to insert into your currently
open report. You’ll see a hash mark (>>) appear in the Mark column.
This will also “lock” the photo view onto the current photo.
3. Click on Place and it will be pushed into the WinTOTAL report as the
Comps Database closes.
Comps PowerView • Adding and Removing Properties
8/10/2001
Page 5.5
Comps PowerView
4. Use the Move Up and Move Down buttons on the Comps
PowerView to rank the comparables. The photos and data on your
photo pages will be rearranged too.
Date and Age Field Formatting
Specifying the sale date
The WinTOTAL database is quite lenient when it comes to entering dates.
The following are all valid date entries for September 1, 1998:
• September 1, 1998
• 9/1/98
• 9/1
• Sept. 1, 1998
• 1-Sept-98
• Sept-98
WinTOTAL automatically converts two digit date entries to their Year
2000 4-digit equivalent.
In order for a computer to search by dates, the date entry needs to be in a
specific format. Quite often, more than just a date is entered into the Sale
Date field, for example “CLS 11/09/98”. The information may make
perfect sense to us as humans, for we can easily see which part of the
text is the date. But, a computer can’t always pick which part is the date.
To solve this problem, WinTOTAL populates two fields in the
Comparables Database from the market section’s “Date of Sale/Time”
time field.
•
Using EXACTLY what was entered in the form, WinTOTAL populates
a field labeled “Sale Date/Time 1". This item isn’t in the default
columns, but it does get imported back to the forms.
•
It also populates a field labeled “Date Sale” with its guess of which
part was the date. If the program can not determine within reason
which part of your text is really the Sale Date, it will leave that item
blank. This field is in the default columns displayed.
The Additional Info tab gives you access to special fields to specify
the neighborhood, formatted sale date and numerical age of a comparable.
Whenever comparables are added to the database, you can verify the
date by going to the Additional Information tab when you click Edit.
Specifying the age of a comparable
In order to perform a search based on age, WinTOTAL needs a definite
number. Since the “Age” field often contains more than just a number,
WinTOTAL has separate fields for a numerical age and a textual age.
Comps PowerView • Date and Age Field Formatting
8/10/2001
Page 5.6
Comps PowerView
For the textual age, you may wish to enter both the actual and effective
age of a property or perhaps the year it was built. This information gets
stored in the database and used on the actual appraisal form when you
merge in comparables from the database.
WinTOTAL tries to determine, based on what you typed, the numerical
age for a property.
•
If there is extraneous text, WinTOTAL tries to strip it and uses the
numbers left over.
•
If the item in the age field is greater than 1500, then WinTOTAL
assumes it’s the year built and subtracts it from the current year.
This information is accessible through the Additional Info tab when you
click on the Edit button. You will want to verify it whenever you import
comparables from the form.
Searching using the Intelligent Query
What is the IQ?
The Intelligent Query (IQ) function supplied with WinTOTAL 2000 is the
most powerful database search tool available today. Instead of using
literal numbers and search criteria, it uses the concept of “comparability”
to the subject. Instead of specifying a “value greater x and less than y”
that would have to be manually figured and entered for each and every
report, it enables you to specify a “value within x percent of the subject’s”
value. Think of it as more of a “search model”.
How to use the IQ
In order to use the search features effectively, you need to first have data
entered into the subject of the currently open report.
1. Load the database through the Comps PowerView.
2. Click the Search button.
3. To include one of the listed items in your search, click in the checkbox
beside it so that it appears filled.
The Intelligent Query (IQ) enables you to set up a model for searching through
your database. Just click the items on which you want to search, set tolerances
and click OK.
4. Enter a range or tolerance for each item used. Any comparables
falling within the range of values will come up as a match.
5. Click on OK to perform the search.
Comps PowerView • Searching using the Intelligent Query
8/10/2001
Page 5.7
Comps PowerView
Only the comparables that met your criteria will be displayed in the list on
screen. If no comparables are displayed, you’ll want to click Search
again and broaden your search criteria.
By default, the Comparables Database saves the ranges you specify for
the next appraisal and notification in the Comps PowerView.
Customizing the text matching fields
In the IQ, you are not limited to matching numeric values in the market
section. You are also given three other fields in which you can match
specific items such as location, condition and map reference. These fields
are not case sensitive and don’t even require you to enter the whole word.
•
•
For example, entering urb in the location field would find only
comparables that contained text such as “urban” or “suburban” in the
location field in addition to fitting the other search criteria.
Use the fields at the bottom of the Intelligent Query screen to search on text.
Similarly, you could enter an item in the field preceded by the word
NOT so that any comparable matching that text in the specified field
would not be retrieved.
As a default, we supply the Location, Condition and Map Reference
fields. However, you can use any field in the database.
Click the arrow to get a drop-down list of text fields
on which to search.
1. If you are not in the Intelligent Query screen, activate it now by clicking on the Search button in the main Comps Database window.
2. Click on the item Select Fields to Compare.
3. Click on OK when you have set the fields as you want them.
The text matching fields do not support operators such as > (greater than)
or < (less than). They are strictly for finding the phrase you entered in any
part of the specified field.
See “Placing comparables into the current report” on page 5 to place
comparables found using the IQ in your current WinTOTAL report.
Printing Comps Database Reports
Generate a hard copy of comp data
1. First perform a search to find a set of records.
2. Click on the Reports button and you’ll see a list of reports available for
the Comparables Database. You’ll want to run each one to see what
Comps PowerView • Printing Comps Database Reports
8/10/2001
Page 5.8
Comps PowerView
kind of data and formatting they give you. (They display on screen
before printing.)
3. Click on the report style you want, and then click OK.
The report will then be displayed on screen exactly as it will print.
•
The current page and number of pages is shown on the left.
•
The number of records is shown on the right.
•
The view dropdown lets you zoom in and out.
•
Use the left and right arrow buttons to advance pages for on-screen
viewing.
Export comp data
The reporting tool built into the Comparables Database also allows you to
export its information to a variety of formats including:
• MS Excel
• MS Word
• Lotus 1-2-3
• Delimited Text
• MS Access
• Fox Pro
• CSV
• HTML
The resulting files can be saved to your hard drive or e-mailed using a
MAPI compatible e-mail program like MS Outlook or OutLook Express.
Each format has its own options regarding items such as column
organization and headings when saving. Experiment with the different
formatting options to find the one that works best for you.
To close the reporting tool, click on the “X” in the top right hand corner of
its window.
Customizing the Database View
Changing the columns you see
The columns that you see in the WinTOTAL 2000 database are
completely customizable. As a default, you are allowed to see Address,
Sale Price, GLA, Age, Sale Date and $per GLA. However, you can
change these to whatever you like by clicking on the Columns button.
The list of items on the left are the fields that are currently being displayed
along with their headings and the amount of space allocated to them on
Comps PowerView • Customizing the Database View
8/10/2001
Page 5.9
Comps PowerView
screen. The items on the right are a list of all possible fields in the
database for each property.
•
To place an item into view, simply highlight it in the column labeled
Remaining fields in the database and click on Add.
•
To remove an item from the visible columns, click on the item in the
Fields that are Displayed and then click Remove.
•
To define the order in which the elements are viewed, highlight an
item from the list labeled Fields that are Displayed and click on
either Move Up or Move Down.
•
Click on OK when you are done.
Sizing the columns and screen
You can change the column widths of the Comparables Database just as
you would in a spreadsheet program.
•
When you are in the main database window, notice that when you
move your cursor toward the left or right edge of a column heading, it
changes to something that looks like a double arrow. When your
cursor looks like this, you can hold down your left mouse button and
drag the column to the desired width.
•
The Comparables Database also functions like any other window in
MS Windows. If you desire, you can stretch the entire screen by
clicking on its border and dragging. Or, you can make it full screen by
clicking on the maximize button.
How to sort comps
Some users prefer to use sorting in lieu of querying to find comparables
for a report. To sort your comparables:
Click on the Sort button for a three
level sort spec.
1. Click on the Sort button.
2. Select the fields on which to sort. You have three levels. If two
comparables are the same for the primary sort field, they will
subsequently be sorted on the secondary field and so on...
3. Click OK.
To sort by date, select the Date Sale field. This is the date field which is
properly formatted. The plain Sale Date/Time field is the text that gets
inserted into the form.
Comps PowerView • Customizing the Database View
8/10/2001
Page 5.10
Comps PowerView
More Chapters
Click here to go to the online Table of Contents where you can
access additional chapters in the WinTOTAL user guide. Or, view the
other parts of the manual by selecting Contents from WinTOTAL’s Help
menu. You will find more tutorials on all of WinTOTAL’s PowerViews.
The more you know about the software, the more efficient and
competitive you can be.
Comps PowerView • Customizing the Database View
8/10/2001
Page 5.11
Photos PowerView
Photos PowerView
The Photos PowerView is your one stop shop for placing digital images
on your photo pages. In this one screen, you can access digital cameras,
read files from the integrated database, browse a file directory or acquire
from a scanner or other TWAIN device. This chapter will cover:
•
Downloading photos from a digital camera
•
Using scanners, disk files and other sources for images
•
Managing photos in our integrated database
•
Placing photos on the photo pages
•
Optimizing your digital images to save disk space
•
Enhancing photos
Configure WinTOTAL’s compression
Before downloading any photos, we strongly recommend examining your
compression vs. quality settings. The default setting in WinTOTAL and on
your digital camera is to use the highest quality setting.
•
In practice, when taking pictures of houses at a distance and printing
them at 3X5 or smaller, you won’t see any visible difference in photos.
(We recommend using the photo pages labeled [small].)
•
You will notice a difference in download times and the number of
images you can save on your camera if you adjust the quality setting
on your camera as well the software.
•
You’ll also see your report file size go down and the number of files
you can save on your PC go up.
Use the Photos PowerView to place digital images into all the photo pages in your report.
You don’t even have to load the photo page on screen since WinTOTAL automatically
maintains all the data on the forms themselves.
You only need to tell WinTOTAL one time what settings to use for photos.
1. On the Appraisal Desktop, click Preferences. From the WinTOTAL
Configuration Options, select the Photos Shortcut. Nine labeled
icons appear in the Shortcuts menu.
2. Click on the tab labeled Miscellaneous. You’ll see a slider labeled
High Resolution JPG photos.
3. By default, that slider will be set to 95%. This setting will result in
images that will be anywhere from 250K to 500K.
Photos PowerView • Configure WinTOTAL’s compression
2/18/2002
Page 6.1
Photos PowerView
4. Change the slider to read 50%. Your downloaded photos will go down
to 100K to 200K and you won’t notice a difference on printouts.
5. Click OK. These new settings will take effect only on photos you
download AFTER the change. Photos in your existing reports will
NOT be affected even if you open and save the report.
The photos in the sample report were saved with a 35% quality rating.
Experiment with different settings to find the one that works best for you.
Be sure to see “The Image Optimizer” on page 10 to learn how to have
WinTOTAL resize and recompress photos automatically.
Pre-entering comp addresses
If you already know the address of the comp photos and you are using
them in the current report, it is best to go ahead and type them into the
form. QuickPix, our photo downloading module, will read those addresses
from the form and allow you to easily put them with the photos. This
keeps you from having to match up the fuzzy preview with a property and
it is one way to prevent dual data entry.
Getting Started with a Digital Camera
Customization for your digital photos is accessible through WinTOTAL’s main
configuration dialog. Click Tools and then Configure.
Launching the photo downloading module
QuickPix is our popular photo downloading utility.
•
QuickPix has built-in serial drivers for many popular cameras as well
as an interface for floppy disks and reading images from card readers
and mounted disks.
•
Store images in a variety of formats so they may be used in other
applications outside of WinTOTAL.
•
Track your images in a Microsoft Access compatible database.
For instructions on how to use the camera controls and interface, please
reference the booklet included with your particular camera.
If you are in WinTOTAL, simply click on the QuickPix... button on the
Photos PowerView. You can also run the downloading module separately
from the program by clicking on its icon in the WinTOTAL program group.
This is quite handy if you are on a network since one person can
download and label the images while the other works up the report.
Photos PowerView • Getting Started with a Digital Camera
2/18/2002
Page 6.2
Photos PowerView
Configuring for a camera that uses a cable connection
WinTOTAL has built in interfaces for popular cameras made by Epson,
Kodak and Logitech. If you are using a Sony Mavica or other camera that
transfers pictures straight from a diskette or memory card without a serial
cable, you may skip straight to either “Configuring for a card reader” on
page 4 or “Configuring QuickPix to read a floppy disk” on page 5.
When using cameras that hook up
via a cable, you need to tell QuickPix the port and the speed. Using
the actual port is better than using
the Auto setting.
The first time you use QuickPix, you’ll need to tell it which kind of camera
you’re using, the port to which it’s connected and the speed at which that
port can communicate with the rest of your system.
Step One: You’ll be prompted the first time you run the WinTOTAL Digital
Photo Wizard, but you can always get back to the configuration by
pressing CTRL+T. Selected the Camera, Port and Baud Rate,
Step Two: Make sure your camera is on and click Properties to access
to more of the cameras settings. If you experience errors after clicking
Properties, it may be due to one of the following reasons:
•
Wrong or invalid COM port selected - consult your PC’s
documentation regarding its external ports.
•
Baud Rate too high - Try reducing gradually until successful.
•
Wrong camera type - Make sure the right one is highlighted.
•
Low camera batteries or bad connection.
•
Camera is turned off or “asleep” - Try opening the shutter before
downloading.
If you experience errors while configuring the camera, the first step
should be for you to try to use the manufacturer’s interface. (This is to
determine if it’s a hardware or software problem.) If the configuration fails
with the manufacturer’s program too, then we recommend contacting
them since the basics of connecting the camera and PC is their specialty.
Once your camera is connected, you’ll be able to activate the Properties function to
configure your camera.
If you are able to configure your camera through the manufacturer’s
interface, but not WinTOTAL, make no hesitation to contact our tech
department so we can help you set up our software.
Step Three: Assuming your camera and PC are “talking”, you’ll see
additional options after clicking on Properties. Since each camera has its
own capabilities, you should refer to the manufacturer’s documentation
regarding your camera’s functions. However, you’ll probably find that the
Photos PowerView • Getting Started with a Digital Camera
2/18/2002
Page 6.3
Photos PowerView
options described in the configuration screen are logical and don’t need a
lot of explanation.
•
You’ll first see a General screen. Click on the tab labeled Options to
see what is available for your particular camera.
•
On Kodak cameras, we recommend setting the resolution to good
and using the maximum image size.
•
If you find yourself continually adjusting the brightness on your photos
after they are in your reports, configure your camera’s exposure
settings for brighter pictures - that way they look better on the way in.
You will save time and have higher quality photos.
These are settings for a
Kodak DC220. Settings for
other cameras may look different, but the options should
be self explanatory.
Configuring for a card reader
If you have a camera that uses removable memory, you should also
investigate an inexpensive card reader. For around $50, you can buy a
device that will treat a camera’s memory card like a hard drive. Reading
images that way is a lot faster than the cable with a lot less hassle.
Contact an a la mode representative at 1-800-ALAMODE for details.
These card readers, such as those made by SanDisk or even built-in to
newer digital cameras include software that, once installed, creates
another drive letter on your PC whenever connected. The size of the
drive is the same as the amount of memory on the card. If you haven't
already installed the software that came with the card reader, do so now.
Next, you need to do is determine what drive letter your card reader is set
as. To do this, follow the directions below.
1. Double click My Computer.
2. In the list of drives you should see removable disk - E:\ or F:\ etc. The card reader will typically be a letter drive that reads Removable
Disk and naturally wasn't there before you installed the device.
3. Close the My Computer / Explorer window.
If you can't find the drive letter, make sure the card reader is plugged in
and configured per the instructions included with it. You should see a light
illuminated when a card is inserted. Now we need to set QuickPix to read
from this drive letter.
1. Open QuickPix.
2. Click the Disk/Directory/Card menu.
Photos PowerView • Getting Started with a Digital Camera
2/18/2002
Page 6.4
Photos PowerView
3. Click Card Setup.
4. Click the Browse button.
5. In the lower portion of the window your now viewing you should see
“Drives:”. From the drop down list choose the letter drive that we
located in the directions above.
When you have a card reader or a camera
that mounts itself as a removable drive, just
configure QuickPix for the Disk/Directory/
PC Card option.
6. Now in the larger portion of the window, the drive you selected should
be showing with one or more folders below it. If this is a Kodak
camera you should have a folder named DCImages. This name may
be shortened to something like DCIM. (And there may be another
drive underneath it with a name resembling your camera. Basically,
you want to go as deep into the directories as you can. It’s different
depending on the camera.) Double click that folder and it should
appear that the folder looks Open.
7. Click OK and then OK again.
You should now be able to continue loading your photos as described in
“Labeling the previews and retrieving the images” on page 6. If no
previews come up after selecting load previews, repeat the steps above
and verify the path you selected to the images.
Configuring QuickPix to read a floppy disk
Cameras like the Sony Mavica save images straight to a floppy disk,
eliminating the need to download them through a serial cable as well as
the additional processing that is often required. This saves you from
having to worry about COM port conflicts or buying additional hardware.
Using QuickPix in this configuration is much more convenient than using
WinTOTAL’s “File” method alone.
•
Copies the image from the source to WinTOTAL’s images directory
and applies JPEG compression that you configure through
WinTOTAL to optimize the size of the file.
•
Assigns a new file name based on WinTOTAL’s naming scheme - the
original image will remain in the disk.
•
Allows you to label the image and then logs the image into a
database as it copies it. Once in WinTOTAL, you or anyone on your
network, can reference it via address or whatever you labeled it.
WinTOTAL has an interface to read
images from floppy disks and automatically catalog them in the database.
Here’s how to configure QuickPix for a camera that uses floppy disks:
Photos PowerView • Getting Started with a Digital Camera
2/18/2002
Page 6.5
Photos PowerView
1. Simply press CTRL+T to get to the configuration dialog. (It will pop up
automatically the first time you run it.)
2. Pick your camera type. If you have a Sony Mavica, choose that option
and check the box that says Retain image compression.
3. Verify the drive and directory to which QuickPix is looking to read
photos. For Mavicas, this is obviously the “A” drive.
4. Click OK Then, proceed with the next section.
Retrieving the Images
Overview
After you have configured WinTOTAL to work with your camera (which
you only have to do once) the process of downloading images from your
digital camera into your appraisal forms is summarized as follows:
1. Display and label the previews.
2. Download the complete images.
3. Return to the Photos PowerView.
4. Locate the image in the database.
5. Associate images from the database into the photo page.
Now, we’ll describe each of these steps in a little more detail.
Labeling the previews and retrieving the images
QuickPix allows you to first see previews or “thumbnails” of the images in
the camera before taking the time to acquire the whole picture. It
automatically assigns a filename to the pictures it downloads and insert
them into the WinTOTAL images database. Here’s how to do it.
1. Click the Load Previews button.
2. Once the previews are loaded, check and label each one you want to
download. If you don’t want to label the photo, that’s okay WinTOTAL will still list it as an unused photo. If you use it from the
database of unused photos, WinTOTAL will update the database with
the address of the property you used it with. Previews that don’t have
the “Retrieve this photo” item checked will be skipped.
3. After you have marked the previews, click Retrieve Photos. After the
photos are downloaded, their file name will appear on screen with the
Photos PowerView • Retrieving the Images
If you have addresses already typed in your forms, all you have to do is use
the drop down list to label your photos.
2/18/2002
Page 6.6
Photos PowerView
preview. This is so you can tell which photos have been drawn from
the camera.
4. When you are through downloading images, exit QuickPix by
selecting Exit from the File menu, and return to WinTOTAL.
Placing photos when previews are labeled
By the time you’re dropping photos onto a page, you should have the
addresses for the comparables typed into the forms. If you haven’t done
this already, do it now.
1. We first need to select a form in which to place photos. At the right of
the Photos PowerView is a section labeled Photo pages in report.
2. Click on the first form for which you want a picture. For the sake of
example, pick a comparable photo page.
3. In the Photo Management section of the Photos PowerView is an
option for Database. Click on it to make sure it is active.
4. Click the stamp sized image placeholder on the right of the Photos
PowerView. You should see the address that is beside the image
frame appear in the Address field in the Photo Management section.
5. If the photo you’re placing doesn’t have an address with the frame
(like a subject or listing photo) you’ll need to type the address in the
address field. You don’t need to type the whole address just part.
6. Now click Find. The cursor should jump to the first entry that matches
what you typed.
7. Click once the database entry and you’ll see a preview appear.
8. Click the Place button and the image will be inserted onto the page.
You can also drag images from the database to the frame.
9. Repeat these steps for each photo on the page.
Placing photos if previews aren’t labeled
WinTOTAL has new functions to accommodate those whose workflow
doesn’t accommodate labeling pictures before downloading them into
your database. Let’s assume you downloaded several photos, but they
don’t have any addresses yet to look them up by.
1. After you’ve got the photos downloaded and comp addresses typed
into your form, go to the Photos PowerView.
Photos PowerView • Retrieving the Images
This is the WInTOTAL image database interface. The database makes it easy to retrieve
and reuse photos.
2/18/2002
Page 6.7
Photos PowerView
2. Click on the Database button to ensure it is activated.
3. Click on the Sort by Date and Show Unused Entries only options.
This will limit the photos in your list. Pair this filter with the Guru
functions that automatically delete unused photos after a given
number of weeks and this makes for a nice “photo queue” system.
4. You can now browse through the database for your picture. You may
recognize it by sequence number or date.
5. If it is the photo you want, drag it onto the stamp sized place holder. If
no address has been previously assigned to that photo, WinTOTAL
will automatically assign that address.
Obtaining images from other sources
Use TWAIN for scanners but not cameras
TWAIN is a standard method for acquiring a single image from a scanner
or other “TWAIN compatible” device. When something is specified as
TWAIN compatible, that means it’s interface may be run from a “host”
program, such as WinTOTAL, and when the user is through acquiring
from the device, the TWAIN compatible interface will “hand off” an image
to the host program in a consistent manner. The host program doesn’t
need to know anything about the separate acquisition program - just that
it will deliver an image.
In theory, TWAIN works great and is well suited for scanners and very
high end systems. For a graphics artist, it is very handy to be able to
access a TWAIN compatible scanner through their favorite image editing
software! In the scope of appraisal forms, TWAIN can be quite
cumbersome:
•
Only one image can be passed at a time through TWAIN.
•
Loading and unloading the TWAIN interface 9 times during the course
of one appraisal is time consuming and inefficient. (That’s why we
developed the batch download/database process for common
cameras.)
•
A manufacturer’s TWAIN interface will likely look nothing like the rest
of the appraisal program and certainly won’t be able to interface with
its functions.
Photos PowerView • Obtaining images from other sources
Scanning is an easy way to get already printed information into your reports. WinTOTAL
communicates using the TWAIN standard. So, when you click Acquire, it launches the
software that came with your scanning device; then WinTOTAL “waits” for it to send the
image back. You may scan through the Photos, Maps and Digital Workfile PowerViews depending on your intended usage of the image.
2/18/2002
Page 6.8
Photos PowerView
Despite the weaknesses noted about TWAIN, we have incorporated
TWAIN capabilities into WinTOTAL - primarily to give users one button
access to devices that aren’t supported directly through our software. To
acquire an image through TWAIN, do the following:
1. Go to the Photos PowerView.
2. Click the Scanner / TWAIN device option. (The first time you use
TWAIN with WinTOTAL, you’ll also need to click on Select Device
button to select your TWAIN device.)
3. Click Acquire.
4. WinTOTAL will then load the “TWAIN” driver for your scanner. At that
point, use that program as directed by the manufacturer to scan or
acquire the image. Usually, you click “OK”, “Close” or “Send to”
option to send the image to the “host” application - WinTOTAL here.
5. Drag the image into the desired place on the selected form. The
image will be saved inside the appraisal report.
6. You may add this image to the database by clicking on the Add to
Database button.
Access images by file name
All you need to know is the name of the file that contains the image, or
perhaps the date it was created.
1. First, load a form that supports photos.
2. Click the Photos PowerView.
3. Click File, and browse to the directory where the image is located.
WinTOTAL also lets you browse for photos by file name and gives you an easy way to
put them in your database if you didn’t download them through QuickPix. We strongly
discourage the habit of always using the file list since it will become cumbersome once
their are hundreds of image on your system.
4. Click on the image name you want to use and you’ll see a preview
appear. You view the image in full resolution and even enhance it by
clicking on the Optimize Photo button.
5. Select the form and which photo you are wanting to place. Then, click
on place photo.
Cut and Paste Images
By using the Windows clipboard, you can easily cut and paste images into
your forms. The only drawback to cutting and pasting is that not all
programs cut and paste the same - sometimes depending on your PC.
Photos PowerView • Obtaining images from other sources
2/18/2002
Page 6.9
Photos PowerView
1. Go to the Forms PowerView and load a WinTOTAL form that supports
images. Keep in mind that most of the sketch and map pages are
simply forms with one big image on them.
2. Switch to the application that is currently displaying the image you
want on your form. This could be a mapping program, a sketch
program or any graphics program.
3. Use that application’s Copy command (usually in the Edit menu) to
copy an image to the clipboard.
4. Switch back to WinTOTAL.
5. Click once in the photo box.
6. Select Paste from the Edit menu.
That’s it! For experienced users this may be a preferred method for some
types of images. However, note that our Maps PowerView has functions
for reading images off of the clipboard as well.
Viewing and Enhancing Photos
Viewing images on the forms
When you view these images on the form, they will appear distorted and
blurry. This is intentional. We use a low resolution “thumbnail” version of
the image for on screen display since they can load much faster than the
complete high resolution version. This image gets stored in the THUMBS
subdirectory.
Note that WinTOTAL always uses the high resolution
image for printing and transmitting the report. If you wish to always see
the high resolution image on screen, do the following:
1. Click the Tools menu and then Configure.
2. Go to the Photos section.
3. In the Thumbnails tab, clear the option labeled “Show photos on
forms as thumbnails (blocky but fast).
The Image Optimizer
You can access the WinTOTAL Image Optimizer from the Photo
PowerView by double-clicking on the thumbnail image or selecting the
image and clicking the Optimize Photo button. The WinTOTAL Image
Optimizer contains two tabs, Optimize and Enhance.
Photos PowerView • Viewing and Enhancing Photos
WinTOTAL may be configured to always use the high resolution image when displaying instead of the fast “thumbnail” preview.
2/18/2002
Page 6.10
Photos PowerView
From the Optimize tab, you can
•
Set the image size to optimize viewing and printing on the size page
you will be using.
•
Set the amount of color you want in your image. Fewer colors can
help to reduce image file size.
•
Set image detail - a medium setting usually gives great image quality
and reduces file size.
From the Enhance tab, you can
•
Adjust brightness, contrast, saturation and sharpness
•
Rotate the image
•
Crop to capture a single wanted area in the image
Try the functions in the Image Optimizer for yourself. It is designed to
give you high-quality, yet disk-efficient photos without knowing much
about the technical aspects of digital photography.
Enhancing photos that have already been placed in a report
These steps will enhance the copy of an image that is placed in an
appraisal report. If this image was imported from the database or disk file,
then the original will remain unchanged.
1. Go to the Photos PowerView.
WinTOTAL’s Image Optimizer allows you to adjust your photos for the best possible
appearance. This can keep you from having to retake photos, saving you time and effort.
2. Click the page that contains the image. As mentioned previously,
you’ll see the low resolution “thumbnail” first.
3. Double click on the stamp-sized thumbnail representation of the
image you wish to enlace.
4. Select the Optimize tab on the WinTOTAL Photo Optimizer to set
image size, color and detail. Select the Enhance tab to make image
adjustments or crop the photo. As you make your changes,
WinTOTAL has a live preview to show you what your image will look
like. To return the image to it’s original settings, simply click Restore.
5. Once the image looks just right, click OK and your changes will be
saved. Your screen will be returned to displaying the thumbnail
preview.
Photos PowerView • Viewing and Enhancing Photos
2/18/2002
Page 6.11
Photos PowerView
If a picture is too dark or needs
adjusting, WinTOTAL provides
powerful functions to assist in
boosting its appearance.
Enhancing photos in the database or on file
These steps will enhance the photo referenced in the database or on disk
file. If the image being enhanced has been used in a report, the image in
the report will remain unchanged since it is just a copy.
1. Activate the Photos PowerView.
2. Select an image from either the database list of file list.
3. After its preview is displayed, click Optimize Photo.
4. Make the necessary changes and click OK.
Auto-optimizing photos
The Image Optimizer may be configured to automatically adjust images
as they are placed in reports. This much requested feature can save you
the time of having to load it individually for every picture.
1. Activate the Image Optimizer.
2. Click Auto Settings.
3. Set your preferences for the image size and detail. If you are using
this feature, you probably use the same ones repeatedly.
4. Click the item at the bottom of the screen which tells WinTOTAL to
use these settings automatically when photos are placed in reports.
The Image Optimizer may be
configured to use the same
defaults each time as well as
automatically optimize each
photo as it placed in the report.
QuickPix Reference
Accessing the database through QuickPix
In addition to downloading photos, QuickPix can also manipulate your
image database.
•
When in QuickPix, click Open Database to see all of your images.
•
To view the full resolution picture, click on the View button.
•
To edit the address or description, click on the record you want to edit.
Then click again in the field you want to change. Your changes will be
saved as soon as you leave the field.
Click the Find button to locate a particular address.
•
You can use the drop down box to find an address in the current
report. Or, you can type an address manually. You don’t have enter
the whole address, just the first few letters.
Photos PowerView • QuickPix Reference
2/18/2002
Page 6.12
Photos PowerView
•
Once an entry is found, you can press F3 to find the next occurrence.
•
When you are through searching, click on Cancel.
Removing images from the database using QuickPix
QuickPix has flexible functions that will assist you in removing old or
unwanted images from your system.
•
You may use the sort function to group photos by date.
•
To delete a single entry, simply highlight and click Delete Entry.
You can select a block of photos by doing the following:
1. Click the entry at the top of the list.
2. While holding your shift key, click on the last entry in the list.
3. Now, click on Delete Entry.
Hint: By using your CTRL key while clicking, you can select/de-select
entries that aren’t necessarily in order.
When removing entries, you will be prompted to also remove the image
file from your hard drive. By default, WinTOTAL embeds a copy of every
image in the report in which it’s used so your appraisals should remain
intact. However, if you turned off the embedding feature, you stand a
chance of losing those photos forever. a la mode, inc. can not be held
responsible for the data you delete.
QuickPix, our image capturing module, also gives you a view into the database.
This is useful for using photos outside of WinTOTAL.
Please take extreme caution when removing images from your drive.
Think of it this way: You can fit 7,000 to 15,000 images in a single
gigabyte of disk space - which costs less than $100. How much money do
you stand to lose by not being able to retrieve a photo?
Customizing QuickPix
Default database labels
handy if you have multiple
tures of the same property
you don’t want to re-enter
address each time.
are
picand
the
There are a variety of ways in which you may configure QuickPix. Just
click on the Configure button. You will be presented with four tabs
representing the different areas of the program which you may configure.
Photo Retrieval - Database Defaults
When capturing images straight into the database through QuickPix, you
first must display and label the previews as described on page 6. To
automate the task of labeling photos, you can set defaults for the
database entries. For example, if all of the images you are going to
Photos PowerView • Customizing QuickPix
2/18/2002
Page 6.13
Photos PowerView
download are for the same address, you can enter a Default Address
before displaying the previews - then perhaps change the Default
Address back before downloading other images.
You also have options for what to show on screen for images that have
already been downloaded during the current QuickPix session.
Another handy feature is naming
your files based on their
address. This makes it easier to
find them without the database.
Automatic file names
As discussed previously, digital images are simply data files on your
system. When the QuickPix utility draws them from your digital camera, it
assigns them a name and stores them in the C:\WIN2000\IMAGES
directory (unless you’ve configured your system differently). As a default,
QuickPix assigns the images a file name based on the date of the
download and the picture number. However, you can customize this
aspect of QuickPix to meet your needs. QuickPix automatically assigns a
file extension based on the format of the image.
File Format - How to save disk space
Depending on your circumstances, you may need to change the format in
which QuickPix saves its images. You can choose one of several formats
in this dialog. As you click on each particular type of file, a brief
description will appear.
File / Output Directory
Depending on your circumstances, you may need to change the directory
in which QuickPix saves its images. We strongly discourage doing this
since it could cause an inexperienced user difficulty in tracking images.
But, if you’re fairly comfortable with your system and desire a different
location for images, you can certainly do so.
More Chapters
Click here to go to the online Table of Contents where you can
access additional chapters in the WinTOTAL user guide. Or, view the
other parts of the manual by selecting Contents from WinTOTAL’s Help
menu. You will find more tutorials on all of WinTOTAL’s PowerViews. The
more you know about the software, the more efficient and competitive you
can be.
Photos PowerView • Customizing QuickPix
2/18/2002
Page 6.14
Apex and the Sketch PowerView
Apex and the Sketch PowerView
The Sketch PowerView is your complete interface for digital sketches and
their resulting area calculations to transfer into your form. In the Sketch
PowerView, you can even access sketches from previous reports.
By including the sketch as part of your electronic report, you gain several
benefits:
•
Floorplan looks professional.
•
Sketch is saved inside the report file with rest of data.
•
Sketch prints on a WinTOTAL form with the rest of your report.
Header information transfers automatically to the WinTOTAL form.
•
Areas can be automatically calculated and transferred to your report.
Included with the WinTOTAL Professional or Enterprise Edition is the
Apex IV Windows Sketching Library. This guide is a “Quick Start” tutorial
for Apex, to get you familiar with the essential drawing functions of the
program. For a more detailed reference, access the full guide via the Help
menu in Apex IV Windows. If you prefer WinSketch, it can be integrated
with WinTOTAL reports through the Sketch PowerView too. Click here to
access our “Sketch PowerView with WinSketch” guide.
Starting a New Floorplan with Apex
The Sketch PowerView incorporates all of your sketching and floor plan
functions on one screen.
1. Click on the Sketch PowerView.
Figure I Apex IV Windows Sketching Library is so easy to use that, with a little practice
and some accurate measurements, you can create sketches like this one in around five
minutes.
2. Under the Area calculations heading, select the appropriate options
for transferring areas back to the other forms in your report.
WinTOTAL will remember these for next time.
3. Click the New button in the top, left-hand corner of the window.
4. In the dialog box that opens, select the page style you want to use
from the drop-down list labeled Page format
5. Click on OK.
You should see the Apex application appear on screen.
Apex and the Sketch PowerView • Starting a New Floorplan with Apex
2/18/2002
Page 7.1
Apex and the Sketch PowerView
The Apex Environment
Apex User Interface
1
2
3
4
5
Title Bar - Displays current file name and scale of sketch
Pull Down Menu - Allows access to every function in Apex
File/Edit Toolbar - Provides convenient access to commands
Drawing Toolbar - Allows the mouse-user to quickly and easily draw
complex shapes, arcs, etc.
Status Toolbar - Displays status of current or last area completed,
including square footage
Apex and the Sketch PowerView • The Apex Environment
6
7
8
9
10
Command Pad - Gives mouse users quick access to commands
Sketch page Indicator - Allows user to easily navigate between pages
Tracking Port - Displays information about the current line being drawn
Help Status Line - Provides helpful information about the current status of Apex for
Windows
Drawing Port - Represents the printable area of the sketches created and edited
2/18/2002
Page 7.2
Apex and the Sketch PowerView
Basic Drawing Concepts
There are three basic steps to drawing a sketch using Apex.
1. Define an area.
2. Draw and close the area.
3. Add text, icons, etc.
Before you begin drawing perimeter walls, Apex will ask you to define and
name the type of area you will be drawing. For example, Apex has
predefined areas such as Gross Living Area (GLA), Garage, Basement,
etc. The area definition is necessary for Apex to handle the distribution of
area calculations on printouts and to pass data to WinTOTAL.
To define an area, click the Define Area button on the right. (It’s the first
button.) After you define an area, you may begin drawing. Press eto
change to Draw Mode. Your Drawing Cursor will look like this:
Engineering Input
Engineering Mode input, the most commonly used input mode, refers to a
decimal unit of measure. For example, 25.5 is the decimal equivalent of
25 feet, 6 inches.
To begin drawing a line using engineering mode input,
1. Press eto change to Draw Mode, then type in the line’s length.
Your input will appear at the bottom of the screen in the Help Status
Line.
2. Press one of the arrow keys to move the cursor. (The direction you
choose will determine the direction to which the line is drawn.)
3. Press eto set the dimension and eagain to anchor the line.
Sketching in this fashion is much quicker and easier than drawing by
using the arrow keys alone. As you can see in the example below,
drawing a line 25.5 feet to the right, takes only three easy steps. That’s all
there is to it!
Type 25.5, press
x
Press
eto set dimension
Press
Figure 2 The Name tab of the Define Area dialog allows
you to use the default name (“First Floor”) chosen by Apex or
give the area a name of your choosing. The Name tab also
allows you to select whether the area will be a positive or a
negative area.
eto anchor line
Apex and the Sketch PowerView • Basic Drawing Concepts
2/18/2002
Page 7.3
Apex and the Sketch PowerView
Drawing diagonal lines is just as easy. Just as the Arrow keys define up,
down, left and right movement, Apex has set another group of keys for 45
degree diagonal movement.
•
•
•
•
{will draw a line 45 degrees up and to the right.
}will draw a line 45 degrees down and to the right.
gwill draw a line 45 degrees up and to the left.
dwill draw a line 45 degrees down and to the left.
For example, to draw a 20 foot line at a 45 degree upward angle to the
right, all you need to do is type 20, press {and then e.
A more flexible method of drawing angles is illustrated by typing 30 (rise),
pressing w, typing 40 (run), pressing x, and then pressing e. This
will draw a 50 foot line upward and to the right. This second method will
allow you to draw any angle, as long as you know the angle’s rise and
run.
In addition to simple 45 degree angles and using rise and run, Apex will
also enable you to specify and angle and wall length. This is described
later on “Specifying an exact angle and length” on page 7.
Figure 3 The dimension in feet and inches will appear in the Help
Status Line.
Architectural Input
Architectural Mode input will allow you to input your dimensions in units of
feet and inches rather than in a decimal format. In this input method,
whole units will be converted to decimal equivalents as they are entered.
For example, to move the cursor 10 feet, 6 inches to the left, you would:
1. Type 10
2. PressT
3. Type 6
4. Press z
5. Press e
If you were in Draw Mode, a line 10.5 feet (10’ 6”) would be drawn to the
left, and the dimension 10.5 would appear in the Tracking Port. (See
Figure 3 and Figure 4.)
You can also enter multiple dimensions as fractions of inches. This is
particularly useful when working off of building plans.
Apex and the Sketch PowerView • Basic Drawing Concepts
2/18/2002
Figure 4 The dimension in decimal notation will appear in the
Tracking Port.
Page 7.4
Apex and the Sketch PowerView
For example, to draw a line 20 feet 6 ½ inches:
1. Type 10
2. PressT
3. Type 6
4. PressT
5. Type 1/2
6. Pressz
7. Press e
This line would display as 20.54 feet in the Tracking Port and post on the
screen as 20.5.
[Note: While by default, dimensions are rounded to one decimal place on
the screen, they are calculated with double floating point accuracy to 15
to 16 decimal places. The number of decimal places shown on screen
can be set between 0 and 4 decimal places by selecting the Precision tab
under the Options/Configuration menu.]
Drawing a Sketch
Figure 5 This sketch might appear complicated, but with Apex IV Windows, it’s
The next few pages will lead you through a step-by-step process of how
the illustrated sketch to the right is drawn. These steps will provide you
some insight to the functions and procedures you can utilize to create
almost any sketch. Once you have become familiar with these functions,
you will find that sketching, regardless of the complexity of the property,
may be accomplished in just a matter of minutes.
only a few keyboard entries and mouse clicks away. Best of all, your calculations
transfer back into WinTOTAL’s forms, making your job that much easier.
Drawing the First Floor
Using Apex’s Quick Keys feature, we will begin drawing the exterior of the
First Floor area.
[Note: If you place a line incorrectly, you can erase it by pressing c. If
necessary, you may continue pressing call the way back to the first
line or any point in between. Conversely, pressing h will replace any
lines you just deleted.]
1. Click the Define Area button to define the Gross Living Area.
Your Arrow Cursor will change to the Drawing Cursor, indicating that
your “pen” is down, and any cursor movement will draw a line.
2. Type 24, press x, press etwice.
Apex and the Sketch PowerView • Drawing a Sketch
2/18/2002
Figure 6 After defining an area, click OK to open the Name dialog, where you
can give the area a unique name and adjust calculations to positive or negative.
Page 7.5
Apex and the Sketch PowerView
As you type in the dimension, your input will appear at the bottom left
of the screen, highlighted in yellow.
•
Pressing x will draw the line the specified length.
•
Pressing ewill end and anchor the line, and the dimension
will appear auto-placed/rotated in the default location.
3. Type 9.8, press y, press etwice.
You are drawing a line 9.8 feet down. Pressing ethe first time will
end the line, and the dimension will appear to the right of the line.
Press e again to anchor the dimension in place.
4. Type 4, press z, press etwice.
5. Type 7.2, press y, press etwice.
6. Type 10, press x, press etwice.
Figure 7 When your drawing extends beyond the borders of the Drawing Pad, you
7. Type 3, press y, press etwice.
can always press C to invoke the Center Drawing feature. This will bring your
sketch back to the middle of the Drawing Pad.
8. Type 10, press x, press etwice.
Notice that the 10’ line you have drawn extends beyond the screen to the
right. Since you are able to determine the scale at which you wish to draw,
this may happen from time to time. Do not be concerned. As you will see
in a moment, the drawing may be easily relocated with only one
keystroke. You may center the drawing by typing C to invoke the Center
Drawing feature. You may perform this operation virtually anytime you
wish, so it is not necessary to spend a lot of time trying to decide where to
begin a drawing.
9. Type 35, press y, press
the printable area.)
etwice. (Your line will extend beyond
10. Press Cto center the sketch.
11. Type 20, press z, press etwice.
12. Type 8, press w, press etwice.
13. Type 6, press z, press etwice.
14. Type 6, press y, press etwice.
Figure 8 After drawing your bay
window angles, your
should look like this.
Apex and the Sketch PowerView • Drawing the First Floor
2/18/2002
sketch
Page 7.6
Apex and the Sketch PowerView
Drawing Angles
Drawing angles with Apex IV Windows is as simple as inputting the rise
and run of an angled wall. A second way to input angles is discussed
later. Continue drawing your sketch to include a bay window.
Rise and Run
1. Type 2, press z, press etwice.
2. Type 2, press y, type 2, press z, and press
results in a 45 degree angle, 2.8 feet long.)
etwice.
(This
3. Type 6, press z, press etwice.
4. Type 2, press w, type 2, press z, and press e twice.
5. Type 2, press z, press etwice.
6. Type 15, press w, press etwice.
Specifying an exact angle and length
The second way to draw angled lines is to input the length, direction, and
degree of angle. By doing so, Apex IV Windows will automatically draw
the wall for you. As you might imagine, this gives you the ability to more
accurately calculate square footage of properties which contain odd
angles. Used in conjunction with a measuring device called a Mite-RGage, you no longer need to worry about obtaining the angle of walls
where the rise and run are difficult to figure.
In our example property, we discovered that the angle of the “wing” to be
drawn is 53 degrees. The length of the wall is 20 feet. In the direction that
you are drawing, you also know that it “turns” to the left. Continue with
your sketch, using the following method to draw the “wing” portion of the
property.
Figure 9 After drawing the “wing” angles, your sketch should look like this.
1. Type 20, press L, type 53, press ethree times.
The next line is 15 feet long, 90 degrees off of the last line drawn, and
turns to the right.
2. Type 15, press R, press ethree times.
Notice that the degree is not necessary when drawing 90 degree
angles. Ninety degrees is assumed when no degree is entered.
The last couple of lines can be determined by looking at the Tracking
Port. The Call to Point of Beginning (POB) is displayed in the Tracking
Port at the bottom right-hand portion of the Apex interface. As you can
Apex and the Sketch PowerView • Drawing Angles
2/18/2002
Figure 10 The Tracking Port provides useful information when it comes time to
close your sketch.
Page 7.7
Apex and the Sketch PowerView
see in the illustration in Figure 10, the Call to POB in our sketch is 14.0
feet up and 6.9 feet to the right. Additionally, the Tracking Port displays
the angle from the current cursor location to the POB (64 degrees) and its
length (15.6 feet.) With these measurements in mind, continue your
sketch.
3. Type 6.9, press x, press etwice.
4. Press A, press etwice. (By pressing A, you invoke the
Autoclose feature which closes the sketch and calculates the area.)
5. Press C to center the sketch.
Drawing the Garage
Adding the garage is a very simple procedure by which we will use
another of Apex’s powerful features called Jump to Point.
Rescale
Before doing this, it will be necessary to rescale the drawing in order to
make the necessary room in the printable area. In order to do this, invoke
the Rescale Configuration dialog. (See Figure 11.)
Figure 11 The Rescale Configuration dialog allows for almost infinite scaling
capabilities. You are limited only by the size of the Drawing Pad.
1. Press b and R together.
2. Choose the scale of 1” = 15’
3. Click OK.
The scale will change immediately, and we can now define our new area.
Make sure the garage is defined as a negative calculation, so it won’t add
to your Gross Living Area’s square footage.
Once your garage is defined, you may place the cursor near the upper left
corner of the sketched property and press J to jump to a point where
you may begin drawing again. (See illustration below.)
Figure 12 With the addition of the garage, your sketch of the first floor is almost
complete.
Jump to Point will allow you to create professional looking sketches with ease.
Apex and the Sketch PowerView • Drawing the Garage
2/18/2002
Page 7.8
Apex and the Sketch PowerView
Drawing a rectangle
Now that we have our starting point for the garage, we may draw it by
simply entering the width and height dimensions by doing the following:
•
Type 24 x 20, press e, type 20, press w, press e.
When you drew the garage, you probably noticed that it drew over the
main residence. Thus, typing 20 and pressing wwas necessary to move
the garage 20 feet up to the appropriate location. Your sketch should now
look like the one in Figure 12.
Next we will draw the rear patio, which will teach you how to handle
curves and arcs.
Drawing the Rear Patio - Curves
Figure 13 The Curve Properties dialog allows you to choose the degree of curvature from a predefined set or specify the degree of curvature in the field provided.
You also choose the direction of the curve, the chord length, the arc length or height,
and/or the rise and run of the curve.
Adding the rear patio will introduce you to curve drawing and tracing
“common walls” back to the point of beginning (POB). As always, click the
Define Area button to define a new area. As you will notice, the Define
area dialog names the area “porch.” Feel free to rename it “patio” when
the Name dialog pops up.
Now, you will have to establish a point of beginning, as you did when you
sketched the garage. Your POB for the patio will be the point of
intersection created by the garage and the upper right-hand side of the
first floor.
Figure 14 Place your cursor near
the intersection created by the garage
and the upper right-hand side of the
first floor, and press J to jump to point.
Begin drawing the rear patio by following the directions below.
1. Press eto establish a POB.
2. Type 6, press x, and press etwice.
3. Press rto invoke the Curve Properties dialog.
The patio sketch needs a 90 degree curve with a rise and run of 10 feet
right and 10 feet down. To draw the curve, complete the following entries
in the Curve properties dialog.
4. Click the 90 degrees radio button.
5. Click the Right radio button.
6. Press e.
Figure 15 When completed, your patio
7. Type 10, press x, Type 10, press y
Apex and the Sketch PowerView • Drawing the Rear Patio - Curves
curve should look like this.
2/18/2002
Page 7.9
Apex and the Sketch PowerView
8. Press eto anchor your line and eagain to set your dimension.
9. Type 10, press y, and press etwice.
Although it now appears that the patio area is closed, it is not. The
common walls must be traced back to the POB to close the area. Follow
the directions below to trace the common walls back to the POB.
[Note: Pressing the Space Bar after anchoring your line will blank out the
dimension. Since we are tracing common walls back to the point of
beginning, and those walls already have dimensions listed on the sketch,
we will want to blank out the dimensions on our new lines.]
10. Type 10, press z, press e, and press k.
11. Type 3, press w, press e, and press k.
12. Type 10, press z, press e, and press k.
13. Type 7.2, press w, press e, and press k.
14. Type 4, press x, press e, and press k.
15. Press Aand press k to autoclose and blank out the dimension.
16. Press Cto center the sketch.
At this point, your sketch should look like the one in Figure 16.
Cloning the First Floor
Adding the second floor is accomplished by using a simple feature called
Clone Area. Before we can begin, though, we must make room in the
Drawing Port to accommodate the new area.
Follow the directions below to accomplish this and complete the cloning
process. To make room on the Drawing Port, press the Mkey, which will
display a thin red outline of the sketch, superimposed over the original
sketch.
1. Press zto move the sketch as far to the left as it will go without moving out of the Drawing Port.
2. Once you have anchored the sketch in its new location, click Tools
and scroll to Clone Area. This will display the Select Area dialog from
which we will choose the area we wish to clone.
3. Select the first floor by clicking on the line which displays the code
GLA1, and click OK. This will display the Define Area dialog, so that
we may choose what we want to clone the first floor as.
Apex and the Sketch PowerView • Cloning the First Floor
2/18/2002
Figure 16 At this point, your first floor sketch is complete and should look much
like this one. By cloning this sketch, you will be able to draw the second floor with
ease.
Page 7.10
Apex and the Sketch PowerView
4. Define the area as a GLA (Gross Living Area), and click OK to open
the Name Area dialog.
5. Select the default name of Second Floor, and click OK to return to
the Drawing Port.
6. Type 45, press x, and press
right of the first floor.
eto anchor the new area to the
At this point, your sketch should look like the one in Figure 18.
Editing the Second Floor
Next, we will edit the second floor to remove the “wing” area of the sketch.
Complete the following steps to accomplish this.
1. Press c, which will cause the Select Area dialog to pop open on
the screen.
2. The Select Area dialog will ask you if you would like to reopen the
second floor. Click Yes. This will erase the last line of the second
floor.
Figure 17 When you clone an area, the new area will have the same properties as
the original. Once you choose an area to clone and click OK, the Define Area dialog
will pop up. Any changes to the cloned area’s properties should be made there.
3. Press cfour (4) more times to delete the lines back to the two foot
line located just to the left of the bay window.
4. Press A, and then press
foot dimension.
eto close the area and anchor the 53
5. Press Cto center the sketch.
Your sketch should resemble the one in Figure 19.
Now, you are ready to add a negative area to the second floor, which will
complete your sketch. Pay close attention to the next section, which
introduces you to an important concept you must utilize in almost every
sketch you will do.
Negative Areas
The second floor of our example property has an area which is open to
the area below it. Since this space will not add to the square footage of
the Gross Living Area, it must be calculated as a negative area, just as
the garage was.
Before adding the “Open to Below” area, however, it is important to
understand an important concept. When adding or subtracting from an
Apex and the Sketch PowerView • Editing the Second Floor
2/18/2002
Figure 18
Page 7.11
Apex and the Sketch PowerView
area, the area types must be alike. In this example, the area we wish to
subtract from is a GLA second floor. Therefore, in order for the
calculations to correctly subtract the Open to Below area from the second
floor, it must be of the same type when it is defined.
1. Click the Define Area button and define the new area as a GLA second floor.
2. Click OK to open the Name Area dialog.
3. In the Name input field, you may enter Open to Below as the name
you wish to display as an area label.
4. Select the negative radio button as shown in the example to the
right.
5. Click OK to return to the Drawing Port.
6. Once you are satisfied with the selections and input you have made,
place your cursor near the upper left-hand corner of the second floor
and press Jto jump to the point where you will begin drawing.
7. Type 24 x 9.8, and press etwice to complete the procedure.
This completes the sketch. Congratulations! If yours resembles the one in
Figure 21, you have mastered sketching with Apex IV Windows.
Figure 19
You may “touch up” the sketch to your liking by adding free-form lines to
represent interior walls, text to identify various areas on the sketch and
icons to represent items within the property and/or to show scale.
Drawing Interior Walls
Now, you can begin drawing interior walls. Unlike the walls you have
already drawn, interior walls do not add or subtract from area
calculations; they are for the purpose of illustration only. Because of that,
you do not have to go through the process of defining an area to begin
drawing. Instead, you will simply click the Free Form lines button, located
to the right of the Define Area button. The Free Form button looks like the
one to the right.
Free Form lines are not only used to draw interior walls, but
can be generally used to show other miscellaneous noncalculated items such as fence lines, sidewalks, driveways,
etc.
Apex and the Sketch PowerView • Drawing Interior Walls
Figure 20 When adding or subtracting an area, make sure that the area types are
alike. In this case, you are adding an area to the second floor which will not add to
the GLA’s square footage, so it’s vital that you choose Negative as your calculation
adjustment.
2/18/2002
Page 7.12
Apex and the Sketch PowerView
To begin drawing your interior walls:
1. Click the Free Form lines button. “Free Form Mode” should appear in
your status line.
2. Place your cursor near the exterior wall where you wish to begin
drawing, and press J to Jump to Point.
3. Press e to establish a starting point.
4. Type the length and direction of your line, and press
line.
eto place the
5. At this point, if you can do one of two things:
•
To continue your drawing without raising your pen, type the length
and direction of the next line, and press e.
•
If you need to raise your pen, press
can move it to the next starting point.
ea second time, so you
[Note: As you move the cursor, the line length will be displayed, to allow
you to make the line the proper length. Cross-hairs will also appear as
you come to points with perpendicular lines or corners, to allow you to
square your lines with previously drawn lines.]
6. You may have to press the Refresh button to see your drawn line.
7. Move your cursor to the next starting point, and begin the process
again, until you are finished drawing the interior lines of your property.
Figure 21 Now your sketch of the property is complete. At this point, you may add
interior walls, icons and identifying text, if you wish.
Line Edit
If you make any errors drawing your interior lines, you can use the Line Edit
function to correct them. Several different methods may be used,
depending on what you need to accomplish.
Figure 22 Notice that the
length of the line is displayed
as you begin drawing your freeform line. This allows you to
place the interior walls to the
correct scale. Notice, too, that
a + appears as your line
crosses an area perpendicular
to a previously drawn corner;
this makes placing interior lines
even easier.
Changing the line style:
1. Select a line, and right-click it.
2. Choose Properties.
3. Change the color and/or line thickness, and click OK.
Apex and the Sketch PowerView • Drawing Interior Walls
2/18/2002
Page 7.13
Apex and the Sketch PowerView
Changing a line’s length after the area is closed:
1. Press bL
2.
3.
Tto the line you wish to edit.
Press e.
Adding lines to an existing area (e.g. bay window):
1. Click on Edit, and scroll to Reopen closed area @....
2.
Tto the line to edit, and press e.
3. Draw in your window, and then autoclose, using A.
Adding Text
Now that the interior walls have been accurately drawn, we can begin
adding text labels to our sketch. Adding text labels is very easy with Apex.
The only thing to remember is that you can not add text to an open area.
The area must be closed to begin.
1. To add text, simply type
(See Figure 24.)
T. This will invoke the Text Entry Dialog.
2. Choose your text from the Text Library, or type in new text of your
own.
3. Click OK.
Figure 23 Once your interior lines are drawn, you may edit them with Line Edit or
4. The text you chose will now be “attached” to your cursor. Use your
cursor to position the text.
start adding text and icons.
5. Click once to place the text in the chosen position.
Text Edit
Once you have placed your text labels, you may edit them in a variety of
ways.
Moving text. In case you placed a phrase in the wrong area:
1. Select the text by clicking it. Your text will now be surrounded by four
red boxes.
2. Click and hold on the Hotspot. The Hotspot is the blue triangle that
appears when you select the text.
3. Move the text, and then release the mouse button.
Apex and the Sketch PowerView • Adding Text
Figure 24 Type in unique text as you go, or
choose from the text list. Here, you can also
change the font used or edit the list.
2/18/2002
Page 7.14
Apex and the Sketch PowerView
Changing text size:
1. Select the text by clicking it.
2. Click and hold on the Hotspot.
3. Use the + or - to increase or decrease the text size.
Rotating text (There are two ways):
1. Select the text by clicking it.
2. Click and hold on the Hotspot.
3. Simultaneously press R.
-OR1. Select the text by clicking it.
2. Click and hold any of the handles (the red squares).
3. Rotate, using your mouse.
Editing text:
1. Select the text by clicking it.
2. Right-click the text.
3. Choose Properties.
4. Click Edit List.
Figure 25 If a word is misspelled, editing the text takes only a few clicks.
5. Click Edit.
6. Retype word correctly.
7. Click OK and then OK again to close the window.
Adding Icons
Icons are used to place doors, windows, and other miscellaneous items
on your sketch; giving it a very professional look.
1. Press Ito bring up the Icon Selection pallet.
2. Type in the icon name at the top of the window, or scroll through the
list to find the icon of your choice.
3. Click OK.
4. The icon will now be “attached” to your cursor. Use your cursor to
position the icon.
5. Click once to place the icon in the chosen position.
Apex and the Sketch PowerView • Adding Icons
2/18/2002
Figure 26 Once you have
the text entered, you can
begin to add icons.
Page 7.15
Apex and the Sketch PowerView
Icon Edit
Once you have placed icons on your sketch, you can edit them in a
number of ways.
Moving icons:
1. Select the icon by clicking it.
2. Click and hold the Hotspot.
3. Move the icon to its preferred position.
4. Release the mouse button.
Changing icon size:
1. Select the icon by clicking it
2. Hold the Hotspot.
3. Use the + or - to increase or decrease the icon size.
Rotating icons (There are two ways):
1. Select the icon by clicking it.
2. Click and hold on the Hotspot.
3. Simultaneously press R.
-OR1. Select the icon by clicking it.
2. Click and hold any of the handles (the red squares).
3. Rotate, using your mouse.
Editing icons:
1. Select the icon by clicking it.
2. Right-click the icon.
3. Choose Properties. This opens the Size Icon dialog.
4. Enter the preferred dimensions for the icon.
5. Click OK.
Apex and the Sketch PowerView • Adding Icons
Figure 27 Finishing touches like interior walls, text labels and icons really
spruce up your property sketch, giving it a much more professional look.
2/18/2002
Page 7.16
Apex IV Windows
Function Keys
A AUTO CLOSE
p FREE FORM ON/OFF
bG CONFIGURE GRID
jbzPOP LEFT TO LINE
C CENTER
q VIEW CALCULATIONS
bI ICON EDIT
bawALLIGN W/POB UP
F FILL AREA
r CURVE PROPERTIES
bL LINE EDIT
bayALLIGN W/POB DOWN
G GOTO CORNER
s ALIGNMENT ON/OFF
bM MOVE AREA
baxALLIGN W/POB RIGHT
I ICONS
u REFRESH SCREEN
bP PRINT
bazALLIGN W/POB LEFT
J JUMP TO POINT
jI REPEAT LAST ICON
bR RESCALE DRAWING
a{SCROLL PORT UP*
L LINE ATTRIBUTES
jT REPEAT LAST TEXT
bT TEXT EDIT
a}SCROLLPORT DOWN*
M MOVE SKETCH
ao EXIT APEX
bV PASTE
bwENHANCED POP UP
T TEXT
boClose Sketch
bX CUT
byENHANCEDPOP DOWN
U UNZOOM
bs CONFIGURE ALLIGNMENT bZ UNDO
bxENHANCEDPOP RIGHT
Z ZOOM IN
buDimension In/Out/Hidden boCLOSE
bzENHANCEDPOP LEFT
l HELP
bA SELECT ALL ITEMS
b{CHANGE SUBJ INFO
jpCASCADE
m SAVE FILE
bC COPY
jbwPOP UP TO LINE
joTILE
n OPEN FILE
bD DIMENSION EDIT
jbyPOP DOWN TO LINE
blHELP INDEX
o DEFINE AREA
bFFull Screen
jbxPOP RIGHT TO LINE
*ONLY AVAILABLE WHEN
ZOOMED IN
Apex and the Sketch PowerView
More Chapters
Click here to go to the online Table of Contents where you can
access additional chapters in the WinTOTAL user guide. Or, view the
other parts of the manual by selecting Contents from WinTOTAL’s Help
menu. You will find more tutorials on all of WinTOTAL’s PowerViews. The
more you know about the software, the more efficient and competitive you
can be.
Apex and the Sketch PowerView • Adding Icons
2/18/2002
Page 7.18
Maps PowerView
Maps PowerView
All map building functions in one place
This chapter will show you how WinTOTAL automates and removes the
common hassles associated with putting together map addenda for your
reports.
•
This is where you go to download maps through our eDomina server.
These maps are completely free when you maintain your annual
membership. Since we know the exact elevation of these maps, we
can also calculate the proximity to the subject and geocode the
addresses.
•
Maps from your scanner as well as maps on disk file or copied to the
Windows clipboard can also be integrated into WinTOTAL via the
Maps PowerView.
•
Add annotations such as addresses and icons to any map right on
screen - no more expensive rub-ons and no re-typing of addresses.
Maps inserted using the Maps PowerView are automatically copied into
the appraisal report and saved with the rest of the appraisal data in one
cohesive file.
The Maps PowerView makes easy work of digital maps. Just click on
the Maps PowerView or select Maps from the PowerView menu.
Using Maps from eDomina.com
Downloading the map
Every day, customers with a current membership and that are using the
Professional or Enterprise level of WinTOTAL download thousands of
maps through the eDomina service. One of the biggest benefits that these
maps are always up to date and more convenient than CD’s or scanning.
Recent improvements to the resolution and default zoom is bound to
make them even more popular.
1. Start with the Page Format and Table of Contents name for the map.
These define the default heading for the top of the form and how it is
listed in your report’s Table of Contents respectively.
2. On the Maps PowerView, click the drop-down list labeled Map Source
and choose the item labeled eDomina Map Server.
Maps PowerView • Using Maps from eDomina.com
8/10/2001
WinTOTAL can import maps from a variety of
sources.
Page 8.1
Maps PowerView
3. WinTOTAL relies on your existing Internet Service Provider’s Dial-up
Networking Connection to get you connected to the Internet. In most
cases, WinTOTAL will even dial and log you in if necessary.
(America Online members must typically sign on manually using the
America Online software before proceeding.)
4. Click Add to insert a new map page into your report. Or, click
Replace if you are replacing a map on a map page already in your
report. (This is handy when you clone and already have the order of
your pages set.)
5. Next, you’ll be prompted to set the options pertaining to automatically
placing the comparables on the map, centering the map on the
subject, displaying proximities in the map annotations, detail level of
the map and how the proximities are transferred to the form. These
should be self-explanatory, but are described in detail on “Configuring
the map options” on page 8.
In a matter of seconds, WinTOTAL automatically connects
to the Internet and downloads a location map for your subject property.
6. The first time you download a map, a message will appear regarding
geocoding, its benefits, and its advantages. Please take a moment to
read this message so you will understand why some addresses are
placed accurately and others not. Then, click OK.
Depending on how fast your system connects to the Internet, a map will
be downloaded and displayed on your screen along with tools for
annotating the map with our Map Palette. You can use these tools in any
sequence you wish to customize your addendum.
Map Palette - Address Tab
One feature exclusive to maps downloaded from eDomina is the Address
Tab of the Map Palette. Immediately after downloading a map, the Map
Palette will appear on screen floating over the map. The Address Tab will
be activated to let you know the confidence level of addresses it has
marked. You have several options available to you:
•
Add another property. The Add a property button enables you to
enter the addresses of other properties such as listings or rentals
which are not automatically imported into the Mapping Utility. After
adding a new property, it will be sent to our geocoding server and
placed on the map just as the other properties were.
Maps PowerView • Using Maps from eDomina.com
8/10/2001
Table 1: Confidence indicators for addresses automatically
The green checkmark indicates an exact “hit” for the
selected property. The location of the anchor should be
accurate, but you will want to verify it.
The yellow question mark indicates the map server did not
find an exact match for the property, but made a best
“guess”. Often this guess will be on the same street or
maybe in the center of the zip code.
The red x indicates that the map server couldn’t even guess
the location. This could be due to the city not being found or
items other than city, state and zip entered into the second
line of the address.
Page 8.2
Maps PowerView
•
Edit a property address. If you notice a property with a question
mark or red x is labeled as such because of a typographical error,
simply click the property address in the Address Tab and then click
Edit. At that point, can enter a new address and click Place; then
see if the property is put on the right place on the map. (We’ll discuss
moving the balloon a little later.)
•
Move a caption. If your balloons are overlapping, simply click the
text on the balloon and drag it to a new location. Notice the anchor
stays in place.
•
Delete a caption. Simply click the balloon, and then press the
DELETE key on your keyboard. You can always replace the caption
by clicking the address and then clicking the Place button.
•
Reposition an anchor. If the anchor is in the wrong spot and not
pointing close enough to the property, carefully click the anchor point
itself and drag it to the correct location. Notice the distance from the
subject is automatically updated. Likewise, if you move the subject,
all comp proximities are updated.
Map Palette - Position Tab
Click the tab labeled Position for functions that pan your map North, West,
East or South as well as zoom in and zoom out. Each time you pan or
zoom, a new map is downloaded from the server. However, this map
should come across faster than the first one since your addresses are
already geocoded.
Annotating Maps
The Annotate Tab is where you add lines and icons to your map. You can
also add and customize the balloons that denote the properties.
The Map Palette is a tabbed interface that gives
you access to many valuable tools such this one
that shows you the confidence level of properties it
has placed on your map.
The Position Tab of the Map Palette enables you to
pan and zoom once you’ve found your original
map. The smaller buttons indicate zooming in.
The Annotate Tab in the Map Palette enables you
to place icons on your map (As shown here) as
well as draw lines and place extra text captions.
Adding symbols
When you first bring up the Annotate Tab, it will be ready for you to place
map symbols from our library. Notice you can scroll down this list to get
to items such as number labels. Just click the symbol you want to place
and then click the map where you want to place it.
•
You can delete a symbol placed on your map by clicking it and then
pressing the DELETE key on your keyboard.
Maps PowerView • Annotating Maps
8/10/2001
Page 8.3
Maps PowerView
•
Likewise, you can move a symbol placed on your map by clicking and
dragging it to a new location.
•
To rotate a symbol, click it and then click one of the orientation
buttons at the bottom of the Annotate Tab.
The “Balloon” section on the Annotate Tab lets you customize
and set defaults for the colors of your text captions.
Customizing the text balloons
The Annotate Tab of the Map Palette enables you to place your own
balloons, change the colors on balloons you’ve placed and set defaults
for future annotations. Click the button that resembles an annotation
balloon.
To change the attributes of an annotation balloon: Click the balloon
on the map, and then click the button corresponding to the attribute you
wish to change. WinTOTAL will remember your changes and if they were
associated with the subject, a comparable or a custom annotation. It will
then use those attributes the next time it places a symbol.
To add a new annotation:
1. Go to the Balloon section of the Annotate Tab.
2. Click on the map where an annotation doesn’t already appear, but in
a place you’d like to put one.
3. You’ll see a list of properties in your report corresponding to the
subject and sales comparables.
4. Mark the property for which you wish to place an annotation, or mark
the custom item and type anything you wish to appear on your map.
5. Click OK. Your annotation will be placed on screen. If there was
already a balloon corresponding to the property you marked, it will be
removed automatically in lieu of your new one.
Just click on the map to place a
new text balloon. We save you
from having to retype addresses!
At that point, you can move the anchor or the balloon as described earlier.
Drawing lines
You can activate our line drawing feature by clicking the line button in the
Annotate Tab. This is useful for showing neighborhood boundaries or
drawing in new streets.
•
Click Color to select the color of the line you wish to draw.
Maps PowerView • Annotating Maps
8/10/2001
Page 8.4
Maps PowerView
•
At the bottom of the palette, there is an option for highlighter or
marker mode. When in highlighter mode, your line is semitransparent so that you can see other objects underneath it.
Use thick lines to show neighborhood boundaries and thin lines to
pencil in new streets that may not be online yet.
To draw a line:
1. Click the desired line width.
2. Click the starting place on the map and drag your cursor to the end
point. When your mouse button is pressed, your pencil is “down” and
drawing.
3. Simply let off the mouse button when you are through drawing a
particular line. You can then move your cursor to a different position
on the map and continue drawing by clicking and dragging.
To modify a line you have already drawn, activate the line tool and then
click the line you wish to modify.
•
Changing attributes such as the color, width and highlighter/marker
mode will modify the currently selected line.
•
You can delete the line by clicking the DELETE key on your keyboard
or you can even drag the line to another place.
Deleting annotations
We’ve given you a real easy way to clear annotations off without selecting
them one by one and using the DELETE. Here’s how you can clear
multiple annotations at one time.
1. Click the Delete Annotations button.
2. Mark which types of items you want to clear.
3. Then, click Remove now to permanently remove them.
Using Maps from Other Sources
Clipboard and 3rd party CD-ROM programs
If you prefer to get maps from a CD-ROM program, you can use the
Windows clipboard as a transfer medium. Before telling WinTOTAL to
pull the map image off the clipboard, you have to first copy it to the
clipboard. Here’s how.
CD-ROM based mapping programs typically only
export to the clipboard and don’t give a map that
will fill up the whole page.
1. Start your map program as you normally would. You don’t have to
exit WinTOTAL. Just minimize it.
Maps PowerView • Using Maps from Other Sources
8/10/2001
Page 8.5
Maps PowerView
2. Use the CD program’s interface to locate the map you wish to use.
3. If you want to use its bundled annotation tools, you may, but
WinTOTAL has its own tools that will keep you from having to retype
addresses. Plus, you can edit your annotations in WinTOTAL even
after you’ve saved.
Of course, WinTOTAL won’t be able
automatically locate your subject or comps for you since only maps
we download are able to be geocoded.
4. Select the Copy function from your CD-ROM map program’s Edit
menu. (It might be in another menu. Consult that program’s
documentation.)
5. Switch back to WinTOTAL and the Maps PowerView.
6. Select the Page Format and Table of Contents name for the map.
These define the default heading for the top of the form and how it is
listed in your report’s Table of Contents respectively.
7. Set your Map Source to Clipboard, and click Add. Or, click Replace
if you are replacing an image on an existing page.
8. Your map will appear on screen. Typically, the maps transferred
through the clipboard only contain what was on screen when you
selected Copy in step 4. That is a limitation of the 3rd party mapping
program itself - not WinTOTAL.
9. Now, you are ready to annotate the map as described on “Annotating
Maps” on page 3. Just click the Annotate Map button.
Using a map saved in a file on disk or CD
Some map programs can export a file to disk. WinTOTAL can read this
image into the Maps PowerView, but you have to save the image first or
know the file name for which you are looking. Follow the instructions
included with your 3rd party program to do so. GIF or PNG images work
the best for maps, but you can also use JPEG, TIF and BMP.
1. After you’ve saved a map image to file, go to the Maps PowerView.
2. Select the Page Format and Table of Contents name for the map.
These define the default heading for the top of the form and how it is
listed in your report’s Table of Contents respectively.
You may also browse your system for images to use in the
maps PowerView.
3. Under the Map Source choose the Disk File option. Then, click Add.
Or, click Replace if you are replacing a map on a map page already
Maps PowerView • Using Maps from Other Sources
8/10/2001
Page 8.6
Maps PowerView
in your report. (This is handy when you clone and already have the
order of your pages set.)
4. A file select dialog will appear for you to browse your system for the
image.
5. After finding the file and clicking OK, it will appear in the Maps
PowerView where you can annotate it. Just click the Annotate Map
button.
Scanning maps and TWAIN
If the map you need to insert in a report isn’t available via the Internet or
3rd party program, you can scan it in. TWAIN is a generic way for
devices like scanners to interface with programs such as WinTOTAL.
1. Go to the Maps PowerView and select the Page Format and Table of
Contents name for the map. These define the default heading for the
top of the form and how it is listed in your report’s Table of Contents
respectively.
Tips when scanning maps into WinTOTAL:
•
Use Black&White or Line Art settings. (You don’t need brilliant
colors in a map. They just make your files larger and slower to
print or send electronically.)
•
Use a low resolution setting of 200dpi or lower. This will keep
your file size down and save disk space. The map will still look
great. Even 100dpi or “fax” resolution will output good-looking
maps.
2. Click the Map Source drop-down and choose the Scanner option.
3. A button labeled Select Source will appear. The first time you use
TWAIN with WinTOTAL, you’ll need to click the Select Source button
and select your scanner from the list of TWAIN devices that appears.
Then, click Select.
4. Click Add. Or, click Replace if you are replacing a map on a map
page already in your report. (This is handy when you clone and
already have the order of your pages set.)
5. Your scanner software will start. Scan in the document according to
the instructions for your particular scanner. Upon closing the scanner
software, the map image will appear in the Maps PowerView.
6. You can then annotate the scanned map by clicking the Annotate
Map button.
More options in the Maps PowerView
Enhancing a map
Photo enhancement tools can be useful for scanned images or to
brighten map colors so that they use less ink in the printer.
Maps PowerView • More options in the Maps PowerView
8/10/2001
Page 8.7
Maps PowerView
1. In the Maps PowerView, click the map page that contains the image
you wish to enhanced.
2. Click the Enhance Map button.
3. Make appropriate adjustments and click OK.
Note: There’s no need to convert maps to greyscale since WinTOTAL
has functions to send map pages to your laser printer if you take
advantage of our dual printing system. Likewise, on inkjet printers, it
saves only a negligible about of ink since it causes your inkjet printer to
use an amount of black ink equal to what it would have used in color.
Deleting a page
When you delete a map page through the Maps PowerView, the map
image is also removed from the report. If this map was copied from a disk
file, the original disk file will not be affected. To delete a map page, just
click its description, and then click Delete.
Configuring the map options
You have many options available to you when you download maps
through WinTOTAL. Most of these are self explanatory. You can set
these before you download or have them come up each time. Click
Options in the Maps PowerView to review the configuration.
•
Map detail. Those with the WinTOTAL Enterprise edition can
download higher quality maps. They have over twice the resolution of
the regular maps. The only downside is they may take slightly longer
to download,
•
Property placement. Most of the time, you will want WinTOTAL to
place the comps. However, if you are in an area that hasn’t been
geocoded and properties usually aren’t found, you may wish to turn
this off. You can also turn this option off to troubleshoot mapping
issues.
•
Map color and positioning. Depending on your preference, you
may have the map properties centered on the map image and
proximity to the subject “as the crow flies” in your annotations. You
also may wish to experiment with the different map colors for your
own style. Many people change colors based on ink usage and color
printing. To this end, WinTOTAL has printing options which let you
Maps PowerView • More options in the Maps PowerView
8/10/2001
WinTOTAL’s eDomina Map Options will help customize your options for; map
quality, property placement options and map color & positioning.
Page 8.8
Maps PowerView
choose whether maps go to your (typically black and while) forms
printer or color photo printer.
At the top of this dialog is a checkbox that tells WinTOTAL not to prompt
you for these options when downloading maps.
More Chapters
Click here to go to the online Table of Contents where you can
access additional chapters in the WinTOTAL user guide. Or, view the
other parts of the manual by selecting Contents from WinTOTAL’s Help
menu. You will find more tutorials on all of WinTOTAL’s PowerViews.
The more you know about the software, the more efficient and
competitive you can be.
Maps PowerView • More options in the Maps PowerView
8/10/2001
Page 8.9
E&O PowerView
E&O and Graphs PowerViews
The E&O and Graphs PowerViews go hand in hand in ensuring the
quality of your reports. These valuable tools, built right into WinTOTAL
can indicate potential problems in your reports as well as add credibility to
your work. Why not use every advantage at your fingertips? Only
WinTOTAL provides you with these valuable features.
E&O PowerView
Guidelines reviewing
Why let errors go out in your reports when WinTOTAL can find many of
them for your automatically? The Guidelines Reviewer built into
WinTOTAL Pro can check for as many as 1200 different rules.
•
Finds logic errors in the neighborhood section.
•
Finds blank items and when multiple items are checked improperly.
•
Compares comps grid against the neighborhood section.
•
Has review “scripts” for over a dozen forms such as the URAR, 2055,
2065 704, Condo, SRIPAR and others. These scripts are written in a
BASIC-like language and are fully customizable so that you can set
rules specific to your office.
Let’s load the sample report and run a review.
1. Click on Open to start the Appraisal Desktop.
2. Click on the Tutorial Folder, then double click on the sample report. If
asked to save changes in your current report, click Yes.
3. Click on the E&O PowerView. You’ll see a split screen with the form
and review results.
4. Scroll through the output to get a feel for what the guidelines reviewer
detects. (We intentionally left errors in the sample.)
Our E&O PowerView runs an extensive list of checks on your reports. Not only does it
find missing entries, it finds inconsistencies in logic and standard guidelines. When you
tell it to view Warnings Only, you can even click one of the items and have it jump to the
form so you can make a correction.
5. Notice when you click the errors in the review results, the form places
the cursor in the suspect field. This makes it easy to correct problems
it finds.
Errors and Omissions Options
The Errors and Omissions Options section provides you the ability to
customize this feature to suit your needs.
E&O PowerView • E&O PowerView
8/10/2001
Page 9.1
E&O PowerView
•
You can view the data in review format, as well as including the
review in your report as a supplemental addendum
•
You can view the warnings only - and double-click the description to
jump to the associated field
You can also configure the following percentage parameters to be used
by WinTOTAL’s E&O reviewer.
•
Net adjustment
•
Gross adjustment
•
Age variation
•
Value variation
•
Single adjustment
•
Size variation
•
Price/SF variation
You can customize the percentages the E&O module uses when reporting errors.
Graphs PowerView
Demonstrates differences and similarities
Just like the E&O PowerView, the Graphs PowerView can help sort out
inconsistencies in your reports. The graphs can also be useful for
supporting value conclusions.
To access the Graphs PowerView from within your report, click
PowerViews. Then, select Graphs from the pull-down menu.
Your subject versus comparables graph will display for the comparison
option you select on-screen. You can choose from the following
comparison options.
•
Price
•
Price per SF
•
Indicated value
•
Indicated value per SF
•
Size
•
Age
•
Weight
E&O PowerView • Graphs PowerView
8/10/2001
Page 9.2
E&O PowerView
You can also choose to graph the options above by value, % variation
you set, or +/- variation you set on your reports. You make your selection
by clicking the appropriate radio button.
Insert a graph into a report
You can add the graph by clicking the Insert into report... button. Should
you decide the graph is not needed, you can remove it from your report
easily. Simply open the report, click the Jump to other forms pull-down
menu and select Review Graph. Then, just click the Remove from
report... button.
More Chapters
Click here to go to the online Table of Contents where you can
access additional chapters in the WinTOTAL user guide. Or, view the
other parts of the manual by selecting Contents from WinTOTAL’s Help
menu. You will find more tutorials on all of WinTOTAL’s PowerViews.
The more you know about the software, the more efficient and
competitive you can be.
The Graphs PowerView provides a powerful visual representation of selected key
information contained in your report.
E&O PowerView • Graphs PowerView
8/10/2001
Page 9.3
Worksheet PowerView
Worksheet PowerView
The Worksheet PowerView provides you spreadsheet functions right
inside your appraisal report. This allows you to set up your own custom
calculations inside forms. Therefore, if you have a different way of doing
the math or wish to add math in a form, you can write worksheet formulas
to do so here. The formulas could be actual arithmetic or they could be
functions that copy the data from field to another.
Our Worksheet PowerView even reads spreadsheets saved from
Microsoft Excel. Therefore, if you are familiar with spreadsheets and
already have some of your own outside of WinTOTAL, then you’ll be up
and running in no time with this.
Worksheet Basics
What is a worksheet / spreadsheet
A worksheet is a tool that enables you to set up formulas and models for
calculations. A calculator typcially only lets you do one calculation at a
time, but a worksheet enables you to change an entire page of
calculations by adjusting just one factor.
•
Individual elements are called “cells”.
•
Cells are referenced by row number and column letter.
•
Cells can contain text, numbers or formulas.
•
Functions can take the contents of one or more cells and perform
math calculations or other functions on them.
•
For one cell to be a function of other cells, the first character needs to
be “=” (example: =A1+B1)
•
Just like a calculator, operands may be grouped using parenthesis.
(example: A1*(B1+C1))
•
Changing the information in the source cell automatically updates
cells containing formulas based on that cell.
The Worksheet PowerView incorporates “live” spreadsheets into your appraisal reports
letting you set up models for the calculations in a report. They’re compatible with MS
Excel too!
Common math functions
When writing functions in your worksheet, use “=” as the first character in
the formula bar. Instead of typing the cell references, simply click in the
Worksheet PowerView • Worksheet Basics
8/10/2001
Page 10.1
Worksheet PowerView
cells. When you resume typing your operands, the worksheet will know to
put you back in the formula bar.
Add:
=A1+A2
Sum:
=SUM(A1,A2,A3,B1,B2,B3) or =SUM(A1:3,B1:3)
Multiply:
=A1*A2
Divide:
=A1/A2
Rounding: =ROUND(9899.435, -2) returns 9900
Condition: =IF(A1>10, “Greater”, “Less”) returns “Greater “if the value of
A1 is greater than 10 and “Less” if A1 is less than 10
Handy text functions
To return only rightmost 5 characters: =RIGHT(A1,5)
To concentrate cells and text: =A1&A2
Linking the fields to your forms
To link a field on the form and field on the worksheet, first click the field on
the form and then click in the cell on the spreadsheet.
•
Click the yellow “uplink” button if you want to push the contents of the
worksheet’s cell into the form.
•
Click the red “downlink” button if you want to push the contents of the
form into the worksheet.
Formatting assists with presentation as well as defining data types.
Use the Unlink button to remove the connection between two fields.
Formatting cells
To make your worksheets more readable as well as specify data types,
use formatting. Just select the cells you need to customize and click the
format cells button.
The Sample Worksheet
Using a variety of functions
WinTOTAL already has a sample worksheet built into it.
variety of functions and formatting. Here’s how to use it:
It shows a
1. Open a URAR report - preferably one that you don’t mind using as a
test file. Make sure the sales comparison section is filled out.
Worksheet PowerView • The Sample Worksheet
8/10/2001
Page 10.2
Worksheet PowerView
1. Click on the Worksheet PowerView. You’ll notice your screen splits.
2. Click Open in the WorkSheet PowerView to get to our sample.
3. Double click the WRKSHEET subfolder and then double click
SAMPLE.XLS.
4. You may be receive a message regarding existing worksheets being
cleared. Click OK. You’ll see our sample load.
5. The equations in this worksheet are tied to fields in the sales
comparison section. So, simply scroll to the comps grid.
6. The yellow fields on the worksheet indicate information that is being
pushed back up into the form. Click on one of the yellow worksheet
fields and notice the active field on the appraisal form switches to the
field linked to that cell on the spreadsheet.
The sample worksheet shows an interesting formula for calculating a time adjustment.
It demonstrates how to use cell formatting to in conjunction with arithmetic to find the
number of days between the subject and comp sale.
7. The red fields on the worksheet are places where data is being read
from the form into the worksheet. Click on a red field and the cursor
on the appraisal form will jump to its source.
8. The blue fields on our sample worksheet are colored blue simply to
point out that is where you can change parameters for the
calculations. We did this with the formatting options.
9. If the sale date, sale price, and room counts aren’t filled for your
subject, enter data in those fields now.
10. As you enter data in those fields, notice how it triggers the
calculations in the Worksheet PowerView. The sample has equations
to trigger automatic adjustments based on sale date and differences
in the room count.
11. Click on the worksheet and enter a different yearly appreciation rate
and see how the adjustments in the comps grid changes in both the
worksheet and the form.
The worksheet in the sample is just that, a sample. You can add your
own calculations to a worksheet and link it with any field of any form.
•
The top of the worksheet calculates the days between the subject and
comps sale and estimates appreciation based on an annual rate.
•
Similarly, you can do automatic room adjustments by assigning
values based on differences in the number of bedrooms and baths.
Worksheet PowerView • The Sample Worksheet
8/10/2001
Page 10.3
Worksheet PowerView
Creating Your Own Worksheets
Become familiar with spreadsheet functions
In this context, we can’t teach you how to use a spreadsheet and our
technicians realistically can’t go over fine details of spreadsheet functions
on the phone. Basically, you should use our worksheet as you would MS
Excel or Lotus. There are dozens of books and videos that can teach you
spreadsheet functions. We highly recommend them.
Example: Add two cells together:
Start with numbers in cells A1 and B1.
1. Click in the cell that is to contain the result - say C1.
2. In the formula bar, type an = sign.
3. Click in the cell that contains the first item you wish to include in the
sum. You’ll see its cell reference appear in the formula bar.
4. Click in the formula bar and type a + sign after the cell reference.
5. Click in the cell that contains the second item to add. You should now
see =A1+B1 in the formula bar.
6. Press ENTER.
Example: Transfer sales comparison value to final reconciliation
Here is a way to make the indicated value by the sales approach transfer
into your final reconciliation.
1. Open a report to the URAR and click on the Worksheet PowerTab.
The screen will split to shoe the form on top and the worksheet on the
bottom.
2. In the Sales Comparison Analysis, on page 2 of the URAR, click
inside the Indicated value by Sales Comparison Approach field.
3. Now click in the cell A1 and click the “Link down” button. Cell A-1 will
turn red and have data that field’s data copied to it..
4. Click in cell B1. While cell B1 is selected click inside the formula bar.
5. Inside the formula bar press the equal [=] key.
6. Now click icell A1, =A1 will appear in the formula bar, and press
ENTER.
Shows which cell the formula is used in.
7. Now click back in cell B-1.
Worksheet PowerView • Creating Your Own Worksheets
Type formuals into the formula bar. This particular formula
equals 3/(4+5) or as you can see in cell D1, .3333333.
8/10/2001
Page 10.4
Worksheet PowerView
8. On the URAR, still on the second page, within the Reconciliation
section, click in the Final Value field.
9. Last, on the Worksheet PowerTab click the Link up button. Cell B1
will turn yellow and have the same data as A1.
The fields are now linked. Any data entered in the Sales Approach, from
Sales Comparison Analysis,will transfer automatically to the Final Value
in the Reconciliation section.
Create spreadsheets in Excel for WinTOTAL
The worksheets used in WinTOTAL are compatible with MS Excel 2000.
It may be easier for you to create your base formulas in Excel since it is
an entire application dedicated to creating them.
1. Once you’ve saved a file in Excel, close it.
2. Go back to WinTOTAL’s Worksheet PowerView and click Open.
3. Browse to the file you saved and double-click it.
Worksheets can also be copied and pasted from MS Excel.
Saving / loading worksheets
If you’ve created complex worksheets you don’t want to type again, you
can click the Save button to keep an external copy of them. WinTOTAL
also remembers which fields were linked to the form and saves those in
the same directory with a DAT extension.
Load presaved worksheets to automatically trigger calculations in forms.
To load a previously saved worksheet, simply click the Load button and
select the file. If a DAT file exists in the same directory, then WinTOTAL
will look in it to see if it contains references to field links.
More Chapters
Click here to go to the online Table of Contents where you can
access additional chapters in the WinTOTAL user guide. Or, view the
other parts of the manual by selecting Contents from WinTOTAL’s Help
menu. You will find more tutorials on all of WinTOTAL’s PowerViews.
The more you know about the software, the more efficient and
competitive you can be.
Worksheet PowerView • Creating Your Own Worksheets
8/10/2001
Page 10.5
Internet EDI
Sending and Receiving Reports
WinTOTAL 2000 Pro includes bi-directional Internet communications. It
can send and receive orders, reports and status messages as well as
download maps and updates to itself. You don’t have to know anything
about e-mail or attachments. Nor do you have to use your browser
separately. It’s virtually hands free in its operation. This chapter will
cover:
•
Configuring WinTOTAL for the Internet
•
Sending Reports and Requests
•
Receiving Reports and Requests
•
Troubleshooting EDI setup
Configuring WinTOTAL's Internet Settings
Get an Internet account first
This chapter assumes that you have already obtained an Internet account
through either a local, regional or national Internet Service Provider (ISP).
These days, most providers use a standard Dial-Up Networking
connection, so if you’re on the Internet, just go through the configuration
steps below.
•
You don’t have to be connected when you configure WinTOTAL for
EDI, but it will prompt to connect you during the process.
•
If you don’t have a connection but want to get one, we recommend
asking appraisers in your area who they use. If they are happy with
service, you may be happy with it too.
•
One major provider that, at the time of this writing, still uses a
proprietary non-standard connection is America Online. See our
troubleshooting section for more details regarding proprietary Internet
connections.
The WinTOTAL Internet Setup Wizard simplifies your EDI configuration. And WinTOTAL’s EDI tools make the keep the process even more easy to follow from there. No
wonder more appraisals are transferred every day using WinTOTAL over other competing packages.
Setup WinTOTAL for EDI
WinTOTAL uses the same EDI configuration for all Internet functions
including transmitting reports, acquiring maps and receiving program
updates. Our Internet EDI Wizard has assisted thousands of appraisers
in getting set up on the Internet. It’s really easy. As a matter of fact, it
Internet EDI • Configuring WinTOTAL's Internet Settings
8/10/2001
Page 11.1
Internet EDI
takes longer to describe than it does to just do it! There are three places
where your EDI can be configured:
•
During WinTOTAL’s intial installation. a screen in the installation
wizard will prompt you to set up WinTOTAL’s internet tools. Click
Internet to begin the Internet Wizard.
•
In a report. Click the EDI menu and click Configure Internet EDI...
•
In the Appraisal Desktop. Click the EDI Center button and then
click Options. Then on the EDI tab, click Internet Setup.
This brings up our Internet Wizard. Here is how you configure it.
1. The first screen of the Internet Wizard will prompt you as to how you
connect to the Internet. Most people connect using a modem and
phone line. If your Internet connection is “always on” or you have to
sign on before using WinTOTAL’s Internet functions, choose the LAN
option.
2. Once you've selected the appropriate connection, click Next to
advance to the next screen in the Wizard.
3. Your connection choice of LAN or Modem in step 2 will determine the
next window that pops up.
•
If you specified that you connect to the Internet using a modem and a
phone line, the Internet Wizard will need to know which Dial-Up
Networking connection to use. You should see your ISP in this list.
Click on it.
•
Click the User Info button to enter your login name and password.
Make sure you enter this information correctly!
•
Click the boxes labeled Save password and Don’t Prompt so that
the Internet connections will go on behind the scenes. Click OK on
the User Info screen and then proceed by clicking Next.
Configure the mailbox
Once our Internet Wizard has determined that you have a valid Internet
connection, it will prompt you for items regarding your Internet e-mail. If
this is the first time you are running the Internet Wizard, it will prompt you
as to which kind of E-mail box you wish to use with WinTOTAL.
•
I want to sign up for a free WinTOTAL 2000 mailbox - If you want
to have WinTOTAL create a new mailbox on our Project 2000 server
Internet EDI • Configuring WinTOTAL's Internet Settings
8/10/2001
The Internet Setup Wizard will seek out the various connections you have to the
Internet. Typically, you’ll have just one.
Be sure to click the User Info button so that you can enter your username and password. Click in the
boxes labeled “Save Password”
and “Don’t prompt when connecting” so that all Internet connections
can go on behind the scenes.
Page 11.2
Internet EDI
for you to use, select this option and the Internet Wizard will walk you
through creating that mailbox. The accounts we provide to current
members do not place restrictions on the size of your messages and
they keep appraisal file transmission separate from your personal email.
•
I want to use an existing E-mail account - If you do not want to use
a mailbox on the Project 2000 server, you can choose this option. If
you do so, you will need to know your Internet Service Provider's
SMTP and POP3 mailbox names.
1. Choose the type of account you wish to configure, and click Next to
advance to the next screen of the Wizard.
2. On this screen, WinTOTAL needs to know what your Internet e-mail
mailbox settings are.
•
If you chose to sign up for a WinTOTAL mailbox, these settings will be
filled in for you. All you will need to enter is a password for your
WinTOTAL mailbox.
Your password must be at least six
characters long and is case-sensitive. When your mailbox is
created, you will be faxed a confirmation letter letting you know.
•
If you chose to use an existing e-mail account, you will need to put in
the appropriate information manually. This information will be
included with the registration documentation you got from your ISP.
Each month, thousands of appraisers send appraisal reports through our
EDI server with a combined throughput exceeding 1.5 gigabytes per day
and climing.
3. Click Next and the Internet Wizard will run a test drive to make sure
every entry was entered correctly.
4. If the test drive passes, you’ll have an opportunity to set up
WinTOTAL for scheduled sending and receiving of EDI. If you
regularly conduct business electronically, this option will ensure
reports don’t wait for delivery or downloading. Click Schedule EDI
and choose when e-mail and reports will be automatically sent and
received.If you don’t want to use this option, then just click Next and
click Finish. Be sure to click Finish, or the Wizard will not save your
EDI configuration.
Configuring PDF Security
The Adobe Acrobat PDF format is one of the most popular EDI methods
available. The appeal of the PDF is the receiver doesn’t need WinTOTAL
to view or print the report - they only need a freeware reader supplied by
Internet EDI • Configuring WinTOTAL's Internet Settings
8/10/2001
Page 11.3
Internet EDI
Adobe Systems, Inc. To get a hard copy of the report, the receiver can
simply open the report file from the e-mail message and print it directly
from the Acrobat Reader application.
If you have not separately purchased and installed the Adobe Acrobat
PDF creation software, the PDF option will not be available.
WinTOTAL has unequaled PDF integration. Not only do we reduce
the number of steps it takes to send the EDI file, we give you easy
access to Acrobat’s security settings. Even if you’ve been using the
PDF for some time, Athena takes better advantage of of security
options in Acrobat 4.0 and later. Please follow the steps in this
section.
Since creating a PDF from your appraisal is actually a “printing” process,
we’re going to go into WinTOTAL’s print setup to make changes. Once
you set this up on your system, you won’t have to do it again.
1. Click WinTOTAL’s File menu and choose Print Setup.
2. Click the tab labeled PDF/General Settings and Security.
3. This is where we tell WinTOTAL which “printer” actually creates PDF
documents. You may have two different Acrobat printers on your
system. Older versions of WinTOTAL used the “quickie” PDFWriter
driver which didn’t automate any secuity settings. Athena can use the
Acrobat Distiller driver which is preferred. Click “Select PDF Printer”.
4. Scroll through the list of printers installed on your system until you get
to the one labeled “Distiller”. (Your system may be set for PDF Writer.
You’ll need to change it.) Choose that “printer” and click OK.
The PDF format is a view/print only version of a document. WinTOTAL automates the
process of sending reports through the Internet in this format. The PDF Reader software is free from its producer, Adobe Systems, Inc. However, Adobe Systems
charges for the software that allows you to convert files to a PDF.
5. Unless you have a specific need to change it, leave the output
directory at its default.
6. Click PDF Security Settings.
7. This is where you can set options that limit what the recipient can do
to your file without knowing your password. At least leave the printing
option turned on!
8. Then, set passwords for opening the document and changing security
settings.
9. Click OK on the PDF Security Settings and OK again on the print
setup.
Internet EDI • Configuring WinTOTAL's Internet Settings
8/10/2001
Page 11.4
Internet EDI
Your PDF documents will now go out and not be modifiable.
Sending Reports and Requests
The entire EDI sending process is made up of two parts; marking the
report to be sent and the actual sending of the report. You can mark the
report while you are in the report or in the File Cabinet. The report can be
sent in either the EDI Center or while you are in the report.
WinTOTAL has multiple methods of sending a report - the native
WinTOTAL and Pocket TOTAL formats, and as a PDF document attached
to a regular e-mail message. As new standards arise, other methods may
be integrated. This chapter will deal with the most common methods - the
PDF and native WinTOTAL “ZAP” file.
Sending a view/print only report as a PDF
Many programs force you to “print” the PDF separately, then use an email program to attach it manually. While that isn’t difficult, our method is
even easier. In one step we create the PDF and attach it to a message we also automate things like the subject line, body text and even make it
easier to pick out the recipients.
1. While in the report, click the EDI menu and select Send Report via
Internet EDI. Or, you may send it from the File Cabinet. Simply click
on the report you want to send and click Send EDI.
2. Enter the e-mail address of the recipient. The To field has a dropdown list for you to choose one of the entities from your report. To
choose anyone from your Address Book, simply type a name in or
click To...
•
Clicking the To... button will bring up another window from which you
can choose the receipient. To add a name, simply double click the
type of entity in which the receipient is located, ie. if you are sending
to an appraiser, double click Appraisers. Then double click the
receipeint’s name to add the name as a receipient and click OK.
•
To view the actual e-mail address of an entity, single click the entity
and then move your mouse pointer to the “Type Name” field until it
hovers over the name. It will take a second, but then a window with
the e-mail address should pop up.
Internet EDI • Sending Reports and Requests
8/10/2001
Athena’s support for Adobe Distiller security makes it easy to add extra protection to
your reports.
The EDI Center pulls the list
of e-mail recipients from
your WinTOTAL Address
Book.
Page 11.5
Internet EDI
•
A copy of the EDI can be sent to an additional receipient by clicking
the Cc... button and choosing a recipient.
WinTOTAL automates the text you
include with your EDI.
3. Select the PDF format for sending the report. Once you use a
particular format for an Address Book entry, WinTOTAL will
remember that format for the next time you send something to them.
4. Since this message is going to show up in someone’s “Inbox”, you
need to enter a subject line and message text as well as specify a
meaningful name for the PDF attachment. You may type in free form
text just as you would a regular e-mail message. However, we have
some automated functions for you to speed things up.
•
The drop-down for the PDF File Name has the description and
address. However, you can also click in that box and type anything
you wish. The PDF extension isn’t necessary. WinTOTAL will add it.
•
The first box labeled “Edit message text” denotes skeleton text to go
with your message. Click the Edit button and you’ll also see we let
you merge in data from your report between a message of your
choice.
•
The “Include signature text” option lets you put a “tag line” on the end
of your message body such as your license number, web site info,
etc.. This isn’t your digital signature. (Digital signatures are describe
in “Digital Signatures” on page 2.9.
5. Once you have your message text entered, you have two options
depending on when you want the report to be sent:
•
Click Send/Receive to send it instantly.This will also send any other
EDI or messages waiting in the EDI Center’s Outbox to be sent.
•
Click Mark to send to place it into the Outbox in the EDI Center. This
will enable you to mark several reports and then send them all at
once instead of one at a time. This will be a convience if you are only
able to be connected to the internet periodically or at specific times of
the day. The report will be delivered the next time WinTOTAL
connects to the Internet. This is done manually by choosing Send/
Receive all Internet EDI from the EDI menu, when your regularly
scheduled connection occurs as specified in your EDI setup, or by
clicking the Send/Receive button in the EDI Center.
Internet EDI • Sending Reports and Requests
8/10/2001
Page 11.6
Internet EDI
6. After choosing the option, a print window will pop up. Mark the pages
you want to send and configure any print options you need to set.
This happens because the PDF Writer is actually a “print driver” and
WinTOTAL “prints” the report using that driver. Instead of coming out
of your printer, a disk file is created. WinTOTAL automatically
attaches that disk file to an e-mail message and queues it to be sent.
7. Click OK to complete the “printing” of the file and e-mail creation. The
report will be delivered the next time WinTOTAL connects to the
Internet. This is done manually by choosing Send/Receive all
Internet EDI from the EDI menu, when your regularly scheduled
connection occurs as specified in your EDI setup, or by clicking the
Send/Receive button in the EDI Center.
Sending a report file in native WinTOTAL format
This is by far the most automated method and requires the least amount
of interaction since WinTOTAL knows how to automatically route files
upon receipt to a printer and/or Office Manager folder.
This is useful for inter-office EDI where appraisers work from remote
locations. If a digital signature has been applied to a report, it will be
read-only and protected from modifications. See “Digital Signatures” in
our “Form PowerView” chapter.
1. While in the report, click the EDI menu and select Send Report via
Internet EDI, or you may send it from the File Cabinet. Simply click
on the report you want to send and click Send EDI.
2. The To field has a drop-down list for you to choose one of the entities
from your repor. To choose anyone from your Address Book, simply
type a name in or click To...
•
Clicking the To... button will bring up another window from which you
can choose the receipient. To add a name, simply double click the
type of entity in which the receipient is located, ie. if you are sending
to an appraiser, double click Appraisers. Then double click the
receipeint’s name to add the name as a receipient and click OK.
•
To find the actually e-mail address of an entity, single click the entity
and then move your mouse pointer to the “Type Name” field until it
hovers over the name. It will take a second, but then a window with
the e-mail address should pop up.
Internet EDI • Sending Reports and Requests
8/10/2001
WinTOTAL can both send and receive reports and requests in its native format. You can
choose selected portions of the report to omit when sending. Naturally, both parties
need to be using WinTOTAL with this method; it is useful insituations where one person
is reviewing another’s work or the file needs to be loaded into WinTOTAL for other reasons.
Page 11.7
Internet EDI
•
A copy of the EDI can be sent to an additional receipient by clicking
the Cc... button.
3. Select the WinTOTAL 2000 EDI format for sending the report. Once
you use a particular format for an Address Book entry, WinTOTAL will
remember that format for the next time you send something to them.
4. Select the items in the report you wish not to transmit, if any, by
placing a checkmark in the appropriate boxes.
5. Now you have two options depending on when you want the report to
be sent:
•
Click Send/Receive to send it instantly.This will also send any other
EDI or messages waiting in the EDI Center’s Outbox to be sent.
•
Click Mark to send to place it into the Outbox in the EDI Center. This
will enable you to mark several reports and then send them all at
once instead of one at a time. This will be a convience if you are only
able to be connected to the internet periodically or at specific times of
the day. The report will be delivered the next time WinTOTAL
connects to the Internet. This is done manually by choosing Send/
Receive all Internet EDI from the EDI menu, when your regularly
scheduled connection occurs as specified in your EDI setup, or by
clicking the Send/Receive button in the EDI Center.
Sending a text message or regular e-mail
Regular e-mail can be sent and received in the EDI Center. It has an
interface similiar to that of Microsoft Outlook. The EDI Center does simple
operations such as sending and receiving e-mail, replying to received email, sending attachments, and fowarding received e-mail.
The EDI Center pulls the list
of e-mail recipients from
your WinTOTAL Address
Book.
1. To send a new message in the EDI Center, simply click on the New
button and it will open a new message.
2. The To field has a drop-down list for you to choose one of the entities
from your repor. To choose anyone from your Address Book, simply
type a name in or click To...
•
Clicking the To... button will bring up another window from which you
can choose the receipient. To add a name, simply double click the
type of entity in which the receipient is located, ie. if you are sending
to an appraiser, double click Appraisers. Then double click the
receipeint’s name to add the name as a receipient and click OK.
Internet EDI • Sending Reports and Requests
8/10/2001
Page 11.8
Internet EDI
•
To view the actual e-mail address of an entity, single click the entity
and then move your mouse pointer to the “Type Name” field until it
hovers over the name. It will take a second, but then a window with
the e-mail address should pop up.
•
A copy of the EDI can be sent to an additional receipient by clicking
the Cc... button.
3. If you want to save the e-mail and send it at a later time, click Save
and the message will be stored in the Drafts folder.
4. To attach a file to the message, click the Attach button and a “Select
files to attach” window will pop up. In this window, you will be able to
navigate the folders on your hard drive and open the specific file you
want to attach.
5. To send the message, simply click Send.
•
•
To reply to a sender that sent you a message, simply highlight the
message and click Reply. This will create a message that you can
treat like a new message.
We simplify your electronic communications by enabling plain text messages to be sent
and received through the Appraisal Desktop’s EDI Center.
A message that was received can be fowarded by clicking Foward.
This will create a message that you can treat like a new message.
Entering EDI Info for Entities
An entity is simply an appraiser, client, lender or other person in your
Address Book. You can specify their e-mail address along with their other
contact information, so that when you send them a report or request, you
don’t have to type in their name and e-mail address.
1. In the File Cabinet, click the Contacts button and select All from the
drop down menu. You’ll then see a list of all the people in your
Address Book.
•
You can add a new entity by clicking Add New... and selecting the
type of entity. (You don’t have to choose the type of entity when you
select a specific entity type from the drop down menu instead of All.)
•
You may edit an existing entry by highlighting it and clicking Edit.
2. After entering the General and Contact Info, click the EDI Info tab.
•
The EDI Center
uses the same
Address Book as
the Requester,
so you only need
to enter your
contacts
one
time - in one
consistent interface.
Under the WinTOTAL 2000 section, the E-mail address field is the
address to which you send appraisal reports in the native WinTOTAL
format. If you set yourself up with an e-mail box following the
Internet EDI • Sending Reports and Requests
8/10/2001
Page 11.9
Internet EDI
instructions at the beginning of this chapter, you would enter this email address in your own record. You’ll need to ask your client or
other person with whom you’re doing EDI for their e-mail address.
•
The Site ID field is typically the area code and phone number of the
person to whom you are sending. This code is used to create a
unique key for each appraisal created.
•
The Personal E-Mail field is an alternate e-mail address for sending
messages that are designed to be downloaded manually, like files in
the PDF format.
3. Enter the information in the appropriate fields and click OK.
Receiving Reports and Requests
Every time WinTOTAL connects to the Internet for EDI, it does two things:
it sends any outgoing reports or messages you've marked to be sent, and
it checks your e-mail box for any reports or messages that have been sent
to you.
Reports and messages are received into the Inbox in the EDI Center.
Reports that are WinTOTAL format can be configured to automatically be
placed in a folder in File Cabinet. Reports that are PDF format are
received and can be opened in the EDI Center’s Inbox. WinTOTAL can
also be configured to automatically check for new messages and reports.
Configure the received directory
You can configure WinTOTAL to automatically place reports that you
receive, that are WinTOTAL format, into a specific folder in the File
Cabinet. These EDI reports will show up in the EDI Center’s Inbox and
also be placed into a specific folder in the File Cabinet.
1. In the EDI Center, click Options and then click the Attached Reports
tab.
2. You will see here that you can configure where reports and requests
are automatically saved. To configure where received reports will be
place, place a check in the box to the left of Automatically save
attached reports in the folder.
3. Then you will be able to choose the folder to which you want the
report to be saved by clicking the drop down arrow and choosing a
Internet EDI • Receiving Reports and Requests
8/10/2001
The EDI Center has “rules” that tell it where to automatically extract
native WinTOTAL files when received as attachments. Requests are
reports that have never had the “Accepted” status item marked.
Page 11.10
Internet EDI
folder from the list. Do the same step to configure where requests are
saved.
•
The default directory that downloaded reports are saved to is the
Internet Received Reports folder in the File Cabinet. Don't worry
about creating this folder; if you don't have it, WinTOTAL will create it
for you.
•
The default directory that downloaded requests are stored in is the
Received Requests folder in the File Cabinet. Again, if you don't
already have this folder, WinTOTAL will create it for you.
WinTOTAL makes a distinction between a report and request based on
the status assigned to a report. To learn more about the differences
between a report and a request, please see our “Managing Your Files”
chapter.
Receiving e-mail and EDI in the EDI Center’s Inbox
EDI and messages are received in the EDI Center’s Inbox. EDI and
message can be previewed without even opening the message with the
preview pane on the lower left portion of the EDI Center.
1. Click Send/Receive in the EDI Center or while you are in a report to
receive any EDI or messages that are in your mailbox.
2. Any EDI or messages that are received will show up in the message
list section in the upper right portion of the EDI Center.
3. The preview section is located in the lower right portion of the EDI
Center and this is where you can preview the highlighted message.
4. You can open a received message simply by double clicking the
message in the message list section and this will open the message
in a window of it’s own.
•
If the file contains an attachment, double click the attachment to save
the file onto your hard drive. A Save Attachment window will pop up
and to save the attachment onto your hard drive, simply navigate the
folders to the desired directory and click Save.
•
To print an e-mail message, right-click it and choose Print from the flyout menu.
The WinTOTAL Guru, which runs in your system tray is responsible for
all scheduled tasks - including the periodic EDI send/receive.
Internet EDI • Receiving Reports and Requests
8/10/2001
Page 11.11
Internet EDI
Schedule WinTOTAL to automatically send and receive messages
You can configure WinTOTAL to automatically send and receive any EDI
or messages that are waiting in your mailbox.
1. In the EDI Center click Option and click the Schedule tab.
2. Place a check in the Enable Scheduling to enable WinTOTAL to
automatically send and receive messages.
3. In the choices below Enable Scheduling, you can choose how often
WinTOTAL sends and receives messages.
Managing Messages in the EDI Center
The EDI Center has a variety of features that will help you organize and
manage or e-mail and EDI efficiently. You can delete messages, store
messagaes, create folders to organize your messages, and create an email signature.
Create a new folder
To create a new folder in the EDI Center, simply click New Folder. This
feature is handy for organizing and managing messages. Once a new
folder is created, you will be able to “drag and drop” an item between
folders. To drag an item click and hold the mouse button, and then move
your mouse (drag the item) to another folder. When you move the cusor
to the folder, simply un-click your mouse and it will “drop” the item into the
specific folder.
Since WinTOTAL can send and receive all types of e-mail, you should
configure it to check periodically. It does all the work of connecting to
your ISP, checking your inbox and disconnecting behind the scenes.
Special folders in the EDI Center
The EDI Center has a handful of special purpose folders pre-installed.
•
Deleted Items. When you highlight a message and click Delete, the
message is moved to the Deleted Items folder. Deleted messages will
remain in the folder until you right click on the folder and left click
Empty Deleted Items. Once a message is placed in this folder, you
will not be able to make changes to it, unless you move to another
folder.
•
Drafts. Any e-mail that you have not finished and want to save will be
stored in the Drafts folder. If, after starting a messages, you click the
X button in the upper right hand corner of the message, you will be
Internet EDI • Managing Messages in the EDI Center
8/10/2001
Page 11.12
Internet EDI
prompted to save the message. If you choose Yes, then the message
will be saved in the Drafts folder.
At any time, you can open this message by clicking on the Drafts
folder and then double clicking the message. You can then treat this
as a new message and resume typing where you left off.
•
Outbox. All text messages and EDI reports that are “marked to be
sent” are placed in the Outbox folder until the Send/Receive button is
clicked. You can modify messages in this folder before they go out by
double-clicking them, making changes and then pressing Send.
Likewise, you can cancel a message by deleting it from this folder.
•
Sent Items. You can save and manage any EDI or e-mail messages
that you have sent with the Sent Items folder. You can know for sure if
you had sent an EDI to a client and even foward them a copy of the
sent message. Reports that were sent EDI will be stored here and
can be placed back into the File Cabinet if you should ever happen to
accidentally lose the report.
Working with messages
There is a function in Windows that allows more than one item to be
marked at a time. This same method can be used in WinTOTAL to mark
multiple files:
•
If the desired files are grouped together, click on the first file, hold
down the SHIFT key and click on the last file in the group. This will
highlight the entire group.
•
If the desired files are "scattered" in the folder, with reports in between
that are not to be marked, hold down the CTRL key while clicking on
each individual file to be highlighted. This will allow multiple files to be
selected without loosing the highlighting on whatever has already
been highlighted.
The Outbox system folder in the EDI Center shows messages queued to be sent the
next time WinTOTAL does its sending and receiving. To clear a message from here, just
click it once and click delete.
Once a message or messages are selected, you can use the copy, move
and delete commands just as you would in Windows Explorer.
Manually copying attached reports to the File Cabinet
A report that is attached to an e-mail message in our EDI Center can be
copied back into the File Cabinet from a message by doing the following:
1. Open the message
Internet EDI • Managing Messages in the EDI Center
8/10/2001
Page 11.13
Internet EDI
2. Double click the report attachment.
3. If the report already exists on in your system, you will be presented
with the supposed match and given an opportunity to either update
the existing file or create a new one.
•
To save the current report as an additional report in the File Cabinet,
click New and then choose the specific folder to where you want to
save the report. Click Save and this will create a copy of the report in
that specific folder in the File Cabinet.
•
To replace the current report in the File Cabinet, click Update. This
will replace the report in the original folder with this attached report.
For files that are not native to WinTOTAL, you will simply be presented
with a Save As dialog where you can browse to directory and save.
Create an e-mail signature
An e-mail signature is basically a default salutation that can be added to
any message that you send from WinTOTAL. This isn’t your digital
signature. (Digital signatures are describe in “Digital Signatures” on
page 2.9.
1. In the EDI Center, click Options, and then click the Signature tab.
2. You can type in new information in the window or copy and paste
information that is stored on the Windows clipboard. You can paste
information that was copied to the clipboard, simply by right clicking in
the window and left clicking Paste.
•
You can copy almost any type of data to the Windows clipboard, by
highlighting text in any program, right clicking on the selection and
clicking Copy.
3. To include the signature in the message, place a check in “Include
signature when sending e-mail” and click OK. Now, every message
you send from the EDI Center will have this e-mail signature at the
end of the document.
Instead of typing your name every time at the bottom of an e-mail
message, set up an e-mail signature.
Internet EDI • Managing Messages in the EDI Center
8/10/2001
Page 11.14
Internet EDI
Troubleshooting and Questions
To see if you have Dial-Up Networking (DUN) installed:
If your system does not use a Dial-Up Networking connection to connect
to the Internet, our Internet Wizard will indicate that it is unable to locate a
connection.
Dial-Up Networking is the Windows standard for connecting to the
Internet. If you’re already on the Internet, it’s very likely that you have a
standard connection.
1. From your Windows desktop, double-click the My Computer icon.
2. In the My Computer window, if you do not see a Dial-Up Networking
folder, please contact your Internet Service Provider for more
information on installing Dial-Up Networking and creating a Dial-Up
Networking connection. If you do see this folder, then Dial-Up
Networking is installed. Double-click on this folder.
3. Within this folder you should have an icon that references your
Internet Service Provider. For example, if you have an account with
the Microsoft Network, you would see an icon called "MSN".
4. To verify the connection works, double-click on the icon. You may
need to type in your username and password.
5. Once the system is through dialing, you should be able to browse the
web.
Passwords and network components
In order for Windows Dial-Up Networking to remember your password,
you must have at least one active Windows login. In addition, you must
have a specific set of network components installed. Listed below is the
step by step process to have your system remember the password.
This part gets a little technical because you are installing Windows
components on your system. a la mode can not take responsibility for
any problems that may arise during this process.
If you are not
comfortable with installing Windows options, you may consider
calling in someone more experienced in this area.
1. Click the Start button, select Settings, and then Control Panel.
2. Double-click the Network icon in the Control Panel window.
Internet EDI • Troubleshooting and Questions
8/10/2001
Page 11.15
Internet EDI
3. Check the list of "installed network components" for the following:
•
Client for Microsoft Networks
•
Dial-Up Adapter
•
TCP/IP
4. If any of these are missing, they will need to be installed before your
system will remember your password. To add any of the above items,
click the button marked Add and follow the prompts. All of these
components can be found by selecting Microsoft from the list of
Manufacturers.
Note: TCP/IP is known as a "protocol." If you have other adapters
installed, such as a network card, check the list of installed network
components to see that TCP/IP is installed for the Dial-Up Adapter.
5. Click OK to close the Network Properties dialog.
6. If you made any changes here, you'll have to restart Windows.
Upon restarting, Windows will prompt you for a Windows login. At this
point, you can create a true password for Windows In which case,
Windows will prompt you for that password each time you boot your
computer. If you prefer, you can leave the password boxes blank, and
Windows won't prompt for a password. Either way, a Windows login will
be created and you will now be able to save your Dial-Up connection’s
password.
Using America Online for EDI
WinTOTAL uses the standard Dial-Up Networking features found in
Windows. This is the type of Internet connection provided by companies
that specialize in Internet connectivity such as Sprynet, and MSN, as well
as most local Internet Service Providers. Dial-Up Networking is the
standard in the industry used by more people to connect to the Internet
than any other method.
America Online historically has used a proprietary, non-standard, direct
modem connection instead of Dial-Up Networking. It is possible to use
America Online with WinTOTAL’s Internet tools. (You must use the
America Online 3.0 or better client.) We can’t guarantee results and
our technicians don’t support this non-standard connection
method. Now that we’ve warned you, here’s how to try it anyway:
Internet EDI • Troubleshooting and Questions
8/10/2001
Page 11.16
Internet EDI
•
Instead of allowing WinTOTAL to connect automatically, you must log
on with the America Online client before doing anything related to the
Internet - configuring, getting updates, EDI, etc. (This makes
automated sending and receiving of reports and orders impossible.)
After connecting to America Online manually, just minimize the
application to the task bar.
•
When configuring, choose the Local Area Network (LAN) option
instead of the option for modem and phone line. This will cause
WinTOTAL to look for the existing Internet connection instead of
attempting to establish a new one. Remember, you’ll need to log on
to America Online separately even before configuring WinTOTAL.
Finding an Internet Service Provider
Using an ISP that implements standard Windows Dial-Up Networking is
the way to go. First see if someone in your field has a provider they
recommend. If it works for them, it will probably work for you. If you don’t
know of anybody to refer you, try a local computer store for names of
providers with which they have experience. Remember: good, reliable,
service is more important than saving a few bucks a month in fees.
You may want to go with a national provider. One advantage to a national
provider is that you will be able to connect to the Internet, toll-free, no
matter where you are in the United States. But a local provider may be
able to provide a different level of service because of locality.
More Chapters
Click here to go to the online Table of Contents where you can
access additional chapters in the WinTOTAL user guide. Or, view the
other parts of the manual by selecting Contents from WinTOTAL’s Help
menu. You will find more tutorials on all of WinTOTAL’s PowerViews. The
more you know about the software, the more efficient and competitive you
can be.
Internet EDI • Troubleshooting and Questions
8/10/2001
Page 11.17
IDC - Internet Data Connector
Internet Data Connector
With the new release of version 4.0 of WinTOTAL the ability to introduce
the latest in time saving technology for appraisers in the wasy of our
Internet Data Connector or more commonly refered to as: “IDC”. Don’t
underestimate the impact that the IDC and Geocoding will have on your
work in the coming years. One of the biggest benefits is that the IDC
feature in WinTOTAL acts as a really fast typist that can visit websites
and pull all of the relevant information without ever having to visit a single
web page. All of the actions of the IDC are done “behind the scenes” in
WinTOTAL without ever changing the screen that you are working on.
Flood & Census Data
Extra feature in WinTOTAL Enterprise
For our customers that are using the Enterprise version of WinTOTAL, we
have now introduced the ability to get flood and census data with a few
clicks of the mouse.
1. When in a form (with the subject address entered) click the button at
the top of the tool bar that reads IDC Data.
2. From there, you will see the prompt screen that describes our
GeoCoding and how it works. Once you have read all of the
GeoCoding information, click OK and this will connect to the eDomina
internet data servers.
Use the WinTOTAL 2000 IDC Wizard to quickly import flood & census data from the
eDomina Internet Data provider.
3. Using your existing Internet connection, WinTOTAL will navigate to
the eDomina internet data provider, submit the subject address and
pull back the particular findings for that address. While this is
happening, you will see the IDC “Gathering IDC data” screen showing
the status of your request.
4. Once the information is obtained, you will see the screen that is
shown here on the right.
5. To import the information, first make sure that the checkboxes in the
“Insert” column on the left side of the screen have been checked.
Then click OK and the flood & census data will automatically be
imported to the proper sections of your report.
IDC - Internet Data Connector • Flood & Census Data
8/10/2001
Page 12.1
IDC - Internet Data Connector
Custom settings within the IDC
WinTOTAL’s IDC feature allows you to customize your flood and census
information to your specifications:
After
confirming
your
addresses, WinTOTAL will
use your existing Internet
connection to access your
flood and census data
To begin the customize process, do the following steps:
1. From within IDC data screen shown on the right, click Options.
2. In the dialog that appears, you will have the following set of options:
•
Data Options - This section contains the ability to append the MSA#
to appear at the beginning of your Census Tract finding and gives you
the ability to make all of the alphabetical characters appear in
uppercase.
•
Data Transfer Options - This section gives you the option of having all
of your “Insert” checkboxes not marked, check only the “Instert”
boxes that have information and check all of the “Insert” boxes so
that the entries that have no data will transfer a blank into the report
•
Insert Legal Addenda - WinTOTAL gives you the ability to add a legal
addenda regarding the IDC data to protect you from liability.
Remember: Changing any of the options in this section will not be applied
until the next time that you run the IDC feature.
Standardized USPS Address
Once WinTOTAL has obtained the flood & census information from the eDomina internet data
site, click the OK button. From there, all of your
findings will transfer back into your report automatically!
In order to help obtain the absolute correct address for your IDC
information, WinTOTAL now verifies the address that you typed into your
report and will compare it to the standardized U.S. Postal Service address
and ZIP code when the information is available.
After WinTOTAL has obtained your flood and census information you will
see a section below that will show the address that you submitted and
the standardized U.S. Postal Service Address whenever it is available.
Confidence Level Colums
Any information that is obtained in the IDC feature, will provide you with a
confidence level indicator. Below you will find a description for the icons
that appear with your IDC data:
1. Green Checkmark - Information was positively found for the selected
property. Confidence is high for this level
IDC - Internet Data Connector • Standardized USPS Address
8/10/2001
Page 12.2
IDC - Internet Data Connector
2. Blue Question Mark - Information was found but you should verify it
for accuracy as the confidence level is less than optimal.
3. Red X - No information was found or is available for the property.
More Chapters
Click here to go to the online Table of Contents where you can
access additional chapters in the WinTOTAL user guide. Or, view the
other parts of the manual by selecting Contents from WinTOTAL’s Help
menu. You can also find more tutorials on all of WinTOTAL’s
PowerViews. The more you know about the software, the more efficient
and competitive you can be.
IDC - Internet Data Connector • Confidence Level Colums
8/10/2001
Using the IDC
data options, you
can specify how
WinTOTAL
responds to the
data
gathered
online.
Page 12.3
File Management
Managing Your Files
The Appraisal Desktop’s File Cabinet is a critical and very powerful
module. It lists all report files, and shows them in “folders” you've created.
It's the equivalent of the File | Open screen in most programs, but it has
several enhancements beyond simple loading of files.
•
The File Cabinet keeps you from using Windows Explorer for file
management since it has searching, sorting and its own folders.
•
The File Cabinet is database driven with bi-directional data transfers
between the forms and your database. You don’t have to enter things
once in the File Cabinet view and then again in your report. And the
database makes file operations in the File Cabinet fast!
•
The File Cabinet also has convenient functions such as file recovery,
EDI, printing, archiving to the eDomina Vault and more.
For a basic tutorial on starting reports and the Requester, be sure to see
the “Welcome to Athena” guide. To learn about complete office
management, receivables, tracking multiple appraisers, fee splits and fee
tables, see our “Payments and Order Tracking” guide.
Managing Folders and Views
The difference between folders and views
WinTOTAL allows you an unlimited number of folders in which to
organize your reports.
•
Folders represent the physical location of the report on your disk. To
view the reports in a particular folder, just click the folder description
on the left, and the reports will be displayed on the right.
•
Different “views” go beyond the physical organization of your files/ A
drop down menu near the top of the File Cabinet with a default setting
of Folder View enables you to see reports based on their level of
completion or in one list regardless of where they are saved.
WinTOTAL’s File Cabinet is your gateway to your appraisal reports.
Note that the purpose of folders is to help you organize your reports into
more manageable groups (such as by client, or by appraiser, or by month,
etc.). Keeping all reports in one folder is the equivalent of just throwing
paper files into a drawer without regard for organization! Your hard drive
File Management • Managing Folders and Views
8/10/2001
Page 13.1
File Management
and network also become inefficient and slow when 500 or more files are
in a single directory.
Create a new folder
1. Click the menu item labeled Folder and select New.
WinTOTAL organizes your files underneath one
directory. However, to access reports outside the
reular File Cabinet folders, you can use our Attach
Directory function.
2. Type a description new folder and click OK.
3. You'll then see your newly created folder in the File Cabinet.
becomes the active folder, and of course, it’s empty right now.
It
Attaching a directory
WinTOTAL has the ability to look at a plain directory on your system as if
it was a folder. Use this to copy files from a laptop to a network or to
restore files from a ZIP, JAZ or recordable CD.
1. Click Options, and select Attach external directory.
2. Use the standard Windows directory tree to navigate to the directory
where your files are stored
3. If you are on a LAN, specify whether or not you want other users to
see this directory in their File Cabinet too.
4. Once you've found the directory, just click OK.
5. You'll be prompted for a “real” name for your attached directory. You
can enter anything you want here.
6. Once you have connected to an external directory, you can copy files
from it to work on them in a “real” WinTOTAL folder. You may need
to click a different folder and then click back on your attached
directory before the reports become visible.
To disconnect from the external drive, go to the Folder menu and select
delete. You will be prompted to confirm your action.
It is intentional that you cannot open the reports from an external drive or
perform editing functions on them. Basically, what you should do is copy
them into your WinTOTAL structure and then work on them.
Customizing the columns in the report list
The columns that you see in the File Cabinet (Description, Map
Reference, etc.) are completely customizable. You can add columns from
a list of over 30 different parts of a report, including Fee, Appraiser, Map
Reference, Client, and more.
File Management • Managing Folders and Views
8/10/2001
Page 13.2
File Management
You can add different columns for each of the File Cabinet's views. For
instance, when using the Accounting view, you may want to see different
information about a report than what you would want when looking at the
Requests view. Take a moment to click the various views and note the
different columns in view. Then, lets customize the columns in the main
folders view.
1. Click Options, and choose Edit column layout.
2. This is a list of all the possible columns for the current File Cabinet
view. To add one of these to your on-screen list, just click once on it
and then click Add.
3. To remove a column, just highlight it on the list and click Remove.
4. Use the Up and Down buttons to re-arrange the order of the columns
on screen.
5. To sort by an item in the list, click once on its description on the right.
Click the Sort by this field checkbox, and then decide on Ascending or
Descending at the bottom of the dialog.
6. You can specify a column width in the Display Width field. Just click
once on the item and enter a number. Since there isn't necessarily
any way to know how wide you'll need the column, you'll probably
want to size the column interactively. This is described in the next
section.
The File Cabinet uses a database to manage your report files. You can customize
which fields are displayed on a view by view basis.
When you are finished customizing the column layout for this File Cabinet
view, click OK to accept your changes and return to the File Cabinet. You
will see your changes immediately. To change the column layout for the
other views in the File Cabinet, you must first click that view to select it.
You can then customize its columns following the same steps as above.
Interactively changing column widths
As described above, you can manually enter a column width for the
existing columns displayed in the "Edit column setup" screen or you can
size the columns interactively.
1. If you are still in the column layout screen, click OK to return to the
main File Cabinet screen.
2. Move your mouse slowly past the columns in the reports list.
File Management • Managing Folders and Views
8/10/2001
Page 13.3
File Management
3. You'll now notice that when you move your cursor toward the edge of
a column, it changes to something that looks like a double arrow.
4. When your cursor looks like a double arrow, hold down your left
mouse button and drag the column to the desired width.
5. When the column is the desired width, release the mouse button.
Sorting the report list
The File Cabinet allows you to sort by any column visible on screen, in
ascending or descending order. Click the column heading, and the list
will be sorted by that item. The first time you click, they will be sorted
ascending - denoted by an arrow pointing up. Click the column heading
again to sort the list descending.
Working with Reports
Editing report information from the File Cabinet
The File Cabinet gives you quick access to basic report info. As click
from report to report, you’ll see information change in the lower panel. To
edit this information right from within the File Cabinet without having to
open the file, just click Edit.
•
Property information will transfer into your report next time it is
opened.
•
Likewise, you can easily get to the status information, too. This is a
lot faster than opening the whole report.
•
Our new QuickNotes feature supplies you with a fast way to jot down
notes about the assignment without opening the report or using paper
post-it notes. These notes are transferred into the Digital Workfile.
See our chapter on “USPAP Compliance in the Digital Domain” for
details on how to eliminate the need to store paper copies of reports.
Basic report elements may be editted straight from the File Cabinet without even opening the report.
Selecting one or several reports
This section will cover operations such as moving, copying and deleting
reports. WinTOTAL allows you to perform these operations either one
report at a time or on multiple reports.
Of course, to select a single file, you just click once on it and it’s
highlighted. Here’s how you can select blocks of reports. This works just
as Windows Explorer. Here’s how you select multiple files at once.
File Management • Working with Reports
8/10/2001
Status is key to our accounting functions as well as the ability to keep clients proactively informed with automated e-mail messages based on status items you mark.
Page 13.4
File Management
1. Go to a folder that has multiple reports - preferably 8 or more.
2. Click the first report in the list so that it is selected.
3. Now, hold down the SHIFT key and click a report further down in the
list. Look, the whole block has been selected.
4. Hold down the CTRL key and click a report even further down in the
list and notice that it becomes selected too.
5. Hold down the CTRL key and click a report that is already highlighted
and you’ll notice it becomes deselected.
6. Go to a report farther down in the list and do a CTRL+click and see
that it is highlighted.
7. The final trick is to go down farther and do a SHIFT+CTRL+click.
Now you have two blocks of files highlight.
To summarize: SHIFT+click selects a block of reports. CTRL+click adds
to the current selection. By using the sort functions in File Cabinet, you
can creatively select groups of files by date, client, etc.
Moving reports to another folder or disk
WinTOTAL's File Cabinet makes file manipulation really easy.
1. Select the file or files you want to move or copy.
2. Click the Move/Copy button.
3. Click the Move option if you want to move the reports. Click the
Copy option if you want to copy them.
4. Click the folder name where you want the report to go. You can also
use this same procedure to copy files to a floppy disk or removable
drive.
File Move and Copy functions work with buttons
as well as by dragging and dropping.
5. Click OK.
You can also drag and drop files between folders as in Explorer.
•
Dragging to another folder will move the file.
•
Dragging to a disk will copy the file.
Deleting reports
Just as you can copy files, you can also click Delete to remove them.
Instead of being erased permanently, they are saved in your Deleted
items system folder. This is similar to the Windows Recycle Bin. Once
File Management • Working with Reports
8/10/2001
Page 13.5
File Management
you delete a file from there, it is permanently erased. To completely clear
your deleted items, do the following:
1. Click the Deleted Items system folder.
2. Click the first report.
3. Scroll to the end of the list and SHIFT+Click the last report. You’ll see
them all highlighted.
4. Now, press the Delete key on your keyboard.
5. You’ll be prompted to delete the first file in the list. You can choose
Yes to all and everything will be permanently erased from your
Deleted items.
Be careful when deleting files. Disk space is cheap, but your time isn’t!
Recovering lost reports
WinTOTAL reports are actually made up of many small files compressed
into one large one. When a report is open, each of the components of
your appraisal are stored in a temporary directory on your disk. When
WinTOTAL automatically saves between forms, it is only saving the tiny
portion that changed - not the entire report. The entire report is saved
when you physically click the Save button, or when the file is closed.
If we saved the ENTIRE file every time you jumped between forms, the
program would seem slow because an appraisal report could be 300K500K in size depending on the number of pictures. That's a significant
amount of data to process and save to disk! The “quick save” is faster.
In the case of the unfortunate incident that your system shuts down in the
middle of a report, the temporary files that make up your appraisal could
still be left on your system; and the re-opening the report could cause it to
appear as though you lost changes. This is because WinTOTAL didn't
have an opportunity to merge the changed portions back in to the
combined file.
In the event that you experience a system crash, here's one way to make
sure you haven't lost any data:
A key objective of WinTOTAL is to keep you from repetitive data entry - even when your
system crashes. Our Recover feature will help you get back going with your latest
changes.
1. Click the folder in which the appraisal was located.
2. Click the Options menu and choose View Recoverable Files.
3. You'll then have two different types of files:
File Management • Working with Reports
8/10/2001
Page 13.6
File Management
•
[OPEN] means you have "pieces" of the appraisal open. This will
have your most recent changes.
•
[BACKUP] files are useful if the appraisal doesn’t appear at all. The
backup file is a copy made the last time you saved.
4. You can restore either the backup, or piece together the [OPEN] file
by moving your cursor over the file description and clicking with your
right mouse button.
5. You will then see a menu fly-out. Select Recover.
The recovered file will have “recovered” in the description, To go back to
seeing your reports in the normal view, click “All Reports”.
Rebuilding the reports list
Rebuilding the reports list is handy in cases it appears as though files are
missing from a folder. (It could be due to a database error or other
unknown problem.) To use the “rebuild reports” function, simply click
once on the folder's description, then select Rebuild the reports list from
the Folder menu.
Searching for reports
If you need to find a report, but you don't know what folder it is in, you may
use the search function to find it by nearly two dozen attributes.
1. Click the Search button.
2. As with any WinTOTAL module, just enter part of the text on wish you
want to search. You don’t need to enter the complete word. For
example, entering YORK in the City field would find reports done in
NEW YORK CITY and YORKSHIRE.
3. Check on the option for Search all folders if you want to search your
entire database.
4. Click OK after you have entered your search criteria.
5. If matches are found, they will be displayed in a dialog a lot like the all
files dialog. You can apply sorting criteria and other viewing
enhancements if you wish.
Seach your file database on one item, or a combination of data you’ve entered on the
forms.
6. Click the All Reports button to bring all of your files back into view.
Renaming a report - changing its description
Sometimes you’ll need to modify a report’s description.
File Management • Working with Reports
8/10/2001
Page 13.7
File Management
1. First, make sure the report is not currently open.
2. Go to the File Cabinet and click the report once to select it.
3. Click the File menu and choose Rename.
4. You’ll then see a dialog in which to type the new name. You can
enter over 200 characters including spaces and punctuation.
5. Then, click OK.
Printing from the File Cabinet
The File Cabinet offers handy printing features that keep you from
opening reports just to get a hard copy as well as get a list of what’s on
your system. Click the Print button, and we’ll describe the options.
Print report. This will initiate’s WinTOTAL printing functions for the
currently selected report. Options will be displayed before printing,
Quick print report. Instead of giving printing options, the current report will
be printed using whatever your defaults are.
Reports and other information can be printed right
from inside the File Cabinet.
Print Invoice only. This will send the Invoice only to the printer.
Print reports list. The columns you choose to view on screen for a
particular view are the same ones that will print for that view if you have
the File Cabinet print a list of reports. You may wish to set the page
orientation for Landscape.
Status and Other Views
File Cabinet views
Up to now, we have only covered the main Folders view in the File
Cabinet. As mentioned previously, there are several other “views” of your
reports and tools available to assist in office management. Click the dropdown list showing “Folders” by default and you will see the other views
available: Requests, In Progress, Completed, Accounting and All
Reports.
They filter out reports based on status. And different sub-filters are
available for the different views - such as in the accounting view, you can
see reports that are 30, 60, 90 days past due. Being aware of the
different types of status will help you make better use of the File Cabinet
and its views.
File Management • Status and Other Views
8/10/2001
Page 13.8
File Management
Assigning status to a report
WinTOTAL and the File Cabinet rely on the data reported in the status
screen of the Requester. The Status Viewer can be accessed several
different ways:
•
WinTOTAL can prompt you automatically for a report's status
whenever you close a report after working in it. You can turn this on
and off by clicking the Preferences while in the File Cabinet and
marking / clearing the checkbox on the Miscellaneous screen.
•
Within a report, you can manually access the Status Viewer by
clicking the File menu and selecting “Report status”.
•
Similarly, in the File Cabinet, you can also quickly view or edit a
report’s status by clicking the status tab at the bottom of the File
Cabinet and clicking the Edit button. This is just a summary of the
status information.
How status is used
As you check off the various status markers, the file becomes visible in
different File Cabinet views. The status flags keep you from having to
use File Cabinet folders to manage your report progress.
•
Until you mark something as accepted, it is considered a Request.
•
You can also use the Report Progress drop down to explicitly state
where you are in a report in addition to marking off status markers.
•
WinTOTAL’s accounting features require reports to be marked as
completed before they will show up on statements.
•
The dates you can enter with the status messages help you figure
turnaround times for you and your appraisers.
•
On the status screen in the Requester is a field for “Send status to”. If
you have an entry here, that person will receive status messages via
e-mail (configured in your Address Book entry) for the current report.
The benefits of being able to see where a report stands without having to
open it are immense. What if you had an assistant that was always
available to answer the phone at the office while you were in the field? If
a lender called wanting to know where you were on a report, the assistant
would normally have to track you down, get the information, and call the
client back. Using the status flags in WinTOTAL, your assistant could
File Management • Status and Other Views
8/10/2001
Use the status screen in the requester to keep track of report progress as well as
enter dates that aren’t part of the appraisal form data.
Page 13.9
File Management
view the status right from the File Cabinet without even opening the
report!
The “All Reports” view
The All Reports view is actually not based on status. It shows all reports
on your system in one handy list, regardless of their folder or status. This
view is great for file manipulations since you can see reports from multiple
(actually all) folders in one list.
•
Use the sorting techniques described on page 4 to sort the items in
this view.
•
Just like all the other views, this one can have its own set of columns
too as described on page 2.
Remember, file operations performed in this and all views DO affect the
reports in your folders. If you delete files in the Accounting or All Reports
view, they will disappear from your folders.
More Chapters
Click here to go to the online Table of Contents where you can
access additional chapters in the WinTOTAL user guide. Or, view the
other parts of the manual by selecting Contents from WinTOTAL’s Help
menu. You will find more tutorials on all of WinTOTAL’s PowerViews.
The more you know about the software, the more efficient and
competitive you can be.
File Management • Status and Other Views
8/10/2001
Page 13.10
Payments and Order Tracking
Payments and Order Tracking
The billing and tracking module built into WinTOTAL offers power and
flexibility for small and large appraisal offices alike. This chapter will
cover the basics of billing clients, paying the appraisers in your office and
generating comprehensive management reports. These functions tie
together several portions of the WinTOTAL system.
•
The Address Book stores the different companies and people in the
system.
•
Report status in the Requester tells us when a job is “complete” and
billable.
•
The Billing PowerView is where you print invoices.
•
The Appraisal Desktop is the starting point for Management Reports.
Configuring Office Settings
About your office
During installation, you were probably prompted for information pertaining
to your office. This information is used in our billing module and
transferred to your invoices.
1. Open up the Appraisal Desktop, click on the Contacts shortcut. Here
you can select the categorgy of contact from the pull-down menu.
You can add, edit, or delete contact lsitings.
2. Click on the Edit Local Office... button and enter the appropriate
information for your office here. Note that the Contact Name you
enter will appear on Invoices generated by WinTOTAL.
3. Click in the EDI Info tab and enter the Internet E-Mail address used
for sending and receiving appraisal reports. This is usually your
customer
number
followed
by
@proj2000.com.
(ex:
[email protected]) Consult our chapter on “Sending and
Receiving Reports” for details on setting up an account with us.
4. Use the Notes tab to enter anything you like. It’s simply free-form text
for your internal uses.
5. If you want to assign a security password for billing click on the
Security tab and proceed to the next section for instructions. Click on
OK when you are through.
Payments and Order Tracking • Configuring Office Settings
8/10/2001
Accurate office management begins with entering your Office Settings.
Page 14.1
Payments and Order Tracking
Security Password
You can restrict access to your financials with a password. Be sure to
write this password down and keep it in a safe place. If you forget the
password, you’ll have to start with a fresh set of fee split settings.
Financial information may be password protected. Be sure to write
your password down.
1. From the Your Office Settings dialog, click the Set Password button.
2. Enter your password. Your typing will show up as asterisks.
3. Click in the next field and enter the password again for verification.
4. Click OK.
Anytime billing information is to be brought up on screen, this password
will have to be entered. Once you enter the password in the Requester,
you can go back and forth between the Billing tab and others, such as
status, without having to re-enter the password.
Setting Up Fee Tables
Default Fees
The most simple type of billing is to set up a default fee for the different
types of reports you do.
1. Open the Appraisal Desktop.
2. Click on Management shortcut and choose Jobs and Fees.
3. You’ll see a dialog come up with three tabs. Stay on the one labeled
Default Fees and Jobs. You’ll see a grid at the bottom listing different
types of appraisal jobs. There are several listed by default.
•
If you use percentages instead of a straight dollar amount, simply
check the box labeled “Use percentages as split-fee determinant.”.
•
To change one of our defaults, simply click in the cell you want to
change and type a new entry. As indicated by the instructions on
screen, you can use either a percentage or whole dollar amount for
the appraiser and supervisor splits.
4. If you need to add another type of job type, perhaps for a rural
property, a rush job or a different fee based on the loan amount, click
the Add button. Enter the job type and the appropriate amounts.
Then click OK. An entry is required in each field, but keep in mind
that WinTOTAL uses percentages or straight dollar amounts based
Payments and Order Tracking • Setting Up Fee Tables
8/10/2001
Default fees are used for job types when there aren’t specific tables for the client
and appraiser.
Page 14.2
Payments and Order Tracking
on the Use percentages as the default split fee determinant
checkbox.
5. Click Close when you are through entering your default fees.
Appraiser-specific fee tables
In you involve multiple appraisers and clients in your business, you
probably don’t have a “one size fits all” solution to billing. WinTOTAL
accommodates that by allowing you to have specific billing schemes for
different appraisers and clients.
•
You may pay appraisers differently based on seniority. Or, maybe
one appraiser always does a particular type of job or handles regions
for you, so it’s just easier to adjust their fees globally. It’s completely
up to you.
•
When an appraiser has a specific fee table assigned to them, the
payment or split percentage from their table will override your default
settings. Be aware of appraiser-specific fee tables when examining
payment for a particular order.
•
When choosing an appraiser for a particular type of job, you also
have the option to restrict your choices to those that have the current
job type in their specific list.
You’re able to set up different
job types to match the work
that you do. These job types
show up in the Requester
when you start new appraisals.
Appraisers with no specific fee table assigned to them just use the default
fees discussed in the previous section.
To set up a custom fee table for an appraiser, do the following:
1. On the Appraisal Desktop, click on the Management shortcut and
then choose Jobs and Fees.
2. Click on the Appraiser Specific Fees tab.
3. Here, you’ll see a list of the appraisers in your system. Click on a
name and you will see their fee split table reported below. If no
appraiser-specific table is being used for the current selection, you’ll
see “-No override table: use defaults-”.
4. You can either associate another table with this appraiser by
choosing it from the drop-down list or create a new table altogether by
clicking on the folder icon next to the list.
By default, each appraiser in your system is set to use the default fee table.
To create a new fee split table for an appraiser, do the following:
Payments and Order Tracking • Setting Up Fee Tables
8/10/2001
Page 14.3
Payments and Order Tracking
1. In the Appraiser-Specific Fees tab of the Job Types and Fee Tables
dialog, click on the folder icon next to the drop-down list for the
Appraiser Fee Split Table.
2. In the top right of the screen, you’ll see a list of the appraiser fee-split
tables.
3. To add a new one, simply click the Add button.
You can have appraiser specific
fee tables for situations where
you want to pay an appraiser
something different than what
the default fee table indicates.
4. On the screen that appears, enter a name for this fee table and then
edit the table entries by clicking in each cell.
•
You can add new job types just as we did earlier in this chapter by
clicking the Add button. It is recommended that you add the job to
your default list too so that it will show up in your Job types list in the
Requester.
•
Similarly, you can remove individual job types by clicking the Delete
button.
If an appraiser has a specific fee table associated with them that does not
have all of the Job Types contained in the default list, then they can be
excluded from even being assigned a job when the “Restrict to those
matching job type” box is checked in the Staff section of the Requester’s
Assignment tab.
Client-specific fee tables
This section assumes you have set up address book entries for the
various people with whom you associate. If you are unfamiliar with the
WinTOTAL address book, please refer to our Getting Started guide.
You may charge differently for particular clients because of the type of
business they give you or their special needs (or lack thereof). It’s
completely up to you.
Client fee tables are also
customizable.
By
default, each one uses
the default fee table.
1. On the Appraisal Desktop, click on the Management shortcut and
then choose Jobs and Fees.
2. Click on the Client Specific Fees tab.
3. Here, you’ll see a list of the clients in your system. Click on a name
and you will see their fee table reported below. If no client-specific
table is being used for the current selection, you’ll see “-No override
table: use defaults-”.
Payments and Order Tracking • Setting Up Fee Tables
8/10/2001
Page 14.4
Payments and Order Tracking
4. You can either associate another table with this client by choosing it
from the drop-down list or create a new table altogether by clicking on
the folder icon next to the list.
To create a new fee table for a client, do the following:
1. In the Client-Specific Fees tab of the Job Types and Fee Tables dialog, click on the folder icon next to the drop-down box for the Client
Fee Table.
2. The Client Table list will be on the left with table details on the right.
3. To add a new one, simply click the Add button.
4. On the screen that appears, enter a name for this fee table and then
edit the table entries by clicking in each cell.
•
You can add new job types just as we did earlier by clicking the Add
button. Any job type you add for a client will also appear in your the
Requester’s Job types list when that client is entered in the Bill To
field.
•
Similarly, you can remove individual job types by clicking the Delete
button. If a Client-specific fee table is associated with a client, only
the job types listed for them will appear in the Requester if they are in
the Bill To field.
You may associate job types with clients as well as charges for those
types of jobs. If a client has a custom set of job types, those will be the
only ones that show up in the Requester’s drop-down list.
Using Fee Tables in Reports
This section assumes you are familiar with cloning reports and the basics
of the Requester as described in our Getting Started guide. It also
assumes you are familiar with and have added entries into your Address
book for the appraisers and clients with whom you do business.
Entering the request
Let’s demonstrate how to use fees in the Requester. What we’re going to
do now is start a new report, demonstrating the items you must fill in to
make billing work.
1. On the Appraisal Desktop, click the Tutorial Folder, and click once on
the Sample Template.
2. Click the File menu, select Clone, and you’ll see the Requester
appear.
Payments and Order Tracking • Using Fee Tables in Reports
8/10/2001
Page 14.5
Payments and Order Tracking
3. Enter a description and any tracking information. Click on the Filing
shortcut. In the File Template section, click on “Clone the report
below, without any data”.
4. Click on the Assignment shortcut, and enter theappropriate
information in this portion of the Requester. In order to bill someone,
you must have an entry in the Bill To field.
5. In the Scope section, click on the Job Type drop-down and you’ll see
the different job types from the previous section of this tutorial. Click
the type of job you want and enter any other items in this section.
6. Select the Appraiser and Supervisor (if any). If you check the item
“Restrict to those matching job type”, then only appraisers with an
entry in their custom fee table for the type of job specified will be
listed.
7. Click the Inspection shortcut and enter any pertinent information
there.
8. Click the Status shortcut. A due date is required for you to track the
report. Enter it in the Billing and Tracking section of the Requester.
•
Leave the Send status to field blank except in cases where you are
entering a request to be delivered electronically.
•
If (and only if) you are sending the request electronically and you
want status messages from the appraiser delivered back to you as
they are checked, put your name in the Send status to field.
Otherwise, just leave it empty.
When entering information into an order, it is important to specify the Job Type.
9. Click the Billing shortcut now. You’ll see your job type and default fee
pre-filled in the appropriate fields.
10. In the Fees section, you can enter other miscellaneous items and
associated charges as well as a description for the total. These items
will also print on the invoice. The diskette icons to the side of the line
items will save your entries in a drop-down list for easy reference
later.
11. Now, go to the Notes shortcut if you need to enter anything else
about this request. This is free form information that doesn’t print.
At this point, there are a variety of options available.
•
You can click Open to open the report and continue working.
Payments and Order Tracking • Using Fee Tables in Reports
8/10/2001
Page 14.6
Payments and Order Tracking
•
If a Fax driver is installed on your system, you can you may click Fax
and fax it off to someone. (Note: Microsoft has a free driver that lets
you send and receive faxes straight from your computer. Consult
your system dealer or Microsoft’s web site for details.)
•
Similarly, you can click Print to generate a hard copy.
•
Or, you may simply click Save where you’ll see the report appear on
the Appraisal Desktop. It will be listed in the Requester below the
reports listings, since we haven’t marked it as Accepted yet. Once it
as marked as Accepted, it will be displayed in the In Progress section.
Completing the report with status
Once you have a request on your system using fee tables, you complete
it just like any other report. It is important that you note the status items
as they help you track the report and signal to WinTOTAL when payment
is due.
1. Once a report is ready for billing, click the Info button while the report
is open in WinTOTAL. (Note: The report doesn’t have to be open for
you to edit billing and status information. You may also click Info
while on the Appraisal Desktop if the report isn’t open.)
2. Click on the Status tab of the Requester.
3. Mark the report as “Complete”. If you are delivering the report that
day, go ahead and mark the Delivered item too. Marking the report
“Complete” is what signals WinTOTAL to make it visible in the
Accounting view of the File Cabinet.
4. Click the Billing tab in the Requester.
•
In the “Client (Bill to)” section, select the appropriate terms from the
drop-down list.
•
In the “Dates” section, verify the due date and type an invoiced date.
•
You may also enter other line items and a description of the grand
total for your invoice. Use the disk icons to save your entries so that
next time, you can pull them from the drop down lists.
In order to be “billable” you must mark a job as “Complete”. You should also enter in due
dates and completed dates to track which appraisers are late or on time.
5. Click Save to lock in your changes and return to whatever you were
doing before - perhaps editing the report. Or, click Open to load the
report for functions like printing an Invoice.
Payments and Order Tracking • Using Fee Tables in Reports
8/10/2001
Page 14.7
Payments and Order Tracking
Invoicing and Payments
Generating an invoice
You don’t even have to add an invoice form to your report to have one.
WinTOTAL will generate one “on the fly”. This functionality is useful in
situations where the person completing the report doesn’t do the actual
billing or when the person receiving the report is not the same as the
person that is billed.
1. Open the report for which you want to generate an Invoice.
2. Click the Billing PowerView to see the invoice on screen.
3. You can choose a different Invoice format from the drop-down at the
top of the screen. The data will automatically fill the on-screen form.
4. Click the Print Invoice button to send it to your printer.
Note: You have the option to add the Invoice form to your table of
contents so that it is printed along with the rest of the report. This is a
more traditional way of generating an invoice with appraisal software and
works for many people. See Chapter 3 on the Contents PowerView for
details.
Using the File Cabinet to see outstanding invoices
When you use the status features in WinTOTAL, the various views in the
File Cabinet come alive. Open the File Cabinet and select Accounting
from the pull-down menu.
•
You should see a list of all reports, marked as completed, but for
which no payment has been received.
•
Click on the List these reports drop-down to filter the list by timeliness
of the payment.
•
The columns in the Accounting view of the File Cabinet may be
customized by clicking on Options and choosing Edit column
layout.
Individual invoices are generated in the Billing PowerView.
Recording payments in the Requester
Once payment is received for an order, simply go to the report information
screen by clicking the Info button when that report is open or highlighted
in the File cabinet.
1. Click on the Billing shortcut.
Payments and Order Tracking • Invoicing and Payments
8/10/2001
Page 14.8
Payments and Order Tracking
2. In the payments section, enter the check number, date, memo field
and amount.
3. You can use the field labeled Total to note the payment. If it is a
partial payment and another invoice is to be sent, these notes will go
with the amount paid.
4. Update the Bill Paid field with the date of payment once payment is
received in full.
5. At the time you pay the Appraiser and Supervisor, you should update
this screen with the date they are paid.
Payments received for
a job should be
entered in the Billing
section of the report’s
Request.
sImilarly,
this is where you enter
payment
for
the
appraiser and supervisor too.
Any information entered here may be shown in the management reports
which are discussed in a later section.
Generating Management Reports
A detailed look at your data
You’ll come to a certain point where you’ll want to see which appraisers
are doing the most work for you, which clients pay on time, which ones
are late, etc. WinTOTAL’s Appraisal Desktop now offers dozens of
reports that let you see where your business stands.
1. Open the Appraisal Dekstop. Then click the Management shortcut
and select Management Reports to access the WinTOTAL Report
Wizard.
2. You’ll then see categories on the left and report names on the right.
When you click on a report name, a brief description appears at the
bottom of the Window. We recommend browsing through all the
reports available - there may be things you never thought of tracking,
but recognize as a good idea for your business. (Note: You can also
get to the reports from the Requester’s Billing shortcut. Just click on
the buttons labeled with the Appraiser, Supervisor and Bill To
names.)
Now that you’ve done such
a good job entering your
data, you can see it presented in dozens of different management reports.
3. To run a report, just double click on its name on the right side of the
reports window.
4. The first time you run a report, you’ll be greeted by the Report Wizard
information screen. Even if you’re in a hurry, you should read it.
Click on Next when you are ready to continue.
Payments and Order Tracking • Generating Management Reports
8/10/2001
Page 14.9
Payments and Order Tracking
5. You are then given the opportunity to customize your report, filtering
by date or by the appraiser, client or bill-to party. If you want to apply
more specific filtering, just click on an item.
6. Once you have chosen other report options, click Next and you’ll be
given an opportunity to output the report to the screen or straight to
the printer.
Even if you print to the screen first, you can still make a hard copy by
clicking the printer button in the report preview window.
•
Use the arrow keys to jump to the pages in your report.
•
You the zoom percentage to make the report larger or smaller on
screen.
•
To close the reporting tool, click on the "X" in the top right hand corner
of its window.
Here are things that may be affecting your reports if you don’t see the
data expected:
•
If you applied options such as date filtering, be aware that reports
created with older versions of WinTOTAL may not have had some
date entries available; hence, they may not show up in reports.
•
Older versions of WinTOTAL would allow multiple entries for the
same client to exist in the address book. When the older version was
updated to Olympus, different client codes were erroneously
generated even though the client name was the same. (The new
version thinks they were different.) Therefore, some of your reports
that list items by client may be splitting up the figures erroneously.
The only way to correct this is to manually delete these duplicate
entries from your address book. This won’t affect your existing
appraisals.
•
Not all of the items on which you can report are required fields. If an
entry in the Request Information for a report is blank, it is likely, the
data for that appraisal won’t show up in a management report.
The Report Wizard enables you to filter on additional items so you can narrow things
down to a particular date range or contact in your address book.
To correct these problems, we created the Migration Wizard to help you
structure your reports all in one batch. From the File Cabinet, click the
Options menu and choose Migration Wizard.
Payments and Order Tracking • Generating Management Reports
8/10/2001
Page 14.10
Payments and Order Tracking
Export data from the report viewer
The Report Information Wizard built into the File Cabinet also allows you
to export its information to a variety of formats including:
• MS Excel
• MS Word
• Lotus 1-2-3
• Delimited Text
• MS Access
• Fox Pro
• CSV
• HTML
The resulting files can be saved to your hard drive or e-mailed using a
MAPI compatible e-mail program like MS Outlook or Outlook Express.
Each format has its own options regarding items such as column
organization and headings when saving. Experiment with the different
formatting options to find the one that works best for you. To close the
reporting tool, click on the "X" in the top right hand corner of its window.
Excluding appraisals in selected File Cabinet folders
It is very likely that you have reports in your system that you don’t want
showing up in your management reports. These could be report
templates, old reports with incomplete data, test reports, you name it.
The File Cabinet has a way to allow you to exclude entire folders from
being included in the management reports.
In the File Cabinet, consolidate the files you want to exclude from
management reports into one or more folders. See our chapter on
“Managing Your Files” to learn how to create folders and move reports
in a batch.
To exclude a whole folder from the management reports, click on the
folder, then pull down the Folder menu and click the item that says
Exclude from management reports. The folder will then appear with a
red mark on it - that’s how you’ll know it is excluded from the management
reports.
QuickBooks Integration
You can integrate your existing QuickBooks software with WinTOTAL to
manage your appraisal office finances. This can save you the time and
effort of making duplicate entries and monitoring your business from
totally unrelated programs.
Payments and Order Tracking • QuickBooks Integration
8/10/2001
Individual folders may be excluded from management reports through a function in the File
Cabinet’s Folder menu. Once excluded, the
folder will have a red tab on it.
Page 14.11
Payments and Order Tracking
Using WinTOTAL’s QuickBooks Interlink Wizard you can export the
following office information into your QuickBooks program.
•
Employees
•
Customers
•
Fees and services
•
Invoices
•
Payments
Requirements
In order to use this feature, you must have established within QuickBooks
•
a company
•
an accounts receivable account
•
an income account
•
an asset accountO
Or, you must enter this information in the Interlink Wizard for import into
QuickBooks.
Import Options
• The QuickBooks Interlink Wizard gives you the option to just create
QuickBooks import records and perform standard error checking. You
will then need to manually import the records you select into your
QuickBooks program. To select an invoice, it must have a date in the
Bill Date field.
•
The QuickBooks Interlink Wizard can also automatically export
records from Quickbooks, check for duplicate data, perform standard
error checking, check for duplicate records, and import records into
QuickBooks. You must have QuickBooks Pro 6.0, QuickBooks 2001
and QuickBooks Pro 2001 to use this feature.
The QuickBooks Interlink Wizard will create files with a .IIF extension
within the Win2000\QuickBks folder on your sysetm. If you entered your
financial information into the Interlink Wizard, an Acc.IIF file will be
created containing this information. You will then need to import these
files by opening QuickBooks, clicking on the File menu, selecting
Utilities, and then Import.
Payments and Order Tracking • QuickBooks Integration
8/10/2001
The QuickBooks Interlink Wizard is the first step to integrating your QuickBooks financial records with WinTOTAL.
Page 14.12
Payments and Order Tracking
Starting the QuickBooks Interlink Wizard
To access this feature from the Appraisal Desktop.
1. Click on the Management shortcut.
2. From the Management screen, click QuickBooks Link.
3. Choose to import the records into QuickBooks yourself, or to have the
WinTOTAL QuickBooks Interlink Wizard to do it for you automatically.
As with all cross-product data conversions, unforeseen problems can
arise. It is highly recommended that you that you backup your
QuickBooks data before attempting the integration.
Note: a la mode, inc. does not provide technical support for issues within
the QuickBooks program. For assistance, please contact Intuit.
More Chapters
Click here to go to the online Table of Contents where you can
access additional chapters in the WinTOTAL user guide. Or, view the
other parts of the manual by selecting Contents from WinTOTAL’s Help
menu. You will find more tutorials on all of WinTOTAL’s PowerViews.
The more you know about the software, the more efficient and
competitive you can be.
Payments and Order Tracking • QuickBooks Integration
8/10/2001
Page 14.13
Configuration and Automated Tasks
Configuration and Automated Tasks
For as many appraisers as there are, there are just as many preferred
work habits. This chapter is dedicated to showing you ways you can
make WinTOTAL’s defaults more transparent. Be sure to see the
individual chapters on WinTOTAL’s PowerViews to learn how to use the
features we configure here. Most configuration items in WinTOTAL are
“set and forget”. So, the things you do in configuring are one-time
operations.
We’ll mainly cover items under the Configure item of the Tools menu and
cover items we may not have touched on in other chapters. In many
cases, we will refer you to another chapter.
Customize WinTOTAL
We’ve centralized the configuration of WinTOTAL to make it easier for
you as well as our support staff when needing to change options in the
program. In WinTOTAL, click Tools and then Configure to get to our
centralize configuration interface.
We’ve provided a scrolling list of categories on the side of this dialog that
lead you to the various sections you can personalize.
•
General Configuration. This area covers modules that go across
multiple PowerViews and are general to the whole WinTOTAL system
•
Formfilling. This sets up options pertaining to how WinTOTAL
prompts you for various items as you fill out forms as well as default
actions.
•
Photos. Optimize default compression as well as file naming.
•
Guru. Configure if and when automated tasks occur.
•
Updates. Tell WinTOTAL at what time and which day of the week or
month to get updates.
•
Pocket TOTAL. Install and configure our software for handheld
PC’s. For more information on Pocket TOTAL, see our “Welcome to
Pocket TOTAL” guide.
•
Connection.
Internet.
The customizing of WinTOTAL has all been centered around one dialog, making it
easy to get to the settings you use to personalize WinTOTAL.
Tell WinTOTAL how your system connects to the
Configuration and Automated Tasks • Customize WinTOTAL
8/10/2001
Page 15.1
Configuration and Automated Tasks
•
EDI Center. Set up your mailbox and default options when sending
and receiving EDI.
•
System. Schedule the clean up of unused and temporary files.
General Configuration
Miscellaneous
Most of these items are fairly self-explanatory. Just setting a few of these
options can save you from having to click to repeatedly confirm the same
dialogs over and over during day to day operation of WinTOTAL.
•
Ask before saving changes. The main reason to leave this on is for
cases where you frequently open completed files and want to make
sure you don’t alter them. Otherwise, you may wish to turn this off especially if you use our auto-save feature (described below) anyway.
•
Open File Cabinet when WinTOTAL starts. For the sake of speed
when starting WinTOTAL, you can leave this off. A fast way to get to
files is to use the “Most Recently Used” list under WinTOTAL’s File
Menu.
•
Close Appraisal Desktop when opening a report. This saves
memory and system resources. The downside is you’ll have to wait
for it to load each time you bring up the file cabinet. Those that do
most of their work inside the forms will leave this option enabled. You
office support staff may wish to leave the Appraisal Desktop running
all the time since they frequently will be in the File Cabinet and
Management sections.
•
Always default to the last printer that was selected. This
conveniently sets your PC’s default printer to the same one you last
chose for a WinTOTAL function.
•
Create transfer locks when converting old reports. WinTOTAL
has a feature that enables you to “lock” fields in which you’ve
overwritten items transferred from the main form. That way, these
fields don’t change every time you go to the minor form. Older
versions of WinTOTAL didn’t have this, so this option tells the
program to “leave data as it is” when you open a file created before
our Olympus generation.
Configuration and Automated Tasks • General Configuration
8/10/2001
The configuration options on this screen take away redundant clicks and streamline program operation.
Page 15.2
Configuration and Automated Tasks
•
Automatically save reports. This keeps you from losing data due to
system crashes or other unforeseen errors.
It can cause
inconvenient delays if your reports take a while to save due to many
digital photos.
•
Prompt for status updates when closing reports. If your office
relies on WinTOTAL’s status sending then you will want to check this
option. If you only use status for billing purposes, then you’ll need to
remember to mark reports as complete. An added benefit to
WinTOTAL’s digital signatures is that when you sign the report, it is
automatically marked as “complete”.
User
On mutli-user systems, it is recommended that each user have his or her
own profile they use when starting WinTOTAL. Many things such as
database preferences and more as well as file locking are tied to the
current user profile. These are described in “Networking WinTOTAL”.
Signature
WinTOTAL has very powerful digital signature capabilities. Not only is it
convenient to sign your whole report with just a couple of clicks, the report
is also “locked” and encrypted. Digital signatures are described in the
chapter on the “Form PowerView”.
Paths
These are the directories in which WinTOTAL stores data files, images
and databases. We do not recommend changing these from the defaults
since data loss can result from invalid entries. Our support staff can also
be more effective when they can work with things in the default
directories.
Many people will want to separate the program files from the data files.
That’s very common. However, the size of the WinTOTAL installation
compared to the data you generate and store in your databases is very
small. You might as well keep the program on the same drive.
If you are an experienced user that has a high volume of appraisals, you
may wish to consider using a different directory for digital photos every so
often since storing two thousand or more photos in one directory can slow
performance.
This setting can be typically changed without ill
consequences.
Configuration and Automated Tasks • General Configuration
8/10/2001
We don’t recommend altering the default paths WinTOTAL sets up unless you are
an expert user.
Page 15.3
Configuration and Automated Tasks
Formfilling Configuration
Data Entry
The recently used items are the last ten items ever typed in a field. This is
a minimal form of automated data entry. Most users prefer the QuickLists
for common responses since they can assign a hot-key as well as control
the list. If you never use the drop downs near the field, you can speed
performance by disabling them here.
If you find your self cloning a lot, it may be more convenient for the whole
field to be selected when you jump into it. That way, your typing
automatically overwrites what’s in that field and you don’t have to use
CTRL+K to remove the data.
A new feature for Athena is the ability to have multiple QuickLists chained
together in one field. This configuration screen enables you to decide the
behavior of the cursor when you use a QuickList entry.
Transfers
WinTOTAL saves you a lot of data entry by transferring items to your
minor forms. There may be rare instances where you don’t want data
transferred in, therefore, you can disable it in this screen.
Appearance
This is where you configure on screen appearance as well as printed
appearance.
•
Fonts. WinTOTAL stores a separate default for your forms and your
addenda. It is recommended that you modify this setting instead of
continually “selecting all” and changing the fonts manually!
•
Colors. The first drop down list lets you choose screen colors or
printed colors. You can actually choose color items for your forms
and they will print as you specify if you use a color printer. The
second drop-down lets you choose which element you are changing.
If you lose track of your changes, you can always click the Defaults
button to get them back to the installation defaults.
•
Initial Zoom Level. Most of the time, you will want to leave this on
Page Width. However, if you need the form zoomed in for better
visibility, you can try other settings here.
Configuration and Automated Tasks • Formfilling Configuration
8/10/2001
WinTOTAL’s on-screen and print colors may be configured independently.
Page 15.4
Configuration and Automated Tasks
Guru, System and Updates
More than pop-up tutorials
The Guru actually does the automated things in WinTOTAL. Click the
Daily tasks.. to see a list. These are items that are typically configured in
their respective area of the program - i.e. EDI Center for automated Send
and Receive.
File Collection
File Collection is a process that cleans up temp files used (and unused)
by WinTOTAL.
•
Delete unused photos. The image database tracks when you drag
a photo from it to a form. If you take a lot of extra pictures, download
them through QuickPix, then never use them, this utility can get rid of
them.
•
Delete temp files. This is a real disk space saver. WinTOTAL saves
a second copy of every report on your system. Instead of.ZAP, it has
an extension of .BZ1. It is simply there in case your ZAP file is
damaged beyond repair. The File Cabinet can restore the BZ1 (See
“Recovering lost reports” in the File Cabinet chapter) so you can at
least get back to one version before the last saved file.
•
Delete used photos. This deletes them from the database so they
won’t be in the way. The photos are still inside your appraisal reports.
Use this if you have old photos you don’t plan to reuse and want to
save disk space.
The schedule item simply specifies when to do these things.
Content Verification
Our Appraisal Desktop is HTML based in many places so it receives
content from the web. Content Verification will enable WinTOTAL to
connect to us online and get new, and always useful, data.
Our File Collection routines keep unnecessary files off your hard drive.
Updates
Part of your yearly membership fee goes towards getting updates at no
extra charge throughout the year. These are typically new forms and
enhancements to the program. Instead of forcing you to remember, we
can connect periodically and get them for you. That way, if you forget and
then an update is a “must have” you won’t have your work interrupted
Configuration and Automated Tasks • Formfilling Configuration
8/10/2001
Page 15.5
Configuration and Automated Tasks
while a lengthy download takes place. When you get the updates as they
come out, it is just a small download every time.
More Chapters
Click here to go to the online Table of Contents where you can
access additional chapters in the WinTOTAL user guide. Or, view the
other parts of the manual by selecting Contents from WinTOTAL’s Help
menu. You will find more tutorials on all of WinTOTAL’s PowerViews.
The more you know about the software, the more efficient and
competitive you can be.
Configuration and Automated Tasks • Formfilling Configuration
8/10/2001
Page 15.6
Multi-User Guide and Networks
Networking WinTOTAL
WinTOTAL has been designed to run in a multi-user environment.
Implemented properly, the benefits gained by sharing data, consolidating
resources and centralizing management of the system are enormous.
a la mode has produced a video on Networking and Multi-User
Installations. There’s something in it for everyone from beginners to
experienced network users. Call 1-800-ALAMODE to order one today!
Network Installation
Pre-installation setup
• Decide upon a server: First, you will need to select which machine
is going to be used as the “server”. If you have a dedicated server (a
machine which is not used by anyone directly for running applications
like WinTOTAL), this is the obvious choice. If you do not have a
dedicated machine available, select one of the computers on your
network to be your server. For better performance in WinTOTAL, it is
highly recommended that you use a dedicated server.
•
Map the network drive: WinTOTAL requires logical drive mapping to
function properly. This means that network drives that are to be used
for WinTOTAL need to be mapped as physical drives, (For example,
F:\) instead of a virtual drive (For example, \\Server\Share\Drive_C).
If you need assistance with basic Windows networking, you will need
to contact a local network technician.
When setting up a workstation to run WinTOTAL over a
network, one very important thing you should do is
“map” the server’s drive to an actual drive letter on the
client system.
It is vital that all workstations on the network “see” the server drive as the
same drive letter (For example, F:\). Before mapping the drive for
WinTOTAL, check all workstations to make sure that same drive letter is
available on each. Any letter can be used as long as it does not represent
a drive that already exists on one of the workstations.
Installing WinTOTAL on a network
If you are on a network, you can install WinTOTAL to the server from any
workstation that has access to the networked drive. You don't have to be
sitting at the server to run the installation. In fact, if you are using a
dedicated server, it’s better if you don’t install directly to the server.
When prompted for the drive and directory for WinTOTAL, simply replace
the default of C:\WIN2000 with F:\WIN2000 or another directory on your
Multi-User Guide and Networks • Network Installation
8/10/2001
Page 16.1
Multi-User Guide and Networks
network. The installation program will automatically add Windows
shortcuts to your Start Menu.
To set up WinTOTAL on the workstations, do the following:
1. Click the Start button, and then select Run.
2. Type F:\WIN2000\WINTOTAL.EXE and click OK. Remember to
substitute the correct drive letter and path for your server in the above
command.
3. The Setup Wizard will appear. Follow the instructions on-screen to
complete the installation on the workstation.
Our program is smart enough to detect whether or not WinTOTAL has
ever been run from that workstation and will set up all the icons and
necessary files. Repeat these steps for each workstation on your
network. Once this is done, all workstations will have shared access to all
of the files, databases, and images that are on the server.
Using a dedicated server
We strongly recommend a system with a dedicated server. Even if your
network is “peer to peer”, there's nothing that says the server can't be
treated as dedicated.
In theory, you should be able to use a network server as a workstation But
in practice, we've seen it cause major network slowdowns and general
unreliability when the server tries to handle requests from it's own console
and through the network.
Setting up user profiles
User profiles handle personal settings and more importantly - file locking.
If two people are logged into WinTOTAL with the same profile, you risk
them opening the same file without warning. When two people open the
same report simultaneously, the result is always errors and data loss.
Each machine must log in with its own profile.
By adding the highlighted line to the AUTOEXEC.BAT file of your Windows 95
or 98 computer, you will add a “new drive” to your system that is an exact mirror
image of your existing C:\ drive.
To set up user profiles, do the following:
1. From within a report, click on 3the Tools menu, and then select Configure. From the WinTOTAL Configuration Options screen, select the
User tab.
2. You’ll see the user names you have established displayed. The
current user will be highlighted. To change users, click Set User.
Multi-User Guide and Networks • Network Installation
8/10/2001
Page 16.2
Multi-User Guide and Networks
3. You should see a profile for every person on your network. If no
profile names appear, click the Add button to create new profiles.
•
Notice the option labeled Use this name automatically in the
future. This option exists so that people aren’t prompted every time
they start the program. On a network, we recommend a network
administrator set up user profiles for every person through this dialog.
Then, go to each machine and switch to the individual profile enabling this option so there is no confusion in the future.
•
Note: After you change the user name, your QuickList comments may
change. You can switch back to another QuickList profile by
selecting the Change TextDB name item in the Edit menu.
Common Installation Mistakes
Although networking the WinTOTAL software is fairly simple, there are a
few things that should be avoided to ensure your installation works
properly when implemented:
•
Do NOT map the network drive to the Win2000 folder in Network
Neighborhood: This is a common practice of many network
technicians attempting to increase security. Doing this, however, will
make some functions of the program inoperable. Be sure to map the
network drive one level above the Win2000 folder so that the path
appears similar to this: F:\WIN2000
•
Make certain that ALL permissions are given to each user on the
Win2000 folder and everything inside: Another common practice of
network technicians for security purposes is to only assign the
“necessary” permissions to users. While this may not affect most
other programs, when using WinTOTAL, every user will be reading
data from the folders, writing to and creating new files and folders,
and even deleting files and folders on a daily basis. This is the nature
of the program.
•
Make certain to run the WINTOTAL.EXE file from the mapped drive
and directory (F:\WIN2000), NOT through Network Neighborhood:
Once the drive is mapped, be sure to use that drive letter, rather than
Network Neighborhood to start the program. If this is not done
properly, the program will still be running through a virtual path, and
you may experience errors when trying to load the program such as
Multi-User Guide and Networks • Common Installation Mistakes
8/10/2001
In a network environment, you should
be certain that every user has their
own profile for WinTOTAL. This will
help to prevent database lockups and
loss of data.
Page 16.3
Multi-User Guide and Networks
“Invalid Zip Argument” or “There are currently 0.00 Megabytes of free
space available...”.
Recovering from an Improper Installation
If you (or your technician) have followed the guidelines on the previous
pages, WinTOTAL should run efficiently across all workstations on your
network. But, what if the installation was not done according to these
guidelines? You will want to rectify this as soon as possible.
There are three main “Improper Installation” types:
•
WinTOTAL being run through a virtual path
•
WinTOTAL installed on multiple machines on the network
•
WinTOTAL installed on a workstation, instead of the server
Each of these installation types brings along its own set of problems, and
has its own resolution.
Using a Virtual Path
Explanation of a virtual path
As we’ve said before, WinTOTAL requires logical drive mapping to
function properly. This means that network drives that are to be used for
WinTOTAL need to be mapped as physical drives, (For example, F:\)
instead of a virtual drive (For example, \\Server\Share\Drive_C).
It is recommended that all workstations on the network “see” the server
drive as the same drive letter (For example, F:\). Before mapping the
drive for WinTOTAL, check all workstations to make sure that same drive
letter is available on each. Any letter can be used as long as it does not
represent a drive that already exists on one of the workstations. Consult
your Network Administrator or a local technician for assistance with
mapping a network drive.
Resetting WinTOTAL to run from the mapped drive
Once the drive is mapped, the contents of the ALAMODE.INI file that hold
settings regarding directories must be cleared so that WinTOTAL can reassign them properly.
1. At the workstation, click the Start button, and select the Run icon.
2. In the Open dialog, type COMMAND, and then click OK.
Multi-User Guide and Networks • Recovering from an Improper Installation8/10/2001
Page 16.4
Multi-User Guide and Networks
3. This will open an MS-DOS window with a blinking cursor in the top,
left-hand corner. At the prompt, type:
REN
%WINDIR%\ALAMODE.INI
ALAMODE.OLD (Press Enter)
Note: You will lose all WinTOTAL settings after this command. If you
have any shortcuts on your desktop pointing to WinTOTAL, delete them
now, too. They will be pointing to the wrong location.
Next, you will need to reset the icons you use to run WinTOTAL and point
them to your server. Here's how:
4. At the workstation, click the Start button, and select Run.
5. In the Open line, type
F:\WIN2000\WINTOTAL.EXE INSTALL
and then click OK.
If your server drive is not F:\, substitute the appropriate drive letter in
the above command.
The Setup Wizard will appear. Follow the on-screen instructions to
complete the installation. When the installation is finished, it will create
new icons in your Start menu. Use these icons to start WinTOTAL, and
the program should open error free.
Multiple Local Installations
Explanation
This is possibly the most problematic type of improper installation you
may encounter. Because the program is being run locally, all of the files,
databases, images, etc. are most likely being loaded from each individual
machine, isolating each workstation from everyone else, and not allowing
anyone to benefit from other users’ efforts.
In order to resolve this kind of configuration, you will need to combine all
of the local installations onto a single server machine. While this process
will safely retain all of your report files and user configurations, doing this
may cause some users on your network to lose some of their database
entries (text, images, comps, etc.). This is a direct result of having local
copies of the program installed in a network environment.
This process is not supported by a la mode’s Technical Support staff, and
a la mode is not responsible for any data lost when following the steps
Multi-User Guide and Networks • Multiple Local Installations
8/10/2001
Page 16.5
Multi-User Guide and Networks
below. If you are uncomfortable with completing any of these steps, you
should contact a certified technician in your area for further support.
Migrating from multiple local installs
Merging multiple installations to one server requires the following:
1. Installing the WinTOTAL program to the server
2. Reconfiguring the workstations to run from the server
3. Saving user configurations to the server
4. Copying the “best” text database to the server
5. Moving the report files to the server
6. Copying/Rebuilding the comps and images databases to the server
Step 1 - Installing the WinTOTAL program to a single server
This step should be done according to the instructions set forth in the first
four pages of this chapter.
Step 2 - Reconfiguring the workstations to run from the server
The following procedures will keep your workstations from running their
local copies. Replace the appropriate drive letters for your network where
necessary:
1. At the workstation, click the Start button, followed by Programs, and
the WinTOTAL program group, and then the Tech Support Assistant icon.
2. Click the Editor button in the top, right-hand corner of the a la mode
Technical Assistant window.
3. Once in the Edit System Files window, click the button labeled Find/
Replace.
4. In the line labeled Find What, type C:\WIN2000. In the line labeled
Replace With, type F:\WIN2000. Then click the Replace All button.
5. Click Exit to exit the Edit System Files window, and then click Done
to exit the Tech Support Assistant.
Note: If you have any shortcuts on your desktop pointing to
WinTOTAL, delete them now. They will be pointing to the wrong location.
Next, you will need to reset the icons you use to run WinTOTAL and point
them to your server. Here's how:
Multi-User Guide and Networks • Multiple Local Installations
8/10/2001
Page 16.6
Multi-User Guide and Networks
6. At the workstation, click the Start button, and select Run.
7. In the field labeled Open, type
F:\WIN2000\WINTOTAL.EXE INSTALL
and click OK.
If your server drive is not F:\, substitute the appropriate drive letter in
the above command.
8. The Setup Wizard will appear. Follow the on-screen instructions to
complete the installation.
Repeat the steps above for each workstation on your network.
Step 3 - Saving user configurations to the server
Now that you have configured the workstations to run WinTOTAL from a
single copy on the server, you will want to copy your user settings from
each local computer to the server. These settings include your common
response database and putting your user name on the list of users.
Here's how to do this:
Note: If the same user name is set up on more than one local copy of
WinTOTAL, you may overwrite user settings on the server. This is a direct
result of having local copies of the program installed in a network
environment. a la mode, inc. is not responsible for loss of data when
following these instructions.
1. At the workstation, click the Start button, and select the Run icon.
2. In the Open dialog, type COMMAND, and then click OK.
3. This will open an MS-DOS window with a blinking cursor in the top,
left-hand corner. At the prompt, type:
XCOPY C:\WIN2000\USERS
(Press ENTER)
XCOPY C:\WIN2000\NETWORK
(Press ENTER)
F:\WIN2000\USERS
/E
/Y
F:\WIN2000\NETWORK
/E
Click Replace All to remove any references in this
WinTOTAL configuration file to the installation on
your computer.
/Y
EXIT (Press ENTER)
Repeat steps 1-3 for each workstation from which you want to transfer
local user settings.
Multi-User Guide and Networks • Multiple Local Installations
8/10/2001
Page 16.7
Multi-User Guide and Networks
Step 4 - Copying the “best” text database to the server
Once all of the workstations have been set up properly, you will have to
make a decision. You must choose which text database you want to
keep. You will only be able to use one copy of this database on the
server. Again, this is a direct result of having multiple local copies in a
network environment. For example, if there were four workstations on the
network running local copies of WinTOTAL, then three of these people
are going to lose their databases. We suggest using the database that
contains the most entries.
The following steps explain how to copy a database from a local computer
to the server.
Note: All users must exit WinTOTAL before moving the database to the
server. Again, these steps assume that WinTOTAL is installed to
F:\WIN2000 on the network server, and C:\WIN2000 is the old local
directory of WinTOTAL. If this is not the case on your network, please
substitute the appropriate drive letters/paths:
1. At the workstation, click the Start button, and select the Run icon.
2. In the Open dialog, type COMMAND, and then click OK.
3. This will open an MS-DOS window with a blinking cursor in the top,
left-hand corner. At the prompt, type:
For the Residential comparables database type:
C:
(Press ENTER)
CD\WIN2000\DATABASE (Press ENTER)
COPY TEXTDB.MDB
F:\WIN2000\DATABASE /Y (Press ENTER)
EXIT (Press ENTER)
Step 5 - Moving the report files to the server
The safest way to copy all of your reports onto the server is to:
•
Open up the Appraisal Desktop’s File Cabinet.
•
Create a new folder for your reports.
•
Attach an external directory to the folder that contains your reports.
•
Use the Move/Copy command.
Multi-User Guide and Networks • Multiple Local Installations
8/10/2001
Page 16.8
Multi-User Guide and Networks
Using this method keeps the threat of overwriting data to a minimum, and
reduces the amount of cryptic commands and procedures you would
have to follow. Again, these steps assume that WinTOTAL is installed to
F:\WIN2000 on the network server, and C:\WIN2000 is the old local
directory of WinTOTAL. If this is not the case on your network, please
substitute the appropriate drive letters/paths in the following instructions.
Here's how to do this:
1. Open WinTOTAL from your network installation. The Appraisal Desktop window should appear. If this does not happen, click the Open
button at the top of the TOTAL for Windows window.
2. From within the Appraisal Desktop, click the Options menu at the top
of the window and select Attach Directory from the drop-down list.
3. The Attach Directory dialog will appear, displaying a directory tree of
all available drives and folders available from your computer.
4. Browse to the drive or folder you wish to attach as a folder within the
Appraisal Desktop.
Example: if your reports are on drive C:\ in the folder called URAR, you
would want to select the C:\ drive and double-click on the WIN2000 folder,
then the Files folder, and then the URAR.FLD directory.
5. Click OK to attach the directory.
The Appraisal Desktop will prompt you for a name for the attached
directory. By default, it will use the path of the directory. However, you
can name it whatever you wish. Click OK when you've named the folder.
The Appraisal Desktop will show the attached directory with a 'computer'
icon. Treat that directory just as if it were another folder in the Appraisal
Desktop. Now either create a new folder for your reports, or select an
existing folder from the Appraisal Desktop. After that, all you need to do
is copy the reports from the attached directory to the folder that you have
selected.
6. Highlight the attached directory you created in steps 1-5.
In the Attach Directory dialog, be sure
to browse to the folder where your
reports are currently stored. Each
folder which contains reports in the
File Cabinet will have an FLD extension (URAR.FLD).
7. Click on the first report, hold down the SHIFT + CTRL + END keys on
your keyboard. This will highlight the entire group of report files.
8. Click on the button marked Move/Copy at the top of the Appraisal
Desktop window.
Multi-User Guide and Networks • Multiple Local Installations
8/10/2001
Page 16.9
Multi-User Guide and Networks
9. The Select Folder dialog will appear, displaying a list of the folders on
your Appraisal desktop.
10. Double-click on the folder name you selected above.
11. Repeat steps 1-10 for each folder that contains reports that need to
be copied from your local hard drive to the server.
12. After copying all of these files, you should disconnect each of the
attached directories to prevent any confusion. To do this click once
on the attached directory you created in steps 1-5 above to highlight
it, and then click the Folder menu and select Delete. Note: The
folder still exists, you're simply “hiding” it from view.
Be sure that the confirmation window asks if you want to disconnect, and
click on Yes.
Note: If you select a folder instead of the attached directory, you may
delete your reports and be unable to recover them.
Step 6 - Creating shared comps and images databases
This step involve your making a decision. You can either:
•
•
One - Start brand new, empty databases, and then let WinTOTAL
automatically rebuild the databases for you from your reports. This
option will completely rebuild both your comps and your images
databases with information that is already contained in your reports.
The only drawback to doing this is that, any images or comparables
that have never been used in any report will not be added to your new
databases. This is the preferred option, as it is faster and more
effective.
Two - Copy your images and/or comps databases from one of your
workstations to the server. This option will give you databases that
are already populated with information, but it will only be from one of
the workstations on the network. You will be giving up any other
database information stored on other workstations. You should use
this option only if you have been manually entering several
comparables/images that have not been used in any of your reports.
If you wish to use this method, skip to “Option #2: Copying a comps
and/or image database to the server” on page 12.
Multi-User Guide and Networks • Multiple Local Installations
8/10/2001
By using basic Windows keyboard commands, or keyboard and mouse combinations, you can select multiple entries at one time to move to your new File Cabinet
folders.
- SHIFT+CTRL+END selects everything from the entry highlighted to the last
entry in the list.
- SHIFT+Click selects everything between the entry highlighted and the entry you
click on.
- CTRL+Click individually selects multiple items in a list with each click
Page 16.10
Multi-User Guide and Networks
Option #1: Importing images and comps from reports
To begin the import process, do the following:
1. Start WinTOTAL - it should be running from your network drive now.
2. Open a report in WinTOTAL (it doesn't matter which report).
3. Click the PowerViews menu, then select Comps PowerView.
4. In the Comps PowerView window, click the Open Database button
to load the comps Database.
5. In the WinTOTAL - comps Database window, click the Insert button
at the top.
6. In the Import Comparables window, first make sure that the option
labeled Import photos with comps under the Additional Import
Information section has a checkmark next to it.
Be sure that this dialog appears when you Delete your
attached directory. If you are not prompted to “disconnect”, you may be deleting one of your main Appraisal
Desktop folders, and all of the reports it contains.
7. Under the File Cabinet Folders section, you will see a list of all folders
that are available in your File Cabinet. Select the folder(s) which
contain(s) your reports and click the Mark button to the right. You will
notice a small, red check mark applied to each folder you mark in this
way.
8. Once you have marked all of the folders you need, click the OK
button in the top, left corner of the dialog.
WinTOTAL will then begin importing all of the comparables that are in
each of the reports stored in the File Cabinet folders you have marked. At
the same time, it will extract a copy of each comparable's photo from the
reports and add it to your images directory and Image Database.
During this process, you may be prompted for additional comparable
information. While this information is not required, it will help to keep your
Comparable Database as complete as possible. You may also be
presented with dialogs that indicate that a Duplicate Comparable was
found. When a comparable in one of the reports matches one that is
already in your database, you are given four options:
•
Add a second copy of the same comparable to the database
•
Update the comparable in the database with the information found in
the report
•
Skip the duplicate comparable found
Multi-User Guide and Networks • Multiple Local Installations
8/10/2001
Page 16.11
Multi-User Guide and Networks
•
Cancel the importing process
Once the import process is complete, you will be able to place your
comparables into reports directly from WinTOTAL's Comparables
Database, and the image(s) associated with it will be placed on the
appropriate form automatically.
Option #2: Copying a comps and/or image database to the server
For this procedure, you will need to choose which copy of the databases
you want to keep. You will only be able to use one copy of these
databases on the server. Again, this is a direct result of having multiple
local copies in a network environment. This step is divided into three
sections:
•
Copying your “best” comps/images database to the server.
•
Copying your images to the server.
•
Modifying the images database to track your images in their new
location.
Copying your “best” comps/images database to the server
Note: All users must exit WinTOTAL before moving the database to the
server. Again, these steps assume that WinTOTAL is installed to
F:\WIN2000 on the network server, and C:\WIN2000 is the old local
directory of WinTOTAL. If this is not the case on your network, please
substitute the appropriate drive letters/paths:
1. At the workstation from which you want to copy the comps/images
database, click the Start button, and select the Run icon.
2. In the Open dialog, type COMMAND, and then click OK.
3. This will open an MS-DOS window with a blinking cursor in the top,
left-hand corner. See the table on the right for the proper commands
to move your database files.
Copying your images to the server
Here are the steps that need to be taken to copy the images from your
local hard drive to the server. If there are images on the server with the
same file names as on workstations, you will be prompted whether to
overwrite the file. We would recommend renaming the image files on
each workstation so that the names are unique. While this will preserve
Multi-User Guide and Networks • Multiple Local Installations
8/10/2001
The Import Comparables dialog includes several options for how to import
your data. For the fastest import, leave only the box for Import photos with
comps selected. If you want to be thorough with your data entry, make
sure that the Prompt for additional comp information for every comp
found option is selected. It is recommended that you leave the option labeled
Search for duplicate comps in the database selected so that you don’t have
several copies of the same comparable in your database.
Page 16.12
Multi-User Guide and Networks
every image, it will make entries to your image database invalid. The
renamed images will not be found in the database.
As mentioned before, this is a direct result of having multiple local copies
in a network environment (and in violation of the licensing agreement). a
la mode is not responsible for loss of data following these instructions.
Note: These steps assume that F:\WIN2000 is the directory of the
network install and C:\WIN2000 is the old local directory of WinTOTAL.
Please substitute the appropriate drive letters in the following instructions.
1. At the workstation, click the Start button, and select the Run icon.
2. In the Open dialog, type COMMAND, and then click OK.
C: (Press ENTER)
CD\WIN2000\DATABASE (Press ENTER)
COPY RESCOMPS.MDB
(Press ENTER)
F:\WIN2000\DATABASE /Y
EXIT (Press ENTER)
For the Commercial comps database type:
3. At the DOS prompt, type:
COPY C:\WIN2000\IMAGES\*.*
(Press ENTER)
For the Residential comps database type:
C: (Press ENTER)
F:\WIN2000\IMAGES
CD\WIN2000\DATABASE (Press ENTER)
COPY CMRCOMPS.MDB
(Press ENTER)
EXIT (Press ENTER)
Repeat steps 1-3 on each workstation.
Modifying the images database to find your images in their new location
Once the databases and the images have been moved, you will need to
modify the images database in order to find the images in their new
location. To do this requires that you open the database in the Visual
Data program included with WinTOTAL to modify the list of folders used
in the database.
Once again: a la mode cannot support this procedure, and is not
responsible for any data lost as a result of modifying your database. If you
are uncomfortable modifying your image database, you should contact a
local technician to make the appropriate changes.
F:\WIN2000\DATABASE /Y
EXIT (Press ENTER)
For the images database type:
C: (Press ENTER)
CD\WIN2000\DATABASE (Press ENTER)
COPY W2IMAGES.MDB
(Press ENTER)
F:\WIN2000\DATABASE /Y
EXIT (Press ENTER)
These steps assume that F:\WIN2000 is the directory of the network
install and C:\WIN2000 is the old local directory of WinTOTAL. Please
substitute the appropriate drive letters in the following instructions.
The following steps will edit the database to point to the new image
location:
1. At the workstation, click the Start button, and select the Run icon.
2. In the Open dialog, type F:\WIN2000\VISDATA, and click OK to start
the Visual Data application.
Multi-User Guide and Networks • Multiple Local Installations
8/10/2001
Page 16.13
Multi-User Guide and Networks
3. Inside Visual Data click the File menu, choose Open Database and
then MS Access.
4. In the Open MS Access Database window, under the Folders
heading in the middle, scroll down and double-click the Database
folder.
5. Under the File name section, scroll to the file named
W2IMAGES.MDB. Click on that file once to highlight it and click the
OK button.
6. With the W2IMAGES.MDB database open, you will see the Tables/
Queries: window with two selections: Folders and Images. Click
once on Folders to highlight it and click Open.
7. Now, inside the Table: Folders window, click the Edit button.
8. The FILEPATH can now be edited to point to the new location of the
images.
(Example: if the images have been moved from the C: drive to the F:
drive, the path would be changed from C:\WIN2000\IMAGES to
F:\WIN2000\IMAGES.)
9. With the path changed to reflect the new path, click the Update
button.
Note: This will bring you back to the previous window. If there are multiple
records that need to be edited, click on the button to take you to the next
record, and repeat steps 7 through 9 for each record.
10. Once you've updated all of the necessary records in the Table:
Folders window, click the Close button.
11. Now click the File menu and choose Exit.
Your images database should now be able to find all of the images on
your network server.
That's It
Once you've completed the above steps on all of your workstations, your
network should be configured for maximum efficiency.
Multi-User Guide and Networks • Multiple Local Installations
8/10/2001
Page 16.14
Multi-User Guide and Networks
Moving From a Local Install to a Shared Server
Explanation
This type of installation happens for a variety of reasons. Commonly, one
person will have the program installed, when the company determines it
would be beneficial to network several computers together. In this case,
many times, a one computer becomes designated as the server (usually
not the same computer where WinTOTAL is already installed), and
everyone wants to run the WinTOTAL program from the server.
To move a single installation of WinTOTAL from one workstation to a
server, you will need to first move all of the program and data files over,
and the, you will need to modify the image database to locate your
images in their new location.
Moving the program and data files to the server
There is a simple DOS command you can use to copy the WinTOTAL
directory from one hard drive to another. Before you begin, though, read
the section of this document devoted to backing-up your files. Backing up
is mentioned simply as a precaution, and is not a requirement. It does
however, insure that you will always have a copy of your reports, and it
can ease the process of restoring WinTOTAL to the new hard drive.
1. At the workstation, click the Start button, and select the Run icon.
Be sure to change the
FILEPATH to point to the
new location in which your
images are stored.
If there are multiple
records, make certain that
you have updated all of
them before exiting the
Visual Data application.
2. In the Open dialog, type COMMAND, and then click OK.
3. This will open an MS-DOS window with a blinking cursor in the top,
left-hand corner. At the prompt, type:
MD
F:\WIN2000 (Press ENTER).
XCOPY
C:\WIN2000
F:\WIN2000
/E (Press ENTER).
Note: If your server drive is not F:\, replace F:\ with the appropriate drive
letter in the above commands.
Your only other concern at this point is to adjust the ALAMODE.INI in the
C:\WINDOWS directory. This file contains all the paths WinTOTAL uses
to access your reports, text database comments, and images, among
other things. To do this, do the following:
Multi-User Guide and Networks • Moving From a Local Install to a Shared Server8/10/2001
Page 16.15
Multi-User Guide and Networks
4. At the workstation, click the Start button, followed by Programs, and
the WinTOTAL program group, and then the Tech Support
Assistant icon.
5. Click the Editor button in the top, right-hand corner of the a la mode
Technical Assistant window.
6. Once in the Edit System Files window, click the button labeled Find/
Replace.
7. In the line labeled Find What, type C:\WIN2000. In the line labeled
Replace With, type F:\WIN2000. Then click the Replace All button.
Click Exit to exit the Edit System Files window, and then click Done
to exit the Tech Support Assistant.
Note: If you have any shortcuts on your desktop pointing to
WinTOTAL, delete them now. They will be pointing to the wrong location.
Next, you will need to reset the icons you use to run WinTOTAL and point
them to your server. Here's how:
8. At the workstation, click the Start button, and select Run.
9. In the Open line, type F:\WIN2000\WIN2000
click OK.
INSTALL and then
If your new drive is not F:\, substitute the appropriate drive letter in the
above command.
10. The Setup Wizard will appear. Follow the on-screen instructions to
complete the installation.
Once you are sure that WinTOTAL is functioning properly on the new
hard drive, you can delete the old WIN2000 directory on the C:\ drive.
Modifying the image database to find images in their new location
When you download pictures through QuickPix, an entry is written to the
image database that tracks where those images are stored on your hard
drive (e.g. C:\WIN2000\IMAGES). If you move those images to a new
hard drive or directory (D:\ or E:\), the database will still look for the
images in the original location marked in the database. This is one of the
reasons for having the new hard drive installed as the C: drive and
copying WinTOTAL over to it. When moved to another C:\ drive all that
changes is the available disk space.
Multi-User Guide and Networks • Moving From a Local Install to a Shared Server8/10/2001
Page 16.16
Multi-User Guide and Networks
Once the databases and the images have been moved, you will need to
modify the images database in order to find the images in their new
location. To do this requires that you open the database in the Visual
Data program included with WinTOTAL to modify the list of folders used
in the database.
a la mode cannot support this procedure, and is not responsible for any
data lost as a result of modifying your database. If you are uncomfortable
modifying your image database, you should contact a local technician to
make the appropriate changes.
These steps assume that D:\WIN2000 is the directory of the new/network
install and C:\WIN2000 is the old local directory of WinTOTAL. Please
substitute the appropriate drive letters in the following instructions.
Click Replace All to remove any references in this
WinTOTAL configuration file to the installation on
your computer.
The following steps will edit the database to point to the new image
location:
1. At the workstation, click the Start button, and select the Run icon.
2. In the Open dialog, type F:\WIN2000\VISDATA, and click OK to
open Visual Data.
3. Inside Visual Data click the File menu, choose Open Database and
then MS Access.
4. In the Open MS Access Database window, under the Folders
heading in the middle, scroll down and double-click the Database
folder.
5. Under the File name section, scroll to the file named
W2IMAGES.MDB. Click on that file once to highlight it and click the
OK button.
6. With the W2IMAGES.MDB database open, you will see the Tables/
Queries: window with two selections: Folders and Images. Click
once on Folders to highlight it and click Open.
7. Now, inside the Table: Folders window, click the Edit button.
8. The FILEPATH can now be edited to point to the new location of the
images.
(Example: if the images have been moved from the C: drive to the D:
drive, the path would be changed from C:\WIN2000\IMAGES to
D:\WIN2000\IMAGES.)
Multi-User Guide and Networks • Moving From a Local Install to a Shared Server8/10/2001
Page 16.17
Multi-User Guide and Networks
9. With the path changed to reflect the new path, click the Update
button.
Note: This will bring you back to the previous window. If there are multiple
records that need to be edited, click on the button to take you to the next
record, and repeat steps 6 through 8 for each record.
10. Once you've updated all of the necessary records in the Table:
Folders window, click the Close button.
11. Now click the File menu and choose Exit.
Your images database should now be able to find all of the images on
your network server.
General Questions
When would I need a network? Can't I just install WinTOTAL on all of
the computers in my office?
If you have several people in your office needing to run WinTOTAL at the
same time, then you should get a network.
•
Even though the WinTOTAL installation disks are not copy protected,
it is against our licensing agreement to run it on two separate
computers at the same time; therefore, you can not legally install it on
several computers for several appraisers to use simultaneously.
Think of it like a book: Two people can't read a book in two places at
the same time.
•
If you have several appraisers in your organization with separate
PC's, you should either network those PC's or buy additional
WinTOTAL licenses from a la mode. Our technicians are authorized
to not support your program if we know it's on multiple PC's.
In plain terms, this sounds kind of rough, but it is actually very standard
for all types of software. When you consider the fact that we don't charge
extra for the network capabilities as our competitors do and that extra
licenses are at a greatly reduced price, it's very reasonable and lenient.
What's the difference between installing WinTOTAL on a network
server and on separate PC's?
When WinTOTAL is on a network server, then all of the program files,
forms, databases and program settings are in one location. It's very
Multi-User Guide and Networks • General Questions
8/10/2001
Page 16.18
Multi-User Guide and Networks
convenient for you by allowing you to share your data with other
appraisers in the office, thereby saving time and effort. It also keeps all
billing and management features centralized and convenient.
Another benefit to networking is that it makes technical support easier,
since we can trace any problems down to one location. For example, if a
function works as intended on workstation and not another, it can be
logically deduced that there is nothing wrong with the WinTOTAL program
files. Our technicians then know to look for things like device drivers that
can change from workstation to workstation.
Can WinTOTAL be installed to the local “C” drive with simply the files
directory pointing to the network?
Absolutely not! In order for Appraisal Desktop functions to work
properly - specifically, keeping the various entries for appraisers, lenders
and clients accurate - WinTOTAL needs to be run from the network
server. The lookups for appraisers, lenders and clients are stored in the
program directory. This is required in order to make a comprehensive
billing module work.
When a data file is opened, WinTOTAL checks to see if it was created on
the same system. (It uses your customer number.) If so, it matches the ID
codes for the appraisers and clients with those in the program directory.
Therefore, if you have multiple local installations using the same
customer number sharing only a common data directory, you risk
getting erroneous data in your appraiser and client fields.
Installing WinTOTAL on several “C” drives in a networked office is also in
violation of our License Agreement and nullifies your support contract.
(Have we convinced you not to do this yet?)
Do I need a special version of WinTOTAL if I plan to run it on a network? Does WinTOTAL run differently on a network?
No. We took extra steps to make WinTOTAL a multi-user program right
out of the box. WinTOTAL always loads user configuration files when you
start it so that it can retain settings for each profile. On a stand alone
system, there is typically just one configuration file.
More Chapters
Multi-User Guide and Networks • General Questions
8/10/2001
Page 16.19
Multi-User Guide and Networks
Click here to go to the online Table of Contents where you can
access additional chapters in the WinTOTAL user guide. Or, view the
other parts of the manual by selecting Contents from WinTOTAL’s Help
menu. You will find more tutorials on all of WinTOTAL’s PowerViews.
The more you know about the software, the more efficient and
competitive you can be.
Multi-User Guide and Networks • General Questions
8/10/2001
Page 16.20
Multi-User Guide and Networks
Multi-User Guide and Networks • General Questions
8/10/2001
Page 16.21
File Conversions
File Conversions
WinTOTAL has extensive conversion capabilities implemented to keep
you from “starting from scratch” when you switch to WinTOTAL. As you’ll
read in this chapter, batch conversions are available and easy to use.
However, we recommend that you convert reports for the express
purpose of using them for templates - eliminating the need to retype data.
After converting reports, you may even wish to create Quicklists from
items you already have typed into forms (described in the chapter titled
“Welcome to Athena”) or build a comps database (described in the
“Comps PowerView” chapter of this guide.).
Upgrading from competing systems
Importing a group of URAR files at once
WinTOTAL’s batch conversion utility offers the ability to convert URAR
and addenda data from most competing appraisal software systems:
•
ACI/PDSI (Both DOS and Windows versions)
•
Bradford (Windows version only)
•
CRAL (Windows version only)
•
Day One (Both DOS and Windows versions)
•
HighPerForm (Both DOS and Windows versions)
•
MCS (DOS version only)
•
Residential Appraiser (Both DOS and Windows versions)
•
Wilson (Windows version only)
Use the WinTOTAL 2000 Conversion Wizard to quickly import your files from any of a
dozen supported software formats.
To begin the batch conversion process, do the following:
1. From within WinTOTAL, click Tools and select Convert...This will
start the Conversion Wizard.
2. Select the software package from which you are converting in the
drop-down list to the right and click Next.
3. You will be prompted for the location of the files you want to convert,
as well as the location to which you want to save your newly
converted reports.
File Conversions • Upgrading from competing systems
8/10/2001
Page 17.1
File Conversions
•
In the Location of data files to be converted field, enter the path to the
current location of your report files, or click the Browse button to
navigate to the appropriate folder.
•
In the Location of data files after conversion field, you can either click
the New button to create a new folder in your File Cabinet, or click the
Browse button to find a folder to store them in.
4. Once you have entered the appropriate information, click the Next
button to progress to the next screen. The information provided in
this dialog explains the conversion, and gives some additional
information for what to do with your report files after conversion.
Once you have read this, click the Next button.
5. WinTOTAL will then scan the specified directory for any reports
created in the competitor’s software and will display a list on the right
of files that can be converted. Simply select the file(s) you wish to
convert and click the Add button. If you want to convert all of the
reports at once, click the Add all button. The report(s) you select will
then appear on the right-hand side of the dialog.
•
Select multiple non-contiguous files by holding down the CTRL key
while clicking the file names.
•
Or, select a block of files by doing the following: Click the first one,
then hold down the SHIFT key and click the last one in the list.
6. Once you have selected all of the files you want to convert, click the
Finish button, and WinTOTAL will convert them automatically and
place the new files in the folder you specified as the Location of data
files after conversion.
Simply point the converter to the directory containing your URAR reports and tell it
where to put the converted files.
The Select Folder dialog enables you to store your
converted data files in any one of your File Cabinet
folders for easy reference.
Note to users of FormFill’s PC Plus software: If you need to convert files
from the DOS version of FormFill’s PC Plus software, you will need to use
the converter that shipped with our DOS TOTAL 2000 package to change
them to our DOS format. Follow the instructions in “Batch conversions
from TOTAL 2000 for DOS” on page 3 to learn how to set up DOS TOTAL
2000. After DOS TOTAL 2000 is installed, go to its Utilities menu and
choose “Convert non a la mode...”. Once there, press F1 for additional
instructions specific to FormFill and PC Plus. Inconsistencies between
file versions in PC Plus prevent a reliable conversion; however, we
recommend trying the conversion to see if your version is supported.
File Conversions • Upgrading from competing systems
8/10/2001
Page 17.2
File Conversions
Upgrading from TOTAL 2000 for DOS
Once again, when upgrading your reports from DOS TOTAL, you have
two options. You can either import the files one at a time, or you can use
the batch import utility to convert a group of several reports at once.
Batch conversions from TOTAL 2000 for DOS
Just follow these steps for a successful upgrade from TOTAL 2000 for
DOS. We've made a program that will convert all user profiles, reports,
text databases and comparables database.
•
If you are converting text databases, user configurations, and comps
database as well as appraisal reports, you’ll need to exit WinTOTAL.
•
If you run the files converter more than once on the same set of old
files, you'll have multiple copies of them in your WinTOTAL folders.
They won't overwrite themselves the second time (on purpose).
1. Start in the Appraisal Desktop. Go to the Solutions Center.
2. Click Run WinTOTAL Utilities.
3. Run the item in the right column titled “Convert from TOTAL 2000 for
DOS”.
The Solutions Center has tools for converting DOS files as well as a lot of utilities to
keep you going once you have fully converted to WinTOTAL
4. Read the instructions on screen and follow the steps in the program
to convert your entire DOS TOTAL 2000 system.
5. After you click on any of the buttons, it may ask you to tell it where
your TOTAL 2000 for DOS program and/or appraisal files are located.
After you've told it once, it shouldn't ask again. For most users,
TOTAL 2000 for DOS will be in "C:\TOTAL" and the reports will be in
"C:\TOTAL\FILES".
Clean up the old DOS files
When converting files and Text Databases, you have the option of letting
the program back up and then delete the old DOS files after it converts
them. This is recommended and is set as the default, since the new
WinTOTAL files are stored in a compressed format -- they usually take up
90% less room on your hard drive compared to the DOS files. A typical
test case converted almost 50 megabytes of TOTAL 2000 for DOS files
into just under 3 megabytes of WinTOTAL files.
If you do want the converter to back up and delete your old DOS files to
save space, then do nothing (it will already be set that way). If you do not
File Conversions • Upgrading from TOTAL 2000 for DOS
8/10/2001
Page 17.3
File Conversions
want it to back up and delete your Text Databases or appraisal reports
after converting them, then click the “Options…” button after choosing
either the Step 2 or Step 4 buttons. Simply turn off the backup and delete
checkbox and then click OK.
If you do allow it to backup and remove the old files during the conversion,
then the old reports, Text Databases, and Quick Lists will not be
accessible to DOS TOTAL unless you later use the "Restore backups"
button on the screen shown above.
Opening a converted report the first time
When you first attempt to open a converted appraisal report in
WinTOTAL, it will take a moment while WinTOTAL does some additional
conversion of the actual data files. Once the report has been opened and
saved one time, the loading process will be much faster for that report in
the future.
Text Database conversions
If you convert Text Databases over to WinTOTAL, please be aware that
not all comments can be properly converted, since the order of the fields
in WinTOTAL's forms is different than in DOS TOTAL's same forms
(since the form is no longer broken up screen-by-screen). You may have
to re-do a handful of comments, and there's unfortunately nothing the
converter can do about it. If you have many multi-field comments, then
it's likely that at least some will not convert properly.
The Solutions Center is valuable during conversions to WinTOTAL as well as operations once you already are using it.
Comps Database conversions
Click the Comps Database button to launch the Comps Database
converter. If you run the converter more than once on the same
database, you'll end up with multiple records for the same properties.
They won't overwrite themselves the second time -on purpose. For the
database conversion, we recommend doing it only once.
Batch conversions from Grand TOTAL 4.1
If you have TOTAL 4.1 files you'd like to use in WinTOTAL, you must first
install TOTAL 2000 for DOS and let its converter update your TOTAL 4.1
files to the TOTAL 2000 format. Then allow WinTOTAL to upgrade your
newly converted TOTAL 2000 for DOS files into Windows format.
File Conversions • Batch conversions from Grand TOTAL 4.1
8/10/2001
WinTOTAL includes an easy step by step upgrade application to ease your transition into the world of Windows. It imports your report files, user configurations,
Text Databases and Comparables Databases. It even “cleans up” the DOS files
and conserves room on your disk!
Page 17.4
File Conversions
The setup for DOS TOTAL 2000 is located on your WinTOTAL CD. In
order for it to be run, it needs to be copied to your hard drive. Follow
these steps to copy the setup and run TOTAL for DOS:
1. Go to the Appraisal Desktop’s Solutions Center.
port Tools.
Then, go to Sup-
2. If you don’t know your CD ROM drive letter: Click on Edit System
Files, then Find and then type CD in the dialog that appears and click
OK. You’ll see a line highlighted that tells you what letter your CD
ROM drive is. Note the letter - i.e. “D” “E” or “F”, etc. Then click on
Cancel and then Exit.
3. Click Utilities. You’ll then see an item labeled MS-DOS prompt.
Double click it.
4. Make a temporary directory for the setup program.
Type: MD T2DOS and press ENTER.
5. Then, switch to that directory.
Type CD T2DOS and press ENTER.
6. Now we need to copy the files off the CD. This step assumes your
CD is drive E, but if yours is different, just substitute it in the following
command:
Type XCOPY E:\PRODUCTS\DOS2000\ALL and press ENTER.
7. After the files copy, type INSTALL and press ENTER to set up
TOTAL 2000 for DOS. If you choose the upgrade option when
installing, it will prompt you to create Table of Contents files for your
old reports - that is what you need to do before proceeding with a
batch conversion to WinTOTAL.
The WinTOTAL CD has a full install of our DOS TOTAL 2000 program on it so that you
can batch import files from competing systems or upgrade a TOTAL 4.1 file system.
More Chapters
Click here to go to the online Table of Contents where you can
access additional chapters in the WinTOTAL user guide. Or, view the
other parts of the manual by selecting Contents from WinTOTAL’s Help
menu. You will find more tutorials on all of WinTOTAL’s PowerViews.
The more you know about the software, the more efficient and
competitive you can be.
File Conversions • Batch conversions from Grand TOTAL 4.1
8/10/2001
Page 17.5
Pocket TOTAL
Welcome to Pocket TOTAL
Pocket TOTAL is the first appraisal application designed especially for
handheld PC’s, commonly referred to as HPC’s, that run the Windows CE
operating system. Incorporating data collection, photos, sketch and
more, it further automates the report writing process by eliminating the
need to re-type data once you get back to the office. It can save you 30
minutes or more per assignment. Read this document to learn about:
•
Preparing Your System for Pocket TOTAL
•
Installation, Setup and Updates
•
Using the Report Manager
•
Data Entry on the HPC
•
Using Digital Photos
•
Sketching the Floorplan
•
Reviewing Data Entered in the Field
•
Synchronizing with the Desktop
•
Internet Sending and Receiving
•
Workflow Examples
Preparing Your System for Pocket TOTAL
Windows CE services
Before installing Pocket TOTAL, you will need to install the Microsoft
Windows CE Services from the CD that came with your HPC. Consult the
documentation that came with your handheld computer for information on
setting up partnerships between your desktop and HPC. We recommend
using the defaults provided by the setup program.
Pocket TOTAL is a part of WinTOTAL Enterprise. I Instead of carrying around a cumbersome clipboard in the field, you can enter the information on a handheld PC, like the
one shown above, and then have that information transfer straight into WinTOTAL.
For information on purchasing Pocket TOTAL and compatible handheld PC’s, contact
an a la mode sales representative at 1-800-ALAMODE.
Pocket TOTAL has built-in synchronization services that update the
program as well as synchronize report files and requests with
WinTOTAL’s Office Manager. Therefore, you do not have to activate the
ActiveSync services provided by Windows CE that handle things like your
address book and appointments in Pocket Outlook, although they are
quite handy. All you need is for your PC to recognize when the HPC
device is plugged in for Pocket TOTAL’s synchronization to work.
Pocket TOTAL • Preparing Your System for Pocket TOTAL
8/10/2001
Page 18.1
Pocket TOTAL
If you installed the Windows CE services with the default settings, your
PC should automatically recognize when you plug your HPC into your
desktop computer.
If your HPC does not automatically connect, here’s how to do it
manually:
1. On your desktop system, double-click My Computer and then doubleclick Mobile Devices.
2. Connect your HPC to your computer.
3. If a connection is not established, then on the HPC, tap Start,
Programs, Communication, then PC Link.
4. After a few moments, your two systems should begin “talking”.
Depending on your setup, you may be prompted on either your
desktop or HPC to confirm the login.
Use the PC Link utility to initiate communications manually if your desktop and handheld PC’s don’t start automatically upon connecting.
Once again, if you installed the Microsoft Windows CE Services with the
default options, this should happen automatically. If you have trouble
connecting the HPC to the desktop, you should contact the manufacturer
of your particular HPC for additional assistance.
Configuring memory on the HPC
To effectively use an HPC with Pocket TOTAL, we recommend you have
at least 16MB. This memory is used for both permanent storage and
RAM. For optimal performance, it is recommended that you use as much
of this for RAM as possible. That way, you could run other applications,
such as the built-in spreadsheet or web browser at the same time you use
Pocket TOTAL.
The setup program for Pocket TOTAL will request up to 2MB (2000KB) of
storage space before starting the installation. At a minimum, you should
have 2MB of free storage space before setting up Pocket TOTAL. To
configure this setting on your HPC, do the following:
1. On your HPC, tap Start, then Settings and go to the Control Panel.
2. Double-tap the System icon.
properties.
You will then see your system
3. Tap the Memory tab to see how memory is allocated on your HPC.
Your HPC will run faster if you have more of its memory allocated to “Program Memory”. But of course, you need room for storing programs and files, too.
4. Move the slider to the right to get more Program Memory (RAM) and
to the left to get more Storage Memory. Simply make sure the
Pocket TOTAL • Preparing Your System for Pocket TOTAL
8/10/2001
Page 18.2
Pocket TOTAL
difference between the “Allocated” and “In Use” items on the left are
more than 2000KB before installing Pocket TOTAL.
5. Tap OK to confirm any changes you may need to make.
You can adjust this setting “on the fly” at any time while using your HPC.
Contrast settings on LCD and monochrome displays
Depending on your handheld device and lighting conditions, you may
need to adjust the contrast so that you can see the screen better while in
the field. We’ve found that the monochrome devices are easier to see
when outdoors. As a matter of fact, most color screens are virtually
impossible to read in sunlight. Monochrome screens also boost
performance and battery life since they use fewer resources.
Unfortunately, the hardware manufacturers are moving away from
monochrome devices; so we recommend getting your hands on one
before they are completely discontinued!
Installation, Setup and Updates
Copying the program to your HPC
Since the Pocket TOTAL setup files are copied to your desktop PC at the
time WinTOTAL is installed, there is no need for a separate installation
CD. The process by which it gets installed to the HPC is done through
WinTOTAL.
1. Press the reset button on your HPC to clear any programs that may
currently be running and could interfere with the installation.
2. Connect your HPC to your desktop computer and start the
synchronization routines provided by the Microsoft Windows CE
Services.
3. Start WinTOTAL and open any report.
4. Click Tools, then Configure. Then, click the Pocket TOTAL tab.
5. Once on the Pocket TOTAL tab, read it over carefully and click Install
Pocket TOTAL.
Depending on the speed of your serial
connection, it may take 10 or 15 minutes
to install Pocket TOTAL. You will see no
activity on your HPC’s screen.
6. It may take several minutes for the program to be copied to your
HPC. Follow the instructions as they appear on screen. After Pocket
TOTAL is installed, you’ll notice the rest of the options in the Pocket
Pocket TOTAL • Installation, Setup and Updates
8/10/2001
Page 18.3
Pocket TOTAL
TOTAL section of the Configure dialog are enabled. A Synchronize
button will also be available in Office Manager.
Synchronizing your QuickLists
After installing Pocket TOTAL, your QuickLists will automatically transfer
to your HPC. Each time you connect your HPC to your desktop PC,
additions made to your WinTOTAL QuickLists will be added to your
database in Pocket TOTAL. There is no mechanism in Pocket TOTAL to
create new QuickList entries, so these must be completed in WinTOTAL.
Getting updates to Pocket TOTAL
Updates to Pocket TOTAL are delivered right along with your WinTOTAL
updates.
Just as reports are synchronized, updates shall be
synchronized as well upon establishing a connection between your HPC
and desktop computer.
The Pocket TOTAL user guide is provided in HTML format and viewable on your HPC.
When in Pocket TOTAL, just tap Help and Pocket TOTAL...
Remember, If your HPC does not connect automatically, you can initiate
the link by tapping on the HPC’s Start menu, then tapping Programs,
Communication and PC Link.
Starting the program
The installation program creates icons for you in your HPC’s start menu.
To start Pocket TOTAL, simply tap Start, Programs, Pocket TOTAL and
then the icon for Pocket TOTAL. Depending on the speed of your HPC,
it may take a moment for the program to load. In general, HPC’s are not
as fast as desktop PC’s. Be patient when loading programs - your
machine may appear to be “hung” when in reality it is processing
information.
By default, the Pocket TOTAL Report Manager will be displayed first. The
Report Manager is your virtual file cabinet for your reports.
WinTOTAL has a special function triggered
by Windows that synchronizes files
between your desktop and HPC even
when WinTOTAL isn’t running.
Using the Report Manager
Organizing jobs and managing folders
Just as in WinTOTAL, you should create additional folders to store
reports and templates. To create new folders, do the following:
1. Bring up the Report Manager window. It loads when you first start the
program. It can also be accessed while in a report by tapping the File
menu and choosing Open.
Pocket TOTAL • Using the Report Manager
8/10/2001
Page 18.4
Pocket TOTAL
2. Tap the Folders menu and choose New.
3. Type the name of the new folder and tap OK.
There are several other items you can use in the Folders menu to
manage your folders. These operations work on the currently selected
folder.
•
Use the Rename option to give a folder a new name.
•
The Delete function will remove a folder and all of its contents.
•
The Refresh item is supplied for rare situations when a report may be
copied into a folder in a background operation like EDI.
Moving and copying reports
To move or copy a file from one folder to another, do the following:
The Report Manager loads as soon as the program is started. It gives you easy access
to your files.
1. Tap on the file you wish to move or copy.
2. Tap the File menu and choose Move or Copy.
3. Once the “File Move or Copy” dialog appears, select whether you
want to Move the file or Copy it.
4. Then, select the folder from the drop down list.
5. Tap OK.
Note: You can select multiple files for moving or copying or deleting by
holding down the CTRL key while tapping on them.
The “Synchronized” folder
When you installed Pocket TOTAL, a Synchronized folder was created in
your WinTOTAL File Cabinet and in Pocket TOTAL’s Report Manager.
Simply move or copy any file you wish to transfer to the other system into
the Synchronized folder and it will be transferred next time you connect even if WinTOTAL isn’t running.
Please see our section on
“Synchronizing with the Desktop” for more details.
Move or copy reports to the Synchronized folder so
that they stay in sync with the desktop.
Creating new files
There are several ways to start a new report.
•
Creating new files in Pocket TOTAL. Once you have started
Pocket TOTAL, simply tap File and then New to start a new request.
Or, tap the new document icon in Pocket TOTAL’s toolbar. You will
Pocket TOTAL • Using the Report Manager
8/10/2001
Page 18.5
Pocket TOTAL
be prompted for the report name, the form type and folder for the
report.
•
Copying existing Pocket TOTAL files. You can copy an existing
Pocket TOTAL report by highlighting it and using the Copy command
from the Report Manager’s File menu. This is handy if you have
templates created.
•
Starting files in WinTOTAL 2000. You can also start a new request
using WinTOTAL 2000. Create it just as you would any other
request, except when you are done, use the File Cabinet’s Move/
Copy function to move the file into the Synchronized folder. The next
time you connect your HPC to your system, it will be copied to the
handheld computer. The information from the Requester will be
visible in the Request PowerView of Pocket TOTAL.
Pocket TOTAL supports most of the popular
major forms. When creating a new report, it
defaults to the last type of form you used.
WinTOTAL and Pocket TOTAL will always synchronize files that are
stored in either system’s Synchronized folder. If the file exists on both
systems, then the data will be merged according to the chart in
“Synchronizing files” on page 15.
Loading an existing file
1. If the Report Manager is not currently in view, tap File, then Open.
2. To get to the right folder, simply tap it with the stylus.
3. Double-tap the file you want to load.
Shortcuts in the Report Manager
Here are some shortcuts to make easier work of functions in the Report
Manager.
•
The File menu contains a Most Recently Used list of the last four files
used. This is a quick way to get to a current project.
•
To delete a file, tap it once. Then click the “X” button in the toolbar.
•
To start a new report, click the new document button in the toolbar.
•
If double-tapping is awkward, you can open a report by tapping it
once and then tapping the icon resembling an open folder.
•
You can select multiple files for moving or copying or deleting by
holding down the CTRL key while tapping on them. You can select
blocks of files by tapping the first one, then pressing and holding the
SHIFT key while tapping the last.
Pocket TOTAL • Using the Report Manager
Pocket TOTAL maintains a Most Recently Used file list for easy access straight from
the File menu.
8/10/2001
Page 18.6
Pocket TOTAL
Data Entry on the HPC
The Pocket TOTAL environment
The Pocket TOTAL data entry environment is segmented into
PowerViews. Each PowerView contains functions related to a particular
portion of the report. To activate a particular PowerView, just tap once on
its name. Certain functions such as: New, Open, Save, Options and Help
are available regardless of the currently active PowerView.
Typing into fields
Typing in Pocket TOTAL primarily takes place in the Form PowerView.
Instead of emulating the form on the tiny HPC screen, we have arranged
the fields linearly in a grid. Above the data entry grid are special controls
(in this order): Jump to section, Visible fields list, Font, Find, Cut, Copy
and Paste.
•
Use ENTER or TAB to move between fields. You can also scroll
using the scroll bar, arrow keys, and PgUp/PgDn.
•
Jump to sections. Above the main form is a drop down to take you
quickly to sections of the form. This is the fastest way to get around.
•
Visible fields list. Tap this drop down to filter your list of fields to
show “All Fields” available in the form, all “Critical Fields” which you
must get while on site or the “Empty Critical Fields” only. You can
even customize the field list to show as many or few items while in the
field. This is described in “Custom Critical Fields” on page 8.
•
Screen text size. Tap the Font button to customize the size of text
on screen. The number of fields visible on screen at one time will
depend on the size you choose. The smallest size available is 10pt.
•
Quickly find fields. Tap the binoculars icon and type a field name to
quickly jump to it. For example, tap the binoculars once and type the
word bath, then tap OK. You’ll quickly jump to the first field that
contains the word bath anywhere in its description. Tap the
binoculars again, and you’ll notice that bath is still in there, so just tap
OK to find the next instance of the word.
•
QuickList comments.
These work in a manner similar to
WinTOTAL.
After the program was installed, your comments
should’ve been transferred over automatically. When you get to a
Pocket TOTAL • Data Entry on the HPC
8/10/2001
The Jump to Section drop-down is
much faster than scrolling through
fields to get to a particular section in
the form
Use the find button
to quickly jump to a
field.
You don’t
have to type the
entire field name.
Page 18.7
Pocket TOTAL
field where QuickLists were defined, you’ll see them on the right side
of the screen. Simply double-tap an entry to use it. The QuickLists
may be move to either side of the screen by tapping Options,
choosing Configure and selecting Left/Right. There is no functionality
for creating comments HPC itself; however, the comments
synchronize with your desktop each time you connect.
•
Cut, Copy and Paste. Buttons for Cut, Copy and Paste are provided
in the toolbar above the form entry section to speed your data entry.
The Cut tool is handy for clearing an entire field. These items are
also in the Edit menu.
•
Checkboxes and picklists. Data may be entered into checkboxes
by simply tapping in the data entry field. For an example of a
checkbox field, try the “Predominant Occupancy” fields in the
Neighborhood section. Certain fields have predefined picklists, such
as the “Marketing Time” field.
Custom Critical Fields
These are items that most typically need to be gathered/verified while on
site. When editing data in the form, you have the option to switch
between: All Fields, Critical Fields, and Empty Critical Fields. This feature
was designed to keep you from forgetting to note important items and
save a return trip back out to the property.
The Critical Fields
drop down allows you
to only view fields on
the form that must be
completed on site.
You can customize your list of Critical Fields by doing the following:
1. Go to the Appraisal Desktop Solutions Center. Then go to Support
Tools and select WinTOTAL Utilities...
2. Run the item on the right side for the Pocket TOTAL Critical Fields
Editor.
3. Click open and choose the Pocket TOTAL form for which you wish to
edit the Critical Fields list.
•
Move through the fields by scrolling or using the arrow keys.
•
You can quickly switch to another section of the form by using the
drop-down at the top much like the “Jump to other forms” feature in
WinTOTAL.
•
Fields can be marked/unmarked by left-clicking the mouse or using
the spacebar or ENTER key.
Pocket TOTAL • Data Entry on the HPC
For each form, you
can choose which
items are displayed
in
the
Pocket
TOTAL
Critical
Fields list.
8/10/2001
Page 18.8
Pocket TOTAL
•
Search for fields by clicking the Search button in the toolbar or
clicking the Tools menu and selecting Search. Type in part of the
description of a field and click OK. To find the next field containing
this text, press the F3 key.
•
Restore will restore the critical fields back to their default settings.
4. When you are satisfied with the list, click the Save button. If you are
on a network, each user will have their own settings.
In order for the changes to take effect, you’ll need to synchronize your
HPC with your WinTOTAL PC. This is described in “Synchronizing with
the Desktop” on page 15.
Entering free-form notes
Pocket TOTAL also incorporates a free-form text tool. Simply tap on the
Notes PowerView to open a full screen editor where you can enter in
comments that will help you when completing the report back at the office.
Using the Request PowerView
For reports that originate in WinTOTAL 2000, you will be able to see all of
the information from the original report request in the Request
PowerView. This function is not available for reports originating in Pocket
TOTAL, even after synchronizing with the desktop.
Using Digital Photos
Overview
Pocket TOTAL has the ability for you to read images from your camera’s
memory card. This feature is useful in situations where you are out of
memory on your card or if remembering which property went with each
photo is an issue. In order to use this feature, you must have the
following:
Use the Request PowerView to view request information on files that originated in WinTOTAL
1. A digital camera, such as a Kodak DC210, that stores images on
removable media.
2. Camera configured to save images in the JPEG format instead of
their proprietary format.
3. An HPC with a CF or PCMCIA slot. You may need to purchase an
inexpensive adapter for your camera’s memory card in case the slot
on your HPC is for a different type of media.
Pocket TOTAL • Using Digital Photos
8/10/2001
Page 18.9
Pocket TOTAL
Reading images from the memory card
The HPC operating system has a built-in understanding of memory cards.
It uses them in much the same way your desktop PC uses floppy disks.
As a matter of fact, the same memory cards sold for digital cameras are
also sold as external storage for HPC’s.
When you switch to the Photos PowerView, the Image Folder label will be
displaying the last used image directory.
•
On the right side of the screen will be the image files in that directory.
If the Image Folder is not correct and/or no image files are in the
directory, click Browse and select the correct folder.
•
You may find that you need to back up several levels to get to the
additional drive representing your memory card.
•
Many digital cameras store digital photos in directories on the card.
For example, the Kodak digital cameras allow you to create photo
albums and subsequently put each photo in the album in a separate
directory.
Photos saved on a memory card, such as one from a Kodak DC210, shown here will
often be in a subdirectory off the root.
Previewing photos before placing them
The Preview function works by creating a temporary HTML document that
Pocket TOTAL launches in the Pocket Explorer web browser.
•
You can preview the currently selected image, by tapping Preview.
•
Or, you can see all photos in the directory by tapping Preview All.
•
Once a preview is displayed in the web browser, you can tap on it to
view it in full resolution.
•
Functions in the browser, such as forward and back are available
when previewing the images.
•
When you are through with previewing the images, exit Pocket
Explorer by clicking on the “X” in the top right corner to conserve
resources.
It may take a minute or so for each preview to load since HPC’s aren’t
able to create low resolution “thumbnail” images as WinTOTAL does.
Placing photos in a report
Pocket TOTAL employs the Windows CE web browser to display previews of images.
1. Activate the Photos PowerView by tapping it once.
2. Tap the property or view with which the photo should be associated.
Pocket TOTAL • Using Digital Photos
8/10/2001
Page 18.10
Pocket TOTAL
3. Verify or Browse to the folder containing the images.
4. Tap once on the name of image file you wish to place.
5. Tap the Place button and the photo will be placed in report.
Photos may be removed from a report by tapping once on the description,
and then tapping Remove.
Note: After placing photos in a report, you may wish to delete them from
the memory card via Windows Explorer on the HPC.
Digital photos transferred to the desktop
When your Pocket TOTAL file is converted to a WinTOTAL file, any digital
photos that were inserted into the Pocket TOTAL report will be placed on
appropriate Subject and Comps photo pages automatically. Additionally,
the photos will be removed automatically from the file on your HPC to
conserve space.
Photos placed in a Pocket TOTAL report will automatically be transferred to an appropriate photo page when the file is copied back to the desktop using WinTOTAL’s synchronization routines.
Digital photo storage and performance
To alleviate memory concerns and increase overall performance,
consider reducing the “quality” setting on your digital camera. WinTOTAL
can do this automatically upon synchronization or reading the image
through QuickPix. (See our WinTOTAL chapter on digital photos)
However, you can increase the storage on your digital camera by using
the middle or lowest quality setting, yet retaining the highest “resolution”
setting. The differences in your printed output will be negligible.
Sketching the Floorplan
Sketch PowerView overview
Pocket TOTAL enables you to draw a simple sketch of the floorplan right
on your HPC. It’s the first on-site, hand-held sketching tool ever
introduced in the appraisal industry. We’ve kept it simple and straight to
the point.
Pocket TOTAL • Sketching the Floorplan
8/10/2001
Page 18.11
Pocket TOTAL
Tools for the sketcher are on the left and have the following functions:
When this Line Tool is activated, dimensions will be
placed automatically as you sketch.
When this Line Tool is activated, no dimensions will
be placed.
Activate the Text tool to place annotations in your
floorplan.
This turns the grid on and off. Set the scale by tapping Options and then Sketch settings.
Use the Undo button to erase lines in the order
they were drawn.
Pocket TOTAL includes a simple sketch tool that enables you to get the floorplan right
on site. It’s a lot easier than carrying around pencils and graph paper!
When Snap to Grid is activated, your cursor will
gravitate toward the nearest grid line on screen.
Click the Zoom-In icon to enlarge the on-screen
sketch.
Click the Zoom-out icon to reduce the on-screen
sketch and see more on screen.
Tap these icons to switch to one of three pages.
Tap on one of the line widths to set the style of line.
At the bottom of the screen is a thumbnail of the current page.
Draw straight lines by typing dimensions
Although you can tap on the screen and drag your stylus to draw in
Pocket TOTAL, you’ll be more accurate if you draw with the keyboard.
1. First, activate either one of the Line tools, with or without dimensions.
2. Then, tap the where you wish to start drawing.
Pocket TOTAL • Sketching the Floorplan
8/10/2001
Page 18.12
Pocket TOTAL
3. Press ENTER to anchor the cursor and indicate to Pocket TOTAL
that you wish to draw a line.
4. Specify the line you want to draw by typing a dimension on the
keyboard and pressing the arrow key to denote the direction.
5. Then, press ENTER to actually draw the line.
As you draw in Pocket TOTAL, you’ll notice line dimensions on
screen. This is also how you can tell if the pen is up or down.
Draw angles by typing dimensions
Draw angles by specifying the rise and run. For example, to draw a wall
that goes down 5 feet and over 6 feet, do the following:
1. If you’re not already in the process of drawing lines, activate the line
tool, tap where you wish to start drawing and then press ENTER to
anchor the cursor.
1. Type 5 and then press the down arrow key.
2. Then, type 6 and press the right arrow key.
3. Complete the line by pressing ENTER.
Moving the cursor without drawing a line
At any point while drawing, press the SPACE BAR to lift your pen off the
sketch tablet. At this point, you can type dimensions and directions and
press ENTER to move the cursor without drawing a line. Or, you can
click in a new location on the page. Then, press SPACE BAR again to put
the pen down.
Draw incrementally with arrow keys
You can also draw lines without necessarily typing dimensions.
1. First, tap where you wish to start drawing.
2. Press ENTER to anchor the cursor and indicate to Pocket TOTAL
that you wish to draw a line.
3. Press an arrow key in the dimension you wish to draw. You can use
all directions. The cursor will move one unit with each key press.
Due to limitations in Windows CE, you will need to press the arrow
keys repeatedly instead of holding the key down to go multiple units
in the same direction.
4. Press ENTER and a line will be drawn between your starting and end
points.
Pocket TOTAL • Sketching the Floorplan
8/10/2001
Page 18.13
Pocket TOTAL
Placing text annotations in the sketch
You can use text annotations to denote rooms or other characteristics of
the floor plan.
1. Tap the Text tool.
2. Click where you want the text to appear on your sketch.
3. Press the ENTER key to lock down the stylus.
4. Type the text.
5. Press ENTER again to lock it in.
You can repeat steps 2 through 5 to continue placing text on screen.
Sketches converted to WinTOTAL
When files are copied back over to your desktop computer, the Pocket
TOTAL sketch is accessible through WinTOTAL’s Sketch PowerView.
Just click the Pocket Sketch button. From there, you can view and print a
hard copy of the sketch so that you may draw a more detailed one using a
sketcher integrated with WinTOTAL.
Reviewing Data Entered in the Field
Overview
The Review capabilities in Pocket TOTAL are to ensure you don’t have to
go back on site once you are through collecting data. Every time you tap
the Review PowerView, Pocket TOTAL takes a moment to rebuild the
review information. There are two sections in the Pocket TOTAL Review
PowerView, the Checklist and Information.
Once your file is synchronized, you can view or print your sketch to make it easier
to redraw it in a more powerful desktop sketcher.
On-site checklist
On the left side is the checklist. Here, you may list items that you want to
remind yourself before leaving. We included text for a few items just to
explain how it works. You can delete or edit those.
•
To add a new task, simply tap Add, type your task and tap OK.
•
To edit an existing task, tap it, then tap Edit and make your changes.
•
To remove a task, tap it and then tap Remove.
•
The Save button allows you to save your entries as the default for all
future reports.
•
The Yes/No item may be toggled by double-tapping on the task.
Pocket TOTAL • Reviewing Data Entered in the Field
8/10/2001
Use Pocket TOTAL’s Review PowerView checklist to add your own personal items
and important things not to forget before leaving the site.
Page 18.14
Pocket TOTAL
Report information
The right side of the Review screen lists report information. A drop-down
list at the top gives you a view of three different types of information.
•
The Summary Information displays a variety of items such as the
date the report was synchronized and other basic data in the report.
At the end of the list, you can see the number of fields in the report,
the number of empty fields and the number of empty critical fields.
•
The Empty Critical Fields actually lists the Critical Fields that have
been left empty.
•
The Empty Fields option will list all fields that contain no data.
Be sure to scroll through the information. There is much more information
listed than what will fit on one screen!
Synchronizing with the Desktop
The Review PowerView is where you can see a summary of your entries as well as
get quick information regarding empty fields in the form. Use the checklist to make
sure you don’t leave the site without performing crucial tasks that could cause a return
Synchronizing QuickLists
Any new QuickList items that have been added to WinTOTAL since the
last time you connected will be transferred to your HPC automatically.
There is no function for creating new QuickList comments in the field on
the HPC.
Synchronizing files
Before connecting your HPC back to your computer, make sure the file is
moved to your “Synchronized” folder on the HPC. Simply tap File and
select the Move/Copy function. When your HPC is connected to your
PC, it will automatically be sync’d with your Office Manager.
You should only keep currently active jobs in your Synchronized folders.
Once you are past the point where an assignment needs to be
synchronized, you should move it to a permanent location on both
systems.
Due to storage limitations on the HPC, we don’t recommend transferring
all your reports to the HPC. However, the Pocket TOTAL files are small in
size, so feel free to keep any file on there that you may want to use later
as a template for another report.
Pocket TOTAL • Synchronizing with the Desktop
8/10/2001
Synchronization logic when file exists on both systems
Edited in Pocket
TOTAL since last
sync’d
Yes
Edited on desktop since last
sync’d
Yes
Yes
No
No
Yes
No
No
Result
Data from both files is
merged together. Blank
fields are skipped
Pocket TOTAL data, including blank fields, is copied
over data in WinTOTAL file.
Desktop data, including
blank fields, is copied over
data on HPC.
No data exchanged.
Page 18.15
Pocket TOTAL
Images embedded in Pocket TOTAL files
When images are used in a Pocket TOTAL report, they will only be
synchronized one time - inserted into appropriate photo pages in the
report. Additionally, the images on the handheld PC will take precedence
over any images already in the report. After the file is copied to your
desktop system, the images are removed from the file on the HPC.
Synchronization options in WinTOTAL
To configure your synchronization options, do the following:
1. Open a report in WinTOTAL.
2. Click Options, then Configure and then the Pocket TOTAL tab.
3. The Synchronization options are in the lower half of the screen.
•
“Synchronize On Connect” is the default option. It causes your
desktop and HPC to synchronize files each time you connect,
regardless of whether WinTOTAL is running or not.
•
“Synchronize Manually” suppresses synchronization until you click
the Synchronize button in Office Manager.
•
The option to “Always delete corresponding reports from the Pocket
TOTAL Synchronized folder...” is useful because it keeps you from
having to repeat the process of moving files out of the
Synchronization folders on both the HPC and WinTOTAL. You
wouldn’t want to keep “finished” files in the Synchronized folders
because they will perpetually be synchronizing! Use this option if you
rarely have to re-edit a file on the HPC after it is merged with the
desktop.
In WinTOTAL, click Options, Configure and then the Pocket TOTAL tab to adjust
your synchronization options.
4. Click OK after you have selected the desired options.
Manual synchronization
Synchronization routines may also be initiated manually from your
desktop. Be sure your HPC is connected at the time you run them.
•
To manually synchronize files and QuickLists, open WinTOTAL’s
Office Manager and click Synchronize.
•
To manually rebuild the QuickLists on your HPC, open WinTOTAL’s
Technical Support Assistant, click Utilities and then run the option
from the list on screen.
Pocket TOTAL • Synchronizing with the Desktop
8/10/2001
Page 18.16
Pocket TOTAL
Internet Sending and Receiving
Overview
Pocket TOTAL has the ability to communicate with WinTOTAL via
Internet e-mail as well. That way, you can send and receive requests and
data while you are out of the office. Pocket TOTAL is assisted by the
Internet connectivity and Pocket Outlook modules bundled with the
Windows CE operating system.
HPC’s contain dialing properties to
accommodate different options when
connecting with your
modem.
Configuring these modules is done outside of Pocket TOTAL and
something Pocket TOTAL assumes is already complete by the time you
attempt to use the features. It is likely that there are different options for
the varying models of HPC’s, but we will attempt to give you the general
idea here to assist you in setting up Internet e-mail on your HPC.
If you use an HPC with wireless capabilities, please skip these sections
on HPC communications properties and Internet settings. Instead, refer to
the manual that came with your wireless HPC.
HPC communications properties
By definition, the HPC is a mobile device that is used often “on the road”
by people that travel frequently. Therefore, it has special settings that
allow you to set up profiles for dialing from different area codes or
countries. Here is one way to set it up to dial from the field when in the
same area code.
1. Tap Start and then Settings, and then Control Panel.
2. The next step varies with the version of CE your system runs:
•
On CE 2.0 HPC’s, such as the Novatel CONTACT, double-tap the
Communications icon. Then, tap the Dialing tab to bring it into view.
•
On CE 2.1HPC’s, usually with color screens, tap the Dialing icon.
3. Let’s set up a new “profile” for in the field. Tap New and type In the
Field for the new location. Then, tap OK.
4. Type your local area code, a country code of 1, tone or pulse and
appropriate options for call waiting.
5. Tap Dialing Patterns. This is where you tell it if you have to dial a
country code or area code from this location. All three items should
typically have a G in them. Tap OK.
Pocket TOTAL • Internet Sending and Receiving
8/10/2001
Creating a new dial-up connection on an HPC is similar to creating one on your desktop PC. Consult your ISP if you need assistance beyond this document.
Page 18.17
Pocket TOTAL
6. Now, tap OK again to accept the Communications Properties.
Configuring HPC Internet settings
This section will help you connect your HPC to the Internet. It is similar to
connecting with your desktop PC and likely that you will be able to use
your existing ISP with your HPC. For this section, you will need to know
the number for your ISP’s dial-up, your account name and password.
1. Tap Start, Programs, Communication, then Remote Networking.
2. Double-tap on Make New Connection.
3. Type a name for the connection. For example, the name of your ISP.
4. Select the item that says “Dial-Up Connection” since we will be
dialing the Internet. Then, click Next.
5. Verify the modem selected. You typically will have only one on your
HPC. The default modem strings and TCP/IP settings should work
for most ISP’s. If you have problems connecting, you should consult
the documentation that came when you ordered your Internet service
or call the support department of your Internet provider.
If you use a standard modem connection, you should be able to dial your ISP with the
same number for both your PC and handheld. But, you probably won’t be able to connect
them both at the same time.
6. Click Next and you will see a screen where you enter the telephone
number of your ISP. Enter a 1 for the country code, your appropriate
area code and the telephone number of your ISP.
7. Click Finish and you will be returned to the Network Settings screen.
8. If your HPC is connected to your desktop computer at this time, you
will need to disconnect. Then, test the Internet connection by doubletapping on the connection.
9. Enter your user name and password. A Domain is typically not
required. Tap Save password if you do not wish to type this
information again when you connect.
10. Make sure a phone line is connected to your HPC and tap Connect.
11. Once connected, you should be able to browse the Internet. Just tap
the Internet icon on your desktop. Or tap Start, Programs and then
The Internet. Try hitting a site such as a la mode’s home page by
typing http://www.alamode.com in the URL field.
If you experience trouble connecting to the Internet with your HPC, you
should consult the Windows CE reference guide as well as contact your
ISP for additional assistance.
Pocket TOTAL • Internet Sending and Receiving
8/10/2001
Page 18.18
Pocket TOTAL
Configuring Pocket Outlook
Once you have successfully connected to the Internet and verified that
you can visit various web sites, you’ll need to set up e-mail services in
Pocket Outlook.
When using Pocket TOTAL with the Internet, you’ll need to have an email address separate from your personal e-mail as well as your regular
WinTOTAL e-mail - in other words, a third e-mail account. Customers
that purchase Pocket TOTAL are able to have another e-mail account on
our Project 2000 server. Contact our Technical Support department to
set up an additional account.
Once you have an account name and a password, here is how you
configure Pocket Outlook to use it. These steps recommend different
options than those you would use for a regular e-mail account on your
HPC, so it is important that you follow them.
Pocket TOTAL uses the Pocket Outlook program bundled with the CE operating system. Since you should keep appraisal e-mail separate from the personal e-mail you
may receive on the HPC, you should create a separate Service for it.
1. Start Inbox using the shortcut on your HPC desktop or hot-key often
found on HPC’s. Or, go the long way by tapping Start, Programs,
Pocket Outlook and then Inbox.
2. The next step varies, depending on the version of CE your HPC has:
•
On systems running CE 2.0, tap Compose and then Options.
•
On systems running CE 2.1, usually those that have color screens,
tap Services and then Options.
3. We recommend leaving the Compose, Read and Delete options at
their default. Tap the Services tab.
4. Tap Add to set up a new e-mail account.
5. The next step varies depending on the version of CE your HPC has:
•
On HPC’s running CE 2.0, select Internet Mail, tap OK and enter a
unique name for the service. You may want to call it Appraisal Mail.
•
On HPC’s running CE 2.1, select POP3 and enter a unique name for
the service. You may want to call it Appraisal Mail.
6. Next, you need to specify the connection settings. Select the
appropriate Internet connection, as described in “Configuring HPC
Internet settings” on page 18.
7. For the POP3 Host, use mail.proj2000.com.
Pocket TOTAL • Internet Sending and Receiving
8/10/2001
You should use a separate mailbox for Pocket TOTAL reports. Contact our support
department on setting up an additional account under your a la mode customer number.
Page 18.19
Pocket TOTAL
8. For the User ID, enter the account name that was given to you at the
time you requested your Pocket TOTAL mail account. It will most
likely be based on your customer number with extra letters at the end
denoting it is for Pocket TOTAL.
9. Enter the password you specified when requesting the account.
10. Specify an SMTP host of mail.proj2000.com.
11. Specify a return address of your account name followed by
“@proj2000.com”.
12. Tap Next. At this point, you may want to check the box that
disconnects you after actions are performed. This is at your
discretion as are the other options on this screen.
13. Tap Next. This screen is very important! Due to storage and speed
limitations, Pocket Outlook does not default to downloading entire email messages. For Pocket TOTAL EDI to work correctly, you must
change the default settings on this screen.
•
Select the option for Full copy of all messages
•
Check the box for File attachments as well.
It is important that you mark the option to download full messages with attachments so
that Pocket TOTAL reports transmit properly.
14. Tap Finish and then OK.
These settings only affect messages for your Pocket TOTAL mailbox. If
you have other e-mail services on your HPC, they will use their own
individual settings.
Sending from WinTOTAL to Pocket TOTAL
When reports are sent from WinTOTAL to Pocket TOTAL, the outbound
report is automatically converted to the Pocket TOTAL format. Only data
from the Requester and major form are sent.
In WinTOTAL, do the following:
1. Start in WinTOTAL’s Office Manager.
2. Click once on the report you wish to send.
3. Click the EDI menu and choose Send Report via Internet EDI.
4. When our EDI Wizard appears, enter the recipient’s name and e-mail
address and choose the Pocket TOTAL method of sending.
5. Click OK.
Pocket TOTAL • Internet Sending and Receiving
8/10/2001
Be sure to choose the Pocket TOTAL format when sending a file to your HPC
so that it gets converted to a format that your HPC can read once it is
received.
Page 18.20
Pocket TOTAL
6. Once back in Office Manager, click the EDI menu select Send/
Receive all Internet EDI.
For more information on transmitting files through the Internet with
WinTOTAL and automating the connection/delivery process, see our
WinTOTAL user guide, or click Help while in the EDI Wizard.
To retrieve the file on your HPC:
The process for receiving files in Pocket TOTAL involves using Pocket
Outlook to download the files and then using Pocket TOTAL’s EDI
functions to move them from the Inbox to the Internet Received Reports
folder.
1. Make sure you are connected to a phone line or that your HPC is otherwise ready to connect to the Internet.
2. Open Pocket Outlook’s Inbox on your HPC.
3. Tap Service and verify that the account set up for your appraisal email is selected. Then, tap Service again and select Connect. This
will retrieve (and send) all mail for the selected account. You may
have to enter your user name and password to get on the Internet.
When sending from Pocket TOTAL, be sure
to select the service that was set up in
Pocket Outlook for your Pocket TOTAL files.
4. Once the mail is retrieved, open Pocket TOTAL’s Report Manager.
5. Tap EDI and select Receive Internet EDI.
6. Any Pocket TOTAL messages that were in your “Appraisal
Messages” Inbox will be moved to your Internet Received Reports
folder.
At this point, you may wish to move them to a working folder, or even your
Synchronized folder.
Sending from Pocket TOTAL to WinTOTAL
The process for sending files from Pocket TOTAL involves using our
Report Manager to place files in Pocket Outlook’s “Outbox”, then using
the connection features in Pocket Outlook to actually deliver them to their
intended destination.
To send the file from the HPC:
1. In Pocket TOTAL’s Report Manager, tap once on the report you wish
to send. (Tapping twice opens it and we don’t want that!)
2. Tap EDI and select Send via Internet EDI.
Pocket TOTAL • Internet Sending and Receiving
8/10/2001
Page 18.21
Pocket TOTAL
3. Type the e-mail address of the intended recipient. This should be a
mailbox intended for WinTOTAL reports only since the message will
be unreadable except by WinTOTAL.
4. Select the mail service you set up in Pocket Outlook for appraisal
related mail. Then, tap OK.
5. Open Pocket Outlook’s Inbox on your HPC.
6. Tap Service and verify that the account set up for your appraisal email is selected.
7. Then, tap Service again and select Connect. This will retrieve (and
send) all mail for the selected account. You may have to enter your
user name and password to get on the Internet.
You can send multiple files at one time through Pocket TOTAL. They
simply get put in the Outbox awaiting the next connection to the Internet.
To retrieve the file(s) in WinTOTAL:
This is just like retrieving any other files sent through the Internet to
WinTOTAL.
1. Click the EDI menu.
2. Select Send/Receive all Internet EDI.
3. The report you sent from the HPC will “land” in your Internet Received
Reports folder.
For more information on using the Internet with WinTOTAL and
automating the connection/delivery process, see our WinTOTAL user
guide.
Workflow Examples
Starting in WinTOTAL and connecting with a cable
Use the Move/Copy function in WinT
TAL’s Office Manager to move files
and from the Synchronized fold
Remember to select the option
move the file, since Copy is the defa
1. Create the new request in WinTOTAL as you typically would.
2. Move it to WinTOTAL’s Synchronized folder.
3. Connect the HPC and allow the report to copy to the HPC’s
Synchronized folder.
4. Go into the field and work up the report.
5. Back at the office connect the HPC to your desktop machine and
allow the report to synchronize back to the desktop.
Pocket TOTAL • Workflow Examples
8/10/2001
Page 18.22
Pocket TOTAL
6. Move the report out of WinTOTAL’s Office Manager Synchronized
folder to a more appropriate working folder.
7. If you are done on the HPC, move the report out of the HPC’s
Synchronized folder or delete it. See “Synchronization options in
WinTOTAL” on page 16 to learn how to automate this procedure.
Starting in Pocket TOTAL connecting with a cable
1. Start and enter data into a Pocket TOTAL file.
2. Move the file to the Synchronized folder if it is not already in there.
3. Connect the HPC to the desktop and allow the file to be copied over.
4. Move the file out of WinTOTAL’s Synchronized folder into a more
appropriate working folder and complete the report.
Be sure to move requests sent from WinTOTAL 2000
into the Pocket TOTAL Synchronized folder if you are
going to transfer them to the desktop via the PC Link/
cable connection.
5. If you are done on the HPC, move the report out of the HPC’s
Synchronized folder or delete it. See “Synchronization options in
WinTOTAL” on page 16 to learn how to automate this procedure
Starting in WinTOTAL and connecting via EDI
1. Create the new request in WinTOTAL as you typically would.
2. Use WinTOTAL’s EDI functions to send it to the HPC’s mailbox.
3. Retrieve the report on the HPC and work it up in Pocket TOTAL.
4. You now have two options to get the file back to the desktop:
•
Send the file back to the WinTOTAL e-mail address and retrieve
it in WinTOTAL. This method does not allow you to synchronize with
any files in WinTOTAL. However, you can merge information from
the Pocket TOTAL file by loading the report that you want to merge
into and using the Merge data function in WinTOTAL’s Form menu.
•
Using the standard cable/PC Link. Move the Pocket TOTAL report
into the Synchronized folder as well as the WinTOTAL file into its
Synchronized folder so they will synchronize when you connect via a
cable back at the office. After synchronizing, you should move the file
from each system’s “Synchronized” folder. See “Synchronization
options in WinTOTAL” on page 16 to learn how to automate this
procedure.
Pocket TOTAL • Workflow Examples
8/10/2001
Page 18.23
Pocket TOTAL
Starting in Pocket TOTAL and connecting via EDI
1. Create the new request in Pocket TOTAL as you typically would and
work up the report.
2. Send the file using Pocket TOTAL’s EDI functions.
3. You now have two options to get the file back to the desktop:
•
Send the file back to the WinTOTAL e-mail address and retrieve
it in WinTOTAL. You can then merge information from the Pocket
TOTAL file by loading the report that you want to merge into and
using the “Merge data...” function in WinTOTAL’s Form menu.
•
Using the standard cable/PC Link. Move the Pocket TOTAL report
into the Synchronized folder. Then connect. After synchronizing,
you should move the file from each system’s “Synchronized” folder.
See “Synchronization options in WinTOTAL” on page 16 to learn how
to automate this procedure.
More Chapters
Click here to go to the online Table of Contents where you can
access additional chapters in the WinTOTAL user guide. Or, view the
other parts of the manual by selecting Contents from WinTOTAL’s Help
menu. You will find more tutorials on all of WinTOTAL’s PowerViews.
The more you know about the software, the more efficient and
competitive you can be.
Pocket TOTAL • Workflow Examples
8/10/2001
Page 18.24
Digital Workfile
USPAP Compliance in the Digital Domain
Get rid of file cabinets
The Digital Workfile is designed to eliminate all the paper associated with
USPAP's guidelines for storing your workfile. Items you save in the digital
workfile stay on your system and don't EDI or print with the rest of your
report unless you specifically send them. We hope that less paper for you
translates into hard dollar savings on not only supplies, but for the space
used for the paper.
WinTOTAL’s file format provides further enhancements
WinTOTAL’s file format (*.ZAP) was initially designed to incorporate
multiple documents in one file. The power of this design decision now
manifests itself in the Digital Workfile. Not only does WinTOTAL’s
architecture lend itself to letting you put anything a report, WinTOTAL also
compresses whatever files are included to conserve disk space and
reduce the amount of time it takes to transfer files online.
Use the Vault for a USPAP compliant backup
The Digital Workfile is the perfect accessory to maximize the usage of the
eDomina Vault. The Vault is an online storage facility custom tailored to
appraisers. For pennies per file, you can have a secure and confidential
copy of your appraisal stored offsite - away from system crashes and
natural disasters.
The Vault also has automation way beyond
conventional backup systems so you can’t “forget” to do the backup. For
more information, visit our online services site, www.edomina.com.
You can store most anything you need to save, but not display in your report
to the Digital Workfile. Work orders, notes, addenda, even extra images like
this!
Using the Digital Workfile
Adding documents into your file
The Digital Workfile can hold practically anything you put into it. We’ve
even included items native to WinTOTAL so that you can work on them
right inside the report.
1. Click Add.
2. Select the type of attachment from the drop-down list. Depending on
the type of attachment, there may be other options. They are
described in the next section.
Digital Workfile • Using the Digital Workfile
2/18/2002
Page 19.1
Digital Workfile
3. Enter a description for this article. This is for your own internal use.
You can rename an item after it’s in your Digital Workfile by
highlighting it and clicking Rename.
4. Click OK.
This section will discuss specifics for each type of file you may add.
Digital Workfile Addenda
This is the same interface used for entering in overflow addenda in your
reports.
Digital Workfile Image
This can be an image from your digital camera or any other source or
from the Windows clipboard.
•
For images that are already saved in file, choose Disk file or CDROM. Once you click OK, you’ll have a dialog where you can browse
your directories for images and even see a preview.
•
If the program you’re using doesn’t support saving to an external file,
see if that program will copy its image to the Windows clipboard usually the Copy command in the Edit menu. You can also use the
Print Screen key and ALT+ Print Screen to capture a screen shot of
your system or active window respectively.
Digital Workfile Scanned Image (TWAIN)
Flatbed scanners are becoming more and more popular as prices drop
and appraisers are seeing the value in being able to scan things into our
Scanned Addendum forms. The Digital Workfile enables you to scan
straight into it as well. See our Photos chapter for details on how to use a
scanner with WinTOTAL.
The Digital WorrkFile enables you to
insert practically anything inside your
electronic file, so you no longer need to
keep paper copies.
Digital Workfile Worksheet
A worksheet is like a very powerful calculator. You set up equations with
variables in a “model” and then can view different scenarios by changing
the variables. WinTOTAL provides the Worksheet PowerView for you to
create your own calculations and models to override the form. The Digital
Workfile provides you additional worksheets where you can permanently
store any ad hoc equations you did to arrive at your value conclusion.
Digital Workfile • Using the Digital Workfile
2/18/2002
Page 19.2
Digital Workfile
Digital Workfile External Attachment
Last, but not least, you can always just embed a file created in another
program into the digital workfile. This could be a PDF of the original
order, a web page that had information on it or a data file from another
program you may use. It doesn’t matter. If it is able to be stored on your
PC, you can insert it into the Digital Workfile and have it saved forever
with the appraisal report.
Digital Workfile functions
As mentioned before, the Digital Workfile does not print with your report
and does not EDI with the rest of your report.
•
The Digital Workfile can only be sent EDI when you use WinTOTAL’s
native EDI format. After clicking the EDI menu and choosing “Send
report via Internet EDI”, be sure to choose the WinTOTAL format and
clear the checkmark that tells our EDI module to omit the Digital
Workfile.
The recipient of this EDI transmission must also have WinTOTAL on
their system to understand the file you send. For more information on
EDI, please see our dedicated EDI Center chapter.
•
Items from the Digital Workfile must be printed one by one. While on
a particular item, just click Print and it will go to your printer.
More Chapters
Click here to go to the online Table of Contents where you can
access additional chapters in the WinTOTAL user guide. Or, view the
other parts of the manual by selecting Contents from WinTOTAL’s Help
menu. You will find more tutorials on all of WinTOTAL’s PowerViews. The
more you know about the software, the more efficient and competitive you
can be.
When sending files electronically, you have the option to not send the digital workfile.
Digital Workfile • Using the Digital Workfile
2/18/2002
Page 19.3
Solution Center
Solution Center - Gateway to Self-help
The Solution Center is truly your one-stop center for finding answers to
your questions or seeking assistance when using WinTOTAL. You will
want to get comfortable using this area of the WinTOTAL program; it plays
a key role in keeping your office productive. The Solution Center is where
you will perform a variety of functions on a regular basis, including:
•
Getting updates to WinTOTAL
•
Accessing and even searching the technical documentation library
•
Submitting electronic Support Requests to our staff
•
Conveniently accessing eDomina services
To access the Solution Center, open WinTOTAL to the Appraisal Desktop;
then, click the Solution Center link on the left side of the screen.
Solution Center layout
The Solution Center Home page is the starting point for accessing all of
the Solution Center features. All pages within the Solution Center are
really divided into two areas.
•
The area above the page name has navigation links to other pages
within the Solution Center. For example, clicking Support Tools takes
you to the Support Tools page.
•
The area below the page name displays the features and links
associated with the page being viewed.
Solution Center Home page
The features area of the Solution Center Home page has two sections,
Best Times to Get Support and ICU Status.
Best Times to Get Support
The Best Times to Get Support area displays a la mode call center data in
an easy-to-read, graphical, format which you can use to determine the
best times to call for technical support. Low points in the graphs point out
when our staff is least busy - thus more available.
•
The Solution Center Home page displays Call Center data in the Best Times to Get
Support section, as well as links for navigating to other Solution Center feature areas.
Average Hourly Call Load. The Average Hourly Call Load section
displays a historical analysis of call volume to the a la mode Technical
Solution Center • Solution Center Home page
11/07/2001
Page 20.1
Solution Center
Support department. You’ll want to try and reach the Technical
Support staff when call volumes are not at their peak.
•
Relative Call Volume (Previous week). The Relative Call Volume
section displays call volumes by day for the previous week, Sunday
through Saturday. Use this section to determine which days are best
to reach the a la mode Technical Support staff. It’s always better to
reach us than to leave a message, so time is not wasted playing
“phone tag”.
We make every attempt to answer all calls immediately, each and every
time. However, there will be instances when you will need to leave a
message. When you leave a message, you should always receive a
receipt via fax or e-mail - based on information already in our customer
database. If you don’t receive confirmation within an hour or so (longer
for faxes or after hours) it may mean we didn’t get your message or our
contact information is incorrect, and you should contact us via another
method. We will always return messages as soon as possible.
If you have a technical issue, question or suggestion that does not require
you to personally speak with a technician, or you simply do not have the
time to speak with someone, consider sending a Support Request rather
than calling the support line. This also helps to keep the support lines
open for those that may require immediate assistance to stay operational.
For more information about sending Electronic Support Requests, refer to
the “Submit a Support Request” section of this chapter.
Getting updates to WinTOTAL
The ICU (Instant Customer Update) system built into WinTOTAL allows
our development staff to implement enhancements such as new or
changed forms, new features and modules, and fixes to an occasional
bug - all without sending disks or posting “patches” on our website. It’s
all automatic, so even a computer novice can get program updates. To
take advantage of the ICU system, you will need to maintain a current
Silver, Gold or Platinum membership and have a connection to the
Internet.
If you have a support issue, check for updates first. After all, we may
have resolved it already. You have nothing to lose as the updates are
included as a part of your Silver, Gold or Platinum membership.
Solution Center • Solution Center Home page
11/07/2001
Click Instant Customer Update to get the latest updates to WinTOTAL.
included with your Silver, Gold or Platinum membership.
They are
Page 20.2
Solution Center
The ICU Status area has two options you can select, Get Updates and
View Update History:
•
Get Updates. Click Get Updates to download program updates
using our on-screen wizard. The Instant Update Wizard connects to
the Internet and a la mode’s update servers to download only updates
your system lacks. If you need help configuring your Internet
connection, refer to “Configuring WinTOTAL's Internet Settings”
in our “Sending and Receiving Reports” chapter.
•
View Update History. As you download updates, documentation
about the changes is shown on screen. In this View Update History
section, you can see that information again if needed.
Support Tools
Click Support Tools and the Support Tools page displays three options
available for use while in communication with an a la mode Support
Technician. These tools allow them to walk you through technical
procedures quickly and easily.
Analyze My System
Clicking this option launches the Tech Assistant and performs an analysis
of your system. The analysis displays a great deal of information about
your system: things like your screen resolution, amount of RAM, printer
drivers installed, and much more.
An a la mode Support Technician might ask you to access this tool to
obtain various information that can help them assist you as quickly as
possible. This analysis also automatically sends as an attachment should
you send a Support Request.
Edit System Files
Clicking this option launches the Tech Support Assistant - Edit System
Files dialog. From here, WinTOTAL configuration file settings can be
viewed and edited when needed.
Note: WinTOTAL configuration settings should ONLY be edited at the
direction of an a la mode Support Technician. Incorrect configuration
settings can cause your WinTOTAL program to function improperly.
Solution Center • Support Tools
11/07/2001
WinTOTAL’s Tech Assistant makes easy work of determining your system configuration and performing essential diagnostics.
Page 20.3
Solution Center
Run WinTOTAL Utilities
Click Run WinTOTAL Utilities and the Launch Utilities dialog displays.
From the Launch Utilities dialog you can run general Windows programs
or utilities, and repair and maintenance utilities specific to WinTOTAL. To
launch any of the utilities, just double-click the listing.
Two very useful Windows utilities you can access from here are ScanDisk
and Disk Defragmenter. It is recommended that you run ScanDisk weekly
and Disk Defragmenter monthly, to help keep your system operating at
optimal levels.
Some of the tasks you can use the WinTOTAL-specific utilities to
accomplish include:
•
Backing up and restoring system databases
•
Copying updates from one computer to another
•
Repairing databases, if necessary
•
Reinstall system files
Tech Doc Library
Click Tech Doc Library to display a “Search Tech Library” screen where,
you can access technical documents designed to answer questions you
may have, or assist you in resolving problems you may experience. You
can even search for the documents you need by using keywords.
You’ll find documents here addressing very specific subjects such as
setting up your digital signature, configuring EDI on a new PC, or how to
fax a report from WinTOTAL. There are also documents that address
malfunctions such as what to do if your printer prints multiple copies that
you didn’t request, what causes the basement square footage to blank
out in a report, or how to reduce image file size.
These technical documents should not be used in place of this manual
but rather, in addition to the manual. Most questions that you’ll ever have
can be answered by referring back to your manual.
The Tech Library contains Technical Support Bulletins that can provide the answers to
how-to questions as well as diagnostics and resolutions to technical issues.
Searching for documents
To search for support documents, do the following:
1. Enter a keyword or phrase in the Search the doc library entry field.
For example: signature
Solution Center • Tech Doc Library
11/07/2001
Page 20.4
Solution Center
2. Click Search. A listing of documents containing the keyword you
entered displays.
3. To view the document, click View PDF. WinTOTAL will connect to our
web site at www.alamode.com to download and then subsequently
display the most current version of the document selected.
Browsing for documents
You can also browse through our list of tech docs. For example, to see
all documents pertaining to WinTOTAL EDI, do the following:
1. Click the plus [+] symbol to select WinTOTAL - Athena Generation.
You’ll see the list expand to show all the categories.
2. The most relevant category would appear to be EDI and Internet
Connectivity. Click the plus [+] symbol to select it. A list of current
documents about EDI and Internet connectivity issues displays.
3. The document titled, “How to Send a Report EDI” sounds as though it
may contain the information you need. Click View PDF. WinTOTAL
will connect to our web site at www.alamode.com to download and
then subsequently display the most current version of the document
selected.
Support Requests
Clicking Support Requests displays the Support Request page. The
Support Request page has two headings, Submit a Support Request and
Support Request History.
Submit a Support Request
This is a great way to get technical support - especially if you have an
issue that doesn’t require you to speak with a technician at that very
moment. Support Requests sent to our staff in this manner are
automatically entered into our call queue and receive more callback
attempts than voice messages, e-mails or faxes. If we don’t get a hold of
you on the day you send the support request, we will make attempts over
the course of several days to get your issue resolved. To submit a
Support Request, do the following:
1. In the Support Requests section of the Appraisal Desktop’s Solution
Center, click Submit Support Request. The Tech Support Assistant Support Request Information dialog displays.
Solution Center • Support Requests
11/07/2001
From the Support Request section of the Solution Center you can submit Support
Requests in order to get assistance from the a la mode Technical Support staff, and view
the history and details of requests submitted previously.
Page 20.5
Solution Center
2. Under the Support Request Priority heading, select the appropriate
priority-level for your circumstances.
3. Under the Your Contact Information heading, enter as much
information as applicable.
4. Click Next.
5. Enter as much detail as possible regarding your issue in the notes
field. If you have a specific error message, error number, or know the
steps to recreate your problem, let us know.
6. If you need to attach a specific file, such as a report or database, to
your Support Request, click Attach. The Attach File dialog displays. If
you are not attaching a file, skip to step 7.
In the left-hand window, double-click the folder within WinTOTAL containing the file to attach. In the center window, click to highlight the
appropriate file. Click Attach, and the file displays in the right-hand
window. Then, click OK. You will see “Attachments” noted in blue text
above the entry window you completed in step 5.
At the request of our technical staff, you may need to send us one or more
files for analysis in order to solve your support issue.
7. Click Send. A Send Report Request window displays letting you
know that we are going to generate a report that will contain
diagnostic information about your system to assist our staff.
8. Click OK. You’ll see the system report generate and WinTOTAL
connect to the Internet to post your support request into our system.
After your support request is received, we will send a fax or e-mail,
based on information in your customer records, letting you know we
received your support request. If you do not receive confirmation
within an hour, contact us via a different means to make sure we
have correct information for you and clear up any communication
breakdowns. We respond to all support requests.
Support Request History
Use the Support Request History to display a listing of Support Requests
you have submitted, from oldest to newest. You can also view any
response sent via email by the a la mode Technical Support staff. This
comes in handy should you have the same question or issue at a latter
time; you can see the answer or resolution that was provided. Use the
scroll bar on the right-hand side of the screen to see more listings, if
necessary.
Solution Center • Support Requests
11/07/2001
Page 20.6
Solution Center
eDomina Tools & Services
If you are an eDomina member, you can use the eDomina Tools &
Services page to conveniently access various eDomina services. For
these functions to work, you will need to have pre-purchased these tools
via the eDomina.com website or by calling us at 1-800-ALAMODE. If you
are not currently an eDomina member, you can access the eDomina.com
web site from here to learn about membership benefits and sign-up.
•
eDomina Exact can automatically duplicate and save to eDomina’s
secure servers the files that make your appraisal software unique to
how you work. With Exact you have access to every database and
setting you’ll need to be up and working quickly from a computer at
home, a laptop in the field or even when setting up a new PC. You
won’t waste hours “re-personalizing” your system.
•
The eDomina Vault is the only online storage service specifically
designed for appraisers, and it works with all appraisal software. Your
files are located in your private storage area to which only you have
access. The Vault’s uploading program automatically checks for and
sends updated and new files, based on your preferences, to our
secure server, as often as you schedule. Use the Vault to backup and
store your files or retrieve them as needed when you’re away from
the office, 24 hours a day, everyday.
•
The eDomina Exact product is designed to keep safe copies of databases
and WinTOTAL configuration files. These copies can be used in the event
your system crashes or in situations where you want to set up a new system with WinTOTAL
eDomina SureReceipts. Use SureReceipts as an alternative to
sending appraisal reports via regular E-mail. No more phone calls to
find out when or if a client received the appraisal report you sent. It is
the best way to be sure a report was delivered.
More Chapters
Click here to go to the online Table of Contents where you can
access additional chapters in the WinTOTAL user guide. Or, view the
other parts of the manual by selecting Contents from WinTOTAL’s Help
menu. You will find more tutorials on all of WinTOTAL’s PowerViews. The
more you know about the software, the more efficient and competitive you
can be.
Solution Center • eDomina Tools & Services
11/07/2001
Page 20.7
Migration Wizard
Athena Migration Wizard
Why we have this Migration Wizard
The Olympus generation of WinTOTAL introduced advanced billing and
office management features. In order to make it work with your existing
(Version 2 - Apollo or converted DOS) data and reports with as little
disruption to your daily workflow as possible, we decided to allow for
certain things in the Olympus Office Management module:
•
Management Reports were based on the contact (i.e. Appraiser,
Lender, Client, etc.) name versus a contact ID-Code. This was
because prior versions didn’t use the ID Code. However, as a result,
if you were to have multiple entries with the same name - branch
offices or multiple contacts at one location - this would cause
duplicates in the Management Reports.
•
WinTOTAL didn’t explicitly require that contacts be in
databases. We didn’t want the program to “get in the way”.
Therefore, you could type them right into the form without any
warning that things like management reports and billing weren’t going
work without first having these entries in the Address Book.
•
Duplicate and blank ID Codes were not restricted. Originally,
these were for your own usage and didn’t have as much importance
as they do now. Therefore, if we were to run reports based on them,
there was still a potential for unexpected results.
•
WinTOTAL allowed duplicates of reports.
There was no
safeguarding against duplicate reports in Office Manager. If you had
3 or 4 copies of a report within WinTOTAL, due to copying in from
disk or other actions, you could experience problems related to
status, billing or running the Management reports.
The WinTOTAL Migration Wizard corrects inconsistent and unstructured entries
in your Address Book for more reliable management reports and billing.
This lack of strictness regarding your data entry could result in numerous
problems with billing, status messaging and the Management Reports.
What this module does to correct problems
So, in preparing for Athena it's important that all of your current data is
structured and meets standards to match Athena's new billing and
management. Instead of requiring you to go and “fix” all of your reports
manually by opening them and assigning entries and checking for
duplicates, we have created this Migration Wizard. It has two main parts:
Migration Wizard • Why we have this Migration Wizard
8/10/2001
Page A2.1
Migration Wizard
•
Reconciling multiple copies of reports
•
Assigning contacts from the database to any files that do not use
them.
The Migration Wizard also creates a unique ID for any contacts that do
not currently have one; however, this happens behind the scenes and
doesn’t require any interaction from you.
Before running the Migration Wizard
How much time will the Migration Wizard take?
Depending on your individual habits, the operations of the Migration
Wizard could run very quickly. Or, they may take a long time.
•
If you use the Requester and Address book as we’ve always
recommended, then the Migration Wizard may not take much time at
all - depending on how many duplicate files you have.
•
If you always type your appraiser names, lenders and clients into the
forms directly and bypass the drop-downs in the Requester, then this
may take a long time as you assign contacts into your reports. Don’t
worry, if you don’t finish, you can always start it again to pick up
where you left off.
Save time by excluding files from the Migration Wizard
As you process files in the Migration Wizard, you are given an option to
move them to an excluded folder in your File Cabinet - which is created
by the Migration Wizard. This is a real easy option; however, it does put
all your excluded files in one place as well as stop you on a one by one
basis.
You can choose to run both or just one part of the Migration Wizard. If you don’t
have time to finish, you can always start it again later by clicking the Office Manager (or File Cabinet) Options menu and choosing Migration Wizard.
Just as you’ve always been able to exclude files from WinTOTAL’s
management reports, files can also be excluded from the Migration
Wizard process on a folder by folder basis. Before running the Migration
Wizard, you may wish to tag some folders to skip. This could save you
time from having the Migration Wizard prompt you for things in dedicated
template files or files from several years ago in which you have no interest
in seeing in a management report or statement.
To exclude, or “hide” from the Migration Wizard all reports in a folder:
1. First, go to WinTOTAL’s Office Manager or Athena’s File Cabinet.)
Migration Wizard • Before running the Migration Wizard
8/10/2001
Page A2.2
Migration Wizard
2. Click the folder you wish to exclude. For example, it could be a folder
that has old reports that you’ll never need to run statements on. Or, it
could be the folder in which you store your templates.
3. Once the folder is highlighted, click the Folder menu and choose
Exclude from Management Reports.
Note: Exclusion is done on entire folders and cannot be applied to single
reports one at a time.
To exclude or “hide” a folder from
Management Reports or the Migration Wizard, simply right-click it and
choose “Excluded from Management Reports”. A red mark will
appear on the folder.
Repeat steps 2 and 3 for any other folder you wish to exclude.
Remember, this will exclude all files contained within that folder from
being shown in billing statements as well as the Migration Wizard. You
may wish to create special folders and use our file moving functions to
organize your files to make this migration easier. For more information,
reference the chapter on “Managing Your Files”.
Starting the utility
The Migration Wizard is set to pop up automatically at certain times.
However, if you don’t have time to finish the operations, you can click
Finish and start again later. The Migration Wizard may be launched at
anytime by clicking the File Cabinet’s Options menu and choosing
Migration Wizard.
Phase One: Check for duplicate file ID’s
How duplicate ID’s occur
As mentioned before, WinTOTAL assigns an internal ID to each report.
However, if a file was copied in any manner, often through typical usage,
the ID wouldn’t be reset and you would have two files with the same
internal ID. This can cause problems with billing, status and reporting if
not corrected. This module helps you correct the problem without
manually opening each report.
Reconciling multiple reports with the same ID
This phase stops at the first group of files that share the same ID.
•
The columns may be sorted by clicking the column’s title. The first
time you click the column title, the reports will sort ascending; the
second time, descending.
Migration Wizard • Phase One: Check for duplicate file ID’s
8/10/2001
Page A2.3
Migration Wizard
•
Click once on files to select them. Once a file is selected,
CTRL+CLICK on a different file and both of them will be highlighted.
Or, you can SHIFT+CLICK to select a block of files. This is the same
functionality as you would see in Windows Explorer.
•
Note that the number of “sets” of files you must go through is reported
at the bottom of your screen.
You must to do something with all but one of the files listed. Select one or
more files, then choose an option:
•
Make Unique. This simply puts a different ID code in the file(s). Use
this in cases where the files really should be tracked differently.
•
Exclude. This puts the selected file(s) into a folder called Excluded
Reports.
•
Delete. Naturally, this option removes the highlighted report(s) and
all data permanently from your system.
Once you have processed a set of files, the Migration Wizard will move on
to the next set until all duplicate files have been cleared up.
Phase Two: Update files with Contacts
The recommend way to enter lenders, appraisers, etc.
When you initially start a report (either new or cloned), you are first
prompted to enter information into the Requester including any Trading
partners (client, lender, bill to, and ship to) and any employees (appraiser
and supervisor).
WinTOTAL assigns an internal ID to all your reports. This is useful for billing functions as well as status. When files are duplicated and have the same ID, unexpected results will occur with certain functions. The Migration Wizard fixes this
problem.
When you use the Address Book, instead of typing them directly, you can
choose these entries from a drop-down list. Not only does this eliminate
repetitive typing, it facilitates our billing and tracking systems. The
purpose of this module is to let you insert entries from our Address Book
into existing reports where the trading partners were not necessarily
chosen from the Requester’s drop down list.
Additional information on the Address Book is given at the end of this
chapter.
Migration Wizard • Phase Two: Update files with Contacts
8/10/2001
Page A2.4
Migration Wizard
Replacing report entries with contacts from the database
For each report that doesn’t have structured entries for the appraiser,
lender, client, etc., it will stop and give you an opportunity to pick people
from your Address Book.
•
The left panel lists all contacts for the current report that don't have an
associated entry in the database. Note: There are a total of 7
possible entries within each report that may not have an associated
database entry. If you have separate names for client, bill to, ship to,
etc. you may see the entries for one report multiple times.
Below the list is additional information to assist you in determining
which report is show. The Report Info button is available to load the
request data for that report in case you need more information.
•
The right panel lists contacts available for that entry, filtered
depending on the type of entry highlighted in the left panel If you're
looking at an entry on the left for a Lender contact, then on the right
you will only have lender/client entries. If you're looking at an entry for
appraiser, you will only have the appraiser contacts listed on the right.
To replace an existing, unstructured, entry in a report with an item
from your Address Book, do the following:
1. Click the item displayed in the left panel.
2. Click the desired item from your Address Book on the right.
(Remember, you may need to add entries into your Address Book if
they don’t exist for the entries in your reports.)
For files that had appraiser, lender, client and other entries typed manually, the Migration
Wizard enables you to easily go through them and assign contacts in a structured format.
3. Click the Assign button. The entry in your appraisal file will be
replaced with the contact you chose, and that item will be cleared
from the list on the left.
4. Repeat steps 1 through 3 until all entries on the left are cleared.
The Migration Wizard will cycle through all files that need the entries
repaired until none are left - at that point you are done. Or, you can click
Finish and pick up where you left off at a later time by launching the
Migration Wizard again from the File Cabinet’s Options menu.
Address Book basics
From within the Migration Wizard you can open your Address Book to
add, delete and edit its entries. (It’s under Step #2.) If you haven’t been
Migration Wizard • Phase Two: Update files with Contacts
8/10/2001
Page A2.5
Migration Wizard
using the Address Book, then you’ll need to add a lot of contacts at this
time. Just click Add, and type in the fields. Click OK when you are
through with an entry. Fill in as much information as you can on all tabs.
Blank fields in your Address Book are the most common cause for
information disappearing from forms and invoices.
A common question regards the ID Code. The ID Code is simply an
internal identifier that helps you organize your entries. The most common
use for the ID Code is when you have two entries with the same name
(i.e. a Lender with two offices) and you need to be able to distinguish
them. You can use any naming scheme you want; for example, you may
wish to use the initials of the appraisers in your office.
If you have existing entries in your Address Book, you may wish to view
them and make sure information is complete and accurate by clicking the
Edit button. For each appraiser listed in your Address Book, click Edit
and make sure that license and certification information is entered as
well.
That’s It! Here are more guides.
Click here to go to the online Table of Contents where you can
access additional chapters in the WinTOTAL user guide. Or, view the
other parts of the manual by selecting Contents from WinTOTAL’s Help
menu. You will find more tutorials on all of WinTOTAL’s functions. The
more you know about the software, the more efficient and competitive you
can be.
Migration Wizard • Phase Two: Update files with Contacts
When adding new contacts, be sure to put in as much information as possible. A
common mistake is to leave off lic/cert information - resulting in entries being cleared
on forms when they are loaded.
8/10/2001
Page A2.6