1
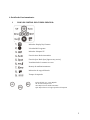
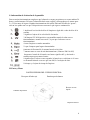
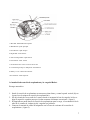
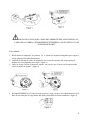
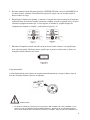
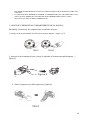
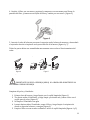
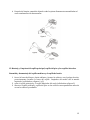
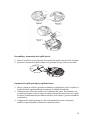
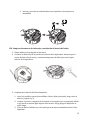
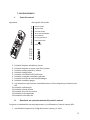
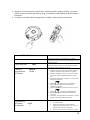
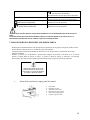
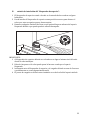
MANUAL DE USUARIO ROBOT ASPIRADOR -‐ MULTIFUNCIONAL ROBOTINA® – Modelo A320 Con Robotina® Viva la vida al máximo cómodamente. www.robotina.cl 1 Muchas gracias por preferir nuestro Nuevo Robot de aspirado y limpieza Robotina® A-‐320. Por favor lea cuidadosamente este Manual antes de usar su Robot. Precauciones de seguridad. 1. Nadie mas puede desmontar, mantener o transformar este producto excepto por los diseñadores técnicos de nuestra compañía, ya que posiblemente cause fuego, shock eléctrico o lesiones. 2. No toque el cable de poder de alto voltaje o los aparatos eléctricos con sus manos mojadas, ya que posiblemente cause un shock eléctrico. 3. No haga contacto con su ropa o cualquier parte de su cuerpo ( cabeza, dedos, etc.) en los cepillos o en las ruedas del robot, ya que posiblemente causará lesiones personales. 4. No utilice otro cargador, solo el cargador que nuestro robot posee ya que posiblemente cause daños al producto, shock eléctrico, o fuego debido al alto voltaje. 5. No doble el cable de poder demasiado o ponga mucho peso en el, ya que puede causar que el cable de poder se dañe o cause fuego o lesiones. 6. No acerque cigarrillos o encendedores, o fósforos u cualquier otro objeto que produzca calor o materiales de combustión como gasolinas de limpieza. ATENCION 1. no olvide apagar el robot en momentos en que lo almacenara por largos periodos de tiempo ya que la batería puede dañarse. 2. revise que el cargador o enchufe esta bien conectado, ya que probablemente cause fallas o incluso fuego. 3. por favor utilice el robot con precaución en la presencia de niños para evitar que se sientan amenazados o atemorizados. 4. No utilice el robot para limpiar agua derramada o cualquier otro tipo de licor ya que el producto puede dañarse. 5. No utilice el robot fuera del hogar o en el exterior. 6. Introduzca siempre el cable de poder en forma correcta y asegúrese que la conexión con el robot es correcta, ya que de lo contrario posiblemente cause shocks eléctricos, corto circuito o humo. 7. Remueva del piso todos los productos dañados (incluyendo objetos , figuras de cerámica, vidrios, botellas, etc.) antes de dar inicio al trabajo del robot ya que puede causar mas daño en la superficie o dañar el robot. 8. No se pare o siente sobre el robot , ya que puede ocasionar que posiblemente se dañe. 9. No utilice el robot en mesas pequeñas o sillas o otro espacio pequeño, de otro modo el robot será dañado. 10. No utilice el robot en espacios comerciales, o el robot puede que se dañe por uso excesivo. Este Robot es sólo para uso doméstico. 11. No deje botado objetos móviles, tales como hilo, alambre y otros con una longitud de más de 150 mm sobre el suelo ya que el cepillo puede dañarse al enredarlo 2 INDICE 1.Aplicabilidad. 2. Introducción – Funciones Principales. 3. Los componentes del Equipo. 4.Detalles de Funcionamiento. i. Panel de control del cuerpo principal .. ii. Función de Información de la interfaz de la pantalla. iii. Partes y Piezas iv. Instalación de estación de acoplamiento y la carga del Robot. v. Montaje y Desmontaje compartimiento de la basura. vi. Montaje y Limpieza del cepillo principal, cepillo del piso y los cepillos laterales . vii. Montaje, desmontaje para la limpieza de las ruedas traseras y delanteras de la izquierda y derecha. viii. Limpieza de sensores de infrarrojos y Sustitución de batería del robot.. 6. Control Remoto -‐ Mando a distancia. i. Panel de control. ii. método de uso y funcionamiento del panel de control. 7. Auto de carga estación de acoplamiento. i. Piezas de la estación de carga y panel de control. ii. Utilizar el método y el estado funcional de la estación de acoplamiento. 8. Espacio aislante – Bloqueador de espacios. i. Barrera de aislación y Panel de control. ii. Función Introducción de bloqueador de espacios. iii. Utilizar el estado funcional de bloqueador de espacios. iv. Método de instalación del bloqueador de Espacios. 9. Solución de Problemas. 10. Especificaciones técnicas. 3 1. Aplicabilidad: El producto, está diseñado para limpieza en el hogar y pequeña oficina, está capacitado para la limpieza de alfombras de pelo corto, suelo de madera, piso duro, baldosas de cerámica, etc. IMPORTANTE: NO ASPIRA LIQUIDOS. 2. Introducción – Principales Funciones: Es un limpiador de la nueva generación de aspirado robótico con una batería recargable, controlada por programa inteligente avanzado, con las siguientes funciones: aspirado robótico, trapear o “mopa”, esterilización o limpieza específica de un lugar, función “full go” -‐ listo para limpiar, posee control remoto inalámbrico, selección de velocidad, fácil de usar y limpiar. 3. Componentes del equipo: robot control remoto puerto de autorecarga bloquedor de zonas cepillo lateral ( 2) adaptador de corriente. filtro (2) armazón de barras almohadillas de trapeado (2) Manual de uso Cepillo de polvo. 4 4. Detalles de Funcionamiento: I. PANEL DE CONTROL DEL CUERPO PRINCIPAL: Indicador Display Dia/ Semana Velocidad del Programa Indicador Lámpara UV Función Auto: Modo Automático Función Spot: Modo Spot (lugares muy sucios) Visualización de la semana en curso. Mensaje de malfuncionamiento Indicación de carga de Batería Tiempo de Aspirado Teclas de fácil uso – o Uso Rápido: UV: Accionar Lámpara UV Auto: Deja robot en modo automatic. Spot: Deja robot en un lugar específico de limpieza 5 ii. Información de la interfaz de la pantalla: Para un mejor funcionamiento asegúrese que la batería se cargue por primera vez como mínimo 24 horas y posteriormente 5/6 horas (la batería debería estar cargada y descargada por lo menos unas 2 o 3 veces antes de lograr el óptimo funcionamiento del robot). Encienda el botón de “power”, oirá un leve pitido una vez que el dispositivo nos muestre lo que sigue a continuación. 1.implicaría la selección de días de limpieza o algún día o cada dos días de la semana. 2.significa el ajuste de la velocidad de las ruedas. 3.la lámpara UV del dispositivo esta prendida cuando el robot esta en funcionamiento, cuando este en off , es por que el robot no esta en funcionamiento 4: auto: limpieza en modo automático 5: spot: liempeza para lugares determinados 6.muestra el día actual de la semana basado en la fecha. 7.muestra error en caso de mal funcionamiento. (Numero. E001 A 005) 8.muestra el estado de la batería, tres barras significa full, y desciende a medida en que posea menos barras. 9.significa que el robot se esta cargando, la batería no es suficiente si el icono se encuentra latiendo o en caso que este full, la luz dejara de latir. 10.tiempo y el ajuste de tiempo de limpieza iii. Partes y Piezas PARTE SUPERIOR DEL CUERPO PRINCIPAL: Receptor de Infra rojo Pantalla dispositivo Parachoques delantero Botones acceso rápido Depósito basura 6 1: Mod Pad: almohadilla del trapeador 2: Main Brush: cepillo principal 3: Floor Brush: cepillo del piso 4: Rigth Well: rueda derecha 5: Side Cleaning Brush: cepillo lateral 6: Front Wheel: rueda frontal 7: Ground Detection sensor: sensor de detección 8: UV Sterlizing Lamp: UV lámpara de esterilización 9: Battery Cover: cubierta de la batería 10: Left Wheel: rueda izquierda iv. instalación de estación de acoplamiento y la carga del Robot. Recarga automática: 1. Instale la estación de acoplamiento en un terreno plano firme y contra la pared vertical (fija en la pared con la etiqueta de estación de acoplamiento). 2. No deje obstáculos en un radio de 3 metros donde se encuentra la base de cargado, la idea es dejar la superficie expedita para que el robot encuentre fácilmente este mismo. ( figura 1) 3. El limpiador no puede buscar la estación de acoplamiento para la carga, si la transmisión de la señal de la ventana de infrarrojos del cargador está cubierta. 4. Conectar el terminal de salida del adaptador con la Toma de corriente de la estación de acoplamiento. ( figura 2). 7 POR FAVOR COLOCAR EL CABLE DE CORRIENTE DEL ADAPTADOR A LO LARGO DE LA PARED, O POSIBLEMENTE INTERFIERA CON EL CEPILLO O LAS RUEDAS DEL ROBOT. Carga Manual: 1. Puede utilizar el adaptador de corriente y/o el puerto de cargado del limpiador para cargar el cuerpo principal del robot directamente. 2. Conectar el terminal de salida del adaptador con la toma de corriente del cuerpo principal durante el uso de adaptador para cargar ( figura 1) 3. Antes de cargar, conecte el puerto de cargado, este seguro que el robot este bien presionado contra el puerto de cargado ( figura 2) 4. Presione DOCKING en el control remoto si quieres cargar el robot. Así el Robot buscará en la base de conexión para la carga dentro del alcance disponible de forma automática (figura 3). 8 5. Presione cualquier botón del panel principal o POWER OFF junto con la tecla DOCKING en el control remoto, mientras el robot buscara el puerto de carga, con esto el robot dejará de buscar su base de carga. 6. Después que la batería este agotada, y comience el cargado del robot, mostrará en el panel que la primera línea del icono de cargado comenzara a palpitar, cuando la segunda línea y la tercer comiencen a palpitar mostrara que se esta cargado, se detendrá el palpitar después de completar por completo el cargado ( refiriéndose a figura 4 y 5) 7. Encienda el limpiador, cuando esta full, mostrara las tres líneas o barras, esto significa que tiene suficiente poder. Una barra menos significa que el poder va en descenso y deberá ser recargado cuando falten las tres barras. Carga Automática: el robot limpiador buscará el puerto de cargado automáticamente en caso que la batera vaya en descenso de poder durante el proceso de aspirado. IMPORTANTE: 1- EL ROBOT PUEDE QUE FALLE EN LA BUSQUEDA DEL PUERTO DE CARGA DEBIDO A LOS OBSTACULOS QUE EXISTAN ENTRE MEDIO DE ESTA, PUEDE QUE AL ESFORZAARSE EN BUSCAR EL PUERTO DE CARGADO SE AGOTE LA BATERÍA. POR LO QUE PARA MEJOR USO 9 DEL MISMO ES MEJOR DEJAR UN ESPACIO AMPLIO DONDE SE ENCUENTRE EL PUERTO DE CARGADO. 2- CUANDO EL ROBOT TERMINE DE ASPIRAR, LA TEMPERATURA DE LA BATERÍA SERA ALTA, POR LO QUE EL TIEMPO DE CARGADO DEL ROBOT DEBERA SER MAYOR Y ASI EN DESCANSO VOLVERA A MISMA TEMPERATURA V. MONTAJE Y DESMONTAJE COMPARTIMIENTO DE LA BASURA: Ensamblaje y desmontaje del compartimiento acumulador del polvo. 1 extraiga el polvo presionando la tecla roja en la parte superior. ( figura 1 y 2) mbly and Cleaning of Dustbin: mbly of Dustbin: n by ey on ure 1 utton ower cally. 2. presione la tecla naranja de este, y luego el soplador se levantara automáticamente ( figura 3) Figure 1 Figure 2 Figure 3 3 3. Abra la compuerta y el filtro aparecerá. ( figura 4) d the fer to Figure 4 , press the semicircle bracket by one from the filter screen, and e fastener d by the other hand and then change a Figure 5) 10 pressing the red key on top. (Refer to Figure 1 and Figure 2) Figure 1 Figure 2 2. Press the orange button on it, and then the blower 4. Cwill ambie l filtro por uno nuevo, presione la compuerta con una mano para liberar la pop up eautomatically. pantalla del filtro, filtro 3 y cambie por uno nuevo. ( figura 5) (Refer to Figure 3) y remueva esta rejilla del Figure 3. Open the bracket and the filter will appear. (Refer to Figure 4) Figure 4 4. Change a new filter, press the semicircle bracket by one hand to release the fastener from the filter screen, and 5. Iremove nvertir l cubo e the la bother asura, la esponja, suelte la barra de arrastre y desenchufe theefilter griddby handarrancar and then change a el snew ujetador derecho e i5)zquierdo en la parte inferior de la basura ( figura 6 y 7). one. (Refer to Figure Todas las partes deben ser ensambladas nuevamente antes volver Figure 5 al funcionamiento del robot 5. Reverse the dustbin, tear out the mop, release the trailing bar and then unplug the right and left fasteners on the bottom of the dustbin (Refer to Figure 6 and Figure 7). All parts should be assembled as before disassembly. Figure 6 Figure 7 Don’t use the mop and trailing bar on the carpet or uneven ground. 8 IMPORTANTE: NO USE LA ESPONJA (MOPA) O LA BARRA DE ARRASTRE EN LA ALFOMBRA O SUELO DISPAREJO Limpieza del polvo y Ventilador. 1. Primero bote la basura, y luego limpie con el cepillo limpiador (figura 1) 2. Tire hacia arriba el Ventilador, y luego limpie por donde sale y entra el aire con el cepillo para el polvo.( figura 2) 3. No limpie el Ventilador con agua 4. Levante hacia arriba el Ventilador, saque el filtro y luego limpie el recipiente de donde se deposita la basura con agua.( figura 3) 5. Limpie el filtro con un secador ordinario o utilice el cepillo limpiador(figuras 4 y 5) 11 6. Después de limpiar, ensamble dejando todas las piezas firmemente ensambladas tal como estaban antes de desarmarlas. VI. Montaje y Limpieza del cepillo principal, cepillo del piso y los cepillos laterales. Ensamble y desmontaje del cepillo mediano y el cepillo del suelo: 1. fuerce la barra de bloqueo hacia adelante y levante la cubierta con el pulgar derecho, posteriormente levantar la barra del cepillo limpiador del medio con la mando izquierda ( refiriéndose a figuras 1 y 2) 2. quite el cepillo principal y el cepillo limpiador del suelo (refiriéndose a figura 3) 3. inserte el cepillo principal y cepillo del piso en los orificios correspondientes antes de cerrar la cubierta y ensamble. 12 Ensamblaje y desmontaje del cepillo lateral. 1. libere el tornillo en el eje principal del costado del cepillo antes de abrir el mismo. y & Disassembly of Side Brush: 2. presione el costado del cepillo contra el eje principal y luego vuelva a atornillar. se the screw in the main shaft side brush before changing e brush. the side brush against the shaft and then fasten the (Refer to the figure) of Main Brush and Floor Brush: the hair or big dust particles e brush and floor brush rly to improve the cleaning mance. Clean the dust at the del cepillo principal y cepillo del suelo Limpieza ake. Clean the wastepaper or particles by dust brush Libere y limpie de cabellos, grandes suciedades o partículas de polvo el cepillo y el y. Rotate the brush1.carefully ut by scissors or pull bycepillo hand del suelo regularmente para mantener la calidad del aspirado. air, yarn and other twisted 2. Limpie de polvo al la zona donde esta el ventilador del robot. Directamente con s. el cand epillo para quitar el polvo limpie el cepillo principal del robot. Rote este cepillo eaning of the main brush brush can be done del rby obot cuidadosamente para liberar cabello u otros objetos ( ya sea cortándolos nce to the assembly & o tirándolos) embly. 3. la limpieza del cepillo principal y el del suelo puedo hacerlo en el momento también en que ensamble y desmonte el panel de basura. bly & Disassembly and Cleaning of Left/Right Wheel and Front Wheel: y & Disassembly and Cleaning of Left/Right Wheel: se the screw of the left/right by the screwdriver. (Refer to 1) 13 aning of Main Brush and Floor Brush: Assembly & Disassembly of Side Brush: Clear the hair or big dust particles on the brush and floor brush egularly to improve the cleaning performance. Clean the dust at the Cleaning of Main Brush and Floor air intake. Clean the wastepaper or Brush: Clear the hair big dust particles small 1.particles by ordust brush on the brush and floor brush directly. Rotate brush carefully regularly the to improve the cleaning performance. Clean the dust at the and cut by scissors or pull by hand air intake. Clean the wastepaper or small by twisted dust brush he hair, yarn particles and other directly. Rotate the brush carefully objects. and cut by scissors or pull by hand the hair, yarn and other twisted The cleaning of the main brush and objects. VII. desmontaje The cleaning of main brush loor 2.brush canMontaje, bethe done by and para la limpieza de las ruedas traseras y delanteras de la floor izquierda brush cany dbe done erecha. by eferencereference to theto assembly & & the assembly disassembly. disassembly. Ensamblaje y desmontaje par las ruedas izq/ derecha : 1. Release the screw in the main shaft of the side brush before changing the side brush. 2. Press the side brush against the main shaft and then fasten the screw. (Refer to the figure) 1. libere los tornillos de la izq/ derecha con un destornillador. ( figura 1) 2. Qite las ruedas de izq/ derecha y límpielas con el cepillo de limpieza. NO LAS vii. Assembly & Disassembly and Cleaning of Left/Right Wheel and Front Wheel: LAVE CON AGUA. ( figura 2) Assembly & Disassembly and Cleaning of Left/Right Wheel: 1. Release the screw of the left/right ssemblywheel & Disassembly and Cleaning by the screwdriver. (Refer to of Left/Right Wheel and Front Wheel: Figure 1) embly & Disassembly and Cleaning of Left/Right Wheel: 2. Take out the left/right wheel and clean them with the brush (Refer to Figure 2). Don’t wash them in water! Figure 1 Release the screw of the left/right wheel by the screwdriver. (Refer to Figure 1) 3. Place the left/right wheel in the original position, and tighten the screw while assembling Take out the left/right wheel and Figure 1 Figure 2 clean them with the brush (Refer to - 10 Figure 2). Don’t wash them in 3. ponga nuevamente las ruedas en la posición original y ensamble firmemente water! con el destornillador. Ensamble y desmontaje para la limpieza de la rueda delantera. Place the left/right wheel in the 1. Tire original position, and tighten thehacia afuera la rueda delantera con sus manos u alguna herramienta para su limpieza ( vea la figura) screw while assembling Figure 2 14 Assembly & Disassembly and Cleaning of Front Wheel: 1. Pull out the front wheel with your finger and tools and then clean it. (Refer to the figure) 2. press inserte y presione la rthe ueda delantera n la p osición correcta para su the front wheel into right position ewhile assembling 2. Insert and ensamblaje VIII. Limpieza de sensores de infrarojos y sustitución de batería del robot. 1. limpie ambos con un algodón u tela suave. 2. Cleaning el sensor e detección de la pared está en Window: frente de la aspiradora, mientras que el viii. ofdSensor and Infrared Transparent sensor de detección de suelo y ventana transparente de infrarrojos son la parte inferior de la aspiradora 1. Clean the sensor and infrared transparent window with the cotton swab or soft cloth. 2. The wall detection sensor is in front of the Cleaner, while the ground detection sensor and infrared transparent window are at the bottom of the Cleaner. (Refer to the figure below) 3. Please keep the transparent window clean so as to make the Robot work better. 3. remplazo de la batería del Robot limpiador. 1. retire los tornillos con un destornillador. Abra el plato principal y luego retire la batería. ( figuras 1 y 2) 2. coloque el positivo y negativo de la batería en los lugares que corresponde debido a que puede ocasionar algún tipo de daño técnico. Luego ponga el limpiador en modo carga. 3. Trate de darle el debido uso a la batería para un mejor mantenimiento del robot limpiador. 15 RECUERDE: 1. retirar la batería cuando el robot este desconectado 2. apagar el robot antes de retirar la batería 3. no someta la batería a altas temperaturas . ( mayor 45C ) o en agua. 4. No someta la batería a una caída de mucha altura 5. La batería debería ser RECICLADA en un basurero adecuado para reciclaje. 6. No arroje la batería a fuego ya que podría explotar 7. En caso que la batería tenga algún tipo de gotera, no se someta a este liquido, ya sea una persona, ropa . utilice una tela de limpieza y ponga la batería en la basura de reciclaje adecuada. NO LA TIRE U ARROJE EN CUALQUIER BASURERO. 16 ntrol: 5. CONTROL REMOTO 6. Remote Control: l: i. I. Control panel: Panel del control. ppearance Key apariencia descripción del Description teclado Overall Appearance Key Description 1.1. 2.2. 3.3. 4.4. 5.5. 6.6. 7.7. 8.8. 9.9. 10. 10. 11.11. 12. 12. 13. 13. 14. 14. Auto/THU Automatic cleaning key/Thursd Auto/THU Automatic cleaning key/Thursday Spot/FRI Spot cleaning key/Friday Spot/FRI Spot cleaning key/Friday Clock/TUE Time set key/Tuesday Clock/TUE Time set key/Tuesday Schedule/MON Timing key/Monday Schedule/MON Timing key/Monday UV/WEDUV sterilizing key/Wednesday UV sterilizing key/Wednesday UV/WED Charge/SUN Automatic recharging key/Sun Charge/SUN Automatic recharging key/Sunday Speed/STA Speed/STA Speed selection Speed key/Saturday selection key/Saturday Full Full Go Go OKOK Turn off/cancel Turn off/cancel It will automatically after It will work automatically afterwork the battery is full battery is full Confirmation key Confirmation key Forward key Forward key Back key Back key Turn left key Turn left key Turn right key Turn right key ii. Using Status ofof Control Panel: 1-‐Method botón d&e Functional limpieza automática/ jueves d & Functional Status Control Panel: 2-‐ botón de limpieza en sector especifico/viernes 3-‐ botón de tiempo especifico/ martes the following steps are very important, or the remote control may fail. steps are very important, or the remote control may fail 4-‐ botón de tiempo/lunes 5-‐ botón e esterilización UV/miércoles check d code of the remote control or cleaner. 1. You should ck code of the remote control or cleaner. e recargado automático/sábados remote dcontrol and Cleaner have enough power, turn off the Cleaner, press OK 2. Check6-‐thebotón te control and Cleaner enough power, turnOK.off the Cleaner, press O botón de sforelección d4s, e vand elocidad/domingos on the7-‐ remote control more thanhave then turn on the Cleaner without releasing ontrol for than 4s, and then the Cleaner without releasing O 8-‐ botón de etwice, ncender/apagar Aftermore the Cleaner toots release OK, then the codeturn check seton is finished. er toots3. twice, release then the set qis este btoot otón hace ue utomáticamente echeck l robot después ue finished. la batería este If you9-‐ fail to hear during theqOK, codefuncione check, justarepeat the code above process. r toot duringfull the code check, just repeat the above process. 10-‐ botón de confirmación 11-‐ botón de ir hacia delante 12-‐ botón de dirección en reversa 13-‐ botón dirección izquierda 14-‐ botón dirección derecha II. Método de uso y funcionamiento del panel de control. Los pasos a continuación son muy importantes, o posiblemente el control remoto falle. 1. usted deberá chequeear el código del control remoto y/o robot 17 2. chequee el control remoto y robot tiene suficiente poder, apague el robot, , presione OK en el control remoto por mas de 4seg. Y encienda el robot sin dejar de presionar el botón OK 3. si usted no escucha sonar al comprobar el código, repita los pasos anteriores Guía de funciones Limpieza automática Auto Lugar especifico Spot Semana y week 8 programación 88:88 del tiempo información de la función presione este botón, el robot limpiara en el Modo automático; presione este botón nuevamente y el robot dejara de aspirar presione este botón, el robot limpiara en el Modo Spot (sirve para lugares más sucios) ; presione este botón nuevamente y el robot dejara de aspirar 1. apague el robot 2. presione Clock/tue en el control remoto, el icono week8 en la pantalla LCD comenzara a palpitar 3. presione la semana correcta en el control remoto; en el icono week8, 1 significa domingo, 2 lunes, etc.. 4. después de seleccionar la semana correcta, puede seleccionar el tiempo 5. 6. 7. 8. 9. Programación del tiempo 88:88 de limpiado presione para entrar la selección del tiempo, el icono 88:88 en la pantalla LCD comenzara a palpitar presione ▲ o ▼ para seleccionar la hora correcta presione nuevamente, 88:88 palpitara presione ▲ o ▼ para seleccionar los minutos correctos al terminar con programación de semana y tiempo, presione OK para guardar el programa Programación de limpieza semanal: 1-‐ 2-‐ 3-‐ encienda el robot presione el botón de programación de limpieza (Schedule/ mon), el icono en la pantalla LCD comenzara a palpitar presione cualquier botón de semana y/o día, 18 días o todos los botones para que programe el tiempo, luego los días seleccionados 4-‐ 5-‐ palpitaran. En , 1 significa domingo, 2 lunes, 3 martes.. etc. Si usted quiere cancelar cualquier programación de día o semana, solo Precione el botón de semana nuevamente. Después de programar el día de limpieza de cada semana, es posible programar el tiempo de inicio del aspirado Programación de hora de limpieza 1. 2. presione para programar el tiempo que desee, el icono 88:88 en la pantalla LCD del robot palpitara presione ▲ o ▼ para seleccionar el tiempo que desea presione nuevamente, 88:88 palpitara presione ▲ o ▼ para seleccionar los minutos al terminar la programación presione Ok para guardar el programa. Cuando el robot este conectado a la estación de cargado se activara automáticamente el programa que ha establecido, cuando el robot este bajo en batería volverá al puerto de cargado por si solo. Presione “ full go”, F en el icono palpitará y el robot comenzará el aspirado automáticamente cuando la batería este cargada (5/6 horas de cargado); esta función es aplicable para casas grandes pero deberá cargarlo nuevamente para continuar con las habitaciones. ATENCION: no puede seleccionar el tiempo y el botón “full go” al mismo tiempo. Presione el botón Speed/sta repetidas veces, puedes escoger entre rápido o moderado. Automáticamente guardara el modo seleccionado (1 rápido, 2 lento) 1. encienda el botón de poder en el robot, y presione el botón on/off 2. puede detener el robot mediante este mismo botón 3. puede borrar o volver al programa original si es que tienes un error o quieres detener el proceso mediante la programación 4. presione el botón por mas de 5seg. Y puedes borrar todos los programas y la memoria y comenzar todo nuevamente Debes presionar OK para guardar cualquier cambio que realice Puede apagar o encender la lámpara UV presionando el botón UV mientas el robot este detenido o en funcionamiento. 3. 4. 5. Programación “ full go” Programación de la velocidad Encendido/apagado/ Cancelación/stop Botón OK Lámpara UV UV Botón AUTO DOCKING ▲ botón hacia adelante Mientras el robot este en receso o en funcionamiento buscara el estación de cargado para recargarse después de que presione el botón “SUN/DOCK” Presiónelo y el robot ira hacia delante. Presione 19 para detenerlo. Se detendrá automáticamente en caso que halla un obstáculo Presiónelo y el robot ira en reversa, se detendrá después que deje de presionar el mismo botón Presiónelo y el robot se dirigirá a la izquierda, se detendrá en caso de obstáculo Presiónelo y el robot se dirigirá a la derecha, se detendrá en caso de obstáculo. ▼ botón en reversa botón hacia la izquierda botón hacia la derecha 1-‐DEBE USAR EL CONTROL REMOTO CON UN RADIO MAXIMO DE 10 M, O POSIBLEMENTE NO LOGRE CAPTAR LA SEÑAL. 2-‐EL ROBOT PUEDE QUE FALLE EN ENCONTRAR EL PUERTO DE CARGADO DEBIDO A LOS OBSTACULOS, Y/O SITUACIONES COMPLEJAS DEL SUELO, O DEBIDO A QUE ESTA CON BAJA BATERÍA. 7. CARGA AUTOMATICA DEL ROBOT A SU BASE DE CARGA: El Robot inicia automáticamente la búsqueda de la estación base de carga para recargarse cuando el nivel de las baterías es inferior al 15 %, durante el proceso de limpieza. Cuando presione el botón de acoplamiento del robot o en el control remoto, la función de auto-‐carga también se habilita. Durante el proceso de “acoplamiento”, presionando cualquier otro botón en el Robot o en el control remoto, el Robot dejar de buscar la base y se activa el modo de espera o “stand-‐by”. Los botones direccionales del control remoto también pueden utilizarse para apoyar la función de búsqueda. El Robot solo puede encontrar la estación de base de carga cuando está cercano a un área de alrededor de 3 metros delante de la base. i. Piezas de la estación de carga y panel de control. 1. 2. 3. 4. 5. 6. Power LED Indicador de carga Transmisor de la señal. Electrodo de carga positivo electrodo de carga negativo soquete carga Power DC 20 ii. Método de uso y funcionalidades estación de carga: Nº Función 1 Power Led 2 Indicador de Carga 3 Transmisor de señal 4 -‐ 5. Electrodos de carga 6. Soquete de carga Power DC. Información de la función Se enciende cuando la base de carga está en funcionamiento. Se enciende cuando el robot está aclopado y en función de recarga. El transmisor de señal es la única vía que permite al robot que ubique en forma automática la base de carga, por lo tanto tiene que estar libre de obstáculos y a una distancia razonable no mayor de 3 metros. Para que la batería del robot se recargue de manera correcta, los electrodos deben estar en contacto 100% con el robot, de lo contrario el proceso de carga puede no funcionar. Cuando tenga conectada la base de carga a un enchufe, debe tener la precaución que el cable quede bien guardado ya que el robot podría enredarse y causarle daños a sus componentes. 8. ESPACIO AISLANTE – BLOQUEADOR DE ESPACIOS. I. Barrera de aislación y panel de control 8. Space Isolator: i.presentación Space Isolator Display and general Control iPanel: nstrucción de funciones Overall Display Function Instructions 1.Toggle switch ii. a b c Turn off Low High Function Introduction of Space Isolator: Space Isolator, an accessory of the cleaner, can block area by sending special infrared signal so as to prevent the Cleaner from entering some unnecessary areas. II. introducción del bloqueador de espacios: Method & Functional Status of Space Isolator : el “bloqueador de espacios” es uno de los accesorios del robot y permite bloquear espacios No. Name mandando una señal infra rojo, así pFunction uede pInformation revenir que el robot entre a lugares innecesarios You can switch the function by sliding repeatedly: T oggle switch o 1 que usted no quiera aspirar. Turn off, Low and High. Slide to the position, then the power is off. a Turn off Slide to Low and turn on the power, you can select b Low the distance within 3m as required by infrared wall. Slide to High and turn on the power, you can select c High the distance within 6m as required by infrared wall. Infrared wall transmitSlide , then you can adjust the distance of the Space 2 Isolator. ting signal head The near-infrared transmitting signal makes the Cleaner Near-infrared transmit 3 run outside the Space Isolator scope of 50-100cm without ting head any impact to it. iii. Using 4 Power LED The Power LED will flicker once every 8s until the low battery after you slide to Low, High, and the Cleaner works normally. 1.Open the battery cover before using, place 2x”D” batteries (not included) into the box correctly. Pay attention to the polarity or the Space Isolator will not work. 21 b Low i. Space Isolator Display and Control Panel: c High 1.Toggle switch 1.T oggle switch Turn off a Turn off Display Function Instructions a 8. SpaceOverall Isolator: Overall Display Function Instructions b Low b Low 8. Space Isolator: ii. Function Introduction of Space Isolator: c High c High oggle switch i. Space Isolator Display and Control1.T Panel: 1.Toggle switch Turn off Space Isolator, an accessory of the cleaner, can block area aby sending special infrared a Turn off ii. Function Introduction of Space Isolator: Overall Function signal so asDisplay to prevent the Cleaner from enteringInstructions some unnecessary areas. Isolator Display and Control Panel: b i. Space Low b Low Space Isolator, an accessory of the cleaner, can block area by sending special infrared c High Overall Display Function Instructions c High signal so as to prevent the Cleaner from entering some unnecessary areas. 1.Toggle switch iii. Using Method & Functional Status of Space Isolator : III. Introduction uso del estado funcional spacios: of Space Isolator: a off de e ii. Function of Space Isolator: del bloqueador ii.Turn Function Introduction 1.T oggle switch bby sending Low iii. Using Method & Functional Status Space Isolator : by asending Space Isolator, an accessory of the cleaner, can block area special infrared Space Isolator, an accessory of theofcleaner, can block area special in Turn off 8. Space Isolator: c High signal so as to prevent the Cleaner from entering some unnecessary areas. signal so as to prevent the Cleaner from entering some unnecessary areas. b Low No. Introduction ii. Function of Space No. Name Nombre Isolator: Function Information información de la función ii. Function Introduction of Space Isolator: c High Youcan can switch the function by sliding repeatedly: Space Isolator, an accessory of the cleaner, block area by sending special infrared i. Space Isolator Display Control iii. Using Method Functional Status Space Isolator : iii. Using Method & Functional Status of Space Isolator : T oggle switch No. Name Function Space Isolator,la anf& accessory of cleaner, canInformation block area by sending special in 1 1. i nterruptor d e a lternación p uedes c ambiar unción aand l dthe eslizar ofPanel: Turn off, Low and High. signal so as to prevent the Cleaner from entering some unnecessary areas. signal soOverall asoff.to prevent the Cleaner entering someby unnecessary areas. You canfrom switch the function sliding repeatedly: Display Function Instructions Slide to the position, then the power is a Turn off T oggle switch Introduction of Space Isolator: 1 repetidamente. Para apagar, High. Turn off, Low and ii. Function Slide to LowIsolator and turn on:the power, you can select iii.Space Using Method & Functional Status of Space Slide to the position, then the power is :off. a Turn off b Low iii. Using Method & Functional Status of Space Isolator No. Name Function Information No. Name Function Information Isolator, an accessory of the cleaner, can block area by sending special infrared the distance within 3m as intensidad fuerte/baja 1.T oggle switch required by infrared wall. ii. Function Introduction of Space Isolator: a can select Turn offrepea Slide to Low and turnthe on function the power, signal so as to prevent the Cleaner from entering areas. You can switch byyou sliding You cansome switchunnecessary the function by sliding repeatedly: Slide to High and turn on the power, you can select b1Space LowIsolator, switch an of distance the cleaner, block area by sending special in 1 c T oggle High switch Turn the off, distance Low and within High. 6m Daseslice 8. aToggle eSpace sta accessory locación, luego off,can b wall.Low the within 3m as required Turn Low and High. by infrared Isolator: required by infrared wall. signal sois as to prevent the Cleaner from Slide entering some unnecessary areas. No. Name Function Information Slide to High and turn on the power, you can c High to the position, then the power is off. Slide to the position, then the power off. a Turn off a Turn off iii. Using Isolator :acpagara No. Name Function Information select wall transmit- Status Slide adjust the distance Space 2 Method a. Infrared & Functional apagado You can of switch Space the , then function you can byse High of the the distance within 6mControl asLow required by infrared wall. you can se 8. Space Isolator: sliding repeatedly: i. Space Isolator Display and Panel: Isolator. Slide to and turn on the power, Slide to Low and turn on the power, you can select ting signal head You can switch the function by sliding repe 1 bMethod Low &switch iii. Functional of Space Isolator : infrared Toggle Infrared wall Slide Status ,Turn then youLow can adjust Spacewall. 1Using b Near-infrared T oggle Low switch transmit Turn the The off, distance Low and within High. 3m transmitting 2 as Drequired eslice atransmit “Cleaner low” (despacio) ythe distance within 3mthe asdistance requiredofbythe by infrared off, and High. near-infrared signal makeswall. the 3 Overall Display Function Slide to the position, then the power is off. a ting signal head i.on Space Display andIsolator. Control Panel:toto High Slide and turnthen on Instructions the can turn the power, you canTurn select scope ofIsolator without Slide the position, thepower, power you is off. off No. c ting Name Function Turn head High off Slide Slide run distance outside impact to Low towithin to the High it. and Space Information 6m and as EIsolator ncienda, p50-100cm uedes seleccionar la distancia ca High The near-infrared transmitting signal makes the Cleanerwall. the Isolator: distance within 6m as required by infrared the required by infrared wall. any turn on the power, you can select Near-infrared transmitii. Function Introduction of Space 8. Space Isolator: Slide to Low and turn on the power, you can s You can switch the function3 by sliding repeatedly: Overall Display Function Instructions b Toggle Low switch 1.T oggle switch outside the SpaceFunction Isolator scope of 50-100cm without bofe Information distance by infrared wall. Infrared wall transmit1 2 4 b. Infrared wall transmitSlide , then you can theby distance ofa the the distance the Space LOW Turn the Slide off, The Low Power and within , then High. 3m you will as can required dadjust e 3once No. m cevery omo s Name rLow equerido prun or infrarrojos ting head LED flicker 8s until the lowaccessory Power LED the distance within 3m as adjust required infrared wall. 2 Space Isolator, an ofimpact the cleaner, can block area by sending special i any to it.can switch Isolator. Isolator. Slide to High and turn onthe the power, you can selectand You the function byon sliding repea batterytoafter you slide to Low, ting signal head ting signal head High, Slide to High and turn the power, you can Slide the position, then power is off. i. Space Isolator Display and Control Panel: a Turn off b signal so as to prevent the Cleaner from entering some unnecessary areas. Toggle switch 1.T oggle switch 1 infrared c Near-infrared High transmit the The distance the near-infrared Cleaner within works 6m transmitting normally. as 4 required Deslice h acia “ high” ( fuerte) y c High The Power LED will flicker once every 8s until the low Turn off, Low and High. by wall. Power LED The near-infrared C signal makes the Cleaner transmita signal Turn off the the distance withintransmitting 6m as required by makes infrared Near-infrared 3 you can cwall. 3 Slide to Low and turn on the power, select battery afterSlide yououtside slide to Isolator Low, High, and to the position, then the power is off. w Overall Function Instructions aDisplay Turn off transmitrun the Space scope of 50-100cm Slide , then the distance of thehead Space run Space scope of 50-100cm without b Low ting Low head wall transmit the Isolator. distance any outside impact within tothe it. 3m you ascan required Isolator adjust Encienda, p uedes s eleccionar l a d istancia Infrared wall ting Slide , then you can adjust the distance of the 2 b Infrared byiii. infrared wall. Status of to Isolator : 2 Using Method & Functional the Cleaner works normally. any impact toSpace it. and turn ting signal head Slide Low power, you can se Isolator. tingselect signal head con the High to High and turn batteries on the power, you bcan Low before using, place 2x”D” (not included) into 1.Open the battery cover Slide cNear-infrared High 1.T oggle switch The Power LED will flicker once every 8s until The Power LED will flicker once every 8s until the low The near-infrared transmitting signal makes the Cleaner the distance within 3m as required by infrared wall. Power LED Power LED 4 transmit4 The near-infrared transmitting signal makes the th C the by wall. 3 c. Near-infrared transmit “HIGH” Pay attention run distance outside to after within the you polarity 6m slide as Isolator required or dthe e scope 6toSpace m infrared como s requerido por infra rojos the box correctly. the Isolator not Turn off Low, 3of battery after the you slidea toscope battery Low, ewill Space 50-100cm without Hig High, andcover before using, place Slide to High and turn on the power, you can run outside Space Isolator of 50-100cm ting head theSpace battery 2x”D” batteries (not included) into 1.Open Infrared wall transmitSlide , then you can adjust the distance of the work. c High ting head b asInformation Low by infrared wall. 2 any to it. the Cleaner works normally. theimpact Cleaner works normally. No.the box correctly. Function ii. Name Function Introduction of Space Isolator: distance within 6m required impact it. Space Isolator will not polarity ortothe Isolator. 2.The duration is related to the selected transmitting Pay attention to the any ting signal headbattery consumption c cancan High The Power LED will flicker once everywork. 8s until the Space low You can switch the by sliding repe Power LED Isolator, an accessory of the cleaner, block area 8s byof send Infrared wall switch transmitSlide , then you adjust the distance the 4 The Power LED willfunction flicker once every until t distance and working The duration, pleasetransmitting select proper transmitting distance Power LED 2 T oggle 4 near-infrared signal makes the Cleaner 1 Near-infrared transmiti nfra r ojo D eslice , l uego p uedes a justar l a ii. Function Introduction of Space Isolator: battery after you slide to Low, Turn off, Low and High. some High, and 3 2.Transmicion Isolator. 2. The battery consumption duration is related to the selected transmitting signal so as to prevent the Cleaner from entering unnecessary a ting signal head battery after you slide to (not Low, Hig and the lowbattery transmitting power to save the battery, so don’t forget to turn off the the battery cover before using, place 2x”D” batteries run outside the Space Isolator scope of 50-100cm without Open included) in Open cover before using, place 2x”D” batteries (not included) into 1. 1. ting head Slide to the position, then thespecial power isthe off. aespacio off Spacedistance anTurn accessory of the please cleaner, can block area by sending infra and working duration, select proper transmitting distance The near-infrared transmitting signal makes the Cleaner works normally. toggle switch para adelante while Pay unused. attention any the impact Cleaner to tothe works it. polarity normally. or dthe istancia dIsolator, el insolado Near-infrared transmitPay attention to the polarity or the Space Isolator will C n the box correctly. Space will the notbox correctly. 3 Isolator and lowto transmitting power to save the battery, so don’t forget to turn off the signal so as prevent the Cleaner from entering some unnecessary areas. run outside the Space Isolator scope of 50-100cm w There will be some difference in the direction, transmitting infrared signal of 3. Slide to Low and turn on the power, you can iii. Using Method & Functional Status of Space Isolator : ting work. work. The Power LED will flicker once every 8s until thehead low PowerrLED b Low 4 3. infra switch while unused. ojo e battery cercanía receiving duration using, after distance you is slide 2x”D” of the batteries Cleaner the etol iselected nfra rtoggle ojo d e The cercanía emite una señal it.within 3m any impact thed Space Isolator and due to environmental the distance by infrared wal ii. Function Introduction of Space Isolator: 2. consumption duration istorelated to as therequired selected transmitti battery Low, 2. The battery consumption related to transmitting High, and battery Open the cover before place (not included) into 1. will be some difference in the direction, transmitting infrared of 3.There Open cover before using, place 2x”D” batteries (not included) in 1. impact using. difference Power LED will flicker once every 8s distan until th Slide to by High and turn the power, you ca Power iii.transmitting Method & the Functional Status of Space Isolator :onsignal distance and working duration, please select proper transmitting and please distance Cleaner normally. 4 the distance box correctly. may and vary movement working Pay based attention duration, the of the to Cleaner actual the works polarity environment during select or the proper qactual ue hUsing ace qThe ue l power rLED obot cbattery orra fPay uera dThe el Space Isolator, an of the cleaner, can block area sending special infrared the Space Isolator will not ceaccessory High the Space Isolator receiving distance of to the Cleaner due environmental the boxand correctly. attention the polarity orto the Space Isolator will n above on the and different battery battery after you slide toforget Low, the distance within 6m as required by infrared wal Hig and low transmitting power to save the battery, so don’t to turn off t and low transmitting power to save the battery, so don’t forget to turn off the so asimpact to prevent the Cleaneroffrom enteringduring some the unnecessary areas. Name Function Informatio andNo. movement the Cleaner actual using. The difference work. 2. work. The toggle of battery the switch Cleaner consumption while and unused. Space duration Isolator. is related to the esignal spacio i nsolado c on u na m ira d e the Cleaner works normally. toggle switch while unused. Infrared wall transmitSlide , then you can adjust the distance of th selected transmitting 2 above may varybattery based on the actual environment different battery power 2.The consumption duration is and related to switch the selected transmitt You can theinfrared function by slid cover difference place batteries (not included) into will be some difference in the direction, transmitting signal 3.There Isolator. will be infrared signal TIsolator. oggle switch ting signal head distance transmitting distance 1of and 1. Open 3. There the the Space correctly. battery and Isolator working some Pay and attention before duration, receiving using, to in please the distance the polarity direction, select 2x”D” of or the proper the transmitting Cleaner Space 5Using 0-‐100cm of the Cleaner Space Turn off, Low and High. No.Isolator Name Function Information distance and working duration, please select proper transmitting distan iii. Method & Functional Status of Space Isolator : the box will not the Space Isolator and receiving distance of the Cleaner due to environmen due to and low transmitting power to save the battery, so don’t forget toenvironmental turn off the The near-infrared transmitting signal makes thetht Near-infrared transmitand low transmitting power to save the battery, so don’t forget to turn off Slide to the position, then a Turn off Open the battery cover before using, place 2x”D” batteries (not included) in 3 You can switch the function by sliding repeated 8. Space Isolator: 1. work. impact and movement of the p Cleaner during the actual using. differen impact The difference 4. power LED and movement unused. of the Cleaner during the actual este power Lting pbox alpitara uPay na vez or cada TED oggle switch toggle switch while run outside the Space Isolator scopeThe of 50-100cm 1using. toggle switch while unused. head Turn off, Low and High. the correctly. attention to the polarity or the Space Isolator will 2. The battery consumption duration related to theand selected transmitting Slide and to Low andbattery turn on pow thenp above may vary based on the any actual environment different above vary based on theinactual environment different battery power -the 17is-direction, impact to it. There willmay be some difference transmitting infrared signal of 3. Lowb There willbbeesome difference in the to direction, transmitting infrared i. Space distance the of Space the Isolator and Isolator working Display and and Space duration, receiving and please distance Control select of the proper Cleaner No. 8 seg cuando l3. a work. atería ste aja, dFunction eslice the Slide position, then within the power is required off.signal a Turn off Cleaner transmitting distance the distance 3m as Panel: ofbthe and Space Isolator. Cleaner Isolator. due to environmental Name Information Thedistance Power LED willto flicker once every 8s until Power theLED Space and receiving of the Cleaner due to environmen 4 turn 2.The batteryIsolator consumption duration isLow related thethe selected transmittin and low transmitting power to save the battery, so don’t forget to off the 17 Slide to High and turn on th Slide to and turn on power, you can sele impact and movement of the Cleaner during the actual using. The b difference battery you slide to repeatedly: Low, You can switch the after function by sliding H impact and of the Cleaner during the actualtransmitting using. The differen c movement High Low distance and working duration, please select proper distan Display Function1InstructionsToggle switch toggleOverall switch while unused. theas distance within 6m as required the distance within 3m required by infrared wall. i. Space Isolator Display and Control Panel: 3. There above will may be vary some based difference on the in actual the direction, environment transmitting and different infrared asignal power ‘above LOW’, vary based Turn ‘power HIGH’, yand eHigh. l environment battery, battery off,the Low Cleaner works normally. on actual pow lowmay transmitting tothe save the so and don’tdifferent forget tobattery turn off th ofand Infrared wall Slide transmit, then adjust th to HighSlide and the power, you can se the Cleaner to the position, thenturn the on power isyou off.can a funcionara of Cleaner and Slide Space Isolator. 2 the switch toggle while unused. cTurn off High to environmental the of Space Isolator and and Space receiving Isolator. -distance 17 - of 1.T the Cleaner switch due robot nting ormalmente. oggle Isolator. the -distance within 6m as required by infrared wall. signal head 17 a Turn off will be some Slide difference to in Low the and direction, signal 3.There turn ontransmitting the power, youinfrared can select impact and movement of the Cleaner during the actual using. The difference theIsolator battery and cover before using, place 2x”D” batteries (not included) LowLow 1.Open wall transmitSlide , 3m then you can adjust the of thesign Sp The near-infrared transmitting Near-infrared transmitdistance of the Cleaner duedistance to environment 2 bbattery b Infrared the receiving distance within as required by infrared wall. above may vary based on the actual environment and different powerthe 3theSpace box correctly. Pay attention to the polarity or the Space Isolator will run outside the SpaceThe Isolator scop ting signal headandting impact movement of Isolator. the Cleaner during the actual using. differen headSlide of the Cleaner and Space Isolator. to High and turn on the power, you can select c High work.may vary based onThe any impact to it. makes c High above near-infrared signal the pow Clea - 17 the- actual different battery Near-infrared transmit- the distance within 6m astransmitting requiredand infrared wall. 17 - environment 3 2. The battery consumption duration related tobythe selected transmit TheIsolator Power LED will50-100cm flicker once run outside theisSpace scope of with Power LED of4transmitthe Cleaner and Space Isolator. IMPORTANTE: tingwall head Infrared Slide , then you can adjust the distance of the Space distance and working duration, transmitting dista 2 batteryproper after you slide to any impactplease to it. select Isolator. ting signal headand low transmitting power to save the battery, so don’t forget to turn off theflicker Cleaner works normally. The Power LED will once every 8s until the Power LED 4 - 17 toggle switch while unused. The near-infrared transmitting signal makes the Cleaner Near-infrared transmitbattery after you slide to Low, 3 ii. Function Introduction of Space Isolator: High, 1. Abra la tapa de la batería antes de uso, ponga 2 pilas (no ncluidas) en theeinl Space espacio ue of 50-100cm outside Isolator q scope without There willibe somerun difference the direction, transmitting infrared signa head 3. the -Cleaner works normally. Space Isolator, an accessory of the cleaner, can block area ting by sending special infrared 17 any impact to it. the Space Isolator receiving distance of the Cleaner to environme the battery cover before using, placedue 2x”D” batteries ( 1.Openand corresponde. Ponga atención a la polaridad que corresponde o el bloqueador no signal so as to prevent the Cleaner from entering some unnecessary impact and movement of the LED Cleaner during the using. the box Pay to actual the polarity orThe thediffere Space The correctly. Power willattention flicker once every 8s until the low Power areas. LED 4 above may vary based onafter the you actual andLow, different battery po funcionara. work. battery slideenvironment High, and before using, place 2x”D” to batteries (not included) into 1.Open the battery cover of the Cleaner andthe Space Isolator. 2.The battery consumption duration is related to the iii. Using Method & Functional Status of Space Isolator : the box Cleaner works correctly. Pay attention to the normally. polarity or the Space Isolator will sele not 2. La duración de la batería dependerá del consumo, a l a d istancia d e t rabajo y d uración distance and working duration, please select proper tran work. and low transmitting save battery,transmitting so don’t for del mismo. Por favor seleccione la transmisión de distancia correcta. El modo “LOW” 2.The battery consumption duration is power relatedtoto thethe selected the battery cover before using, 2x”D” batteries (not included) into toggle switchplace while unused. 1.Open distance and working duration, please select proper transmitting distance No. ayudara con el ahorro de energía. No se olvide de apagar el botón de deslizamiento Name Function Information forget towill the box correctly. Pay3. attention toto the or the so Space Isolator notoff the There will be some in don’t the direction, transmitting and low transmitting power save battery, turn -polarity 17the - difference You can switch the function by work. sliding repeatedly: the Space Isolator and receiving distance of the Cleaner due toggle switch while unused. Toggle switchno utiliza e 1 m ientras l boff, loqueador. Turn Low and High. 2.The3. and movement of Cleaner during the actual battery consumption duration is the related tothe the selected transmitting There will be someimpact difference in direction, transmitting infrared signalusin of Slide to the position, then the power is off. above may vary based on the Cleaner actual environment and differ distance and working duration, please select proper transmitting a Turn off 3. Habrán algunas diferencias en la dirección, andtransmisión infra roja de la señal del the Space Isolator and receiving distance of the due to distance environmental of the Cleaner and Space Isolator. low transmitting power to save the battery, so don’t forget to turn off the Slide Low and turn on the power, you can impact andselect movement of the Cleaner during the actual using. The difference b Low espacio bloqueado y la señal de torecepción del debido al onambiente en que se toggle switchmay while unused. the distance within 3m as required byrobot infrared wall. above vary based the actual environment and different battery power There will be some difference inIsolator. the direction, transmitting infrared signal of 3. of the Cleaner and Space Slide to High and turn on the power, you can select encuentre el robot. La diferencia variaría dependiendo del ambiente de trabajo y el c High the by Space Isolator the distance within 6m as required infrared wall. and receiving distance of the Cleaner due to environmental impact and movement of the Cleaner during the actual The difference poder d e c ada b atería. - 17using. Infrared wall transmitSlide , then you can adjust the distance of Space 2 above may varythe based on the actual environment and different battery power Isolator. ting signal head of the Cleaner and Space Isolator. - 17 The near-infrared transmitting signal makes the Cleaner Near-infrared transmit3 run outside the Space Isolator scope of 50-100cm without ting head any impact to it. The Power LED will flicker once every 8s until the low Power LED 4 - 17 battery after you slide to Low, High, and the Cleaner works normally. 1.Open the battery cover before using, place 2x”D” batteries (not included) into the box correctly. Pay attention to the polarity or the Space Isolator will not work. 2.The battery consumption duration is related to the selected transmitting distance and working duration, please select proper transmitting distance 22 IV. método de instalación del “bloqueador de espacios”: iv. Installation method of Space Isolator: 1. El bloqueador de espacios estará colocado en la entrada de las escaleras o alguna habitación. 2. 1. Puede instalar el bis loqueador de entrance espacio to en una posición orrecta para detener el The Space Isolator placed at the the stair or room c generally. robot y no entre espacios que atno deseas aspirar 2. You can place thea Space Isolator proper position to stop the Cleaner passing through 3. Remueva cualquier obstáculo del área en que quiera bloquear enfrente del espacio some places. 3. Remove obstacles the area p you want to block front of the Space Isolator as much bloqueado debido afrom que pueda roducir un mal indesempeño as possible for fear of poor effect. IMPORTANTE: 1. el bloqueador de eIsolator spacios debería ser colocado en ulevel n lugar al ground mismo where nivel the del suelo should be placed at the same of the 1.The Space running. donde eCleaner l robot tisrabajara. should check whether the pCleaner can passcreada the Space while 2.You 2. Debería chequeear si el robot puede asar la b arrera por eIsolator l espacio using it first. bloqueado. 3.The distance between the Space Isolator and recharger should be more than 3. la distancia entre bloqueador de espacios y el cargador deberá ser mas de 3 metros 3m, or thereel will be interference. o posiblemente se creara alguna Station shouldinterferencia not be installed within the signal scope of the 4.The Docking Space Isolator. 4. El puerto de cargado no debería estar instalado cerca de la señal del espacio aislado - 18 23 9. SOLUCION DE PROBLEMAS -‐El robot no trabaja o no aspira correctamente 1. chequee moviendo el botón de ON 2. chequee que todas las partes del robot estén funcionando ( almacenador de polvo, filtro, cepillos, etc.) 3. chequee que el voltaje de la batería no decrezca rápidamente -‐El control remoto no funciona 1. chequee el estatus de la batería 2. chequee el estatus de la batería del robot 3. cheche ya sea el control remoto tiene una señal de transmisión que el robot pueda detectar -‐El robot no puede cargarse automáticamente 1.chequee que el adaptador este conectado correctamente al cargador 2. chequee que la batería no sea demasiado baja; si es así; cárguela al adaptador directamente 3. este seguro que no hayan barreras en frente del puerto de carga 4. use el control remoto para dejar que el robot vuelva al puerto de carga -‐Aumento del ruido que genera el robot 1.limpie el filtro y el lugar de almacenamiento del polvo 2. chequee que los cepillos no están muy sucios 3. si el ruido sigue siendo demasiado, podría mandar el robot a algún lugar de mantenimiento para que lo reparen y/o aceiten -‐El robot deja de funcionar repentinamente apareciendo un mensaje de error en la pantalla 1. chequee en caso el programa seleccionado allá acabado 2. chequee no hallan códigos de error en la pantalla -‐El robot se demuestra en direcciones confusas 1. procure no usar el robot en lugares de mucho sol o mucha oscuridad 2. mueva el para choque delantero -‐El robot se cae por las escaleras limpie los detectores de piso en la parte delantera de la parte de abajo del robot -‐El robot no se auto recarga después de su uso por periodos de tiempo muy largos use el cargador hasta cargarlo por completo -‐El cargador deja de funcionar pero no hay un mensaje de error en la pantalla: 1. no desarme en robot y lo repare por usted mismo, contacte algún servicio de mantención Información sobre fallos que pueden aparecer durante el uso 24 Código de error causa del error solución E001 Detectores de suelo E002 Cepillo mediano no funciona E003 Robot se apaga E004 Ruedas derecha/izquierda E005 Aspirado insuficiente limpie los sensores de la parte delantera por debajo del robot limpie los cepillos de pelos, telas, etc use el adaptador de carga, después que se cargó por completo vuelva a usarlo Chequee las ruedas y límpielas con el cepillo especial. Limpie el depósito de basura ATENCION: Si las fallas persisten después de realizar alguna de las soluciones indicadas, contacte a un servicio de mantención, o algún profesional o técnico, pero no trate de solucionar el problema usted mismo ya que puede dañar aun mas el robot. 10. ESPECIFICACIONES TECNICAS: Del Robot: 1. voltaje: ni-‐cd 14.4v o ni-‐mh 14.4 (Europa) 2. batería: recargue la batería por lo menos 5hrs. 3. Horas de trabajo: 90 minutos aprox. 4. Potencia nominal: <24w 5. Rango de trabajo en temperatura entre -‐10*c – 45*c 6. Rango de trabajo en humedad: < 85rh 7. Ac/dc apartador: ac 100/240v-‐ 50/60 hz Dc 24v 1.0A 8. Remoto inalámbrico: ism frecuencia de banda 2.4 GHz 9. Especificaciones: 320x84 mm 10. Peso: 3.2kg 11. Capacidad de batería: 2200mA Del control remoto Modelo: Robotina A320 Voltaje: 3V Batería: 2 A AA baterías ( no incluidlas) Modelo del control remoto: ISM nada de frecuencia 2.4 GHz Recibimiento y trasmisión de distancia: >10M Trasmisión de poder: 0dB Temperatura de operación: -‐10*c-‐ 45*c Húmeda de operación: 85RH Especificación: 135x47x22.5 mm Peso: 0.08kg Del puerto de carga 1. especificación: LxWxH: 200x51x102 mm 2. peso: 0.23kg 3. voltaje: 24V. 25