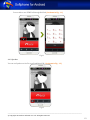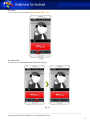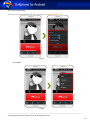
1
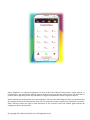
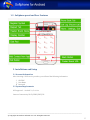
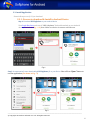
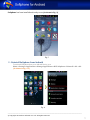
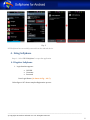
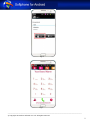
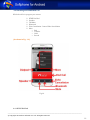
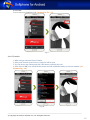
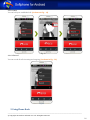
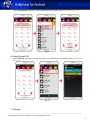
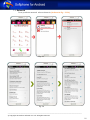
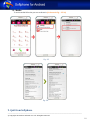
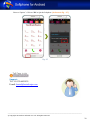
Adore Softphone is a registered trademark. No part of this User’s Manual Guide may be copied, altered, or transferred to, any other media without written explicit concern from Adore Infotech Pvt. Ltd. All brand or product names appearing herein are trademarks or registered trademarks of their respective holders. Adore Infotech has developed this user manual guide to the best of its knowledge, but does not guarantee that the program will meet all requirements of the user. No warranty is made in regard to specifications or features. Adore InfoTech retains the right to make alterations to the contents of this user manual guide without the obligation to inform third parties. © Copyright 2014 Adore Infotech Pvt Ltd. All Rights Reserved 1. Welcome to Softphone 1.1 ‐ About Softphone for Android 1.2 ‐ Features 1.3 ‐ Softphone panel and User Features 2. Installations and Setup 2.1 ‐ Account Information 2.2 ‐ System Requirements 2.3 ‐ Install Application 2.3.1‐ Process to download & Install in Android Device 3. Uninstall Softphone from Android Device 4. Using Softphone 4.1‐ Register Softphone 4.2 ‐ Placing a Call 4.3 ‐ Ending a Call 4.4 – Handling an Established Call 4.4.1 – DTMF Dial Pad 4.4.2 – Speaker 4.4.3 – Mute 4.4.4 ‐ Bluetooth 4.4.5 – Echo Cancellation 4.4.6 ‐ More 4.4.6.1 – End 4.4.6.2 ‐ Transfer 4.4.6.3 – Hold 4.4.6.4 – Record 5. Using Recent Call 6. Using Phone Book 7. Setting 7.1‐ Network 7.2‐ Media 8. Quit from Softphone _________________________________________________________________________________________________________________ © Copyright 2014 Adore Infotech Pvt. Ltd. All Rights Reserved 3 1. Welcome to Softphone 1.1 ‐ Softphone for Android Softphone is revolutionary software that resides on your internet enabled devices as a “Virtual Phone” and allows you to make cheapest international calls. Not only the price but the quality this software delivers are simply unmatched in the industry. It is packed with latest smart features and bespoke user options to let you enjoy a holistic calling experience. This software has been based on leading SIP standards and is fully interoperable with most major Internet Telephone service provider (ITSP) and VOIP software and hardware. This software also allows you to record calls, make conference calls, redial, speed dial and even transfer calls easily. Softphone comes with default NAT/ Firewall and STUN server support. No need to make heavy investments in IT infrastructure and its maintenance. Furthermore, you get innovative, smart research based solutions to meet all your calling needs. This highlight is the Mobile Dialer which allows you to make calls to and from the countries where VoIP services are blocked and not provided, such as UAE, Oman, Qatar, Ghana, and some African countries. With our Softphone you can make calls to wherever you go. With our Softphone, you can turn any computer, tablet or smartphone into a feature‐rich IP phone to stay connected from any network. 1.2 ‐ Features Customized with company name OP Code SIP protocol support Phone Book (Synchronize with Phone Address Book) Recent Call Call Hold Call Transfer Call Log Call Status Indicator Silence Suppression Echo Cancellation Registration Timeout Work with all standard SIP SoftSwitches Touch Tone These features would enable you to connect your Android Softphone to any Phone and enjoy the slashed rates in comparison to traditional phone call. _________________________________________________________________________________________________________________ © Copyright 2014 Adore Infotech Pvt. Ltd. All Rights Reserved 4 1.3 ‐ Softphone panel and User Features 2. Installations and Setup 2.1 Account Information After choosing a VoIP service provider, you will need the following information OPCODE User Name Password 2.2 System Requirements OS Supported : Android 2.x, 3.x & 4.x Internet Connectivity: Wi‐Fi/GPRS/EDGE/3G _________________________________________________________________________________________________________________ © Copyright 2014 Adore Infotech Pvt. Ltd. All Rights Reserved 5 2.3. Install Application Please follow process (2.3.1) to download 2.3.1‐ Process to download & Install in Android Device Step 1: Download HVS Softphone on your android device Visit Google Play Store and search “‘HVS Softphone” find and download on your Android device. (As shown in Fig. – 1‐3) Note: Make sure device is connect with Internet Fig.1 Step 2: Its automatically start downloading HVS Softphone file to your Device. Now click on “Open” button to run the application. (As shown in Fig. ‐ 2) Fig.2 _________________________________________________________________________________________________________________ © Copyright 2014 Adore Infotech Pvt. Ltd. All Rights Reserved 6 Softphone has been installed and ready to use (As shown in Fig. ‐3) Fig-3 3 ‐ Uninstall Softphone from Android To uninstall Softphone from your Android Device, go to Menu‐>Settings‐>Applications‐>Manage Applications‐>HVS Softphone‐>Uninstall‐> Ok ‐>Ok (As shown in Fig. ‐4‐5) Fig. 4 _________________________________________________________________________________________________________________ © Copyright 2014 Adore Infotech Pvt. Ltd. All Rights Reserved 7 Fig. 5 HVS Softphone has successfully removed from the android device. 4 ‐ Using Softphone Steps 1 – Select “HVS Softphone” to open the application 4.1 Register Softphone 1. Login Interface appears OPCODE Username Password Press Login Button (As shown in Fig. – 6 & 7) Below figure 6 & 7 shows complete Registration process _________________________________________________________________________________________________________________ © Copyright 2014 Adore Infotech Pvt. Ltd. All Rights Reserved 8 Fig.6 Fig.7 _________________________________________________________________________________________________________________ © Copyright 2014 Adore Infotech Pvt. Ltd. All Rights Reserved 9 4.2 Placing a Call You can make a call by using softphone To make call 1. Press desired number through Dial Pad 2. Press “Call” button When Call is in progress its display “Calling...” and then your call connected. (As shown in Fig. ‐ 8) Fig.8 4.3 Ending a Call 1. Press “End Call” button to ending a call. 2. Session message displayed “Hung Up”. (As shown in Fig. ‐ 9) Fig. 9 _________________________________________________________________________________________________________________ © Copyright 2014 Adore Infotech Pvt. Ltd. All Rights Reserved 10 4.4 Handling an Established Call While the call is in progress you can use: DTMF Dial Pad Speaker Call Mute Bluetooth Echo Cancellation‐ Control Echo Cancellation More o End o Transfer o Hold o Record (As shown in Fig. ‐ 10) Fig‐10 4.4.1 DTMF Dial Pad _________________________________________________________________________________________________________________ © Copyright 2014 Adore Infotech Pvt. Ltd. All Rights Reserved 11 You can able to use DTMF Call through Dial Pad. (As shown in Fig. ‐ 11) Fig‐11 4.4.2 Speaker You can use Speaker on & off in your Established Call‐ (As shown in Fig. ‐ 12) Fig‐12 _________________________________________________________________________________________________________________ © Copyright 2014 Adore Infotech Pvt. Ltd. All Rights Reserved 12 4.4.3 Mute You can mute your Established call. (As shown in Fig. ‐ 13) Fig‐13 4.4.4 Bluetooth You can use your call via Bluetooth: (As Shown in fig‐14) Fig‐14 _________________________________________________________________________________________________________________ © Copyright 2014 Adore Infotech Pvt. Ltd. All Rights Reserved 13 4.4.5 Echo Cancellation You can set on your established call Echo Cancellation. (As shown in Fig. ‐ 15) Fig‐15 4.4.6 More Fig‐16 _________________________________________________________________________________________________________________ © Copyright 2014 Adore Infotech Pvt. Ltd. All Rights Reserved 14 4.4.6.1 End You can end your established call. (As shown in Fig. ‐ 17) Fig‐17 4.4.6.2 Transfer 1. When call get connected .Press Transfer. 2. After press Transfer your Device’s Contact list will be open. 3. You can choose any number and click “Ok” button to transfer this call. 4. After click on “Ok” your call will be disconnect and call established with your choosen number. (As shown in Fig. ‐ 18) Fig-18 _________________________________________________________________________________________________________________ © Copyright 2014 Adore Infotech Pvt. Ltd. All Rights Reserved 15 4.4.6.3 Hold You can hold your established call. (As shown in Fig. ‐ 19) Fig‐19 4.4.6.4 Record You can record all calls incoming and outgoing. (As shown in Fig. ‐ 20) Fig-20 5. Using Phone Book _________________________________________________________________________________________________________________ © Copyright 2014 Adore Infotech Pvt. Ltd. All Rights Reserved 16 Select “Phone Book” then selects your number which you wish to call (As shown in Fig. ‐ 21) Fig.21 6. Using Recent Call Select “Call Log” By using recent call you can get your call history of last dialed number. (As shown in Fig. ‐ 22) Fig-22 7. Settings _________________________________________________________________________________________________________________ © Copyright 2014 Adore Infotech Pvt. Ltd. All Rights Reserved 17 7.1‐ Network To set your desire network select as shown in (As shown in Fig. – 23‐24) Fig. 23 Fig. 24 _________________________________________________________________________________________________________________ © Copyright 2014 Adore Infotech Pvt. Ltd. All Rights Reserved 18 7.2‐ Media To set the media follow the process as shown in (As shown in Fig. – 25‐26) Fig. 25 Fig. 26 9. Quit from Softphone _________________________________________________________________________________________________________________ © Copyright 2014 Adore Infotech Pvt. Ltd. All Rights Reserved 19 Select on “Option” > Click on “Ok” to Quit the Softphone. (As shown in Fig. – 27) Fig. 27 Support: Tel: +91-120-6450129 E-mail: [email protected] _________________________________________________________________________________________________________________ © Copyright 2014 Adore Infotech Pvt. Ltd. All Rights Reserved 20