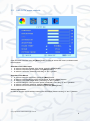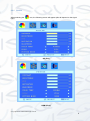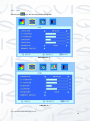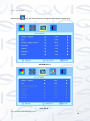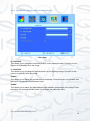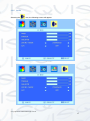
1
19” LED SECURITY MONITOR LED-HDMI1906-PA User’s Manual V1.0 01 / 2014 Welcome Thank you for purchasing the 19” LED Security Monitor. This user’s manual is designed to be a reference tool for the installation and operation of the device. Here you can find information about the corresponding model’s features and functions, as well as detailed instructions on how to operate the device. Before you operate the device please read the following safeguards and warnings carefully! © Copyright Qvis ®. All documentation rights reserved. 1 Table of Contents 1 2 3 General information ..................................................................................................... 3 1.1 Product description and type of use ........................................................................ 3 1.2 General features ..................................................................................................... 3 1.3 Opening the box ..................................................................................................... 3 1.4 Contents of the box ................................................................................................. 3 Warnings ...................................................................................................................... 4 2.1 Power ..................................................................................................................... 4 2.2 Safety precautions .................................................................................................. 4 2.3 Installation precautions ........................................................................................... 4 2.4 Cleaning the device ................................................................................................ 5 2.5 Privacy and copyright .............................................................................................. 5 Controls & Settings ..................................................................................................... 6 3.1 Controls: ................................................................................................................. 6 3.1.1 Control key board: ........................................................................................... 6 3.1.2 Power connector (DC) ..................................................................................... 6 3.1.3 Power BUTTON ............................................................................................... 6 3.1.4 Volume buttons [“+””-”] and confirm [menu] ...................................................... 6 3.1.5 Menu button [menu] and confirm...................................................................... 7 3.1.6 Video input selection button [1] ........................................................................ 7 3.1.7 HDMI input ....................................................................................................... 7 3.1.8 PC signal input (VGA) ...................................................................................... 7 3.1.9 Audio input/output (VGA) ................................................................................. 7 3.1.10 BNC1 - BNC2 video inputs............................................................................... 7 3.1.11 BNC1 - BNC2 video output .............................................................................. 7 3.2 OSD CCTV menu controls ...................................................................................... 8 3.2.1 Picture ............................................................................................................. 9 3.2.2 OSD............................................................................................................... 12 3.2.3 Functions ....................................................................................................... 14 3.2.4 GEOMETRY (Only available for VGA version) ............................................... 16 3.2.5 Audio ............................................................................................................. 17 4 LED monitor quality and pixel ................................................................................... 19 5. Product Specifications .............................................................................................. 20 © Copyright Qvis ®. All documentation rights reserved. 2 1 General information 1.1 Product description and type of use The LED color monitor is designed to be very durable and comes with a hardwearing case structure. It is also ideal for continuous operation and can be used in closed circuit TV systems without risks of excessive operational degradation. The Flat Panel Display has an active matrix, thin-film transistor (TFT) and a Light Emitting Diode (LED) display. 1.2 General features Display area Wall mounting (bracket not included) Audio input/output sockets HDMI video input Two composite video input channels (BNC) & one composite video output channels (BNC). Wide inclination/viewing angle to allow you to view either from a seated position, when standing up or when moving from one position to the other. Multilingual OSD menu for easy setup and optimisation of the display. 1.3 Opening the box Check that the packing and the contents are not visibly damaged. Contact the retailer immediately if parts are either missing or damaged. Do not attempt to use the device if you do find that there are parts missing or the device is damaged. Send the product back in its original packing, if it is damaged, to the supplier. 1.4 Contents of the box LED monitor Remote Control (Optional) Power unit 12VDC 3A Power cable VGA cable Instruction manual © Copyright Qvis ®. All documentation rights reserved. 3 2 Warnings 2.1 Power Only use the power unit provided to power the device. Check the mains voltage rating before plugging the power unit in. Do not pull the cable to unplug the device. Grip the plug end firmly and slowly pull out of the monitor. 2.2 Safety precautions Keep the device away from rain and atmospheres with a high humidity, to prevent risk of fire and electrocution. Do not introduce material (either solid or liquid) to the interior of the device. If this should accidentally occur, disconnect the device from the mains IMMEDIATELY and have it inspected by qualified personnel. Never open the device. In all cases, contact the qualified personnel or authorised service center for repairs. Keep the device away from children, to prevent accidental damage. Do not touch the device with wet hands so to prevent electrical shock or mechanical damage. Do not use the device if the external casing is damaged from a fall or impact from a heavy/forceful object. There is a risk of electrocution if the device is continued to be used when the casing has been compromised. In all cases, contact the qualified personnel or authorised service center for repairs. It is advisable to disconnect the power wire if the monitor is not used for a certain time. 2.3 Installation precautions To prevent the device from overheating, locate it in a position where there is an allowance of air flow through the slots in the casing. Ensure at least 5 cm of free space when installing inside a rack. For the same reason, do not install near sources of heat, such as radiators or hot air ducts. Keep away from direct sunlight. Do not install in areas subject to excessive dust, mechanical vibrations or shocks. Do not arrange this device on an unstable surface, such as a unbalanced or slanted table. The device could fall causing injury or mechanical failures. Do not install the device in a place where it could be exposed to humidity or water. Do not direct a jet of water onto the device: risk of fire, electrocution or even mechanical failure. Stop using the device if water or other material should penetrate inside; risk of fire and electrocution. Contact the retailer or authorized installer. Slots and openings in the cabinet are provided for ventilation. These openings © Copyright Qvis ®. All documentation rights reserved. 4 2.4 must not be blocked or covered. Do not place heavy or heat generating objects on top of the device: this could damage the casing and/or increase internal temperature causing faults. Do not cover the device with a cloth while it is running to prevent deforming the external casing and overheating the internal parts. This could raise the risk of fire, electrocution and mechanical failure. Keep magnets and magnetised objects away from the device to prevent faults. Do not use the device in the presence of smoke, vapor or dust. Wait for a while before operating a device immediately after transporting it from a cold place to a warm place and vice versa. Wait on average for three hours: this will allow the device to adapt to the new ambient (temperature, humidity, etc.). The monitor is provided with a plastic base and rubber feet. It can be positioned on a horizontal surface, such as a desk or a table. Make sure that the device is fastened firmly and that it is not resting on unstable supports or surfaces. Remember to adjust the brightness and contrast to obtain a perfect image. The monitor can also be installed on the wall by means of a bracket (not provided). Cleaning the device Rub delicately with a dry cloth to remove dust and dirt. Dip the cloth in neutral detergent if dirt cannot be eliminated with a dry cloth alone. Do not use volatile liquids (such a petrol, alcohol, solvents, etc.) or chemically treated clothes to clean the device to prevent deformation, deterioration or scratches to the paint finish. 2.5 Privacy and copyright The LED security monitor is a device for CCTV systems. Recording of images is subject to the laws in force in your country. Recording of images that are protected by copyright is forbidden. Product users shall be responsible for checking and respecting all local rules and regulations concerning monitoring and recording video signals. The manufacturing SHALL NOT MADE BE LIABLE for use of this product not in compliance with the laws in force. © Copyright Qvis ®. All documentation rights reserved. 5 3 Controls & Settings 3.1 Controls: 3.1.1 Control key board: Control Key AUTO MENU “-“ “+” Power Function Use this to select the video input source and confirm your choice in an on-screen menu. Use this to display the main on-screen menu. Use this to select a menu or an item. Use this to select a menu or an item. Use this switch to turn on the monitor. Press this button again to turn off the monitor. NO SIGNAL means that there is no connected video signal being detected from the input port. The indicators display the status of the power: Indicator Status Lit (Red) Lit (Green) Blinking (Red): Power off Power on Power saving mode 3.1.2 Power connector (DC) Plug the power wire of the adapter provided into the respective DC power port. 3.1.3 Power BUTTON This is used to switch the monitor on and off. The blue LED lights up when the monitor is on, when it is in red it means that it is in standby mode. 3.1.4 Volume buttons [“+””-”] and confirm [menu] These keys allow you to change the volume (”+” button increases the volume, “-” button decreases the volume).The “Menu” button also allows you to confirm each setting. © Copyright Qvis ®. All documentation rights reserved. 6 3.1.5 Menu button [menu] and confirm This is used to access and quit the OSD (On-Screen Display) Menu and to confirm the selected settings 3.1.6 Video input selection button [1] To select the desired signal (”PC”, “HDMI”, “BNC1” or “BNC2”) press the button [AUTO] to select the desired item. Press the button + / - “DOWN” or “UP” to confirm. 3.1.7 HDMI input This HDMI port (High Definition Media Interface) allows the connection of a HDMI signal and an audio signal, coming from an external source provided with an HDMI output 3.1.8 PC signal input (VGA) PC input. 3.1.9 Audio input/output (VGA & BNC) Jack plugs audio input/output. 3.1.10 BNC1 - BNC2 video inputs These inputs allow the connection of video signals coming from external sources. 3.1.11 BNC1 - BNC2 video output This BNC output allows the repeating of the BNC1-BNC2 video signals to another video input (another monitor or DVR). © Copyright Qvis ®. All documentation rights reserved. 7 3.2 OSD CCTV menu controls Open the menu interface using the [Menu] button in order to access the menus, submenus and their functions Selection of the video input In order to show the possible video inputs, press the [Auto] button. In order to scroll through the options, use [Auto] buttons. In order to confirm the selection press the [“+” or “-”] button. Selection of the Menus In order to show the main Menu, press the [Menu] button. In order to select the Menus of the horizontal bar, press the [Auto] buttons. In order to select each single Menu, press the [“+” or “-”] button. In order to change a value (once the option is selected), press the [“+” or “-”] buttons. In order to confirm the selection, press the [Menu] button. In order to exit from menus and submenus, press the [Menu] button. Volume adjustment In order to vary the volume without entering the OSD Menu please use the [“+” or “-”] buttons. © Copyright Qvis ®. All documentation rights reserved. 8 3.2.1 Picture When selecting the type): icon, the following screen will appear (this will depend on the signal AV (Pic1) HDMI (Pic 2) © Copyright Qvis ®. All documentation rights reserved. 9 VGA (Pic 2) © Copyright Qvis ®. All documentation rights reserved. 10 CONTRAST This allows you to change contrast between the white and black areas of the image. A clear resolution of good white, black and grey gradation is achieved by setting of contrast correctly or to your preference. Press the + and - buttons to change the values of this parameter. BRIGHTNESS This allows to change image brightness, according to ambient light. Press the + and - buttons to change the values of this parameter. HUE Only used in the NTSC system. SATURATION This allows you to change the colors of the image. Press the + and - buttons to change the values of this parameter. SHARPNESS This allows you to optimise the image’s sharpness parameters according to ambient light. Press the + and - buttons to change the values of this parameter. COLOR TEMP. This allows you to change the color settings among the following options: “Normal - Warm – Cool”. Press the + and - buttons to change the values of this parameter. SCALE This allows you to change the video format of the images in regards to the aspect ratio of the monitor panel. Press the + and - to change the values of this parameter PICTURE MODE This allows you to change the image settings among the following options: ”STANDARD - SOFT – VIVID - USER”. Press + and - buttons to change the values of this parameter. © Copyright Qvis ®. All documentation rights reserved. 11 3.2.2 OSD Selecting the icon, the following screen will appear: AV/HDMI (Pic 1) VGA (Pic 2) © Copyright Qvis ®. All documentation rights reserved. 12 LANGUAGE This allows you to select the desired language: “English-Deutsch-French-Spanish-ItalianPortuguese-Polish-Russian”. Press the + and - buttons to change the values of this parameter. H - POSITION This allows you to change horizontal position of the display image. Press the + and - buttons to horizontally move the image. V - POSITION This allows you to change vertical position of the display image. Press the + and - buttons to vertically move the image. DURATION This allows you to set the OSD duration time on the screen. Press the + and - buttons to change the values of this parameter. HALFTONE This allows you to set the OSD transparency time on the screen. Press the + and - buttons to change the values of this parameter. BACKLIGHT This allows you to change the backlight settings among the following options: HIGH – LOW MID. Press the + and - buttons to change the values of this parameter. MEMORY RECALL This allows you to reload the factory defaults. All the user settings will be lost. © Copyright Qvis ®. All documentation rights reserved. 13 3.2.3 Functions Selecting the icon, the following screen will appear(depending the signal type): AV/HDMI (Pic 1) VGA (Pic 2) © Copyright Qvis ®. All documentation rights reserved. 14 SLEEP TIMER This allows you to set the automatic switch-off time. Options are: ”OFF – 15– 30 – 45 – 60”. Press the + and - buttons to change the values of this parameter. DLC This allows you to automatically adjust the image brightness. Press the + and - buttons to change the values of this parameter. NOISE REDUCTION This allows you to enable/disable the noise filter with three possible values: MID - HIGH - OFF LOW. Press the + and - buttons to change the values of this parameter. HSTART This allows you to change the horizontal position of the display image. Press the + and - buttons to horizontally move the image. HSIZE This allows you to change the horizontal size of the display image. Press the + and - buttons to horizontally move the image. VSTART This allows to you to change the vertical position of the display image. Press the + and - buttons to vertically move the image. VSIZE This allows to you to change the vertical size of the display image. Press the + and - buttons to vertically move the image. © Copyright Qvis ®. All documentation rights reserved. 15 3.2.4 GEOMETRY (Only available for VGA version) VGA (Only) H - POSITION This allows you to change the horizontal position of the displayed image. Press the + and buttons to horizontally move the image. V - POSITION This allows to you to change the vertical position of the displayed image. Press the + and buttons to vertically move the image. CLOCK This allows you to reduce the vertical bars on the display. Press the button + to increase and the button - to decrease the parameter value. PHASE This allows you to reduce the video distortion and instability components of the image. Press the button + to increase and the button - to decrease the parameter value. © Copyright Qvis ®. All documentation rights reserved. 16 3.2.5 Audio Selecting the icon, the following screen will appear. AV/HDMI (Pic 1) VGA (Pic 1) © Copyright Qvis ®. All documentation rights reserved. 17 BASS This allows you to adjust the bass levels of the sound. Press the + and - buttons to change the values of this parameter. TREBLE This allows you to adjust the treble levels of the sound. Press the + and - buttons to change the values of this parameter. BALANCE This allows you to balance the sounds of the two speakers. Press the + and - buttons to change the values of this parameter. SOUND MODE It allows to change the sound settings among the following options: ”STANDARD -MOVIE MUSIC - USER”. Press the + and - buttons to change the values of this parameter. AVC This allows you to automatically adjust the audio volume in order to avoid unwanted peaks. Press the + and - buttons to change the values of this parameter. © Copyright Qvis ®. All documentation rights reserved. 18 4 LED monitor quality and pixel The TFT monitor uses high-precision technology, manufactured according to industry standards, to guarantee trouble-free performance. Nevertheless, the display may have cosmetic imperfections that appear as small bright or dark spots. This a common matter related to the specific nature of TFT technology which determines the possible presence of discontinuity on the screen and is not specific to products. © Copyright Qvis ®. All documentation rights reserved. 19 5. Product Specifications Display Specification Panel Type 19'' (4:3) LED Backlit Monitor Case Type Plastic Best Resolution 1280 (H) x 1024 (V) Active Display Area 376.32(H) x 301.06 (V) mm Pixel Pitch 0.294 (H) x 0.294 (V) mm Contrast Ratio 1000:1 Brightness 250 cd/m² Response Time 5ms Viewing Angle U/D: 85° / 85°, L /R: 75° / 75° Display Colours 16.7 Million PC Compatible Frequency 30-80KHz(H) / 50-75Hz(V) Adjustable Colour Temperature 9300K / 6500K / User Video Compatiblity Multi-Standard for NTSC / PAL Aspect Ratio 4:3 Speaker Multimedia Speakers Right x 1 Left x 1, 2.0W Sound Demodulation Stereo. Audio Mute Yes Work Humidity 20 % - 70 % Work Temperature - 10 to 50 °C IN/OUT INTERFACE Video Interface HDMI x1, VGA x 1 BNC x 2 In / BNC x1 Audio Interface Audio in x 1,Audio Out x 1, © Copyright Qvis ®. All documentation rights reserved. 20 Power Interface DC In x 1 Termination 75 Ohms (Automatic termination) Safety & EMC Certification Energy Star / CE / FCC / ROHS /WEEE Stand Type Desktop Colour Black Button Position Downside Dimensions 425 x 595 x 482mm NET/Gross Weight 4.5KG / 6.569KG POWER Power Supply 12VDC, 3 Amp Voltage AC100 - 240V 50 / 60Hz Power Consumption <25W IMPORTANT NOTE: Product specifications may be subject to change without prior notice. © Copyright Qvis ®. All documentation rights reserved. 21 For more information about our accessories and other available cameras, NVRs & cameras, please visit our website: www.adata.co.uk Alternatively scan this QR code with your smart phone to be directed instantly to our website: © Copyright Qvis ®. All documentation rights reserved. 22