1
DVD/CD/MP3 PLAYER
DVD2040
USER'S MANUAL
Please read this manual before connection and use.
PALSONIC
1 JOYNTON AVENUE
WATERLOO NSW 2017 AUSTRALIA
TEL: (02) 9313 7111
FAX: (02) 9313 7555
www.palsonic.com.au
PALSONIC CUSTOMER SERVICE
TELEPHONE
AUSTRALIA: 1300 657 888
Important Safety and Function Instructions
When using this DVD player, basic precautions should always be followed, including the
following:
1) Read these instructions
2) Keep these instructions
3) Heed all warnings
4) Follow all instructions
5) Do not use this apparatus near water
6) Clean only with dry cloth
7) Do not block any ventilation opening, install in accordance with the manufacturer's instructions
8) do not install near any heat sources such as radiators, hear registers, stoves, or other apparatus
(including amplifiers) that produce heat.
9) Do not defect the safety purpose of the polarized plug, A polarized plug has two blades with one
wider than the other, the wide blade is provided for your safety, if the provided plug does not fit
into your outlet, consult an electrician for replacement of the obsolete outlet
10) Protect the power cord from being walked on or pinched particularly at plugs, convenience
receptacles, and the point where they exit from the apparatus.
11) Only use attachments/accessories specified by the manufacturer.
12) Use only with the cart, stand, tripod, bracket, or table specified by the manufacturer,or sold with
the apparatus, when a cart is used, use caution when moving the cart/apparatus combination to
avoid injury from tip over.
13) Unplug this apparatus during lightning storms or when unused for long periods of time.
14) Warning: :To reduce the risk of fire or electric shock, do not expose this apparatus to rain or moisture
15) Refer all servicing to qualified service personnel, servicing is required when the apparatus
has been damaged in anyway, such as power-supply cord or plug is damaged, liquid has been
spilled or objects have fallen into apparatus, the apparatus has been exposed to rain or
moisture, does not operate normally, or has been dropped.
Warning:
Load 2 x ‘AAA’ batteries into the battery compartment. Make sure that the batteries have been inserted
in the correct polarities matching to the symbols + -, marked in the battery compartment, otherwise, it
will leak out or explode.
For your safety, please don't put any breakable and/or watery objects on this player.
SAVE THESE INSTRUCTIONS
1
Important Safety and Function Instructions
TO REDUCE THE RISK OF FIRES AND ELECTRIC SHOCKS, DO NOT EXPOSE THIS
UNIT TO RAIN OR MOISTURE.
CAUTION: To reduce the risk of fire and
electric shock, do not remove the cover
(or back) of the unit. Refer servicing only
to qualified service personnel.
This lightning flash arrow head symbol, within an equilateral
triangle, is intended to alert user tot he presence of uninsulated “dangerous voltage” with in the product's enclosure
that maybe of sufficient magnitude to constitute a risk of
electric shock to persons.
The exclamation point within an equilateral triangle is
intended to alert use to the presence of important operating
and maintenance (servicing) instructions in the literature
accompanying the appliance.
The marking of products using lasers will be shown at the rear
panel of the unit, it means the unit has been classified as Class 1
and is utilizing laser beams that are of the weaker class: there is no
danger of hazardous radiation outside the unit
Invisible laser radiation when open and interlock
failed or defeated. Avoid direct exposure to laser
beam.
DANGER!
SELECT A DVD DISC
DVD discs and DVD players are manufactured under the worldwide agreed DVD Regional Code System
which means that the player will operate only with corresponding disc of the same Regional Code.
DVD Regional Code:
Regional Code
Region
1
Canada, USA
2
Europe (incl. Poland, The Czech republic), Japan,
Middle East (incl. Saudi Arabia, Egypt, Iran, South Africa)
3
East Asia (incl. Hong Kong, Taiwan, South Korea) South-East Asia
4
Australia, Caribbean, Central & South America, Mexico, New Zealand
5
Africa, Former Soviet Union, India, North Korea, Pakistan,
Turkmenistan
6
China
2
Table of Contents
CONTENT
Important Safety and Function Instructions .........................................................................
Table of Contents .....................................................................................................................
Brief Instruction of Controls
Connections
1. Preparations ...........................................................................................................................
2. System Connections ..............................................................................................................
Basic operations
1. Turn on the TV and your DVD player .....................................................................................
2. Place A Disc ...........................................................................................................................
3. Play A Disc .............................................................................................................................
A) Menu Play .........................................................................................................................
B) Title Play ...........................................................................................................................
C) Sequence Play .................................................................................................................
4. Selecting Tracks .....................................................................................................................
5. Skipping Tracks ......................................................................................................................
6. Multi-speed Fast Motion Playback .........................................................................................
7. Multi-speed Slow Motion Playback .........................................................................................
8. Using the Repeat Feature ......................................................................................................
9. Using the Display Feature ......................................................................................................
10. Using the Search Feature ....................................................................................................
11. Changing the Audio Language .............................................................................................
12. Subtitles ...............................................................................................................................
13. Changing the Camera Angle ................................................................................................
14. Changing the TV System ......................................................................................................
15. Mute the audio output ...........................................................................................................
16. Zoom In the video image ......................................................................................................
17. Changing the Soundtrack .....................................................................................................
18. Using the return playing .......................................................................................................
19. Volume Control ....................................................................................................................
20. Playing MP3, JPEG discs .....................................................................................................
System Setup
1. VIDEO SETUP .......................................................................................................................
A) TV shape setup ................................................................................................................
B) TV system setup ...............................................................................................................
C) Video setup ......................................................................................................................
2. LANGUAGE SETUP ..............................................................................................................
A) OSD menu language setup ..............................................................................................
B) Subtitle language setup ....................................................................................................
C) Audio language setup ......................................................................................................
D) DVD menu language setup ..............................................................................................
3. AUDIO SETUP .......................................................................................................................
A) Digital out ..........................................................................................................................
B) Down sampling .................................................................................................................
C) DRC setup ........................................................................................................................
4. RATING SETUP .....................................................................................................................
A) Password setup ................................................................................................................
B) Rating set up .....................................................................................................................
C) Default Reset setup ..........................................................................................................
Trouble Shooting ......................................................................................................................
Technical Specifications .........................................................................................................
3
1-2
3
4
4
5
5
5
5
6
6
6
6
6
6
7
7
7
7
7
8
8
8
8
8
8
9
9
10
10
10
10
10
11
11
11
11
11
11
12
12
12
12
12
12
14
15
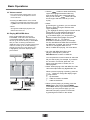
Connections
1. Preparations
Accessories
1. Remote control
2. Audio cable
3. User's manual
(check after opening the box if everything has been delivered)
Battery installation of remote control
Place two batteries 7” in the battery compartment. Be sure the polarities are correct. There should
be on large obstacles between the remote control and the main unit.
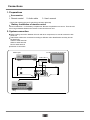
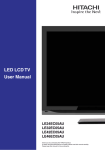
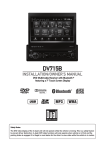
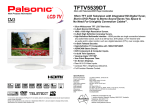
2. System connection
When making connection between this unit and other components, be sure all connection with
power-off.
Audio/Video cables are connected according to different colour identification and they should
be fitted firmly.
Yellow to video terminal
White to audio terminal
Red to audio terminal
Scheme of connection
TV with progressively scan jack
Stereo input
AUDIO INPUT
S-Video input
Video input
Digital audio amplifier
14
Basic Operations
Use the reset notice:
If you have forgotten a password or if you
have changed the Audio/Video settings to
the extent that you are not happy with
Audio/Video output and you are not sure
on how to change the settings back, you
have the option of restoring the settings
to the original Factory settings. To restore
the settings to the original Factory settings
simply press the RESET button once. If
you press the RESET button by accident,
you will have to change the settings back
to where they were by entering the SETUP
menu and changing the settings back
manually.
•
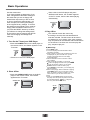
Place a disc in the DVD player and press
OPEN/CLOSE button, the "CLOSE" appears
on the TV screen, then the disc starts playing
automatically.
OPEN/CLOSE
CLOSE
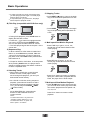
3. Play A Disc
• The contents of each disc menu vary
according to how the disc was authored and
what are included. The disc menu will be turned
on features for you to select, when menu pressed.
Play and pause can be switched with PAUSE button
on the remote. Functions such as menu play title
play, sequence play etc.
1. Turn On the TV and your DVD Player
• Press the POWER button on the DVD player or
the remote control, and “Read” appears on the
TV screen.
A) Menu Play
a.Press MENU button
• TV screen displays the DVD Root Menu when
a DVD disc is loaded
• When a SVCD or VCD2.0 disc Is loaded, the menu will
POWER
be displayed only when the PBC is on. (At this
moment, press PBC button once to display
current PBC state).
PBC is initialized on when a SVCD or VCD2.0
disc is loaded.
b. When a DVD disc is loaded, you can press
buttons to highlight the menu item you want to
choose: As SVCD or VCD2.0, you can press
Numeric buttons to select a track to play.
c Press ENTER or PLAY button, you can begin play
with the highlight.
d. Return when playing: When a DVD disc is playing,
press MENU button, and you can return to Root
Menu; As SVCD or VCD2.0, and PBC is on, press
return button so you can return to the menu.
e. Stop
When you press STOP button for the first time
the player turns into quasi stop state, at the same
time the OSD appears “ -Stop”, to begin the
title over, press STOP button twice,
• If there is no disc in the DVD player
•
2. Place A Disc
• Press the OPEN/CLOSE button on the DVD
player or the remote control, and “OPEN”
appearson the TV screen
•
OPEN/CLOSE
STOP
5
Quasi Stop
Basic Operations
•
•
In quasi stop state, the player remembers when
you start playing the disc again. The DVD player
picks up where you left off.
In stop state,when you press PLAY, the player
enters sequence playback mode.
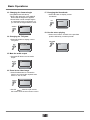
5. Skipping Tracks
Press NEXT
button to jump to the begin
ning of the next title/chapter/track on a disc.
NEXT
B) Title Play (compatible with DVD discs only)
TITLE
DVD
TITLE
Press PREV
button to jump to the begin
ning of the preceding title/chapter/track on
a disc.
PREV
a. During DVD playback, press TITLE button to
display the DVD title content.
b. Press the
buttons to highlight the title
you want to choose,and press ENTER button
You can also press number buttons to choose.
c. The DVD player begins with the chapter 1 of the
chosen title
6. Multi speed Fast Motion Playback
•Press FWD key to get 2x, 4x, 8x, 16x,
normal play circular fast forward function
of disc playing.
C) Sequence Play
a. When a SVCD or VCD2.0 disc is loaded and
PBC is on,once PBC button pressed, PBC swit
-ches off, then the player can play in sequence
play back mode; when PBC button pressed twice.
PBC switches on.
FWD
FF2X
•Press REV key to get 2x, 4x, 8x, 16x,
b. Except for SVCD or VCD discs, in the stop state.
when pressing PLAY button, the player enters
sequence playback mode; this feature is effective
to all the compatible discs.
normal play circular fast Reverse function
of disc playing.
REV
FR2X
4. Selecting Tracks
•
•
•
When playing a DVD disc, press Numeric
buttons on menu or title page to select
track: During DVD playback, you can input
desired title number directly.
As a SVCD or VCD disc, during sequence
playback, press Numeric buttons to select
tracks.(During program playback and PBC
is on, you can only Press PREV /NEXT
to button select)
•Press PLAY button to resume or playback,
during CD, HDCD, MP3, playback,with the
FRx2, the player has no audio output.
7. Multi-speed Slow Motion Playback
• Press SLOW button when pictures moving,
you can enter slow motion play back mode,
slow motion playback has six speeds: 1/2,
1/4, 1/6, 1/8.
As for MP3/JEPG disc, press Numeric
buttons to select different tracks on
current track list.
Press PLAY button to resume normal
playback.
Notes:
To select tracks from 1-10,press corre
-sponding numeric buttons (1-9, 10).
To select track above 10, press 10+,
then to press 1-10 buttons.
6
Basic Operations
• Loading and playing VCDs.
8. Using the Repeat Feature
Press OSD button first time:
While a disc playing, press Repeat button
once, and the repeat banner appears to
show current repeat mode.
OSD
• In SVCD/VCD/CD/MP3/JEPG sequence
•
playback mode, press REPEAT button
again on the remote to turn on repeat mode.
press REPEAT button again to turn to the
next repeat mode,there-are three repeat
options: Off, Track Repeat and Disc Repeat,
if you press the button four times, repeat
mode cycles back to Off.
In DVD playback, press REPEAT button
again to turn on repeat mode.
There are three repeat options: Off, Chapter
repeat and Title Repeat. With each consecutive press of the button, the repeat mode
switches, if you press the button four times,
repeat mode cycles back to Off.
Press OSD button for the again, the
display menu fades out.
10. Using the Search Feature
• You can use Search feature to select a title
/track/chapter number or goto specific point
in a title. Firstly, press GOTO button on the remote control to bring up the search menu and
enter the edit state: Secondly, press
buttons to highlight the title/chapter/track number or the time option; Thirdly, use numeric
buttons to enter the title/chapter/track you want
to play or the time you want to go to in that title:
At last, press ENTER button to start playback.
9. Using the OSD Feature
•
Loading and playing DVDs.
Press OSD button first time;
• Notes:
This feature does not work in program play
mode.
If PBC is on, it will turn off automatically
when Search Playback starts
When playing MP3/JEPG disc, search
feature only chapter
OSD
11. Changing the Audio Language
• During the disc playback, press - Language •
For second time press OSD key;
button once, and the audio language info
banner appears.
When a DVD or SVCD is recorded with
Multiple sound tracks, you can use the language feature to temporarily change the
audio language.
12. Subtitles (compatible with DV or SVCD)
Press the SUBTITLE button on the remote
once, and the subtitle info banner appears.
• When a DVD or SVCD is recorded with sub
titles, you can use the subtitle feature to view
the subtitles on-screen, by default, subtitles
are off, the info banner will display “Subt Off”
• To display subtitles, press the SUBTITLE
button again, the default language with its
corresponding serial number will be displayed
in the info banner and subtitles will be displayed
in that language.
Press OSD button for the third time, the
display menu fades out.
7
Basic Operations
13. Changing the Camera Angle
(Compatible with DVD discs)
• During disc playback, press ANGLE
button and the angle icon appears.
• Some DVDs contain multiple angles
of a particular scene or sequence, so
you can use the angle feature to view.
17. Changing the Soundtrack
• Press l/R bulton to display current
soundtrack.
R/L
ANGLE
18. Use the return playing
• Press return button: Go back to the specified
position defined by contents provider
14. Changing the TV Sytem
• Press NIP button to display current
TV system.
RETURN
NIP
RETURN
15. Mute the audio output
• Press MUTE button to mute audio
output.
MUTE
16. Zoom in the video image
• Press ZOOM button to activate the
function and choose the required zoom
factor: 01, 02, 03, OFF
ZOOM
• Use the
buttons to pan across
the screen when the zoom factor is 2/3/4
8
Basic Operations
19. Volume control
• You can press the volume button on the
•
Use the
buttons to enter the directory
region and highlight the desired directory,
then the first track under it starts playback;
also you can use the
buttons to enter
the file region and select the file you want
to play.
•
Notes:
Pressing the
buttons, you can activate
directory region, file region and files witch
region separately.
The highlight in directory region is shown as the
picture above; in this state there appears a
transparent rectangle in files witch region.
In file switch region, you can press the
buttons to switch the highlight, then press
ENTER; the “M”, “P” , “G” button is
illustrated in the above picture, for example,
if a disc with MP3 and JPEG files but without
any NES files, is loaded, the colour of the teller
“M” and “P” will appear white and “G”
black, if a MP3 file is playing, “M” turns darker.
•
On a disc with MP3/JPEG files, when
playing a JPEG picture, press the
RETURN button to return to JPEG list.
front of TV set or the amplifier to control
the sound level.
• Pressing the VOL+ button on the remote
allows you to amplify the sound level; pressing VOL- button will reduce the sound level.
• Notes:
During DVD PCM output playback, this
feature does not work.
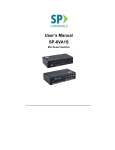
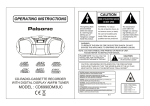
20. Playing MP3/JPEG discs
Place an MP3/JPEG disc into the tray,
Press PLAY, it will search the directories
of saved MP3/JPEG files, after searching, it
will auto go to the first directory of saved MP3
files (on a disc containing both MP3 and
JPEG files and on a disc containing single type
of files. It will auto go to the first directory)
and play the first song in the directory ("01"
is highlighted), the screen displays as the
picture below:
•
You can press the numeric buttons to select the
file you want to play, for example. If you desire
the 15 track in current list, press the “10+”
button once then press “5” button, the 15
starts playback.
Notes: When playing a disc with MP3 file, video
cannot be output while only digital audio can.
When a picture is playing or pausing, press the
buttons to change the display angle:
: flip vertical
: flip horizontal
: rotate 90 counter-clockwise
: rotate 90 clockwise
• When a picture playing or pausing, press the
MENU button, the screen displays MENU
Press NEXT button to go forward and the PREV
button to go to the previous page, you can
also select and play a picture in full screen
by pressing that number on the remote.
9
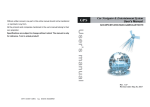
System Setup
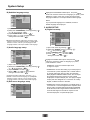
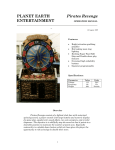
1. VIDEO SETUP
C) Video out setup
A)TV Shape setup
Language
Video
Audio
Language
Aspect Ratio
:4:3
Video Mode
:Auto fit
TV System
:PAL
Video Out
:S-VIDEO
Smart Picture
:Standard
Video
Audio
Aspect Ratio
:4:3
Video Mode
:Auto fit
TV System
:PAL
Video Out
:S-VIDEO
S-VIDEO
:Standard
YUV
Smart Picture
P-Scan
Rating
Misc
Rating
Misc
1) Open main menu by pressing <
>
2) Select the <VIDEO> menu by pressing < >
or < > and pressing <
>
3) Open <VIDEO OUT> row with <
>
4) Press <
> or <
> to select desired
setting and confirm with <
>.
1) Open main menu by pressing <
>
2) Select the <VIDEO> menu by pressing < >
or < > and pressing <
>
3) Open <ASPECT RATIO> row with <
>
4) Press <
> or <
> to select desired
setting and confirm with <
>.
TV SHAPE
16:9 (wide screen): choose this setting if your DVD player
is connected to a wide screen TV, if you choose this setting
and you don’t have a widescreen TV, the images on the
screen may appear distorted due to vertical compression.
4:3 LB (letter box): choose this setting if your DVD player
is connected to a normal ratio TV, connector you'll see
the movies in the original aspect ratio, you'll see the entire
frame of the movie might appear with back bars at the top
and bottom of the screen.
4:3 PS (pan & scan): choose this setting if your DVD player
is connected to a normal ratio TV, you can fill the movie to
entire screen your TV, this might mean that parts of the
picture (the left and right edges) won't be seen.
VIDEO OUT
• S-Video: choose this setting if your DVD player is connected
•
to a TV with S-VIDEO video cables.
• INTERLACE-YUV: choose this setting if your DVD player is
connected to a TV with Y, Cb, Cr video cables,
• P-SCAN: choose this setting if your DVD player is connected
to a progressive scan TV with Y,Cb, Cr, video cables.
•
•
2. LANGUAGE SETUP
A) OSD menu language setup
Language
B)TV system setup
Language
Video
Audio
Rating
Video
:4:3
Video Mode
:Auto fit
Fill
:PAL
Original
:S-VIDEO
Height Fit
:Standard
Width Fit
Video Out
Smart Picture
MP4 Subtitle
:English
English
:English
French
:ASCII
Audio
:English
DVD Menu
:English
Subtitle
Aspect Ratio
TV System
OSD Language
Audio
Rating
Misc
Auto Fit
Pan Scan
1) Open main menu by pressing <
>
2) Select the <VIDEO> menu by pressing < >
or < > and pressing <
>
3) Open <OSD LANGUAGE> row with <
>
4) Press <
> or <
> to select desired
setting and confirm with <
>.
Misc
1) Open main menu by pressing <
>
2) Select the <VIDEO> menu by pressing < >
or < > and pressing <
>
3) Open <TV SYSTEM> row with <
>
4) Press <
> or <
> to select desired
setting and confirm with <
>.
Highlight the OSD LANGUAGE option, and press
buttons to choose the OSD language you prefer, press
ENTER to confirm, and it will display OSD in that
language.
TV SYSTEM
According to the colour system of the TV, you can choose the
TV system
AUTO: choose this setting if your DVD player is connected
to a multi-system TV
NTSC: choose this setting if your DVD player is connected
to a NTSC TV
PAL: choose this setting if your DVD player is connected
to a PAL TV
•
•
•
10
System Setup
B) Subtitles language setup
Language
Video
OSD Language
:English
Subtitle
:English
English
:ASCII
French
:English
Auto
:English
Off
MP4 Subtitle
Audio
Audio
DVD Menu
Highlight the DVD MENU LANG option, and press
buttons to choose the DVD menu language you prefer, press
ENTER to confirm, if the disc you are playing has that
language available, it will output subtitle in that language.
Notes:
If your preferred language isn’t available, the disc's
default language will be played.
Rating
Misc
1) Open main menu by pressing <
>
2) Select the <LANGUAGE> menu by pressing < >
or < > and pressing <
>
3) Open <SUBTITLES> row with <
>
4) Press <
> or <
> to select desired
setting and confirm with <
>.
3. AUDIO SETUP
A) Digital out setup
Language
Video
Audio
Highlight the SUBTITLE LANG option and press
buttons to choose the subtitle language you prefer, press
ENTER to confirm, if the disc you are playing has that
language available, it will output subtitle in that language.
Rating
Video
Audio
OSD Language
:English
Subtitle
:English
MP4 Subtitle
:ASCII
Audio
:English
English
:English
French
DVD Menu
1) Open main menu by pressing <
>
2) Select the <LANGUAGE> menu by pressing < >
or < > and pressing <
>
3) Open <AUDIO> row with <
>
4) Press <
> or <
> to select desired
setting and confirm with <
>.
:Auto
Test Tone
:Off
Off
:No
Delay
PCM
Center Spk Delay
Digital Output
:No
Delay
RAW
:Off
• SPDIF/RAW: Choose this setting if your DVD player is
connected to a power amplifier with a coaxial cable or
an optical cable when playing a disc recorded with
Dolby Digital and MPEG audio formats, the corresponding digital signal will be output from the Coaxial
Output jack or Optical Output jack. This player's digital
output jacks are designed for a connection to a Dolby
Digital, or MPEG receiver or decoder.
D) DVD menu language setup
Rating
:Normal
Sub Woofer
SPDIF/OFF: From the Coaxial Output Jack.
no signal is output.
Highlight the AUDIO LANG option, and press
buttons to choose the audio language you prefer, press
ENTER to confirm, it the disc you are playing has that
language available, it will output audio in that language.
Audio
:Normal
Surround Speakers
Highlight the AUDIO OUT option and press the
buttons to choose the audio out language you prefer,
press ENTER to confirm.
Misc
Video
:Large
Center Speakers
1) Open main menu by pressing <
>
2) Select the <AUDIO> menu by pressing < >
or < > and pressing <
>
3) Open <DIGITAL OUT> row with <
>
4) Press <
> or <
> to select desired
setting and confirm with <
>.
Rating
Language
:Off
Front Speakers
Rear Spk Delay
Misc
C) Audio language setup
Language
Bass Management
OSD Language
:English
Subtitle
:English
MP4 Subtitle
:ASCII
Audio
:English
DVD Menu
:English
English
• SPDIF/PCM: Choose this setting if your DVD player is
connected to a 2-channel digital stereo amplifier; when
playing a disc recorded with Dolby Digital and MPEG
audio formats, audio singals will be modulated into 2channel PCM signal, and it will be output from the
Coaxial Output jack or Optical Output jack.
French
Misc
11
System Setup
B) Down sampling setup
4. Rating SETUP
A) Password setup
Language
Digital Output
:Off
Down Sampling
:Off
Off
Video
Language
Parental Control
:8 Adult
Set Password
On
Video
Audio
Audio
Rating
Rating
Misc
Misc
1) Open main menu pressing <
>
2) Select the <Audio> menu by pressing < >
or < > and pressing <
>.
3) Open < Down sampling > row with <
>
4) Press <
> or <
> to select desired
setting and confirm with <
>.
Choose this option to setup the L and R mono output
mode:
C) DRC Setup
Language
Video
Audio
Rating
Misc
Bass Management
:Off
Front Speakers
:Large
Center Speakers
:Normal
Surround Speakers
:Normal
Sub Woofer
:Auto
Test Tone
:Off
Center Spk Delay
:No Delay
Rear Spk Delay
:No Delay
Digital Output
:Off
1) Open main menu by pressing <
>.
2) Select the <Rating> menu by pressing < >
or < > and pressing <
>
3) Enter a 4-digit number (this is your password, don’t forget it).
4) Press <
>
SET PASSWORD
The password is “8888”, and you can set the ratings
limit or change the password by entering “8888” number
(this is your password, don’t forget it), and pressing
ENTER.
In order for the Rating feature to work,the password mode
must be turned on, if you want to set the rating limit, you will
need to enter the default password.
B) Rating setup
Language
Parental Control
:8 Adult
Set Password
Video
Audio
1) Open main menu by pressing <
>
2) Select the <Audio> menu by pressing < >
or < > and pressing <
>
3) Open <DRC> row with <
>.
4) Press <
> or <
> to select desired
setting and confirm with <
>
NIGHT MODE: this function is generally used
when playing high volume programs at night, in
order not to disturb the neighbours, this selling can
dynamically lower the volume and still keep
the original tone quality, this is the range, measured
in decibels (dB), between the loudest and the
quietest sound registers in a sound track.
Rating
Misc
1) Open main menu by pressing <
>.
2) Select the <Rating> menu by pressing < >
or < > and pressing <
>.
3) Open <PARENTAL CONTROL> by pressing <
4) Press <
> or <
> to select desired
setting and confirm with <
>.
>
Use the
buttons to move, adjust the scroll and adjust
the contrast.
There are seven rating options:
1 KID SAFE, 2 G, 3 PG, 4 PG13, 5 PG-R, 6 R, 7 NC-17, 8 ADULT
12
System Setup
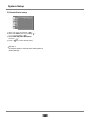
C) Default-Reset setup
Language
Use Default Settings
Screen Saver
:Off
Video
Audio
Rating
Misc
1) Open main menu by pressing <
>
2) Select the <MISC> menu by pressing < >
or < > and pressing <
>
3) Open <USE DEFAULT SETTINGS>
row with <
>
4) Press <
> to select desired setting.
DEFAULT
Choose this option to resume all the setup options to
default settings.
13
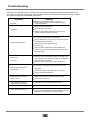
Trouble Shooting
When there is a problem it does not mean malfunction, before sending the product for repair, please check
your device according to the following. Please note that under no circumstances should you attempt to repair
the system yourself; this will invalidate the warranty.
Symptom
No Power
Remedy
Make sure power cord is properly connected
Check if there is power at the AC outlet by plugging
in another appliance.
Check if the TV is switched on
No picture
Check the video connection
Check the appropriate video input mode on the TV,
whether it receives another DV signal
If no disc is inserted, please insert the disc.
Insert a playable disc of a correct type, check if regional
Unable to start playback
code matches the DVD player.
Ensure that the disc label is facing up.
Clean the disc.
Check if the disc is defective by trying another disc.
Check to see if the disc is defective, badly scratched or
warped (not flat).
Picture poor
No sound
Clean the disc if there are finger prints or dirt with a soft
cloth, wiping from the centre to the edge in a straight line.
Check the audio connection.
Select the correct input mode of the audio receiver.
Point the remote control at the remote sensor of the
The remote control does no
work properly
DVD player.
Operate the remote control within about 23 ft (7m)
Inspect or replace the batteries.
Wired Microphone unable to
produce voice
Adjust the microphone volume to suitable volume.
Turn on the microphone.
Player does not respond to
some operating commands
Operations may not be permitted by the disc
Player can not close the tray
Please place the disc again on the centre of the tray.
Player cannot open the tray
If the tray is locked by obstacle or disc, please use the thin
stick to enter into Emergency Opening Hole and move the
inside bar on the bottom of the player manually.
14
Technical Specifications
Play mode
NTSC/PAL/AUTO
Disc mode
DVD, VCD, CD, SVCD, MP3, DVD-R, CD-R, CD-RW, JPEG, WMA
VIDEO CHARACTERISTICS
Resolution
500 lines
Video S/N ratio
56dB
Audio characteristic
Frequency response
fs 192KHz: 4Hz-44KHz: +/- 1dB
Audio S/N Ratio
90dB
Dynamic range
90dB
Distortion
< 0.01%
D/A converter
192KHz/24bit
Output characteristic
Video output
1Vp-p (75 )
S-Video output
Y:1Vp-p (75 ) C:0.3Vp-p (75 )
Audio output
2.0V
Digital audio output
Coaxial
AC 3
2.1 channel output
Power voltage
~ 120-240V 50/60Hz
Power comsumption
0.0V
1.0V
25W
Specifications are subject to change without notice.
15
PALSONIC
1 JOYNTON AVENUE
WATERLOO NSW 2017 AUSTRALIA
TEL: (02) 9313 7111
FAX: (02) 9313 7555
www.palsonic.com.au
PALSONIC CUSTOMER SERVICE
TELEPHONE
AUSTRALIA: 1300 657 888