1
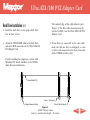
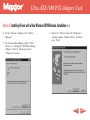
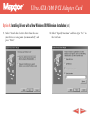
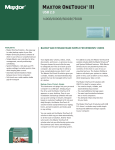
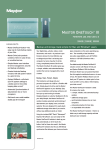
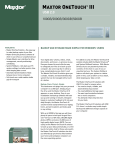
Ultra ATA/100 PCI Adapter Card
INSTALLATION
GUIDE
Ultra ATA/100 PCI Adapter Card
1
PRE INSTALLATION
Thank You
Thank you for selecting Maxtor’s Ultra ATA/100
PCI Adapter Card.
Please follow these installation instructions to reap
the full benefits of your purchase.
Handling Precautions
If these handling precautions are not followed,
damage to the adapter card may result – which
may void your product warranty.
Please see the Warranty section for additional
information.
Adapter cards are sensitive to electrostatic
discharge (ESD) damage. Handle the Ultra
ATA/100 Adapter Card by its sides. DO
NOT touch the printed circuit board
assembly.
DON’T connect/disconnect any cables
when the system power is on.
DON’T force or rock the Adapter Card
connectors into or out of their connection
sockets.
BACK
F O R WA R D
Ultra ATA/100 PCI Adapter Card
1
PRE INSTALLATION CONT.
System Requirements
• Pentium-class or higher with available PCI Bus
Mastering expansion slot. (See system or mother
board guide for additional information.)
Operating System Requirements
• Windows NT 4.x (SP4) or higher
• Windows 98/Millennium
• Windows 2000
Tools Required for Installation
• A small (#2) Phillips screw driver
Important – Please Read
• Maxtor recommends that you make a backup
copy of the files on any existing hard drives
prior to installing the new adapter card. Refer to
your computer user’s manual for detailed data
backup instructions.
• For your records, document your system’s current
BIOS (system setup) settings prior to installing
the adapter card. Some system BIOS may need to
be set for “add-on IDE adapter.”
• Uninstall any hard drive installation software (e.g.,
MaxBlast™, EZ-Drive or Ontrack) that may reside
on existing hard drives.
Failure to do so may result in loss of data.
Reference the following URL if the existing hard
drive is from Maxtor: http://www.maxtor.com/satisfaction/index.html.
• Your computer user’s manual
• Operating system software
Click on the Ultra ATA/100 Adapter link for details.
BACK
F O R WA R D
Ultra ATA/100 PCI Adapter Card
1
PRE INSTALLATION CONT.
WARNING: Removing the installation software of
hard drives other than Maxtor will result in data loss.
Please contact other hard drive manufacturers for
their specific third party software removal procedures.
Fujitsu
Quantum
Seagate
Western Digital
http://www.fujitsu.com
http://www.quantum.com
http://www.seagate.com
http://www.wdc.com
ATAPI Devices (DVD ROM, Tape Backup)
If your ATAPI device is not UDMA 66 or 100
compliant, and is currently working fine, please
leave it on that channel. If you experience problems
when attaching a ATAPI device and the device is
not seen by its installation software, please call that
device manufacture for new software.
NOTE: If you’re installing this card in conjunction
with a new Maxtor hard drive, please physically
install both devices (Ultra ATA/100 PCI Adapter
Card and hard drive) before using MaxBlast software.
Refer to the DiamondMax® Hard Drive Installation
Guide for specific instructions and drive jumper
configurations.
BACK
F O R WA R D
Ultra ATA/100 PCI Adapter Card
2
KIT COMPONENTS
Ultra ATA/100 PCI
Adapter Card
The Maxtor Ultra ATA/100 PCI Adapter Card
Kit includes the components shown here.
Familiarize yourself with each of these items.
Depending on your particular computer setup,
some or all of these parts may be needed to
complete the Adapter Card installation.
UDMA IDE Interface Cable
(necessary for UDMA 66/100 devices)
Diskette (Ultra ATA/100 Drivers)
BACK
F O R WA R D
Ultra ATA/100 PCI Adapter Card
3
HARDWARE INSTALLATION
4. Install the Ultra ATA/100 PCI Adapter Card
into the open slot (Figure 1).
Adapter Card Installation
Installing the Ultra ATA/100 PCI Adapter Card in
a system is a simple process.The card fits into any
available 32-bit PCI expansion slot on the
system's motherboard.
1. To prevent ESD damage, make sure you are
properly grounded before handling the Ultra
ATA/100 PCI Adapter Card and any other
system components.
2. Remove the cover of your system.
3. Remove the inside slot cover of an available
32-bit PCI slot on the motherboard.
Figure 1
Installing the Adapter Card into a PCI Slot
BACK
F O R WA R D
Ultra ATA/100 PCI Adapter Card
Adapter Card Installation (cont.)
Hard Drive Installation
5. If applicable, attach the LED cable connector on
your system case to the LED connector on the
Ultra ATA/100 PCI Adapter Card (Figure 2).
NOTE: If you're installing the Ultra ATA/100 PCI
Adapter Card into a system with an existing
Windows NT operating system, do not connect any
hard drives to the Ultra ATA/100 PCI Adapter
Card before installing the driver software.
IDE 2 (secondary)
pin 1
IDE 1 (primary)
LED
connector
Some OEM systems require a BIOS change for
SCSI add-in cards.
Drives attached to the Ultra ATA/100 PCI Adapter
Card cannot boot Windows NT without driver
support. See Software Installation, Option C, Step
1C for details.
32-pin PCI connector
Figure 2
Adapter Card Connections
6. Fasten the adapter card bracket to the system case.
1. Configure the jumpers of the hard drive(s) you're
preparing to install with the Ultra ATA/100 PCI
Adapter Card with the appropriate master/slave
settings.
You may need to refer to your hard drive's
manual for more information.
NOTE: Do not apply any jumper that is meant
to reduce the capacity of the hard drive.
BACK
F O R WA R D
Ultra ATA/100 PCI Adapter Card
Hard Drive Installation (cont.)
2. Install the hard drives in the proper hard drive
bays of your system.
3. Attach the UDMA IDE cable to the hard drives
and to the IDE connectors on the Ultra ATA/100
PCI Adapter Card.
The colored edge of the cable indicates pin 1
(Figure 3).The blue cable connector must be
attached to IDE 1 on the Ultra ATA/100 PCI
Adapter Card.
4. If two drives are connected via the same cable,
make sure that one drive is configured as a master drive and connected to the back connector
of the UDMA interface cable.
If you're installing the adapter on a system with
Windows NT already installed, see the NOTE
above for more information.
Striped Edge (Pin 1)
Drive 1 - Slave (gray)
Adapter Connector (blue)
Drive 0 - Master (black)
Figure 3
UDMA Interface Cable
(industry standard cable length - 18 inches)
BACK
F O R WA R D
Ultra ATA/100 PCI Adapter Card
Hard Drive Installation (cont.)
You must use the UDMA IDE interface cable
when connecting Ultra ATA/100 hard drives to
the Ultra ATA/100 PCI Adapter Card.
The Ultra ATA/100 PCI Adapter Card package
contains one UDMA interface cable.
You will need an additional UDMA interface cable
if connecting more than two Ultra ATA/100 hard
drives to the Ultra ATA/100 PCI Adapter Card.
Helpful Hint: If upon booting, your system doesn’t recognize
the card, change the card to a different PCI slot.
BACK
F O R WA R D
Ultra ATA/100 PCI Adapter Card
4
SOFTWARE INSTALLATION
This section details software driver installation of
the Ultra ATA/100 PCI Adapter Card when used
with various operating systems.
This section contains four different options for
installing the Ultra ATA/100 Drivers:
• Option A: Installing Drivers with a New
Windows 98/Millennium Installation
Software drivers are small program files that enable
recognition/communication between devices (e.g.,
the Ultra ATA/100 PCI Adapter Card) and an
operating system.
• Option B: Installing Drivers with Pre-Existing
Windows 98/Millennium Installation
• Option C: Installing Drivers during Windows
NT 4.x/2000 Fresh Installation
• Option D: Installing Drivers with a Pre-Existing
Windows NT 4.x/2000 Installation
BACK
F O R WA R D
Ultra ATA/100 PCI Adapter Card
Option A: Installing Drivers with a New Windows 98/Millennium Installation
1. After installing the Ultra ATA/100 PCI Adapter
Card and configuring the hard drive(s), partition
and format your hard drive(s).
2. Install Windows 9x.
3. After installation, go to the “Start” menu and
select “Settings.”
4. From the “Settings” menu, select “Control
Panel.”
5. In the “Control Panel” window, double-click on
the “System” icon.
BACK
F O R WA R D
Ultra ATA/100 PCI Adapter Card
Option A: Installing Drivers with a New Windows 98/Millennium Installation (cont.)
6. In the “System” window, select “Device
Manager.”
8. Select the “Driver” tab in the “Properties”
window, choose “Update Driver” and then
press “Next.”
7. In the hierarchical display under “Other
Devices” is a listing for “PCI Mass Storage
Adapter.” Select it and then press the
“Properties” button.
BACK
F O R WA R D
Ultra ATA/100 PCI Adapter Card
Option A: Installing Drivers with a New Windows 98/Millennium Installation (cont.)
9. Select “Search for a better driver than the one
your device is using now (recommended),” and
press “Next.”
10.Select “Specify Location” and then type “A:\” in
the text box.
BACK
F O R WA R D
Ultra ATA/100 PCI Adapter Card
Option A: Installing Drivers with a New Windows 98/Millennium Installation (cont.)
11.Insert the “Ultra ATA/100 Drivers” diskette into
the A: diskette drive.
13.Press “Next", then "Finish,” then “Yes” when
asked if you want to restart your computer. Be
sure to remove the diskette from drive A:.
12.Press the “Next” button. A message informing
you that Windows has found “Maxtor Ultra
ATA/100 Adapter” should appear.
BACK
F O R WA R D
Ultra ATA/100 PCI Adapter Card
Option B: Installing Drivers with Pre-Existing Windows 98/ Millennium Installation
1. After installing the Ultra ATA/100 PCI Adapter
Card and configuring the hard drives, power up
the system and boot Windows.
2. The “Add New Hardware Wizard” will appear,
informing you that it has found a “PCI
Adapter.”
Refer to steps 3 through 9 of Option A for remaining driver installation instructions.
Driver Confirmation
To confirm that the driver has been properly
loaded, choose “Settings” from the "Start" menu.
Select “Control Panel,” and then double-click on
the “System” icon.
Choose the “Device Manager” tab, and then click
the “+” in front of “SCSI adapters.” “Maxtor Ultra
ATA/100 Adapter” should appear.
BACK
F O R WA R D
Ultra ATA/100 PCI Adapter Card
Option C: Installing Drivers during Windows NT 4.x/2000 Fresh Installation
1. Start the system installation by booting from the
Windows NT Disk #1:
a). Floppy Install: boot the system with the
Windows NT installation disks.
c). CD-ROM Disk Install: boot from the CDROM disk and press the “F6” key (several times)
when the message “Setup is inspecting your
computer’s configuration” appears.
2. Press “S” to configure an additional adapter.
b). Floppy-less Install: boot from floppy and type
“WINNT/B”. After the files have been copied,
the system will reboot.
On the reboot, press the “F6” key when the
message “Setup is inspecting your computer’s
hardware configuration” appears.
3. Insert the Maxtor Ultra ATA/100 Driver diskette
into drive A: and press “Enter.”
Then simply follow the screen prompts.
BACK
F O R WA R D
Ultra ATA/100 PCI Adapter Card
Option D: Installing Drivers with a Pre-Existing Windows NT 4.0/2000
Hard drives should not be connected to the Ultra
ATA/100 Adapter Card before performing the
following procedure.
The Ultra ATA/100 Drivers must be loaded on the
system hard drive (running under the existing hard
drive adapter) before any hard drives are connected
to the Ultra ATA/100 PCI Adapter Card.
NOTE: Please refer to screen capture pictures listed
in Steps 7, 8, 9 and 11 of Option A - as they also
apply for the steps outlined here in Option D.
5. In the “Install Drivers” dialog box, press
“Have Disk.”
6. When “Install From Disk” appears, insert the
“Ultra ATA/100 Driver” diskette in drive A:,
and select “OK.”
7. When the “Install Driver” dialog box appears,
select “Maxtor Ultra ATA/100 Adapter” and
press “OK.”
8. When the “Select SCSI Adapter Option” box
appears, press “Install.”
1. Select “Settings” from “Start” menu.
2. Select “Control Panel” from the “Settings”
menu.
9. After a successful installation, the SCSI Adapter
Setup box will show that the Maxtor Ultra
ATA/100 Adapter driver was installed.
3. Double-click on the “SCSI Adapters” icon,
which generates the “SCSI Adapters” dialog
box.
Power off your system and attach the hard
drive(s) to the Ultra ATA/100 PCI Adapter
Card.
4. Choose “Drivers,” and press “Add.”
BACK
F O R WA R D
Ultra ATA/100 PCI Adapter Card
5
PRODUCT REGISTRATION
Register and take advantage of all the benefits!
By registering your new Maxtor product, you’ll have
the option to receive product updates, special offers,
and other important information about other storage
solutions from Maxtor.
Simply point your web browser to: www.maxtor.com
go to the warranty registration page, and complete the
short questionnaire.
BACK
F O R WA R D
Ultra ATA/100 PCI Adapter Card
PRODUCT WARRANTY
Maxtor’s warranty obligations are limited to the terms set forth: Maxtor warrants
only to the original consumer purchaser that new Maxtor Ultra ATA/100 PCI
Adapter Card products will be free from defects in material and workmanship for
1 year from the date of original purchase.
For a replacement Ultra ATA/100 PCI Adapter Card, the warranty on the replacement card is the remainder of the warranty on the original card or 90 days, whichever is longer. If you discover a defect, Maxtor will replace the Card at no charge to
you, provided you return it during the warranty period, with transportation charges
prepaid, to Maxtor in Ireland, Singapore or the USA.
Ultra ATA/100 PCI Adapter Cards must be properly packaged in Maxtor packaging
or Maxtor approved packaging to obtain warranty service. Before returning a
Maxtor Adapter, please contact Maxtor at 1-800-2MAXTOR (in USA) to obtain a
Return Material Authorization (RMA) number. A copy of the receipt or a bill of
sale bearing the appropriate Maxtor serial number and model number may be
required for warranty service.The warranty applies only to the Maxtor Ultra
ATA/100 PCI Adapter Cards that can be identified by the Maxtor trademark, trade
name, serial number or logo affixed to them. Maxtor does not warrant any Card that
is not manufactured by, for or with permission from Maxtor.
This warranty is not applicable to: Abnormal wear and tear; Abuse, unreasonable use,
mistreatment, or neglect; Damage caused during installation of the Card; Damage
caused by the equipment or system with which the Card is used; Damage caused by
modification or repair not made or authorized by Maxtor; Cards whose Maxtor
Serial Number has been removed or defaced; Damage caused by use of non-Maxtor
packaging; Damage caused by improper or improperly used packaging; Damage
caused by lack of ESD protection; Cards that are determined to be stolen.
THIS WARRANTY AND REMEDIES SET FORTH ABOVE ARE EXCLUSIVE AND IN LIEU OF ALL OTHERS, WHETHER ORAL OR WRITTEN,
EXPRESSED OR IMPLIED. MAXTOR SPECIFICALLY DISCLAIMS ANY
AND ALL IMPLIED WARRANTIES, INCLUDING,WITHOUT LIMITATION,WARRANTIES OF MERCHANTABILITY AND FITNESS FOR A
PARTICULAR PURPOSE AND AGAINST INFRINGEMENT. No Maxtor
dealer, agent or employee is authorized to make any modification, extension or
addition to this warranty.
MAXTOR IS NOT RESPONSIBLE FOR SPECIAL, INCIDENTAL, INDIRECT OR CONSEQUENTIAL DAMAGES RESULTING FROM ANY
BREACH OF WARRANTY, OR UNDER ANY OTHER LEGAL THEORY,
INCLUDING BUT NOT LIMITED TO LOSS OF DATA, LOSS PROFITS,
DOWNTIME, GOODWILL, DAMAGE OR REPLACEMENT OF EQUIPMENT AND PROPERTY, AND ANY COSTS OF RECOVERING, PROGRAMMING OR REPRODUCING ANY PROGRAM OR DATA STORED
IN OR USED WITH MAXTOR DISK DRIVES OR MAXTOR’S ULTRA
ATA/100 PCI ADAPTER CARDS.
Some states/jurisdictions do not allow the exclusion or limitation of incidental or
consequential damages or exclusions of implied warranties, so the above limitations
or exclusions may not apply to you.This warranty gives you specific legal rights,
and you may also have other rights that vary from jurisdiction to jurisdiction.
BACK
F O R WA R D
Ultra ATA/100 PCI Adapter Card
☎
CONTACTING MAXTOR
1-800-2MAXTOR (1-800-262-9867)
Product Support and Customer Service Agents are available from 6 a.m. to 6 p.m.
(MST) Monday - Friday.
Maxtor on the Internet
Homepage
http://www.maxtor.com
FTP Site
ftp://ftp.maxtor.com
Maxtor via E-mail
Customer Service E-mail
Maxtor Outside the U.S. and Canada
Customer Support
303-678-2015
MaxInfo
303-678-2015, press 1
MaxFax ®
303-678-2618
www.maxtor.com
All material contained herein Copyright © 2000 Maxtor Corporation. MaxFax
and Maxtor are registered trademarks of Maxtor. Other trademarks are the property of their respective holders. Contents subject to change without notice.
Printed in the U.S.A. Maxtor Part #20130600-WEB