1
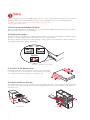
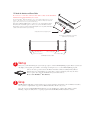
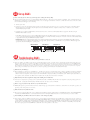
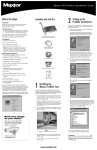
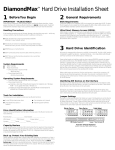
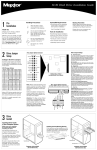
DiamondMax™ Hard Drive Installation Guide
Thank you for your purchase of a Maxtor DiamondMax™ Hard Drive Kit.This Installation Guide and MaxBlast™ Plus
software provide three easy steps to successfully install your new Maxtor hard drive in your computer system.
Kit Components
The Maxtor Hard Drive Retail Kit may have included accessory components shown here. Familiarize yourself with each of
these components. Depending on your particular computer setup, some or all of these parts may be needed to complete the
Maxtor hard drive installation. DiamondMax™ Hard Drive Kits that carry a “U” in the kit number are UltraDMA 66
compatible and will include a special interface cable that must be used to install the hard drive.
IDE Interface Cable
MaxBlast™ Plus
Installation Software
5.25-inch Mounting Brackets
Mounting Screws
Back up. Protect your Existing Data
Periodic backup of important data is always a good idea.Whenever your computer is on, there is the potential for losing data on
your hard drive.This is especially true when running disk utilities or any software that directly manipulates your files.
Maxtor recommends that you make a backup copy of the files on any existing hard drives prior to installing the new drive. If
required, this data may then be copied to the Maxtor hard drive after it has been installed in the computer. Refer to your computer user’s manual for detailed data backup instructions.
Pre-installation Notes
If you do not understand the steps outlined in
this Installation Guide, please have a qualified
computer technician install the hard drive.
Handling Precautions
If the handling precautions are not followed,
damage to the hard drive may result – which
may void your warranty. See the Warranty
section for additional information.
Allow the drive to reach room temperature BEFORE installing it in the
computer.
Hard drives are sensitive to electrostatic discharge (ESD) damage.
Handle the drive by its sides. DO
NOT touch the printed circuit
board assembly.
NEVER drop, jar, or bump the drive.
DON’T connect/disconnect any
drive cables when the power is on.
DON’T force or rock the hard drive
connectors into or out of their
connection sockets.
Tools for Installation
The following tools are needed to install
your new Maxtor hard drive:
• A small (#2) Phillips head screw driver
• Small needle-nose pliers or tweezers
• Your computer user’s manuals
• Operating system software
System Requirements
• IDE/AT interface
• Maxtor recommends:
• Drives less than or equal to 8.4 GB
– 486 DX 66 MHz
• Drives larger than 8.4 GB
– Pentium-class processor
Operating System Requirements
• Drives less than or equal to 8.4 GB:
• DOS 5.0 or higher
• Drives larger than 8.4 GB:
• Installing as boot drive (Primary Master)
requires full installation set of Windows
95/98 – not an update from DOS or
Windows 3.x.
• Installing as non-boot drive (Primary
Slave, Secondary Master or Slave)
requires Windows 95/98 on the
boot drive.
1
Hook up
Maxtor recommends that you use the MaxBlast™ Plus software to create a customized installation guide for your system before
physically installing your new hard drive.The information created by MaxBlast Plus relates to the following illustrations.
For additional information and answers to common installation questions, refer to
the back of this Installation Guide.
1A. Boot the System with the MaxBlast Plus Diskette
Before physically installing the Maxtor hard drive, boot your system with the MaxBlast Plus diskette. It will assist you with the
instructions in this section for a successful installation.
1B. Configure the Drive Jumpers
You must determine how the jumpers on the Maxtor hard drive should be set for your system.A jumper is a small piece of plastic
that slides over a pair of configuration pins on the hard drive to activate a specific function.
The jumper configurations below show the three valid jumper settings – Master, Slave and Cable Select. Maxtor hard drives are
always shipped with the Master jumper setting enabled.
Master
J50 J48 J46 J44 J42
Slave
J50 J48 J46 J44 J42
Cable Select
J50 J48 J46 J44 J42
Rear View of Hard Drive / Jumper Detail
1C. Install the 5.25-inch Mounting Brackets
If the Maxtor hard drive will be mounted in a 5.25-inch device bay, the figure
to the right shows how to attach the brackets to the hard drive.These brackets
are not required if the drive is mounted in a 3.5-inch device bay.
1D. Install the Hard Drive in a Device Bay
The example figures below are of typical computer systems and mounting styles.Your computer may have a different mounting
style. Refer to your computer user’s manual for specific mounting information. Be sure to secure the drive to the device bay
with all four screws.
5.25-inch Bay
2
3.5-inch Bay
1E. Attach the Interface and Power Cables
Do not force or rock the connectors into their sockets on the hard drive.
Push them in straight until they are seated.
Note: DiamondMax™ Hard Drive Kits that carry a “U” in the kit number include a special
interface cable that must be used to install the hard drive. Follow the illustration below for
proper cable connections to the system and hard drive(s).
EIDE
Attach an available IDE interface connector to J1 on the Maxtor hard
drive. Attach an available power connector to J2 on the Maxtor hard
drive.This connector is keyed and will only fit one way. Check all other
cable connections before you start up.
Inte
rfac
e-
J1
pin
jum 1
pe
Po w
r
er -
J2
Striped/red-colored edge is pin 1
Rear View of Hard Drive / Interface
and Power Connections
Striped Edge (Pin 1)
Drive 1 - Slave (gray)
System Connector (blue)
Drive 0 - Master (black)
UDMA 66 Interface Cable
2
Start up
Turn your system ON. During the system start up sequence, run the SETUP (BIOS) program. Newer systems usually display a message like “press DEL to enter Setup,” showing how to access the SETUP (BIOS) program.
Choose the device position where the Maxtor hard drive will be installed (Primary Master,
Primary Slave, Secondary Master, Secondary Slave or their equivalents) and select the “Auto
Detect” option. Save and exit the BIOS.The system will now boot.
Boot to the MaxBlast™ Plus diskette.
3
Set up
MaxBlast™ Plus will guide you through the steps to prepare (partition and format) your new Maxtor hard drive.
Once you have completed this step, your new Maxtor hard drive will be ready to use.
Note: Do not discard the MaxBlast™ Plus diskette once the installation is complete.The diskette contains
Maxdiag, a diagnostic utility that is a separate program from the MaxBlast™ Plus installation software.
Q1 Hook up Q&A’s
Q. What is needed to Backup data?
A. With today’s large capacity hard drives, backing up data has become very important. In order to backup a hard drive you need to have a backup device (preferably a
device with removable media) installed on your system.The device (e.g., tape or Zip drive) and a software backup application allows all or selected information to be
copied from a hard drive to the backup device.This protects data from loss and can be used to restore the data to the hard drive in the event of loss or corruption.
Q. How do I make a backup of my existing data?
A. Using a device described in the previous question. Use either (1) the application program provided with the device to create the backup or, (2) operating system utilities like Copy, My Computer or Explorer to copy the data from your hard drive.The use of applications for backing up data is usually more efficient then the operating system utilities. Some operating system utilities do not correctly copy all of the operating system programs. If you do not have a backup capability for your system,
Maxtor recommends that you backup your important data to floppy disks.
Q. Can you explain the terms “Master” and “Slave”?
A. Master and Slave represent the relationship between the devices on the same IDE interface (ribbon cable).The interface requires a primary or “Master” device be
attached to the ribbon cable before it will recognize a secondary or “Slave” device on the cable.The Master device will usually be assigned a drive letter by the operating system before a slave device.The Primary Master device will always be the C: drive.
Q. How many devices can I put on a cable?
A. The ribbon cable (IDE interface) is limited to a maximum of two IDE devices and a maximum length of 18 inches.These limitations are defined by the ANSI standards. Some systems may require a shorter cable for optimal performance.
Q. When is a jumper change required for a device?
A. When the relationship to other devices has changed.This happens when a device changes position from Master to Slave and vice versa. Some devices need a jumper
change when an additional device is added to the same cable. Information regarding the correct jumper configurations on other manufacturer’s devices is available in
their product documentation or directly from the manufacturer of that device.
Q. What is Cable Select?
A. Cable Select is an alternate way of identifying devices on the interface cable. Instead of the “Master” and “Slave” settings, all devices are jumpered as Cable Select and
identification is selected by the position on the cable.This requires a special interface cable that identifies one connector as device 0 and the other connector as device
1. If you do not know if your system supports Cable Select, you can set the devices to the conventional Master and Slave settings.
Q2 Start up Q&A’s
Q. What is a BIOS, and is it the same as “Setup”?
A. BIOS stands for Basic Input/Output System and is contained in a chip on the motherboard.This is the program that is activated during system boot. It contains system parameters and the identification of the devices attached to the system and the address to be used to communicate with them. It then starts loading the installed
operating system.“Setup” is the term for the program that is needed to allow the users to set the parameters contained within the BIOS and is just one of the features of the BIOS chip.
Q. How do I access my BIOS setup program?
A. Newer systems will typically display a message (e.g., press DEL to Enter Setup) identifying how to access the SETUP (BIOS) program. If your system does not display
a message during boot, refer to the manufacturers documentation or contact the manufacturer for assistance in accessing the BIOS.
Q3 Set up Q&A’s
Q. Do I have to use MaxBlast™ Plus to install my new drive?
A. Maxtor recommends using MaxBlast™ Plus to prepare your new hard drive.The answer is definitely “Yes” if the BIOS on your
system or interface card has capacity barriers and limitations. If the BIOS or interface card correctly support the hard drive capacity then the answer is “No,” the operating systems utilities FDISK and FORMAT may be used. MaxBlast Plus is designed to only install on those systems where it is needed.
If the system BIOS or interface card supports the drive capacity, then MaxBlast Plus will prepare (partition and format) the drive for use by the operating system –
without using any special drivers or overlay software.
Q. How do I use the MaxBlast™ Plus installation software?
A. MaxBlast™ Plus is provided on a bootable diskette. Once you have completed the hook up and start up sections,
simply boot to the diskette and follow the on-screen prompts.
4
Q3 Set up Q&A’s
Q. After connecting my new drive, my system hangs after counting the memory. Why?
A. If the system hangs during the boot process after installing the Maxtor hard drive – either before or after setting the system BIOS – this is an indication that the system BIOS has a capacity barrier or cylinder limitation and does not correctly support the hard drive. Or there is a conflict with another device on the same cable as
the new hard drive. If this happens, do the following:
1 Turn the system OFF.
2 If the drive is on the same cable with another device, make sure the jumper settings for both devices are set correctly for their positions or Install the cylinder
limitation jumper (J46) on the Maxtor drive.The figure below shows the Maxtor hard drive configured as a Master, Slave or Cable Select device with the
cylinder limitation jumper installed.
3 If the BIOS was set to AUTO DETECT, follow the instructions in Section 3 on the front of this Installation Guide to prepare the hard drive using the
MaxBlast™ Plus installation software.
If other BIOS settings were used, access the system BIOS SETUP program and set the BIOS parameters to a User Definable Type with 1,023 cylinders, 16 heads and
63 sectors per track for the Maxtor hard drive, and disable LBA (typically set to normal).Then follow the instructions in Section 3 on the front of this Installation Guide
to prepare the hard drive using the MaxBlast Plus installation software.
IMPORTANT:When the Cylinder Limitation jumper (J46) is installed, the Maxtor hard drive MUST be prepared using the MaxBlast Plus installation software.
Certain operating systems (e.g.Windows NT and Novell) do not support this option.You will have to install the drive on a system that has a BIOS that supports the
capacity of the drive when installing these operating systems.
Master Device
Slave Device
J50 J48 J46 J44 J42
Cable Select
J50 J48 J46 J44 J42
J50 J48 J46 J44 J42
Cylinder Limitation Option
Q4 Troubleshooting Q&A’s
Q. Why, after installing my new Maxtor drive, is the system unable to detect it?
A. There are a number of possibilities; (1) the drive was not physically installed correctly – check the cables to verify that they are fully seated and the drive is getting power; (2) the drive was not set in the system BIOS – verify the BIOS settings; (3) the drive was not partitioned and formatted – use the MaxBlast™ Plus
software to prepare the drive; (4) there is a conflict with another device in the system – try the new drive alone in the system. If each device will work alone in
the system but not together, then you may be experiencing a device communication issue.Try reversing the order of the devices or try the devices on separate
cables, setting each as a Master device.You may want to contact the operating system manufacturer for additional information.
Q. Where did my CD-ROM go?
A. Most CD-ROM’s are considered to be an ATAPI device – basically a device that is not controlled by the system or interface card BIOS and requires the installation
of special software drivers in order for the system to be able to access the device.There are two basic issues regarding CD-ROM’s; (1) since the operating system
controls the drive letter assignment, the letter assigned to the CD-ROM will be changed by installing a new hard drive. (2) CD ROM’s require software drivers to
be recognized as a drive letter. If the new Maxtor drive is installed as the only drive, these drivers must be re-installed.
Q. Why did all my drive letter assignments change after installing the new hard drive?
A. Drive letters are assigned by the operating system, not by the BIOS, hard drive or MaxBlast™ Plus.The drive letter assignment used by the operating system is for
hard drives first – starting with the Primary Master IDE hard drive then other devices such as CD-ROM’s.
Q. How do I copy my data from my old drive to my new Maxtor drive?
A. MaxBlast Plus provides a option in the Advanced menu to make an image copy of the data from one hard drive to another.This is not a file by file copy, but a complete image of the existing drive to the new drive.
Q. What should I do if my hard drive fails?
A. First you need to verify the failure.This can be accomplished by using Maxtor’s diagnostic utility included on the MaxBlast Plus diskette called “MAXDIAG.EXE.”
A text file, titled “MAXDIAG.TXT,” is also included with instructions for running this utility. Follow the on-screen instructions if you encounter a failure.
Q. After installing my new Maxtor drive, I am not able to see the full capacity. Why?
A. There are three common possibilities:(1) the drive was not correctly partitioned and formatted; (2) the system BIOS has a capacity barrier; (3) your operating system has a limitation. If you used your operating system FDISK and FORMAT utilities to partition and format the drive, the partitions may not have been created
correctly within the operating system constraints. If when attempting to use the operating system FDISK utility and the total disk space is not the full capacity of
the drive, then you have a BIOS with a capacity limitation. Operating systems that use the FAT16 file system have a limitation of 2.048 MB per drive letter. Any
drive with a capacity greater than 2.048MB must be divided into two or more partitions or drive letters.
Q4 Troubleshooting Q&A’s
Q. What is Ultra DMA?
A. Ultra DMA or UDMA is the term that identifies the ANSI standard protocol for a burst data transfer rate using Direct Memory Access (DMA).The burst data
transfer rate is defined as follows: UDMA Mode 2, 33 Megabytes per second for 3 milliseconds. UDMA Mode 4, 66 Megabytes per second for 3 milliseconds.
Q. How do I enable Ultra DMA?
A. The following are requirements necessary to use UDMA data transfers: (1) the IDE device must support UDMA; (2) the mother board or interface card must support UDMA; (3) the UDMA drivers for the operating system must be loaded; and (4) for UDMA 66, an 80-conductor cable must be used.This cable is included in
all Maxtor Retail Kits that contain a “U” in the kit number.
Q. My question is not listed. Where can I get more information?
A. Maxtor provides many automated services including MaxFax, MaxInfo and our site on the world-wide-web. Please refer to the “How to Contact Maxtor Customer
Service and Support” section below. Also listed are the telephone numbers for Technical Assistance and Customer Service if you are unable to find your solution
through the automated systems.
W Maxtor Limited Warranty
Maxtor’s warranty obligations are limited to the terms set forth: Maxtor warrants to the original consumer purchaser that new Maxtor products will be free from defects in material and workmanship
for 3 years from the date of original purchase. For replacement disk drives the warranty on the replacement drive is the remainder of the warranty on the original drive or 90 days, whichever is
longer. For disk drives obtained under the Maxtor Upgrade Program, the warranty period is 3 years commencing on the date Maxtor ships the drive to the customer.
If you discover a defect, Maxtor will, at its option, repair or replace the product at no charge to you, provided you return it during the warranty period, with transportation charges prepaid, to Maxtor
in San Jose, CA; Bray, Ireland or Singapore. Drives must be properly packaged in Maxtor packaging or Maxtor approved packaging to obtain warranty service. Before returning a Maxtor product,
please contact Maxtor at 1-800-2MAXTOR (in USA) to obtain a Return Material Authorization (RMA) number.A copy of the receipt or a bill of sale bearing the appropriate Maxtor serial number
and model number may be required for warranty service.
The warranty applies only to the Maxtor products that can be identified by the Maxtor trademark, trade name or logo affixed to them. Maxtor does not warrant any product that is not manufactured
by, for or with permission from Maxtor.This warranty is not applicable to:
• Abnormal wear and tear
• Abuse, unreasonable use, mistreatment, or neglect
• Damage caused during installation of the disk drive
• Damage caused by the equipment or system with which the disk drive is used
• Damage caused by modification or repair not made or authorized by Maxtor
• Disk drives whose Maxtor Serial Number has been removed or defaced
• Damage caused by use of non-Maxtor packaging
• Damage caused by improper or improperly used packaging
• Damage caused by lack of ESD protection
• Drives that are determined to be stolen
THIS WARRANTY AND REMEDIES SET FORTH ABOVE ARE EXCLUSIVE AND IN LIEU OF ALL OTHERS, WHETHER ORAL OR WRITTEN, EXPRESSED OR IMPLIED.
MAXTOR SPECIFICALLY DISCLAIMS ANY AND ALL IMPLIED WARRANTIES, INCLUDING,WITHOUT LIMITATION,WARRANTIES OF MERCHANTABILITY AND FITNESS FOR A PARTICULAR PURPOSE AND AGAINST INFRINGEMENT. No Maxtor dealer, agent or employee is authorized to make any modification, extension or addition to this warranty.
MAXTOR IS NOT RESPONSIBLE FOR SPECIAL, INCIDENTAL, INDIRECT OR CONSEQUENTIAL
DAMAGES RESULTING FROM ANY BREACH OF WARRANTY, OR UNDER ANY OTHER LEGAL THEORY, INCLUDING BUT NOT LIMITED TO LOSS OF DATA, LOSS
PROFITS, DOWNTIME, GOODWILL, DAMAGE OR REPLACEMENT OF EQUIPMENT AND PROPERTY,AND ANY COSTS OF RECOVERING, PROGRAMMING OR REPRODUCING ANY PROGRAM OR DATA STORED IN OR USED WITH MAXTOR DISK DRIVES.
Some states do not allow the exclusion or limitation of incidental or consequential damages or exclusions of implied warranties, so the above limitations or exclusions may not apply to you.This warranty gives you specific legal rights, and you may also have other rights that vary from state to state.
Contacting Maxtor’s Customer Support Center
1-800-2MAXTOR (1-800-262-9867)
Agents are available from 6 a.m. to 6 p.m.
(mountain time) Monday through Friday.
PRESS 1
• Technical Support
• Installation and
troubleshooting assistance
• MaxInfo 24 hour automated
voice troubleshooting system
•
•
•
•
PRESS 2
PRESS 3
Customer Service
Replacement Options
Warranty and RMA Status
24 hour automated customer
service information
• MaxFax™ 24 hour automated
FAX retrieval system
Fax and E-mail
Technical Support Fax
Customer Service Fax
E-mail Customer Support
Contacting Maxtor Outside the U.S. and Canada
303-678-2260
408-922-2085
Visit Maxtor's website and
follow the E-mail links.
Customer Support Center
MaxInfo
MaxFax™
303-678-2015
303-678-2015, press 1
303-678-2618
Maxtor on the Internet
Home Page
FTP Site
http://www.maxtor.com
ftp://ftp.maxtor.com
All material contained herein Copyright © 1999 Maxtor Corporation. Contents and specifications subject to change
without notice. DiamondMax™, MaxBlast™ Plus and MaxFax™ are trademarks of Maxtor. Printed in the U.S.A.
Maxtor Part #20097000
®