1
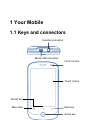
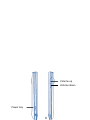
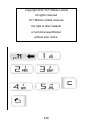
MTAG 351
User Manual
CONENT
1 YOUR MOBILE........................................................5
1.1 KEYS AND CONNECTORS................................................................ 5
1.2 GETTING STARTED....................................................................10
1.3 HOME SCREEN........................................................................17
2 TEXT INPUT..........................................................28
2.1 USING ONSCREEN KEYBOARD.......................................................28
3 PHONE CALL, CALL LOG AND CONTACTS...............30
3.1 PHONE................................................................................. 30
3.2 CALL LOG..............................................................................36
3.3 CONTACTS ............................................................................37
4 GOOGLE MESSAGING, GMAIL/ EMAIL, GOOGLE
TALK.......................................................................41
4.1 GOOGLE MESSAGING................................................................41
4.2 GMAIL/EMAIL .......................................................................44
4.2.2 EMAIL............................................................................... 46
4.3 GOOGLE TALK........................................................................48
5 GOOGLE CALENDAR & ALARM CLOCK &
2
CALCULATOR..........................................................50
5.1 GOOGLE CALENDAR .................................................................51
5.2 CLOCK................................................................................. 54
5.3 CALCULATOR.......................................................................... 55
6 GETTING CONNECTED..........................................57
6.1 CONNECTING TO THE INTERNET.....................................................57
6.1.2 WI-FI.............................................................................. 59
6.2 BROWSER.............................................................................. 61
6.3 CONNECTING TO BLUETOOTH DEVICES..............................................64
6.4 CONNECTING TO A COMPUTER VIA USB..........................................67
6.5 SHARING YOUR PHONE'S MOBILE DATA CONNECTION..............................69
7 PLAY STORE(ANDROID MARKET)..........................73
7.1 LOCATE THE ITEM YOU WANT TO DOWNLOAD AND INSTALL......................74
7.2 DOWNLOAD AND INSTALL............................................................ 75
8 MULTIMEDIA APPLICATIONS................................78
8.1 CAMERA/CAMCORDER...............................................................78
8.2 GALLERY...............................................................................81
8.3 YOUTUBE.............................................................................83
3
8.4 MUSIC.................................................................................84
9 GOOGLE MAPS.....................................................87
9.1 GET MY LOCATION.................................................................. 88
9.2 SEARCH FOR A LOCATION............................................................89
9.3 STAR A LOCATION.....................................................................90
9.4 GET DRIVING, PUBLIC TRANSPORT OR WALKING DIRECTIONS......................91
10 OTHERS..............................................................93
10.1 FILE MANAGER.....................................................................93
10.2 VIDEOS .............................................................................94
10.3 SOUND RECORDER.................................................................95
10.4 FM RADIO.........................................................................95
10.5 OTHER APPLICATIONS............................................................... 97
FQA........................................................................98
SAFETY AND USE...................................................102
4
1 Your Mobile
1.1 Keys and connectors
Headset connector
Micro-USB connector
Front camera
Touch screen
Search key
Menu key
Back key
5
Home key
Volume up
Volume down
Power key
6
• On Home screen, press to quickly access Settings
menu or Notification panel; to launch quick search; to
customize your Home screen by adding applications
or changing wallpaper/theme.
• On other screens, press to view options list.
Short press: Light up the screen
Return to the Home screen
or back to the central
Home screen if it is extended.
Long press: Enter the recently used applications list.
7
Go back to the previous menu or screen.
Short press: End a call
Lock the screen
Light up the screen
Long press: When phone is off, power on the phone.
When phone is on, enter Phone options:
Silent mode, Airplane mode, Reboot and
Power off.
Press to adjust the Volume (in call/media playing
mode).
Open Search bar for searching within an application,
the phone or web.
8
Specific Absorption Rate (SAR)
Your mobile device is a radio transmitter and receiver. It is
designed not to exceed the limits for exposure to radio
waves recommended by international guidelines. These
guidelines were developed by the independent scientific
organization ICNIRP and include safety margins designed
to assure the protection of all persons, regardless of age
and health.
The guidelines use a unit of measurement known as
Specific Absorption Rate, or SAR. The SAR limit for mobile
devices is 2 W/kg and the highest SAR value for this device
when tested at the ear was 0.955 W/kg. As mobile devices
offer a range of functions, they can be used in other
positions, such as on the body as described in this user
guide.
As SAR is measured utilizing the device's highest
transmitting power, the actual SAR of this device while
operating is typically below that indicated above. This is due
9
to automatic changes to the power level of the device to
ensure it only uses the minimum power required to
communicate with the network.
1.2 Getting started
1.2.1 Set-up
Removing or installing the back cover
Inserting or removing the UIM card
You must insert your UIM card to make phone calls. Please
power off your phone and remove battery before inserting
or removing the UIM card.
10
Place the UIM card with the chip facing downwards and
slide it into its housing. Make sure that it is correctly
inserted. To remove the card, press and slide it out.
Installing and removing the MicroSD card
To release the microSD card holder, slide it in the direction
of the arrow and lift it. Then insert the microSD card with the
golden contact downward. Finally, turn down the microSD
holder and slide it in the opposite direction to lock it.
Installing or removing the battery
• Insert and click the battery into place, then close the
phone cover.
• Unclip the cover, then remove the battery.
11
12
Charging the battery
Standard charger
UK charger
Connect the battery charger to your phone and mains
socket respectively.
• The phone will be switched on when charging the battery.
• Be careful not to force the plug into the socket.
• Make sure the battery is correctly inserted before
connecting the charger.
13
• The mains socket must be near to the phone and easily
accessible (avoid electric extension cables).
• When using your telephone for the first time, charge the
battery fully (approximately 4 hours).
You are advised to fully charge the battery. Charging status
is indicated by the depth of water on the lock screen. The
depth increases as the phone is charged.
Extending the Battery Life
Active applications, screen brightness levels, Bluetooth and
Wi-Fi usage can drain your battery. You can follow the
helpful tips below to conserve your battery power:
• Reduce the screen timeout.
• Lower the screen brightness.
• Turn Bluetooth off when not in use.
• Turn Wi-Fi off when not in use.
14
1.2.2 Power on your phone
Hold down the Power key until
the phone powers on, type in
your PIN code if necessary and
then confirm. The Home screen
is displayed.
If you do not know your PIN
code or if you have forgotten it,
contact your network operator. Do not leave your PIN code
with your telephone. Store this information in a safe place
when not in use.
Set up your phone for the first time
The first time you power on the phone, you are required to
touch the Android logo to begin and then sign into your
Google account to synchronize email, contacts, calendar
and other Google applications (Application availability
depends on country and operator).
15
• Enter your user name and password, then touch Sign in. If
you forget your password, you can go to
http://www.google.com/ to retrieve it. If you don’t own a
Google Account, you are prompted to create one by
touching Create.
• Read the setup information on the screen.
• Mark/Unmark the check box to choose whether you want
to take advantage of Google's location service, then
touch Next.
• Set up the date and time, then touch Next.
• Touch Finish setup.
In power on screen without UIM card inserted, you can also
connect to a Wi-Fi network (refer to section 6.1.2 Wi-Fi) to
sign into your Google account and to use some features.
1.2.3 Power off your phone
16
Hold down the Power key from the Home screen until the
phone options appear, select Power off.
1.3 Home screen
You can bring all the items (applications, shortcuts, folders
and widgets) you love or use most frequently to your Home
screen for quick access. Press Home key to switch to
Home screen.
Status bar
• Status/Notification indicators
• Touch and drag down to open
notification panel.
Touch an icon to open an application.
Application tab
Touch to open applications list.
Touch to open android browser.
Touch to access Messaging
Touch to access Contacts
Touch to access Call log and number keypad
17
Home screen is provided in an extended format to allow
more space for adding applications, shortcuts etc. Slide the
Home screen horizontally left and right to get a complete
view of the Home screen.
1.3.1 Use the touch screen
Touch
18
To access an application, touch it with your finger.
Touch and Hold
To enter the available options for an item, touch and hold
the item. For example, select a contact in Contacts, touch
and hold this contact, options list will then appear on
screen.
Drag
Place your finger on the screen to drag an
object to another location.
Slide/Swipe
Slide the screen to scroll up and down the
applications, images, web pages… at your convenience.
You could slide the screen horizontally too.
Flick
19
Similar to swiping, but flicking makes it move quicker.
Pinch/Spread
Place your fingers of one hand on the screen surface and
draw them apart or together to scale an element on the
screen.
Rotate
Automatically change the screen
orientation from portrait to landscape by turning the phone
sideways to have a better screen view.
1.3.2 Status bar
From status bar, you can view both phone status (to the
right side) and notification information (to the left side).
Status icons
EVDO connected
1x connected
EVDO in use
1x in use
20
Signal strength
Speakerphone is on
Wi-Fi is connected
Microphone is mute
Bluetooth is on
No signal
BT device connected
Battery status (<15%)
Airplane mode
Battery status (15%~35%)
Alarm is set
Battery status (35%~50%)
GPS is on
Battery status (50%~75%)
Receiving location data
Battery status (75%~90%)
from GPS
Battery status (90%~100%)
Headset connected
Battery is charging
Ringer is silenced
Data is synchronizing
Vibrate mode
Notification icons
An open Wi-Fi network
is
USB debugging
available.
connected
Uploading data (black)
Missed call
Upload finish (green)
Unread message
Song is playing
USB connected
New email
21
Radio is on
Bluetooth headset (blue)
Tethering or hotspot active
Downloading data (black)
Download finish (green)
Call in progress (green)
More hidden notifications
Call in progress using
Notification panel
Touch and drag down the Status
bar or press Menu key and touch
Notifications to open the notification
panel. Touch and drag up to close
it. From Notification panel, you can
open items and other reminders
indicated by notification icons or
view wireless service information.
1.3.3 Search bar
The phone provides a Search function which can be used to
locate information within applications, the phone or the web.
22
2
3
1
4
1 Touch to search by text
2 Touch to search by voice
3 Touch to enter the suggested text for quick search
4 Touch to begin to search
1.3.4 Lock/Unlock your screen
To protect your phone and privacy, you can lock the phone
23
screen by creating a variety of patterns, PIN or password
etc.
To create a screen unlock pattern
• Press Menu key from the home screen, touch Settings,
then touch Location & security\Set up screen
lock\Pattern.
• Draw your own pattern, you
can also press Menu key
for
help.
1
1 Draw your unlock pattern
2 Touch to confirm by
2
drawing
pattern again
24
To create a screen unlock PIN/Password
• Press Menu key from the home screen, touch Settings,
then touch Location & security\Set up screen lock\PIN
or Password.
• Set your PIN or password.
To lock phone screen
Press Power key once to lock
the screen.
To unlock phone screen
Draw the unlock pattern you
have created or enter PIN or
password to wake up the screen.
If you did not set the unlock screen, drag the lock icon to
one of three icons(Home, Messaging, Call log) around the
lock icon.
If you forget your PIN code and input the wrong
PIN code 3 times, you are requested to input PUK
code to unlock the UIM card. You can find the PIN code and
25
PUK code on the UIM card sleeve when you buy the UIM
card.
If you forget the password or pattern you have set,
there is no way to unlock the phone, except
restore factory settings, or ask after service to download the
software again, You can restore factory by the steps below
in this situation:
1. Power off and then removed UIM card and SD card.
2. Instert the battery.
3. Press and hold the Home key and Power key for 5
seconds at the same time.
4. After a few seconds, when you see a robot and a triangle
with an exclamation point inside, prss Power key.
5. Press the volume keys to change the cursor down to
select wipe date/factory reset, then press Home key to
open it.
6. Press volume keys to select Yes -- delete all user data,
and then press Home key to confirm.
26
7. After a few seconds, select reboot system now and press
Home key to confirm.
Warning: These steps will restore factory setings, and
all user data in your phone will be erased.
1.3.5 Personalize your home screen
Add
Touch and hold an empty area or press Menu key and
touch Add on the Home screen. The Add to Home screen
will appear, offering a range of options.
• Shortcuts To add a shortcut to Home screen, such as
applications, bookmark, contact, etc.
• Widgets To add a widget to Home screen, such as clock,
music player, etc.
• Folders To add a folder to Home screen, such as new
folder, contact folder, etc.
• Batch adding Batch adding applications.
27
2 Text input
2.1 Using Onscreen Keyboard
Onscreen keyboard will display automatically when a
program requires entering text or numbers.
Onscreen keyboard settings
Press Menu key from Home screen, select
Settings\Language & keyboard\TouchPal Input(or
Android keyboard), a series of settings are available for
your selection. You could scroll the keyboard to change
keyboard style.
Adjust the onscreen keyboard orientation
Turn the phone sideways or upright to adjust the onscreen
keyboard orientation. You can also adjust it by settings
(Press Menu key on Home screen\Settings\Display).
2.1.1 Android keyboard
28
1
2
3
4
5
1 Touch to enter text or numbers, touch and hold for one or
two seconds to select input method.
2 Long press to enter an accent of the letter.
29
3 Touch to lock in capital letter input mode.
4 Touch to switch to symbol and numeric keyboard.
5 Touch to enter Voice input.
3 Phone call, Call log and
Contacts
3.1 Phone
3.1.1 Placing a call
The user can easily start a call
using Phone.
Enter this menu using one of the
following two ways:
• Touch Phone icon from Home
screen.
• Touch Application tab from Home screen and select
Phone.
30
Enter the desired number from the keyboard directly or
select a contact from Contacts, Call log or Favourites by
touching tabs, then touch
to place the call. The number
you entered can be saved to Contacts by touch
To dial an international call, touch and hold
.
to enter “+”,
then enter the international country prefix followed by the
full phone number and finally touch
.
Emergency call
If your phone has network coverage, dial emergency
number and touch to make an emergency call. This works
even without a UIM card and without typing the PIN code.
3.1.2 Answering or rejecting a call
If the screen is locked, when you receive an incoming call,
drag right the green phone icon to answer or dray left the
green phone icon to left to reject,
or drag up message rejecting and select one rejecting
message. If the screen is unlocked, just press answer
31
button to answer, or press decline button to reject, you also
can drag up message rejecting to select one rejecting
message.
3.1.3During a call
When a call is in progress, you
can see six button in the screen.
32
Touch Bluetooth to switch between headset and phone. To
adjust the volume during a call, press Volume up/down
key.
Touch to add a third party call.
Touch to open the keyboad. Touch
this
icon again to hide the keyboard.
Touch to turn on the loudspeaker. Touch this
icon again to turn off the loudspeeker.
Touch to connect to Bluetooth headset. Touch
this icon again to disconnect to Bluetooth
headset.
Touch to hang up the call.
Touch to mute the current call. Touch this icon
again to unmute the call.
During a call, you can press Home key to return to home
screen and then do more operation. You can dray down the
status bar and touch Current call to return to the calling
33
screen.
In order to avoid unexpected touching screen
during the call, the screen backlight will turn off
automatically when the earphone is close to the ear, and
the backlight will turn on when the phone is away from the
ear.
3.1.4 Conference call
When you are in a call, you can add a new call and then
make conference call.
1. Receive an incoming call or make a call, be sure the call
is connected.
2. Press Add call to open dial keypad.
3. Dial a new phone number.
34
4. Press Merge calls icon in the call screen to begin
conference call.
5. When you finish the conference call, press Manager
calls icon to disconnect the second call or press End call
button to end all calls.
35
3.2 Call log
You can find call log just in the
back of the dial keyboard. You
can touch Dial to hide the
keyboard to show all call log.
Outgoing calls
Incoming calls
Missed calls
You can touch
to make a call derectly.
Touch or touch & hold a contact or number to view
36
information or further operations.
You can view detailed information of a call, launch a new
call or send message to a contact or number, or add
number to Contacts (only available for phone numbers), etc.
To clear the entire call memory, press Menu key then touch
Clear call log.
3.3 Contacts
Contacts enables quick and easy access to the people you
want to reach.
37
You can view and create
contacts on your phone and
synchronize these with your
Gmail contacts or other
applications on the web or on
your phone.
When using Contacts
for the first time you are
required to add new contacts, import contacts from UIM
card, or synchronize contacts from other application
accounts to your phone.
3.3.1 Consult your Contacts
To access the Contacts, touch Application tab on the Home
screen, then select Contacts.
Touch and hold a contact to display its option menu.
You can also press Menu key to display contacts list option
menu. Following actions are enabled:
38
• New contact Add new contact to phone.
• Import/Export Import or export contacts between phone,
UIM card, and MicroSD card..
• Default account Set default location for new contact.
• Sync Launch synchronization with the account you set.
• Filter Choose contacts to display, for example only
contacts with phones, other application contacts if any, etc.
• Delete Select and delete unwanted contacts.
3.3.2 Adding a contact
Press Menu key from contacts list screen and touch New
contact.
You are required to enter the contact's name and other
contact information. By scrolling up and down the screen,
you can move from one field to another easily.
When finished, touch Finish to save.
3.3.3 Editing your contacts
To edit contact information, touch and hold the contact
39
whose information is to be edited, then touch Edit contact.
You also can touch the contacts to view detail, then touch
the edit icon
to edit its information. When finished, touch
Finish.
3.3.4 Communicating with your contacts
From the contacts list, you can communicate with your
contacts by making a call or exchanging messages.
To launch a call to a contact, locate the contact or number
your want to call, and then touch . You can also touch &
hold the contact or number, then touch Call contact.
To send a message to a contact, touch & hold the contact
or number you want to send a message to, and then touch
Text contact. You can also touch
to the right side of the
contact from contact details screen.
3.3.5 Accounts
Contacts, data or other information can be synchronized
from multiple accounts, depending on the applications
installed on your phone.
40
To add an account, press Menu key from Contacts list,
touch Accounts, then touch Add account tab; or access it
by pressing Menu key from Home screen, touch Settings,
then selecting Accounts & Sync and finally touching Add
account tab.
You are required to select the kind of accounts to add, like
Google, Facebook, etc.
As with other account set-ups, you need to enter detailed
information, like username, password, etc.
You can remove an account to delete it and all associated
information from the phone.
4 Google Messaging, Gmail/ Email,
Google Talk
4.1 Google Messaging
You can create, edit and receive SMS and MMS with this
mobile phone.
To access this feature, touch Application tab from Home
41
screen, then select Messaging.
NOTE: All messages you receive or send out can only be
saved in phone memory. To consult messages stored in
UIM card, press Menu key from Messaging screen, then
touch Settings\Manage UIM messages.
4.1.1 Write message
On message list screen, touch
Compose to write
text/multimedia messages.
Sending a text message
Enter mobile phone number of
the recipient on Recipients bar
or touch
to add recipients,
touch Type to compose bar to enter the text of the
message. When finished, touch Send to send the text
message.
An SMS message of more than 160 characters will be
42
charged as several SMS. When the total number of
characters you have entered is approaching the 160character limit, a counter will appear on the lower right
corner below Send option of the text box to remind you how
many characters are allowed to be entered in one message.
Sending a multimedia message
MMS enables you to send video clips, images, photos,
animations, slides and sounds to other compatible mobiles
and e-mail addresses.
An SMS will be converted to MMS automatically when
media files (image, video, audio, slides, etc.) are attached
or Subject or email addresses added.
To send a multimedia message, enter the recipient's phone
number in the Recipients bar, touch Type to compose bar
to enter the text of the message.
Press Menu key to open the option menu, touch Add
subject to insert a subject, and touch Attach to attach
picture, video, audio or slide. When finished, touch Send
43
MMS to send the multimedia message.
4.2 Gmail/Email
The first time you set up your phone, you can select to use
an existing Gmail or to create a new Email account.
4.2.1 Gmail
As Google's web-based email service, Gmail is configured
when you first set up your phone. Gmail on your phone can
be automatically synchronized with your Gmail account on
the web. Unlike other kinds of email account, each message
and its replies in Gmail are grouped in your inbox as a
single conversation; all emails are organized by labels but
not by folders.
To access Gmail
From Home screen, touch the Application tab to enter the
applications list, then touch Gmail.
Gmail displays messages and conversations from one
single Gmail account at a time, if you own more than one
44
account, you can switch to another by pressing Menu key
from Inbox screen, touching Accounts, then touching the
account your want to view.
To create and send emails
• Press Menu key from Inbox screen, and touch Compose.
• Enter recipient(s)’s email address in To field, and if
necessary, press Menu key and touch Add Cc/Bcc to
include a copy or a blind copy to the message.
• Enter the subject and content of the message.
• Press Menu key, touch Attach to send an attachment to
the receiver.
• Finally, touch Send.
• If you do not want to send the mail out right away, you can
touch Save as draft to save copy. To view the draft, press
Menu key and touch go to labels, then select Drafts.
If you do not want to send or save the mail, you can touch
Discard.
To add a signature to emails, press Menu key from inbox
45
screen, and touch Settings, then select Signature.
To receive and read your emails.
When a new email arrives, you will be notified by a ringtone
or vibration, and an icon will appear on Status bar. Touch
and drag down the Status bar to display the Notification
panel, touch the new email to view it. Or you can also
access the Gmail Inbox label and touch the new mail to
read it.
4.2.2 Email
Besides your Gmail account, you can also set-up external
POP3 or IMAP email accounts in your phone.
To access this function, touch Application tab from Home
screen, then select Email.
An email wizard will guide you through the steps to set-up
an email account.
• Enter the email address and password of the account you
want to setup.
46
• Touch Next. If the account you entered is not provided by
your service provider in the phone, you will be prompted to
go to the email account settings screen to enter settings
manually. Or you can touch Manual setup to directly enter
the incoming and outgoing settings for the email account
you are setting up.
• Enter the account name and display name in outgoing
emails.
• Touch Done.
• To add another email account, you can press Menu key
and touch Add account to create.
To create and send emails
• Press Menu key from Inbox screen, and touch Compose.
• Enter recipient(s)’s email address in To field, and if
necessary, press Menu key and touch Add Cc/Bcc to
include a copy or a blind copy to the message.
• Enter the subject and content of the message.
• Press Menu key, touch Add attachment to send an
47
attachment to the receiver.
• Finally, touch Send.
• If you do not want to send the mail right away, you can
touch Save as draft or press Back key to save a copy.
4.3 Google Talk
Google's instant messaging service, Google Talk, lets you
communicate with your friends whenever they are
connected to this service.
To access this feature and sign in, touch Application tab
from Home screen, then touch Talk. All friends added by
using Google Talk from the web or phone will be displayed
in your friends list.
Touch
to set your online status.
Available (green)
Busy
Invisible (gray)
Touch the text box udner the online status icon and then
48
enter your status message.
To sign out, press Menu key from Friends list to display
options, touch Sign out.
4.3.1 Chatting with your friends
To start a chat, touch the name of a friend in your Friends
list, then enter your message and finally touch Send.
You can invite other friends to join in a group chat by
pressing Menu key, touching Add to chat and then select
the friend you want to add.
When chatting with more than one friend, you can switch
screens by pressing Menu key, then touching Switch
chats.
To return to Friends list screen, press Menu key, then touch
Friends list.
4.3.2 To add a new friend
From Friends list, press Menu key to open options list and
touch Add Friend to add a new friend. Enter the Google
49
Talk ID or Gmail address of the friend you want to add, and
then touch Send invitation.
A notification with this invitation will be received by the
friend. By touching the invitation, the friend can select
Accept or Cancel in response.
You can also check all invitations you have sent or received
by pressing Menu key from Friends list and touching
More\Invites.
4.3.3 To close a chat
When you want to end a chat, the following two ways are
available:
• From Friends list screen, touch and hold the friend you
want to stop chatting with to open Option menu, touch End
chat.
• Press Menu key from chatting screen directly, and then
touch End chat.
5 Google Calendar & Alarm clock
50
& Calculator
5.1 Google Calendar
Use Google Calendar to keep track of important meetings,
appointments, etc.
To access this function, touch Application tab from Home
screen, then touch Calendar.
5.1.1 Multimode view
You can display the Calendar in daily, weekly, monthly, or
agenda view.
To change your Calendar view, press Menu key, then touch
Day, Week, Month or Agenda.
Agenda view
Day view
Week view
Month view
51
In Agenda, Day or Week view touch an event to view its
details.
Touch a day in Month view to open that day's events.
5.1.2 To create new events
You can add new events from any Calendar view.
• Press Menu key from Calendar screen, and touch
More\New event to access new event edit screen.
• Fill in all required information for this new event. If it is a
whole-day event, you can select All day.
• Invite guests to the event. Enter the email addresses of
the guests you want to invite with commas to separate. If
52
the guests use Google Calendar, they will receive an
invitation from Calendar and email.
• When finished, touch Done from the end of the screen.
To quickly create an event from Day, Week or Month view
screen, touch and hold an empty spot or an event to open
Option menu, then touch New event to enter the event
details screen of the time you have previously selected.
5.1.3 To delete or edit event
To delete or edit an event, touch the event to enter details
screen, press Menu key, touch Edit event, or Delete
event.
5.1.4 Event reminder
If a reminder is set for an event, the upcoming event icon
appears on Status bar as a notification when the
reminder time arrives.
Touch and drag down the status bar to open notification
panel, touch event name to view Calendar notification list.
Touch Snooze all to turn off all event reminders for 5
53
minutes.
Touch Dismiss all to delete all reminders from the list.
Press Back key to keep the reminders pending in the status
bar and notification panel.
Important options by pressing Menu key\More from
Calendar main screen:
• New event To add a new event.
• Calendars To show or hide, remove or add calendars.
• Settings To set a series of Calendar settings.
5.2 Clock
Your mobile phone has a built-in clock.
54
To access this function, touch the Application tab from
Home screen, then touch Clock.
You can find 4 tabs in the
bottom.
•
Alarm
•
Slide
•
Music
•
Home screen
These small tools are easy to operate and also very useful.
5.3 Calculator
With Calculator, you can solve many mathematical
problems.
To access this function, touch Application tab from Home
screen, then touch Calculator.
There are two panels available: Basic panel and Advanced
panel.
To switch between panels, select one of the following two
55
ways:
• Touch and drag the basic screen to the left to open the
Advanced panel.
• Or press Menu key from basic panel to open option menu
and touch Advanced panel.
Enter a number and the arithmetic operation to be
performed, and enter the second number, then touch “=” to
display the result. Touch CLEAR to delete digits one by
56
one, touch and hold CLEAR to delete all at one time.
6 Getting connected
To connect to the internet with this phone, you can use
EVDO/1x networks or Wi-Fi, whichever is most convenient.
6.1 Connecting to the Internet
6.1.1 EVDO/1x
The first time you turn on your phone with UIM card
inserted, it will automatically configure network service:
EVDO or 1x.
To check the network connection you are using, press
Menu key on Home screen, then touch Settings\Wireless
& networks\Mobile networks\Access Point Names.
To create a new access point
A new EVDO/1x network connection can be added to your
phone with the following steps:
• Press Menu key from Home screen.
57
• Touch Settings\Wireless & networks\Mobile
networks\Access Point Names.
• Then press Menu key again and the touch New APN.
• Enter the required APN information.
• When finished, press Menu key and touch Save.
To activate/deactivate Data roaming
When roaming, you can decide to connect/disconnect to a
data service.
• Press Menu key from Home screen.
• Touch Settings\Wireless & networks\Mobile
networks\Data roaming.
• Mark/Unmark the checkbox to activate or deactivate data
roaming.
• When Data roaming is deactivated, you can still perform
data exchange with a Wi-Fi connection (refer to section
6.1.2 Wi-Fi).
To limit your data connection to 2G networks only
To save battery and extend battery life, you can set to
58
activate 2G networks (CDMA 1x) only.
• Press Menu key from Home screen.
• Touch Settings\Wireless & networks\Mobile networks\
6.1.2 Wi-Fi
Using Wi-Fi, you can connect to the Internet when your
phone is within range of a wireless network. Wi-Fi can be
used on phone even without a UIM card inserted.
To turn Wi-Fi on and connect to a wireless network
• Press Menu key from Home screen.
• Touch Settings\Wireless & networks\Wi-Fi.
• Mark/Unmark the checkbox to turn on/off Wi-Fi.
• Touch Wi-Fi settings. The detailed information of
detected Wi-Fi networks is displayed in the Wi-Fi networks
section.
• Touch a Wi-Fi network to connect. If the network you
selected is secured, you are required to enter a password
or other credentials (you may contact network operator for
59
details). When finished, touch Connect.
To activate notification when a new network is
detected
When Wi-Fi is on and network notification is activated, the
Wi-Fi icon will appear on the status bar whenever the phone
detects an available wireless network within range. The
following steps activate the notification function:
• Press Menu key from Home screen.
• Touch Settings\Wireless & networks\Wi-Fi
settings\Network notification.
• Mark/Unmark the checkbox to activate/deactivate this
function.
To add a Wi-Fi network
When Wi-Fi is on, you may add new Wi-Fi networks
according to your preference.
• Press Menu key from Home screen.
• Touch Settings\Wireless & networks\Wi-Fi
settings\Add Wi-Fi network.
60
• Enter the name of the network and any required network
information.
• Touch Save.
When successfully connected, you phone will be connected
automatically the next time you are within range of this
network.
To forget a Wi-Fi network
The following steps prevent automatic connection to
networks which you
no longer wish to use.
• Turn on Wi-Fi, if it’s not already on.
• In the Wi-Fi settings screen, touch & hold the name of the
network.
• Touch Forget network in the dialog that opens.
6.2 Browser
Using Browser, you can enjoy surfing the Web.
To access this function, touch Application tab from Home
61
screen, then touch Browser.
To go to a web page
On Browser screen, touch the URL box at the top, enter the
address of the web page, then touch Go.
To set home page
• Press Menu key from Browser screen to display option
menu, touch More\Settings\Set home page.
• Enter the URL of the website you want to set as your
home page.
• Finally touch OK to confirm.
6.2.1 Viewing web pages
When opening a website, you can navigate on web pages
by sliding your finger on the screen in any direction to locate
the information you want to view.
To zoom in/out of a web page
Zoom controls
will be activated when scrolling
the screen using your finger. Touch the plus or minus to the
side of the Zoom control to zoom in or out.
62
To quickly zoom into a section of a web page, double-tap
on the section you want to view. To return to normal zoom
level, double-tap again.
To find text on a web page
• Press Menu key from web page screen, then touch
More\Find on page.
• Enter the text or phrase you want to find.
• The first word with matching characters will be highlighted
on the screen, and subsequent matches are boxed.
• Touch the left or right arrow to switch to the previous or
next matching items.
• When finished, you can touch
to close the search bar.
To copy text on a web page
You can copy text from a web page and paste it into emails
or SMS/MMS messages.
• Press Menu key from web page screen, then touch
More\Select text.
• Place your finger at the start of the text you want to copy
63
and then drag it to the end of the text.
• Selected text is copied and highlighted in color.
• Release your finger.
To paste the copied text into an email or SMS/MMS
message, touch and hold the enter box and then touch
Paste on the options menu.
To open new window/switch between windows
Multiple windows can be opened at the same time for your
convenience.
• Press Menu key from web page screen, and touch New
window.
• To view all currently open windows, press Menu key then
touch Windows, or pinch current web pages.
• Touch a window you want to view.
To close a window, touch
on the window you want to
close.
6.3 Connecting to Bluetooth
64
devices
Bluetooth is a short-range wireless communications
technology that you can use to exchange data, or connect
to other Bluetooth devices for various uses.
To access this feature, press Menu key from Home screen,
touch Settings\Wireless & Networks\Bluetooth or
Bluetooth settings.
To turn on Bluetooth
• Press Menu key from Home screen.
• Touch Settings\Wireless & networks\Bluetooth or
Bluetooth settings.
• Mark/Unmark the checkbox to activate/deactivate this
function.
To change device name
To make your phone more recognizable, you can change
your phone name which is visible to others.
• Press Menu key from Home screen.
65
• Touch Settings\Wireless & networks\Bluetooth
settings\Device name.
• Enter a name, and touch OK.
To make device visible
• Press Menu key from Home screen.
• Touch Settings\Wireless & networks\Bluetooth
settings\Discoverable.
• Mark/Unmark the checkbox to activate/deactivate this
function.
To pair/connect your phone with a Bluetooth device
To exchange data with another device, you need to turn
Bluetooth on and pair your phone with the Bluetooth device
with which you want to exchange data.
• Press Menu key from Home screen.
• Touch Settings\Wireless & networks\Bluetooth
settings
• Touch Scan for devices
• Select a Bluetooth device you want to be paired with in the
66
list.
• Enter a passcode (0000 or 1234)
• If the pairing is successful, your phone connects to the
device.
To disconnect/unpair from a Bluetooth device
• Touch & hold the device in the Bluetooth settings screen.
• Touch Unpair or Disconnect & Unpair in the menu that
opens.
6.4 Connecting to a computer via
USB
With the USB cable, you can transfer media files and other
files between your phone’s MicroSD card and the computer.
To connect/disconnect your phone to/from the
computer
To connect your phone to the computer:
• Use the USB cable that came with your phone to connect
the phone to a USB port on your computer. You will receive
a notification that the USB is connected.
67
• Open the Notifications panel and touch USB connected.
• Touch Turn on USB storage in the dialog that opens to
confirm that you want to transfer files.
To disconnect:
• Unmount the microSD card on your computer.
• Open the Notifications panel and touch Turn off USB
storage.
To safely remove the microSD card from your phone
The MicroSD card can be removed from your phone any
time the phone is powered off. To remove the microSD card
while the phone is on, you must unmount the storage card
from the phone first, to prevent corrupting or damaging the
storage card.
• Press Menu key from Home screen.
• Touch Settings\Storage.
• Touch Unmount SD card.
You can now safely remove the microSD card from the
phone.
68
To format a microSD card
• Press Menu key from Home screen.
• Touch Settings\Storage.
• Touch Unmount SD card. You can format a microSD
card only when it is unmounted.
• Touch Erase SD card. On the screen that warns you that
formatting the microSD card will erase its contents, touch
Erase everything to continue.
6.5 Sharing your phone's
mobile data connection
You can share your phone's mobile data connection with a
single computer via a USB cable (USB tethering) or with up
to eight devices at once by turning your phone into a
portable Wi-Fi hotspot.
NOTE: The functions below may incur additional network
charges from your network operator. Extra fees may also be
charged in roaming areas.
69
To share your phone's data connection via USB
Use the USB cable that along with your phone to connect
the phone to a USB port on your computer.
• Press Menu key from Home screen.
• Touch Settings\Wireless & networks\Tethering &
portable hotspot.
• Mark\unmark the check box of USB tethering to
activate/deactivate this function.
To share your phone's data connection as a portable
Wi-Fi hotspot
• Press Menu key from Home screen.
• Touch Settings\Wireless & networks\Tethering &
portable hotspot.
• Mark\unmark the check box of Portable Wi-Fi hotspot to
activate/deactivate this function.
To rename or secure your portable hotspot
When Portable Wi-Fi hotspot is activated, you could change
the name of your phone's Wi-Fi network (SSID) and secure
70
its Wi-Fi network.
• Press Menu key from Home screen.
• Touch Settings\Wireless & networks\Tethering &
portable hotspot\Portable hotspot settings.
• Touch Configure Wi-Fi hotspot to change the network
SSID or set your network security.
• Touch Save.
6.6 Connecting to virtual private networks
Virtual private networks (VPNs) allow you to connect to the
resources inside a secured local network, from outside that
network. VPNs are commonly deployed by corporations,
schools, and other institutions so that their users can
access local network resources when not on campus, or
when connected to a wireless network.
To add a VPN
• Press Menu key from Home screen.
• Touch Settings\Wireless & networks\VPN settings\Add
VPN.
71
• Touch the type of VPN to add.
• In the screen that opens, follow the instructions from your
network administrator to configure each component of the
VPN settings.
• Press Menu key and touch Save.
The VPN is added to the list on the VPN settings screen.
To connect/disconnect to a VPN
To connect to a VPN:
• Press Menu key from Home screen.
• Touch Settings\Wireless & networks\VPN settings.
• VPNs you have added are listed; touch the VPN you want
to connect with.
• In the dialog that opens, enter any requested credentials
and touch Connect.
To disconnect:
• Open the Notifications panel and touch the resulting
notification for the VPN connection.
To edit/delete a VPN
72
To edit a VPN:
• Press Menu key from Home screen.
• Touch Settings\Wireless & networks\VPN settings.
• VPNs you have added are listed; touch & hold the VPN
you want to edit.
• Touch Edit network.
• After finishing, press Menu key and touch Save.
7 Play Store(Android Market)
Google Play is an online software store, where you can
download and install applications and games to your
Android Powered Phone. Its old name is Android Market.
To open Google Play:
• Touch Application tab from Home screen, and then touch
Play Store.
• For the first time you access Google Play, a screen with
terms of service pops up for your attention, touch Accept to
73
continue.
Press Menu key, then touch Help to enter Google Play help
page for
more information on this function.
7.1 Locate the item you want to
download and install
Google Play home page
provides several ways to find
applications. It showcases
applications and games in
categorized listings, and a link to
all your downloads.
Touch the item on Google Play
screen to browse its contents,
and then select subcategory.
Within each subcategory you can select to view items
sorted by TOP PAID, TOP FREE, and so on.
74
7.2 Download and install
To download & install
• Navigate to the item you want to download, and select to
enter the details screen from which you can read its overall
rating or comments, view developer developer’s
information, etc.
• Press Menu key and touch Security to preview the
functions and data the application can access on your
phone if you install it.
• Touch Install.
NOTE: Be especially cautious with applications that have
access to many functions or to a significant amount of your
data. Once you touch OK to continue, you are responsible
for the results of using this item on your phone.
• To check the progress of the download, open the
Notification panel. To stop the downloading of the item,
touch the progress bar and Cancel download on the
75
screen that opens.
• After download and installation have finished, you will see
a notification icon
on the status bar.
To open the application you have downloaded:
• On Google Play screen, touch Downloads.
• Touch the installed application in the list, then touch Open.
To buy an application
On Google Play, some applications are labeled as free,
while some of them are to be paid for before downloading
and installing.
• Touch the application you want to buy.
• Touch Buy on the bottom of the screen.
?When making your first purchase, you are prompted to log
in to Google Checkout payment and billing service.
• If your Google Checkout account has multiple credit card
accounts, select one to proceed.
• Select the Terms of service link and read the document.
When finished, press Back key.
76
• Mark the check box if you agree with the terms of service.
• Touch Buy now at the bottom of the screen.
When finished, Android downloads the application.
How to use memory effectively
If you install the
applications to the phone
storage always, you will see the
insufficient storage notification
one day when you install new
application. In this case, you
have to move some applications
to SD card to save more
storage. You can go to main menu/
Settings/Applications/Manage applications, touch the
downloaded applications in the first tab page, and then
touch Move to SD card to move the applications to SD card.
It’s a good habit to install applications into SD card,
specially big applications. You can set the the default
77
preferred install location by the menu of
Settings/Applications/ Preferred install location.
When you play a big game and the phone cannot run
smoothly, that is because a number of non-system
applications are running in background and the system is
heavy-load. You can go to main menu/Settings/Applications
/Manage applications/Running, and touch those non-system
applications and stop them before you start playing a big
game.
8 Multimedia applications
8.1 Camera/Camcorder
Your mobile phone is fitted with a Camera and Camcorder
for taking photos and shooting videos.
Before using Camera or Camcorder, please ensure that a
MicroSD card where all pictures and videos are stored is
correctly installed. Also, be sure to open the protective lens
78
cover before use to avoid it affecting your picture quality.
To access this function, touch Application tab from Home
screen and then touch Camera or
Camcorder.
Touch
to view pictures or
videos you have taken.
Drag up or down to switch
between
between
Camera mode
switch between
mode and Video mode.
and Video mode
Touch to take a picture or
record a video.
Settings
White balance
Flash mode
Zoom
Select back camera or front camera
To take a picture
The screen acts as the viewfinder. First position the object
or landscape in the viewfinder, and touch
79
icon to take
the picture, which will be automatically saved.
Zoom in/zoom out
Touch
icon to open the Zoom control and slide the scroll
bar to zoom in or out gradually. Touch the screen twice to
zoom all the way in or out.
To shoot a video
Switch Camera mode to Video mode or access Camcorder
directly from the applications list. First position the object or
landscape in the viewfinder, and touch
recording. Touch
icon to start
icon to stop shooting. The video will be
automatically saved.
Further operations when viewing a picture or a video
you have taken:
Touch to share the picture or video you have just taken
or shot by MMS, Email, etc.
Touch to delete the picture or video you have just taken
or shot.
More operation
80
Touch to return to frame mode after viewing a picture or
shooting a video.
Touch to play the video you have just shot.
8.2 Gallery
Gallery acts as a media player for you to view photos and
playback videos. In addition, a set of further operations to
pictures and videos are available for your choice (refer to
page 90).
To access this function, touch Application tab from Home
screen, then touch Gallery.
From this menu, you can access Camera or Camcorder for
taking a picture or video.
Touch to open camera.
Pinch the album and spread it apart.
Slide left or right to view more albums.
81
To view a picture/play a video
Pictures and videos are displayed by albums in Gallery.
• Touch an album, pinch it with two fingers and then all
pictures or videos will spread the screen.
• Touch the picture/video directly to view or play it.
• Slide to left or right to view previous or next pictures.
Batch operation
Gallery provides multi-select function, so that you can work
with pictures/videos in batches.
Open the main Gallery window, press Menu twice, and
mark the checkbox before
Touch
theand
filescroll
you the
want
barto
to work
switch.This
on, then
will change the album view from grid to
perform further actions,stack.
like delete, share, etc.
Drag left or right to scroll through the
album quickly.
82
8.3 YouTube
YouTube is an online videosharing service where the
user can download, share
and view videos. It supports a
streaming function that allows
you to start watching videos
almost as soon as they begin
downloading from the Internet.
To access this function, touch Application tab from Home
83
screen, then touch YouTube.
All videos in YouTube are grouped into several categories,
like Most popular, Most viewed, Top rated, and etc.
By pressing Menu key from YouTube screen, you can rate,
share, label as favourite, etc. For details about these
features, please visit the YouTube website:
www.YouTube.com
8.3.1 Watch videos
Touch a video to play it.
Touch video playing screen to display playback controls
with which you can pause, skip forward or backward, or
drag the progress bar to the point you want to watch.
To exit video playing screen, press Back key to return to
video list.
8.4 Music
Using this menu, you can play music files stored on the
MicroSD card in your phone. Music files can be downloaded
84
from computer to MicroSD card using a USB cable.
To access this function, touch Application tab from Home
screen, then touch Music.
You will find four libraries in which all songs are classified:
Artists, Albums, Songs, and Playlist. Touch a category
and view the list.
With the help of Search key, you can easily search for
songs you want to play in libraries.
To delete a song, press Menu key from playback screen
and then touch Delete to remove it from the Micro SD card.
You can also set a song as a ringtone, press Menu key
from playback screen to display option menu, then touch
Use as ringtone.
8.4.1 Playing music
From any of the four library
screens, touch a song to play
back. In playing screen.
85
it
Adjust volume
To adjust the volume, you can press Volume up or Volume
down key.
8.4.2 Using Party shuffle
All songs will be displayed in order by default. When shuffle
is activated, some songs will be selected and played at
random. Press Menu key, then touch shuffle all to turn on
this function. To turn it off, touch Now playing song, then
press Menu key, and then touch Show options, then touch
to turn shuffle off.
8.4.3 Working with playlists
Playlists allow you to conveniently organize all the songs
stored in the card.
You can create a new playlist, add a song to the list,
rearrange the order of the list, and delete or rename a
playlist.
86
To create a playlist
Press Menu key from playback screen to display the option
menu, touch Add to playlist, then touch New, enter the
name and finally touch Save.
To change the order of songs in a playlist
Enter a playlist, drag a song up or down to change the order
within the playlist.
To delete a song or a playlist
Locate the song or playlist you want to delete, touch and
hold or press Menu key from playback screen to display
option menu, then touch Delete.
To rename a playlist
Locate the playlist you want to rename, touch and hold to
display option menu, then touch Rename. When finished,
touch Save.
9 Google Maps
87
9.1 Get My Location
9.1.1 Choose a data source to decide My
Location
Press Menu key from Home screen, touch
Settings\Location & security.
• Mark the check box of Use wireless networks to set WiFi and/or mobile networks as My Location data source.
• Or mark the check box of Use GPS satellites to set GPS
as My Location data source.
9.1.2 Open Google Maps and view My
Location
Touch Application tab from
Home screen, then touch
Maps.
Press Menu again and touch
My Location.
The map will then center on a
88
blue dot with a blue circle around. Your actual position is
within the blue circle.
To move the map, drag the map with your finger.
To zoom in and out of a map, touch the plus or minus side
of the zoom
Control “+” or “-” , or you can also zoom in/out by doubletapping a location on screen.
To clear the map history, press Menu key and touch
More\Clear Map.
9.2 Search for a location
• While viewing a map, press Menu key and touch Search,
or you can directly press
Search key on keyboard to
activate search function.
• In the search box, enter an
address, a city or a local
business.
89
• Touch the search icon and in a while your search results
will appear on the map highlighted by markers with letter
labels.
You can touch a marker to open a balloon that contains a
label. Touch the balloon to open a screen with more handy
information about the location.
9.3 Star a location
Just like bookmarking a web address on the Internet, you
can star any position on the map for later use.
9.3.1 How to star (or unstar) a location
• Touch & hold a location on a map
• Touch the address rectangle that opens
• Touch the gray star at the top of the screen to star the
location. (Or touch a gold star to unstar that location.)
9.3.2 View a list of starred items
• Press Menu key from maps screen and touch
More\Starred items.
90
• The list of your starred items and their addresses opens.
• Touch a location in the list to view it .
Press Menu key and touch Refresh to update the list.
9.4 Get driving, public transport
or walking directions
9.4.1 Get suggested routes for your trip
• Press Menu key from maps screen and touch Directions.
• Touch enter bar to edit your start point by one of the
following methods: entering an address, using My Location,
selecting a start point on a map, selecting a starred item,
selecting an address from your contacts or using search
history.
91
• Do likewise for your end point.
• To reverse directions, press Menu key and touch Reverse
Start & End.
• Then select a transport mode: driving by car, using public
transport, or walking directions.
• Finally touch Go.
• A couple of suggested routes will appear in a list. Touch
any routes to view their respective detailed directions.
To get reverse directions for a route you’ve already made,
simply open that route’s directions window and select
Reverse. No need to enter your start point and end point
again.
9.4.2 Preview suggested routes and
decide on a route more preferable or
feasible to you
You can preview each turn in your route in Navigation,
Satellite, and other views.
• Touch a left or right arrow to preview the next or previous
92
leg of your route.
• You can view turn-by-turn directions in a list by touching
, press Back key to return to previous view.
When selecting a more preferable or feasible route,
distance and time will be the two most important factors for
your evaluation. Distance and estimated time will be
displayed at the top of the directions screen.
10 Others
10.1 File Manager
To access this function, touch Application tab from Home
screen, then touch File Manager.
File Manager works with your SD card instead of your
phone memory. To use it, you have to install your SD card
first. See page 15 for instructions on inserting the SD card.
File Manager displays all data stored on the MicroSD card,
including applications, media files downloaded from Google
93
Play, YouTube or other locations; video, pictures or audios
you have captured; other data transferred via Bluetooth,
USB cable, etc.
When you download an application from PC to MicroSD
card, you can locate the application on FileManager, then
touch it to install it in your phone. FileManager allows you to
perform and be really efficient with the following common
operations: create (sub) folder, open folder/file, view,
rename, move, copy, delete, play, share, etc.
10.2 Videos
To access this function, touch Application tab from Home
screen, then touch Videos.
Videos is a small built-in video player that lists all your
videos.
Touch an item from the list to play. While playing, use
Pause, Forward and Back functional icons as required,
press Menu key to go to full screen, or touch a point on the
94
timeline to jump to and play from.
10.3 Sound Recorder
To access this function, touch Application tab from Home
screen, then touch Sound Recorder.
Sound Recorder allows you to record voice/sound for
seconds/hours.
10.4 FM Radio
Your phone is equipped with a radio with RDS functionality.
You can use the application as a traditional radio with saved
channels or with parallel visual information related to the
radio program on the display if you tune to stations that
offer Visual Radio service.
To access this function, touch Application tab from Home
1
screen, then touch FM Radio.
2
NOTE: To use it, you must plug in your headset, which
3
works as4 an antenna connected with your5phone.
6
8
7
95
1 Switch on/off
2 Current frequency channel
3 Frequency reduce 0.1MHz
4 Search previous channel
5 Search next channel
6 Frequency add 0.1MHz
7 Channel list
96
8 Current playing channel
Press Menu key you will find more options:
• Mute/Cancel Mute
• Mono/Stereo
• Speaker/Headset
• Search
10.5 Other applications
The previous applications in this section are pre-installed to
your phone. To read a brief introduction of the preinstalled
3rd party applications, please refer to the leaflet provided
with the phone. You can also download thousands more 3rd
party applications by going to Play Store(Android market)
on your phone.
97
FQA
If an anomaly occurs when you are using your mobile
phone, please refer to the following table. If the problem
98
remains unsolved, please contact the phone costumer
service.
FAQ
The telephone
does not charge
properly
Item to be checked
Make sure that the charger is
correctly connected to the phone
and the power socket.
Make sure you are using a charger
specifically designed for this phone.
The phone does
not switch on
Check the battery charge level.
Make sure the battery is properly
installed and the battery is not
empty.
Press and hold the ON key until the
screen comes on.
Unable to dial a
number
Make sure you have dialled a valid
phone number.
Check if your phone is connected
to the network.
99
FAQ
Poor sound
quality
Item to be checked
Check if the reception signal is
strong enough.
If you are inside a building, move
closer to a window or non obstacle
places.
The other party
cannot hear you
during a call
The receiver
volume is low
The phone signal
is poor or
switches off
frequently
Make sure the mouthpiece is not
blocked.
Check if the receiver volume is set
to a higher level.
Make sure the phone antenna is
not damaged.
Check the phone signal strength.
If there is no signal, use your
phone in a location where the
signal is strong.
100
FAQ
The phone
displays “out of
network” or
“network failure”.
Item to be checked
Check if you are in an area where
the signal is weak (in a tunnel or
surrounded by building). Move to
another location and try again.
Make sure you are not trying to use
a service that you haven’t
subscribed to. If you require this
service, contact the network for
details.
When you cannot
connect to the
network normally
(1) The network provider does not
provide this service or you have not
subscribed to this service. Please
contact your provider for details on
the subscription and use of these
services.
(2) Incorrect setting. Please set the
correct parameters
101
Safety and use
102
Please read carefully and observe the following regulations
to avoid damaging your telephone or using it against the
law.
Electronic devices/Health care facilities.
Turn off your phone when you are near high-precision
electronic devices in use to avoid causing malfunction or
interfering with their operation (fire alarms, automatic doors
and automatic control equipment).
Turn off your phone in hospitals or places where the use of
mobile phones is restricted. Mobile phones affect the
normal operation of electronic devices and medical
instruments, such as pacemakers, hearing aids and other
electronic medical devices.
Pacemaker manufacturers recommend that mobile phones
are kept at least 15 cm away from pacemakers to prevent
the phone interference. When using the phone, you should
hold it against the ear on the opposite side to the device, to
reduce interference.
103
Mobile phones should be forbidden inside an operating
theatre, Intensive Care Unit (ICU) or Cardiac Care Unit
(CCU).
Pay attention to the settings of the sound volume and the
vibration to avoid disturbing the patients.
Flammable or explosive areas
Turn off your phone near flammable or explosive areas. Do
not install/remove or charge the battery or use the phone in
these areas to prevent any explosion or fire. Flammable
and explosive areas include: chemical plants, facilities with
chemical substances or particles in the air (grains, dust and
metal powder ), petrol stations and fuel depots, fuel storage
areas (for example, under a ship’s deck), areas with
explosion warning signs, areas with “turn off two-way radio
equipment” signs and places where you are usually
recommended to switch off car engines.
104
Safety of use in a vehicle
Please observe the relevant local or national regulations
related to the use of mobile phones in a vehicle. Please
refrain from using the phone while driving. If you are driving
and need to use the phone in an emergency, use a handsfree device (optional purchase) to be safe. Otherwise, park
the car before using the phone.
Do not place your phone on the dashboard or within an
airbag deployment area to avoid causing injury to
passengers in the car when the bag inflates or bursts.
Using the phone on an airplane is strictly forbidden. Turn off
your phone before you board an aircraft. It is recommended
to remove the battery to avoid the phone being turned on
accidentally.
Storing environment
To avoid demagnetizing problem, keep the phone away
105
from magnetic materials, such as magnetic discs and credit
cards.
Ensure that the phone does not come into contact with
liquids. If it does, turn it off immediately, remove the battery
and quickly contact the vendor.
Do not store the phone, battery or charger in an
environment with a strong magnetic field, such as an
electromagnetic pot or a microwave oven, to avoid causing
the phone to malfunction, catch fire or explode.
Do not subject the phone, battery or charger to heavy
impact or vibration to avoid battery leakage, phone
malfunction, overheating, fire or explosion
Do not place sharp metallic items such as needles, near the
receiver because the receiver will attract them and you may
be injured when using the phone.
Do not place the phone in the back pocket of your trousers
or skirt to avoid damaging it when you sit down
106
Child health
Keep the phone, battery and charger out of the reach of
children. Do not let children use the phone, battery or
charger without supervision.
Do not let a child put a battery in his/her mouth to avoid
electrolyte poisoning.
Keep children away from small phone accessories to
prevent suffocation or blocking of the oesophagus as a
result of swallowing.
Operating environment
This phone is equipped with a built-in antenna. When the
phone is on, unless necessary, do not touch the antenna
area (top of the phone) for optimal communication quality.
Do not use your phone while it is being charged during
thunderstorms, or use it outdoors to avoid being struck by
lightning or other injury.
Do not use your mobile phone in dusty, wet, dirty places or
107
places near magnetic fields to prevent malfunction of its
internal circuits. Keep the phone as dry as possible. Keep
the phone, battery and charger away from water and water
vapour and do not clean the phone with a wet cloth to avoid
short circuits, malfunction due to corrosion and electric
shocks.
Do not turn in or off the phone against your ear to avoid
your ears and body from being impaired.
To comply with regulations on radio frequency exposure,
keep the antenna at least one inch (2.5 cm) away from your
body when holding your phone or using its data functions.
If you feel unwell (epileptic seizures or blackouts) after
playing the games with your phone for a long period of time,
please seek medical assistance immediately.
Move your mobile phone away from your ear while using
the hands-free mode, because the amplified volume might
cause hearing damage.
Make sure you switched off your phone in areas where
108
mobile phone use is prohibited!
Cleaning and maintenance
Switch off the phone before cleaning and maintenance. The
charger should be unplugged from the power socket and
the phone and charger disconnected to prevent any electric
shock or short circuiting of the battery or charger.
Do not wipe the phone or charger using chemical substance
(alcohol benzene), chemical agents or abrasive cleaning
agents to avoid damaging its parts or causing a
malfunction. You may clean with a slightly damp anti-static
soft cloth.
Do not scrape or alter the phone case as paint substances
may cause an allergic reaction. If such a reaction occurs,
cease using the phone immediately and seek medical help.
Wipe dust off the power plug and keep it dry to avoid risk of
fire
If the phone or accessories do not work properly, contact
your local vendor
109
Do not dismantle the phone or its accessories yourself.
Protecting the environment
Please observe the local regulations on phone packaging,
battery and used phone disposal and bring them to the
collection point for proper recycling. Do not dispose of used
phones or batteries in a household rubbish bin.
Please take your used, unwanted lithium batteries to a
designated place. Do not dispose of them in a rubbish bin.
Emergency call
In an emergency situation, if the phone is on and you are
within the network range, it can be used to make an
emergency call. However, emergency call numbers may not
be reachable on all networks; you should never rely on your
mobile phone for emergency calls.
110
Using the battery/charger
Only use batteries and chargers approved by the
manufacturer. Do not use batteries or chargers that are not
compatible with your model to avoid any explosion.
Do not throw a battery in a fire as it might catch fire or
explode. Do not cause a short circuit to the charger as it
might result in malfunction, smoke or fire.
Do not place conductors like metals, keys or jewels, against
the battery poles or allow them to touch the ends of the
battery to avoid short circuiting the battery and causing
injury (burns, for example) as a result of battery overheating
If the power cable is damaged (wires exposed or broken) or
the connection to the plug is loose, do not use it to avoid
electric shock, short-circuit of the charger or a fire.
Do not dismantle the battery or weld the two poles of the
battery to prevent the battery from leaking, overheating,
catching fire or exploding.
111
Keep the charger away from any container of water or other
liquids. Infiltration of liquid may cause electric leakage or
other malfunction to the charger.
If the battery leaks, emits smoke or a strange odour, cease
use immediately and move it far away from naked flames or
people to avoid a fire or injury from explosion.
Do not charge the battery in a dusty or damp environment
and keep the cable away from heated objects.
The battery is not fully charged when leaving the factory.
Therefore, you should charge the battery for two hours
before use. Before charging, make sure the charge plug is
correctly inserted in the power socket. If it is incorrectly
inserted, electric shock might occur and the phone or
battery may catch fire or explode. When charging is
completed, pull out the charger plug from the power socket,
and do not pull the cable.
If the liquid in the battery splashes into your eyes, do not
rub the eyes to avoid damaging your vision, rinse the eyes
112
immediately in clean water and go to a hospital for
assistance.
Do not place heavy objects on the charger cable. Do not
damage, twist or pull the cable to avoid causing electric
shock or fire.
When the battery cannot be installed correctly in the phone,
do not press down on it heavily to prevent it from leaking or
exploding. Do not remove the battery when the phone is on.
If the battery is distorted, has changed colour or is
unusually hot when charging or when it is stored, remove
immediately the battery and stop using it or it may leak,
become overheated, explode or catch fire.
If a battery is not used for a long period of time after
charging, store it at room temperature
Do not touch the power socket, power cable or charger with
wet hands to avoid electric shock.
If water or other liquid enters the charger, immediately
disconnect the charger plug from the power socket to
113
prevent it from overheating, catching a fire or malfunction.
Explanation: The instructions in this user manual apply to
English mode. In other language operating modes, slight
differences may appear.
Warning: The manufacturer disclaims any liability for
damage, which may result as a consequence of improper
use of this mobile phone or use contrary to the instructions
contained in this manual.
114
115
Copyright 2012 TCT Mobile Limited
All rights reserved
TCT Mobile Limited reserves
the right to alter material
or technical specification
without prior notice.
116