1
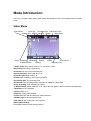
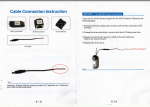
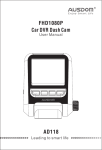
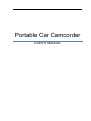
Portable Car Camcorder
USER’S MANUAL
Product description ..................................................................................................................................... 2
Product Quick Manual ................................................................................................................................ 2
Start to use ................................................................................................................................................... 3
How to use.................................................................................................................................................... 3
How to power on/power off the machine.................................................................................. 3
How to charge the battery .......................................................................................................... 3
How to place the Micro SD card................................................................................................ 3
Mode Introduction ........................................................................................................................................ 4
Video Mode .................................................................................................................................. 4
Photo Mode .................................................................................................................................. 5
Playback Mode ............................................................................................................................... 6
System Option Setting ................................................................................................................ 7
How to connect to PC ................................................................................................................................. 8
HDMI Interface .............................................................................................................................................. 9
AV-OUT Interface ........................................................................................................................................ 9
Features ........................................................................................................................................................ 9
Product description
This is a multi-functional 、high-tech new product which is a set of video camera、 camera 、
recording with night mode function and external TF card memory. This product uses
high-performance and high compression ratio video codec technology. It can transport
high-quality transmission of video and multi-channel audio data by AV-OUT multimedia interfaces.
Mainly used in car shooting, improving road safety accident forensics, and applicable to everyday
life, travel, outdoor activities, to bring you a colorful life.
Product Quick Manual
1 2 3 4 56
7
8
20
11
12
13
14
9
10
15 16 17 18 19
1 Power Key 2 OK Key 3 Menu Key 4 Up Key 5 Down Key 6 Mode Key 7 Strap Holder
8 Speaker
9 Lens
10 Infrared Night Vision Light 11 TFT-LCD 12 TF card slot 13 USB
interface 14 DC power supply 15 AV-OUT Interface 16 HDMI 17 Power LED 18 Charge
LED 19 Reset Key
20 MIC
Start to use
Key function :
Button
functions
Power
First short press :power on Long press: power off
Short press: Record Audio on/off
Menu
Enter setting options
Mode
Switch mode :Video mode/Photo mode/Playback mode
down key
Move down /Digital zoom out
up key
Move up /Digital zoom in
OK key
confirm
Reset key
Reset the system
LED description
LED
description
Power LED
Turn on the machine, the power indicator red LED lights up
Charge
LED
Green lights indicate the current state of charge, when charging is
complete, the light will go out
How to use
How to power on/power off the machine
Press Power key to power on the machine, meantime the power indicator would be on.
Long press Power key once more to power off the machine,meantime the power indicator would
be off.
Warning:the machine will power off when the system get low voltage.
How to charge the battery
Use PC-USB /DC adapter/Car charger to charge the battery. Red light indicator is on while
charging. Full charge time is about 180 minutes.
How to place the Micro SD card
Place the Micro SD card into the memory card slot according to the product quick manual, press it
until you hear a click .
Removing Micro SD card: Press it once and remove it after it pops up.
Mode Introduction
There are 3 modes: video mode, photo mode and playback mode. Press Mode button to switch
mode.
Video Mode
1Video Mode
3Lock file 5Infrared Light 7Recording Time
2Recording 4Gravity Sensing 6Audio
8Resolution
9Loop Recording 11Exposure 13Date
10 Motion detect
12 Zoom
14Time
16 SD card in
15Battery level
1 Video mode: Show which mode is it in, and now is video
2Recording:Recording is processing.
3Lock file:Lock the current recording file .
4Gravity Sensing: Gravity Sensing is on.
5Infrared Light: Night mode is on.
6Audio:When recording, audio is also recorded.
7Recording time: The recording time
8Resolution:The recording video's resolution is 1080HFD 1920×1080.
9Loop recording :Loop recording is enable
10 Motion detect :Motion detection is on. When the sign green it stop, but white it start detecting
11Exposure:+0.0 is selected.
12Zoom:Zoom in 1.5.
13Date:Recording date showed.
14Time:Show the real time when the video recorded.
15Battery sign: Show the battery level.
16SD card in: SD card is put in the card slot.
Video Option Setting
Press Menu button to enter setting options:
Resolution : 6 options:1080HFD 1920×1080 /1080P 1440×1080 /720P 1280×720 /WVGA
848×480/VGA 640×480/QVGA 320×240.1280×720 is default value.
Loop recording: recording time: 3/5/10 minutes. Choose Off to disable this function.
Exposure:+2.0、+5/3、+4/3、+1.0、+2/3、+1/3、+0.0、-1/3、-2/3、-1.0、-4/3、-5/3、-2.0,+0.0
is default value.
Motion detection: Turn on/off the motion detection. When open motion detection, lens will
respond to the motion of the target. after 10s video will automatically stop.
Record Audio: Turn on/off to choose record audio or not.
Date Stamp: Show the real time or not.
Gsensor: 3 options: Sensitive/General/Common.
Infrared light: Turn on/off.
Photo Mode
Press OK button to take a photo.
Take photo and set the relevant parameters in the photo mode menu.
1Photo mode 3White balance 5File name
7Photos Quality
2Exposure 4Defend shaking
6 Photo size
8 ISO
9 No SD card 10 Battery
Photo Option Setting
11Smile Detect
Capture Mode:4 options: Single/2s Timer/5sTimer/10s Timer.
Resolution:12M 4032×3024,10M 3648×2736,8M 3264×2448,5M 2592×1944,3M 2048×1536,2M
HD 1920×1080,VGA 640×480,1.3M 1280×960.
Sequence: On/Off.
Quality: Fine/Standard/Economy
Sharpness: Strong/Normal/Soft.
White Balance:4 options: Auto/Daylight/Cloudy/Tungsten
Color: Black & White/Color/Sepia
ISO: Auto/100/200/400
Preview: on/off
Exposure:+2.0、+5/3、+4/3、+1.0、+2/3、+1/3、+0.0、-1/3、-2/3、-1.0、-4/3、-5/3、-2.0,+0.0
is default value.
Face Detection: Choose "Face Detection"/"Smile detection"
Anti-Shaking: Turn on/off.
Quick Review: Select 2/5 seconds or Off.
Date Stamp: Choose Date to show date only, "Date/Time" to show date and time.
Playback Mode
Play the photos and videos.
1playback mode
2 file name
3 Resolution
4 play 5Stop
8 Battery 9 Time 10date
6Play preview/rewind 7Play next/Fast forward
1. Press Mode button to select playback mode.
2. Press Up /Down button to select the recorded files and preview the video by pressing OK
button.
3. Press OK button to play or stop movie. When played, press Up/Down key to zoom in/out.
Playback Option Setting
Delete: Choose to delete current one/all file/files.
Protect: Protect current one/all file/files, or Unlock current one/all file/files.
Slide Show: Set the Slide show time as:2 seconds/5 seconds/8seconds,or turn off slide show.
System Option Setting
Press Menu button, enter System Setting “Setup” option.
Date/Time: Set the date and time.
Deleted Shutdown: Delay 1/3 minutes to shut down the machine.
Beep Sound: Key tone on/off.
Screen Saver: Select 3/5/10minutes to auto turn off the LCD.
Infrared light: Turn on/off.
Language: Choose one from the options "English/ French/Spanish/ Portuguese/German/Italian/
Simplified Chinese/ Traditional Chinese/Russian/Japanese" as the system language.
TV Mode: NTSC/PAL, NTSC for default.
Frequency: 50Hz/60Hz
Image rotation: Turn on/off rotation.
Format: Choose format Internal Memory or SD Card.
Default Setting: Return menu setting to defaults
Version:410C3NOD4505N08
How to connect to PC
Before connect the machine to PC, turn on the machine, and enter System Option Setting to
make sure connect to "Disk Drive" or "PC Cam". Place the Micro SD card into the memory card
slot before connect to PC.
1. Disk Drive:
Choose to regard the machine as an external memory to PC.
2. PC Cam
Choose to regard the machine as an external camera to PC.
HDMI Interface
The driving recorder, equipped with HDMI all-digital video and audio transmission interface, can
transport high-quality audio and video signal to the set-top boxes, DVD players, personal computers, video
games, integrated amplifier, digital audio and TV.
Connect the TV's HDMI cable to the HDMI, driving recorder will automatically switch the video output
to the TV.
HDMI
AV-OUT Interface
Connect the TV's AV-OUT cable to the AV-OUT, driving recorder will automatically switch the
video output to the TV.
Features
DSP
NT96220
Platform
DV Turnkey
DRAM
DDRⅠ 118Mb
Anti-Handshake
Electronic Image Stabilization
Digital Zoom
4x Digital Zoom
Movie
12M 4032×3024,10M 3648×2736,8M 3264×2448,5M2592×1944,
3M 2048×1536,2M HD 1920×1080,VGA 640×480,1.3M 1280×960
File Format
Still Image : JPG
Movie Format: avi
White Balance Control
Auto /Daylight /Cloudy/ Tungsten
Color Effect
Normal/Black and white/Sepia
Seamless video
yes
Off file recovery
Yes
Motion detection
Yes
file naming
Yes
Recording Media
SD (Up to 32 GB support)
Multi-language
Support(10 languages)
English/ French/Spanish/ Portuguese/German/Italian/ Simplified
Chinese/ Traditional Chinese/Russian/Japanese
HDMI out support
yes, HDMI port: mini HDMI
AV-OUT
yes
Standard
NTSC/PAL
USB functions
1. Mass Storage
2. PC Camera