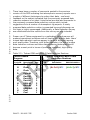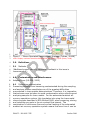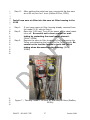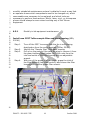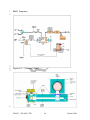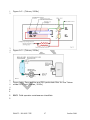
1
1
2
3
4
5
6
7
8
9
10
11
12
13
14
15
16
17
18
19
20
21
22
23
24
25
26
27
28
29
30
31
32
33
34
Draft Standard Operating Procedures for
Analysis of Gaseous and Fine Particulate-Bound
Mercury
Version 2.0
Comments provided by:
John Dalziel – CAMNET
Thomas Holsen + Hyun-Deok Choi – Clarkson University
Laurier Poissant – CAMNET
Dirk Felton – NYSDEC
Mae Gustin + Seth Lyman – University of Nevada-Reno
Mark Olson – USGS
Winston Luke – NOAA
Eric Miller – ERG, LTD.
Sandy Steffen – CAMNET
Tina Scherz - CAMNET
Mark Rhodes - NADP
OCTOBER 2008
U.S. EPA
CAMD
1200 Pennsylvania
Avenue, NW
Washington, DC 20460
35
36
37
NADP Program Office
Illinois State Water
Survey
2204 Griffith Drive
Champaign, IL 61820
Tekran Canada
330 Nantucket Blvd
Toronto, ON
M1P2P4
Asterisks located in this SOP denote that additional information is
available in the Technical Support Commentary document.
1
TABLE OF CONTENTS
2
3
4
1.0
Scope and Application ......................................................... 4
5
2.0
Summary of Method............................................................ 4
6
3.0
Definitions ......................................................................... 9
7
4.0
Contamination and Interferences .......................................... 9
8
5.0
Health and Safety ............................................................. 14
9
6.0
Maintenance, Equipment and Supplies ................................. 17
10
7.0
Reagents and Standards .................................................... 84
11
8.0
Sample Collection, Preservation and Storage ........................ 84
12
9.0
Quality Control ................................................................. 84
13
10.0
Calibration and Standardization........................................ 85
14
11.0
Procedure and Equipment Settings ................................... 86
15
12.0
Data Analysis and Calculations......................................... 86
16
13.0
Method Performance....................................................... 87
17
14.0
Troubleshooting ............................................................. 88
18
15.0
Pollution Prevention........................................................ 89
19
16.0
Waste Management........................................................ 89
20
17.0
References .................................................................... 90
21
18.0
Acronym Dictionary ........................................................ 92
22
23
24
25
26
27
19.0
Tables, Diagrams, Checklists and QA Worksheets ............... 93
DRAFT – DO NOT CITE
2
October 2008
1
2
3
4
5
6
7
8
9
10
11
12
13
14
15
16
17
18
19
20
21
22
23
24
25
26
PREFACE
Standard Operating Procedures for Analysis of Gaseous and Particulate
Mercury describes how to properly operate and maintain an automated
speciated ambient mercury monitoring unit. This document ensures
the systematic planning in the collection of ambient mercury data. The
systematic planning behind this standard operating procedure has
been developed from a best practices questionnaire distributed by the
National Atmospheric Deposition Program (NADP) to detail the
operation of an automated speciated ambient mercury monitoring unit.
Atmospheric mercury scientists throughout North America convened to
discuss the best practices for monitoring for ambient mercury. These
discussions were held at the NADP Atmospheric Mercury Scientists
Workshop held in Chicago, IL on October 3-4, 2007.
This SOP continues with efforts started at special meeting at the NADP
Spring Conference in Riverside, CA on May 1, 2006; an Atmospheric
Mercury Scientists Workshop in Chicago, IL on June 27, 2006; the
NADP Fall Conference in Norfolk, VA on October 24-26, 2006; the
NADP Spring Conference in Underhill, VT on April 9-10, 2007; and the
Atmospheric Mercury Best Practices and SOP Workshop October 3-4,
2007.
Any use of trade, product, or firm names is for descriptive purposes
only and does not imply endorsement by the U.S. Government.
DRAFT – DO NOT CITE
3
October 2008
1
2
3
Standard Operating Procedures for Analysis of Gaseous and
Particulate Mercury
4
5
6
7
8
9
1.0 Scope and Application
This Standard Operating Procedure is applicable to the collection of
ambient mercury concentrations using an automatic speciated ambient
mercury monitoring unit (Figure 1). This method is for determination
of mercury (Hg) in the range of 0.001 to 50 nanograms/cubic meter
(ηg/m3 as Hg).
10
11
12
13
14
15
16
17
18
19
20
21
22
23
24
25
26
27
28
29
30
31
32
33
34
35
36
37
38
39
40
2.0
Summary of Method
The term Reactive Gaseous Mercury has become accepted through
usage. However, the term “reactive” is at best misleading and very
imprecise. We propose that this SOP could serve to correct this
problem and set proper definitions for the long-term. Eric Prestbo,
Tekran, Inc. (Toronto, ON) suggested that consistency and correctness
would be better served if we used GEM, GOM, and PBM2.5. Gaseous
Oxidized Mercury (GOM) is more descriptive and accurate than is
reactive gaseous mercury (RGM). Gaseous elemental mercury (GEM)
is commonly used. Particulate-Bound Mercury (PBM2.5) is better than
particulate mercury, because the latter implies there are particles of
mercury rather than mercury on/in particles. These new terms, GOM
and PBM2.5, are used throughout this SOP.
The method was developed and performance tested under the
direction of the USEPA Office of Research and Development and Florida
State Department of Environmental Protection (Landis et al., 2002).
The method is a real-time selective separation of gaseous oxidized
mercury (GOM), fine fraction particulate-bound mercury (PBM2.5) and
gaseous elemental mercury (GEM) with subsequent detection by
automated pure gold cartridge pre-concentration and cold vapor
atomic fluorescence spectroscopy (CVAFS).
Ambient air is pulled under vacuum through an impactor inlet to
remove particulate matter greater than 2.5 µm and then through a
potassium chloride (KCl) coated quartz annular denuder to selectively
adsorb GOM, with GEM and PBM2.5 passing through the denuder. The
air stream then passes through a regenerable particulate filter (RPF)
assembly to selectively capture PBM2.5 while the remaining mercury
fraction, GEM, quantitatively passes through and is captured on pure
DRAFT – DO NOT CITE
4
October 2008
1
2
3
4
5
6
7
8
9
10
11
12
13
14
15
16
17
18
19
20
21
22
23
24
25
26
27
28
gold cartridges to complete the quantitative separation and collection
of the mercury fractions.
The mercury fractions must be in the GEM form for quantitative
transfer and pre-concentration on gold cartridges and subsequent
detection by the automated CVAFS. Mercury is thermally desorbed
from the gold cartridge in an ultra high purity argon stream that
carries the released Hg0 into the cell of a cold-vapor atomic
fluorescence spectrometer (CVAFS) for detection.
During GOM and PBM2.5 sample collection, GEM in air is continuously
being collected on alternative A and B gold cartridges and analyzed by
the automated CVAFS detector at 5-minute intervals. After a
predefined time (e.g. 2 hours) the automated system switches to
PBM2.5 and GOM analysis. During this period, the system thermally
converts and desorbs in succession the PBM2.5 and GOM at high
temperature to the GEM form in a stream of mercury-free (zero) air
for pre-concentration on gold cartridges and subsequent CVAFS
detection.
Quality of the Tekran 2537 is assured through calibration on a set
interval by an automated internal, temperature controlled mercury
permeation source within the detector (Poissant, 2008). Other quality
assurance steps include external intrinsically NIST traceable mercury
permeation source verification, various performance tests, leak
checks, routine maintenance and high frequency data quality criteria
review by an automatic computer program.
*
DRAFT – DO NOT CITE
5
October 2008
1
Table 2.1 Schedule: On-Site Equipment Maintenance and QA Checks
Bi-weekly
Install new blanked GOM denuder
Install trace-clean GL14-GL18 union (Luke, 2008)
Install trace-clean inlet glassware including new frit
Install new pre-purged soda lime trap
Install trace-clean zero air filter housing and new filter media in 1130
Install trace-clean sample line filter housing and new filter media in 1130
Check lamp voltage – adjust and recalibrate as needed
Check dri-rite (or similar) on outlet of air dryer and replace as necessary (Miller, 2008a)
Leak check the entire system by zero-air vacuum method
Monthly
Install trace-clean 2537 sample filter housing and new filter media in 2537 (Holsen & Choi, 2008)
Install trace-clean 2537 zero air filter housing and new filter media in 2537 (Holsen & Choi, 2008)
Confirm inlet volumetric flow rate is between 8.0 to 11.0 L/min (Miller, 2008b)
4-6 Weeks
Install new blanked regenerable particulate filter assembly
Install trace-clean RPF 3/8” to ¼” Teflon elbow fitting and Teflon tubing (Luke, 2008)
Rinse Teflon tubing extending from soda-lime trap to 2537 sample filter with DIW and methanol
Quarterly
Audit the mass flow controller in the 2537
Audit the mass flow meter in the 1130 pump module
Verify the 2537 internal mercury permeation tube emission rate by syringe injection
Check the nichrome gold cartridge heating coils, reseat and tighten electrical connection and confirm
operation by “red” color at peak of heating cycle
Check and synchronize Tekran clock to NIST time source (Miller, 2008a)
6 Months
Rinse or install new, trace-clean Teflon tubing at key locations in the 1130 pump module and/or
prior to the heated line (Miller, 2008a)
Change both of the 1130 pump unit zero air carbon canisters and DFU filters
Monitor the instrument shelter air – check for possible indoor Hg sources (Miller, 2008a; Steffen,
2008) – see Section 4.2.5.1
Annually
Replace the nichrome gold cartridge heating coils
Install new 2537A zero air canister and DFU filter if needed
Rinse or install new Teflon tubing at key locations between the 2537 and 1130 including the heated
sample line
Replace GL14-GL18 union fitting between denuder and RPF
Verify the 2537 internal mercury permeation tube emission rate by independent QA audit technician
Maintenance on 1102 or other zero air system (Felton, 2008)
Replace the 1130 pump diaphragm and brushes (Olson, 2008)
As needed
Maintain the 2537 pump with needed new parts dependent on model type (KNF UN89 or KNF N79
Install new match-pair pure gold cartridges within the 2537
Clean or install new 2537 Teflon valves
Replace/clean quartz fluorescence cell
Replace the 2537 lamp due to age and poor performance
2
3
*
DRAFT – DO NOT CITE
6
October 2008
1
2
Table 2.2 Consensus NADP-AMI Tekran Model 1130/1135 Controller
Program Worksheet
3
4
*
DRAFT – DO NOT CITE
7
October 2008
1
2
3
4
5
6
7
8
9
10
11
12
13
14
15
16
17
18
19
20
There have been a number of comments posted to the previous
version of this SOP indicating that atmospheric mercury experts use a
number of different techniques to reduce their data – and most
feedback on the subject indicated that the previously proposed data
reduction scheme is not ideal. Listed below are data and comments to
the previously proposed data reduction routine which include
suggestions from a number of atmospheric Hg experts. A newly
proposed data reduction routine is presented here and discussion on
this topic is highly encouraged. Additionally, a Data Reduction Survey
was distributed and the results from this survey are also included.
Proper use of Tekran equipment in a methodical, skilled manner will
preempt operational problems and will lead to high quality data. Users’
unique data reduction routines appear to be most divergent among
poor quality data. Therefore, with skilled operation, the use of unique
data reduction routines and other data screening techniques should
become a moot point in terms of providing consistent, high quality
data.
Table 2.3 – Tekran GOM and PBM2.5 Data Reduction Routines
Tekran Desorb
Tekran GOM and PBM2.5 Data
Program
Reduction Routines
Cycle ID
Description
Flag
A
B
Flush
Flush
1
1
C
Flush
1
D
E
F
G
H
I
J
K
L
Pyro-Ht
Part-Ht
Part-Ht
Part-Ht
RGM-Ht
RGM-Ht
RGM-Ht2
Cool
Cool
2
2
2
2
3
3
3
1
1
USERID
PBM2.5
Calculation
GOM Calculation
(E+F+G)-3*C
(H+I+J)-3*C
21
22
23
24
DRAFT – DO NOT CITE
8
October 2008
1
2
3
Figure 1 - Tekran Speciated Mercury Vapor Analyzer (Tekran, 2006b)
4
3.0
5
6
7
8
3.1 Methods
(Additional expert mercury monitoring feedback in this issue is
recommended.)
note: Display numbers should be 800/800/38 and 500/50/75/38 (Olson, 2008)
Definitions
9
10
4.0 Contamination and Interferences
Adapted from (US-EPA, 2002)
11
12
13
14
15
16
17
18
19
20
21
4.1 Preventing contamination
Preventing samples from becoming contaminated during the sampling
and analysis process constitutes one of the greatest difficulties
encountered in trace metals determinations. Therefore, it is imperative
that extreme care be taken to avoid contamination when collecting and
analyzing samples for trace metals. For the automated ambient air
mercury speciation system, this translates into using the trace metal
clean concepts described in EPA Method 1669, when preparing, storing
and installing any parts in the air-contact flow stream. The
combination of continuous flow and cyclical heating of the automated
ambient air mercury speciation system means that over time it can be
DRAFT – DO NOT CITE
9
October 2008
1
2
3
4
5
6
7
8
9
10
11
12
13
14
15
16
17
18
19
20
self-cleaning if contamination occurs. Thus, if there is low-level
contamination, patience may be the best course of action. However
this self-cleaning mechanism is not a replacement for careful lab and
field work to avoid contamination.
The air-flow sample stream may become contaminated by numerous
routes. Potential sources of trace metals contamination during
preparation, storage or installation of parts in the air-contact flow
stream include: metallic or metal-containing labware (e.g., talc gloves
that contain high levels of zinc), containers, sampling equipment,
reagents, and reagent water; improperly cleaned or stored equipment,
labware, and reagents; and atmospheric inputs such as dirt and dust.
Even human contact can be a source of trace metals contamination.
For example, it has been demonstrated that dental work (e.g.,
mercury amalgam fillings) in the mouths of laboratory personnel can
contaminate air-flow sample streams directly exposed to exhalation or
saliva. Cleaning, preparation and storage of replacement parts in the
laboratory should be done in a low-mercury (<30 ng/m3), lowparticulate environment.
21
4.2
Contamination Control
22
23
24
25
26
27
4.2.1
Philosophy – The philosophy behind contamination control
is to ensure that any object or substance that contacts any part in the
air-flow sample stream (e.g. fittings, tubing, and denuder) is metal
free and free from any material that may contain mercury, including
but not limited to, human hair, dust, fibers, aerosol matter and very
high mercury air present in the working environment.
28
29
30
31
4.2.2
The integrity of the results produced cannot be
compromised by contamination of the air-flow sample path. This
Method and the Sampling Method give requirements and suggestions
for control of the air-flow sample stream contamination.
32
33
34
35
36
37
38
4.2.3
The use of mercury calibration standards, pressure
measurement devices such as barometers, broken fluorescent lights
containing mercury and other such items cannot be allowed to
contaminate the field site work area or instrumentation used for trace
metals measurements. This method gives requirements and
suggestions for protecting the field site work area and surrounding
environment.
39
40
4.2.4
Although contamination control is essential, personnel
health and safety remain the highest priority. The Sampling Method
DRAFT – DO NOT CITE
10
October 2008
1
2
and Section 5 of this Method give suggestions and requirements for
personnel safety.
3
4
5
6
7
8
9
10
11
4.2.5
Avoiding contamination—The best way to control
contamination is to completely avoid exposure of the air-flow sample
stream to contamination in the first place. Avoiding exposure means
performing operations in an area and with materials known to be free
from contamination. Two of the most important factors in
avoiding/reducing sample contamination are (1) an awareness of
potential sources of contamination and (2) strict attention to work
being done. Therefore, it is imperative that the procedures described
in this Method be carried out by well-trained, experienced personnel.
12
13
14
15
16
17
18
19
20
21
22
23
24
4.2.5.1
Section must be added here to describe the need to assess
the level of location contamination or possible bias by activities or
materials brought within close distance of the field site. For example
mercury thermometers, building materials, paint and so forth.
25
26
27
28
29
30
31
32
33
34
35
36
37
38
4.2.6
Minimize exposure—The air-flow sample stream parts that
will contact sample air, zero air or mercury standard air should be
exposed only in a clean room, clean bench, or glove box so that
exposure to an uncontrolled atmosphere is minimized. When not being
used, the Apparatus should be covered with clean plastic wrap, stored
in the clean bench or in a plastic box or glove box, or bagged in clean
ziploc-type bags. Minimizing the time between cleaning and use will
also minimize contamination. In the field, when installing parts into the
instrument, the conditions and exposure time should be optimized to
avoid sources of contamination. For example, use clean gloves,
change gloves as needed, keep parts in clean storage bags when
installing where practical and consider yourself as a point of
contamination. Also, it may be wise to turn off sources of high air
flow in the shelter such as the heater, air conditioner or fans.
39
40
4.2.7
Clean work surfaces—Before air flow sample stream parts
(e.g. impactor inlets) are being prepared for use, all work surfaces in
Lessons Learned:
“What we have done in the past is to use the 2537 to test the indoor
air [before] we decide to move to a site. We run it for a while at
different spots inside and out. Testing the air coming around doors
and windows from the outside in order to not have the indoor air
contaminate the outdoor air. For RGM/PHg contamination …you’d
have to run it the same way I’d imagine.” (Steffen, 2008)
*
DRAFT – DO NOT CITE
11
October 2008
1
2
3
the hood, clean bench, or glove box in which the samples will be
processed should be cleaned by wiping with a lint-free cloth or wipe
soaked with reagent-grade water or methanol.
4
5
6
7
8
9
10
11
12
13
4.2.8
Wear gloves—personnel servicing the instrumentation
related to installation or changing air-flow sample stream parts must
wear clean, non-talc, nitrile or PVC gloves during all operations
involving handling. Only clean gloves may touch the critical parts. If
another object or substance is touched, the glove(s) must be changed
before again handling the air-flow parts. If it is even suspected that
gloves have become contaminated, work must be halted, the
contaminated gloves removed, and a new pair of clean gloves put on.
Wearing multiple layers of clean gloves will allow the old pair to be
quickly stripped with minimal disruption to the work activity.
14
15
16
17
18
19
20
21
22
23
24
4.2.9
The laboratory or cleaning facility is responsible for
cleaning the air-flow sample stream parts used by the field
maintenance team. If there are any indications that the air-flow
sample stream parts are not clean or functional when received by the
field maintenance team (e.g., noticeable particulate, ripped sample
bags, etc), an assessment of the likelihood of contamination must be
made. Installation must not proceed if it is possible that the
instrument sample flow stream could become contaminated. If the
newly installed air-flow sample stream parts are found to be
contaminated, they must be returned to the laboratory or cleaning
facility for proper cleaning before they can be reinstalled.
25
26
27
28
29
30
31
32
33
34
35
36
37
38
39
40
41
4.2.10
Service the 1130 pump unit off site or with great care. A
significant contamination risk is the carbon dust generated by the
pump motor brushes in the 1130 (and 2537A). Great care should be
taken that this carbon dust (or similar generated by other instruments)
is not released into the instrument shelter environment or be allowed
to contaminate the sample stream. The carbon dust may easily find
its way into the instrument flow path and may scavenge Hg. This dust
should be removed from the 1130 housing every 6 months during
carbon cartridge changes by wiping with damp kimwipe. Do not blow
out with compressed air as the carbon dust will go everywhere. If
you are servicing elements of the sample air stream at the same time,
do that first and take great care not to contaminate your shelter or
work area. (Miller, 2008a)
“It should be recommended that each site maintain a clean, back-up
set of filters and glassware on-site in the event that the primary set to
be changed in is found to be contaminated.“ (Miller, 2008a)
DRAFT – DO NOT CITE
12
October 2008
1
2
3
4
5
6
7
8
9
10
11
12
13
14
15
16
17
18
19
20
21
22
23
24
25
26
27
28
29
30
31
32
33
34
35
36
37
38
39
40
41
42
43
4.3
Interferences
This section is critical and has yet to be fully flushed out. Please
contribute to this section or offer topics not covered by the following
list.
4.3.1
High purity argon
The use of high purity argon is very critical to keep the instrument
operating properly and reduce the potential for interferences. “An inline gold trap (Tekran 3025200-00 Gold gas scrubber) is important to
ensure no Hg is in the argon supply.” (Holsen & Choi, 2008)
4.3.2
Co-collected compounds that are released from the KCldenuder or RPF
*
4.3.3
Use of soda-lime to minimize interferences
Update from Tekran:
“Tekran is about to launch a low-cost, factory and field tested batches
of soda-lime traps with date stamp. We will continue to actively track
soda-lime experience and support proper use of soda lime” (Prestbo,
2008)
Lessons learned:
“To me this is a big issue. We need to figure out what type of soda
lime and how to effectively prepare it. I once baked it on Matt Landis’s
recommendation and it crapped everything up. Plus we have to stress
the indicating vs. non indicating. Some consensus on the brand and
mesh size would be needed…” (Steffen, 2008)
“Soda-lime traps placed both before the 2537A inlet and on the 1130
zero-air outlet have been demonstrated to reduce the activity of
unspecified interfering elements or compounds that appear to alter the
surface of the analytical gold traps causing “passivation” of the
surface. Passivation is evident when the GEM readings post desorption
of the denuder are significantly lower than the GEM readings
immediately prior to desorption. The GEM readings then subsequently
recover to the prior values over the course of the 1 to 2 hour
denuder/RPF accumulation interval. However, not all suppliers or
batches of soda lime from a given supplier and satisfactorily free of
mercury for use. Most soda lime requires some period of purging with
DRAFT – DO NOT CITE
13
October 2008
1
2
3
4
5
6
7
8
9
10
11
12
13
14
15
16
17
18
19
20
21
22
23
24
25
26
27
28
29
mercury-free air to remove weakly surface bound mercury. Soda lime
batches must be tested to determine if the standard purge treatment
provides satisfactorily clean soda lime.” (Miller, 2008b)
4.3.4
Suspected iodine compound Au cartridge passivation
effects that can occur if zero air canisters become wet.
Update from Tekran:
“Tekran is about to launch a model 1102 zero air dryer modification kit
to absolutely remove this potential interferant. It will include capping
the V1 valve in the 1130 denuder module. In addition, some users
have found that regular activated carbon canisters are providing good
zeros and may be a solution as well. This interferant is avoidable and
the SOP can reflect this….” (Prestbo, 2008)
4.3.5
Selectivity and avoidance of interferences due to the realtime separation during sampling (e.g. 2.5 µm cut size), selectivity of
the method by gold-cartridge pre-concentration and atomic
fluorescence.
4.3.6
No interferences for ambient air levels of SO2, O3, and
other air pollutants have been observed when challenged by careful
experiments.
Lessons learned:
“We should make a note to be careful about other instruments
collecting ancillary data …they calibrate and produce O3 …something
to be aware of when discussing interferences” (Steffen, 2008)
30
31
5.0 Health and Safety
Adapted from (US-EPA, 2002)
32
33
34
35
36
5.1 Toxicity
The toxicity or carcinogenicity of each chemical used in this Method
has not been precisely determined; however, each compound should
be treated as a potential health hazard. Exposure to these compounds
should be reduced to the lowest possible level.
37
38
39
40
5.1.1
Chronic exposure
Chronic mercury exposure may cause kidney damage, muscle tremors,
spasms, personality changes, depression, irritability and nervousness.
Organo-mercurials may cause permanent brain damage. Because of
DRAFT – DO NOT CITE
14
October 2008
1
2
3
the toxicological and physical properties of Hg, pure standards should
be handled only by highly trained personnel thoroughly familiar with
handling and cautionary procedures and the associated risks.
4
5
6
7
8
9
10
5.1.2
Safety and use
This Method does not address all safety issues associated with its use.
The laboratory and field site is responsible for maintaining a current
file of OSHA regulations for safe handling of the chemicals specified in
this Method. OSHA rules require that a reference file of material safety
data sheets (MSDSs) must be made available to all personnel involved
in these analyses.
11
12
13
14
15
16
17
18
19
5.1.3
Laboratory and Field-Site safety
Standard concentrations of Hg at elevated levels are handled using
essentially the same techniques employed in handling radioactive or
infectious materials. Well ventilated, controlled access laboratories are
required. Assistance in evaluating the health hazards of particular
laboratory conditions may be obtained from certain consulting
laboratories and from State Departments of Health or Labor, many of
which have an industrial health service. Each laboratory and field site
must develop a safety program for handling Hg.
20
21
22
23
24
25
26
27
28
29
5.1.3.1
Protective equipment
Use of protective equipment such as gloves is normally used to keep
mercury contamination from the sampling system. However, certain
tasks may require handling of mercury standards or solutions where
disposable plastic gloves, apron lab coat, safety glasses or mask, and
a glove box or fume hood adequate for radioactive work should be
used. During analytical operations that may give rise to high levels of
gaseous mercury or aerosols (e.g. transferring liquid mercury for a
calibration system), personnel should wear respirators equipped with
activated carbon filters as needed.
30
31
32
33
5.1.3.2
Training
Both lab and field site technicians must be trained in the proper
method of removing contaminated gloves and clothing without
contacting the exterior surfaces.
34
35
36
37
38
39
5.1.3.3
Effluent vapors
The amount of mercury in the sample and standards is exceedingly
small and does not pose a risk in the majority of cases. However, one
must consider whether the effluent from the CVAFS should pass
through either a column of activated charcoal or a trap containing gold
or trap any mercury vapors.
DRAFT – DO NOT CITE
15
October 2008
1
2
3
4
5
6
7
8
9
10
11
12
13
14
15
16
17
18
19
20
21
22
23
24
25
26
27
28
29
30
31
32
33
34
35
36
37
38
39
40
5.1.3.4
Waste handling
Good technique includes minimizing contaminated waste.
Lessons learned:
“Never discard old Hg lamp in normal garbage. Special regulation
about hazardous materials.” (Poissant, 2008)
5.2
Compressed gas cylinder safety (NOAA, 2006)
Compressed gas cylinders require basic attention to safety to prevent
injury to the operator or equipment.
During operation or storage, always secure gas cylinders upright to a
permanent object by straps or chains to prevent them from falling.
Dropping a gas cylinder could break off or damage the valve, which
would create an extremely dangerous situation.
When moving gas cylinders, always ensure that the valve protection
caps are on, that the cylinder is secured in an upright position, and
only vehicles or hand trucks designed for transporting gas cylinders
are used. Gas cylinders may be rolled on their bottom edge for short
distances only.
When a gas cylinder is empty, close the main cylinder valve before
removing the regulator, fit protection caps over the valve and mark
the cylinders as empty.
Ensure that all argon cylinders are labeled Ultra-High-Purity (or UHP,
99.999%) argon. Also ensure that no helium has been used in this
cylinder before, as helium will shorten the lifetime of the Tekran 2537
unit lamp (Felton, 2008).
DRAFT – DO NOT CITE
16
October 2008
1
6.0
Maintenance, Equipment and Supplies
2
3
4
5
6
7
8
6.1
Schedule: Equipment maintenance and QA checks
9
10
11
12
13
14
6.2
Equipment maintenance details were separated into on-site and in-lab
procedures to ensure that components are prepared using similar
techniques under similar conditions. This information should also help
minimize weather and/or contamination issues.
Site-visit/remote access on-site equipment maintenance and QA
checks
Table 6.2 Site-visit/remote access on-site equipment maintenance and
QA checks
Site-visit/remote access on-site equipment
maintenance and QA checks
Action required:
Work through operator sitevisit/remote access data
checklist
Maintenance
None
required:
Consumables
None
required:
Tools required:
None
15
16
17
18
19
20
21
22
23
24
25
26
27
28
29
30
During each site visit or through remote access, the operator should
complete an operator site-visit/remote access data checklist. This
checklist provides a surficial examination of the ambient mercury
monitoring system to ensure that there aren’t any obvious mechanical
faults.
The operator site-visit/remote access data checklist is found in the
appendix.
Lessons Learned:
“Daily on-site checks can be replaced with automated or remote daily
checks via data logger and appropriate software. In our system the
data logger checks each of these daily parameters and more and sends
a text message to PI and site operator cell phones if anything is out of
spec. If operator makes any adjustments to the system they get
DRAFT – DO NOT CITE
17
October 2008
1
2
logged in an electronic site-log file which is sent by ftp hourly to the PI
and remote server for backup.” (Miller, 2008a)
3
4
5
6.3
Weekly on-site equipment maintenance and QA checks
Table 6.3 weekly on-site equipment maintenance and QA checks
Weekly On-site equipment maintenance and
QA checks
Action required:
Work through operator
weekly data checklist
Maintenance
None
required:
Consumables
None
required:
Tools required:
None
6
7
8
9
10
11
12
13
14
15
16
17
18
19
20
21
22
23
24
25
If the field operator visits the site once a week, the operator should
complete an operator weekly data checklist. This checklist provides a
surficial examination of the ambient mercury monitoring system to
ensure that there aren’t any obvious mechanical faults.
The operator weekly data checklist is found in the appendix.
Lessons learned:
“Weekly checklist items that are not automated can be logged in the
electronic site log. Many of the weekly parameters can be (and should
be allowed to be) monitored via data logger. These include various
system temperatures.” (Miller, 2008a)
6.4
Bi-Weekly equipment maintenance and QA checks
Table 6.4.1 Bi-weekly in-lab equipment maintenance and QA checks
Bi-Weekly in-lab equipment maintenance and QA checks
Action required:
1. Maintenance
Maintenance
1. Prepare a new blanked GOM denuder
required:
2. Prepare a new GL14-GL18 union
[model 1130]
3. Prepare new trace-clean inlet
glassware including a new frit
DRAFT – DO NOT CITE
18
October 2008
Consumables
required:
Tools required:
1
2
3
4
4. Prepare a new pre-purged soda lime
trap
1. Soda lime trap
2. Soda lime
3. Glass wool
4. 18.2 MΩ cm-resistivity water
5. Nitric acid or HCl
6. Laboratory-grade methanol
7. GOM (quartz annular) denuder
8. 2.4 M KCl
9. Source of clean air to flush denuder
during pre-baking
1. Nitrile (or similar) gloves*
2. Teflon-coated tweezers
3. Impactor tool
4. Toothbrush
5. Lindberg/Blue M, model TF55035
clamshell tube furnace
6. An aspirator or other type of vacuum
pump to draw KCl solution into
the denuder
Table 6.4.2 Bi-weekly on-site equipment maintenance and QA checks
Bi-Weekly on-site equipment maintenance and QA checks
Action required:
1. Work through operator bi-weekly data
checklist
2. Maintenance
Maintenance
1. Install new blanked GOM denuder
required:
2. Install trace-clean GL14-GL18 union
3. Install new trace-clean inlet glassware
including a new frit
4. Install new pre-purged soda lime trap
5. Install new, pre-packed zero air filter
housing in 1130 (Olson, 2008)
6. Install new, pre-packed sample line
filter housing in 1130 (Olson,
2008)
7. Leak check the system by zero-air
vacuum method
8. Check lamp voltage – adjust as
necessary
9. Check dri-rite and replace as
DRAFT – DO NOT CITE
19
October 2008
Consumables
required:
Tools required:
1
2
3
4
5
6
7
8
9
10
11
12
13
14
15
16
17
18
19
20
21
22
23
24
25
26
27
28
29
necessary (Miller, 2008a)
1. New blanked GOM denuder
2. Pre-purged soda lime trap
3. New zero air filter in 1130
4. New sample line filter in 1130
5. Dri-rite (if necessary)
6. Pre-cut saran wrap or cut-off new
clean nitrile or PVC glove finger
1. Nitrile (or similar) gloves
2. Toothbrush
3. Multimeter for testing lamp voltage
and precision
4. Flat-head screwdriver
5. Pair of adjustable wrenches
Every other week, the operator should complete an operator bi-weekly
data checklist and perform all of the required scheduled maintenance
listed in the bi-weekly scheduled maintenance protocol. This checklist
provides a more in-depth examination of the ambient mercury
monitoring system to ensure that there aren’t any obvious mechanical
faults. The bi-weekly scheduled maintenance protocol is detailed in
such a way that an operator knows which components need to be
changed out, which consumables are necessary to be replaced, and
which tools are necessary to perform these actions. Nitrile, latex, vinyl,
or chloroprene gloves should always be worn when touching any of the
Tekran equipment.
6.4.1
Bi-weekly in-lab equipment maintenance
Prepare a new blanked GOM denuder
Cleaning previously coated denuders adapted from (Landis et al.,
2002)
Step 1.
Step 2.
Step 3.
Rinse the denuder with 18.2 MΩ cm-resistivity water.
Submerge the denuder vertically by a ring stand for 24
hours with 18.2 MΩ cm-resistivity water up to the radial
notches of the annulus.
After this 24-hour rinsing, the denuder should be cleaned
in the same manner as a new quartz annular denuder.
Cleaning new quartz denuders adapted from (Landis et al., 2002)
DRAFT – DO NOT CITE
20
October 2008
1
2
3
4
5
6
7
8
9
10
11
12
13
14
15
16
17
18
19
20
21
22
23
24
25
26
27
28
29
30
31
32
33
34
35
36
37
38
39
40
41
42
Step 1.
Step 2.
Step 3.
Rinse the denuder with 1% HCl or 10% reagent-grade
nitric acid.
Rinse the denuder with 18.2 MΩ cm-resistivity water.
Carefully pour laboratory-grade methanol into the
denuder, but not into the annulus through the vent.
Lessons learned:
“We have not cleaned ours with nitric acid…we rinse with methanol
and blow them dry after they have been thoroughly soaked in DI
water.” (Steffen, 2008)
“Ditto, no nitric acid for me either.” (Olson, 2008)
Coating the denuder adapted from (Landis et al., 2002)
Step 1.
Step 2.
Step 3.
Step 4.
Step 5.
Step 6.
Step 7.
Step 8.
Prepare the 2.4 M concentration aqueous KCl solution by
dissolving 90 grams of high-purity KCl into 18.2 MΩ cmresistivity water to produce 500 mL of coating solution.
The denuder should be suspended vertically by a ring
stand holding the denuder inlet submerged in a beaker
filled with KCl solution.
A vacuum line (or aspirator) with a needle valve connected
to the exit side of the denuder should be used to pull KCl
solution into the denuder to just above the active denuder
surface.
After the KCl solution reaches just above the denuder
surface, allow the KCl solution to recede down into the
beaker by opening up the needle valve.
The coating process is to be repeated twice to allow for a
full coating of the denuder.
Once the coating process is finished, remove the denuder
from the ring stand and shake it to remove excess
solution.
Remove excess KCl solution from the denuder walls below
the etched area by drawing up 18.2 MΩ cm-resistivity
water several times up to the bottom of the etched area
(Felton, 2008).
The denuder can be further dried by blowing with zero air
(Olson, 2008).
Lessons learned:
DRAFT – DO NOT CITE
21
October 2008
1
2
3
4
5
6
7
8
9
10
11
12
13
14
15
16
17
18
19
20
21
22
23
24
25
26
27
28
29
“You have to clean the quartz section located at the bottom between
the inlet and the annuli and let it dry prior to baking it. If it’s not clean
this changes the surface coating and the property of the denuder.
Furthermore, they assure that the annuli is not plugged.” (Poissant,
2008)
Baking the denuder adapted from (Landis et al., 2002)
Step 1.
Step 2.
Step 3.
KCl denuders should be heated in a clamshell tube furnace
(commercially available: Lindberg/Blue M, model TF55035)
at 525 °C for 30 minutes while pulling mercury-free air
through the denuder at a rate of 1.5 liters per minute
(Landis et al., 2002; Poissant, 2008).
Coaxial cooling fans should be used at both ends of the
furnace to prevent damage to the Teflon hoses from
excessive heat.
Folded quartz fiber filters may be used to ensure a tight
seal between the furnace ends and the denuder.
Prepare new trace-clean inlet and glassware including a new
frit
Step 1.
Step 2.
Step 3.
If the inlet and glassware has been removed from the
model 1130 already, start at Step 5.
Unbutton the external heating jacket (at the bottom of the
1130 case) on the impactor and allow it to hang down.
Disconnect the Teflon tubing from the zero air inlet at the
red nut.
DRAFT – DO NOT CITE
22
October 2008
1
2
3
4
5
6
7
8
Figure 2 - Zero air inlet attachment to impactor (Steffen, 2002b)
Step 4.
Step 5.
Loosen the red nut (GL25 union) that holds the denuder
and inlet – remove this dirty glassware train.
Separate the impactor tee from the impactor inlet and then
remove the upstream tee from the impactor body. (Miller,
2008b)
9
DRAFT – DO NOT CITE
23
October 2008
1
2
3
4
5
6
7
8
9
10
11
12
13
14
15
16
17
18
19
20
21
22
Figure 3 – Tekran® model 1130 inlet components (Tekran, 2006a)
Step 6.
Step 7.
Remove the impactor frit using the impactor tools.
The white impactor “OUT” tool screws into the impactor on
the inlet side while the three prongs of the impactor
removal tool is used to push the frit out of the impactor.
Figure 4 – Impactor “OUT” tool (ARA, 2003e)
Step 8.
Wipe the inside of inlet glassware with nitrile gloved hands
and long cotton swabs to remove visible dirt and insects. A
[toothbrush] can be used with deionized water to clean the
dirty side of the frit (Miller, 2008b). Must be careful with
the use of brushes in any Teflon coated glassware and
must be careful not to scratch coating (Olson, 2008).
Step 9.
Flip the frit to the other side to get use out of both sides, if
both sides have been used, install a new frit into the
impactor (Felton, 2008; Luke, 2008; Steffen, 2008).*
Step 10. The impactor “IN” tool screws into the outlet side of the
impactor.
DRAFT – DO NOT CITE
24
October 2008
1
2
3
4
5
6
7
8
9
10
11
12
13
14
15
16
17
18
19
20
21
22
23
24
25
26
27
28
29
30
Figure 5 – Impactor “IN” tool (ARA, 2003e)
Step 11. Use the flat side of the impactor “IN” tool to push the frit
into place, trying to solidly place the frit into the holder.
Step 12. With the new frit installed, place the impactor back onto
the inlet. Ensure the impactor is facing the proper
direction – otherwise no flow and poor data will
result (Steffen, 2008).
Step 13. Place the new trace-clean impactor and glassware into a
double-bagged ziploc bag for travel to site.
Lessons learned:
“When replacing the denuder and impact disk glassware, I connect the
units together in a clean area of the lab and stored in plastic until just
before installation in the 1130 sampling unit. I would think trying to
put these parts together outside during the denuder-inlet change out
would be asking for trouble. The units can be easily put together and
checked in a clean area of the operations lab and stored in plastic until
ready for installation.” (Dalziel, 2008)
“It is also important to remember when connecting the impactor inlet
to the impactor body (Fig. 10), not to screw this glass connector too
tightly to the impactor disk, just snug is all that is required. Over
tightening can dislodge the impact disk from its Teflon holder in the
impactor body.” (Dalziel, 2008)
“Acid rinse ALL components upstream of denuder with every denuder
change, not simply wiping the glassware clean (this will not clean as
well, and may damage the Teflon coating over time) -acid rinse/DI
DRAFT – DO NOT CITE
25
October 2008
1
2
3
4
5
6
7
8
9
10
11
12
13
14
15
16
17
18
19
20
21
22
23
24
25
26
27
28
29
30
31
32
33
34
35
36
37
38
39
40
41
42
rinse/methanol rinse the elutriator, impactor (flip or replace frit to
expose an unused face), glass tee, and Teflon union to denuder body.”
(Luke, 2008)
“I use DIH2O and MeOH” (Olson, 2008)
Prepare a new pre-purged soda lime trap
Figure 6 – Soda lime trap (ARA, 2003e)
Update from Tekran:
“We are about to launch an inexpensive soda lime trap that we will
test, date-label and pack in batches so users can just install a new
tube filled with soda lime each time they need to. You could leave
these steps in the method for those that want to do their own. We’d
want to add a short description of the alternative procedure when we
know that.” (Prestbo, 2008)
Step 1.
Step
Step
Step
Step
Step
Step
Step
Step
Step
Unscrew one of the Teflon nuts at one end of the soda lime
trap and remove the glass wool from this end with
tweezers.
2.
Empty out all of the soda lime.
3.
Unscrew the Teflon nut at the opposite end of the soda
lime trap and remove the glass wool from this end with
tweezers.
4.
Place the empty soda lime trap and Teflon nuts into a 1%
HCl or 10% nitric acid bath for 12 hours.
5.
Rinse the soda lime trap 3 times with 18.2 MΩ cmresistivity water and then use laboratory-grade methanol
to facilitate drying.
6.
Allow to dry in a clean portion of a lab.
7.
Place a small piece of glass wool into one end of the soda
lime trap to prevent soda lime from pouring out.
8.
Screw the Teflon nut at the end with the glass wool, being
careful not to torque the nut so much that it deforms.
9.
Pour soda lime into the soda lime trap allowing enough
room for glass wool to prevent soda lime from pouring out
of the opposite end.
10. Screw the opposite Teflon nut onto the soda lime trap,
again being careful not to torque the nuts so much that
they deform.
DRAFT – DO NOT CITE
26
October 2008
1
2
3
4
5
6
7
8
9
10
11
12
13
14
15
16
17
18
19
20
21
22
23
24
Step 11. After packing the soda lime trap, purge with Hg-free zero
air at 50 mL/min for 1 hour (Holsen & Choi, 2008).
Install new zero air filter into the zero air filter housing in the
1130
Step 1.
Step 2.
Step 3.
If you have a zero air filter housing already removed from
the model 1130, skip to Step 4.
Open the 1130 case. Turn off the power so the case heater
turns off. Be careful not to burn yourself or melt
tubing by contacting the case heater element.
(Miller, 2008b)
Remove the zero air filter housing by first unscrewing the
Teflon nuts attaching the housing to the Teflon tubing. Be
careful not to lose the ferules or twist the Teflon
tubing when disconnecting the housing. (Miller,
2008b)
Figure 7 – Tekran® model 1130 zero air and sample filters (Steffen,
2002b)
DRAFT – DO NOT CITE
27
October 2008
1
2
3
4
5
6
7
8
9
10
11
12
13
14
15
16
17
18
19
20
21
22
23
24
25
26
27
28
29
30
31
32
33
34
35
36
37
38
39
40
41
42
43
44
Step 4.
Step 5.
Step 6.
Step 7.
Step 8.
With the filter housing out of the model 1130, use one of
the green filter wrenches to grasp one half of the filter
housing and grasp the other half of the housing with
another green filter wrench.
When the two halves of the filter housing are separated,
remove the old filter.
Using Teflon-coated tweezers, install a new 1 µm Teflon
filter, ensuring that the smooth Teflon side faces up and
the fibrous backing side is down.
Close the filter housing by hand before using two green
filter wrenches to seal the filter housing.
Cap the inlet and outlet ends with plastic travel caps and
store the housing in a double-bagged ziploc bag for
storage and transport to the site.
Lessons learned:
“I have found it much easier when replacing the sample and zero
filters in the 1130 sampling unit to have the filters preloaded in their
Teflon holders and install the “loaded” filter units rather than try to
load the individual filter into the holders in the outside environment.”
(Dalziel, 2008)
“Optionally, the filter holder can be exchanged with one that already
has a clean filter installed – this is easier in windy, cold and
rain/snow.” (Felton, 2008)
“I like to take filters out then loosen and replace.” (Olson, 2008)
“My recommendation here would be to remove the filter holder entirely
and replace it with one that has a preloaded filter in it. Much easier
and not fiddling with those terrible green wrenches outside.” (Steffen,
2008)
“At VT99 we clean and repack the filter housings in the controlled
environment of the lab (no clean hood needed) and never have
contamination problems. We then swap fully loaded filter housings
(clean for dirty) in the sampling head. We feel this provides for a
much lower risk of contamination than the recommended approach.
The steps below are modified for our method.” (Miller, 2008b)
Install new sample filter into the sample air filter housing in
the 1130
DRAFT – DO NOT CITE
28
October 2008
1
2
3
4
5
6
7
8
9
10
11
12
13
14
15
16
17
18
19
20
21
22
23
24
25
26
27
28
29
30
31
32
33
34
35
36
37
38
39
40
41
42
43
Step 1.
Step 2.
Step 3.
Step 4.
Step 5.
Step 6.
Step 7.
Step 8.
Step 9.
If you have a sample air filter housing already removed
from the model 1130, skip to Step 4.
Open the 1130 case. Turn off the power so the case heater
turns off. Be careful not to burn yourself or melt
tubing by contacting the case heater element. (Miller,
2008b)
Remove the sample air filter housing by first unscrewing
the Teflon nuts attaching the housing to the Teflon tubing
(see Figure 7). Be careful not to lose the ferules. Be
especially careful not to twist the Teflon tubing
when disconnecting the housing as this may torque
the regenerable particulate filter (RPF) and break
the RPF tail. (Miller, 2008b)
With the filter housing out of the model 1130, use one of
the green filter wrenches to grasp one half of the filter
housing and grasp the other half of the housing with
another green filter wrench.
When the two halves of the filter housing are separated,
remove the old filter.
Using Teflon-coated tweezers, install a new quartz fiber
filter, ensuring that the smooth side faces down.
Close the filter housing by hand before using two green
filter wrenches to seal the filter housing.
Cap the inlet and outlet ends with plastic travel caps and
store the housing in a double-bagged ziploc bag for
storage and transport to the site.
Turn the power back on
Lessons learned:
“I have found it much easier when replacing the sample and zero
filters in the 1130 sampling unit to have the filters preloaded in their
Teflon holders and install the “loaded” filter units rather than try to
load the individual filter into the holders in the outside environment.”
(Dalziel, 2008)
“Optionally, the filter holder can be exchanged with one that already
has a clean filter installed – this is easier in windy, cold and
rain/snow.” (Felton, 2008)
“I like to take filters out then loosen and replace.” (Olson, 2008)
DRAFT – DO NOT CITE
29
October 2008
1
2
3
4
5
6
7
8
9
10
11
12
13
“My recommendation here would be to remove the filter holder entirely
and replace it with one that has a preloaded filter in it. Much easier
and not fiddling with those terrible green wrenches outside.” (Steffen,
2008)
14
15
16
17
18
19
20
21
22
23
24
25
26
27
28
6.4.2
“At VT99 we clean and repack the filter housings in the controlled
environment of the lab (no clean hood needed) and never have
contamination problems. We then swap fully loaded filter housings
(clean for dirty) in the sampling head. We feel this provides for a
much lower risk of contamination than the recommended approach.
The steps below are modified for our method.” (Miller, 2008b)
Bi-weekly on-site equipment maintenance and QA checks
Install trace-clean blanked GOM denuder into the model 1130
Step 1.
Step 2.
Check the 2537 unit’s operating mode. If the 2537 is
operating in Hg (0) mode (neither desorbing, nor
calibrating), then depress the ‘ESC’ button in rapid
succession, and then depress ‘ESC’ once more to put the
2537 into IDLE mode. If the 2537 is not in Hg (0) mode,
wait until it goes into Hg (0) mode before putting it into
IDLE mode. (Miller, 2008b)
Unbutton the external heating jacket (at the bottom of the
1130 case) on the impactor and allow the jacket to hang
down. Carefully remove the inlet thermocouple. (Miller,
2008b)
DRAFT – DO NOT CITE
30
October 2008
1
2
3
4
5
6
7
8
9
Figure 8 - External heating jacket (Steffen, 2002b)
Step 3.
Disconnect the Teflon tubing from the zero air inlets at the
red nut, while being careful not to lose the gasket at the
end of the Teflon tubing. (Miller, 2008b)
Figure 9 - Zero air inlet attachment to impactor (Steffen, 2002b)
DRAFT – DO NOT CITE
31
October 2008
1
2
3
4
5
6
7
8
9
10
11
12
13
14
15
16
17
18
Step 4.
Loosen the red coupling nut that holds the denuder and
impactor together and set the impactor aside.
Figure 10 - Red coupling nut connecting the denuder and impactor
(Steffen, 2002b)
Step 5.
Step 6.
Open the 1130 case. Turn off the power so the case heater
turns off. Be careful not to burn yourself or melt
tubing by contacting the case heater element.
(Miller, 2008b)
Loosen the GL14-GL18 union fitting that holds the denuder
and regenerable particulate filter (RPF) together. When
loosening the GL14-18 do not allow the RPF to turn. Hold
the top of the RPF. The RPF has to be disconnected from
the bracket and moved up to allow the denuder to move
up enough to go over the pins (Felton, 2008; Poissant,
2008; Steffen, 2008).
DRAFT – DO NOT CITE
32
October 2008
1
2
3
4
5
6
7
8
9
10
11
12
13
Figure 11 - Red coupling nut between the denuder and RPF (ARA,
2003a)
Step 7.
There are two tabs on the top of the denuder to keep it in
place. To remove the denuder, carefully push up on the
denuder and rotate it 90 degrees to clear the tabs. Do not
let go of the denuder or it will fall to the ground and break.
Lessons learned:
“Really difficult to do it when RPF is installed, especially when the
small device is installed onto the RPF tail. This is due to you pushing
up on the RPF to remove the union.” (Poissant, 2008)
DRAFT – DO NOT CITE
33
October 2008
1
2
3
4
5
6
7
8
9
10
11
12
13
14
15
16
17
18
19
20
21
22
23
24
25
26
27
28
29
30
Figure 12 – Glass tabs on the quartz annular denuder (Tekran,
2006a)
Step 8.
Carefully pull the denuder straight down and off the 1130
case.
Step 9.
Install a new blanked denuder by first removing the red
cap from the small end of the denuder. Use a cut off new
clean nitrile, latex, or, PVC glove finger or piece of saran
wrap to cover the small end of the denuder.
Step 10. Carefully push the small end of the denuder up through
the 1130 case until it appears out of the top end. Push the
denuder up enough to allow the tabs to come out of the
rubber seal and then rotate the denuder 90 degrees. Now
lower the denuder so that it rests on top of the rubber
seal.
Step 11. Remove the clean glove finger, then tighten the red nut
connecting the denuder and the RPF (ensuring that neither
the denuder, nor the RPF rotate). Be very careful not to
push the RPF up or you will break the tail. (Miller,
2008b)
Step 12. At some point the denuder will be up enough to allow the
tabs to come out of the rubber seal. Try to rotate the
denuder so the tabs catch – before you fully tighten the
denuder/RPF coupling. Tighten the coupling fully and check
that it is still tight on the RPF.
Lessons learned:
“Occasionally, the glass connecting tube in the coupling will lift up into
mouth of the RPF as the fitting is screwed onto the denuder. If this
DRAFT – DO NOT CITE
34
October 2008
1
2
3
4
5
6
7
8
9
10
11
12
13
14
15
16
17
18
19
20
21
22
23
24
happens, you will have to back everything out and remove the fitting
from the mouth of the RPF.” (Miller, 2008b)
Step 13. Using a clean glove finger, push the glass tube down so it
seals on the gasket. Push the small (denuder end) red cap
up the tube as far as it goes. Now reassemble, carefully
lowering the small red cap to the denuder threads as
needed.
Step 14. Close the 1130 case. Keep the power off and the heating
jacket unbuttoned for installing new trace-clean inlet
glassware and exchanging the sample air and zero air
filters.
Step 15. Turn power back on unless proceeding with additional
servicing
Install a trace-clean GL14-GL18 union
Step 1.
Open the 1130 case. Turn off the power so the case heater
turns off. Be careful not to burn yourself or melt
tubing by contacting the case heater element.
(Miller, 2008b)
Figure 13 – GL14-GL18 union (ARA, 2003d)
DRAFT – DO NOT CITE
35
October 2008
1
2
3
4
5
6
7
8
9
10
11
12
13
14
15
16
17
18
19
20
21
22
23
24
25
26
27
28
29
30
31
32
Step 2.
Step 3.
Step 4.
Step 5.
Step 6.
Loosen the old GL14-GL18 union fitting that holds the
denuder and regenerable particulate filter (RPF) together.
When loosening the GL14-18 do not allow the RPF to turn.
Hold the top of the RPF. Do not let go of the denuder or it
will fall to the ground and break.
Rinse the GL14-18 union 3 times with 18.2 MΩ cmresistivity water and then use laboratory-grade methanol
to facilitate drying.* (If the GL14-18 union is believed to
be contaminated – it may be necessary to place the GL1418 union in a 1% HCl or 10% nitric acid bath for 12 hours.
After an acid bath, rinse 3 times with 18.2 MΩ cmresistivity water and then use laboratory-grade methanol
to facilitate drying.)
Allow to dry in a clean portion of a lab.
Replace the old GL14-18 union fitting with a trace-clean
GL14-18 union.
Turn on the power inside the 1130 case. Close the 1130
case.
Install trace-clean inlet and glassware including a new frit
adapted from (Miller, 2008b)
Step 1.
Step 2.
Step 3.
The heating jacket should already be unbuttoned.
The zero air feed line should already be disconnected. Take
the end cap off of the clean denuder that has just been
installed in the unit. Put it on the dirty denuder that has
been removed.
You should have a fully prepared clean inlet glassware
train in a ziploc bag.
DRAFT – DO NOT CITE
36
October 2008
1
2
3
4
5
6
7
8
9
10
11
12
13
14
15
16
17
18
19
20
21
22
23
24
25
26
27
28
Figure 14 – Tekran® model 1130 inlet components (Tekran, 2006a)
Step 4.
Step 5.
Step 6.
Step 7.
Slide the zero air feed line into the upstream Tee.
Screw the full inlet train onto the denuder mouth and
tighten the GL-25 union securely. Be very careful not to
push up on the denuder or you could break the RPF
tail. Be sure not to let the denuder rotate or the
denuder/RPF fitting may be loosened and leak – or
you could twist the RPF and break the tail. All the
glassware handling in this system takes incredible
care, patience, and a light touch.
Securely tighten the red nut connecting the zero air feed
line to the upstream Tee.
Carefully place the monitoring thermocouple into the
heated boot so it will rest just inside the boot against the
inlet. Secure the heated boot over the inlet glassware and
fasten up.
Install new pre-purged soda lime trap
Step 1.
Step 2.
Check the 2537 unit’s operating mode.
If the 2537 is operating in Hg (0) mode, then depress the
‘ESC’ button in rapid succession, then depress ‘ESC’ once
more to put the 2537 into IDLE mode. If the 2537 is not in
Hg (0) mode, wait until it goes into Hg (0) mode before
putting it into IDLE mode. *
DRAFT – DO NOT CITE
37
October 2008
1
2
3
4
5
6
7
8
9
10
11
12
13
14
15
16
17
18
19
20
21
22
23
24
25
26
27
28
29
30
Step 3.
Unscrew Teflon end nuts from the soda lime trap.
Figure 15 – Soda lime trap (ARA, 2003e)
Step 4.
Install a new pre-purged soda lime trap downstream of the
sample splitting Tee and before the 2537 sample filter.*
Firmly tighten (but not deforming) the Teflon end nuts with
adjustable wrenches (Felton, 2008).
Lessons learned:
“Na-lime traps…I purge with Zero Hg air for 30-40 minutes just prior
to installation. I use the Tekran 1100 zero air generator with DFU
filter and regulator as my source of Hg free air. I also change out the
quartz wool used in both ends of the trap each time new Na-lime is
used. If this method is deemed suitable maybe we should include
these details for the end user.” (Dalziel, 2008)
Install new pre-packaged zero air filter housing in 1130
Step 1.
Open the 1130 case. The power should be off, but if not,
turn off the power so the case heater turns off. Be careful
not to burn yourself or melt tubing by contacting the
case heater element. (Miller, 2008b)
DRAFT – DO NOT CITE
38
October 2008
1
2
3
4
5
6
7
8
9
10
11
12
13
Figure 16 – Inside the Tekran® model 1130 unit (ARA, 2003a)
Step 2.
Remove the travel cap from the inlet side of the new zero
air filter housing. Carefully loosen the Teflon nuts on the
lower end of the zero air filter housing and remove this
housing. Take care not to lose the ferrule. Slide the new
filter housing carefully upward into the holder and connect
the Teflon nuts to the inlet side of the new filter housing.
Place the travel cap on the open port of the old filter
housing. (Miller, 2008b)
DRAFT – DO NOT CITE
39
October 2008
1
2
3
4
5
6
7
8
9
10
11
12
13
14
15
16
17
18
19
20
21
22
23
Figure 17 – Tekran® model 1130 zero air and sample filters (Steffen,
2002b)
Step 3.
Step 4.
Step 5.
Step 6.
Remove the travel cap from the outlet of the new zero air
filter housing (now sitting in the holder bracket). (Miller,
2008b)
Remove the Teflon nuts from the base of the old sample
line filter cartridge (don’t lose the ferrule!). Attach to the
base (outlet) of the new zero air filter housing. Again be
careful not to push the cartridge up and tweak the
RPF tail. (Miller, 2008b)
Put the travel cap on the open port of the old zero air filter
housing. (Miller, 2008b)
Make sure no Teflon lines are near the case heater
element. Make sure you haven’t left anything loose inside
the case. (Miller, 2008b)
Lessons learned:
“I have found it much easier when replacing the sample and zero
filters in the 1130 sampling unit to have the filters preloaded in their
Teflon holders and install the “loaded” filter units rather than try to
DRAFT – DO NOT CITE
40
October 2008
1
2
3
4
5
6
7
8
9
10
11
12
13
14
15
16
17
18
19
20
21
22
23
24
25
26
27
28
29
30
31
32
33
34
35
36
37
38
39
40
41
42
43
load the individual filter into the holders in the outside environment.”
(Dalziel, 2008)
“Optionally, the filter holder can be exchanged with one that already
has a clean filter installed – this is easier in windy, cold and
rain/snow.” (Felton, 2008)
“I like to take filters out then loosen and replace.” (Olson, 2008)
“My recommendation here would be to remove the filter holder entirely
and replace it with one that has a preloaded filter in it. Much easier
and not fiddling with those terrible green wrenches outside.” (Steffen,
2008)
“At VT99 we clean and repack the filter housings in the controlled
environment of the lab (no clean hood needed) and never have
contamination problems. We then swap fully loaded filter housings
(clean for dirty) in the sampling head. We feel this provides for a
much lower risk of contamination than the recommended approach.
The steps below are modified for our method.” (Miller, 2008b)
Install new pre-packaged sample filter housing in 1130
Step 1.
Step 2.
Open the 1130 case. The power should be off, but if not,
turn off the power so the case heater turns off. Be careful
not to burn yourself or melt tubing by contacting the
case heater element. (See Figure 17) (Miller, 2008b)
Remove the travel cap from the outlet side of the new
sample line filter housing. Carefully loosen the Teflon nuts
on the upper end of the zero air filter housing and remove
it. Take care not to lose the ferrule. It is very
important that the tubing connected to the filter
housing does not twist or is not forced upward. The
RPF may break. The best way to avoid this problem
is to slowly lower the old sample line filter in the
holder bracket as the quick-grip fitting is loosened.
Once the Teflon nut is loose, slide the old sample filter
housing out of the holder. Slide the new filter housing
carefully upward into the holder and connect the Teflon nut
fitting to the inlet side of the new sample line cartridge.
Slowly ease the cartridge up in the holder as you tighten
the fitting, so the tail of the RPF is not flexed. Place the
DRAFT – DO NOT CITE
41
October 2008
1
2
3
4
5
6
7
8
9
10
11
12
13
14
15
16
17
18
19
20
21
22
23
24
25
26
27
28
29
30
31
32
33
34
35
36
37
38
39
40
41
42
43
44
Step 3.
Step 4.
Step 5.
Step 6.
travel cap on open port of the old filter housing. See Figure
17 (Miller, 2008b)
Remove the travel cap from the outlet of the new sample
filter housing (now sitting in the holder bracket). (Miller,
2008b)
Remove the Teflon nuts from the base of the old sample
filter housing (don’t lose the ferrule!). Attach to the base
(outlet) of the new sample filter housing which holds
quartz fiber filters. Again be careful not to push the
cartridge up and tweak the RPF tail. (Miller, 2008b)
Put the travel cap on the open port of the old sample filter
housing. (Miller, 2008b)
Make sure no Teflon lines are near the case heater
element. Make sure you haven’t left anything loose inside
the case. Turn on the case power. Close the case. (Miller,
2008b)
Lessons learned:
“I have found it much easier when replacing the sample and zero
filters in the 1130 sampling unit to have the filters preloaded in their
Teflon holders and install the “loaded” filter units rather than try to
load the individual filter into the holders in the outside environment.”
(Dalziel, 2008)
“Optionally, the filter holder can be exchanged with one that already
has a clean filter installed – this is easier in windy, cold and
rain/snow.” (Felton, 2008)
“I like to take filters out then loosen and replace.” (Olson, 2008)
“My recommendation here would be to remove the filter holder entirely
and replace it with one that has a preloaded filter in it. Much easier
and not fiddling with those terrible green wrenches outside.” (Steffen,
2008)
“At VT99 we clean and repack the filter housings in the controlled
environment of the lab (no clean hood needed) and never have
contamination problems. We then swap fully loaded filter housings
(clean for dirty) in the sampling head. We feel this provides for a
much lower risk of contamination than the recommended approach.
The steps below are modified for our method.” (Miller, 2008b)
DRAFT – DO NOT CITE
42
October 2008
1
2
3
4
5
6
7
8
9
10
11
12
13
14
15
16
17
18
19
20
21
22
23
24
25
26
27
28
29
30
31
32
33
34
35
36
37
38
39
40
41
42
43
Bi-weekly QA checks
Leak check the system by zero air vacuum method
Step 1.
Step 2.
Step 3.
Step 4.
Step 5.
Perform the leak test only when the 2537 is operating in
Hg (0) mode, otherwise wait until the 2537 goes into Hg
(0) mode.
Ensure that the 2537 has been operating for at least 15
minutes.
Secure a zero air canister to the Tekran model 1130
impactor inlet. This will require a connecting union
between the ¼” Teflon line exiting the zero air canister and
the impactor inlet, which may be available through URG
(Chapel Hill, NC) or Tekran. The zero air canister should
scrub all Hg from the incoming air and increase the
pressure drop within the entire speciation system.
Operate the Tekran model 1130, if no Hg peak is detected,
then the entire speciation system passes the leak check.
And if the entire speciation system doesn’t pass, you need
to go through part by part to check where the leak is
(Steffen, 2008).
*
This method should be thoroughly reviewed by mercury monitoring
experts, specifically updating information regarding:
a) What is the part number for the connecting union between the
impactor inlet and the zero air canister?
Lessons learned:
“URG has a connector for #30 thread to the bottom of their denuder
but not to #25 thread on the Tekran style denuder – I am ordering
tapered rubber stoppers for the inlet because I can’t find silicone. I
have asked URG for a tube connector to the impactor inlet.” (Felton,
2008)
b) How should the 2537/1130 be programmed to effectively test
this method?)
The zero air vacuum method discussed in this SOP allows for
increasing the pressure drop while still allowing air to pass through the
system.
DRAFT – DO NOT CITE
43
October 2008
1
2
3
4
5
6
7
8
9
10
11
12
13
14
15
16
17
18
19
20
21
22
23
24
25
26
27
28
Check lamp voltage – adjust as needed
Lessons learned:
“Lamp driver voltage can be continuously monitored and displayed by
a data logger, eliminating the need for a multimeter.” (Miller, 2008a)
Procedure for auditing the UV lamp adjustment potentiometer
(ARA, 2003b; Tekran, 2006c)
(this method is an alternative to checking the analog output voltage at
the back of the 2537)
Step 1.
Step 2.
Ensure the 2537 instrument has been in RUN mode for at
least 30 minutes prior to testing the lamp adjustment
potentiometer voltage.
Remove the top panel from the 2537 and locate the lamp
driver board.
Figure 18 – Lamp driver board (ARA, 2003b)
Step 3.
Locate the lamp adjustment potentiometer (on the lamp
driver board) and the two test points: GND (Black) and
LDR (Red).
Lessons learned:
“The LDR check point on the lamp stabilizer circuit board is not located
as shown on some older Tekran models.” (Dalziel, 2008)
DRAFT – DO NOT CITE
44
October 2008
1
2
3
4
5
6
7
8
9
10
11
12
13
14
15
16
17
18
19
20
21
22
23
24
25
26
27
28
Figure 19 – Lamp adjustment potentiometer (ARA, 2003b)
Step 4.
Step 5.
Set the multimeter tool to read DC volts and attach this
multimeter to the two test points, GND and LDR, on the
lamp driver board.
The voltage on the multimeter tool should read between 912 VDC for older lamps and approximately 7 VDC for new
lamps.
Lessons learned:
“Why does this procedure have to be performed bi-weekly? It could be
more appropriate to use the analog output located at the back of the
2537A to monitor the lamp voltage.” (Poissant, 2008)
“I prefer to have the LDR and GND voltage available on the rear panel.
I installed 2 banana plugs just below the chart output on the
instrument rear panel. That way you do not have to remove the
instrument cover.
Tekran has a problem with the 2537B lamp driver. The lamp is driven
near its maximum and if it is also physically optimized the lamp circuit
has a problem because as it increases the voltage the lamp output
decreases. Tekran said there may be a hardware fix available by the
end of this week. If you have this problem, you will not be able to
adjust the LDR low enough for example: (<10.5 v)” (Felton, 2008).*
DRAFT – DO NOT CITE
45
October 2008
1
2
3
4
5
6
7
8
9
10
11
12
13
14
15
16
17
18
19
20
21
22
23
24
25
26
27
28
Procedure for adjusting the UV lamp adjustment potentiometer
(ARA, 2003b; Tekran, 2006c)
Step 1.
Step 2.
Step 3.
Ensure the 2537 instrument has been in RUN mode for at
least 30 minutes prior to testing the lamp detector voltage.
Remove the top panel from the 2537 and locate the lamp
stabilizer (L/S) circuit board (see Figure 20).
Locate the lamp adjustment potentiometer (on the lamp
driver board) and the two test points: GND (Black) and
LDR (Red).
Figure 20 – Lamp adjustment potentiometer (ARA, 2003b)
Step 4.
Step 5.
Step 6.
Set the multimeter tool to read DC volts and attach this
multimeter to the two test points, GND and LDR, on the
lamp driver board.
Use a precision flat-head screwdriver to adjust the lamp
voltage by turning the lamp adjustment potentiometer. For
new lamps the voltage should be set to 7 VDC. For older
lamps the voltage should be set to 9 VDC.
Check and adjust the front panel OFFSET control if
required to ensure that the baseline is positive. (The
instrument must continue to be in RUN mode to do this.)
Change the LED display on the 2537 to RUN.CURRENT by
using the < and > buttons. The detector voltage
(displayed on the right-hand side of the LED display)
should be between 0.09 and 0.11 VDC (Holsen & Choi,
DRAFT – DO NOT CITE
46
October 2008
1
2
3
4
5
6
7
8
9
10
11
12
13
14
15
16
17
18
19
20
21
22
23
24
25
26
27
Step 7.
2008; Olson, 2008), if the voltage is not within this range,
then the front panel OFFSET adjustment is necessary.*
“Don’t make adjustments when the instrument indicates
“HEATING”, “PEAKDLY”, or “Baseline” cycles, as you won’t
be setting on the baseline, you will be setting on a peak.”*
(Miller, 2008b; Olson, 2008)
Unlock the OFFSET adjustment knob (located on the front
face of the 2537 unit – see Figure 21) and turn the knob
clockwise to increase the UV lamp detector voltage.
Figure 21 – Tekran® ambient Hg vapor analyzer – the red circle
indicates the offset adjustment knob (Tekran, 2006c)
Lessons learned:
“I have found when required to adjust the baseline voltage, I find it
easier to keep the Offset adjustment knob locked while adjusting the
voltage. This makes it much easier to make gradual and fine
adjustments to the baseline voltage.” (Dalziel, 2008)
“I have noted on occasion with new and older Tekrans, adjusting the
lamp voltage with the lamp intensity adjustment screw at times does
not produce a voltage effect to the lamp…and by toggling the Lamp
Mode Switch from Auto to Fixed and back to Auto will solve this issue.”
(Dalziel, 2008)
28
29
DRAFT – DO NOT CITE
47
October 2008
1
2
3
4
6.5
Monthly equipment maintenance and QA checks
Table 6.5.1 Monthly in-lab equipment maintenance
Monthly in-lab equipment maintenance
Action required:
1. Maintenance
Maintenance
1. Install new sample filter for 2537
required:
(Holsen & Choi, 2008)
2. Install new zero air filter for 2537
(Holsen & Choi, 2008)
Consumables
1. New zero air filter for 2537
required:
2. New sample filter for 2537
3. HCl or nitric acid*
4. 18.2 MΩ cm-resistivity water
5. Laboratory-grade methanol
Tools required:
1. Nitrile (or similar) gloves
2. Teflon-coated tweezers
3. Two green filter wrenches
4. Pair of adjustable wrenches
5
6
7
8
9
Table 6.5.2 Monthly on-site equipment maintenance and QA checks
Monthly on-site equipment maintenance and QA checks
Action required:
1. Work through operator monthly data
checklist
2. Maintenance
Maintenance
1. Confirm inlet volumetric flow rate is
required:
between 8.0 and 11.0 L/min*
Consumables
1. None
required:
Tools required:
1. Nitrile (or similar) gloves
2. Pair of adjustable wrenches
3. Two green filter wrenches
4. Bios®, Gilibrator®, or equivalent
mass flowmeter
10
11
12
13
14
15
Every month, the operator should complete an operator monthly data
checklist and perform all of the required scheduled maintenance listed
in the monthly scheduled maintenance protocol. This checklist provides
a more in-depth examination of the ambient mercury monitoring
system to ensure that there aren’t any obvious mechanical faults. The
DRAFT – DO NOT CITE
48
October 2008
1
2
3
4
5
6
7
8
9
10
11
12
13
14
15
16
17
18
19
20
21
22
23
24
25
monthly scheduled maintenance protocol is detailed in such a way that
an operator knows which components need to be changed out, which
consumables are necessary to be replaced, and which tools are
necessary to perform these actions. Nitrile, latex, vinyl, or chloroprene
gloves should always be worn when touching any of the Tekran
equipment.
6.5.1
Monthly in-lab equipment maintenance
Install new 2537 Teflon sample filter and clean housing (ARA,
2003d)
Step 1.
Step 2.
Step 3.
Step 4.
Turn off the 2537 to ensure that the fan is not blowing
dust/carbon from the pump brushes. (Miller, 2008a)
Identify the “Sample Inlet” filter pack housing.
Pull up on the sample filter pack housing to remove it from
the green holders. Next loosen the Teflon nuts from the
inlet and outlet of the filter housing with an adjustable
wrench.
With one of the green filter wrenches, grasp the inlet of
the filter housing (top, clear portion) and loosen the filter
housing with another green filter wrench.
26
DRAFT – DO NOT CITE
49
October 2008
1
2
3
4
5
6
7
8
9
10
11
12
13
14
15
16
17
18
19
20
21
22
23
24
25
26
27
28
29
30
31
32
33
34
35
36
37
38
39
40
41
42
43
Figure 22 – Rear face of the Tekran 2537 ambient mercury vapor
analyzer (ARA, 2003d)
Step 5.
Step 6.
Step 7.
Step 8.
When the two halves of the filter housing are separated,
remove the old filter.
Clean the filter housing by rinsing with 1% HCl or 10%
reagent-grade nitric acid, then rinse with 18.2 MΩ cmresistivity water, and then lastly rinse with laboratorygrade methanol and allow to fully dry (Landis et al., 2002).
Using Teflon-coated tweezers, install a new 1 µm Teflon
filter, ensuring that the smooth Teflon side faces up and
the fibrous backing side is down.
Close the filter housing by hand before using green filter
wrenches to seal the filter housing. Tighten the Teflon
tubing loosened during the filter change out.
Lessons learned:
“I replace the whole cartridge with a new one and would never change
it in place due to potential contamination. I like to have spare
equipment that I slap in place then re-clean the used stuff and vacuum
seal the parts.” (Olson, 2008)
“Changing the filter in the shelter is OK. But please turn off the
instrument first so the fan is not blowing dust/ carbon from the pump
brushes around the area as you change the filter. A better solution is
to have pre-packed filter housings in the lab and change the whole
housing out.” (Miller, 2008a)
*
Install new 2537 zero air filter and clean housing (ARA, 2003c)
Step 1.
Step 2.
Step 3.
Step 4.
Step 5.
Identify the “Zero Air Inlet” filter pack housing.*
Pull up on the sample filter pack housing to remove it from
the green holders. Next loosen the Teflon nuts from the
inlet and outlet of the filter housing with an adjustable
wrench.
With one of the green filter wrenches, grasp the inlet of
the filter housing (top, clear portion) and loosen the filter
housing with another green filter wrench (see Figure 22)
When the two halves of the filter housing are separated,
remove the old filter.
Clean the filter housing by rinsing with 1% HCl or 10%
reagent-grade nitric acid, then rinse with 18.2 MΩ cm-
DRAFT – DO NOT CITE
50
October 2008
1
2
3
4
5
6
7
8
9
10
11
12
13
14
15
16
17
18
19
20
21
22
23
24
25
26
27
28
29
30
31
32
33
34
35
36
37
38
39
40
41
42
43
Step 6.
Step 7.
Step 8.
resistivity water, and then lastly rinse with laboratorygrade methanol and allow to fully dry (Landis et al., 2002).
Using Teflon-coated tweezers, install a new 1 µm Teflon
filter, ensuring that the smooth Teflon side faces up and
the fibrous backing side is down.
Close the filter housing by hand before using green filter
wrenches to seal the filter housing. Tighten the Teflon
tubing loosened during the filter change out.
Turn the 2537 back on.
Lessons learned:
“I replace the whole cartridge with a new one and would never change
it in place due to potential contamination. I like to have spare
equipment that I slap in place then re-clean the used stuff and vacuum
seal the parts.” (Olson, 2008)
“Changing the filter in the shelter is OK. But please turn off the
instrument first so the fan is not blowing dust/ carbon from the pump
brushes around the area as you change the filter. A better solution is
to have pre-packed filter housings in the lab and change the whole
housing out.” (Miller, 2008a)
*
Monthly QA checks
Confirm inlet volumetric flow rate is between 8.0 – 11.0 L/min
(Miller, 2008a; Tekran, 2006a)
Step 1.
Step 2.
Step 3.
Check the 2537 unit’s operating mode.
If the 2537 is operating in Hg (0) mode, then depress the
‘ESC’ button in rapid succession, then depress ‘ESC’ once
more to put the 2537 into IDLE mode. If the 2537 is not in
Hg (0) mode, wait until it goes into Hg (0) mode before
putting it into IDLE mode (Miller, 2008b).*
Connect the mass flowmeter (e.g., Gilibrator®, Bios®,
etc) to the impactor inlet fitting of the Tekran® model
1130.
Lessons learned:
“Gil. flow meter is not easy to use outside due to weather conditions:
wind, rain, and solar radiation.” (Poissant, 2008)
Step 4.
Flip the PUMP FLOW switch to the ‘SAMPLE’ position.
DRAFT – DO NOT CITE
51
October 2008
1
2
3
4
5
6
7
8
9
10
11
12
13
14
15
16
17
18
19
20
21
22
23
24
25
26
27
28
29
30
31
32
Step 5.
Step 6.
Flip the ZERO AIR switch to the ‘OFF’ position.
Turn on the “PUMP” switch on the 1130 pump module
(Miller, 2008b).
Figure 23 – Tekran model 1130 pump unit (Tekran, 2006a)
Step 7.
Step 8.
Record the mass flowmeter’s gauge reading and enter it
into the site-operations log.
Confirm inlet volumetric flow rate is between 8.0 – 11.0
L/min (Miller, 2008b).
Lessons learned:
“To be complete or if out of spec, record the temp and pressure”
(Felton, 2008).
Step 9.
If the volumetric flow rate is not between 8.0 – 11.0
L/min, adjust the sample flow set point potentiometer
accordingly (Miller, 2008b).
Step 10. IMPORTANT - Reset the scale factors to adjust for the new
flow setting (see Table A-2 in the Appendix).
Lessons learned:
“You might be able to locate your flow meter inside the shelter and use
the dedicated zero (leak-check) line connected to the inlet for the flow
rate test. I want to try this, as we cannot successfully use our flow
meter outside during harsh winter conditions. If this doesn’t work,
then we might need to relax the requirement for system flow-rate
check during harsh/winter weather.” (Miller, 2008a)*
DRAFT – DO NOT CITE
52
October 2008
1
2
3
4
5
6
7
8
6.6
Four to six-week equipment maintenance and QA checks
Table 6.6.1 Four to six-week on-site equipment maintenance and QA
checks
Six-week in-lab equipment maintenance
Action required:
1. Maintenance
Maintenance
1. Clean and repack the RPF [model
required:
1135]
2. Trace-clean the RPF 3/8” to ¼” Teflon
elbow fitting and Teflon tubing (Luke,
2008)
1. New 20.6 µm quartz filter for RPF
Consumables
required:
2. Quartz wool
3. Laboratory-grade methanol
4. 18.2 MΩ cm-resistivity water (DIW)
Tools required:
1. Nitrile (or similar) gloves
2. Lindberg/Blue M, model TF55035
clamshell tube furnace
3. Nichrome wire removal tool
4. Teflon-coated tweezers
9
10
11
12
Table 6.6.2 Six-week on-site equipment maintenance and QA checks
Six-week on-site equipment maintenance and QA checks
Action required:
1. Work through operator six-week data
checklist
2. Maintenance
Maintenance
1. Install new blanked regenerable
required:
particulate filter assembly [model
1135]
2. Install trace-clean RPF 3/8” to ¼”
Teflon elbow fitting and Teflon
tubing [model 1135] (Luke, 2008)
3. Rinse Teflon tubing extending from
soda-lime trap to 2537 sample
filter with DIW and methanol
Consumables
1. Nitrile (or similar) gloves
2. New 20.6 µm quartz filter for RPF
required:
DRAFT – DO NOT CITE
53
October 2008
Tools required:
1
2
3
4
5
6
7
8
9
10
11
12
13
14
15
16
17
18
19
20
21
22
23
24
25
26
27
3. Quartz wool
4. Laboratory-grade methanol
1. Nichrome wire removal tool
Nitrile, latex, vinyl, or chloroprene gloves should always be worn when
touching any of the Tekran equipment.
Clean and repack the regenerable particulate filter (RPF)
adapted from (Miller, 2008b; Tekran, 2006b)
Step 1.
Step 2.
Step 3.
Step 4.
Step 5.
Step 6.
Step 7.
Step 8.
If the RPF is already removed from the model 1135, skip
to Step 11.
Always replace the quartz annular denuder before
replacing the RPF.
Check the 2537 unit’s operating mode.
If the 2537 is operating in Hg (0) mode, then depress the
‘ESC’ button in rapid succession, then depress ‘ESC’ once
more to put the 2537 into IDLE mode. If the 2537 is not in
Hg (0) mode, wait until it goes into Hg (0) mode before
putting it into IDLE mode.
Open the 1130 front face and the top door on the 1135.
Inside the 1130, remove the inlet line from the sample
filter and make sure it’s free. (Olson, 2008)
If you use the RPF support bracket, loosen the bracket
thumb screws and remove the RPF support bracket.*
“With the RPF in place, hold down bracket for the
extension tube on the RPF must be set loose before any
adjustment to the fitting holding the RPF to the denuder
GL14-GL18 union.” (Dalziel, 2008)
28
DRAFT – DO NOT CITE
54
October 2008
1
2
3
4
5
6
7
8
9
10
11
12
13
14
15
16
17
18
19
20
21
22
23
24
25
26
27
Figure 24 – RPF mounting bracket screws and Teflon elbow (ARA,
2003c)
Step 9.
Loosen the red nut (on the left side at the top of the 1130
case) that holds the denuder and regenerable particulate
filter (RPF) together.
Figure 25 - Red coupling nut between the denuder and RPF (ARA,
2003a)
Step 10. Pull the RPF and sample line slowly and carefully up and
out of the 1135 case.
Step 11. Use the nichrome wire removal tool to remove the quartz
wool plug from the RPF. Set the old quartz wool plug aside
to use as a size reference for its replacement.
Step 12. Rinse the RPF with deionized water by filling from each
end, swirling, and then dumping it out.
Step 13. Rinse the RPF with methanol by filling from each end,
swirling, and then dumping it out.*
Step 14. If any visible residue remains in the tail, attach moist (or
methanol moistened) quartz wool to wire tool. Carefully
swab the tail. Do not leave any quartz wool remaining
Step 15. Rinse the RPF with deionized water by filling from each
end, swirling, and then dumping it out.
Step 16. Install the nut and ferrule for the elbow fitting on the tail
of the RPF. Wrap 2-3 thicknesses of Teflon tape covering
½ inch from the end of the tail.
DRAFT – DO NOT CITE
55
October 2008
1
2
3
4
5
6
7
8
9
10
11
12
13
14
15
16
17
18
19
20
21
22
23
24
25
26
27
28
29
30
31
32
33
34
35
36
37
38
39
40
41
42
43
Step 17. Test fit the elbow fitting. Adjust the Teflon tape as needed
to get a secure, snug fit. This is a prime location for leaks.
There WILL be a leak if you do not use Teflon tape.
Step 18. Attach the elbow fitting and Teflon tubing. You will use it
to connect to the mercury-free air source.
Step 19. Dry the RPF by purging with mercury-free air for 1 hour.
Step 20. Gently bend a quartz filter disk and fit it through the
opening. Slide the curled disk down the tube. When the
filter reaches the frit, use the tool to unfold the filter.
Insure the filter is centered and flat on the frit. Ensure the
filter seals over the whole frit.
Step 21. Pack a piece of quartz wool (refer to the old piece for size)
so it sits on top of the filter. Pack this reasonably firmly,
but not too firmly.
Step 22. Install the main body of the RPF into the Lindberg/Blue M,
model TF55035 clamshell tube furnace. Attach the
mercury-free air source to tubing attached to the tail. Bake
at 800°C for 30 minutes while pulling mercury-free air
through the RPF tail at a rate of 1.5 liters per minute.*
Step 23. When cool, cap the large end with the yellow or red end
cap. Remove the elbow fitting (leaving the nut and ferrule
on the tail). Wrap the tail end tightly with saran-wrap.
Store in the protective case.
Step 24. Wrap the ends of the elbow-tubing piece with saran wrap
and store in a clean ziploc bag. Label the bag “clean RPF
tail fittings”. Place this bag in the 1135 case with the RPF.
Step 25. Should the need arise for extreme cleaning or changing of
the quartz chips in the pyrolyzer section of the RPF, refer
to the Tekran manual.
Lessons learned:
“Might as well change the Teflon fitting and the tubing on the tail
whenever you change the RPF as these do get scummy and should be
cleaned.” (Miller, 2008a)
Install a new blanked regenerable particulate filter (RPF) (ARA,
2003c; Steffen, 2002b; Tekran, 2006b)
Step 1.
Step 2.
Always replace the quartz annular denuder before
replacing the RPF.
Check the 2537 unit’s operating mode.
DRAFT – DO NOT CITE
56
October 2008
1
2
3
4
5
6
7
8
9
10
11
12
13
14
15
16
17
18
19
20
21
22
Step 3.
Step 4.
Step 5.
Step 6.
Step 7.
If the 2537 is operating in Hg (0) mode, then depress the
‘ESC’ button in rapid succession, then depress ‘ESC’ once
more to put the 2537 into IDLE mode. If the 2537 is not in
Hg (0) mode, wait until it goes into Hg (0) mode before
putting it into IDLE mode.
Open the 1130 front face and the top door on the 1135.
Inside the 1130, remove the inlet line from the sample
filter and make sure it’s free. (Olson, 2008)
If you use the RPF support bracket, loosen the bracket
thumb screws and remove the RPF support bracket.
“With the RPF in place, hold down bracket for the
extension tube on the RPF must be set loose before any
adjustment to the fitting holding the RPF to the denuder
GL14-GL18 union.” (Dalziel, 2008)
Figure 26 – RPF mounting bracket screws and Teflon elbow (ARA,
2003c)
Step 8.
Loosen the red nut (on the left side at the top of the 1130
case) that holds the denuder and regenerable particulate
filter (RPF) together.
DRAFT – DO NOT CITE
57
October 2008
1
2
3
4
5
6
7
8
9
10
11
12
13
14
15
16
17
18
19
20
21
22
23
24
25
26
27
Figure 27 - Red coupling nut between the denuder and RPF (ARA,
2003a)
Step 9.
Step 10.
Step 11.
Step 12.
Step 13.
Pull the RPF and inlet line slowly and carefully up and out
of the 1135 case.
Attach an inlet line to a new RPF and install by slowly and
carefully pushing a new RPF down into the 1135 case.*
Tighten the red nut (on the left side at the top of the 1130
case) that holds the denuder and regenerable particulate
filter (RPF) together.
If you use the RPF support bracket, replace the RPF
support bracket onto the RPF and tighten the support
bracket thumb screws.
Close the 1135 case door.
Lessons learned:
“This is one of the most common places for the system to leak. I do
not tighten this elbow in place, rather I remove the nut and tubing
from the top (inlet) of the 1130 sample filter. Then I remove the
tubing with the RPF. This allows me to rinse the tubing, tighten it
onto the new RPF and install it as one unit. If you try and suggest
people tighten this in place, they’ll either break them or they’ll leak.”
(Olson, 2008)
Regarding the RPF support bracket, “I don’t use this.” (Olson, 2008)
DRAFT – DO NOT CITE
58
October 2008
1
2
3
4
5
6
7
8
9
10
11
12
13
14
15
16
17
18
19
20
21
22
23
24
25
26
27
“Might as well change the Teflon fitting and the tubing on the tail
whenever you change the RPF as these do get scummy and should
be cleaned.” (Miller, 2008a)
Rinse the Teflon tubing extending from soda-lime trap to 2537
sample filter with DIW
Step 1.
Step 2.
Step 3.
Step 4.
Step 5.
Step 6.
6.7
Check the 2537 unit’s operating mode.
If the 2537 is operating in Hg (0) mode, then depress the
‘ESC’ button in rapid succession, then depress ‘ESC’ once
more to put the 2537 into IDLE mode. If the 2537 is not in
Hg (0) mode, wait until it goes into Hg (0) mode before
putting it into IDLE mode.
Disconnect the Teflon tubing between the soda-lime trap
to the 2537 sample filter.
Rinse the Teflon tubing 3 times with 18.2 MΩ cm-resistivity
water.
Rinse the Teflon tubing with laboratory-grade methanol
and allow to fully dry.
Reattach the Teflon tubing and put the 2537 back to RUN
mode.
Quarterly on-site equipment maintenance and QA checks
Table 6.7 Quarterly on-site equipment maintenance and QA checks
Quarterly on-site equipment maintenance and QA checks
Action required:
1. Work through operator quarterly data
checklist
2. Maintenance
Maintenance
1. Audit the mass flowmeter in 2537
required:
2. Audit the mass flowmeter in the 1130
pump module
3. Verify the 2537 internal permeation
tube emission rate by syringe
injection (by site auditor)
4. Check the nichrome gold cartridge
heating coils [model 2537]
5. Check and synchronize the Tekran
clock to NIST source time (Miller,
2008a)
Consumables
1. Tekran 2537 Septa
DRAFT – DO NOT CITE
59
October 2008
required:
Tools required:
1
2
3
4
5
6
7
8
9
10
11
12
13
14
15
16
17
18
19
20
21
22
23
24
25
26
27
28
29
30
31
32
33
1. Nitrile (or similar) gloves
2. Bios®, Gilibrator®, or equivalent mass
flowmeter
3. Tekran 2505 Mercury Vapor Calibration
Unit
4. Thermocouple or multimeter to test
the nichrome gold cartridge
heating coils
Nitrile, latex, vinyl, or chloroprene gloves should always be worn when
touching any of the Tekran equipment.
Audit the mass flowmeter in the 2537 (Tekran, 2006a)
Step 1.
Step 2.
Step 3.
Step 4.
Check the 2537 unit’s operating mode.
If the 2537 is operating in Hg (0) mode, then depress the
‘ESC’ button in rapid succession, then depress ‘ESC’ once
more to put the 2537 into IDLE mode. If the 2537 is not in
Hg (0) mode, wait until it goes into Hg (0) mode before
putting it into IDLE mode.
Connect the mass flowmeter (e.g., Gilibrator®, Bios®,
etc) to the SAMPLE fitting of the 2537 unit.
Record the mass flowmeter’s gauge reading.
Lessons learned:
“We use a Sierra Instruments mass flow meter to check the 2537A
sample flow and the 1130 pump unit sample flow. Our Sierra
instruments mass flow meter is calibrated to different standard
conditions than the Tekran mass flow meters/controllers (it gets
calibrated annually by Sierra), so I made a little Excel spreadsheet that
uses the ideal gas law to convert the volume flow digital outputs to
mass flow so I can compare the Tekran instruments against my flow
meter. A Bios or something that has temperature and pressure
correction built in could also check the Tekran mass flows. Measuring
volumetric flow through the sample inlet would need to be done with a
Bios or Gillibrator volumetric flow meter.” (Lyman, 2008)
Audit the mass flowmeter in the 1130 pump module (Tekran,
2006a)
Step 1.
Check the 2537 unit’s operating mode.
DRAFT – DO NOT CITE
60
October 2008
1
2
3
4
5
6
7
8
9
10
11
12
13
14
15
16
17
18
19
20
21
22
23
24
25
26
27
28
29
30
Step 2.
Step 3.
Step 4.
Step 5.
If the 2537 is operating in Hg (0) mode, then depress the
‘ESC’ button in rapid succession, then depress ‘ESC’ once
more to put the 2537 into IDLE mode. If the 2537 is not in
Hg (0) mode, wait until it goes into Hg (0) mode before
putting it into IDLE mode.
Connect the mass flowmeter (e.g., Gilibrator®, Bios®,
etc) to the VENT fitting of the 1130 pump module.
Flip the PUMP FLOW switch to the ‘DESORB’ position.
Flip the ZERO AIR switch to the ‘ON’ position.
Figure 28 – Tekran model 1130 pump unit (Tekran, 2006a)
Step 6.
Record the mass flowmeter’s gauge reading.
Verify the 2537 internal permeation tube emission rate by
syringe injection (INL, 2006; Steffen, 2002a)
(Additional expert mercury monitoring feedback in this issue is
necessary to complete this section)
Manual, syringe injections are made with a microliter capacity syringe
(e.g., 25 µL Hamilton® digital syringe) drawing pure gaseous
elemental mercury from a Tekran® model 2505 mercury vapor
primary calibration unit.
Lessons learned:
“Take Calibrator to site and plug it in on trip before audit is to be
performed if possible.“ (Felton, 2008)
DRAFT – DO NOT CITE
61
October 2008
1
2
3
4
5
6
7
8
9
10
11
12
13
14
15
16
17
18
19
20
21
22
23
24
25
26
27
28
29
30
31
32
33
34
35
36
37
38
39
40
41
42
43
“My procedure has not changed from the SOP for CAMNet to which you
refer here. We do change the perm rate when it’s different by more
than 5%.” (Steffen, 2008)
“I have a very [specific] approach to verifying the perm tube. I’ve
learned this by trial and error (mainly error). There a lot of things that
can go wrong during this procedure and it can contaminate the system
for days. Some points below:
Clean 2505 inlet, change septum, allow to stabilize.
Heat/clean syringe needle
Have 2537 stop mark etched in needle
Change 2537 septum after 2 injections and at end of procedure.
I’ve found that injections (2537) during sampling cycle (1130P @ 9
LPM) the system is under vacuum thus the recoveries are a few %
higher.
Once again, you need to be really [specific] and know what you’re
doing not to [mess] things up.”* (Olson, 2008)
Check the nichrome gold cartridge heating coils by color or
temperature
(Additional expert mercury monitoring feedback in this issue is
recommended to complete this section)
Lessons learned:
“That’s pretty much what we do… if they are more than a year old we
usually change them for good measure anyway.” (Steffen, 2008)
*
This can be performed in a number of ways:
1) Using a thermocouple to record the heating coils’
temperature
Lessons learned:
“How? I do this with a dummy trap in the lab but in a 2537? [This is
difficult] – remove traps etc…” (Olson, 2008)
2) Using a multimeter to test the heater coils’ voltage
*
3) Observing the heater coil turn red when heating up
DRAFT – DO NOT CITE
62
October 2008
1
2
3
4
5
6
7
8
9
10
11
12
13
14
15
16
17
18
19
20
21
22
23
24
25
26
27
28
29
30
31
32
33
34
35
36
37
38
39
40
41
42
43
44
Lessons learned:
Regarding option #3, observing the heater coil turn red when heating
up; “That’s what I do” (Olson, 2008)
“At VT99 we are currently using method 3 or method 1 as needed.
This is not a necessary quarterly step in our view. Adequate QA
function and detection of problems with the heaters is achieved by
simply monitoring the SPAN area counts for each channel. The SPAN
area counts should be relatively stable. If there is a sudden or
continued downward drift in the area count, this signals that heaters
may be the problem. When such a signal is observed we would
observe the heaters or replace them as part of our trouble shooting
steps. If the SPAN area counts are stable, there is no problem with
the heaters. So this test is unnecessary on a regular basis. We
replace heater coils once per year, which prevents this type of
problem.” (Miller, 2008b)
Check and synchronize the Tekran clock to the NIST Time
Standard
Step 1.
Double click the clock on the bottom right hand side of
your computer screen. A new window entitled “Date and
Time Properties” appears, click on the “Internet time” tab
and then click on “Update now” – ensure that
“Automatically synchronize with an Internet time server”
has a check mark filled in. This will ensure that your
computer’s clock is synchronized (if an internet connection
is not available at your site, a GPS unit will provide
accurate time).
Step 2.
On the model 2537, navigate through the user screens if
needed to display the Tekran Time.
Step 3.
Note the time difference between the Tekran and the
computer clock (set to NIST time) and record this
difference in the site operations log.
Step 4.
Idle the 2537A and navigate to the SETUP
TIME screen.
Step 5.
Keeping in mind that the NIST time display may be in
DAYLIGHT SAVINGS TIME (when appropriate), note the
time of the upcoming hour and minute in eastern
DRAFT – DO NOT CITE
63
CLK
SET
October 2008
1
2
3
4
5
6
7
8
9
10
11
12
13
14
15
16
17
18
19
20
21
22
23
24
25
26
standard time (as appropriate to your site) that will occur
at the top of the next minute. Example, if the current
NIST time is 13:22:07, then the next “top of the minute”
would be 13:23:00. If the NIST source is displaying in
DAYLIGHT TIME, then subtract one hour from the
displayed hour.
Step 6.
Enter this 4-digit time value into the Tekran – but don’t
hit enter yet. Following the above example, you would
be entering 1323 into the Tekran. Note you need to have
at least 15-20 seconds before the top of the next minute
to have enough time to complete this step.
Step 7.
Watching the NIST time display on the computer, count
down the seconds to the top of the minute “55, 56, 57, …”.
When the count reaches “59”, hit the ENTER key on the
Tekran. The Tekran is now synchronized to NIST Time.
6.8
Six month on-site equipment maintenance and QA checks
Table 6.8 Six month on-site equipment maintenance and QA checks
Six month on-site equipment maintenance and QA checks
Action required:
1. Work through operator six month data
checklist
2. Maintenance
Maintenance
1. Rinse or install new, trace-clean Teflon
required:
tubing at key locations in the 1130
pump module and/or prior to the
heated line (Miller, 2008a)
2. Change both of the 1130 pump unit
zero air carbon canisters and DFU
filters
3. Monitor the instrument shelter air for
possible indoor Hg sources (Miller,
2008a; Steffen, 2008)
Consumables
1. A pair of zero air carbon canisters and
required:
DFU filters
2. Teflon tubing
DRAFT – DO NOT CITE
64
October 2008
Tools required:
1
2
3
4
5
6
7
8
9
10
11
12
13
14
15
16
17
18
19
20
21
22
23
24
25
26
27
28
29
30
31
32
33
34
35
36
37
38
39
40
1.
2.
3.
4.
Nitrile (or similar) gloves
Pair of adjustable wrenches
Snips or scissors to cut wire-ties
Kimwipes
Nitrile, latex, vinyl, or chloroprene gloves should always be worn when
touching any of the Tekran equipment.
Rinse or install new, trace-clean Teflon tubing at key locations
in the 1130 pump module and/or prior to the heated line
(Miller, 2008a)
Step 1.
Step 2.
Step 3.
Step 4.
Step 5.
Turn off the Tekran model 1130 pump unit.
Remove the top cover from the 1130 pump unit.
Visually inspect the Teflon tubing inside the 1130 pump
unit. If any tubing looks dirty, replace it or rinse it with
18.2 MΩ cm-resistivity water, then rinse with laboratorygrade methanol to assist drying.
Replace the top cover on the 1130 pump unit.
Repeat the visual inspection for Teflon tubing prior to the
heated line.
Change both of the 1130 pump unit zero air carbon canisters
and DFU filters
Step
Step
Step
Step
Step
Step
Step
Step
Step
Step
1.
2.
3.
4.
Turn off the Tekran model 1130 pump unit.
Remove the top cover from the 1130 pump unit.
Cut the wire-ties holding the carbon cartridges in place.
Use adjustable wrenches to loosen the nuts at the ends of
each of the zero air carbon canisters.
5.
Then loosen the nuts connecting the DFU filters to the
Teflon tubing.
6.
Completely remove the zero air carbon canisters and DFU
filters from the Tekran model 1130 pump unit.
7.
Wipe up the carbon dust from the inside of the case using
a damp Kimwipe. The carbon dust comes from the wear of
the pump brushes. Dry the case with a dry Kimwipe.
Change your gloves.
8.
If there is visible carbon deposit in the tubing, change the
tubing and nylon fittings.
9.
Install new 1130 pump unit zero air carbon canisters and
DFU filters.
10. Hand-tighten the end nuts of each of the DFU filters and
zero air carbon canisters.
DRAFT – DO NOT CITE
65
October 2008
1
2
3
4
5
6
7
8
9
10
11
12
13
14
15
16
17
18
19
20
21
22
23
24
25
26
27
28
29
30
31
Step 11. Tighten the end nuts of each of the DFU filters and zero air
carbon canisters with adjustable wrenches.
Step 12. Secure the canisters with wire-ties.
Step 13. Replace the cover and restore power to the pump module.
Lessons learned:
“Clean the carbon dust out of the 1130 box while the cartridges are
out. Use a damp kimwipe. Clean or change the tubing.” (Miller,
2008a)
Monitor the instrument shelter air – check for possible indoor
Hg sources (Miller, 2008a; Steffen, 2008) – see Section 4.2.5.1
Step 1.
Step 2.
Step 3.
Disconnect the 2537 sample line from the sample 1130 &
1135 train.
Operate the 2537 in RUN mode and observe the Hg (0)
values – record any irregularities.
Reconnect the 2537 sample line to the 1130 & 1135 train.
Lessons Learned:
“What we have done in the past is to use the 2537 to test the indoor
air because we decide to move to a site. We run it for a while at
different spots inside and out. Testing the air coming around doors
and windows from the outside in order to not have the indoor air
contaminate the outdoor air. For RGM/PHg contamination …you’d
have to run it the same way I’d imagine.” (Steffen, 2008)
6.9
Annual on-site equipment maintenance and QA checks
Table 6.9 Annual on-site equipment maintenance and QA checks
Annual on-site equipment maintenance and QA checks
Action required:
1. Work through operator annual data
checklist
2. Maintenance
Maintenance
1. Replace the nichrome gold cartridge
required:
heating coils [model 2537]
2. Install new 2537 zero air canister and
DFU filter
3. Rinse or install new Teflon tubing at
key locations between the 2537
and 1130 including the heated line
DRAFT – DO NOT CITE
66
October 2008
Consumables
required:
Tools required:
1
2
3
4
5
6
7
8
9
10
11
12
13
4. Replace GL14-GL18 union fitting
between denuder and RPF [model
1130]
5. Verify the 2537 internal mercury
permeation tube emission rate by
independent QA audit technician
6. Service the 1102 dryer or other zero
air system (Felton, 2008)
7. Replace 1130 diaphragm and brushes
[1130 pump module] (Olson,
2008)
1. Nichrome gold cartridge heating coils
[model 2537]
2. Zero air canister and DFU filter [model
2537]
3. Teflon 3/8” to ¼” reducing union fitting
on the end of the RPF tail [model
1135]
4. Teflon ¼” tubing – between 2537 and
1130
5. GL14-GL18 union fitting between
denuder and RPF [model 1130]
6. 1130 pump diaphragm and brushes
1. Nitrile (or similar) gloves
2. Pair of adjustable wrenches
3. Two pieces of 5” long Teflon ¼” tubing
or stainless steel
4. Flat-head screwdriver
5. Phillips screwdriver
6. Pliers
Nitrile, latex, vinyl, or chloroprene gloves should always be worn when
touching any of the Tekran equipment.
Lessons learned:
Regarding the nichrome gold cartridge heating coils, “I’ve never had
these go bad – yet. It’s the 1135 Heater that puke all the time.”
(Olson, 2008)
Replace the nichrome gold cartridge heating coils (Tekran,
2006c)
DRAFT – DO NOT CITE
67
October 2008
1
2
3
4
5
6
7
8
9
10
11
12
13
14
15
16
17
18
19
20
21
22
23
24
25
26
This method is thoroughly detailed in the Tekran® model 2537 user’s
manual.
Figure 29 – Valve assembly within the Tekran® model 2537 (Tekran,
2006c)
Replacing the nichrome gold cartridge heating coils can be performed
by following the Tekran® user’s manual (Tekran, 2006c):
“Installation Procedure
Current heaters are wound more tightly than original heaters, allowing
faster heat transfer into the cartridge. This tighter fit requires extra
caution to prevent cartridge breakage !
1) Turn off and unplug instrument. Remove top cover and valve
assembly cover.
2) Remove both cartridges as per instructions in your User Manual. If
the old heaters are tight, use a counter-clockwise rotation to assist
removal of the cartridges from the heaters. (This direction of
rotation serves to temporarily unwind (relax) the heater.)
3) Remove the two screws in the ceramic terminal block that secure
each heater. Remove old heaters.
4) Thread the two 1/4" tubes into the new heaters. These tubes will be
used to help align the new heaters. DO NOT use glass cartridges
for this purpose. They will break.
DRAFT – DO NOT CITE
68
October 2008
1
2
3
4
5
6
7
8
9
10
11
12
13
14
15
16
17
18
19
20
21
22
23
24
25
26
27
28
29
30
31
32
33
34
35
36
37
38
39
40
41
42
43
44
5) Attach the new heaters, taking care to align the leads the same as
the pair just removed. Tighten the ceramic block mounting screws
tightly. Use pliers to bend the heater leads so that the tubes are
aligned with the rear valve assembly fittings and can slide into
these fittings without undue lateral force. Spread heaters coils
slightly to ensure that adjacent turns do not short together.
6) Temporarily attach the front valve assembly to the two tubes.
Continue using pliers to adjust the heater leads so that the heaters
are aligned with the front and rear assemblies. This will minimize
sideways forces on the cartridges.
7) Remove the tubes. Reinstall your cartridges. Gently screw them
into the heaters using a counter-clockwise rotation. Install the front
(downstream) valve assembly. If steps 4 through 6 above were
properly done, there should be very little lateral stress imposed on
the cartridges during this operation.
8) Tighten all fittings. Apply power to the instrument and start RUN
mode. Check that the heaters are operating properly. (They should
glow red towards the end of each heating operation.)* Check for
cold spots which indicate that adjacent coils are touching. If so,
wait until the heater cools, then use a small screwdriver to separate
the shorted turns.
9) Reinstall all covers. Let the instrument run for several hours to
allow it to condition.” (Tekran, 2006c)
Install new 2537 zero air canister and DFU filter
Step 1.
Step 2.
Step 3.
Step 4.
Step 5.
Step 6.
Step 7.
Check the 2537 unit’s operating mode.
If the 2537 is operating in Hg (0) mode, then depress the
‘ESC’ button in rapid succession, then depress ‘ESC’ once
more to put the 2537 into IDLE mode. If the 2537 is not in
Hg (0) mode, wait until it goes into Hg (0) mode before
putting it into IDLE mode.
Use adjustable wrenches to loosen the nuts at the ends of
each of the zero air carbon canisters.
Then loosen the nuts connecting the DFU filters to the
Teflon tubing.
Install new zero air carbon canisters and DFU filters.
Hand-tighten the end nuts of each of the DFU filters and
zero air carbon canisters.
Tighten the end nuts of each of the DFU filters and zero air
carbon canisters with adjustable wrenches.
*
DRAFT – DO NOT CITE
69
October 2008
1
2
3
4
5
6
7
8
9
10
11
12
13
14
15
16
17
18
19
20
21
22
23
24
25
26
27
28
29
30
31
32
33
34
35
36
37
38
39
40
41
42
43
44
Rinse or install new Teflon tubing at key locations between the
2537 and 1130 in the heat line adapted from (Miller, 2008b)
(further feedback on this issue is encouraged)
Step 1.
Step 2.
Step 3.
Step 4.
Step 5.
Step 6.
Step 7.
Inspect the Teflon tubing ends of the heated line between
the 2537 and 1130 units. Trim back the ends only if
needed to solve a leak problem.
Replace other Teflon tubing in the system that is in poor
condition due to age and normal wear.
Disconnect the heated sample line from the sample
line filter in the 1130 sampling head and from the
inlet of the soda-lime trap. Rinse the heated sample
line once with deionized water. Make sure you have a
suitable receptacle to catch the rinse as it comes
through the line. Two people are almost essential for
this operation. Do not rinse the zero air line unless you
have an obvious contamination problem (e.g. iodine
spewed from the iodized activated-carbon cartridges).
Only if the sample line is judged to be contaminated rinse
the sample line with methanol.
Ensure all liquid has been drained from the sample line.
Dry the sample line by plumbing the zero air line into the
sample line and running mercury-free air through the line
for an hour. Some moisture may be ejected from the line
initially, so be sure you still have a catch vessel at the
outlet.
Reconnect all lines.
*
Lessons learned:
“I clean this along with heated sample line annually” (Olson, 2008).
“If the flushes are good, you don’t expect a contamination problem in
the sampling line. You could use 10% HCl for one week in the tube to
remove contamination, followed by Milli-Q water rinse” (Poissant,
2008).
“We have only done this once in 5 years and it’s not part of our
procedure. The main reason for me is that I need to be able to take
the line down in a time when it’s not totally frozen and I don’t have
access to the site during those times of the year. So, that may just be
my problem…I’d like to hear from others the effectiveness of this.
Depending on the site location this could be a total pain in the butt.
DRAFT – DO NOT CITE
70
October 2008
1
2
3
4
5
6
7
8
9
10
11
12
13
14
15
16
17
18
19
20
21
22
23
24
25
26
27
28
29
30
31
32
33
34
35
36
37
38
39
40
41
42
43
44
But then I think I probably have one of the more challenging sites (the
high Arctic) and so I am always thinking in those terms.” (Steffen,
2008)
“This service is best and most efficiently performed prior to a biweekly denuder change with additional quarterly maintenance. The
sample line should be cleaned prior to changing the denuder/1130
filters and the 2537A inlet soda lime trap. The sample line should also
be cleaned prior to changing filters on the back of the 2537A. This
service item may not be necessary in all years. The site-PI will decide
if this service item is required in any given year. The rational for this
decision will be recorded in the site operations log. This service item
may be performed “as needed” to deal with any potential line
contamination problem that might arise.” (Miller, 2008b)
Replace the GL14-GL18 union fitting between the denuder and
RPF
Step 1.
Step 2.
Step 3.
Step 4.
Step 5.
Check the 2537 unit’s operating mode. If the 2537 is
operating in Hg (0) mode (neither desorbing, nor
calibrating), then depress the ‘ESC’ button in rapid
succession, and then depress ‘ESC’ once more to put the
2537 into IDLE mode. If the 2537 is not in Hg (0) mode,
wait until it goes into Hg (0) mode before putting it into
IDLE mode (Miller, 2008b).
Open the 1130 case. Turn off the power so the case heater
turns off. Be careful not to burn yourself or melt
tubing by contacting the case heater element (Miller,
2008b).
Loosen the GL14-GL18 union fitting that holds the denuder
and regenerable particulate filter (RPF) together. When
loosening the GL14-18 do not allow the RPF to turn. Hold
the top of the RPF. The RPF has to be disconnected from
the bracket and moved up to allow the denuder to move
up enough to go over the pins (Felton, 2008; Poissant,
2008; Steffen, 2008).
Remove the old GL14-GL18 union fitting and replace with a
new GL14-18 union fitting.
Turn on the power in the model 1130 and close the 1130
case door.
Lessons learned:
DRAFT – DO NOT CITE
71
October 2008
1
2
3
4
5
6
7
8
9
10
11
12
13
14
15
16
17
18
19
20
21
22
23
24
25
26
27
28
29
30
31
32
33
34
“Might want to replace the GL14-GL18 fitting (or gaskets) quarterly or
every 6 months as this is a common leak location.” (Miller, 2008a)
*
35
36
37
6.10 As-needed on-site equipment maintenance and QA checks
Verify the 2537 internal permeation tube emission rate by
independent QA audit technician
(Feedback from many different stakeholders should weigh in on the
issue of whether a single network-wide site liaison/QA audit technician
is necessary and what roles this person would fulfill – there seems to
be interest in this)
Lessons learned:
“It could be important to certify the Hg source once a year by an
external source like NIST. Audit on site is difficult to set and really
expensive.” (Poissant, 2008)
“I think that this is a terrific idea!! We did this for CAMNet and found
that the syringes were the biggest source of error between sites so
best if the person brings their own syringe and compares it to that
used at the site. I can’t recall how effective it was to bring the cal unit
from site to site …I’ll have to reread the audit report. In principle I
think this is a MUST!” (Steffen, 2008)
There was discussion of a site liaison/QA audit technician at the
Atmospheric Mercury Best Practices and SOP Workshop held by NADP
in Chicago, IL on Oct 3-4, 2007 (NADP, 2007).
Maintenance on the 1102 or other zero air system (Felton, 2008)
(further discussion is encouraged)
Replace the 1130 pump diaphragm and brushes (Olson, 2008)
(further discussion is encouraged)
Table 6.10 As-needed on-site equipment maintenance and QA checks
As-needed on-site equipment maintenance and QA checks
Action required:
1. Work through operator “As-needed”
data checklist
2. Maintenance
Maintenance
1. Maintain the 2537 pump with needed
DRAFT – DO NOT CITE
72
October 2008
required:
2.
3.
4.
5.
Consumables
required:
Tools required:
1.
2.
3.
4.
1.
2.
3.
4.
5.
6.
7.
1
2
3
4
5
6
7
8
9
10
11
12
13
14
15
16
17
18
19
new parts dependent on model
type (KNF UN89 or KNF N79)
Install new match-pair pure gold
cartridges within the 2537
Clean or install new 2537 Teflon
valves
Replace/clean quartz fluorescence
cell
Replace the 2537 lamp due to age
and poor performance
New pure gold cartridges for the
2537
New Teflon valves for the 2537
New fluorescence cell for the 2537
New UV lamp for the 2537
Nitrile (or similar) gloves
Adjustable wrench
Two pieces of 5” long Teflon ¼”
tubing or stainless steel
Flat-head screwdriver
Phillips screwdriver
Pliers
Allen wrenches (Felton, 2008)
Nitrile, latex, vinyl, or chloroprene gloves should always be worn when
touching any of the Tekran equipment.
Maintain the 2537 pump with needed new parts dependent on
model type (KNF UN89 or KNF N79)
(further discussion is encouraged)
Install new match-pair pure gold cartridges within the 2537
This method is thoroughly detailed in the Tekran® model 2537 user’s
manual (Tekran, 2006c).
“Cartridge Removal and Replacement
Under normal conditions, the cartridges should have an indefinite
lifetime. If improper or unbalanced cartridge operation is suspected,
cleaning or replacement may be required. Note that cartridges are
DRAFT – DO NOT CITE
73
October 2008
1
2
3
4
5
6
7
8
9
10
11
12
13
14
15
16
17
18
19
20
21
22
23
24
25
26
27
28
29
30
31
32
33
34
35
36
37
38
39
40
41
42
43
44
usually replaced in matched pairs. Figure 29 shows the valve
assembly.
1) Turn off and unplug the instrument. Remove the top cover.
2) Remove the four screws that hold the valve assembly cover. Two
are located at the rear of the assembly, and two at the front.
Disconnect the cartridge cooling fan power connector. Pressing the
release latch will allow the connectors to be separated. Remove the
valve assembly cover.
3) Remove the four screws holding the bracket containing the high
temperature cutoff switch. This bracket straddles the top of the
upstream (rear) and downstream (front) valve assemblies. It is not
necessary to disconnect the wires attached to this bracket. It is
sufficient to simply move the bracket to one side. A slot screwdriver
is required for removal.
4) Loosen the four Teflon nuts holding the cartridges in place. Allow
the nuts and ferrules to slide loosely along the cartridge tubes.
5) Loosen the front (downstream) valve bracket mounting screws.
Remove these 4 screws.
6) Gently pull the loose valve assembly towards the front of the
instrument until the front of the cartridges are clear of the fittings.
Lift and tilt the front assembly until the fittings do not obstruct the
cartridges.
7) Mark the front ends and relative positions of the cartridges. Then
remove the cartridges, sliding them forward and out of their heater
coils. Note the order and orientation of the nuts, the (black) gripper
and the (white) ferrules on the fittings when removing them!
8) Either obtain new cartridges or recondition the existing cartridges
using the procedures described below.
9) Slip the new/reconditioned cartridges through the heating coils,
taking care to maintain their original orientation. Slip the Teflon
nuts and ferrules over the rear and front quartz tubes. Ensure that
the various component parts of the fittings are in the correct order
when being reinstalled! Install the new cartridges and heaters.
Caution: The cartridges are fragile. Use care when reconnecting
them.
Note: The cartridges are not reversible! The end with the glass orifice
should always be downstream (towards the front of the instrument).
10) If necessary, centre the heating coils over the gold adsorbent slug
in each cartridge. Gently flex the heating coils and heater power
leads to accomplish this.
DRAFT – DO NOT CITE
74
October 2008
1
2
3
4
5
6
7
8
9
10
11
12
13
14
15
16
17
18
19
20
21
22
23
24
25
26
27
28
29
30
31
32
33
34
35
36
37
38
39
40
41
42
43
Caution: Ensure that adjacent turns of the heater coils do not
touch one another. This will result in a short circuit that will
damage the heater and the drive electronics.
11) Position the front valve assembly and tighten the mounting
screws. Tighten the four 1/4" Teflon nuts hand tight. Tighten an
additional 1/3 turn using a wrench.
Caution: Do not over tighten these fittings. Teflon fittings are
very easy to strip.
12) Reinstall the temperature cutoff switch bracket across the tops of
the large solenoid valves.
13) Run the instrument for a few cycles to ensure proper heater
operation. Each heater should glow red by the end of the heating
time.
14) Always perform a Leak Check of the A and B cartridges after
replacing cartridges.
15) Replace the valve assembly cover. Reconnect the fan and replace
and tighten the thumb screws.
16) Replace the top cover.” (Tekran, 2006c)
Clean or install new 2537 Teflon valves
(Additional expert mercury monitoring feedback in this issue is
recommended) (also described in the 2537A Tekran operating manual
(Poissant, 2008))
Lessons learned:
Clean the valves with, “10% nitric acid, DI water, methanol, and let
them dry” (Holsen & Choi, 2008).
“We don’t clean them we have just replaced them as required”
(Steffen, 2008).
“You need to be careful with these valves, they’re PFA into FEP which
is really soft material. Do not ever use a wire to clean. Back flush
with DIW and MeOH only. I do this in place but wouldn’t recommend
that as water and electronics do not mix. No I haven’t learned that
the hard way, that’s why I’m still doing them in place.” (Olson, 2008)
DRAFT – DO NOT CITE
75
October 2008
1
2
3
4
5
6
7
8
9
10
11
12
13
14
15
16
17
18
19
20
21
22
23
24
25
26
27
28
29
30
31
32
33
34
35
36
37
38
39
40
41
42
43
“It seems likely based on recent experience that valves will need to be
changed annually for instruments in continuous operation.” (Miller,
2008a)
Replace/clean quartz fluorescence cell
(Additional expert mercury monitoring feedback in this issue is
recommended)
Lessons learned:
“10% nitric acid, DI water, methanol, and let them dry” (Holsen &
Choi, 2008).
“I assume you mean the cuvette. We have generally followed the
Tekran procedure to clean the cells but in all honesty – at the site I
would recommend putting a new one in and take the old one back to
the lab for cleaning and testing…no need to waste time on site.”
(Steffen, 2008)
*
Replace the 2537 lamp due to age and poor performance
This method is thoroughly detailed in the Tekran model 2537 user’s
manual (Tekran, 2006c).
“1) Turn off the instrument. Remove the top and bottom covers. The
instrument should be placed on its side with both the top and
bottom of the instrument accessible. Although this is no longer
applicable for the 2537B (Felton, 2008).
2) On the top of the instrument, loosen the set screw (1/16" Hex
drive) holding the lamp in place. This screw is located on the top
of the lamp housing and is accessible through a hole in the lamp
stabilizer circuit board. Gently pull the lamp from the housing until
it is free. Feed the lamp and cable backwards under and between
the detection cell rubber isolating standoffs until the entire cable is
free. The cable is routed beneath the baseplate through the cutout
located at the front right corner of the plate.
*
3) On the underside of the instrument, locate the lamp driver module.
This is the small black plastic case. Locate and disconnect the six
pin rectangular lamp connector. Although this is no longer
applicable for the 2537B (Felton, 2008).
DRAFT – DO NOT CITE
76
October 2008
1
2
3
4
5
6
7
8
9
10
11
12
13
14
15
16
17
18
19
20
21
22
23
24
25
26
27
4) Feed the old lamp downwards through the base plate cutout until it
is free of the instrument. Discard the old lamp.
5) Route the new lamp (Tekran Part No: 90-25180-01) upwards
through the base plate cutout. Feed the lamp and cable under the
cell, between the rubber isolating standoffs. Place the lamp into
the detector cell housing. Ensure that there is enough free cable
to allow future removal and repositioning of the lamp.
Note: Do not allow your fingers to contact the lamp. If this is not
possible, use methanol to remove any oils or other residue from the
lamp envelope.
6) Route the lamp cable to the lamp driver module. Connect the cable
to the module.
7) Replace the bottom cover and place instrument upright.
8) Perform the Lamp Physical Optimization procedure below.”
(Tekran, 2006c)
*
Lessons learned:
“Note: Lamp needs to be optimized and then de-tuned to provide
enough Dout signal.” (Felton, 2008)
“Never discard old Hg lamp in normal garbage. Special regulation
about hazardous materials.” (Poissant, 2008)
28
29
30
31
32
33
6.11 Audit Schedule
(Expert mercury monitoring feedback in this issue is necessary)
34
35
36
37
38
6.11.1
39
40
6.11.2
“The biweekly, quarterly and annual procedures cover the audit unless
you need an external audit.” (Felton, 2008)
Quarterly
“It would be tough for one person to handle quarterly audit visits.“
(Olson, 2008)
Annually
DRAFT – DO NOT CITE
77
October 2008
1
2
3
4
5
6
7
8
9
10
11
12
13
Lessons learned:
“Semi Annual spiking?
Annually:
Perm source check/adjustment
Flow checks, 2537, 1130P zero and sample mode
2537 and 1130 P annual service – on site training” (Olson, 2008).
14
6.12 Soda Lime Trap and Air Drying
15
16
17
18
19
20
21
22
23
24
25
26
27
28
29
30
31
32
33
34
35
36
37
38
39
40
41
6.12.1
Soda lime
(Additional expert mercury monitoring feedback in this issue is
recommended)
“I would say one initial audit for all sites than the work it so that each
site is audited each 2 years. You can go from site to site within the 2
years so not all sites are audited within the same year but still get
them done.” (Steffen, 2008)
Lessons learned:
“Soda lime is easily contaminated. One supplier (auditor) of packed,
pre-purged soda lime traps that have been tested and vacuum sealed
would be useful.” (Olson, 2008)
“I look for comments on this as well. My experience has been 4-8
mesh. Do not bake it ahead of time and don’t use the indicating
stuff.” (Steffen, 2008)
The soda lime trap was discussed at the Atmospheric Mercury Best
Practices and SOP Workshop held by NADP in Chicago, IL on Oct 3-4,
2007 (NADP, 2007). The following is a summary of this discussion:
“TOPIC 5: Soda Lime (SL) Trap. The goal of this topic was to learn
about current practices and then have a plan for moving forward
regarding soda lime use. This topic has some relevance to Topic 6
“Zero Air System” which will be dealt with separately. Several
important comments were made about SL, they are:
1) Historical Information:
a. SL was chosen early on because it had been very well characterized
in the mercury analytical realm and had already been proven to scrub
acid gases and halide compounds while still passing elemental mercury
quantitatively.
DRAFT – DO NOT CITE
78
October 2008
1
2
3
4
5
6
7
8
9
10
11
12
13
14
15
16
17
18
19
20
21
22
23
24
25
26
27
28
29
30
31
32
33
34
35
36
37
38
39
40
41
b. SL use has been shown to prevent gold-trap passivation due to the
release of deleterious compounds co-captured or formed from the
heating of the denuder and RPF. No passivation is observed in
locations as diverse as Detroit, Chicago, Okinawa and Everglades when
using SL. Gold traps have lasted from 1.5 to 2 years with this
protective SL trap installed.
Lessons learned:
Regarding the gold traps lasting from 1.5 to 2 years, “Unfortunately I
have not had such benefits…” (Steffen, 2008).
c. Without SL, gold cartridge passivation may occur even if the zero air
system is modified to be very dry and lacking any halide release (see
Topic 6 below). Thus, it is critical that we develop a standard SL trap
and protocol for use that works throughout the ambient mercury
network.
*
2) Tekran is willing to provide SL traps that conform to the strict
preparation, packing and date tracking requirements as defined by the
user community. The SL traps will be provided at low cost and
available without delay via Tekran or NADP.
Lessons learned:
“Good idea!!! My experience shows though that the ones from Tekran
are too long and shorter ones, like what Matt recommends, work much
better. No clue as to why ☺” (Steffen, 2008).
3) SL management and observations
a. It should be noted that passivation of gold cartridges is not always
related to the absence of a SL trap. For example, making certain the
nichrome wire heating system is functioning properly to burn off
(clean) the gold cartridges each 5-minute sample is important to avoid
gold cartridge passivation.
b. Proper storage seems to be an important factor. The SL must stay
dry. The SL must not be allowed to absorb mercury from the air in the
storage location.
c. SL should be changed out weekly or possibly every other week since
adsorption of water and CO2 will transform it to other compounds – it
will eventually turn into Ca(OH)2 or CaCO3 and no longer be soda
lime. Removing water from the zero air may also improve SL
longevity.
DRAFT – DO NOT CITE
79
October 2008
1
2
3
4
5
6
7
8
9
10
11
12
13
14
15
16
17
18
19
20
21
22
23
24
25
26
27
28
29
30
31
32
33
34
35
36
37
38
39
40
d. Exposure of SL to high levels of halides (e.g. in mercury + halide
rate experiments) has been shown to ruin the SL ability to pass
elemental mercury quantitatively.
e. Teflon tubes holding SL should be pre-cleaned in acid, rinsed, dried
and packed as needed. Teflon tubes are tossed after one use.
41
42
6.12.2
Air Drying Unit
Tekran (Toronto, ON) Model 1102 Air Drying Unit
Lessons learned:
“We’ve never done that – just pull the tubing from the package and fill
it up. Maybe this can explain why my gold traps don’t last…not that I
think so.“ (Steffen, 2008)
f. Recommend keeping SL in a desiccated box, mercury free air
g. Baked quartz wool was recommended over glass wool.
h. SL Brand: No consensus, but suggest using Mallinckrodt AR 7337
non-indicating, 4-8 mesh (Note Mallinckrodt and JTBaker merged).
i. Most users employ a SL trap and the trap is kept at room
temperature.
SL Consensus: In the near term, all users in the network will use SL
following a standard protocol most closely resembling the one used in
Landis et al., 2002 for type, packing, pre-purge and change frequency.
The performance of the SL traps should be recorded and shared
(ideally in a user forum). It was recommended that one entity should
produce the SL traps for consistency (individual users can still make
their own if desired). Tekran has offered to follow the set protocol,
including pre-purge, made to order, fresh SL, air-tight seal,
documented SL age and “use-by” time stamp. Tekran will offer a very
low-cost tube-only replacement (on-site compression fittings can may
be cleaned and re-used).”(NADP, 2007)
Lessons learned:
“Do not see any reason to toss Teflon tubes for soda lime after each
use. We routinely clean and reuse Teflon filter housings in the system.
This seems wasteful and onerous and is not in our budget. We will
continue to clean and reuse soda lime Teflon tubes until Tekran is able
to provide economical disposable (or recyclable) units. Note
suggested soda lime part number is only available in 15 kg buckets.
Not practical for each site to obtain. This should be centralized
network function to provide pre-purged soda lime traps.” (Miller,
2008a)
DRAFT – DO NOT CITE
80
October 2008
1
2
3
4
5
6
7
8
9
10
11
12
13
14
15
16
17
18
19
20
21
22
23
24
25
26
27
28
29
30
31
32
33
34
35
36
37
38
39
40
41
42
43
(Additional expert mercury monitoring feedback in this issue is
recommended)
Lessons learned:
“These units need to be looked at further. I’ve had several problems
with zero air cans going bad after a month with 1102 drier installed.
Need to determine if the cycle/regeneration set times are sufficient.”
(Olson, 2008)
The air drying unit was discussed at the Atmospheric Mercury Best
Practices and SOP Workshop held by NADP in Chicago, IL on Oct 3-4,
2007 (NADP, 2007). The following is a summary of this discussion:
“TOPIC 6: Zero Air System: There was a good bit of conversation
surrounding the Tekran 1130 pump module, 1102 air dryer and zero
air canisters which make up the “Zero Air System”. There was a high
level of consensus that the proper operation and maintenance of the
zero air system is critical for continuous, high quality mercury
speciation measurements. A summary of the conversation and action
items are listed below.
1) Maintaining very dry zero air has been shown to improve the
performance of the Tekran Speciation System. It is presumed that
providing dry air to the 1130 pump module prevents the release of
halogen compounds from the zero air canisters which may adsorb
on the soda lime trap or the gold cartridges to cause temporary and
transitory low biased elemental mercury values. (Experiment: when
passivation occurs after a denuder desorption cycle, disconnect the
soda lime trap and see if the Tekran recovers immediately – some
have observed this effect).
2) The addition of the Tekran 1102 air dryer has improved overall
performance in the majority of uses as documented in the
questionnaire. However, additional drying after the Tekran 1102 has
been added by many users with even greater overall performance.
Typically the additional drying agent is drierite or similar. Although
some have tried Nafion tubes or external compressors to provide dry
air as worthy alternatives.
Lessons learned:
“We hook up two drierite columns between 1130 pump unit and air
dryer” (Holsen & Choi, 2008).
DRAFT – DO NOT CITE
81
October 2008
1
2
3
4
5
6
7
8
9
10
11
12
13
14
15
16
17
18
19
20
21
22
23
24
25
26
27
28
29
30
31
32
33
34
35
36
37
38
39
40
41
42
43
“In NY we have found that 1 drierite column can be saturated after 2
weeks when installed between the 1102 and the 1130. The second
column remained blue.” (Felton, 2008)
3) According to the questionnaire responses, most users do not
change their zero air canisters on a set schedule. However some
respondents maintain that frequent changing improves performance,
especially with respect to observed passivation. We agreed that the
zero air canisters must be changed at least every 6 months.
4) The use of an activated carbon instead of iodinated carbon in the
second stage zero air canister was postulated as a possible
improvement to avoid the release of halogen compounds. Tekran
briefly offered these canisters, but learned that they did not work as
well. Several scientists offered to order activated carbon canisters and
try them in different ways. Post meeting note: Tekran has installed an
activated carbon canister on their system in Toronto and found again
that it did not provide mercury free air and may actually be releasing
mercury.
Lessons learned:
“I ordered AC cartridges and installed them on the outlet of the 1130P
zero air feed line, downstream of the can was a DFU. In the 1130P
were Iodinated cans. I saw nothing but zeros indicating no
contamination from the non-I cans. This may be a way to reduce the
Iodine into the system but when they go, all cans would be shot and
potentially the internal tubing excessively contaminated with I. Still
need some work in this area.” (Olson, 2008)
5) The questionnaire documented that the Tekran 1102 air drying unit
has been found to be helpful. In comparison to other options
considered for water removal, the 1102 is compact, quiet, modular
and simple to operate. However, in some extreme cases the 1102 has
been found to under perform. It has been suggested that the cycling
time of the 1102 could be adjusted for better performance. It was also
suggested that the molecular sieve in the 1102 will eventually need
replacing. It was also suggested that the addition of a small pump to
supply forced air during the heating cycle of the 1102 would help drive
collected water off of the molecular sieve to improve performance.
Based on the workshop conversation the following set of solutions is
recommended for improved zero air system performance. Prestbo will
coordinate the following:
DRAFT – DO NOT CITE
82
October 2008
1
2
3
4
5
6
7
8
9
10
11
12
13
14
15
16
17
18
19
20
21
22
23
24
25
26
27
28
29
30
31
32
33
34
35
1) Development of an improved Zero Air System (and retrofit if
possible) to include
a. Optimize the heat cycle of the 1102 air dryer, if possible.
b. Determine whether a small pump and switching valves can be
added to the 1102 to provide forced air to drive out water during the
heat cycle. *
c. Determine if an activated carbon canisters plus protective DFU filter
can be used as a final polishing step and still provide high quality zero
air. Coordinate use and information exchange with scientists trying this
approach.
36
37
38
39
40
41
42
6.12.2.1 Alternative Air Drying Methods
(Expert mercury monitoring feedback in this issue is necessary.)
Lessons learned:
“I tried this and it seemed to work.” (Olson, 2008)
d. Develop a refillable canister with indicating molecular sieve to be
used in place of silica gel or drierite as the polishing drying capacity.
Molecular sieve has greater water absorption capacity than silica gel or
drierite.
Lessons learned:
“Dririte is cheap, we use 2 columns in series so the second one always
remains as a polisher.”(Felton, 2008)
e. Develop a retrofit for the 1130 pump module that will allow
plumbing such that multiple drying and mercury removal canisters can
be mounted externally (probably on the 1102 panel) for easy change
out.
f. Develop a final disposable prophylactic sorbent trap containing soda
lime, activated carbon or other compound which will ensure the zero
air is free of halogen or other deleterious compounds, while
maintaining mercury free air. The final prophylactic sorbent trap
should maintain performance for at least 2 weeks in the very dry and
clean zero air stream.” (NADP, 2007)
There was some discussion of Nafion® drying methods at the
Atmospheric Mercury Best Practices and SOP Workshop held by NADP
in Chicago, IL on Oct 3-4, 2007 (NADP, 2007).
DRAFT – DO NOT CITE
83
October 2008
1
2
3
4
5
6
7
7.0 Reagents and Standards
(This portion is included for completeness of this SOP, but may not
necessarily be important to speciated ambient mercury monitoring.
Feedback on this is encouraged.)
8
9
10
7.1
Reagents
“High quality reagents reduce contamination problems” (Poissant,
2008).
11
12
13
7.2
14
15
16
17
8.0 Sample Collection, Preservation and Storage
(This portion is included for completeness of this SOP, but may not
necessarily be important to speciated ambient mercury monitoring.
Feedback on this is encouraged.)
18
19
8.1
*
Sample Collection
20
21
8.2
Sample Preservation
22
23
8.3
Sample Storage
24
25
26
27
28
29
9.0 Quality Control
(Expert mercury monitoring feedback in this issue is necessary)
Standards
“Annual audits by certified tech to ensure data comparability between
sites.” (Olson, 2008)
30
31
9.1
Tekran Performance Checks: Quality Assurance Analysis
32
33
9.2
Tekran Performance Checks: Quality Assurance Performance
Checks
DRAFT – DO NOT CITE
84
October 2008
1
2
3
4
5
6
7
8
9
10
11
12
13
14
15
16
17
18
19
20
21
22
23
24
25
26
27
28
29
30
Specifics regarding quality assurance performance checks were
discussed at the Atmospheric Mercury Best Practices and SOP
Workshop held by NADP in Chicago, IL on Oct 3-4, 2007 (NADP,
2007). The following is a summary of this discussion:
The Tekran 2537 should be programmed for internal calibration using
the internal mercury permeation tube every 72 hours, with a
permeation time of 120 seconds.
The operator should maintain a control chart of the internal mercury
permeation source calibration factor (CF).
The nominal internal mercury permeation source calibration factor
(RespFctr) should be greater than 600,000 (6E5) area units.*
The criterion for an acceptable zero value for internal permeation
source calibration should be less than 0.25 pg – this value will be used
as a warning flag. (“Good to have this value zero.” (Holsen & Choi,
2008; Olson, 2008))
The criterion of an acceptable internal permeation source calibration
factor with respect to the A:B gold cartridge difference should be:
warning level: 0.96 – 1.04 ng/m3 (“Should be shown in SPAN area.
Concentrations not compatible with calibration factor” (Holsen & Choi,
2008))
control level: 0.95 – 1.05 ng/m3 (“Should be shown in SPAN area.
Concentrations not compatible with calibration factor” (Holsen & Choi,
2008))
*
31
32
10.0 Calibration and Standardization
33
34
35
36
10.1 Tekran 2537 Detector Calibration
(Expert mercury monitoring feedback in this issue is necessary)
*
37
38
39
40
10.2 Tekran Performance Checks: Manual Injections or Standard
Additions
(Expert mercury monitoring feedback in this issue is necessary)
DRAFT – DO NOT CITE
85
October 2008
1
2
3
4
5
6
7
8
9
10
11
12
“Control charts, spiked denuders (FGS), Injections in impactor and
2537.” (Olson, 2008)
13
14
15
11.0 Procedure and Equipment Settings
This section details how the operator should set up the automated
mercury monitoring equipment in a network-standardized manner.
16
17
18
19
20
21
11.1 Mercury Speciation and Data Capture
(Expert mercury monitoring feedback in this issue is necessary as well
as NADP input with regards to options for receiving and polling Tekran
data)
22
23
24
12.0 Data Analysis and Calculations
This section details procedures and algorithms to manipulate raw data
to delineate blanks and calculate other critical values.
25
26
27
28
29
30
31
32
33
34
35
36
37
38
39
12.1 Mercury Speciation Data Reduction and Analysis
(Additional expert mercury monitoring feedback in this issue is
recommended)
Lessons learned:
“I have been running a 2537 for 13 years and it’s vital to have the
standard addition unit running to assess the quality of the instrument
functions… From what I understood this was not possible on the
1130/1135…am I wrong. I think we need something like this for the
QAQC – as we do in CAMNet at least to keep up how well the 2537 is
performing. As for standard additions for RGM and PHg…we will need
some standards. Which I think is something we must work forward
on.” (Steffen, 2008)
A speciated data reduction scheme was discussed, developed, and
agreed upon by members attending the Atmospheric Mercury Best
Practices and SOP Workshop held by NADP in Chicago, IL on Oct 3-4,
2007 (NADP, 2007).
*
There have been a number of comments posted to the previous
version of this SOP indicating that atmospheric mercury experts use a
number of different techniques to reduce their data – and most
feedback on the subject indicated that the previously proposed data
reduction scheme is not ideal. Listed below are data and comments to
the previously proposed data reduction routine which include
DRAFT – DO NOT CITE
86
October 2008
1
2
3
4
5
suggestions from a number of atmospheric Hg experts. A newly
proposed data reduction routine is presented here and discussion on
this topic is highly encouraged.
Table 12.1 – Tekran GOM and PBM2.5 Data Reduction Routines
Tekran Desorb
Tekran GOM and PBM2.5 Data
Program
Reduction Routines
Cycle ID
6
7
8
9
Description
Flag
A
B
Flush
Flush
1
1
C
Flush
1
D
E
F
G
H
I
J
K
L
Pyro-Ht
Part-Ht
Part-Ht
Part-Ht
RGM-Ht
RGM-Ht
RGM-Ht2
Cool
Cool
2
2
2
2
3
3
3
1
1
USERID
PBM2.5
Calculation
GOM Calculation
(E+F+G)-3*C
(H+I+J)-3*C
*
10
11
12
13
14
15
16
17
18
13.0 Method Performance
(Expert mercury monitoring feedback in this issue is necessary)
19
20
21
22
23
24
13.1 Method
Lessons learned:
“It is important to characterize routine maintenance, calibration, etc as
“UP TIME” for billing purposes. These are required activities.” (Miller,
2008a)
“We are in the process of summarizing an inlet study that we made in
Alert looking at how much RGM sticks to the inlet. More details will
follow.” (Steffen, 2008)
DRAFT – DO NOT CITE
87
October 2008
1
2
13.2 Precision
3
4
13.3 Bias
*
5
6
13.4 Representativeness
7
8
9
13.5 Detectability
*
10
11
12
13
14
15
16
13.6 Completeness
17
18
19
20
21
22
13.7 Comparability
Lessons learned:
“If I calibrate and lose 1 hour in every 72 that’s 1.5%, then the
servicing every 2 weeks. I think a good goal would be 80%” (Olson,
2008)
Lessons learned:
“Spiked denuders. A collocated unit (WI USGS). Audit Tech.” (Olson,
2008)
23
24
14.0 Troubleshooting
(further discussion is encouraged)
25
14.1 Tekran Analyzer Unit model 2537
26
14.2 Tekran Speciation Unit model 1130
27
14.3 Tekran Speciation Unit model 1130 – pump module
28
14.4 Tekran Particulate Unit model 1135
29
30
14.5 Other
DRAFT – DO NOT CITE
88
October 2008
1
2
3
15.0 Pollution Prevention
4
5
15.1 Pollution
6
7
16.0 Waste Management
8
9
16.1 Waste
DRAFT – DO NOT CITE
89
October 2008
1
2
3
4
5
6
7
8
9
10
11
12
13
14
15
16
17
18
19
20
21
22
23
24
25
26
27
28
29
30
31
32
33
34
35
36
37
38
39
40
41
42
43
44
45
17.0 References
ARA (2003a). Tekran Denuder Changeout. Atmospheric Research & Analysis, Inc,
http://www.atmospheric-research.com/websops/Tekran%20Denuder%20Changeout.htm.
ARA (2003b). Tekran Measure-Adjust Lamp and Detector Voltage. Atmospheric
Research & Analysis, Inc,
http://www.atmospheric-research.com/websops/Tekran%20MeasureAdjust%20%20Lamp%20and%20Detector%20Voltages.htm.
ARA (2003c). Tekran RPF and Zero Filter Changeout. Atmospheric Research &
Analysis, Inc,
http://www.atmosphericresearch.com/websops/Tekran%20RPF%20and%20Zero%20Filter%20Changeout
.htm.
ARA (2003d). Tekran Sample Filter Changeout. Atmospheric Research & Analysis, Inc,
http://www.atmosphericresearch.com/websops/Tekran%20Sample%20Filter%20Changeout.htm.
ARA (2003e). Tekran Soda Lime and Impactor Frit Changeout. Atmospheric Research &
Analysis, Inc,
http://www.atmosphericresearch.com/websops/Tekran%20Soda%20Lime%20and%20Impactor%20Frit%
20Changeout.htm.
Dalziel, J. (2008) Comments on the Draft Standard Operating Procedures for Analysis of
Gaseous and Fine Particulate-Bound Mercury (ed US-EPA).
Felton, D. (2008) Comments on the Draft Standard Operating Procedures for Analysis of
Gaseous and Fine Particulate-Bound Mercury (ed US-EPA).
Holsen, T. & Choi, H.-D. (2008) Comments on the Draft Standard Operating Procedures
for Analysis of Gaseous and Fine Particulate-Bound Mercury (ed US-EPA).
INL (2006). INL Tekran Mercury Measurement System QA/QC Protocol. Idaho National
Laboratory.
Landis, M.S., Stevens, R.K., Shaedlich, F., & Prestbo, E. (2002) Development and
characterization of an annular denuder methodology for the measurement of
divalent inorganic reactive gaseous mercury in ambient air. Environmental
Science and Technology, 36, 3000-3009
Luke, W. (2008) Comments on the Draft Standard Operating Procedures for Analysis of
Gaseous and Fine Particulate-Bound Mercury (ed US-EPA).
Lyman, S. (2008) Comments on the Draft Standard Operating Procedures for Analysis of
Gaseous and Fine Particulate-Bound Mercury (ed US-EPA).
Miller, E. (2008a) Comments on the Draft Standard Operating Procedures for Analysis of
Gaseous and Fine Particulate-Bound Mercury (ed US-EPA).
Miller, E. (2008b). Standard Operating Procedures for Analysis of Gaseous and Fine
Particulate-Bound Mercury at VT99-MTN. Ecosystems Research Group, Ltd. ,
Norwich, VT.
NADP (2007) Atmospheric Mercury Best Practices and SOP Workshop. In Atmospheric
Mercury Best Practices and SOP Workshop (ed E. Prestbo), pp. 1-17, Chicago,
IL.
DRAFT – DO NOT CITE
90
October 2008
1
2
3
4
5
6
7
8
9
10
11
12
13
14
15
16
17
18
19
20
21
22
23
24
25
26
27
28
NOAA (2006). Operator procedures for the NOAA ARL/EPA CAMD Airborne Mercury
Monitoring.
Olson, M. (2008) Comments on the Draft Standard Operating Procedures for Analysis of
Gaseous and Fine Particulate-Bound Mercury (ed US-EPA).
Poissant, L. (2008) Comments on the Draft Standard Operating Procedures for Analysis
of Gaseous and Fine Particulate-Bound Mercury (ed US-EPA).
Prestbo, E. (2008) Comments on the Draft Standard Operating Procedures for Analysis of
Gaseous and Fine Particulate-Bound Mercury (ed US-EPA).
Schroeder, W., Lindqvist, O., Munthe, J., & Xiao, Z. (1992) Volatilization of mercury
from lake surfaces. The Science of The Total Environment, 125, 47-66
Steffen, S. (2002a). Ambient Vapour-Phase Mercury Sampling. CAMNET.
Steffen, S. (2002b). Tekran Mercury Speciation Unit Protocol. CAMNET.
Steffen, S. (2008) Comments on the Draft Standard Operating Procedures for Analysis of
Gaseous and Fine Particulate-Bound Mercury (ed US-EPA).
Swartzendruber, P.C., Jaffe, D.A., Prestbo, E.M., & Weiss-Penzias, P. (2006).
Observations of Ambient Mercury Speciation with the Tekran 2537/1130/1135 at
Mt. Bachelor, Oregon.
Tekran (2006a). Model 1130 Mercury Speciation Unit User Manual, Rep. No. v. 2.02.
Tekran Incorporated, Toronto, ON
Tekran (2006b). Model 1135 Particulate Mercury Unit User Manual, Rep. No. v. 1.20.
Tekran Incorporated, Toronto, ON
Tekran (2006c). Model 2537A Ambient Mercury Vapour Analyzer User Manual, Rep.
No. v. 3.01. Tekran Incorporated, Toronto, ON
US-EPA (2002). Method 1631, Revision E: Mercury in Water by Oxidation, Purge and
Trap, and Cold Vapor Atomic Fluorescence Spectrometry.
DRAFT – DO NOT CITE
91
October 2008
1
2
3
4
5
6
7
8
9
10
11
12
13
14
15
16
17
18
19
20
21
22
23
24
25
26
27
28
29
30
31
32
33
34
35
36
37
38
39
40
41
42
18.0 Acronym Dictionary
AC – activated charcoal
AMDE – atmospheric mercury deposition event
AMN – atmospheric mercury network
CASTNET – clean air status and trends network
CAMNET – Canadian atmospheric mercury network
CVAFS – cold vapor atomic fluorescence spectroscopy
DFU – dry filter unit
DI – deionized
DIW – deionized water
EPA – environmental protection agency
FTP – file transfer protocol
GEM – gaseous elemental mercury
GOM – gaseous oxidized mercury
GPS – global positioning system
MDE – mercury deposition event
MDN – mercury deposition network
MFC – mass flow controller
MFM – mass flowmeter
MSDS – material safety and data sheets
NADP – national atmospheric deposition program
NIST – national institute of standards and technology
NOAA – national oceanic and atmospheric administration
OSHA – office safety and health administration
PBM2.5 – particulate-bound mercury with a 2.5 µm cut-off
PFA - perfluoroalkoxy
PHg – particulate mercury
PTFE - polytetrafluoroethylene
PVC - polyvinyl chloride
QA – quality assurance
QC – quality control
RGM – reactive gaseous mercury
RPF – regenerable particulate filter
SLT – soda lime trap
SOP – standard operating procedure
TGM – total gaseous mercury
UHP – ultra high purity
USGS – United States geological survey
UV – ultraviolet
VAC – volts (alternating current)
VDC – volts (direct current)
DRAFT – DO NOT CITE
92
October 2008
1
2
19.0 Tables, Diagrams, Checklists and QA Worksheets
3
4
19.1 Tables
5
6
7
8
Mercury physical properties
Table A-1 – Mercury physical and chemical properties (Schroeder et
al., 1992)
DRAFT – DO NOT CITE
93
October 2008
1
2 Table A-2 - Tekran model 1130/1135 controller program worksheet
3
DRAFT – DO NOT CITE
94
October 2008
Necessary for Tekran 1135 Necessary for Tekran 1130
Necessary for Tekran
2537A
Comments
1
2
3
4
5
6
7
8
Total
units
Instrument
Model
Part #
UV Analytical lamp, 1"
Gold cartridge, matched pair
Zero Air Canister only
0.2µm, 47 µm part. Filters, 100
Inj. Port septum; 100
Rev 2. Cartridge Heater, pair
QG: 1/4" Nut assembly
1/4-28 nut assemblies. (3)
1/4" tubing (per foot)
Tekran
Tekran
Tekran
Tekran
Tekran
Tekran
Tekran
Tekran
Tekran
90-25180-01
35-25500-00
90-25360-00
90-25102-100
90-25110-100
35-25506-12
30-25105-00
30-25300-03
30-35004-047
Impactor disks; pkg of 10
Teflon: 0.2 µm, 47µm Zero
Filters; pkg of 100
Heated boot
First Stage Iodated Carbon Zero
Filter Canister and DFU Filter
Second Stage Iodated Carbon
Zero Filter Canister and DFU
Filter
Quartz denuder (body only)
Tekran
30-13127-10
1
Tekran
Tekran
90-13110-100
18-13115-00
1
1
Tekran
90-30360-01
2
Tekran
Tekran
90-30360-02
30-13100-00
2
2
Tekran
90-13500-25
1
Tekran
Tekran
90-13510-25
30-13510-00
1
1
Tekran
30-13520-00
1
Tekran
30-13500-00
2
Quartz filter disks for RPF; 0.1
µm, 21 µm dia, pkg of 25. For
1135
Quartz wool RPF fill material; 25
refills. For 1135
GL14-GL18 Union
Teflon 90 Reducing Union 3/8" 1/4" Elbow
Quartz Regenerable Particulate
Filter Assembly (filled)
Have Heater Core on hand!
(Olson, 2008)
1
1
1
1
1
1
1
1
20
Table A-3 – Consumable and parts required to have on hand for
uninterrupted and high quality speciated ambient mercury monitoring
Lessons learned:
“Recommend adding spare pumps for 1130, 2537A and spare V2/V3 to
the suggested consumable parts. Also add soda lime and/or prepurged traps.” (Miller, 2008a)
DRAFT – DO NOT CITE
95
October 2008
1
2
3
4
5
19.2 Diagrams
Figure A-1 - (Tekran, 2006c)
6
DRAFT – DO NOT CITE
96
October 2008
1
2
3
4
5
6
7
8
9
10
11
12
13
Figure A-2 - (Tekran, 2006c)
Figure A-3 - (Tekran, 2006c)
Figure A-4 – Zero air filter and DFU particulate filter for the Tekran
model 2537 unit (Tekran, 2006c)
19.3 Field operator maintenance checklists
DRAFT – DO NOT CITE
97
October 2008
1
2
3
4
5
6
7
8
9
10
11
12
13
14
15
16
17
18
19
20
21
22
23
24
25
26
27
28
29
30
31
32
33
34
35
36
37
38
39
40
41
42
43
19.3.1
Daily checklist
Operator Daily Data Checklist and Upload (NOAA, 2006)
Operator: _______________
Date: _________________
Time: _________________
Site: ____________________
Checks on the Tekran 2537 Monitor
Is the date and time correct?
Y/N
(local standard time/NIST/GPS time)
Is the data being recorded correctly?
Y/N
Record Tekran 2537 Operation Parameters:
Baseline Voltage (0.9 V - 1.1 V (Holsen & Choi, 2008; Olson, 2008))*
Y/N
Baseline Deviation (<0.100 V (Olson, 2008))
Y/N
Status (should be OK, OKF, or NP(Olson, 2008))
Y/N
Volume (should be =5.0 (Olson, 2008))
Y/N
Lessons learned:
“the SOP flags baseline deviation of > 500 mv….I thought in my past
discussions with Tekran, there are serious issues when the baseline
voltage gets above 250 mv…..”(Dalziel, 2008)
“Agreed – the baseline deviation should be less than 0.1 as listed just
above” (Prestbo, 2008)
Zero from Calibration A __________
Zero from Calibration B __________
Span from Calibration A __________RespFctr > 6E5
Span from Calibration B __________
Compare the mean values of the last 4 consecutive elemental mercury
results (Flag 0) from CARTRIDGE A and CARTRIDGE B, to ensure that
there is no bias (should be within 10% of each other)
“This won’t work if concentrations are changing and does not provide
enough statistical power. Often traps can have slight difference of
10% that are very short lived. I think the daily check or whatever we
agreed upon should be the rule and not a few values” (Prestbo, 2008)
DRAFT – DO NOT CITE
98
October 2008
1
2
3
4
5
6
7
8
9
10
11
12
13
14
15
16
17
18
19
20
21
A ________________
B ________________
mean difference = _______
Single Heat Cycle Zero Value (Flag 1) _________________ (pg/m3)
Does the first particulate heat cycle (Flag 2) show a clear peak
response?
Y/N
Does the first denuder heat cycle (Flag 3) show a clear peak response?
Y/N
Has data been commented (valid, invalid, Questionable), graphed and
uploaded? Y/N
Lessons learned:
“The daily check list – I would have the site operator also check the
1110 Tekran dryer …I have had two or three occasions when my unit
was not working …after a power failure ….it is a very quick and easy
thing to check…i.e. Is the unit warm at the top?....” (Dalziel, 2008).
DRAFT – DO NOT CITE
99
October 2008
1
2
3
4
5
6
7
8
9
10
11
12
13
14
15
16
17
18
19
20
21
22
23
24
25
26
27
28
29
30
31
32
33
34
35
36
37
38
39
40
41
42
43
19.3.2
Weekly checklist
Operator Weekly Site Visit (NOAA, 2006)
(roughly 2 hours – observing one complete cycle)
Operator: _______________
Date: _________________
Time: _________________
Site: ____________________
Argon cylinder pressure ____________ psi
Regulator should be set to 50 psi.
Replace argon gas when the pressure in the cylinder is below 300 psi.
Don't switch off unit during a calibration or desorb. Turn instrument
OFF when changing the cylinder. (See Argon Cylinder Safety section)
Lessons learned:
“If you’re fast, no need to shut down instrument. Do it during non
flush or heating…” (Olson, 2008).
“Regarding the regulator setting, “I run all my Tekran instruments @
30.” (Olson, 2008)
Lamp indicator light
If “on” request lamp change
On/Off
Perm indicator light
(should be flashing)
Flashing/Steady/Off
Checks on Pump Unit (yes/no):
Are the four 1130 pump module cycle switches on auto?
Y/N
Are the three 1135 pump module cycle switches on auto?
Y/N
Is the 1130 pump module flow switch set to auto?
Y/N
Does the indicated pump flow rate match the flow set point?
Y/N
Record Tekran 1130/1135 Operation Parameters (Holsen & Choi,
2008; Olson, 2008):
Sampling and analysis (S&A) vs. Desorbtion (Desorb) temperatures:
Denuder temperature: S&A (°C)_
_50 Desorb(°C)_____500
Pyrolysis temperature: S&A (°C)_
_50 Desorb(°C)_____800
Particulate temperature: S&A (°C)_
_50 Desorb(°C)_____800
Sample Line Temperature: S&A (°C)____50
External Heater Temperature: S&A (°C)_
50 Desorb(°C)_____75
Case Temperature 1130: S&A (°C)____38
Case Temperature 1135: S&A (°C)____38
DRAFT – DO NOT CITE
100
October 2008
1
2
3
4
5
Are the heating cycles up to the correct temperatures?
Y/N
Pyrolysis - 800°C; Particulate - 800°C; denuder - 500°C
Inlet visually checked for insects or clogs?
OK/Insects/Clogged
Top of 1102 Air dryer unit warm? Warm/Cold
DRAFT – DO NOT CITE
101
October 2008
19.3.3
1
2
Bi-weekly checklist (Swartzendruber et al., 2006)
Bi-Weekly QA List: Maintenance and Tasks and QC Measurements
3
4
Date
Data
recorded
properly
Change
denuder
Rinse
inlet
Boot
temp.
Lamp
volt.
Change
1130
filters
Change
inlet
glassware
MM/DD/YYYY
y/n
y/n
y/n
~50 C
8-9 V
y/n
12/07/200
7
y
y
y
48
8.5
y
y/n
Inspect
boot
pass/
fail
Inspect
tubing
pass/
fail
y
Pass
Pass
1
19.3.4
Monthly checklist
2
Monthly QA List: Maintenance and Tasks and QC Measurements
Date
MM/DD/YYYY
12/07/2007
3
Change RPF
y/n
y
Confirm Vol.
Flow rate
9-11 L/min
9.5
Comments
[range]
[example]
1
19.3.5
Quarterly checklist
2
Quarterly QA List: Maintenance and Tasks and QC Measurements
Date
MM/DD/YYYY
12/07/2007
Audit
MFM in
2537
y/n
y
Audit
MFM
zero air
in 1130
pump
y/n
y
Verify 2537
by man.
Injection
y/n
y
Check
nichrome
heater coil
y/n
y
Install new
2537 Teflon
sample filter
+ clean
housing
y/n
y
Install new
2537 zero
air filter +
clean
housing
y/n
y
Comment
[range]
[example]
1
2
3
19.3.6
6-Month checklist
6-Month QA List: Maintenance and Tasks and QC Measurements
Date
MM/DD/YYYY
12/07/2007
Change both of the 1130 pump unit zero air carbon
canisters + DFU filters
y/n
y
Comments
[range]
[example]
1
19.3.7
Annual checklist
Annual QA List: Maintenance and Tasks and QC Measurements
Date
MM/DD/YYYY
12/7/2007
2
Replace
heater
coils
y/n
y
Install
2537
zero air
canister
y/n
y
New
Teflon
RPF
elbow +
tubing
y/n
y
Teflon
tubing
other
y/n
y
Rinse/
install
new
tubing
in 1130
pump
Rin/inst
y
Replace
GL1418
union
y/n
y
Independent
QA audit
y/n
y
Comments
[range]
[example]
19.3.8
1
2
As-Needed checklist
As-Needed QA List: Maintenance and Tasks and QC Measurements
3
4
Replace
gold cart.
In 2537
Clean
Teflon
valves
Install new
Teflon
valves
Clean
quartz fluor
cell
Replace
quartz fluor
cell
Replace
2537 lamp
MM/DD/YYYY
MM/DD/YYYY
MM/DD/YYYY
MM/DD/YYYY
MM/DD/YYYY
MM/DD/YYYY
12/7/2007
12/7/2007
12/7/2007
12/7/2007
12/7/2007
12/7/2007
Comments
[range]
[example]
1
2
3
4
5
6
7
8
9
10
19.4
Field operator quality assurance worksheets
(Expert mercury monitoring feedback in this issue is necessary)
19.5
Field audit quality assurance worksheets
(Expert mercury monitoring feedback in this issue is necessary)