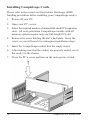
1
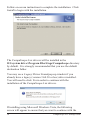
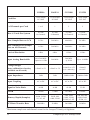
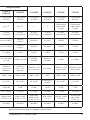
About GaGe Products
Our extensive product line includes ultra high-speed data
acquisition cards, digital oscilloscope cards, analog and digital
signal generation cards, arbitrary waveform generator cards,
digital pattern generation cards, digital input cards and supporting
software.
We make the most advanced computer-based instruments in the
world. They are the fastest, of the highest quality, and the most
versatile. We offer more than 50 different hardware cards and
numerous software packages to operate them or to help integrate
them in a test system. For multi-channel applications, several
GaGe cards can be combined for up to 64 channels in a single
system.
We provide our customers with the industry’s most extensive
array of software. All CompuScope digitizer cards are equipped
with ready-to-use application software (GageScope) as well as
optional Software Development Kits for C/C#, LabVIEW,
MATLAB, and other programming environments.
Our products are used worldwide across diverse fields such
as Communications, Computers, Semiconductor, Aerospace,
Scientific Research and Education. Major applications served are
Manufacturing Test, Advanced Research, Ultrasonics, Lasers and
Embedded DAQ.
P/N: 0045514
0811
CompuScope PCI Startup Guide
© Copyright Gage Applied Technologies 2008
Sixth Edition (November 2008)
CompuScope, Cobra, BASE-8, Octopus, CompuGen, and GageScope are
trademarks or registered trademarks of Gage Applied Technologies. Visual
Basic, WINDOWS 98, WINDOWS ME, WINDOWS NT, WINDOWS 2000,
WINDOWS XP, and WINDOWS Vista are registered trademarks of Microsoft
Corporation. LabVIEW and LabWindows/CVI are registered trademarks of
National Instruments. MATLAB is a registered trademark of The MathWorks
Inc. All other trademarks are trademarks or registered trademarks of their
respective companies.
Changes are periodically made to the information herein; these changes will be
incorporated into new editions of the publication. Gage Applied Technologies may
make improvements and/or changes in the products and/or programs described in
this publication at any time. The latest copy of this manual can be found on our
web site at www.gage-applied.com in the Support section, Software & Manuals.
Copyright © 2008 Gage Applied Technologies. All Rights Reserved, including
those to reproduce this publication or parts thereof in any form without permission
in writing from Gage Applied Technologies. The installation program used
to install GaGe software, InstallShield, is licensed software provided by
InstallShield Software Corp., 900 National Parkway, Ste. 125, Schaumburg,
IL. InstallShield is Copyright ©1998 by InstallShield Software Corp., which
reserves all copyright protection worldwide. InstallShield is provided to you for
the exclusive purpose of installing GaGe software. In no event will InstallShield
Software Corp. be able to provide any technical support for GaGe software.
How to reach GaGe Product Support
Toll-free phone: (800) 567-GAGE
Toll-free fax: (800) 780-8411
To reach GaGe Product Support from outside North America
Tel: +1-514-633-7447
Fax: +1-514-633-0770
Email: [email protected]
Website: www.gage-applied.com
Please have the following information when calling for technical support:
Model Number(s)
Serial Number(s)
Purchase Date
Name of vendor if not purchased from GaGe
You must also have the following information when you call:
• Software driver & application version
• Software Development Kit, if applicable
• Brand name and type of computer
• Processor and bus speed
• Total memory size
• Information on all other hardware in the computer
II
CompuScope PCI Startup Guide
Preface
This manual provides driver and hardware installation instructions
for CompuScope PCI Analog Input cards and CompuScope PCI
Digital Input cards.
Please note that this manual is not intended as a reference for
CompactPCI bus CompuScope cards. If you did not receive
the correct guide, please contact GaGe Product Support for a
replacement.
It is assumed that the reader is familiar with using PCs, Windows
and PCI bus cards. No description is included for these topics.
If you are not comfortable with these areas, it is strongly
recommended that you refer to the relevant product guides.
To maintain the accuracy of the information contained herein,
we reserve the right to make changes to this manual from time to
time.
Note: For brevity, in this manual,
“Cobra CompuScope Family” is abbreviated as “Cobra Family”
“BASE-8 CompuScope” is abbreviated as “BASE-8”
“Octopus Multi-Channel Digitizer Family” is abbreviated as
“Octopus Family”
“CompuScope 12400” is abbreviated as “CS12400”
“CompuScope 1220” is abbreviated as “CS1220”
“CompuScope 14200” is abbreviated as “CS14200”
“CompuScope 14105” is abbreviated as “CS14105”
“CompuScope 1610” is abbreviated as “CS1610”
“CompuScope 1602” is abbreviated as “CS1602”
“CompuScope 3200” is abbreviated as “CS3200”
CompuScope PCI Startup Guide
General Safety Summary
Review the following safety precautions to avoid injury and
prevent damage to this product or any products connected to it.
To avoid potential hazards, use this product only as specified.
Observe all terminal ratings.
To avoid fire or shock hazard, observe all ratings and markings
on the product. Consult the product manual for further ratings
information before making connections to the product.
Do not apply a potential to any terminal, including the common
terminal, that exceeds the maximum rating of that terminal.
Do not operate with suspected failures.
If you suspect there is damage to this product, have it inspected
by qualified service personnel.
Do not operate in wet/damp conditions.
Do not operate in an explosive atmosphere.
CompuScope PCI Startup Guide
!
CAUTION. Static discharge
can damage any semiconductor
component in this instrument.
!
Before installing or servicing this product, read the ESD
information below:
When handling this instrument in any way that requires access
to the on-board circuitry, adhere to the following precautions
to avoid damaging the circuit components due to electrostatic
discharge (ESD).
1. Minimize handling of static-sensitive circuit boards and
components.
2. Transport and store static-sensitive modules in their staticprotected containers or on a metal rail. Label any package
that contains static-sensitive boards.
3. Discharge the static voltage from your body by wearing a
grounded antistatic wrist strap while handling these modules
and circuit boards. Perform installation and service of staticsensitive modules only at a static-free work station.
4. Nothing capable of generating or holding a static charge
should be allowed on the work station surface.
5. Handle circuit boards by the edges when possible.
6. Do not slide the circuit boards over any surface.
7. Avoid handling circuit boards in areas that have a floor or
work-surface covering capable of generating a static charge.
CompuScope PCI Startup Guide
What you will receive with your CompuScope
If you order an independent CompuScope card, you should
receive the following articles:
• One CompuScope card (of memory model type purchased)
• GaGe CompuScope CD (with GageScope Software) and
CompuScope PCI Startup Guide
The CompuScope CD contains all of the software drivers and
application packages needed to operate your CompuScope
hardware. Some application packages will only be available if
you have purchased the software and have a key provided by
GaGe.
Note that you will receive only one copy of the CompuScope
CD and CompuScope PCI Startup Guide per order.
The CompuScope Hardware Manual is available in PDF format
on the CompuScope CD.
• CompuScope Certificate of NIST Traceable Calibration
Each CompuScope card is shipped with a Certificate of
NIST Traceable Calibration. NIST is the National Institute
of Standards and Technologies - the US organization that is
responsible for the definitions and measurement of metrology
standards.
Prior to shipment, GaGe runs each CompuScope card through
a battery of over 1000 automated performance verification
tests using a NIST traceable calibration source. The tested
CompuScope is then considered a NIST traceable calibration
instrument for a period of one year – the calibration interval that
is generally accepted by the Test and Measurement industry.
• Product warranty card
• You may also receive a number of optional items, if purchased:
CompuScope PCI Startup Guide
• You will be provided with a software key to use for the
installation of GageScope Standard or Professional edition,
or a CompuScope SDK.
• If you ordered Master or Slave upgrades with your
CompuScope cards, you will receive Master/Slave Timing
Module(s) in addition to the number of CompuScope cards
in your Master/Slave system: Master/Slave Timing Modules
differ from model to model, 2 examples are shown below.
Carefully inspect these articles before proceeding further. If you
find any damage caused by transportation, please report it to the
organization from which you purchased the CompuScope card.
CompuScope PCI Startup Guide
IMPORTANT! Install drivers prior to
installing CompuScope cards
If you have not already done so, insert your GaGe CompuScope
CD into the CD-ROM drive of your computer. The Windows
AutoRun feature will bring-up the installer’s main screen. If this
does not occur, you can start the installer by double-clicking on
the gage.exe file that you will find on the CD.
The Main CompuScope CD screen will appear.
This window offers five possible options:
•
•
•
•
•
Install GaGe Software
Documentation
Contact GaGe
About CD
Install Adobe Acrobat Reader
The fourth option, About CD, is an important first step when
troubleshooting the installation or asking for technical support.
It provides valuable information about the various software
drivers and application packages available on the CD.
The second option, Documentation, gives you access to
the manuals and software readme.txt files available on the
CompuScope CD.
If you click on Manuals, you will be given a list of available
manuals to view using your default PDF viewer. If you do not
have a PDF viewer installed on your system, you can install
Adobe Acrobat Reader from the CompuScope CD by clicking on
the fifth option on the Main screen, Install Adobe Acrobat Reader.
If you click on Readmes from the Documentation screen, you will
CompuScope PCI Startup Guide
be given a list of the software readme.txt files for the software
that is available on the CompuScope CD. They will open with
your default .txt file viewer.
Another useful feature of the installer is the Contact GaGe
option available from the CompuScope CD’s main screen. From
this screen, you will find useful contact information for GaGe
technical support.
Now that you have become familiar with the first level of the
installer, we can proceed with the installation of the CompuScope
drivers.
Please refer to the section Installing Optional Software within
this guide for installation instructions for the applications and
Software Development Kits that are available on the CompuScope
CD.
Installing GaGe Software
Click on the Install GaGe Software button to view the available
GaGe software.
The Install Software screen offers 5 software options to install:
•
•
•
•
CompuScope Drivers
CompuScope SDKs
GageScope Application (for GaGe digitizer cards)
Utilities
As you position the mouse over one of the five menu options,
details of each option appear in a text box to the right of the
screen.
CompuScope PCI Startup Guide
CompuScope Drivers Installation
To begin installation, click on the CompuScope Drivers button
from the Install Software screen. Note that the main installation
steps are shown, but we will not show every screen.
Next select if you are using a 32 or 64-bit operating system.
CompuScope PCI Startup Guide
The following InstallShield Wizard screen appears:
Click Next to continue with the installation of the CompuScope
4.xx drivers. During the installation process, you will be asked to
select a setup type. We recommend that you select the Complete
setup.
CompuScope PCI Startup Guide
Follow on-screen instructions to complete the installation. Click
Install to begin with the installation.
The CompuScope 4.xx drivers will be installed in the
O/S system drive:\Program Files\Gage\CompuScope directory
by default. It is strongly recommended that you use the default
destination folder.
You may see a Legacy Driver Found pop-up window if you
already have a legacy (version 3.60.30 or less) driver installed.
You will need to click Yes in order to continue with the
installation of the CompuScope 4.xx drivers.
If installing using Microsoft Windows Vista, the following
screen will appear to ensure that you want to continue with the
10
CompuScope PCI Startup Guide
installation. Click Install to continue with the installation.
The above window will appear for every board that will be
installed unless the checkbox to always trust software from
Gage Applied Technologies is checked. In order to use the
CompuScope Drivers, you must restart your computer. You will
be asked whether you want to restart your computer immediately
or at a later time. At this time, it is recommended to shut down
your computer and install your CompuScope hardware.
Once you have installed your CompuScope hardware and
restarted your computer, the Found New Hardware wizard will
pop-up. Simply follow the on-screen instructions. Note that all
CompuScope drivers are known to Windows and the CD will not
be required to complete the installation.
NOTE: The CompuScope CD includes the CompuScope
Windows drivers for current CompuScope cards and includes
improved functionality that is not available on older versions of
the driver. Supported 32-bit operating systems are Win2K/XP/
Win Server 2003/Vista and 64-bit are XP/Win Server 2003/Vista.
You can download the CompuScope drivers for older versions of
Windows from the GaGe website:
http://www.gage-applied.com/support/
CompuScope PCI Startup Guide
11
COBRA
BASE-8
CS12400
CS1220
1 Full-length
PCI Slot
1 Full-length
PCI Slot
1 Full-length
PCI Slot
1 Full-length
PCI Slot
1 or 2
1
2
2
8 Cards
16 Channels
8 Cards
8 Channels
8 Cards
16 Channels
8 Cards
16 Channels
Max. Sample Rate on 1 Ch
2 GS/s
500 MS/s
400 MS/s
20 MS/s
Max. Simultaneous Sample
Rate on All Channels
1 GS/s
500 MS/s
200 MS/s
20 MS/s
Vertical Resolution
8 Bits
8 Bits
12 Bits
12 Bits
Over 500 MHz
Option to 1 GHz
200 MHz
200 MHz
@ 50 Ω
Up to 10 MHz
±50mV to 5V
±50mV to 5V
50Ω
Card Size
# of Channels per Card
Max. # Cards Per System
Input Analog Bandwidth
Voltage Ranges
(Auto calibration circuitry
available on all cards)
Input Impedance
Input Coupling
Signal to Noise Ratio
ENOB
Memory Depth (Samples)
PCI Data Transfer Rate
±100mV to ±5V
(±5V: 50Ω only)
±500mV
to ±10V
50Ω
1MΩ or 50Ω
1MΩ or 50Ω
AC or DC
AC or DC
AC or DC
AC or DC
46 dB
46 dB
62 dB
55 dB
7.4 Bits
7.4 Bits
10.0 Bits
8.9 Bits
256M, 512M,
1G, 2G, 4G
128 K, 8M,
64M, 256M
32M, 64M,
128M, 256M,
512M, 1G, 2G
1M, 4M, 8M,
64M, 256M,
512M, 1G
200 MB/s
50 MB/s
200 MB/s
50 MB/s
*
Maximum sample rate and channel count for the Octopus™ family of digitizers.
12
CompuScope PCI Startup Guide
Octopus Family
CS82XX/
CS83XX
CS84XX
CS14200
CS14105
CS1610
CS1602
1 Full-length
PCI Slot
1 Full-length
PCI Slot
1 Full-length
PCI Slot
1 Full-length
PCI Slot
1 Full-length
PCI Slot
1 Full-length
PCI Slot
Up to 8*
Up to 8*
2
2
2 Differential
2 Differential
8 Cards
64 Channels
8 Cards
64 Channels
8 Cards
16 Channels
8 Cards
16 Channels
8 Cards
16 Channels
8 Cards
16 Channels
10 to 125 MS/s*
1 kS/s to
25 MS/s*
200 MS/s
105 MS/s
10 MS/s
2.5 MS/s
10 to 125 MS/s*
1 kS/s to
25 MS/s*
200 MS/s
105 MS/s
10 MS/s
2.5 MS/s
12/14 Bits
16 Bits
14 Bits
14 Bits
16 Bits
16 Bits
Over 100 MHz
@ 50 Ω
20 MHz @ 50 Ω
100 MHz
@ 50 Ω
180 kHz to
230 MHz
4 MHz
1.25 MHz
±100mV to
±10V (±10V:
±100mV to
±10V (±10V:
±100mV to ±5V
1MΩ or 50Ω
1MΩ or 50Ω
1MΩ or 50Ω
AC or DC
AC or DC
64/68 dB
74 dB
10.3/11.0 Bits
0.5V RMS
80dB CMRR
@ 60Hz
±500mV to ±10V ±500mV to ±10V
(single-ended)
(single-ended)
50Ω
1MΩ or 50Ω
1MΩ or 50Ω
AC or DC
Transformercoupled
AC or DC
AC or DC
66 dB
71 dB
70 dB
75 dB
12.0 Bits
10.7 Bits
11.5 Bits
11.2 Bits
12.2 Bits
128M, 256M,
512M, 1G, 2G
128M, 256M,
512M, 1G, 2G
32M, 64M,
128M, 256M,
512M, 1G, 2G
16M, 128M,
1G, 2G
1M, 8M, 128M,
512M, 1G
1M, 4M, 8M,
64M, 256M,
512M, 1G
200 MB/s
200 MB/s
200 MB/s
200 MB/s
50 MB/s
50 MB/s
1MΩ only)
1MΩ only)
(±5V: 50Ω only)
80dB CMRR
@ 60Hz
Specifications are subject to change without notice.
CompuScope PCI Startup Guide
13
Installing CompuScope Cards
Please refer to the section on Electrostatic Discharge (ESD)
handling procedures before installing your CompuScope card(s).
1. Power off your PC.
2. Open your PC’s cover.
3. Select the required number of unused full-sized PCI expansion
slots. All next generation CompuScope models with all
memory options require only one full-length PCI slot.
4. Remove the screw holding the slot’s backplate. Keep the
screw, as you will need it in subsequent installation steps.
5. Insert the CompuScope card(s) into the empty slot(s).
6. After making sure that the card(s) are properly seated, screw
the card(s) to the chassis.
7. Close the PC’s cover and turn on the main power switch.
14
CompuScope PCI Startup Guide
8. Once you have installed your CompuScope hardware and
restarted your computer, the Found New Hardware wizard
will pop-up. Simply follow the on-screen instructions.
9. Verify installation and configuration of your CompuScope
hardware with CompuScope Manager. CompuScope
Manager is provided and installed with the 4.xx drivers.
Please refer to the CompuScope PCI Hardware Manual
(available in PDF format on the CompuScope CD) for
detailed instructions.
10. Verify the operation of the card using CSTest+. CSTest+
is a utility provided with the CompuScope drivers to ensure
proper operation of the CompuScope cards. CSTest+ is
provided and installed with the 4.xx drivers. Please refer to
the CompuScope PCI Hardware Manual (available in PDF
format on the CompuScope CD) for detailed instructions.
11. Install GageScope software. Follow the instructions provided
in the next section for installing this software.
12. Run GageScope software and start acquiring data. Follow the
instructions provided in the GageScope Online Help for using
this software.
13. (Optional) When writing your own program using one of
the GaGe Software Development Kits (SDKs), please refer to
the appropriate GaGe SDK manual for information on usage
of the GaGe SDK. GaGe SDK installation instructions are
shown in the next section.
CompuScope PCI Startup Guide
15
Installing Optional Software
GageScope
GageScope® has standardized installation procedures and therefore
will not be covered in detail in this startup guide. The steps are very
similar to the CompuScope driver installation, but you will be asked
to enter a software key to activate the GageScope edition that you
have selected. To begin installation of GageScope, click on the
GageScope Application button from the Install Software screen.
During the installation, you will be asked to select the GageScope
edition that you wish to install. There are 3 versions:
• GageScope Lite Edition (free edition with basic functionality)
• GageScope Standard Edition (provides limited functionality of
features for intermediate users)
• GageScope Professional Edition (provides full functionality of
features for expert users)
In this example, it is assumed that you have chosen to install the
16
CompuScope PCI Startup Guide
Lite Edition. However, the steps are similar when installing the
Standard Edition.
Click on either the Next or Install Lite Edition buttons. In order
to proceed with the installation of GageScope Lite Edition, you
will need a Lite Edition software key.
You must register on-line at www.gagescope.com/registration to
obtain the GageScope Lite Edition software key. Once you have
registered, the Lite Edition software key will be e-mailed directly
to you. A GageScope Lite Edition software key cannot be
obtained by contacting GaGe or its representatives by telephone,
fax or e-mail.
If you are installing GageScope Standard or Professional Edition,
you will be asked to enter a software key. The software key can be
found at the back of the case which holds your CompuScope CD
and CompuScope PCI Startup Guide.
CompuScope PCI Startup Guide
17
CompuScope Software Development Kits (SDKs)
The CompuScope Software Development Kits (SDKs) also have
standardized installation procedures and therefore will not be
covered in detail in this startup guide. The steps are very similar
to the CompuScope driver installation, but you will be asked to
enter a software key in order to proceed with the installation. The
software key can be found at the back of the case which holds
your CompuScope CD and CompuScope PCI Startup Guide.
To access available SDKs, click on the CompuScope SDKs
button from the Install Software screen.
You will see a list of available CompuScope SDKs. A description
for each SDK will be shown as you hover over each selection.
You can also access a list of the manuals that are available on the
CompuScope CD.
Once you have clicked on one of the SDKs listed, installation will
begin.
It is strongly recommended that you use the default installation
folder: O/S system drive:\Program Files\Gage\CompuScope\
18
CompuScope PCI Startup Guide
CompuScope XXX SDK, where XXX is the SDK programming
environment (C, MATLAB, or LabVIEW).
IMPORTANT NOTE:
If you are trying to install GageScope or a GaGe Software
Development Kit, you must first install the drivers for your
hardware. If you do not install the drivers, both GageScope
and the SDKs will not function.
CompuScope PCI Startup Guide
19
Technical Support
We offer technical support for all our products.
In order to serve you better, we have created a web-based
technical support system that is available to you 24 hours a day.
Visit our web site (www.gage-applied.com/support) today for
instant access to our complete support tools and services such
as:
•
•
•
•
•
Frequently Asked Questions
Software/Driver and User Manual downloads
Application Request forms
Support Request forms
Warranty and RMA Policies
To obtain technical support, simply visit:
www.gage-applied.com/support/support_form.php
Please complete and submit this form. A Technical Support
Specialist will be in contact with you within 24 hours of form
submittal.
If you encounter problems submitting the form on our web site,
please e-mail us at:
[email protected]
Note that Technical Support Requests received via e-mail or by
telephone will take an average of 2 to 3 days to process.
20
CompuScope PCI Startup Guide
When calling for support we ask that you have the following
information available:
1. Version and type of your CompuScope SDK and drivers.
(The version numbers are indicated in the About CD screen
of the CompuScope CD. Version numbers can also be
obtained by looking in the appropriate README.TXT files)
2. Type, version and memory depth of your CompuScope card.
3. Type and version of your operating system.
4. Type and speed of your computer and bus.
5. If possible, the file saved from the Information tab of the
CompuScope Manager utility.
6. Any extra hardware peripherals (i.e. CD-ROM, joystick,
network card, etc.)
7. Were you able to reproduce the problem with standalone
GaGe Software (e.g. GageScope, GageBit)?
Complete this information for future reference
CompuScope model Memory size Version Options Calibration date This information is available on the Options/Mods and
Calibration labels affixed to your CompuScope card.
CompuScope PCI Startup Guide
21
GaGe Products
For ordering information, see GaGe’s Product Catalog or visit our
web site at www.gage-applied.com
PCI Bus Products
CompuScope 1610
16-bit, 10 MS/s A/D card
CompuScope 1602
16-bit, 2.5 MS/s A/D card
CompuScope 14200
14-bit, 200 MS/s A/D card
CompuScope 14105
14-bit, 105 MS/s A/D card
Octopus multi-channel
digitizer family
Up to 8 channels in a single-slot PCI card,
12 or 14-bit resolution, 10 to 125 MS/s
CompuScope 12400
12-bit, 400 MS/s A/D card
CompuScope 1220
12-bit, 20 MS/s A/D card
Cobra CompuScopes
8-bit, 1 or 2 channels, 2 GS/s A/D card
BASE-8 CompuScopes
8-bit, 1 channel, 500 MS/s A/D card
CompuScope 3200
32-bit, 100 MHz Digital Input Card
CompuGen PCI
CompuGen 4300/4302
12-bit, 4-ch, 300 MHz Analog Output Cards
CompuGen 8150/8152
12-bit, 8-ch, 150 MHz Analog Output Cards
CompuGen 11G/11G2
12-bit, 1 GHz Analog Output Cards
CompactPCI/PXI Bus Products
CompuScope 1610C
16-bit, 10 MS/s A/D card
CompuScope 14100C
14-bit, 100 MS/s A/D card
CompuScope 82GC
8-bit, 2 GS/s A/D card
CompuScope 3200C
32-bit, 100 MHz Digital Input Card
CompuGen ISA
CompuGen 1100
12-bit, 80 MS/s D/A card
CompuGen 3250
32-bit, 50 MHz Digital Output Card
Application Software
GageScope Software
World’s Most Powerful Oscilloscope Software
GageBit Software
Digital Input/Digital Output Software
22
CompuScope PCI Startup Guide
CompuGen for Windows
Arbitrary Waveform Generator Software for
Windows
Software Development Kits
CompuScope SDK for C/C#
CompuScope SDK for MATLAB
CompuScope SDK for LabVIEW
CompuGen SDK for C/C++
CompuGen SDK for LabVIEW
CompuGen SDK for MATLAB
Instrument Mainframes
LapScope-1
1-slot PCI Expansion Chassis for CompuScope and
CompuGen cards
LapScope-2
2-slot PCI Expansion Chassis for CompuScope and
CompuGen cards
Instrument Mainframe 7500
4-slot Portable Instrument Mainframe for
CompuScope and CompuGen cards
Instrument Mainframe 2020E
18 PCI slot and 1 ISA slot Instrument Mainframe
for CompuScope and CompuGen cards
Instrument Mainframe 4000
5 PCI-X and 1 PCI slot Instrument Mainframe for
CompuScope and CompuGen cards
Instrument Mainframe 8000C
7 cPCI/PXI slot Instrument Mainframe for
CompuScope CompactPCI/PXI cards
CompuScope PCI Startup Guide
23
24
CompuScope PCI Startup Guide