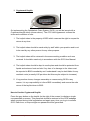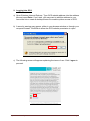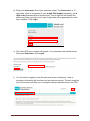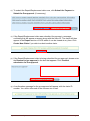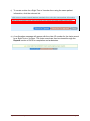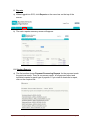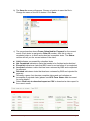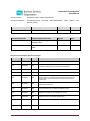
1
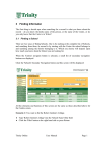
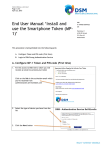
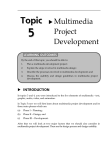
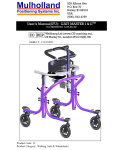
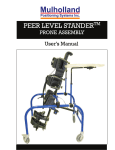
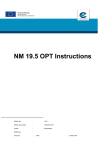
Ophthalmic Claim System
User Manual
Document Title:
Ophthalmic Claim System User Manual
Document Filename:
H:\Ophthalmic\OCS Pilot\User Manual\Ophthalmic Claim System User
Manual (V0.98)
Document Creator(s)
Project/Organisation Role
Marc Mulholland
FPS Project Support Assistant
Document Reviewer
Project/Organisation Role
Kevin Carland
Dental & Ophthalmic Payments
Manager, BSO
Roisin Hughes
Services and Improvement Manager,
BSO
Signed
Date
Signed
Date
Project Closure Report & Version Control
Version
Date
Author
Change Description
0.90
24/07/2013
MM
First draft.
0.91
04/08/2013
MM
Changed OCS website address. Amended registration & log-in guide with new
screenshots. Added section for if password has been forgotten.
0.92
20/09/2013
MM
Added OCSPR form section.
0.93
07/10/2013
MM
Amended section 2, 3 and 8 to include information on F5 protected workspace.
0.94
16/10/2013
MM
Added section 6 i) on using Find function to search for claims. Removed section
9) Help & Support - to be updated and circulated as separate sheet when
visiting practices. Added Cross References to allow links to sections on
Contents page.
0.95
09/12/2013
MM
Amended section 6 i) to include new Find Claim function. Added
Delete Claim section 6 j).
0.96
10/03/2013
MM
Removed references to protected workspace function
0.97
15/04/2014
MM
Updated screenshots of new OCSPR (V1.3) form
0.98
25/06/2014
MM
Updated to reflect new website address log-in
Ophthalmic Claim System User Manual
Page 1
Contents
Section
Page
1. Cryptocard Keyfob
3
2. Logging in to OCS
4
3. My Profile
7
3.1 Updating My Details
3.2 Changing My Password
4. New Claims
7
9
10
4.1 Searching for the Patient using Health & Care Number
10
4.2 Searching for the Patient using Name and Date-of-Birth
11
4.3 Selecting a Claim Type
12
4.4 Sight Test Claims
14
4.5 Voucher Claims
20
4.6 Repair or Replace Claims
26
5. Reports
5.1 Viewing Reports
5.2 Finding a Specific Claim
5.3 Deleting a Claim
33
33
36
36
6. OCSPR Forms
37
7. Forgotten Password
38
* Note - if using the digital copy of this user manual, click on the page numbers to
be taken to the relevant page.
Ophthalmic Claim System User Manual
Page 2
1. Cryptocard Keyfob
On implementing the Ophthalmic Claim System (OCS), you will be issued with a
Cryptocard keyfob token (shown above). The OCS User Agreement outlines the
terms and conditions of use:
1. The keyfob token is the property of BSO which reserves the right to request its
return at any time.
2. The keyfob token should be used solely by staff within your practice and is not
to be used by any other person for any other purpose.
3. The keyfob token will be returned in the same working condition as it was
received. It should be used only in accordance with the OCS User Manual.
4. The keyfob token should be kept in a safe place and should be protected from
liquids and extreme heat and cold. Any loss of or damage to the token must
be reported to BSO immediately and I understand I may be held liable for any
resultant costs (currently £45 per token but this may be subject to increase).
5. If my practice closes, changes ownership or ceases using OCS for any
reason, it is my responsibility to inform BSO immediately and ensure the safe
return of the keyfob token to BSO.
How to Use the Cryptocard Keyfob
Press the grey button on the keyfob (to the right of the screen) to display a singleuse passcode on-screen. This passcode should be entered on the OCS webpage
when required during initial registration and again every time you log-in to access
OCS. Each time, a unique single-use password will be generated.
Ophthalmic Claim System User Manual
Page 3
2. Logging into OCS
a) Open Windows Internet Explorer. Type OCS website address into the address
bar and press Enter. If you wish, you may want to add this address to your
favourites list or create a desktop shortcut to enable quicker access to OCS.
b) A security warning may appear, either in your browser window or through your
computer firewall. Click Yes to allow the OCS website permission to open.
c) The following screen will appear explaining the terms of use. Click I agree to
proceed.
Ophthalmic Claim System User Manual
Page 4
d) Enter your Username (this is your premises code). The Passcode is a 10
digit code, which is comprised of your 4 digit PIN number followed by the 6
digit code generated by the keyfob token. Your 4 digit PIN will remain the
same every time you log-in but a new 6 digit code will be generated for each
log-in session. Click Login.
e) The main OCS log-in screen will appear. Your premises code will be shown.
Enter your Password. Click Login.
f) You will now be logged in and the welcome screen will appear. Links to
important information will be shown on the welcome screen. The bar along the
top of the screen will allow you to navigate between different menus on OCS.
Ophthalmic Claim System User Manual
Page 5
Home will return you to the welcome screen.
New Claim will enable you to make a payment or pre-approval claim.
Reports will enable you to view a monthly payment forecast, view payment
summaries for previous months, view individual forms successfully submitted
for payment, and check the status of pre-approval or notification requests.
My Profile will enable you to change your details or password as necessary.
Don’t forget to click Logout to safely end the session when all claims have
been submitted.
g) If you do not enter any details or navigate within the system for 20 minutes or
more, the session will automatically log you out and you will see the session
timeout screen. This timeout provides an extra level of data security by
preventing unauthorised access to your account. If OCS times out, you may
lose any data or forms you were working on. It is important to ensure that all
activity on OCS is submitted promptly to avoid loss of work.
Ophthalmic Claim System User Manual
Page 6
3. My Profile
When logged into OCS, click My Profile on the menu bar on the top of the screen.
3.1 Updating My Details
a) My Details will be shown onscreen. If you wish to change your forename,
surname, e-mail address or OO/OMP Code, click on Edit.
Ophthalmic Claim System User Manual
Page 7
b) This edit screen will appear. Enter the new Forename, Surname, Contact
Email Address or OO/OMP Code as required. The OO/OMP code must
include the three digits and omit the letter. Click Save Changes to continue.
c) The new details will be shown. Check the information is correct. Click Please
click here to continue to finish and return to the main OCS welcome screen.
Ophthalmic Claim System User Manual
Page 8
3.2 Changing Your Password
a) Click on My Profile. Scroll down to the My Password section.
b) To change your password, enter your existing password in the Old Password
field. Enter the new password in the New Password field and again in the
Retype New Password field. Your password should be at least eight
characters long and contain at least one capital letter, one small letter, one
number and one symbol for maximum security. When you have entered your
new password, click Change Password to continue.
c) A message will be displayed confirming the password has been successfully
changed. Click the Please click here to continue message to return to the
OCS main welcome page.
Ophthalmic Claim System User Manual
Page 9
4. New Claims
When logged into OCS, click New Claim on the menu bar on the top of the screen.
4.1 Searching for the Patient using Health & Care Number
a) The New Claim screen will be displayed. Enter the patient’s ten-digit Health &
Care Number in the first field. Click “Click here to validate Health & Care
No”.
Ophthalmic Claim System User Manual
Page 10
b) If a valid Health and Care Number has been entered, the patient details will
be populated on screen. You can now move to step 4.3 to make a claim.
4.2 Searching for a Patient using Name and Date of Birth
a) If the patient’s details cannot be found using the HCN, input the patient’s
Surname, Forename and Date of Birth (in the format DD/MM/YYYY) and
click “Click here to search for patient using the above details”. Please
note the patient’s name must match their record exactly e.g. any
apostrophes or hyphens must be entered if applicable.
Ophthalmic Claim System User Manual
Page 11
b) Click on the drop-down arrow menu to view all matching patients. Click
on the patient’s name to populate their details on the claim. Occasionally,
there may be two or more patients with the exact same name and date-ofbirth shown. In these cases, use the address to determine the correct
patient and click on their record to load their details. When the patient’s
details have been populated, proceed to step 4.3.
4.3 Selecting a Claim Type
a) Enter the Date of Last GOS Test for the patient if known (in the format
DD/MM/YYYY).
Ophthalmic Claim System User Manual
Page 12
b) Click on the drop down menu Create Claim for to show the three types of
claim:
1. GOS(NI)ST – Sight Test
2. GOS(NI)V – Voucher
3. GOS(NI)R – Repair or Replacement
Click on the correct type of claim to select it.
c) After selecting a claim type, click New Claim to begin filling out the claim.
Ophthalmic Claim System User Manual
Page 13
4.4 Sight Test Claims
a) Follow the instructions in part 5.1 to find the patient’s details and select 1 –
GOS(NI)ST Sight Test in the drop down menu. Click New Claim.
b) Check the patient details displayed in Part 1 are correct.
c) Scroll down to Part 2, which displays the Sight Test details.
Ophthalmic Claim System User Manual
Page 14
d) Select a Sight Test outcome category by clicking the relevant box or boxes. At
least one selection must be made from Options 1, 2 or 3. Option 4 – Referred to GP
may also be selected if applicable.
e) Select a medical exemption category, if applicable.
f) If a medical condition is selected, the following box will appear which requires you
to input the Name and Address of GP Practice / Hospital Consultant who can
confirm the patient’s condition.
g) If applying for an Early retest claim, this box should be ticked and the
Explanation for early retest should be entered. If the sight test is within three
months from the previous test, the claim should be submitted for pre-approval from
BSO. If the early retest is over the three month period, the claim can be submitted for
payment without pre-approval.
Ophthalmic Claim System User Manual
Page 15
h) Tick any of the exemption categories which apply.
i) If the Patient given GOS(NI)V Voucher type box is ticked, enter the Voucher
Code in the box that appears.
j) Before carrying out a domiciliary sight test, a notification code must be obtained
from BSO at least 48 hours prior to the test. Fill in the domiciliary section and request
a code. After getting the domiciliary code and carrying out the test, open the claim
and fill out the remaining sections to submit the claim for payment.
1. Click the Domiciliary Sight Test drop down menu and select option 1 or 2.
2. If it was a substitution, click the box for This is a substitution.
3. It is mandatory to state why the domiciliary visit was made in the Remarks
box.
4. Fill in the Address at which test was carried out (if different from address
of claimant) if applicable.
5. Enter the Date and Time of Domiciliary visit.
6. Click Request Notification Code if a domiciliary notification code is required.
Ophthalmic Claim System User Manual
Page 16
k) Ensure this section is completed.
1. Enter the OO/OMP Code (including the 3 digits only).
2. Enter the Date of Sight Test either by typing it in (format DD/MM/YYYY) or
by clicking in the field and using the calendar menu to select the year, month
then day.
3. Click on the drop down menu and choose an Exemption Category (this may
be set already based on above menu selections).
4. Tick Evidence not seen if applicable.
Ophthalmic Claim System User Manual
Page 17
l) When certain exemption categories are selected, the option I am the partner of
someone who is getting the benefit I have ticked will appear, and should be
ticked if applicable.
m) The practice details will be displayed. Click the tick box to confirm you have read
the declaration.
n) To submit the Sight Test claim now, click Submit for Payment or Submit for
Pre-approval (if necessary).
o) If the Sight Test claim was submitted for payment, a message confirming this will
appear onscreen along with the Claim ID. The claim will then appear in the Report
section of OCS where it can be viewed at any time. Click Create New Claim if you
wish to submit another claim.
Ophthalmic Claim System User Manual
Page 18
p) If the Sight Test claim is being submitted for pre-approval, please enter the
Reason for pre-approval in the box that appears. Click Confirm submission for
Pre-approval.
q) A confirmation message for the pre-approval will appear with the claim ID number.
You will be informed of the outcome via e-mail.
r) To create a claim for a Voucher or Repair/Replacement form using the same
patient information, click the relevant link.
s) A confirmation message will appear with the claim ID number for the new claim for
a Voucher or Repair / Replacement. The claim record can then be viewed through
the Reports section of OCS for completion and submission.
Ophthalmic Claim System User Manual
Page 19
4.5 Voucher Claim
a) Follow the instructions in part 5.1 to find the patient’s details and select 2 –
GOS(NI)V – Voucher in the drop down menu. Click New Claim.
b) Check the patient details displayed in Part 1 are correct.
c) Part 2 displays the Voucher details.
Ophthalmic Claim System User Manual
Page 20
d) Click the drop down menu to select a reason for the Voucher claim.
e) Enter the prescription details:
The drop down menus for Spherical and Cylindrical can be used to enter
a plus or minus sign and a value must be typed in the adjacent box
(between 0 and 2600) in a multiple of 25.
A value must be entered in the Axis field.
A value can be entered in the Prism value if applicable.
The drop down menu in the Base field can be used to select a category if
applicable.
A value can be entered in the V/A (Visual Acuity) field if applicable.
f) Click the drop down menus to select numbers for each category as required.
Ophthalmic Claim System User Manual
Page 21
g) Ensure this section is completed:
Enter the OO/OMP Code (including the 3 digits only).
Enter the Date of Sight Test either by typing it in (format DD/MM/YYYY) or
by clicking in the field and using the calendar menu.
Click on the drop down menu to choose an Exemption Category.
Tick Evidence not seen if applicable.
h) If the Student Exemption Category is selected, an additional field will
appear. The Name and Address of School or College should be input in
this field.
i) When certain exemption categories are selected, the option I am the partner
of someone who is getting the benefit I have ticked will appear, and
should be ticked if applicable.
Ophthalmic Claim System User Manual
Page 22
j) Complete Part 3:
Enter the Date of Supply either by typing it in (format DD/MM/YYYY) or by
clicking in the field and using the calendar menu.
Enter the Retail Price and Sum patient assessed to pay on form HC3 as
applicable. The system will calculate the other values as necessary.
Click I claim Small Glasses Supplement if applicable.
If prescribed and dispensed by the same practitioner, tick the Prescribed and
Dispensed box. If prescribed and dispensed by different practitioners, enter
the Name and Address of Prescriber in the box.
k) The practice details will be displayed. Click the tick box to confirm you have
read the declaration.
Ophthalmic Claim System User Manual
Page 23
l) To submit the Voucher claim now, click Submit for Payment or Submit for
Pre-approval (if necessary).
m) If the Voucher claim was submitted for payment, a message confirming this
will appear onscreen along with the claim ID. The claim will then appear in the
Report section of OCS where it can be viewed at any time. Click Create New
Claim if you wish to submit another claim.
n) If the Voucher claim is being submitted for pre-approval, please enter the
Reason for pre-approval in the box that appears. Click Confirm
submission for Pre-approval.
o) A confirmation message for the pre-approval will appear with the Claim ID
number. You will be informed of the outcome via e-mail.
Ophthalmic Claim System User Manual
Page 24
p) To create a claim for a Sight Test or Repair/Replacement form using the
same patient information, click the relevant link.
q) A confirmation message will appear with the claim ID number for the new
claim record for a Sight Test or Repair / Replacement. The claim record can
then be viewed through the Reports section of OCS for completion and
submission.
Ophthalmic Claim System User Manual
Page 25
4.6 Repair or Replacement Claim
a) Follow the instructions in part 5.1 to find the patient’s details and select 3 –
GOS(NI) R Repr/Repl in the drop down menu. Click New Claim.
b) Check the patient details displayed in Part 1 are correct.
Ophthalmic Claim System User Manual
Page 26
c) Part 2 displays the Repair/Replace claim details.
d) Click the drop down menu to specify either a Repair or a Replacement claim.
e) Enter an explanation in the Nature of Repair/Replace field.
Ophthalmic Claim System User Manual
Page 27
f) If the lens needs to be repaired or for all replacements, please enter the
prescription details:
The drop down menus for Spherical and Cylindrical can be used to enter a
plus or minus sign and a value must be typed in the adjacent box (between 0
and 2600) in a multiple of 25.
A value must be entered in the Axis field.
A value can be entered in the Prism value if applicable.
The drop down menu in the Base field can be used to select a category if
applicable.
A value can be entered in the V/A (Visual Acuity) field if applicable.
g) Click the drop down menus to select numbers for each category as required.
h) For a repair, tick the boxes relevant for the parts which need to be repaired. For a
replacement, tick New Frame if applicable.
Repair
Ophthalmic Claim System User Manual
Replacement
Page 28
i) Click the drop down menu to select an Exemption Category. Tick Evidence Not
Seen if applicable.
j) If the Student Exemption Category is selected, an additional field will appear.
The Name and Address of School or College should be input in this field.
k) When certain exemption categories are selected, the option I am the partner of
someone who is getting the benefit I have ticked will appear, and should be
ticked if applicable. More boxes will appear. The His/Her name and address is
and His/Her National Insurance No fields must be completed.
Ophthalmic Claim System User Manual
Page 29
l) Complete Part 3:
Enter the Date of Supply either by typing it in (format DD/MM/YYYY) or by
clicking in the field and using the calendar menu.
Enter the Retail Price if applicable.
Enter the Sum patient assessed to pay on form HC3 if applicable. A
declaration and tick box will appear. Tick this to accept the declaration.
Tick I claim Small Glasses Supplement or In full-time attendance at
school boxes as applicable.
m) The practice details will be displayed. Click the tick box to confirm you have read
the declaration.
Ophthalmic Claim System User Manual
Page 30
n) To submit the Repair/Replacement claim now, click Submit for Payment or
Submit for Pre-approval (if necessary).
o) If the Repair/Replacement claim was submitted for payment, a message
confirming this will appear onscreen along with the claim ID. The claim will then
appear in the Report section of OCS where it can be viewed at any time. Click
Create New Claim if you wish to submit another claim.
p) If the Repair/Replacement claim is being submitted for pre-approval, please enter
the Reason for pre-approval in the box that appears. Click Confirm
submission for Pre-approval.
q) A confirmation message for the pre-approval will appear with the claim ID
number. You will be informed of the outcome via e-mail.
Ophthalmic Claim System User Manual
Page 31
r) To create a claim for a Sight Test or Voucher form using the same patient
information, click the relevant link.
s) A confirmation message will appear with the claim ID number for the claim record
for a Sight Test or Voucher. The claim record can then be viewed through the
Reports section of OCS for completion and submission.
Ophthalmic Claim System User Manual
Page 32
5. Reports
a) When logged into OCS, click Reports on the menu bar on the top of the
screen.
b) The main reports summary screen will appear.
5.1 Viewing Reports
a) The first section shows Payment Processing Reports for the payment made
the previous month. There is a summary report, a full payment report and
individual reports for each type of payment. If you wish to download a report,
click on the required file.
Ophthalmic Claim System User Manual
Page 33
b) The Save As screen will appear. Choose a location to save the file in.
Change the name of the file if desired. Click Save.
c) The second section shows Forms Submitted for Payment for the current
month. Each claim is assigned a Claim ID number, click this to view a
completed claim or to finish and submit an incomplete claim. The Status
column will tell you the current status of the claim:
Valid indicates a successfully submitted claim
Not Completed indicates a claim that needs to be finished and submitted
Exception indicates a claim that BSO need to review before it is completed
Accepted indicates a claim that has been reviewed by BSO and completed
for payment
Returned indicates a claim that has been reviewed by BSO and rejected for
payment
Generally a green font denotes complete claims and red indicates an
incomplete or rejected claim (please see OCS Form Status List document
for more details)
Select Click here to download report as CSV to download a claim report for
the current month.
Ophthalmic Claim System User Manual
Page 34
d) The third section shows Forms Submitted for Pre-Approval or Notification.
The Status column will show whether the claim was approved or rejected. An
approved claim will also be assigned a reference Code. Select Click here to
download report as CSV to download a pre-approval/notification report for
the current month.
e) The fourth section shows Previous Months claims summaries. Click on the
relevant month if you wish to view more detailed reports.
f) Clicking on a previous month will bring you to a similar screen for that month’s
payment. You can download Payment Processing Reports or Forms
Submitted for Payment and view the list of claims on the webpage. Click the
page number buttons to move through the list on the webpage.
Ophthalmic Claim System User Manual
Page 35
5.2 Finding a Specific Claim
Use the Find Claim function at the top of the Reports page to find a specific claim.
Type the Claim ID in the field and click Search to display the claim form.
5.3 Deleting a Claim
To delete a form before it has been accepted for payment, open it in Reports by
clicking the Claim ID. Scroll to the bottom of the page and click Delete Claim.
Ophthalmic Claim System User Manual
Page 36
6. OCSPR Forms
The Ophthalmic Claim System Patient Record (OCSPR) form is used to record the
details of patients who are exempt from paying Health Service charges and acts as a
declaration of their entitlement to Health Service treatment. The form may be folded
in half if desired for storage purposes.
Page 1 of OCSPR Form
Page 2 of OCSPR Form
Ophthalmic Claim System User Manual
Page 37
Parts A and B of this form must be filled in the first time you treat the patient. Part A
must be filled in by the patient as it states the reason why they are exempt from
paying Health Service charges. The patient must sign and date the patient
declaration in Part B to confirm the information they have provided is accurate.
The patient and ophthalmic contractor information in Part B should be filled in by the
practice. The claim table should be filled in each time the patient receives Health
Service treatment.
You should first use OCS to submit a Sight Test, Voucher or Repair claim for the
patient. When the claim has been submitted, a confirmation message will appear
with the Claim ID number.
This should be recorded in the claim table on the OCSPR form, and you should tick
the relevant box to indicate the type of claim and whether the evidence for the
exemption has been seen by your practice. The patient must sign the claim each
time they receive Health Service treatment. The form should then be retained in
practice and used each time the patient is provided with Health Service treatment.
7. Forgotten Password
a) Follow the instructions given in part 2 a) to d).
b) Click I forgot my password.
Ophthalmic Claim System User Manual
Page 38
c) Enter your Email Address and OO/OMP Code. Click Submit.
d) A message will appear informing you that you will receive a confirmation email to the address you registered with. Click Please click here to continue
to return to the login page.
e) Open your e-mail service to receive the e-mail containing your username
(premises code) and a Temporary Password. Highlight and copy this
temporary password. The first time you log in to the system you will be asked
to change this password for security purposes.
Ophthalmic Claim System User Manual
Page 39
f) Enter the Temporary Password from the e-mail in the Password field. Click
Login.
g) You will be prompted to again enter the Temporary Password in the Old
Password field. Then enter a new password of your choice in the New
Password field and re-enter it in the Retype New Password field. For
maximum security, it is advised to use a unique password of at least eight
characters which contains a mix of capital letters, small letters, numbers and
symbols.
h) A message will appear, confirming the password change. Click Please click
here to continue to continue.
i) The welcome screen for OCS will appear.
Ophthalmic Claim System User Manual
Page 40