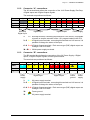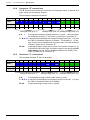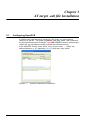
1
sigmadue microPAC MP-02 Quick Guide Quick Guide Q.G. MicroPAC MP-02-1/13.07 Cod. J30-478-1AQGMP E Copyright © 2007, 2013 Ascon Tecnologic Srl All rights reserved No part of this document may be stored in a retrieval system, or transmitted in any form, electronic or mechanical, without prior written permission of Ascon Tecnologic Srl. Ascon Tecnologic has used the best care and effort in preparing this manual and believes that the information contained in this publication is accurate. As Ascon Tecnologic continues to improve and develop products, the information contained in this manual may also be subject to change. Ascon Tecnologic reserves the right to change such information without notice. Ascon Tecnologic makes no warranty of any kind, expressed or implied, with regard to the documentation contained in this manual. Ascon Tecnologic shall not be liable in any event - technical and publishing error or omissions - for any incidental and consequential damages, in connection with, or arising out of the use of this manual. sigmadue®, gammadue® and deltadue®, are trademarks of Ascon Tecnologic Srl. All other trade names or product names are trademarks or registered trademarks. Ascon Tecnologic s.r.l. viale Indipendenza 56, 27029 Vigevano (PV) Phone +39 0381 69871 Fax +39 0381 698730 Internet site www.ascontecnologic.com E-mail [email protected] INDEX Prerequisites . . . . . . . . . . . . . . . . . . . . . . . . . . . . . . . . . . . . . . . . . . . . . v Chapter 1 Hardware Installation 1 1-1 1-2 ................................. Mechanical installation . . . . . . . . . . . . . . . . . . . . . . . . . . . . . . . . . . . . . 1-1-1 Installing and Removing modules . . . . . . . . . . . . . . . . . . . . . Electrical installation . . . . . . . . . . . . . . . . . . . . . . . . . . . . . . . . . . . . . . 1-2-1 Connect the communication cables . . . . . . . . . . . . . . . . . . . 1-2-2 Connector “A” connections . . . . . . . . . . . . . . . . . . . . . . . . . . 1-2-3 Connector “B” connections . . . . . . . . . . . . . . . . . . . . . . . . . . 1-2-4 Connector “E” connections . . . . . . . . . . . . . . . . . . . . . . . . . . 1-2-5 Connector “F” connections . . . . . . . . . . . . . . . . . . . . . . . . . . Chapter 2 OpenPCS Programming Suite Installation . . . . . . . . . . . . . . . . 2-1 Installing OpenPCS . . . . . . . . . . . . . . . . . . . . . . . . . . . . . . . . . . . . . . . 2-1-1 Hardware and Software Requirements . . . . . . . . . . . . . . . . 2-1-2 Installation . . . . . . . . . . . . . . . . . . . . . . . . . . . . . . . . . . . . . . 2-1-3 Starting OpenPCS . . . . . . . . . . . . . . . . . . . . . . . . . . . . . . . . Chapter 3 AT target .cab file Installation 3-1 .......................... Configuring OpenPCS . . . . . . . . . . . . . . . . . . . . . . . . . . . . . . . . . . . . . 1 1 2 2 3 3 4 4 5 5 5 5 5 6 6 Chapter 4 PC Ethernet port configuration . . . . . . . . . . . . . . . . . . . . . . . . . 7 Chapter 5 OpenPCS Set-up . . . . . . . . . . . . . . . . . . . . . . . . . . . . . . . . . . . . . 8 5-1 OpenPCS Setup ......................................... Chapter 6 Getting started: the first project . . . . . . . . . . . . . . . . . . . . . . . . . 6-1 6-2 6-3 6-4 6-5 Creating a New project . . . . . . . . . . . . . . . . . . . . . . . . . . . . . . . . . . . . Writing Code . . . . . . . . . . . . . . . . . . . . . . . . . . . . . . . . . . . . . . . . . . . . Executing Code . . . . . . . . . . . . . . . . . . . . . . . . . . . . . . . . . . . . . . . . . . Monitoring Code . . . . . . . . . . . . . . . . . . . . . . . . . . . . . . . . . . . . . . . . . Online Edit . . . . . . . . . . . . . . . . . . . . . . . . . . . . . . . . . . . . . . . . . . . . . . Appendix A Reference documents . . . . . . . . . . . . . . . . . . . . . . . . . . . . . . . . . 8 10 11 12 13 14 16 17 iii Index (continued) iv Prerequisites The products described in this manual should be installed, operated and maintained only by qualified application programmers and software engineers who are familiar with EN 61131-3 concepts of PLC programming, automation safety topics and applicable national standards. This quick guide gives the first principles of use for the Ascon Tecnologic microPAC system. To start programming, you need this guide, a PC, the OpenPCS programming suite and at least the microPAC Basic Unit. There are three possibilities regarding the hardware and software in use: 1. Use the microPAC demo box. In this case you have all the things you need. Just install OpenPCS on your PC and connect it to the demo box. 2. Use microPAC Basic Unit alone. In this case you should provide: - An adequate power supply; - An Ethernet CAT 5 cross cable (e.g. Ascon Tecnologic part #: AP-S2/CABLECUPROG); - When requested (the serial ports are optional), the service port serial cable (e.g. Ascon Tecnologic part #: AP-S2/CANBLECUCONF). 3. Use microPAC Basic Unit with some I/O modules. In this case you should provide: - An adequate power supply; - An Ethernet CAT 5 cross cable (e.g. Ascon Tecnologic part #: AP-S2/CABLECUPROG); - When requested (the serial ports are optional), the service port serial cable (e.g. Ascon Tecnologic part #: AP-S2/CANBLECUCONF); - When the external I/O modules are specific to the microPAC series, it is only necessary to connect the modules and the I/Os, as the modules are ready to be installed. v Sigmadue - microPAC MP-02 - Quick Guide Using this manual Specifications within the text of this manual are given in the International System of Units (SI), with non SI equivalents in parentheses. Fully Capitalized words within the text indicate markings found on the equipment. Words in bold style within the text indicate markings found in the Configuration Tools. Warnings, Cautions and Notes are used to emphasize critical instructions: DANGER! Indicates an imminently hazardous situation which, if not avoided, will result in death or serious injury. WARNING Indicates a potentially hazardous situation which, if not avoided, could result in death or serious injury. Caution Indicates a potentially hazardous situation which, if not avoided, may result in minor or moderate injury, or property damage. Note: Highlights important information about an operating procedure or the equipment. Current Documentation on the Internet Make sure you are always working with the latest version of this document. Ascon Tecnologic Srl reserves the right to make changes to its products in the name of technological advancement. New manual revisions, when published, and can be found online at: http://www.ascontecnologic.com vi Chapter 1 Hardware Installation 1-1 Mechanical installation The sigmadue microPAC and the expansion modules are installed on standard DIN rail. In a normal cabinet layout the first slot on the left must be reserved for the Basic Unit because the connector for the expansion modules is on the right end. Up to two I/O modules can be connected to each Basic Unit. 1-1-1 Installing and Removing modules A complete description on how the modules can be mounted on or removed from a DIN Rail can be found in the “MP-02 Installation Manual” [9]. Ethernet 10 Base T port (LAN) + 2 LAN status LEDs RS485 Modbus Connector (X1) Serial ports configuration microswitches RS232/485 Communication/Configuration Port Connector (X0) RESET button Serial ports X0, X1 activity LEDs (green) Expansion bus connector 8 digital input LEDs (yellow) 8 digital output LEDs (red) Diagnostics LEDs • = ERR • = RUN • = BAT • = PWR Power Supply T Terminals = +24 Vac/dc (A10, A11) = Ground (B10) = 0V (B1, B11) Analogue input terminals (E1...E6, F1...F6) Analogue input terminals (E7...E10, F6...F10) Analogue output terminals (E11...E14 F11...F14) Run/Stop terminal (A1) and RS status LED Digital input Digital output terminals terminals (A2...A4, (A6...A9, B2...B4) B6...B9) Figure 1.1 - Basic Unit I/O and Communication Ports. WARNING The RESET button does not restart the CPU or the 1131 application. The RESET button resets all the stored setup parameters and restores the defaut parameters (as well as those set by the user). 1 Sigmadue - microPAC MP-02 - Quick Guide Ethernet 10 Base T port (LAN) + 2 LAN status LEDs Serial ports configuration microswitches Expansion bus connector RS485 Modbus Connector (X1) RS232/485 Configuration Port Connector (X0) Figure 1.2 - Communications and expansion bus connectors. For pin-outs and electrical characteristics see “MP-02 Installation Manual” [9]. 1-2 Electrical installation Referring to “Figure 1.1 - Basic Unit I/O and Communication Ports.” and “Figure 1.2 - Communications and expansion bus connectors.”. 1-2-1 RS232/485 Serial Service/ ModBus Port Connect the communication cables X0 connector The connector X0 on the MP-02 unit is an RJ45 type, with the following pinout: Pin 1 Signal D+ (RS485) RS485 Modbus Port 2 D(RS485) 5 RX (RS232) 6 7 8 TX NC NC (RS232) 2 D- (RS485) 3 GND (RS485) 4 5 6 7 8 NC NC NC NC NC LAN connector The connector on the CPU module is an RJ45 type, with the following pinout: Pin Signal 2 4 GND (RS232) X1 connector The connector X1 on the MP-02 unit is an RJ45 type, with the following pinout: Pin 1 Signal D+ (RS485) LAN Ethernet 10baseT 3 GND (RS485) 1 TX+ 2 TX- 3 RX+ 4 NC 5 NC 6 RX- 7 NC 8 NC Chapter 1 - Hardware Installation 1-2-2 Connector “A” connections The “A” terminal block allows the connection of the +24V Power Supply, Run/Stop, 4 Digital Inputs and 4 Digital Outputs Signals. The terminals are positioned as follows: Pin 1 2 3 4 5 6 Label RS 1 2 3 4 1 Function Run/Stop DI1 DI2 DI3 DI4 DO1 Signal INPUT INPUT INPUT INPUT INPUT OUT Run/Stop Digital Input 1 7 2 DO2 OUT 8 3 DO3 OUT 9 4 DO4 OUT Digital Output Digital Input 10 11 L+ L+ POWER +24V +24V Power Supply RS Run/Stop terminal, connecting this terminal to a 24V source, it is possible to launch or stop the execution of the 1131 program loaded in the CPU; 2...5 1...4 4 Digital Inputs terminals, connecting this terminal to a 24V source, it is possible to change the status of the input; 6...9 1...4 4 Digital Outputs terminals. Each source type (PNP) digital output can manage a 24V 0.5A load; 10...11 L+ 24Vdc power supply terminals. 1-2-3 Connector “B” connections The “B” terminal block allows the connection of the 0V Power Supply, 4 Digital Inputs, 4 Digital Outputs Signals and the system hearth. The terminals are positioned as follows: Pin 1 2 3 4 5 6 7 8 9 Label M- 5 6 7 8 5 6 7 8 10 M- Function POWER DI1 DI2 DI3 DI4 DO1 DO2 DO3 DO4 Ground Signal 0V INPUT INPUT INPUT INPUT OUT OUT OUT OUT Ground Power supply 1 Digital Input M- Digital Output 11 Frame ground POWER 0V Power supply 0V power supply terminal. 2...5 5...8 4 Digital Inputs terminals, connecting this terminal to a 24V source, it is possible to change the status of the input 6...9 5...8 4 Digital Outputs terminals. Each source type (PNP) digital output can manage a 24V 0.5A load. 10 11 Frame ground. M- 0V power supply terminal. 3 Sigmadue - microPAC MP-02 - Quick Guide 1-2-4 Connector “E” connections The “E” terminal block allows the connection of 6 Analogue Inputs, 2 optional Analogue Inputs and 4 Analogue Outputs. The terminals are positioned as follows: Pin 1 2 3 4 5 6 Label +1 + + + + + Function AI1 Signal IN AI2 IN AI3 IN AI4 IN AI5 IN AI6 IN Analogue input (mA, V) 1...6 + 7 8 A B V mA Univ. AI1 IN 9 10 11 9 10 11 A B + + + + V mA Univ. AI2 AO1 AO2 AO3 AO4 IN OUT OUT OUT OUT Analogue input (±mA, ±V) Analogue ouput (±mA, ±V) 6 configurable analogue (linear) input plus (+) poles. These inputs can be configured as mA or V. The minus (-) poles are on connector “F”; 7...10 A...B 2 optional universal/high level analogue (linear) inputs (No. 7, 8) (see the “MP-02 Installation Manual” for details). The number (0... 2) and type of input can be identified with the order code. The other terminals of these 2 inputs are on connector “F”; 11...14 + 1-2-5 4 optional analogue output plus (+) poles. The number of output (0... 4) is specified in the order code, the type of output is set during the CPU setup phase (see the “MP-02 Installation Manual” for details). The minus (-) poles are on connector “F”. Connector “F” connections The connector labelled “F” has 14 terminals: Pin 1 2 3 4 5 6 Name - - - - - - Function AI1 Signal IN AI2 IN AI3 IN AI4 IN AI5 IN AI6 IN Analogue input (mA, V) 1...6 - 7 8 9 10 11 12 13 14 P b P b com com Univ. AI1 Univ. AI2 AO1 AO2 AO3 AO4 IN IN OUT OUT OUT OUT Analogue input (±mA, ±V) Analogue ouput (±mA, ±V) 6 configurable analogue (linear) input minus (-) poles; 7...10 P...b 2 optional universal/high level analogue (linear) inputs (No. 7, 8) (see the “MP-02 Installation Manual” for details); 11...14 - 4 4 optional analogue output minus (-) poles. Chapter 2 OpenPCS Programming Suite Installation The OpenPCS programming suite from Infoteam is provided on CD-ROM. It is also available online at: www.infoteam.de. 2-1 Installing OpenPCS 2-1-1 Hardware and Software Requirements OpenPCS requires a PC with at least: - 2-1-2 Pentium II, 1GHz; 512 MB RAM; 16 GB of free disk space; CD-ROM and 1024*768 resolution; Windows 2003 Server, Windows XP SPII or Windows Vista 32bit. Installation OpenPCS is provided on CD-ROM. The CD auto-starts a screen where you can select the software you want to install. If auto-start is not activated or does not work, please start the last distributed OpenPCS programming tool version (e.g. OpenPCS_Ver_631e.exe file) available in X:\SETUP\ folder (“X”: is the letter assigned to the CD-ROM drive in your PC). At the end of the installation, you will be asked if you want to install hardware drivers. If drivers were provided with your PLC, enter the path to the hardware driver, otherwise click “Exit”. If drivers were received for your PLC, a license key for OpenPCS was also included. See Licence Editor for how to insert a licence key. If you did not receive a hardware driver nor a licence key, OpenPCS is still fully functional, but restricted to 'SIMULATION'. Note: Installations to substitute drives are not supported by Windows XP. 2-1-3 Starting OpenPCS With Windows started choose: Start Æ Programs Æ infoteam OpenPCS 2008 Æ infoteam OpenPCS 2008 this will open the Framework. 5 Chapter 3 AT target .cab file Installation 3-1 Configuring OpenPCS In order to work with the Ascon Tecnologic CPU target, you must install in OpenPCS a cab file. The file AT_sigmadue_Lxx_Hyy_zzzz.cab contains all the files describing Ascon Tecnologic sigmadue Hardware, drivers, examples and utilities (xx, yy and zzzz are digits to identify the software version). In the OpenPCS “Extras” menu, select “tools – Driver install…”. “Select” the desired cabinet (e.g. AT_sigmadue_L13_H7_2009.cab), then “Install”. Figure 3.1 - 6 OpenPCS OEM Driver Installation Chapter 4 PC Ethernet port configuration In order to communicate with the Ascon Tecnologic MP-02 you must set the IP address and subnet mask of your PC. To do this, go to the: Start ➔ Control Panel ➔ Network Connection ➔ LAN right-click it with your mouse to show the context menu, and select “Properties”. In the “General” sheet select “Internet Protocol” and chose “Properties”. In the “General” sheet now you can set: IP address subnet mask 192.168.5.xx 255.255.255.0 xx: all except 11 7 Chapter 5 OpenPCS Set-up 5-1 OpenPCS Setup To connect the OpenPCS development system to the Ascon Tecnologic target, a new connection must be defined. Select “Connections...” item in the “PLC” menu. In the window of Figure 5.1 OpenPCS Connection Setup select “New”. Now in the window “Edit connection” it is possible to set the new connection. In the field “Name” you can name the new connection. By pushing the “Select” button you can pick the driver that manages the communication with the target: for Ascon Tecnologic CPU is TCP52. Figure 5.1 - OpenPCS Connection Setup By clicking the “Settings” button you can set set the communication parameters. Figure 5.2 - TCP Settings The Port number and IP address must be the same as those configured at the initial CPU configuration session. See the Ethernet setup menu, items 7 and 2. OpenPCS environment is now ready to communicate with the AT target. The project must be set up in order to use the CPU. 8 Chapter 5 - OpenPCS Setup Select the “Resource Properties” item in the PLC menu, select “Ascon Tecnologic…” in the “Hardware Module” field, then select the newly created TCP connection in the “Network Connection” field. Figure 5.3 - OpenPCS resource Specifications The code “Optimization” menu allows for three choices of compilation: “Normal” and “Speed only” refers to the NCC: Native Code Compilation, while “Size only” refers to the standard code. Please note that the use of NCC does not permit the user to insert break points in debugging projects. Setup Communication Timeout There are several conditions that could make it necessary to set the Ethernet Port communication timeout to a value higher than the default value. This timeout checks the dialogue between OpenPCS and the target CPU. When dealing with large programs, it may be necessary to set a longer driver timeout. The default value of 20000ms can be increased by using the following register key: [HKEY_LOCAL_MACHINE\SOFTWARE\infoteam Software GmbH\ OpenPCS\6.x.x\Online\TcpDriverTimeout_ms] Value = "20000" means a timeout of 20 seconds. 9 Chapter 6 Getting started: the first project To introduce you to OpenPCS, we will use a simple example shown below. The rest of this chapter will then implement the solution with OpenPCS. Problem: A blinker shall blink when a button `button` is pressed with an interval of 2 seconds. If the button is released, the blinker should immediately turn off. Solution: might look like this: PROGRAM X blinker_st Y VAR Z button [ AT %I0.0 : BOOL; (*input \*) blinker AT %Q0.0 : BOOL; (*output*) timer : TON; (*timer functionblock*) END_VAR (* call 2s-timer \*) timer(in:= button,pt:=T#2s); ] (* if 2s are over... *) if (timer.q) then (* ... toggle blinker *) blinker := not blinker; (* and reset timer! *) timer (in:= false); end_if; blinker := blinker AND button; END_PROGRAM X A The program starts with the keyword PROGRAM, and ends with the other keyword END_PROGRAM. When working with OpenPCS, you will not type in these keywords, but rather the editor will create them automatically for you. B OpenPCS will prompt you for the name of the program when you create a new program. C In contrast to traditional PLC programming languages, IEC61131 requires that you declare all variables that you use. D This line declares a variable of name ‘button’ of data type ‘BOOL’, to be mapped to hard ware address ‘%I0.0’, i.e. this variable shall denote the lowest bit of the first input byte. E Almost everywhere in IEC61131 you can use comments to describe your programs. F The instruction part of the program starts with a call of a functionblock. As you will notice, most instructions are assignments and function(block) calls. 10 Chapter 6 - Getting started: the first project In this sample program, we have a functionblock TON (output is true after expiration of time), control strucure IF (code of this block is only executed if its expression is satisfied), assignments := (result of the right is assigned to variable on the left) and the operator AND (and-connect operand to current result). Please note: which hardware addresses are valid is strongly dependent on the PLC you are using. 6-1 Creating a New project For our first OpenPCS code, we will set up a new project. Start OpenPCS and select File ➔ Project ➔ New. A dialog box will prompt for the name and location of the new project. Enter a name of your choice, e.g. “MyFirst”. Note: The name of an OpenPCS project should not contain blank (space) characters or special characters. Plus, for easy updates, it is recommended that you store your application separate from OpenPCS. To give an example, C:\PROJECTS is a good location to store your projects. Now, the Browser contains the new project. There are different views on your project: 1. The Files-Pane shows all files of the project; 2. The Resource-Pane displays the current configuration, with all defined Resources and their tasks; 3. The Library-Pane contains all installed libraries; 4. The Help-Pane shows the help topics. 11 Sigmadue - microPAC MP-02 - Quick Guide OpenPCS has already created one (empty) file to contain your type definitions named “usertype.typ” and a default resource, named “resource”. Typically, the default resource will need to be configured properly for your controller. We are not using any controller here, so the resource is quite ok, but to demonstrate breakpoints later we will need to set optimisation low enough to allow that. Find the “resource” entry in the Resource-Pane, right-click it with your mouse to show the context menu, and select “Properties”: Under “Optimization”, “Size only” should be selected by default. If you use a sample project from your PLC manufacturer, other optimization settings can be set. 6-2 WARNING For using breakpoints, optimization must be set to “Size only”! Writing Code To create a new program, choose “File ➔ New”. A dialog-box will appear, where you must choose the programming language, a filename and the location where the file will be stored. As you can see there are plenty of programming languages that can be chosen, but we will only use ST in this introduction. Enter “blinker_st” as the name and ST as language and press “OK”. Do not change the file location. Now you are asked if you want to link the new program to the active resource. Click “Yes” and a new task, named “blinker_st” will appear in the resource-pane under the active resource. The Editor-Pane will open, displaying two different windows: At the top is the declaration window for your first program, at the bottom is the instruction window of your program. Enter the sample program like shown below: 12 Chapter 6 - Getting started: the first project Press File ➔ CheckSyntax to invoke a syntax check. In the diagnostic output window, you should read “0 errors, 0 warnings”. If not, carefully check what you have entered. 6-3 Executing Code To execute your small application, we need to compile it and transfer the code to the controller first. To build the code for the controller select PLC ➔ Build Active Resource from the menu bar. In the output window, you will see the compilation proceed. The end of the output should look similar to the following: After compilation finished successfully, your code needs to be transferred to your controller. Now select PLC ➔ Online to Connect to the resource. OpenPCS will detetct, that your application needs to be downloaded and will prompt your permission to do so: Accept that with “yes”. You will see a progress bar while the code is being transferred, but for this small example it should be finished very quickly. When download has finished, you will see that OpenPCS automatically opened another of its tools, the “Test and Commissioning”. This is proof that OpenPCS is online: Note: In this introduction, we are not using a real hardware controller. Instead, we are using the “Windows Simulation tool” that comes with OpenPCS, named SmartSIM: Use PLC ➔ Coldstart (or press the red arrow in the toolbar) to start execution of your code. Go to SmartSIM and activate the first input (“button”). This should activate the first output (“blinker”). After an expiration of three seconds it should go inactive switching back after another three seconds. De-activate the first input (“button”), and the first output (“blinker”) should be inactive. 13 Sigmadue - microPAC MP-02 - Quick Guide 6-4 Monitoring Code Now that your application is running, go back to the Browser and find the “Resource” in your project. Click all the small plus signs to open the entire tree under the resource entry. This will reveal the “instance tree”, showing all instances of programs and function blocks and all variables that you used in your program: Double-click some of the variable entries (grey boxes with 0/1 shown), and see the corresponding variables added to the watch list in the Test&Commissioning: Go back to SmartSIM and modify the inputs to see the effect in the watch list. The ST-Editor will also be in monitor mode. You should see a different cursor once you move the mouse onto the ST-Editor. 14 Chapter 6 - Getting started: the first project Move the mouse cursor to a variable in your code and after a short period, you will see a “tooltip” like display of online value display: Move the mouse around and point at different variables to examine their values. If the variables are modified by the application, the display will be automatically refreshed. If you need to analyse the logic of your code, value display alone may not be enough. Move the cursor to a line of your program that contains code, and single click the mouse. Now press F9 to set a breakpoint to that line. You will see a red dot immediately, marking the breakpoint. Shortly after that, you will notice a yellow arrow, identifying the current instruction pointer. OpenPCS will display “Breakpoint reached” in the output window. You may still move the mouse cursor around to examine variable values while the controller is stopped at the breakpoint. Press F10 to single-step through your code, or press F5 to continue execution. Within a line that contains a breakpoint, press F9 again to delete the breakpoint. OpenPCS supports “Online Edit”, for further information see Online Edit in the user manual. Note: If SmartSIM does not stop when you set a breakpoint, you probably did not set optimisation settings properly. Be sure your resource is configured for “size only”. 15 Sigmadue - microPAC MP-02 - Quick Guide 6-5 Online Edit Online Edit (or Online Change) is a feature whereby program changes are applied to the PLC without the need to restart it. The following Stepps need to be done in order to run Online Edit. The program must be compiled and running on the PLC. The source is opened in an editor window. The Editor can be switched from Monitor Mode (green colored symbol) to Edit Mode (red colored symbol) and back via PLC ➔ Online/ Edit or the corresponding button of the toolbar . Implement the desired changes and close the Edit Mode via PLC ➔ Online/ Edit again. OpenPCS prints a dialogue to accept and download the changes: If the changes are accepted, OpenPCS recompiles the necessary unit and downloads them to the PLC without stoppig the running cycle. The changes have bearing on the next cycle. OpenPCS prompts a message in the output window, if the update is finished: 16 Appendix A Reference documents [1] [2] “Infoteam OpenPCS programming system – user manual” – version 6.0 English “IEC 61131-3: Programming Industrial Automation Systems” – Karl-Heinz John, Michael Tiegelkamp - Springer [3] “Ascon Tecnologic Firmware Function Block Library” [4] “IEC 61131-3 Function Block Library”. [5] “Estensioni per gestire porte di comunicazione dell’ambiente OpenPCS” V1.0 – Maurizio Grassi [6] “Modbus Messaging on TCP/IP implementation guide” - http://www.Modbus-IDA.org [7] “MODBUS over Serial Line Specification & Implementation guide” - http://www.Modbus-IDA.org [8] “MODBUS APPLICATION PROTOCOL SPECIFICATION” - http://www.Modbus-IDA.org [9] “MP-02 Installation manual” (code: J30 - 658 - 1AMP-02 E). [10] “MP-02 User manual” (code: J30 - 478 - 1AMP-02 E). [11] “microPAC I/O modules Installation Manuals”. [12] “microPAC I/O modules User Manuals”. 17 Sigmadue - microPAC MP-02 - Quick Guide 18