1
Oracle® VM
Manager User's Guide for Release 3.3
E50250-05
July 2015
Oracle Legal Notices
Copyright © 2011, 2015 Oracle and/or its affiliates. All rights reserved.
This software and related documentation are provided under a license agreement containing restrictions on use and disclosure and are protected
by intellectual property laws. Except as expressly permitted in your license agreement or allowed by law, you may not use, copy, reproduce,
translate, broadcast, modify, license, transmit, distribute, exhibit, perform, publish, or display any part, in any form, or by any means. Reverse
engineering, disassembly, or decompilation of this software, unless required by law for interoperability, is prohibited.
The information contained herein is subject to change without notice and is not warranted to be error-free. If you find any errors, please report them
to us in writing.
If this is software or related documentation that is delivered to the U.S. Government or anyone licensing it on behalf of the U.S. Government, then
the following notice is applicable:
U.S. GOVERNMENT END USERS: Oracle programs, including any operating system, integrated software, any programs installed on the hardware,
and/or documentation, delivered to U.S. Government end users are "commercial computer software" pursuant to the applicable Federal Acquisition
Regulation and agency-specific supplemental regulations. As such, use, duplication, disclosure, modification, and adaptation of the programs,
including any operating system, integrated software, any programs installed on the hardware, and/or documentation, shall be subject to license
terms and license restrictions applicable to the programs. No other rights are granted to the U.S. Government.
This software or hardware is developed for general use in a variety of information management applications. It is not developed or intended for
use in any inherently dangerous applications, including applications that may create a risk of personal injury. If you use this software or hardware
in dangerous applications, then you shall be responsible to take all appropriate fail-safe, backup, redundancy, and other measures to ensure its
safe use. Oracle Corporation and its affiliates disclaim any liability for any damages caused by use of this software or hardware in dangerous
applications.
Oracle and Java are registered trademarks of Oracle and/or its affiliates. Other names may be trademarks of their respective owners.
Intel and Intel Xeon are trademarks or registered trademarks of Intel Corporation. All SPARC trademarks are used under license and are
trademarks or registered trademarks of SPARC International, Inc. AMD, Opteron, the AMD logo, and the AMD Opteron logo are trademarks or
registered trademarks of Advanced Micro Devices. UNIX is a registered trademark of The Open Group.
This software or hardware and documentation may provide access to or information about content, products, and services from third parties.
Oracle Corporation and its affiliates are not responsible for and expressly disclaim all warranties of any kind with respect to third-party content,
products, and services unless otherwise set forth in an applicable agreement between you and Oracle. Oracle Corporation and its affiliates will not
be responsible for any loss, costs, or damages incurred due to your access to or use of third-party content, products, or services, except as set
forth in an applicable agreement between you and Oracle.
Documentation Accessibility
For information about Oracle's commitment to accessibility, visit the Oracle Accessibility Program website at
http://www.oracle.com/pls/topic/lookup?ctx=acc&id=docacc.
Access to Oracle Support
Oracle customers that have purchased support have access to electronic support through My Oracle Support. For information, visit
http://www.oracle.com/pls/topic/lookup?ctx=acc&id=info or visit http://www.oracle.com/pls/topic/lookup?ctx=acc&id=trs if you are hearing impaired.
Abstract
Document generated on: 2015-07-20 (revision: 4803)
Table of Contents
Preface ............................................................................................................................................ vii
1 Audience ............................................................................................................................... vii
2 Related Documents ............................................................................................................... vii
3 Command Syntax ................................................................................................................. viii
4 Conventions ......................................................................................................................... viii
1 Using Oracle VM Manager .............................................................................................................. 1
1.1 Web Browser Requirements ................................................................................................. 1
1.2 Logging into Oracle VM Manager ......................................................................................... 2
1.3 Oracle VM Manager Accessibility Features ............................................................................ 3
1.4 HTML Access Keys ............................................................................................................. 3
1.5 User Interface Overview ....................................................................................................... 3
1.6 Using the Global Links ......................................................................................................... 5
1.6.1 Help Menu ................................................................................................................ 5
1.7 Using the Tabs .................................................................................................................... 5
1.7.1 Getting Started Tab ................................................................................................... 6
1.7.2 Subtabs .................................................................................................................... 7
1.7.3 Navigation Pane ........................................................................................................ 7
1.7.4 Perspectives ............................................................................................................. 8
1.7.5 Toolbars ................................................................................................................. 10
1.7.6 Management Pane .................................................................................................. 10
1.8 Object Icon Colors ............................................................................................................. 11
1.9 Changing Default UI Behaviour ........................................................................................... 11
1.10 Drag and Drop ................................................................................................................. 11
1.11 Right-Click Action Menus .................................................................................................. 12
1.12 Multi-Select Functionality .................................................................................................. 12
1.13 Name Filters .................................................................................................................... 12
1.14 Tags ................................................................................................................................ 13
1.15 Case Sensitivity ............................................................................................................... 13
2 Health Tab ................................................................................................................................... 15
2.1 Status Overview ................................................................................................................. 15
2.1.1 Toolbar ................................................................................................................... 16
2.1.2 Detailed Information Dialog ...................................................................................... 16
2.2 Error Conditions ................................................................................................................. 16
2.2.1 Toolbar ................................................................................................................... 17
2.3 Statistics ............................................................................................................................ 17
2.3.1 Toolbar ................................................................................................................... 17
2.3.2 Server Pools Folder ................................................................................................ 17
2.3.3 Server Pool Item ..................................................................................................... 18
2.3.4 Server Item ............................................................................................................. 18
2.3.5 Unassigned Servers Folder ...................................................................................... 19
2.3.6 Unassigned Servers Item ......................................................................................... 19
2.3.7 Unassigned Virtual Machines Folder ......................................................................... 19
3 Servers and VMs Tab ................................................................................................................... 21
3.1 Toolbar .............................................................................................................................. 25
3.1.1 Discover Servers ..................................................................................................... 25
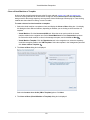
3.1.2 Create Server Pool .................................................................................................. 26
3.1.3 Create Virtual Machine ............................................................................................ 30
3.2 Summary ........................................................................................................................... 38
3.3 Server Pools Folder ........................................................................................................... 39
3.3.1 Server Pools Perspective ......................................................................................... 39
3.3.2 Server Processor Compatibility Perspective .............................................................. 51
iii
Oracle® VM
3.4 Server Pool Item ................................................................................................................ 54
3.4.1 Info Perspective ...................................................................................................... 54
3.4.2 Servers Perspective ................................................................................................ 55
3.4.3 Virtual Machines Perspective ................................................................................... 72
3.4.4 Anti-Affinity Groups Perspective ............................................................................... 91
3.4.5 Policies Perspective ................................................................................................ 94
3.4.6 Server Update Repositories Perspective ................................................................... 97
3.4.7 Events Perspective .................................................................................................. 99
3.5 Server Item ...................................................................................................................... 101
3.5.1 Info Perspective .................................................................................................... 101
3.5.2 Virtual Machines Perspective ................................................................................. 103
3.5.3 CPUs Perspective ................................................................................................. 123
3.5.4 Ethernet Ports Perspective ..................................................................................... 124
3.5.5 Bond Ports Perspective ......................................................................................... 125
3.5.6 Physical Disks Perspective .................................................................................... 128
3.5.7 Storage Initiators Perspective ................................................................................. 134
3.5.8 Control Domains Perspective ................................................................................. 135
3.5.9 Repository Exports Perspective .............................................................................. 136
3.5.10 Events Perspective .............................................................................................. 137
3.6 Unassigned Servers Folder ............................................................................................... 139
3.6.1 Servers Perspective ............................................................................................... 140
3.6.2 Events Perspective ................................................................................................ 157
3.7 Unassigned Virtual Machines Folder ................................................................................. 159
3.7.1 Virtual Machines Perspective ................................................................................. 159
3.7.2 Events Perspective ................................................................................................ 172
4 Repositories Tab ......................................................................................................................... 175
4.1 Toolbar ............................................................................................................................ 176
4.1.1 Create New Repository .......................................................................................... 176
4.2 Summary ......................................................................................................................... 179
4.3 Repositories Folder .......................................................................................................... 179
4.3.1 Repositories Perspective ........................................................................................ 179
4.4 Repository Item ................................................................................................................ 184
4.4.1 Info Perspective .................................................................................................... 184
4.4.2 Events Perspective ................................................................................................ 185
4.5 Assemblies Item ............................................................................................................... 187
4.5.1 Assemblies Perspective ......................................................................................... 187
4.6 ISOs Item ........................................................................................................................ 189
4.6.1 ISOs Perspective ................................................................................................... 189
4.7 VM Files Item .................................................................................................................. 191
4.7.1 VM Files Perspective ............................................................................................. 191
4.8 VM Templates Item .......................................................................................................... 191
4.8.1 VM Templates Perspective .................................................................................... 191
4.9 Virtual Disks Item ............................................................................................................. 204
4.9.1 Virtual Disks Perspective ....................................................................................... 204
5 Networking Tab .......................................................................................................................... 209
5.1 Networks ......................................................................................................................... 210
5.1.1 Create New Network ............................................................................................. 211
5.1.2 Edit Existing Network ............................................................................................. 214
5.1.3 Delete Existing Network ......................................................................................... 216
5.2 VLAN Interfaces ............................................................................................................... 216
5.2.1 Navigation Pane .................................................................................................... 217
5.2.2 Management Pane ................................................................................................ 217
5.2.3 Create VLAN Interfaces ......................................................................................... 218
5.2.4 Edit VLAN Interfaces ............................................................................................. 219
iv
Oracle® VM
5.2.5 Delete VLAN Interfaces .........................................................................................
5.3 Virtual NICs .....................................................................................................................
6 Storage Tab ...............................................................................................................................
6.1 Toolbar ............................................................................................................................
6.1.1 Discover File Server ..............................................................................................
6.1.2 Discover SAN Server .............................................................................................
6.2 Summary .........................................................................................................................
6.3 File Servers Folder ...........................................................................................................
6.3.1 File Servers Perspective ........................................................................................
6.4 File Server Item ...............................................................................................................
6.4.1 Info Perspective ....................................................................................................
6.4.2 Events Perspective ................................................................................................
6.4.3 File Systems Perspective .......................................................................................
6.4.4 Access Groups Perspective ...................................................................................
6.5 SAN Servers Folder .........................................................................................................
6.5.1 SAN Servers Perspective .......................................................................................
6.6 SAN Server Item ..............................................................................................................
6.6.1 Info Perspective ....................................................................................................
6.6.2 Events Perspective ................................................................................................
6.6.3 Physical Disks Perspective ....................................................................................
6.6.4 Access Groups Perspective ...................................................................................
6.6.5 Volume Groups Perspective ...................................................................................
6.7 Volume Group Item ..........................................................................................................
6.7.1 Info Perspective ....................................................................................................
6.7.2 Physical Disks Perspective ....................................................................................
6.7.3 Events Perspective ................................................................................................
6.8 Unmanaged Fibre Channel Storage Array Item ..................................................................
6.8.1 Info Perspective ....................................................................................................
6.8.2 Events Perspective ................................................................................................
6.8.3 Physical Disks Perspective ....................................................................................
6.8.4 Access Groups Perspective ...................................................................................
6.8.5 Volume Groups Perspective ...................................................................................
6.9 Unmanaged iSCSI Storage Array Item ..............................................................................
6.9.1 Info Perspective ....................................................................................................
6.9.2 Events Perspective ................................................................................................
6.9.3 Physical Disks Perspective ....................................................................................
6.9.4 Access Groups Perspective ...................................................................................
6.9.5 Volume Groups Perspective ...................................................................................
6.10 Local File Systems Item .................................................................................................
6.10.1 Edit File System ..................................................................................................
6.10.2 Refresh File System ............................................................................................
6.10.3 Delete File System ..............................................................................................
6.10.4 Show Events .......................................................................................................
6.11 Shared File Systems Item ...............................................................................................
6.11.1 Edit File System ..................................................................................................
6.11.2 Refresh File System ............................................................................................
6.11.3 Delete File System ..............................................................................................
6.11.4 Show Events .......................................................................................................
7 Tools and Resources Tab ...........................................................................................................
7.1 Tags ................................................................................................................................
7.1.1 Add Tag ................................................................................................................
7.1.2 Edit Tag ................................................................................................................
7.1.3 Delete Tag ............................................................................................................
7.1.4 Find Components with matching Tag ......................................................................
v
219
219
221
223
223
227
232
233
233
240
240
241
243
246
250
250
257
258
259
260
267
274
275
275
276
282
284
285
285
287
294
301
302
303
303
305
312
318
319
320
320
321
321
323
324
324
324
325
329
330
330
331
331
331
Oracle® VM
7.2 Server Update Groups ......................................................................................................
7.2.1 Create New Server Update Repository ...................................................................
7.2.2 Edit Server Update Repository ...............................................................................
7.2.3 Delete Server Update Repository ...........................................................................
7.3 Preferences .....................................................................................................................
8 Jobs Tab ....................................................................................................................................
8.1 Summary .........................................................................................................................
8.1.1 Status Filters .........................................................................................................
8.1.2 Export to Excel ......................................................................................................
8.1.3 Job Details ............................................................................................................
8.1.4 Debug Transcript ...................................................................................................
8.1.5 Abort Jobs ............................................................................................................
8.2 Recurring .........................................................................................................................
8.2.1 Edit a Recurring Job ..............................................................................................
Glossary ........................................................................................................................................
Index .............................................................................................................................................
vi
332
333
334
334
334
337
338
338
338
339
341
341
341
342
343
349
Preface
Table of Contents
1
2
3
4
Audience ....................................................................................................................................... vii
Related Documents ....................................................................................................................... vii
Command Syntax ......................................................................................................................... viii
Conventions ................................................................................................................................. viii
The preface contains information on how to use the Oracle VM Manager User's Guide.
1 Audience
The Oracle VM Manager User's Guide is intended for system administrators and end users who want to
learn how to provision and manage virtual machines using the Oracle VM Manager Web Interface. This
book is designed to map directly onto the Oracle VM Manager Web Interface, as a result some sections
may be repeated if the user interface provides the same options or views in more than one place. Ideally,
you should identify the item that you need help with within the user interface and then use the table of
contents to navigate to the relevant section in this book.
For more general descriptions of the design and architecture of the product, you should refer to the Oracle
VM Concepts Guide. For a basic guide to getting started with configuring your environment within the
Oracle VM Manager Web Interface, refer to Oracle VM Manager Getting Started Guide.
2 Related Documents
For more information, see the following documents in the Oracle VM documentation set:
• Oracle VM Release Notes
• Oracle VM Installation and Upgrade Guide
• Oracle VM Concepts Guide
• Oracle VM Manager Getting Started Guide
• Oracle VM Manager User's Guide
• Oracle VM Manager Command Line Interface User's Guide
• Oracle VM Administrator's Guide
• Oracle VM Windows Paravirtual Drivers Installation Guide
• Oracle VM Web Services API Developer's Guide
• Oracle VM Security Guide
• Oracle VM Licensing Information User Manual
You can also get the latest information on Oracle VM by going to the Oracle VM Web site:
http://www.oracle.com/us/technologies/virtualization/oraclevm
vii
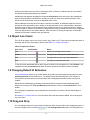
Command Syntax
3 Command Syntax
Oracle Linux command syntax appears in monospace font. The dollar character ($), number sign (#), or
percent character (%) are Oracle Linux command prompts. Do not enter them as part of the command.
The following command syntax conventions are used in this guide:
Convention
Description
backslash \
A backslash is the Oracle Linux command continuation character. It is used in
command examples that are too long to fit on a single line. Enter the command
as displayed (with a backslash) or enter it on a single line without a backslash:
dd if=/dev/rdsk/c0t1d0s6 of=/dev/rst0 bs=10b \
count=10000
braces { }
Braces indicate required items:
.DEFINE {macro1}
brackets [ ]
Brackets indicate optional items:
cvtcrt termname [outfile]
ellipses ...
Ellipses indicate an arbitrary number of similar items:
CHKVAL fieldname value1 value2 ... valueN
italics
Italic type indicates a variable. Substitute a value for the variable:
library_name
vertical line |
A vertical line indicates a choice within braces or brackets:
FILE filesize [K|M]
forward slash /
A forward slash is used as an escape character in the Oracle VM Manager
Command Line Interface to escape the special characters ", ', ?, \, /, <, >.
Special characters need only be escaped when within single or double quotes:
create Tag name=MyTag description="HR/'s VMs"
4 Conventions
The following text conventions are used in this document:
Convention
Meaning
boldface
Boldface type indicates graphical user interface elements associated with an
action, or terms defined in text or the glossary.
italic
Italic type indicates book titles, emphasis, or placeholder variables for which
you supply particular values.
monospace
Monospace type indicates commands within a paragraph, URLs, code in
examples, text that appears on the screen, or text that you enter.
viii
Chapter 1 Using Oracle VM Manager
Table of Contents
1.1
1.2
1.3
1.4
1.5
1.6
Web Browser Requirements ......................................................................................................... 1
Logging into Oracle VM Manager ................................................................................................. 2
Oracle VM Manager Accessibility Features ................................................................................... 3
HTML Access Keys ..................................................................................................................... 3
User Interface Overview ............................................................................................................... 3
Using the Global Links ................................................................................................................. 5
1.6.1 Help Menu ........................................................................................................................ 5
1.7 Using the Tabs ............................................................................................................................ 5
1.7.1 Getting Started Tab ........................................................................................................... 6
1.7.2 Subtabs ............................................................................................................................ 7
1.7.3 Navigation Pane ................................................................................................................ 7
1.7.4 Perspectives ..................................................................................................................... 8
1.7.5 Toolbars ......................................................................................................................... 10
1.7.6 Management Pane .......................................................................................................... 10
1.8 Object Icon Colors ..................................................................................................................... 11
1.9 Changing Default UI Behaviour ................................................................................................... 11
1.10 Drag and Drop ......................................................................................................................... 11
1.11 Right-Click Action Menus .......................................................................................................... 12
1.12 Multi-Select Functionality .......................................................................................................... 12
1.13 Name Filters ............................................................................................................................ 12
1.14 Tags ........................................................................................................................................ 13
1.15 Case Sensitivity ....................................................................................................................... 13
Management for the Oracle VM environment is provided by Oracle VM Manager, a transaction-based
framework that also includes an integrated database, a web-based management user interface and a
command line interface.
This book discusses using the Oracle VM Manager Web Interface. In this chapter we discuss how to
access the web-based user interface, the general design and layout of the application and generic
behaviors that can be applied to each section of the application as you make use of it.
Notably, the web-based user interface includes additional logic to help ensure that actions performed within
Oracle VM Manager do not result in configurations that could cause future runtime errors. This additional
logic is not available within the command line interface, which provides greater flexibility but requires a
deeper understanding of object relationships. The Oracle VM Manager Web Interface helps to guide users
toward configuring an Oracle VM environment consistently and with minimal chance of error.
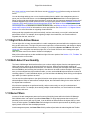
1.1 Web Browser Requirements
The Oracle VM Manager user interface is supported in the following Web browsers:
• Microsoft Internet Explorer 10 and above.
• Mozilla Firefox 8 and above.
• Apple Safari 6 and above, running on Mac OS X.
• Google Chrome 15 and above.
1
Logging into Oracle VM Manager
The Oracle VM Manager user interface is best used on client systems with a minimum screen resolution of
at least 1024 x 768 pixels.
The Oracle VM Manager user interface is best used in an environment where no proxy server is configured
between the client web-browser and the Oracle VM Manager host. Operations performed through the
Oracle VM Manager user interface are synchronous and frequently depend on the completion of a previous
operation. It is imperative that any environment that makes use of a proxy server between client webbrowsers and the Oracle VM Manager host is configured in such a way that proxy timeouts take into
account the length of time that it takes to perform some operations. Neglecting to configure a proxy server
for this may cause unexpected behaviour within the Oracle VM Manager Web Interface. The length of
time that an operation may take to complete is not fixed and is dependent on your own environment. For
example, refreshing a large storage array takes longer than a smaller one.
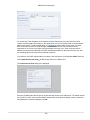
1.2 Logging into Oracle VM Manager
To open the Login page of the Oracle VM Manager Web Interface, enter the following address in a Web
browser:
https://hostname:port/ovm/console
Where, hostname refers to the host name or IP address of the Oracle VM Manager host, and port refers
to the port number on which the Oracle VM Manager Web Interface is listening (which is 7002 by default).
Note
In previous versions of Oracle VM Manager unencrypted HTTP traffic was permitted
by default. HTTP access is now disabled by default and Oracle VM Manager uses
Secure Sockets Layer (SSL) to encrypt all HTTP traffic. Therefore, you should
always use https in the protocol section of your URI.
Important
You must ensure that if you are accessing Oracle VM Manager through a firewalled
connection, the firewall is configured to allow TCP traffic on the port that Oracle VM
Manager is using to listen for connections.
To connect to Oracle VM Manager on a host named example.com, use:
https://example.com:7002/ovm/console
Enter your Oracle VM Manager administration username in the Username field. This is the administration
username you create during the Oracle VM Manager install. Enter the password for the Oracle VM
Manager administration username in the Password field.
Important
The Oracle VM Manager Web Interface makes use of cookies in order to store
session data. Therefore, to successfully login and use the Oracle VM Manager Web
Interface your web browser must accept cookies from the Oracle VM Manager host.
Now you are logged in, you can add Oracle VM Servers, add storage, create storage repositories and
import resources into them, create server pools, and create virtual machines.
The user interface displays context sensitive information, relevant to the selection in the navigator and
content panes.
2
Oracle VM Manager Accessibility Features
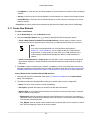
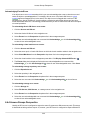
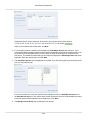
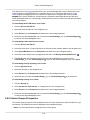
1.3 Oracle VM Manager Accessibility Features
As part of the effort to make Oracle products, services, and supporting documentation accessible and
usable to the disabled community, Oracle VM Manager Web Interface allows you to configure the following
accessibility features:
• Support for Screen Reader.
• Support for High Contrast.
• Support for Large Fonts.
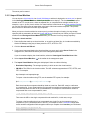
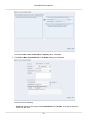
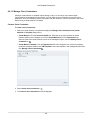
You can enable these features when logging in to the Oracle VM Manager Web Interface or you can set or
change the accessibility options once you have logged in.
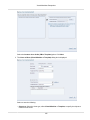
To enable accessibility options when logging in:
1. On the login page of the Oracle VM Manager Web Interface, click the arrow to expand Accessibility
Options.
2. Select one or more check box from the following accessibility options:
• I use a screen reader.
• I use high contrast.
• I use large fonts.
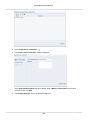
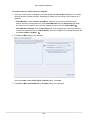
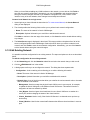
To set or change accessibility options while you are logged in:
1. In the Global Links at the top of the right-hand-side of the Oracle VM Manager Web Interface, click
Settings.
2. From the drop-down list, select from the following accessibility options:
• I use a screen reader.
• I use high contrast.
• I use large fonts.
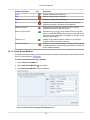
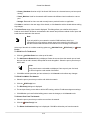
1.4 HTML Access Keys
To access menus without using a mouse, you can use the HTML access keys. The shortcut key for a
user interface item is shown as an underline of the shortcut key letter in the item name, for example, the
shortcut key for the Servers and VMs tab is S, as that is the letter underlined in the tab text.
To access the shortcut key, enter the HTML access key for your browser, plus the access key letter. For
example, to access a shortcut key on Microsoft Internet Explorer, press Alt + shortcut_key at the same
time. See your web browser documentation to find the key combination to use for HTML access keys for
your browser.
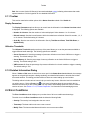
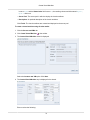
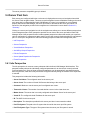
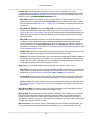
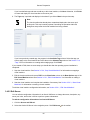
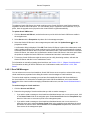
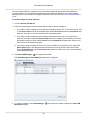
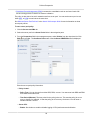
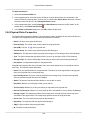
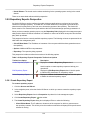
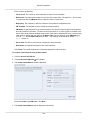
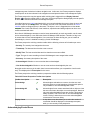
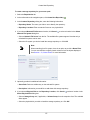
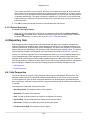
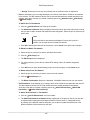
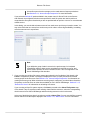
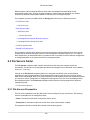
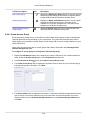
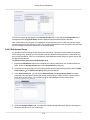
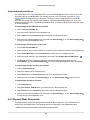
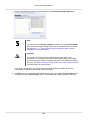
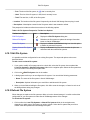
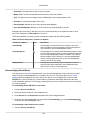
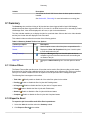
1.5 User Interface Overview
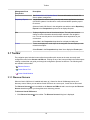
The Oracle VM Manager Web Interface provides a set of tabs, work areas (management panes), icons,
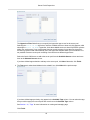
and toolbars, for access to various functions and configuration screens. Figure 1.1, “The Oracle VM
Manager Web Interface” shows the main components of the Oracle VM Manager Web Interface.
3
User Interface Overview
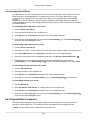
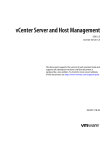
Figure 1.1 The Oracle VM Manager Web Interface
The components of the Oracle VM Manager Web Interface are described in more detail in Table 1.1,
“Oracle VM Manager Web Interface components”.
Table 1.1 Oracle VM Manager Web Interface components
User Interface Item
Description
Global Links
Contain navigation and resources which are relevant to the whole Oracle
VM Manager Web Interface. See Section 1.6, “Using the Global Links” for
information on each global link.
Tabs
The tabs available are Health, Servers and VMs, Repositories, Networking,
Storage, Tools and Resources, Jobs,and Getting Started. See Section 1.7,
“Using the Tabs” for information on each tab.
Toolbar
Allows quick access to a group of task icons. The icons in the toolbar change
depending on the selected tab. See Section 1.7.5, “Toolbars” for information on
the toolbar.
Navigation Pane
Contains the navigation tree. See Section 1.7.3, “Navigation Pane”
Navigation Tree
Shows hierarchy of physical and virtual components. Click on a component
to open its default pane and related management panes. See Section 1.7.3,
“Navigation Pane” for more information on the navigation tree.
Management Pane
Contains the management panes for the selected tab. The management panes
change depending on the selected subtab or Perspective in the drop-down
list in the management pane toolbar. The management panes that can be
displayed are described in each tab. See Section 1.7.4, “Perspectives” for
more information.
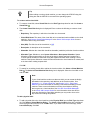
Job Summary Pane
The Job Summary pane provides a summary of jobs; Total Jobs, Pending,
In Progress, Failed, Aborted and Complete. Click an icon to open a dialog
box showing the tasks. The dialog box lets you export a list of the jobs to a
spreadsheet file, view details of a job, or abort a job. See Chapter 8, Jobs Tab
for more information on jobs.
The Job Summary pane also includes a status icon that indicates the
readiness of Oracle VM Manager:
•
The icon is green when Oracle VM Manager is running normally and it is
safe to perform any operations.
4
Using the Global Links
User Interface Item
Description
•
The icon is yellow when Oracle VM Manager is either in the process of
starting up or shutting down. During these periods it is not recommended
that any actions are performed within Oracle VM Manager.
The sections that follow describe each set of controls and their relationship to one another, in more detail.
1.6 Using the Global Links
The global links are available on every page. The global links are as shown in Table 1.2, “Global Link Item
Descriptions”:
Table 1.2 Global Link Item Descriptions
Global Link
Description
Logged in as username Displays the username of the user currently logged in.
Logout
Logs out of the Oracle VM Manager Web Interface and displays the Oracle VM
Manager log in screen.
Settings
The drop-down list contains configurable accessibility options. See Section 1.3,
“Oracle VM Manager Accessibility Features” for more information on the
Settings menu.
Help
The drop-down list contains the Oracle VM Help, Getting Started,
Oracle.com and About menu items. See Section 1.6.1, “Help Menu” for more
information on the Help menu.
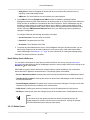
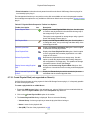
1.6.1 Help Menu
Use the Help menu to display the Oracle VM Manager online help, the Getting Started chapter of the
online help, the product release number, and to go to Oracle's home page. The Help menu options are as
shown in Table 1.3, “Help Menu Options”.
Table 1.3 Help Menu Options
Help Menu Option
Icon
Description
Oracle VM Manager Help
Opens a new web browser window which contains the
Oracle VM Manager online help system.
Getting Started
Opens a new web browser window which contains
the Getting Started chapter of the online help system.
Read this section to quickly get started using Oracle VM
Manager.
Oracle.com
Opens a new web browser window which contains the
Oracle home page.
About
Displays the About Oracle VM dialog box which
contains the release number.
1.7 Using the Tabs
Each tab defines different objects and functional areas of operations that can be performed in Oracle VM
Manager. When you select a tab the default management pane for that tab is displayed. The management
5
Getting Started Tab
pane change depending on the selected object in the navigation tree and the Perspective selected in the
drop-down list in the management pane toolbar. The tabs in the Oracle VM Manager Web Interface are:
• Chapter 2, Health Tab: to monitor the overall health and status of your virtualization environment and to
view historical statistics such as memory and CPU usage.
• Chapter 3, Servers and VMs Tab: to discover Oracle VM Servers, create and manage server pools and
virtual machines, assign Oracle VM Servers to server pools, and create and configure virtual machines
in server pools.
• Chapter 4, Repositories Tab: to create and configure storage repositories and their content; assemblies,
VM templates, ISO files, virtual disks and virtual machine configuration files.
• Chapter 5, Networking Tab: to manage networks and their functions in your environment, create, edit
and delete networks and VLAN groups, and create virtual NICs which can be used by virtual machines.
• Chapter 6, Storage Tab: to manage, discover and edit file servers and SAN servers (storage arrays),
physical disks, access groups and volume groups.
• Chapter 7, Tools and Resources Tab: to manage tags which can be used to identify and group objects
within Oracle VM Manager, and to configure server update repositories for updates of the Oracle VM
Servers being managed by Oracle VM Manager. This tab also contains preferences that control certain
user interface behaviors.
• Chapter 8, Jobs Tab: to get a global view on jobs, to evaluate information on jobs completed or aborted,
or to cancel a job in progress.
A Getting Started tab is also available if the Getting Started panel is displayed. This tab is described in
more detail in Section 1.7.1, “Getting Started Tab”.
The order of the tabs is largely determined by frequency of use once your environment is completely
configured. It is not indicative of the order in which you should attempt to configure the different elements
within your environment. For an insight into the typical order in which configuration tasks should be
performed for a fresh installation please refer to the information provided in the Getting Started tab, or to
the Oracle VM Manager Getting Started Guide.
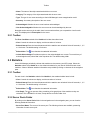
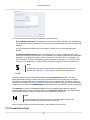
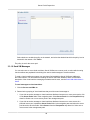
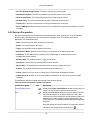
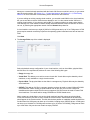
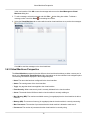
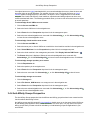
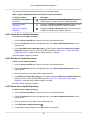
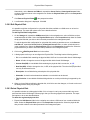
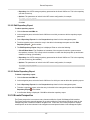
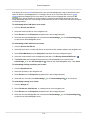
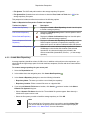
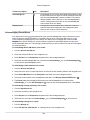
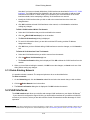
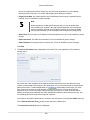
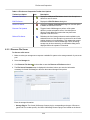
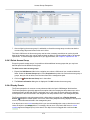
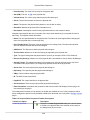
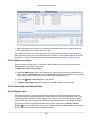
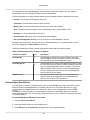
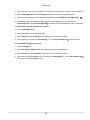
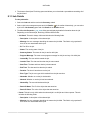
1.7.1 Getting Started Tab
When you first log in to the Oracle VM Manager Web Interface the Getting Started tab is displayed on
the right side of the management pane. The Getting Started tab contains a tutorial that describes how to
get started with Oracle VM Manager, and walks you through discovering Oracle VM Servers, registering
storage, setting up networking, setting up a storage repository and importing resources into it, creating a
server pool and creating virtual machines. To show or hide the tutorial, click the arrow to the right of the
management pane.
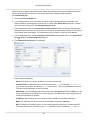
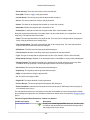
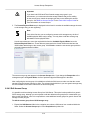
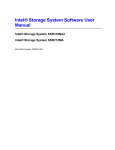
Figure 1.2, “Getting Started tab” shows the Getting Started tab.
6
Subtabs
Figure 1.2 Getting Started tab
The information displayed in this tab is based on the content provided in the Oracle VM Manager Getting
Started Guide.
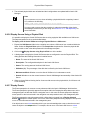
1.7.2 Subtabs
On some tabs, links are shown at the top of the tab. These links are referred to as subtabs. Each subtab
displays its own management pane. Subtabs are usually used when no navigation pane is shown, and
serve a similar purpose to perspectives. Unlike perspectives, however, they do not display content about
related object types, but are specific to a single configuration or management view within the Oracle VM
Manager Web Interface. For example, subtabs are used on the Tools and Resources tab to distinguish
between the configuration options available for different elements within Oracle VM Manager: Tags,
Server Update Groups and Preferences. Each of these elements is self-contained and bears no specific
relationship to the other.
1.7.3 Navigation Pane
Many of the views rendered for the different tabs available in the Oracle VM Manager Web Interface
include a navigation pane, situated on the left hand side of the screen. The navigation pane is mostly used
to organize objects that have a grouped relationships within Oracle VM Manager. These relationships are
exposed in the form of a navigation tree.
The navigation tree shows the relationship between managed objects. These objects are both physical
and virtual, and include Oracle VM Servers, server pools, virtual machines and so on, created using
Oracle VM Manager. For example, the relationships between server pools, Oracle VM Servers, and the
virtual machines hosted on those Oracle VM Servers. The navigation tree presents each object type as
a node. If an object type contains child elements, it is possible to expand the node to view the elements
that it contains. In the navigation tree presented on the Servers and VMs tab, there is a parent object
called Server Pools. If you have already defined a server pool within your environment, this node can
be expanded to show the server pools that you have already defined. Since each server pool must
contain one or more servers, the individual server pool entries in the navigation tree are also displayed as
expandable nodes. By expanding any of these nodes it is possible to see a list of each server within the
server pool.
7
Perspectives
For each item in the hierarchy of the navigation tree, a different view is displayed in the management pane.
The content of the management pane changes, depending on the object you select in the navigation tree.
This view can often be changed by selecting a particular perspective from the Section 1.7.4, “Perspectives”
drop-down. Therefore, if you wish to see the virtual machines that are running on a particular server within
a server pool, on the Servers and VMs tab you would expand the Server Pools node, expand the server
pool entry that you are interested in and select the server that you wish to view. Finally, in the management
pane, select the Virtual Machines perspective.
Note
The icons for objects in the Navigation Tree may vary depending on the object's
event status. Usually the same icon is used but an event anomaly is highlighted
using an overlay applied to the original icon. See Section 1.8, “Object Icon Colors”
for more information.
1.7.4 Perspectives
If the tab that you are viewing includes a navigation pane, it is more than likely that there are numerous
perspectives associated with the item selected in the navigation tree. These perspectives are different
views of information associated with each object stored within Oracle VM Manager. The perspectives
are listed in a drop-down menu located in the toolbar at the top of the management pane. By selecting
a particular perspective from the menu, the data in the management pane is updated to show the
information relevant to the selected perspective. Furthermore, the perspective toolbar is updated to provide
management and configuration options that are specific to the perspective that you are viewing.
1.7.4.1 Info Perspective
The Info perspective is common to many elements within the Oracle VM Manager Web Interface. This
perspective always shows the individually configured parameters for an item that is currently selected
in the navigation tree. Some of these configured parameters may be automatically populated through a
discovery process, while others may have been configured manually during the creation of the object that
is selected.
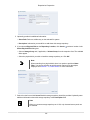
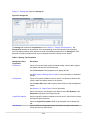
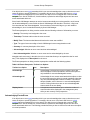
1.7.4.2 Events Perspective
The Events perspective is common to many elements within the Oracle VM Manager Web Interface.
The Events perspective generally appears as an option within the Perspectives drop-down menu on the
management pane of tabs that include a navigation tree. In this case, the Events perspective displays
events specific to the item selected in the navigation tree and presents these in the management pane.
The Events perspective may also appear within a dialog that is triggered from a Display Selected
Events... perspective toolbar option. In this case, the Events perspective dialog displays events specific
to one or more elements selected in the management pane.
If an object has an error event associated with it you must acknowledge the event to clear the error and
return the object to normal operations. For example, this can occur if an Oracle VM Server or virtual
machine appear as Stopped (Error) in the status. The object in error is flagged with a red icon in the
navigation tree. Oracle VM Servers, virtual machines, repositories and storage objects can have error
events associated with them.
Since Oracle VM Manager attempts to resolve issues automatically as much as possible, not all events
can be acknowledged by a user within the Oracle VM Manager Web Interface. Therefore, a flag is set
for events that are user acknowledgeable. If an event does not have this flag set, you are unable to
acknowledge it, since it is handled internally by Oracle VM Manager.
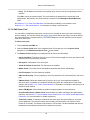
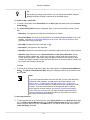
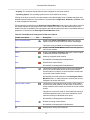
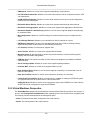
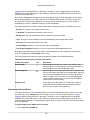
The Events perspective or dialog contains a table with the following columns of information per event:
8
Perspectives
• Severity: The severity level assigned to the event.
• Timestamp: The date and time that the event occurred.
• Modify Time: The last recorded date and time that the event was modified.
• Type: The type of event according to Oracle VM Manager's event categorization model.
• Summary: A summary description of the event.
• Acknowledged: Whether an error event has been acknowledged.
• User Acknowledgeable: Whether or not an event can be acknowledged by the user.
Alongside each event entry in the table, there is an arrow that allows you to expand the view for each
entry. This displays the full Description for the event.
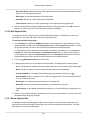
The Events perspective or dialog contains a perspective toolbar with the following options:
Table 1.4 Events Perspective Toolbar Icon Options
Toolbar Icon Option
Icon
Description
Acknowledge
Acknowledge a selected error event to clear the error and
return the object to normal operations. Note that this option is
only available for user acknowledgeable events.
Acknowledge All
Acknowledge all error events associated with an object to clear
the errors and return the object to normal operations. Note that
only user acknowledgeable events are cleared. This button is
always clickable, even if there are no user acknowledgeable
events. Clicking it when there are no user acknowledgeable
events results in an error dialog.
Display Count
A drop-down menu that allows you to select the number of
events that should be displayed in the management pane,
while you are currently in this perspective.
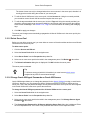
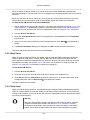
Acknowledging Events/Errors
If an object has an error event associated with it you must acknowledge the event to clear the error and
return the object to normal operations. For example, this can occur if an Oracle VM Server or virtual
machine appear as Stopped (Error) in the status. The object in error is flagged with a red icon in the
navigation tree. Oracle VM Servers, virtual machines, repositories and storage objects can have error
events associated with them. The following procedures show you how to clear errors and return the object
to normal operations.
To acknowledge Oracle VM Server error events:
1. Click the Servers and VMs tab.
2. Select the Oracle VM Server in the navigation tree.
3. Select Events from the Perspective drop-down list in the management pane.
4. Select the user acknowledgeable error event and click Acknowledge
to clear all user acknowledgeable errors.
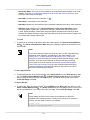
To acknowledge virtual machine error events:
1. Click the Servers and VMs tab.
9
, or click Acknowledge All
Toolbars
2. Select the server pool, or Oracle VM Server on which the virtual machine resides in the navigation tree.
3. Select Virtual Machines from the Perspective drop-down list in the management pane.
4. Select the virtual machine in the management pane table. Click Display Selected VM Events...
.
5. The Events dialog box is displayed. Select the user acknowledgeable error event and click
Acknowledge , or click Acknowledge All to clear all user acknowledgeable errors. Click Close.
To acknowledge storage repository error events:
1. Click the Repositories tab.
2. Select the repository in the navigation tree.
3. Select Events from the Perspective drop-down list in the management pane.
4. Select the error event and click Acknowledge
, or click Acknowledge All
to clear all errors.
To acknowledge storage error events:
1. Click the Storage tab.
2. Select File Servers, SAN Servers, or a storage server in the navigation tree.
3. Select Events from the Perspective drop-down list in the management pane.
4. Select the user acknowledgeable error event and click Acknowledge
to clear all user acknowledgeable errors.
, or click Acknowledge All
1.7.5 Toolbars
One or more toolbars may be displayed on a tab, depending on the tab, subtab or perspective that you
are viewing. If a navigation pane is displayed, a toolbar is frequently displayed at the top of the navigation
pane, referred to as the navigation pane toolbar. When viewing different perspectives a toolbar is
positioned at the top of the management pane. This toolbar is called the perspective toolbar.
The toolbars are used to perform specific actions. Depending on the selected tab, the icons in the toolbars
change. Furthermore, the icons in the perspective toolbar change depending on the perspective selected.
Therefore, the toolbar options are context-sensitive and change depending on the part of the user interface
that you are currently viewing. Many of the toolbar options are also available as right-click menu options.
In most cases, clicking on a toolbar icon results in the display of a dialog or wizard to guide you through
the configuration or management task selected. The icons for each toolbar available on each tab and
perspective within the user interface are summarized for each tab view throughout this guide.
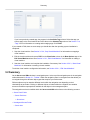
1.7.6 Management Pane
The management pane is usually, but not always, presented in table format. Objects or elements are listed
in rows, and information or fields of data related to an object or element is separated into columns. In some
cases information in the management pane may be simply presented as informational content listed in a
form-like presentation.
Where the information in the management pane is presented as a table, it is often possible to sort the
data in the table in ascending or descending format according to the different columns available. This is
indicated on columns supporting sort functionality through the display of up and down arrow icons, which
appear on mouse roll-over. Clicking on the up arrow icon for a column sorts in ascending order, while
10
Object Icon Colors
clicking on the down arrow icon sorts in descending order. Columns in a tabular view can be resized or
rearranged through drag-and-drop style behavior.
A View menu that appears alongside the drop-down Perspectives menu at the top of the management
pane provides alternative mechanisms to change sort order, the order of the fields presented in each
column and to control which columns are displayed within a view.
Where additional information about an object or element is available, an additional expansion arrow is
provided as a link alongside the item, usually on the left-hand side of a row when the data is presented
in tabular format. Clicking on the expansion arrow expands the view for the selected element to display
further information. Where this information is categorized according to related sub-elements, the expanded
view may display tabs for the content related to each sub-element. Clicking through each of these tabs
exposes the information related to each sub-element.
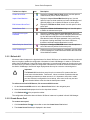
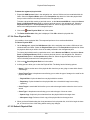
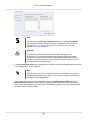
1.8 Object Icon Colors
The icon for an object may be one of three colors: gray, yellow or red. These colors represent the status of
the object and the color meanings are listed in table Table 1.5, “Object Icon Colors”.
Table 1.5 Object Icon Colors
Icon Color
Icon Example
Status
Gray
Normal. No warning or error events.
Yellow
The object has a warning event associated with it.
Red
The object has an error event associated with it.
Blue
The object is in an unknown state.
To see the events associated with an object, select the object in the navigation tree. Select Events in the
management pane's Perspective drop-down list. All the events for that object is listed in the table.
1.9 Changing Default UI Behaviour
Oracle VM Manager makes use of certain default values while performing particular operations or while
presenting particular screens within the UI. The default values should be sufficient for the majority of
environments, however there are particular cases where changing these default values may improve
usability.
Default Oracle VM Manager parameters can be easily edited from within Oracle VM Manager Web
Interface by clicking on the Tools and Resources tab and then clicking on the Preferences link in the
toolbar.
The configuration parameters can be changed with instant effect. No restart of Oracle VM Manager is
required.
See Section 7.3, “Preferences” for more information about the parameters available, their meaning and
how to set them.
1.10 Drag and Drop
You can drag and drop one or more Oracle VM Servers (either from the table in the management pane, or
from the navigation tree) to another server pool, or the Unassigned Servers folder in the navigation tree.
11
Right-Click Action Menus
Any virtual machines on an Oracle VM Server must be migrated or moved before moving an Oracle VM
Server.
You can also drag and drop one or more virtual machines from the table in the management pane to a
server pool, an Oracle VM Server or to the Unassigned Virtual Machines folder in the navigation tree.
When you drag and drop multiple virtual machines to a server pool, the placement strategies for the virtual
machines depend on the Oracle VM Server roles, and server pool policies such as Distributed Resource
Scheduler (DRS) and Distributed Power Management (DPM). See What are Server Roles? in the Oracle
VM Concepts Guide for information on Oracle VM Server roles, and What are Server Pool Policies? in the
Oracle VM Concepts Guide for information on server pool policies. See Section 3.5.2.11, “Migrate Virtual
Machines” for more information on migrating virtual machines.
All drag and drop operations are performed serially, and not concurrently, so one job is submitted and
performed at a time. For example, when migrating multiple virtual machines, one virtual machine is
migrated, then the next, and so on.
1.11 Right-Click Action Menus
You can right-click on many elements within in a tab's management pane and within the navigation tree to
bring up the action menu. The right-click action menu options are context-sensitive, and change to display
actions related to the selected element. For example, if you click the Servers and VMs tab and select a
server pool in the navigation tree and then right-click on an Oracle VM Server in the management pane
table, the action menu for the Oracle VM Server is displayed.
Many of the toolbar options are also available as right-click menu options. See Section 1.7.5, “Toolbars” for
more information on the toolbar.
1.12 Multi-Select Functionality
The Oracle VM Manager Web Interface allows you to select multiple objects from the management pane
tables and perform actions on all selected objects at one time. Multi-select functionality supports all
commonly used selection options and shortcuts. For instance, selecting the first object in the table, holding
down the Shift key and selecting the last object in the table can be used to select all objects. Alternately,
once you have selected any object within the table, you can use the Ctrl+A keyboard shortcut to select all
remaining objects. To select individual objects, you can hold down the Ctrl key while clicking on the objects
upon which you want to perform an action.
You can use the toolbar options or the right-click action menu options to perform an action on multiple
selected objects. When an action affects multiple objects, the confirmation dialog for the action lists all of
the objects that are affected.
All multi-select operations are performed serially, and not concurrently, so one job is submitted and
performed at a time. For example, when starting multiple virtual machines, one virtual machine is started,
then the next, and so on.
1.13 Name Filters
In many of the tab management panes and in some of the dialog boxes within the Oracle VM Manager
Web Interface there is an option to provide a Name Filter. For large deployments where many items
pertaining to the current view may be listed, it can be difficult to find and select the objects that you want
to run an action against. The Name Filter field is designed to make this process easier by allowing you to
specify search criteria to filter the displayed results.
In tab management panes, the Name Filter field is positioned just below the tabs alongside the Toolbar.
12
Tags
The input field is case-insensitive and accepts wild card characters such as * (multiple character variations)
and ? (single character variation). For example, a typical filter used in the Select File Systems dialog may
look like this: nfs*vol?/repo*.
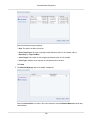
1.14 Tags
Oracle VM Manager provides the ability to create tags which can be used to identify and group together
objects. This functionality makes it easier to quickly limit views of objects and to perform batch operations
against objects sharing a common tag. Tags are managed within the Tags subtab on the Tools and
Resources tab within the Oracle VM Manager Web Interface. Management of tags is discussed in more
detail in Section 7.1, “Tags”.
Once tags have been created within Oracle VM Manager it is possible to assign them to various
components or objects. This can be done by either editing existing objects and adding tags within the
dialog that appears, or during the creation of a new object. For instance, to add a tag to an existing Oracle
VM Server you should locate the Oracle VM Server on the Servers and VMs tab and select the option to
edit the Oracle VM Server. In the dialog that appears, click on the Tags tab and assign the tags that you
wish to use to identify the Oracle VM Server in future.
Tags can be reused across objects of different types. For instance, the same tag used to identify a
particular set of Oracle VM Servers can also be used to group a set of virtual machines together. To see all
objects that share the same tag, you can click on the Find Components icon on the Tags subtab on the
Tools and Resources tab.
The Find Components feature supports multi-select functionality, allowing you to search for components
that are tagged by a number of separate tag names. Furthermore, the Find Components dialog allows
you to filter results by object type, by selecting a particular object type from the Show Types drop-down
selector.
Many screens within the Oracle VM Manager Web Interface provide the option to use a Tag Filter. This
feature takes the form of a drop-down box listing the available tags that can be used to form a filter.
Selecting a tag limits the view in the current screen to objects sharing the same tag. On a screen that
also provides the Name Filter option, it is possible to switch between the filter types by selecting the
appropriate filter type from the drop-down menu.
When a view is limited using the Tag Filter function, batch operations can be performed on all items listed
by using shortcut keys such as Ctrl + a to select all items before selecting the operation that you wish to
execute.
1.15 Case Sensitivity
The values you enter in UI fields are case sensitive, unless explicitly stated in this Guide. For example,
entering MyServer in a field is not the same as entering myserver. The UI treats these strings as case
sensitive, and are considered different.
13
14
Chapter 2 Health Tab
Table of Contents
2.1 Status Overview .........................................................................................................................
2.1.1 Toolbar ...........................................................................................................................
2.1.2 Detailed Information Dialog ..............................................................................................
2.2 Error Conditions .........................................................................................................................
2.2.1 Toolbar ...........................................................................................................................
2.3 Statistics ....................................................................................................................................
2.3.1 Toolbar ...........................................................................................................................
2.3.2 Server Pools Folder ........................................................................................................
2.3.3 Server Pool Item .............................................................................................................
2.3.4 Server Item .....................................................................................................................
2.3.5 Unassigned Servers Folder ..............................................................................................
2.3.6 Unassigned Servers Item .................................................................................................
2.3.7 Unassigned Virtual Machines Folder .................................................................................
15
16
16
16
17
17
17
17
18
18
19
19
19
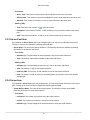
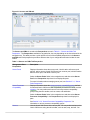
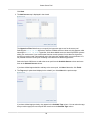
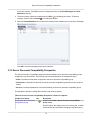
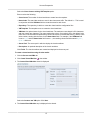
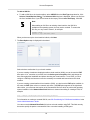
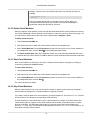
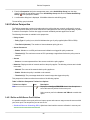
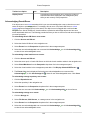
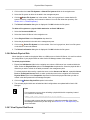
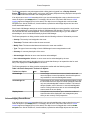
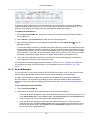
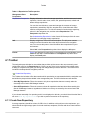
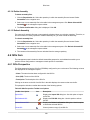
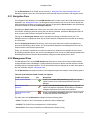
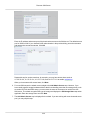
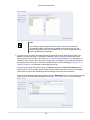
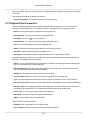
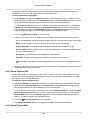
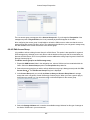
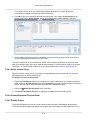
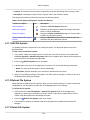
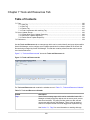
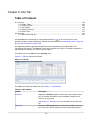
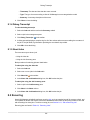
Use the Health tab to monitor the overall health and status of your Oracle VM environment, and to view
historical statistics such as memory and CPU usage.
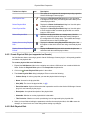
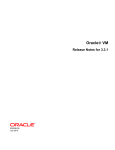
Figure 2.1, “Health tab” shows the Health tab.
Figure 2.1 Health tab
2.1 Status Overview
The dashboard displays information about each server pool, Oracle VM Server summary, and the number
of Oracle VM Servers that are running or stopped.
A green, yellow, or red status is displayed for each server pool:
Green: All Oracle VM Servers and virtual machines are in a normal state.
Yellow: One or more Oracle VM Server(s) has a CPU or memory utilization above the specified limit.
One or more virtual machine(s) has a CPU utilization above the specified limit. Click the hyperlink to view
detailed information. See Section 2.1.2, “Detailed Information Dialog” for more information on this dialog.
15
Toolbar
Red: One or more Oracle VM Server(s) has unacknowledged events indicating a down state that needs
operator attention. Click the hyperlink to view detailed information.
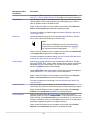
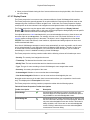
2.1.1 Toolbar
This section contains the toolbar options in the Status Overview subtab of the Health tab.
Display Parameters
The Display Parameters options allow you to control how the information in the Status Overview subtab
is displayed. The following options are available:
• Number of Columns: Sets the number of columns displayed. Select between 1 to 10 columns.
• Refresh Interval: Sets the interval between which the statistics are refreshed. Select 30 seconds, 1, 2, 5
or 10 minutes. The default setting is 5 minutes.
• Order By: Sets the sort order for the information. Sort by Total Servers Down, Total VMs Down, or
Alphabetically.
Utilization Thresholds
The Utilization Thresholds options at the top of the panel allows you to set the parameters available to
trigger different health warnings. The following options are available:
• Server Processor %: Sets the percentage of processor utilization on an Oracle VM Server to trigger a
warning. The default setting is 70%.
• Server Memory %: Sets the percentage of memory utilization on an Oracle VM Server to trigger a
warning. The default setting is 95%.
• VM Processor %: Sets the percentage of processor utilization for a virtual machine to trigger a warning.
The default setting is 70%.
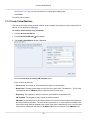
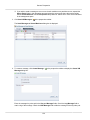
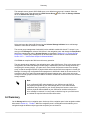
2.1.2 Detailed Information Dialog
When a Yellow or Red status is shown for a server pool in the Status Overview dashboard, the message
appears as a hyperlink that opens a dialog containing more detailed information to describe the incident
that needs attention. This dialog provides facilities to discover events leading up to an incident.
The dialog toolbar includes various icons to help you resolve any issues. Select the item in the table that
you wish to act on. Click the Events icon
to view more information about the events within the log
related to the item that you are working with. You may need to acknowledge particular events in order to
resolve an issue. See Section 1.7.4.2, “Events Perspective” for information on acknowledging events.
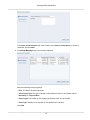
2.2 Error Conditions
The Error Conditions subtab displays an up-to-date view of all error conditions and warnings.
The table view in the Error Conditions subtab includes the following fields:
• Severity: The severity level assigned to the error event.
• Timestamp: The date and time the error event occurred.
• Modify Time: The last recorded date and time the error event was modified.
16
Toolbar
• Name: The name of the object associated with the error event.
• Category: The category of the object associated with the error event.
• Type: The type of error event according to Oracle VM Manager's event categorization model.
• Summary: A summary description of the error event.
• Acknowledged: Whether the error event has been acknowledged.
• User Acknowledgeable: Whether the error event can be acknowledged by the user.
Alongside each event entry in the table, there is an arrow that allows you to expand the view for each
entry. This displays the full Description for the event.
2.2.1 Toolbar
The Error Conditions subtab of the Health tab includes the toolbar items:
• View: Controls the columns to display, and the sort order of columns.
• Refresh Interval: Sets the interval between which the statistics are refreshed. Select 30 seconds, 1, 2, 5
or 10 minutes. The default setting is 5 minutes.
• Refresh Now: The
icon refreshes the statistical information.
• Include Acknowledged: Provides an option to view acknowledged error events. To see a history of
acknowledged events, select Yes in the drop-down list. The default setting is No.
2.3 Statistics
Oracle VM Manager periodically collects vital statistics such as memory and CPU usage. Select the
Statistics subtab of the Health tab to view historical statistics for your Oracle VM Servers and virtual
machines. Views of different statistical information are provided by clicking on elements in the navigation
pane.
2.3.1 Toolbar
For each view in the Statistics subtab of the Health tab, the standard toolbar items include:
• View: Controls the columns to display, and the sort order of columns.
• Refresh Interval: Sets the interval between which the statistics are refreshed. Select 30 seconds, 1, 2, 5
or 10 minutes. The default setting is 5 minutes.
• Refresh Now: The
icon refreshes the statistical information.
• Line Graph: The
icon opens a dialog containing a line graph view of the statistics as they are
refreshed. This is available in all views, except the Server Pools Folder view.
2.3.2 Server Pools Folder
By clicking on the Server Pools folder in the navigation tree in the navigation pane, you can view the
following statistical information:
• Server Pool Name: The name of the server pool. The following columns are available, presenting
information for each server pool:
17
Server Pool Item
• Processors:
• Server Total: Total number of processors of all Oracle VM Servers in the server pool.
• VM Allocated: Total number of processors available for use by virtual machines in the server pool.
• VM Used: Total number of processors in use by virtual machines in the server pool.
• Memory (GiB):
• Total: Total amount of memory, in GiB, in the server pool.
• Configured: Total amount of memory, in GiB, available for use by virtual machines in the server
pool.
• Used: Total amount of memory, in GiB, in use by virtual machines in the server pool.
2.3.3 Server Pool Item
By expanding the Server Pools node in the navigation pane, you can click on individual server pools.
Clicking on a server pool displays the following statistical data:
• Server Name: The name of the Oracle VM Server. The following columns are available, presenting
information for each Oracle VM Server:
• Processors:
• Utilization (%): The percentage of total processors in use on the Oracle VM Server.
• Total: The number of processors available on the Oracle VM Server.
• Memory (GiB):
• Utilization (%): The percentage of total memory in use on the Oracle VM Server.
• Total: The memory, in GiB, on the Oracle VM Server.
• Usable by VMs: The memory, in GiB, available for use on the Oracle VM Server.
• Used: The memory, in GiB, in use by the operating system, its processes, and virtual machine
management.
2.3.4 Server Item
By expanding a Server Pool item in the navigation tree, you can select Oracle VM Servers in the server
pool. Clicking on an Oracle VM Server displays the following statistical data:
• Virtual Machine Name: The name of the virtual machine. The following columns are available,
presenting information for each virtual machine:
• Processors:
• Configured: The number of processors set in the virtual machine.
• Current: The number of processors in use by the virtual machine.
• Utilization (%): The percentage of the total processors in use by the virtual machine.
18
Unassigned Servers Folder
• Memory (GiB):
• Configured: The amount of memory, in GiB, set for the virtual machine.
• Used: The memory, in GiB, in use by the virtual machine.
2.3.5 Unassigned Servers Folder
By clicking on the Unassigned Servers folder in the navigation tree, you can view the following statistical
information:
• Server Name: The name of the Oracle VM Server. The following columns are available, presenting
information for each Oracle VM Server:
• Processors:
• Utilization (%): The percentage of total processors in use on the Oracle VM Server.
• Total: The number of processors available on the Oracle VM Server.
• Memory (GiB):
• Utilization (%): The percentage of total memory in use on the Oracle VM Server.
• Total: The memory, in GiB, on the Oracle VM Server.
• Usable by VMs: The memory, in GiB, available for use on the Oracle VM Server.
• Used: The memory, in GiB, in use by the operating system, its processes, and virtual machine
management.
2.3.6 Unassigned Servers Item
By expanding the Unassigned Servers folder in the navigation tree, you can select Oracle VM Servers
that are not part of a server pool. Clicking on an Oracle VM Server displays the following statistical data:
• Virtual Machine Name: The name of the virtual machine. The following columns are available,
presenting information for each virtual machine:
• Processors:
• Configured: The number of processors set in the virtual machine.
• Current: The number of processors in use by the virtual machine.
• Utilization (%): The percentage of the total processors in use by the virtual machine.
• Memory (GiB):
• Configured: The amount of memory, in GiB, set for the virtual machine.
• Used: The memory, in GiB, in use by the virtual machine.
2.3.7 Unassigned Virtual Machines Folder
By clicking on the Unassigned Virtual Machines folder in the navigation tree, you can view the following
statistical information:
19
Unassigned Virtual Machines Folder
• Virtual Machine Name: The name of the virtual machine. The following columns are available,
presenting information for each virtual machine:
• Processors:
• Configured: The number of processors set in the virtual machine.
• Current: The number of processors in use by the virtual machine.
• Utilization (%): The percentage of the total processors in use by the virtual machine.
• Memory (GiB):
• Configured: The amount of memory, in GiB, set for the virtual machine.
• Used: The memory, in GiB, in use by the virtual machine.
20
Chapter 3 Servers and VMs Tab
Table of Contents
3.1 Toolbar ...................................................................................................................................... 25
3.1.1 Discover Servers ............................................................................................................. 25
3.1.2 Create Server Pool .......................................................................................................... 26
3.1.3 Create Virtual Machine .................................................................................................... 30
3.2 Summary ................................................................................................................................... 38
3.3 Server Pools Folder ................................................................................................................... 39
3.3.1 Server Pools Perspective ................................................................................................. 39
3.3.2 Server Processor Compatibility Perspective ...................................................................... 51
3.4 Server Pool Item ........................................................................................................................ 54
3.4.1 Info Perspective .............................................................................................................. 54
3.4.2 Servers Perspective ........................................................................................................ 55
3.4.3 Virtual Machines Perspective ........................................................................................... 72
3.4.4 Anti-Affinity Groups Perspective ....................................................................................... 91
3.4.5 Policies Perspective ........................................................................................................ 94
3.4.6 Server Update Repositories Perspective ........................................................................... 97
3.4.7 Events Perspective .......................................................................................................... 99
3.5 Server Item .............................................................................................................................. 101
3.5.1 Info Perspective ............................................................................................................ 101
3.5.2 Virtual Machines Perspective ......................................................................................... 103
3.5.3 CPUs Perspective ......................................................................................................... 123
3.5.4 Ethernet Ports Perspective ............................................................................................. 124
3.5.5 Bond Ports Perspective ................................................................................................. 125
3.5.6 Physical Disks Perspective ............................................................................................ 128
3.5.7 Storage Initiators Perspective ......................................................................................... 134
3.5.8 Control Domains Perspective ......................................................................................... 135
3.5.9 Repository Exports Perspective ...................................................................................... 136
3.5.10 Events Perspective ...................................................................................................... 137
3.6 Unassigned Servers Folder ....................................................................................................... 139
3.6.1 Servers Perspective ....................................................................................................... 140
3.6.2 Events Perspective ........................................................................................................ 157
3.7 Unassigned Virtual Machines Folder ......................................................................................... 159
3.7.1 Virtual Machines Perspective ......................................................................................... 159
3.7.2 Events Perspective ........................................................................................................ 172
Use the Servers and VMs tab to discover Oracle VM Servers, create and manage server pools and virtual
machines, assign Oracle VM Servers to server pools, and create and configure virtual machines in server
pools.
Figure 3.1, “Servers and VMs tab” shows the Servers and VMs tab.
21
Figure 3.1 Servers and VMs tab
The Servers and VMs tab contains the Perspectives set out in Table 3.1, “Servers and VMs Tab
Perspective”. The Perspectives available in any particular view vary depending on the item selected in the
navigation tree. This table provides a quick reference for all of the available perspectives in the Servers
and VMs tab. Each perspective provides a different view of your configuration and also includes its own
toolbar.
Table 3.1 Servers and VMs Tab Perspective
Management Pane
Perspective
Description
Server Pools
Displays information about the server pools. Use this tab to edit server pool
policies, add or remove Oracle VM Servers from a server pool, edit information
about a server pool, and delete a server pool.
Select the Server Pools folder in the navigation tree and then select Server
Pool in the Perspective drop-down list to display this pane.
For more information about managing server pool, see Section 3.3.1, “Server
Pools Perspective” .
Server Processor
Compatibility
Displays information about the server processor compatibility groups defined
for selected Oracle VM Servers with compatible processors for virtual machine
migration. You can perform actions on the server processor compatibility
groups using the tab's toolbar, such as create, edit and delete.
Select the Server Pools folder in the navigation tree and then select Server
Processor Compatibility in the Perspective drop-down list to display this
pane.
See Section 3.3.2, “Server Processor Compatibility Perspective” for
information on server processor compatibility groups.
Servers
Lists the Oracle VM Servers in the server pool. You can perform actions on the
Oracle VM Servers using the tab's toolbar, such as start, stop, and edit. You
22
Management Pane
Perspective
Description
can also use the tab's toolbar to discover an Oracle VM Server and create a
virtual machine on a selected Oracle VM Server. When an Oracle VM Server is
discovered, it is listed in the Unassigned Servers folder. When an Oracle VM
Server is added to a server pool, it is listed in the Server Pools folder.
Select a server pool in the navigation tree and then select Servers in the
Perspective drop-down list to display this pane.
See Section 3.4.2, “Servers Perspective”.
Virtual Machines
Displays information about the virtual machines in the server pool, or on the
Oracle VM Server. You can perform actions on the virtual machines using the
tab's toolbar, such as start, stop, edit, migrate and clone.
Use the Name Filter input field to specify search criteria to filter the displayed
results. See Section 1.13, “Name Filters” for more information.
Select a server pool or Oracle VM Server in the navigation tree and then select
Virtual Machines in the Perspective drop-down list to display this pane.
The Virtual Machines pane is also displayed when you select the Unassigned
Virtual Machines folder in the navigation tree.
See Section 3.4.3, “Virtual Machines Perspective”.
Anti-Affinity Group
Displays information about the anti-affinity groups defined to keep selected
virtual machines on separate Oracle VM Servers. You can perform actions on
the anti-affinity groups using the tab's toolbar, such as create, edit and delete.
Select a server pool in the navigation tree and then select Anti-Affinity Group
in the Perspective drop-down list to display this pane.
See Section 3.4.4, “Anti-Affinity Groups Perspective” for information on antiaffinity groups.
Policies
Displays information about server pool power and resource management
policies; Distributed Resource Scheduler (DRS), or Distributed Power
Management (DPM). You can define or edit a policy for the server pool using
the tab's toolbar.
Select a server pool in the navigation tree and then select Policies in the
Perspective drop-down list to display this pane.
See What are Server Pool Policies? in the Oracle VM Concepts Guide for
more information on these server pool policies.
See Section 3.4.5, “Policies Perspective”.
Server Update
Repositories
Displays information about the update repositories to update the software on
Oracle VM Servers. These repositories override the global repositories set
in the Tools and Resources tab. You can perform actions on the update
repositories using the tab's toolbar, such as create, edit and delete.
Select a server pool in the navigation tree and then select Server Update
Repositories in the Perspective drop-down list to display this pane. See
Section 3.4.6, “Server Update Repositories Perspective” for information
23
Management Pane
Perspective
Description
on using the update repositories to override the global repositories. See
Section 7.2, “Server Update Groups” for information on the global repositories.
Ethernet Ports
Lists the Ethernet ports on the selected Oracle VM Server that can be used for
network bridges. Use this tab to edit the type of addressing (none, DHCP or
static IP address) used for the Ethernet port.
Select an Oracle VM Server in the navigation tree and then select Ethernet
Ports in the Perspective drop-down list to display this pane.
For more information on network bridges, see Network Bridges in the Oracle
VM Concepts Guide.
Bond Ports
Lists the bonded Ethernet ports on the selected Oracle VM Server. Use this
tab to create, edit and delete bonds on Ethernet ports.
Note
While Oracle VM Manager uses the Linux terminology,
Oracle Solaris users should understand port bonding to
be equivalent to data link aggregation.
Select an Oracle VM Server in the navigation tree and then select Bond Ports
in the Perspective drop-down list to display this pane.
For more information on network bonding, see How is Network Bonding Used
in Oracle VM? in the Oracle VM Concepts Guide.
Physical Disks
Lists the local storage available on the selected Oracle VM Server. Use this
tab to edit, rescan, clone, refresh, delete, display servers using a physical disk,
and display events for local storage. You can also use this tab to create or
delete an OCFS2 file system on local storage.
Use the Name Filter input field to specify search criteria to filter the displayed
results. See Section 1.13, “Name Filters” for more information.
Select an Oracle VM Server in the navigation tree and then select Physical
Disks in the Perspective drop-down list to display this pane.
For more information on local storage, see Local Storage in the Oracle VM
Concepts Guide.
Storage Initiators
Lists the storage initiators available on the Oracle VM Server in your
environment. Use this tab to view access groups for selected storage initiators.
Select an Oracle VM Server in the navigation tree and then select Storage
Initiators in the Perspective drop-down list to display this pane.
Control Domains
Displays information about the control domain, such as CPU, memory,
operating system and Oracle VM Agent version. A control domain is an Oracle
Solaris concept, and is also known as dom0 on an x86 host. You can also use
this tab to view which version of Oracle VM Server the server is running before
and after an upgrade using the server update repository.
Select an Oracle VM Server in the navigation tree and then select Control
Domains in the Perspective drop-down list to display this pane.
24
Toolbar
Management Pane
Perspective
Description
See Section 3.4.2.10, “Update Server” for more information on Oracle VM
Server update management.
Repository Exports
List the export file servers used by backup and restore applications to access
OCFS2 file systems. Use this tab to create, edit and delete repository export
file servers.
Select an Oracle VM Server in the navigation tree and then select Repository
Exports in the Perspective drop-down list to display this pane.
Info
Displays a high-level view of the selected object. The Info pane contents
change to reflect information about the object selected in the navigation
tree. You can use this pane to view information about repositories in your
environment.
Select Info in the Perspective drop-down list to display the Info pane.
Events
Events are displayed for each object in the navigation tree and displays event
related to that object.
Select Events in the Perspective drop-down list to display the Events pane.
3.1 Toolbar
The navigation pane includes its own toolbar that provides quick access to the most commonly used
configuration tools for the Servers and VMs tab. Clicking on any of the icons provided in the toolbar opens
a dialog or wizard that can guide you through the configuration process for that item. The following tools
are available in this toolbar:
•
Discover Servers
•
Create Server Pool
•
Create Virtual Machine
3.1.1 Discover Servers
When an Oracle VM Server is installed and starts up, it listens for Oracle VM Manager server pool
discovery events. Before you can add an Oracle VM Server to a server pool, it must first be discovered.
The Discover Servers icon is available on the Servers and VMs tab and is used to open the Discover
Servers wizard that guides you through the server discovery process.
To discover Oracle VM Servers:
1. Click Discover Servers
in the toolbar. The Discover Servers dialog box is displayed.
25
Create Server Pool
2. Enter information about the Oracle VM Server(s) to be discovered:
• Oracle VM Agent Password: The password to connect to the Oracle VM Agent. It is advisable that
the password is the same on all Oracle VM Servers to avoid authentication issues for the Oracle VM
Manager.
An incorrect password results in an error message, notifying you of an 'Unauthorized access
attempt'.
• IP Addresses/DNS Hostnames: Enter the IP address(es), IP ranges or DNS hostnames of the
Oracle VM Server(s) to be discovered. You can paste a list of multiple IP addresses or multiple DNS
hostnames. If you enter an IP range it must be in the format 192.168.10.2-10. For example, if you
enter 192.168.10.2-4 Oracle VM Manager performs discovery for 192.168.10.2, 192.168.10.3 and
192.168.10.4. IP addresses, IP ranges and DNS host names must be entered on separate lines.
Note
Invalid entries may result in a job that fails to complete and may need to be
aborted. See Section 8.1.5, “Abort Jobs” for information on aborting a job.
Click OK.
The Oracle VM Servers are discovered and added to the Unassigned Servers folder. The newly
discovered Oracle VM Server contains some basic information about itself, and about any immediate
connectivity to a shared SAN, but it is considered to be in an unconfigured state. The Oracle VM Server
cannot be used to perform any virtual machine, or active cluster operations. Physical network and storage
configuration can be performed, and any subsequent storage discovery operations may also be performed.
The Utilization % column in the Servers perspective in the management pane does not report the
utilization statistics of an Oracle VM Server that is in the Unassigned Servers folder. This field does not
report utilization statistics unless an Oracle VM Server is included in a server pool.
Note
Discovered Oracle VM Servers do not use a Virtual IP address until they are
properly configured by being included in a server pool.
When an Oracle VM Server has been discovered, it can be added to a server pool.
3.1.2 Create Server Pool
26
Create Server Pool
To create a server pool:
1. Click Create Server Pool
in the toolbar to start the Create Server Pool wizard.
2. The Create Server Pool step is displayed in the wizard.
Enter the server pool information:
• Server Pool Name: The name of the server pool. The maximum length of a server pool name is 256
characters and may contain any character.
• Virtual IP Address for the Pool: An IP address used to identify the master Oracle VM Server,
which controls the other Oracle VM Server in the server pool. In the event that the master Oracle VM
Server fails or is placed into maintenance mode, another Oracle VM Server is selected to perform the
master role, and this IP address is then assigned to the new host. The virtual IP address must be an
unused IP address within the same subnetwork that is used for the management network.
• VM Console Keymap: The key mapping to be used when connecting to a virtual machine's console.
• VM Start Policy: For each server pool you can define the default start-up policy for all of your virtual
machines. Options include the ability to start the virtual machine on the current server (the server to
which the virtual machine has been assigned) and the ability to start the virtual machine on the best
available server (determined using the same algorithms as DRS and DPM). It is possible to override
the default policy within the configuration of each virtual machine. See Section 3.1.3, “Create Virtual
Machine” for information on setting the start policy for an individual virtual machine. Note that as of
Release 3.3, the VM Start Policy also applies to the VM Resume operation.
• Secure VM Migrate: Select whether to enable encrypted migration of virtual machines. When
Secure VM Migrate is checked, virtual machines are migrated using SSL to protect the data during
the migration process. Secure migration of a virtual machine may effect the time taken to perform the
migration as the encryption and decryption of data requires more system resources and time.
• Clustered Server Pool: Select whether to enable clustering of the Oracle VM Servers in the server
pool to enable HA. See How do Server Pool Clusters Work? and How does High Availability (HA)
Work?in the Oracle VM Concepts Guide for more information on server pool clustering and on HA
support and policies.
27
Create Server Pool
Important
If the Oracle VM Servers in your server pool are SPARC-based, you should
be aware that clustering can only function if the distributed lock manager
package is installed on all of the Oracle VM Servers that you intend to add
to the server pool, as described in Installing DLM for SPARC Server Pool
Clusters in the Oracle VM Installation and Upgrade Guide. Furthermore,
clustering is not supported for servers that have multiple control domains
(shadow domains). Clustering for SPARC is only supported using NFS
storage for the cluster file system. Failure to meet these requirements results
in an error when attempting to create the clustered server pool, notifying you
that the server lacks the ability to perform clustering.
• Timeout for cluster: If clustering is enabled for the server pool, this option allows you to set the
timeout parameter. The maximum cluster timeout setting is 300 seconds. The minimum cluster
timeout is 12 seconds. The default cluster timeout is 120 seconds. The Disk heartbeat and network
heartbeat are automatically derived from the cluster timeout value.
The cluster timeout can only be changed when there are no servers in the server pool, therefore it is
usually good to set this during the creation of your server pool.
Note
This option is greyed out if the Clustered Server Pool check box is
unchecked.
• Storage for Server Pool: Select the file system type to use for the server pool, either a Network
File System, or a Physical Disk. The server pool file system is used to hold the server pool cluster
data, and is also used for cluster heartbeating. Oracle recommends that you create this storage
with a size of at least 12 GB, as a NAS export or LUN. Note that if you are creating a SPARC-based
server pool, only NFS is supported for a server pool file system.
A server pool file system is exclusive, just like other storage. That is, in the same way that you
cannot create two storage repositories on the same export path, the server pool file system cannot
be shared with other server pools, or with storage repositories. Each fully qualified export path (for
example, /export/myexport/one, /export/myexport/two) must be used for one, and only one, purpose,
that is, for a storage repository, or a server pool file system.
Note
This option is greyed out if the Clustered Server Pool check box is
unchecked.
For information on creating storage, see Chapter 6, Storage Tab.
• Network File System: The file system to use as the pool file system. Click Search in the Storage
Location field to search for a network file system. This field is displayed if you select Network File
System in the previous field.
• Physical Disk: The file system to use as the pool file system. Click Search in the Storage
Location field to search for a physical disk. This field is displayed if you select Physical Disk in the
previous field.
• Description: A description of the server pool. This field is optional.
28
Create Server Pool
Click Next.
3. The Add Servers step is displayed in the wizard.
The Hypervisor Filter field allows you to specify the hypervisor type to use for the server pool.
Selecting the Oracle VM x86 hypervisor, limits the available servers to show only x86 systems; while
selecting the Oracle VM SPARC hypervisor, limits the available servers to show only SPARC systems
within your environment. If your environment does not contain systems of more than one hypervisor,
the filter is greyed out and is automatically set to the hypervisor available within your environment. It is
not possible to create a server pool consisting of servers that use different hypervisors.
Select the Oracle VM Servers to add to the server pool from the Available Servers column and move
them to the Selected Servers column.
If you have defined tags and wish to add any to the server pool, click Next. Otherwise, click Finish.
4. The Tags step is optional and displays in the wizard if you clicked Next in the previous step.
If you have defined tags previously, they appear in the Available Tags column. You can select the tags
that you wish to apply to the server pool and move them to the Selected Tags column.
29
Create Virtual Machine
See Section 1.14, “Tags” for more information on creating and managing tags.
Click Finish.
The server pool is created.
3.1.3 Create Virtual Machine
This section discusses creating a virtual machine using a template, and creating a virtual machine from an
ISO file, or from physical or virtual disks.
To create a virtual machine using a template:
1. Click the Servers and VMs tab.
2. Click Create Virtual Machine
in the toolbar.
3. The Create Virtual Machine wizard is displayed.
Select the Clone from an existing VM Template option.
Enter or select the following:
• Clone Count: The number of virtual machines to create from the template.
• Name Index: The start index number to use for the clone name suffix. The default is 0. This is used
in conjunction with the VM Name field to create the name for each clone.
• Repository: The repository in which to create the virtual machine configuration files.
• VM Template: The template to use to create the virtual machines.
• VM Name: An optional name for the virtual machines. The maximum name length is 256 characters
and may contain any character. The name need not be unique. If no value is given, the default is the
name of the virtual machine template being cloned. Each clone is suffixed with a dot (.) and the clone
index number, starting with the value for the Name Index field. For example, if the VM Name field
30
Create Virtual Machine
is set to MyVM, and the Name Index field is set to 1, the resulting clones would be named MyVM.1,
MyVM.2 and so on.
• Server Pool: The server pool in which to deploy the virtual machines.
• Description: An optional description of the virtual machines.
Click Finish. The virtual machines are created and deployed to the server pool.
To create a virtual machine using all other media:
1. Click the Servers and VMs tab.
2. Click Create Virtual Machine
in the toolbar.
3. The Create Virtual Machine wizard is displayed.
Select the Create a new VM option. Click Next.
4. The Create Virtual Machine step is displayed in the wizard.
Enter or select the following:
31
Create Virtual Machine
• Server Pool: The server pool on which to create the virtual machine.
• Server: The server that the virtual machine should be created on. The default option is Any, but the
drop-down selection lists the servers that exist in the server pool that you have selected. Selecting a
particular server forces the virtual machine to be created on that server. This has implications for the
Start Policy discussed later.
• Repository: The repository in which to create the virtual machine configuration file.
• Name: A name for the virtual machine. The maximum name length is 256 characters and may
contain any character. The name need not be unique.
• Enable High Availability: Whether to enable High Availability (HA). See How does High Availability
(HA) Work? in the Oracle VM Concepts Guide for more information on HA.
• Enable Huge Pages: Whether to enable HugePages. This option can be used when configuring
Huge Pages for paravirtualized VMs with the Domain Type set to XEN_PVM. Huge Pages are
available by default for HVM and PVHVM and this parameter cannot be set if your Domain Type is
not set to XEN_PVM. Setting this parameter automatically sets the page size to 2 MB. This means
that when assigning memory to a virtual machine with this parameter set, you must ensure that the
values specified are multiples of 2 MB. If you enable HugePages, you must also enable support for
HugePages in the guest operating system. If you want to change this value when editing a virtual
machine, the virtual machine must first be stopped. This option is not available if the virtual machine
is to be deployed to a SPARC-based server pool.
See How are Huge Pages Enabled for Virtual Machines?, in the Oracle VM Concepts Guide, for
more information on Huge Page support.
• Description: An optional description of the virtual machine.
• Operating System: The operating system of the virtual machine. This setting enables or disables
certain virtual machine settings that the guest operating system may require.
• Mouse Device Type: The mouse type to use for the virtual machine. This option is not available if
the virtual machine is to be deployed to a SPARC-based server pool.
• Keymap: The keyboard mapping to use for the virtual machine. This option is not available if the
virtual machine is to be deployed to a SPARC-based server pool.
• Domain Type: The domain type of the virtual machine. Oracle recommends you create
paravirtualized virtual machines if possible, as the performance of a paravirtualized virtual machine
is superior to that of a hardware virtualized machine guest. This option is not available if the virtual
machine is to be deployed to a SPARC-based server pool.
• XEN_HVM: Hardware virtualization, or fully virtualized. When you select this option you must
supply an ISO file in a repository (in the Arrange Disks step of the wizard) from which to create
the virtual machine. See Section 4.6.1.1, “Import ISO” for information on importing an ISO file into
a repository.
• XEN_HVM_PV_DRIVERS: Identical to XEN_HVM, but with additional paravirtualized drivers
for improved performance of the virtual machine. See What are Virtualization Modes or Domain
Types? in the Oracle VM Concepts Guide for more information about using paravirtualized drivers.
This domain type is used to run Microsoft Windows guest operating systems with an acceptable
performance level.
32
Create Virtual Machine
• XEN_PVM: Paravirtualized. Enables you to select a location for the mounted ISO file from which
to create the virtual machine. Before you create the virtual machine using the paravirtualized
method, mount the ISO file on an NFS share, or HTTP or FTP server. You supply the location of
the mounted ISO file in the Network Boot Path field in the Boot Options step of the wizard. For
information on creating a mounted ISO file, see ISO Provisioning for PVM Guest Installations in the
Oracle VM Administrator's Guide.
• LDOMS_PVM: This domain type should be selected if the server pool and hypervisors use Oracle
VM Server for SPARC as the hypervisor instead of Oracle VM Server for x86.
• Unknown: This option is informational in the event that Oracle VM Manager is unable to determine
the domain type for an existing virtual machine. It is not possible to actually set a virtual machine's
domain type to this value. Attempting to do so generates a rule violation when you try to save the
virtual machine settings and an error message is returned.
• Start Policy: The policy that should be used to start the virtual machine. Select one of:
• Best Server: The virtual machine is started on the best available Oracle VM Server as determined
by the algorithm used for the server pool policies DRS and DPM. For more information on server
pool policies, see What are Server Pool Policies? in the Oracle VM Concepts Guide.
• Current Server: The virtual machine is started on the Oracle VM Server to which it is assigned. If
you selected a particular server to create the virtual machine on, then it is started on this server.
• Use Pool Policy: The virtual machine is started using the start policy defined for the entire server
pool. See Section 3.1.2, “Create Server Pool” for more information on setting the start policy for a
server pool.
• Max. Memory (MB): The maximum memory size the virtual machine can be allocated. If you have
enabled Huge Pages, the value here must be a multiple of 2 MB.
• Memory (MB): The memory size the virtual machine is allocated. When creating a virtual machine,
this is the memory allocation used when starting the virtual machine. You can change this when
editing a running PVM and no virtual machine restart is required. For HVM guests, increasing or
decreasing the memory requires the virtual machine to be stopped. If you have enabled Huge Pages,
the value here must be a multiple of 2 MB.
• Max. Processors: The maximum number of processors the virtual machine can be allocated. The
number of processors is expressed in number of physical CPU cores, and is limited to 128. This
cannot be changed when editing a running virtual machine. To edit this value, you must first stop the
virtual machine.
• Processors: The number of processors the virtual machine is allocated. The number of processors
is expressed in number of physical CPU cores, and is limited to 128. You can change this when
editing a running virtual machine, up to the value of Max. Processors.
• Priority: The CPU priority of the virtual machine. The higher the priority, the more physical CPU
cycles are given to the virtual machine. This option is not available if the virtual machine is to be
deployed to a SPARC-based server pool.
• Processor Cap %: Increase or decrease the percentage to which the virtual CPUs can receive
scheduled time. This parameter defines the maximum percentage to which the virtual CPUs can
receive scheduled time. Use this parameter to keep low priority virtual machines from consuming too
many CPU cycles on a Virtual Machine Server. This option is not available if the virtual machine is to
be deployed to a SPARC-based server pool.
33
Create Virtual Machine
The Priority and Processor Cap% parameters are passed to the Xen hypervisor for use by the credit
scheduler, which automatically load balances guest VCPUs across all available physical CPUs using
an algorithm that combines these two parameters. Therefore, these parameters are a key factor for the
performance of the virtual machine on x86 hardware.
On SPARC, each virtual machine uses dedicated physical CPU threads and CPUs are not shared
between virtual machines, being exclusively assigned to a single virtual machine.
Click Next.
5. The Set up Networks step is displayed in the wizard.
This step of the wizard allows you to add VNICs to the virtual machine. If you want to specify the MAC
address for a VNIC, select Specify MAC Address and enter the MAC address. Otherwise, leave the
default Dynamically Assign MAC to dynamically assign a MAC Address. Select a network with the
virtual machine role from the Network drop-down list. If no networks are available, you must first create
a network with the virtual machine role as a dedicated network for virtual machine traffic is required.
See Section 5.1.1, “Create New Network” for information on creating a network. Click Add VNIC.
The VNIC order specified here is important, as it determines the order in which they are presented to
the virtual machine. You can control the ordering of the VNICs using the up and down arrows on the
right of the table.
If you are editing the networking of an existing stopped virtual machine, you can change the network
to which the VNIC belongs using the Network drop-down list in the table. It is important that the VNIC
belongs to a network already associated with the Oracle VM Servers on which it can run, or you cannot
start the virtual machine. See Section 5.1.1, “Create New Network” and Section 5.1.2, “Edit Existing
Network” for more information on associating Oracle VM Servers with networks.
If you are editing an existing running virtual machine, you are able to add VNICs to the virtual machine,
but you are not able to remove VNICs that are already in use. You also cannot reorder VNICs on a
running virtual machine. If you choose to add a VNIC to a running machine you must ensure that the
VNIC belongs to a virtual machine network already associated with the Oracle VM Servers on which it
can run, by selecting the appropriate network from the Network drop-down list.
A virtual machine can have up to eight (8) VNICs for HVM guests and up to 31 for PVM guests. A PVM
guest requires network connectivity to perform the operating system install and must have at least one
VNIC.
Click Next.
34
Create Virtual Machine
6. The Arrange Disks step of the wizard is displayed.
Select the desired storage configuration of your virtual machine, such as virtual disks, physical disks,
and ISO files. On a separate slot, add one or more of the following disk types:
• Empty: An empty slot.
• Virtual Disk: This allows you to add or create a virtual disk. Virtual disks may be shared by virtual
machines, or only available to a single virtual machine.
• Physical Disk: The physical disks are the disks in a storage array. Physical disks may be shared by
virtual machines.
• CD/DVD: This adds an ISO file in a storage repository and can be used to create HVM and PVHVM
virtual machines. When creating a virtual machine from an ISO file, you must use a single file.
Installations that span multiple ISO files are not supported. ISO files cannot be used to create PVM
virtual machines. You cannot add an empty CDROM on a SPARC-based server.
Add or create any virtual disks to use as the virtual machine's hard disk, select any physical disks
to add, and select any ISO files to use to create the virtual machine. Add the disks in the order they
should appear in the virtual machine. The disk with the boot partition or installation media should be the
first disk listed. An HVM guest can have up to four disks, including empty CD/DVD drives. A PVM guest
can have up to 104 disks. A PVHVM guest can have up to 107 disks. An LDOMS_PVM guest can have
up to 1024 disks. Only one slot can contain an empty CD/DVD.
Tip
When editing a running virtual machine, you can change the CD/DVD using this
dialog box and the CD/DVD is mounted in the operating system.
To create or add a virtual disk:
a. To create a virtual disk, select Virtual Disk from the Disk Type drop-down list and click Create a
Virtual Disk .
b. The Create Virtual Disk dialog box is displayed. Enter or select the following to create a virtual
disk:
• Repository: The repository in which the virtual disk is to be created.
35
Create Virtual Machine
• Virtual Disk Name: The name of the virtual disk to be created and made available to the virtual
machine. See How are Virtual Disks Managed? in the Oracle VM Concepts Guide for more
information about using virtual disks.
• Size (GiB): The disk size of the virtual disk, in GiB.
• Description: A description of the virtual disk.
• Shareable: Whether the virtual disk should be shareable (read/write) with other virtual machines.
• Allocation Type: Whether to use a Sparse Allocation or Non-sparse Allocation. Sparse
Allocation creates a sparse disk, so the size of the disk is initially small and increases as it
is used. Sparse allocation is faster than using Non-Sparse Allocation when creating a virtual
machine. Non-Sparse Allocation creates the entire disk when the virtual machine is created, and
so is slower than creating a sparse disk.
Click OK.
c. To search for an existing virtual disk to add to the virtual machine, click Select a Virtual Machine
Disk . The Select a Virtual Machine Disk dialog box is displayed. Select the virtual disk to use
and Click OK.
Note
If your virtual machine needs more than one disk, you can create the disk(s)
afterwards in the repository, and add them to the virtual machine. See
Section 4.9.1.1, “Create Virtual Disk” and Section 3.5.2.1, “Edit Virtual
Machine” for more information on creating a virtual disk and editing a virtual
machine. There are some limitations on mixing virtual disks of differing
device types on a virtual machine. See How are Virtual Disks Managed?
in the Oracle VM Concepts Guide for more information about how device
types are allocated to virtual disks and what you may need to do to solve
any issues surrounding this problem.
To add a physical disk:
a. To add a physical disk to the virtual machine, select Physical Disk from the Disk Type drop-down
list. Click Select a Virtual Machine Disk . The Select a Physical Disk dialog box is displayed.
Select a physical disk from the list of available disks. If you want to leave the slot empty, select
Leave Slot Empty. Click OK.
To add an ISO file:
a. To add an ISO file to the virtual machine, select CD/DVD from the Disk Type drop-down list. Click
Select a Virtual Machine Disk . The Select an ISO dialog box is displayed. Select a Iso file from
the list of available files. If you want to leave the slot empty, select Leave Slot Empty. Click OK.
Note
When adding an ISO file to an existing virtual machine, the ISO file is
available to the operating system, but may not be mounted. To access the
ISO file, you may need to mount it, for example:
# mkdir /cdrom
# mount -o loop /dev/xvdb /cdrom
36
Create Virtual Machine
When you have set up the virtual machine's disks, click Next.
7. The Boot Options step is displayed in the wizard.
Select the boot media order for your virtual machine.
If you are creating a hardware virtualized machine virtual machine (HVM), you can choose the PXE
boot option. If so, remember to put PXE first in the Select your boot options field, and change the
boot order again after installation and before rebooting the virtual machine. To use PXE, you must
configure a PXE/tftp environment to offer the necessary boot media and instructions to the virtual
machine.
If you are creating a paravirtualized virtual machine (PVM), you also have the PXE option available. In
this case, the PXE option refers to a network style boot. If the PXE option appears in the right-handside column, you must enter the location of the mounted ISO file from which to perform the operating
system installation in the Network Boot Path field that is shown when editing or creating a PVM, for
example
http://example.com/Enterprise-R6-U1-Server-x86_64-dvd.iso/
For information on creating a mounted ISO file, see ISO Provisioning for PVM Guest Installations in the
Oracle VM Administrator's Guide.
You cannot use the Network Boot Path field to boot a virtual machine using PXE. This field can only
be used to specify the path to a mounted ISO file to use when installing a PVM guest.
If you have defined tags and want to add any to this virtual machine, click Next. Otherwise, click Finish
to create and deploy the virtual machine to the server pool.
8. The Tags step is optional and displays in the wizard if you clicked Next in the previous step.
Note
The virtual machine has already been created and deployed to the server pool
at this point. This step is entirely optional. Cancelling the operation within this
dialog does not prevent the virtual machine from being created.
37
Summary
If you have previously created tags, they appear in the Available Tags column. Select the tags you
want to apply to the virtual machine and move them to the Selected Tags column. See Section 1.14,
“Tags” for more information on creating and managing tags. Click Finish.
If you created a PVM, there are some steps you should take after the operating system installation is
completed:
1. Stop the virtual machine. See Section 3.5.2.4, “Stop Virtual Machines” for information on stopping a
virtual machine.
2. Edit the virtual machine and remove PXE from the Boot Order column in the Boot Options step of the
Edit Virtual Machine wizard. See Section 3.5.2.1, “Edit Virtual Machine” for information on editing a
virtual machine.
3. Start the virtual machine and complete the installation if necessary. See Section 3.5.2.3, “Start Virtual
Machines” for information on starting a virtual machine.
To edit the virtual machine configuration information, see Section 3.5.2.1, “Edit Virtual Machine”.
3.2 Summary
On the Servers and VMs tab there is a navigation pane. At the top of the navigation pane is the navigation
toolbar discussed in Section 3.1, “Toolbar”. Within the navigation pane is a navigation tree that allows you
to navigate through the different object types that comprise your environment.
Different objects may be nested at different levels within the navigation tree depending on their
relationships to each other. Clicking on different objects or folders within the navigation tree enables
access to the different perspectives available for that object in the management pane.
The navigation tree that is available within the Servers and VMs tab conforms to the following structure:
• Server Pools Folder
• Server Pool Item
• Server Item
• Unassigned Servers Folder
• Server Item
38
Server Pools Folder
• Unassigned Virtual Machines Folder
Each navigation element has a number of associated perspectives offering different views of the objects
contained by the selected navigation element, or the configuration information specific to it. For many of
these perspectives, an associated toolbar is provided so that it is possible to perform different configuration
or management tasks on elements selected in the management pane.
3.3 Server Pools Folder
The Server Pools navigation folder contains each server pool that has been configured within the
environment. The structure of the navigation provided in the navigation tree is discussed in more detail in
Section 3.2, “Summary”.
Clicking on the Server Pools navigation folder in the navigation tree allows you to access different
perspectives in the management pane. Each perspective provides its own view of all of the server pools
within Oracle VM Manager. Most of the perspectives also include separate perspective toolbars that enable
you to perform various configuration or management tasks specific to the view currently displayed within
the management pane. The Server Pools navigation folder offers the following perspectives within the
management pane:
• Server Pools Perspective
• Server Processor Compatibility Perspective
3.3.1 Server Pools Perspective
The Server Pools perspective lists the different server pools configured in your environment. The following
columns are displayed in the management pane:
• Name: The name that has been configured for the server pool.
• Tag(s): Any tags that have been applied to the server pool.
• Keymap: The configured keymap for the server pool.
• Virtual IP: The virtual IP address that is configured for the server pool.
• Master Server: The current Master Server configured for the server pool.
• Pool File System: The path location to the server pool file system.
• Secure VM Migrate: Whether or not the server pool is configured to support secure virtual machine
migration.
• Description: A description entered for the server pool when it was created or edited.
This perspective includes a toolbar that consists of the following options:
Table 3.2 Server Pools Perspective Toolbar Icon Options
Toolbar Icon Option
Refresh All
Icon
Description
Rediscovers all Oracle VM Server instances, file servers, and
SAN servers. Use this to refresh information about all Oracle
VM Server instances
Use this option after rebuilding your database, to ensure that
all information stored within the database is up to date.
39
Server Pools Perspective
Toolbar Icon Option
Icon
Description
Create Server Pool...
Displays the Create a Server Pool wizard. Use this option to
create a server pool for Oracle VM Servers.
Import Virtual Machine...
Displays the Import Virtual Machine dialog box. Use this
option to import a virtual machine into Oracle VM Manager and
optionally deploy it to an Oracle VM Server or server pools.
Edit Selected Server Pool...
Displays the Edit Server Pool wizard. Use this option to edit a
server pool.
Delete Server Pool
Displays the Delete Confirmation dialog box. Use this option
to delete the selected server pool.
Change Servers Agent
Password
Displays the Change Servers Agent Password dialog box.
Use this option to change the Oracle VM Agent password used
by all of the Oracle VM Servers in the selected server pool.
Note that the Oracle VM Agent password is only used during
the process of taking ownership of an Oracle VM Server,
thereafter certificate based authentication is used.
Define Policy for Server Pool...
Displays the Configure DRS/DPM wizard. Use this option to
set or edit resource policies for the server pool.
Send VM Messages...
Send one or more virtual machines a message. Use this option
to send messages to virtual machines that have the Oracle VM
Guest Additions installed.
3.3.1.1 Refresh All
If there are either changes to the physical state of an Oracle VM Server or its attached storage, you should
discover it again to update the configuration information in Oracle VM Manager. In order to cut load time
within Oracle VM Manager, Oracle VM Server rediscovery is not performed at start-up, therefore there may
be cases where you want to update the configuration information for all Oracle VM Server instances within
the Oracle VM Manager. Note that in larger deployments this may be a resource consuming action.
Important
The Refresh All function does not pick up the contents of file systems that have
never been refreshed before. Furthermore, it does not refresh repositories that are
not already presented on at least one server. It is important to keep this in mind if
you have restored a configuration from a backup, since some items may not have
been refreshed before at the time that the backup was created.
To rediscover all Oracle VM Servers, file servers and SAN servers:
1. On the Servers and VMs tab click on the Server Pools folder in the navigation pane.
2. Select the Server Pools perspective from the drop-down selector.
3. Click Refresh All
in the perspective toolbar.
The configuration information about all Oracle VM Server instances is updated in Oracle VM Manager.
3.3.1.2 Create Server Pool
To create a server pool:
1. Click Create Server Pool
in the toolbar to start the Create Server Pool wizard.
2. The Create Server Pool step is displayed in the wizard.
40
Server Pools Perspective
Enter the server pool information:
• Server Pool Name: The name of the server pool. The maximum length of a server pool name is 256
characters and may contain any character.
• Virtual IP Address for the Pool: An IP address used to identify the master Oracle VM Server,
which controls the other Oracle VM Server in the server pool. In the event that the master Oracle VM
Server fails or is placed into maintenance mode, another Oracle VM Server is selected to perform the
master role, and this IP address is then assigned to the new host. The virtual IP address must be an
unused IP address within the same subnetwork that is used for the management network.
• VM Console Keymap: The key mapping to be used when connecting to a virtual machine's console.
• VM Start Policy: For each server pool you can define the default start-up policy for all of your virtual
machines. Options include the ability to start the virtual machine on the current server (the server to
which the virtual machine has been assigned) and the ability to start the virtual machine on the best
available server (determined using the same algorithms as DRS and DPM). It is possible to override
the default policy within the configuration of each virtual machine. See Section 3.1.3, “Create Virtual
Machine” for information on setting the start policy for an individual virtual machine. Note that as of
Release 3.3, the VM Start Policy also applies to the VM Resume operation.
• Secure VM Migrate: Select whether to enable encrypted migration of virtual machines. When
Secure VM Migrate is checked, virtual machines are migrated using SSL to protect the data during
the migration process. Secure migration of a virtual machine may effect the time taken to perform the
migration as the encryption and decryption of data requires more system resources and time.
• Clustered Server Pool: Select whether to enable clustering of the Oracle VM Servers in the server
pool to enable HA. See How do Server Pool Clusters Work? and How does High Availability (HA)
Work?in the Oracle VM Concepts Guide for more information on server pool clustering and on HA
support and policies.
Important
If the Oracle VM Servers in your server pool are SPARC-based, you should
be aware that clustering can only function if the distributed lock manager
package is installed on all of the Oracle VM Servers that you intend to add
to the server pool, as described in Installing DLM for SPARC Server Pool
41
Server Pools Perspective
Clusters in the Oracle VM Installation and Upgrade Guide. Furthermore,
clustering is not supported for servers that have multiple control domains
(shadow domains). Clustering for SPARC is only supported using NFS
storage for the cluster file system. Failure to meet these requirements results
in an error when attempting to create the clustered server pool, notifying you
that the server lacks the ability to perform clustering.
• Timeout for cluster: If clustering is enabled for the server pool, this option allows you to set the
timeout parameter. The maximum cluster timeout setting is 300 seconds. The minimum cluster
timeout is 12 seconds. The default cluster timeout is 120 seconds. The Disk heartbeat and network
heartbeat are automatically derived from the cluster timeout value.
The cluster timeout can only be changed when there are no servers in the server pool, therefore it is
usually good to set this during the creation of your server pool.
Note
This option is greyed out if the Clustered Server Pool check box is
unchecked.
• Storage for Server Pool: Select the file system type to use for the server pool, either a Network
File System, or a Physical Disk. The server pool file system is used to hold the server pool cluster
data, and is also used for cluster heartbeating. Oracle recommends that you create this storage
with a size of at least 12 GB, as a NAS export or LUN. Note that if you are creating a SPARC-based
server pool, only NFS is supported for a server pool file system.
A server pool file system is exclusive, just like other storage. That is, in the same way that you
cannot create two storage repositories on the same export path, the server pool file system cannot
be shared with other server pools, or with storage repositories. Each fully qualified export path (for
example, /export/myexport/one, /export/myexport/two) must be used for one, and only one, purpose,
that is, for a storage repository, or a server pool file system.
Note
This option is greyed out if the Clustered Server Pool check box is
unchecked.
For information on creating storage, see Chapter 6, Storage Tab.
• Network File System: The file system to use as the pool file system. Click Search in the Storage
Location field to search for a network file system. This field is displayed if you select Network File
System in the previous field.
• Physical Disk: The file system to use as the pool file system. Click Search in the Storage
Location field to search for a physical disk. This field is displayed if you select Physical Disk in the
previous field.
• Description: A description of the server pool. This field is optional.
Click Next.
3. The Add Servers step is displayed in the wizard.
42
Server Pools Perspective
The Hypervisor Filter field allows you to specify the hypervisor type to use for the server pool.
Selecting the Oracle VM x86 hypervisor, limits the available servers to show only x86 systems; while
selecting the Oracle VM SPARC hypervisor, limits the available servers to show only SPARC systems
within your environment. If your environment does not contain systems of more than one hypervisor,
the filter is greyed out and is automatically set to the hypervisor available within your environment. It is
not possible to create a server pool consisting of servers that use different hypervisors.
Select the Oracle VM Servers to add to the server pool from the Available Servers column and move
them to the Selected Servers column.
If you have defined tags and wish to add any to the server pool, click Next. Otherwise, click Finish.
4. The Tags step is optional and displays in the wizard if you clicked Next in the previous step.
If you have defined tags previously, they appear in the Available Tags column. You can select the tags
that you wish to apply to the server pool and move them to the Selected Tags column.
See Section 1.14, “Tags” for more information on creating and managing tags.
Click Finish.
43
Server Pools Perspective
The server pool is created.
3.3.1.3 Import Virtual Machine
You can import a virtual machine into Oracle VM Manager and have it deployed to a server pool, or placed
in the Unassigned Virtual Machines folder if you do not want to deploy it. The virtual machine must be
located on an FTP or web server, either as separate files, or compressed into a single archive file (for
example, a .tgz or .zip file). As an archive of a virtual machine is also known as a virtual machine template,
you can also use this process to import older style Oracle VM virtual machine templates. This process
does not work for the newer OVF/OVA style templates.
When you import a virtual machine into a server pool, you have the option of saving it to any storage
repository that is presented to at least one Oracle VM Server in the server pool. When you import a virtual
machine to the Unassigned Virtual Machines folder, you can save it into any storage repository.
To import a virtual machine:
1. Place the files that make up a virtual machine, or an archive of those files, in a location accessible by
Oracle VM Manager using any of these protocols: HTTP, HTTPS or FTP.
2. Click the Servers and VMs tab.
3. If you want to import and deploy the virtual machine to a server pool, select Server Pools in the
navigation tree, then select the server pool in the management pane table.
If you do not want to deploy the virtual machine, select the Unassigned Virtual Machines folder.
4. Select Import Virtual Machine...
in the toolbar in the management pane.
5. The Import Virtual Machine dialog box is displayed. Select or edit the following:
• Destination Repository: The storage repository in which to save the virtual machine.
• VM URLs: The URLs for the virtual machine. The URL schemes supported are HTTP, HTTPS, and
FTP. For example:
http://example.com/mytemplate.tgz
To import a virtual machine using FTP, use the standard FTP syntax, for example:
ftp://user:password@server/path/filename.tgz
Each virtual machine component should be listed on a new line. Each URL must be a reference
to a complete file. If your virtual machine files are split into multiple compressed files, concatenate
those files and enter the URL for the concatenated file, for example to concatenate a number of
compressed files to one compressed file, enter:
$ cat vm.tgz.1of3 vm.tgz.2of3 vm.tgz.3of3 > vm.tgz
Then enter the URL to the single compressed virtual machine file, in this case, vm.tgz.
To import a virtual machine that is not compressed as a single file, each component must be a
complete file (if not, concatenate them to one file), for example to enter a virtual disk image and a
virtual machine configuration file that together make up a complete virtual machine, you could enter:
http://myexample.com/System-sda.img
http://myexample.com/vm.cfg
44
Server Pools Perspective
• Proxy: The IP address or hostname of an optional proxy server to use when importing the virtual
machine.
Click OK to import the virtual machine. The virtual machine is deployed to the server pool in the
stopped state. Alternatively, the virtual machine is imported to the Unassigned Virtual Machines
folder.
See Section 3.5.2.3, “Start Virtual Machines” for information on starting a virtual machine, and
Section 3.5.2.1, “Edit Virtual Machine” for information on editing a virtual machine.
3.3.1.4 Edit Server Pool
You can edit the configuration information of a server pool, including the server pool name, description,
and key mapping. You can also change the master server, which controls the cluster, as well as whether
the virtual machines are migrated securely. You cannot change the virtual IP address or the file system
used for the server pool.
To edit a server pool:
1. Click the Servers and VMs tab.
2. Select the Server Pools folder in the navigation pane. Ensure that you are in the Server Pools
perspective. Click Edit Selected Server Pool... in the toolbar.
3. The Edit Server Pool dialog box is displayed. Edit the server pool information:
• Server Pool Name: The name of the server pool. The maximum length of a server pool name is 256
characters and may contain any character.
• Description: A description of the server pool.
• Virtual IP Address for the Pool: This field cannot be modified.
• Master Server: The master server that handles interactions with Oracle VM Manager.
• Pool File System: This field cannot be modified.
• VM Console Keymap: The key mapping to use in the consoles for all virtual machines in the server
pool.
• VM Start Policy: Define the default start-up policy for all of your virtual machines handled by
this server pool. It is possible to override the default policy within the configuration of each virtual
machine. See Section 3.1.3, “Create Virtual Machine” for information on setting the start policy for an
individual virtual machine.
• Secure VM Migrate: Select whether to enable encrypted migration of virtual machines.
• Override Global Server Update Group: Select whether to enable overriding of the global update
repository. See Section 7.2, “Server Update Groups” and Section 3.4.6, “Server Update Repositories
Perspective” for more information on update repositories.
• Timeout for cluster: If clustering is enabled for the server pool, this option allows you to set the
timeout parameter. The maximum cluster timeout setting is 300 seconds. The minimum cluster
timeout is 12 seconds. The default cluster timeout is 120 seconds. The disk heartbeat and network
heartbeat are automatically derived from the cluster timeout value.
45
Server Pools Perspective
The cluster timeout can only be changed when there are no servers in the server pool, therefore it is
usually good to set this during the creation of your server pool.
4. To edit the Oracle VM Servers in the server pool, click the Servers tab. Using the controls provided,
you can add or remove Oracle VM Servers that comprise the server pool.
5. To edit the tags associated with the server pool, click the Tags tab. Using the controls provided, you
can add or remove tags that can be used to identify the server pool and to group it with other objects
within Oracle VM Manager. See Section 1.14, “Tags” for more information on creating and managing
tags.
6. Click OK to apply your changes.
The server pool changes are automatically propagated to all Oracle VM Servers in the server pool by the
master server.
3.3.1.5 Delete Server Pool
Before you can delete a server pool, you must delete or remove all virtual machines and remove all Oracle
VM Servers from the server pool.
To delete server pools:
1. Click the Servers and VMs tab.
2. Select the Server Pools folder in the navigation tree.
3. Select Server Pools from the Perspective drop-down list.
4. Select one or more server pools in the table in the management pane. Click Delete
in the toolbar.
5. The Delete Confirmation dialog box is displayed. Click OK to delete the server pools.
The server pools are deleted.
Tip
To delete a server pool which is HA-enabled, you must have an admin server
assigned to any NFS file server-based storage.
3.3.1.6 Change Oracle VM Agent Passwords on Oracle VM Servers
Oracle VM Manager allows you to change the password for the Oracle VM Agent running on each Oracle
VM Server. However, you must change the Oracle VM Agent password for all Oracle VM Servers in a
server pool. This is why the password change can only be executed at the server pool level and is applied
to all Oracle VM Servers in the server pool at the same time.
To change the Oracle VM Agent password for all Oracle VM Servers in a server pool:
1. Select the Server Pools folder in the navigation tree.
2. Select Server Pools from the Perspective drop-down list.
3. Select one or more server pools in the table in the management pane. Click Change Servers Agent
Password in the toolbar.
4. The Change Agent Password for All Servers within the Server Pool dialog box is displayed. Enter
the current password first. Then enter a new password and confirm it in the respective fields.
46
Server Pools Perspective
5. Click OK to complete the operation. Oracle VM Manager logs into each Oracle VM Server in the server
pool and changes the Oracle VM Agent password.
3.3.1.7 Define or Edit Server Pool Policies
It is possible to define server pool policies to improve power and resource usage across the servers within
your server pool. The two policies you can set are for:
• Distributed Resource Scheduling (DRS): Optimizes virtual machine resource utilization in a server pool.
• Distributed Power Management (DPM): Increases the consolidation ratio to use fewer Oracle VM
Servers during periods of relative low resource utilization.
The policy is also able to be set for networks used in a server pool. You can set the server pool to use
either DRS, or DPM, but not both at the same time.
See What are Server Pool Policies? in the Oracle VM Concepts Guide for more information on these
server pool policies.
To set a server pool policy:
1. Click the Servers and VMs tab.
2. Select the server pool in the Server Pools folder in the navigation pane.
3. From the Perspective field in the management pane, select Policies from the drop-down list. Click
Edit in the toolbar. The Configure Policy step of the Configure DRS/DPM wizard is displayed.
Enter the server pool policy information:
• Policy Control:
47
Server Pools Perspective
• Policy Type: You can choose from either DRS, DPM, or none. You cannot set both DRS and DPM
to be active at the same time.
• Time Period (Minutes): The time period for the policy job to run. This sets the policy job to run
every n minutes, for example, 10 sets the policy job to run every 10 minutes. You can enter a
number between 2 and 60.
• Server CPU:
• Enable: Set whether to enable or disable logging of CPU performance and utilization.
• Threshold (%): The maximum amount of CPU percentage usage allowed before the policy must
be enacted. You can enter between 0 and 99.
• Servers: Select the Oracle VM Servers for which the policy is to be enabled by moving the selected
Oracle VM Servers from the Available Servers to the Selected Servers shuttle box.
Click Next.
4. The Select Networks step of the Configure DRS/DPM wizard is displayed.
Select the networks to be included in the policy. Click Next.
5. The Network Settings step of the Configure DRS/DPM wizard is displayed.
48
Server Pools Perspective
Select whether to enable the policy on the network, and select the threshold at which the policy is to be
enacted for the network. Click Finish.
The policy is set for the server pool.
3.3.1.8 Send VM Messages
You can select one or more virtual machines, Oracle VM Servers or server pools, to select which running
virtual machines are populated in the dialog box used to send messages to virtual machines.
To send a virtual machine a message you must have first installed the Oracle VM Guest Additions in
the virtual machine. For information on installing the Oracle VM Guest Additions, and a more detailed
description of the virtual machine messaging mechanism and its uses, see the Oracle VM Administrator's
Guide.
To send messages to virtual machines:
1. Click the Servers and VMs tab.
2. Determine the grouping of virtual machines that you wish to send a message to:
i.
If you wish to send a message to virtual machines distributed across one or more server pools, click
on the Server Pools folder in the navigation pane. Select Server Pools from the Perspective dropdown list. Select one or more server pools in the management pane.
ii. If you wish to send a message to virtual machines distributed across one or more servers in a
particular server pool, expand the Server Pools folder in the navigation pane and select the server
pool where the servers reside. Select Servers from the Perspective drop-down list. Select one or
more servers in the management pane.
49
Server Pools Perspective
iii. If you wish to send a message to one or more virtual machines on a particular server, expand the
Server Pools folder in the navigation pane and select the server pool where the servers reside.
Select Virtual Machines from the Perspective drop-down list. Select one or more virtual machines
in the management pane.
3. Click Send VM Messages...
in the perspective toolbar.
The Send Messages to Virtual Machines dialog box is displayed.
4. To create a message, click Create Message...
Message dialog box.
in the perspective toolbar to display the Create VM
Enter the message key value pair in the Key and Message fields. Check the Log Message field to
retain a log of the message. Check the Hide Message field to hide the message of the key/value pair
50
Server Processor Compatibility Perspective
in the user interface. Click OK to save the message and return to the Send Messages to Virtual
Machines dialog box.
5. To edit a message, select the message and click Edit... in the dialog box toolbar. To delete a
message, select it and click Delete in the dialog box toolbar.
6. Select the Virtual Machines tab to select which running virtual machines are to receive the messages.
Click OK to send the messages to the virtual machines.
3.3.2 Server Processor Compatibility Perspective
The Server Processor Compatibility perspective lists the different server processor compatibility groups
configured in your environment. The following columns are displayed in the management pane:
• Name: The name that has been configured for the server processor compatibility group.
• Description: A description entered for the server processor compatibility group when it was created or
edited.
• Servers: A comma-separated list of servers that belong to the server processor compatibility group.
This perspective includes a toolbar that consists of the following options:
Table 3.3 Server Processor Compatibility Perspective Toolbar Icon Options
Toolbar Icon Option
Create New Server Processor
Compatibility Group...
Icon
Description
Displays the Create a Server Processor Compatibility
Group wizard.
Use this option, after adding servers to a server pool, to define
which servers have processors belonging to the same family.
51
Server Processor Compatibility Perspective
Toolbar Icon Option
Icon
Description
This helps to improve the success of live virtual machine
migration.
Edit Server Processor
Compatibility Group...
Displays the Edit Server Processor Compatibility Group
wizard. Use this option to edit a server processor compatibility
group.
Delete Server Processor
Compatibility Group
Displays the Delete Confirmation dialog box. Use this option
to delete the selected server processor compatibility group.
3.3.2.1 Create Server Processor Compatibility Group
To create a server processor compatibility group:
1. Click the Servers and VMs tab. Select Server Pools in the navigation pane.
2. From the Perspective field in the management pane, select Server Processor Compatibility from the
drop-down list. Click Create New Server Processor Compatibility... in the perspective toolbar.
3. The Create a Server Processor Compatibility Group wizard is displayed.
Enter the server processor compatibility group information:
• Group Name: Enter the name of the server processor compatibility group.
• Description: A description of the server processor compatibility group.
Click Next.
4. The Select Servers step of the Create a Server Processor Compatibility Group wizard is displayed.
52
Server Processor Compatibility Perspective
Select the servers to include in the server processor compatibility group and move them from the
Available Servers column to the Selected Servers column.
Click Finish.
The server processor compatibility group is created and listed in the Server Processor Compatibility
Group table in the management pane.
3.3.2.2 Edit Server Processor Compatibility Group
To edit a server processor compatibility group:
1. In the Servers and VMs tab, select Server Pools in the navigation pane.
2. From the Perspective field in the management pane, select Server Processor Compatibility from the
drop-down list. Select the server processor compatibility group in the Server Processor Compatibility
table and click Edit Server Processor Compatibility... in the perspective toolbar.
3. The Edit Server Processor Compatibility Group dialog box is displayed. Edit the server processor
compatibility group as required. To edit the Oracle VM Servers in the server processor compatibility
group, click the Servers tab.
Click OK.
The server processor compatibility group is edited and displayed in the Server Processor Compatibility
Group table in the management pane.
3.3.2.3 Delete Server Processor Compatibility Group
To delete a server processor compatibility group:
1. In the Servers and VMs tab, select Server Pools in the navigation pane.
2. From the Perspective field in the management pane, select Server Processor Compatibility from the
drop-down list. Select the server processor compatibility group in the Server Processor Compatibility
table and click Delete Server Processor Compatibility in the perspective toolbar.
3. A confirmation dialog box is displayed. Click OK to delete the server processor compatibility group.
53
Server Pool Item
The server processor compatibility group is deleted.
3.4 Server Pool Item
Each server pool configured within the environment is displayed as a server pool navigation item within
the Server Pools navigation folder. These server pool navigation items are labelled according to the server
pool name that is configured within Oracle VM Manager. If a name is not available or not configured
properly within Oracle VM Manager, the server pool UUID is allocated as the server pool name. The
structure of the navigation provided in the navigation tree is discussed in more detail in Section 3.2,
“Summary”.
Clicking on a server pool navigation item in the navigation tree allows you to access different perspectives
in the management pane. Each perspective provides its own view of the server pool within Oracle VM
Manager. Most of the perspectives also include separate perspective toolbars that enable you to perform
various configuration or management tasks specific to the view currently displayed within the management
pane. A server pool navigation item offers the following perspectives within the management pane:
• Info Perspective
• Servers Perspective
• Virtual Machines Perspective
• Anti-Affinity Groups Perspective
• Policies Perspective
• Server Update Repositories Perspective
• Events Perspective
3.4.1 Info Perspective
The Info perspective is common to many elements within the Oracle VM Manager Web Interface. This
perspective always shows the individually configured parameters for an item that is currently selected
in the navigation tree. Some of these configured parameters may be automatically populated through a
discovery process, while others may have been configured manually during the creation of the object that
is selected.
This perspective includes the following information:
• Server Pool Name: The configured name for the server pool.
• Server Count: The number of Oracle VM Servers that belong to the server pool.
• Clustered: Whether or not the server pool is configured as a cluster.
• Timeout for Cluster: The number of seconds before a server in the cluster times out.
• Master Server: The server that is currently configured as the Master Server for the server pool.
• Virtual IP: The configured virtual IP address for the server pool.
• ID: The UUID for this server pool.
• Description: The description provided for this server pool when it was created or edited.
• Pool File System: The path to the file system that is used for the server pool file system.
• Pool File System Type: The type of file system where the server pool file system is stored.
54
Servers Perspective
• Pool File System Storage Device: The device used for the pool file system.
• NFS/NAS File System: The NFS mount path for the pool file system if NFS is used.
• VM Console Keymap: The configured keymap for the virtual machine console.
• VM Start Policy: The virtual machine start-up policy selected for the server pool.
• File Servers: A list of file servers that are currently presented to the server pool.
• Secure VM Migrate: Whether or not the server pool is configured to support secure migrations of virtual
machines.
3.4.2 Servers Perspective
The Servers perspective lists the different servers that belong to either a server pool or the Unassigned
Servers folder, depending on the item selected in the navigation pane. The following columns are
displayed in the management pane:
• Name: The name that has been configured for the server.
• Status: The running status of the server.
• Tag(s): Any tags that have been applied to the server.
• Maintenance Mode: Whether or not the server is configured to be in maintenance mode.
• IP Address: The IP address that is used by Oracle VM Manager to access the server on the
management network channel.
• Memory (GiB): The available memory, in GiB, on the server.
• Processors: The number of processors that the server contains.
• Speed (GHz): The speed that the processors for the server are configured to run at.
• Product: The physical host brand and type reported by the server bios.
• Owned: Whether or not the server is owned by the current Oracle VM Manager instance.
• Update Required: Whether or not a server update is available for the server from its server update
repository.
This perspective includes a toolbar that consists of the following options:
Table 3.4 Servers Perspective Toolbar Icon Options
Toolbar Icon Option
Icon
Description
Create Virtual Machine...
Displays the Create Virtual Machine wizard. Use this option to
create a virtual machine in the selected server pool.
Edit...
Displays the Edit Server dialog box. Use this option to edit the
name and description for an Oracle VM Server. This is also
used to put the Oracle VM Server into maintenance mode, take
ownership of it, and to configure remote management of the
Oracle VM Server using IPMI (Intelligent Platform Management
Interface).
Note that placing an Oracle VM Server in maintenance mode is
indicated in the navigation pane with this icon:
55
Servers Perspective
Toolbar Icon Option
Icon
Description
Delete
Displays the Delete Confirmation dialog box. Use this option
to delete the selected Oracle VM Server.
Start
Starts a stopped Oracle VM Server.
Stop
Stops a running Oracle VM Server.
Restart
Restarts a running Oracle VM Server.
Kill
Powers off an Oracle VM Server. This is the equivalent of
physically pushing the Off button on the hardware.
Rediscover Server
Rediscovers the Oracle VM Server. Use this to refresh
information about the Oracle VM Server.
Rescan Physical Disks
Rescans the local storage on an Oracle VM Server. Use this
option to rescan the storage presented to an Oracle VM Server
when the storage configuration is changed, for example, a new
storage array is added.
Update Server
Updates or upgrades the Oracle VM Server if an update is
available in the server update repository.
Send VM Messages...
Send one or more virtual machines a message. Use this option
to send messages to virtual machines that have the Oracle VM
Guest Additions installed.
3.4.2.1 Create Virtual Machine
This section discusses creating a virtual machine using a template, and creating a virtual machine from an
ISO file, or from physical or virtual disks.
To create a virtual machine using a template:
1. Click the Servers and VMs tab.
2. Click Create Virtual Machine
in the toolbar.
3. The Create Virtual Machine wizard is displayed.
56
Servers Perspective
Select the Clone from an existing VM Template option.
Enter or select the following:
• Clone Count: The number of virtual machines to create from the template.
• Name Index: The start index number to use for the clone name suffix. The default is 0. This is used
in conjunction with the VM Name field to create the name for each clone.
• Repository: The repository in which to create the virtual machine configuration files.
• VM Template: The template to use to create the virtual machines.
• VM Name: An optional name for the virtual machines. The maximum name length is 256 characters
and may contain any character. The name need not be unique. If no value is given, the default is the
name of the virtual machine template being cloned. Each clone is suffixed with a dot (.) and the clone
index number, starting with the value for the Name Index field. For example, if the VM Name field
is set to MyVM, and the Name Index field is set to 1, the resulting clones would be named MyVM.1,
MyVM.2 and so on.
• Server Pool: The server pool in which to deploy the virtual machines.
• Description: An optional description of the virtual machines.
Click Finish. The virtual machines are created and deployed to the server pool.
To create a virtual machine using all other media:
1. Click the Servers and VMs tab.
2. Click Create Virtual Machine
in the toolbar.
3. The Create Virtual Machine wizard is displayed.
Select the Create a new VM option. Click Next.
4. The Create Virtual Machine step is displayed in the wizard.
57
Servers Perspective
Enter or select the following:
• Server Pool: The server pool on which to create the virtual machine.
• Server: The server that the virtual machine should be created on. The default option is Any, but the
drop-down selection lists the servers that exist in the server pool that you have selected. Selecting a
particular server forces the virtual machine to be created on that server. This has implications for the
Start Policy discussed later.
• Repository: The repository in which to create the virtual machine configuration file.
• Name: A name for the virtual machine. The maximum name length is 256 characters and may
contain any character. The name need not be unique.
• Enable High Availability: Whether to enable High Availability (HA). See How does High Availability
(HA) Work? in the Oracle VM Concepts Guide for more information on HA.
• Enable Huge Pages: Whether to enable HugePages. This option can be used when configuring
Huge Pages for paravirtualized VMs with the Domain Type set to XEN_PVM. Huge Pages are
available by default for HVM and PVHVM and this parameter cannot be set if your Domain Type is
not set to XEN_PVM. Setting this parameter automatically sets the page size to 2 MB. This means
that when assigning memory to a virtual machine with this parameter set, you must ensure that the
values specified are multiples of 2 MB. If you enable HugePages, you must also enable support for
HugePages in the guest operating system. If you want to change this value when editing a virtual
machine, the virtual machine must first be stopped. This option is not available if the virtual machine
is to be deployed to a SPARC-based server pool.
See How are Huge Pages Enabled for Virtual Machines?, in the Oracle VM Concepts Guide, for
more information on Huge Page support.
• Description: An optional description of the virtual machine.
• Operating System: The operating system of the virtual machine. This setting enables or disables
certain virtual machine settings that the guest operating system may require.
• Mouse Device Type: The mouse type to use for the virtual machine. This option is not available if
the virtual machine is to be deployed to a SPARC-based server pool.
• Keymap: The keyboard mapping to use for the virtual machine. This option is not available if the
virtual machine is to be deployed to a SPARC-based server pool.
58
Servers Perspective
• Domain Type: The domain type of the virtual machine. Oracle recommends you create
paravirtualized virtual machines if possible, as the performance of a paravirtualized virtual machine
is superior to that of a hardware virtualized machine guest. This option is not available if the virtual
machine is to be deployed to a SPARC-based server pool.
• XEN_HVM: Hardware virtualization, or fully virtualized. When you select this option you must
supply an ISO file in a repository (in the Arrange Disks step of the wizard) from which to create
the virtual machine. See Section 4.6.1.1, “Import ISO” for information on importing an ISO file into
a repository.
• XEN_HVM_PV_DRIVERS: Identical to XEN_HVM, but with additional paravirtualized drivers
for improved performance of the virtual machine. See What are Virtualization Modes or Domain
Types? in the Oracle VM Concepts Guide for more information about using paravirtualized drivers.
This domain type is used to run Microsoft Windows guest operating systems with an acceptable
performance level.
• XEN_PVM: Paravirtualized. Enables you to select a location for the mounted ISO file from which
to create the virtual machine. Before you create the virtual machine using the paravirtualized
method, mount the ISO file on an NFS share, or HTTP or FTP server. You supply the location of
the mounted ISO file in the Network Boot Path field in the Boot Options step of the wizard. For
information on creating a mounted ISO file, see ISO Provisioning for PVM Guest Installations in the
Oracle VM Administrator's Guide.
• LDOMS_PVM: This domain type should be selected if the server pool and hypervisors use Oracle
VM Server for SPARC as the hypervisor instead of Oracle VM Server for x86.
• Unknown: This option is informational in the event that Oracle VM Manager is unable to determine
the domain type for an existing virtual machine. It is not possible to actually set a virtual machine's
domain type to this value. Attempting to do so generates a rule violation when you try to save the
virtual machine settings and an error message is returned.
• Start Policy: The policy that should be used to start the virtual machine. Select one of:
• Best Server: The virtual machine is started on the best available Oracle VM Server as determined
by the algorithm used for the server pool policies DRS and DPM. For more information on server
pool policies, see What are Server Pool Policies? in the Oracle VM Concepts Guide.
• Current Server: The virtual machine is started on the Oracle VM Server to which it is assigned. If
you selected a particular server to create the virtual machine on, then it is started on this server.
• Use Pool Policy: The virtual machine is started using the start policy defined for the entire server
pool. See Section 3.1.2, “Create Server Pool” for more information on setting the start policy for a
server pool.
• Max. Memory (MB): The maximum memory size the virtual machine can be allocated. If you have
enabled Huge Pages, the value here must be a multiple of 2 MB.
• Memory (MB): The memory size the virtual machine is allocated. When creating a virtual machine,
this is the memory allocation used when starting the virtual machine. You can change this when
editing a running PVM and no virtual machine restart is required. For HVM guests, increasing or
decreasing the memory requires the virtual machine to be stopped. If you have enabled Huge Pages,
the value here must be a multiple of 2 MB.
• Max. Processors: The maximum number of processors the virtual machine can be allocated. The
number of processors is expressed in number of physical CPU cores, and is limited to 128. This
59
Servers Perspective
cannot be changed when editing a running virtual machine. To edit this value, you must first stop the
virtual machine.
• Processors: The number of processors the virtual machine is allocated. The number of processors
is expressed in number of physical CPU cores, and is limited to 128. You can change this when
editing a running virtual machine, up to the value of Max. Processors.
• Priority: The CPU priority of the virtual machine. The higher the priority, the more physical CPU
cycles are given to the virtual machine. This option is not available if the virtual machine is to be
deployed to a SPARC-based server pool.
• Processor Cap %: Increase or decrease the percentage to which the virtual CPUs can receive
scheduled time. This parameter defines the maximum percentage to which the virtual CPUs can
receive scheduled time. Use this parameter to keep low priority virtual machines from consuming too
many CPU cycles on a Virtual Machine Server. This option is not available if the virtual machine is to
be deployed to a SPARC-based server pool.
The Priority and Processor Cap% parameters are passed to the Xen hypervisor for use by the credit
scheduler, which automatically load balances guest VCPUs across all available physical CPUs using
an algorithm that combines these two parameters. Therefore, these parameters are a key factor for the
performance of the virtual machine on x86 hardware.
On SPARC, each virtual machine uses dedicated physical CPU threads and CPUs are not shared
between virtual machines, being exclusively assigned to a single virtual machine.
Click Next.
5. The Set up Networks step is displayed in the wizard.
This step of the wizard allows you to add VNICs to the virtual machine. If you want to specify the MAC
address for a VNIC, select Specify MAC Address and enter the MAC address. Otherwise, leave the
default Dynamically Assign MAC to dynamically assign a MAC Address. Select a network with the
virtual machine role from the Network drop-down list. If no networks are available, you must first create
a network with the virtual machine role as a dedicated network for virtual machine traffic is required.
See Section 5.1.1, “Create New Network” for information on creating a network. Click Add VNIC.
The VNIC order specified here is important, as it determines the order in which they are presented to
the virtual machine. You can control the ordering of the VNICs using the up and down arrows on the
right of the table.
If you are editing the networking of an existing stopped virtual machine, you can change the network
to which the VNIC belongs using the Network drop-down list in the table. It is important that the VNIC
60
Servers Perspective
belongs to a network already associated with the Oracle VM Servers on which it can run, or you cannot
start the virtual machine. See Section 5.1.1, “Create New Network” and Section 5.1.2, “Edit Existing
Network” for more information on associating Oracle VM Servers with networks.
If you are editing an existing running virtual machine, you are able to add VNICs to the virtual machine,
but you are not able to remove VNICs that are already in use. You also cannot reorder VNICs on a
running virtual machine. If you choose to add a VNIC to a running machine you must ensure that the
VNIC belongs to a virtual machine network already associated with the Oracle VM Servers on which it
can run, by selecting the appropriate network from the Network drop-down list.
A virtual machine can have up to eight (8) VNICs for HVM guests and up to 31 for PVM guests. A PVM
guest requires network connectivity to perform the operating system install and must have at least one
VNIC.
Click Next.
6. The Arrange Disks step of the wizard is displayed.
Select the desired storage configuration of your virtual machine, such as virtual disks, physical disks,
and ISO files. On a separate slot, add one or more of the following disk types:
• Empty: An empty slot.
• Virtual Disk: This allows you to add or create a virtual disk. Virtual disks may be shared by virtual
machines, or only available to a single virtual machine.
• Physical Disk: The physical disks are the disks in a storage array. Physical disks may be shared by
virtual machines.
• CD/DVD: This adds an ISO file in a storage repository and can be used to create HVM and PVHVM
virtual machines. When creating a virtual machine from an ISO file, you must use a single file.
Installations that span multiple ISO files are not supported. ISO files cannot be used to create PVM
virtual machines. You cannot add an empty CDROM on a SPARC-based server.
Add or create any virtual disks to use as the virtual machine's hard disk, select any physical disks
to add, and select any ISO files to use to create the virtual machine. Add the disks in the order they
should appear in the virtual machine. The disk with the boot partition or installation media should be the
first disk listed. An HVM guest can have up to four disks, including empty CD/DVD drives. A PVM guest
can have up to 104 disks. A PVHVM guest can have up to 107 disks. An LDOMS_PVM guest can have
up to 1024 disks. Only one slot can contain an empty CD/DVD.
61
Servers Perspective
Tip
When editing a running virtual machine, you can change the CD/DVD using this
dialog box and the CD/DVD is mounted in the operating system.
To create or add a virtual disk:
a. To create a virtual disk, select Virtual Disk from the Disk Type drop-down list and click Create a
Virtual Disk .
b. The Create Virtual Disk dialog box is displayed. Enter or select the following to create a virtual
disk:
• Repository: The repository in which the virtual disk is to be created.
• Virtual Disk Name: The name of the virtual disk to be created and made available to the virtual
machine. See How are Virtual Disks Managed? in the Oracle VM Concepts Guide for more
information about using virtual disks.
• Size (GiB): The disk size of the virtual disk, in GiB.
• Description: A description of the virtual disk.
• Shareable: Whether the virtual disk should be shareable (read/write) with other virtual machines.
• Allocation Type: Whether to use a Sparse Allocation or Non-sparse Allocation. Sparse
Allocation creates a sparse disk, so the size of the disk is initially small and increases as it
is used. Sparse allocation is faster than using Non-Sparse Allocation when creating a virtual
machine. Non-Sparse Allocation creates the entire disk when the virtual machine is created, and
so is slower than creating a sparse disk.
Click OK.
c. To search for an existing virtual disk to add to the virtual machine, click Select a Virtual Machine
Disk . The Select a Virtual Machine Disk dialog box is displayed. Select the virtual disk to use
and Click OK.
Note
If your virtual machine needs more than one disk, you can create the disk(s)
afterwards in the repository, and add them to the virtual machine. See
Section 4.9.1.1, “Create Virtual Disk” and Section 3.5.2.1, “Edit Virtual
Machine” for more information on creating a virtual disk and editing a virtual
machine. There are some limitations on mixing virtual disks of differing
device types on a virtual machine. See How are Virtual Disks Managed?
in the Oracle VM Concepts Guide for more information about how device
types are allocated to virtual disks and what you may need to do to solve
any issues surrounding this problem.
To add a physical disk:
a. To add a physical disk to the virtual machine, select Physical Disk from the Disk Type drop-down
list. Click Select a Virtual Machine Disk . The Select a Physical Disk dialog box is displayed.
Select a physical disk from the list of available disks. If you want to leave the slot empty, select
Leave Slot Empty. Click OK.
62
Servers Perspective
To add an ISO file:
a. To add an ISO file to the virtual machine, select CD/DVD from the Disk Type drop-down list. Click
Select a Virtual Machine Disk . The Select an ISO dialog box is displayed. Select a Iso file from
the list of available files. If you want to leave the slot empty, select Leave Slot Empty. Click OK.
Note
When adding an ISO file to an existing virtual machine, the ISO file is
available to the operating system, but may not be mounted. To access the
ISO file, you may need to mount it, for example:
# mkdir /cdrom
# mount -o loop /dev/xvdb /cdrom
When you have set up the virtual machine's disks, click Next.
7. The Boot Options step is displayed in the wizard.
Select the boot media order for your virtual machine.
If you are creating a hardware virtualized machine virtual machine (HVM), you can choose the PXE
boot option. If so, remember to put PXE first in the Select your boot options field, and change the
boot order again after installation and before rebooting the virtual machine. To use PXE, you must
configure a PXE/tftp environment to offer the necessary boot media and instructions to the virtual
machine.
If you are creating a paravirtualized virtual machine (PVM), you also have the PXE option available. In
this case, the PXE option refers to a network style boot. If the PXE option appears in the right-handside column, you must enter the location of the mounted ISO file from which to perform the operating
system installation in the Network Boot Path field that is shown when editing or creating a PVM, for
example
http://example.com/Enterprise-R6-U1-Server-x86_64-dvd.iso/
For information on creating a mounted ISO file, see ISO Provisioning for PVM Guest Installations in the
Oracle VM Administrator's Guide.
You cannot use the Network Boot Path field to boot a virtual machine using PXE. This field can only
be used to specify the path to a mounted ISO file to use when installing a PVM guest.
63
Servers Perspective
If you have defined tags and want to add any to this virtual machine, click Next. Otherwise, click Finish
to create and deploy the virtual machine to the server pool.
8. The Tags step is optional and displays in the wizard if you clicked Next in the previous step.
Note
The virtual machine has already been created and deployed to the server pool
at this point. This step is entirely optional. Cancelling the operation within this
dialog does not prevent the virtual machine from being created.
If you have previously created tags, they appear in the Available Tags column. Select the tags you
want to apply to the virtual machine and move them to the Selected Tags column. See Section 1.14,
“Tags” for more information on creating and managing tags. Click Finish.
If you created a PVM, there are some steps you should take after the operating system installation is
completed:
1. Stop the virtual machine. See Section 3.5.2.4, “Stop Virtual Machines” for information on stopping a
virtual machine.
2. Edit the virtual machine and remove PXE from the Boot Order column in the Boot Options step of the
Edit Virtual Machine wizard. See Section 3.5.2.1, “Edit Virtual Machine” for information on editing a
virtual machine.
3. Start the virtual machine and complete the installation if necessary. See Section 3.5.2.3, “Start Virtual
Machines” for information on starting a virtual machine.
To edit the virtual machine configuration information, see Section 3.5.2.1, “Edit Virtual Machine”.
3.4.2.2 Edit Server
You can edit the configuration information for an Oracle VM Server to change the name, description, any
server pool roles, and to take it off-line to perform system maintenance.
To edit the configuration information of an Oracle VM Server:
1. Click the Servers and VMs tab.
2. Select the Oracle VM Server in the navigation pane. Click Edit Server
64
in the toolbar.
Servers Perspective
3. The Edit Server dialog box is displayed. In the Configuration tab, edit the information about the
Oracle VM Server:
• Name: The name of the Oracle VM Server.
• Description: A description of the Oracle VM Server.
• NTP Server(s): Allows you to specify the NTP server settings for each individual Oracle VM Server.
You can add multiple NTP servers using a comma-separated list.
Note
If you need to batch edit the NTP servers for a large number of Oracle
VM Servers in your environment, you should use the Oracle VM Manager
Command Line Interface, edit Server, or the Oracle VM Web Services API to
do this programmatically.
• Server in Maintenance Mode: Select whether to place the Oracle VM Server in maintenance mode.
An Oracle VM Server can be placed into maintenance mode to perform hardware or software
maintenance. When an Oracle VM Server is placed in maintenance mode, any virtual machines
running on the Oracle VM Server are automatically migrated to other Oracle VM Servers in the
server pool, if they are available. If the Oracle VM Server is the master Oracle VM Server in the
server pool, this role is moved to another Oracle VM Server in the server pool, if available, after the
server is shutdown. If any of these automatic processes fail, check the Oracle VM Server event log
(Section 3.5.10, “Events Perspective”) for reasons why the failure occurred.
When an Oracle VM Server is placed into maintenance mode its icon:
pane.
is updated in the navigation
When you have finished performing maintenance on the Oracle VM Server and you are ready for it to
rejoin the server pool, ensure that the Maintenance Mode check box is unchecked.
• Take Ownership of Server: Select to take ownership of the Oracle VM Server.
Note
Configuration of NTP for each Oracle VM Server takes place when a
server changes ownership. If you release ownership of a server, its NTP
configuration is updated to point locally to itself. When Oracle VM Manager
takes ownership of a server, the server's NTP configuration is automatically
updated to point to the Oracle VM Manager instance. This may only be
evident after the server has been refreshed.
Tip
You cannot edit the ownership of an Oracle VM Server if it is included in a
server pool or if a repository is presented to it.
• Inbound Migration Locked: Select whether to allow additional virtual machines to run on the Oracle
VM Server. Selecting this option prevents new or migrated virtual machines to run on the Oracle VM
Server. See How Can I Protect Virtual Machines? for more information on inbound migration lock.
• Oracle VM Agent password: The password to connect to the Oracle VM Agent. The value for this
field is required if you select to take ownership of the Oracle VM Server.
65
Servers Perspective
• Utility Server: Select to designate the Oracle VM Server to perform utility functions such as
importing, cloning and storage refresh.
• VM Server: The virtual machine role is required to run virtual machines.
4. In the IPMI tab, select the Enable Server IPMI check box to enable the Intelligent Platform
Management Interface (IPMI). IPMI allows you to remotely power on or power off an Oracle VM Server.
If IPMI is either not available or not enabled on the Oracle VM Server, Oracle VM Manager may still
be able to remotely power on an Oracle VM Server using a Wake on LAN message without having
to physically press the power button, and it may be able to send a system power off message to shut
it down. Select the IPMI Password Required check box if your IPMI setup requires a password to
change the configuration.
To configure IPMI enter the following information in the fields:
• Access Username: The user name for the IPMI.
• Password: The password for the IPMI.
• IP Address: The IP address of the IPMI.
5. To edit the tags associated with the server, click the Tags tab. Using the controls provided, you can
add or remove tags that can be used to identify the server and to group it with other objects within
Oracle VM Manager. See Section 1.14, “Tags” for more information on creating and managing tags.
Click OK. The Oracle VM Server is updated.
Batch Editing Oracle VM Servers
You can edit the information for more than one Oracle VM Server at a time by using the multi-select
functionality provided within the Oracle VM Manager interface to select multiple items before clicking on the
Edit Server icon in the toolbar.
When editing a group of Oracle VM Servers in batch mode the options available to you are limited to
actions that can be applied to all selected items. The following options are available:
• Server in Maintenance Mode: Checking this check box sets all selected items into Maintenance Mode.
• Take Ownership of Server: Checking this check box allows Oracle VM Manager to take ownership of
all of the selected items.
• Oracle VM Agent password: The password to connect to the Oracle VM Agent. The value for this field
is required if you select to take ownership of the selected items.
• Utility Server: Checking this check box changes the role of all selected items to Utility Servers.
• VM Server: Checking this check box changes the role of all selected items to Virtual Machine Servers.
Note
If the values set for the options provided vary across the selected servers, the
dialog displays the values for the first server in the selection. Clicking OK updates
all of the selected servers to have the same status.
3.4.2.3 Delete Server
66
Servers Perspective
When you delete an Oracle VM Server, it is removed from the Oracle VM Manager repository and
becomes unmanaged. The Oracle VM Server is not stopped, nor is anything physically done to the Oracle
VM Server.
Before you can delete an Oracle VM Server, you must stop any running virtual machines, or place the
Oracle VM Server into maintenance mode to automatically migrate the running virtual machines.
To delete Oracle VM Servers from Oracle VM Manager:
1. Stop or migrate any running virtual machines. To stop the virtual machines see Section 3.5.2.4, “Stop
Virtual Machines”. To automatically migrate the virtual machines to other Oracle VM Servers in the
server pool, place the Oracle VM Server into maintenance mode, see Section 3.4.2.2, “Edit Server”.
2. Click the Servers and VMs tab.
3. Select the Unassigned Servers folder in the navigation tree. Select Servers from the Perspective
drop-down list.
4. Select one or more Oracle VM Servers in the management pane. Click Delete
toolbar.
in the perspective
5. The Delete Confirmation dialog box is displayed. Click OK to delete the Oracle VM Servers.
The Oracle VM Servers are deleted from Oracle VM Manager.
3.4.2.4 Start Server
When you start an Oracle VM Server, it is started using the Intelligent Platform Management Interface
(IPMI), or Wake-on-LAN (WOL). If neither IPMI nor WOL have been configured, the job to start the
Oracle VM Server cannot be completed and may need to be aborted. The Oracle VM Server must then
be powered on manually. See Section 3.4.2.2, “Edit Server” for information on configuring IPMI. See
Section 8.1.5, “Abort Jobs” for information on aborting a hanging job.
To start Oracle VM Servers:
1. Click the Servers and VMs tab.
2. Select the server pool in which the Oracle VM Server resides in the navigation tree.
3. Select Servers from the Perspective drop-down list. Select one or more Oracle VM Servers in the
management pane, and click Start Server in the perspective toolbar.
The Oracle VM Servers are started.
3.4.2.5 Stop Server
When you stop an Oracle VM Server, it is stopped using the Intelligent Platform Management Interface
(IPMI), or a system power off command. Before you can stop an Oracle VM Server, you must stop any
running virtual machines, or place the Oracle VM Server into maintenance mode to automatically migrate
the running virtual machines.
Warning
Make sure that the IPMI is properly configured on the Oracle VM Server, otherwise
it cannot be started again remotely. See Section 3.4.2.2, “Edit Server” for IPMI
configuration. Alternatively, make sure that you activate the Wake-on-LAN (WOL)
feature in the Oracle VM Server BIOS and that you have tested that it is properly
67
Servers Perspective
working. If an Oracle VM Server cannot start through IPMI or WOL, it must be
power-cycled manually.
To stop Oracle VM Servers:
1. Stop or migrate any running virtual machines. To stop the virtual machines see Section 3.5.2.4, “Stop
Virtual Machines”. To automatically migrate the virtual machines to other Oracle VM Servers in the
server pool, place the Oracle VM Servers into maintenance mode , see Section 3.4.2.2, “Edit Server” .
2. Click the Servers and VMs tab.
3. Select the server pool in which the Oracle VM Server resides in the navigation tree.
4. Select Servers from the Perspective drop-down list. Select one or more Oracle VM Servers in the
management pane, and click Stop Server in the perspective toolbar.
The Oracle VM Servers are powered off.
3.4.2.6 Restart Server
When you restart an Oracle VM Server, an operating system restart command is sent and the Oracle
VM Server is restarted. Before you can restart an Oracle VM Server, you must stop any running virtual
machines, or place the Oracle VM Server into maintenance mode to automatically migrate the running
virtual machines.
When the Oracle VM Server is restarted and rejoins the server pool, the master Oracle VM Server initiates
any pending HA operations in the server pool. When Oracle VM Manager is notified that the Oracle VM
Server is online and available, any pending state changes are reconciled before any policy actions are
resumed.
There is more information on the implications of restarting servers covered in Rebooting and Changing
Power State of Oracle VM Servers in the Oracle VM Concepts Guide.
To restart Oracle VM Servers:
1. Stop or migrate any running virtual machines. To stop the virtual machines see Section 3.5.2.4, “Stop
Virtual Machines”. To automatically migrate the virtual machines to other Oracle VM Servers in the
server pool, place the Oracle VM Servers into maintenance mode , see Section 3.4.2.2, “Edit Server” .
2. Click the Servers and VMs tab.
3. Select the server pool in which the Oracle VM Server resides in the navigation tree.
4. Select Servers from the Perspective drop-down list. Select one or more Oracle VM Servers in the
management pane, and click Restart in the perspective toolbar.
The Oracle VM Servers are restarted.
3.4.2.7 Kill Server
To kill an Oracle VM Server is equivalent to performing a power off of an Oracle VM Server, similar to
unplugging the power cable from the physical machine. This is not the recommended method of shutting
down an Oracle VM Server, but may be used if the shut down command fails to shut down the Oracle VM
Server.
To kill Oracle VM Servers:
1. Click the Servers and VMs tab.
68
Servers Perspective
2. Select the server pool in which the Oracle VM Server resides in the navigation tree.
3. Select Servers from the Perspective drop-down list. Select one or more Oracle VM Servers in the
management pane, and click Kill in the perspective toolbar. Click OK in the Confirmation dialog.
The Oracle VM Servers are powered off.
3.4.2.8 Rediscover Server
If there are either changes to the physical state of an Oracle VM Server or its attached storage, you should
discover it again to update the configuration information in Oracle VM Manager.
To rediscover Oracle VM Servers:
1. Click the Servers and VMs tab.
2. Select the server pool in which the Oracle VM Servers reside in the navigation tree.
3. Select Servers from the Perspective drop-down list. Select one or more Oracle VM Servers in the
management pane, and click Rediscover Server in the perspective toolbar.
The configuration and storage information about the Oracle VM Servers is updated in Oracle VM Manager.
3.4.2.9 Rescan Physical Disks
You can view and manage the physical disks on an Oracle VM Server, as well as those available to it from
a SAN server. You can also refresh the physical disks on an Oracle VM Server when SAN server disks
have been added or removed.
To refresh the physical disks on Oracle VM Servers:
1. Click the Servers and VMs tab, and select the server pool in which the Oracle VM Servers reside in
the navigation tree. Select Servers in the Perspective drop-down list in the management pane. Select
the Oracle VM Servers in the management pane table.
Alternatively, on the Servers and VMs tab, expand the Server Pools or Unassigned Servers folder,
to select a particular server in the navigation tree. Select the Physical Disks option in the Perspective
drop-down list.
2. Click Rescan Physical Disks
in the perspective toolbar.
3. A confirmation dialog box is displayed. Click OK.
3.4.2.10 Update Server
Software updates and upgrades to Oracle VM Servers can be performed using the global server update
repository configured in the Server Updates subtab of the Tools and Resources tab. See Section 7.2,
“Server Update Groups” for information on configuring a global server update repository. A repository can
be overridden for a server pool if required. See Section 3.4.6, “Server Update Repositories Perspective” for
information on overriding a global update repository for a server pool.
To see which version of the Oracle VM Server software is installed before and after an upgrade, click
the Servers and VMs tab, select the Oracle VM Server in the navigation tree, and then select Control
Domains in the Perspective drop-down list. See Section 3.5.8, “Control Domains Perspective” for
information on control domains.
When an Oracle VM Server update is available, an event is posted to the Oracle VM Server and Yes is
displayed in the Update Required column in the Servers perspective in the management pane.
69
Servers Perspective
To update an Oracle VM Server, the virtual machines on the Oracle VM Server must first be stopped or
migrated to another Oracle VM Server. You can manually stop or migrate the virtual machines, or, if you
prefer, have the upgrade server job perform the virtual machine migrate automatically.
To update Oracle VM Servers:
1. Click the Servers and VMs tab, and select the server pool in which the Oracle VM Servers reside in
the navigation tree.
2. Select Servers in the Perspective drop-down list in the management pane.
3. Select the Oracle VM Servers in the management pane table and click Update Server
perspective toolbar.
from the
A confirmation dialog is displayed. Click OK. Each Oracle VM Server is placed into maintenance mode,
and the update performed. Any virtual machines on the Oracle VM Servers are automatically migrated
to another Oracle VM Server when it is put into maintenance mode. If the Oracle VM Server is a master
Oracle VM Server, the master role is transferred to another Oracle VM Server in the server pool. When
the update is complete the Oracle VM Server is restarted and remains in maintenance mode.
4. To have the Oracle VM Servers rejoin the server pool as a fully functioning member, edit each the
Oracle VM Server and take it out of maintenance mode.
For information on manually migrating virtual machines, see Section 3.5.2.11, “Migrate Virtual Machines”.
For information on taking an Oracle VM Server out of maintenance mode, see Section 3.4.2.2, “Edit
Server”.
3.4.2.11 Send VM Messages
You can select one or more virtual machines, Oracle VM Servers or server pools, to select which running
virtual machines are populated in the dialog box used to send messages to virtual machines.
To send a virtual machine a message you must have first installed the Oracle VM Guest Additions in
the virtual machine. For information on installing the Oracle VM Guest Additions, and a more detailed
description of the virtual machine messaging mechanism and its uses, see the Oracle VM Administrator's
Guide.
To send messages to virtual machines:
1. Click the Servers and VMs tab.
2. Determine the grouping of virtual machines that you wish to send a message to:
i.
If you wish to send a message to virtual machines distributed across one or more server pools, click
on the Server Pools folder in the navigation pane. Select Server Pools from the Perspective dropdown list. Select one or more server pools in the management pane.
ii. If you wish to send a message to virtual machines distributed across one or more servers in a
particular server pool, expand the Server Pools folder in the navigation pane and select the server
pool where the servers reside. Select Servers from the Perspective drop-down list. Select one or
more servers in the management pane.
70
Servers Perspective
iii. If you wish to send a message to one or more virtual machines on a particular server, expand the
Server Pools folder in the navigation pane and select the server pool where the servers reside.
Select Virtual Machines from the Perspective drop-down list. Select one or more virtual machines
in the management pane.
3. Click Send VM Messages...
in the perspective toolbar.
The Send Messages to Virtual Machines dialog box is displayed.
4. To create a message, click Create Message...
Message dialog box.
in the perspective toolbar to display the Create VM
Enter the message key value pair in the Key and Message fields. Check the Log Message field to
retain a log of the message. Check the Hide Message field to hide the message of the key/value pair
71
Virtual Machines Perspective
in the user interface. Click OK to save the message and return to the Send Messages to Virtual
Machines dialog box.
5. To edit a message, select the message and click Edit... in the dialog box toolbar. To delete a
message, select it and click Delete in the dialog box toolbar.
6. Select the Virtual Machines tab to select which running virtual machines are to receive the messages.
Click OK to send the messages to the virtual machines.
3.4.3 Virtual Machines Perspective
The Virtual Machines perspective lists the different virtual machines that belong to either a server pool, a
server or the Unassigned Virtual Machines folder, depending on the item selected in the navigation pane.
The following columns are displayed in the management pane:
• Name: The name that has been configured for the virtual machine.
• Status: The running status of the virtual machine.
• Tag(s): Any tags that have been applied to the virtual machine.
• Event Severity: What event severity level is currently indicated for the virtual machine.
• Server: The actual Oracle VM Server that the virtual machine is currently residing on.
• Max. Memory (MB): The maximum available memory (in megabytes) that the virtual machine is able to
consume.
• Memory (MB): The amount of memory (in megabytes) that the virtual machine is currently consuming.
• Max. Processors: The number of processors that the virtual machine is allowed to make use of.
• Processors: The number of processors that the virtual machine is currently using.
72
Virtual Machines Perspective
• Keymap: The character keymap that has been configured for the virtual machine.
• Operating System: The operating system that the virtual machine is running.
Clicking on the arrow to the left of a virtual machine in the table displays a set of subtabs that show more
detailed information about the virtual machine. These tabs are Configuration, Networks, and Disks. Click
on a tab to display the information.
If this perspective is viewed from the Unassigned Virtual Machines folder, some of the toolbar icons that
are usually available for this perspective are not included in the toolbar. The table below lists all of the
toolbar icons that are available for this perspective and indicates the items that are not available when the
perspective is viewed from the Unassigned Virtual Machines folder.
Table 3.5 Virtual Machines Perspective Toolbar Icon Options
Toolbar Icon Option
Import Virtual Machine...
Icon
Description
Displays the Import Virtual Machine dialog box. Use this
option to import a virtual machine into Oracle VM Manager.
This option is only available for Unassigned Virtual Machines.
Edit...
Displays the Edit Virtual Machine wizard. Use this option to
edit a virtual machine.
Delete
Displays the Delete Confirmation dialog box. Use this option
to delete the selected virtual machines.
Start
Starts up a stopped virtual machine.
Not available for Unassigned Virtual Machines.
Stop
Shuts down a virtual machine.
Not available for Unassigned Virtual Machines.
Launch Console
Launches the virtual machine VNC console in an x86-based
server pool, which enables access to the virtual machine.
Use this option to connect to a virtual machine's console and
access the virtual machine directly.
Not available for virtual machines in the Unassigned Virtual
Machines folder, or virtual machines in a server pool, but not
assigned to an Oracle VM Server.
Launch Serial Console
Launches the virtual machine serial console, which enables
access to the virtual machine. Use this option to connect to a
virtual machine's serial console and access the virtual machine
directly.
This service is commonly used for virtual machines running in
a SPARC-based server pool, but is also available for virtual
machines running on x86-based server pools.
Not available for Unassigned Virtual Machines.
Restart
Restarts a running virtual machine.
Not available for Unassigned Virtual Machines.
Kill
Shuts down a running virtual machine.
73
Virtual Machines Perspective
Toolbar Icon Option
Icon
Suspend
Description
Not available for Unassigned Virtual Machines.
Suspends (pauses) a running virtual machine.
Not available for Unassigned Virtual Machines.
Resume
Resumes (unpauses) a suspended virtual machine.
Not available for Unassigned Virtual Machines.
Migrate Virtual Machine...
Migrates a virtual machine to another Oracle VM Server.
Clone or Move Virtual
Machine...
Displays the Clone or Move Virtual Machine dialog box. Use
this option to clone a virtual machine to create another virtual
machine.
Manage Clone Customizers...
Displays the Manage Clone Customizer dialog box. The
clone customizer lets you set up clone parameters, such as
networking, disks and ISO resources. Use this option to create,
edit or delete a clone customizer.
Display VM Config File
Content...
Displays the VM Config File Content dialog box. Displays a
read-only view of the configuration file for the selected virtual
machine. Use this option to view the content of the virtual
machine configuration file.
Send VM Messages...
Send one or more virtual machines a message. Use this option
to send messages to virtual machines that have the Oracle VM
Guest Additions installed.
Not available for Unassigned Virtual Machines.
Display Selected VM Events...
Displays the Events dialog box. Displays events for
the selected virtual machine. Use this option to view or
acknowledge error events for the virtual machine.
3.4.3.1 Edit Virtual Machine
Changes to virtual machine configuration do not have an immediate effect on a running virtual machine.
The virtual machine must be stopped and then started for the hypervisor to reload the virtual machine
configuration. A restart does not force the hypervisor to reload the configuration.
To edit a virtual machine:
1. Click the Servers and VMs tab.
2. Select the server pool on which the virtual machine resides in the navigation tree.
3. Select Virtual Machines from the Perspective drop-down list. Select the virtual machine in the
management pane, and click Edit... in the management pane toolbar
4. The Edit Virtual Machine dialog box is displayed. Select each tab to edit the virtual machine
configuration. See Section 3.1.3, “Create Virtual Machine” for the details of each tab. Click OK to save
the changes.
Note
It is not possible to dynamically change resources such as the number or
processors or allocated memory for an Oracle Solaris virtual machine without
first enabling the drd service on the virtual machine itself. To allow for these
74
Virtual Machines Perspective
changes, connect to the virtual machine and make sure that the drd service is
enabled:
# svcadm enable -s drd
# svcs drd
These commands should notify you that the service is online. When you
have performed these actions, you are able to use Oracle VM Manager to
dynamically change the allocation of resources.
3.4.3.2 Delete Virtual Machines
When you delete a virtual machine, all the files and data associated with this virtual machine are removed
from Oracle VM Manager. Before deleting a virtual machine, make sure you do not need it any longer. You
can only delete a virtual machine when the virtual machine status is Stopped or Error.
To delete virtual machines:
1. Click the Servers and VMs tab.
2. Select the server pool on which the virtual machines reside in the navigation tree.
3. Select Virtual Machines from the Perspective drop-down list. Select one or more virtual machines in
the management pane, and click Delete in the management pane toolbar.
4. The Delete Confirmation dialog box is displayed. Select any virtual disks associated with the virtual
machines that you want to delete. Click OK to delete the virtual machines and the selected virtual disks.
3.4.3.3 Start Virtual Machines
After a virtual machine is created, you can start it. Starting a virtual machine is analogous to starting a
computer by pressing the Power On button.
To start virtual machines:
1. Click the Servers and VMs tab.
2. Select the server pool on which the virtual machines reside in the navigation tree.
3. Select Virtual Machines from the Perspective drop-down list. Select one or more virtual machines in
the management pane, and click Start .
The virtual machines are started.
3.4.3.4 Stop Virtual Machines
When a virtual machine is not in use, you should shut it down to release system resources. Stopping a
virtual machine is analogous to a normal shutdown of a physical computer.
If you want to save the state of the virtual machine, you should suspend it. See Section 3.5.2.9, “Suspend
Virtual Machines” for information on suspending virtual machines.
In some situations you may not be able to stop a virtual machine, for example, if you have tried to stop
it while another job is in progress on the virtual machine such as a start virtual machine job. To resolve
this type of situation, you should abort the job that is in progress, then kill the virtual machine. See
Section 8.1.5, “Abort Jobs” for information on aborting jobs, and Section 3.5.2.8, “Kill Virtual Machines” for
information on killing a virtual machine.
75
Virtual Machines Perspective
To stop virtual machines:
1. Click the Servers and VMs tab.
2. Select the server pool on which the virtual machines reside in the navigation tree.
3. Select Virtual Machines from the Perspective drop-down list. Select one or more virtual machines in
the management pane, and click Stop .
Note
You can also shut down a virtual machine from within the virtual machine, the same
way you shut down a physical computer.
After issuing the stop command, the status of the virtual machine is changed to
Stopped. However, this only indicates that the command was acknowledged. There
is no guarantee that the virtual machine is effectively shut down correctly. This is
expected behavior since an operating system running on a physical PC may also
hang during the shutdown sequence.
If the virtual machine fails to shut down, you can power it off using the kill virtual machine option, which
is similar to unplugging the power cable from a physical machine. To perform a power off (kill) of virtual
machines, see Section 3.5.2.8, “Kill Virtual Machines”.
3.4.3.5 Launch Console
Important
The VNC Console can only be used to connect to virtual machines running on an
x86 Oracle VM Server. If you are attempting to connect to a virtual machine running
on Oracle VM Server for SPARC you should use the serial console. The Launch
Console is greyed out when Oracle VM Manager detects that the virtual machine
is running on an LDOM hypervisor. See Section 3.5.2.6, “Launch Serial Console”.
The VNC Console makes use of noVNC, that uses HTML5 (WebSockets, Canvas) to render a web-based
VNC client accessible from any browser that properly supports HTML5. You can find out more about
noVNC at http://kanaka.github.io/noVNC/.
To use the VNC Console, the appropriate packages must be installed on the Oracle VM Manager host so
that a connection can be made with the virtual machine and so that the noVNC client can be rendered in
a browser. See the Oracle VM Installation and Upgrade Guide for information on installing the required
packages on the Oracle VM Manager host computer.
The VNC Console is not available for virtual machines in the Unassigned Virtual Machines folder, or
virtual machines in a server pool, but not assigned to an Oracle VM Server.
The key mapping for each VNC session is set when you create or edit a virtual machine, in the Keymap
field. See Section 3.1.3, “Create Virtual Machine” and Section 3.5.2.1, “Edit Virtual Machine” for information
on creating and editing a virtual machine.
To connect to a virtual machine's console:
1. Click the Servers and VMs tab.
2. Select the server pool on which the virtual machine resides in the navigation tree.
3. Select Virtual Machines from the Perspective drop-down list. Select the virtual machine in the
management pane, and click Launch Console in the perspective toolbar
76
Virtual Machines Perspective
4. A new browser window or tab is opened.
Tip
If the console does not start, check that your web browser allows pop-ups to
be displayed. If you are using Microsoft Internet Explorer, add the base URL of
Oracle VM Manager (for example, http://example.com) to the list of trusted
sites in the security settings. You may also need to downgrade the security level
from medium to medium-low for the Trusted sites zone.
If the virtual machine's console is in use by another user, a message is displayed asking if you want
to take over the connection. If you take over the connection, the other user's session is disconnected
and the VNC session is started on your client computer. If the VNC client has trouble taking over the
connection, you may need to close it and launch the VNC console again.
The virtual machine console is displayed. Log in and interact with the virtual machine as you would
through any other VNC session.
Note that, if you open a virtual machine console to a running virtual machine and use the Ctrl-Alt-Delete
button to restart the virtual machine, the virtual machine restarts and the console reconnects but the control
buttons for the console move out of the visible area in the dialog. This is expected behavior, related to the
size of the VNC display returned by Oracle VM Server and the way in which HTML5 canvases work.
To view the control buttons for the virtual machine console after the virtual machine has restarted, you may
either extend the right side of dialog, or close the dialog and open it again.
77
Virtual Machines Perspective
3.4.3.6 Launch Serial Console
You cannot use the VNC console to connect to virtual machines on a SPARC-based server pool. Instead,
use the Telnet-based serial console. The serial console can be used to view serial console output for
virtual machines running on an x86-based server pool, but output is read-only and non-interactive.
Furthermore, if attempting to use the serial console to access a virtual machine on an x86-based server
pool, the virtual machine must support redirecting serial output and must be configured to do so. Therefore,
it is recommended that for virtual machines running on an x86-based server pool, you use the provided
VNC console. See Section 3.4.3.5, “Launch Console” for more information.
The Serial Console makes use of jsTerm, that uses HTML5 (WebSockets, Canvas) to render a web-based
terminal emulator accessible from any browser that properly supports HTML5. You can find out more about
jsTerm at http://jsterm.com/.
To use the Serial Console, the appropriate packages must be installed on the Oracle VM Manager host so
that a connection can be made with the virtual machine and so that the jsTerm terminal emulator can be
rendered in a browser. See the Oracle VM Installation and Upgrade Guide for information on installing the
required packages on the Oracle VM Manager host computer.
To connect to a virtual machine's serial console:
1. Click the Servers and VMs tab.
2. Select the server pool on which the virtual machine resides in the navigation tree.
3. Select Virtual Machines from the Perspective drop-down list. Select the virtual machine in the
management pane, and click Launch Serial Console in the management pane toolbar
4. A new browser window or tab is opened.
Tip
If the console does not start, check that your web browser allows pop-ups to
be displayed. If you are using Microsoft Internet Explorer, add the base URL of
Oracle VM Manager (for example, http://example.com) to the list of trusted
sites in the security settings. You may also need to downgrade the security level
from medium to medium-low for the Trusted sites zone.
If the virtual machine's console is in use by another user, a message is displayed asking if you want to
take over the connection. If you take over the connection, the other user's session is disconnected and
the terminal session is started on your client computer. If the terminal emulator has trouble taking over
the connection, you may need to close it and launch the serial console again.
The virtual machine console is displayed. Log in and interact with the virtual machine as you would
through any other Telnet console session. If required, enter the user name and password of the guest
operating system to log in to the operating system.
3.4.3.7 Restart Virtual Machines
Restarting a virtual machine is analogous to rebooting a computer. You may need to restart a virtual
machine if an operating system update requires you to restart the virtual machine, for example Microsoft
Windows™ updates.
To restart virtual machines:
1. Click the Servers and VMs tab.
78
Virtual Machines Perspective
2. Select the server pool on which the virtual machines reside in the navigation tree.
3. Select Virtual Machines from the Perspective drop-down list. Select one or more virtual machines in
the management pane, and click Restart .
The virtual machines are restarted.
Note
If a virtual machine has not fully started, a restart request may not succeed as the
virtual machine may not be ready to initiate the request. In this case, you may need
to abort the restart job and try again later. Alternately, kill the virtual machine and
start it again.
3.4.3.8 Kill Virtual Machines
Killing a virtual machine is equivalent to performing a power off of a virtual machine, similar to unplugging
the power cable from a physical machine. This is not the recommended method of shutting down a virtual
machine, but may be used if the shut down command fails to shut down the virtual machine.
To kill virtual machines:
1. Click the Servers and VMs tab.
2. Select the server pool on which the virtual machine resides in the navigation tree.
3. Select Virtual Machines from the Perspective drop-down list. Select one or more virtual machines in
the management pane, and click Kill .
The virtual machines are powered off.
3.4.3.9 Suspend Virtual Machines
Suspending a virtual machine is analogous to putting a computer into sleep mode. When a virtual machine
is suspended, the current state of the operating system, and applications is saved, and the virtual machine
put into a suspended mode. When you resume the virtual machine, the operating system and applications
continue from the same point you suspended the virtual machine.
To suspend virtual machines:
1. Click the Servers and VMs tab.
2. Select the server pool on which the virtual machine resides in the navigation tree.
3. Select Virtual Machines from the Perspective drop-down list. Select one or more virtual machines in
the management pane, and click Suspend .
The virtual machine state is saved and the virtual machines suspended.
To resume the virtual machine, see Section 3.5.2.10, “Resume Virtual Machine”.
3.4.3.10 Resume Virtual Machine
Resuming a suspended virtual machine is analogous to waking up a computer that has been in sleep
mode. When you resume a suspended virtual machine, the operating system and applications continue
from the same point you suspended the virtual machine.
79
Virtual Machines Perspective
To resume a virtual machine:
1. Click the Servers and VMs tab.
2. Select the server pool on which the virtual machine resides in the navigation tree.
3. Select Virtual Machines from the Perspective drop-down list. Select the virtual machine to start in the
management pane, and click Resume .
The virtual machine state is retrieved and the virtual machine started according to the VM Start Policy
defined for the server pool.
3.4.3.11 Migrate Virtual Machines
The steps below assume the virtual machine is deployed to an Oracle VM Server. If the virtual machine is
located in the Unassigned Virtual Machines folder, select it in that folder to perform the migration.
To migrate a virtual machine:
1. Click the Servers and VMs tab.
2. Select the server pool on which the virtual machine resides in the navigation tree.
3. Select Virtual Machines from the Perspective drop-down list. Select the virtual machine to migrate in
the management pane, and click Migrate .
4. The Migrate Virtual Machine dialog box is displayed. Select the virtual machine destination:
• Unassigned Virtual Machines Folder: Removes the virtual machine from the server pool and
moves it to the Unassigned Virtual Machines folder. The virtual machine must be in a stopped state
for this option to be available. When migrating a running virtual machine, this option is not enabled.
• Remove from Server: Removes the virtual machine from the Oracle VM Server. The virtual machine
stays in the same server pool, it is only removed from the Oracle VM Server. The virtual machine
must be in a stopped state for this option to be available. When migrating a running virtual machine,
this option is not enabled.
• Compatible Server: Moves the virtual machine to the selected Oracle VM Server. Stopped virtual
machines can be migrated to Oracle VM Servers in other server pools sharing the same repository,
so Oracle VM Servers from other server pools may be listed here.
• Server Pool: Moves the virtual machine to the selected server pool. Stopped virtual machines can
be migrated to other server pools. The virtual machine is not deployed to a particular Oracle VM
Server within the destination pool; you need to start the virtual machine in the destination server pool
for it to be deployed to an Oracle VM Server. When migrating a running virtual machine, this option is
not enabled.
If the Oracle VM Server you want is not listed, click the arrow next to Why don't I see other servers
to migrate to?. A list of all Oracle VM Servers registered with Oracle VM Manager is displayed. Click
the arrow next to the Oracle VM Server you want for an explanation as to why it is not available as a
migration target.
Click OK.
The virtual machine is migrated.
To migrate multiple virtual machines:
1. Click the Servers and VMs tab.
80
Virtual Machines Perspective
2. Select the server pool on which the virtual machines reside in the navigation tree.
3. Select Virtual Machines from the Perspective drop-down list. Select the virtual machines to migrate
in the management pane and drag and drop them to the Oracle VM Server, server pool or the
Unassigned Virtual Machines folder in the navigation tree to which you want to migrate the virtual
machines. See Section 1.10, “Drag and Drop” for information on using the drag and drop feature.
4. The virtual machines are migrated.
3.4.3.12 Clone or Move a Virtual Machine
Cloning a virtual machine means making a copy of it, so that you can create multiple virtual machines or
templates from the original. Moving a virtual machine means moving the virtual machine configuration file
to another storage repository.
Note
The virtual machine cloning procedure below uses the same dialog box to clone a
virtual machine and a template.
Clone a Virtual Machine or Template
A clone can also be performed using two other file copy methods: sparse copy, and non-sparse copy.
These two cloning methods can be used when cloning from and to different repositories, and when the
storage used for the storage repository uses a generic Oracle VM Storage Connect plug-in. These cloning
methods are slower than thin cloning, but more versatile.
To create a clone of a virtual machine or template:
1. Select the virtual machine or template to clone and display the Clone or Move dialog box. You display
this dialog box from different locations, depending on whether you are cloning a virtual machine or a
template.
• Virtual Machine: Click the Servers and VMs tab. Select the server pool on which the virtual
machine resides in the navigation tree. Select Virtual Machines from the Perspective drop-down
list. Select the virtual machine to clone in the management pane, and click Clone or Move .
• Virtual Machine Template: Click the Repositories tab. In the navigation tree, select the repository
in which the template resides, then VM Templates. Select the template in the management pane and
click Clone or Move Template... .
2. The Clone or Move dialog box is displayed.
81
Virtual Machines Perspective
Select the Create a clone of this (VM or Template) option. Click Next.
3. The Clone or Move (Virtual Machine or Template) dialog box is displayed.
Select or enter the following:
• Clone to a: Select the clone type, either Virtual Machine or Template, to specify the objects to
create from the clone.
82
Virtual Machines Perspective
• Clone Count: The number of clones to create.
• Name Index: The start index number to use for the clone name suffix. The default is 0. This is used
in conjunction with the Clone Name field to create the name for each clone.
• Clone Name: An optional name for the virtual machines or templates. The maximum name length is
256 characters and may contain any character. The name need not be unique. If no value is given,
the default is the name of the virtual machine or template being cloned. Each clone is suffixed with a
dot (.) and the clone index number, starting with the value for the Name Index field. For example, if
the Clone Name field is set to MyVM, and the Name Index field is set to 1, the resulting clones would
be named MyVM.1, MyVM.2 and so on.
• Target Server Pool: The server pool on which the clone is to be deployed.
Note
The list of server pools that are available in the drop-down is limited to valid
server pools that are capable of handling the cloning process correctly. This
helps you to prevent cloning to a server pool that may fail to process the
request. If this list is empty, you should refer to the table presented under the
Why don't I see other server pools to clone to? element in this dialog.
• Description: A description for the virtual machines or templates.
• Advanced Clone: Whether to use a clone customizer to set preferences for the clone operation.
• Clone Customizer: The clone customizer to use to create the clones. This is used to set virtual
disk mappings to enable you to copy disks to other storage locations. It also allows you to create
network mappings so you can use new VNICs and other networks for the clone. Click Create... to
create a new clone customizer. See Section 3.5.2.13, “Manage Clone Customizers” for information
on creating a clone customizer. This field is enabled if Advanced Clone is checked.
• Target Repository: The repository to store the cloned virtual machine configuration file. This does
not affect any clone disk mappings you set using a clone customizer; this option is only for the virtual
machine configuration file. This field is enabled if Advanced Clone is checked.
• Why don't I see other server pools to clone to? A collapsed window element, providing a table
of server pools that do not meet the requirements to accept a clone request. Expanding any of the
entries in this table displays the reason that the server pool does not qualify.
Tip
If you clone a virtual machine or template without using a clone customizer, the
storage repository is locked for the duration of the cloning job; this may be some
time in some circumstances. To quickly create clones and not lock the storage
repository, use a clone customizer.
Click OK.
The virtual machines are created and deployed to the server pool. The templates are created in the
storage repository.
It is important to understand that older templates may use a different device type to attach virtual disks.
This may affect your ability to attach new virtual disks, such as a virtual CDROM device. There are some
limitations on mixing virtual disks of differing device types on a virtual machine. See How are Virtual Disks
83
Virtual Machines Perspective
Managed? in the Oracle VM Concepts Guide for more information about how device types are allocated to
virtual disks and what you may need to do to solve any issues surrounding this problem.
Move a Virtual Machine
To move a virtual machine between repositories:
1. Click the Servers and VMs tab.
2. Select the server pool on which the virtual machine resides in the navigation tree.
3. Select Virtual Machines from the Perspective drop-down list. Select the virtual machine in the
management pane, and click Clone or Move .
4. The Clone or Move dialog box is displayed. Select Move this VM.
Select a clone customizer from the Clone Customizer drop-down list. If no clone customizers
are displayed or you want to create a new one, click Create. See Create a Clone Customizer for
information on creating a clone customizer.
Select a repository from the Target Repository drop-down list. This is the location of the new virtual
machine configuration file.
Click Finish to move the virtual machine.
3.4.3.13 Manage Clone Customizers
Cloning a virtual machine or template means making a copy of it, so that you can create multiple
virtual machines or templates from the original. You can create a clone customizer to set up the clone
parameters, such as networking, and the virtual disk, and ISO resources. A clone customizer is also used
when moving a virtual machine or template.
Create a Clone Customizer
To create a clone customizer:
1. Select the virtual machine or template and display the Manage Clone Customizers for (Virtual
Machine or Template) dialog box by:
• Virtual Machine: Click the Servers and VMs tab. Select the server pool on which the virtual
machine resides in the navigation tree. Select Virtual Machines from the Perspective dropdown list. Select the virtual machine to clone in the management pane, and click Manage Clone
Customizers... .
• Virtual Machine Template: Click the Repositories tab. In the navigation tree, select the repository
in which the template resides, then VM Templates. Select the template in the management pane and
click Manage Clone Customizers .
84
Virtual Machines Perspective
2. Select Create Clone Customizer...
.
3. The Create a Clone Customizer wizard is displayed.
In the Name and Description step of the wizard, enter a Name and Description for the clone
customizer, and click Next.
4. The Storage Mappings step of the wizard is displayed.
85
Virtual Machines Perspective
Select the following storage mappings:
• Disk: The disks to include in the clone.
• Clone Target Type: The type of storage location where the disk is to be created, either a
Repository or a Physical Disk.
• Clone Target: The location on the storage type where the disk is to be created.
• Clone Type: Whether to use a sparse or non-sparse files for the disk.
Click Next.
5. The Network Mappings step of the wizard is displayed.
Select the Virtual NICss to include in the clone customizer, and the Ethernet Network to which they
should belong.
86
Virtual Machines Perspective
Note
The network configuration is not changed when moving a virtual machine or
template. It is only used when cloning a virtual machine or template.
Click Finish.
The clone customizer is now available to use to create a virtual machine, or template. See Clone a Virtual
Machine or Template for information on using the clone customizer to create a virtual machine or template.
Edit a Clone Customizer
To edit a clone customizer:
1. Select the object to which the clone customizer belongs, either a virtual machine, or a virtual machine
template. Click Manage Clone Customizers... .
2. The Manage Clone Customizers for (VM or Template) dialog box is displayed. Select the clone
customizer to edit and click Edit Clone Customizer... .
3. The Edit Clone Customizer dialog box is displayed. Edit the clone customizer.
Click OK. The changes to the clone customizer are saved.
Delete a Clone Customizer
To delete a clone customizer:
1. Select the object to which the clone customizer belongs, either a virtual machine, or a virtual machine
template. Click Manage Clone Customizers... .
2. The Manage Clone Customizers for (VM or Template) dialog box is displayed. Select the clone
customizer to delete and click Delete Clone Customizer .
3. A dialog box is displayed to confirm you want to delete the clone customizer. Confirm you want to
delete the clone customizer and click OK. The clone customizer is deleted.
3.4.3.14 View Virtual Machine Configuration File
You can view the content of a virtual machine configuration file. The content is not editable but you can
view and copy the text according to your needs.
To view a virtual machine configuration file:
1. Click the Servers and VMs tab.
2. Select the server pool on which the virtual machines reside in the navigation tree.
3. Select Virtual Machines from the Perspective drop-down list. Select the virtual machine to which the
configuration file belongs. Click VM Config File Content... .
4. The VM Config File Content dialog box is displayed with the content of the virtual machine
configuration file. You can view and copy the text according to your needs.
5. Click OK to close the dialog.
3.4.3.15 Send VM Messages
You can select one or more virtual machines, Oracle VM Servers or server pools, to select which running
virtual machines are populated in the dialog box used to send messages to virtual machines.
87
Virtual Machines Perspective
To send a virtual machine a message you must have first installed the Oracle VM Guest Additions in
the virtual machine. For information on installing the Oracle VM Guest Additions, and a more detailed
description of the virtual machine messaging mechanism and its uses, see the Oracle VM Administrator's
Guide.
To send messages to virtual machines:
1. Click the Servers and VMs tab.
2. Determine the grouping of virtual machines that you wish to send a message to:
i.
If you wish to send a message to virtual machines distributed across one or more server pools, click
on the Server Pools folder in the navigation pane. Select Server Pools from the Perspective dropdown list. Select one or more server pools in the management pane.
ii. If you wish to send a message to virtual machines distributed across one or more servers in a
particular server pool, expand the Server Pools folder in the navigation pane and select the server
pool where the servers reside. Select Servers from the Perspective drop-down list. Select one or
more servers in the management pane.
iii. If you wish to send a message to one or more virtual machines on a particular server, expand the
Server Pools folder in the navigation pane and select the server pool where the servers reside.
Select Virtual Machines from the Perspective drop-down list. Select one or more virtual machines
in the management pane.
3. Click Send VM Messages...
in the perspective toolbar.
The Send Messages to Virtual Machines dialog box is displayed.
4. To create a message, click Create Message...
Message dialog box.
88
in the perspective toolbar to display the Create VM
Virtual Machines Perspective
Enter the message key value pair in the Key and Message fields. Check the Log Message field to
retain a log of the message. Check the Hide Message field to hide the message of the key/value pair
in the user interface. Click OK to save the message and return to the Send Messages to Virtual
Machines dialog box.
5. To edit a message, select the message and click Edit... in the dialog box toolbar. To delete a
message, select it and click Delete in the dialog box toolbar.
6. Select the Virtual Machines tab to select which running virtual machines are to receive the messages.
Click OK to send the messages to the virtual machines.
3.4.3.16 View Virtual Machine Events
89
Virtual Machines Perspective
The Events perspective is common to many elements within the Oracle VM Manager Web Interface.
The Events perspective generally appears as an option within the Perspectives drop-down menu on the
management pane of tabs that include a navigation tree. In this case, the Events perspective displays
events specific to the item selected in the navigation tree and presents these in the management pane.
The Events perspective may also appear within a dialog that is triggered from a Display Selected
Events... perspective toolbar option. In this case, the Events perspective dialog displays events specific
to one or more elements selected in the management pane.
If an object has an error event associated with it you must acknowledge the event to clear the error and
return the object to normal operations. For example, this can occur if an Oracle VM Server or virtual
machine appear as Stopped (Error) in the status. The object in error is flagged with a red icon in the
navigation tree. Oracle VM Servers, virtual machines, repositories and storage objects can have error
events associated with them.
Since Oracle VM Manager attempts to resolve issues automatically as much as possible, not all events
can be acknowledged by a user within the Oracle VM Manager Web Interface. Therefore, a flag is set
for events that are user acknowledgeable. If an event does not have this flag set, you are unable to
acknowledge it, since it is handled internally by Oracle VM Manager.
The Events perspective or dialog contains a table with the following columns of information per event:
• Severity: The severity level assigned to the event.
• Timestamp: The date and time that the event occurred.
• Modify Time: The last recorded date and time that the event was modified.
• Type: The type of event according to Oracle VM Manager's event categorization model.
• Summary: A summary description of the event.
• Acknowledged: Whether an error event has been acknowledged.
• User Acknowledgeable: Whether or not an event can be acknowledged by the user.
Alongside each event entry in the table, there is an arrow that allows you to expand the view for each
entry. This displays the full Description for the event.
The Events perspective or dialog contains a perspective toolbar with the following options:
Table 3.6 Events Perspective Toolbar Icon Options
Toolbar Icon Option
Icon
Description
Acknowledge
Acknowledge a selected error event to clear the error and
return the object to normal operations. Note that this option is
only available for user acknowledgeable events.
Acknowledge All
Acknowledge all error events associated with an object to clear
the errors and return the object to normal operations. Note that
only user acknowledgeable events are cleared. This button is
always clickable, even if there are no user acknowledgeable
events. Clicking it when there are no user acknowledgeable
events results in an error dialog.
Display Count
A drop-down menu that allows you to select the number of
events that should be displayed in the management pane,
while you are currently in this perspective.
Acknowledging Events/Errors
90
Anti-Affinity Groups Perspective
If an object has an error event associated with it you must acknowledge the event to clear the error and
return the object to normal operations. For example, this can occur if an Oracle VM Server or virtual
machine appear as Stopped (Error) in the status. The object in error is flagged with a red icon in the
navigation tree. Oracle VM Servers, virtual machines, repositories and storage objects can have error
events associated with them. The following procedures show you how to clear errors and return the object
to normal operations.
To acknowledge Oracle VM Server error events:
1. Click the Servers and VMs tab.
2. Select the Oracle VM Server in the navigation tree.
3. Select Events from the Perspective drop-down list in the management pane.
4. Select the user acknowledgeable error event and click Acknowledge
to clear all user acknowledgeable errors.
, or click Acknowledge All
To acknowledge virtual machine error events:
1. Click the Servers and VMs tab.
2. Select the server pool, or Oracle VM Server on which the virtual machine resides in the navigation tree.
3. Select Virtual Machines from the Perspective drop-down list in the management pane.
4. Select the virtual machine in the management pane table. Click Display Selected VM Events...
.
5. The Events dialog box is displayed. Select the user acknowledgeable error event and click
Acknowledge , or click Acknowledge All to clear all user acknowledgeable errors. Click Close.
To acknowledge storage repository error events:
1. Click the Repositories tab.
2. Select the repository in the navigation tree.
3. Select Events from the Perspective drop-down list in the management pane.
4. Select the error event and click Acknowledge
, or click Acknowledge All
to clear all errors.
To acknowledge storage error events:
1. Click the Storage tab.
2. Select File Servers, SAN Servers, or a storage server in the navigation tree.
3. Select Events from the Perspective drop-down list in the management pane.
4. Select the user acknowledgeable error event and click Acknowledge
to clear all user acknowledgeable errors.
, or click Acknowledge All
3.4.4 Anti-Affinity Groups Perspective
The Anti-Affinity Groups perspective lists the different anti-affinity groups that have been created and the
virtual machines that belong to them.
Anti-affinity groups specify that specific virtual machines should never run on the same Oracle VM Server.
An anti-affinity group applies to all the Oracle VM Servers in a server pool. You may want to set up antiaffinity groups when you want to build-in redundancy or load balancing of specific applications in your
environment.
91
Anti-Affinity Groups Perspective
If you add a virtual machine to an anti-affinity group that already has a virtual machine in the group running
on the same Oracle VM Server, the job is aborted and the virtual machine is not added to the group. To
add the virtual machine to the anti-affinity group, migrate it to another Oracle VM Server, then add it to the
group.
The following columns are displayed in the management pane:
• Name: The name that has been configured for the anti-affinity group.
• Description: The description that has been configured for the anti-affinity group.
• Virtual Machines: A comma-separated list of the virtual machines that belong to the anti-affinity group.
This perspective includes a toolbar that consists of the following options:
Table 3.7 Anti-Affinity Groups Perspective Toolbar Icon Options
Toolbar Icon Option
Icon
Description
Create New Anti-Affinity
Group...
Displays the Create Anti-Affinity Group wizard. Use this
option to create a new anti-affinity group.
Edit Anti-Affinity Group...
Displays the Edit Create Anti-Affinity Group dialog box. Use
this option to change the configuration for an anti-affinity group.
Delete Anti-Affinity Group
Displays the Delete Confirmation dialog box. Use this option
to delete the selected anti-affinity group..
3.4.4.1 Create Anti-Affinity Group
To create an anti-affinity group:
1. Click the Servers and VMs tab. Select a server pool in the navigation pane.
2. From the Perspective field in the management pane, select Anti-Affinity Group from the drop-down
list. Click Create New Anti-Affinity Group... in the perspective toolbar.
3. The Create Anti-Affinity Group wizard is displayed.
Enter the anti-affinity group information:
• Anti-Affinity Group Name: Enter the name of the anti-affinity group.
92
Anti-Affinity Groups Perspective
• Description: A description of the anti-affinity group.
Click Next.
4. The Select Virtual Machines step of the Create Anti-Affinity Group wizard is displayed.
Select the virtual machines to include in the anti-affinity group and move them from the Available
Virtual Machines column to the Selected Virtual Machines column.
Click Finish.
The anti-affinity group is created and listed in the Anti-Affinity Group table in the management pane.
3.4.4.2 Edit Anti-Affinity Group
To edit an anti-affinity group:
1. In the Servers and VMs tab, select the server pool to which the anti-affinity group belongs in the
navigation pane.
2. From the Perspective field in the management pane, select Anti-Affinity Group from the drop-down
list. Select the anti-affinity group in the Anti-Affinity Group table and click Edit Anti-Affinity Group...
in the perspective toolbar.
3. The Edit Anti-Affinity Group dialog box is displayed. Edit the anti-affinity group as required. To edit
the virtual machines in the anti-affinity group, click the Virtual Machines tab. For more information on
the tabs in this wizard, see Section 3.4.4.1, “Create Anti-Affinity Group”.
Click OK.
The anti-affinity group is edited and displayed in the Anti-Affinity Group table in the management pane.
3.4.4.3 Delete Anti-Affinity Group
To delete an anti-affinity group:
1. In the Servers and VMs tab, select the server pool to which the anti-affinity group belongs in the
navigation pane.
93
Policies Perspective
2. From the Perspective field in the management pane, select Anti-Affinity Group from the dropdown list. Select the anti-affinity group in the Anti-Affinity Group table and click Delete Anti-Affinity
Group... in the perspective toolbar.
3. A confirmation dialog box is displayed. Click OK to delete the anti-affinity group.
The anti-affinity group is deleted.
3.4.5 Policies Perspective
The Policies perspective provides information about the policies that are currently configured for a server
pool. These policies define how virtual machines are managed across the server pool depending on power
or resource consumption. Policies also apply to network availability and are applied here as well.
The following information is available in this perspective:
• Policy Control
• Policy Type: If a policy is set, this field indicates the type of policy applied (either DRS or DPM).
• Time Period (minutes): The number of minutes between policy job runs.
• Server Processors
• Enable: Whether or not CPU performance and utilization are logged for policy enactment.
• Threshold (%): The maximum amount of CPU percentage usage allowed before the policy must be
enacted.
• Servers
• Servers: A comma-separated list of the servers to which the policy applies.
• Networks: Displays a table of networks and how the policy applies. The following columns are included
in the table:
• Network: The name of the network that the policy applies to.
• Enable: Whether the policy is enabled on the network.
• Threshold (%): The percentage threshold of network usage that triggers the policy.
This perspective includes a toolbar that consists of the following options:
Table 3.8 Policies Perspective Toolbar Icon Options
Toolbar Icon Option
Icon
Edit...
Description
Displays the Configure DRS/DPM wizard. Use this option to
set or edit resource policies for the server pool.
Select a server pool in the Servers and VMs tab to enable this
option.
3.4.5.1 Define or Edit Server Pool Policies
It is possible to define server pool policies to improve power and resource usage across the servers within
your server pool. The two policies you can set are for:
• Distributed Resource Scheduling (DRS): Optimizes virtual machine resource utilization in a server pool.
94
Policies Perspective
• Distributed Power Management (DPM): Increases the consolidation ratio to use fewer Oracle VM
Servers during periods of relative low resource utilization.
The policy is also able to be set for networks used in a server pool. You can set the server pool to use
either DRS, or DPM, but not both at the same time.
See What are Server Pool Policies? in the Oracle VM Concepts Guide for more information on these
server pool policies.
To set a server pool policy:
1. Click the Servers and VMs tab.
2. Select the server pool in the Server Pools folder in the navigation pane.
3. From the Perspective field in the management pane, select Policies from the drop-down list. Click
Edit in the toolbar. The Configure Policy step of the Configure DRS/DPM wizard is displayed.
Enter the server pool policy information:
• Policy Control:
• Policy Type: You can choose from either DRS, DPM, or none. You cannot set both DRS and DPM
to be active at the same time.
• Time Period (Minutes): The time period for the policy job to run. This sets the policy job to run
every n minutes, for example, 10 sets the policy job to run every 10 minutes. You can enter a
number between 2 and 60.
• Server CPU:
• Enable: Set whether to enable or disable logging of CPU performance and utilization.
95
Policies Perspective
• Threshold (%): The maximum amount of CPU percentage usage allowed before the policy must
be enacted. You can enter between 0 and 99.
• Servers: Select the Oracle VM Servers for which the policy is to be enabled by moving the selected
Oracle VM Servers from the Available Servers to the Selected Servers shuttle box.
Click Next.
4. The Select Networks step of the Configure DRS/DPM wizard is displayed.
Select the networks to be included in the policy. Click Next.
5. The Network Settings step of the Configure DRS/DPM wizard is displayed.
96
Server Update Repositories Perspective
Select whether to enable the policy on the network, and select the threshold at which the policy is to be
enacted for the network. Click Finish.
The policy is set for the server pool.
3.4.6 Server Update Repositories Perspective
The Server Update Repositories perspective provides the facilities to add, edit and delete server update
(YUM or IPS) repositories for a server pool. These repositories override any repositories for Oracle VM
Servers set up in the Server Updates Group subtab of the Tools and Resources tab (seeSection 7.2,
“Server Update Groups”). Before you can create a server update group for a server pool, make sure
the server pool allows the global repositories to be overridden using the Override Global Server
Update Group check box in the Edit Server Pool dialog box. See Section 3.3.1.4, “Edit Server Pool” for
information on editing a server pool.
These options can be accessed using the toolbar at the top of the tab when you click on an item within the
management pane table.
The following columns are displayed in the management pane:
• Name: The name that has been configured for the repository.
• Repository Name: The unique name that has been configured for the repository.
• Enabled: Whether the repository is enabled.
• Package Signature Type: The type of verification signature for the repository.
• URL: The URL for the repository.
• Description: The description that has been configured for the repository.
97
Server Update Repositories Perspective
This perspective includes a toolbar that consists of the following options:
Table 3.9 Server Update Repositories Perspective Toolbar Icon Options
Toolbar Icon Option
Icon
Description
Create New Server Update
Repository...
Displays the Create Server Update Repository dialog box.
Use this option to create a new server update repository.
Edit Server Update
Repository...
Displays the Edit Server Update Repository dialog box. Use
this option to edit an existing server update repository.
Delete Server Update
Repository
Displays the Delete Confirmation dialog box. Use this option
to delete the selected server update repository.
3.4.6.1 Create Server Update Repository
To create a server update repository:
1. Click the Servers and VMs tab. Select a server pool in the navigation pane.
2. From the Perspective field in the management pane, select Server Update Repositories from the
drop-down list.
3. Click Create New Server Update Repository in the toolbar to display the Create Server Update
Repository dialog box. Enter or select the fields as described in Section 7.2.1, “Create New Server
Update Repository” to create the server update repository. Click OK.
The server update repository is created.
3.4.6.2 Edit Server Update Repository
To edit a server update repository:
1. Click the Servers and VMs tab. Select a server pool in the navigation pane.
2. From the Perspective field in the management pane, select Server Update Repositories from the
drop-down list.
3. Select a repository from the table in the management pane.
4. Click Edit Server Update Repository in the toolbar to display the Edit Server Update Repository
dialog box. Enter or select the fields as described in Section 7.2.1, “Create New Server Update
Repository” to edit the server update repository. Click OK.
The server update repository is updated.
3.4.6.3 Delete Server Update Repository
To delete a server update repository:
1. Click the Servers and VMs tab. Select a server pool in the navigation pane.
2. From the Perspective field in the management pane, select Server Update Repositories from the
drop-down list.
3. Select a repository from the table in the management pane.
4. Click Delete Server Update Repository
.
5. A confirmation dialog is displayed. Click OK to delete the repository.
98
Events Perspective
The server update repository is deleted.
3.4.7 Events Perspective
The Events perspective is common to many elements within the Oracle VM Manager Web Interface.
The Events perspective generally appears as an option within the Perspectives drop-down menu on the
management pane of tabs that include a navigation tree. In this case, the Events perspective displays
events specific to the item selected in the navigation tree and presents these in the management pane.
The Events perspective may also appear within a dialog that is triggered from a Display Selected
Events... perspective toolbar option. In this case, the Events perspective dialog displays events specific
to one or more elements selected in the management pane.
If an object has an error event associated with it you must acknowledge the event to clear the error and
return the object to normal operations. For example, this can occur if an Oracle VM Server or virtual
machine appear as Stopped (Error) in the status. The object in error is flagged with a red icon in the
navigation tree. Oracle VM Servers, virtual machines, repositories and storage objects can have error
events associated with them.
Since Oracle VM Manager attempts to resolve issues automatically as much as possible, not all events
can be acknowledged by a user within the Oracle VM Manager Web Interface. Therefore, a flag is set
for events that are user acknowledgeable. If an event does not have this flag set, you are unable to
acknowledge it, since it is handled internally by Oracle VM Manager.
The Events perspective or dialog contains a table with the following columns of information per event:
• Severity: The severity level assigned to the event.
• Timestamp: The date and time that the event occurred.
• Modify Time: The last recorded date and time that the event was modified.
• Type: The type of event according to Oracle VM Manager's event categorization model.
• Summary: A summary description of the event.
• Acknowledged: Whether an error event has been acknowledged.
• User Acknowledgeable: Whether or not an event can be acknowledged by the user.
Alongside each event entry in the table, there is an arrow that allows you to expand the view for each
entry. This displays the full Description for the event.
The Events perspective or dialog contains a perspective toolbar with the following options:
Table 3.10 Events Perspective Toolbar Icon Options
Toolbar Icon Option
Icon
Description
Acknowledge
Acknowledge a selected error event to clear the error and
return the object to normal operations. Note that this option is
only available for user acknowledgeable events.
Acknowledge All
Acknowledge all error events associated with an object to clear
the errors and return the object to normal operations. Note that
only user acknowledgeable events are cleared. This button is
always clickable, even if there are no user acknowledgeable
events. Clicking it when there are no user acknowledgeable
events results in an error dialog.
99
Events Perspective
Toolbar Icon Option
Icon
Display Count
Description
A drop-down menu that allows you to select the number of
events that should be displayed in the management pane,
while you are currently in this perspective.
Acknowledging Events/Errors
If an object has an error event associated with it you must acknowledge the event to clear the error and
return the object to normal operations. For example, this can occur if an Oracle VM Server or virtual
machine appear as Stopped (Error) in the status. The object in error is flagged with a red icon in the
navigation tree. Oracle VM Servers, virtual machines, repositories and storage objects can have error
events associated with them. The following procedures show you how to clear errors and return the object
to normal operations.
To acknowledge Oracle VM Server error events:
1. Click the Servers and VMs tab.
2. Select the Oracle VM Server in the navigation tree.
3. Select Events from the Perspective drop-down list in the management pane.
4. Select the user acknowledgeable error event and click Acknowledge
to clear all user acknowledgeable errors.
, or click Acknowledge All
To acknowledge virtual machine error events:
1. Click the Servers and VMs tab.
2. Select the server pool, or Oracle VM Server on which the virtual machine resides in the navigation tree.
3. Select Virtual Machines from the Perspective drop-down list in the management pane.
4. Select the virtual machine in the management pane table. Click Display Selected VM Events...
.
5. The Events dialog box is displayed. Select the user acknowledgeable error event and click
Acknowledge , or click Acknowledge All to clear all user acknowledgeable errors. Click Close.
To acknowledge storage repository error events:
1. Click the Repositories tab.
2. Select the repository in the navigation tree.
3. Select Events from the Perspective drop-down list in the management pane.
4. Select the error event and click Acknowledge
, or click Acknowledge All
to clear all errors.
To acknowledge storage error events:
1. Click the Storage tab.
2. Select File Servers, SAN Servers, or a storage server in the navigation tree.
3. Select Events from the Perspective drop-down list in the management pane.
4. Select the user acknowledgeable error event and click Acknowledge
to clear all user acknowledgeable errors.
100
, or click Acknowledge All
Server Item
3.5 Server Item
Each server configured within the environment is displayed as a server navigation item belonging to either
a particular server pool navigation item, or to the Unassigned Servers folder. These server navigation items
are labelled according to the server name that is configured within Oracle VM Manager. The structure of
the navigation provided in the navigation tree is discussed in more detail in Section 3.2, “Summary”.
Clicking on a server navigation item in the navigation tree allows you to access different perspectives in
the management pane. Each perspective provides its own view of the server within Oracle VM Manager.
Most of the perspectives also include separate perspective toolbars that enable you to perform various
configuration or management tasks specific to the view currently displayed within the management pane. A
server navigation item offers the following perspectives within the management pane:
• Info Perspective
• Virtual Machines Perspective
• Ethernet Ports Perspective
• Bond Ports Perspective
• CPUs Perspective
• Physical Disks Perspective
• Storage Initiators Perspective
• Control Domains Perspective
• Repository Exports Perspective
• Events Perspective
3.5.1 Info Perspective
The Info perspective is common to many elements within the Oracle VM Manager Web Interface. This
perspective always shows the individually configured parameters for an item that is currently selected
in the navigation tree. Some of these configured parameters may be automatically populated through a
discovery process, while others may have been configured manually during the creation of the object that
is selected.
This perspective includes the following information:
• Server Name: The configured name for the server.
• Host Name: The hostname of the server on the management network channel.
• Status: The running status of the server. If the status is UNKNOWN, this may be because the server is
not owned by the instance of Oracle VM Manager. To take ownership of an Oracle VM Server, see
Section 3.4.2.2, “Edit Server”.
• Processors: The number of processors on the server.
• Ethernet Ports: The number of Ethernet ports detected on the server.
• Maintenance Mode: Whether or not the server is configured in maintenance mode.
• Inbound Migration Locked: Whether or not the server allows additional virtual machines to run.
101
Info Perspective
• Ownership: Whether or not the server is owned by the current Oracle VM Manager instance.
• Server Pool: The name of the server pool that the server belongs to.
• Roles: Whether the server has the Utility Server role, VM Server role, or both.
• NTP Servers: A list of NTP servers that are configured for the server.
• IP Address: The configured IP address for the server.
• Processor Speed (GHz): The speed of the processors on the server.
• Memory (GiB): The memory on the server in GiB.
• Bond Ports: The number of bond ports that are configured on the server.
• CPU Compatibility Group: The name of the server processor compatibility group that the server
belongs to.
• Processor Type: The processor type used for the server.
• Hypervisor Type: The hypervisor used for the server.
• Version: The version number of the Oracle VM Server software on the server.
• Advanced:
• ID: The UUID assigned to the server by Oracle VM Manager.
• Manufacturer: The manufacturer of the server reported by the server BIOS.
• Serial Number: The serial number of the server reported by the server BIOS.
• Product Name: The product name of the server reported by the server BIOS.
• Processor Family: The processor family reported by the server BIOS.
• Processor Model: The processor model reported by the server BIOS.
• Cache Size (KB): The processor cache size reported by the server BIOS.
• BIOS Version: The BIOS version number for the server.
• BIOS Release Date: The BIOS version release date for the server.
• Sockets Filled: The number of processor sockets that are in use on the server.
• Manager UUID: The UUID of the Oracle VM Manager instance that owns this server.
• Server Abilities:
• Cluster: Whether or not the server supports clustering.
• Nfs: Whether or not the server is capable of mounting NFS shares.
• iSCSI: Whether or not the server is capable of mounting iSCSI LUNs.
• Fibre Channel: Whether or not the server is capable of mounting Fibre Channel LUNs.
• HighAvailability: Whether or not the server supports high availability for virtual machines.
102
Virtual Machines Perspective
• VMSuspend: Whether or not the server supports suspending a virtual machine.
• Per VM CPUOverSubscribe: Whether or not each virtual machine can be configured to perform CPU
over-subscription.
• All VM CPUOverSubscribe: Whether or not all virtual machines on the server can be configured to
perform CPU over-subscription.
• Bondmode Active Backup: Whether or not the server supports active backup network bonds.
• Bondmode Link Aggregation: Whether or not the server supports link aggregation network bonds.
• Bondmode Adaptive Load Balancing: Whether or not the server supports adaptive load balancing
for a network bonds.
• Mtu Configuration: Whether or not MTU settings for network interfaces can be configured on the
server.
• Local Storage Element: Whether or not a local disk be used for storage on a server.
• VM Memory Alignment: The size of the data alignment block that is used for offsetting memory
requirements for each virtual machine to ensure better performance.
• Vnc Console: Whether or not the server supports VNC.
• Serial Console: Whether or not the server supports Serial Console.
• Migration Setup: An internal facility to perform setup requirements for virtual machine migration,
typically used for SPARC deployments.
• HVM Max Vnics: The maximum number of VNICs that can be assigned to a hardware virtualized
virtual machine.
• Server Package Update: Whether or not the server supports package updates.
• PowerOn WOL: Whether or not the server supports Wake On LAN.
• Repo On SharedDisk: Whether or not the server supports a repository on a shared disk, such as
iSCSI or Fibre Channel.
• Repo On LocalDisk: Whether or not the server supports a repository on a local disk.
• ClusterFs On PhysicalDisk: Whether or not the server is capable of creating an OCFS2 file system
on a physical disk, such as an iSCSI LUN or Fibre Channel LUN.
• VmEmptyCdrom: Whether or not the server supports an empty virtual CDROM on a virtual machine.
SPARC servers do not support an empty virtual CDROM.
3.5.2 Virtual Machines Perspective
The Virtual Machines perspective lists the different virtual machines that belong to either a server pool, a
server or the Unassigned Virtual Machines folder, depending on the item selected in the navigation pane.
The following columns are displayed in the management pane:
• Name: The name that has been configured for the virtual machine.
• Status: The running status of the virtual machine.
103
Virtual Machines Perspective
• Tag(s): Any tags that have been applied to the virtual machine.
• Event Severity: What event severity level is currently indicated for the virtual machine.
• Server: The actual Oracle VM Server that the virtual machine is currently residing on.
• Max. Memory (MB): The maximum available memory (in megabytes) that the virtual machine is able to
consume.
• Memory (MB): The amount of memory (in megabytes) that the virtual machine is currently consuming.
• Max. Processors: The number of processors that the virtual machine is allowed to make use of.
• Processors: The number of processors that the virtual machine is currently using.
• Keymap: The character keymap that has been configured for the virtual machine.
• Operating System: The operating system that the virtual machine is running.
Clicking on the arrow to the left of a virtual machine in the table displays a set of subtabs that show more
detailed information about the virtual machine. These tabs are Configuration, Networks, and Disks. Click
on a tab to display the information.
If this perspective is viewed from the Unassigned Virtual Machines folder, some of the toolbar icons that
are usually available for this perspective are not included in the toolbar. The table below lists all of the
toolbar icons that are available for this perspective and indicates the items that are not available when the
perspective is viewed from the Unassigned Virtual Machines folder.
Table 3.11 Virtual Machines Perspective Toolbar Icon Options
Toolbar Icon Option
Import Virtual Machine...
Icon
Description
Displays the Import Virtual Machine dialog box. Use this
option to import a virtual machine into Oracle VM Manager.
This option is only available for Unassigned Virtual Machines.
Edit...
Displays the Edit Virtual Machine wizard. Use this option to
edit a virtual machine.
Delete
Displays the Delete Confirmation dialog box. Use this option
to delete the selected virtual machines.
Start
Starts up a stopped virtual machine.
Not available for Unassigned Virtual Machines.
Stop
Shuts down a virtual machine.
Not available for Unassigned Virtual Machines.
Launch Console
Launches the virtual machine VNC console in an x86-based
server pool, which enables access to the virtual machine.
Use this option to connect to a virtual machine's console and
access the virtual machine directly.
Not available for virtual machines in the Unassigned Virtual
Machines folder, or virtual machines in a server pool, but not
assigned to an Oracle VM Server.
Launch Serial Console
Launches the virtual machine serial console, which enables
access to the virtual machine. Use this option to connect to a
104
Virtual Machines Perspective
Toolbar Icon Option
Icon
Description
virtual machine's serial console and access the virtual machine
directly.
This service is commonly used for virtual machines running in
a SPARC-based server pool, but is also available for virtual
machines running on x86-based server pools.
Not available for Unassigned Virtual Machines.
Restart
Restarts a running virtual machine.
Not available for Unassigned Virtual Machines.
Kill
Shuts down a running virtual machine.
Not available for Unassigned Virtual Machines.
Suspend
Suspends (pauses) a running virtual machine.
Not available for Unassigned Virtual Machines.
Resume
Resumes (unpauses) a suspended virtual machine.
Not available for Unassigned Virtual Machines.
Migrate Virtual Machine...
Migrates a virtual machine to another Oracle VM Server.
Clone or Move Virtual
Machine...
Displays the Clone or Move Virtual Machine dialog box. Use
this option to clone a virtual machine to create another virtual
machine.
Manage Clone Customizers...
Displays the Manage Clone Customizer dialog box. The
clone customizer lets you set up clone parameters, such as
networking, disks and ISO resources. Use this option to create,
edit or delete a clone customizer.
Display VM Config File
Content...
Displays the VM Config File Content dialog box. Displays a
read-only view of the configuration file for the selected virtual
machine. Use this option to view the content of the virtual
machine configuration file.
Send VM Messages...
Send one or more virtual machines a message. Use this option
to send messages to virtual machines that have the Oracle VM
Guest Additions installed.
Not available for Unassigned Virtual Machines.
Display Selected VM Events...
Displays the Events dialog box. Displays events for
the selected virtual machine. Use this option to view or
acknowledge error events for the virtual machine.
3.5.2.1 Edit Virtual Machine
Changes to virtual machine configuration do not have an immediate effect on a running virtual machine.
The virtual machine must be stopped and then started for the hypervisor to reload the virtual machine
configuration. A restart does not force the hypervisor to reload the configuration.
To edit a virtual machine:
1. Click the Servers and VMs tab.
105
Virtual Machines Perspective
2. Select the server pool on which the virtual machine resides in the navigation tree.
3. Select Virtual Machines from the Perspective drop-down list. Select the virtual machine in the
management pane, and click Edit... in the management pane toolbar
4. The Edit Virtual Machine dialog box is displayed. Select each tab to edit the virtual machine
configuration. See Section 3.1.3, “Create Virtual Machine” for the details of each tab. Click OK to save
the changes.
Note
It is not possible to dynamically change resources such as the number or
processors or allocated memory for an Oracle Solaris virtual machine without
first enabling the drd service on the virtual machine itself. To allow for these
changes, connect to the virtual machine and make sure that the drd service is
enabled:
# svcadm enable -s drd
# svcs drd
These commands should notify you that the service is online. When you
have performed these actions, you are able to use Oracle VM Manager to
dynamically change the allocation of resources.
3.5.2.2 Delete Virtual Machines
When you delete a virtual machine, all the files and data associated with this virtual machine are removed
from Oracle VM Manager. Before deleting a virtual machine, make sure you do not need it any longer. You
can only delete a virtual machine when the virtual machine status is Stopped or Error.
To delete virtual machines:
1. Click the Servers and VMs tab.
2. Select the server pool on which the virtual machines reside in the navigation tree.
3. Select Virtual Machines from the Perspective drop-down list. Select one or more virtual machines in
the management pane, and click Delete in the management pane toolbar.
4. The Delete Confirmation dialog box is displayed. Select any virtual disks associated with the virtual
machines that you want to delete. Click OK to delete the virtual machines and the selected virtual disks.
3.5.2.3 Start Virtual Machines
After a virtual machine is created, you can start it. Starting a virtual machine is analogous to starting a
computer by pressing the Power On button.
To start virtual machines:
1. Click the Servers and VMs tab.
2. Select the server pool on which the virtual machines reside in the navigation tree.
3. Select Virtual Machines from the Perspective drop-down list. Select one or more virtual machines in
the management pane, and click Start .
The virtual machines are started.
106
Virtual Machines Perspective
3.5.2.4 Stop Virtual Machines
When a virtual machine is not in use, you should shut it down to release system resources. Stopping a
virtual machine is analogous to a normal shutdown of a physical computer.
If you want to save the state of the virtual machine, you should suspend it. See Section 3.5.2.9, “Suspend
Virtual Machines” for information on suspending virtual machines.
In some situations you may not be able to stop a virtual machine, for example, if you have tried to stop
it while another job is in progress on the virtual machine such as a start virtual machine job. To resolve
this type of situation, you should abort the job that is in progress, then kill the virtual machine. See
Section 8.1.5, “Abort Jobs” for information on aborting jobs, and Section 3.5.2.8, “Kill Virtual Machines” for
information on killing a virtual machine.
To stop virtual machines:
1. Click the Servers and VMs tab.
2. Select the server pool on which the virtual machines reside in the navigation tree.
3. Select Virtual Machines from the Perspective drop-down list. Select one or more virtual machines in
the management pane, and click Stop .
Note
You can also shut down a virtual machine from within the virtual machine, the same
way you shut down a physical computer.
After issuing the stop command, the status of the virtual machine is changed to
Stopped. However, this only indicates that the command was acknowledged. There
is no guarantee that the virtual machine is effectively shut down correctly. This is
expected behavior since an operating system running on a physical PC may also
hang during the shutdown sequence.
If the virtual machine fails to shut down, you can power it off using the kill virtual machine option, which
is similar to unplugging the power cable from a physical machine. To perform a power off (kill) of virtual
machines, see Section 3.5.2.8, “Kill Virtual Machines”.
3.5.2.5 Launch Console
Important
The VNC Console can only be used to connect to virtual machines running on an
x86 Oracle VM Server. If you are attempting to connect to a virtual machine running
on Oracle VM Server for SPARC you should use the serial console. The Launch
Console is greyed out when Oracle VM Manager detects that the virtual machine
is running on an LDOM hypervisor. See Section 3.5.2.6, “Launch Serial Console”.
The VNC Console makes use of noVNC, that uses HTML5 (WebSockets, Canvas) to render a web-based
VNC client accessible from any browser that properly supports HTML5. You can find out more about
noVNC at http://kanaka.github.io/noVNC/.
To use the VNC Console, the appropriate packages must be installed on the Oracle VM Manager host so
that a connection can be made with the virtual machine and so that the noVNC client can be rendered in
a browser. See the Oracle VM Installation and Upgrade Guide for information on installing the required
packages on the Oracle VM Manager host computer.
107
Virtual Machines Perspective
The VNC Console is not available for virtual machines in the Unassigned Virtual Machines folder, or
virtual machines in a server pool, but not assigned to an Oracle VM Server.
The key mapping for each VNC session is set when you create or edit a virtual machine, in the Keymap
field. See Section 3.1.3, “Create Virtual Machine” and Section 3.5.2.1, “Edit Virtual Machine” for information
on creating and editing a virtual machine.
To connect to a virtual machine's console:
1. Click the Servers and VMs tab.
2. Select the server pool on which the virtual machine resides in the navigation tree.
3. Select Virtual Machines from the Perspective drop-down list. Select the virtual machine in the
management pane, and click Launch Console in the perspective toolbar
4. A new browser window or tab is opened.
Tip
If the console does not start, check that your web browser allows pop-ups to
be displayed. If you are using Microsoft Internet Explorer, add the base URL of
Oracle VM Manager (for example, http://example.com) to the list of trusted
sites in the security settings. You may also need to downgrade the security level
from medium to medium-low for the Trusted sites zone.
If the virtual machine's console is in use by another user, a message is displayed asking if you want
to take over the connection. If you take over the connection, the other user's session is disconnected
and the VNC session is started on your client computer. If the VNC client has trouble taking over the
connection, you may need to close it and launch the VNC console again.
The virtual machine console is displayed. Log in and interact with the virtual machine as you would
through any other VNC session.
108
Virtual Machines Perspective
Note that, if you open a virtual machine console to a running virtual machine and use the Ctrl-Alt-Delete
button to restart the virtual machine, the virtual machine restarts and the console reconnects but the control
buttons for the console move out of the visible area in the dialog. This is expected behavior, related to the
size of the VNC display returned by Oracle VM Server and the way in which HTML5 canvases work.
To view the control buttons for the virtual machine console after the virtual machine has restarted, you may
either extend the right side of dialog, or close the dialog and open it again.
3.5.2.6 Launch Serial Console
You cannot use the VNC console to connect to virtual machines on a SPARC-based server pool. Instead,
use the Telnet-based serial console. The serial console can be used to view serial console output for
virtual machines running on an x86-based server pool, but output is read-only and non-interactive.
Furthermore, if attempting to use the serial console to access a virtual machine on an x86-based server
pool, the virtual machine must support redirecting serial output and must be configured to do so. Therefore,
it is recommended that for virtual machines running on an x86-based server pool, you use the provided
VNC console. See Section 3.4.3.5, “Launch Console” for more information.
The Serial Console makes use of jsTerm, that uses HTML5 (WebSockets, Canvas) to render a web-based
terminal emulator accessible from any browser that properly supports HTML5. You can find out more about
jsTerm at http://jsterm.com/.
To use the Serial Console, the appropriate packages must be installed on the Oracle VM Manager host so
that a connection can be made with the virtual machine and so that the jsTerm terminal emulator can be
109
Virtual Machines Perspective
rendered in a browser. See the Oracle VM Installation and Upgrade Guide for information on installing the
required packages on the Oracle VM Manager host computer.
To connect to a virtual machine's serial console:
1. Click the Servers and VMs tab.
2. Select the server pool on which the virtual machine resides in the navigation tree.
3. Select Virtual Machines from the Perspective drop-down list. Select the virtual machine in the
management pane, and click Launch Serial Console in the management pane toolbar
4. A new browser window or tab is opened.
Tip
If the console does not start, check that your web browser allows pop-ups to
be displayed. If you are using Microsoft Internet Explorer, add the base URL of
Oracle VM Manager (for example, http://example.com) to the list of trusted
sites in the security settings. You may also need to downgrade the security level
from medium to medium-low for the Trusted sites zone.
If the virtual machine's console is in use by another user, a message is displayed asking if you want to
take over the connection. If you take over the connection, the other user's session is disconnected and
the terminal session is started on your client computer. If the terminal emulator has trouble taking over
the connection, you may need to close it and launch the serial console again.
The virtual machine console is displayed. Log in and interact with the virtual machine as you would
through any other Telnet console session. If required, enter the user name and password of the guest
operating system to log in to the operating system.
3.5.2.7 Restart Virtual Machines
Restarting a virtual machine is analogous to rebooting a computer. You may need to restart a virtual
machine if an operating system update requires you to restart the virtual machine, for example Microsoft
Windows™ updates.
To restart virtual machines:
1. Click the Servers and VMs tab.
2. Select the server pool on which the virtual machines reside in the navigation tree.
3. Select Virtual Machines from the Perspective drop-down list. Select one or more virtual machines in
the management pane, and click Restart .
The virtual machines are restarted.
Note
If a virtual machine has not fully started, a restart request may not succeed as the
virtual machine may not be ready to initiate the request. In this case, you may need
to abort the restart job and try again later. Alternately, kill the virtual machine and
start it again.
3.5.2.8 Kill Virtual Machines
Killing a virtual machine is equivalent to performing a power off of a virtual machine, similar to unplugging
the power cable from a physical machine. This is not the recommended method of shutting down a virtual
machine, but may be used if the shut down command fails to shut down the virtual machine.
110
Virtual Machines Perspective
To kill virtual machines:
1. Click the Servers and VMs tab.
2. Select the server pool on which the virtual machine resides in the navigation tree.
3. Select Virtual Machines from the Perspective drop-down list. Select one or more virtual machines in
the management pane, and click Kill .
The virtual machines are powered off.
3.5.2.9 Suspend Virtual Machines
Suspending a virtual machine is analogous to putting a computer into sleep mode. When a virtual machine
is suspended, the current state of the operating system, and applications is saved, and the virtual machine
put into a suspended mode. When you resume the virtual machine, the operating system and applications
continue from the same point you suspended the virtual machine.
To suspend virtual machines:
1. Click the Servers and VMs tab.
2. Select the server pool on which the virtual machine resides in the navigation tree.
3. Select Virtual Machines from the Perspective drop-down list. Select one or more virtual machines in
the management pane, and click Suspend .
The virtual machine state is saved and the virtual machines suspended.
To resume the virtual machine, see Section 3.5.2.10, “Resume Virtual Machine”.
3.5.2.10 Resume Virtual Machine
Resuming a suspended virtual machine is analogous to waking up a computer that has been in sleep
mode. When you resume a suspended virtual machine, the operating system and applications continue
from the same point you suspended the virtual machine.
To resume a virtual machine:
1. Click the Servers and VMs tab.
2. Select the server pool on which the virtual machine resides in the navigation tree.
3. Select Virtual Machines from the Perspective drop-down list. Select the virtual machine to start in the
management pane, and click Resume .
The virtual machine state is retrieved and the virtual machine started according to the VM Start Policy
defined for the server pool.
3.5.2.11 Migrate Virtual Machines
The steps below assume the virtual machine is deployed to an Oracle VM Server. If the virtual machine is
located in the Unassigned Virtual Machines folder, select it in that folder to perform the migration.
To migrate a virtual machine:
1. Click the Servers and VMs tab.
111
Virtual Machines Perspective
2. Select the server pool on which the virtual machine resides in the navigation tree.
3. Select Virtual Machines from the Perspective drop-down list. Select the virtual machine to migrate in
the management pane, and click Migrate .
4. The Migrate Virtual Machine dialog box is displayed. Select the virtual machine destination:
• Unassigned Virtual Machines Folder: Removes the virtual machine from the server pool and
moves it to the Unassigned Virtual Machines folder. The virtual machine must be in a stopped state
for this option to be available. When migrating a running virtual machine, this option is not enabled.
• Remove from Server: Removes the virtual machine from the Oracle VM Server. The virtual machine
stays in the same server pool, it is only removed from the Oracle VM Server. The virtual machine
must be in a stopped state for this option to be available. When migrating a running virtual machine,
this option is not enabled.
• Compatible Server: Moves the virtual machine to the selected Oracle VM Server. Stopped virtual
machines can be migrated to Oracle VM Servers in other server pools sharing the same repository,
so Oracle VM Servers from other server pools may be listed here.
• Server Pool: Moves the virtual machine to the selected server pool. Stopped virtual machines can
be migrated to other server pools. The virtual machine is not deployed to a particular Oracle VM
Server within the destination pool; you need to start the virtual machine in the destination server pool
for it to be deployed to an Oracle VM Server. When migrating a running virtual machine, this option is
not enabled.
If the Oracle VM Server you want is not listed, click the arrow next to Why don't I see other servers
to migrate to?. A list of all Oracle VM Servers registered with Oracle VM Manager is displayed. Click
the arrow next to the Oracle VM Server you want for an explanation as to why it is not available as a
migration target.
Click OK.
The virtual machine is migrated.
To migrate multiple virtual machines:
1. Click the Servers and VMs tab.
2. Select the server pool on which the virtual machines reside in the navigation tree.
3. Select Virtual Machines from the Perspective drop-down list. Select the virtual machines to migrate
in the management pane and drag and drop them to the Oracle VM Server, server pool or the
Unassigned Virtual Machines folder in the navigation tree to which you want to migrate the virtual
machines. See Section 1.10, “Drag and Drop” for information on using the drag and drop feature.
4. The virtual machines are migrated.
3.5.2.12 Clone or Move a Virtual Machine
Cloning a virtual machine means making a copy of it, so that you can create multiple virtual machines or
templates from the original. Moving a virtual machine means moving the virtual machine configuration file
to another storage repository.
Note
The virtual machine cloning procedure below uses the same dialog box to clone a
virtual machine and a template.
112
Virtual Machines Perspective
Clone a Virtual Machine or Template
A clone can also be performed using two other file copy methods: sparse copy, and non-sparse copy.
These two cloning methods can be used when cloning from and to different repositories, and when the
storage used for the storage repository uses a generic Oracle VM Storage Connect plug-in. These cloning
methods are slower than thin cloning, but more versatile.
To create a clone of a virtual machine or template:
1. Select the virtual machine or template to clone and display the Clone or Move dialog box. You display
this dialog box from different locations, depending on whether you are cloning a virtual machine or a
template.
• Virtual Machine: Click the Servers and VMs tab. Select the server pool on which the virtual
machine resides in the navigation tree. Select Virtual Machines from the Perspective drop-down
list. Select the virtual machine to clone in the management pane, and click Clone or Move .
• Virtual Machine Template: Click the Repositories tab. In the navigation tree, select the repository
in which the template resides, then VM Templates. Select the template in the management pane and
click Clone or Move Template... .
2. The Clone or Move dialog box is displayed.
Select the Create a clone of this (VM or Template) option. Click Next.
3. The Clone or Move (Virtual Machine or Template) dialog box is displayed.
113
Virtual Machines Perspective
Select or enter the following:
• Clone to a: Select the clone type, either Virtual Machine or Template, to specify the objects to
create from the clone.
• Clone Count: The number of clones to create.
• Name Index: The start index number to use for the clone name suffix. The default is 0. This is used
in conjunction with the Clone Name field to create the name for each clone.
• Clone Name: An optional name for the virtual machines or templates. The maximum name length is
256 characters and may contain any character. The name need not be unique. If no value is given,
the default is the name of the virtual machine or template being cloned. Each clone is suffixed with a
dot (.) and the clone index number, starting with the value for the Name Index field. For example, if
the Clone Name field is set to MyVM, and the Name Index field is set to 1, the resulting clones would
be named MyVM.1, MyVM.2 and so on.
• Target Server Pool: The server pool on which the clone is to be deployed.
Note
The list of server pools that are available in the drop-down is limited to valid
server pools that are capable of handling the cloning process correctly. This
helps you to prevent cloning to a server pool that may fail to process the
request. If this list is empty, you should refer to the table presented under the
Why don't I see other server pools to clone to? element in this dialog.
• Description: A description for the virtual machines or templates.
• Advanced Clone: Whether to use a clone customizer to set preferences for the clone operation.
114
Virtual Machines Perspective
• Clone Customizer: The clone customizer to use to create the clones. This is used to set virtual
disk mappings to enable you to copy disks to other storage locations. It also allows you to create
network mappings so you can use new VNICs and other networks for the clone. Click Create... to
create a new clone customizer. See Section 3.5.2.13, “Manage Clone Customizers” for information
on creating a clone customizer. This field is enabled if Advanced Clone is checked.
• Target Repository: The repository to store the cloned virtual machine configuration file. This does
not affect any clone disk mappings you set using a clone customizer; this option is only for the virtual
machine configuration file. This field is enabled if Advanced Clone is checked.
• Why don't I see other server pools to clone to? A collapsed window element, providing a table
of server pools that do not meet the requirements to accept a clone request. Expanding any of the
entries in this table displays the reason that the server pool does not qualify.
Tip
If you clone a virtual machine or template without using a clone customizer, the
storage repository is locked for the duration of the cloning job; this may be some
time in some circumstances. To quickly create clones and not lock the storage
repository, use a clone customizer.
Click OK.
The virtual machines are created and deployed to the server pool. The templates are created in the
storage repository.
It is important to understand that older templates may use a different device type to attach virtual disks.
This may affect your ability to attach new virtual disks, such as a virtual CDROM device. There are some
limitations on mixing virtual disks of differing device types on a virtual machine. See How are Virtual Disks
Managed? in the Oracle VM Concepts Guide for more information about how device types are allocated to
virtual disks and what you may need to do to solve any issues surrounding this problem.
Move a Virtual Machine
To move a virtual machine between repositories:
1. Click the Servers and VMs tab.
2. Select the server pool on which the virtual machine resides in the navigation tree.
3. Select Virtual Machines from the Perspective drop-down list. Select the virtual machine in the
management pane, and click Clone or Move .
4. The Clone or Move dialog box is displayed. Select Move this VM.
Select a clone customizer from the Clone Customizer drop-down list. If no clone customizers
are displayed or you want to create a new one, click Create. See Create a Clone Customizer for
information on creating a clone customizer.
Select a repository from the Target Repository drop-down list. This is the location of the new virtual
machine configuration file.
Click Finish to move the virtual machine.
115
Virtual Machines Perspective
3.5.2.13 Manage Clone Customizers
Cloning a virtual machine or template means making a copy of it, so that you can create multiple
virtual machines or templates from the original. You can create a clone customizer to set up the clone
parameters, such as networking, and the virtual disk, and ISO resources. A clone customizer is also used
when moving a virtual machine or template.
Create a Clone Customizer
To create a clone customizer:
1. Select the virtual machine or template and display the Manage Clone Customizers for (Virtual
Machine or Template) dialog box by:
• Virtual Machine: Click the Servers and VMs tab. Select the server pool on which the virtual
machine resides in the navigation tree. Select Virtual Machines from the Perspective dropdown list. Select the virtual machine to clone in the management pane, and click Manage Clone
Customizers... .
• Virtual Machine Template: Click the Repositories tab. In the navigation tree, select the repository
in which the template resides, then VM Templates. Select the template in the management pane and
click Manage Clone Customizers .
2. Select Create Clone Customizer...
.
3. The Create a Clone Customizer wizard is displayed.
116
Virtual Machines Perspective
In the Name and Description step of the wizard, enter a Name and Description for the clone
customizer, and click Next.
4. The Storage Mappings step of the wizard is displayed.
Select the following storage mappings:
• Disk: The disks to include in the clone.
• Clone Target Type: The type of storage location where the disk is to be created, either a
Repository or a Physical Disk.
• Clone Target: The location on the storage type where the disk is to be created.
• Clone Type: Whether to use a sparse or non-sparse files for the disk.
Click Next.
117
Virtual Machines Perspective
5. The Network Mappings step of the wizard is displayed.
Select the Virtual NICss to include in the clone customizer, and the Ethernet Network to which they
should belong.
Note
The network configuration is not changed when moving a virtual machine or
template. It is only used when cloning a virtual machine or template.
Click Finish.
The clone customizer is now available to use to create a virtual machine, or template. See Clone a Virtual
Machine or Template for information on using the clone customizer to create a virtual machine or template.
Edit a Clone Customizer
To edit a clone customizer:
1. Select the object to which the clone customizer belongs, either a virtual machine, or a virtual machine
template. Click Manage Clone Customizers... .
2. The Manage Clone Customizers for (VM or Template) dialog box is displayed. Select the clone
customizer to edit and click Edit Clone Customizer... .
3. The Edit Clone Customizer dialog box is displayed. Edit the clone customizer.
Click OK. The changes to the clone customizer are saved.
Delete a Clone Customizer
To delete a clone customizer:
1. Select the object to which the clone customizer belongs, either a virtual machine, or a virtual machine
template. Click Manage Clone Customizers... .
2. The Manage Clone Customizers for (VM or Template) dialog box is displayed. Select the clone
customizer to delete and click Delete Clone Customizer .
3. A dialog box is displayed to confirm you want to delete the clone customizer. Confirm you want to
delete the clone customizer and click OK. The clone customizer is deleted.
118
Virtual Machines Perspective
3.5.2.14 View Virtual Machine Configuration File
You can view the content of a virtual machine configuration file. The content is not editable but you can
view and copy the text according to your needs.
To view a virtual machine configuration file:
1. Click the Servers and VMs tab.
2. Select the server pool on which the virtual machines reside in the navigation tree.
3. Select Virtual Machines from the Perspective drop-down list. Select the virtual machine to which the
configuration file belongs. Click VM Config File Content... .
4. The VM Config File Content dialog box is displayed with the content of the virtual machine
configuration file. You can view and copy the text according to your needs.
5. Click OK to close the dialog.
3.5.2.15 Send VM Messages
You can select one or more virtual machines, Oracle VM Servers or server pools, to select which running
virtual machines are populated in the dialog box used to send messages to virtual machines.
To send a virtual machine a message you must have first installed the Oracle VM Guest Additions in
the virtual machine. For information on installing the Oracle VM Guest Additions, and a more detailed
description of the virtual machine messaging mechanism and its uses, see the Oracle VM Administrator's
Guide.
To send messages to virtual machines:
1. Click the Servers and VMs tab.
2. Determine the grouping of virtual machines that you wish to send a message to:
i.
If you wish to send a message to virtual machines distributed across one or more server pools, click
on the Server Pools folder in the navigation pane. Select Server Pools from the Perspective dropdown list. Select one or more server pools in the management pane.
ii. If you wish to send a message to virtual machines distributed across one or more servers in a
particular server pool, expand the Server Pools folder in the navigation pane and select the server
pool where the servers reside. Select Servers from the Perspective drop-down list. Select one or
more servers in the management pane.
iii. If you wish to send a message to one or more virtual machines on a particular server, expand the
Server Pools folder in the navigation pane and select the server pool where the servers reside.
Select Virtual Machines from the Perspective drop-down list. Select one or more virtual machines
in the management pane.
3. Click Send VM Messages...
in the perspective toolbar.
The Send Messages to Virtual Machines dialog box is displayed.
119
Virtual Machines Perspective
4. To create a message, click Create Message...
Message dialog box.
in the perspective toolbar to display the Create VM
Enter the message key value pair in the Key and Message fields. Check the Log Message field to
retain a log of the message. Check the Hide Message field to hide the message of the key/value pair
in the user interface. Click OK to save the message and return to the Send Messages to Virtual
Machines dialog box.
5. To edit a message, select the message and click Edit... in the dialog box toolbar. To delete a
message, select it and click Delete in the dialog box toolbar.
6. Select the Virtual Machines tab to select which running virtual machines are to receive the messages.
120
Virtual Machines Perspective
Click OK to send the messages to the virtual machines.
3.5.2.16 View Virtual Machine Events
The Events perspective is common to many elements within the Oracle VM Manager Web Interface.
The Events perspective generally appears as an option within the Perspectives drop-down menu on the
management pane of tabs that include a navigation tree. In this case, the Events perspective displays
events specific to the item selected in the navigation tree and presents these in the management pane.
The Events perspective may also appear within a dialog that is triggered from a Display Selected
Events... perspective toolbar option. In this case, the Events perspective dialog displays events specific
to one or more elements selected in the management pane.
If an object has an error event associated with it you must acknowledge the event to clear the error and
return the object to normal operations. For example, this can occur if an Oracle VM Server or virtual
machine appear as Stopped (Error) in the status. The object in error is flagged with a red icon in the
navigation tree. Oracle VM Servers, virtual machines, repositories and storage objects can have error
events associated with them.
Since Oracle VM Manager attempts to resolve issues automatically as much as possible, not all events
can be acknowledged by a user within the Oracle VM Manager Web Interface. Therefore, a flag is set
for events that are user acknowledgeable. If an event does not have this flag set, you are unable to
acknowledge it, since it is handled internally by Oracle VM Manager.
The Events perspective or dialog contains a table with the following columns of information per event:
• Severity: The severity level assigned to the event.
• Timestamp: The date and time that the event occurred.
• Modify Time: The last recorded date and time that the event was modified.
121
Virtual Machines Perspective
• Type: The type of event according to Oracle VM Manager's event categorization model.
• Summary: A summary description of the event.
• Acknowledged: Whether an error event has been acknowledged.
• User Acknowledgeable: Whether or not an event can be acknowledged by the user.
Alongside each event entry in the table, there is an arrow that allows you to expand the view for each
entry. This displays the full Description for the event.
The Events perspective or dialog contains a perspective toolbar with the following options:
Table 3.12 Events Perspective Toolbar Icon Options
Toolbar Icon Option
Icon
Description
Acknowledge
Acknowledge a selected error event to clear the error and
return the object to normal operations. Note that this option is
only available for user acknowledgeable events.
Acknowledge All
Acknowledge all error events associated with an object to clear
the errors and return the object to normal operations. Note that
only user acknowledgeable events are cleared. This button is
always clickable, even if there are no user acknowledgeable
events. Clicking it when there are no user acknowledgeable
events results in an error dialog.
Display Count
A drop-down menu that allows you to select the number of
events that should be displayed in the management pane,
while you are currently in this perspective.
Acknowledging Events/Errors
If an object has an error event associated with it you must acknowledge the event to clear the error and
return the object to normal operations. For example, this can occur if an Oracle VM Server or virtual
machine appear as Stopped (Error) in the status. The object in error is flagged with a red icon in the
navigation tree. Oracle VM Servers, virtual machines, repositories and storage objects can have error
events associated with them. The following procedures show you how to clear errors and return the object
to normal operations.
To acknowledge Oracle VM Server error events:
1. Click the Servers and VMs tab.
2. Select the Oracle VM Server in the navigation tree.
3. Select Events from the Perspective drop-down list in the management pane.
4. Select the user acknowledgeable error event and click Acknowledge
to clear all user acknowledgeable errors.
, or click Acknowledge All
To acknowledge virtual machine error events:
1. Click the Servers and VMs tab.
2. Select the server pool, or Oracle VM Server on which the virtual machine resides in the navigation tree.
3. Select Virtual Machines from the Perspective drop-down list in the management pane.
122
CPUs Perspective
4. Select the virtual machine in the management pane table. Click Display Selected VM Events...
.
5. The Events dialog box is displayed. Select the user acknowledgeable error event and click
Acknowledge , or click Acknowledge All to clear all user acknowledgeable errors. Click Close.
To acknowledge storage repository error events:
1. Click the Repositories tab.
2. Select the repository in the navigation tree.
3. Select Events from the Perspective drop-down list in the management pane.
4. Select the error event and click Acknowledge
, or click Acknowledge All
to clear all errors.
To acknowledge storage error events:
1. Click the Storage tab.
2. Select File Servers, SAN Servers, or a storage server in the navigation tree.
3. Select Events from the Perspective drop-down list in the management pane.
4. Select the user acknowledgeable error event and click Acknowledge
to clear all user acknowledgeable errors.
, or click Acknowledge All
3.5.3 CPUs Perspective
The CPUs perspective lists the CPUs configured on a server. The following columns are displayed in the
management pane:
• CPU Number: The CPU number as reported by the BIOS for each CPU on the server.
• Level Two Cache Size: The amount of memory in the level two cache.
• Model Name: The model and name of the CPU as reported by the BIOS.
• Name: The name of the CPU as an object within Oracle VM Manager.
• Description: The description of the CPU object as stored in Oracle VM Manager.
This perspective includes a toolbar that consists of the following options:
Table 3.13 Edit CPUs Perspective Toolbar Icon Options
Toolbar Icon Option
Icon
Edit Selected CPU...
Description
Displays the Edit CPU dialog box. Use this option to edit the
selected CPU.
3.5.3.1 Edit CPUs
To edit CPUs:
1. Click the Servers and VMs tab.
2. In the navigation pane, select the Oracle VM Server on which you want to edit the CPUs. If the Oracle
VM Server is already part of a server pool, it is listed under Server Pools. Otherwise, find and select
the Oracle VM Server in the Unassigned Servers folder.
3. Select CPUs from the Perspective drop-down list in the management pane.
123
Ethernet Ports Perspective
4. Select the CPU to edit in the table in the management pane and click Edit Selected CPU...
toolbar.
in the
5. The Edit CPU dialog box is displayed. You can edit the name and the description of the CPU.
6. Click OK to save and apply your changes.
3.5.4 Ethernet Ports Perspective
The Ethernet Ports perspective lists the different Ethernet ports or physical NICs configured on a server.
The following columns are displayed in the management pane:
• Port: The port device name detected on the server.
• Status: The interface status (whether the port is up or down).
• Interface Name: The name of the interface as detected on the server.
• MAC Address: The MAC address for the network port.
• MTU: The MTU size set for the port.
• Addressing:
• Type: How the interface is configured to obtain an IP address (for example, DHCP).
• IP Address: The current IP address configured on the interface.
• Netmask: The netmask for the network that is configured on the interface.
• Bond Name: The name of the network bond that this interface is attached to (if any).
• Network: The name of the network that this interface belongs to (if any):
This perspective includes a toolbar that consists of the following options:
Table 3.14 Ethernet Ports Perspective Toolbar Icon Options
Toolbar Icon Option
Icon
Edit Selected Port...
Description
Displays the Edit Port dialog box. Use this option to edit the
configuration of an Ethernet port on a server.
3.5.4.1 Edit Port
To edit an Ethernet port:
1. Select the Servers and VMs tab.
2. In the navigation pane, select the Oracle VM Server on which the Ethernet port is to be edited. If the
Oracle VM Server is already part of a server pool, it is listed under Server Pools. Otherwise, find and
select the Oracle VM Server in the Unassigned Servers folder.
3. In the management pane, set the Perspective to Ethernet Ports and select the Ethernet port to edit.
In the toolbar above, click Edit Selected Port . The Edit Port dialog box is displayed.
4. You can set or change the IP addressing, the mask, the MTU or the description. The Addressing
field provides a drop-down selector that allows you to choose either None, Static or Dynamic to
specify how IP Addressing should be configured on this interface or port. If you select Static here,
the IP Address and Mask fields become available to edit, otherwise they remain uneditable. Setting the
Addressing field to None deletes any previous IP addressing configured for the port.
124
Bond Ports Perspective
Note
The IP addressing must either be set to Dynamic or Static (and the IP
addressing information completed) if you intend to use the network port for
an Oracle VM network channel, such as for "Server Management", "Live
Migrate","Cluster Heartbeat" or "Storage".
5. Click OK to save and apply your changes.
3.5.5 Bond Ports Perspective
The Bond Ports perspective lists the different network bonds configured for the ports on a server. The
following columns are displayed in the management pane:
• Port: The bond port device name detected on the server.
• Status: The bond interface status (whether the bond port is up or down).
• Interface Name: The name of the bond interface as detected on the server.
• MAC Address: The MAC address for the network bond port.
• MTU: The MTU size set for the bond port.
• Addressing:
• Type: How the interface is configured to obtain an IP address (for example, DHCP).
• IP Address: The current IP address configured on the interface.
• Netmask: The netmask for the network that is configured on the interface.
• Networking:
• Network: The name of the network that this bond port belongs to (if any).
• Bond Name: The name of the bond in the bond port.
This perspective includes a toolbar that consists of the following options:
Table 3.15 Bond Ports Perspective Toolbar Icon Options
Toolbar Icon Option
Icon
Description
Create Bond Port...
Displays the Create Bond Port wizard. Use this option to
create a new bond port consisting of a number of physical
Ethernet ports on a server.
Edit Selected Port...
Displays the Edit Bond Port dialog box. Use this option to
change the configuration of the selected bond port on a server.
Delete Selected Port
Displays the Delete Confirmation dialog box. Use this option
to delete the selected bond port on a server.
3.5.5.1 Create Bond Port
The management port on each Oracle VM Server is specified at installation time and is automatically
configured as a bonded interface. You create additional bonds to add redundancy and if desired, load-
125
Bond Ports Perspective
balancing to your network environment. Once created, these bonds can be used as building blocks when
building VLAN Interfaces or networks. This section discusses managing bonded interfaces.
To create a bond port:
1. Select the Servers and VMs tab.
2. In the navigation pane, select the Oracle VM Server on which the bond port is to be created. If the
Oracle VM Server is already part of a server pool, it is listed under Server Pools. Otherwise, find and
select the Oracle VM Server in the Unassigned Servers folder.
3. In the management pane, set the Perspective to Ethernet Ports. Make sure that the selected Oracle
VM Server's ports to be used for the bond port are not part of an existing bond, network or VLAN group.
Verify that the ports are available. You cannot add a port to a bond if the port has an IP address.
4. In the management pane, set the Perspective to Bond Ports. In the toolbar above, click Create Bond
Port to display the Create Bond Port dialog box.
5. The Create Bond Port dialog box is displayed.
Enter or select the following:
• Server: The name of the Oracle VM Server. You cannot edit this field.
• Interface Name: An optional name for the bond in the format bondN, for example bond1, or bond2.
If you do not enter a name, the default of bondN is used, where N is the next available bond number.
This cannot be changed after the bond is created.
• Addressing: The IP addressing type to use for the bond, either Dynamic (DHCP) or Static. You can
assign an IP address to this bond now, or wait to assign an IP address later, when using the bond to
create VLAN Interfaces or networks.
• IP Address: The IP address to use for the bond. This is available if using Static addressing.
• Mask: The netmask to use for the bond. This is available if using Static addressing.
• MTU: The Maximum Transfer Unit size. If your network supports jumbo frames, increase the MTU
value to the required size. The MTU is set to 1500 by default, and can be between 1500 and 9000
126
Bond Ports Perspective
for a 1GbE NIC, and 1500 and 64000 for a 10GbE NIC. Setting the MTU field sets the maximum
transmission rate, so a packet size of 5000 can be sent and received if the MTU is set to 9000 for a
1GbE NIC.
Note
If configuring a port on SPARC system, changing the MTU value may require
that the interface is not currently in use. If you attempt to change the MTU
value on an interface that is currently in use, an error message may be
returned.
• Description: An optional description for the bond.
• Bonding: The bonding mode, either Active Passive, Link Aggregation, or Load Balanced. See How
is Network Bonding Used in Oracle VM? in the Oracle VM Concepts Guide, for more information
about network bonding modes.
• Available Ports: The available Ethernet ports on the Oracle VM Server. Select the ports to use from
here and move them to the Selected Ports column.
• Selected Ports: The ports to use for the bond.
Click OK to create the bond.
When you have created the bond port, you can make changes to its configuration. You can update its
bonding mode, and add or remove ports as well as changing its description and IP addressing.
3.5.5.2 Edit Bond Port
To edit a bond port:
1. Select the Servers and VMs tab.
2. In the navigation pane, select the Oracle VM Server on which the bond port is to be edited. If the
Oracle VM Server is already part of a server pool, it is listed under Server Pools. Otherwise, find and
select the Oracle VM Server in the Unassigned Servers folder.
3. In the management pane, set the Perspective to Bond Ports and select the bond to edit. In the toolbar
above, click Edit Selected Port . The Edit Port dialog box is displayed.
4. You can set or change the bonding mode, the IP addressing, the mask, the MTU, the description, or
the ports that are part of the bond. The Addressing field provides a drop-down selector that allows you
to choose either None, Static or Dynamic to specify how IP Addressing should be configured on this
bond. If you select Static here, the IP Address and Mask fields become available to edit, otherwise
they remain uneditable. Setting the Addressing field to None deletes any previous IP addressing
configured for the bond.
Note
The IP addressing must either be set to Dynamic or Static (and the IP
addressing information completed) if you intend to use the network bond
for an Oracle VM network channel, such as for "Server Management", "Live
Migrate","Cluster Heartbeat" or "Storage".
5. Click OK to save and apply your changes.
3.5.5.3 Delete Bond Port
127
Physical Disks Perspective
To delete a bond port:
1. Select the Servers and VMs tab.
2. In the navigation pane, select the Oracle VM Server on which the bond port is to be deleted. If the
Oracle VM Server is already part of a server pool, it is listed under Server Pools. Otherwise, find and
select the Oracle VM Server in the Unassigned Servers folder.
3. In the management pane, set the Perspective to Bond Ports and select the bond to delete. In the
toolbar above, click Delete Selected Port .
4. In the Delete Confirmation dialog box, click OK to delete the bond port.
3.5.6 Physical Disks Perspective
The Physical Disks perspective displays a list of the physical disks accessible by the Oracle VM Server in
the table in the management pane. The following information is available:
• Name: The name of the physical disk entry.
• Event Severity: The current event severity status for the physical disk.
• Size (GiB): The size, in GiB, of the physical disk.
• Volume Group: The volume group that the physical disk belongs to.
• SAN Server: The SAN server that the physical disk belongs to (if local storage, this is also indicated).
• Type: The type of storage that the physical disk is a part of (for example, iSCSI or Fibre Channel).
• Storage Plugin: The Oracle VM Storage Connect plug-in that is used to access this physical disk.
• Description: A configured description for the physical disk.
Alongside each physical disk entry in the table, there is an arrow that allows you to expand the view for
each entry. This exposes further information:
• Name: The user-specified alias for the physical disk. The name can be changed without changing the
name of the physical disk on the storage array.
• User Friendly Name: The name of the physical disk on the storage array. The name was specified
when the disk was created and cannot be changed.
• Status: The status of the physical disk (whether or not the disk is online).
• Shareable: Whether or not the physical disk can be shared.
• Thin Provision: Whether or not thin provisioning is supported by the physical disk.
• Reserved by Server(s): Whether or not the physical disk is unavailable for use by Oracle VM Manager.
• Storage Targets: The endpoint provided by the storage server through which the server may direct
commands to the physical disk. The storage target provides access to the physical disk.
• Server Pool: The server pool that the physical disk belongs to.
• Repository: The repository that the physical disk belongs to.
• VM(s): Virtual machines using the physical disk.
• ID: The UUID for the physical disk.
128
Physical Disks Perspective
• Page83 ID: The unique identifier for the physical disk.
• Access Groups: The access groups that the physical disk belongs to.
• Extra Information: Information that is passed to and from the Oracle VM Storage Connect plug-in for
use internally by the plug-in.
The management functions you can perform on the disk are available as icons in the perspective toolbar.
Some management options are only available to SAN server disks that use a non-generic Oracle VM
Storage Connect plug-in.
Table 3.16 Physical Disks Perspective Toolbar Icon Options
Toolbar Icon Option
Icon
Description
Rescan Physical Disks
Request an update of the all the physical disks available to the
Oracle VM Server to see if changes have been made.
Edit Physical Disk...
Change the name, description and extra information of the
physical disk, or make it shareable.
Delete Physical Disk
Stop using the selected physical disk in your Oracle VM
environment.
Warning
If you effectively delete a LUN from a
registered storage array, make sure
that you delete it in Oracle VM Manager
first, before you physically delete it from
the storage server. If you do not respect
this order of operations, the system
goes into an unknown state, which
can only be resolved by rebooting the
Oracle VM Servers the deleted LUN is
connected to.
Clone Physical Disk
Create a thin clone, sparse copy or non-sparse copy of the
physical disk on the selected target.
Delete File System
Delete one or more file systems and contents of the physical
disks.
Refresh Physical Disks
Request an update of one or more physical disks to see if
changes have been made to the size and configuration.
Display Selected Physical Disk
Events...
Display the Events dialog box which contains the job event
associated with the physical disk.
3.5.6.1 Rescan Physical Disks
You can view and manage the physical disks on an Oracle VM Server, as well as those available to it from
a SAN server. You can also refresh the physical disks on an Oracle VM Server when SAN server disks
have been added or removed.
To refresh the physical disks on Oracle VM Servers:
1. Click the Servers and VMs tab, and select the server pool in which the Oracle VM Servers reside in
the navigation tree. Select Servers in the Perspective drop-down list in the management pane. Select
the Oracle VM Servers in the management pane table.
129
Physical Disks Perspective
Alternatively, on the Servers and VMs tab, expand the Server Pools or Unassigned Servers folder,
to select a particular server in the navigation tree. Select the Physical Disks option in the Perspective
drop-down list.
2. Click Rescan Physical Disks
in the perspective toolbar.
3. A confirmation dialog box is displayed. Click OK.
3.5.6.2 Edit Physical Disk
It is possible to edit the configuration for a physical disk either available on a SAN server or as local or
shared storage. The steps and options to do so are described below.
To edit Physical Disk configuration:
1. On the Storage tab, expand the SAN Servers folder in the navigation tree, select a SAN server item
contained within the folder. Select the Physical Disks option in the Perspective drop-down list. Select
the physical disk that you wish to edit in the table presented in the management pane.
To edit the physical disk configuration for a physical disk used by a particular server, on the Servers
and VMs tab, expand the Server Pools or Unassigned Servers folder, to select a particular server
in the navigation tree. Select the Physical Disks option in the Perspective drop-down list. Select the
physical disk that you wish to edit in the table presented in the management pane.
2. Click on the
Edit Physical Disk icon in the toolbar.
3. A dialog opens to allow you to reconfigure the Physical Disk. The dialog has the following options:
• ID: A non-editable field containing the physical disk's UUID as it is stored within Oracle VM Manager.
• Name: A field to change the name of the physical disk within Oracle VM Manager.
• Current Size(GiB): A non-editable field containing the physical disk's current size, in GiB.
• New Size(GiB): A field to change the size, in GiB, of the physical disk. The size of the physical disk
can only be increased in size.
• Description: A text field allowing a description of the physical disk.
• Shareable: A check box that determines whether or not the disk can be shared.
• Thin Provision: A non-editable field describing whether or not thin provisioning is supported by the
disk.
4. When you have finished editing the physical disk, click OK to save the changes, or Cancel to exit out of
the dialog without saving any changes.
3.5.6.3 Delete Physical Disk
It is possible to delete an existing physical disk if it is no longer in use by any servers within any server
pools and the Oracle VM Storage Connect plug-in that you are using supports this operation. The steps
and options to do so are described below.
To delete the registered physical disk:
1. Expand the SAN Servers folder in the navigation tree, select a SAN server item contained within the
folder. Select the Physical Disks option in the Perspective drop-down list. Select the physical disk
that you wish to delete in the table presented in the management pane.
130
Physical Disks Perspective
To delete a physical disk used by a particular server, on the Servers and VMs tab, expand the Server
Pools or Unassigned Servers folder, to select a particular server in the navigation tree. Select the
Physical Disks option in the Perspective drop-down list. Select the physical disk that you wish to
delete in the table presented in the management pane.
2. Click on the
Delete Physical Disk icon in the toolbar.
3. The Delete Confirmation dialog box is displayed. Click OK to delete the physical disk.
3.5.6.4 Clone Physical Disk
It is possible to clone a physical disk. The steps and options to do so are described below.
To clone a Physical Disk:
1. On the Storage tab, expand the SAN Servers folder in the navigation tree, select a SAN server item
contained within the folder. Select the Physical Disks option in the Perspective drop-down list. Select
the physical disk that you wish to clone in the table presented in the management pane.
To clone a physical disk used by a particular server, on the Servers and VMs tab, expand the Server
Pools or Unassigned Servers folder, to select a particular server in the navigation tree. Select the
Physical Disks option in the Perspective drop-down list. Select the physical disk that you wish to
clone in the table presented in the management pane.
2. Click on the
Clone Physical Disk icon in the toolbar.
3. A dialog opens to allow you to clone the Physical Disk. The dialog has the following options:
• Name: A field to set the name of the physical disk clone that you are going to create within Oracle
VM Manager.
• Clone Target Type: A drop-down menu allowing you to select the type of storage to be used for the
physical disk clone:
• Physical Disk: Copies the data from one physical disk to another.
• Repository: Copies the data from the physical disk into a virtual disk image in an existing
repository.
• Clone Target: A searchable field to allow you to select the target location where the clone is to be
stored.
• Clone Type: A drop-down menu allowing you to select the type of clone to create:
• Sparse Copy: Copies only the written data from the physical disk to the target clone.
• Non-sparse Copy: Performs a block copy of the physical disk to the target clone.
4. When you have finished setting the clone parameters for the physical disk, click OK to begin the clone
job, or Cancel to exit out of the dialog without saving any changes.
3.5.6.5 Delete File System
It is possible to delete the file system on local and shared storage devices, and on a physical disk attached
to an Oracle VM Server.
To delete a file system on local or shared storage:
1. Select the Storage tab.
131
Physical Disks Perspective
2. Click on either the Local File Systems or Shared File Systems folder in the navigation tree.
3. Select the file system to delete in the table in the management pane.
4. Click the Delete File System icon in the toolbar. If the icon is greyed out it means that the file
system is used by a repository and it cannot be deleted. You must first delete the repository. See
Section 4.3.1.3, “Delete Repository”.
5. The Delete Confirmation dialog box is displayed. Click OK to delete the file system.
To delete a file system on a physical disk attached to an Oracle VM Server:
1. Select the Servers and VMs tab.
2. Select the Oracle VM Server in the navigation tree.
3. Select Physical Disks in the Perspective drop-down list.
4. Select the physical disk in the table in the management pane.
5. Click on the Delete File System icon in the toolbar. If the icon is greyed out, there is no file system
on the disk so it cannot be deleted.
6. The Delete Confirmation dialog box is displayed. Click OK to delete the file system.
3.5.6.6 Refresh Physical Disk
When changes are made to the physical disks on a SAN server or Oracle VM Server, it is useful to refresh
the configuration of your physical disks to make Oracle VM Manager aware of the changes.
To refresh physical disks:
1. Expand the SAN Servers folder in the navigation tree, select a SAN server item contained within the
folder. Select the Physical Disks option in the Perspective drop-down list. Select the physical disk or
disks that you wish to refresh in the table presented in the management pane.
To refresh physical disks used by a particular server, on the Servers and VMs tab, expand the Server
Pools or Unassigned Servers folder, to select a particular server in the navigation tree. Select the
Physical Disks option in the Perspective drop-down list. Select the physical disk that you wish to
refresh in the table presented in the management pane.
2. Click on the
Refresh Physical Disk option in the toolbar.
3. The selected physical disks are refreshed and their configurations are updated within Oracle VM
Manager.
Note
If you encounter an error, when refreshing a physical disk with a repository located
on it, similar to the following:
OVMAPI_7281E Cannot perform operation on file system...
You may need to ensure that the repository is under the ownership of the Oracle
VM Manager instance that you are using. See Section 4.3.1.2, “Edit Repository” for
more information.
3.5.6.7 View Physical Disk Events
132
Physical Disks Perspective
The Events perspective is common to many elements within the Oracle VM Manager Web Interface.
The Events perspective generally appears as an option within the Perspectives drop-down menu on the
management pane of tabs that include a navigation tree. In this case, the Events perspective displays
events specific to the item selected in the navigation tree and presents these in the management pane.
The Events perspective may also appear within a dialog that is triggered from a Display Selected
Events... perspective toolbar option. In this case, the Events perspective dialog displays events specific
to one or more elements selected in the management pane.
If an object has an error event associated with it you must acknowledge the event to clear the error and
return the object to normal operations. For example, this can occur if an Oracle VM Server or virtual
machine appear as Stopped (Error) in the status. The object in error is flagged with a red icon in the
navigation tree. Oracle VM Servers, virtual machines, repositories and storage objects can have error
events associated with them.
Since Oracle VM Manager attempts to resolve issues automatically as much as possible, not all events
can be acknowledged by a user within the Oracle VM Manager Web Interface. Therefore, a flag is set
for events that are user acknowledgeable. If an event does not have this flag set, you are unable to
acknowledge it, since it is handled internally by Oracle VM Manager.
The Events perspective or dialog contains a table with the following columns of information per event:
• Severity: The severity level assigned to the event.
• Timestamp: The date and time that the event occurred.
• Modify Time: The last recorded date and time that the event was modified.
• Type: The type of event according to Oracle VM Manager's event categorization model.
• Summary: A summary description of the event.
• Acknowledged: Whether an error event has been acknowledged.
• User Acknowledgeable: Whether or not an event can be acknowledged by the user.
Alongside each event entry in the table, there is an arrow that allows you to expand the view for each
entry. This displays the full Description for the event.
The Events perspective or dialog contains a perspective toolbar with the following options:
Table 3.17 Events Perspective Toolbar Icon Options
Toolbar Icon Option
Icon
Description
Acknowledge
Acknowledge a selected error event to clear the error and
return the object to normal operations. Note that this option is
only available for user acknowledgeable events.
Acknowledge All
Acknowledge all error events associated with an object to clear
the errors and return the object to normal operations. Note that
only user acknowledgeable events are cleared. This button is
always clickable, even if there are no user acknowledgeable
events. Clicking it when there are no user acknowledgeable
events results in an error dialog.
Display Count
A drop-down menu that allows you to select the number of
events that should be displayed in the management pane,
while you are currently in this perspective.
133
Storage Initiators Perspective
Acknowledging Events/Errors
If an object has an error event associated with it you must acknowledge the event to clear the error and
return the object to normal operations. For example, this can occur if an Oracle VM Server or virtual
machine appear as Stopped (Error) in the status. The object in error is flagged with a red icon in the
navigation tree. Oracle VM Servers, virtual machines, repositories and storage objects can have error
events associated with them. The following procedures show you how to clear errors and return the object
to normal operations.
To acknowledge Oracle VM Server error events:
1. Click the Servers and VMs tab.
2. Select the Oracle VM Server in the navigation tree.
3. Select Events from the Perspective drop-down list in the management pane.
4. Select the user acknowledgeable error event and click Acknowledge
to clear all user acknowledgeable errors.
, or click Acknowledge All
To acknowledge virtual machine error events:
1. Click the Servers and VMs tab.
2. Select the server pool, or Oracle VM Server on which the virtual machine resides in the navigation tree.
3. Select Virtual Machines from the Perspective drop-down list in the management pane.
4. Select the virtual machine in the management pane table. Click Display Selected VM Events...
.
5. The Events dialog box is displayed. Select the user acknowledgeable error event and click
Acknowledge , or click Acknowledge All to clear all user acknowledgeable errors. Click Close.
To acknowledge storage repository error events:
1. Click the Repositories tab.
2. Select the repository in the navigation tree.
3. Select Events from the Perspective drop-down list in the management pane.
4. Select the error event and click Acknowledge
, or click Acknowledge All
to clear all errors.
To acknowledge storage error events:
1. Click the Storage tab.
2. Select File Servers, SAN Servers, or a storage server in the navigation tree.
3. Select Events from the Perspective drop-down list in the management pane.
4. Select the user acknowledgeable error event and click Acknowledge
to clear all user acknowledgeable errors.
, or click Acknowledge All
3.5.7 Storage Initiators Perspective
The Storage Initiators perspective lists the different storage initiators available on a server. It also allows
you to add storage initiators to different access groups. The following columns are displayed in the
management pane:
• Name: The name of the storage initiator on the selected server.
134
Control Domains Perspective
• Description: The configured description for the storage initiator.
This perspective includes a toolbar that consists of the following options:
Table 3.18 Storage Initiators Perspective Toolbar Icon Options
Toolbar Icon Option
Icon
View Access Groups for
Selected Initiator
Description
Displays the View Access Groups for Initiator dialog box.
Use this option to add storage initiators on a particular server
to any existing access groups that you have configured.
3.5.7.1 View Access Groups for Selected Initiator
In order to access SAN server storage, an access group must be created, and a storage initiator
configured on the Oracle VM Server. Storage initiators are added to an Oracle VM Server during discovery,
based on your storage configuration. You configure access groups to bind storage initiators to physical
disks. For information on creating access groups, see Section 6.6.4, “Access Groups Perspective”. You
can also view and configure existing storage initiators for a particular Oracle VM Server.
To view access groups for storage initiators on an Oracle VM Server:
1. Click the Servers and VMs tab, and select the Oracle VM Server in the navigation tree.
2. Select Storage Initiators in the Perspective drop-down list in the management pane. The storage
initiators configured on the Oracle VM Server are listed in the management pane table.
3. Select a storage initiator in the table, and click View access groups for selected initiator
.
4. The View Access Groups for Initiator dialog box is displayed. Select the SAN Server and Access
Groups from the drop-down lists and click Add. Click OK.
See Section 6.6.4, “Access Groups Perspective” for more information on managing SAN server access
groups.
3.5.8 Control Domains Perspective
The Control Domains perspective displays information about the control domain (dom0), running on the
Oracle VM Server, in the table in the management pane. The following information is available:
• Name: The name of the domain
• Processors: The number of processors available for use by the control domain.
• Memory (MB): The amount of memory (in megabytes) used by the control domain.
• Host OS Name: The host operating system name running within the control domain.
• Host OS Type: The type of operating system running in the control domain (for example, Linux or
Solaris).
• OVM Version: The version number reported by the Oracle VM software running in the control domain.
Alongside each control domain entry in the table, there is an arrow that allows you to expand the view for
each entry. This exposes further information:
• Host OS Major Version: The major version number for the operating system version.
• Host OS Minor Version: The minor version number for the operating system version.
• Agent Version: The version number of the Oracle VM Agent software running in the control domain.
135
Repository Exports Perspective
• Kernel Release: The kernel version release numbering for the operating system running in the control
domain.
There are no associated toolbars with this perspective.
3.5.9 Repository Exports Perspective
An Oracle VM Server can be configured to enable third party applications to perform a back up of the
contents of a storage repository. To enable this, an Oracle VM Server is configured to provide an NFS
share that a third party back up tool can use to access the contents of the repository. The Oracle VM
Server must be in a clustered server pool and have the OCFS2-based storage repository presented to it.
When you have created a repository export, use the Repository Path (displayed in the management pane
table) and the Oracle VM Server hostname or IP address to connect to the NFS mount point from the third
party back up software.
This perspective lists the currently available repository exports. The following columns are presented in the
table within the management pane:
• Client IP/Host Name: The IP address or hostname of the computer which has been granted access to
the repository
• Options: Additional NFS mount parameters
• Repository: The repository being exported
This perspective includes a toolbar that consists of the following options:
Table 3.19 Repository Exports Perspective Toolbar Icon Options
Toolbar Icon Option
Icon
Create Repository Export...
Description
Displays the Create a Repository Export wizard.
Use this option to create repository exports to backup your
repositories.
Edit Repository Export...
Displays the Edit Repository Export wizard. Use this option
to edit the NFS parameters for a repository export.
Delete Repository Export...
Displays the Delete Confirmation dialog box. Use this option
to delete the selected repository export.
3.5.9.1 Create Repository Export
To create a repository export:
1. Click the Servers and VMs tab.
2. In the navigation pane, select the Oracle VM Server on which you want to create the repository export
location.
3. Select Repository Exports from the Perspective drop-down list in the management pane.
4. Click Create Repository Export..
in the toolbar.
5. The Create Repository Export dialog box is displayed. Enter or select the following:
• Client IP/Host Name: The IP address or hostname of the computer for which to grant access to
the repository contents. This is likely to be the machine on which the third party back up and restore
software is running.
136
Events Perspective
• Repository: An OCFS2 storage repository presented to the Oracle VM Server. This is the repository
you want to back up.
• Options: The parameters to include in the NFS mount configuration, for example:
rw, async, no_root_squash
Click OK.
3.5.9.2 Edit Repository Export
To edit a repository export:
1. Click the Servers and VMs tab.
2. In the navigation pane, select the Oracle VM Server on which you want to edit the repository export
parameters.
3. Select Repository Exports from the Perspective drop-down list in the management pane.
4. To edit a repository export, select the entry in the table in the management pane and click Edit
Repository Export.. in the toolbar.
5. The Edit Repository Export dialog box is displayed. Enter or select the following:
• Client IP/Host Name: The IP address or hostname of the computer for which to grant access to
the repository contents. This is likely to be the machine on which the third party back up and restore
software is running. (Not editable)
• Repository: An OCFS2 storage repository presented to the Oracle VM Server. This is the repository
you want to back up. (Not editable)
• Options: The parameters to include in the NFS mount configuration, for example:
rw, async, no_root_squash
Click OK.
3.5.9.3 Delete Repository Export
To delete a repository export:
1. Click the Servers and VMs tab.
2. In the navigation pane, select the Oracle VM Server for which you want to delete the repository export.
3. Select Repository Exports from the Perspective drop-down list in the management pane.
4. To delete a repository export, select the entry in the table in the management pane and click Delete
Repository Export in the toolbar.
5. A confirmation dialog is displayed. Click OK to delete the repository export.
3.5.10 Events Perspective
The Events perspective is common to many elements within the Oracle VM Manager Web Interface.
The Events perspective generally appears as an option within the Perspectives drop-down menu on the
management pane of tabs that include a navigation tree. In this case, the Events perspective displays
events specific to the item selected in the navigation tree and presents these in the management pane.
137
Events Perspective
The Events perspective may also appear within a dialog that is triggered from a Display Selected
Events... perspective toolbar option. In this case, the Events perspective dialog displays events specific
to one or more elements selected in the management pane.
If an object has an error event associated with it you must acknowledge the event to clear the error and
return the object to normal operations. For example, this can occur if an Oracle VM Server or virtual
machine appear as Stopped (Error) in the status. The object in error is flagged with a red icon in the
navigation tree. Oracle VM Servers, virtual machines, repositories and storage objects can have error
events associated with them.
Since Oracle VM Manager attempts to resolve issues automatically as much as possible, not all events
can be acknowledged by a user within the Oracle VM Manager Web Interface. Therefore, a flag is set
for events that are user acknowledgeable. If an event does not have this flag set, you are unable to
acknowledge it, since it is handled internally by Oracle VM Manager.
The Events perspective or dialog contains a table with the following columns of information per event:
• Severity: The severity level assigned to the event.
• Timestamp: The date and time that the event occurred.
• Modify Time: The last recorded date and time that the event was modified.
• Type: The type of event according to Oracle VM Manager's event categorization model.
• Summary: A summary description of the event.
• Acknowledged: Whether an error event has been acknowledged.
• User Acknowledgeable: Whether or not an event can be acknowledged by the user.
Alongside each event entry in the table, there is an arrow that allows you to expand the view for each
entry. This displays the full Description for the event.
The Events perspective or dialog contains a perspective toolbar with the following options:
Table 3.20 Events Perspective Toolbar Icon Options
Toolbar Icon Option
Icon
Description
Acknowledge
Acknowledge a selected error event to clear the error and
return the object to normal operations. Note that this option is
only available for user acknowledgeable events.
Acknowledge All
Acknowledge all error events associated with an object to clear
the errors and return the object to normal operations. Note that
only user acknowledgeable events are cleared. This button is
always clickable, even if there are no user acknowledgeable
events. Clicking it when there are no user acknowledgeable
events results in an error dialog.
Display Count
A drop-down menu that allows you to select the number of
events that should be displayed in the management pane,
while you are currently in this perspective.
Acknowledging Events/Errors
If an object has an error event associated with it you must acknowledge the event to clear the error and
return the object to normal operations. For example, this can occur if an Oracle VM Server or virtual
machine appear as Stopped (Error) in the status. The object in error is flagged with a red icon in the
navigation tree. Oracle VM Servers, virtual machines, repositories and storage objects can have error
138
Unassigned Servers Folder
events associated with them. The following procedures show you how to clear errors and return the object
to normal operations.
To acknowledge Oracle VM Server error events:
1. Click the Servers and VMs tab.
2. Select the Oracle VM Server in the navigation tree.
3. Select Events from the Perspective drop-down list in the management pane.
4. Select the user acknowledgeable error event and click Acknowledge
to clear all user acknowledgeable errors.
, or click Acknowledge All
To acknowledge virtual machine error events:
1. Click the Servers and VMs tab.
2. Select the server pool, or Oracle VM Server on which the virtual machine resides in the navigation tree.
3. Select Virtual Machines from the Perspective drop-down list in the management pane.
4. Select the virtual machine in the management pane table. Click Display Selected VM Events...
.
5. The Events dialog box is displayed. Select the user acknowledgeable error event and click
Acknowledge , or click Acknowledge All to clear all user acknowledgeable errors. Click Close.
To acknowledge storage repository error events:
1. Click the Repositories tab.
2. Select the repository in the navigation tree.
3. Select Events from the Perspective drop-down list in the management pane.
4. Select the error event and click Acknowledge
, or click Acknowledge All
to clear all errors.
To acknowledge storage error events:
1. Click the Storage tab.
2. Select File Servers, SAN Servers, or a storage server in the navigation tree.
3. Select Events from the Perspective drop-down list in the management pane.
4. Select the user acknowledgeable error event and click Acknowledge
to clear all user acknowledgeable errors.
, or click Acknowledge All
3.6 Unassigned Servers Folder
The Unassigned Servers navigation folder in the navigation tree contains all of the servers that do not
belong to a configured server pool within Oracle VM Manager. The structure of the navigation provided in
the navigation tree is discussed in more detail in Section 3.2, “Summary”.
Clicking on the Unassigned Servers folder in the navigation tree allows you to access different
perspectives in the management pane. Each perspective provides its own view of all of the unassigned
servers within Oracle VM Manager. Most of the perspectives also include separate perspective toolbars
that enable you to perform various configuration or management tasks specific to the view currently
displayed within the management pane. The Unassigned Servers folder offers the following perspectives
within the management pane:
• Servers Perspective
139
Servers Perspective
• Events Perspective
Within the Unassigned Servers navigation folder, individual server navigation items may also be
displayed if there are servers within your environment that have not been assigned to a particular server
pool. Each server item has the same associated perspectives and toolbars available as a server item listed
within a particular server pool.
To see further information on the perspectives and toolbars associated with a server navigation item,
please refer to Section 3.5, “Server Item”.
3.6.1 Servers Perspective
The Servers perspective lists the different servers that belong to either a server pool or the Unassigned
Servers folder, depending on the item selected in the navigation pane. The following columns are
displayed in the management pane:
• Name: The name that has been configured for the server.
• Status: The running status of the server.
• Tag(s): Any tags that have been applied to the server.
• Maintenance Mode: Whether or not the server is configured to be in maintenance mode.
• IP Address: The IP address that is used by Oracle VM Manager to access the server on the
management network channel.
• Memory (GiB): The available memory, in GiB, on the server.
• Processors: The number of processors that the server contains.
• Speed (GHz): The speed that the processors for the server are configured to run at.
• Product: The physical host brand and type reported by the server bios.
• Owned: Whether or not the server is owned by the current Oracle VM Manager instance.
• Update Required: Whether or not a server update is available for the server from its server update
repository.
This perspective includes a toolbar that consists of the following options:
Table 3.21 Servers Perspective Toolbar Icon Options
Toolbar Icon Option
Icon
Description
Create Virtual Machine...
Displays the Create Virtual Machine wizard. Use this option to
create a virtual machine in the selected server pool.
Edit...
Displays the Edit Server dialog box. Use this option to edit the
name and description for an Oracle VM Server. This is also
used to put the Oracle VM Server into maintenance mode, take
ownership of it, and to configure remote management of the
Oracle VM Server using IPMI (Intelligent Platform Management
Interface).
Note that placing an Oracle VM Server in maintenance mode is
indicated in the navigation pane with this icon:
Delete
Displays the Delete Confirmation dialog box. Use this option
to delete the selected Oracle VM Server.
140
Servers Perspective
Toolbar Icon Option
Icon
Description
Start
Starts a stopped Oracle VM Server.
Stop
Stops a running Oracle VM Server.
Restart
Restarts a running Oracle VM Server.
Kill
Powers off an Oracle VM Server. This is the equivalent of
physically pushing the Off button on the hardware.
Rediscover Server
Rediscovers the Oracle VM Server. Use this to refresh
information about the Oracle VM Server.
Rescan Physical Disks
Rescans the local storage on an Oracle VM Server. Use this
option to rescan the storage presented to an Oracle VM Server
when the storage configuration is changed, for example, a new
storage array is added.
Update Server
Updates or upgrades the Oracle VM Server if an update is
available in the server update repository.
Send VM Messages...
Send one or more virtual machines a message. Use this option
to send messages to virtual machines that have the Oracle VM
Guest Additions installed.
3.6.1.1 Create Virtual Machine
This section discusses creating a virtual machine using a template, and creating a virtual machine from an
ISO file, or from physical or virtual disks.
To create a virtual machine using a template:
1. Click the Servers and VMs tab.
2. Click Create Virtual Machine
in the toolbar.
3. The Create Virtual Machine wizard is displayed.
Select the Clone from an existing VM Template option.
141
Servers Perspective
Enter or select the following:
• Clone Count: The number of virtual machines to create from the template.
• Name Index: The start index number to use for the clone name suffix. The default is 0. This is used
in conjunction with the VM Name field to create the name for each clone.
• Repository: The repository in which to create the virtual machine configuration files.
• VM Template: The template to use to create the virtual machines.
• VM Name: An optional name for the virtual machines. The maximum name length is 256 characters
and may contain any character. The name need not be unique. If no value is given, the default is the
name of the virtual machine template being cloned. Each clone is suffixed with a dot (.) and the clone
index number, starting with the value for the Name Index field. For example, if the VM Name field
is set to MyVM, and the Name Index field is set to 1, the resulting clones would be named MyVM.1,
MyVM.2 and so on.
• Server Pool: The server pool in which to deploy the virtual machines.
• Description: An optional description of the virtual machines.
Click Finish. The virtual machines are created and deployed to the server pool.
To create a virtual machine using all other media:
1. Click the Servers and VMs tab.
2. Click Create Virtual Machine
in the toolbar.
3. The Create Virtual Machine wizard is displayed.
Select the Create a new VM option. Click Next.
4. The Create Virtual Machine step is displayed in the wizard.
142
Servers Perspective
Enter or select the following:
• Server Pool: The server pool on which to create the virtual machine.
• Server: The server that the virtual machine should be created on. The default option is Any, but the
drop-down selection lists the servers that exist in the server pool that you have selected. Selecting a
particular server forces the virtual machine to be created on that server. This has implications for the
Start Policy discussed later.
• Repository: The repository in which to create the virtual machine configuration file.
• Name: A name for the virtual machine. The maximum name length is 256 characters and may
contain any character. The name need not be unique.
• Enable High Availability: Whether to enable High Availability (HA). See How does High Availability
(HA) Work? in the Oracle VM Concepts Guide for more information on HA.
• Enable Huge Pages: Whether to enable HugePages. This option can be used when configuring
Huge Pages for paravirtualized VMs with the Domain Type set to XEN_PVM. Huge Pages are
available by default for HVM and PVHVM and this parameter cannot be set if your Domain Type is
not set to XEN_PVM. Setting this parameter automatically sets the page size to 2 MB. This means
that when assigning memory to a virtual machine with this parameter set, you must ensure that the
values specified are multiples of 2 MB. If you enable HugePages, you must also enable support for
HugePages in the guest operating system. If you want to change this value when editing a virtual
machine, the virtual machine must first be stopped. This option is not available if the virtual machine
is to be deployed to a SPARC-based server pool.
See How are Huge Pages Enabled for Virtual Machines?, in the Oracle VM Concepts Guide, for
more information on Huge Page support.
• Description: An optional description of the virtual machine.
• Operating System: The operating system of the virtual machine. This setting enables or disables
certain virtual machine settings that the guest operating system may require.
• Mouse Device Type: The mouse type to use for the virtual machine. This option is not available if
the virtual machine is to be deployed to a SPARC-based server pool.
• Keymap: The keyboard mapping to use for the virtual machine. This option is not available if the
virtual machine is to be deployed to a SPARC-based server pool.
143
Servers Perspective
• Domain Type: The domain type of the virtual machine. Oracle recommends you create
paravirtualized virtual machines if possible, as the performance of a paravirtualized virtual machine
is superior to that of a hardware virtualized machine guest. This option is not available if the virtual
machine is to be deployed to a SPARC-based server pool.
• XEN_HVM: Hardware virtualization, or fully virtualized. When you select this option you must
supply an ISO file in a repository (in the Arrange Disks step of the wizard) from which to create
the virtual machine. See Section 4.6.1.1, “Import ISO” for information on importing an ISO file into
a repository.
• XEN_HVM_PV_DRIVERS: Identical to XEN_HVM, but with additional paravirtualized drivers
for improved performance of the virtual machine. See What are Virtualization Modes or Domain
Types? in the Oracle VM Concepts Guide for more information about using paravirtualized drivers.
This domain type is used to run Microsoft Windows guest operating systems with an acceptable
performance level.
• XEN_PVM: Paravirtualized. Enables you to select a location for the mounted ISO file from which
to create the virtual machine. Before you create the virtual machine using the paravirtualized
method, mount the ISO file on an NFS share, or HTTP or FTP server. You supply the location of
the mounted ISO file in the Network Boot Path field in the Boot Options step of the wizard. For
information on creating a mounted ISO file, see ISO Provisioning for PVM Guest Installations in the
Oracle VM Administrator's Guide.
• LDOMS_PVM: This domain type should be selected if the server pool and hypervisors use Oracle
VM Server for SPARC as the hypervisor instead of Oracle VM Server for x86.
• Unknown: This option is informational in the event that Oracle VM Manager is unable to determine
the domain type for an existing virtual machine. It is not possible to actually set a virtual machine's
domain type to this value. Attempting to do so generates a rule violation when you try to save the
virtual machine settings and an error message is returned.
• Start Policy: The policy that should be used to start the virtual machine. Select one of:
• Best Server: The virtual machine is started on the best available Oracle VM Server as determined
by the algorithm used for the server pool policies DRS and DPM. For more information on server
pool policies, see What are Server Pool Policies? in the Oracle VM Concepts Guide.
• Current Server: The virtual machine is started on the Oracle VM Server to which it is assigned. If
you selected a particular server to create the virtual machine on, then it is started on this server.
• Use Pool Policy: The virtual machine is started using the start policy defined for the entire server
pool. See Section 3.1.2, “Create Server Pool” for more information on setting the start policy for a
server pool.
• Max. Memory (MB): The maximum memory size the virtual machine can be allocated. If you have
enabled Huge Pages, the value here must be a multiple of 2 MB.
• Memory (MB): The memory size the virtual machine is allocated. When creating a virtual machine,
this is the memory allocation used when starting the virtual machine. You can change this when
editing a running PVM and no virtual machine restart is required. For HVM guests, increasing or
decreasing the memory requires the virtual machine to be stopped. If you have enabled Huge Pages,
the value here must be a multiple of 2 MB.
• Max. Processors: The maximum number of processors the virtual machine can be allocated. The
number of processors is expressed in number of physical CPU cores, and is limited to 128. This
144
Servers Perspective
cannot be changed when editing a running virtual machine. To edit this value, you must first stop the
virtual machine.
• Processors: The number of processors the virtual machine is allocated. The number of processors
is expressed in number of physical CPU cores, and is limited to 128. You can change this when
editing a running virtual machine, up to the value of Max. Processors.
• Priority: The CPU priority of the virtual machine. The higher the priority, the more physical CPU
cycles are given to the virtual machine. This option is not available if the virtual machine is to be
deployed to a SPARC-based server pool.
• Processor Cap %: Increase or decrease the percentage to which the virtual CPUs can receive
scheduled time. This parameter defines the maximum percentage to which the virtual CPUs can
receive scheduled time. Use this parameter to keep low priority virtual machines from consuming too
many CPU cycles on a Virtual Machine Server. This option is not available if the virtual machine is to
be deployed to a SPARC-based server pool.
The Priority and Processor Cap% parameters are passed to the Xen hypervisor for use by the credit
scheduler, which automatically load balances guest VCPUs across all available physical CPUs using
an algorithm that combines these two parameters. Therefore, these parameters are a key factor for the
performance of the virtual machine on x86 hardware.
On SPARC, each virtual machine uses dedicated physical CPU threads and CPUs are not shared
between virtual machines, being exclusively assigned to a single virtual machine.
Click Next.
5. The Set up Networks step is displayed in the wizard.
This step of the wizard allows you to add VNICs to the virtual machine. If you want to specify the MAC
address for a VNIC, select Specify MAC Address and enter the MAC address. Otherwise, leave the
default Dynamically Assign MAC to dynamically assign a MAC Address. Select a network with the
virtual machine role from the Network drop-down list. If no networks are available, you must first create
a network with the virtual machine role as a dedicated network for virtual machine traffic is required.
See Section 5.1.1, “Create New Network” for information on creating a network. Click Add VNIC.
The VNIC order specified here is important, as it determines the order in which they are presented to
the virtual machine. You can control the ordering of the VNICs using the up and down arrows on the
right of the table.
If you are editing the networking of an existing stopped virtual machine, you can change the network
to which the VNIC belongs using the Network drop-down list in the table. It is important that the VNIC
145
Servers Perspective
belongs to a network already associated with the Oracle VM Servers on which it can run, or you cannot
start the virtual machine. See Section 5.1.1, “Create New Network” and Section 5.1.2, “Edit Existing
Network” for more information on associating Oracle VM Servers with networks.
If you are editing an existing running virtual machine, you are able to add VNICs to the virtual machine,
but you are not able to remove VNICs that are already in use. You also cannot reorder VNICs on a
running virtual machine. If you choose to add a VNIC to a running machine you must ensure that the
VNIC belongs to a virtual machine network already associated with the Oracle VM Servers on which it
can run, by selecting the appropriate network from the Network drop-down list.
A virtual machine can have up to eight (8) VNICs for HVM guests and up to 31 for PVM guests. A PVM
guest requires network connectivity to perform the operating system install and must have at least one
VNIC.
Click Next.
6. The Arrange Disks step of the wizard is displayed.
Select the desired storage configuration of your virtual machine, such as virtual disks, physical disks,
and ISO files. On a separate slot, add one or more of the following disk types:
• Empty: An empty slot.
• Virtual Disk: This allows you to add or create a virtual disk. Virtual disks may be shared by virtual
machines, or only available to a single virtual machine.
• Physical Disk: The physical disks are the disks in a storage array. Physical disks may be shared by
virtual machines.
• CD/DVD: This adds an ISO file in a storage repository and can be used to create HVM and PVHVM
virtual machines. When creating a virtual machine from an ISO file, you must use a single file.
Installations that span multiple ISO files are not supported. ISO files cannot be used to create PVM
virtual machines. You cannot add an empty CDROM on a SPARC-based server.
Add or create any virtual disks to use as the virtual machine's hard disk, select any physical disks
to add, and select any ISO files to use to create the virtual machine. Add the disks in the order they
should appear in the virtual machine. The disk with the boot partition or installation media should be the
first disk listed. An HVM guest can have up to four disks, including empty CD/DVD drives. A PVM guest
can have up to 104 disks. A PVHVM guest can have up to 107 disks. An LDOMS_PVM guest can have
up to 1024 disks. Only one slot can contain an empty CD/DVD.
146
Servers Perspective
Tip
When editing a running virtual machine, you can change the CD/DVD using this
dialog box and the CD/DVD is mounted in the operating system.
To create or add a virtual disk:
a. To create a virtual disk, select Virtual Disk from the Disk Type drop-down list and click Create a
Virtual Disk .
b. The Create Virtual Disk dialog box is displayed. Enter or select the following to create a virtual
disk:
• Repository: The repository in which the virtual disk is to be created.
• Virtual Disk Name: The name of the virtual disk to be created and made available to the virtual
machine. See How are Virtual Disks Managed? in the Oracle VM Concepts Guide for more
information about using virtual disks.
• Size (GiB): The disk size of the virtual disk, in GiB.
• Description: A description of the virtual disk.
• Shareable: Whether the virtual disk should be shareable (read/write) with other virtual machines.
• Allocation Type: Whether to use a Sparse Allocation or Non-sparse Allocation. Sparse
Allocation creates a sparse disk, so the size of the disk is initially small and increases as it
is used. Sparse allocation is faster than using Non-Sparse Allocation when creating a virtual
machine. Non-Sparse Allocation creates the entire disk when the virtual machine is created, and
so is slower than creating a sparse disk.
Click OK.
c. To search for an existing virtual disk to add to the virtual machine, click Select a Virtual Machine
Disk . The Select a Virtual Machine Disk dialog box is displayed. Select the virtual disk to use
and Click OK.
Note
If your virtual machine needs more than one disk, you can create the disk(s)
afterwards in the repository, and add them to the virtual machine. See
Section 4.9.1.1, “Create Virtual Disk” and Section 3.5.2.1, “Edit Virtual
Machine” for more information on creating a virtual disk and editing a virtual
machine. There are some limitations on mixing virtual disks of differing
device types on a virtual machine. See How are Virtual Disks Managed?
in the Oracle VM Concepts Guide for more information about how device
types are allocated to virtual disks and what you may need to do to solve
any issues surrounding this problem.
To add a physical disk:
a. To add a physical disk to the virtual machine, select Physical Disk from the Disk Type drop-down
list. Click Select a Virtual Machine Disk . The Select a Physical Disk dialog box is displayed.
Select a physical disk from the list of available disks. If you want to leave the slot empty, select
Leave Slot Empty. Click OK.
147
Servers Perspective
To add an ISO file:
a. To add an ISO file to the virtual machine, select CD/DVD from the Disk Type drop-down list. Click
Select a Virtual Machine Disk . The Select an ISO dialog box is displayed. Select a Iso file from
the list of available files. If you want to leave the slot empty, select Leave Slot Empty. Click OK.
Note
When adding an ISO file to an existing virtual machine, the ISO file is
available to the operating system, but may not be mounted. To access the
ISO file, you may need to mount it, for example:
# mkdir /cdrom
# mount -o loop /dev/xvdb /cdrom
When you have set up the virtual machine's disks, click Next.
7. The Boot Options step is displayed in the wizard.
Select the boot media order for your virtual machine.
If you are creating a hardware virtualized machine virtual machine (HVM), you can choose the PXE
boot option. If so, remember to put PXE first in the Select your boot options field, and change the
boot order again after installation and before rebooting the virtual machine. To use PXE, you must
configure a PXE/tftp environment to offer the necessary boot media and instructions to the virtual
machine.
If you are creating a paravirtualized virtual machine (PVM), you also have the PXE option available. In
this case, the PXE option refers to a network style boot. If the PXE option appears in the right-handside column, you must enter the location of the mounted ISO file from which to perform the operating
system installation in the Network Boot Path field that is shown when editing or creating a PVM, for
example
http://example.com/Enterprise-R6-U1-Server-x86_64-dvd.iso/
For information on creating a mounted ISO file, see ISO Provisioning for PVM Guest Installations in the
Oracle VM Administrator's Guide.
You cannot use the Network Boot Path field to boot a virtual machine using PXE. This field can only
be used to specify the path to a mounted ISO file to use when installing a PVM guest.
148
Servers Perspective
If you have defined tags and want to add any to this virtual machine, click Next. Otherwise, click Finish
to create and deploy the virtual machine to the server pool.
8. The Tags step is optional and displays in the wizard if you clicked Next in the previous step.
Note
The virtual machine has already been created and deployed to the server pool
at this point. This step is entirely optional. Cancelling the operation within this
dialog does not prevent the virtual machine from being created.
If you have previously created tags, they appear in the Available Tags column. Select the tags you
want to apply to the virtual machine and move them to the Selected Tags column. See Section 1.14,
“Tags” for more information on creating and managing tags. Click Finish.
If you created a PVM, there are some steps you should take after the operating system installation is
completed:
1. Stop the virtual machine. See Section 3.5.2.4, “Stop Virtual Machines” for information on stopping a
virtual machine.
2. Edit the virtual machine and remove PXE from the Boot Order column in the Boot Options step of the
Edit Virtual Machine wizard. See Section 3.5.2.1, “Edit Virtual Machine” for information on editing a
virtual machine.
3. Start the virtual machine and complete the installation if necessary. See Section 3.5.2.3, “Start Virtual
Machines” for information on starting a virtual machine.
To edit the virtual machine configuration information, see Section 3.5.2.1, “Edit Virtual Machine”.
3.6.1.2 Edit Server
You can edit the configuration information for an Oracle VM Server to change the name, description, any
server pool roles, and to take it off-line to perform system maintenance.
To edit the configuration information of an Oracle VM Server:
1. Click the Servers and VMs tab.
2. Select the Oracle VM Server in the navigation pane. Click Edit Server
149
in the toolbar.
Servers Perspective
3. The Edit Server dialog box is displayed. In the Configuration tab, edit the information about the
Oracle VM Server:
• Name: The name of the Oracle VM Server.
• Description: A description of the Oracle VM Server.
• NTP Server(s): Allows you to specify the NTP server settings for each individual Oracle VM Server.
You can add multiple NTP servers using a comma-separated list.
Note
If you need to batch edit the NTP servers for a large number of Oracle
VM Servers in your environment, you should use the Oracle VM Manager
Command Line Interface, edit Server, or the Oracle VM Web Services API to
do this programmatically.
• Server in Maintenance Mode: Select whether to place the Oracle VM Server in maintenance mode.
An Oracle VM Server can be placed into maintenance mode to perform hardware or software
maintenance. When an Oracle VM Server is placed in maintenance mode, any virtual machines
running on the Oracle VM Server are automatically migrated to other Oracle VM Servers in the
server pool, if they are available. If the Oracle VM Server is the master Oracle VM Server in the
server pool, this role is moved to another Oracle VM Server in the server pool, if available, after the
server is shutdown. If any of these automatic processes fail, check the Oracle VM Server event log
(Section 3.5.10, “Events Perspective”) for reasons why the failure occurred.
When an Oracle VM Server is placed into maintenance mode its icon:
pane.
is updated in the navigation
When you have finished performing maintenance on the Oracle VM Server and you are ready for it to
rejoin the server pool, ensure that the Maintenance Mode check box is unchecked.
• Take Ownership of Server: Select to take ownership of the Oracle VM Server.
Note
Configuration of NTP for each Oracle VM Server takes place when a
server changes ownership. If you release ownership of a server, its NTP
configuration is updated to point locally to itself. When Oracle VM Manager
takes ownership of a server, the server's NTP configuration is automatically
updated to point to the Oracle VM Manager instance. This may only be
evident after the server has been refreshed.
Tip
You cannot edit the ownership of an Oracle VM Server if it is included in a
server pool or if a repository is presented to it.
• Inbound Migration Locked: Select whether to allow additional virtual machines to run on the Oracle
VM Server. Selecting this option prevents new or migrated virtual machines to run on the Oracle VM
Server. See How Can I Protect Virtual Machines? for more information on inbound migration lock.
• Oracle VM Agent password: The password to connect to the Oracle VM Agent. The value for this
field is required if you select to take ownership of the Oracle VM Server.
150
Servers Perspective
• Utility Server: Select to designate the Oracle VM Server to perform utility functions such as
importing, cloning and storage refresh.
• VM Server: The virtual machine role is required to run virtual machines.
4. In the IPMI tab, select the Enable Server IPMI check box to enable the Intelligent Platform
Management Interface (IPMI). IPMI allows you to remotely power on or power off an Oracle VM Server.
If IPMI is either not available or not enabled on the Oracle VM Server, Oracle VM Manager may still
be able to remotely power on an Oracle VM Server using a Wake on LAN message without having
to physically press the power button, and it may be able to send a system power off message to shut
it down. Select the IPMI Password Required check box if your IPMI setup requires a password to
change the configuration.
To configure IPMI enter the following information in the fields:
• Access Username: The user name for the IPMI.
• Password: The password for the IPMI.
• IP Address: The IP address of the IPMI.
5. To edit the tags associated with the server, click the Tags tab. Using the controls provided, you can
add or remove tags that can be used to identify the server and to group it with other objects within
Oracle VM Manager. See Section 1.14, “Tags” for more information on creating and managing tags.
Click OK. The Oracle VM Server is updated.
Batch Editing Oracle VM Servers
You can edit the information for more than one Oracle VM Server at a time by using the multi-select
functionality provided within the Oracle VM Manager interface to select multiple items before clicking on the
Edit Server icon in the toolbar.
When editing a group of Oracle VM Servers in batch mode the options available to you are limited to
actions that can be applied to all selected items. The following options are available:
• Server in Maintenance Mode: Checking this check box sets all selected items into Maintenance Mode.
• Take Ownership of Server: Checking this check box allows Oracle VM Manager to take ownership of
all of the selected items.
• Oracle VM Agent password: The password to connect to the Oracle VM Agent. The value for this field
is required if you select to take ownership of the selected items.
• Utility Server: Checking this check box changes the role of all selected items to Utility Servers.
• VM Server: Checking this check box changes the role of all selected items to Virtual Machine Servers.
Note
If the values set for the options provided vary across the selected servers, the
dialog displays the values for the first server in the selection. Clicking OK updates
all of the selected servers to have the same status.
3.6.1.3 Delete Server
151
Servers Perspective
When you delete an Oracle VM Server, it is removed from the Oracle VM Manager repository and
becomes unmanaged. The Oracle VM Server is not stopped, nor is anything physically done to the Oracle
VM Server.
Before you can delete an Oracle VM Server, you must stop any running virtual machines, or place the
Oracle VM Server into maintenance mode to automatically migrate the running virtual machines.
To delete Oracle VM Servers from Oracle VM Manager:
1. Stop or migrate any running virtual machines. To stop the virtual machines see Section 3.5.2.4, “Stop
Virtual Machines”. To automatically migrate the virtual machines to other Oracle VM Servers in the
server pool, place the Oracle VM Server into maintenance mode, see Section 3.4.2.2, “Edit Server”.
2. Click the Servers and VMs tab.
3. Select the Unassigned Servers folder in the navigation tree. Select Servers from the Perspective
drop-down list.
4. Select one or more Oracle VM Servers in the management pane. Click Delete
toolbar.
in the perspective
5. The Delete Confirmation dialog box is displayed. Click OK to delete the Oracle VM Servers.
The Oracle VM Servers are deleted from Oracle VM Manager.
3.6.1.4 Start Server
When you start an Oracle VM Server, it is started using the Intelligent Platform Management Interface
(IPMI), or Wake-on-LAN (WOL). If neither IPMI nor WOL have been configured, the job to start the
Oracle VM Server cannot be completed and may need to be aborted. The Oracle VM Server must then
be powered on manually. See Section 3.4.2.2, “Edit Server” for information on configuring IPMI. See
Section 8.1.5, “Abort Jobs” for information on aborting a hanging job.
To start Oracle VM Servers:
1. Click the Servers and VMs tab.
2. Select the server pool in which the Oracle VM Server resides in the navigation tree.
3. Select Servers from the Perspective drop-down list. Select one or more Oracle VM Servers in the
management pane, and click Start Server in the perspective toolbar.
The Oracle VM Servers are started.
3.6.1.5 Stop Server
When you stop an Oracle VM Server, it is stopped using the Intelligent Platform Management Interface
(IPMI), or a system power off command. Before you can stop an Oracle VM Server, you must stop any
running virtual machines, or place the Oracle VM Server into maintenance mode to automatically migrate
the running virtual machines.
Warning
Make sure that the IPMI is properly configured on the Oracle VM Server, otherwise
it cannot be started again remotely. See Section 3.4.2.2, “Edit Server” for IPMI
configuration. Alternatively, make sure that you activate the Wake-on-LAN (WOL)
feature in the Oracle VM Server BIOS and that you have tested that it is properly
152
Servers Perspective
working. If an Oracle VM Server cannot start through IPMI or WOL, it must be
power-cycled manually.
To stop Oracle VM Servers:
1. Stop or migrate any running virtual machines. To stop the virtual machines see Section 3.5.2.4, “Stop
Virtual Machines”. To automatically migrate the virtual machines to other Oracle VM Servers in the
server pool, place the Oracle VM Servers into maintenance mode , see Section 3.4.2.2, “Edit Server” .
2. Click the Servers and VMs tab.
3. Select the server pool in which the Oracle VM Server resides in the navigation tree.
4. Select Servers from the Perspective drop-down list. Select one or more Oracle VM Servers in the
management pane, and click Stop Server in the perspective toolbar.
The Oracle VM Servers are powered off.
3.6.1.6 Restart Server
When you restart an Oracle VM Server, an operating system restart command is sent and the Oracle
VM Server is restarted. Before you can restart an Oracle VM Server, you must stop any running virtual
machines, or place the Oracle VM Server into maintenance mode to automatically migrate the running
virtual machines.
When the Oracle VM Server is restarted and rejoins the server pool, the master Oracle VM Server initiates
any pending HA operations in the server pool. When Oracle VM Manager is notified that the Oracle VM
Server is online and available, any pending state changes are reconciled before any policy actions are
resumed.
There is more information on the implications of restarting servers covered in Rebooting and Changing
Power State of Oracle VM Servers in the Oracle VM Concepts Guide.
To restart Oracle VM Servers:
1. Stop or migrate any running virtual machines. To stop the virtual machines see Section 3.5.2.4, “Stop
Virtual Machines”. To automatically migrate the virtual machines to other Oracle VM Servers in the
server pool, place the Oracle VM Servers into maintenance mode , see Section 3.4.2.2, “Edit Server” .
2. Click the Servers and VMs tab.
3. Select the server pool in which the Oracle VM Server resides in the navigation tree.
4. Select Servers from the Perspective drop-down list. Select one or more Oracle VM Servers in the
management pane, and click Restart in the perspective toolbar.
The Oracle VM Servers are restarted.
3.6.1.7 Kill Server
To kill an Oracle VM Server is equivalent to performing a power off of an Oracle VM Server, similar to
unplugging the power cable from the physical machine. This is not the recommended method of shutting
down an Oracle VM Server, but may be used if the shut down command fails to shut down the Oracle VM
Server.
To kill Oracle VM Servers:
1. Click the Servers and VMs tab.
153
Servers Perspective
2. Select the server pool in which the Oracle VM Server resides in the navigation tree.
3. Select Servers from the Perspective drop-down list. Select one or more Oracle VM Servers in the
management pane, and click Kill in the perspective toolbar. Click OK in the Confirmation dialog.
The Oracle VM Servers are powered off.
3.6.1.8 Rediscover Server
If there are either changes to the physical state of an Oracle VM Server or its attached storage, you should
discover it again to update the configuration information in Oracle VM Manager.
To rediscover Oracle VM Servers:
1. Click the Servers and VMs tab.
2. Select the server pool in which the Oracle VM Servers reside in the navigation tree.
3. Select Servers from the Perspective drop-down list. Select one or more Oracle VM Servers in the
management pane, and click Rediscover Server in the perspective toolbar.
The configuration and storage information about the Oracle VM Servers is updated in Oracle VM Manager.
3.6.1.9 Rescan Physical Disks
You can view and manage the physical disks on an Oracle VM Server, as well as those available to it from
a SAN server. You can also refresh the physical disks on an Oracle VM Server when SAN server disks
have been added or removed.
To refresh the physical disks on Oracle VM Servers:
1. Click the Servers and VMs tab, and select the server pool in which the Oracle VM Servers reside in
the navigation tree. Select Servers in the Perspective drop-down list in the management pane. Select
the Oracle VM Servers in the management pane table.
Alternatively, on the Servers and VMs tab, expand the Server Pools or Unassigned Servers folder,
to select a particular server in the navigation tree. Select the Physical Disks option in the Perspective
drop-down list.
2. Click Rescan Physical Disks
in the perspective toolbar.
3. A confirmation dialog box is displayed. Click OK.
3.6.1.10 Update Server
Software updates and upgrades to Oracle VM Servers can be performed using the global server update
repository configured in the Server Updates subtab of the Tools and Resources tab. See Section 7.2,
“Server Update Groups” for information on configuring a global server update repository. A repository can
be overridden for a server pool if required. See Section 3.4.6, “Server Update Repositories Perspective” for
information on overriding a global update repository for a server pool.
To see which version of the Oracle VM Server software is installed before and after an upgrade, click
the Servers and VMs tab, select the Oracle VM Server in the navigation tree, and then select Control
Domains in the Perspective drop-down list. See Section 3.5.8, “Control Domains Perspective” for
information on control domains.
When an Oracle VM Server update is available, an event is posted to the Oracle VM Server and Yes is
displayed in the Update Required column in the Servers perspective in the management pane.
154
Servers Perspective
To update an Oracle VM Server, the virtual machines on the Oracle VM Server must first be stopped or
migrated to another Oracle VM Server. You can manually stop or migrate the virtual machines, or, if you
prefer, have the upgrade server job perform the virtual machine migrate automatically.
To update Oracle VM Servers:
1. Click the Servers and VMs tab, and select the server pool in which the Oracle VM Servers reside in
the navigation tree.
2. Select Servers in the Perspective drop-down list in the management pane.
3. Select the Oracle VM Servers in the management pane table and click Update Server
perspective toolbar.
from the
A confirmation dialog is displayed. Click OK. Each Oracle VM Server is placed into maintenance mode,
and the update performed. Any virtual machines on the Oracle VM Servers are automatically migrated
to another Oracle VM Server when it is put into maintenance mode. If the Oracle VM Server is a master
Oracle VM Server, the master role is transferred to another Oracle VM Server in the server pool. When
the update is complete the Oracle VM Server is restarted and remains in maintenance mode.
4. To have the Oracle VM Servers rejoin the server pool as a fully functioning member, edit each the
Oracle VM Server and take it out of maintenance mode.
For information on manually migrating virtual machines, see Section 3.5.2.11, “Migrate Virtual Machines”.
For information on taking an Oracle VM Server out of maintenance mode, see Section 3.4.2.2, “Edit
Server”.
3.6.1.11 Send VM Messages
You can select one or more virtual machines, Oracle VM Servers or server pools, to select which running
virtual machines are populated in the dialog box used to send messages to virtual machines.
To send a virtual machine a message you must have first installed the Oracle VM Guest Additions in
the virtual machine. For information on installing the Oracle VM Guest Additions, and a more detailed
description of the virtual machine messaging mechanism and its uses, see the Oracle VM Administrator's
Guide.
To send messages to virtual machines:
1. Click the Servers and VMs tab.
2. Determine the grouping of virtual machines that you wish to send a message to:
i.
If you wish to send a message to virtual machines distributed across one or more server pools, click
on the Server Pools folder in the navigation pane. Select Server Pools from the Perspective dropdown list. Select one or more server pools in the management pane.
ii. If you wish to send a message to virtual machines distributed across one or more servers in a
particular server pool, expand the Server Pools folder in the navigation pane and select the server
pool where the servers reside. Select Servers from the Perspective drop-down list. Select one or
more servers in the management pane.
155
Servers Perspective
iii. If you wish to send a message to one or more virtual machines on a particular server, expand the
Server Pools folder in the navigation pane and select the server pool where the servers reside.
Select Virtual Machines from the Perspective drop-down list. Select one or more virtual machines
in the management pane.
3. Click Send VM Messages...
in the perspective toolbar.
The Send Messages to Virtual Machines dialog box is displayed.
4. To create a message, click Create Message...
Message dialog box.
in the perspective toolbar to display the Create VM
Enter the message key value pair in the Key and Message fields. Check the Log Message field to
retain a log of the message. Check the Hide Message field to hide the message of the key/value pair
156
Events Perspective
in the user interface. Click OK to save the message and return to the Send Messages to Virtual
Machines dialog box.
5. To edit a message, select the message and click Edit... in the dialog box toolbar. To delete a
message, select it and click Delete in the dialog box toolbar.
6. Select the Virtual Machines tab to select which running virtual machines are to receive the messages.
Click OK to send the messages to the virtual machines.
3.6.2 Events Perspective
The Events perspective is common to many elements within the Oracle VM Manager Web Interface.
The Events perspective generally appears as an option within the Perspectives drop-down menu on the
management pane of tabs that include a navigation tree. In this case, the Events perspective displays
events specific to the item selected in the navigation tree and presents these in the management pane.
The Events perspective may also appear within a dialog that is triggered from a Display Selected
Events... perspective toolbar option. In this case, the Events perspective dialog displays events specific
to one or more elements selected in the management pane.
If an object has an error event associated with it you must acknowledge the event to clear the error and
return the object to normal operations. For example, this can occur if an Oracle VM Server or virtual
machine appear as Stopped (Error) in the status. The object in error is flagged with a red icon in the
navigation tree. Oracle VM Servers, virtual machines, repositories and storage objects can have error
events associated with them.
Since Oracle VM Manager attempts to resolve issues automatically as much as possible, not all events
can be acknowledged by a user within the Oracle VM Manager Web Interface. Therefore, a flag is set
for events that are user acknowledgeable. If an event does not have this flag set, you are unable to
acknowledge it, since it is handled internally by Oracle VM Manager.
The Events perspective or dialog contains a table with the following columns of information per event:
157
Events Perspective
• Severity: The severity level assigned to the event.
• Timestamp: The date and time that the event occurred.
• Modify Time: The last recorded date and time that the event was modified.
• Type: The type of event according to Oracle VM Manager's event categorization model.
• Summary: A summary description of the event.
• Acknowledged: Whether an error event has been acknowledged.
• User Acknowledgeable: Whether or not an event can be acknowledged by the user.
Alongside each event entry in the table, there is an arrow that allows you to expand the view for each
entry. This displays the full Description for the event.
The Events perspective or dialog contains a perspective toolbar with the following options:
Table 3.22 Events Perspective Toolbar Icon Options
Toolbar Icon Option
Icon
Description
Acknowledge
Acknowledge a selected error event to clear the error and
return the object to normal operations. Note that this option is
only available for user acknowledgeable events.
Acknowledge All
Acknowledge all error events associated with an object to clear
the errors and return the object to normal operations. Note that
only user acknowledgeable events are cleared. This button is
always clickable, even if there are no user acknowledgeable
events. Clicking it when there are no user acknowledgeable
events results in an error dialog.
Display Count
A drop-down menu that allows you to select the number of
events that should be displayed in the management pane,
while you are currently in this perspective.
Acknowledging Events/Errors
If an object has an error event associated with it you must acknowledge the event to clear the error and
return the object to normal operations. For example, this can occur if an Oracle VM Server or virtual
machine appear as Stopped (Error) in the status. The object in error is flagged with a red icon in the
navigation tree. Oracle VM Servers, virtual machines, repositories and storage objects can have error
events associated with them. The following procedures show you how to clear errors and return the object
to normal operations.
To acknowledge Oracle VM Server error events:
1. Click the Servers and VMs tab.
2. Select the Oracle VM Server in the navigation tree.
3. Select Events from the Perspective drop-down list in the management pane.
4. Select the user acknowledgeable error event and click Acknowledge
to clear all user acknowledgeable errors.
To acknowledge virtual machine error events:
1. Click the Servers and VMs tab.
158
, or click Acknowledge All
Unassigned Virtual Machines Folder
2. Select the server pool, or Oracle VM Server on which the virtual machine resides in the navigation tree.
3. Select Virtual Machines from the Perspective drop-down list in the management pane.
4. Select the virtual machine in the management pane table. Click Display Selected VM Events...
.
5. The Events dialog box is displayed. Select the user acknowledgeable error event and click
Acknowledge , or click Acknowledge All to clear all user acknowledgeable errors. Click Close.
To acknowledge storage repository error events:
1. Click the Repositories tab.
2. Select the repository in the navigation tree.
3. Select Events from the Perspective drop-down list in the management pane.
4. Select the error event and click Acknowledge
, or click Acknowledge All
to clear all errors.
To acknowledge storage error events:
1. Click the Storage tab.
2. Select File Servers, SAN Servers, or a storage server in the navigation tree.
3. Select Events from the Perspective drop-down list in the management pane.
4. Select the user acknowledgeable error event and click Acknowledge
to clear all user acknowledgeable errors.
, or click Acknowledge All
3.7 Unassigned Virtual Machines Folder
The Unassigned Virtual Machines navigation folder in the navigation tree contains all of the virtual
machines that do not belong to a configured server pool within Oracle VM Manager. The structure of the
navigation provided in the navigation tree is discussed in more detail in Section 3.2, “Summary”.
Clicking on the Unassigned Virtual Machines folder in the navigation tree allows you to access different
perspectives in the management pane. Each perspective provides its own view of all of the unassigned
virtual machines within Oracle VM Manager. Most of the perspectives also include separate perspective
toolbars that enable you to perform various configuration or management tasks specific to the view
currently displayed within the management pane. The Unassigned Virtual Machines folder offers the
following perspectives within the management pane:
• Virtual Machines Perspective
• Events Perspective
3.7.1 Virtual Machines Perspective
The Virtual Machines perspective lists the different virtual machines that belong to either a server pool, a
server or the Unassigned Virtual Machines folder, depending on the item selected in the navigation pane.
The following columns are displayed in the management pane:
• Name: The name that has been configured for the virtual machine.
• Status: The running status of the virtual machine.
• Tag(s): Any tags that have been applied to the virtual machine.
159
Virtual Machines Perspective
• Event Severity: What event severity level is currently indicated for the virtual machine.
• Server: The actual Oracle VM Server that the virtual machine is currently residing on.
• Max. Memory (MB): The maximum available memory (in megabytes) that the virtual machine is able to
consume.
• Memory (MB): The amount of memory (in megabytes) that the virtual machine is currently consuming.
• Max. Processors: The number of processors that the virtual machine is allowed to make use of.
• Processors: The number of processors that the virtual machine is currently using.
• Keymap: The character keymap that has been configured for the virtual machine.
• Operating System: The operating system that the virtual machine is running.
Clicking on the arrow to the left of a virtual machine in the table displays a set of subtabs that show more
detailed information about the virtual machine. These tabs are Configuration, Networks, and Disks. Click
on a tab to display the information.
If this perspective is viewed from the Unassigned Virtual Machines folder, some of the toolbar icons that
are usually available for this perspective are not included in the toolbar. The table below lists all of the
toolbar icons that are available for this perspective and indicates the items that are not available when the
perspective is viewed from the Unassigned Virtual Machines folder.
Table 3.23 Virtual Machines Perspective Toolbar Icon Options
Toolbar Icon Option
Import Virtual Machine...
Icon
Description
Displays the Import Virtual Machine dialog box. Use this
option to import a virtual machine into Oracle VM Manager.
This option is only available for Unassigned Virtual Machines.
Edit...
Displays the Edit Virtual Machine wizard. Use this option to
edit a virtual machine.
Delete
Displays the Delete Confirmation dialog box. Use this option
to delete the selected virtual machines.
Start
Starts up a stopped virtual machine.
Not available for Unassigned Virtual Machines.
Stop
Shuts down a virtual machine.
Not available for Unassigned Virtual Machines.
Launch Console
Launches the virtual machine VNC console in an x86-based
server pool, which enables access to the virtual machine.
Use this option to connect to a virtual machine's console and
access the virtual machine directly.
Not available for virtual machines in the Unassigned Virtual
Machines folder, or virtual machines in a server pool, but not
assigned to an Oracle VM Server.
Launch Serial Console
Launches the virtual machine serial console, which enables
access to the virtual machine. Use this option to connect to a
virtual machine's serial console and access the virtual machine
directly.
160
Virtual Machines Perspective
Toolbar Icon Option
Icon
Description
This service is commonly used for virtual machines running in
a SPARC-based server pool, but is also available for virtual
machines running on x86-based server pools.
Not available for Unassigned Virtual Machines.
Restart
Restarts a running virtual machine.
Not available for Unassigned Virtual Machines.
Kill
Shuts down a running virtual machine.
Not available for Unassigned Virtual Machines.
Suspend
Suspends (pauses) a running virtual machine.
Not available for Unassigned Virtual Machines.
Resume
Resumes (unpauses) a suspended virtual machine.
Not available for Unassigned Virtual Machines.
Migrate Virtual Machine...
Migrates a virtual machine to another Oracle VM Server.
Clone or Move Virtual
Machine...
Displays the Clone or Move Virtual Machine dialog box. Use
this option to clone a virtual machine to create another virtual
machine.
Manage Clone Customizers...
Displays the Manage Clone Customizer dialog box. The
clone customizer lets you set up clone parameters, such as
networking, disks and ISO resources. Use this option to create,
edit or delete a clone customizer.
Display VM Config File
Content...
Displays the VM Config File Content dialog box. Displays a
read-only view of the configuration file for the selected virtual
machine. Use this option to view the content of the virtual
machine configuration file.
Send VM Messages...
Send one or more virtual machines a message. Use this option
to send messages to virtual machines that have the Oracle VM
Guest Additions installed.
Not available for Unassigned Virtual Machines.
Display Selected VM Events...
Displays the Events dialog box. Displays events for
the selected virtual machine. Use this option to view or
acknowledge error events for the virtual machine.
3.7.1.1 Import Virtual Machine
You can import a virtual machine into Oracle VM Manager and have it deployed to a server pool, or placed
in the Unassigned Virtual Machines folder if you do not want to deploy it. The virtual machine must be
located on an FTP or web server, either as separate files, or compressed into a single archive file (for
example, a .tgz or .zip file). As an archive of a virtual machine is also known as a virtual machine template,
you can also use this process to import older style Oracle VM virtual machine templates. This process
does not work for the newer OVF/OVA style templates.
When you import a virtual machine into a server pool, you have the option of saving it to any storage
repository that is presented to at least one Oracle VM Server in the server pool. When you import a virtual
machine to the Unassigned Virtual Machines folder, you can save it into any storage repository.
161
Virtual Machines Perspective
To import a virtual machine:
1. Place the files that make up a virtual machine, or an archive of those files, in a location accessible by
Oracle VM Manager using any of these protocols: HTTP, HTTPS or FTP.
2. Click the Servers and VMs tab.
3. If you want to import and deploy the virtual machine to a server pool, select Server Pools in the
navigation tree, then select the server pool in the management pane table.
If you do not want to deploy the virtual machine, select the Unassigned Virtual Machines folder.
4. Select Import Virtual Machine...
in the toolbar in the management pane.
5. The Import Virtual Machine dialog box is displayed. Select or edit the following:
• Destination Repository: The storage repository in which to save the virtual machine.
• VM URLs: The URLs for the virtual machine. The URL schemes supported are HTTP, HTTPS, and
FTP. For example:
http://example.com/mytemplate.tgz
To import a virtual machine using FTP, use the standard FTP syntax, for example:
ftp://user:password@server/path/filename.tgz
Each virtual machine component should be listed on a new line. Each URL must be a reference
to a complete file. If your virtual machine files are split into multiple compressed files, concatenate
those files and enter the URL for the concatenated file, for example to concatenate a number of
compressed files to one compressed file, enter:
$ cat vm.tgz.1of3 vm.tgz.2of3 vm.tgz.3of3 > vm.tgz
Then enter the URL to the single compressed virtual machine file, in this case, vm.tgz.
To import a virtual machine that is not compressed as a single file, each component must be a
complete file (if not, concatenate them to one file), for example to enter a virtual disk image and a
virtual machine configuration file that together make up a complete virtual machine, you could enter:
http://myexample.com/System-sda.img
http://myexample.com/vm.cfg
• Proxy: The IP address or hostname of an optional proxy server to use when importing the virtual
machine.
Click OK to import the virtual machine. The virtual machine is deployed to the server pool in the
stopped state. Alternatively, the virtual machine is imported to the Unassigned Virtual Machines
folder.
See Section 3.5.2.3, “Start Virtual Machines” for information on starting a virtual machine, and
Section 3.5.2.1, “Edit Virtual Machine” for information on editing a virtual machine.
3.7.1.2 Edit Virtual Machine
Changes to virtual machine configuration do not have an immediate effect on a running virtual machine.
The virtual machine must be stopped and then started for the hypervisor to reload the virtual machine
configuration. A restart does not force the hypervisor to reload the configuration.
162
Virtual Machines Perspective
To edit a virtual machine:
1. Click the Servers and VMs tab.
2. Select the server pool on which the virtual machine resides in the navigation tree.
3. Select Virtual Machines from the Perspective drop-down list. Select the virtual machine in the
management pane, and click Edit... in the management pane toolbar
4. The Edit Virtual Machine dialog box is displayed. Select each tab to edit the virtual machine
configuration. See Section 3.1.3, “Create Virtual Machine” for the details of each tab. Click OK to save
the changes.
Note
It is not possible to dynamically change resources such as the number or
processors or allocated memory for an Oracle Solaris virtual machine without
first enabling the drd service on the virtual machine itself. To allow for these
changes, connect to the virtual machine and make sure that the drd service is
enabled:
# svcadm enable -s drd
# svcs drd
These commands should notify you that the service is online. When you
have performed these actions, you are able to use Oracle VM Manager to
dynamically change the allocation of resources.
3.7.1.3 Delete Virtual Machines
When you delete a virtual machine, all the files and data associated with this virtual machine are removed
from Oracle VM Manager. Before deleting a virtual machine, make sure you do not need it any longer. You
can only delete a virtual machine when the virtual machine status is Stopped or Error.
To delete virtual machines:
1. Click the Servers and VMs tab.
2. Select the server pool on which the virtual machines reside in the navigation tree.
3. Select Virtual Machines from the Perspective drop-down list. Select one or more virtual machines in
the management pane, and click Delete in the management pane toolbar.
4. The Delete Confirmation dialog box is displayed. Select any virtual disks associated with the virtual
machines that you want to delete. Click OK to delete the virtual machines and the selected virtual disks.
3.7.1.4 Delete Virtual Machines
When you delete a virtual machine, all the files and data associated with this virtual machine are removed
from Oracle VM Manager. Before deleting a virtual machine, make sure you do not need it any longer. You
can only delete a virtual machine when the virtual machine status is Stopped or Error.
To delete virtual machines:
1. Click the Servers and VMs tab.
2. Select the server pool on which the virtual machines reside in the navigation tree.
163
Virtual Machines Perspective
3. Select Virtual Machines from the Perspective drop-down list. Select one or more virtual machines in
the management pane, and click Delete in the management pane toolbar.
4. The Delete Confirmation dialog box is displayed. Select any virtual disks associated with the virtual
machines that you want to delete. Click OK to delete the virtual machines and the selected virtual disks.
3.7.1.5 Clone or Move a Virtual Machine
Cloning a virtual machine means making a copy of it, so that you can create multiple virtual machines or
templates from the original. Moving a virtual machine means moving the virtual machine configuration file
to another storage repository.
Note
The virtual machine cloning procedure below uses the same dialog box to clone a
virtual machine and a template.
Clone a Virtual Machine or Template
A clone can also be performed using two other file copy methods: sparse copy, and non-sparse copy.
These two cloning methods can be used when cloning from and to different repositories, and when the
storage used for the storage repository uses a generic Oracle VM Storage Connect plug-in. These cloning
methods are slower than thin cloning, but more versatile.
To create a clone of a virtual machine or template:
1. Select the virtual machine or template to clone and display the Clone or Move dialog box. You display
this dialog box from different locations, depending on whether you are cloning a virtual machine or a
template.
• Virtual Machine: Click the Servers and VMs tab. Select the server pool on which the virtual
machine resides in the navigation tree. Select Virtual Machines from the Perspective drop-down
list. Select the virtual machine to clone in the management pane, and click Clone or Move .
• Virtual Machine Template: Click the Repositories tab. In the navigation tree, select the repository
in which the template resides, then VM Templates. Select the template in the management pane and
click Clone or Move Template... .
2. The Clone or Move dialog box is displayed.
164
Virtual Machines Perspective
Select the Create a clone of this (VM or Template) option. Click Next.
3. The Clone or Move (Virtual Machine or Template) dialog box is displayed.
Select or enter the following:
• Clone to a: Select the clone type, either Virtual Machine or Template, to specify the objects to
create from the clone.
165
Virtual Machines Perspective
• Clone Count: The number of clones to create.
• Name Index: The start index number to use for the clone name suffix. The default is 0. This is used
in conjunction with the Clone Name field to create the name for each clone.
• Clone Name: An optional name for the virtual machines or templates. The maximum name length is
256 characters and may contain any character. The name need not be unique. If no value is given,
the default is the name of the virtual machine or template being cloned. Each clone is suffixed with a
dot (.) and the clone index number, starting with the value for the Name Index field. For example, if
the Clone Name field is set to MyVM, and the Name Index field is set to 1, the resulting clones would
be named MyVM.1, MyVM.2 and so on.
• Target Server Pool: The server pool on which the clone is to be deployed.
Note
The list of server pools that are available in the drop-down is limited to valid
server pools that are capable of handling the cloning process correctly. This
helps you to prevent cloning to a server pool that may fail to process the
request. If this list is empty, you should refer to the table presented under the
Why don't I see other server pools to clone to? element in this dialog.
• Description: A description for the virtual machines or templates.
• Advanced Clone: Whether to use a clone customizer to set preferences for the clone operation.
• Clone Customizer: The clone customizer to use to create the clones. This is used to set virtual
disk mappings to enable you to copy disks to other storage locations. It also allows you to create
network mappings so you can use new VNICs and other networks for the clone. Click Create... to
create a new clone customizer. See Section 3.5.2.13, “Manage Clone Customizers” for information
on creating a clone customizer. This field is enabled if Advanced Clone is checked.
• Target Repository: The repository to store the cloned virtual machine configuration file. This does
not affect any clone disk mappings you set using a clone customizer; this option is only for the virtual
machine configuration file. This field is enabled if Advanced Clone is checked.
• Why don't I see other server pools to clone to? A collapsed window element, providing a table
of server pools that do not meet the requirements to accept a clone request. Expanding any of the
entries in this table displays the reason that the server pool does not qualify.
Tip
If you clone a virtual machine or template without using a clone customizer, the
storage repository is locked for the duration of the cloning job; this may be some
time in some circumstances. To quickly create clones and not lock the storage
repository, use a clone customizer.
Click OK.
The virtual machines are created and deployed to the server pool. The templates are created in the
storage repository.
It is important to understand that older templates may use a different device type to attach virtual disks.
This may affect your ability to attach new virtual disks, such as a virtual CDROM device. There are some
limitations on mixing virtual disks of differing device types on a virtual machine. See How are Virtual Disks
166
Virtual Machines Perspective
Managed? in the Oracle VM Concepts Guide for more information about how device types are allocated to
virtual disks and what you may need to do to solve any issues surrounding this problem.
Move a Virtual Machine
To move a virtual machine between repositories:
1. Click the Servers and VMs tab.
2. Select the server pool on which the virtual machine resides in the navigation tree.
3. Select Virtual Machines from the Perspective drop-down list. Select the virtual machine in the
management pane, and click Clone or Move .
4. The Clone or Move dialog box is displayed. Select Move this VM.
Select a clone customizer from the Clone Customizer drop-down list. If no clone customizers
are displayed or you want to create a new one, click Create. See Create a Clone Customizer for
information on creating a clone customizer.
Select a repository from the Target Repository drop-down list. This is the location of the new virtual
machine configuration file.
Click Finish to move the virtual machine.
3.7.1.6 Manage Clone Customizers
Cloning a virtual machine or template means making a copy of it, so that you can create multiple
virtual machines or templates from the original. You can create a clone customizer to set up the clone
parameters, such as networking, and the virtual disk, and ISO resources. A clone customizer is also used
when moving a virtual machine or template.
Create a Clone Customizer
To create a clone customizer:
1. Select the virtual machine or template and display the Manage Clone Customizers for (Virtual
Machine or Template) dialog box by:
• Virtual Machine: Click the Servers and VMs tab. Select the server pool on which the virtual
machine resides in the navigation tree. Select Virtual Machines from the Perspective dropdown list. Select the virtual machine to clone in the management pane, and click Manage Clone
Customizers... .
• Virtual Machine Template: Click the Repositories tab. In the navigation tree, select the repository
in which the template resides, then VM Templates. Select the template in the management pane and
click Manage Clone Customizers .
167
Virtual Machines Perspective
2. Select Create Clone Customizer...
.
3. The Create a Clone Customizer wizard is displayed.
In the Name and Description step of the wizard, enter a Name and Description for the clone
customizer, and click Next.
4. The Storage Mappings step of the wizard is displayed.
168
Virtual Machines Perspective
Select the following storage mappings:
• Disk: The disks to include in the clone.
• Clone Target Type: The type of storage location where the disk is to be created, either a
Repository or a Physical Disk.
• Clone Target: The location on the storage type where the disk is to be created.
• Clone Type: Whether to use a sparse or non-sparse files for the disk.
Click Next.
5. The Network Mappings step of the wizard is displayed.
Select the Virtual NICss to include in the clone customizer, and the Ethernet Network to which they
should belong.
169
Virtual Machines Perspective
Note
The network configuration is not changed when moving a virtual machine or
template. It is only used when cloning a virtual machine or template.
Click Finish.
The clone customizer is now available to use to create a virtual machine, or template. See Clone a Virtual
Machine or Template for information on using the clone customizer to create a virtual machine or template.
Edit a Clone Customizer
To edit a clone customizer:
1. Select the object to which the clone customizer belongs, either a virtual machine, or a virtual machine
template. Click Manage Clone Customizers... .
2. The Manage Clone Customizers for (VM or Template) dialog box is displayed. Select the clone
customizer to edit and click Edit Clone Customizer... .
3. The Edit Clone Customizer dialog box is displayed. Edit the clone customizer.
Click OK. The changes to the clone customizer are saved.
Delete a Clone Customizer
To delete a clone customizer:
1. Select the object to which the clone customizer belongs, either a virtual machine, or a virtual machine
template. Click Manage Clone Customizers... .
2. The Manage Clone Customizers for (VM or Template) dialog box is displayed. Select the clone
customizer to delete and click Delete Clone Customizer .
3. A dialog box is displayed to confirm you want to delete the clone customizer. Confirm you want to
delete the clone customizer and click OK. The clone customizer is deleted.
3.7.1.7 View Virtual Machine Configuration File
You can view the content of a virtual machine configuration file. The content is not editable but you can
view and copy the text according to your needs.
To view a virtual machine configuration file:
1. Click the Servers and VMs tab.
2. Select the server pool on which the virtual machines reside in the navigation tree.
3. Select Virtual Machines from the Perspective drop-down list. Select the virtual machine to which the
configuration file belongs. Click VM Config File Content... .
4. The VM Config File Content dialog box is displayed with the content of the virtual machine
configuration file. You can view and copy the text according to your needs.
5. Click OK to close the dialog.
3.7.1.8 View Virtual Machine Events
170
Virtual Machines Perspective
The Events perspective is common to many elements within the Oracle VM Manager Web Interface.
The Events perspective generally appears as an option within the Perspectives drop-down menu on the
management pane of tabs that include a navigation tree. In this case, the Events perspective displays
events specific to the item selected in the navigation tree and presents these in the management pane.
The Events perspective may also appear within a dialog that is triggered from a Display Selected
Events... perspective toolbar option. In this case, the Events perspective dialog displays events specific
to one or more elements selected in the management pane.
If an object has an error event associated with it you must acknowledge the event to clear the error and
return the object to normal operations. For example, this can occur if an Oracle VM Server or virtual
machine appear as Stopped (Error) in the status. The object in error is flagged with a red icon in the
navigation tree. Oracle VM Servers, virtual machines, repositories and storage objects can have error
events associated with them.
Since Oracle VM Manager attempts to resolve issues automatically as much as possible, not all events
can be acknowledged by a user within the Oracle VM Manager Web Interface. Therefore, a flag is set
for events that are user acknowledgeable. If an event does not have this flag set, you are unable to
acknowledge it, since it is handled internally by Oracle VM Manager.
The Events perspective or dialog contains a table with the following columns of information per event:
• Severity: The severity level assigned to the event.
• Timestamp: The date and time that the event occurred.
• Modify Time: The last recorded date and time that the event was modified.
• Type: The type of event according to Oracle VM Manager's event categorization model.
• Summary: A summary description of the event.
• Acknowledged: Whether an error event has been acknowledged.
• User Acknowledgeable: Whether or not an event can be acknowledged by the user.
Alongside each event entry in the table, there is an arrow that allows you to expand the view for each
entry. This displays the full Description for the event.
The Events perspective or dialog contains a perspective toolbar with the following options:
Table 3.24 Events Perspective Toolbar Icon Options
Toolbar Icon Option
Icon
Description
Acknowledge
Acknowledge a selected error event to clear the error and
return the object to normal operations. Note that this option is
only available for user acknowledgeable events.
Acknowledge All
Acknowledge all error events associated with an object to clear
the errors and return the object to normal operations. Note that
only user acknowledgeable events are cleared. This button is
always clickable, even if there are no user acknowledgeable
events. Clicking it when there are no user acknowledgeable
events results in an error dialog.
Display Count
A drop-down menu that allows you to select the number of
events that should be displayed in the management pane,
while you are currently in this perspective.
171
Events Perspective
Acknowledging Events/Errors
If an object has an error event associated with it you must acknowledge the event to clear the error and
return the object to normal operations. For example, this can occur if an Oracle VM Server or virtual
machine appear as Stopped (Error) in the status. The object in error is flagged with a red icon in the
navigation tree. Oracle VM Servers, virtual machines, repositories and storage objects can have error
events associated with them. The following procedures show you how to clear errors and return the object
to normal operations.
To acknowledge Oracle VM Server error events:
1. Click the Servers and VMs tab.
2. Select the Oracle VM Server in the navigation tree.
3. Select Events from the Perspective drop-down list in the management pane.
4. Select the user acknowledgeable error event and click Acknowledge
to clear all user acknowledgeable errors.
, or click Acknowledge All
To acknowledge virtual machine error events:
1. Click the Servers and VMs tab.
2. Select the server pool, or Oracle VM Server on which the virtual machine resides in the navigation tree.
3. Select Virtual Machines from the Perspective drop-down list in the management pane.
4. Select the virtual machine in the management pane table. Click Display Selected VM Events...
.
5. The Events dialog box is displayed. Select the user acknowledgeable error event and click
Acknowledge , or click Acknowledge All to clear all user acknowledgeable errors. Click Close.
To acknowledge storage repository error events:
1. Click the Repositories tab.
2. Select the repository in the navigation tree.
3. Select Events from the Perspective drop-down list in the management pane.
4. Select the error event and click Acknowledge
, or click Acknowledge All
to clear all errors.
To acknowledge storage error events:
1. Click the Storage tab.
2. Select File Servers, SAN Servers, or a storage server in the navigation tree.
3. Select Events from the Perspective drop-down list in the management pane.
4. Select the user acknowledgeable error event and click Acknowledge
to clear all user acknowledgeable errors.
, or click Acknowledge All
3.7.2 Events Perspective
The Events perspective is common to many elements within the Oracle VM Manager Web Interface.
The Events perspective generally appears as an option within the Perspectives drop-down menu on the
172
Events Perspective
management pane of tabs that include a navigation tree. In this case, the Events perspective displays
events specific to the item selected in the navigation tree and presents these in the management pane.
The Events perspective may also appear within a dialog that is triggered from a Display Selected
Events... perspective toolbar option. In this case, the Events perspective dialog displays events specific
to one or more elements selected in the management pane.
If an object has an error event associated with it you must acknowledge the event to clear the error and
return the object to normal operations. For example, this can occur if an Oracle VM Server or virtual
machine appear as Stopped (Error) in the status. The object in error is flagged with a red icon in the
navigation tree. Oracle VM Servers, virtual machines, repositories and storage objects can have error
events associated with them.
Since Oracle VM Manager attempts to resolve issues automatically as much as possible, not all events
can be acknowledged by a user within the Oracle VM Manager Web Interface. Therefore, a flag is set
for events that are user acknowledgeable. If an event does not have this flag set, you are unable to
acknowledge it, since it is handled internally by Oracle VM Manager.
The Events perspective or dialog contains a table with the following columns of information per event:
• Severity: The severity level assigned to the event.
• Timestamp: The date and time that the event occurred.
• Modify Time: The last recorded date and time that the event was modified.
• Type: The type of event according to Oracle VM Manager's event categorization model.
• Summary: A summary description of the event.
• Acknowledged: Whether an error event has been acknowledged.
• User Acknowledgeable: Whether or not an event can be acknowledged by the user.
Alongside each event entry in the table, there is an arrow that allows you to expand the view for each
entry. This displays the full Description for the event.
The Events perspective or dialog contains a perspective toolbar with the following options:
Table 3.25 Events Perspective Toolbar Icon Options
Toolbar Icon Option
Icon
Description
Acknowledge
Acknowledge a selected error event to clear the error and
return the object to normal operations. Note that this option is
only available for user acknowledgeable events.
Acknowledge All
Acknowledge all error events associated with an object to clear
the errors and return the object to normal operations. Note that
only user acknowledgeable events are cleared. This button is
always clickable, even if there are no user acknowledgeable
events. Clicking it when there are no user acknowledgeable
events results in an error dialog.
Display Count
A drop-down menu that allows you to select the number of
events that should be displayed in the management pane,
while you are currently in this perspective.
Acknowledging Events/Errors
173
Events Perspective
If an object has an error event associated with it you must acknowledge the event to clear the error and
return the object to normal operations. For example, this can occur if an Oracle VM Server or virtual
machine appear as Stopped (Error) in the status. The object in error is flagged with a red icon in the
navigation tree. Oracle VM Servers, virtual machines, repositories and storage objects can have error
events associated with them. The following procedures show you how to clear errors and return the object
to normal operations.
To acknowledge Oracle VM Server error events:
1. Click the Servers and VMs tab.
2. Select the Oracle VM Server in the navigation tree.
3. Select Events from the Perspective drop-down list in the management pane.
4. Select the user acknowledgeable error event and click Acknowledge
to clear all user acknowledgeable errors.
, or click Acknowledge All
To acknowledge virtual machine error events:
1. Click the Servers and VMs tab.
2. Select the server pool, or Oracle VM Server on which the virtual machine resides in the navigation tree.
3. Select Virtual Machines from the Perspective drop-down list in the management pane.
4. Select the virtual machine in the management pane table. Click Display Selected VM Events...
.
5. The Events dialog box is displayed. Select the user acknowledgeable error event and click
Acknowledge , or click Acknowledge All to clear all user acknowledgeable errors. Click Close.
To acknowledge storage repository error events:
1. Click the Repositories tab.
2. Select the repository in the navigation tree.
3. Select Events from the Perspective drop-down list in the management pane.
4. Select the error event and click Acknowledge
, or click Acknowledge All
to clear all errors.
To acknowledge storage error events:
1. Click the Storage tab.
2. Select File Servers, SAN Servers, or a storage server in the navigation tree.
3. Select Events from the Perspective drop-down list in the management pane.
4. Select the user acknowledgeable error event and click Acknowledge
to clear all user acknowledgeable errors.
174
, or click Acknowledge All
Chapter 4 Repositories Tab
Table of Contents
4.1 Toolbar ....................................................................................................................................
4.1.1 Create New Repository ..................................................................................................
4.2 Summary .................................................................................................................................
4.3 Repositories Folder ..................................................................................................................
4.3.1 Repositories Perspective ................................................................................................
4.4 Repository Item ........................................................................................................................
4.4.1 Info Perspective ............................................................................................................
4.4.2 Events Perspective ........................................................................................................
4.5 Assemblies Item .......................................................................................................................
4.5.1 Assemblies Perspective .................................................................................................
4.6 ISOs Item ................................................................................................................................
4.6.1 ISOs Perspective ...........................................................................................................
4.7 VM Files Item ..........................................................................................................................
4.7.1 VM Files Perspective .....................................................................................................
4.8 VM Templates Item ..................................................................................................................
4.8.1 VM Templates Perspective ............................................................................................
4.9 Virtual Disks Item .....................................................................................................................
4.9.1 Virtual Disks Perspective ...............................................................................................
176
176
179
179
179
184
184
185
187
187
189
189
191
191
191
191
204
204
Use the Repositories tab to create and configure storage repositories and their content; assemblies,
virtual machine templates, ISO files (CDROMs), virtual disks and to display virtual machine configuration
files.
Figure 4.1, “Repositories tab” shows the Repositories tab.
Figure 4.1 Repositories tab
The Repositories tab contains the Perspectives set out in Table 4.1, “Repositories Tab Perspective”. The
Perspectives available in any particular view vary depending on the item selected in the navigation tree.
This table provides a quick reference for all of the available perspectives in the Repositories tab. Each
perspective provides a different view of your configuration and also includes its own toolbar.
175
Toolbar
Table 4.1 Repositories Tab Perspective
Management Pane
Perspective
Description
Repositories Perspective Displays information about the storage repositories, and the resources in each
repository. Use this tab to view, create, edit, present/unpresent, refresh and
delete storage repositories.
You can also use this tab to create and manage the contents of storage
repositories; assemblies, ISO files, template files, virtual disks and virtual
machine configuration files. To view the contents of each storage repository,
select it in the navigation tree, and then select Repositories in the
Perspective drop-down list.
See Understanding Repositories in the Oracle VM Concepts Guide for more
information on managing storage repositories.
Info
Displays a high-level view of the selected object. The Info pane contents
change to reflect information about the object selected in the navigation
tree. You can use this pane to view information about repositories in your
environment.
Select Info in the Perspective drop-down list to display the Info pane.
Events
Events are displayed for each object in the navigation tree and displays events
related to that object. Select Events in the Perspective drop-down list to
display the Events pane.
4.1 Toolbar
The navigation pane includes its own toolbar that provides quick access to the most commonly used
configuration tools for the Repositories tab. Clicking on any of the icons provided in the toolbar opens
a dialog or wizard that can guide you through the configuration process for that item. The toolbar icons
included in the Repositories navigation pane are:
•
Create New Repository
The Toolbar also includes a filter that controls which repositories are represented within the navigation tree
and within the perspectives available in the management pane. The filter includes two radio buttons:
• Show My Repositories: Filters the content to only show repositories that are currently under the
ownership of this Oracle VM Manager instance.
• Show All Repositories: Filters the content to show all repositories that have been discovered by this
Oracle VM Manager instance, regardless of whether or not they are owned by the current Oracle VM
Manager instance .
If you release ownership of a repository and it is not displayed on this tab, you should check that the filter is
not set to Show My Repositories if you wish to perform an action on the repository.
4.1.1 Create New Repository
A storage repository should be at least 10 GB in size. In addition to this minimum size requirement, you
should include enough storage space for virtual machines, templates, ISO files and other virtual machine
resources.
176
Create New Repository
To create a storage repository for your server pool:
1. Select the Repositories tab.
2. In the toolbar above the navigation pane, click Create New Repository
.
3. In the Create a Repository dialog box, enter the following information:
• Repository Name: The name you wish to use to identify the repository.
• Repository Location: Either a network file server or a physical disk.
4. If you selected Network File Server as location, click Search
Network File System dialog box:
to select a location in the Select
• Select a Network File Server from the list. The available file systems appear. Note that only a
refreshed file system can be used.
• Select the file system you wish to install the storage repository on. Click OK.
Note
When searching for a file system, there is an option to provide a Name Filter.
You can use this filter to specify search criteria to limit the objects displayed.
See Section 1.13, “Name Filters” for more information.
5. Optionally provide this additional information:
• Share Path: Path to a subdirectory on the selected file system.
• Description: Information you would like to add about this storage repository.
6. If you selected Physical Disk as the Repository Location, click Search
Select Physical Disk dialog box:
to select a location in the
• Select a Storage Array and, if applicable, a Volume Group from the respective lists. The available
disks appear.
• Select the physical disk you wish to install the storage repository on. Click OK.
177
Create New Repository
Note
When searching for a physical disk, there is an option to provide a Name
Filter. You can use this filter to specify search criteria to limit the objects
displayed. See Section 1.13, “Name Filters” for more information.
7. Select from the list to which Server Pool this storage repository should be provided. Optionally enter
additional information about this storage repository in the Description field.
Note
When you create a storage repository on a LUN, only clustered server pools can
be selected.
8. Click Next to proceed to the second section of the wizard: Present to Servers.
When the storage repository is prepared and created, it must also be made available for use by your
Oracle VM Servers before it can be populated. Typically you present the storage repository to all the
Oracle VM Servers in the server pool. However, should you wish to set up storage differently, Oracle
VM Manager allows you to present a repository to a selection of Oracle VM Servers instead of the
entire server pool. See also Section 4.3.1.4, “Present or Unpresent Repository”
9. In the Present to Servers dialog box, use the arrow buttons to move the required Oracle VM Servers
from the left to the right pane.
10. Click Finish to create the new storage repository and present it to the selected Oracle VM Servers. The
new storage repository is displayed in the Repositories table in the management pane.
178
Summary
At this point, the storage repository has been created, Oracle VM Manager has taken ownership, and the
selected Oracle VM Servers have access in order to store virtual machines, ISO files, templates and so on.
To modify the configuration of servers with access to the storage repository, see Section 4.3.1.4, “Present
or Unpresent Repository”.
4.2 Summary
On the Repositories tab there is a navigation pane. At the top of the navigation pane is the navigation
toolbar discussed in Section 4.1, “Toolbar”. Within the navigation pane is a navigation tree that allows you
to navigate through the different object types that comprise your environment.
Different objects may be nested at different levels within the navigation tree depending on their
relationships to each other. Clicking on different objects or folders within the navigation tree enables
access to the different perspectives available for that object in the management pane.
The navigation tree that is available within the Repositories tab conforms to the following structure:
• Repositories Folder
• Repository Item
• Assemblies Item
• ISOs Item
• VM Files Item
• VM Templates Item
• Virtual Disks Item
Each navigation element has a number of associated perspectives offering different views of the objects
contained by the selected navigation element, or the configuration information specific to it. For many of
these perspectives, an associated toolbar is provided so that it is possible to perform different configuration
or management tasks on elements selected in the management pane.
4.3 Repositories Folder
The Repositories navigation folder contains each storage repository that has been configured within the
environment. The structure of the navigation provided in the navigation tree is discussed in more detail in
Section 4.2, “Summary”.
Clicking on the Repositories navigation folder in the navigation tree allows you to access different
perspectives in the management pane. Each perspective provides its own view of all of the storage
repositories within Oracle VM Manager. Most of the perspectives also include separate perspective
toolbars that enable you to perform various configuration or management tasks specific to the view
currently displayed within the management pane. The Repositories navigation folder offers the following
perspectives within the management pane:
• Repositories Perspective
4.3.1 Repositories Perspective
The Repositories perspective lists the different storage repositories configured in your environment. The
following columns are displayed in the management pane:
• Name: The name that has been configured for the repository.
179
Repositories Perspective
• File System: The UUID and path location to the storage repository file system.
• File System Size: Contains three sub columns to show the Free, Used and Total size in GiB of the
storage repository file system.
This perspective includes a toolbar that consists of the following options:
Table 4.2 Repositories Perspective Toolbar Icon Options
Toolbar Icon Option
Icon
Description
Create New Repository
Displays the Create a Data Repository wizard. Use this option
to create a storage repository.
Edit Selected Repository
Displays the Edit Repository wizard. Use this option to edit a
storage repository.
Delete Selected Repository
Displays the Delete Confirmation dialog box. Use this option
to delete the selected storage repository.
Present-Unpresent Selected
Repository
Displays the Present this Repository to Server(s) dialog box.
Use this option to present or unpresent the repository to an
entire server pool or to and from individual Oracle VM Servers.
Refresh Selected Repository
Refreshes one or more selected storage repositories. Oracle
VM Manager re-checks the disk contents of the selected
repositories. Any detected changes are reflected in the
various content tabs (Assemblies, ISO files, ...) of the storage
repository.
4.3.1.1 Create New Repository
A storage repository should be at least 10 GB in size. In addition to this minimum size requirement, you
should include enough storage space for virtual machines, templates, ISO files and other virtual machine
resources.
To create a storage repository for your server pool:
1. Select the Repositories tab.
2. In the toolbar above the navigation pane, click Create New Repository
.
3. In the Create a Repository dialog box, enter the following information:
• Repository Name: The name you wish to use to identify the repository.
• Repository Location: Either a network file server or a physical disk.
4. If you selected Network File Server as location, click Search
Network File System dialog box:
to select a location in the Select
• Select a Network File Server from the list. The available file systems appear. Note that only a
refreshed file system can be used.
• Select the file system you wish to install the storage repository on. Click OK.
Note
When searching for a file system, there is an option to provide a Name Filter.
You can use this filter to specify search criteria to limit the objects displayed.
See Section 1.13, “Name Filters” for more information.
180
Repositories Perspective
5. Optionally provide this additional information:
• Share Path: Path to a subdirectory on the selected file system.
• Description: Information you would like to add about this storage repository.
6. If you selected Physical Disk as the Repository Location, click Search
Select Physical Disk dialog box:
to select a location in the
• Select a Storage Array and, if applicable, a Volume Group from the respective lists. The available
disks appear.
• Select the physical disk you wish to install the storage repository on. Click OK.
Note
When searching for a physical disk, there is an option to provide a Name
Filter. You can use this filter to specify search criteria to limit the objects
displayed. See Section 1.13, “Name Filters” for more information.
7. Select from the list to which Server Pool this storage repository should be provided. Optionally enter
additional information about this storage repository in the Description field.
Note
When you create a storage repository on a LUN, only clustered server pools can
be selected.
181
Repositories Perspective
8. Click Next to proceed to the second section of the wizard: Present to Servers.
When the storage repository is prepared and created, it must also be made available for use by your
Oracle VM Servers before it can be populated. Typically you present the storage repository to all the
Oracle VM Servers in the server pool. However, should you wish to set up storage differently, Oracle
VM Manager allows you to present a repository to a selection of Oracle VM Servers instead of the
entire server pool. See also Section 4.3.1.4, “Present or Unpresent Repository”
9. In the Present to Servers dialog box, use the arrow buttons to move the required Oracle VM Servers
from the left to the right pane.
10. Click Finish to create the new storage repository and present it to the selected Oracle VM Servers. The
new storage repository is displayed in the Repositories table in the management pane.
At this point, the storage repository has been created, Oracle VM Manager has taken ownership, and the
selected Oracle VM Servers have access in order to store virtual machines, ISO files, templates and so on.
To modify the configuration of servers with access to the storage repository, see Section 4.3.1.4, “Present
or Unpresent Repository”.
4.3.1.2 Edit Repository
To edit a storage repository:
1. Select the repository in the tree view in the navigation pane and click Edit Selected Repository
the toolbar above.
in
2. In the Edit Repository dialog box you can make the following changes:
Repository Name: Edit the name of the selected repository.
Server Pool: This option is available if your repository location is a Physical Disk. It allows you to
change the server pool that the repository is associated with. This option makes it simple to move
OCFS2 repositories from one server pool to another. Usually after changing server pool association,
you should change the Oracle VM Servers or server pool where the repository is presented. See
Section 4.3.1.4, “Present or Unpresent Repository” for more information on presenting a repository to
Oracle VM Servers.
Description: Optionally enter a more elaborate description of the selected repository.
Release Ownership: This check box is displayed if the repository is currently under ownership of
the current Oracle VM Manager instance. Select this check box to allow the repository to be used by
another Oracle VM Manager.
182
Repositories Perspective
Take Ownership: This check box is displayed if the repository is not under the ownership of the current
Oracle VM Manager instance. Select this check box to take ownership of the repository. The repository
should first be released from the ownership of any other Oracle VM Manager instance.
By clicking on the Present Repository tab, you can easily change the servers or server pools on
which the repository is presented. See Section 4.3.1.4, “Present or Unpresent Repository” for more
information on this.
Note
The Present Repository tab is only available if the repository is owned by the
current Oracle VM Manager instance.
3. Click OK to save the changes to the storage repository.
4.3.1.3 Delete Repository
It is possible to delete a storage repository entirely, removing the entire directory structure from the file
system where it is hosted.
To delete an owned storage repository:
1. Make sure that all content has been removed from the storage repository you wish to delete.
2. Select one or more repositories in the table in the management pane and click Delete Selected
Repository in the toolbar above.
3. Confirm that you wish to delete the storage repository: click OK to continue.
It is also possible to remove a storage repository from the current Oracle VM Manager instance without
actually removing any of its contents. This can be useful if you intend to make use of the repository within
an alternate Oracle VM Manager instance.
To delete a storage repository without removing the contents:
1. Select the repository in the table in the management pane and click Present/Unpresent
toolbar above.
in the
2. In the Present Repository dialog box, unpresent the storage repository from all Oracle VM Servers.
Click OK.
3. Select the repository in the tree view in the navigation pane and click Edit Selected Repository
the toolbar above. Select the Release Ownership check box and click OK.
in
4. Select the now unowned repository in the table and click Delete.
5. Confirm that you wish to delete this storage repository: click OK to continue.
4.3.1.4 Present or Unpresent Repository
To present a storage repository to Oracle VM Servers:
1. Select the Repositories tab and select the repository of your choice in the navigation pane.
2. Click Present/Unpresent
presented to.
in the toolbar above to change the list of servers the repository is
3. In the Present this Repository to Server(s) dialog box, use the check box to select whether to
present individual Oracle VM Servers, or all Oracle VM Servers in one or more server pools. Then use
the arrow buttons to move the required Oracle VM Servers or server pools between the panes.
183
Repository Item
If you present a repository to a server pool, this has the same effect as selecting all of the Oracle VM
Servers within the server pool and presenting the repository to them individually. If you add or remove
servers from a server pool after you have presented the repository to a server pool, the configuration is
not updated automatically. The option to present the repository to a server pool is a convenience and
simply presents the repository to all servers that belong to a particular server pool at the time that you
perform the action.
4. Click OK to present the storage repository to the selected Oracle VM Servers.
4.3.1.5 Refresh Repository
To refresh a storage repository:
1. Select one or more repositories in the table in the management pane and click Refresh Selected
Repository in the toolbar above. Note that a repository refresh, does not automatically refresh the
contents of an assembly. To do this, refer to Section 4.5.1.5, “Refresh Assembly”.
4.4 Repository Item
Each storage repository configured within the environment is displayed as a repository navigation item
within the Repositories navigation folder. These repository navigation items are labelled according to the
repository name that is configured within Oracle VM Manager. If a name is not available or not configured
properly within Oracle VM Manager, the repository UUID is allocated as the repository name. The structure
of the navigation provided in the navigation tree is discussed in more detail in Section 4.2, “Summary”.
Clicking on a repository navigation item in the navigation tree allows you to access different perspectives
in the management pane. Each perspective provides its own view of the repository within Oracle VM
Manager. Most of the perspectives also include separate perspective toolbars that enable you to perform
various configuration or management tasks specific to the view currently displayed within the management
pane. A repository navigation item offers the following perspectives within the management pane:
• Info Perspective
• Events Perspective
4.4.1 Info Perspective
The Info perspective is common to many elements within the Oracle VM Manager Web Interface. This
perspective always shows the individually configured parameters for an item that is currently selected
in the navigation tree. Some of these configured parameters may be automatically populated through a
discovery process, while others may have been configured manually during the creation of the object that
is selected.
This perspective includes the following information:
• Repository Name: The configured name for the repository.
• Ownership: The owner of the repository.
• Path: The path to the file system that is used for the repository file system.
• Physical Disk: The name that has been configured for the physical disk.
• Share Path: The path to a subdirectory on the repository file system.
• File System Size (GiB): The total size of the file system.
184
Events Perspective
• File System Used (GiB): The amount of file system that is in use.
• Used (%): The amount of file system that is in use as a percentage.
• ID: The ID for the repository.
• Presented to Servers: A list of the servers to which the repository has been presented.
4.4.2 Events Perspective
The Events perspective is common to many elements within the Oracle VM Manager Web Interface.
The Events perspective generally appears as an option within the Perspectives drop-down menu on the
management pane of tabs that include a navigation tree. In this case, the Events perspective displays
events specific to the item selected in the navigation tree and presents these in the management pane.
The Events perspective may also appear within a dialog that is triggered from a Display Selected
Events... perspective toolbar option. In this case, the Events perspective dialog displays events specific
to one or more elements selected in the management pane.
If an object has an error event associated with it you must acknowledge the event to clear the error and
return the object to normal operations. For example, this can occur if an Oracle VM Server or virtual
machine appear as Stopped (Error) in the status. The object in error is flagged with a red icon in the
navigation tree. Oracle VM Servers, virtual machines, repositories and storage objects can have error
events associated with them.
Since Oracle VM Manager attempts to resolve issues automatically as much as possible, not all events
can be acknowledged by a user within the Oracle VM Manager Web Interface. Therefore, a flag is set
for events that are user acknowledgeable. If an event does not have this flag set, you are unable to
acknowledge it, since it is handled internally by Oracle VM Manager.
The Events perspective or dialog contains a table with the following columns of information per event:
• Severity: The severity level assigned to the event.
• Timestamp: The date and time that the event occurred.
• Modify Time: The last recorded date and time that the event was modified.
• Type: The type of event according to Oracle VM Manager's event categorization model.
• Summary: A summary description of the event.
• Acknowledged: Whether an error event has been acknowledged.
• User Acknowledgeable: Whether or not an event can be acknowledged by the user.
Alongside each event entry in the table, there is an arrow that allows you to expand the view for each
entry. This displays the full Description for the event.
The Events perspective or dialog contains a perspective toolbar with the following options:
Table 4.3 Events Perspective Toolbar Icon Options
Toolbar Icon Option
Acknowledge
Icon
Description
Acknowledge a selected error event to clear the error and
return the object to normal operations. Note that this option is
only available for user acknowledgeable events.
185
Events Perspective
Toolbar Icon Option
Icon
Description
Acknowledge All
Acknowledge all error events associated with an object to clear
the errors and return the object to normal operations. Note that
only user acknowledgeable events are cleared. This button is
always clickable, even if there are no user acknowledgeable
events. Clicking it when there are no user acknowledgeable
events results in an error dialog.
Display Count
A drop-down menu that allows you to select the number of
events that should be displayed in the management pane,
while you are currently in this perspective.
Acknowledging Events/Errors
If an object has an error event associated with it you must acknowledge the event to clear the error and
return the object to normal operations. For example, this can occur if an Oracle VM Server or virtual
machine appear as Stopped (Error) in the status. The object in error is flagged with a red icon in the
navigation tree. Oracle VM Servers, virtual machines, repositories and storage objects can have error
events associated with them. The following procedures show you how to clear errors and return the object
to normal operations.
To acknowledge Oracle VM Server error events:
1. Click the Servers and VMs tab.
2. Select the Oracle VM Server in the navigation tree.
3. Select Events from the Perspective drop-down list in the management pane.
4. Select the user acknowledgeable error event and click Acknowledge
to clear all user acknowledgeable errors.
, or click Acknowledge All
To acknowledge virtual machine error events:
1. Click the Servers and VMs tab.
2. Select the server pool, or Oracle VM Server on which the virtual machine resides in the navigation tree.
3. Select Virtual Machines from the Perspective drop-down list in the management pane.
4. Select the virtual machine in the management pane table. Click Display Selected VM Events...
.
5. The Events dialog box is displayed. Select the user acknowledgeable error event and click
Acknowledge , or click Acknowledge All to clear all user acknowledgeable errors. Click Close.
To acknowledge storage repository error events:
1. Click the Repositories tab.
2. Select the repository in the navigation tree.
3. Select Events from the Perspective drop-down list in the management pane.
4. Select the error event and click Acknowledge
, or click Acknowledge All
To acknowledge storage error events:
1. Click the Storage tab.
2. Select File Servers, SAN Servers, or a storage server in the navigation tree.
186
to clear all errors.
Assemblies Item
3. Select Events from the Perspective drop-down list in the management pane.
4. Select the user acknowledgeable error event and click Acknowledge
to clear all user acknowledgeable errors.
, or click Acknowledge All
4.5 Assemblies Item
The management pane includes the default Assemblies perspective, and toolbars that enable you to
perform various configuration or management tasks specific to assemblies.
4.5.1 Assemblies Perspective
The Assemblies perspective lists the assemblies configured in your environment. The following columns
are displayed in the management pane:
• Name: The name that has been configured for the assembly.
• Origin: The origin of the assembly which is the URL from which this assembly was imported.
• Description: The description of the assembly.
Clicking on the arrow to the left of an assembly in the table displays the resources that use the assembly.
This perspective includes a toolbar that consists of the following options:
Table 4.4 Assemblies Perspective Toolbar Icon Options
Toolbar Icon Option
Icon
Description
Import VM Assembly...
Displays the Import VM Assembly dialog box. Use this option
to import an assembly file.
Create VM Template...
Displays the Create VM Template dialog box. Use this option
to create a virtual machine template from an assembly file.
Edit Selected VM Assembly...
Displays the Edit VM Assembly dialog box. Use this option to
edit an assembly file.
Delete Selected VM Assembly
Displays the Delete Confirmation dialog box. Use this option
to delete the selected assembly file.
Refresh Selected VM
Assembly...
Refreshes one or more selected assembly files.
4.5.1.1 Import Assembly
To import an assembly:
1. Create or locate an assembly file. This should be a single .ova file, which contains the .ovf descriptive
file(s), and disk image file(s) for the assembly.
If you do not have the assembly in the archive (.ova) format, but instead have a series of virtual disk
images and an .ovf file, you can place all the files in the same directory on a web server, import the .ovf
file, and all the supporting virtual disk files are also imported. Alternatively, you can first import all the
virtual disk files, then continue with this procedure to import the .ovf file.
Note
OVF files in the version 0.9 format (as used by ESX 3.5) are not supported.
If the assembly uses an unsupported format, you can try to use VMware's
Converter or OVF Tool to convert to a newer version, or you can use qemu-
187
Assemblies Perspective
img to convert the vmdk files to raw disk files and recreate the virtual machine
manually.
See Section 4.9.1.2, “Import Virtual Disk” for information on importing virtual disk files.
2. Place the assembly file in a location accessible from your Oracle VM Manager host computer using
either of these protocols: HTTP, HTTPS or FTP.
3. Click the Repositories tab. Select the repository in which to store the assembly file. Select
Assemblies in the navigation tree.
4. Select Import VM Assembly...
in the toolbar in the management pane.
5. The Import VM Assembly dialog box is displayed. Select or edit the following:
• VM Assembly download location: The URL for the assembly file. The URL schemes supported are
HTTP, HTTPS, and FTP. For example:
http://example.com/assemblies/myassembly.ova
• Proxy: The IP address or hostname of an optional proxy server to use when importing the assembly.
Click OK to import the assembly file. When the import job is complete, the new assembly is displayed in
the table in the management pane.
4.5.1.2 Create VM Template
To create a virtual machine template from an assembly:
1. Click the Repositories tab. Select the repository in which the assembly file is located. Select
Assemblies in the navigation tree.
2. Select Create VM Template...
in the toolbar in the management pane.
3. The Create VM Template dialog box is displayed. Select or edit the following:
• Assembly Virtual Machines: The virtual machine in the assembly from which to create a template.
• VM Template Name: A name for the template.
• Description: An optional text description of the template.
Click OK to create the template. The template is created in the same repository as the original
assembly is located. When you have created a template from the assembly, you can use the template
to create and deploy virtual machines.
See Section 3.1.3, “Create Virtual Machine” for information on using a template to create virtual
machines.
4.5.1.3 Edit Assembly
To edit an assembly file:
1. Click the Repositories tab. Select the repository in which the assembly file is located. Select
Assemblies in the navigation tree.
2. Select the assembly in the table in the management pane. Click Edit Selected VM Assembly...
the management pane toolbar.
3. Edit the Name or Description. Click OK.
188
in
ISOs Item
4.5.1.4 Delete Assembly
To delete assembly files:
1. Click the Repositories tab. Select the repository in which the assembly files are located. Select
Assemblies in the navigation tree.
2. Select one or more assembly files in the table in the management pane. Click Delete Selected VM
Assembly in the management pane toolbar.
3. The Delete Confirmation dialog box is displayed. Click OK.
4.5.1.5 Refresh Assembly
The contents of assembly files are not automatically refreshed when you refresh a repository. Therefore, to
see the contents of a newly imported or modified assembly file, you must refresh the assembly.
To refresh assembly files:
1. Click the Repositories tab. Select the repository in which the assembly files are located. Select
Assemblies in the navigation tree.
2. Select one or more assembly files in the table in the management pane. Click Refresh Selected VM
Assembly in the management pane toolbar.
3. The contents of the assembly files are refreshed from the storage repository.
4.6 ISOs Item
The management pane includes the default Assemblies perspective, and toolbars that enable you to
perform various configuration or management tasks specific to assemblies.
4.6.1 ISOs Perspective
The ISOs perspective lists the ISO files (CDROMs) configured in your environment. The following columns
are displayed in the management pane:
• Name: The name that has been configured for the ISO file.
• Size (GiB): The size of the ISO file.
• Description: The description of the ISO file.
Clicking on the arrow to the left of an ISO file in the table displays the resources that use the file.
This perspective includes a toolbar that consists of the following options:
Table 4.5 ISOs Perspective Toolbar Icon Options
Toolbar Icon Option
Icon
Description
Import ISO...
Displays the Import ISO dialog box. Use this option to import
an ISO file.
Edit Selected ISO...
Displays the Edit ISO dialog box. Use this option to edit an
ISO file.
Delete Selected ISO
Displays the Delete Confirmation dialog box. Use this option
to delete the selected ISO file.
Clone ISO...
Clones (creates a copy of) an ISO file.
189
ISOs Perspective
4.6.1.1 Import ISO
To import an ISO file:
1. Click the Repositories tab. Select the repository in which to store the ISO file. Select ISOs in the
navigation tree.
2. Select Import ISO...
in the toolbar in the management pane.
3. The Import ISO dialog box is displayed. Select or edit the following:
• ISO download location: The URL for the ISO file. The URL schemes supported are HTTP, HTTPS,
and FTP. For example:
http://example.com/isos/myiso.iso
• Proxy: The IP address or hostname of an optional proxy server to use when importing the ISO file.
Click OK to import the ISO file. When the import job is complete, the new ISO is displayed in the table
in the management pane.
4.6.1.2 Edit ISO
To edit an ISO file:
1. Click the Repositories tab. Select the repository in which the ISO file is located. Select ISOs in the
navigation tree.
2. Select the ISO in the table in the management pane. Click Edit Selected ISO
pane toolbar.
in the management
3. The Edit ISO dialog box is displayed. Edit the ISO Name or Description. Click OK.
4.6.1.3 Delete ISO
To delete an ISO file, it must not be in use by any virtual machines.
To delete ISO files:
1. Click the Repositories tab. Select the repository in which the ISO files are located. Select ISOs in the
navigation tree.
2. Select one or more ISO files in the table in the management pane. Click Delete Selected ISO
management pane toolbar.
in the
3. The Delete Confirmation dialog box is displayed. Click OK.
4.6.1.4 Clone ISO
To copy an ISO file to the same repository, another repository, a file system, or a storage array, you clone
the ISO file. To clone an ISO file, it must not be in use by any running virtual machines or other clone job.
To clone an ISO file:
1. Click the Repositories tab. Select the repository in which the ISO is located. Select ISOs in the
navigation tree.
2. Select the ISO in the table in the management pane. Click Clone ISO
toolbar.
3. The Clone ISO dialog box is displayed. Select or edit the following:
190
in the management pane
VM Files Item
• Clone Target Type: The destination storage type for the cloned ISO, either:
• Repository
• Physical Disk
• Storage Array
• Clone Target: The destination location for the cloned ISO. Click Search Clone Target
the destination.
to select
The Search Clone Target dialog box is displayed. Select the location on which to clone the ISO and
click OK.
• Clone Type: Whether to use a Sparse Copy or Non-sparse Copy. Sparse Copy creates a sparse
disk, so the size of the disk is smaller than the original. Sparse copy is faster than using Non-Sparse
Copy. Non-Sparse Copy copies the entire ISO, and so is slower than creating a sparse disk.
Click OK to clone the ISO file.
4.7 VM Files Item
The management pane includes the default VM Files perspective, and toolbars that enable you to perform
various configuration or management tasks specific to virtual machine configuration files.
4.7.1 VM Files Perspective
The VM Files perspective lists the virtual machine configuration files in your environment. The following
columns are displayed in the management pane:
• Virtual Machine: The name of the virtual machine.
• Server: The Oracle VM Server on which the virtual machine is deployed.
• Server Pool: The server pool in which the virtual machine is deployed.
You can only view the list of virtual machine configuration files; you cannot perform any operations on
them.
4.8 VM Templates Item
The management pane includes the default VM Templates perspective, and toolbars that enable you to
perform various configuration or management tasks specific to virtual machine templates.
4.8.1 VM Templates Perspective
The VM Templates perspective lists the virtual machine templates configured in your environment. The
following columns are displayed in the management pane:
• Name: The name that has been configured for the template.
• Domain Type: The domain type.
• Max. Memory (MB): The maximum memory that can be allocated.
• Memory (MB): The memory that is allocated.
191
VM Templates Perspective
• Max. Processors: The maximum number of CPUs that can be allocated.
• Processors: The number of CPUs that are allocated.
• Operating System: The operating system type.
• Description: The description of the template.
Clicking on the arrow to the left of a virtual machine template in the table displays a set of subtabs that
show more detailed information about the template. These tabs are Configuration, Networks, and Disks.
Click on a tab to display the information.
This perspective includes a toolbar that consists of the following options:
Table 4.6 VM Templates Perspective Toolbar Icon Options
Toolbar Icon Option
Icon
Description
Import VM Template...
Displays the Import VM Template dialog box. Use this option
to import a virtual machine template.
Edit Selected VM Template...
Displays the Edit VM Template dialog box. Use this option to
edit a virtual machine template.
Delete Selected VM Template
Displays the Delete Confirmation dialog box. Use this option
to delete the selected virtual machine template.
Clone or Move Template...
Displays the Clone or Move Template wizard. Use this option
to clone (create a copy of) a virtual machine template, or move
the disks and configuration file to another storage repository.
Manage Clone Customizers...
Displays the Manage Clone Customizers for VM dialog box.
Use this option to manage the clone customizers for a virtual
machine template.
Display VM Config File
Content...
Displays the VM Config File Content dialog box. Displays a
read-only view of the configuration file for the selected virtual
machine. Use this option to view the content of the virtual
machine configuration file.
4.8.1.1 Import Template
To import a virtual machine template:
1. The Oracle VM template should be accessible to your Oracle VM environment from a location that can
be reached using HTTP, HTTPS or FTP.
2. Click the Repositories tab. Select the repository in which to store the template. Select VM Templates
in the navigation tree.
3. Select Import VM Template...
in the toolbar in the management pane.
4. The Import VM Template dialog box is displayed. Select or edit the following:
• VM Template URLs: The URLs for the templates. The URL schemes supported are HTTP, HTTPS,
and FTP. For example:
http://example.com/mytemplate.tgz
To import a template using FTP, use the standard FTP syntax:
ftp://user:password@server/path/filename.tgz
192
VM Templates Perspective
1
If your template files are split into multiple compressed files , concatenate those files and enter
the URL for the concatenated file, for example to concatenate a number of compressed files to one
compressed file, enter
$ cat template.tgz.1of3 template.tgz.2of3 template.tgz.3of3 > template.tgz
Then enter the URL to the single compressed template file, in this case, template.tgz.
To import a template that is not compressed as a single file, each component must be a complete file
(if not, concatenate them to one file), for example to enter a virtual disk image and a virtual machine
configuration file that together make up a complete template, you could enter:
http://myexample.com/System-sda.img
http://myexample.com/vm.cfg
Each template component should be listed on a new line. Each URL must be a reference to a
complete file.
Alternatively, you can place all the files in the same directory on a web server, and import the vm.cfg
file, and all the supporting virtual disk files are also imported.
• Proxy: The IP address or hostname of an optional proxy server to use when importing the template.
Click OK to import the template. When the import job is complete, the new template is displayed in the
table in the management pane. Expand the table row to see more information about the template.
4.8.1.2 Edit Template
You can edit a virtual machine template to change the configuration, networking, disks and boot order.
To edit a virtual machine template:
1. Click the Repositories tab. Select the repository in which the template is saved. Click VM Templates
in the navigation tree.
2. Select the template to edit in the table in the management pane and click Edit Selected VM
Template... .
3. The Edit VM Template dialog box is displayed. The dialog has four separate tabs:
• Configuration: This tab allows you to edit the following information:
• VM Template Name: The name of the template. The maximum name length is 256 characters and
may contain any character. The name need not be unique.
• Enable Huge Pages: Whether to enable HugePages. If you enable HugePages, you must disable
support for HugePages in the guest operating system. This option is not available if the virtual
machine is to be deployed to a SPARC-based server pool.
• Description: An optional description of the template.
• Operating System: The guest operating system of the virtual machine in the template. This setting
enables or disables certain virtual machine settings that your guest operating system may require.
1
Templates can get very large, so it is not unusual that they are split into manageable chunks. This splitting is done without any attempt at preserving
the structure, so the structure must be reconstructed by amalgamating the various files together again before import.
193
VM Templates Perspective
• Mouse Device Type: The mouse type to use for the template. This option is ignored if using a
SPARC-based server pool.
• Domain Type: The domain type of the virtual machine. Oracle recommends you create
paravirtualized virtual machines if possible, as the performance of a paravirtualized virtual machine
is superior to that of a hardware virtualized machine guest. This option is not available if the virtual
machine is to be deployed to a SPARC-based server pool.
• XEN_HVM: Hardware virtualization, or fully virtualized. When you select this option you must
supply an ISO file in a repository (in the Arrange Disks step of the wizard) from which to create
the virtual machine. See Section 4.6.1.1, “Import ISO” for information on importing an ISO file
into a repository.
• XEN_HVM_PV DRIVERS: Identical to XEN_HVM, but with additional paravirtualized drivers for
improved performance of the virtual machine. See What are Virtualization Modes or Domain
Types? in the Oracle VM Concepts Guide for more information about using paravirtualized
drivers. This domain type is used to run Microsoft Windows guest operating systems with an
acceptable performance level.
• XEN_PVM: Paravirtualized. Enables you to select a location for the mounted ISO file from which
to create the virtual machine. Before you create the virtual machine using the paravirtualized
method, mount the ISO file on an NFS share, or HTTP or FTP server. You supply the location of
the mounted ISO file in the Network Boot Path field in the Boot Options step of the wizard. For
information on creating a mounted ISO file, see ISO Provisioning for PVM Guest Installations in
the Oracle VM Administrator's Guide.
• LDOMS_PVM: This domain type should be selected if the server pool and hypervisors use
Oracle VM Server for SPARC as the hypervisor instead of Oracle VM Server for x86.
• Unknown: This hypervisor should be selected if the domain type is unknown.
• Max. Memory (MB): The maximum size of the memory the virtual machine is to be allocated.
When you edit a running virtual machine, this is the maximum amount of memory that can be
allocated.
• Memory (MB): The size of the memory the virtual machine is to be allocated. This is the memory
allocation to use when starting the virtual machine. You can change this when editing a running
virtual machine, up to the value of the maximum memory set in the previous field. For HVM guests,
increasing or decreasing the memory requires a restart of the virtual machine. For PVM guest, no
restart is required.
• Max Processors: The maximum number of processors to be used by the virtual machine. The
number of processors is expressed in number of physical CPU cores, and is limited to 128.
• Processors: The number of processors to be used by the virtual machine. The number of
processors is expressed in number of physical CPU cores, and is limited to 128.
• Priority: The CPU priority of the virtual machine. You can select a high (100), intermediate (50), or
low (1) priority for the virtual CPUs, or a self-defined priority, by moving the slider. The higher the
priority, the more physical CPU cycles are given to the virtual machine.
This option is ignored if using a SPARC-based server pool.
• Processor Cap %: Increase or decrease the percentage to which the virtual CPUs can receive
scheduled time. This parameter defines the maximum percentage to which the virtual CPUs can
194
VM Templates Perspective
receive scheduled time. You can select a high (100), intermediate (50), or low (1) percentage
of scheduled time for the virtual CPUs, or a custom percentage, by moving the slider. Use this
parameter to keep low priority virtual machines from consuming too many CPU cycles on a virtual
machine server.
This option is ignored if using a SPARC-based server pool.
The Priority and Processor Cap% parameters are passed to the Xen hypervisor for use by the
credit scheduler, which automatically load balances guest VCPUs across all available physical
CPUs using an algorithm that combines these two parameters. Therefore, these parameters are a
key factor for the performance of the virtual machine on x86 hardware.
On SPARC, each virtual machine uses dedicated physical CPU threads and CPUs are not shared
between virtual machines, being exclusively assigned to a single virtual machine.
• Networks: This tab allows you to manage which networks to use. Use the arrow buttons to move
the networks between the Available Ethernet Networks field and the Selected Ethernet Networks
field. If no networks are available, you must first create a network with the virtual machine role as a
dedicated network for virtual machine traffic is required. See Section 5.1.1, “Create New Network” for
information on creating a network.
• Disks: This tab allows you to edit the storage configuration of your template, such as virtual disk,
physical disks, and ISO files. On a separate slot, add one or more of the following disk types:
• Empty: An empty slot.
• Virtual Disk: This allows you to add or create a virtual disk. Virtual disks may be shared by virtual
machines, or only available to a single virtual machine.
• Physical Disk: The physical disks are the disks in a storage array. Physical disks may be shared
by virtual machines.
• CD/DVD: This adds an ISO file in a storage repository and can be used to create HVM and
PVHVM virtual machines. When creating a virtual machine from an ISO file, you must use a single
file. Installations that span multiple ISO files are not supported. ISO files cannot be used to create
PVM virtual machines.
Add or create any virtual disks to use as the virtual machine's hard disk, select any physical disks
to add, and select any ISO files to use to create the virtual machine. Add the disks in the order they
should appear in the virtual machine. The disk with the boot partition or installation media should be
the first disk listed. An HVM guest can have up to four disks, including empty CD/DVD drives. A PVM
guest can have up to 104 disks. A PVHVM guest can have up to 107 disks. An LDOMS_PVM guest
can have up to 1024 disks. Only one slot can contain an empty CD/DVD.
To create or add a virtual disk:
a. To create a virtual disk, select Virtual Disk from the Disk Type drop-down list and click Create a
Virtual Disk .
b. The Create Virtual Disk dialog box is displayed. Enter or select the following to create a virtual
disk:
• Repository: The repository in which the virtual disk is to be created.
195
VM Templates Perspective
• Virtual Disk Name: The name of the virtual disk to be created and made available to the virtual
machine. See How are Virtual Disks Managed? in the Oracle VM Concepts Guide for more
information about using virtual disks.
• Size (GiB): The disk size of the virtual disk, in GiB.
• Description: A description of the virtual disk.
• Shareable: Whether the virtual disk should be shareable (read/write) with other virtual
machines.
• Allocation Type: Whether to use a Sparse Allocation or Non-sparse Allocation. Sparse
Allocation creates a sparse disk, so the size of the disk is initially small and increases as it
is used. Sparse allocation is faster than using Non-Sparse Allocation when creating a virtual
machine. Non-Sparse Allocation creates the entire disk when the virtual machine is created,
and so is slower than creating a sparse disk.
Click OK.
c. To search for an existing virtual disk to add to the virtual machine, click Select a Virtual Machine
Disk . The Select a Virtual Machine Disk dialog box is displayed. Select the virtual disk to use
and Click OK.
Note
If your virtual machine needs more than one disk, you can create the
disk(s) afterwards in the repository, and add them to the virtual machine.
See Section 4.9.1.1, “Create Virtual Disk” and Section 3.5.2.1, “Edit Virtual
Machine” for more information on creating a virtual disk and editing a
virtual machine.
To add a physical disk:
a. To add a physical disk to the virtual machine, select Physical Disk from the Disk Type dropdown list. Click Select a Virtual Machine Disk . The Select a Physical Disk dialog box is
displayed. Select a physical disk from the list of available disks. If you want to leave the slot
empty, select Leave Slot Empty. Click OK.
To add an ISO file:
a. To add an ISO file to the virtual machine, select CD/DVD from the Disk Type drop-down list.
Click Select a Virtual Machine Disk . The Select an ISO dialog box is displayed. Select a Iso
file from the list of available files. If you want to leave the slot empty, select Leave Slot Empty.
Click OK.
Note
When adding an ISO file to an existing virtual machine, the ISO file is
available to the operating system, but may not be mounted. To access the
ISO file, you may need to mount it, for example:
# mkdir /cdrom
# mount -o loop /dev/xvdb /cdrom
• Boot Order: This tab allows you to edit the boot media order for your virtual machine.
Select the boot media order for your virtual machine.
196
VM Templates Perspective
If you are creating a hardware virtualized machine virtual machine (HVM), you can choose the PXE
boot option. If so, remember to put PXE first in the Select your boot options field, and change the
boot order again after installation and before rebooting the virtual machine. To use PXE, you must
configure a PXE/tftp environment to offer the necessary boot media and instructions to the virtual
machine.
If you are creating a paravirtualized virtual machine (PVM), you also have the Network option
available (not shown in here). If so, specify Network to be at the top of the right-hand-side column,
and enter the location of the mounted ISO file from which to perform the operating system installation
in the Network Boot Path field (also not shown in here), for example
http://example.com/Enterprise-R6-U1-Server-x86_64-dvd.iso/
For information on creating a mounted ISO file, see ISO Provisioning for PVM Guest Installations in
the Oracle VM Administrator's Guide.
You cannot use the Network Boot Path field to boot a virtual machine using PXE. This field can only
be used to specify the path to a mounted ISO file to use when installing a PVM guest.
4. When you have finished editing the virtual machine template, click OK to save the changes, or Cancel
to exit out of the dialog without saving any changes.
4.8.1.3 Delete Template
You can delete a virtual machine template, and the virtual disk associated with it.
To delete a virtual machine template:
1. Click the Repositories tab. Select the repository in which the template is saved. Click VM Templates
in the navigation tree.
2. Select one or more templates in the table in the management pane and click Delete Selected VM
Template... .
3. The Delete Confirmation dialog box is displayed. Select the virtual disks associated with the templates
you want to delete, if any. Click OK to delete the templates.
4.8.1.4 Clone or Move a Template
Cloning a virtual machine template means making a copy of it, so that you can create multiple virtual
machines or templates from the original. Moving a virtual machine template means moving the resources,
including disk locations and networks.
Note
The virtual machine cloning procedure below uses the same dialog box to clone a
virtual machine and a template.
Clone a Virtual Machine or Template
A clone can also be performed using two other file copy methods: sparse copy, and non-sparse copy.
These two cloning methods can be used when cloning from and to different repositories, and when the
storage used for the storage repository uses a generic Oracle VM Storage Connect plug-in. These cloning
methods are slower than thin cloning, but more versatile.
197
VM Templates Perspective
To create a clone of a virtual machine or template:
1. Select the virtual machine or template to clone and display the Clone or Move dialog box. You display
this dialog box from different locations, depending on whether you are cloning a virtual machine or a
template.
• Virtual Machine: Click the Servers and VMs tab. Select the server pool on which the virtual
machine resides in the navigation tree. Select Virtual Machines from the Perspective drop-down
list. Select the virtual machine to clone in the management pane, and click Clone or Move .
• Virtual Machine Template: Click the Repositories tab. In the navigation tree, select the repository
in which the template resides, then VM Templates. Select the template in the management pane and
click Clone or Move Template... .
2. The Clone or Move dialog box is displayed.
Select the Create a clone of this (VM or Template) option. Click Next.
3. The Clone or Move (Virtual Machine or Template) dialog box is displayed.
198
VM Templates Perspective
Select or enter the following:
• Clone to a: Select the clone type, either Virtual Machine or Template, to specify the objects to
create from the clone.
• Clone Count: The number of clones to create.
• Name Index: The start index number to use for the clone name suffix. The default is 0. This is used
in conjunction with the Clone Name field to create the name for each clone.
• Clone Name: An optional name for the virtual machines or templates. The maximum name length is
256 characters and may contain any character. The name need not be unique. If no value is given,
the default is the name of the virtual machine or template being cloned. Each clone is suffixed with a
dot (.) and the clone index number, starting with the value for the Name Index field. For example, if
the Clone Name field is set to MyVM, and the Name Index field is set to 1, the resulting clones would
be named MyVM.1, MyVM.2 and so on.
• Target Server Pool: The server pool on which the clone is to be deployed.
Note
The list of server pools that are available in the drop-down is limited to valid
server pools that are capable of handling the cloning process correctly. This
helps you to prevent cloning to a server pool that may fail to process the
request. If this list is empty, you should refer to the table presented under the
Why don't I see other server pools to clone to? element in this dialog.
• Description: A description for the virtual machines or templates.
• Advanced Clone: Whether to use a clone customizer to set preferences for the clone operation.
199
VM Templates Perspective
• Clone Customizer: The clone customizer to use to create the clones. This is used to set virtual
disk mappings to enable you to copy disks to other storage locations. It also allows you to create
network mappings so you can use new VNICs and other networks for the clone. Click Create... to
create a new clone customizer. See Section 3.5.2.13, “Manage Clone Customizers” for information
on creating a clone customizer. This field is enabled if Advanced Clone is checked.
• Target Repository: The repository to store the cloned virtual machine configuration file. This does
not affect any clone disk mappings you set using a clone customizer; this option is only for the virtual
machine configuration file. This field is enabled if Advanced Clone is checked.
• Why don't I see other server pools to clone to? A collapsed window element, providing a table
of server pools that do not meet the requirements to accept a clone request. Expanding any of the
entries in this table displays the reason that the server pool does not qualify.
Tip
If you clone a virtual machine or template without using a clone customizer, the
storage repository is locked for the duration of the cloning job; this may be some
time in some circumstances. To quickly create clones and not lock the storage
repository, use a clone customizer.
Click OK.
The virtual machines are created and deployed to the server pool. The templates are created in the
storage repository.
It is important to understand that older templates may use a different device type to attach virtual disks.
This may affect your ability to attach new virtual disks, such as a virtual CDROM device. There are some
limitations on mixing virtual disks of differing device types on a virtual machine. See How are Virtual Disks
Managed? in the Oracle VM Concepts Guide for more information about how device types are allocated to
virtual disks and what you may need to do to solve any issues surrounding this problem.
Move a Template
You can move a virtual machine template's resources (virtual disk, virtual machine configuration files) to
a different storage repository, or change the location of the disks and network used in the template. You
can change the location of disks and the network to use when you move a virtual machine template using a
clone customizer.
To move a virtual machine template:
1. Click the Repositories tab. Select the repository in which the template is saved. Click VM Templates
in the navigation tree.
2. Select the template to move in the table in the management pane and click Clone or Move
.
3. The Clone or Move Template dialog box is displayed. Select Move this Template.
Select a clone customizer from the Clone Customizer drop-down list. If no clone customizers
are displayed or you want to create a new one, click Create. See Create a Clone Customizer for
information on creating a clone customizer.
Select a repository from the Repository drop-down list. The repository is where the template's virtual
machine configuration file is moved to.
Click Finish to move the template.
200
VM Templates Perspective
4.8.1.5 Manage Clone Customizers
Cloning a virtual machine or template means making a copy of it, so that you can create multiple
virtual machines or templates from the original. You can create a clone customizer to set up the clone
parameters, such as networking, and the virtual disk, and ISO resources. A clone customizer is also used
when moving a virtual machine or template.
Create a Clone Customizer
To create a clone customizer:
1. Select the virtual machine or template and display the Manage Clone Customizers for (Virtual
Machine or Template) dialog box by:
• Virtual Machine: Click the Servers and VMs tab. Select the server pool on which the virtual
machine resides in the navigation tree. Select Virtual Machines from the Perspective dropdown list. Select the virtual machine to clone in the management pane, and click Manage Clone
Customizers... .
• Virtual Machine Template: Click the Repositories tab. In the navigation tree, select the repository
in which the template resides, then VM Templates. Select the template in the management pane and
click Manage Clone Customizers .
2. Select Create Clone Customizer...
.
3. The Create a Clone Customizer wizard is displayed.
201
VM Templates Perspective
In the Name and Description step of the wizard, enter a Name and Description for the clone
customizer, and click Next.
4. The Storage Mappings step of the wizard is displayed.
Select the following storage mappings:
• Disk: The disks to include in the clone.
• Clone Target Type: The type of storage location where the disk is to be created, either a
Repository or a Physical Disk.
• Clone Target: The location on the storage type where the disk is to be created.
• Clone Type: Whether to use a sparse or non-sparse files for the disk.
Click Next.
202
VM Templates Perspective
5. The Network Mappings step of the wizard is displayed.
Select the Virtual NICss to include in the clone customizer, and the Ethernet Network to which they
should belong.
Note
The network configuration is not changed when moving a virtual machine or
template. It is only used when cloning a virtual machine or template.
Click Finish.
The clone customizer is now available to use to create a virtual machine, or template. See Clone a Virtual
Machine or Template for information on using the clone customizer to create a virtual machine or template.
Edit a Clone Customizer
To edit a clone customizer:
1. Select the object to which the clone customizer belongs, either a virtual machine, or a virtual machine
template. Click Manage Clone Customizers... .
2. The Manage Clone Customizers for (VM or Template) dialog box is displayed. Select the clone
customizer to edit and click Edit Clone Customizer... .
3. The Edit Clone Customizer dialog box is displayed. Edit the clone customizer.
Click OK. The changes to the clone customizer are saved.
Delete a Clone Customizer
To delete a clone customizer:
1. Select the object to which the clone customizer belongs, either a virtual machine, or a virtual machine
template. Click Manage Clone Customizers... .
2. The Manage Clone Customizers for (VM or Template) dialog box is displayed. Select the clone
customizer to delete and click Delete Clone Customizer .
3. A dialog box is displayed to confirm you want to delete the clone customizer. Confirm you want to
delete the clone customizer and click OK. The clone customizer is deleted.
203
Virtual Disks Item
4.8.1.6 View Virtual Machine Configuration File
You can view the content of a virtual machine configuration file. The content is not editable but you can
view and copy the text according to your needs.
To view a virtual machine configuration file:
1. Click the Repositories tab.
2. Select the repository in which the virtual machines is located in the navigation tree.
3. Select the virtual machine to which the configuration file belongs in the table in the management pane.
Click VM Config File Content... .
4. The VM Config File Content dialog box is displayed with the content of the virtual machine
configuration file. You can view and copy the text according to your needs.
5. Click OK to close the dialog.
4.9 Virtual Disks Item
The management pane includes the default Virtual Disks perspective, and toolbars that enable you to
perform various configuration or management tasks specific to virtual disks.
4.9.1 Virtual Disks Perspective
The Virtual Disks perspective lists the virtual disks in your environment. The following columns are
displayed in the management pane:
• Name: The name that has been configured for the virtual disk.
• Used (GiB): The amount of disk used.
• Max. (GiB): The maximum allocated disk size that may be used.
• Shareable: Whether the disk is shareable with other virtual machines.
• File: The location path in the storage repository.
• Description: The description of the virtual disk.
Clicking on the arrow to the left of a virtual disk in the table lists the objects that use the virtual disk.
This perspective includes a toolbar that consists of the following options:
Table 4.7 Virtual Disks Perspective Toolbar Icon Options
Toolbar Icon Option
Icon
Description
Create Virtual Disk...
Displays the Create Virtual Disk dialog box. Use this option to
create a new virtual disk.
Import Virtual Disk
Displays the Import Virtual Disk dialog box. Use this option to
import a virtual disk.
Edit Virtual Disk...
Displays the Edit Virtual Disk dialog box. Use this option to
edit an virtual disk.
Delete Selected Virtual Disk
Displays the Delete Confirmation dialog box. Use this option
to delete the selected virtual disk.
204
Virtual Disks Perspective
Toolbar Icon Option
Clone Virtual Disk
Icon
Description
Displays the Clone Virtual Disk dialog box. Use this option to
clone (create a copy of) a virtual disk.
4.9.1.1 Create Virtual Disk
To create a new virtual disk:
1. Click the Repositories tab. Select the repository in which to store the virtual disk. Select Virtual Disks
in the navigation tree.
2. Click Create Virtual Disk...
in the management pane toolbar.
3. The Create Virtual Disk dialog box is displayed. Enter or select the following:
• Virtual Disk Name: A name for the virtual disk.
• Size (GiB): The size of the disk, in GiB.
• Description: A description of the virtual disk.
• Shareable: Whether the virtual disk is shareable. Shareable disks have read/write privileges in
multiple virtual machines and should be used with caution.
• Allocation Type: Whether to create a sparse or non-sparse virtual disk.
Click OK to create the new disk. To display which virtual machines use a disk, expand the table row in
the management pane.
4.9.1.2 Import Virtual Disk
To import a virtual disk:
1. Click the Repositories tab. Select the repository in which to store the virtual disk. Select Virtual Disks
in the navigation tree.
2. Click Import Virtual Disk...
in the management pane toolbar.
3. The Import Virtual Disk dialog box is displayed. Select or edit the following:
• Virtual Disk download location: The URL for the virtual disk file. The URL schemes supported are
HTTP, HTTPS, and FTP. For example:
http://example.com/vdisks/myvdisk.img
• Proxy: The IP address or hostname of an optional proxy server to use when importing the virtual
disk.
Click OK to import the virtual disk file. When the import job is complete, the new virtual disk is displayed
in the table in the management pane.
4.9.1.3 Edit Virtual Disk
To edit a virtual disk:
1. Click the Repositories tab. Select the repository in which the virtual disk is located. Select Virtual
Disks in the navigation tree.
205
Virtual Disks Perspective
2. Select the virtual disk in the table in the management pane. Click Edit Virtual Disk...
management pane toolbar.
in the
3. The Edit Virtual Disk dialog box is displayed. Enter or select the following:
• Virtual Disk Name: A name for the virtual disk.
• Size (GiB): The size of the disk, in GiB.
• Resize Action: Whether the virtual disk should use sparse or non-sparse allocation. This drop-down
selector does not default to the allocation type that was used when the disk was created, as this
information is not stored within Oracle VM Manager.
• Description: A description of the virtual disk.
• Shareable: Whether the virtual disk is shareable. Shareable disks have read/write privileges in
multiple virtual machines and should be used with caution.
Note
The actual virtual disk image file is saved with a filename that contains the UUID
for the virtual disk image. This is displayed in the ID field at the top of the dialog.
This field is not editable.
Click OK to save the changes.
Warning
When resizing a disk there is always a risk of data corruption. Also, the file
system on the virtual disk may not be aware of the resize operation, so you may
have to perform operating specific procedures to make the guest virtual machine
aware of the change in disk size. Usually, after resizing a virtual disk, you may
need to shutdown and then restart the guest virtual machine that is making use
of the disk before it is able to register the new disk size.
4.9.1.4 Delete Virtual Disk
To delete virtual disks:
1. Click the Repositories tab. Select the repository in which the virtual disks are located. Select Virtual
Disks in the navigation tree.
2. Select one or more virtual disks in the table in the management pane. Click Delete Selected Virtual
Disk in the management pane toolbar.
3. The Delete Confirmation dialog box is displayed. Click OK.
4.9.1.5 Clone Virtual Disk
To clone a virtual disk:
1. Click the Repositories tab. Select the repository in which the virtual disk is located. Select Virtual
Disks in the navigation tree.
2. Select the virtual disk in the table in the management pane. Click Clone Virtual Disk
management pane toolbar.
3. The Clone Virtual Disk dialog box is displayed. Select or edit the following:
206
in the
Virtual Disks Perspective
• Clone Target Type: The destination storage type for the cloned virtual disk, either:
• Repository
• Physical Disk
• Storage Array
• Clone Target: The destination location for the cloned virtual disk. Click Search Clone Target
select the destination.
to
The Search Clone Target dialog box is displayed. Select the location on which to clone the virtual
disk and click OK.
• Clone Type: Whether to use a Sparse Copy or Non-sparse Copy. Sparse Copy creates a sparse
disk, so the size of the disk is smaller than the original. Sparse copy is faster than using Non-Sparse
Copy. Non-Sparse Copy copies the entire virtual disk, and so is slower than creating a sparse disk.
Click OK to clone the virtual disk.
207
208
Chapter 5 Networking Tab
Table of Contents
5.1 Networks .................................................................................................................................
5.1.1 Create New Network .....................................................................................................
5.1.2 Edit Existing Network .....................................................................................................
5.1.3 Delete Existing Network .................................................................................................
5.2 VLAN Interfaces .......................................................................................................................
5.2.1 Navigation Pane ............................................................................................................
5.2.2 Management Pane ........................................................................................................
5.2.3 Create VLAN Interfaces .................................................................................................
5.2.4 Edit VLAN Interfaces .....................................................................................................
5.2.5 Delete VLAN Interfaces .................................................................................................
5.3 Virtual NICs .............................................................................................................................
210
211
214
216
216
217
217
218
219
219
219
Use the Networking tab to manage networks and their functions in your environment, create, edit and
delete networks, manage VLAN interfaces, and manage Virtual NICs used by virtual machines.
Figure 5.1, “Networking tab” shows the Networking tab.
Figure 5.1 Networking tab
The Networking tab contains the subtabs set out in Table 5.1, “Networking Subtabs”.
Table 5.1 Networking Subtabs
Subtab
Description
Networks
Displays information about networks. Use this tab to create, edit, and
delete networks.
Select the Networks subtab to display this pane. Select a network
in the table to view and edit information about networks within your
environment. You can use this pane to create new networks either
a
using ports, bonds or VLAN interfaces ; or as virtual networks on a
single server for the use of any virtual machines on that server.
209
Networks
Subtab
Description
See Section 5.1, “Networks” for more information on managing
networks.
VLAN Interfaces
Displays information about VLAN Interfaces. Use this tab to create,
edit and delete VLAN interfaces.
Select the VLAN Interfaces subtab to display this pane. Select a
VLAN Interface in the table to view and edit information about the
ports, VLAN IDs and IP address assignment for a VLAN .
See Section 5.2, “VLAN Interfaces” for more information on managing
VLAN Interfaces.
Virtual NICs
Displays information about virtual NICs. Use this tab to view the virtual
NICs in use by your virtual machines. You can also use this tab to
define the MAC address range that should be used when a virtual NIC
is created on a virtual machine.
See Section 5.3, “Virtual NICs” for more information on managing
virtual NICs.
a
If you intend to create a network using VLAN interfaces, these need to be configured first on the VLAN Interfaces pane.
5.1 Networks
The Networks subtab provides facilities to add, edit and delete networks; and presents a tabular view of
the networks that are currently configured within the Oracle VM environment. Configuration options can be
accessed using the toolbar at the top of the tab.
The toolbar at the top of the tab consists of the following options:
Table 5.2 Networks Subtab Toolbar Icon Options
Toolbar Icon Option
Icon
Description
Create New Network...
Displays the Create Network dialog box. Use this option to
create a new network within Oracle VM Manager.
Edit Selected Network...
Displays the Edit Network dialog box. Use this option to
change the network configuration for an existing network.
Delete Selected Network
Displays the Delete Confirmation dialog box. Use this option
to delete the selected network.
The table view in the Networks subtab includes the following fields:
• ID: The UUID for the network.
• Name: The name defined for the network within Oracle VM Manager.
• Intra-Network Server: The name of the server on which a local network is defined, if the network is of
this type.
• Network Channels: A grouping of the different network channels or roles that a network may support.
• Server Management: A check box item to indicate whether or not the network is a member of the
Server Management channel.
• Cluster Heartbeat: A check box item to indicate whether or not the network is a member of the
Cluster Heartbeat channel.
210
Create New Network
• Live Migrate: A check box item to indicate whether or not the network is a member of the Live Migrate
channel.
• Storage: A check box item to indicate whether or not the network is a member of the Storage channel.
• Virtual Machine: A check box item to indicate whether or not the network is a member of the Virtual
Machine channel.
• Description: A field to present the text description defined for the network within Oracle VM Manager.
5.1.1 Create New Network
To create a new Network
1. On the Networking tab, click the Networks subtab.
2. Click the Create New Network icon
. A dialog is displayed with the following two options:
• Create a Network with Ports/Bond Ports/VLAN Interfaces: Use this option to create a normal
network that makes use of physical ports, bond ports or VLAN Interfaces defined on your servers.
Note
If you have not already defined any VLAN interfaces as described in
Section 5.2, “VLAN Interfaces”, you are unable to add any VLAN interfaces
to the network. In other words, you must define your VLAN interfaces on the
VLAN Interfaces subtab before attempting to add any VLAN interfaces to a
network.
• Create a Local Network on a single server: Use this field to create a virtual network running on a
single Oracle VM Server, usually to facilitate communication between virtual machines running on
that server.
3. Click Next to continue configuring your network, or Cancel to exit out of the dialog without saving any
changes. Depending on the selection that you made in this dialog, either skip to Create a Network with
Ports/Bond Ports/VLAN Interfaces or Create a Local Network on a single server for further instruction.
Create a Network with Ports/Bond Ports/VLAN Interfaces
1. Assuming that you have followed the instructions in To create a new Network, the Create Network
dialog is now displayed.
2. The wizard provides the following fields to allow you to perform basic network configuration:
• Name: The name of the network in Oracle VM Manager.
• Description: Optional information you would like to add about this network.
• Network Uses: A set of check boxes that allow you to define the various network roles or channels
that are enabled on the network.
• Management: Used to manage the physical Oracle VM Servers in a server pool, for example, to
update the Oracle VM Agent on the different Oracle VM Servers. This network function is assigned
to at least one network by default.
• Live_Migrate: Used to migrate virtual machines from one Oracle VM Server to another in a server
pool, without changing the status of the virtual machine.
211
Create New Network
• Cluster_Heartbeat: Used to verify if the Oracle VM Servers in a clustered server pool are up and
running.
• Virtual_Machine: Used for the network traffic between the different virtual machines in a server
pool.
• Storage: Reserved for future use and currently has no practical function or application.
Click Next to continue to the next stage of the wizard, or click Cancel to exit the wizard without making
any changes.
3. The Select Ports stage of the wizard is displayed. This dialog allows you to define which ports or
bonds on each Oracle VM Server are attached to the network and presents a tabular view of ports and
bonds that are attached to the network.
Note
If you only wish for your network to contain VLAN interfaces, there is no
requirement for you to add any network ports to the network in this dialog. You
are able to add VLAN interfaces to the network in the next stage of the wizard.
At the top of the table is a toolbar containing options to
Port(s).
Add New Ports,
Edit Port(s), or
Delete
To Add A Port To The Network
a. Click the
Add New Ports icon at the top of the table.
b. The Add Ports to Network dialog is displayed. Select the server where the network port or bond
that you wish to add is located, and expand the node alongside it. Select the port or ports that you
wish to add.
Note
Only ports that are not bonded are displayed. Once a port is part of a bond,
it can no longer be used outside of that bond.
c. Click OK to add the ports that you have selected, or click Cancel to exit without any changes.
To Edit A Port Within The Network
a. Select the port or ports that you wish to edit within the network.
b. Click the
Edit Port(s) icon.
c. The Edit Port(s) dialogue is displayed.
d. For each port listed, you are able to edit the MTU setting, and the IP Address assignment settings.
e. Click OK when you have finished editing ports to save the changes, or click Cancel to exit.
To Delete A Port From The Network
a. Select the port or ports that you wish to remove from the network.
b. Click the
Delete Port(s) icon.
c. The Delete Confirmation dialog box is displayed. Click OK to delete the port from the network.
212
Create New Network
When you have finished defining the ports that belong to the network, you can click Next to continue
to the next stage of the wizard, or click Cancel to exit the wizard. Note that if you only wish for your
network to contain VLAN interfaces, there is no requirement for you to add any network ports to the
network in this dialog, as you are able to add VLAN interfaces to the network in the next stage of the
wizard.
4. The Select VLAN Interfaces stage of the wizard is displayed. This dialog allows you to define which
VLAN interfaces on each Oracle VM Server are attached to the network and presents a tabular view
of VLAN interfaces that are attached to the network. Note that in order to add a VLAN interface to a
network it must have been defined prior to starting this wizard, as described in Section 5.2, “VLAN
Interfaces”. At the top of the table is a toolbar containing options to Add VLAN Interfaces, Edit
VLAN Interface(s), or Delete VLAN Interface(s).
To Add A VLAN Interface To The Network
a. Click the
Add VLAN Interfaces icon in the toolbar.
b. The Add VLAN Interfaces to Network dialog is displayed. In the panel on the left, you are able
to expand nodes showing servers assigned to different server pools, or unassigned servers. By
clicking on the different nodes in this panel, you are able to update the tabular view of the different
available VLAN interfaces on the right.
Note that if you have not already defined any VLAN interfaces as described in Section 5.2, “VLAN
Interfaces”, no VLAN interfaces are displayed in this view and you are unable to add any VLAN
interfaces to the network. In other words, you must define your VLAN interfaces on the VLAN
Interfaces subtab, before attempting to add any VLAN interfaces to a network.
c. Identify the VLAN interfaces that you wish to add to the network and check the check box alongside
them.
d. Click OK to add the selected VLAN interfaces to the network, or click Cancel to exit without making
any changes.
To Edit A VLAN Interface Within The Network
a. Select the VLAN interface that you wish to edit within the network.
b. Click the
Edit VLAN Interface(s) icon in the toolbar.
c. The Edit VLAN Interface(s) dialog is displayed.
d. For each VLAN interface listed, you are able to edit the MTU setting, and the IP Address
assignment settings.
e. Click OK when you have finished editing VLAN interfaces to save the changes, or click Cancel to
exit.
To Delete A VLAN Interface From The Network
a. Select the VLAN interfaces that you wish to remove from the network.
b. Click the
Delete VLAN Interface(s) icon.
c. The Delete Confirmation dialog box is displayed. Click OK to delete the VLAN interface from the
network.
213
Edit Existing Network
When you have finished adding any VLAN interfaces to the network, you are able to click Finish to
save the new network configuration. Alternatively, you can click Cancel to exit the wizard without
saving the network changes. Note that if you edited the configuration for a Port, Bond or VLAN
interface in any of the sub-wizards, these changes have already been effected.
Create a Local Network on a single server
1. Assuming that you have followed the instructions in To create a new Network, the Create Network
dialog is now displayed.
2. The wizard provides the following fields to allow you to perform basic network configuration:
• Name: The name of the network in Oracle VM Manager.
• Description: Optional information you would like to add about this network.
Click Next to continue to the next stage of the wizard, or click Cancel to exit the wizard without making
any changes.
3. The Select Server stage is displayed in the wizard. This stage provides a drop-down list of all of the
servers configured within Oracle VM Manager. Select the server where you wish to create the local
network, and click Finish to save the new network configuration. Alternatively, you can click Cancel to
exit the wizard without saving the network changes.
5.1.2 Edit Existing Network
It is possible to edit the configuration for an existing network. The steps and options to do so are described
below.
To edit the configuration for an existing network:
1. On the Networking tab, click the Networks subtab link and select the network that you wish to edit.
2. Click the
Edit Network icon in the toolbar.
3. A dialog opens to allow you to reconfigure the network. The dialog has three separate tabs:
• Configuration:: A tab containing a form allowing you to edit the following information:
• Name: The name of the network in Oracle VM Manager.
• Description: Optional information you would like to add about this network.
• Network Uses: A set of check boxes that allow you to define the various network roles or channels
that are enabled on the network.
• Management: Used to manage the physical Oracle VM Servers in a server pool, for example,
to update the Oracle VM Agent on the different Oracle VM Servers. This network function is
assigned to at least one network by default.
• Live_Migrate: Used to migrate virtual machines from one Oracle VM Server to another in a
server pool, without changing the status of the virtual machine.
• Cluster_Heartbeat: Used to verify if the Oracle VM Servers in a clustered server pool are up
and running.
• Virtual_Machine: Used for the network traffic between the different virtual machines in a server
pool.
214
Edit Existing Network
• Storage: Reserved for future use and currently has no practical function or application.
• Ports: A tab allowing you to manage which ports or bonds on each Oracle VM Server are attached
to the network. This tab contains a tabular view of ports and bonds that are already attached to the
network. At the top of the table is a toolbar containing options to Add New Ports, Edit Port(s),
or Delete Port(s).
To Add A Port To The Network
a. Click the
Add New Ports icon at the top of the table.
b. The Add Ports to Network dialog is displayed. Select the server where the network port or bond
that you wish to add is located, and expand the node alongside it. Select the port or ports that you
wish to add.
Note
Only ports that are not bonded are displayed. Once a port is part of a
bond, it can no longer be used outside of that bond.
c. Click OK to add the ports that you have selected, or click Cancel to exit without any changes.
To Edit A Port Within The Network
a. Select the port or ports that you wish to edit within the network.
b. Click the
Edit Port(s) icon.
c. The Edit Port(s) dialog is displayed.
d. For each port listed, you are able to edit the MTU setting, and the IP Address assignment
settings.
e. Click OK when you have finished editing ports to save the changes, or click Cancel to exit.
To Delete A Port From The Network
a. Select the port or ports that you wish to remove from the network.
b. Click the
Delete Port(s) icon.
c. The Delete Confirmation dialog box is displayed. Click OK to delete the port from the network.
• VLAN Interfaces: A tab allowing you to manage which VLAN interfaces are attached to the network.
This tab contains a tabular view of VLAN interfaces that are already attached to the network.
At the top of the table is a toolbar containing options to Add VLAN Interfaces, Edit VLAN
Interface(s), or Delete VLAN Interface(s).
To Add A VLAN Interface To The Network
a. Click the
Add VLAN Interfaces icon in the toolbar.
b. The Add VLAN Interfaces to Network dialog is displayed. In the panel on the left, you are able
to expand nodes showing servers assigned to different server pools, or unassigned servers.
By clicking on the different nodes in this panel, you are able to update the tabular view of the
different available VLAN interfaces on the right.
215
Delete Existing Network
Note that if you have not already defined any VLAN interfaces as described in Section 5.2, “VLAN
Interfaces”, no VLAN interfaces are displayed in this view and you are unable to add any VLAN
interfaces to the network. In other words, you must define your VLAN interfaces on the VLAN
Interfaces subtab, before attempting to add any VLAN interfaces to a network.
c. Identify the VLAN interfaces that you wish to add to the network and check the check box
alongside them.
d. Click OK to add the selected VLAN interfaces to the network, or click Cancel to exit without
making any changes.
To Edit A VLAN Interface Within The Network
a. Select the VLAN interface that you wish to edit within the network.
b. Click the
Edit VLAN Interface(s) icon in the toolbar.
c. The Edit VLAN Interface(s) dialog is displayed.
d. For each VLAN interface listed, you are able to edit the MTU setting, and the IP Address
assignment settings.
e. Click OK when you have finished editing VLAN interfaces to save the changes, or click Cancel to
exit.
To Delete A VLAN Interface From The Network
a. Select the VLAN interfaces that you wish to remove from the network.
b. Click the
Delete VLAN Interface(s) icon.
c. The Delete Confirmation dialog box is displayed. Click OK to delete the VLAN interface from the
network.
4. When you have finished editing the network, click OK to save the changes, or Cancel to exit out of the
dialog without saving any changes.
5.1.3 Delete Existing Network
It is possible to delete a network. The steps and options to do so are described below.
To delete a network:
1. On the Networking tab, click the Networks subtab link and select the network that you wish to delete.
2. Click the
Delete Network icon in the toolbar.
3. The Delete Confirmation dialog box is displayed. Click OK to delete the network.
5.2 VLAN Interfaces
1
The VLAN Interfaces tab allows you to define and manage VLAN interfaces on your Oracle VM Servers
. If your network is configured to support VLANs, you should define interfaces for your different VLAN IDs
on each of your servers, so that you are able to define Oracle VM networks that take advantage of VLAN
separation.
1
VLAN configuration within Oracle VM Manager has changed significantly in Oracle VM 3.3. If you have used previous releases of Oracle VM, it is
important that you understand these changes and it is recommended that you refer to Understanding Networks in the Oracle VM Concepts Guide.
216
Navigation Pane
The VLAN Interfaces tab is divided into two sections, a Navigation Pane and a Management Pane
displaying a tabular view of the VLAN Interfaces associated with the item selected in the navigation pane.
5.2.1 Navigation Pane
The Navigation Pane displayed on the VLAN Interfaces tab is used to control the VLAN interfaces that are
displayed in the Management Pane. The Navigation Pane presents a tree view of the server objects that
have been discovered within your environment. Servers are grouped by Server Pools or are automatically
presented beneath the node titled Unassigned Servers.
Expanding the Server Pools node, allows you to see each of the server pools configured within your
environment. Selecting a particular server pool from the list presented, updates the Management Pane to
show only the VLAN interfaces configured for that server pool.
Clicking on the Unassigned Servers node is equivalent to selecting an individual server pool. The
Management Pane is updated to show only the VLAN interfaces configured for servers that do not belong
to a server pool.
Both the Unassigned Servers node and any of the server pool nodes can be further expanded to list
the servers that belong to these nodes. The VLAN interfaces displayed in the Management Pane can be
further limited to each individual server listed.
Finally, you are able to expand server nodes to list the ports or bonds that are available for each server.
By selecting a particular port for any server in the Navigation Pane, the list of VLAN interfaces presented in
the Management Pane is limited to those interfaces configured for that specific port or bond.
5.2.2 Management Pane
The Management Pane on the VLAN Interface tab allows you to create, edit or delete VLAN interfaces
configured within Oracle VM Manager. VLAN interfaces are listed in a tabular view that includes a toolbar
providing options to manage interfaces. The VLAN Interfaces that are displayed in the table at any point in
time are controlled using the Navigation Pane.
The VLAN Interface tab includes a toolbar in the management pane that consists of the following options:
Table 5.3 VLAN Interface Subtab Toolbar Icon Options
Toolbar Icon Option
Icon
Description
Create VLAN Interface...
Displays the Create VLAN Interface(s) dialog box. Use this
option to create a new VLAN Interface within Oracle VM
Manager.
Edit Selected VLAN
Interface...
Displays the Edit VLAN Interface(s) dialog box. Use this
option to change the description, MTU settings or IP address
assignment options for an existing VLAN Interface.
Delete Selected VLAN
Interface
Displays the Delete Confirmation dialog box. Use this option
to delete the selected VLAN Interface.
The table view in the VLAN Interface subtab includes the following fields:
• Name: The name of the VLAN interface as defined in Oracle VM Manager.
• VLAN ID: The VLAN ID that is assigned to the VLAN interface.
• Server Pool: The server pool where this VLAN interface is located (if any).
217
Create VLAN Interfaces
• Server: The server where the VLAN interface is located.
• Port: The network port on which the VLAN interface is assigned.
• MTU: The MTU value for the VLAN interface.
• Network: The network that the VLAN interface is attached to (if any).
• Addressing: A grouping of fields to display IP address assignment.
• Type: Describes the network address assignment type (either Static, Dynamic or blank if None).
• IP Address: The IP address allocated to the VLAN interface (if any).
• Netmask: The netmask applied to the VLAN interface (if any).
• Description: The description of the VLAN interface as defined in Oracle VM Manager.
5.2.3 Create VLAN Interfaces
If your environment is configured to use VLANs, you need to configure VLAN interfaces within Oracle VM
Manager before you are able to use them within a network configuration.
To Create A VLAN Interface
1. On the Networking tab, click the VLAN Interfaces subtab link.
2. Click the
Create VLAN Interface icon in the toolbar.
3. The Create VLAN Interface(s) dialog is displayed.
4. A navigation tree similar to the one shown in the Navigation Pane is displayed in the pane on the
right of the dialog. Use the navigation tree to identify server ports or bonds that are configured for your
VLANs. You are able to expand nodes in the navigation tree to identify individual servers, and then
expand each server to identify the ports that are available. Alongside each port, listed for a server, is a
check box that allows you to enable the port to configure VLAN interfaces that are attached to it. You
must select at least one port. Be careful not to select a port that is already in use or which is part of a
bond. The user interface does not filter the ports to allow you to only select unused ports.
5. Once you have selected the ports for which you wish to create VLAN interfaces, you can click Next to
continue to the next stage of the wizard, or click Cancel to exit the wizard without making any changes.
6. The Select VLAN IDs stage is displayed in the wizard. In the panel on the right, you are able to
select a VLAN ID range. Using the two fields available you can specify a range of VLAN IDs that are
configured on the network ports for which you are creating VLAN interfaces. Use the Add, Delete and
Delete All buttons to manage the VLAN IDs for which VLAN interfaces should be created. A VLAN
interface is created for each VLAN ID specified in the list provided here. You must select at least one
VLAN ID.
7. When you have finished selecting VLAN IDs, you can click Next to continue to the next stage of the
wizard, or click Cancel to exit the wizard without making any changes.
8. The Configure IP Address stage is displayed in the wizard. On the panel on the right, a table is
presented listing each of the VLAN interfaces that have been created. For each VLAN interface listed,
you are able to edit the MTU setting, the IP Address assignment settings and the description. The
Addressing field provides a drop-down selector that allows you to choose either None, Static or
Dynamic to specify how IP Addressing should be configured on this interface. If you select Static
here, the IP Address and Mask fields become available to edit, otherwise they remain uneditable.
218
Edit VLAN Interfaces
A Filter By VLAN ID drop-down selector is provided at the top of the table, to allow you to quickly limit
the VLAN interfaces displayed in the table to make changes in a more orderly fashion.
9. Click Finish when you have finished editing VLAN interfaces to save the changes, or click Cancel to
exit.
5.2.4 Edit VLAN Interfaces
To Edit A VLAN Interface
1. On the Networking tab, click the VLAN Interfaces subtab link.
2. Use the navigation pane to locate filter the list of VLAN interfaces displayed in the management pane.
3. Select the VLAN interface that you wish to edit from the interfaces listed in the management pane.
4. Click the
Edit VLAN Interface icon in the toolbar.
5. The Edit VLAN Interface(s) dialog is displayed.
6. For each VLAN interface listed, you are able to edit the MTU setting, the IP Address assignment
settings and the description. The Addressing field provides a drop-down selector that allows you
to choose either None, Static or Dynamic to specify how IP Addressing should be configured on
this interface. If you select Static here, the IP Address and Mask fields become available to edit,
otherwise they remain uneditable.
7. Click OK when you have finished editing VLAN interfaces to save the changes, or click Cancel to exit.
5.2.5 Delete VLAN Interfaces
To Delete A VLAN Interface
1. On the Networking tab, click the VLAN Interfaces subtab link.
2. Use the navigation pane to locate filter the list of VLAN interfaces displayed in the management pane.
3. Select the VLAN interfaces that you wish to remove from Oracle VM Manager from the interfaces listed
in the management pane.
4. Click the
Delete VLAN Interface(s) icon at the top of the table displayed in the management pane.
5. The Delete Confirmation dialog box is displayed. Click OK to delete the VLAN interface from Oracle
VM Manager.
5.3 Virtual NICs
A VNIC is a virtualized Network Interface Card, used by a Virtual Machine as its network interface. A VNIC
is assigned a MAC address. Each MAC address corresponds with a single virtual NIC, which is used by
a virtual machine. You create VNICs when you create a virtual machine. The Virtual NICs tab is used to
display the VNICs assigned to different virtual machines within your environment and to control the MAC
addresses applied to each VNIC.
The Virtual NICs tab presents a list of all of the VNICs configured within Oracle VM Manager in tabular
format. The following fields are displayed for each VNIC:
• Name: The name of the VNIC, which is usually the same as the MAC address assigned to it.
219
Virtual NICs
• Virtual NIC: The MAC address of the VNIC.
• Network: The network that the VNIC is attached to.
• Assigned to VM: The virtual machine that the VNIC is assigned to.
• Assigned to VM Template: The virtual machine template that the VNIC is assigned to.
Above the table on the Virtual NICs tab are a set of editable fields that allow you to customize the MAC
address range that can be assigned to VNICs as they are generated within your environment. The fields
accept valid hexadecimal characters between 00 and FF. The first three fields (octets) represent the
Organizationally Unique Identifier (OUI). Changing these fields can cause network conflicts and ultimately
network failure and is not recommended. If you edit the MAC address range, you must click the Apply
Range button to save your changes. To reset the range, you can click the Reset Range button.
If you select to change the first three octets of the OUI, a warning message is displayed, explaining the
consequences of this change, since the MAC addresses assigned to your VNICs can overlap with vendor
assigned OUIs. If you proceed to make this change, despite this warning, you receive no subsequent
warnings for changing these three octets.
Changing the MAC address range affects the creation of subsequent VNICs during the process of creating
or editing a virtual machine. It does not automatically update the MAC addresses already assigned to your
virtual machines. To do this, you must edit each virtual machine to change the MAC address there.
For information on creating, editing and removing VNICs on virtual machines, please refer to
Section 3.5.2.1, “Edit Virtual Machine” and Section 3.1.3, “Create Virtual Machine”.
Caution
It is important that you do not have overlapping MAC address ranges as this can
lead to issues tracing network issues. Oracle VM Manager attempts to prevent the
likelihood of this happening by generating unique MAC addresses. However, if you
run more than one Oracle VM Manager instance, it is possible that an overlapping
MAC address could be generated. If you create a MAC address that is already in
the Oracle VM Manager database, an error message is displayed.
220
Chapter 6 Storage Tab
Table of Contents
6.1 Toolbar ....................................................................................................................................
6.1.1 Discover File Server ......................................................................................................
6.1.2 Discover SAN Server .....................................................................................................
6.2 Summary .................................................................................................................................
6.3 File Servers Folder ...................................................................................................................
6.3.1 File Servers Perspective ................................................................................................
6.4 File Server Item .......................................................................................................................
6.4.1 Info Perspective ............................................................................................................
6.4.2 Events Perspective ........................................................................................................
6.4.3 File Systems Perspective ...............................................................................................
6.4.4 Access Groups Perspective ...........................................................................................
6.5 SAN Servers Folder .................................................................................................................
6.5.1 SAN Servers Perspective ...............................................................................................
6.6 SAN Server Item ......................................................................................................................
6.6.1 Info Perspective ............................................................................................................
6.6.2 Events Perspective ........................................................................................................
6.6.3 Physical Disks Perspective ............................................................................................
6.6.4 Access Groups Perspective ...........................................................................................
6.6.5 Volume Groups Perspective ...........................................................................................
6.7 Volume Group Item ..................................................................................................................
6.7.1 Info Perspective ............................................................................................................
6.7.2 Physical Disks Perspective ............................................................................................
6.7.3 Events Perspective ........................................................................................................
6.8 Unmanaged Fibre Channel Storage Array Item ..........................................................................
6.8.1 Info Perspective ............................................................................................................
6.8.2 Events Perspective ........................................................................................................
6.8.3 Physical Disks Perspective ............................................................................................
6.8.4 Access Groups Perspective ...........................................................................................
6.8.5 Volume Groups Perspective ...........................................................................................
6.9 Unmanaged iSCSI Storage Array Item ......................................................................................
6.9.1 Info Perspective ............................................................................................................
6.9.2 Events Perspective ........................................................................................................
6.9.3 Physical Disks Perspective ............................................................................................
6.9.4 Access Groups Perspective ...........................................................................................
6.9.5 Volume Groups Perspective ...........................................................................................
6.10 Local File Systems Item .........................................................................................................
6.10.1 Edit File System ..........................................................................................................
6.10.2 Refresh File System ....................................................................................................
6.10.3 Delete File System ......................................................................................................
6.10.4 Show Events ...............................................................................................................
6.11 Shared File Systems Item .......................................................................................................
6.11.1 Edit File System ..........................................................................................................
6.11.2 Refresh File System ....................................................................................................
6.11.3 Delete File System ......................................................................................................
6.11.4 Show Events ...............................................................................................................
223
223
227
232
233
233
240
240
241
243
246
250
250
257
258
259
260
267
274
275
275
276
282
284
285
285
287
294
301
302
303
303
305
312
318
319
320
320
321
321
323
324
324
324
325
Use the Storage tab to manage, discover and edit file servers and SAN servers (storage arrays), physical
disks, access groups and volume groups.
221
Figure 6.1, “Storage tab” shows the Storage tab.
Figure 6.1 Storage tab
The Storage tab contains the Perspectives set out in Table 6.1, “Storage Tab Perspective”. The
Perspectives available in any particular view vary depending on the item selected in the navigation
tree. This table provides a quick reference for all of the available perspectives in the Storage tab. Each
perspective provides a different view of your configuration and also includes its own toolbar.
Table 6.1 Storage Tab Perspective
Management Pane
Perspective
Description
File Servers
Lists the file servers which contain file-based storage. Use this tab to register,
edit, delete and discover file-based storage.
Select File Servers in the navigation tree to display this tab.
See What Types of Storage Can be Used? for more information on file-based
storage.
File Systems
Lists the file systems available on the file server. Use this tab to discover edit,
refresh, delete and display events for file systems.
Use the Name Filter input field to specify search criteria to filter the displayed
results.
See Section 1.13, “Name Filters” for more information.
Select a file server in the navigation tree and then select File Systems in the
Perspective drop-down list to display this tab.
Logical File Systems
Lists the logical file systems available on the file server. Use this tab to refresh
and delete logical file systems.
Select the Logical File Systems folder in the navigation tree to display this
tab.
SAN Servers
Lists the SAN servers (storage arrays). Use this tab to register, edit, delete,
refresh and discover SAN servers.
222
Toolbar
Management Pane
Perspective
Description
Use the Name Filter input field to specify search criteria to filter the displayed
results.
See Section 1.13, “Name Filters” for more information.
Select SAN Servers in the navigation tree to display this tab.
See What Types of Storage Can be Used? for more information on storage
arrays.
Physical Disks
Lists the physical disks on the storage array. Use this tab to create, edit, clone,
delete, refresh, display servers using a physical disk, and display events for
physical disks.
Select a storage array in the navigation tree and then select Physical Disks in
the Perspective drop-down list to display this tab.
Access Groups
Lists the access groups for the storage array. Use this tab to create, edit,
delete, present/unpresent and display events for storage array access groups.
Also use this tab to grant access to physical disks in the storage array to
Oracle VM Servers using the access groups.
Select a storage array in the navigation tree and then select Access Groups in
the Perspective drop-down list to display this tab.
Volume Groups
Lists the volume groups for the storage array. Use this tab to create, edit
and delete storage array volume groups. Also use this tab to grant access to
physical disks in the storage array to Oracle VM Servers using the volume
groups.
Select a storage array in the navigation tree and then select Volume Groups
in the Perspective drop-down list to display this tab.
Info
Displays a high-level view of the selected object. The Info pane contents
change to reflect information about the object selected in the navigation
tree. You can use this pane to view information about repositories in your
environment.
Select Info in the Perspective drop-down list to display the Info pane.
Events
Events are displayed for each object in the navigation tree and displays events
related to that object. Select Events in the Perspective drop-down list to
display the Events pane.
6.1 Toolbar
The navigation pane includes its own toolbar that provides quick access to the most commonly used
configuration tools for the Storage tab. Clicking on any of the icons provided in the toolbar opens a dialog
or wizard that can guide you through the configuration process for that item. The following tools are
available in this toolbar:
•
Discover File Server
•
Discover SAN Server
6.1.1 Discover File Server
223
Discover File Server
To discover a file server:
1. Make sure that your storage server exposes a writable file system to the storage network of your server
pool.
2. Select the Storage tab.
3. Click Discover File Server
in the toolbar to start the Discover a File Server wizard.
4. The File Server Parameters step is displayed in the wizard, where you enter the information
necessary for Oracle VM Manager to discover the external storage mount points.
Enter the storage information:
• Storage Plug-in: The Oracle VM Storage Connect plug-in corresponding to the type of file server
(generic NFS or vendor-specific). As Oracle VM Storage Connect plug-in are located on the Oracle
VM Servers, this field is only populated if you have already performed Server Discovery. You cannot
add storage without taking this step first.
• Name: The name you wish to use to identify the file server.
• Access Host: The host name or IP address of the server offering the file system.
• Uniform Exports: If all Oracle VM Servers in all server pools have access to the same exports on
the file server, leave this as the default (checked). If the file server is configured to offer different
exports to different server pools, this box should be unchecked and, once you have completed the
steps in the wizard, you need to configure Access Groups so that Oracle VM Manager can be made
aware of export permissions. See Section 6.4.4, “Access Groups Perspective” for more information.
Important
Non-uniform exports are not intended for servers within the same server pool.
Your NFS server should be configured to, at least, provide the same exports
to all of the servers that belong to a particular clustered server pool.
• Description: Optional information you would like to add about this file server.
If you are adding a non-generic file server, for example a Sun ZFS Storage Appliance, also enter
the additional plug-in options to enable Oracle VM Manager to access the file server's configuration
management functions:
224
Discover File Server
• Admin Host: The host name or IP address where administrative access to the file server is allowed
with appropriate credentials.
• Admin User Name: A user name with administrator access to the file server.
• Admin Password: The administrator password for the user name you entered.
Click Next.
5. The Add Admin Servers step is displayed in the wizard. If you are working with a non-clustered server
pool, you may skip this step. Admin servers are designated Oracle VM Servers that are capable of
logging into a storage array or file server to perform administrative functions such as extending a
file system or creating a new LUN. In the case of an NFS file server, admin servers are only used to
validate the file server. For backward compatibility reasons, admin servers are also capable of being
used to perform file server refreshes in much the same way as refresh servers.
Use the arrow buttons to move the required Oracle VM Servers from the Available Admin Server(s)
box to the Selected Admin Server(s) box.
Click Next.
6. The Select Refresh Servers step is displayed in the wizard. Refresh server are designated Oracle VM
Servers that have visibility of one or more file systems on an NFS file server. These servers are used
for file system refreshing across server pools.
Each file system must be assigned at least one refresh server to allow for file system refreshing. During
the refresh of a file server, the refresh servers are used to refresh all file systems used across all pools.
For this reason it is critical that your refresh server list contains at least one server from each server
pool.
Important
In some environments, it is plausible to expect that the file server is configured
to provide different file system exports to different server pools. Therefore, it
is possible that no single server has access to all of the exports provided by a
file server. By assigning a server from each server pool to handle file system
refreshes, Oracle VM can ensure that all file systems are refreshed across all
server pools. If your environment is set up in such a way, you need to configure
225
Discover File Server
Access Groups so that the manager can be made aware of export permissions.
See Section 6.4.4, “Access Groups Perspective” for more information.
If you select the Refresh All option available in the context menu for Server Pools on the Servers
and VMs tab, the configured refresh servers specified for each file system are used to perform a
comprehensive file system refresh and you are not provided with an option to use one or more alternate
refresh servers.
In this dialog, you must include at least one server from each server pool that you intend to create. You
may select more than one server from each server pool in order to ensure high availability, but adding
more than two servers is superfluous.
Note
If you defined a group of admin servers in the previous step, for backward
compatibility reasons, these servers are added to the refresh server list, and
can be used to perform file server refreshes as well. This is not apparent in the
Oracle VM Manager Web Interface.
7. If you are using non-uniform file system exports (as selected in the first dialog of this wizard), click
Finish to complete the wizard. A message is displayed to inform you that you should now create
access groups for the file server. See Section 6.4.4, “Access Groups Perspective” for information on
creating an access group. When at least one access group is configured, you should then refresh the
file systems on the file server to make them available for use in Oracle VM Manager. Section 6.3.1.5,
“Refresh File Server” for information on refreshing a file server.
If you are using uniform file system exports, click Next to proceed to the Select File Systems step
of the wizard. If any file systems contain existing virtual machine resources, select the corresponding
check boxes to have Oracle VM Manager add the existing resources to the environment.
At the top of the dialog box there is an option to provide a Name Filter. You can use this filter to specify
search criteria to limit the objects displayed. See Section 1.13, “Name Filters” for more information.
226
Discover SAN Server
Click Finish to complete the file server registration.
The new file server appears in the navigation pane, under File Servers.
Note
If you created shares to be used as server pool file systems, these are
discovered in the same process. Since these file systems are relatively small, be
sure to keep those available for the server pools and create storage repositories
on the higher capacity file systems.
At the end of the file server discovery a refresh operation is triggered to make sure all file systems
available on the file server appear in Oracle VM Manager. When the operation is complete, and if you
select the file server in the navigation pane, the available file systems appear in the File Systems
overview table in the management pane.
Warning
If a server is unable to mount the file system for some reason, such as a
permissions related issue, Oracle VM Manager does not report the failure
as this would stop any further mounting. If a server is unable to access a file
system the reason is reported in the /var/log/ovs-agent.log log file on
the server.
6.1.2 Discover SAN Server
227
Discover SAN Server
This first phase covers the discovery and registration part, meaning how you discover the container of the
storage elements you intend to use in your environment.
Depending on the selected storage type and plug-in, you may be required to enter additional information
than shown in this example (which uses an ISCSI SAN server) when registering your storage array, as
shown in the following table.
Table 6.2 Required Information for Registering Different Storage Types
Information Field Required
Generic iSCSI
Vendorspecific iSCSI
Generic Fibre
Channel
Vendorspecific Fibre
Channel
Access host and port
Yes
Yes
No
No
Access credentials/CHAP
No
Optional
No
No
Administration information
No
Yes
No
Yes
Plug-in private data
No
Optional
No
Optional
To discover a storage array:
1. Make sure that your storage server exposes raw disks (Fibre Channel SAN volumes, iSCSI targets and
LUNs) to the storage network of your server pool.
2. Select the Storage tab.
3. Click Discover SAN Server
to start the Discover SAN Server wizard.
4. The Discover SAN Server step is displayed in the wizard, where you enter the information necessary
for Oracle VM Manager to discover the external storage elements.
Enter the SAN storage information:
• Name: The name you wish to use to identify the SAN server.
• Description: Optional information you would like to add about this SAN server.
• Storage Type: The array is either a fibre channel or an iSCSI storage server.
• Storage Plug-in: The storage plug-in corresponding to the type of storage array, which is either
generic iSCSI, or a vendor-specific iSCSI or fibre channel plug-in. As Oracle VM Storage Connect
228
Discover SAN Server
plug-in are located on the Oracle VM Servers, this field is only populated if you have already
performed Server Discovery. You cannot add storage without taking this step first.
• Plugin Private Data: Any vendor-specific Oracle VM Storage Connect plug-in data that may be
required. This is not available to generic storage.
Note
When registering a vendor-specific storage array, be sure to double-check
the information you entered in the plug-in private data field. Once the storage
array is registered, this field can no longer be modified. If you need to update
the plug-in private data, you must unregister and re-register the storage array.
• Admin Host: The host name or IP address of the administration host. This is not available to generic
storage.
• Admin Username: The admin host username. This is not available to generic storage.
• Admin Password: The password for the admin user. This is not available to generic storage.
Click Next.
5. The Access Information step is displayed in the wizard. This is not applicable to Fibre Channel
storage arrays.
An access host is the IP address of the network interface that has access to the SAN server and
creates a network path to the storage. In this dialog enter one or more access hosts to create network
paths to the storage. To add multiple paths (for multipathing), add multiple access hosts. You must
have at least one access host to the storage. On some ISCSI servers, only one access host is
supported, so your screen may differ from the example in this step. If so, enter the access host IP
address, access port and optionally the CHAP authentication details on the screen that you see, and
the remaining parts of this step are not required to perform.
If you want to use CHAP authentication to connect to the SAN server, check the Use CHAP check box.
Click Create New Access Host
to add access hosts for the SAN server.
The Create Access Host dialog box is displayed.
229
Discover SAN Server
Enter the IP address and access port of the host that has access to the SAN server. The default access
port for iSCSI is 3260. If you checked CHAP authentication in the previous dialog, enter the username
and password to access the storage. Click OK.
Repeat this step for each access host, for example, you may have access hosts such as
10.172.76.130, 10.172.76.131, 10.172.77.130, and 10.172.77.131 to enable multipathing.
When you have entered all access hosts, click Next.
6. For most SAN servers the wizard moves straight to the Add Admin Servers step. However, if you
have vendor-specific storage hardware with an admin host handling more than one storage array, such
as certain HP EVAs and EMC arrays, you must enter the name of the array to be used for the new
SAN server. The wizard recognizes this type of storage and displays the Set Storage Name step when
applicable. Enter the storage name and click Next.
7. The Add Admin Servers step is displayed in the wizard. If you are working with a non-clustered server
pool, you may skip this step.
230
Discover SAN Server
Use the arrow buttons to move the required Oracle VM Servers from the Available Server(s) box to
the Selected Server(s) box. This selects which Oracle VM Servers are to be made available to perform
Oracle VM related admin operations on the SAN server. Click Next.
8. The Manage Access Group step is displayed in the wizard.
This final phase of the wizard offers you the access group configuration functionality. Within an access
group you add the storage initiators to Oracle VM Servers to complete the storage configuration.
Important
You must add a storage initiator to an access group for each Oracle VM Server
that you want to access the SAN server. If you do not add any storage initiators,
Oracle VM cannot log in to the storage array and no LUNs can be accessed.
A default access group may be created during the discovery process.
• If no access group exists, you can create one from this dialog by clicking Create Access Group
.
• If you want to modify an existing access group for use with this SAN server, select it from the list and
click Edit Access Group .
• If necessary, you can delete an access group by clicking Delete Access Group
231
Summary
This example uses a generic ISCSI SAN server, so a default access group is created. Select the
default access group in the table and click Edit Access Group , then select the Storage Initiators
tab in the Edit Access Group dialog box.
Select and move the Oracle VM Servers into the Selected Storage Initiators box to add storage
initiators to each Oracle VM Server. Click OK.
The access group management functionality is also available outside this wizard. To access it, you
must go to the Storage tab, select a SAN server in the navigation pane, and change the Perspective
field in the management pane to Access Groups, as described in Section 6.6.4, “Access Groups
Perspective”. Access group management for an individual Oracle VM Server is also described in
Section 3.5.7.1, “View Access Groups for Selected Initiator”.
Click Finish to complete the SAN server discovery operation.
The new storage array appears in the navigation pane, under SAN Servers. Prior to the access group
configuration, the Oracle VM Storage Connect plug-in established a link to the storage location. By
configuring the access group(s), you grant one or more Oracle VM Servers access to the storage
array, so that the storage elements or physical disks offered by the SAN server appear in Oracle VM
Manager. Access group configuration and management is described in detail in the next section. The
exception to the rule is again the unmanaged fibre channel storage array, which does not use the
concept of access groups but offers its LUNs to all Oracle VM Servers connected to the fibre channel
storage network.
Note
If you configured CHAP authentication for your SAN server and CHAP is
not properly configured on your SAN storage device, or the authentication
credentials that you provide for your Access Groups are incorrect, none of the
LUNs or physical disks available on your SAN server are discovered and no
error message is returned. You may need to check the logs on your SAN server
to evaluate the required action that should be taken.
6.2 Summary
On the Storage tab there is a navigation pane. At the top of the navigation pane is the navigation toolbar
discussed in Section 6.1, “Toolbar”. Within the navigation pane is a navigation tree that allows you to
navigate through the different object types that comprise your environment.
232
File Servers Folder
Different objects may be nested at different levels within the navigation tree depending on their
relationships to each other. Clicking on different objects or folders within the navigation tree enables
access to the different perspectives available for that object in the management pane.
The navigation tree that is available within the Storage tab conforms to the following structure:
• File Servers Folder
• File Server Item
• SAN Servers Folder
• SAN Server Item
• Volume Group Item
• Unmanaged Fibre Channel Storage Array Item
• Unmanaged iSCSI Storage Array Item
• Local File Systems Item
• Shared File Systems Item
Each navigation element has a number of associated perspectives offering different views of the objects
contained by the selected navigation element, or the configuration information specific to it. For many of
these perspectives, an associated toolbar is provided so that it is possible to perform different configuration
or management tasks on elements selected in the management pane.
6.3 File Servers Folder
The File Servers navigation folder contains each file server that has been configured within the
environment. The structure of the navigation provided in the navigation tree is discussed in more detail in
Section 6.2, “Summary”.
Clicking on the File Servers navigation folder in the navigation tree allows you to access different
perspectives in the management pane. Each perspective provides its own view of all of the file servers
within Oracle VM Manager. Most of the perspectives also include separate perspective toolbars that enable
you to perform various configuration or management tasks specific to the view currently displayed within
the management pane. The File Servers navigation folder offers the following perspectives within the
management pane:
• File Servers Perspective
6.3.1 File Servers Perspective
The File Servers perspective lists the different file servers configured in your environment. The following
columns are displayed in the management pane:
• Name: The name that has been configured for the file server.
• Description: A description entered for the file server when it was created or edited.
This perspective includes a toolbar that consists of the following options:
233
File Servers Perspective
Table 6.3 File Servers Perspective Toolbar Icon Options
Toolbar Icon Option
Icon
Description
Discover File Server...
Displays the Discover File Server wizard. Use this option to
discover a new file server.
Edit File Server...
Displays the Edit File Server dialog box.
Delete File Server
Displays the Delete Confirmation dialog box. Use this option
to delete the selected file server.
Discover File Systems
Triggers Oracle VM Manager to perform a file system
discovery on the selected file server. Use this option to
discover newly added file systems that may have been
exported on the file server.
Refresh File Server
Refreshes the list of storage elements made available by the
selected file server. Use this option to rescan a file server after
making changes to its configuration. This updates the storage
information known to Oracle VM Manager. Since refreshing
storage may be time consuming, a confirmation dialog box is
displayed before the operation is launched.
6.3.1.1 Discover File Server
To discover a file server:
1. Make sure that your storage server exposes a writable file system to the storage network of your server
pool.
2. Select the Storage tab.
3. Click Discover File Server
in the toolbar to start the Discover a File Server wizard.
4. The File Server Parameters step is displayed in the wizard, where you enter the information
necessary for Oracle VM Manager to discover the external storage mount points.
Enter the storage information:
• Storage Plug-in: The Oracle VM Storage Connect plug-in corresponding to the type of file server
(generic NFS or vendor-specific). As Oracle VM Storage Connect plug-in are located on the Oracle
234
File Servers Perspective
VM Servers, this field is only populated if you have already performed Server Discovery. You cannot
add storage without taking this step first.
• Name: The name you wish to use to identify the file server.
• Access Host: The host name or IP address of the server offering the file system.
• Uniform Exports: If all Oracle VM Servers in all server pools have access to the same exports on
the file server, leave this as the default (checked). If the file server is configured to offer different
exports to different server pools, this box should be unchecked and, once you have completed the
steps in the wizard, you need to configure Access Groups so that Oracle VM Manager can be made
aware of export permissions. See Section 6.4.4, “Access Groups Perspective” for more information.
Important
Non-uniform exports are not intended for servers within the same server pool.
Your NFS server should be configured to, at least, provide the same exports
to all of the servers that belong to a particular clustered server pool.
• Description: Optional information you would like to add about this file server.
If you are adding a non-generic file server, for example a Sun ZFS Storage Appliance, also enter
the additional plug-in options to enable Oracle VM Manager to access the file server's configuration
management functions:
• Admin Host: The host name or IP address where administrative access to the file server is allowed
with appropriate credentials.
• Admin User Name: A user name with administrator access to the file server.
• Admin Password: The administrator password for the user name you entered.
Click Next.
5. The Add Admin Servers step is displayed in the wizard. If you are working with a non-clustered server
pool, you may skip this step. Admin servers are designated Oracle VM Servers that are capable of
logging into a storage array or file server to perform administrative functions such as extending a
file system or creating a new LUN. In the case of an NFS file server, admin servers are only used to
validate the file server. For backward compatibility reasons, admin servers are also capable of being
used to perform file server refreshes in much the same way as refresh servers.
Use the arrow buttons to move the required Oracle VM Servers from the Available Admin Server(s)
box to the Selected Admin Server(s) box.
235
File Servers Perspective
Click Next.
6. The Select Refresh Servers step is displayed in the wizard. Refresh server are designated Oracle VM
Servers that have visibility of one or more file systems on an NFS file server. These servers are used
for file system refreshing across server pools.
Each file system must be assigned at least one refresh server to allow for file system refreshing. During
the refresh of a file server, the refresh servers are used to refresh all file systems used across all pools.
For this reason it is critical that your refresh server list contains at least one server from each server
pool.
Important
In some environments, it is plausible to expect that the file server is configured
to provide different file system exports to different server pools. Therefore, it
is possible that no single server has access to all of the exports provided by a
file server. By assigning a server from each server pool to handle file system
refreshes, Oracle VM can ensure that all file systems are refreshed across all
server pools. If your environment is set up in such a way, you need to configure
Access Groups so that the manager can be made aware of export permissions.
See Section 6.4.4, “Access Groups Perspective” for more information.
If you select the Refresh All option available in the context menu for Server Pools on the Servers
and VMs tab, the configured refresh servers specified for each file system are used to perform a
comprehensive file system refresh and you are not provided with an option to use one or more alternate
refresh servers.
In this dialog, you must include at least one server from each server pool that you intend to create. You
may select more than one server from each server pool in order to ensure high availability, but adding
more than two servers is superfluous.
236
File Servers Perspective
Note
If you defined a group of admin servers in the previous step, for backward
compatibility reasons, these servers are added to the refresh server list, and
can be used to perform file server refreshes as well. This is not apparent in the
Oracle VM Manager Web Interface.
7. If you are using non-uniform file system exports (as selected in the first dialog of this wizard), click
Finish to complete the wizard. A message is displayed to inform you that you should now create
access groups for the file server. See Section 6.4.4, “Access Groups Perspective” for information on
creating an access group. When at least one access group is configured, you should then refresh the
file systems on the file server to make them available for use in Oracle VM Manager. Section 6.3.1.5,
“Refresh File Server” for information on refreshing a file server.
If you are using uniform file system exports, click Next to proceed to the Select File Systems step
of the wizard. If any file systems contain existing virtual machine resources, select the corresponding
check boxes to have Oracle VM Manager add the existing resources to the environment.
At the top of the dialog box there is an option to provide a Name Filter. You can use this filter to specify
search criteria to limit the objects displayed. See Section 1.13, “Name Filters” for more information.
237
File Servers Perspective
Click Finish to complete the file server registration.
The new file server appears in the navigation pane, under File Servers.
Note
If you created shares to be used as server pool file systems, these are
discovered in the same process. Since these file systems are relatively small, be
sure to keep those available for the server pools and create storage repositories
on the higher capacity file systems.
At the end of the file server discovery a refresh operation is triggered to make sure all file systems
available on the file server appear in Oracle VM Manager. When the operation is complete, and if you
select the file server in the navigation pane, the available file systems appear in the File Systems
overview table in the management pane.
Warning
If a server is unable to mount the file system for some reason, such as a
permissions related issue, Oracle VM Manager does not report the failure
as this would stop any further mounting. If a server is unable to access a file
system the reason is reported in the /var/log/ovs-agent.log log file on
the server.
6.3.1.2 Edit File Server
It is possible to edit the configuration for an existing file server. The steps and options to do so are
described below.
To edit the registered file server configuration:
1. If you need to modify a file server, select the File Servers folder in the navigation pane, select the file
servers in the management pane table.
2. Click on the
Edit File Server icon in the toolbar.
3. A dialog opens to allow you to reconfigure the file server. The dialog has three separate tabs:
• Configuration: A tab containing a form allowing you to edit the following information:
• Name: The name of the file server in Oracle VM Manager.
• Access Host: The host name or IP address of the server offering the file system.
• Uniform Exports: If all Oracle VM Servers in all server pools have access to the same exports on
the file server, leave this as the default (checked). If the file server is configured to offer different
238
File Servers Perspective
exports to different server pools, this box should be unchecked and, once you have completed
the steps in the wizard, you need to configure Access Groups so that Oracle VM Manager can
be made aware of export permissions. See Section 6.4.4, “Access Groups Perspective” for more
information.
Important
Non-uniform exports are not intended for servers within the same server
pool. Your NFS server should be configured to, at least, provide the same
exports to all of the servers that belong to a particular clustered server pool.
• Description: Optional information you would like to add about this file server.
• Admin Host: The host name or IP address where administrative access to the file server is
allowed with appropriate credentials. (Only available for non-generic file servers).
• Admin User Name: A user name with administrator access to the file server. (Only available for
non-generic file servers).
• Admin Password: The administrator password for the user name you entered. (Only available for
non-generic file servers).
• Admin Servers: A tab allowing you to manage which servers are delegated as Admin servers.
Admin servers are Oracle VM Servers that are capable of logging into a storage array or file server to
perform administrative functions such as extending a file system or creating a new LUN. In the case
of an NFS file server, admin servers are only used to validate the file server.
• Refresh Servers: A tab allowing you to manage which servers are delegated as Refresh servers.
Each file system must be assigned at least one refresh server to allow for file system refreshing.
During the refresh of a file server, the refresh servers are used to refresh all file systems used across
all pools. For this reason it is critical that your refresh server list contains at least one server from
each server pool.
4. When you have finished editing the file server, click OK to save the changes, or Cancel to exit out of
the dialog without saving any changes.
6.3.1.3 Delete File Server
It is possible to delete an existing file server if it is no longer in use by any servers within any server pools
and the Oracle VM Storage Connect plug-in that you are using supports this operation. The steps and
options to do so are described below.
To delete the registered file server:
1. If you need to delete a file server, select the File Servers folder in the navigation pane and select one
or more file servers in the management pane table.
2. Click on the
Delete File Server icon in the toolbar.
3. The Delete Confirmation dialog box is displayed. Click OK to delete the file server.
6.3.1.4 Discover File Systems
It is possible to trigger file system discovery on a file server. The steps and options to do so are described
below.
239
File Server Item
To discover the available file systems on a file server:
1. If you need to discover the file systems that are available on a file server, select the File Servers folder
in the navigation pane and select one or more file servers in the management pane table.
2. Click on the
Discover File Systems icon in the toolbar.
3. File System discovery for the selected file server is triggered and carried out automatically.
6.3.1.5 Refresh File Server
When changes are made to the disks, file systems or exports on a file server, it is useful to refresh the
configuration of your file servers to make Oracle VM Manager aware of the changes.
To refresh the registered file server:
1. Select the File Servers folder in the navigation pane, select one or more file servers in the
management pane table.
2. Click on the
Refresh File Server option in the toolbar.
3. The selected file servers are refreshed and their configurations are updated within Oracle VM Manager.
6.4 File Server Item
Each File Server navigation item is listed underneath the Section 6.3, “File Servers Folder” when it has
been expanded. The structure of the navigation provided in the navigation tree is discussed in more detail
in Section 6.2, “Summary”.
Clicking on a File Server navigation item in the navigation tree allows you to access different perspectives
in the management pane. Each perspective provides its own view of the file server within Oracle VM
Manager. Most of the perspectives also include separate perspective toolbars that enable you to perform
various configuration or management tasks specific to the view currently displayed within the management
pane. A File Server navigation item offers the following perspectives within the management pane:
• Info Perspective
• Events Perspective
• File Systems Perspective
• Access Groups Perspective
6.4.1 Info Perspective
The Info perspective is common to many elements within the Oracle VM Manager Web Interface. This
perspective always shows the individually configured parameters for an item that is currently selected
in the navigation tree. Some of these configured parameters may be automatically populated through a
discovery process, while others may have been configured manually during the creation of the object that
is selected.
This perspective includes information reported by the NFS File Server based on information returned by
the Oracle VM Storage Connect plug-in in use. Some fields may not be populated, if the plug-in does not
support them. The information and fields available may vary depending on the plug-in that you are using.
The Generic File Server plug-in returns the following information:
• File Server Name: The configured name for the file server.
240
Events Perspective
• Description: The configured description for the file server.
• Storage Name: The storage server controller name specified when the storage server was created.
Uniquely identifies the correct controller if the storage server manager supports multiple controllers.
• Status: The status of the file server as reported by the file server.
• Validated: Whether or not the file server has been validated by Oracle VM Manager. No special storage
operations supported by the Oracle VM Storage Connect plug-in may occur until the storage server is
validated by Oracle VM Manager.
• Storage Plug-In: The name of the Oracle VM Storage Connect plug-in that is used to connect to the file
server.
• Storage Plug-In Version: The version number of the Oracle VM Storage Connect plug-in used to
connect to the file server.
• Plug-in Private Data: Additional parameters passed to the Oracle VM Storage Connect plug-in.
• Total Size (GiB): The total size, in GiB, reported by the file server.
• Free Size (GiB): The available free size, GiB, reported by the file server.
• Used Size (GiB): The amount of used space, in GiB, reported by the file server.
Additional fields may be listed to indicate the support status for various storage related functions as
reported by the Oracle VM Storage Connect plug-in in use.
6.4.2 Events Perspective
The Events perspective is common to many elements within the Oracle VM Manager Web Interface.
The Events perspective generally appears as an option within the Perspectives drop-down menu on the
management pane of tabs that include a navigation tree. In this case, the Events perspective displays
events specific to the item selected in the navigation tree and presents these in the management pane.
The Events perspective may also appear within a dialog that is triggered from a Display Selected
Events... perspective toolbar option. In this case, the Events perspective dialog displays events specific
to one or more elements selected in the management pane.
If an object has an error event associated with it you must acknowledge the event to clear the error and
return the object to normal operations. For example, this can occur if an Oracle VM Server or virtual
machine appear as Stopped (Error) in the status. The object in error is flagged with a red icon in the
navigation tree. Oracle VM Servers, virtual machines, repositories and storage objects can have error
events associated with them.
Since Oracle VM Manager attempts to resolve issues automatically as much as possible, not all events
can be acknowledged by a user within the Oracle VM Manager Web Interface. Therefore, a flag is set
for events that are user acknowledgeable. If an event does not have this flag set, you are unable to
acknowledge it, since it is handled internally by Oracle VM Manager.
The Events perspective or dialog contains a table with the following columns of information per event:
• Severity: The severity level assigned to the event.
• Timestamp: The date and time that the event occurred.
• Modify Time: The last recorded date and time that the event was modified.
241
Events Perspective
• Type: The type of event according to Oracle VM Manager's event categorization model.
• Summary: A summary description of the event.
• Acknowledged: Whether an error event has been acknowledged.
• User Acknowledgeable: Whether or not an event can be acknowledged by the user.
Alongside each event entry in the table, there is an arrow that allows you to expand the view for each
entry. This displays the full Description for the event.
The Events perspective or dialog contains a perspective toolbar with the following options:
Table 6.4 Events Perspective Toolbar Icon Options
Toolbar Icon Option
Icon
Description
Acknowledge
Acknowledge a selected error event to clear the error and
return the object to normal operations. Note that this option is
only available for user acknowledgeable events.
Acknowledge All
Acknowledge all error events associated with an object to clear
the errors and return the object to normal operations. Note that
only user acknowledgeable events are cleared. This button is
always clickable, even if there are no user acknowledgeable
events. Clicking it when there are no user acknowledgeable
events results in an error dialog.
Display Count
A drop-down menu that allows you to select the number of
events that should be displayed in the management pane,
while you are currently in this perspective.
Acknowledging Events/Errors
If an object has an error event associated with it you must acknowledge the event to clear the error and
return the object to normal operations. For example, this can occur if an Oracle VM Server or virtual
machine appear as Stopped (Error) in the status. The object in error is flagged with a red icon in the
navigation tree. Oracle VM Servers, virtual machines, repositories and storage objects can have error
events associated with them. The following procedures show you how to clear errors and return the object
to normal operations.
To acknowledge Oracle VM Server error events:
1. Click the Servers and VMs tab.
2. Select the Oracle VM Server in the navigation tree.
3. Select Events from the Perspective drop-down list in the management pane.
4. Select the user acknowledgeable error event and click Acknowledge
to clear all user acknowledgeable errors.
, or click Acknowledge All
To acknowledge virtual machine error events:
1. Click the Servers and VMs tab.
2. Select the server pool, or Oracle VM Server on which the virtual machine resides in the navigation tree.
3. Select Virtual Machines from the Perspective drop-down list in the management pane.
4. Select the virtual machine in the management pane table. Click Display Selected VM Events...
242
.
File Systems Perspective
5. The Events dialog box is displayed. Select the user acknowledgeable error event and click
Acknowledge , or click Acknowledge All to clear all user acknowledgeable errors. Click Close.
To acknowledge storage repository error events:
1. Click the Repositories tab.
2. Select the repository in the navigation tree.
3. Select Events from the Perspective drop-down list in the management pane.
4. Select the error event and click Acknowledge
, or click Acknowledge All
to clear all errors.
To acknowledge storage error events:
1. Click the Storage tab.
2. Select File Servers, SAN Servers, or a storage server in the navigation tree.
3. Select Events from the Perspective drop-down list in the management pane.
4. Select the user acknowledgeable error event and click Acknowledge
to clear all user acknowledgeable errors.
, or click Acknowledge All
6.4.3 File Systems Perspective
The File Systems perspective lists the different file systems configured in your environment and running on
an NFS file server. The following columns are displayed in the management pane:
• Name: The name that has been configured for the file system.
• Event Severity: The event level severity for each file system.
• Refreshed: Whether or not the file system has been refreshed.
• Size (GiB): A grouping that consists of the following columns:
• Free: The size of the file system, in GiB, that is currently free.
• Used: The size of the file system, in GiB, that is currently in use.
• Total: The total size, in GiB, of the file system.
• Description: A description entered for the file system when it was created or edited.
This perspective includes a toolbar that consists of the following options:
Table 6.5 File Systems Perspective Toolbar Icon Options
Toolbar Icon Option
Icon
Description
Edit File System...
Displays the Edit File System dialog box.
Delete File System
Displays the Delete Confirmation dialog box. Use this option
to delete the selected file system.
Refresh File System
Refreshes the file systems made available by the selected
file server. Use this option to rescan the file systems after
making changes to its configuration. This updates the storage
information known to Oracle VM Manager.
243
File Systems Perspective
Toolbar Icon Option
Display Selected File System
Events...
Icon
Description
Display the Events dialog box which contains the job event
associated with the selected file systems.
6.4.3.1 Edit File System
It is possible to edit the configuration for an existing file system. The steps and options to do so are
described below.
To edit an NFS file system:
1. If you need to modify an NFS file system, select a file server item contained the File Servers folder in
the navigation pane, change perspective to the File Systems perspective. Select the file system that
you wish to edit in the management pane table.
2. Click on the
Edit File System icon in the toolbar.
3. A dialog opens to allow you to reconfigure the file system. You can edit the following parameters:
• Name: The name of the file system in Oracle VM Manager.
• Description: Optional information you would like to add about this file system.
4. When you have finished editing the file system, click OK to save the changes, or Cancel to exit out of
the dialog without saving any changes.
6.4.3.2 Delete File System
It is possible to delete an existing file system on an NFS File Server if it is no longer in use by any servers
within any server pools. The steps and options to do so are described below.
To delete an NFS file system:
1. If you need to delete an NFS file system, select a file server item contained the File Servers folder in
the navigation pane, change perspective to the File Systems perspective. Select the file system or file
systems that you wish to delete in the management pane table.
2. Click on the
Delete File System icon in the toolbar.
3. The Delete Confirmation dialog box is displayed. Click OK to delete the file system.
6.4.3.3 Refresh File System
When changes are made to the file systems or exports on a file server, it is useful to refresh the
configuration of your file systems to make Oracle VM Manager aware of the changes.
To refresh the file system:
1. Select a file server item contained the File Servers folder in the navigation pane, change perspective
to the File Systems perspective. Select the file system or file systems that you wish to refresh in the
management pane table.
2. Click on the
Refresh File System option in the toolbar.
3. The selected file systems are refreshed and their configurations are updated within Oracle VM
Manager.
6.4.3.4 Display Events
244
File Systems Perspective
The Events perspective is common to many elements within the Oracle VM Manager Web Interface.
The Events perspective generally appears as an option within the Perspectives drop-down menu on the
management pane of tabs that include a navigation tree. In this case, the Events perspective displays
events specific to the item selected in the navigation tree and presents these in the management pane.
The Events perspective may also appear within a dialog that is triggered from a Display Selected
Events... perspective toolbar option. In this case, the Events perspective dialog displays events specific
to one or more elements selected in the management pane.
If an object has an error event associated with it you must acknowledge the event to clear the error and
return the object to normal operations. For example, this can occur if an Oracle VM Server or virtual
machine appear as Stopped (Error) in the status. The object in error is flagged with a red icon in the
navigation tree. Oracle VM Servers, virtual machines, repositories and storage objects can have error
events associated with them.
Since Oracle VM Manager attempts to resolve issues automatically as much as possible, not all events
can be acknowledged by a user within the Oracle VM Manager Web Interface. Therefore, a flag is set
for events that are user acknowledgeable. If an event does not have this flag set, you are unable to
acknowledge it, since it is handled internally by Oracle VM Manager.
The Events perspective or dialog contains a table with the following columns of information per event:
• Severity: The severity level assigned to the event.
• Timestamp: The date and time that the event occurred.
• Modify Time: The last recorded date and time that the event was modified.
• Type: The type of event according to Oracle VM Manager's event categorization model.
• Summary: A summary description of the event.
• Acknowledged: Whether an error event has been acknowledged.
• User Acknowledgeable: Whether or not an event can be acknowledged by the user.
Alongside each event entry in the table, there is an arrow that allows you to expand the view for each
entry. This displays the full Description for the event.
The Events perspective or dialog contains a perspective toolbar with the following options:
Table 6.6 Events Perspective Toolbar Icon Options
Toolbar Icon Option
Icon
Description
Acknowledge
Acknowledge a selected error event to clear the error and
return the object to normal operations. Note that this option is
only available for user acknowledgeable events.
Acknowledge All
Acknowledge all error events associated with an object to clear
the errors and return the object to normal operations. Note that
only user acknowledgeable events are cleared. This button is
always clickable, even if there are no user acknowledgeable
events. Clicking it when there are no user acknowledgeable
events results in an error dialog.
Display Count
A drop-down menu that allows you to select the number of
events that should be displayed in the management pane,
while you are currently in this perspective.
245
Access Groups Perspective
Acknowledging Events/Errors
If an object has an error event associated with it you must acknowledge the event to clear the error and
return the object to normal operations. For example, this can occur if an Oracle VM Server or virtual
machine appear as Stopped (Error) in the status. The object in error is flagged with a red icon in the
navigation tree. Oracle VM Servers, virtual machines, repositories and storage objects can have error
events associated with them. The following procedures show you how to clear errors and return the object
to normal operations.
To acknowledge Oracle VM Server error events:
1. Click the Servers and VMs tab.
2. Select the Oracle VM Server in the navigation tree.
3. Select Events from the Perspective drop-down list in the management pane.
4. Select the user acknowledgeable error event and click Acknowledge
to clear all user acknowledgeable errors.
, or click Acknowledge All
To acknowledge virtual machine error events:
1. Click the Servers and VMs tab.
2. Select the server pool, or Oracle VM Server on which the virtual machine resides in the navigation tree.
3. Select Virtual Machines from the Perspective drop-down list in the management pane.
4. Select the virtual machine in the management pane table. Click Display Selected VM Events...
.
5. The Events dialog box is displayed. Select the user acknowledgeable error event and click
Acknowledge , or click Acknowledge All to clear all user acknowledgeable errors. Click Close.
To acknowledge storage repository error events:
1. Click the Repositories tab.
2. Select the repository in the navigation tree.
3. Select Events from the Perspective drop-down list in the management pane.
4. Select the error event and click Acknowledge
, or click Acknowledge All
to clear all errors.
To acknowledge storage error events:
1. Click the Storage tab.
2. Select File Servers, SAN Servers, or a storage server in the navigation tree.
3. Select Events from the Perspective drop-down list in the management pane.
4. Select the user acknowledgeable error event and click Acknowledge
to clear all user acknowledgeable errors.
, or click Acknowledge All
6.4.4 Access Groups Perspective
Usually an NFS server is configured to export the same file systems to different server pools. This setup
is described as having uniform exports. If, however, your NFS server is configured to export different file
246
Access Groups Perspective
systems to different server pools, no single server in any server pool has full access to all of the exports
available on the NFS server. This setup is described as having non-uniform exports. In these cases, in
order for Oracle VM Manager to properly handle file system refreshes, you need to configure Access
Groups to define the permissions available to each server pool. If your exports are uniform across all
server pools, you do not need to perform this operation.
It is important to understand that when describing uniform and non-uniform exports, we are describing
how the NFS server is configured to present exports to all of the servers belonging to a particular server
pool. Within any clustered server pool, all of the servers must have access to the same exports on the NFS
server.
The Access Groups perspective lists the different Access Groups configured in your environment. The
following columns are displayed in the management pane:
• Name: The name that has been configured for the access group.
• Event Severity: The event level severity associated with the access group.
• File Server: The file server that the access group applies to.
• Servers: The servers that belong to the access group.
• Description: A description entered for the access group when it was created or edited.
This perspective includes a toolbar that consists of the following options:
Table 6.7 Access Groups Perspective Toolbar Icon Options
Toolbar Icon Option
Icon
Description
Create An Access Group
Displays the Create an Access Group dialog box. Use this
option to create a new access group.
Edit Access Group
Displays the Edit Access Group dialog box. Use this option
to edit access group settings such as name, description, file
systems belonging to the Access Group and the servers that
have access to these file systems.
Delete Access Group
Displays the Delete Confirmation dialog box. Use this option
to delete the selected access group.
Display Selected Access
Group Events...
Display the Events dialog box which contains the job event
associated with the selected access groups.
6.4.4.1 Create Access Group
To create Access Groups for non-uniform exports
1. In the Storage tab, expand the File Servers folder in the navigation pane and select a file server listed
here. In the management pane, select the Access Groups perspective from the drop down.
2. To add a new Access Group, click the Create an Access Group icon
.
a. The Create an Access Group wizard appears. Enter a meaningful name and description for the
Access Group that you are creating. The group defines the set of file systems that are available to a
particular set of servers. Click Next.
b. In the Select File Systems step, identify the file systems that are accessible via the set of servers
that you are going to assign to the Access Group. Use the arrow buttons to move them into the
Selected File System(s) panel. Click Next.
247
Access Groups Perspective
c. In the Select Servers step, select either the individual servers or the server pools that have access
to the file system exports that you selected in the previous step. Use the arrow buttons to move
them into the Selected Server(s)/Selected Server Pool(s) panel. The option to add an entire
server pool to the access group is a convenience and simply adds all of the servers that belong
to a particular server pool at the time that you perform the action. If you add or remove a server
from a server pool after you have created the access group, the access group configuration is not
automatically updated.
d. Click Finish to complete the process of defining a new Access Group.
Note
A file system may only be associated with one Access Group. If you create a new
Access Group for a file system that is already associated with an existing Access
Group, the file system is disassociated from the original Access Group.
6.4.4.2 Edit Access Group
To edit Access Groups for non-uniform exports
1. In the Storage tab, expand the File Servers folder in the navigation pane and select a file server listed
here. In the management pane, select the Access Groups perspective from the drop down.
2. To edit an existing Access Group, click the Edit Access Group icon . The Edit Access Group
dialog opens. Tabs are provided to allow you to change the Access Group details, File Systems and
Servers.
6.4.4.3 Delete Access Groups
To delete Access Groups for non-uniform exports
1. On the Storage tab, expand the File Servers folder in the navigation pane and select a file server
listed here. In the management pane, select the Access Groups perspective from the drop down.
2. To delete an existing Access Group, click the Delete Access Group icon
displayed before the action can be completed.
. A confirmation dialog is
6.4.4.4 Display Events
The Events perspective is common to many elements within the Oracle VM Manager Web Interface.
The Events perspective generally appears as an option within the Perspectives drop-down menu on the
management pane of tabs that include a navigation tree. In this case, the Events perspective displays
events specific to the item selected in the navigation tree and presents these in the management pane.
The Events perspective may also appear within a dialog that is triggered from a Display Selected
Events... perspective toolbar option. In this case, the Events perspective dialog displays events specific
to one or more elements selected in the management pane.
If an object has an error event associated with it you must acknowledge the event to clear the error and
return the object to normal operations. For example, this can occur if an Oracle VM Server or virtual
machine appear as Stopped (Error) in the status. The object in error is flagged with a red icon in the
navigation tree. Oracle VM Servers, virtual machines, repositories and storage objects can have error
events associated with them.
Since Oracle VM Manager attempts to resolve issues automatically as much as possible, not all events
can be acknowledged by a user within the Oracle VM Manager Web Interface. Therefore, a flag is set
248
Access Groups Perspective
for events that are user acknowledgeable. If an event does not have this flag set, you are unable to
acknowledge it, since it is handled internally by Oracle VM Manager.
The Events perspective or dialog contains a table with the following columns of information per event:
• Severity: The severity level assigned to the event.
• Timestamp: The date and time that the event occurred.
• Modify Time: The last recorded date and time that the event was modified.
• Type: The type of event according to Oracle VM Manager's event categorization model.
• Summary: A summary description of the event.
• Acknowledged: Whether an error event has been acknowledged.
• User Acknowledgeable: Whether or not an event can be acknowledged by the user.
Alongside each event entry in the table, there is an arrow that allows you to expand the view for each
entry. This displays the full Description for the event.
The Events perspective or dialog contains a perspective toolbar with the following options:
Table 6.8 Events Perspective Toolbar Icon Options
Toolbar Icon Option
Icon
Description
Acknowledge
Acknowledge a selected error event to clear the error and
return the object to normal operations. Note that this option is
only available for user acknowledgeable events.
Acknowledge All
Acknowledge all error events associated with an object to clear
the errors and return the object to normal operations. Note that
only user acknowledgeable events are cleared. This button is
always clickable, even if there are no user acknowledgeable
events. Clicking it when there are no user acknowledgeable
events results in an error dialog.
Display Count
A drop-down menu that allows you to select the number of
events that should be displayed in the management pane,
while you are currently in this perspective.
Acknowledging Events/Errors
If an object has an error event associated with it you must acknowledge the event to clear the error and
return the object to normal operations. For example, this can occur if an Oracle VM Server or virtual
machine appear as Stopped (Error) in the status. The object in error is flagged with a red icon in the
navigation tree. Oracle VM Servers, virtual machines, repositories and storage objects can have error
events associated with them. The following procedures show you how to clear errors and return the object
to normal operations.
To acknowledge Oracle VM Server error events:
1. Click the Servers and VMs tab.
2. Select the Oracle VM Server in the navigation tree.
3. Select Events from the Perspective drop-down list in the management pane.
249
SAN Servers Folder
4. Select the user acknowledgeable error event and click Acknowledge
to clear all user acknowledgeable errors.
, or click Acknowledge All
To acknowledge virtual machine error events:
1. Click the Servers and VMs tab.
2. Select the server pool, or Oracle VM Server on which the virtual machine resides in the navigation tree.
3. Select Virtual Machines from the Perspective drop-down list in the management pane.
4. Select the virtual machine in the management pane table. Click Display Selected VM Events...
.
5. The Events dialog box is displayed. Select the user acknowledgeable error event and click
Acknowledge , or click Acknowledge All to clear all user acknowledgeable errors. Click Close.
To acknowledge storage repository error events:
1. Click the Repositories tab.
2. Select the repository in the navigation tree.
3. Select Events from the Perspective drop-down list in the management pane.
4. Select the error event and click Acknowledge
, or click Acknowledge All
to clear all errors.
To acknowledge storage error events:
1. Click the Storage tab.
2. Select File Servers, SAN Servers, or a storage server in the navigation tree.
3. Select Events from the Perspective drop-down list in the management pane.
4. Select the user acknowledgeable error event and click Acknowledge
to clear all user acknowledgeable errors.
, or click Acknowledge All
6.5 SAN Servers Folder
The SAN Servers navigation folder contains each SAN server that has been configured within the
environment. The structure of the navigation provided in the navigation tree is discussed in more detail in
Section 6.2, “Summary”.
Clicking on the SAN Servers navigation folder in the navigation tree allows you to access different
perspectives in the management pane. Each perspective provides its own view of all of the SAN servers
within Oracle VM Manager. Most of the perspectives also include separate perspective toolbars that enable
you to perform various configuration or management tasks specific to the view currently displayed within
the management pane. The File Servers navigation folder offers the following perspectives within the
management pane:
• SAN Servers Perspective
6.5.1 SAN Servers Perspective
The SAN Servers perspective lists the different SAN servers configured in your environment. The following
columns are displayed in the management pane:
• Name: The name that has been configured for the SAN server.
250
SAN Servers Perspective
• Status: The status of the SAN server (whether or not the disk is online).
• Size (GiB): A grouping that consists of the following columns:
• Allocated: The total size available for use by the SAN server.
• Free: The size of the SAN server, in GiB, that is currently free.
• Used: The size of the SAN server, in GiB, that is currently in use.
• Total: The total size, in GiB, of the SAN server.
• Description: A description entered for the SAN server when it was created or edited.
This perspective includes a toolbar that consists of the following options:
Table 6.9 SAN Servers Perspective Toolbar Icon Options
Toolbar Icon Option
Icon
Description
Discover SAN Server...
Displays the Discover SAN Server wizard. Use this option to
discover a new SAN server.
Edit SAN Server...
Displays the Edit SAN Server dialog box.
Delete SAN Server
Displays the Delete Confirmation dialog box. Use this option
to delete the selected SAN server.
Refresh SAN Server
Refreshes the list of storage elements made available by the
selected SAN server. Use this option to rescan a SAN server
after making changes to its configuration. This updates the
storage information known to Oracle VM Manager. Since
refreshing storage may be time consuming, a confirmation
dialog box is displayed before the operation is launched.
6.5.1.1 Discover SAN Server
This first phase covers the discovery and registration part, meaning how you discover the container of the
storage elements you intend to use in your environment.
Depending on the selected storage type and plug-in, you may be required to enter additional information
than shown in this example (which uses an ISCSI SAN server) when registering your storage array, as
shown in the following table.
Table 6.10 Required Information for Registering Different Storage Types
Information Field Required
Generic iSCSI
Vendorspecific iSCSI
Generic Fibre
Channel
Vendorspecific Fibre
Channel
Access host and port
Yes
Yes
No
No
Access credentials/CHAP
No
Optional
No
No
Administration information
No
Yes
No
Yes
Plug-in private data
No
Optional
No
Optional
To discover a storage array:
1. Make sure that your storage server exposes raw disks (Fibre Channel SAN volumes, iSCSI targets and
LUNs) to the storage network of your server pool.
251
SAN Servers Perspective
2. Select the Storage tab.
3. Click Discover SAN Server
to start the Discover SAN Server wizard.
4. The Discover SAN Server step is displayed in the wizard, where you enter the information necessary
for Oracle VM Manager to discover the external storage elements.
Enter the SAN storage information:
• Name: The name you wish to use to identify the SAN server.
• Description: Optional information you would like to add about this SAN server.
• Storage Type: The array is either a fibre channel or an iSCSI storage server.
• Storage Plug-in: The storage plug-in corresponding to the type of storage array, which is either
generic iSCSI, or a vendor-specific iSCSI or fibre channel plug-in. As Oracle VM Storage Connect
plug-in are located on the Oracle VM Servers, this field is only populated if you have already
performed Server Discovery. You cannot add storage without taking this step first.
• Plugin Private Data: Any vendor-specific Oracle VM Storage Connect plug-in data that may be
required. This is not available to generic storage.
Note
When registering a vendor-specific storage array, be sure to double-check
the information you entered in the plug-in private data field. Once the storage
array is registered, this field can no longer be modified. If you need to update
the plug-in private data, you must unregister and re-register the storage array.
• Admin Host: The host name or IP address of the administration host. This is not available to generic
storage.
• Admin Username: The admin host username. This is not available to generic storage.
• Admin Password: The password for the admin user. This is not available to generic storage.
Click Next.
5. The Access Information step is displayed in the wizard. This is not applicable to Fibre Channel
storage arrays.
252
SAN Servers Perspective
An access host is the IP address of the network interface that has access to the SAN server and
creates a network path to the storage. In this dialog enter one or more access hosts to create network
paths to the storage. To add multiple paths (for multipathing), add multiple access hosts. You must
have at least one access host to the storage. On some ISCSI servers, only one access host is
supported, so your screen may differ from the example in this step. If so, enter the access host IP
address, access port and optionally the CHAP authentication details on the screen that you see, and
the remaining parts of this step are not required to perform.
If you want to use CHAP authentication to connect to the SAN server, check the Use CHAP check box.
Click Create New Access Host
to add access hosts for the SAN server.
The Create Access Host dialog box is displayed.
Enter the IP address and access port of the host that has access to the SAN server. The default access
port for iSCSI is 3260. If you checked CHAP authentication in the previous dialog, enter the username
and password to access the storage. Click OK.
253
SAN Servers Perspective
Repeat this step for each access host, for example, you may have access hosts such as
10.172.76.130, 10.172.76.131, 10.172.77.130, and 10.172.77.131 to enable multipathing.
When you have entered all access hosts, click Next.
6. For most SAN servers the wizard moves straight to the Add Admin Servers step. However, if you
have vendor-specific storage hardware with an admin host handling more than one storage array, such
as certain HP EVAs and EMC arrays, you must enter the name of the array to be used for the new
SAN server. The wizard recognizes this type of storage and displays the Set Storage Name step when
applicable. Enter the storage name and click Next.
7. The Add Admin Servers step is displayed in the wizard. If you are working with a non-clustered server
pool, you may skip this step.
Use the arrow buttons to move the required Oracle VM Servers from the Available Server(s) box to
the Selected Server(s) box. This selects which Oracle VM Servers are to be made available to perform
Oracle VM related admin operations on the SAN server. Click Next.
8. The Manage Access Group step is displayed in the wizard.
254
SAN Servers Perspective
This final phase of the wizard offers you the access group configuration functionality. Within an access
group you add the storage initiators to Oracle VM Servers to complete the storage configuration.
Important
You must add a storage initiator to an access group for each Oracle VM Server
that you want to access the SAN server. If you do not add any storage initiators,
Oracle VM cannot log in to the storage array and no LUNs can be accessed.
A default access group may be created during the discovery process.
• If no access group exists, you can create one from this dialog by clicking Create Access Group
.
• If you want to modify an existing access group for use with this SAN server, select it from the list and
click Edit Access Group .
• If necessary, you can delete an access group by clicking Delete Access Group
This example uses a generic ISCSI SAN server, so a default access group is created. Select the
default access group in the table and click Edit Access Group , then select the Storage Initiators
tab in the Edit Access Group dialog box.
Select and move the Oracle VM Servers into the Selected Storage Initiators box to add storage
initiators to each Oracle VM Server. Click OK.
255
SAN Servers Perspective
The access group management functionality is also available outside this wizard. To access it, you
must go to the Storage tab, select a SAN server in the navigation pane, and change the Perspective
field in the management pane to Access Groups, as described in Section 6.6.4, “Access Groups
Perspective”. Access group management for an individual Oracle VM Server is also described in
Section 3.5.7.1, “View Access Groups for Selected Initiator”.
Click Finish to complete the SAN server discovery operation.
The new storage array appears in the navigation pane, under SAN Servers. Prior to the access group
configuration, the Oracle VM Storage Connect plug-in established a link to the storage location. By
configuring the access group(s), you grant one or more Oracle VM Servers access to the storage
array, so that the storage elements or physical disks offered by the SAN server appear in Oracle VM
Manager. Access group configuration and management is described in detail in the next section. The
exception to the rule is again the unmanaged fibre channel storage array, which does not use the
concept of access groups but offers its LUNs to all Oracle VM Servers connected to the fibre channel
storage network.
Note
If you configured CHAP authentication for your SAN server and CHAP is
not properly configured on your SAN storage device, or the authentication
credentials that you provide for your Access Groups are incorrect, none of the
LUNs or physical disks available on your SAN server are discovered and no
error message is returned. You may need to check the logs on your SAN server
to evaluate the required action that should be taken.
6.5.1.2 Edit SAN Server
It is possible to edit the configuration for an existing SAN server. The steps and options to do so are
described below.
To edit the registered SAN server configuration:
1. Select the SAN Servers folder in the navigation tree, select the SAN Servers option in the
Perspective drop-down list, select the SAN server that you wish to edit in the table.
2. Click on the
Edit SAN server icon in the toolbar.
3. A dialog opens to allow you to reconfigure the SAN server. The dialog has three separate tabs:
• Configuration: A tab containing a form allowing you to edit the following information:
• Name: The name of the SAN server in Oracle VM Manager.
• Description: Optional information you would like to add about this SAN server.
• Storage Plugin: The Oracle VM Storage Connect plug-in used to access the SAN Server.
• Storage Name: The storage name used by an Oracle VM Storage Connect plug-in that requires it.
• Admin Host: The host name or IP address where administrative access to the SAN server is
allowed with appropriate credentials. (Only available for non-generic SAN servers).
• Admin User Name: A user name with administrator access to the file server. (Only available for
non-generic SAN servers).
256
SAN Server Item
• Change Password: To modify the admin password, you must select the Change Password check
box.
• Admin Password: The administrator password for the user name you entered. (Only available for
non-generic SAN servers).
• Access: A tab allowing you to manage the IP addresses, port numbers and user credentials to use
for each access host that is available for the SAN server. This tab is not available for Fibre Channel
SAN servers.
• Admin Servers: A tab allowing you to manage which servers are delegated as Admin servers.
Admin servers are Oracle VM Servers that are capable of logging into a storage array or file server to
perform administrative functions such as extending a file system or creating a new LUN.
4. When you have finished editing the SAN server, click OK to save the changes, or Cancel to exit out of
the dialog without saving any changes.
6.5.1.3 Delete SAN Server
It is possible to delete an existing SAN server if it is no longer in use by any Oracle VM Servers within any
server pools and the Oracle VM Storage Connect plug-in that you are using supports this operation. The
steps and options to do so are described below.
To delete the registered SAN server:
1. If you need to delete a SAN server, select the SAN Servers folder in the navigation tree, select the
SAN Servers option in the Perspective drop-down list, select one or more SAN servers in the table
2. Click on the
Delete SAN server icon in the toolbar.
3. The Delete Confirmation dialog box is displayed. Click OK to delete the SAN server.
6.5.1.4 Refresh SAN Server
When changes are made to the disks or file systems on a SAN server, it is useful to refresh the
configuration of your SAN servers to make Oracle VM Manager aware of the changes. This option is not
available for unmanaged SAN servers.
To refresh the registered SAN server:
1. Select the SAN Servers folder in the navigation tree, select the SAN Servers option in the
Perspective drop-down list, select one or more SAN servers in the table
2. Click on the
Refresh SAN server option in the toolbar.
3. The selected SAN servers are refreshed and their configurations are updated within Oracle VM
Manager.
6.6 SAN Server Item
Each SAN Server navigation item is listed underneath the Section 6.5, “SAN Servers Folder” when it has
been expanded. The structure of the navigation provided in the navigation tree is discussed in more detail
in Section 6.2, “Summary”.
Clicking on a SAN Server navigation item in the navigation tree allows you to access different perspectives
in the management pane. Each perspective provides its own view of the SAN server within Oracle VM
Manager. Most of the perspectives also include separate perspective toolbars that enable you to perform
257
Info Perspective
various configuration or management tasks specific to the view currently displayed within the management
pane. A SAN Server navigation item offers the following perspectives within the management pane:
• Info Perspective
• Events Perspective
• Physical Disks Perspective
• Access Groups Perspective
• Volume Groups Perspective
6.6.1 Info Perspective
The Info perspective is common to many elements within the Oracle VM Manager Web Interface. This
perspective always shows the individually configured parameters for an item that is currently selected
in the navigation tree. Some of these configured parameters may be automatically populated through a
discovery process, while others may have been configured manually during the creation of the object that
is selected.
This perspective includes the following information:
• SAN Server Name: The configured name for the SAN server.
• Admin Host: The configured admin host to access this SAN server.
• Admin Username: The configured admin username to access this SAN server.
• Storage Name: The name of storage array as returned by the Oracle VM Storage Connect plug-in.
• Storage Type: The storage type for the storage array.
• Description: The configured description for the SAN server.
• SAN Server's Storage Description: The description returned for the SAN server as returned by the
Oracle VM Storage Connect plug-in.
• Status: The status of the SAN server as reported by the SAN server.
• Validated: Whether or not the SAN server has been validated by Oracle VM Manager. No special
storage operations supported by the Oracle VM Storage Connect plug-in may occur until the storage
server is validated by Oracle VM Manager.
• Storage Plug-In: The name of the Oracle VM Storage Connect plug-in used to connect to the SAN
server.
• Storage Plug-In Version: The version number of the Oracle VM Storage Connect plug-in used to
connect to the SAN server.
• Plug-in Private Data: Additional parameters passed to the Oracle VM Storage Connect plug-in.
• Total Size (GiB): The total size, in GiB, reported by the SAN server.
• Free Size (GiB): The available free size, in GiB, reported by the SAN server.
• Used Size (GiB): The amount of used space reported by the SAN server.
Additional fields may be listed to indicate the support status for various storage related functions as
reported by the Oracle VM Storage Connect plug-in in use.
258
Events Perspective
6.6.2 Events Perspective
The Events perspective is common to many elements within the Oracle VM Manager Web Interface.
The Events perspective generally appears as an option within the Perspectives drop-down menu on the
management pane of tabs that include a navigation tree. In this case, the Events perspective displays
events specific to the item selected in the navigation tree and presents these in the management pane.
The Events perspective may also appear within a dialog that is triggered from a Display Selected
Events... perspective toolbar option. In this case, the Events perspective dialog displays events specific
to one or more elements selected in the management pane.
If an object has an error event associated with it you must acknowledge the event to clear the error and
return the object to normal operations. For example, this can occur if an Oracle VM Server or virtual
machine appear as Stopped (Error) in the status. The object in error is flagged with a red icon in the
navigation tree. Oracle VM Servers, virtual machines, repositories and storage objects can have error
events associated with them.
Since Oracle VM Manager attempts to resolve issues automatically as much as possible, not all events
can be acknowledged by a user within the Oracle VM Manager Web Interface. Therefore, a flag is set
for events that are user acknowledgeable. If an event does not have this flag set, you are unable to
acknowledge it, since it is handled internally by Oracle VM Manager.
The Events perspective or dialog contains a table with the following columns of information per event:
• Severity: The severity level assigned to the event.
• Timestamp: The date and time that the event occurred.
• Modify Time: The last recorded date and time that the event was modified.
• Type: The type of event according to Oracle VM Manager's event categorization model.
• Summary: A summary description of the event.
• Acknowledged: Whether an error event has been acknowledged.
• User Acknowledgeable: Whether or not an event can be acknowledged by the user.
Alongside each event entry in the table, there is an arrow that allows you to expand the view for each
entry. This displays the full Description for the event.
The Events perspective or dialog contains a perspective toolbar with the following options:
Table 6.11 Events Perspective Toolbar Icon Options
Toolbar Icon Option
Icon
Description
Acknowledge
Acknowledge a selected error event to clear the error and
return the object to normal operations. Note that this option is
only available for user acknowledgeable events.
Acknowledge All
Acknowledge all error events associated with an object to clear
the errors and return the object to normal operations. Note that
only user acknowledgeable events are cleared. This button is
always clickable, even if there are no user acknowledgeable
events. Clicking it when there are no user acknowledgeable
events results in an error dialog.
Display Count
A drop-down menu that allows you to select the number of
events that should be displayed in the management pane,
while you are currently in this perspective.
259
Physical Disks Perspective
Acknowledging Events/Errors
If an object has an error event associated with it you must acknowledge the event to clear the error and
return the object to normal operations. For example, this can occur if an Oracle VM Server or virtual
machine appear as Stopped (Error) in the status. The object in error is flagged with a red icon in the
navigation tree. Oracle VM Servers, virtual machines, repositories and storage objects can have error
events associated with them. The following procedures show you how to clear errors and return the object
to normal operations.
To acknowledge Oracle VM Server error events:
1. Click the Servers and VMs tab.
2. Select the Oracle VM Server in the navigation tree.
3. Select Events from the Perspective drop-down list in the management pane.
4. Select the user acknowledgeable error event and click Acknowledge
to clear all user acknowledgeable errors.
, or click Acknowledge All
To acknowledge virtual machine error events:
1. Click the Servers and VMs tab.
2. Select the server pool, or Oracle VM Server on which the virtual machine resides in the navigation tree.
3. Select Virtual Machines from the Perspective drop-down list in the management pane.
4. Select the virtual machine in the management pane table. Click Display Selected VM Events...
.
5. The Events dialog box is displayed. Select the user acknowledgeable error event and click
Acknowledge , or click Acknowledge All to clear all user acknowledgeable errors. Click Close.
To acknowledge storage repository error events:
1. Click the Repositories tab.
2. Select the repository in the navigation tree.
3. Select Events from the Perspective drop-down list in the management pane.
4. Select the error event and click Acknowledge
, or click Acknowledge All
to clear all errors.
To acknowledge storage error events:
1. Click the Storage tab.
2. Select File Servers, SAN Servers, or a storage server in the navigation tree.
3. Select Events from the Perspective drop-down list in the management pane.
4. Select the user acknowledgeable error event and click Acknowledge
to clear all user acknowledgeable errors.
, or click Acknowledge All
6.6.3 Physical Disks Perspective
The Physical Disks perspective lists the different physical disks configured in your environment and
running on a SAN storage array. The following columns are displayed in the management pane:
• Name: The name that has been configured for the physical disk
260
Physical Disks Perspective
• Event Severity: The event level severity for the physical disk.
• Size (GiB): The size, in GiB, of the physical disk.
• Volume Group: The volume group that the physical disk belongs to.
• Server: The servers that have access to the physical disk.
• Status: The status of the physical disk (whether or not the disk is online).
• Shareable: Whether the physical disk is shareable or not.
• Description: A description entered for the physical disk when it was created or edited.
Alongside each physical disk entry in the table, there is an arrow that allows you to expand the view for
each entry. This exposes further information:
• Name: The user-specified alias for the physical disk. The name can be changed without changing the
name of the physical disk on the storage array.
• User Friendly Name: The name of the physical disk on the storage array. The name was specified
when the disk was created and cannot be changed.
• SAN Server: The SAN server that the physical disk belongs to.
• Thin Provision: Whether or not thin provisioning is supported by the physical disk.
• Type: The type of storage that the physical disk is a part of (for example, iSCSI or Fibre Channel).
• Reserved by Server(s): Whether or not the physical disk is unavailable for use by Oracle VM Manager.
• Storage Targets: The endpoint provided by the storage server through which the server may direct
commands to the physical disk. The storage target provides access to the physical disk.
• Server Pool: The server pool that the physical disk belongs to.
• Repository: The repository that the physical disk belongs to.
• VM(s): Virtual machines using the physical disk.
• ID: The UUID for the physical disk.
• Page83 ID: The unique identifier for the physical disk.
• Access Groups: The access groups that the physical disk belongs to.
• Extra Information: Information that is passed to and from the Oracle VM Storage Connect plug-in for
use internally by the plug-in.
The management functions you can perform on the disk are available as icons in the perspective toolbar.
Some management options are only available to SAN server disks that use a non-generic Storage Connect
plug-in.
Table 6.12 Physical Disks Perspective Toolbar Icon Options
Toolbar Icon Option
Create Physical Disk...
Icon
Description
Displays the Create Physical Disk dialog box. Use this option
to create a new physical disk in the selected volume group of
the storage array of your choice.
261
Physical Disks Perspective
Toolbar Icon Option
Icon
Description
This option is not supported for storage arrays using a generic
Oracle VM Storage Connect plug-in.
Edit Physical Disk...
Displays the Edit Physical Disk dialog box. Use this option
to change the name, size, provisioning and share ability of the
selected physical disk.
Delete Physical Disk
Displays the Delete Confirmation dialog box. Use this option
to delete the selected physical disk.
Clone Physical Disk
Displays the Clone Physical Disk dialog box. Use this option
to clone a physical disk to another physical disk or to a disk
image on a file server.
Refresh Physical Disk
Refreshes the physical disks on a storage array. Use this
option to rescan the physical disks after making changes to
the configuration of a storage array. This updates the storage
information known to Oracle VM Manager.
Display Servers using Physical
Disk...
Displays the Servers using Physical Disk dialog box. Use
this option to view which servers are using a selected physical
disk.
Display Selected Physical Disk
Events...
Display the Events dialog box which contains the job event
associated with the selected physical disks.
6.6.3.1 Create Physical Disk (not supported on Generic)
On SAN Servers that are not using a generic Oracle VM Storage Connect plug-in, it is frequently possible
to create a new physical disk.
To create a physical disk on a SAN Server:
1. Expand the SAN Servers folder in the navigation tree, select a SAN server item contained within the
folder. Select the Physical Disks option in the Perspective drop-down list.
2. Click on the
Create Physical Disk option in the toolbar.
3. The Create Physical Disk dialog is displayed. Enter or select the following:
• Volume Group: A volume group that you want the physical disk to belong to.
• Name: A name for the physical disk.
• Size (GiB): The size of the physical disk, in GiB.
• Extra Information: Optional information that is passed to and from the Oracle VM Storage Connect
plug-in for use internally by the plug-in.
• Description: An optional description of the physical disk.
• Shareable: Whether or not the physical disk is shareable.
• Thin Provision: Whether or not thin provisioning is to be supported by the physical disk.
4. When you have finished editing the parameters to define the new physical disk, click OK to save the
changes, or Cancel to exit out of the dialog without saving any changes.
6.6.3.2 Edit Physical Disk
262
Physical Disks Perspective
It is possible to edit the configuration for a physical disk either available on a SAN server or as local or
shared storage. The steps and options to do so are described below.
To edit Physical Disk configuration:
1. On the Storage tab, expand the SAN Servers folder in the navigation tree, select a SAN server item
contained within the folder. Select the Physical Disks option in the Perspective drop-down list. Select
the physical disk that you wish to edit in the table presented in the management pane.
To edit the physical disk configuration for a physical disk used by a particular server, on the Servers
and VMs tab, expand the Server Pools or Unassigned Servers folder, to select a particular server
in the navigation tree. Select the Physical Disks option in the Perspective drop-down list. Select the
physical disk that you wish to edit in the table presented in the management pane.
2. Click on the
Edit Physical Disk icon in the toolbar.
3. A dialog opens to allow you to reconfigure the Physical Disk. The dialog has the following options:
• ID: A non-editable field containing the physical disk's UUID as it is stored within Oracle VM Manager.
• Name: A field to change the name of the physical disk within Oracle VM Manager.
• Current Size(GiB): A non-editable field containing the physical disk's current size, in GiB.
• New Size(GiB): A field to change the size, in GiB, of the physical disk. The size of the physical disk
can only be increased in size.
• Description: A text field allowing a description of the physical disk.
• Shareable: A check box that determines whether or not the disk can be shared.
• Thin Provision: A non-editable field describing whether or not thin provisioning is supported by the
disk.
4. When you have finished editing the physical disk, click OK to save the changes, or Cancel to exit out of
the dialog without saving any changes.
6.6.3.3 Delete Physical Disk
It is possible to delete an existing physical disk if it is no longer in use by any servers within any server
pools and the Oracle VM Storage Connect plug-in that you are using supports this operation. The steps
and options to do so are described below.
To delete the registered physical disk:
1. Expand the SAN Servers folder in the navigation tree, select a SAN server item contained within the
folder. Select the Physical Disks option in the Perspective drop-down list. Select the physical disk
that you wish to delete in the table presented in the management pane.
To delete a physical disk used by a particular server, on the Servers and VMs tab, expand the Server
Pools or Unassigned Servers folder, to select a particular server in the navigation tree. Select the
Physical Disks option in the Perspective drop-down list. Select the physical disk that you wish to
delete in the table presented in the management pane.
2. Click on the
Delete Physical Disk icon in the toolbar.
3. The Delete Confirmation dialog box is displayed. Click OK to delete the physical disk.
6.6.3.4 Clone Physical Disk
263
Physical Disks Perspective
It is possible to clone a physical disk. The steps and options to do so are described below.
To clone a Physical Disk:
1. On the Storage tab, expand the SAN Servers folder in the navigation tree, select a SAN server item
contained within the folder. Select the Physical Disks option in the Perspective drop-down list. Select
the physical disk that you wish to clone in the table presented in the management pane.
To clone a physical disk used by a particular server, on the Servers and VMs tab, expand the Server
Pools or Unassigned Servers folder, to select a particular server in the navigation tree. Select the
Physical Disks option in the Perspective drop-down list. Select the physical disk that you wish to
clone in the table presented in the management pane.
2. Click on the
Clone Physical Disk icon in the toolbar.
3. A dialog opens to allow you to clone the Physical Disk. The dialog has the following options:
• Name: A field to set the name of the physical disk clone that you are going to create within Oracle
VM Manager.
• Clone Target Type: A drop-down menu allowing you to select the type of storage to be used for the
physical disk clone:
• Physical Disk: Copies the data from one physical disk to another.
• Repository: Copies the data from the physical disk into a virtual disk image in an existing
repository.
• Clone Target: A searchable field to allow you to select the target location where the clone is to be
stored.
• Clone Type: A drop-down menu allowing you to select the type of clone to create:
• Sparse Copy: Copies only the written data from the physical disk to the target clone.
• Non-sparse Copy: Performs a block copy of the physical disk to the target clone.
4. When you have finished setting the clone parameters for the physical disk, click OK to begin the clone
job, or Cancel to exit out of the dialog without saving any changes.
6.6.3.5 Refresh Physical Disk
When changes are made to the physical disks on a SAN server or Oracle VM Server, it is useful to refresh
the configuration of your physical disks to make Oracle VM Manager aware of the changes.
To refresh physical disks:
1. Expand the SAN Servers folder in the navigation tree, select a SAN server item contained within the
folder. Select the Physical Disks option in the Perspective drop-down list. Select the physical disk or
disks that you wish to refresh in the table presented in the management pane.
To refresh physical disks used by a particular server, on the Servers and VMs tab, expand the Server
Pools or Unassigned Servers folder, to select a particular server in the navigation tree. Select the
Physical Disks option in the Perspective drop-down list. Select the physical disk that you wish to
refresh in the table presented in the management pane.
2. Click on the
Refresh Physical Disk option in the toolbar.
264
Physical Disks Perspective
3. The selected physical disks are refreshed and their configurations are updated within Oracle VM
Manager.
Note
If you encounter an error, when refreshing a physical disk with a repository located
on it, similar to the following:
OVMAPI_7281E Cannot perform operation on file system...
You may need to ensure that the repository is under the ownership of the Oracle
VM Manager instance that you are using. See Section 4.3.1.2, “Edit Repository” for
more information.
6.6.3.6 Display Servers Using a Physical Disk
It is possible to display the Oracle VM Servers that are using a physical disk available on a SAN server.
The steps and options to do so are described below.
To display a list of Oracle VM Servers using a Physical Disk on a SAN server:
1. Expand the SAN Servers folder in the navigation tree, select a SAN server item contained within the
folder. Select the Physical Disks option in the Perspective drop-down list. Select the physical disk
that you wish to view in the table presented in the management pane.
2. Click on the
Display Servers using Physical Disk icon in the toolbar.
3. A dialog opens to display the Oracle VM Servers that are configured to use the Physical Disk. The
dialog provides the following information in tabular format:
• Name: The name of the Oracle VM Server.
• Description: The configured description for the Oracle VM Server.
• Status: The running status of the Oracle VM Server.
• Utilization (%): The percentage of the disk that is utilized by the Oracle VM Server.
• Maintenance Mode: Whether or not the Oracle VM Server is in maintenance mode.
• Owned: Whether or not the current instance of Oracle VM Manager has ownership of the Oracle VM
Server.
4. When you have finished viewing the list of servers with access to the physical disk, click Close to exit
out of the dialog.
6.6.3.7 Display Events
The Events perspective is common to many elements within the Oracle VM Manager Web Interface.
The Events perspective generally appears as an option within the Perspectives drop-down menu on the
management pane of tabs that include a navigation tree. In this case, the Events perspective displays
events specific to the item selected in the navigation tree and presents these in the management pane.
The Events perspective may also appear within a dialog that is triggered from a Display Selected
Events... perspective toolbar option. In this case, the Events perspective dialog displays events specific
to one or more elements selected in the management pane.
If an object has an error event associated with it you must acknowledge the event to clear the error and
return the object to normal operations. For example, this can occur if an Oracle VM Server or virtual
265
Physical Disks Perspective
machine appear as Stopped (Error) in the status. The object in error is flagged with a red icon in the
navigation tree. Oracle VM Servers, virtual machines, repositories and storage objects can have error
events associated with them.
Since Oracle VM Manager attempts to resolve issues automatically as much as possible, not all events
can be acknowledged by a user within the Oracle VM Manager Web Interface. Therefore, a flag is set
for events that are user acknowledgeable. If an event does not have this flag set, you are unable to
acknowledge it, since it is handled internally by Oracle VM Manager.
The Events perspective or dialog contains a table with the following columns of information per event:
• Severity: The severity level assigned to the event.
• Timestamp: The date and time that the event occurred.
• Modify Time: The last recorded date and time that the event was modified.
• Type: The type of event according to Oracle VM Manager's event categorization model.
• Summary: A summary description of the event.
• Acknowledged: Whether an error event has been acknowledged.
• User Acknowledgeable: Whether or not an event can be acknowledged by the user.
Alongside each event entry in the table, there is an arrow that allows you to expand the view for each
entry. This displays the full Description for the event.
The Events perspective or dialog contains a perspective toolbar with the following options:
Table 6.13 Events Perspective Toolbar Icon Options
Toolbar Icon Option
Icon
Description
Acknowledge
Acknowledge a selected error event to clear the error and
return the object to normal operations. Note that this option is
only available for user acknowledgeable events.
Acknowledge All
Acknowledge all error events associated with an object to clear
the errors and return the object to normal operations. Note that
only user acknowledgeable events are cleared. This button is
always clickable, even if there are no user acknowledgeable
events. Clicking it when there are no user acknowledgeable
events results in an error dialog.
Display Count
A drop-down menu that allows you to select the number of
events that should be displayed in the management pane,
while you are currently in this perspective.
Acknowledging Events/Errors
If an object has an error event associated with it you must acknowledge the event to clear the error and
return the object to normal operations. For example, this can occur if an Oracle VM Server or virtual
machine appear as Stopped (Error) in the status. The object in error is flagged with a red icon in the
navigation tree. Oracle VM Servers, virtual machines, repositories and storage objects can have error
events associated with them. The following procedures show you how to clear errors and return the object
to normal operations.
To acknowledge Oracle VM Server error events:
1. Click the Servers and VMs tab.
266
Access Groups Perspective
2. Select the Oracle VM Server in the navigation tree.
3. Select Events from the Perspective drop-down list in the management pane.
4. Select the user acknowledgeable error event and click Acknowledge
to clear all user acknowledgeable errors.
, or click Acknowledge All
To acknowledge virtual machine error events:
1. Click the Servers and VMs tab.
2. Select the server pool, or Oracle VM Server on which the virtual machine resides in the navigation tree.
3. Select Virtual Machines from the Perspective drop-down list in the management pane.
4. Select the virtual machine in the management pane table. Click Display Selected VM Events...
.
5. The Events dialog box is displayed. Select the user acknowledgeable error event and click
Acknowledge , or click Acknowledge All to clear all user acknowledgeable errors. Click Close.
To acknowledge storage repository error events:
1. Click the Repositories tab.
2. Select the repository in the navigation tree.
3. Select Events from the Perspective drop-down list in the management pane.
4. Select the error event and click Acknowledge
, or click Acknowledge All
to clear all errors.
To acknowledge storage error events:
1. Click the Storage tab.
2. Select File Servers, SAN Servers, or a storage server in the navigation tree.
3. Select Events from the Perspective drop-down list in the management pane.
4. Select the user acknowledgeable error event and click Acknowledge
to clear all user acknowledgeable errors.
, or click Acknowledge All
6.6.4 Access Groups Perspective
The Access Groups perspective lists the different Access Groups configured in your environment. The
following columns are displayed in the management pane:
• Name: The name that has been configured for the access group.
• Event Severity: The event level severity associated with the access group.
• SAN Server: The SAN server that the access group applies to.
• Description: A description entered for the access group when it was created or edited.
This perspective includes a toolbar that consists of the following options:
Table 6.14 Access Groups Perspective Toolbar Icon Options
Toolbar Icon Option
Create Access Group...
Icon
Description
Displays the Create an Access Group dialog box. Use this
option to create a new access group. This option is only
available for non-generic storage arrays.
267
Access Groups Perspective
Toolbar Icon Option
Icon
Description
Edit Access Group...
Displays the Edit Access Group dialog box. Use this option to
edit access group settings such as name, description and the
storage initiators that have access to the SAN Server.
Delete Access Group
Displays the Delete Confirmation dialog box. Use this option
to delete the selected access group. This option is only
available for non-generic storage arrays. This option is only
available for non-generic storage arrays.
Display Selected Access
Group Events...
Display the Events dialog box which contains the job event
associated with the selected access groups.
6.6.4.1 Create Access Group
Except for generic storage arrays, it is possible to create multiple access groups in order to arrange and
restrict physical disk access according to your requirements. The generic iSCSI storage arrays have a
single access group available by default, where you can simply add or remove storage initiators from your
Oracle VM Servers.
Generic fibre channel storage has no access groups and is always listed under the Unmanaged Fibre
Channel Storage Array folder.
To configure an access group for a non-generic iSCSI storage array:
1. Expand the SAN Servers folder in the navigation tree, select a SAN server item contained within the
folder. Select the Access Groups option in the Perspective drop-down list.
2. Click Create Access Group
to start the Create an Access Group wizard.
3. The Create Access Group step is displayed in the wizard. Enter a name for your new access group
and optionally provide a description. Click Next.
4. The Select Initiators step is displayed in the wizard. It contains the available storage initiators for this
type of storage on the Oracle VM Servers in your environment. Use the arrow buttons to move the
required initiators from the Available Storage Initiators box to the Selected Storage Initiators box.
Click Next.
268
Access Groups Perspective
Note
You can also use the Storage Initiators perspective in the Servers and VMs
tab to view and configure storage initiators on an individual Oracle VM Server.
See Section 3.5.7.1, “View Access Groups for Selected Initiator” for more
information on using this method.
Important
If you have both iSCSI and Fibre Channel storage array types in your
environment, you must ensure that the storage initiators that you are adding
for the access group, match the storage type that you are defining this access
group for. See What are Access Groups? in the Oracle VM Concepts Guide for
more information on Access Groups.
5. The Present Physical Disks step is displayed in the wizard. It contains the available storage elements
on the storage array you are registering.
Note
If this is the first time you are configuring access to this storage array, the list of
available physical disks may be empty. You may have to edit the access group
afterwards to select physical disks.
Use the arrow buttons to move the required disks from the Available Physical Disks box to the
Selected Physical Disks box. These disks are presented to the Oracle VM Servers that have the
iSCSI initiator that belongs to the access group. Click Finish to create the new access group with the
selected initiators and physical disks.
269
Access Groups Perspective
The new access group now appears in the Access Groups table. If you change the Perspective of the
management pane to Physical Disks, the list of presented physical disks appear in the table.
After configuring the access group it is advisable to refresh the SAN server to make sure that the current
storage layout and access rules are in effect. The selected physical disks in your non-generic storage array
are now available to the Oracle VM Servers in this access group.
6.6.4.2 Edit Access Group
It is possible to edit an existing Access Group for a SAN Server. This option is also possible for a generic
iSCSI storage array, although you are only able to edit the default access group that is created when you
discover the SAN Server, since it is not possible to create additional access groups for generic Oracle VM
Storage Connect plug-ins.
To edit the access group for an iSCSI storage array:
1. Expand the SAN Servers folder in the navigation tree, select a SAN server item contained within the
folder. Select the Access Groups option in the Perspective drop-down list.
2. Select the access group that you wish to edit (a default access group is always present) and click Edit
Access Group . The Edit Access Group dialog box is displayed.
3. In the Access Group tab, you can edit the Name on Array and Access Group Name for storage
arrays that use a non-generic Oracle VM Storage Connect plug-in. When you have a generic plug-in,
these items are greyed out. You can also provide or edit a description for the access group.
4. Select the Storage Initiators tab. It contains the available storage initiators for this type of storage on
the Oracle VM Servers in your environment.
270
Access Groups Perspective
5. Use the arrow buttons to move the required initiators to the Selected Storage Initiators box.
Note
You can also use the Storage Initiators perspective in the Servers and VMs
tab to view and configure storage initiators on an individual Oracle VM Server.
See Section 3.5.7.1, “View Access Groups for Selected Initiator” for more
information on using this method.
Important
If you have both iSCSI and Fibre Channel storage array types in your
environment, you must ensure that the storage initiators that you are adding
for the access group, match the storage type that you are defining this access
group for. See What are Access Groups? in the Oracle VM Concepts Guide for
more information on Access Groups.
For a generic storage array you cannot select which physical disks are added; all disks are
automatically presented to the selected Oracle VM Servers.
6. Click OK to save your changes to the default access group. If you change the Perspective of the
management pane to Physical Disks, the list of presented physical disks appears in the table.
271
Access Groups Perspective
7. After configuring the access group it is advisable to refresh the storage array to make sure that the
current storage layout and access rules are in effect.
The Oracle VM Servers in this access group now have the necessary permissions to use the physical
disks of the storage array; they can be deployed either as disks for virtual machines (VMs) or for storage
repositories. To create storage repositories on your physical disks, see Chapter 4, Repositories Tab.
6.6.4.3 Delete Access Group
Except for generic storage arrays, it is possible to delete additional access groups that you may have
defined apart from the default access group.
To delete one or more access groups:
1. Expand the SAN Servers folder in the navigation tree, select a SAN server item contained within the
folder. Select the Access Groups option in the Perspective drop-down list. Select the access group or
groups, that you wish to delete, from the items listed in the management pane.
2. Click on the
Delete Access Group icon in the toolbar.
3. The Delete Confirmation dialog box is displayed. Click OK to delete the access group.
6.6.4.4 Display Events
The Events perspective is common to many elements within the Oracle VM Manager Web Interface.
The Events perspective generally appears as an option within the Perspectives drop-down menu on the
management pane of tabs that include a navigation tree. In this case, the Events perspective displays
events specific to the item selected in the navigation tree and presents these in the management pane.
The Events perspective may also appear within a dialog that is triggered from a Display Selected
Events... perspective toolbar option. In this case, the Events perspective dialog displays events specific
to one or more elements selected in the management pane.
If an object has an error event associated with it you must acknowledge the event to clear the error and
return the object to normal operations. For example, this can occur if an Oracle VM Server or virtual
machine appear as Stopped (Error) in the status. The object in error is flagged with a red icon in the
272
Access Groups Perspective
navigation tree. Oracle VM Servers, virtual machines, repositories and storage objects can have error
events associated with them.
Since Oracle VM Manager attempts to resolve issues automatically as much as possible, not all events
can be acknowledged by a user within the Oracle VM Manager Web Interface. Therefore, a flag is set
for events that are user acknowledgeable. If an event does not have this flag set, you are unable to
acknowledge it, since it is handled internally by Oracle VM Manager.
The Events perspective or dialog contains a table with the following columns of information per event:
• Severity: The severity level assigned to the event.
• Timestamp: The date and time that the event occurred.
• Modify Time: The last recorded date and time that the event was modified.
• Type: The type of event according to Oracle VM Manager's event categorization model.
• Summary: A summary description of the event.
• Acknowledged: Whether an error event has been acknowledged.
• User Acknowledgeable: Whether or not an event can be acknowledged by the user.
Alongside each event entry in the table, there is an arrow that allows you to expand the view for each
entry. This displays the full Description for the event.
The Events perspective or dialog contains a perspective toolbar with the following options:
Table 6.15 Events Perspective Toolbar Icon Options
Toolbar Icon Option
Icon
Description
Acknowledge
Acknowledge a selected error event to clear the error and
return the object to normal operations. Note that this option is
only available for user acknowledgeable events.
Acknowledge All
Acknowledge all error events associated with an object to clear
the errors and return the object to normal operations. Note that
only user acknowledgeable events are cleared. This button is
always clickable, even if there are no user acknowledgeable
events. Clicking it when there are no user acknowledgeable
events results in an error dialog.
Display Count
A drop-down menu that allows you to select the number of
events that should be displayed in the management pane,
while you are currently in this perspective.
Acknowledging Events/Errors
If an object has an error event associated with it you must acknowledge the event to clear the error and
return the object to normal operations. For example, this can occur if an Oracle VM Server or virtual
machine appear as Stopped (Error) in the status. The object in error is flagged with a red icon in the
navigation tree. Oracle VM Servers, virtual machines, repositories and storage objects can have error
events associated with them. The following procedures show you how to clear errors and return the object
to normal operations.
To acknowledge Oracle VM Server error events:
1. Click the Servers and VMs tab.
273
Volume Groups Perspective
2. Select the Oracle VM Server in the navigation tree.
3. Select Events from the Perspective drop-down list in the management pane.
4. Select the user acknowledgeable error event and click Acknowledge
to clear all user acknowledgeable errors.
, or click Acknowledge All
To acknowledge virtual machine error events:
1. Click the Servers and VMs tab.
2. Select the server pool, or Oracle VM Server on which the virtual machine resides in the navigation tree.
3. Select Virtual Machines from the Perspective drop-down list in the management pane.
4. Select the virtual machine in the management pane table. Click Display Selected VM Events...
.
5. The Events dialog box is displayed. Select the user acknowledgeable error event and click
Acknowledge , or click Acknowledge All to clear all user acknowledgeable errors. Click Close.
To acknowledge storage repository error events:
1. Click the Repositories tab.
2. Select the repository in the navigation tree.
3. Select Events from the Perspective drop-down list in the management pane.
4. Select the error event and click Acknowledge
, or click Acknowledge All
to clear all errors.
To acknowledge storage error events:
1. Click the Storage tab.
2. Select File Servers, SAN Servers, or a storage server in the navigation tree.
3. Select Events from the Perspective drop-down list in the management pane.
4. Select the user acknowledgeable error event and click Acknowledge
to clear all user acknowledgeable errors.
, or click Acknowledge All
6.6.5 Volume Groups Perspective
The Volume Groups perspective lists the different Volume Groups configured for each SAN Server in your
environment. The following columns are displayed in the management pane:
• Name: The name that has been configured for the volume group.
• Size (GiB): A grouping that consists of the following columns:
• Free: The size of the volume, in GiB, that is currently free.
• Used: The size of the volume, in GiB, that is currently in use.
• Total: The total size, in GiB, of the volume.
• Description: A description entered for the volume group when it was created or edited.
This perspective includes a toolbar that consists of the following options:
274
Volume Group Item
Table 6.16 Volume Groups Perspective Toolbar Icon Options
Toolbar Icon Option
Edit Volume Group...
Icon
Description
Displays the Edit Volume Group dialog box. Use this option to
edit volume group settings such as name and description.
6.6.5.1 Edit Volume Group
It is possible to edit the configuration for a Volume Group available on a SAN server. The steps and
options to do so are described below.
To edit Volume Group configuration on a SAN server:
1. Expand the SAN Servers folder in the navigation tree, select a SAN server item contained within the
folder. Select the Volume Groups option in the Perspective drop-down list. Select the volume group
that you wish to edit in the table presented in the management pane.
2. Click on the
Edit Volume Group icon in the toolbar.
3. A dialog opens to allow you to reconfigure the Volume Group. The dialog has the following options:
• ID: A non-editable field containing the volume group's UUID as it is stored within Oracle VM
Manager.
• Name: A field to change the name of the volume group within Oracle VM Manager.
• Description: A text field allowing a description of the volume group.
4. When you have finished editing the volume group, click OK to save the changes, or Cancel to exit out
of the dialog without saving any changes.
6.7 Volume Group Item
Each Volume Group navigation item is listed underneath the Section 6.6, “SAN Server Item” when it has
been expanded. The structure of the navigation provided in the navigation tree is discussed in more detail
in Section 6.2, “Summary”.
Clicking on a Volume Group navigation item in the navigation tree allows you to access different
perspectives in the management pane. Each perspective provides its own view of the Volume Group within
Oracle VM Manager. Most of the perspectives also include separate perspective toolbars that enable
you to perform various configuration or management tasks specific to the view currently displayed within
the management pane. A Volume Group navigation item offers the following perspectives within the
management pane:
• Info Perspective
• Physical Disks Perspective
• Events Perspective
6.7.1 Info Perspective
The Info perspective is common to many elements within the Oracle VM Manager Web Interface. This
perspective always shows the individually configured parameters for an item that is currently selected
in the navigation tree. Some of these configured parameters may be automatically populated through a
275
Physical Disks Perspective
discovery process, while others may have been configured manually during the creation of the object that
is selected.
This perspective includes the following information:
• Volume Group Name: The configured name for the volume group.
6.7.2 Physical Disks Perspective
The Physical Disks perspective lists the different physical disks configured in your environment and
running on a SAN storage array. The following columns are displayed in the management pane:
• Name: The name that has been configured for the physical disk
• Event Severity: The event level severity for the physical disk.
• Size (GiB): The size, in GiB, of the physical disk.
• Volume Group: The volume group that the physical disk belongs to.
• Server: The servers that have access to the physical disk.
• Status: The status of the physical disk (whether or not the disk is online).
• Shareable: Whether the physical disk is shareable or not.
• Description: A description entered for the physical disk when it was created or edited.
Alongside each physical disk entry in the table, there is an arrow that allows you to expand the view for
each entry. This exposes further information:
• Name: The user-specified alias for the physical disk. The name can be changed without changing the
name of the physical disk on the storage array.
• User Friendly Name: The name of the physical disk on the storage array. The name was specified
when the disk was created and cannot be changed.
• SAN Server: The SAN server that the physical disk belongs to.
• Thin Provision: Whether or not thin provisioning is supported by the physical disk.
• Type: The type of storage that the physical disk is a part of (for example, iSCSI or Fibre Channel).
• Reserved by Server(s): Whether or not the physical disk is unavailable for use by Oracle VM Manager.
• Storage Targets: The endpoint provided by the storage server through which the server may direct
commands to the physical disk. The storage target provides access to the physical disk.
• Server Pool: The server pool that the physical disk belongs to.
• Repository: The repository that the physical disk belongs to.
• VM(s): Virtual machines using the physical disk.
• ID: The UUID for the physical disk.
• Page83 ID: The unique identifier for the physical disk.
• Access Groups: The access groups that the physical disk belongs to.
276
Physical Disks Perspective
• Extra Information: Information that is passed to and from the Oracle VM Storage Connect plug-in for
use internally by the plug-in.
The management functions you can perform on the disk are available as icons in the perspective toolbar.
Some management options are only available to SAN server disks that use a non-generic Storage Connect
plug-in.
Table 6.17 Physical Disks Perspective Toolbar Icon Options
Toolbar Icon Option
Icon
Create Physical Disk...
Description
Displays the Create Physical Disk dialog box. Use this option
to create a new physical disk in the selected volume group of
the storage array of your choice.
This option is not supported for storage arrays using a generic
Oracle VM Storage Connect plug-in.
Edit Physical Disk...
Displays the Edit Physical Disk dialog box. Use this option
to change the name, size, provisioning and share ability of the
selected physical disk.
Delete Physical Disk
Displays the Delete Confirmation dialog box. Use this option
to delete the selected physical disk.
Clone Physical Disk
Displays the Clone Physical Disk dialog box. Use this option
to clone a physical disk to another physical disk or to a disk
image on a file server.
Refresh Physical Disk
Refreshes the physical disks on a storage array. Use this
option to rescan the physical disks after making changes to
the configuration of a storage array. This updates the storage
information known to Oracle VM Manager.
Display Servers using Physical
Disk...
Displays the Servers using Physical Disk dialog box. Use
this option to view which servers are using a selected physical
disk.
Display Selected Physical Disk
Events...
Display the Events dialog box which contains the job event
associated with the selected physical disks.
6.7.2.1 Create Physical Disk (not supported on Generic)
On SAN Servers that are not using a generic Oracle VM Storage Connect plug-in, it is frequently possible
to create a new physical disk.
To create a physical disk on a SAN Server:
1. Expand the SAN Servers folder in the navigation tree, select a SAN server item contained within the
folder. Select the Physical Disks option in the Perspective drop-down list.
2. Click on the
Create Physical Disk option in the toolbar.
3. The Create Physical Disk dialog is displayed. Enter or select the following:
• Volume Group: A volume group that you want the physical disk to belong to.
• Name: A name for the physical disk.
• Size (GiB): The size of the physical disk, in GiB.
277
Physical Disks Perspective
• Extra Information: Optional information that is passed to and from the Oracle VM Storage Connect
plug-in for use internally by the plug-in.
• Description: An optional description of the physical disk.
• Shareable: Whether or not the physical disk is shareable.
• Thin Provision: Whether or not thin provisioning is to be supported by the physical disk.
4. When you have finished editing the parameters to define the new physical disk, click OK to save the
changes, or Cancel to exit out of the dialog without saving any changes.
6.7.2.2 Edit Physical Disk
It is possible to edit the configuration for a physical disk either available on a SAN server or as local or
shared storage. The steps and options to do so are described below.
To edit Physical Disk configuration:
1. On the Storage tab, expand the SAN Servers folder in the navigation tree, select a SAN server item
contained within the folder. Select the Physical Disks option in the Perspective drop-down list. Select
the physical disk that you wish to edit in the table presented in the management pane.
To edit the physical disk configuration for a physical disk used by a particular server, on the Servers
and VMs tab, expand the Server Pools or Unassigned Servers folder, to select a particular server
in the navigation tree. Select the Physical Disks option in the Perspective drop-down list. Select the
physical disk that you wish to edit in the table presented in the management pane.
2. Click on the
Edit Physical Disk icon in the toolbar.
3. A dialog opens to allow you to reconfigure the Physical Disk. The dialog has the following options:
• ID: A non-editable field containing the physical disk's UUID as it is stored within Oracle VM Manager.
• Name: A field to change the name of the physical disk within Oracle VM Manager.
• Current Size(GiB): A non-editable field containing the physical disk's current size, in GiB.
• New Size(GiB): A field to change the size, in GiB, of the physical disk. The size of the physical disk
can only be increased in size.
• Description: A text field allowing a description of the physical disk.
• Shareable: A check box that determines whether or not the disk can be shared.
• Thin Provision: A non-editable field describing whether or not thin provisioning is supported by the
disk.
4. When you have finished editing the physical disk, click OK to save the changes, or Cancel to exit out of
the dialog without saving any changes.
6.7.2.3 Delete Physical Disk
It is possible to delete an existing physical disk if it is no longer in use by any servers within any server
pools and the Oracle VM Storage Connect plug-in that you are using supports this operation. The steps
and options to do so are described below.
278
Physical Disks Perspective
To delete the registered physical disk:
1. Expand the SAN Servers folder in the navigation tree, select a SAN server item contained within the
folder. Select the Physical Disks option in the Perspective drop-down list. Select the physical disk
that you wish to delete in the table presented in the management pane.
To delete a physical disk used by a particular server, on the Servers and VMs tab, expand the Server
Pools or Unassigned Servers folder, to select a particular server in the navigation tree. Select the
Physical Disks option in the Perspective drop-down list. Select the physical disk that you wish to
delete in the table presented in the management pane.
2. Click on the
Delete Physical Disk icon in the toolbar.
3. The Delete Confirmation dialog box is displayed. Click OK to delete the physical disk.
6.7.2.4 Clone Physical Disk
It is possible to clone a physical disk. The steps and options to do so are described below.
To clone a Physical Disk:
1. On the Storage tab, expand the SAN Servers folder in the navigation tree, select a SAN server item
contained within the folder. Select the Physical Disks option in the Perspective drop-down list. Select
the physical disk that you wish to clone in the table presented in the management pane.
To clone a physical disk used by a particular server, on the Servers and VMs tab, expand the Server
Pools or Unassigned Servers folder, to select a particular server in the navigation tree. Select the
Physical Disks option in the Perspective drop-down list. Select the physical disk that you wish to
clone in the table presented in the management pane.
2. Click on the
Clone Physical Disk icon in the toolbar.
3. A dialog opens to allow you to clone the Physical Disk. The dialog has the following options:
• Name: A field to set the name of the physical disk clone that you are going to create within Oracle
VM Manager.
• Clone Target Type: A drop-down menu allowing you to select the type of storage to be used for the
physical disk clone:
• Physical Disk: Copies the data from one physical disk to another.
• Repository: Copies the data from the physical disk into a virtual disk image in an existing
repository.
• Clone Target: A searchable field to allow you to select the target location where the clone is to be
stored.
• Clone Type: A drop-down menu allowing you to select the type of clone to create:
• Sparse Copy: Copies only the written data from the physical disk to the target clone.
• Non-sparse Copy: Performs a block copy of the physical disk to the target clone.
4. When you have finished setting the clone parameters for the physical disk, click OK to begin the clone
job, or Cancel to exit out of the dialog without saving any changes.
6.7.2.5 Refresh Physical Disk
279
Physical Disks Perspective
When changes are made to the physical disks on a SAN server or Oracle VM Server, it is useful to refresh
the configuration of your physical disks to make Oracle VM Manager aware of the changes.
To refresh physical disks:
1. Expand the SAN Servers folder in the navigation tree, select a SAN server item contained within the
folder. Select the Physical Disks option in the Perspective drop-down list. Select the physical disk or
disks that you wish to refresh in the table presented in the management pane.
To refresh physical disks used by a particular server, on the Servers and VMs tab, expand the Server
Pools or Unassigned Servers folder, to select a particular server in the navigation tree. Select the
Physical Disks option in the Perspective drop-down list. Select the physical disk that you wish to
refresh in the table presented in the management pane.
2. Click on the
Refresh Physical Disk option in the toolbar.
3. The selected physical disks are refreshed and their configurations are updated within Oracle VM
Manager.
Note
If you encounter an error, when refreshing a physical disk with a repository located
on it, similar to the following:
OVMAPI_7281E Cannot perform operation on file system...
You may need to ensure that the repository is under the ownership of the Oracle
VM Manager instance that you are using. See Section 4.3.1.2, “Edit Repository” for
more information.
6.7.2.6 Display Servers Using a Physical Disk
It is possible to display the Oracle VM Servers that are using a physical disk available on a SAN server.
The steps and options to do so are described below.
To display a list of Oracle VM Servers using a Physical Disk on a SAN server:
1. Expand the SAN Servers folder in the navigation tree, select a SAN server item contained within the
folder. Select the Physical Disks option in the Perspective drop-down list. Select the physical disk
that you wish to view in the table presented in the management pane.
2. Click on the
Display Servers using Physical Disk icon in the toolbar.
3. A dialog opens to display the Oracle VM Servers that are configured to use the Physical Disk. The
dialog provides the following information in tabular format:
• Name: The name of the Oracle VM Server.
• Description: The configured description for the Oracle VM Server.
• Status: The running status of the Oracle VM Server.
• Utilization (%): The percentage of the disk that is utilized by the Oracle VM Server.
• Maintenance Mode: Whether or not the Oracle VM Server is in maintenance mode.
• Owned: Whether or not the current instance of Oracle VM Manager has ownership of the Oracle VM
Server.
280
Physical Disks Perspective
4. When you have finished viewing the list of servers with access to the physical disk, click Close to exit
out of the dialog.
6.7.2.7 Display Events
The Events perspective is common to many elements within the Oracle VM Manager Web Interface.
The Events perspective generally appears as an option within the Perspectives drop-down menu on the
management pane of tabs that include a navigation tree. In this case, the Events perspective displays
events specific to the item selected in the navigation tree and presents these in the management pane.
The Events perspective may also appear within a dialog that is triggered from a Display Selected
Events... perspective toolbar option. In this case, the Events perspective dialog displays events specific
to one or more elements selected in the management pane.
If an object has an error event associated with it you must acknowledge the event to clear the error and
return the object to normal operations. For example, this can occur if an Oracle VM Server or virtual
machine appear as Stopped (Error) in the status. The object in error is flagged with a red icon in the
navigation tree. Oracle VM Servers, virtual machines, repositories and storage objects can have error
events associated with them.
Since Oracle VM Manager attempts to resolve issues automatically as much as possible, not all events
can be acknowledged by a user within the Oracle VM Manager Web Interface. Therefore, a flag is set
for events that are user acknowledgeable. If an event does not have this flag set, you are unable to
acknowledge it, since it is handled internally by Oracle VM Manager.
The Events perspective or dialog contains a table with the following columns of information per event:
• Severity: The severity level assigned to the event.
• Timestamp: The date and time that the event occurred.
• Modify Time: The last recorded date and time that the event was modified.
• Type: The type of event according to Oracle VM Manager's event categorization model.
• Summary: A summary description of the event.
• Acknowledged: Whether an error event has been acknowledged.
• User Acknowledgeable: Whether or not an event can be acknowledged by the user.
Alongside each event entry in the table, there is an arrow that allows you to expand the view for each
entry. This displays the full Description for the event.
The Events perspective or dialog contains a perspective toolbar with the following options:
Table 6.18 Events Perspective Toolbar Icon Options
Toolbar Icon Option
Icon
Description
Acknowledge
Acknowledge a selected error event to clear the error and
return the object to normal operations. Note that this option is
only available for user acknowledgeable events.
Acknowledge All
Acknowledge all error events associated with an object to clear
the errors and return the object to normal operations. Note that
only user acknowledgeable events are cleared. This button is
always clickable, even if there are no user acknowledgeable
events. Clicking it when there are no user acknowledgeable
events results in an error dialog.
281
Events Perspective
Toolbar Icon Option
Icon
Display Count
Description
A drop-down menu that allows you to select the number of
events that should be displayed in the management pane,
while you are currently in this perspective.
Acknowledging Events/Errors
If an object has an error event associated with it you must acknowledge the event to clear the error and
return the object to normal operations. For example, this can occur if an Oracle VM Server or virtual
machine appear as Stopped (Error) in the status. The object in error is flagged with a red icon in the
navigation tree. Oracle VM Servers, virtual machines, repositories and storage objects can have error
events associated with them. The following procedures show you how to clear errors and return the object
to normal operations.
To acknowledge Oracle VM Server error events:
1. Click the Servers and VMs tab.
2. Select the Oracle VM Server in the navigation tree.
3. Select Events from the Perspective drop-down list in the management pane.
4. Select the user acknowledgeable error event and click Acknowledge
to clear all user acknowledgeable errors.
, or click Acknowledge All
To acknowledge virtual machine error events:
1. Click the Servers and VMs tab.
2. Select the server pool, or Oracle VM Server on which the virtual machine resides in the navigation tree.
3. Select Virtual Machines from the Perspective drop-down list in the management pane.
4. Select the virtual machine in the management pane table. Click Display Selected VM Events...
.
5. The Events dialog box is displayed. Select the user acknowledgeable error event and click
Acknowledge , or click Acknowledge All to clear all user acknowledgeable errors. Click Close.
To acknowledge storage repository error events:
1. Click the Repositories tab.
2. Select the repository in the navigation tree.
3. Select Events from the Perspective drop-down list in the management pane.
4. Select the error event and click Acknowledge
, or click Acknowledge All
to clear all errors.
To acknowledge storage error events:
1. Click the Storage tab.
2. Select File Servers, SAN Servers, or a storage server in the navigation tree.
3. Select Events from the Perspective drop-down list in the management pane.
4. Select the user acknowledgeable error event and click Acknowledge
to clear all user acknowledgeable errors.
6.7.3 Events Perspective
282
, or click Acknowledge All
Events Perspective
The Events perspective is common to many elements within the Oracle VM Manager Web Interface.
The Events perspective generally appears as an option within the Perspectives drop-down menu on the
management pane of tabs that include a navigation tree. In this case, the Events perspective displays
events specific to the item selected in the navigation tree and presents these in the management pane.
The Events perspective may also appear within a dialog that is triggered from a Display Selected
Events... perspective toolbar option. In this case, the Events perspective dialog displays events specific
to one or more elements selected in the management pane.
If an object has an error event associated with it you must acknowledge the event to clear the error and
return the object to normal operations. For example, this can occur if an Oracle VM Server or virtual
machine appear as Stopped (Error) in the status. The object in error is flagged with a red icon in the
navigation tree. Oracle VM Servers, virtual machines, repositories and storage objects can have error
events associated with them.
Since Oracle VM Manager attempts to resolve issues automatically as much as possible, not all events
can be acknowledged by a user within the Oracle VM Manager Web Interface. Therefore, a flag is set
for events that are user acknowledgeable. If an event does not have this flag set, you are unable to
acknowledge it, since it is handled internally by Oracle VM Manager.
The Events perspective or dialog contains a table with the following columns of information per event:
• Severity: The severity level assigned to the event.
• Timestamp: The date and time that the event occurred.
• Modify Time: The last recorded date and time that the event was modified.
• Type: The type of event according to Oracle VM Manager's event categorization model.
• Summary: A summary description of the event.
• Acknowledged: Whether an error event has been acknowledged.
• User Acknowledgeable: Whether or not an event can be acknowledged by the user.
Alongside each event entry in the table, there is an arrow that allows you to expand the view for each
entry. This displays the full Description for the event.
The Events perspective or dialog contains a perspective toolbar with the following options:
Table 6.19 Events Perspective Toolbar Icon Options
Toolbar Icon Option
Icon
Description
Acknowledge
Acknowledge a selected error event to clear the error and
return the object to normal operations. Note that this option is
only available for user acknowledgeable events.
Acknowledge All
Acknowledge all error events associated with an object to clear
the errors and return the object to normal operations. Note that
only user acknowledgeable events are cleared. This button is
always clickable, even if there are no user acknowledgeable
events. Clicking it when there are no user acknowledgeable
events results in an error dialog.
Display Count
A drop-down menu that allows you to select the number of
events that should be displayed in the management pane,
while you are currently in this perspective.
Acknowledging Events/Errors
283
Unmanaged Fibre Channel Storage Array Item
If an object has an error event associated with it you must acknowledge the event to clear the error and
return the object to normal operations. For example, this can occur if an Oracle VM Server or virtual
machine appear as Stopped (Error) in the status. The object in error is flagged with a red icon in the
navigation tree. Oracle VM Servers, virtual machines, repositories and storage objects can have error
events associated with them. The following procedures show you how to clear errors and return the object
to normal operations.
To acknowledge Oracle VM Server error events:
1. Click the Servers and VMs tab.
2. Select the Oracle VM Server in the navigation tree.
3. Select Events from the Perspective drop-down list in the management pane.
4. Select the user acknowledgeable error event and click Acknowledge
to clear all user acknowledgeable errors.
, or click Acknowledge All
To acknowledge virtual machine error events:
1. Click the Servers and VMs tab.
2. Select the server pool, or Oracle VM Server on which the virtual machine resides in the navigation tree.
3. Select Virtual Machines from the Perspective drop-down list in the management pane.
4. Select the virtual machine in the management pane table. Click Display Selected VM Events...
.
5. The Events dialog box is displayed. Select the user acknowledgeable error event and click
Acknowledge , or click Acknowledge All to clear all user acknowledgeable errors. Click Close.
To acknowledge storage repository error events:
1. Click the Repositories tab.
2. Select the repository in the navigation tree.
3. Select Events from the Perspective drop-down list in the management pane.
4. Select the error event and click Acknowledge
, or click Acknowledge All
to clear all errors.
To acknowledge storage error events:
1. Click the Storage tab.
2. Select File Servers, SAN Servers, or a storage server in the navigation tree.
3. Select Events from the Perspective drop-down list in the management pane.
4. Select the user acknowledgeable error event and click Acknowledge
to clear all user acknowledgeable errors.
, or click Acknowledge All
6.8 Unmanaged Fibre Channel Storage Array Item
An Unmanaged Fibre Channel Storage Array navigation item is listed underneath the Section 6.5, “SAN
Servers Folder” when it has been expanded. The structure of the navigation provided in the navigation tree
is discussed in more detail in Section 6.2, “Summary”.
Clicking on a Unmanaged Fibre Channel Storage Array navigation item in the navigation tree allows
you to access different perspectives in the management pane. Each perspective provides its own view of
284
Info Perspective
any unmanaged Fibre Channel storage arrays within Oracle VM Manager. Most of the perspectives also
include separate perspective toolbars that enable you to perform various configuration or management
tasks specific to the view currently displayed within the management pane. The Unmanaged Fibre
Channel Storage Array navigation item offers the following perspectives within the management pane:
• Info Perspective
• Events Perspective
• Physical Disks Perspective
• Access Groups Perspective
• Volume Groups Perspective
6.8.1 Info Perspective
The Info perspective is common to many elements within the Oracle VM Manager Web Interface. This
perspective always shows the individually configured parameters for an item that is currently selected
in the navigation tree. Some of these configured parameters may be automatically populated through a
discovery process, while others may have been configured manually during the creation of the object that
is selected.
This perspective usually includes the following information depending on what information is returned by
the Oracle VM Storage Connect plug-in:
• Storage Name: The name of storage array as returned by the Oracle VM Storage Connect plug-in.
• Description: The configured description for the storage array.
• SAN Server's Storage Description: The description returned for the storage array as returned by the
Oracle VM Storage Connect plug-in.
• Status: The status of the storage array as returned by the Oracle VM Storage Connect plug-in.
• Validated: Whether or not the storage array has been validated by Oracle VM Manager. No special
storage operations supported by the Oracle VM Storage Connect plug-in may occur until the storage
server is validated by Oracle VM Manager.
• Storage Plug-In: The name of the Oracle VM Storage Connect plug-in used to access the storage
array.
• Storage Plug-In Version: The version number of the SOracle VM Storage Connect plug-in used to
access the storage array.
• Plug-in Private Data: Additional parameters passed to the Oracle VM Storage Connect plug-in.
• Total Size (GiB): The total size, in GiB, reported by the Oracle VM Storage Connect plug-in.
• Free Size (GiB): The available free space, in GiB, reported by the Oracle VM Storage Connect plug-in.
• Used Size (GiB): The amount of used space, in GiB, reported by the Oracle VM Storage Connect plugin.
Additional fields may be listed to indicate the support status for various storage related functions as
reported by the Oracle VM Storage Connect plug-in in use.
6.8.2 Events Perspective
285
Events Perspective
The Events perspective is common to many elements within the Oracle VM Manager Web Interface.
The Events perspective generally appears as an option within the Perspectives drop-down menu on the
management pane of tabs that include a navigation tree. In this case, the Events perspective displays
events specific to the item selected in the navigation tree and presents these in the management pane.
The Events perspective may also appear within a dialog that is triggered from a Display Selected
Events... perspective toolbar option. In this case, the Events perspective dialog displays events specific
to one or more elements selected in the management pane.
If an object has an error event associated with it you must acknowledge the event to clear the error and
return the object to normal operations. For example, this can occur if an Oracle VM Server or virtual
machine appear as Stopped (Error) in the status. The object in error is flagged with a red icon in the
navigation tree. Oracle VM Servers, virtual machines, repositories and storage objects can have error
events associated with them.
Since Oracle VM Manager attempts to resolve issues automatically as much as possible, not all events
can be acknowledged by a user within the Oracle VM Manager Web Interface. Therefore, a flag is set
for events that are user acknowledgeable. If an event does not have this flag set, you are unable to
acknowledge it, since it is handled internally by Oracle VM Manager.
The Events perspective or dialog contains a table with the following columns of information per event:
• Severity: The severity level assigned to the event.
• Timestamp: The date and time that the event occurred.
• Modify Time: The last recorded date and time that the event was modified.
• Type: The type of event according to Oracle VM Manager's event categorization model.
• Summary: A summary description of the event.
• Acknowledged: Whether an error event has been acknowledged.
• User Acknowledgeable: Whether or not an event can be acknowledged by the user.
Alongside each event entry in the table, there is an arrow that allows you to expand the view for each
entry. This displays the full Description for the event.
The Events perspective or dialog contains a perspective toolbar with the following options:
Table 6.20 Events Perspective Toolbar Icon Options
Toolbar Icon Option
Icon
Description
Acknowledge
Acknowledge a selected error event to clear the error and
return the object to normal operations. Note that this option is
only available for user acknowledgeable events.
Acknowledge All
Acknowledge all error events associated with an object to clear
the errors and return the object to normal operations. Note that
only user acknowledgeable events are cleared. This button is
always clickable, even if there are no user acknowledgeable
events. Clicking it when there are no user acknowledgeable
events results in an error dialog.
Display Count
A drop-down menu that allows you to select the number of
events that should be displayed in the management pane,
while you are currently in this perspective.
286
Physical Disks Perspective
Acknowledging Events/Errors
If an object has an error event associated with it you must acknowledge the event to clear the error and
return the object to normal operations. For example, this can occur if an Oracle VM Server or virtual
machine appear as Stopped (Error) in the status. The object in error is flagged with a red icon in the
navigation tree. Oracle VM Servers, virtual machines, repositories and storage objects can have error
events associated with them. The following procedures show you how to clear errors and return the object
to normal operations.
To acknowledge Oracle VM Server error events:
1. Click the Servers and VMs tab.
2. Select the Oracle VM Server in the navigation tree.
3. Select Events from the Perspective drop-down list in the management pane.
4. Select the user acknowledgeable error event and click Acknowledge
to clear all user acknowledgeable errors.
, or click Acknowledge All
To acknowledge virtual machine error events:
1. Click the Servers and VMs tab.
2. Select the server pool, or Oracle VM Server on which the virtual machine resides in the navigation tree.
3. Select Virtual Machines from the Perspective drop-down list in the management pane.
4. Select the virtual machine in the management pane table. Click Display Selected VM Events...
.
5. The Events dialog box is displayed. Select the user acknowledgeable error event and click
Acknowledge , or click Acknowledge All to clear all user acknowledgeable errors. Click Close.
To acknowledge storage repository error events:
1. Click the Repositories tab.
2. Select the repository in the navigation tree.
3. Select Events from the Perspective drop-down list in the management pane.
4. Select the error event and click Acknowledge
, or click Acknowledge All
to clear all errors.
To acknowledge storage error events:
1. Click the Storage tab.
2. Select File Servers, SAN Servers, or a storage server in the navigation tree.
3. Select Events from the Perspective drop-down list in the management pane.
4. Select the user acknowledgeable error event and click Acknowledge
to clear all user acknowledgeable errors.
, or click Acknowledge All
6.8.3 Physical Disks Perspective
The Physical Disks perspective lists the different physical disks configured in your environment and
running on a SAN storage array. The following columns are displayed in the management pane:
• Name: The name that has been configured for the physical disk
287
Physical Disks Perspective
• Event Severity: The event level severity for the physical disk.
• Size (GiB): The size, in GiB, of the physical disk.
• Volume Group: The volume group that the physical disk belongs to.
• Server: The servers that have access to the physical disk.
• Status: The status of the physical disk (whether or not the disk is online).
• Shareable: Whether the physical disk is shareable or not.
• Description: A description entered for the physical disk when it was created or edited.
Alongside each physical disk entry in the table, there is an arrow that allows you to expand the view for
each entry. This exposes further information:
• Name: The user-specified alias for the physical disk. The name can be changed without changing the
name of the physical disk on the storage array.
• User Friendly Name: The name of the physical disk on the storage array. The name was specified
when the disk was created and cannot be changed.
• SAN Server: The SAN server that the physical disk belongs to.
• Thin Provision: Whether or not thin provisioning is supported by the physical disk.
• Type: The type of storage that the physical disk is a part of (for example, iSCSI or Fibre Channel).
• Reserved by Server(s): Whether or not the physical disk is unavailable for use by Oracle VM Manager.
• Storage Targets: The endpoint provided by the storage server through which the server may direct
commands to the physical disk. The storage target provides access to the physical disk.
• Server Pool: The server pool that the physical disk belongs to.
• Repository: The repository that the physical disk belongs to.
• VM(s): Virtual machines using the physical disk.
• ID: The UUID for the physical disk.
• Page83 ID: The unique identifier for the physical disk.
• Access Groups: The access groups that the physical disk belongs to.
• Extra Information: Information that is passed to and from the Oracle VM Storage Connect plug-in for
use internally by the plug-in.
The management functions you can perform on the disk are available as icons in the perspective toolbar.
Some management options are only available to SAN server disks that use a non-generic Storage Connect
plug-in.
Table 6.21 Physical Disks Perspective Toolbar Icon Options
Toolbar Icon Option
Create Physical Disk...
Icon
Description
Displays the Create Physical Disk dialog box. Use this option
to create a new physical disk in the selected volume group of
the storage array of your choice.
288
Physical Disks Perspective
Toolbar Icon Option
Icon
Description
This option is not supported for storage arrays using a generic
Oracle VM Storage Connect plug-in.
Edit Physical Disk...
Displays the Edit Physical Disk dialog box. Use this option
to change the name, size, provisioning and share ability of the
selected physical disk.
Delete Physical Disk
Displays the Delete Confirmation dialog box. Use this option
to delete the selected physical disk.
Clone Physical Disk
Displays the Clone Physical Disk dialog box. Use this option
to clone a physical disk to another physical disk or to a disk
image on a file server.
Refresh Physical Disk
Refreshes the physical disks on a storage array. Use this
option to rescan the physical disks after making changes to
the configuration of a storage array. This updates the storage
information known to Oracle VM Manager.
Display Servers using Physical
Disk...
Displays the Servers using Physical Disk dialog box. Use
this option to view which servers are using a selected physical
disk.
Display Selected Physical Disk
Events...
Display the Events dialog box which contains the job event
associated with the selected physical disks.
6.8.3.1 Create Physical Disk (not supported on Generic)
On SAN Servers that are not using a generic Oracle VM Storage Connect plug-in, it is frequently possible
to create a new physical disk.
To create a physical disk on a SAN Server:
1. Expand the SAN Servers folder in the navigation tree, select a SAN server item contained within the
folder. Select the Physical Disks option in the Perspective drop-down list.
2. Click on the
Create Physical Disk option in the toolbar.
3. The Create Physical Disk dialog is displayed. Enter or select the following:
• Volume Group: A volume group that you want the physical disk to belong to.
• Name: A name for the physical disk.
• Size (GiB): The size of the physical disk, in GiB.
• Extra Information: Optional information that is passed to and from the Oracle VM Storage Connect
plug-in for use internally by the plug-in.
• Description: An optional description of the physical disk.
• Shareable: Whether or not the physical disk is shareable.
• Thin Provision: Whether or not thin provisioning is to be supported by the physical disk.
4. When you have finished editing the parameters to define the new physical disk, click OK to save the
changes, or Cancel to exit out of the dialog without saving any changes.
6.8.3.2 Edit Physical Disk
289
Physical Disks Perspective
It is possible to edit the configuration for a physical disk either available on a SAN server or as local or
shared storage. The steps and options to do so are described below.
To edit Physical Disk configuration:
1. On the Storage tab, expand the SAN Servers folder in the navigation tree, select a SAN server item
contained within the folder. Select the Physical Disks option in the Perspective drop-down list. Select
the physical disk that you wish to edit in the table presented in the management pane.
To edit the physical disk configuration for a physical disk used by a particular server, on the Servers
and VMs tab, expand the Server Pools or Unassigned Servers folder, to select a particular server
in the navigation tree. Select the Physical Disks option in the Perspective drop-down list. Select the
physical disk that you wish to edit in the table presented in the management pane.
2. Click on the
Edit Physical Disk icon in the toolbar.
3. A dialog opens to allow you to reconfigure the Physical Disk. The dialog has the following options:
• ID: A non-editable field containing the physical disk's UUID as it is stored within Oracle VM Manager.
• Name: A field to change the name of the physical disk within Oracle VM Manager.
• Current Size(GiB): A non-editable field containing the physical disk's current size, in GiB.
• New Size(GiB): A field to change the size, in GiB, of the physical disk. The size of the physical disk
can only be increased in size.
• Description: A text field allowing a description of the physical disk.
• Shareable: A check box that determines whether or not the disk can be shared.
• Thin Provision: A non-editable field describing whether or not thin provisioning is supported by the
disk.
4. When you have finished editing the physical disk, click OK to save the changes, or Cancel to exit out of
the dialog without saving any changes.
6.8.3.3 Delete Physical Disk
It is possible to delete an existing physical disk if it is no longer in use by any servers within any server
pools and the Oracle VM Storage Connect plug-in that you are using supports this operation. The steps
and options to do so are described below.
To delete the registered physical disk:
1. Expand the SAN Servers folder in the navigation tree, select a SAN server item contained within the
folder. Select the Physical Disks option in the Perspective drop-down list. Select the physical disk
that you wish to delete in the table presented in the management pane.
To delete a physical disk used by a particular server, on the Servers and VMs tab, expand the Server
Pools or Unassigned Servers folder, to select a particular server in the navigation tree. Select the
Physical Disks option in the Perspective drop-down list. Select the physical disk that you wish to
delete in the table presented in the management pane.
2. Click on the
Delete Physical Disk icon in the toolbar.
3. The Delete Confirmation dialog box is displayed. Click OK to delete the physical disk.
6.8.3.4 Clone Physical Disk
290
Physical Disks Perspective
It is possible to clone a physical disk. The steps and options to do so are described below.
To clone a Physical Disk:
1. On the Storage tab, expand the SAN Servers folder in the navigation tree, select a SAN server item
contained within the folder. Select the Physical Disks option in the Perspective drop-down list. Select
the physical disk that you wish to clone in the table presented in the management pane.
To clone a physical disk used by a particular server, on the Servers and VMs tab, expand the Server
Pools or Unassigned Servers folder, to select a particular server in the navigation tree. Select the
Physical Disks option in the Perspective drop-down list. Select the physical disk that you wish to
clone in the table presented in the management pane.
2. Click on the
Clone Physical Disk icon in the toolbar.
3. A dialog opens to allow you to clone the Physical Disk. The dialog has the following options:
• Name: A field to set the name of the physical disk clone that you are going to create within Oracle
VM Manager.
• Clone Target Type: A drop-down menu allowing you to select the type of storage to be used for the
physical disk clone:
• Physical Disk: Copies the data from one physical disk to another.
• Repository: Copies the data from the physical disk into a virtual disk image in an existing
repository.
• Clone Target: A searchable field to allow you to select the target location where the clone is to be
stored.
• Clone Type: A drop-down menu allowing you to select the type of clone to create:
• Sparse Copy: Copies only the written data from the physical disk to the target clone.
• Non-sparse Copy: Performs a block copy of the physical disk to the target clone.
4. When you have finished setting the clone parameters for the physical disk, click OK to begin the clone
job, or Cancel to exit out of the dialog without saving any changes.
6.8.3.5 Refresh Physical Disk
When changes are made to the physical disks on a SAN server or Oracle VM Server, it is useful to refresh
the configuration of your physical disks to make Oracle VM Manager aware of the changes.
To refresh physical disks:
1. Expand the SAN Servers folder in the navigation tree, select a SAN server item contained within the
folder. Select the Physical Disks option in the Perspective drop-down list. Select the physical disk or
disks that you wish to refresh in the table presented in the management pane.
To refresh physical disks used by a particular server, on the Servers and VMs tab, expand the Server
Pools or Unassigned Servers folder, to select a particular server in the navigation tree. Select the
Physical Disks option in the Perspective drop-down list. Select the physical disk that you wish to
refresh in the table presented in the management pane.
2. Click on the
Refresh Physical Disk option in the toolbar.
291
Physical Disks Perspective
3. The selected physical disks are refreshed and their configurations are updated within Oracle VM
Manager.
Note
If you encounter an error, when refreshing a physical disk with a repository located
on it, similar to the following:
OVMAPI_7281E Cannot perform operation on file system...
You may need to ensure that the repository is under the ownership of the Oracle
VM Manager instance that you are using. See Section 4.3.1.2, “Edit Repository” for
more information.
6.8.3.6 Display Servers Using a Physical Disk
It is possible to display the Oracle VM Servers that are using a physical disk available on a SAN server.
The steps and options to do so are described below.
To display a list of Oracle VM Servers using a Physical Disk on a SAN server:
1. Expand the SAN Servers folder in the navigation tree, select a SAN server item contained within the
folder. Select the Physical Disks option in the Perspective drop-down list. Select the physical disk
that you wish to view in the table presented in the management pane.
2. Click on the
Display Servers using Physical Disk icon in the toolbar.
3. A dialog opens to display the Oracle VM Servers that are configured to use the Physical Disk. The
dialog provides the following information in tabular format:
• Name: The name of the Oracle VM Server.
• Description: The configured description for the Oracle VM Server.
• Status: The running status of the Oracle VM Server.
• Utilization (%): The percentage of the disk that is utilized by the Oracle VM Server.
• Maintenance Mode: Whether or not the Oracle VM Server is in maintenance mode.
• Owned: Whether or not the current instance of Oracle VM Manager has ownership of the Oracle VM
Server.
4. When you have finished viewing the list of servers with access to the physical disk, click Close to exit
out of the dialog.
6.8.3.7 Display Events
The Events perspective is common to many elements within the Oracle VM Manager Web Interface.
The Events perspective generally appears as an option within the Perspectives drop-down menu on the
management pane of tabs that include a navigation tree. In this case, the Events perspective displays
events specific to the item selected in the navigation tree and presents these in the management pane.
The Events perspective may also appear within a dialog that is triggered from a Display Selected
Events... perspective toolbar option. In this case, the Events perspective dialog displays events specific
to one or more elements selected in the management pane.
If an object has an error event associated with it you must acknowledge the event to clear the error and
return the object to normal operations. For example, this can occur if an Oracle VM Server or virtual
292
Physical Disks Perspective
machine appear as Stopped (Error) in the status. The object in error is flagged with a red icon in the
navigation tree. Oracle VM Servers, virtual machines, repositories and storage objects can have error
events associated with them.
Since Oracle VM Manager attempts to resolve issues automatically as much as possible, not all events
can be acknowledged by a user within the Oracle VM Manager Web Interface. Therefore, a flag is set
for events that are user acknowledgeable. If an event does not have this flag set, you are unable to
acknowledge it, since it is handled internally by Oracle VM Manager.
The Events perspective or dialog contains a table with the following columns of information per event:
• Severity: The severity level assigned to the event.
• Timestamp: The date and time that the event occurred.
• Modify Time: The last recorded date and time that the event was modified.
• Type: The type of event according to Oracle VM Manager's event categorization model.
• Summary: A summary description of the event.
• Acknowledged: Whether an error event has been acknowledged.
• User Acknowledgeable: Whether or not an event can be acknowledged by the user.
Alongside each event entry in the table, there is an arrow that allows you to expand the view for each
entry. This displays the full Description for the event.
The Events perspective or dialog contains a perspective toolbar with the following options:
Table 6.22 Events Perspective Toolbar Icon Options
Toolbar Icon Option
Icon
Description
Acknowledge
Acknowledge a selected error event to clear the error and
return the object to normal operations. Note that this option is
only available for user acknowledgeable events.
Acknowledge All
Acknowledge all error events associated with an object to clear
the errors and return the object to normal operations. Note that
only user acknowledgeable events are cleared. This button is
always clickable, even if there are no user acknowledgeable
events. Clicking it when there are no user acknowledgeable
events results in an error dialog.
Display Count
A drop-down menu that allows you to select the number of
events that should be displayed in the management pane,
while you are currently in this perspective.
Acknowledging Events/Errors
If an object has an error event associated with it you must acknowledge the event to clear the error and
return the object to normal operations. For example, this can occur if an Oracle VM Server or virtual
machine appear as Stopped (Error) in the status. The object in error is flagged with a red icon in the
navigation tree. Oracle VM Servers, virtual machines, repositories and storage objects can have error
events associated with them. The following procedures show you how to clear errors and return the object
to normal operations.
To acknowledge Oracle VM Server error events:
1. Click the Servers and VMs tab.
293
Access Groups Perspective
2. Select the Oracle VM Server in the navigation tree.
3. Select Events from the Perspective drop-down list in the management pane.
4. Select the user acknowledgeable error event and click Acknowledge
to clear all user acknowledgeable errors.
, or click Acknowledge All
To acknowledge virtual machine error events:
1. Click the Servers and VMs tab.
2. Select the server pool, or Oracle VM Server on which the virtual machine resides in the navigation tree.
3. Select Virtual Machines from the Perspective drop-down list in the management pane.
4. Select the virtual machine in the management pane table. Click Display Selected VM Events...
.
5. The Events dialog box is displayed. Select the user acknowledgeable error event and click
Acknowledge , or click Acknowledge All to clear all user acknowledgeable errors. Click Close.
To acknowledge storage repository error events:
1. Click the Repositories tab.
2. Select the repository in the navigation tree.
3. Select Events from the Perspective drop-down list in the management pane.
4. Select the error event and click Acknowledge
, or click Acknowledge All
to clear all errors.
To acknowledge storage error events:
1. Click the Storage tab.
2. Select File Servers, SAN Servers, or a storage server in the navigation tree.
3. Select Events from the Perspective drop-down list in the management pane.
4. Select the user acknowledgeable error event and click Acknowledge
to clear all user acknowledgeable errors.
, or click Acknowledge All
6.8.4 Access Groups Perspective
The Access Groups perspective lists the different Access Groups configured in your environment. The
following columns are displayed in the management pane:
• Name: The name that has been configured for the access group.
• Event Severity: The event level severity associated with the access group.
• SAN Server: The SAN server that the access group applies to.
• Description: A description entered for the access group when it was created or edited.
This perspective includes a toolbar that consists of the following options:
Table 6.23 Access Groups Perspective Toolbar Icon Options
Toolbar Icon Option
Create Access Group...
Icon
Description
Displays the Create an Access Group dialog box. Use this
option to create a new access group. This option is only
available for non-generic storage arrays.
294
Access Groups Perspective
Toolbar Icon Option
Icon
Description
Edit Access Group...
Displays the Edit Access Group dialog box. Use this option to
edit access group settings such as name, description and the
storage initiators that have access to the SAN Server.
Delete Access Group
Displays the Delete Confirmation dialog box. Use this option
to delete the selected access group. This option is only
available for non-generic storage arrays. This option is only
available for non-generic storage arrays.
Display Selected Access
Group Events...
Display the Events dialog box which contains the job event
associated with the selected access groups.
6.8.4.1 Create Access Group
Except for generic storage arrays, it is possible to create multiple access groups in order to arrange and
restrict physical disk access according to your requirements. The generic iSCSI storage arrays have a
single access group available by default, where you can simply add or remove storage initiators from your
Oracle VM Servers.
Generic fibre channel storage has no access groups and is always listed under the Unmanaged Fibre
Channel Storage Array folder.
To configure an access group for a non-generic iSCSI storage array:
1. Expand the SAN Servers folder in the navigation tree, select a SAN server item contained within the
folder. Select the Access Groups option in the Perspective drop-down list.
2. Click Create Access Group
to start the Create an Access Group wizard.
3. The Create Access Group step is displayed in the wizard. Enter a name for your new access group
and optionally provide a description. Click Next.
4. The Select Initiators step is displayed in the wizard. It contains the available storage initiators for this
type of storage on the Oracle VM Servers in your environment. Use the arrow buttons to move the
required initiators from the Available Storage Initiators box to the Selected Storage Initiators box.
Click Next.
295
Access Groups Perspective
Note
You can also use the Storage Initiators perspective in the Servers and VMs
tab to view and configure storage initiators on an individual Oracle VM Server.
See Section 3.5.7.1, “View Access Groups for Selected Initiator” for more
information on using this method.
Important
If you have both iSCSI and Fibre Channel storage array types in your
environment, you must ensure that the storage initiators that you are adding
for the access group, match the storage type that you are defining this access
group for. See What are Access Groups? in the Oracle VM Concepts Guide for
more information on Access Groups.
5. The Present Physical Disks step is displayed in the wizard. It contains the available storage elements
on the storage array you are registering.
Note
If this is the first time you are configuring access to this storage array, the list of
available physical disks may be empty. You may have to edit the access group
afterwards to select physical disks.
Use the arrow buttons to move the required disks from the Available Physical Disks box to the
Selected Physical Disks box. These disks are presented to the Oracle VM Servers that have the
iSCSI initiator that belongs to the access group. Click Finish to create the new access group with the
selected initiators and physical disks.
296
Access Groups Perspective
The new access group now appears in the Access Groups table. If you change the Perspective of the
management pane to Physical Disks, the list of presented physical disks appear in the table.
After configuring the access group it is advisable to refresh the SAN server to make sure that the current
storage layout and access rules are in effect. The selected physical disks in your non-generic storage array
are now available to the Oracle VM Servers in this access group.
6.8.4.2 Edit Access Group
It is possible to edit an existing Access Group for a SAN Server. This option is also possible for a generic
iSCSI storage array, although you are only able to edit the default access group that is created when you
discover the SAN Server, since it is not possible to create additional access groups for generic Oracle VM
Storage Connect plug-ins.
To edit the access group for an iSCSI storage array:
1. Expand the SAN Servers folder in the navigation tree, select a SAN server item contained within the
folder. Select the Access Groups option in the Perspective drop-down list.
2. Select the access group that you wish to edit (a default access group is always present) and click Edit
Access Group . The Edit Access Group dialog box is displayed.
3. In the Access Group tab, you can edit the Name on Array and Access Group Name for storage
arrays that use a non-generic Oracle VM Storage Connect plug-in. When you have a generic plug-in,
these items are greyed out. You can also provide or edit a description for the access group.
4. Select the Storage Initiators tab. It contains the available storage initiators for this type of storage on
the Oracle VM Servers in your environment.
297
Access Groups Perspective
5. Use the arrow buttons to move the required initiators to the Selected Storage Initiators box.
Note
You can also use the Storage Initiators perspective in the Servers and VMs
tab to view and configure storage initiators on an individual Oracle VM Server.
See Section 3.5.7.1, “View Access Groups for Selected Initiator” for more
information on using this method.
Important
If you have both iSCSI and Fibre Channel storage array types in your
environment, you must ensure that the storage initiators that you are adding
for the access group, match the storage type that you are defining this access
group for. See What are Access Groups? in the Oracle VM Concepts Guide for
more information on Access Groups.
For a generic storage array you cannot select which physical disks are added; all disks are
automatically presented to the selected Oracle VM Servers.
6. Click OK to save your changes to the default access group. If you change the Perspective of the
management pane to Physical Disks, the list of presented physical disks appears in the table.
298
Access Groups Perspective
7. After configuring the access group it is advisable to refresh the storage array to make sure that the
current storage layout and access rules are in effect.
The Oracle VM Servers in this access group now have the necessary permissions to use the physical
disks of the storage array; they can be deployed either as disks for virtual machines (VMs) or for storage
repositories. To create storage repositories on your physical disks, see Chapter 4, Repositories Tab.
6.8.4.3 Delete Access Group
Except for generic storage arrays, it is possible to delete additional access groups that you may have
defined apart from the default access group.
To delete one or more access groups:
1. Expand the SAN Servers folder in the navigation tree, select a SAN server item contained within the
folder. Select the Access Groups option in the Perspective drop-down list. Select the access group or
groups, that you wish to delete, from the items listed in the management pane.
2. Click on the
Delete Access Group icon in the toolbar.
3. The Delete Confirmation dialog box is displayed. Click OK to delete the access group.
6.8.4.4 Present/Unpresent Physical Disks
6.8.4.5 Display Events
The Events perspective is common to many elements within the Oracle VM Manager Web Interface.
The Events perspective generally appears as an option within the Perspectives drop-down menu on the
management pane of tabs that include a navigation tree. In this case, the Events perspective displays
events specific to the item selected in the navigation tree and presents these in the management pane.
The Events perspective may also appear within a dialog that is triggered from a Display Selected
Events... perspective toolbar option. In this case, the Events perspective dialog displays events specific
to one or more elements selected in the management pane.
299
Access Groups Perspective
If an object has an error event associated with it you must acknowledge the event to clear the error and
return the object to normal operations. For example, this can occur if an Oracle VM Server or virtual
machine appear as Stopped (Error) in the status. The object in error is flagged with a red icon in the
navigation tree. Oracle VM Servers, virtual machines, repositories and storage objects can have error
events associated with them.
Since Oracle VM Manager attempts to resolve issues automatically as much as possible, not all events
can be acknowledged by a user within the Oracle VM Manager Web Interface. Therefore, a flag is set
for events that are user acknowledgeable. If an event does not have this flag set, you are unable to
acknowledge it, since it is handled internally by Oracle VM Manager.
The Events perspective or dialog contains a table with the following columns of information per event:
• Severity: The severity level assigned to the event.
• Timestamp: The date and time that the event occurred.
• Modify Time: The last recorded date and time that the event was modified.
• Type: The type of event according to Oracle VM Manager's event categorization model.
• Summary: A summary description of the event.
• Acknowledged: Whether an error event has been acknowledged.
• User Acknowledgeable: Whether or not an event can be acknowledged by the user.
Alongside each event entry in the table, there is an arrow that allows you to expand the view for each
entry. This displays the full Description for the event.
The Events perspective or dialog contains a perspective toolbar with the following options:
Table 6.24 Events Perspective Toolbar Icon Options
Toolbar Icon Option
Icon
Description
Acknowledge
Acknowledge a selected error event to clear the error and
return the object to normal operations. Note that this option is
only available for user acknowledgeable events.
Acknowledge All
Acknowledge all error events associated with an object to clear
the errors and return the object to normal operations. Note that
only user acknowledgeable events are cleared. This button is
always clickable, even if there are no user acknowledgeable
events. Clicking it when there are no user acknowledgeable
events results in an error dialog.
Display Count
A drop-down menu that allows you to select the number of
events that should be displayed in the management pane,
while you are currently in this perspective.
Acknowledging Events/Errors
If an object has an error event associated with it you must acknowledge the event to clear the error and
return the object to normal operations. For example, this can occur if an Oracle VM Server or virtual
machine appear as Stopped (Error) in the status. The object in error is flagged with a red icon in the
navigation tree. Oracle VM Servers, virtual machines, repositories and storage objects can have error
events associated with them. The following procedures show you how to clear errors and return the object
to normal operations.
300
Volume Groups Perspective
To acknowledge Oracle VM Server error events:
1. Click the Servers and VMs tab.
2. Select the Oracle VM Server in the navigation tree.
3. Select Events from the Perspective drop-down list in the management pane.
4. Select the user acknowledgeable error event and click Acknowledge
to clear all user acknowledgeable errors.
, or click Acknowledge All
To acknowledge virtual machine error events:
1. Click the Servers and VMs tab.
2. Select the server pool, or Oracle VM Server on which the virtual machine resides in the navigation tree.
3. Select Virtual Machines from the Perspective drop-down list in the management pane.
4. Select the virtual machine in the management pane table. Click Display Selected VM Events...
.
5. The Events dialog box is displayed. Select the user acknowledgeable error event and click
Acknowledge , or click Acknowledge All to clear all user acknowledgeable errors. Click Close.
To acknowledge storage repository error events:
1. Click the Repositories tab.
2. Select the repository in the navigation tree.
3. Select Events from the Perspective drop-down list in the management pane.
4. Select the error event and click Acknowledge
, or click Acknowledge All
to clear all errors.
To acknowledge storage error events:
1. Click the Storage tab.
2. Select File Servers, SAN Servers, or a storage server in the navigation tree.
3. Select Events from the Perspective drop-down list in the management pane.
4. Select the user acknowledgeable error event and click Acknowledge
to clear all user acknowledgeable errors.
, or click Acknowledge All
6.8.5 Volume Groups Perspective
The Volume Groups perspective lists the different Volume Groups configured for each SAN Server in your
environment. The following columns are displayed in the management pane:
• Name: The name that has been configured for the volume group.
• Size (GiB): A grouping that consists of the following columns:
• Free: The size of the volume, in GiB, that is currently free.
• Used: The size of the volume, in GiB, that is currently in use.
• Total: The total size, in GiB, of the volume.
301
Unmanaged iSCSI Storage Array Item
• Description: A description entered for the volume group when it was created or edited.
This perspective includes a toolbar that consists of the following options:
Table 6.25 Volume Groups Perspective Toolbar Icon Options
Toolbar Icon Option
Edit Volume Group...
Icon
Description
Displays the Edit Volume Group dialog box. Use this option to
edit volume group settings such as name and description.
6.8.5.1 Edit Volume Group
It is possible to edit the configuration for a Volume Group available on a SAN server. The steps and
options to do so are described below.
To edit Volume Group configuration on a SAN server:
1. Expand the SAN Servers folder in the navigation tree, select a SAN server item contained within the
folder. Select the Volume Groups option in the Perspective drop-down list. Select the volume group
that you wish to edit in the table presented in the management pane.
2. Click on the
Edit Volume Group icon in the toolbar.
3. A dialog opens to allow you to reconfigure the Volume Group. The dialog has the following options:
• ID: A non-editable field containing the volume group's UUID as it is stored within Oracle VM
Manager.
• Name: A field to change the name of the volume group within Oracle VM Manager.
• Description: A text field allowing a description of the volume group.
4. When you have finished editing the volume group, click OK to save the changes, or Cancel to exit out
of the dialog without saving any changes.
6.9 Unmanaged iSCSI Storage Array Item
An Unmanaged iSCSI Storage Array navigation item is listed underneath the Section 6.5, “SAN Servers
Folder” when it has been expanded. The structure of the navigation provided in the navigation tree is
discussed in more detail in Section 6.2, “Summary”.
Clicking on a Unmanaged iSCSI Storage Array navigation item in the navigation tree allows you to
access different perspectives in the management pane. Each perspective provides its own view of any
unmanaged iSCSI storage arrays within Oracle VM Manager. Most of the perspectives also include
separate perspective toolbars that enable you to perform various configuration or management tasks
specific to the view currently displayed within the management pane. The Unmanaged iSCSI Storage
Array navigation item offers the following perspectives within the management pane:
• Info Perspective
• Events Perspective
• Physical Disks Perspective
• Access Groups Perspective
• Volume Groups Perspective
302
Info Perspective
6.9.1 Info Perspective
The Info perspective is common to many elements within the Oracle VM Manager Web Interface. This
perspective always shows the individually configured parameters for an item that is currently selected
in the navigation tree. Some of these configured parameters may be automatically populated through a
discovery process, while others may have been configured manually during the creation of the object that
is selected.
This perspective usually includes the following information depending on what information is returned by
the Oracle VM Storage Connect plug-in:
• Admin Host: The configured admin host to access this storage array.
• Admin Username: The configured admin username to access this storage array.
• Storage Name: The name of storage array as returned by the Oracle VM Storage Connect plug-in.
• Description: The configured description for the storage array.
• SAN Server's Storage Description: The description returned for the storage array as returned by the
Oracle VM Storage Connect plug-in.
• Status: The status of the storage array as returned by the Oracle VM Storage Connect plug-in.
• Validated: Whether or not the storage array has been validated by Oracle VM Manager. No special
storage operations supported by the Oracle VM Storage Connect plug-in may occur until the storage
server is validated by Oracle VM Manager.
• Storage Plug-In: The name of the Oracle VM Storage Connect plug-in used to access the storage
array.
• Storage Plug-In Version: The version number of the Oracle VM Storage Connect plug-in used to
access the storage array.
• Plug-in Private Data: Additional parameters passed to the Oracle VM Storage Connect plug-in.
• Total Size (GiB): The total size, in GiB, reported by the Oracle VM Storage Connect plug-in.
• Free Size (GiB): The available free space, in GiB, reported by the Oracle VM Storage Connect plug-in.
• Used Size (GiB): The amount of used space, in GiB, reported by the Oracle VM Storage Connect plugin.
Additional fields may be listed to indicate the support status for various storage related functions as
reported by the Oracle VM Storage Connect plug-in in use.
6.9.2 Events Perspective
The Events perspective is common to many elements within the Oracle VM Manager Web Interface.
The Events perspective generally appears as an option within the Perspectives drop-down menu on the
management pane of tabs that include a navigation tree. In this case, the Events perspective displays
events specific to the item selected in the navigation tree and presents these in the management pane.
The Events perspective may also appear within a dialog that is triggered from a Display Selected
Events... perspective toolbar option. In this case, the Events perspective dialog displays events specific
to one or more elements selected in the management pane.
If an object has an error event associated with it you must acknowledge the event to clear the error and
return the object to normal operations. For example, this can occur if an Oracle VM Server or virtual
303
Events Perspective
machine appear as Stopped (Error) in the status. The object in error is flagged with a red icon in the
navigation tree. Oracle VM Servers, virtual machines, repositories and storage objects can have error
events associated with them.
Since Oracle VM Manager attempts to resolve issues automatically as much as possible, not all events
can be acknowledged by a user within the Oracle VM Manager Web Interface. Therefore, a flag is set
for events that are user acknowledgeable. If an event does not have this flag set, you are unable to
acknowledge it, since it is handled internally by Oracle VM Manager.
The Events perspective or dialog contains a table with the following columns of information per event:
• Severity: The severity level assigned to the event.
• Timestamp: The date and time that the event occurred.
• Modify Time: The last recorded date and time that the event was modified.
• Type: The type of event according to Oracle VM Manager's event categorization model.
• Summary: A summary description of the event.
• Acknowledged: Whether an error event has been acknowledged.
• User Acknowledgeable: Whether or not an event can be acknowledged by the user.
Alongside each event entry in the table, there is an arrow that allows you to expand the view for each
entry. This displays the full Description for the event.
The Events perspective or dialog contains a perspective toolbar with the following options:
Table 6.26 Events Perspective Toolbar Icon Options
Toolbar Icon Option
Icon
Description
Acknowledge
Acknowledge a selected error event to clear the error and
return the object to normal operations. Note that this option is
only available for user acknowledgeable events.
Acknowledge All
Acknowledge all error events associated with an object to clear
the errors and return the object to normal operations. Note that
only user acknowledgeable events are cleared. This button is
always clickable, even if there are no user acknowledgeable
events. Clicking it when there are no user acknowledgeable
events results in an error dialog.
Display Count
A drop-down menu that allows you to select the number of
events that should be displayed in the management pane,
while you are currently in this perspective.
Acknowledging Events/Errors
If an object has an error event associated with it you must acknowledge the event to clear the error and
return the object to normal operations. For example, this can occur if an Oracle VM Server or virtual
machine appear as Stopped (Error) in the status. The object in error is flagged with a red icon in the
navigation tree. Oracle VM Servers, virtual machines, repositories and storage objects can have error
events associated with them. The following procedures show you how to clear errors and return the object
to normal operations.
To acknowledge Oracle VM Server error events:
1. Click the Servers and VMs tab.
304
Physical Disks Perspective
2. Select the Oracle VM Server in the navigation tree.
3. Select Events from the Perspective drop-down list in the management pane.
4. Select the user acknowledgeable error event and click Acknowledge
to clear all user acknowledgeable errors.
, or click Acknowledge All
To acknowledge virtual machine error events:
1. Click the Servers and VMs tab.
2. Select the server pool, or Oracle VM Server on which the virtual machine resides in the navigation tree.
3. Select Virtual Machines from the Perspective drop-down list in the management pane.
4. Select the virtual machine in the management pane table. Click Display Selected VM Events...
.
5. The Events dialog box is displayed. Select the user acknowledgeable error event and click
Acknowledge , or click Acknowledge All to clear all user acknowledgeable errors. Click Close.
To acknowledge storage repository error events:
1. Click the Repositories tab.
2. Select the repository in the navigation tree.
3. Select Events from the Perspective drop-down list in the management pane.
4. Select the error event and click Acknowledge
, or click Acknowledge All
to clear all errors.
To acknowledge storage error events:
1. Click the Storage tab.
2. Select File Servers, SAN Servers, or a storage server in the navigation tree.
3. Select Events from the Perspective drop-down list in the management pane.
4. Select the user acknowledgeable error event and click Acknowledge
to clear all user acknowledgeable errors.
, or click Acknowledge All
6.9.3 Physical Disks Perspective
The Physical Disks perspective lists the different physical disks configured in your environment and
running on a SAN storage array. The following columns are displayed in the management pane:
• Name: The name that has been configured for the physical disk
• Event Severity: The event level severity for the physical disk.
• Size (GiB): The size, in GiB, of the physical disk.
• Volume Group: The volume group that the physical disk belongs to.
• Server: The servers that have access to the physical disk.
• Status: The status of the physical disk (whether or not the disk is online).
• Shareable: Whether the physical disk is shareable or not.
• Description: A description entered for the physical disk when it was created or edited.
305
Physical Disks Perspective
Alongside each physical disk entry in the table, there is an arrow that allows you to expand the view for
each entry. This exposes further information:
• Name: The user-specified alias for the physical disk. The name can be changed without changing the
name of the physical disk on the storage array.
• User Friendly Name: The name of the physical disk on the storage array. The name was specified
when the disk was created and cannot be changed.
• SAN Server: The SAN server that the physical disk belongs to.
• Thin Provision: Whether or not thin provisioning is supported by the physical disk.
• Type: The type of storage that the physical disk is a part of (for example, iSCSI or Fibre Channel).
• Reserved by Server(s): Whether or not the physical disk is unavailable for use by Oracle VM Manager.
• Storage Targets: The endpoint provided by the storage server through which the server may direct
commands to the physical disk. The storage target provides access to the physical disk.
• Server Pool: The server pool that the physical disk belongs to.
• Repository: The repository that the physical disk belongs to.
• VM(s): Virtual machines using the physical disk.
• ID: The UUID for the physical disk.
• Page83 ID: The unique identifier for the physical disk.
• Access Groups: The access groups that the physical disk belongs to.
• Extra Information: Information that is passed to and from the Oracle VM Storage Connect plug-in for
use internally by the plug-in.
The management functions you can perform on the disk are available as icons in the perspective toolbar.
Some management options are only available to SAN server disks that use a non-generic Storage Connect
plug-in.
Table 6.27 Physical Disks Perspective Toolbar Icon Options
Toolbar Icon Option
Create Physical Disk...
Icon
Description
Displays the Create Physical Disk dialog box. Use this option
to create a new physical disk in the selected volume group of
the storage array of your choice.
This option is not supported for storage arrays using a generic
Oracle VM Storage Connect plug-in.
Edit Physical Disk...
Displays the Edit Physical Disk dialog box. Use this option
to change the name, size, provisioning and share ability of the
selected physical disk.
Delete Physical Disk
Displays the Delete Confirmation dialog box. Use this option
to delete the selected physical disk.
Clone Physical Disk
Displays the Clone Physical Disk dialog box. Use this option
to clone a physical disk to another physical disk or to a disk
image on a file server.
Refresh Physical Disk
Refreshes the physical disks on a storage array. Use this
option to rescan the physical disks after making changes to
306
Physical Disks Perspective
Toolbar Icon Option
Icon
Description
the configuration of a storage array. This updates the storage
information known to Oracle VM Manager.
Display Servers using Physical
Disk...
Displays the Servers using Physical Disk dialog box. Use
this option to view which servers are using a selected physical
disk.
Display Selected Physical Disk
Events...
Display the Events dialog box which contains the job event
associated with the selected physical disks.
6.9.3.1 Create Physical Disk (not supported on Generic)
On SAN Servers that are not using a generic Oracle VM Storage Connect plug-in, it is frequently possible
to create a new physical disk.
To create a physical disk on a SAN Server:
1. Expand the SAN Servers folder in the navigation tree, select a SAN server item contained within the
folder. Select the Physical Disks option in the Perspective drop-down list.
2. Click on the
Create Physical Disk option in the toolbar.
3. The Create Physical Disk dialog is displayed. Enter or select the following:
• Volume Group: A volume group that you want the physical disk to belong to.
• Name: A name for the physical disk.
• Size (GiB): The size of the physical disk, in GiB.
• Extra Information: Optional information that is passed to and from the Oracle VM Storage Connect
plug-in for use internally by the plug-in.
• Description: An optional description of the physical disk.
• Shareable: Whether or not the physical disk is shareable.
• Thin Provision: Whether or not thin provisioning is to be supported by the physical disk.
4. When you have finished editing the parameters to define the new physical disk, click OK to save the
changes, or Cancel to exit out of the dialog without saving any changes.
6.9.3.2 Edit Physical Disk
It is possible to edit the configuration for a physical disk either available on a SAN server or as local or
shared storage. The steps and options to do so are described below.
To edit Physical Disk configuration:
1. On the Storage tab, expand the SAN Servers folder in the navigation tree, select a SAN server item
contained within the folder. Select the Physical Disks option in the Perspective drop-down list. Select
the physical disk that you wish to edit in the table presented in the management pane.
To edit the physical disk configuration for a physical disk used by a particular server, on the Servers
and VMs tab, expand the Server Pools or Unassigned Servers folder, to select a particular server
in the navigation tree. Select the Physical Disks option in the Perspective drop-down list. Select the
physical disk that you wish to edit in the table presented in the management pane.
307
Physical Disks Perspective
2. Click on the
Edit Physical Disk icon in the toolbar.
3. A dialog opens to allow you to reconfigure the Physical Disk. The dialog has the following options:
• ID: A non-editable field containing the physical disk's UUID as it is stored within Oracle VM Manager.
• Name: A field to change the name of the physical disk within Oracle VM Manager.
• Current Size(GiB): A non-editable field containing the physical disk's current size, in GiB.
• New Size(GiB): A field to change the size, in GiB, of the physical disk. The size of the physical disk
can only be increased in size.
• Description: A text field allowing a description of the physical disk.
• Shareable: A check box that determines whether or not the disk can be shared.
• Thin Provision: A non-editable field describing whether or not thin provisioning is supported by the
disk.
4. When you have finished editing the physical disk, click OK to save the changes, or Cancel to exit out of
the dialog without saving any changes.
6.9.3.3 Delete Physical Disk
It is possible to delete an existing physical disk if it is no longer in use by any servers within any server
pools and the Oracle VM Storage Connect plug-in that you are using supports this operation. The steps
and options to do so are described below.
To delete the registered physical disk:
1. Expand the SAN Servers folder in the navigation tree, select a SAN server item contained within the
folder. Select the Physical Disks option in the Perspective drop-down list. Select the physical disk
that you wish to delete in the table presented in the management pane.
To delete a physical disk used by a particular server, on the Servers and VMs tab, expand the Server
Pools or Unassigned Servers folder, to select a particular server in the navigation tree. Select the
Physical Disks option in the Perspective drop-down list. Select the physical disk that you wish to
delete in the table presented in the management pane.
2. Click on the
Delete Physical Disk icon in the toolbar.
3. The Delete Confirmation dialog box is displayed. Click OK to delete the physical disk.
6.9.3.4 Clone Physical Disk
It is possible to clone a physical disk. The steps and options to do so are described below.
To clone a Physical Disk:
1. On the Storage tab, expand the SAN Servers folder in the navigation tree, select a SAN server item
contained within the folder. Select the Physical Disks option in the Perspective drop-down list. Select
the physical disk that you wish to clone in the table presented in the management pane.
To clone a physical disk used by a particular server, on the Servers and VMs tab, expand the Server
Pools or Unassigned Servers folder, to select a particular server in the navigation tree. Select the
Physical Disks option in the Perspective drop-down list. Select the physical disk that you wish to
clone in the table presented in the management pane.
308
Physical Disks Perspective
2. Click on the
Clone Physical Disk icon in the toolbar.
3. A dialog opens to allow you to clone the Physical Disk. The dialog has the following options:
• Name: A field to set the name of the physical disk clone that you are going to create within Oracle
VM Manager.
• Clone Target Type: A drop-down menu allowing you to select the type of storage to be used for the
physical disk clone:
• Physical Disk: Copies the data from one physical disk to another.
• Repository: Copies the data from the physical disk into a virtual disk image in an existing
repository.
• Clone Target: A searchable field to allow you to select the target location where the clone is to be
stored.
• Clone Type: A drop-down menu allowing you to select the type of clone to create:
• Sparse Copy: Copies only the written data from the physical disk to the target clone.
• Non-sparse Copy: Performs a block copy of the physical disk to the target clone.
4. When you have finished setting the clone parameters for the physical disk, click OK to begin the clone
job, or Cancel to exit out of the dialog without saving any changes.
6.9.3.5 Refresh Physical Disk
When changes are made to the physical disks on a SAN server or Oracle VM Server, it is useful to refresh
the configuration of your physical disks to make Oracle VM Manager aware of the changes.
To refresh physical disks:
1. Expand the SAN Servers folder in the navigation tree, select a SAN server item contained within the
folder. Select the Physical Disks option in the Perspective drop-down list. Select the physical disk or
disks that you wish to refresh in the table presented in the management pane.
To refresh physical disks used by a particular server, on the Servers and VMs tab, expand the Server
Pools or Unassigned Servers folder, to select a particular server in the navigation tree. Select the
Physical Disks option in the Perspective drop-down list. Select the physical disk that you wish to
refresh in the table presented in the management pane.
2. Click on the
Refresh Physical Disk option in the toolbar.
3. The selected physical disks are refreshed and their configurations are updated within Oracle VM
Manager.
Note
If you encounter an error, when refreshing a physical disk with a repository located
on it, similar to the following:
OVMAPI_7281E Cannot perform operation on file system...
You may need to ensure that the repository is under the ownership of the Oracle
VM Manager instance that you are using. See Section 4.3.1.2, “Edit Repository” for
more information.
309
Physical Disks Perspective
6.9.3.6 Display Servers Using a Physical Disk
It is possible to display the Oracle VM Servers that are using a physical disk available on a SAN server.
The steps and options to do so are described below.
To display a list of Oracle VM Servers using a Physical Disk on a SAN server:
1. Expand the SAN Servers folder in the navigation tree, select a SAN server item contained within the
folder. Select the Physical Disks option in the Perspective drop-down list. Select the physical disk
that you wish to view in the table presented in the management pane.
2. Click on the
Display Servers using Physical Disk icon in the toolbar.
3. A dialog opens to display the Oracle VM Servers that are configured to use the Physical Disk. The
dialog provides the following information in tabular format:
• Name: The name of the Oracle VM Server.
• Description: The configured description for the Oracle VM Server.
• Status: The running status of the Oracle VM Server.
• Utilization (%): The percentage of the disk that is utilized by the Oracle VM Server.
• Maintenance Mode: Whether or not the Oracle VM Server is in maintenance mode.
• Owned: Whether or not the current instance of Oracle VM Manager has ownership of the Oracle VM
Server.
4. When you have finished viewing the list of servers with access to the physical disk, click Close to exit
out of the dialog.
6.9.3.7 Display Events
The Events perspective is common to many elements within the Oracle VM Manager Web Interface.
The Events perspective generally appears as an option within the Perspectives drop-down menu on the
management pane of tabs that include a navigation tree. In this case, the Events perspective displays
events specific to the item selected in the navigation tree and presents these in the management pane.
The Events perspective may also appear within a dialog that is triggered from a Display Selected
Events... perspective toolbar option. In this case, the Events perspective dialog displays events specific
to one or more elements selected in the management pane.
If an object has an error event associated with it you must acknowledge the event to clear the error and
return the object to normal operations. For example, this can occur if an Oracle VM Server or virtual
machine appear as Stopped (Error) in the status. The object in error is flagged with a red icon in the
navigation tree. Oracle VM Servers, virtual machines, repositories and storage objects can have error
events associated with them.
Since Oracle VM Manager attempts to resolve issues automatically as much as possible, not all events
can be acknowledged by a user within the Oracle VM Manager Web Interface. Therefore, a flag is set
for events that are user acknowledgeable. If an event does not have this flag set, you are unable to
acknowledge it, since it is handled internally by Oracle VM Manager.
The Events perspective or dialog contains a table with the following columns of information per event:
• Severity: The severity level assigned to the event.
• Timestamp: The date and time that the event occurred.
310
Physical Disks Perspective
• Modify Time: The last recorded date and time that the event was modified.
• Type: The type of event according to Oracle VM Manager's event categorization model.
• Summary: A summary description of the event.
• Acknowledged: Whether an error event has been acknowledged.
• User Acknowledgeable: Whether or not an event can be acknowledged by the user.
Alongside each event entry in the table, there is an arrow that allows you to expand the view for each
entry. This displays the full Description for the event.
The Events perspective or dialog contains a perspective toolbar with the following options:
Table 6.28 Events Perspective Toolbar Icon Options
Toolbar Icon Option
Icon
Description
Acknowledge
Acknowledge a selected error event to clear the error and
return the object to normal operations. Note that this option is
only available for user acknowledgeable events.
Acknowledge All
Acknowledge all error events associated with an object to clear
the errors and return the object to normal operations. Note that
only user acknowledgeable events are cleared. This button is
always clickable, even if there are no user acknowledgeable
events. Clicking it when there are no user acknowledgeable
events results in an error dialog.
Display Count
A drop-down menu that allows you to select the number of
events that should be displayed in the management pane,
while you are currently in this perspective.
Acknowledging Events/Errors
If an object has an error event associated with it you must acknowledge the event to clear the error and
return the object to normal operations. For example, this can occur if an Oracle VM Server or virtual
machine appear as Stopped (Error) in the status. The object in error is flagged with a red icon in the
navigation tree. Oracle VM Servers, virtual machines, repositories and storage objects can have error
events associated with them. The following procedures show you how to clear errors and return the object
to normal operations.
To acknowledge Oracle VM Server error events:
1. Click the Servers and VMs tab.
2. Select the Oracle VM Server in the navigation tree.
3. Select Events from the Perspective drop-down list in the management pane.
4. Select the user acknowledgeable error event and click Acknowledge
to clear all user acknowledgeable errors.
, or click Acknowledge All
To acknowledge virtual machine error events:
1. Click the Servers and VMs tab.
2. Select the server pool, or Oracle VM Server on which the virtual machine resides in the navigation tree.
3. Select Virtual Machines from the Perspective drop-down list in the management pane.
311
Access Groups Perspective
4. Select the virtual machine in the management pane table. Click Display Selected VM Events...
.
5. The Events dialog box is displayed. Select the user acknowledgeable error event and click
Acknowledge , or click Acknowledge All to clear all user acknowledgeable errors. Click Close.
To acknowledge storage repository error events:
1. Click the Repositories tab.
2. Select the repository in the navigation tree.
3. Select Events from the Perspective drop-down list in the management pane.
4. Select the error event and click Acknowledge
, or click Acknowledge All
to clear all errors.
To acknowledge storage error events:
1. Click the Storage tab.
2. Select File Servers, SAN Servers, or a storage server in the navigation tree.
3. Select Events from the Perspective drop-down list in the management pane.
4. Select the user acknowledgeable error event and click Acknowledge
to clear all user acknowledgeable errors.
, or click Acknowledge All
6.9.4 Access Groups Perspective
The Access Groups perspective lists the different Access Groups configured in your environment. The
following columns are displayed in the management pane:
• Name: The name that has been configured for the access group.
• Event Severity: The event level severity associated with the access group.
• SAN Server: The SAN server that the access group applies to.
• Description: A description entered for the access group when it was created or edited.
This perspective includes a toolbar that consists of the following options:
Table 6.29 Access Groups Perspective Toolbar Icon Options
Toolbar Icon Option
Icon
Description
Create Access Group...
Displays the Create an Access Group dialog box. Use this
option to create a new access group. This option is only
available for non-generic storage arrays.
Edit Access Group...
Displays the Edit Access Group dialog box. Use this option to
edit access group settings such as name, description and the
storage initiators that have access to the SAN Server.
Delete Access Group
Displays the Delete Confirmation dialog box. Use this option
to delete the selected access group. This option is only
available for non-generic storage arrays. This option is only
available for non-generic storage arrays.
Display Selected Access
Group Events...
Display the Events dialog box which contains the job event
associated with the selected access groups.
6.9.4.1 Create Access Group
312
Access Groups Perspective
Except for generic storage arrays, it is possible to create multiple access groups in order to arrange and
restrict physical disk access according to your requirements. The generic iSCSI storage arrays have a
single access group available by default, where you can simply add or remove storage initiators from your
Oracle VM Servers.
Generic fibre channel storage has no access groups and is always listed under the Unmanaged Fibre
Channel Storage Array folder.
To configure an access group for a non-generic iSCSI storage array:
1. Expand the SAN Servers folder in the navigation tree, select a SAN server item contained within the
folder. Select the Access Groups option in the Perspective drop-down list.
2. Click Create Access Group
to start the Create an Access Group wizard.
3. The Create Access Group step is displayed in the wizard. Enter a name for your new access group
and optionally provide a description. Click Next.
4. The Select Initiators step is displayed in the wizard. It contains the available storage initiators for this
type of storage on the Oracle VM Servers in your environment. Use the arrow buttons to move the
required initiators from the Available Storage Initiators box to the Selected Storage Initiators box.
Click Next.
Note
You can also use the Storage Initiators perspective in the Servers and VMs
tab to view and configure storage initiators on an individual Oracle VM Server.
See Section 3.5.7.1, “View Access Groups for Selected Initiator” for more
information on using this method.
313
Access Groups Perspective
Important
If you have both iSCSI and Fibre Channel storage array types in your
environment, you must ensure that the storage initiators that you are adding
for the access group, match the storage type that you are defining this access
group for. See What are Access Groups? in the Oracle VM Concepts Guide for
more information on Access Groups.
5. The Present Physical Disks step is displayed in the wizard. It contains the available storage elements
on the storage array you are registering.
Note
If this is the first time you are configuring access to this storage array, the list of
available physical disks may be empty. You may have to edit the access group
afterwards to select physical disks.
Use the arrow buttons to move the required disks from the Available Physical Disks box to the
Selected Physical Disks box. These disks are presented to the Oracle VM Servers that have the
iSCSI initiator that belongs to the access group. Click Finish to create the new access group with the
selected initiators and physical disks.
The new access group now appears in the Access Groups table. If you change the Perspective of the
management pane to Physical Disks, the list of presented physical disks appear in the table.
After configuring the access group it is advisable to refresh the SAN server to make sure that the current
storage layout and access rules are in effect. The selected physical disks in your non-generic storage array
are now available to the Oracle VM Servers in this access group.
6.9.4.2 Edit Access Group
It is possible to edit an existing Access Group for a SAN Server. This option is also possible for a generic
iSCSI storage array, although you are only able to edit the default access group that is created when you
discover the SAN Server, since it is not possible to create additional access groups for generic Oracle VM
Storage Connect plug-ins.
To edit the access group for an iSCSI storage array:
1. Expand the SAN Servers folder in the navigation tree, select a SAN server item contained within the
folder. Select the Access Groups option in the Perspective drop-down list.
314
Access Groups Perspective
2. Select the access group that you wish to edit (a default access group is always present) and click Edit
Access Group . The Edit Access Group dialog box is displayed.
3. In the Access Group tab, you can edit the Name on Array and Access Group Name for storage
arrays that use a non-generic Oracle VM Storage Connect plug-in. When you have a generic plug-in,
these items are greyed out. You can also provide or edit a description for the access group.
4. Select the Storage Initiators tab. It contains the available storage initiators for this type of storage on
the Oracle VM Servers in your environment.
5. Use the arrow buttons to move the required initiators to the Selected Storage Initiators box.
Note
You can also use the Storage Initiators perspective in the Servers and VMs
tab to view and configure storage initiators on an individual Oracle VM Server.
See Section 3.5.7.1, “View Access Groups for Selected Initiator” for more
information on using this method.
Important
If you have both iSCSI and Fibre Channel storage array types in your
environment, you must ensure that the storage initiators that you are adding
for the access group, match the storage type that you are defining this access
group for. See What are Access Groups? in the Oracle VM Concepts Guide for
more information on Access Groups.
315
Access Groups Perspective
For a generic storage array you cannot select which physical disks are added; all disks are
automatically presented to the selected Oracle VM Servers.
6. Click OK to save your changes to the default access group. If you change the Perspective of the
management pane to Physical Disks, the list of presented physical disks appears in the table.
7. After configuring the access group it is advisable to refresh the storage array to make sure that the
current storage layout and access rules are in effect.
The Oracle VM Servers in this access group now have the necessary permissions to use the physical
disks of the storage array; they can be deployed either as disks for virtual machines (VMs) or for storage
repositories. To create storage repositories on your physical disks, see Chapter 4, Repositories Tab.
6.9.4.3 Delete Access Group
Except for generic storage arrays, it is possible to delete additional access groups that you may have
defined apart from the default access group.
To delete one or more access groups:
1. Expand the SAN Servers folder in the navigation tree, select a SAN server item contained within the
folder. Select the Access Groups option in the Perspective drop-down list. Select the access group or
groups, that you wish to delete, from the items listed in the management pane.
2. Click on the
Delete Access Group icon in the toolbar.
3. The Delete Confirmation dialog box is displayed. Click OK to delete the access group.
6.9.4.4 Present/Unpresent Physical Disks
6.9.4.5 Display Events
The Events perspective is common to many elements within the Oracle VM Manager Web Interface.
The Events perspective generally appears as an option within the Perspectives drop-down menu on the
316
Access Groups Perspective
management pane of tabs that include a navigation tree. In this case, the Events perspective displays
events specific to the item selected in the navigation tree and presents these in the management pane.
The Events perspective may also appear within a dialog that is triggered from a Display Selected
Events... perspective toolbar option. In this case, the Events perspective dialog displays events specific
to one or more elements selected in the management pane.
If an object has an error event associated with it you must acknowledge the event to clear the error and
return the object to normal operations. For example, this can occur if an Oracle VM Server or virtual
machine appear as Stopped (Error) in the status. The object in error is flagged with a red icon in the
navigation tree. Oracle VM Servers, virtual machines, repositories and storage objects can have error
events associated with them.
Since Oracle VM Manager attempts to resolve issues automatically as much as possible, not all events
can be acknowledged by a user within the Oracle VM Manager Web Interface. Therefore, a flag is set
for events that are user acknowledgeable. If an event does not have this flag set, you are unable to
acknowledge it, since it is handled internally by Oracle VM Manager.
The Events perspective or dialog contains a table with the following columns of information per event:
• Severity: The severity level assigned to the event.
• Timestamp: The date and time that the event occurred.
• Modify Time: The last recorded date and time that the event was modified.
• Type: The type of event according to Oracle VM Manager's event categorization model.
• Summary: A summary description of the event.
• Acknowledged: Whether an error event has been acknowledged.
• User Acknowledgeable: Whether or not an event can be acknowledged by the user.
Alongside each event entry in the table, there is an arrow that allows you to expand the view for each
entry. This displays the full Description for the event.
The Events perspective or dialog contains a perspective toolbar with the following options:
Table 6.30 Events Perspective Toolbar Icon Options
Toolbar Icon Option
Icon
Description
Acknowledge
Acknowledge a selected error event to clear the error and
return the object to normal operations. Note that this option is
only available for user acknowledgeable events.
Acknowledge All
Acknowledge all error events associated with an object to clear
the errors and return the object to normal operations. Note that
only user acknowledgeable events are cleared. This button is
always clickable, even if there are no user acknowledgeable
events. Clicking it when there are no user acknowledgeable
events results in an error dialog.
Display Count
A drop-down menu that allows you to select the number of
events that should be displayed in the management pane,
while you are currently in this perspective.
Acknowledging Events/Errors
317
Volume Groups Perspective
If an object has an error event associated with it you must acknowledge the event to clear the error and
return the object to normal operations. For example, this can occur if an Oracle VM Server or virtual
machine appear as Stopped (Error) in the status. The object in error is flagged with a red icon in the
navigation tree. Oracle VM Servers, virtual machines, repositories and storage objects can have error
events associated with them. The following procedures show you how to clear errors and return the object
to normal operations.
To acknowledge Oracle VM Server error events:
1. Click the Servers and VMs tab.
2. Select the Oracle VM Server in the navigation tree.
3. Select Events from the Perspective drop-down list in the management pane.
4. Select the user acknowledgeable error event and click Acknowledge
to clear all user acknowledgeable errors.
, or click Acknowledge All
To acknowledge virtual machine error events:
1. Click the Servers and VMs tab.
2. Select the server pool, or Oracle VM Server on which the virtual machine resides in the navigation tree.
3. Select Virtual Machines from the Perspective drop-down list in the management pane.
4. Select the virtual machine in the management pane table. Click Display Selected VM Events...
.
5. The Events dialog box is displayed. Select the user acknowledgeable error event and click
Acknowledge , or click Acknowledge All to clear all user acknowledgeable errors. Click Close.
To acknowledge storage repository error events:
1. Click the Repositories tab.
2. Select the repository in the navigation tree.
3. Select Events from the Perspective drop-down list in the management pane.
4. Select the error event and click Acknowledge
, or click Acknowledge All
to clear all errors.
To acknowledge storage error events:
1. Click the Storage tab.
2. Select File Servers, SAN Servers, or a storage server in the navigation tree.
3. Select Events from the Perspective drop-down list in the management pane.
4. Select the user acknowledgeable error event and click Acknowledge
to clear all user acknowledgeable errors.
, or click Acknowledge All
6.9.5 Volume Groups Perspective
The Volume Groups perspective lists the different Volume Groups configured for each SAN Server in your
environment. The following columns are displayed in the management pane:
• Name: The name that has been configured for the volume group.
318
Local File Systems Item
• Size (GiB): A grouping that consists of the following columns:
• Free: The size of the volume, in GiB, that is currently free.
• Used: The size of the volume, in GiB, that is currently in use.
• Total: The total size, in GiB, of the volume.
• Description: A description entered for the volume group when it was created or edited.
This perspective includes a toolbar that consists of the following options:
Table 6.31 Volume Groups Perspective Toolbar Icon Options
Toolbar Icon Option
Icon
Edit Volume Group...
Description
Displays the Edit Volume Group dialog box. Use this option to
edit volume group settings such as name and description.
6.9.5.1 Edit Volume Group
It is possible to edit the configuration for a Volume Group available on a SAN server. The steps and
options to do so are described below.
To edit Volume Group configuration on a SAN server:
1. Expand the SAN Servers folder in the navigation tree, select a SAN server item contained within the
folder. Select the Volume Groups option in the Perspective drop-down list. Select the volume group
that you wish to edit in the table presented in the management pane.
2. Click on the
Edit Volume Group icon in the toolbar.
3. A dialog opens to allow you to reconfigure the Volume Group. The dialog has the following options:
• ID: A non-editable field containing the volume group's UUID as it is stored within Oracle VM
Manager.
• Name: A field to change the name of the volume group within Oracle VM Manager.
• Description: A text field allowing a description of the volume group.
4. When you have finished editing the volume group, click OK to save the changes, or Cancel to exit out
of the dialog without saving any changes.
6.10 Local File Systems Item
Clicking on the Local File Systems navigation item in the navigation tree allows you to view a list of all
of the local file systems available within Oracle VM Manager within the management pane. There are no
perspectives available for this item.
The following information is displayed within the table in the management pane:
• Name: The name that has been configured for the file system.
• Storage Device: The storage device mapping where the file system is located.
• Event Severity: The event level severity for each file system.
• Size (GiB): A grouping that consists of the following columns:
319
Edit File System
• Free: The size of the file system, in GiB, that is currently free.
• Used: The size of the file system, in GiB, that is currently in use.
• Total: The total size, in GiB, of the file system.
• Location: The location of the file system if reported by the Oracle VM Storage Connect plug-in used.
• Description: A description entered for the file system when it was created or edited.
This perspective includes a toolbar that consists of the following options:
Table 6.32 File Systems Perspective Toolbar Icon Options
Toolbar Icon Option
Icon
Description
Edit File System...
Displays the Edit File System dialog box.
Refresh File System
Refreshes the file systems to update the storage information
known to Oracle VM Manager.
Delete File System
Displays the Delete Confirmation dialog box. Use this option
to delete the selected file system.
Display Selected File System
Events...
Display the Events dialog box which contains the job event
associated with the selected file systems.
6.10.1 Edit File System
It is possible to edit the configuration for an existing file system. The steps and options to do so are
described below.
To edit a local or shared file system:
1. If you need to modify a file system stored on a local disk, select the file system item contained the
Local File Systems or Shared File Systems folder in the navigation pane. Select the file system that
you wish to edit in the management pane table.
2. Click on the
Edit File System icon in the toolbar.
3. A dialog opens to allow you to reconfigure the file system. You can edit the following parameters:
• Name: The name of the file system in Oracle VM Manager.
• Description: Optional information you would like to add about this file system.
4. When you have finished editing the file system, click OK to save the changes, or Cancel to exit out of
the dialog without saving any changes.
6.10.2 Refresh File System
When changes are made to the file systems or disks on local or shared storage, it is useful to refresh the
configuration of your file systems to make Oracle VM Manager aware of the changes.
To refresh the file system:
1. Click on either the Local File Systems or Shared File Systems folder in the navigation tree,
depending on which type of file system you wish to refresh. Select the file system that you wish to
refresh in the table presented in the management pane.
320
Delete File System
2. Click on the
Refresh File System option in the toolbar.
3. The selected file systems are refreshed and their configurations are updated within Oracle VM
Manager.
6.10.3 Delete File System
It is possible to delete the file system on local and shared storage devices, and on a physical disk attached
to an Oracle VM Server.
To delete a file system on local or shared storage:
1. Select the Storage tab.
2. Click on either the Local File Systems or Shared File Systems folder in the navigation tree.
3. Select the file system to delete in the table in the management pane.
4. Click the Delete File System icon in the toolbar. If the icon is greyed out it means that the file
system is used by a repository and it cannot be deleted. You must first delete the repository. See
Section 4.3.1.3, “Delete Repository”.
5. The Delete Confirmation dialog box is displayed. Click OK to delete the file system.
To delete a file system on a physical disk attached to an Oracle VM Server:
1. Select the Servers and VMs tab.
2. Select the Oracle VM Server in the navigation tree.
3. Select Physical Disks in the Perspective drop-down list.
4. Select the physical disk in the table in the management pane.
5. Click on the Delete File System icon in the toolbar. If the icon is greyed out, there is no file system
on the disk so it cannot be deleted.
6. The Delete Confirmation dialog box is displayed. Click OK to delete the file system.
6.10.4 Show Events
The Events perspective is common to many elements within the Oracle VM Manager Web Interface.
The Events perspective generally appears as an option within the Perspectives drop-down menu on the
management pane of tabs that include a navigation tree. In this case, the Events perspective displays
events specific to the item selected in the navigation tree and presents these in the management pane.
The Events perspective may also appear within a dialog that is triggered from a Display Selected
Events... perspective toolbar option. In this case, the Events perspective dialog displays events specific
to one or more elements selected in the management pane.
If an object has an error event associated with it you must acknowledge the event to clear the error and
return the object to normal operations. For example, this can occur if an Oracle VM Server or virtual
machine appear as Stopped (Error) in the status. The object in error is flagged with a red icon in the
navigation tree. Oracle VM Servers, virtual machines, repositories and storage objects can have error
events associated with them.
Since Oracle VM Manager attempts to resolve issues automatically as much as possible, not all events
can be acknowledged by a user within the Oracle VM Manager Web Interface. Therefore, a flag is set
321
Show Events
for events that are user acknowledgeable. If an event does not have this flag set, you are unable to
acknowledge it, since it is handled internally by Oracle VM Manager.
The Events perspective or dialog contains a table with the following columns of information per event:
• Severity: The severity level assigned to the event.
• Timestamp: The date and time that the event occurred.
• Modify Time: The last recorded date and time that the event was modified.
• Type: The type of event according to Oracle VM Manager's event categorization model.
• Summary: A summary description of the event.
• Acknowledged: Whether an error event has been acknowledged.
• User Acknowledgeable: Whether or not an event can be acknowledged by the user.
Alongside each event entry in the table, there is an arrow that allows you to expand the view for each
entry. This displays the full Description for the event.
The Events perspective or dialog contains a perspective toolbar with the following options:
Table 6.33 Events Perspective Toolbar Icon Options
Toolbar Icon Option
Icon
Description
Acknowledge
Acknowledge a selected error event to clear the error and
return the object to normal operations. Note that this option is
only available for user acknowledgeable events.
Acknowledge All
Acknowledge all error events associated with an object to clear
the errors and return the object to normal operations. Note that
only user acknowledgeable events are cleared. This button is
always clickable, even if there are no user acknowledgeable
events. Clicking it when there are no user acknowledgeable
events results in an error dialog.
Display Count
A drop-down menu that allows you to select the number of
events that should be displayed in the management pane,
while you are currently in this perspective.
Acknowledging Events/Errors
If an object has an error event associated with it you must acknowledge the event to clear the error and
return the object to normal operations. For example, this can occur if an Oracle VM Server or virtual
machine appear as Stopped (Error) in the status. The object in error is flagged with a red icon in the
navigation tree. Oracle VM Servers, virtual machines, repositories and storage objects can have error
events associated with them. The following procedures show you how to clear errors and return the object
to normal operations.
To acknowledge Oracle VM Server error events:
1. Click the Servers and VMs tab.
2. Select the Oracle VM Server in the navigation tree.
3. Select Events from the Perspective drop-down list in the management pane.
322
Shared File Systems Item
4. Select the user acknowledgeable error event and click Acknowledge
to clear all user acknowledgeable errors.
, or click Acknowledge All
To acknowledge virtual machine error events:
1. Click the Servers and VMs tab.
2. Select the server pool, or Oracle VM Server on which the virtual machine resides in the navigation tree.
3. Select Virtual Machines from the Perspective drop-down list in the management pane.
4. Select the virtual machine in the management pane table. Click Display Selected VM Events...
.
5. The Events dialog box is displayed. Select the user acknowledgeable error event and click
Acknowledge , or click Acknowledge All to clear all user acknowledgeable errors. Click Close.
To acknowledge storage repository error events:
1. Click the Repositories tab.
2. Select the repository in the navigation tree.
3. Select Events from the Perspective drop-down list in the management pane.
4. Select the error event and click Acknowledge
, or click Acknowledge All
to clear all errors.
To acknowledge storage error events:
1. Click the Storage tab.
2. Select File Servers, SAN Servers, or a storage server in the navigation tree.
3. Select Events from the Perspective drop-down list in the management pane.
4. Select the user acknowledgeable error event and click Acknowledge
to clear all user acknowledgeable errors.
, or click Acknowledge All
6.11 Shared File Systems Item
Clicking on the Shared File Systems navigation item in the navigation tree allows you to view a list of all
of the shared file systems available within Oracle VM Manager within the management pane. There are no
perspectives available for this item.
The following information is displayed within the table in the management pane:
• Name: The name that has been configured for the file system.
• Storage Device: The storage device mapping where the file system is located.
• Event Severity: The event level severity for each file system.
• Size (GiB): A grouping that consists of the following columns:
• Free: The size of the file system, in GiB, that is currently free.
• Used: The size of the file system, in GiB, that is currently in use.
• Total: The total size, in GiB, of the file system.
323
Edit File System
• Location: The location of the file system if reported by the Oracle VM Storage Connect plug-in used.
• Description: A description entered for the file system when it was created or edited.
This perspective includes a toolbar that consists of the following options:
Table 6.34 File Systems Perspective Toolbar Icon Options
Toolbar Icon Option
Icon
Description
Edit File System...
Displays the Edit File System dialog box.
Refresh File System
Refreshes the file systems to update the storage information
known to Oracle VM Manager.
Delete File System
Displays the Delete Confirmation dialog box. Use this option
to delete the selected file system.
Display Selected File System
Events...
Display the Events dialog box which contains the job event
associated with the selected file systems.
6.11.1 Edit File System
It is possible to edit the configuration for an existing file system. The steps and options to do so are
described below.
To edit a local or shared file system:
1. If you need to modify a file system stored on a local disk, select the file system item contained the
Local File Systems or Shared File Systems folder in the navigation pane. Select the file system that
you wish to edit in the management pane table.
2. Click on the
Edit File System icon in the toolbar.
3. A dialog opens to allow you to reconfigure the file system. You can edit the following parameters:
• Name: The name of the file system in Oracle VM Manager.
• Description: Optional information you would like to add about this file system.
4. When you have finished editing the file system, click OK to save the changes, or Cancel to exit out of
the dialog without saving any changes.
6.11.2 Refresh File System
When changes are made to the file systems or disks on local or shared storage, it is useful to refresh the
configuration of your file systems to make Oracle VM Manager aware of the changes.
To refresh the file system:
1. Click on either the Local File Systems or Shared File Systems folder in the navigation tree,
depending on which type of file system you wish to refresh. Select the file system that you wish to
refresh in the table presented in the management pane.
2. Click on the
Refresh File System option in the toolbar.
3. The selected file systems are refreshed and their configurations are updated within Oracle VM
Manager.
6.11.3 Delete File System
324
Show Events
It is possible to delete the file system on local and shared storage devices, and on a physical disk attached
to an Oracle VM Server.
To delete a file system on local or shared storage:
1. Select the Storage tab.
2. Click on either the Local File Systems or Shared File Systems folder in the navigation tree.
3. Select the file system to delete in the table in the management pane.
4. Click the Delete File System icon in the toolbar. If the icon is greyed out it means that the file
system is used by a repository and it cannot be deleted. You must first delete the repository. See
Section 4.3.1.3, “Delete Repository”.
5. The Delete Confirmation dialog box is displayed. Click OK to delete the file system.
To delete a file system on a physical disk attached to an Oracle VM Server:
1. Select the Servers and VMs tab.
2. Select the Oracle VM Server in the navigation tree.
3. Select Physical Disks in the Perspective drop-down list.
4. Select the physical disk in the table in the management pane.
5. Click on the Delete File System icon in the toolbar. If the icon is greyed out, there is no file system
on the disk so it cannot be deleted.
6. The Delete Confirmation dialog box is displayed. Click OK to delete the file system.
6.11.4 Show Events
The Events perspective is common to many elements within the Oracle VM Manager Web Interface.
The Events perspective generally appears as an option within the Perspectives drop-down menu on the
management pane of tabs that include a navigation tree. In this case, the Events perspective displays
events specific to the item selected in the navigation tree and presents these in the management pane.
The Events perspective may also appear within a dialog that is triggered from a Display Selected
Events... perspective toolbar option. In this case, the Events perspective dialog displays events specific
to one or more elements selected in the management pane.
If an object has an error event associated with it you must acknowledge the event to clear the error and
return the object to normal operations. For example, this can occur if an Oracle VM Server or virtual
machine appear as Stopped (Error) in the status. The object in error is flagged with a red icon in the
navigation tree. Oracle VM Servers, virtual machines, repositories and storage objects can have error
events associated with them.
Since Oracle VM Manager attempts to resolve issues automatically as much as possible, not all events
can be acknowledged by a user within the Oracle VM Manager Web Interface. Therefore, a flag is set
for events that are user acknowledgeable. If an event does not have this flag set, you are unable to
acknowledge it, since it is handled internally by Oracle VM Manager.
The Events perspective or dialog contains a table with the following columns of information per event:
• Severity: The severity level assigned to the event.
325
Show Events
• Timestamp: The date and time that the event occurred.
• Modify Time: The last recorded date and time that the event was modified.
• Type: The type of event according to Oracle VM Manager's event categorization model.
• Summary: A summary description of the event.
• Acknowledged: Whether an error event has been acknowledged.
• User Acknowledgeable: Whether or not an event can be acknowledged by the user.
Alongside each event entry in the table, there is an arrow that allows you to expand the view for each
entry. This displays the full Description for the event.
The Events perspective or dialog contains a perspective toolbar with the following options:
Table 6.35 Events Perspective Toolbar Icon Options
Toolbar Icon Option
Icon
Description
Acknowledge
Acknowledge a selected error event to clear the error and
return the object to normal operations. Note that this option is
only available for user acknowledgeable events.
Acknowledge All
Acknowledge all error events associated with an object to clear
the errors and return the object to normal operations. Note that
only user acknowledgeable events are cleared. This button is
always clickable, even if there are no user acknowledgeable
events. Clicking it when there are no user acknowledgeable
events results in an error dialog.
Display Count
A drop-down menu that allows you to select the number of
events that should be displayed in the management pane,
while you are currently in this perspective.
Acknowledging Events/Errors
If an object has an error event associated with it you must acknowledge the event to clear the error and
return the object to normal operations. For example, this can occur if an Oracle VM Server or virtual
machine appear as Stopped (Error) in the status. The object in error is flagged with a red icon in the
navigation tree. Oracle VM Servers, virtual machines, repositories and storage objects can have error
events associated with them. The following procedures show you how to clear errors and return the object
to normal operations.
To acknowledge Oracle VM Server error events:
1. Click the Servers and VMs tab.
2. Select the Oracle VM Server in the navigation tree.
3. Select Events from the Perspective drop-down list in the management pane.
4. Select the user acknowledgeable error event and click Acknowledge
to clear all user acknowledgeable errors.
To acknowledge virtual machine error events:
1. Click the Servers and VMs tab.
326
, or click Acknowledge All
Show Events
2. Select the server pool, or Oracle VM Server on which the virtual machine resides in the navigation tree.
3. Select Virtual Machines from the Perspective drop-down list in the management pane.
4. Select the virtual machine in the management pane table. Click Display Selected VM Events...
.
5. The Events dialog box is displayed. Select the user acknowledgeable error event and click
Acknowledge , or click Acknowledge All to clear all user acknowledgeable errors. Click Close.
To acknowledge storage repository error events:
1. Click the Repositories tab.
2. Select the repository in the navigation tree.
3. Select Events from the Perspective drop-down list in the management pane.
4. Select the error event and click Acknowledge
, or click Acknowledge All
to clear all errors.
To acknowledge storage error events:
1. Click the Storage tab.
2. Select File Servers, SAN Servers, or a storage server in the navigation tree.
3. Select Events from the Perspective drop-down list in the management pane.
4. Select the user acknowledgeable error event and click Acknowledge
to clear all user acknowledgeable errors.
327
, or click Acknowledge All
328
Chapter 7 Tools and Resources Tab
Table of Contents
7.1 Tags ........................................................................................................................................
7.1.1 Add Tag ........................................................................................................................
7.1.2 Edit Tag ........................................................................................................................
7.1.3 Delete Tag ....................................................................................................................
7.1.4 Find Components with matching Tag ..............................................................................
7.2 Server Update Groups .............................................................................................................
7.2.1 Create New Server Update Repository ...........................................................................
7.2.2 Edit Server Update Repository .......................................................................................
7.2.3 Delete Server Update Repository ...................................................................................
7.3 Preferences .............................................................................................................................
330
330
331
331
331
332
333
334
334
334
Use the Tools and Resources tab to manage tags which can be used to identify and group objects within
Oracle VM Manager, and to configure server update repositories for software updates of the Oracle VM
Servers being managed by Oracle VM Manager. This tab also contains preferences that control certain
user interface behaviors.
Figure 7.1, “Tools and Resources tab” shows the Tools and Resources tab.
Figure 7.1 Tools and Resources tab
The Tools and Resources tab contains the subtabs set out in Table 7.1, “Tools and Resources Subtabs”.
Table 7.1 Tools and Resources Subtabs
Subtab
Description
Tags
Use this tab to manage tags, which can be used within Oracle VM
Manager to identify and group objects such as server pools, servers
and virtual machines. The panel provides options to add, edit and
remove tags within Oracle VM Manager. There is also an option to
search for components that have been tagged with a particular tag.
See Section 7.1, “Tags” for more information on working with tags.
329
Tags
Subtab
Description
Server Update Groups
Displays the Server Update Groups sub tab. Use this tab to
configure server update repositories for updates of the Oracle VM
Servers being managed by Oracle VM Manager.
See Section 7.2, “Server Update Groups” for more information on
Oracle VM Server update management.
Preferences
Displays the Preferences dialog box. Use this tab to configure user
interface behavior such as whether or not to timeout during a file
system refresh.
See Section 7.3, “Preferences” for more information on the Oracle VM
Manager Web Interface preferences.
7.1 Tags
The Tags subtab provides facilities to add, edit and delete tags. There is also an option to find components
that share a common tag. These options can be accessed either using the toolbar at the top of the tab, or
by using the context menu that appears when you right-click on an item within the panel.
The way in which tags are used within Oracle VM Manager is discussed in detail in Section 1.14, “Tags”
Note
Tag names are case-sensitive. Tag names are unique and cannot be duplicated.
This subtab includes a toolbar that consists of the following options:
Table 7.2 Tags Subtab Toolbar Icon Options
Toolbar Icon Option
Icon
Description
Create New Tag...
Displays the Create Tag dialog box. Use this option to create
a new tag to identify and group components within Oracle VM
Manager.
Edit Tag...
Displays the Edit Tag dialog box. Use this option to change
the name or description of an existing tag.
Delete Tag
Displays the Delete Confirmation dialog box. Use this option
to delete the selected tag.
Find Components...
Displays the Components Using Tag dialog box. Use this
option to search for components that share the same selected
tag.
7.1.1 Add Tag
To create a new tag
1. On the Tools and Resources tab, click on the Tags subtab link.
2. Click on the Create New Tag icon
. A dialog is displayed with the following fields:
• Tag Name: Use this field to name the tag.
• Description: Use this field to provide a description for the tag.
330
Edit Tag
3. Click OK to save the changes, or Cancel to exit out of the dialog without saving any changes.
7.1.2 Edit Tag
To edit a tag
1. On the Tools and Resources tab, click on the Tags subtab link.
2. In the management pane, select the tag that you wish to edit.
3. Click Edit Tag
. A dialog is displayed with the following fields:
• Tag Name: Use this field to rename a tag.
• Description: Use this field to provide or update the description for a tag.
4. Click OK to save the changes, or Cancel to exit out of the dialog without saving any changes.
7.1.3 Delete Tag
To delete a tag
1. On the Tools and Resources tab, click on the Tags subtab link.
2. In the management pane, select the tag or tags that you wish to delete.
3. Click on the Delete Tag icon
. A confirmation dialog is displayed before the action can be completed.
7.1.4 Find Components with matching Tag
To view all components that share a common tag
1. On the Tools and Resources tab, click on the Tags subtab link.
2. In the management pane, select the tag that you wish to search.
3. Click on the Find Components icon
. A dialog is displayed with the following editable fields:
• Components using Tag: Use this drop-down menu to select alternative tags that you have defined
to quickly search through different groups of components.
• Show Type: Use this drop-down menu to select the different object types that should be displayed
for the selected tag. By default all object types are shown, but you can limit the display to any
combination of:
• Server Pools
• Servers
• Virtual Machines
A table is shown in the dialog, listing all objects that match the defined criteria. The table provides the
following information:
• Name: The name of the object that meets the search criteria.
• Tag(s): A comma-separated list of the different tags that currently apply to the object.
• Type: The object type (for example Server Pool, Server or VM).
331
Server Update Groups
• Parent: The name of the object's parent, if a parent object exists.
4. Click Close to exit out of the dialog.
7.2 Server Update Groups
Updates and upgrades to Oracle VM Servers can be performed using a server update repository. To
access patch updates for Oracle VM, you should contact Oracle to purchase an Oracle VM Support
contract and gain access to the Unbreakable Linux Network (ULN) which contains updates for Oracle
VM. If you have access to ULN you can use this to set up your own server update repository to use when
updating your Oracle VM Servers. Setting up a repository is beyond the scope of this documentation,
however you can read about setting up a Yum repository for x86-based servers in an OTN article Yum
Repository Setup at:
http://www.oracle.com/technetwork/articles/servers-storage-admin/yum-repo-setup-1659167.html
Make sure you subscribe to the Oracle VM Release 3.3 channel on ULN when you set up your Yum
repository. For SPARC-based servers, you should refer to Upgrading Oracle VM Agent for SPARC in
the Oracle VM Installation and Upgrade Guide for further information on configuring Oracle Solaris IPS
repositories.
There are two server update groups, one for x86-based Oracle VM Servers, and one for SPARC-based
Oracle VM Servers. You can create multiple repositories for each server update group, and enable
repositories as required. These repositories are available to all Oracle VM Servers of that type, so all x86based Oracle VM Servers can access all the server update repositories created in the x86 server update
group.
To override either of these default repositories and create a repository that is restricted to a particular
server pool, see Section 3.4.6, “Server Update Repositories Perspective”. To update an Oracle VM Server,
see Section 3.4.2.10, “Update Server”.
If you have one or more server update repositories configured for Oracle VM Server updates, you add and
manage these using the Server Update Groups subtab.
Important
If you have previously upgraded your Oracle VM Servers from a 3.2 release, as
described in Upgrading Oracle VM Server for x86 in the Oracle VM Installation and
Upgrade Guide the, you may still have the transitional repository enabled among
your listed server update groups. This repository is named '3.3_trans_repo'. It is
very important that once you have finished upgrading your servers from the 3.2
release you disable or remove this repository. If this repository is enabled and you
perform an upgrade between errata releases, the upgrade may fail.
The Server Update Groups subtab provides facilities to add, edit and delete server update repositories.
These options can be accessed using the toolbar at the top of the tab when you click on an item within the
navigation tree or management pane table.
This subtab includes a toolbar that consists of the following options:
Table 7.3 Server Update Repository Subtab Toolbar Icon Options
Toolbar Icon Option
Create New Server Update
Repository...
Icon
Description
Displays the Create Server Update Repository dialog box.
Use this option to create a new server update repository.
332
Create New Server Update Repository
Toolbar Icon Option
Icon
Description
Edit Server Update
Repository...
Displays the Edit Server Update Repository dialog box. Use
this option to edit an existing server update repository.
Delete Server Update
Repository
Displays the Delete Confirmation dialog box. Use this option
to delete the selected server update repository.
7.2.1 Create New Server Update Repository
To create a new server update repository:
1. Click the Tools and Resources tab.
2. Click the Server Update Groups subtab.
3. In the navigation tree, select GlobalSparcServerUpdateConfiguration to create a repository for
SPARC-based Oracle VM Servers, or GlobalX86ServerUpdateConfiguration for x86-based Oracle
VM Servers.
4. Click Create New Server Update Repository to display the Create Server Update Repository
dialog box. Enter the following information about the repository:
• Name: A name for the repository as stored in Oracle VM Manager.
• Repository Name: The repository name as used by a server to distinguish between different
upgrade repositories. This may only contain alphanumeric characters and underscores. No spaces
are permitted. For SPARC environments, the repository name must match a valid publisher at the
URL where the repository is hosted.
• URL: The URL to access the repository, for example:
http://example.com/OVM3/Server/
Note
The URL should contain the RPMs and the repodata directory created by
the createrepo tool. If you are copying the RPMs from the Oracle VM Server
ISO media, or loop mounting the ISO file, make sure to include the Server
directory (which includes the repodata directory), for example:
http://example.com/OVM3/Server/
• Enable: Whether to enable the repository.
• Package Signature Type: The signature type to verify the validity of the repository, either GPG key,
CA (Certificate Authority). Use NONE if there is no verification required.
• Package Signature Key: The verification signature for the repository, for example, the location of
the GPG key:
http://example.com/OVM3/RPM-GPG-KEY
The GPG key must be available via one of HTTP, FTP, FILE or HTTPS protocols.
The GPG key for Oracle-signed updates from ULN is pre-installed on Oracle VM Server at /etc/pki/
rpm-gpg/RPM-GPG-KEY-oracle. If you want to use this GPG key, enter:
file:///etc/pki/rpm-gpg/RPM-GPG-KEY-oracle
333
Edit Server Update Repository
The value for this field is required if you select a Package Signature Type other than NONE.
• Description: An optional description for the repository.
Click OK.
The repository is added and ready to use to update Oracle VM Servers for the server update group. Note
that if repository creation fails for a particular server, then an event is generated on the affected server.
Oracle VM Manager does not attempt to validate the repository before it is added to each server. If the
repository is invalid or, in the case of a SPARC repository, the repository name does not match a valid
publisher at the URL specified, an error event is generated for the servers affected.
The repository is checked regularly for updates by the Server Upgrade Checker Task recurring job, though
there may be a delay between the repository being created and the update notification being displayed
in Oracle VM Manager. To change the frequency of the Server Upgrade Checker Task recurring job, see
Section 8.2, “Recurring”.
7.2.2 Edit Server Update Repository
To edit a server update repository:
1. Click the Tools and Resources tab.
2. Click the Server Update Groups subtab.
3. In the navigation tree, select GlobalSparcServerUpdateConfiguration to edit a repository for SPARCbased Oracle VM Servers, or GlobalX86ServerUpdateConfiguration for x86-based Oracle VM
Servers.
4. Select a repository from the table in the management pane.
5. Click Edit Server Update Repository to display the Edit Server Update Repository dialog box.
Edit the fields as described in Section 7.2.1, “Create New Server Update Repository”. Click OK.
7.2.3 Delete Server Update Repository
To delete a server update repository:
1. Click the Tools and Resources tab.
2. Click the Server Update Groups subtab.
3. In the navigation tree, select GlobalSparcServerUpdateConfiguration to delete a repository for
SPARC-based Oracle VM Servers, or GlobalX86ServerUpdateConfiguration for x86-based Oracle
VM Servers.
4. Select a repository from the table in the management pane.
5. Click Delete Server Update Repository
.
6. A confirmation dialog is displayed. Click OK to delete the repository.
7.3 Preferences
The Preferences subtab allows you to change the default values used by Oracle VM Manager. The
management pane contains a form that allows you to change different variable values.
334
Preferences
The options listed here apply to different functionalities within Oracle VM Manager. These are described
below:
• Refresh Job Timeout Value: This radio button controls whether or not a timeout value is applied for
long running jobs, such as refreshing the list of available file systems. If a timeout value is set, specify
the number of seconds to wait before timing out in the field provided.
• Statistics Collection Interval: This field allows you to specify how frequently statistics are collected for
servers. The statistics are used within Oracle VM Manager on the Health tab. The value for this field can
be between 20 seconds and 31,536,000 seconds (one year). For more information on server statistics
see Section 2.3, “Statistics”.
• Statistics Collection Hold Time: This field allows you to specify how long statistics are stored by
Oracle VM Manager before they are refreshed. The statistics are used within Oracle VM Manager on the
Health tab. The value for this field can be between 15 minutes and 4320 minutes (3 days). The default
value is 60 minutes. For more information on server statistics see Section 2.3, “Statistics”.
The configuration parameters can be changed with instant effect. No restart of Oracle VM Manager is
required.
See No File Systems Found When Searching a Storage Server in the Oracle VM Administrator's Guide for
more information on when these UI preferences should be changed.
335
336
Chapter 8 Jobs Tab
Table of Contents
8.1 Summary .................................................................................................................................
8.1.1 Status Filters .................................................................................................................
8.1.2 Export to Excel ..............................................................................................................
8.1.3 Job Details ....................................................................................................................
8.1.4 Debug Transcript ...........................................................................................................
8.1.5 Abort Jobs ....................................................................................................................
8.2 Recurring .................................................................................................................................
8.2.1 Edit a Recurring Job ......................................................................................................
338
338
338
339
341
341
341
342
Use the Jobs tab for information on current and past tasks, or jobs. A job is a set of one or more
operations made in Oracle VM Manager. Jobs are discussed in detail in Understanding Jobs, Events and
Errors in the Oracle VM Concepts Guide.
The Jobs tab provides comprehensive information on all completed and in-progress jobs in the
virtualization environment. The Jobs tab is used to get a global view on jobs, to evaluate information on
jobs completed or aborted, or to cancel a job in progress.
The default view on the Jobs tab is the Summary view.
Figure 8.1, “Jobs tab” shows the Jobs tab.
Figure 8.1 Jobs tab
The Jobs tab contains the subtabs set out in Table 8.1, “Jobs Subtabs”.
Table 8.1 Jobs Subtabs
Subtab
Description
Summary
Displays the Summary subtab. Use this tab to get a global view on
jobs, to evaluate information on jobs completed or aborted, or to
cancel a job in progress.
See Section 8.1, “Summary” for more information on the Summary
tab.
Recurring
Displays the Recurring subtab. Use this tab to configure recurring
jobs, such as the Server Upgrade Checker Task that periodically
337
Summary
Subtab
Description
checks that the Oracle VM Servers have the latest product versions
installed.
See Section 8.2, “Recurring” for more information on recurring jobs.
8.1 Summary
The Summary view provides a listing of all jobs that have been triggered within Oracle VM Manager,
whether those jobs were triggered within the UI, from the CLI, the Web Services API or internally by Oracle
VM Manager itself. Jobs can be displayed for all users, or just for the administrator.
The Jobs calendar enables you to display the jobs for a particular date. Select a date in the Jobs calendar
and the jobs for that date are displayed in the Jobs table.
This subtab includes a toolbar that consists of the following options:
Table 8.2 Summary Subtab Toolbar Icon Options
Toolbar Icon Option
Icon
Description
Export to Excel
Use this option to save a list of the jobs to a spreadsheet file.
Details...
Displays the View Job Properties dialog box. Use this option
to view details about the job.
Debug Transcript...
Displays a Message dialog box. Use this option to view a
complete log for all of the actions and events surrounding the
run status of the job.
Abort Job
Displays the Abort Job dialog box. Use this option to abort a
job.
8.1.1 Status Filters
The Status Filters toolbar provides a set of icons that can be used to filter jobs according to their status.
By default all of the filters are enabled and all of the icons appear to be depressed. By clicking on the filter
icons you can enable or disable the filter to expand or limit the jobs listed in the management pane.
The following filter icons appear in the toolbar:
• Total Jobs:
• Pending:
Globally enable or disable all of the other filter options in the toolbar
Enable or disable the filter for jobs with Pending status
• In Progress:
• Failed:
Enable or disable the filter for jobs with In Progress status
Enable or disable the filter for jobs with Failed status
• Aborted:
• Complete:
Enable or disable the filter for jobs with Aborted status
Enable or disable the filter for jobs with Completed status
8.1.2 Export to Excel
To export the job list as a Microsoft Office Excel spreadsheet:
1. Select the Jobs tab and then select the Summary subtab.
2. Click Export to Excel
in the toolbar.
338
Job Details
3. The browser Save/Open File dialog opens and allows you to download a spreadsheet containing all of
the jobs listed.
8.1.3 Job Details
To view job details:
1. Select the Jobs tab and then select the Summary subtab.
2. Select a job in the management pane and click Details... in the toolbar. Alternatively, you can select
a job in the Job Summary pane and click Details in the Details column.
3. The View Job Properties: job_name dialog opens displaying detailed information about the job.
Depending on the selected job, the dialog contains different tabs:
• Job Detail: This tab is always visible and includes the following fields:
• Description: A description of the selected job.
• Message: An error message describing the reason the job failed. This field is only populated if
there is an error associated with the job.
• ID: The ID for the job.
• Status: The running state of the job.
• Summary Status: The status for the job and its child jobs.
• Progress Message: The most recent progress message for this job and any of its child jobs.
• Created By: The user which created the job.
• Creation Time: The date and time that the job was created.
• Start Time: The date and time that the job was started.
• End Time: The date and time that the job ended.
• Duration: The time it has taken to run the job.
• Error Type: The job error type which resulted from the job execution.
• Abortable: Whether or not the job is abortable.
• Aborted: Whether or not the job has been aborted.
• Aborted By: The user which aborted the job.
• Result ID Name: The ID of the object that was acted on.
• Result ID Value: The value of the object that was acted on.
• Parent: This tab is only visible when the selected job is a child job and it has a parent. This tab
includes the following fields:
• Description: A description of the selected job.
• Message: An error message describing the reason the job failed. This field is only populated if
there is an error associated with the job.
339
Job Details
• ID: The ID for the job.
• Status: The running state of the job.
• Summary Status: The status for the job and its child jobs.
• Progress Message: The most recent progress message for this job and any of its child jobs.
• Created By: The user which created the job.
• Creation Time: The date and time that the job was created.
• Start Time: The date and time that the job was started.
• End Time: The date and time that the job ended.
• Duration: The time it has taken to run the job.
• Error Type: The job error type which resulted from the job execution.
• Abortable: Whether or not the job is abortable.
• Aborted: Whether or not the job has been aborted.
• Aborted By: The user which aborted the job.
• Result ID Name: The ID of the object that was created.
• Result ID Value: The value of the object that was created.
• Child Jobs: This tab is only visible when the selected job is a parent job that has related child jobs.
This tab contains a table with the following columns of information:
• Timestamp: The date and time that the job occurred.
• Status: The running state of the job.
• Progress: The most recent progress message for the job.
• Description: A description of the selected job.
• Created By: The user which created the job.
• Duration: The time it has taken to run the job.
• End Time: The date and time that the job ended.
• Child Error Summary: This tab is only visible when the selected job has related child jobs. This tab
displays information about any child job errors.
• Queued Info: This tab is always visible and displays information about any queued jobs associated
with the selected job.
• Job Events: This tab is always visible and contains a table with the following columns of information
per event:
• Severity: The severity level assigned to the event.
340
Debug Transcript
• Timestamp: The date and time that the event occurred.
• Type: The type of event according to Oracle VM Manager's event categorization model.
• Summary: A summary description of the event.
4. Click Close to close the dialog.
8.1.4 Debug Transcript
To view the debug transcript
1. Select the Jobs tab and then select the Summary subtab.
2. Select a job in the management pane.
3. Click Debug Transcript...
in the toolbar.
4. A dialog opens displaying a complete log for all of the actions and events surrounding the run status of
the job. If the job failed, log information providing the error details is provided.
5. Click OK to close the dialog.
8.1.5 Abort Jobs
There are two ways to abort a job:
• Using the Jobs tab
• Using the Job Summary pane
Both procedures for aborting jobs are listed below.
To abort jobs using the Jobs tab:
1. Select the Jobs tab.
2. Select one or more jobs in the Jobs table.
3. Click Abort Job
in the toolbar.
4. In the Abort Job Confirmation dialog box, click OK to abort the jobs.
To abort jobs using the Job Summary pane:
1. Select a job in the Job Summary pane.
2. Click Abort in the Abort column.
3. In the Abort Job Confirmation dialog box, click OK to abort the job.
8.2 Recurring
Oracle VM Manager periodically performs recurring jobs, such as repositories and file systems refresh, and
Yum updates for Oracle VM Servers. Select the Jobs tab and then select the Recurring subtab to view and
edit the settings for these jobs. To edit a recurring job, see Section 8.2.1, “Edit a Recurring Job”.
Recurring jobs are listed in Table 8.3, “Recurring Jobs”.
341
Edit a Recurring Job
Table 8.3 Recurring Jobs
Recurring Job
Definition
Backup Task
The Backup Task periodically backs up the Oracle VM Manager core
database. The default setting for this job is enabled with an interval of 1440
minutes (24 hours).
Performance Manager
Task
Oracle VM Manager includes a performance monitor that collects performance
statistics from the Oracle VM Manager core periodically. No jobs are
associated with this task, but enabling it causes the statistics to be logged on
the Oracle VM Manager host and makes it possible to query these statistics
using the Web Services API. The default setting for this task is disabled with an
interval of 1 minute.
Refresh Repositories'
File Systems Task
Oracle VM Manager performs refresh operations for all file systems containing
repositories owned by Oracle VM Manager to help keep in synch with file
system changes. The Refresh Repositories' File Systems Task minimizes the
amount of time that the file system is locked. If the file system size or free size
changes, the change is reflected in the repository and the file system size is
displayed in the Oracle VM Manager Web Interface. The default setting for this
job is disabled with an interval of 61 minutes.
Server Upgrade Checker The Server Upgrade Checker Task periodically checks that all owned Oracle
Task
VM Servers known to Oracle VM Manager have the latest product versions
installed. This check is performed against the updates available in the Yum
repository. The default setting for this job is enabled with an interval of 1464
minutes.
8.2.1 Edit a Recurring Job
To edit a recurring job
1. Select the Jobs tab and then select the Recurring subtab.
2. Select a job in the Recurring Jobs table.
3. Click Edit...
in the toolbar.
4. The Edit Recurring Job: job_name dialog box is displayed. Edit the recurring job as required and
click OK.
342
Glossary
A
admin server
An Oracle VM Server dedicated to performing administrative functions on storage servers such as creating a new
LUN or extending a file system. The server must be capable of logging into a storage array or file server as an
admin user. The administrative functions available to the server are defined by the Oracle VM Storage Connect
plug-in.
anti-affinity
Specify that specific virtual machines should never run on the same host.
B
bonding
Bonding is a Linux OS feature that provides a method for aggregating several ports into a single bonded interface,
to provide load balancing or redundancy. When you discover an Oracle VM Server, the bonded interface is shown
as containing a single port.
Network bonding refers to the combination of network interfaces on one host for redundancy and/or increased
throughput. Redundancy is the key factor: You want to protect your virtualized environment from loss of service
due to failure of a single physical link.
In Oracle VM, there are three modes of network bonding:
• Active - Passive: One Network Interface Card (NIC) is active while the other NIC is standby. If the active NIC
goes down, the other NIC becomes active.
• Dynamic Link Aggregation: All NICs act as one NIC and the network traffic flows through all interfaces
concurrently, which results in a higher throughput. With this mode, your network administrator must create
LACP (Link Aggregation Control Protocol) bonding on the network switch(es).
• Adaptive Load Balancing: The network traffic is equally balanced over the NICs of the bond. This mode does
not require any special configuration on connected network switch(es), However, this mode does not support
using VLAN with bridges. If using this mode for your bonded interfaces in any network, you cannot use VLANs
if this network is configured with the Virtual Machine network channel.
C
clone
The action or result of making an exact copy of an object. The object may be a virtual machine, virtual machine
template, ISO file, or virtual disk. Cloning is analogous to copying and maintains the integrity of the original object,
while creating a new object based on the original. A clone customizer may be used to define cloning options to
specify details of where the object components may reside when cloned, such as in a different storage repository.
control domain
A privileged domain that creates and manages other logical domains and services.
D
distributed power management
DPM complements DRS to reduce the Oracle VM Servers in a server pool when there are periods of low resource
utilization. It can automatically add capacity as needed when resource utilization ramps up.
343
See Also: distributed resource scheduling
distributed resource scheduling
DRS provides real-time monitoring of Oracle VM Server utilization with the goal to rebalance a server pool to
provide consistent resources to the running virtual machines. DRS migrates load away from heavily loaded Oracle
VM Servers to less heavily loaded Oracle VM Servers.
See Also:distributed power management
dom0
An abbreviation for domain zero. The management domain with privileged access to the hardware and device
drivers. Dom0 is the first domain started at boot time. Dom0 has more privileges than domU. It can access the
hardware directly and can manage the device drivers for other domains. It can also start new domains.
E
events
Events are used to register status information of "objects" within Oracle VM Manager for future reference or to
make problems easier to trace back. Events are often, though not always, related to jobs that are initiated within
Oracle VM Manager. For instance, when a job fails, an event is generated. Events can also be triggered through
changes in the environment such as server crashes or storage disconnects. Therefore, events are used to alert
you to potential problems that may need your attention.
Events are categorized by severity. Most events will be informational, but they can also be warnings or errors. If
an event has an error level severity, you need to acknowledge the error event to clear the error and to perform
further operations on the object that generated the error.
See Also: jobs
G
GiB
Gibibyte (GiB) is a unit of digital information storage used to denote the size of data. One gibibyte is equal to 1024
mebibytes. Gibibyte is closely related to gigabyte, where one gigabyte is equal to 1000 megabytes.
GPG key
The GPG key (or GnuPG key) is the key used in the GNU project's implementation of the OpenPGP key
management standard. The GPG key is used to check the validity of a YUM repository, and any packages
(RPMs) downloaded from the repository.
H
hardware virtualized machine (HVM)
A hardware virtualized guest runs on the virtualization platform as it would on a physical host. Because the device
drivers of the hardware virtualized guest are emulated, dom0 must contain device emulation code to support the
guest’s device drivers. The other types of privileged instructions issued by the hardware virtualized guest, for
example, for CPU or memory access, are not emulated, but are trapped, which also requires support from CPU
vendors.
The guest’s OS does not require any modification to run as a hardware virtualized guest.
A virtual machine with an unmodified guest operating system. It is not recompiled for the virtual environment.
There may be substantial performance penalties running as a hardware virtualized guest. Enables Microsoft
344
Windows™™ operating system to be run, as well as legacy operating systems. Hardware virtualization is only
available on Intel® VT or AMD SVM CPUs.
host computer
The physical computer on which the software is installed. Typically used to refer to either the computer on which
Oracle VM Server or Oracle VM Manager is running.
HugePages
HugePages is a feature integrated into the Linux kernel to support memory pages greater than the default. Using
very large page sizes can improve system performance on a virtual machine by reducing the amount of system
resources required to access page table entries.
J
jobs
Jobs are a sequential operations that take place through Oracle VM Manager, such as server discovery,
presenting a repository and creating a VM. Jobs are assigned a status that is refreshed according to their
progress. A history of all jobs in the environment is stored within Oracle VM Manager.
Since jobs are sequential and sometimes take time to complete, tracking the status of a job allows you to
understand what actions the system is currently performing, and which actions are queued to run in sequence
after the current job has completed. Jobs also allow you to access system messages that may be useful to debug
the failure of an operation.
Most jobs tend to generate events that each have a different severity level.
See Also: events
L
local storage
Local storage consists of hard disks installed locally in an Oracle VM Server. Local storage is often not
appropriate for production environments, because it prevents or sharply constrains the ability of a virtual machine
to run anywhere in the server pool in the event of the failure of the Oracle VM server, which owns the local
storage.
M
master Oracle VM Server
A component of Oracle VM Agent. An application that acts as the contact point to Oracle VM Manager, and to
other Oracle VM Agents. Provides virtual machine host load-balancing, and local persistence for Oracle VM
Server.
There is only one master Oracle VM Server in a server pool. A physical server can perform as the master Oracle
VM Server, Utility Server and Virtual Machine Server simultaneously.
migrate
The act of moving a virtual machine from one Oracle VM Server to another, or to the Unassigned Virtual
Machines folder. Migration can be performed on either a running or a stopped virtual machine.
move
The act of moving an object from one location to another. This may be moving a stopped virtual machine from
one Oracle VM Server to another, moving a virtual machine template from one storage repository to another, or
moving an ISO file or virtual disk to another storage location.
345
multipath
The technique of creating more than one physical path between the server CPU and its storage devices. It results
in better fault tolerance and performance enhancement. Oracle VM supports multipath I/O out of the box. Oracle
VM Servers are installed with multipathing enabled because it is a requirement for SAN disks to be discovered by
Oracle VM Manager
N
non-sparse copy
A clone of the type "non-sparse copy" is a disk image file of a physical disk, taking up the space equivalent to the
full specified disk size, including empty blocks.
See Also: sparse copy
O
OCFS2
OCFS2 is a general-purpose shared-disk cluster file system for Linux capable of providing both high performance
and high availability. OCFS2 is developed by Oracle and is integrated within the mainstream Linux kernel.
OCFS2 is used within Oracle VM to facilitate clustered server pools, storage of virtual machine images and for the
purpose of allowing guests to share the same file system.
A clustered server pool always uses an OCFS2 file system to store the cluster configuration and to take
advantage of OCFS2's heartbeat facility. There are two types of heartbeats used in OCFS2 to ensure high
availability:
• The disk heartbeat: all Oracle VM Servers in the cluster write a time stamp to the server pool file system device.
• The network heartbeat: all Oracle VM Servers communicate through the network to signal to each other that
every cluster member is alive.
These heartbeat functions exist directly within the kernel and are fundamental to the clustering functionality that
Oracle VM offers for server pools. The server pool file system should be stored on a separate NFS server or on a
small LUN if possible, as OCFS2's heartbeat facility can be disturbed by intensive I/O operations taking place on
the same physical storage.
A storage repository configured on a LUN-based repository must be linked to a clustered server pool due to the
nature of the OCFS2 file system. As a result, LUN-based repositories cannot be shared between multiple server
pools, although it is possible to move an OCFS2 repository from one server pool to another.
For more information on OCFS2, please refer to https://oss.oracle.com/projects/ocfs2/.
Oracle VM Agent
An application installed with Oracle VM Server. The Oracle VM Agent receives and processes management
requests, and provides event notifications and configuration data to the Oracle VM Manager. Oracle VM Manager
manages the virtual machines running on Oracle VM Server by communicating with Oracle VM Agent. It contains
three components: master Oracle VM Server, Utility Server, and Virtual Machine Server.
Oracle VM Manager
The Oracle VM Manager is the management platform, which offers an easy-to-use, web-browser interface as
well as a command-line interface (CLI). The Oracle VM Manager tracks and manages the resources available
in your virtual environment. The user interface, which is an Application Development Framework (ADF) web
application, allow you to easily manage Oracle VM Server pools. Manages virtual machine life cycle, including
creating virtual machines from templates or from installation media, deleting, powering off, uploading, deployment
and live migration of virtual machines. Manages resources including ISO files, templates and shared virtual disks.
346
Oracle VM Server
A self-contained virtualization environment designed to provide a lightweight, secure, server-based platform
for running virtual machines. The Oracle VM Server comprises a hypervisor and a privileged domain (called
dom0) that allow multiple domains or virtual machines (that is, Linux, Solaris, Windows, and so on) to run on one
physical machine. Includes Oracle VM Agent to enable communication with Oracle VM Manager.
The Oracle VM Server for x86 incorporates an open source Xen hypervisor component, which has been
customized and optimized to integrate into the larger, Oracle - developed virtualization server. The Oracle
VM Server for x86 is also responsible for access and security management and generally acts as the server
administrative entity, because the hypervisor’s role is limited.
On Oracle VM Server for SPARC systems, the SPARC hypervisor is built into the SPARC firmware and is
generally referred to as the Logical Domains Manager (LDOM). As with the Xen hypervisor, each virtual machine
is securely executed on a single computer and runs its own guest Oracle Solaris operating system
P
paravirtualized machine (PVM)
A virtual machine with a kernel that is recompiled to be made aware of the virtual environment. Runs at near
native speed, with memory, disk and network access optimized for maximum performance.
Paravirtualized guests use generic, idealized device drivers, which are part of the guest’s OS. The I/O operations
using these generic device drivers are mapped to the real device drivers in dom0. The generic, abstracted drivers
in the guest seldom change and provide excellent guest stability. The dom0 domain, alternatively, can use the
native hardware vendor drivers, and the guests can safely migrate to another dom0 with slightly different drivers.
For other resources such as CPU and memory, paravirtualized kernels make special “hypercalls” to the Xen
hypervisor. These hypercalls provide better performance by reducing the number of instructions and context
switches required to handle an incoming request. By contrast, on an emulated (hardware virtualized) guest, driver
requests engage the guest’s interrupt handler, increasing the I/O operation overhead.
R
refresh server
An Oracle VM Server dedicated to handling file system refreshes on behalf of a server pool. A refresh server
temporarily mounts file systems on an NFS file server during the refresh operation. The server must be granted
full data access in order to perform the refresh. For each NFS file server, at least one Oracle VM Server from
each server pool accessing the file server must be assigned as a refresh server.
S
server pool
Logically an autonomous region that contains one or more physical Oracle VM Servers. Presents a unified view
of the storage where the virtual machines reside, and groups the users of these virtual machines into a single
community called a group, in which each user is a server pool member.
Each server pool can have up to 32 physical servers. Each Oracle VM Server can be a member of only one
server pool. The server pool is the operational unit of Oracle VM. Policies are configured and enforced at the
server pool level.
server processor compatibility group
A server processor compatibility group is a group of Oracle VM Servers with compatible processors, or CPUs
sharing the same processor family and model number. These groups are created to ensure that a virtual machine
running on one Oracle VM Server can safely be migrated and continue to run on another Oracle VM Server.
347
Oracle VM Manager automatically creates processor compatibility groups as it discovers servers that have
different processor types.
Using Oracle VM Manager you can create custom compatibility groups to improve your ability to do smooth
migrations and to group servers according to your own requirements.
sparse copy
A clone of the type "sparse copy" is a disk image file of a physical disk, taking up only the amount of space
actually in use; not the full specified disk size.
See Also: non-sparse copy
Storage Connect
Oracle VM integrates with all types of storage, referred to as generic storage, but also provides advanced storage
functionality for storage vendors that provide a plug-in to access their storage. This plug-in is part of Oracle VM’s
Storage Connect framework.
Oracle VM provides its own Oracle VM Storage Connect plug-in for the Sun ZFS Storage Appliance, and for the
Oracle Axiom systems.
T
thin clone
A thin clone is a clone of a virtual disk that takes up only the amount of disk space actually in use; not the full
specified disk size.
Thin cloning of virtual disks on OCFS2-based repositories is supported. Thin provisioning of physical disks on
generic storage is not supported.
V
virtual disk
A file or set of files, usually on the host file system although it may also be a remote file system, that appears as a
physical disk drive to the guest operating system.
virtual machine (VM)
A guest operating system and the associated application software that runs within Oracle VM Server. May be
paravirtualized or hardware virtualized machines. Multiple virtual machines can run on the same Oracle VM
Server.
virtual machine template
A template of a virtual machine. Contains basic configuration information such as the number of CPUs, memory
size, hard disk size, and network interface card (NIC). Create virtual machines based on a virtual machine
template using Oracle VM Manager.
VLAN
A layer-2 network may be segregated into partitions, at the switch or router, so that network traffic is isolated to a
distinct broadcast domain. VLANs can be tagged so that a trunk can transport data for all of the different VLANs
in a network.
VLANs are commonly used in large networks to help simplify network design, provide mechanisms to achieve
better scalability, and to improve security.
348
storage repository, 176, 180
virtual machine, 30, 56, 141
Index
A
D
abort
job, 341
access group
Oracle VM Server, 135
storage initiator, 135
access groups
file system, 246, 247, 248, 248
SAN, 267, 294, 312
accessibility, 3
acknowledge
error, 8, 9, 89, 90, 99, 100, 121, 122, 132, 134, 137,
138, 157, 158, 170, 172, 172, 174, 185, 186, 241, 242,
244, 246, 248, 249, 259, 260, 265, 266, 272, 273, 281,
282, 282, 283, 285, 287, 292, 293, 299, 300, 303, 304,
310, 311, 316, 317, 321, 322, 325, 326
event, 8, 9, 89, 90, 99, 100, 121, 122, 132, 134, 137,
138, 157, 158, 170, 172, 172, 174, 185, 186, 241, 242,
244, 246, 248, 249, 259, 260, 265, 266, 272, 273, 281,
282, 282, 283, 285, 287, 292, 293, 299, 300, 303, 304,
310, 311, 316, 317, 321, 322, 325, 326
admin server, 223, 227, 234, 251
agent, 25
anti-affinity, 91
debug transcript
view, 341
delete
network, 216
Oracle VM Server, 66, 151
details
jobs, 339
discover
Oracle VM Server, 25
disk, 69, 129, 154
drag and drop, 11
B
back up
storage repository, 136
bond
network, 125, 127, 127
C
case sensitivity, 13
CDROM
add to virtual machine, 30, 56, 141
clone
virtual machine, 81, 113, 164, 197
virtual machine template, 81, 113, 164, 197
clone customizers, 81, 113, 164, 197
cluster
activate, 26, 40
timeout, 26, 40, 45
configuration file
virtual machine, 87, 119, 170, 204
context menus, 12
contrast, 3
copy
non-sparse, 81, 113, 164, 197
sparse, 81, 113, 164, 197
create
E
edit
network, 214
recurring job, 342
edit repository, 182
error
acknowledge, 8, 9, 89, 90, 99, 100, 121, 122, 132,
134, 137, 138, 157, 158, 170, 172, 172, 174, 185, 186,
241, 242, 244, 246, 248, 249, 259, 260, 265, 266, 272,
273, 281, 282, 282, 283, 285, 287, 292, 293, 299, 300,
303, 304, 310, 311, 316, 317, 321, 322, 325, 326
event, 8, 9, 89, 90, 99, 100, 121, 122, 132, 134, 137,
138, 157, 158, 170, 172, 172, 174, 185, 186, 241, 242,
244, 246, 248, 249, 259, 260, 265, 266, 272, 273, 281,
282, 282, 283, 285, 287, 292, 293, 299, 300, 303, 304,
310, 311, 316, 317, 321, 322, 325, 326
Ethernet
bond, 125, 127, 127
port, 124
event
acknowledge, 8, 9, 89, 90, 99, 100, 121, 122, 132,
134, 137, 138, 157, 158, 170, 172, 172, 174, 185, 186,
241, 242, 244, 246, 248, 249, 259, 260, 265, 266, 272,
273, 281, 282, 282, 283, 285, 287, 292, 293, 299, 300,
303, 304, 310, 311, 316, 317, 321, 322, 325, 326
error, 8, 9, 89, 90, 99, 100, 121, 122, 132, 134, 137,
138, 157, 158, 170, 172, 172, 173, 185, 186, 241, 242,
244, 246, 248, 249, 259, 260, 265, 266, 272, 273, 281,
282, 282, 283, 285, 287, 292, 293, 299, 300, 303, 304,
310, 311, 316, 317, 321, 322, 325, 326
events, 337
export
repository, 136
F
field
case sensitivity, 13
349
file server
delete, 239
discover, 223, 234
discover file system, 239
edit, 238
refresh, 240
vendor-specific, 223, 234
file system
access groups, 246, 247, 248, 248
delete, 131, 244, 321, 324
edit, 244
refresh, 223, 234, 244, 320, 324
refresh server, 223, 234
select, 223, 234
filter
name, 12
tags, 13
font size, 3
G
global links, 5
H
help menu, 5
I
icon
colors, 11
import
virtual machine, 44, 161
initiator, 268, 268, 270, 295, 295, 297, 312, 312, 314
IP Addressing, 124
IPMI, 64, 64, 64, 67, 67, 149, 149, 149, 152, 152
IPS
repositories, 332
repository, 69, 154
iSCSI
initiator, 268, 270, 295, 297, 312, 314
ISO file
add to virtual machine, 30, 56, 141
J
job
abort, 341
jobs
details, 338, 339
recurring, 341
status filters, 338
summary, 338
tab, 337
jumbo frames, 125, 127, 127
K
kill
Oracle VM Server, 68, 153
virtual machine, 79, 110
L
links, 5
local file system
edit, 320, 324
M
management controller, 64, 149
master server
change, 45
menus, 12
migrate
virtual machine, 11, 80, 111
move
Oracle VM Server, 11
virtual machine, 11
MTU, 125, 127, 127
multi-select, 12
multipath
configuring, 227, 251
N
name filter, 12
navigation pane
overview, 7
navigation tree, 7
network, 214, 216
add, 211
bond, 125, 127, 127
configure, 210
create, 211
delete, 216
edit, 214
port, 124
networking
networks, 210
tab, 209
vlan, 216
vlan create, 218
vlan delete, 219
vlan edit, 219
vnic, 219
NFS, 223, 234, 238, 239, 239, 240, 244, 244, 244
non-uniform exports, 247, 248, 248
nfs
non-uniform exports, 246
non-sparse copy, 81, 113, 164, 197
350
O
R
object
status icon, 11
Oracle VM Agent
change password, 46
Oracle VM Manager
preferences, 334
UI options, 11, 334
Oracle VM Server
access group, 135
batch edit, 66, 151
change Oracle VM Agent password, 46
delete, 66, 151
discover, 25
edit configuration, 64, 149
file system, 131, 321, 325
killing, 68, 153
manage disks, 69, 129, 154
move, 11
rediscover, 69, 154
restart, 68, 153
shutting down, 68, 153
start, 64, 67, 149, 152
stop, 67, 152
storage initiator, 135
update, 69, 97, 154, 332
upgrade, 69, 154
Wake on LAN, 64, 149
recurring
jobs, 341
recurring job
edit, 342
rediscover
Oracle VM Server, 69, 154
refresh
NFS, 223, 234
storage, 223, 234
refresh server, 223, 234
repositories
tab, 175
repository
back up, 136
create, 176, 180
edit, 182
export, 136
present, 183
restart
Oracle VM Server, 68, 153
virtual machine, 78, 110
resume
virtual machine, 79, 111
right-click menus, 12
S
P
patch updates, 69, 154
perspectives
overview, 8
physical disk, 69, 129, 154
delete, 130, 263, 278, 290, 308
edit, 130, 262, 278, 289, 307
SAN Storage Array, 130, 263, 278, 290, 308
Physical Disk
clone, 131, 263, 279, 290, 308
create, 262, 277, 289, 307
refresh, 132, 264, 279, 291, 309
SAN Storage Array, 130, 131, 132, 262, 262, 264,
264, 265, 277, 278, 279, 279, 280, 289, 289, 291, 291,
292, 307, 307, 308, 309, 310
usage, 265, 280, 292, 310
port
network, 124
power off
Oracle VM Server, 68, 153
virtual machine, 79, 110
present repository, 183
SAN, 256, 257, 257
access groups, 267, 294, 312
non-uniform exports, 267, 294, 312
volume groups, 274, 301, 318
SAN server
delete, 257
edit, 256
refresh, 257
SAN Storage Array
volume group, 275, 302, 319
screen reader, 3
search
tags, 13
secure migrate, 26, 40
select
multiple objects, 12
server
batch edit, 66, 151
delete, 66, 151
edit configuration, 64, 149
manage disks, 69, 129, 154
restart, 68, 153
start, 67, 152
stop, 67, 152
update, 69, 154
upgrade, 69, 154
351
server pool
activate cluster, 26, 40
change Oracle VM Agent password, 46
cluster timeout, 26, 40, 45
edit, 45, 45
policies, 47, 94
server update management, 329
Servers and VMs
tab, 21
shared file system
edit, 320, 324
shortcut keys, 3
shut down
virtual machine, 75, 107
sparse copy, 81, 113, 164, 197
SSL migration, 26, 40
start
Oracle VM Server, 64, 67, 149, 152
virtual machine, 75, 106
status filters
jobs, 338
stop
Oracle VM Server, 67, 152
virtual machine, 75, 107
storage
edit repository, 182
file server, 223, 234, 238, 239, 239, 240
file system, 131, 244, 244, 320, 321, 324, 325
file systems, 244, 320, 324
local and shared, 131, 320, 321, 324, 325
permissions, 246, 247, 248, 248, 267, 294, 312
physical disk, 130, 263, 278, 290, 308
present repository, 183
SAN server, 130, 131, 132, 256, 257, 257, 262, 262,
264, 264, 265, 275, 277, 278, 279, 279, 280, 289, 289,
291, 291, 292, 302, 307, 307, 308, 309, 310, 319
tab, 221
volumes, 274, 301, 318
storage array
required information, 227, 251
storage initiator, 268, 268, 270, 295, 295, 297, 312, 312,
314
access group, 135
Oracle VM Server, 135
storage repository
back up, 136
create, 176, 180
subtabs
overview, 7
suspend
virtual machine, 79, 111
T
tabs
jobs, 337
navigation pane overview, 7
networking, 209
perspectives overview, 8
repositories, 175
Servers and VMs, 21
storage, 221
subtabs overview, 7
toolbars overview, 10
tools and resources, 329
using, 5
tags
add, 330
adding and removing, 329, 330
create, 330
edit, 331
filter, 13
find components, 331
management, 13, 330
removing, 331
rename, 331
search, 13, 331
template
clone, 81, 113, 164, 197
text
case sensitivity, 13
toolbars
overview, 10
tools and resource
tab, 329
U
UI
preferences, 329
UI options
Oracle VM Manager, 11, 334
update
Oracle VM Server, 69, 97, 154, 332
upgrade
Oracle VM Server, 69, 97, 154, 332
using tabs, 5
V
vendor-specific storage, 223, 234
view
debug transcript, 341
virtual machine
clone, 81, 113, 164, 197
clone customizers, 81, 113, 164, 197
configuration file, 87, 119, 170, 204
configuring, 74, 105, 162
352
create, 30, 56, 141
deleting, 75, 106, 163, 163
editing, 74, 105, 162
import, 44, 161
killing, 79, 110
migrate, 11, 80, 111
move, 11, 84, 84, 115, 115, 167, 167
restarting, 78, 110
resuming, 79, 111
shutting down, 75, 79, 107, 110
starting, 75, 106
stopping, 75, 107
suspending, 79, 111
virtual machine template
clone, 81, 113, 164, 197
clone customizers, 81, 113, 164, 197
vlan
networking, 216
vlan interfaces
configure, 216
create, 218
delete, 219
edit, 219
vm
import, 44, 161
migrate, 11
VM
migrate, 80, 111
vnic
mac range, 219
volume group
edit, 275, 302, 319
volume groups
SAN, 274, 301, 318
W
Wake on LAN, 64, 67, 67, 149, 152, 152
Y
YUM, 97
repositories, 332
repository, 69, 154
353
354