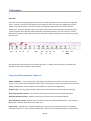
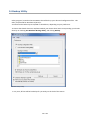
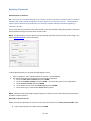
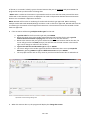
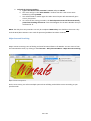
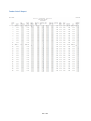
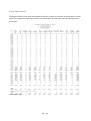
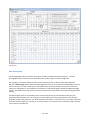
1
User Manual Magnum Software Systems, Inc. Bluffton, South Carolina 843-476-4767 1 / 362 Table of Contents Welcome......................................................................................................................................... 18 1 Introduction ................................................................................................................................. 18 Features .................................................................................................................................................. 18 Optional Software ................................................................................................................................. 21 Optional Hardware ............................................................................................................................... 22 System Requirements ......................................................................................................................... 22 2 Getting Started .......................................................................................................................... 23 Installation............................................................................................................................................ 23 Installing updates .............................................................................................................................. 25 Starting the Program ........................................................................................................................ 26 Customizing the System .................................................................................................................. 29 Getting Help.......................................................................................................................................... 29 Setting Up the Program for the First Time - Entering your Data ...................................... 29 Configuration Information .......................................................................................................... 29 Passwords ......................................................................................................................................... 30 Tax Code Definitions ..................................................................................................................... 30 Terms Code Definition .................................................................................................................. 30 Vendors .............................................................................................................................................. 30 Department/ Class Codes ............................................................................................................ 31 Inventory ........................................................................................................................................... 31 Salesperson Information ............................................................................................................. 31 Customers ......................................................................................................................................... 32 Customer Balances......................................................................................................................... 32 Close Out A/R Period .................................................................................................................... 32 3 Configuration ............................................................................................................................. 33 2 / 362 Accessing the Configuration Program ........................................................................................ 34 Business Code ...................................................................................................................................... 35 Storage Location ................................................................................................................................. 35 Business Name and Address ........................................................................................................... 36 Tax Rate ................................................................................................................................................. 38 Default Numbers ................................................................................................................................. 39 Optional Equipment Setup .............................................................................................................. 41 Pole Display ...................................................................................................................................... 42 Barcode Printing ............................................................................................................................. 43 Cash Drawer ..................................................................................................................................... 44 Data Collector Configuration ...................................................................................................... 45 Credit Cards .......................................................................................................................................... 46 Adding/Deleting New Credit Cards .......................................................................................... 47 Modifying Credit Cards ................................................................................................................. 47 X-Charge Setup ............................................................................................................................... 47 Printers ................................................................................................................................................... 48 Accounts Receivable Setup ............................................................................................................. 48 Miscellaneous ....................................................................................................................................... 49 Default Area/Zip Code ....................................................................................................................... 49 Inventory ............................................................................................................................................... 49 Inventory Setup ................................................................................................................................. 49 Pennies Precision............................................................................................................................ 50 Auto Vendor Item Numbering.................................................................................................... 50 Ask Label Form Number ............................................................................................................... 51 Limit Price Changes to My Store ............................................................................................... 51 Quantity Precision .......................................................................................................................... 51 Default Margin ................................................................................................................................. 51 Label Form Number ....................................................................................................................... 52 3 / 362 Taxable Options .............................................................................................................................. 52 Special Retail Price Options ........................................................................................................ 53 Retail Calculation Type ................................................................................................................. 53 Costing Options ............................................................................................................................... 53 Accounts Payable Setup ................................................................................................................... 54 Remote Store ....................................................................................................................................... 55 Adding a Remote Store ................................................................................................................. 55 Store Setup ....................................................................................................................................... 56 Options ............................................................................................................................................... 57 Currency ................................................................................................................................................. 59 General Ledger Setup........................................................................................................................ 60 Folders .................................................................................................................................................... 61 Point Of Sale Module Options ........................................................................................................ 62 Always Prompt for Quantity ....................................................................................................... 63 Repeat Last Salesman................................................................................................................... 63 Current Store Number .................................................................................................................. 63 Sales Ticket Form Number .......................................................................................................... 64 Sales Order Form Number ........................................................................................................... 64 Purchase Order Form Number ................................................................................................... 65 Ask Form Number ........................................................................................................................... 65 Skip Register Menu ........................................................................................................................ 65 Ask PO Number................................................................................................................................ 65 Always/Never Ask Ship Mode, Etc. .......................................................................................... 66 Ask Check No. at Tender .............................................................................................................. 66 Ask Gift Certificate No. at Tender ............................................................................................. 66 Allow Split Salesman Sales ......................................................................................................... 66 Print Options .................................................................................................................................... 66 Default Tender Type ...................................................................................................................... 67 4 / 362 Discount Key Assignments .......................................................................................................... 67 4 Inventory .................................................................................................................................... 68 Inventory Management Features ................................................................................................. 68 How to Add Inventory....................................................................................................................... 70 Adding Inventory without the Matrix ..................................................................................... 71 Clone........................................................................................................................................................ 71 How to Search (F4) ............................................................................................................................ 72 Searching with the Inventory Look Up Table....................................................................... 72 How to Modify Inventory Records ............................................................................................... 73 Getting Around - Previous and Next Keys ................................................................................. 74 Deleting Inventory from Active Inventory ................................................................................ 74 Un-Deleting Inventory from the Archive Inventory File ...................................................... 75 Inventory Fields Defined ................................................................................................................. 75 Label Generation................................................................................................................................. 83 Sub-Assembly Inventory ................................................................................................................. 84 How to Connect Inventory .......................................................................................................... 84 How to Disconnect Inventory .................................................................................................... 85 Inventory Variance ............................................................................................................................ 86 Inventory Variance Report.............................................................................................................. 86 Item Notes ............................................................................................................................................ 86 Item Number Modifier ...................................................................................................................... 86 Item History ......................................................................................................................................... 87 Inventory Audit ................................................................................................................................... 87 Daily Close Out Audit......................................................................................................................... 88 5 Matrix Inventory ....................................................................................................................... 89 Using a Matrix ...................................................................................................................................... 89 Adding New Inventory using the Matrix .................................................................................... 90 Gaining Access to the Matrix for New Inventory ................................................................ 91 5 / 362 Defining the Matrix Table/Changing Headers ......................................................................... 93 Working With Matrix Tables ....................................................................................................... 94 Working with an Existing Style ................................................................................................. 94 Matrix Table Functions ..................................................................................................................... 95 On Hand Quantities ........................................................................................................................ 95 Redline and Reorder Amounts ................................................................................................... 95 Inventory Variance ........................................................................................................................ 95 6 Inventory Look Up Table ......................................................................................................... 96 Accessing the Look Up Table from Inventory .......................................................................... 96 Accessing the Look Up Table from the Quick Sale Screen................................................... 97 Searching with the Look Up Table................................................................................................ 97 Exiting, Bringing the Item ............................................................................................................... 98 Exiting, Without Bringing the item .............................................................................................. 98 Getting a New View in Inventory Look Up ................................................................................ 98 7 Customers .................................................................................................................................. 99 Where is Customer Information ................................................................................................. 100 How To Add Customer Information ........................................................................................... 101 How to Exit.......................................................................................................................................... 101 How to Search.................................................................................................................................... 102 Search By Customer Number ................................................................................................... 102 Search By Customer Look Up ................................................................................................... 102 How to Modify Customer Profiles ............................................................................................... 102 Previous & Next Keys ...................................................................................................................... 103 How To Delete.................................................................................................................................... 103 Save Customer Information to Outlook ................................................................................... 103 Customer History .............................................................................................................................. 104 Customer Notes ................................................................................................................................. 105 Customer Notes ............................................................................................................................. 105 6 / 362 Statement Notes ........................................................................................................................... 105 Customer Letters .............................................................................................................................. 106 Customer Fields Defined ................................................................................................................ 106 Customer Look Up ............................................................................................................................ 111 8 General Ledger Interface ...................................................................................................... 113 What is the General Ledger Interface? .................................................................................... 113 Getting Started with General Ledger ........................................................................................ 115 Entering General Ledger Accounts ............................................................................................. 116 Adding General Ledger Accounts ............................................................................................ 117 Modifying General Ledger Account Names ......................................................................... 118 Deleting General Ledger Accounts ......................................................................................... 118 Modifying Account Numbers .................................................................................................... 118 Adding Accounts to the General Ledger Software ........................................................... 118 Printing a List of G/L Accounts ................................................................................................ 119 How do Transactions affect G/L? ............................................................................................... 119 Chart of Accounts ............................................................................................................................. 121 General Ledger Trial Balance ....................................................................................................... 122 Balancing the General Ledger Trial Balance ....................................................................... 123 Updating Quickbooks Pro GL ........................................................................................................ 125 9 Vendor Information................................................................................................................ 127 Where is Vendor Information? .................................................................................................... 127 Adding a New Vendor in the Vendor Profile ........................................................................... 127 Save Vendor Information to Outlook ........................................................................................ 128 How to Exit.......................................................................................................................................... 128 How to Search.................................................................................................................................... 128 Search by Vendor Account Number ....................................................................................... 129 Search By Vendor Look Up ........................................................................................................ 129 How to Modify Vendor Profiles .................................................................................................... 129 7 / 362 How To Delete ....................................................................................................................................... 130 Vendor Notes ...................................................................................................................................... 130 Vendor Notes (F8) ........................................................................................................................ 130 Purchase Order Notes (F7) ....................................................................................................... 131 Vendor Letters ................................................................................................................................... 132 Vendor Fields Defined ..................................................................................................................... 132 Vendor Look Up ................................................................................................................................. 134 10 Notes ....................................................................................................................................... 136 What Are Notes? ............................................................................................................................... 136 Adding Notes ...................................................................................................................................... 136 Customer Notes ................................................................................................................................. 136 Customer Letters .............................................................................................................................. 137 Sales Tickets Notes .......................................................................................................................... 138 Vendors ................................................................................................................................................ 138 Vendor Letters ................................................................................................................................... 139 Purchase Order Notes ..................................................................................................................... 139 Inventory Notes ................................................................................................................................ 140 11 Sales Person Definition ....................................................................................................... 142 Where is Sales Person Information? ......................................................................................... 142 Adding Sales Person Information ............................................................................................... 142 Exiting (F10)....................................................................................................................................... 143 Modifying Sales Person Profiles .................................................................................................. 143 Deleting (F3) ...................................................................................................................................... 143 Sales Person Fields Defined .......................................................................................................... 143 Setting up the Commision Ladder Pay Scale .......................................................................... 144 Other Uses for Sales Person Profiles ......................................................................................... 145 Time Clock ........................................................................................................................................... 145 Explanation of Time Calculations ............................................................................................... 146 8 / 362 Employee Performance Reports Using Hours Worked........................................................ 148 12 Terms Definition ................................................................................................................... 149 What Are Term Codes? ................................................................................................................... 149 Where is the Terms Definition Screen? .................................................................................... 150 Terms Fields Defined ....................................................................................................................... 150 How To Add Term Codes ................................................................................................................ 151 How To Modify ................................................................................................................................... 151 How To Delete.................................................................................................................................... 151 Sample Terms Code ......................................................................................................................... 151 13 Power Spreadsheet .............................................................................................................. 153 What Are Power Spreadsheets? .................................................................................................. 153 Why have separate Inventory Power Spreadsheets? ......................................................... 154 Why have separate Customer Power Spreadsheet? ............................................................ 156 Viewing Data in Power Spreadsheet ......................................................................................... 157 Printing Data with Power Spreadsheet .................................................................................... 161 Selecting Rows in the Power Spreadsheet ............................................................................. 161 Modifying Data in a Power Spreadsheet .................................................................................. 162 Importing Data with Power Spreadsheet................................................................................ 163 14 Backup Utility ........................................................................................................................ 166 Restore From Backup ...................................................................................................................... 167 15 Accounts Receivable ............................................................................................................ 169 Setting Up In-House Charge Accounts (Accounts Receivable) ....................................... 170 Received on Account (Point of Sale) ......................................................................................... 174 Applying Payments .......................................................................................................................... 175 16 Point Of Sale Module ........................................................................................................... 182 Quick Sale ............................................................................................................................................ 183 Entering the Customer Number .................................................................................................. 184 Entering the Sales Person ............................................................................................................. 186 9 / 362 Entering Sales Person (SP) for Line Items .............................................................................. 187 Entering Quantity ............................................................................................................................. 187 Entering Item Information ........................................................................................................... 187 Entering Description ........................................................................................................................ 189 Entering the Unit Price ................................................................................................................... 190 Accepting Payment For The Sale ................................................................................................ 191 Special Tender Options ................................................................................................................... 193 How to make Invoice Adjustments ............................................................................................ 194 Possible Quick Sale Warnings ...................................................................................................... 196 Back Orders......................................................................................................................................... 196 Converting Back Orders to Sales ............................................................................................ 198 Converting Special Orders to a Sale ...................................................................................... 198 Deleting Back Orders................................................................................................................... 199 Quick Save/Quick Load .................................................................................................................. 199 Sales Refund vs Void Sale ............................................................................................................. 199 How To Make A Sales Refund....................................................................................................... 200 Voiding Sale ........................................................................................................................................ 201 Reprint Sale ........................................................................................................................................ 202 Layaway ............................................................................................................................................... 202 Paid Out................................................................................................................................................ 207 Accessing Paid Out ....................................................................................................................... 207 How to do a Paid Out .................................................................................................................. 208 Purchase Gift Certificate ................................................................................................................ 208 Accessing Purchase Gift Certificates ..................................................................................... 209 Purchasing Gift Certificates ...................................................................................................... 209 Voiding Gift Certificates ............................................................................................................. 210 Modify Transaction........................................................................................................................... 210 Escaping from a Transaction ........................................................................................................ 211 10 / 362 Additional Features Available in the Point of Sale Module ............................................... 211 Generate Sales Order ...................................................................................................................... 214 Work with Sales Orders .................................................................................................................. 214 Received on Account ....................................................................................................................... 214 Accessing The Received on Account Screen ........................................................................... 215 Quick Payment on Account ........................................................................................................... 216 Minimum Payment Properties ................................................................................................. 217 17 Point Of Sale Menus ............................................................................................................. 218 Tools Menu .......................................................................................................................................... 218 Inventory (F4) ............................................................................................................................... 219 New POS Module........................................................................................................................... 219 Open Cash Drawer........................................................................................................................ 219 POS Options .................................................................................................................................... 220 Receipt Policy ................................................................................................................................. 220 Mobile ................................................................................................................................................... 221 Import From Mobile Unit ........................................................................................................... 221 Export From Mobile Unit ............................................................................................................ 222 View ....................................................................................................................................................... 222 Sales Statistics............................................................................................................................... 222 Major Account ................................................................................................................................ 223 Customer History .......................................................................................................................... 224 Note ................................................................................................................................................... 224 Inventory Table ............................................................................................................................. 224 End Of Day........................................................................................................................................... 224 Drawer Reconciliation................................................................................................................. 225 Store To Store Transfer .............................................................................................................. 225 Send Out Today's Transactions ............................................................................................... 225 Send And Receive Transfers Now ........................................................................................... 225 11 / 362 Quickly Add New Customer .......................................................................................................... 225 18 Close Out Menu ..................................................................................................................... 227 Daily Close Out .................................................................................................................................. 227 Drawer Reconciliation screen .................................................................................................. 228 Major Account Invoicing ............................................................................................................ 230 Monthly Close Out ............................................................................................................................ 232 A/R Integrity Check..................................................................................................................... 233 Finance Charges ............................................................................................................................ 234 A/R Aging Report ......................................................................................................................... 237 Close Out A/R Period .................................................................................................................. 240 MTD Figure Close Out.................................................................................................................. 241 Re-initialize Open to Buy (OTB) .............................................................................................. 242 Layaway Statements ................................................................................................................... 242 Monthly Statements .................................................................................................................... 242 Yearly Close Out ................................................................................................................................ 244 YTD Figure Close Out................................................................................................................... 244 Re-initialize OTB (Open to Buy) Module .............................................................................. 245 19 Purchase Orders ................................................................................................................... 246 Optional Settings .............................................................................................................................. 248 Buttons ................................................................................................................................................. 249 Receiving ............................................................................................................................................. 250 Finish This Order Now ..................................................................................................................... 250 Edit Menu ............................................................................................................................................. 252 Auto Generate PO ............................................................................................................................. 256 Print ....................................................................................................................................................... 257 Quick Scan Utility ............................................................................................................................. 257 20 Reports ................................................................................................................................... 260 Money Reports ................................................................................................................................... 260 12 / 362 Sales Journal Report ................................................................................................................... 260 Sales Register Report.................................................................................................................. 262 Tender Detail Report ................................................................................................................... 264 4 Year Sales Journal .................................................................................................................... 265 Tax Worksheet ............................................................................................................................... 266 Periodic Hot Seller Report ......................................................................................................... 267 Category Summary....................................................................................................................... 270 Sales By Hour ................................................................................................................................. 271 Sell Through by.. ........................................................................................................................... 272 Bottom Line Report ...................................................................................................................... 273 Gift Certificate Detail Report .................................................................................................... 273 Daily Closeout Audit .................................................................................................................... 274 Inventory Reports ............................................................................................................................ 276 Physical Listing by.. ..................................................................................................................... 276 Inventory Value by... ................................................................................................................... 276 Sales Trending ............................................................................................................................... 277 Stock Status Summary ............................................................................................................... 278 Item Number Labels .................................................................................................................... 279 Reorder Notification Listing...................................................................................................... 279 Inventory Variance Report........................................................................................................ 280 Customer Reports ............................................................................................................................. 280 Mailing Merge/Labels ................................................................................................................. 281 Customer Listing ........................................................................................................................... 283 Account Receivable Aging ......................................................................................................... 284 Payment Charge Summary........................................................................................................ 285 Open Back Orders ......................................................................................................................... 287 Special Order Listing ................................................................................................................... 287 Customer Sales By Vendor ........................................................................................................ 288 13 / 362 Major Account Invoice Register .............................................................................................. 290 Customer Book By Major Account .......................................................................................... 290 Discount Cost Sheet/Price List ................................................................................................ 292 Vendor Reports.................................................................................................................................. 293 Vendor Listing ................................................................................................................................ 293 Purchase Order Status ................................................................................................................ 294 Future Orders By.. ........................................................................................................................ 295 Reprint Purchase Orders ............................................................................................................ 295 Purchase Order Check In Sheet .............................................................................................. 296 Purchase Order Labels ................................................................................................................ 296 Employee Reports ............................................................................................................................ 296 Sales Commission Report .......................................................................................................... 296 Employee Performance............................................................................................................... 296 Miscellaneous Reports .................................................................................................................... 297 File Statistics .................................................................................................................................. 297 Transfer Summary Report ......................................................................................................... 297 Drill Down Reporting Feature ...................................................................................................... 297 21 Form Definition ..................................................................................................................... 299 How to Define a New Form ........................................................................................................... 300 Deleting A Whole Form ................................................................................................................... 302 Copying The Entire Form ............................................................................................................... 302 Add (x) to all Rows .......................................................................................................................... 303 Add (x) to all Columns .................................................................................................................... 303 New Form Number ........................................................................................................................... 303 New Form Length ............................................................................................................................. 304 Cost Code Definition ........................................................................................................................ 304 Field Definitions ................................................................................................................................ 305 Sales Ticket ..................................................................................................................................... 305 14 / 362 Purchase Orders Field Definitions .......................................................................................... 309 Statements - Account Receivables............................................................................................. 311 Sales Order .......................................................................................................................................... 314 Check A/P ............................................................................................................................................ 315 Labels - Inventory ............................................................................................................................ 316 Major Account Invoices .................................................................................................................. 317 WYSIWYG ............................................................................................................................................ 320 22 Physical Inventory ............................................................................................................... 322 Inventory Variance Overview Steps .......................................................................................... 322 Delete Variance Files ....................................................................................................................... 323 Log Current Inventory Levels ...................................................................................................... 323 Inventory Variance Dialog ............................................................................................................ 324 PDT Upload Utility ............................................................................................................................ 325 Update Inventory From Scanned Items ................................................................................... 325 Control Number Summary Report .............................................................................................. 325 Detail Report by Control Number ............................................................................................... 325 Delete Control Batch ....................................................................................................................... 325 Zero Range Of Unscanned Inventory ........................................................................................ 325 Print Variance Report...................................................................................................................... 326 23 Passwords .............................................................................................................................. 327 What Are Passwords? ..................................................................................................................... 327 How To Add Password .................................................................................................................... 328 How To Change Passwords ........................................................................................................... 329 How To Delete Passwords ............................................................................................................. 329 Password Fields Defined ................................................................................................................ 329 24 Accounts Payable ................................................................................................................. 335 Introduction and Features ............................................................................................................ 335 Getting Started with Accounts Payable ................................................................................... 336 15 / 362 Terms Codes Definition .............................................................................................................. 336 Setting Up an Initial Checking Account Balance ............................................................... 337 Accounts Payable Configuration ............................................................................................. 337 Checks............................................................................................................................................... 337 Accessing the Payables Entry/Modify screen ........................................................................ 338 Adding Invoices to the Payables Module ................................................................................. 338 Adding Invoices in the Payables Entry/Modify screen ................................................... 338 Payables Entry/Modify Fields Defined .................................................................................. 339 Paying Invoices and Printing Checks ........................................................................................ 342 Paying Invoices by Discount or Due Date ........................................................................... 342 Paying Invoices with the Mark for Payment screen ........................................................ 344 Paying Invoices with Quick Checks ....................................................................................... 346 Posting Checks .................................................................................................................................. 348 Deleting Checks................................................................................................................................. 349 Deleting Un-posted Checks ....................................................................................................... 349 Deleting Posted Checks and Quick Checks ......................................................................... 349 Adding Deposits ................................................................................................................................ 351 Deposits through the Point of Sale Module ........................................................................ 351 Deposits through the Miscellaneous Deposit function ................................................... 351 Deposits through the Check Register ................................................................................... 352 Modifying Invoices/Deposits ....................................................................................................... 353 Check Register ................................................................................................................................... 353 Reconciling the Check Register ............................................................................................... 355 Accounts Payable Aging ................................................................................................................. 356 Accounts Payable Reports ............................................................................................................. 357 Check Ledger Report ................................................................................................................... 357 Cash Requirements Report ....................................................................................................... 358 G/L Disbursement Journal ........................................................................................................ 359 16 / 362 A/P Aging Report .......................................................................................................................... 360 Vendor Payment History Report ............................................................................................. 361 17 / 362 Welcome 1 Introduction The First step using a new system is to review all of its features and requirements. This chapter will give a general overview of Winsale’s features and why automation at the Point-of-Sale is the key to business growth. The chapter also lists system requirements as well as optional hardware and software, to make your Point-of-Sale system give you the best results possible. Welcome Winsale is a completely integrated Point of Sale and Accounting system. It records your sales and purchases in the daily course of business with no extra steps needed. Every aspect of your business is monitored, providing you with the timely statistical data you need, when you need it. Why Winsale? Businesses must grow and prosper or they will eventually die. Their moment in time is eclipsed by the competitor, whose goal is growth. The key ingredient for growth is not stockholders but knowledge. A detailed picture of your operation is critical for you to make key business decisions for the months and years ahead. There are many factors that determine the success of any retail store and there is no question that knowledge of your products and customer preferences lead the list. Winsale arms you with this crucial ammunition and much more. Most businesses do not have access to the statistical data needed to make informed operational decisions. Management by intuition is no longer reliable. Today, profitable companies rely on computer gathered data management information systems. Now, even smaller operations can afford superior data management information systems using Winsale. Features Winsale is so much more than your normal quote-un-quote point of sale system. It also includes Accounts Receivables, Accounts Payables, Inventory Control, and General Ledger. You can use the one screen point of sale module to perform sales, layaways, quoting or customers, special orders creation and tracking nearly every function that is needed to completely encapsulate your business onto a computer system is included. Winsale is like several employees rolled into one. Winsale, works for only pennies a day and never calls in sick or takes vacations. 18 / 362 Multiple companies processing is supported. You may process data for virtually any number of separate companies, as well as multiple store locations under the same company name. Polling remote locations takes place automatically, (usually during evening hours), giving the “Parent Location” an exact picture of what has taken place. This ability also allows for the movement of new inventory in and out of each store for optimal stocking between locations. Mobile Sales are easily accomplished with the integrated mobile sales system. With this system you can easily take a notebook computer and go directly to your customer’s site and use your mobile computer as a portable POS system, all the while your store system is being used back at your store. The information from the mobile system is then easily exported out of the notebook and is read back into your main store system effortlessly. When exporting and importing data between your mobile work force and your instore system, you will be prompted for the configurations of the to-and-from systems. This setup allows for all possibilities to be selected with the click of the mouse. Power Spreadsheets allow the store owner or manger to have complete access over all the data in the system. Any database in Winsale can be viewed, reported on, manipulated, imported to or exported out of. In short, it gives anyone with access rights to have complete control over the data for analyzation or for modification purposes. Structured Query Language is used along with other powerful reporting capabilities, Winsale is also standardized with state-of-the-art software allowing the end-user to report on, modify or delete any record in the system. This front end allows for nearly limitless reporting abilities. Zip Code Look-Up -- Whenever you enter a Zip Code, the software automatically looks up the City and State. This saves time entering customer and vendor information and also eliminates inaccuracies. Form Definition Winsale allows for full user-definition of all computer generated forms. These forms include all sales tickets, inventory hang tags, purchase orders, monthly accounts receivable statements and certain historical and inventory reports. This means you, not a computer programmer, can decide what you want your sales tickets, sales orders, statements, and purchase orders to look like. Background Bitmaps can be used instead of purchasing expensive custom pre-printed forms. You may use these custom bit maps for your sales receipts, monthly statements, purchase orders, major account invoices. The bitmaps can easily be created in any drawing software even the Paint program included with the Windows operating system will work. Magnum software can also create the bitmaps for you for a minimal fee. This one small feature can save you hundreds of dollars per year. User Definable Screens are available to allow you to customize Winsale for your store. You can turn off fields so that they are not prompted for, or color code the fields that are needed. You can even change the order for which fields will be prompted for. You can be both the user and designer of Winsale. Whatever works best for you! Balance forward / revolving/ Open Item A/R - WINSALE gives you wide flexibility for in-house charge accounts with an option of three accounting methods. Balance Forward is defined as maintaining the customer’s account balance as a total and not by each individual transaction. Open Item is defined as keeping the balance for each individual sales ticket until it is completely paid off. Revolving is much like Balance Forward except that Revolving works on a single-month basis and is never overdue unless the customer does not make the minimum payment for the month. In the case where the minimum payment is missed or underpaid, the remaining amount becomes delinquent and is added to the next month’s minimum charge. The A/R statement form definition allows for all of these criteria. 19 / 362 Open-to-Buy -- Winsale gives you everything that you need to plan purchases. This information is defined departmentally and is, basically, the amount of merchandise that needs to be received into stock within a buying period to achieve a predetermined level of sales. WINSALE gives you a spreadsheet system that allows you to perform “what if” analysis. The spreadsheet takes into account Planned Stock-to-Sales Ratios, Planned Sales, Planned Markdowns, etc. See Section 30 for more detailed information. Electronic Notes You may attach permanent notes to Customer, Vendor and Sales person profiles, as well as Inventory Items and Purchase Orders. The Customer and Item Notes can be viewed and/or updated at the point-of-sale screen as well as the customer and inventory screens. Their primary purpose is to notify the sales clerk of important information about a customer or inventory item. In the case of Customer Notes, they could notify the clerk not to take checks from a customer or give the names of spouses and children. In the case of Item Number notes, they can notify the clerk to sell a substitute item or a related item with the item being purchased. Vendor Notes can be viewed or updated at the Vendor Profile screen as well as the Purchase Order Modules. Salesperson notes may be viewed or updated at the Salesperson profile screen and can be used as instructions to salespeople as they clock in and out. In addition to the above, WINSALE gives you the ability to attach notes or instructions to Purchase Orders, Sales Tickets and monthly Accounts Receivable Statements. Purchase Order Notes are used for special instructions to the vendor and may be printed on every purchase order to this vendor or on a single purchase order. Monthly Accounts Receivable Statement notes will only print on the monthly statement once and will then be deleted automatically. They are handy for special wording on overdue accounts, etc. Major Accounts can be setup so that they receive all accounts receivable billings from their employees’ purchases at your store. This is a parent-child relationship that allows the billing of items purchased by one party to be billed to another party. This is commonly used in business to business sales, or even in team sports. Major Account business rules are also easily maintained within Winsale. Look‑ Up Tables -- Look‑ up tables are available whenever an account number is needed. Typing in an account name allows you to view accounts (Customer, Vendor, and Salesperson) alphabetically. You can access the table by entering letters of the name and then using the arrow keys to highlight the correct account. Once the correct account is found, click on Accept or double click on the highlighted name to pull the account into the program application. Look‑ up tables can be exited by simply clicking on Exit. Customize Screen Options - Winsale allows you to modify any field or menu name by using the customize screen options. This can be done by simply right clicking on certain sections of most screens. Data Entry and Editing Keys - Data entry and editing (copy and paste functions) allow you to use arrow keys and special function keys to select data fields on the same screen. Smart Capitalization allows for quick data entry. You do not have to touch the shift key to capitalize a name throughout all modules. For example, with ordinary programs, if you were entering the name Michael O’Bryan you would have to use 18 keystrokes; WINSALE requires only 15 keystrokes. This small feature alone will save you thousands of keystrokes per year. Menu Bars and Pull‑ Down Windows -- Winsale allows you to access the application and option menus quickly and easily. All the menus are logically grouped, providing you with easy access to any function. You may choose the key combination using the highlighted letter, the cursor keys or the mouse. Reports are displayed on the screen initially for review and can be scrolled in any direction. They can then 20 / 362 be printed out to your specified printing device. Reports can be saved as text files for import to spreadsheets or saved to PDF files. You can also search for any text inside the screen file by clicking on Find. Winsale grows with your business. The same version works with a single computer or with any number networked together. This insures that you have a good growth path for the months and years ahead. Winsale also permits a centrally located database (parent store) to oversee databases for up to 99 stores, allowing for reports on a whole group of stores or an individual unit. Canadian Support: Province abbreviations (three letters) and Postal Codes (alphanumeric) are provided in the Customer and Vendor profile screens. Currency Conversions are also supported. Winsale also provides a link to the current exchange rate through your internet connection. Last Name First -- If customers are stored in the customer database Last name first, First name second and are separated by a comma, the mailing label and statement programs will print them reversed in the correct format. F1 Help -- A complete electronic version of this manual is available on the screen at the touch of a key. If you need help understanding a feature or capability, you need not refer to the printed version of the user manual. The electronic version of the manual provides for almost instant searching. It is indexed to give the user complete true Hypertext control. You may go on to something else and return back to the place you left with just the touch of a key. The electronic manual is completely context sensitive; it knows where you are at every instant and takes you automatically to the correct section in the manual. Access to the Electronic Manual is available throughout the program by pressing the F1 key. In addition to the context sensitive help system you may select the Help menu to search for a particular topic of interest. As minor updates take place, the electronic manual will be more complete and up-to-date than the hard copy version, thus it should be referenced more often. The Help Menu also contains an item called NEW FEATURES LISTING. This menu choice will give you the most current version’s list of new features and bug fixes. This list can be viewed on screen or printed to a printer. To print this document, click on File and Print. You will then be prompted for the printing device to print to. Optional Software The optional software that you may interface to Winsale includes: SHOW MY PC - is required for Magnum Software On-Line Support. MICROSOFT SECURITY ESSENTIALS – free anti-virus software from Microsoft for safety of your computer, that would not interfere or block WinSale activity on your PC. QUICK BOOKS PRO GENERAL LEDGER -- An easy to use and extremely powerful general ledger system designed by Intuit. Winsale interfaces to Quick Books General Ledger via and ActiveX direct connection to Quick Books API. Every transaction that affects general ledger passes to Quick Books. In addition Customer Profile and Vendor Profile information is also automatically transferred to Quick books. With this interface you have everything needed to create financial statements.STAMPS.COM – A service that 21 / 362 uses the Internet to purchase and print United States postage. This service also allow the printing of many different types of mailing labels, envelopes and required documents for mailing to foreign countries of the United States. Winsale interfaces all areas of itself to the usage of this service. For example, the mailing program integrated into Winsale is been fully implemented to Stamps.com as well as other areas that make using Winsale to mail items quick, easy and extremely convenient. Optional Hardware The selection of optional hardware supported by Winsale includes numerous amount of debit card pinpads, magnetic stripe readers, receipt printers and other hardware that has been constantly added to support Winsale and make your user experience at most easy and pleasant. Some of the examples of such hardware provided below : Bar Code Scanners: The system supports both the printing and reading of bar codes. Code 3 of 9 is used because of its ability to store both alpha and numeric text. It allows up to 15 characters to be represented with one bar code. WINSALE supports any scanner which reads code 3 of 9. Cash Drawers:The cash drawer can be a serial or parallel device. When a serial port is used, it must be connected to Com port 1, or Com port 2. Com ports 3 and above are not supported. The drawer should be set to receive data at 300 baud. A parallel drawer can be connected to LPT1 or LPT2. The cash drawer interface is defined completely within the Configuration Program. (See Section 3 for more information.) WINSALE supports most cash drawers. DSL/T1 High Speed Internet Connection: This is necessary for all remote desktop/updating/polling operations and for Magnum Software‘s online support. We recommend a minimum download speed of 1Mbps in order to have optimal performance of Winsale. Pole Display (Price Display Screen): WINSALE supports both Printer Products , Aedex compatible units and the IBM Sure-One unit. Receipt Printers:We recommend Star Micronics receipt printers for ease of use, but, since the program allows for complete driver control, you can use any receipt printer. Please check with Magnum technical support for specifics. Bar Code Printers:WINSALE supports Eltron and Zebra bar code printers. Report Printers:Because you have full control of print drivers, you may use any printer with WINSALE, including dot matrix, laser and ink jet printers. Please note, however, that you will not be able to print hangtags or stickers on the laser and ink jet printers because of label configurations. You will need a bar code printer to print hangtags and stickers. System Requirements Winsale system requirements match your Operating System minimum hardware requirements, and can be different, depending on OS version you use (e.g. Windows 2000, XP, Vista, 7). 22 / 362 2 Getting Started This chapter will give you step-by-step instructions to set up Winsale for the first time. You will read about how to install the system as well a how to enter data for the first time. Inputting your data is one of the most important steps in getting started with the system. This chapter will instruct you on how to enter first time data and will give you the correct order in which certain data should be entered to ensure integrity throughout the system. Installation Note: If Magnum Software setup your system at their corporate office location, you can skip this section and only reference it when doing updates, etc. Before physically installing WinSale you should make sure that your system has the minimum system requirements. WinSale system requirements match your Operating System minimum hardware requirements, and can be different, depending on OS version you use (e.g. Windows 2000, XP, Vista, 7). Place the CD label side up into the CD ROM drive. The installation program should automatically start. If this in an upgrade installation you may skip Step One of the installation and click on Step Two. Please read the instructions and information on the screen carefully! WinSale requires the Database Management system to be installed. If there is not one detected then you will be prompted to have it installed for you. 23 / 362 2. First screen displays the intentions of the installation and warns you that this program is Copyrighted and that illegal copying is prohibited. Accept the terms in the license agreement, then click Next to proceed. 3. The next screen displays the standard License agreement. You should read this if you have any questions about ownership of the software and the rules of copying software. Accept the terms of the license agreement to continue with installation. 24 / 362 4. That is all the information that is needed for WinSale to begin installation. Click on Next to continue. Installing updates If you already have Winsale installed and you need to install an update: 1. In the program, go to the Help menu. a. Click on Update Installer. b. You will receive the option to Download Update on the screen. c. Click on “Download Update” to begin the download process. You may continue to work in Winsale while the download is taking place. d. One the download is complete; Winsale will notify you that it is ready to install the update. Choose “yes” to continue. e. The system will prompt you to make sure that you do not have the Winsale program currently f. running. Choose OK to continue. Follow each prompt until the update installation is complete. 25 / 362 Starting the Program To start the software, click on the Winsale icon that has been placed on your desktop. When starting up WinSale for the very first time you will be greeted with the above screen. This screen is used for specifying where the program is installed and where it should look for the Configuration files. Since WinSale allows you to have many configurations as well as up to 99 businesses per configuration, it is imperative that this information be given. WinSale will automatically search your hard drives and network drives for any possible configuration. If you have never had any other Magnum Software Products on your network the most likely path is the one shown above. (C:\WINSALE\). Click OK to continue. 26 / 362 The next screen you will see is the Business Selection screen. In this case, the current configuration has only one business set up. Red Wing Shoe Store is the demonstration company supplied with WinSale. It has some very simple data already configured for you. The top left of the Business Selection Screen has a Date prompt. This allows you to perform any function in the software on the date specified. This date does not change the computer’s system date and will not affect any other workstation using the system on a network. However, any transaction that you make will be time stamped with this date. NOTE: Business Selection Menu can be used to hide or to unhide inactive business selections. This is based on the terminal doing the procedure so that different work stations can have different business selection menus. To use this functionality right-click on the menu option then starting Winsale to hide and choose Hide. To restore the menu back to the default settings, right-click and choose un-hide all. The Password prompt allows you to enter the system under a predefined user level. The user level that is employed is based on the password entered here. If the user level that you enter in the system does not have privileges to do a certain function then a password over-ride will occur. The password over-ride will usually be entered by management or a more powerful privilege level. Appropriate passwords can be produced at a later date. Terminal Environment Variable WinSale requires that each individual workstation or terminal has an ID that uniquely identifies it. This Terminal ID can be any three consecutive characters. Typically this will be numeric like 001, 002, or 003, etc. 27 / 362 The screen above is the main menu of the system. If you are familiar at all with Windows programs then you will feel right at home here. The bottom of the screen above has some pertinent information that might come in handy as you work with the program. The first two are self explanatory and are simply the status of the num lock key and the system date. The next item is the current store number. WinSale can easily manage hundreds of retail stores in real time over the Internet. Inventory levels move seamlessly between stores on a nightly basis. The main location also receives all sales history, customer history, vendor history, employee time sheets and commissions, etc. WinSale has been written from the ground up to handle multi-locations. Even if you don't have multi-locations now, why limit your future. The next item is the Terminal ID. Each workstation/register has a unique ID assigned. This allows for easier auditing of transactions. WinSale can handle any number of registers in a store, and without extra cost. Some software companies charge you per register. As always with WinSale you have an open path to expansion without having to worry about costly and complicated license agreements. The next item displays the amount of free memory available to the program. Always try and keep this number above 20%. If it falls below 10% your system may respond sluggishly. This may mean that you may have to exit some other programs or maybe even consider purchasing more RAM memory. The last item on the main screen in the above figure is the operating system path to the data. You will rarely have to be aware of this, but, if for nothing else other than backups, this is a necessity to know. 28 / 362 Customizing the System Most computer systems require your business to fit the mold the software author thinks best. This is not so with Winsale. In this program you can modify any field name. Winsale comes initially designed for an Apparel or Shoe Store. However, it can be customized to fit the needs of a Gift Shop, Hardware, Office supply, or almost any type of sales operation. This can be done by changing the field names associated to the data base. More often than not, this involves changing the field names on the inventory screen to meet the needs of the business you are operating. For example, a shoe store will not need the Color field in the Inventory record, so this field can be changed to a Width field for shoe sizes. Getting Help WinSale has the ability to provide you with Remote Internet Support. This can be used for you to allow Magnum Software to remotely log into your computer for the sole purpose to help in the supporting your WinSale software. In order to use this free service you will have to have high speed Internet access to one of your Winsale Computers. This is a completely secure interface and uses the VNC Tight open source wrapped in a ShowmyPC.com interface wrapper. This program is also available for your personal use on the web at http://www.showmypc.com Setting Up the Program for the First Time - Entering your Data NOTE: The Configuration must be completely set up! Go through each menu in succession until all information has been filled in. The following provides an outline for setting up the software. If you follow this outline when setting up the software the first time, you will save yourself time and duplicating efforts. The information that follows is simply an outline. You may skip some steps depending on how you plan to use the program. Configuration Information The Configuration is located under the Modules Menu. The Configuration must be completely set up! Go through each section until all necessary information has been filled. A demonstration company has already been setup for you. If you are evaluating the software then no further setup is required. See Section 3 Configuration for detailed instructions on how to configure the programs. 29 / 362 Passwords The Password Input Screen is located on the Main Screen, under the Profiles Menu. At this stage, we recommend not changing anything until you are fully setup later, you may choose to set up other password levels. Passwords define who can access different functions or portions of the program and should be defined according to user levels, for example: Owner, Manager, Salesperson, etc. Tax Code Definitions If you will be doing in-house charge sales or sales which need tax percentages other than the default tax rate that you set up in the Configuration, then the Tax Code Definition Table should be set up before inputting customer data. If you do not specify a tax code when setting up a customer, the default sales tax rate, as defined in the configuration, will be applied to that customer. The Tax Table is located in the Profiles menu. See Section 7 Customers for more information. Terms Code Definition Terms Definition Codes are located in the Profiles Menu. This information must be filled in for two purposes: a. If you will be using the Accounts Payable module or plan to use it later. You may enter your terms codes now or assign Terms Codes while you are inputting Vendor Information. (This is accomplished by double clicking in the Terms Code Field inside the Vendor Profile Screen. See Section 9 Vendors for more information.) This information will be printed on Purchase Orders to notify your vendor of your payment terms. It will also be used by the Accounts Payable Module for early payment discounts. If you plan to give your customers payment or discounting terms. You may also assign Terms Codes while you are inputting Customer Information. (This is accomplished by double clicking in the Terms Code Field inside the Customer Profile Screen. See Section 7 Customers for more information.) This information is only necessary if you intend to print the Terms Definition on your Sales Receipts. See Section 12 Terms Definition, for detailed instructions. Vendors Vendor information is also located in the Profiles Menu. This information must be entered before you begin inputting your inventory. The inventory file has a field called Vendor Account Number, which should 30 / 362 always be filled in because it is used to identify the primary vendor for the inventory item See Section 9 Vendor Information, for more detail on how to fill these fields. Note: If you are converting from another software package, we may be able to convert your vendor list electronically. Contact Magnum Software Systems, Inc. for more information.) Department/ Class Codes Department Code Setup is located in the Profiles Menu. This information departmentalizes your inventory and gives you the ability to generate Sales History By Department or Class. It is also used for planning purchases with the built-in Open-to-Buy Spreadsheet. Careful consideration should be given to setting up departments and Alternate Departments the first time. You should consider a meaningful numbering scheme that will allow you to take the most advantage of grouping inventory together for reports. Besides access to Department/Class codes from the Profiles menu, you can also call up and view, or edit, departments when you are entering inventory into the system. Simply type in the first letter of the Department name or double click when the cursor is in the Department Field of the inventory screen. Note: when changing a department number in the Department Code Definition under the Profile menu Winsale will automatically change any inventories that are assigned to the old department to the new department number. If the new department number already exists in the department code definition the department number cannot be changed. Inventory Inventory is the first choice of the Module Menu. Inventory should be filled in as completely as possible to take full advantage of the reporting features that WinSale has to offer. See Section 4 Inventory for detailed information on how to fill in these fields. Salesperson Information Salesperson Information is located in the Profiles Menu. Each Sales-person should be assigned a sales number so that they can be credited for their sales. If you are not using the Sales Commission module, you may delay this step. However, before you can ring up any sales, you must have, at least, a house account set up with an assigned number. See Section Salesperson Fields Defined for more information. 31 / 362 Customers Customer information is located in the Profiles Menu. If you wish to track your sales by customer, enter your existing customer base. Customers can be added to the program at any time, even during the sales process. See Section 7 Customer for more information. Customer Balances These balances should be entered after all customer information has been input to ensure that they are up-to-date. Future account balances will be aged based on the Last Transaction Date field in the Customer File, so, if you know the last transaction date, that information should be input also. You may also enter existing customer balances from the Received on Account screen or by using the build in Account Balance Loader located under Customer Utilities. Either way, inputting balances should be the last thing done before going live with the software system. If you enter customer balances through the Received on Account screen, the next step may be eliminated. Close Out A/R Period This function moves all customer balances from the Customer File over to the Accounts Receivable File. See Section 15 A/R for more information on setting up accounts for the first time. 32 / 362 3 Configuration Overview The configuration program is used to direct all of the other program modules on the specifics of your operation. For example, the configuration program is where you set up the software for state tax rates, hardware setups, such as bar coding options, program prompts, forms, etc. This chapter will guide you through the first time setup of your company’s configuration. This chapter instructs you on how to enter valuable company information. This includes Accounts Receivables, Accounts Payable and Inventory. You will also be guided through the optional equipment setup for cash drawers, pole displays, and scanners. Please go through every step that pertains to your company in the configuration setup. After installation of the software, the configuration program must be filled in as completely as possible. The first time that you install the program it will automatically take you to the Welcome New User Screen. Once you have accepted your program location and accepted your default business, click on Modules and then click on Configuration Program to begin set up. After this initial set up, the system will take you to the Business Selection each time you enter the program. You may access the configuration program at any time thereafter, however, to modify settings. 33 / 362 Main Configuration Menu The configuration program makes use of logically grouped sections. By selecting menu options, you will be brought to other menus or be shown question and answer boxes. The first time through the configuration program you should start at the first option (Data Storage) and work your way progressively through each Tab section. Most question and answer boxes already have default answers shown and only need to be changed if inappropriate for your type of business. Accessing the Configuration Program 1. From the main Modules Menu, highlight and click on ‘Configuration’. 2. From the Windows Start Menu Choose All Programs – Winsale – Configuration. IMPORTANT: If you need to exit the Configuration module, Click on Save from the configuration program 34 / 362 main menu and then click on Exit. This insures that all files are updated properly. Business Code (2 Alpha/Numeric) -- This code represents the business for which you will be processing data. It is a unique code that is user definable. The Business Code can be any combination of up to two characters or numbers and is typically something that relates to your store environment. For example, if your store name is Danny’s Fashions, a good business code would be DF. If you are running in a multiple store environment and your store number is ‘2’, a good business code would be ‘02’. This field must not be left blank. Because the program allows for any number of businesses to be set up and used with the same software, you will be required to set up a unique Business Code for each separate business. The Business Code is used internally by the system to determine which database to use for each business. Note: Each business is maintained as a completely separate database. Information is not easily transferred between businesses. To enter a new Business Code: 1. If you are installing WinSale for the first time, you will be automatically taken to the Business Code prompt. 2. If you are adding a new business, choose ‘Configuration Program’ from the Module menu, then click on New - you will be prompted for a new Business Code’. 3. Type in the two-digit business code that you want to use. Storage Location (27 Alpha/Numeric) – This field represents the physical location of all the data stored on the fixed disk. It uses a Data path to point to the location on the fixed disk. For example, for WinSale, by typing in ‘C:\WINSALE\DATA’, you are telling the software that you will be storing all of the data in a subdirectory labeled ‘DATA’ in the ‘WINSALE’ directory on the local drive where you installed the program. (See Section 2.2 Installation) The program will automatically create the directory if it does not currently exist. If you need more information about directories and file structures, refer to the Disk Operating System supplied with your computer. a. Click on Data Storage and fill in the correct database path. b. The Alternate Workstation path is used when using mapped drive letters on workstations and the local drive letter on the Server system. In other words, when more than one drive letter is being used to represent the same physical location for different systems. The data location path field on the left of the screen will be used for all workstation unless one has been entered into the Alternate Data Path. In that case the path entered on the right side (The Alternate) is used instead of the path entered onto the left side. 35 / 362 Data Path Prompt Business Name and Address This is where you will enter name and address information for your business. This information will also be the format of the address information on your receipts. To access this configuration option: a. Click on Business Name & Address and fill in the appropriate information. 36 / 362 Business Name & Address prompt Name (30 Alpha/Numeric) - The business name that you enter here will appear on all printed invoices, purchase orders and reports. To enter the name of your business: a. Type in the Business Name. TIP: Remember, as with all fields that require proper noun usage, you will not have to use the shift key to capitalize a name or street address. Simply type the name, with the proper spacing, and the program will capitalize where necessary. Address (30 Alpha/Numeric)- This information will be the address printed on Sales Invoices and Customer A/R and Layaway Statements. You may use a street address or a PO Box, whichever you prefer. To enter this information: a. Type in the business address, using the correct spacing TIP: The name and address that is printed on Sales Invoices and Statements can be different from what is entered in the configuration program. This is accomplished with the Form Definition Program. See Section 37 / 362 20 for more information. City -Type in the City in which your business is located. State/Province - Type in the standard state or province abbreviation for your location. You may use 2 or 3 characters. Postal Code - Type in the Postal Zip Code for your business. You may use either 5 or 9 characters. As with all Zip Code fields, however, do NOT enter the dash in between the Zip Code and the plus 4 code. Phone - Type in the Primary Phone Number, including area code, for your business. This phone number is for informational purposes only unless it has been included in your form definitions. Fax - Type in the Fax Number, including area code, for your business. This fax number is for informational purposes only. Tax Rate The information entered at this prompt will be the tax rate for all sales within the system, unless that rate is manually adjusted at point of sale or in the customer profile. (See Section 16 Point of Sale Module and Section 7 Customer for more information on changing the sales tax rates.) To access this prompt: a. Click on Tax Rate. Default Sales Tax prompt Default Sales Tax Factor (6 digits) -- Type in your state’s sales tax factor. If the sales tax rate is 7.5%, type ‘. 075’ into this field. 38 / 362 TIP: Out‑ of‑ state customers or other ‘tax exception’ customers will have their own tax rates set up in their individual customer setup screen under ‘Tax Code’. This code corresponds to information set up in the ‘Tax Code Definition’ table. See Section 7 Customer for more information on the set up of additional tax rates. NOTE: You can force Tax Rate – The taxes that are charged for brick and mortar stores (not Mobile Units) can be set to always maintain the local county and state rates while still maintaining major account tax rules. Essentially this is done by forcing any non-zero tax rate setting to be as defined in the tax rate setting inside of the configuration program. This tax rate factor is used in every case but one. The exception to this rule is when the tax rate is zero. By allowing this exception to the rule you can still give a full tax exemption for those cases where no tax is to be charged for example for the first one hundred dollars of the sale. Default Numbers Default Numbers are subsequent numbers that automatically update each time used. For example, if you enter 1 for the Invoice Number, the first sale that you “ring” will be assigned the number “00000001”, the second sale will be “00000002”’, and so on. In most cases, there should be no reason for you to change or edit default numbers. (The exception to this rule is multiple store companies. Please see the ‘Multiple Store’ note below.) To access the Default Number prompt: a. Click on Default Numbers. 39 / 362 Default Numbers Prompt Multiple Stores If you have multiple locations, define each location with a unique numbering scheme to ensure that there is no duplication when the remote stores are polled. For instance, start store number one with ‘1’ as the first digit of all the default numbers, and the second store with ‘2’, etc. In this example, the next customer number for Store 1 would be “10000001”, while for Store 2 it would be “20000001”, etc. 1. Next Customer Number (8 Numeric) - The number entered here will be the next number to appear in the Customer Profile when you are in the add mode. You may override this default number by typing the customer's telephone number over it. When adding new customers in the Point of Sale screens, the Customer Default number will not appear. Instead, you will need to enter the customer's telephone number as the customer number. 2. Next Sales Ticket Number (8 Numeric) - This number will be the next default sales ticket number. It is very important that you use the system’s default numbers for sales tickets in order to avoid multiple sales per invoice number! (Sales Ticket Numbers may be over-ridden at the point of sale, however, by setting the ‘Ask Invoice Number’ to ‘Yes’ in the Point of Sale Configuration option.) Multiple Stores In remote store environments where the mother store, (The Calling Store), also “rings” sales, the mother store should use a higher numbering sequence for their sales ticket numbers than the remote locations. This is important because the mother store will receive the outlying store's sales history and keep it in memory. When a sale is performed, the POS module automatically scans for the highest sales ticket number found in the sales database. It then uses the next available number as the sales ticket number. By 40 / 362 making the mother store’s invoice numbers the highest; we can greatly speed up this process. 3. Next P O Number (8 Numeric) - The next PO number will be the next default number for Purchase Orders. It is very important that you use the system’s default numbers for purchase orders in order to avoid multiple purchase orders per PO number! 4. Next Vendor Number (8 Numeric) - This number will be the next default vendor number. You may override this number by typing the vendor’s telephone number over it, if you would prefer to use telephone numbers for convenience. (See Section 9 Vendor Information) 5. Next Sales Order No. (6 Numeric) - The number in this field will be the next number used for a back order, preceded by a ‘QP’. It is very important that you use the system’s default numbers for sales orders in order to avoid multiple back orders per QP number! 6. Next Layaway Number (6 Numeric) - This number will be used for the next Layaway created. You may use the system’s default numbers for layaways in order to avoid multiple sales per layaway number. You may also overwrite the Layaway number by typing over the number when using WARNING: It is extremely important that you use the system’s default numbers for Sales Ticket Numbers, Purchase Order Numbers, Sales Order Numbers and Layaway Numbers. If you attempt to use your own numbers, you will be at risk of cross-writing or overwriting fields! Optional Equipment Setup Optional Equipment Prompt 41 / 362 NOTE: Bar Code Scanners do not have to be configured within the system. If you are planning on using bar code scanners, please contact Magnum Software so that we can provide you with product information to ensure compatibility. This menu option allows you to set up your point of sale peripheral equipment, such as cash drawers and data collectors. (Printers are set up separately in menu Option 9.) You will also set up the format for bar code printing from this menu. Pole Display Pole displays show transactions to customers as they take place. In addition, advertisements, sales, etc. Can be shown when the display is idle (when a transaction is not being performed). Configuration Menu for Pole Displays You will see a list of pole display brands and models. (See ‘Configuration Menu for Pole Displays’ above.) Any of these pole displays are automatically compatible with WinSale. TIP: Please review this list of compatible pole displays before purchasing one. If you have a pole display that does not appear on this list, please contact Magnum Software. We may be able to customize this setup for your pole display. Text Messages You may also set up a text file that contains advertising, information for your store or it might be enabled to show the discounted price at Point of Sale. This file will be scrolled left to right on the pole display when no transaction is being processed. To enter any text to be shown on the display: 1. Exit out of the WinSale 2. Click on the start menu in lower left corner of the screen, and then, browse to My Computer, to a C:\ WinSale prompt or an F:\winsale network prompt. 3. Right click on an empty space in the folder and click on New – Text Document and name it DISPLAY.TXT. 42 / 362 4. Type your message up to 60 characters. 5. When you have finished your message, exit out of it, and click Save when prompted. Barcode Printing Bar Code printing ability is built into your software but you need to “turn it on” by choosing the bar code format. WinSale can print out bar code symbology 3 of 9 to any IBM or Epson compatible printer. TIP: Bar Codes can only be printed by Dot Matrix or Thermal Bar Code Printers. (You will not be able to use Laser or Ink Jet printers.) If you are using a Dot Matrix printer, please make sure that it is IBM or EPSON emulation. To set up the program to print bar codes: 1. Highlight and click on Configuration Program’ from the main Module menu. 2. Click on Opt’l Equipment Setup’. Configuration Menu for Bar Code Printing There are many different options to choose from for either a 9 pin or 24 pin printer. (See Configuration Menu for Bar Code Printing above.) The option chosen is determined by several factors. You will have greater success by choosing Option 1 = 2 Line 9 Pin Wide or Option 2 = 2 Line 24 Pin Wide. (These are the largest styles in both height and width.) 1. Readability is the most important factor in determining the bar code format. Because Dot Matrix Printers use ribbons, they are always in a constant state of wear. In other words, the ribbon on the printer can be anywhere from new and very inky to old and very faded. Inky ribbons tend to splatter ink. Since bar codes are read by the thickness of the bars and thickness of the white space, ink splatter can prevent readability. If a ribbon is worn and faded, it is hard for a scanner to differentiate between the white space and the black bars of the code. By using a larger style bar code you will get a greater degree of readability. 2. The type of bar code scanner that you are using is also a factor in determining bar code format. For Laser type guns, you may use the one line style bar code. Bar Code wands, on the other hand, have to physically touch the bar code and be dragged across it at an even speed and degree of angle. The best style for this type of bar code reading is the Wide bar code. To use the bar code printing system, highlight the correct format. If you will not be using bar codes, highlight use ‘No Barcode printing’. 43 / 362 Note: Any bar code reader that emulates the keyboard may be used. It must be able to read Code 3 of 9, however. Refer to the bar code reader manual to confirm this information. Cash Drawer In order to use a cash drawer, you must tell the program where and how it can be accessed. To set up the program for cash drawers: 1. 2. Highlight and click on ‘Configuration Program’ from the main Module menu. Click on Opt’l Equipment ’. Configuration Menu for Cash Drawer Set Up The first section asks where your printer is connected to your computer: If the cash drawer is a serial cash drawer it is typically connected to Com1: or Com2:. If you are using a receipt printer, the cash drawer is typically a parallel cash drawer and is connected to LPT1:. 3. Highlight the correct option. 1. 2. The next section will ask you for the Cash Drawer Open Signal: 1. 2. 3. For Serial Cash Drawers the Open Signal is typically 0. For Parallel Cash Drawers (those used with a receipt printer), the Open Signal is typically 7. Type in the correct signal and click on Test to confirm setup. Note: The cash drawer will open from the configuration screen once the option has been turned on. The drawer will only open if the setup for the drawer is correct. If your cash drawer is NOT connected through LPT or COM port, and communicates with WinSale through printer driver, but not directly, then setting it up to work is different. 44 / 362 1. Click on Start Menu – Devices and Printers – Add a printer (Sart – Control Panel – Device and Printers). After you click on add a printer button, dialog box will appear. You would need to go through the process of adding a receipt printer. 2. When prompted if printer is local or network, select an option and click next. 3. You will be asked to choose appropriate port for your printer (Typically its USB001), click Next. 4. When you will be prompted to choose Manufacturer, scroll for Generic and in Printers choose Generic/Text Only. 5. Name your printer the way you want, e.g. Receipt Printer. 6. After naming your printer and clicking Next you will see a screen, that will ask you if you want to share your printer. Choose Do not share this printer. Hit Next. 7. Click Finish, and you are done installing new printer driver. 8. Click on Start Menu – Devices and Printers. Right click on the printer driver you just created and choose Printer Properties. Then choose Printer Commands Tab and in the Begin Print Job text field type: <07> (Star Printer Code; for other codes compatible with your printers, please follow the instructions provided with your printer). Created with the Personal Edition of HelpNDoc: Free CHM Help documentation generator Data Collector Configuration The information that you enter in this set up will tell the computer where your data collector is connected to your computer and how to access it. This information must be supplied before you can download from your data collector.(See Section 33 Physical Inventory for more information on using data collectors.) To set up the program for data collectors: 1. Highlight and click on ‘Configuration Program’ from the main Module menu. 2. Click on Opt’l Equipment ’. Configuration Menu for Hand Held Configuration To set up your data collector: 1. The first information to be supplied is the Com port that the data collector will be connected to. a. Choose the correct ‘Com port for Device’. b. Your two choices are -Communications Port 1 or Communications Port 2. 1. The com port that you connect the data collector to may be labeled on the back of 45 / 362 your computer. In most cases it will be Comport 1. Highlight the correct choice. 2. The second piece of necessary information is the Baud Rate, which will be highlighted. 2. The Baud Rate is the speed at which your data collector can communicate to the computer. You may need to check the data collector manual in order to determine the speed for your unit. b. Click on the fastest speed that your data collector can accept. To exit the Configuration program from the main menu, click on Save and then click on Exit. a. WinSale supports big variety of Data Collectors available on market today. To utilize as much models as possible, WinSale uses the import file created by data collectors to gather information needed. To transfer that information, there are Xfer and 232Read applications available, that come with your WinSale installation. Credit Cards WinSale can track sales by credit card type. In order to use this feature, you must define the credit cards that you accept. Once you have defined the credit cards that you accept, you will see those credit cards on the split-tender screen at point of sale. To enter the Credit Card Setup program: 1. Highlight and click on ‘Configuration Program’ from the main Module menu. 2. Click on ‘Credit Card Setup’. Credit Card Setup Screen 46 / 362 Adding/Deleting New Credit Cards WARNING: Credit Cards should only be deleted at the beginning of a new month, since deleting a credit card can cause errors in your General Ledger and Sales Summary report. When you enter the credit card set up screen, you will see a list of existing credit cards in the top left corner. To delete a credit card: 1. Highlight the block to the left of the credit card that you want to delete and press the DELETE key on your keyboard. 2. A warning will appear to confirm your choice, 3. If you decide not to delete the credit card at this time, click on cancel. a. If you want to continue, click on OK. 3. The credit card will be deleted. To exit and save the credit card set up, click on save, then Exit. Modifying Credit Cards You may want to change a credit card name without affecting your General Ledger or reports or change an In-House A/R Account connected to the credit card: 1. Highlight the credit card that you want to modify and simply type over the current name. 2. The credit card will be modified. Click on Save and then Exit to save the changes. X-Charge Setup You may specify where X-Charge data is to be stored in the configuration program. 1. 2. 3. 4. From the Main Modules menu highlight and click on “Configuration”. Click on ‘Credit Card Setup ‘. To notify the configuration that X-Charge is installed, Check the X-Charge is installed field. If X-Charge is installed, you will be prompted for the correct data path to store the data. You will also be shown the preferred data path by the program. 47 / 362 Printers This tab allows you to control WinSale's access to your local printers, when using Terminal Server. Printer Options Tab in Configuration Menu Don't Print in Landscape - enabling this option will prevent any of your reports to be printed in landscape. Don't Hide any Printers from This User - with this option enabled you can view and print to any printer on the Terminal Server. When you send some reports or any other document to print queque you may send it not only to printers that are physically connected to your computer, but to any printer from the Printers List. Accounts Receivable Setup For Winsale users utilizing the Accounts Receivable module, this portion of the configuration program is extremely important as it sets up the basis for your aging of accounts. 1. Aging Brackets (3 Digits Each). Enter the break down (or overdue days) for how you wish to age your A/R accounts. The standard breakdown is 30, 60, and 90 days, but you may use any combination that you like. These aging brackets will be the categories reported on in the A/R Aging Report. (See Section 19 Reports and Section Accounts Receivable for more information.) 48 / 362 2. Dunning Messages (60 Characters Each) These are messages that you write for each of the overdue periods. If these dunning messages are defined in the statement form definition, they will print each month on the statements based on the aging of the accounts. These messages may be overwritten when you print statements by typing in an “Override Dunning Message”. Besides these messages, there are also statement notes available to remind customers that they are behind in payment. (See Section Accounts Receivable for more information.) 3. Statement Form Number (1 Digit) There is one pre-defined form for statements in the program which has been designed to print on white paper. The program will provide the headings and you may use a dot matrix or laser printer. Of course, you may design your own statement (or have Magnum do it for you) or use any statement format that you have from other programs. (Please notify Magnum if you wish to use a format from another program.) 4. Default Service Charge You may set up a default service charge from this configuration screen. This default Service charge will be filled automatically in the customer profiles when adding a new customer. NOTE: In Winsale, forms may be designed or altered by the user. For more difficult forms Magnum Software will create the form for $85.00 per hour (subject to change). See Section 20 Form Definition for information on how to design forms. Miscellaneous Default Area/Zip Code The default area code and zip code information is used to speed up the entry of local customers. If you fill in this part of the configuration, these two codes will automatically be used when adding new customers, both from the Customer Screen and the Point of Sale module’s Quick Add screen. NOTE: If you use the nine digit zip code, you do not need to use a hyphen. Just type in all nine digits . Created with the Personal Edition of HelpNDoc: Easy CHM and documentation editor Inventory Inventory Setup This configuration option allows you to set up the way in which you are going to account for and sell inventory. 49 / 362 Pennies Precision This field is used to tell the system to what degree of accuracy you want the pennies displayed. The default for this value is 2 decimal places. You may choose to have the pennies displayed from 0 to 4 decimal places. For example, you can have $1.02 displayed as 1, 1.0, 1.02, 1.020, or 1.0200. This is useful for operations that sell items for less then one penny a piece. Auto Vendor Item Numbering You may elect to have the system automatically create a numerically sequential vendor item number when you add inventory. If you choose to do this, the program will place the next sequential number in the ‘Vendor Item Number’ field in the Inventory screen. When this option is turned on, a vendor item number will be inserted each time you create a new item and place it on a purchase order. This number 50 / 362 may be printed on the inventory hangtags and labels as a cross-reference. NOTE: This option does not assign sequential numbers by vendor. It uses one set of numbers and assigns the next available number to the inventory item. Ask Label Form Number This option allows for a prompt for the form number to use for the inventory labels and hangtags. There may be times when you need to print a different style hangtag or label. For example, you may want to use hangtags on hanging garments, stickers on packaged garments and butterfly stickers on jewelry. By turning this option on, there will be a prompt for label form number each time you try to print inventory labels. The prompt will be: ‘Current Label Form Number is __. Enter Form Number to use’ where the current form number is picked up from option 3 above. Limit Price Changes to My Store If you have a Remote Store Setup, enabling this option will limit any price changes only to your local store, without affecting any other stores. Quantity Precision This field is used to tell the system to what degree of accuracy you want quantities displayed. The default for this value is 0 decimal places. You may choose to have quantity displayed from 0 to 4 decimal places. For example, you can have a quantity of 1 displayed as 1, 1.0, 1.00, 1.000, or 1.0000. This is useful for stores that sell quantities less than a whole unit, such as fabric stores. Default Margin This will be the “mark up” that will be used to calculate resale prices. This mark up percentage will be automatically applied to all new inventory items, whether entered through the Inventory or Purchase Order module. You may overwrite this margin for individual inventory items by accessing the inventory record, changing the margin percentage and saving the change or by changing the resale price. See Section 4 Inventory for more information. TIP: If you do not want the system to automatically calculate the resale price based on cost you can set the default margin to 0. This means that, if the cost of an item changes, the resale price will not change. 51 / 362 Label Form Number This is the form definition used to define the layout of the hang tag or inventory label. There is one predefined form definition in the system, which is form number 12. When the configuration is saved for the first time, the software will look to see if there is a form number ‘12’ in the form definition file. If there is not, the software will create the default inventory label (hang tag). You can modify the default label or create a new one using a different number in the Form Definition utility. NOTE: In Winsale, forms may be designed or altered by the user. For more difficult forms, Magnum Software will create the form for $85.00 per hour (subject to change). See Section 20 Form Definition for information on how to design forms. Taxable Options This is a flag identifying the tax status of an item. Entry "Y" is for a taxable item or "N" if it is not. (See “D” and “L” below.) When you use these tax codes, the point of sale module will prompt you to back order goods that are not in stock. You may also choose "F" so that the point of sale module prompts you for the tax status and your cost for the item at the time of the sale. This is handy for miscellaneous items that you do not stock, but sell occasionally. (You would normally use an item number such as `NONSTOCK’ for such cases.) The codes “D” and “L” are also used for nonstock items or items that you will never back order. When they are used you will not be prompted to backorder items from the point of sale screen. When “D” (Department) is used the item will be taxed. When “L” (Labor) is used the item will not be taxed. In order to keep inventory entry simple, you will want to set up your most frequently used tax code as the default tax code for the field. This is done in the Configuration module under Inventory Set Up. (See Section 3.10 Point of Sale Module Options ) TIP: The “D” tax code is normally used when you are first starting with the program. By creating “Department” items, (see Item Numbers above), and using a “D” tax code, you will be able to start selling your existing stock, without entering each individual piece into the system, and you will not be prompted to back order merchandise. As you sell your existing stock under this system, you can enter your new inventory. NOTE: If a customer is tax exempt, his tax status overrides the `Y’ and “D” tax flags. For example, if an item is marked as taxable, but the customer is marked as non‑ taxable, tax will not be charged. 52 / 362 Special Retail Price Options You may set up special retail price options from the Inventory Setup. The Following options have been added: Keep As Figured By Cost & Margin Round Price Up to Next Dollar Round Price DOWN to Last Dollar Always End Price with (X) Add (X) to Price Subtract (X) From Price These options are looked at in the order shown above. With these options you may have the retail price automatically calculated to your preferences when adding inventory either through the main inventory screen or through the Market Matrix Purchase Order. Retail Calculation Type Use Margin Calculation Use Markup Calculation You need to specify a method that WinSale will use to calculate your resale prices. By default its set to use Margin Calculation. Costing Options There are three generally accepted accounting methods for reporting inventory value. A. Last in First Out (LIFO) LIFO uses only the most current cost for an item, as entered in the Purchase Order procedure. In other words, the only price that is used for valuing inventory is the cost that was used on the last purchase order. B. Average (Weighted Average) Average uses a weighted average of costs. In other words, the cost is dependent on what quantity is now in stock at the current cost and what quantity is in stock at the previous cost. C. First in First Out (FIFO) FIFO uses the very first cost that was put into the inventory record when the inventory item was first set up. This means that, when a purchase order is received, no matter what the current cost of the item is, the cost in inventory will not change. 53 / 362 Accounts Payable Setup This part of the configuration program sets up defaults for the Accounts Payable module. A. Check Form Number - This is the form definition used to define the check layout. There is one pre-defined form definition for checks in the system, which is form number 12. The checks that use this form definition may be purchased from Magnum Software. You can modify the check format or create a new one using a different number in the Form Definition utility. NOTE: Forms may be designed or altered by the user. For more difficult forms Magnum Software will create the form for $85.00 per hour (subject to change). See Form Definition for information on how to design forms. B. Default Checking Account Number – Because The Winsale can handle up to 9 separate checking accounts, you will need to set up a default account number. This checking account number will automatically appear when receiving purchase orders or adding through the Payables/Entry screen, but typing a new number into the Checking Account prompt may overwrite it. See Accounts Payable for more information. 54 / 362 C. Purchase Order Form Number - Form Definition used to define layout of purchase orders. Form number 8 is used by default. Call Magnum Software to create and setup your own form for Purchse orders. Remote Store If you have multiple stores and want them to communicate with each other, you will need to set up the remote sites in the Configuration program so that the system knows how and what files to transfer. TIP: You will see references to Multiple Store and Multiple Business companies throughout this section. Multiple Stores refers to one company with multiple locations. Multiple Business refers to multiple companies having separate databases. Adding a Remote Store When you enter the Remote Store Setup, a new menu-bar will be displayed on the left-hand side of the screen. This menu contains the list of stores that the Mother Store (or Warehouse) will call during each communication. (At the remote site locations, you will only have to set up the one local location.) There are also options for adding, deleting or editing store set-ups. See Section…28 for information on how to use these options. At the Mother Store location, you will enter the store setup for the first remote store to be called. TIP: At the Mother Store, you will create a set up for each remote location, but not for the Mother Store. At each Remote location, you will only create a set up for that location and no others. For Remote Site Locations, you will enter the setup information for the store you are physically at only. 55 / 362 Store Setup Type in the Store Name, Address, City, State and Zip Code If you are at the Mother Location, you will be entering information for the remote site stores. If you are at a Remote Site store, you will enter information for that store and no others. Remote Store Number - This is where you will set up the actual store number, not the calling sequence store number. Extraction Business Code This is the Business Code for the store that you are configuring. In other words, the Business Code, as defined in the Configuration Program under Business Code, will be the same as the Extraction Business Code. NOTE: The Mother Store and Remote Stores do not have to have the same business/extraction codes. Insert #1 Business Code This is the business code for the primary location (Mother Store/Warehouse) that will receive the data. This is typically the same as the Business Code. A. At the Mother Store, for a single business setup with multiple locations, this will be the same as the Extract Business Code. For some multiple business setups, with multiple locations, use the business code for the company receiving the data. (Call Magnum Software for more information 56 / 362 on setting up this type of configuration.) A. Remote site locations should always use their own business code as defined in the Configuration Program under ‘1 - Business Code’. B. Type in the two-character code 6. Insert #2 Business Code will be highlighted. This should only be filled in for multiple business companies. A. At the Mother Store (Warehouse) this is the secondary location receiving data. For example, if you are the warehouse location and you need to insert data into two different business databases, you will need to fill this field with the second business code. This is the only case when this field should be filled in. B. Remote site locations will never use this field. C. Type in the two-character code. Only Allow Transfers to Stores - To stop invalid store to store transfers from taking place an Option has been added to the remote store setup. In order to use the store to store transfer you must assign store numbers that are allowable to transfer to at each remote and mother location. Options 1. Xfer / Read A/P Information A. At the Mother Location this field is used to direct Winsale to send updated Accounts Payable information to the Remote Site Location(s). B. At the Remote Site this field directs the program’s extraction routine to build updated Accounts Payable information and tells winsale to transfer the information to the Mother Location. 2. Xfer / Read A/R Information A. At the Mother Location this field is used to direct PC Anywhere to send updated Accounts Receivable information to the Remote Site Location(s). B. At the Remote Site this field directs the program’s extraction routine to build updated Accounts Receivable information and tells PC Anywhere to transfer the information to the Mother Location. 3. Call this Store With this option you may choose whether or not to call a specific store from the warehouse location. It has no impact at the Remote Site Location and, therefore, does not need to be filled in at the remote site. 4. Xfer / Read Other Stores Inventory This option is used at the Mother Location to inform the system to send all other remote stores’ current inventory to the store that you are setting up. In other words, if you set Store 1 to YES for ‘Xfer/Read Others’, they will be able to view Store 2 and 3 inventory. See Section 4 Inventory for more information. 57 / 362 NOTE: A Remote Site cannot sell inventory from another remote site, even though they may be set up to view the other store’s inventory. A. At the Mother Location, if you want to send this store (the one that you are setting up) the other store’s entire current inventory, then set this field to YES. B. At the Remote Site, if you want to insert other stores’ inventory, set this option to YES. 5. Mother Location This information is very important for remote communications because it identifies the Mother Location (Warehouse). The Mother Location is the main inventory control hub, so it needs additional inventory control options. At the Mother Location, the inventory module will automatically perform transfers to other locations when the inventory record for the other location is changed and saved. No quantities are transferred when this is done, but all of the other inventory information is. This allows the Mother Store to change a Price or Description, etc. for an outlying store’s inventory item. When the change is saved, the information will be automatically updated to the outlying store. (You may also make inventory record changes using the Auto Inventory Update. See Section 13 Utilities for more information.) If a transfer is initiated from the Mother Location and the receiving store does not already have this item in inventory, an inventory record will be automatically created at the receiving store. If the transfer is not initiated at the Mother Location and the receiving store does not have the item in inventory, an inventory record will not be created. The item will still be “transferred” but the receiving store will not show it in inventory. A. At the Mother Location: 1. Every remote store that you set up should say YES for the Mother Location option. B. At the Remote Site: 1. The remote store should always say NO for the Mother Location option. 6. Use Accelerated Access for Insert This option can greatly increase the speed of the insertion process during communications. It should be used with extreme caution, however. When this option is set to YES, Btrieve files are opened. This WILL lead to data loss if the computer loses power or is rebooted during the actual insertion process. This option should only be set to YES when a great speed increase is absolutely necessary. 7. Move Selling Prices on Transfer There may be situations when you have the same item at more than one remote location but the locations are not selling the item for the same price. In this situation, you would not want to change the selling price at the remote locations, so you would not want to move selling prices when you transferred additional items. 58 / 362 This option works both as an ‘extraction’ guideline at the sending store and an ‘inserting’ guideline at the receiving store. Therefore, if the sending store is set to ‘move selling prices..’ but the receiving store is not set to ‘move selling prices..’, the prices will not be inserted at the receiving store. In order for prices to be transferred, both the sending and receiving stores must be set to ‘move selling prices..’ NOTE: Prices are always sent for new inventory. When the transfer process does not find an inventory item in the receiving store’s inventory, it automatically transfers and inserts the selling price along with the rest of the inventory record. 8. Adjust Cost on Insert and Average on Transfer - With this option you may set up each store as to whether it gets Cots and Resale Prices transferred as well as quantities. This is handy when all stores will sell everything at the same prices as all other stores. This must be set up at each store and especially the Mother Store Location. This option may be turned on and off separately for each store in the calling chain. Currency For businesses outside United States of America, that accept multiple currencies, this tab will help you setup your in-store currency exchange rate and using a link to Yahoo! Finance allows you to look up current exchange rates. 59 / 362 General Ledger Setup General ledger setup is limited to specifying only the Month, on which your fiscal year starts. For the most part, General Ledger is pre-setup for you. For any questions on customizing or setting up G/L, call Magnum Software: 843-757-5097 60 / 362 Folders This portion of setup should stay intact and should not be changed from default settings, otherwise WinSale might not operate properly or data might be lost! Folders Tab is used by Magnum Software Support Team to identify any problems during installation or setup, or if your data path suddenly becomes unresponsive and wont accept any changes. 61 / 362 Point Of Sale Module Options This menu allows for a number of options relating to the Point of Sale module’s parameters. IT can be found by accessing Point Of Sale Screen, then Tools - POS Options. 62 / 362 Configuration Menu for Point of Sale Options Always Prompt for Quantity Since a store usually sells only one of the same items at a time, this feature allows you to skip the quantity prompt at point of sale and assume a quantity of 1. (Even if you skip the quantity column, you may press the Esc key to go back to the Quantity column and change the quantity to a number other than 1. See Section Point of Sale Module) Repeat Last Salesman If your store has one salesperson per check-out or only one salesperson ringing up sales at a time, you can set the software to default to the last salesperson that rang up a transaction. In other words, if salesperson number ‘2’ was the last person to ring up a sale then, when it’s time to ring up the next sale, the salesperson number will come up automatically as ‘2'. (You can easily change this salesperson number at point of sale by pressing ESC to get to the ‘SM’ column and typing over the salesperson number. (See Section Point of Sale Module) Current Store Number Enter the applicable store number (the store number where the point of sale workstation is). 63 / 362 1. Since WinSale allows you to operate many store locations under one business setup, enter the current store number for which you will be processing data. If you are using one location, leave this at ‘0’ (zero). Multiple Stores There will never be a need for you to change the current store number. If you are set up as a multi-store company, there will be prompts throughout the program for all of the purchase orders, inventory and reports. See Section Remote Store Utilities for more information. To change the current store number (at a remote site): \ 2. Double click in ‘Current Store Number’ and type in the store number. Sales Ticket Form Number This is the sales number that will be used throughout the point of sale module. There are several predefined forms already built into the program. If you alter any of the pre-defined forms, use the new form number from the Form Definition program at this prompt. NOTE: In WinSale, forms may be designed or altered by the user. For more difficult forms, Magnum Software will create the form for $85.00 per hour (subject to change). See Section 20 Form Definition for information on how to design forms. Configuration menu for Point of Sale options Sales Order Form Number NOTE: In WinSale forms may be designed or altered by the user. For more difficult forms, Magnum Software will create the form for $85.00 per hour (subject to change). See Section 20 Form Definition for information on how to design forms. This is the sales order form number that will be used throughout the point of sale module. This form is usually the same one that is used for invoices. There are several pre-defined forms already built into the program. If you alter any of the pre-defined forms, use the new form number from the Form Definition program at this prompt. 64 / 362 Purchase Order Form Number This is the purchase order form number that will be used to print PO’s. There are two pre-defined forms already built into the program: 1. NEBS Form U9040 - This form option will use the same ‘INVOICE’ form that you use for sales receipts. You should only use this option for non-matrix purchase orders on a dot matrix printer. 2. White Paper - This form can be used with both non-matrix and matrix purchase orders, on a dot matrix printer or a laser printer. The program will provide all headings for this form. 3. User Defined Type - You may define a form definition, (or have Magnum Software design it), for any purchase order form that you have used with other software programs. NOTE: Forms may be designed or altered by the user. For more difficult forms, Magnum Software will create the form for $85.00 per hour (subject to change). See Section 20 Form Definition for information on how to design forms. Ask Form Number This option allows for a prompt at point of sale that asks for the form number to use for the sales receipt. There may be times when you need to print a different style sales receipt. For example, you may want to use a full size sales receipt for sales over $100.00 and a register tape style sales receipt for low cost items. (This feature may also be turned on and off from the Tools Menu in the Point of Sale module. See Section Point of Sale Module) In most cases you will want this option set to NO to avoid confusion at point of sale. Skip Register Menu If this option is enabled, the program will skip the ‘Register’ menu between transactions and remain in the Quick Sale screen. The majority of the transactions processed in point of sale will be sales transactions, so skipping the menu saves a step for your salespeople. Ask PO Number This option allows you to use an out of sequence purchase order number by asking for a PO number each time a purchase order is created. This is a practice that you should avoid! In most cases you should allow the system to assign purchase order numbers in order. Otherwise, you may end up “crossing” PO’s and having incorrect history. 65 / 362 Always/Never Ask Ship Mode, Etc. These two options determine whether or not you will be asked for a PO number and Ship Mode when completing a sale at point of sale. (These prompts appear after you have chosen a tender type(s) and amount(s). See Section 15 Point of Sale Module for more information on the prompts.) There are three set up combinations for these prompts: 1. Always Ask… NO (Default Setting) Never Ask… NO (Default Setting) Ask Check No. at Tender This option enables check number that you enter to automatically print on the receipt and stores it in your history for easy lookup and access. \ Ask Gift Certificate No. at Tender If you turn this option on and your salespeople choose the ‘E = Gift Certificate’ tender option at point of sale, they will be prompted to enter a gift certificate number. The program will check this number against it’s file of open gift certificates to determine if this tender option can be accepted. (See Section Point of Sale Module for more information.) If this option is turned off, any gift certificate will be accepted and there will not be a prompt for a gift certificate number. Allow Split Salesman Sales If you offer your salespeople commission for total sales, you should not allow salespeople to split sales in order to insure the integrity of sales records. (See Section Point of Sale Module and Section Salesperson Definition for more information.) Print Options This is the default device that will be used to print sales tickets, sales orders, quotations, etc. from the point of sale module. This option only applies to the point of sale module. (You will be prompted for a print to device from every other section of the program.) The default setting for this option is ‘Ask User Printer at POS’. You may also specify the number of copies you want to print, after you select the 66 / 362 appropriate printer. Default Tender Type This option allows you to set up a default tender type for point of sale. Whenever you are press F9 to end a transaction and go to the tender screen, the default tender type code will be at the ‘Code:’ prompt so that you only have to press ENTER, (instead of typing the code and then pressing ENTER). You should use whichever tender type you receive most often for this option. Discount Key Assignments The Point of Sale discount keys may be customized for each individual company’s preferences. They are store specific even when you have multiple stores. You can freely change these discount key assignments with the POS Options dialog under the Tools menu found on the Point of Sale screen. 67 / 362 4 Inventory Overview Accurate control and safeguarding of inventory are crucial ingredients of a successful, well-organized store. Inventory movement and valuation are the primary focus of inventory management systems, which use this information to provide company management with timely and accurate financial information. Likewise, Winsale’s goal is to provide timely and accurate information pertaining to the receipt of goods, the movement of goods (within or between locations), the sale, removal, or other disposition of goods, and the precise valuation and status of goods remaining in inventory at any given point in time. F10 F9 F2 F3 F4 Ctrl+T Ctrl+ M Ctrl +L Ctrl +H F8 F7 Alt+ F11 Bksp This document makes reference to the above functions. It defines the functions by the hotkey that initializes the function instead of the icon name. Inventory Management Features Matrix Capability -- You may work with a grouping of related inventory items as a whole unit on one screen. You can view all of the different sizes, colors, and widths of a style simultaneously and have the ability to manipulate, order, or delete all of the SKUs as if they were a single entity. Product Lines - You may group inventory with similar characteristics for accounting and reporting. Price/Cost Decimal Precision - Price and cost entries may use from zero to four decimal places. Quantity Decimal Precision - Quantity entries may use from zero to four decimal places. User-Defined Sort Fields - Reports may be sorted by seven user-defined classifications. (For example, Department, Vendor, Style, Size, Color, Date, etc.) Item Pricing -- Detailed price schedules based upon customer price levels and quantity sold may be created for each item. Prices may be calculated as a discount of the standard price or a markup of the 68 / 362 standard cost, and may be automatically accessed by WINSALE Point of Sale module. Costing Methods -- The software provides for average cost, LIFO, and FIFO methods of inventory valuation. Vendor Identification -- You may identify the primary purchasing source of each item as well as supplying the vendor’s item number using up to 15 characters. Reordering -- You are alerted when the stock on hand reaches a specified reorder point. You may reorder items from a central location for all locations based upon stock levels or you may reorder stock separately from each location. Item Stock Inquiry -- This on-line feature lets you display on-hand quantity and quantities on order or on layaway for an item. Detailed Sales History -- You may print a detailed sales history for items by location and customer for any prior period. Inventory Inquiry -- This feature allows you to quickly review or change information for a specific inventory item. A search feature may be used to pull up the desired item using the Item Description, Item Number, Size, Color, Style, Vendor, and/or Department classifications. This search mode may be used from the Inventory screen or from the Point of Sale screen. Automatic Inventory Modification -- You may change the Cost, Retail Price, Sales Price, Department, Vendor, etc., of a large group of items automatically. You may change the cost by a percentage of the current cost or a flat dollar amount. Sales Promotions -- Special sale prices may be automatically calculated using many different methods. Physical Count -- You may physically count your inventory without interrupting the normal sales entry process. Worksheets are available through the program that aid in the physical count process and speed up data entry. After you have input your new inventory quantities, a variance report provides data that highlights differences between the new physical count and the existing inventory records. You may also use scanners and portable equipment to aid in the process of physical inventories. Item Notes -- You may attach a 100 line note to any item in inventory. These notes may be anything that you wish to remember about the item. Typically notes are used for educating sales clerks about merchandise. For example, you could notify clerks to sell a related item in conjunction with the item that they are selling. Notes could also be used to show a possible substitute item. Auditing -- Winsale can use a very powerful ability to audit the unique fields displayed on the inventory screen. It uses the history of the item that is maintained automatically to verify the correct field values like quantity on hand, quantity on order, last PO Number, Last Date Sold, and many more. This ability is available throughout the program to ensure that your inventory counts are always accurate. 69 / 362 Inventory Screen How to Add Inventory There are two ways to add inventory to the system -- direct entry into the inventory system or the creation of purchase orders. This section will guide you through adding inventory directly into the inventory system without the aid of purchase orders. See Section 18 Purchase Orders for information on creating and filling purchase orders. To access Inventory, highlight Inventory on the Module Menu and press ENTER. You will be greeted with a large collection of fields. Don’t worry--you will not have to fill them all! However, by filling these fields as completely as possible, you will reap greater benefits later because Winsale reports on sales by many of these inventory fields. There are two types of inventory that you will be entering--unique items (SKUs) and related items (one style number/different SKUs). Related items are easier to work with in a Matrix Table. For example, you will have clothing of the same style, but with unique color and size combinations. The matrix table will allow you to enter view and modify all of the size and color combinations of a style at one time instead of item by item. See Section 5 Matrix Inventory for information on how to use matrix tables. 70 / 362 Adding Inventory without the Matrix We will start by entering inventory that does not require a matrix. When you enter the Inventory screen, notice the function key assignments across the bottom of the screen. 1. Press the F2 (ADD) function key. The cursor will appear in the Item Number field at the top of the screen. 2. Type an item number, then press ENTER. (For more information on Item Numbers, see Section 4.7 Inventory Fields Defined.) The cursor will appear in the next field that you need to fill in. 3. Continue to fill in information until you have filled every field that you wish to track. When you are finished filling information, press the F9 (SAVE) key. A blank inventory record will appear with the cursor in the Item Number field. You may continue to add inventory, always pressing the F9 (SAVE) key to save each completed record. 4. If you do not want to add additional inventory or if you do not want to save an inventory entry , press the F2 (NO ADD) key. The function key assignments at the bottom of the screen will change and you can press F10 (EXIT) to go back to the Module Menu. TIP: Nothing will be saved unless the F9 (SAVE) key is pressed when you are finished entering information for an item. See Section Inventory Fields Defined, for a definition of each of the inventory record fields and some suggestions for assigning Inventory Numbers to your inventory items. NOTE: Remote Store Information: If the mother store presses F9 SAVE on their own item, it is written in the transfer file as a replacement transfer. However, it is not written to the transfer log file. This is done so that any quantity adjustments made from the record itself are automatically transferred to outlying stores. Clone The ‘Clone’ function allows you to copy a record of your choice that contains information similar to an item that you are currently viewing. Using the Clone function will save you a lot of key strokes entering duplicate fields in inventory. 1. When viewing an existing inventory item you clone the existing item by pressing the F11 (Clone) key. 2. All the fields will remain on the screen for you to edit as desired. The exception is the Item Number field. You must assiagn a new and unique Item Number to the new item just cloned from an existing item. 3. When you are finished editing the record, press F9 (SAVE) to save the new item. 71 / 362 How to Search (F4) 1. From the main Inventory screen press the F4 (SEARCH) key. 2. A window will appear prompting you for the item number to search for. You may type the whole item number or just the first few characters, then press ENTER. 3. The window will disappear and the item number closest to the one that you typed in will be displayed on the Inventory screen. (If you are a multiple store company, the Inventory record for the current store will be pulled up first.) You will also notice that the Vendor Name and Department Name are displayed at the bottom of the screen for easy reference. Searching with the Inventory Look Up Table Inventory Look Up Table In addition to searching for inventory by item number you may also use the Inventory Look Up Table. See Section 6 Inventory Table for more information about the Inventory Look Up Table. 1. To access the inventory table, press the F4 (SEARCH) key 2 times in succession from the Inventory screen or click on them icon on the top of the screen labeled ‘Table’. The Inventory Look Up Table will appear. (See screen above) 2. Select the search mode that you want to use by pressing the appropriate function key. For example, if you know the style number that you are searching for, press the F6-Style function 72 / 362 key. 3. The cursor will move to the Style Box on the Look Up Table. Type in the Style Number that you are searching for and press ENTER. The system will display all of the inventory items with this style number. a. You can also check to only display on – hand quantities, by putting a checkmark on the bottom of the screen. 4. If you want to narrow your search, you can choose a second, third, fourth, etc. criteria to “zoom in” on the item you want. 5. Highlight the correct item, (using the arrow keys), and press the ENTER key. The item selected will be brought into the main inventory screen. You will also see the vendor and department name across the bottom of the screen for easy reference. Multiple Stores: If you are a multiple store company and have chosen to “Show For All Stores”, you can view another store’s inventory. NOTE: When searching for an item with the F4 FIND key in inventory, the current store number is pulled up first. You may of course use the F5 PREVIOUS and F6 NEXT key to pull up other stores inventory. How to Modify Inventory Records When an inventory record is on the screen, the system is automatically in the Modify Mode. You can make changes to any field in the record or delete the item. 1. When the cursor is in the field that you wish to modify, type over or add to the information in the field. 2. When the information in the field appears as you want it, press the ENTER key. If you want to save your changes, you must also press the F9 (SAVE) key after pressing ENTER. 3. After saving the item, you may use the F6 (NEXT) key to go directly to the next inventory record. It is not necessary to “go back to square one” by using F4 to search for the next record TIP: If you wish to cancel any changes you have made and you have not pressed the F9 (SAVE) key, press the F2 (NEW) key. This restores the original inventory record and will not save any changes. Multiple Stores: In multiple store companies, at the Mother store location, if the record being modified and saved is not the current store’s (Mother store’s) record, then the saved record is also entered as an automatic transfer to the store that the item belongs to. This only takes place at the Mother store location. For example, if you are at the Mother store and you change an inventory record for Store 1, that change will automatically transfer to Store 1. The actual quantity that will be transferred is zero, however, any price changes or description changes, etc. will be sent to Store 1. See Section Remote Store for information on setting up a store as the Mother Store Location. 73 / 362 Getting Around - Previous and Next Keys The F5 (PREVIOUS) and F6 (NEXT) keys allow movement to the Previous and Next inventory records. This forward and backward movement is based on the access path that you are using to search, which is usually the Item Number field. For example, if you used ‘3M’ in a search by Item Number you might bring up ‘3MAFF’. Press the NEXT key once and you might get ‘3MAFF-1’. You can also search for items via the Description, Vendor, Department, Size, Color, or Style fields. To search in a field other than the Item Number field, select that access path from the Inventory Look Up Table and pull the item into the Inventory module using the ENTER key. For example, if you go to the Look Up Table and search by style, then select an item to pull into the Inventory screen, the F5 and F6 keys will show you the previous and next items by style instead of item number. Deleting Inventory from Active Inventory Once you have brought up an item on the Inventory screen, you may delete it from Active Inventory and place it into the Archive Inventory File, where it is saved for historical purposes. You should always archive any item with any HISTORY PRESENT! If you don’t’ sales or purchase order history will no longer be accurate because the type data i.e., Department number, vendor number, etcetera will not be known for reporting. To Archive: 1. Press the F3 (DELETE) key. 2. Choose Archive from the screen shown above and press OK WARNING: You will not be able to retrieve a permanently deleted item or its history! 74 / 362 Un-Deleting Inventory from the Archive Inventory File When you delete an item from the Active Inventory File, it is placed into the Archive Inventory File. If you later decide that you did not want to delete the item from Active Inventory: 1. Go to the Inventory screen and press the F8 (Archive) key to work with Archived Inventory. 2. The caption will change to Archive Inventory. 3. Find the item that you want to ‘un-delete’ using the F4 (Search) key or the Look Up Table. Pull 4. 5. 6. 7. the item into the Inventory screen. With the item displayed in the Inventory screen, use the F3 (Delete) key to delete it from the Archive File. A window will appear asking if you want to Un-Archive the item. Once deleted from the Archived Inventory file, the item will automatically return to the Active Inventory File. Use the F8 (Archive) key to return to the Active Inventory File. Inventory Fields Defined In the following discussions the abbreviation “A/N” means “alphanumeric.” Note: You may right-click and choose ‘Customize current Screen’ to change the names of fields in order to customize the Inventory screen for your particular type of store. When a change is required, most users elect to change the Size, Color or Style fields since these fields are already programmed as a method of sorting and tracking sales and inventory. Item Number (15 A/N) -- The Item Number is a unique code that is user definable. This code represents an Inventory item, or SKU. If the Matrix Inventory (See Section Matrix Inventory) is used to enter inventory, the Item Number will be automatically generated based on Style, Color and Size. (If the Style is ‘1102’ and the Color is ‘RED’ and the size is ‘8’, the Item Number is ‘1102RED8’.) If the matrix method is not used, there are two suggested methods of creating item numbers: 1. 2. Prefix the item number with the primary vendor’s number. As an illustration, if the primary vendor’s number is `00000026’ and the vendor’s item number is AFF then use 26‑ AFF as the item number. Place an abbreviated version of the primary vendor’s name in front of the item code. As an illustration, if the primary vendor’s name is `3M Products’ and the vendor’s item number is AFF then use 3MAFF as the item number. These two methods will eliminate the problem of duplicate style numbers between vendors and make the best use of Winsale’s searching capabilities. The Item Number is stored internally in a character base, not a numeric base. This does not mean that you cannot have numbers in your Item Number--you certainly may. However, a character base is sorted differently than a numeric base. For example, in a report that lists Item Numbers, you would probably expect them to be listed as follows: IN‑ 1 IN‑ 2 75 / 362 IN‑ 10 IN‑ 11 IN‑ 20 IN‑ 21 However, the Record Manager, using a character base, will list them in the following manner: IN‑ 1 IN‑ 10 IN‑ 11 IN‑ 2 IN‑ 20 IN‑ 21 Therefore, if you want your Item Numbers to be listed numerically, you should precede a single digit number with a zero. For example, the preceding list should be numbered as follows: IN‑ IN‑ IN‑ IN‑ IN‑ IN‑ 01 02 10 11 20 21 Store Number (3 digits) -- Since Winsale can accommodate many stores at once, a number of up to three digits is assigned to each store. If you have a single store, your store number will be 0, which is the default store number. Multiple Stores: TIP: There are some special Item Numbers that you may want to set up. In order to create comments on a sales ticket, such as an alternate shipping address for a customer or a special note, you can enter an item into Inventory with the Item Number ‘COMMENT’. In Inventory, press F2 to add an item, type in COMMENT as the Item Number and press ENTER. Leave all other fields blank and press F9 to save the information. In the Quick Sale screen, type COMMENT in the Item Number field. The system will recognize this signal and allow you to place a custom message in the Description column. There will not be any quantity or pricing attached to this comment. ALTERATIONS - For ringing alterations charges into a quick sale, add an item to inventory with an item number ‘ALTERATIONS’. (Use the F2 Add function from the Inventory screen.) For description, type in ALTERATIONS. Leave your Cost and Resale Price as $0. Go to the Department field and type in the number for the Alterations department. Press ENTER and then F9 to save the item. In the Quick Sale screen, type ALTERATIONS in the Item Number field. When the price comes up as $0, 76 / 362 overtype in the correct price for the alterations. If you are just starting on the system and don’t want to input all of your inventory into the system at once, you may set up Item Numbers that correspond to your Department Numbers. These items should be set up as above for alterations, using the Department Number for the Item Number, the Department Name for the Description, a Cost and resale Price of $0 and the actual Department Number for the Department Number. In the Quick Sale screen, when you are selling an item that has not been entered into Inventory yet, you can type the item’s Department Number into the Item Number field and overtype the correct price. This store numbering system lets multiple stores determine the availability of stock at another location, since the store number is attached to every inventory item. (A store cannot sell another store’s inventory, however. See Section 28 Remote Store Utilities for more information.) TIP: It is recommended that you sequentially number your stores starting with zero. This is because some report functions begin by determining the highest store number found in inventory and then progressively work through a loop starting at zero until this high store number is reached. If you skip store numbers you will slow down these reporting functions needlessly. Description (40 A/N) -- Descriptions are user definable and should be developed to help you easily identify inventory items. They can be up to 40 characters but are split into two portions—Description 1 and Description 2. The Look Up tables only utilize the first 20 characters from Description 1. For forms within the system, you may use all 40 characters of the description by adding both Description 1 and Description 2, (each 20 characters long), to the Form Definition. See Section Form Definition for more information. Most system users only print Description 1 on their sales tickets in order to conserve space. If you choose this type of Form Definition, you will want to include your most important description information in the first 20 characters, which will also help you with the Look Up tables. TIP: Descriptions can be very useful for inventory look up. In order to make this system more efficient, you may want to begin your descriptions with a key word, such as SKIRTS This will allow you to easily look up your skirt inventory by description or identify pieces of a vendor group more easily. Quantity on Hand (10 Digits) -- This field contains the current stock level for an item. The first set of brackets contains the actual number of items which are available for sale. The second set of brackets contains the Allocated Inventory. (See Allocated Inventory below.) Both of these quantities are updated as sales, layaways and sales orders occur and as purchase orders are received. These quantities may be overwritten by using the Inventory Variance or by simply typing over the quantity in the field. TIP: You should password protect the ability to change Inventory quantities once you are up and running on the system! See Section Passwords for more detail. Allocated Inventory (10 Digits) -- This is the quantity of the item that is currently on Layaway or Sales Order and is not considered to be in stock for reselling purposes. Whenever a Layaway or a Sales Order is generated, the software will automatically move a quantity from the On Hand field and place it in the Allocated Quantity field. (The total of these two fields is the actual physical level of inventory.) Normally you will not have to directly enter or change the entry in this field. Tax (1 Char) -- This is a flag identifying the tax status of an item. Enter `Y’ if it is a taxable item or `N’ if it 77 / 362 is not. (See “D” and “L” below.) When you use these tax codes, the point of sale module will prompt you to back order goods that are not in stock. You may also enter `F’ so that the point of sale module prompts you for the tax status and your cost for the item at the time of the sale. This is handy for miscellaneous items that you do not stock, but sell occasionally. (You would normally use an item number such as `NONSTOCK’ for such cases.) The codes “D” and “L” are also used for nonstock items or items that you will never back order. When they are used you will not be prompted to backorder items from the point of sale screen. When “D” (Department) is used the item will be taxed. When “L” (Labor) is used the item will not be taxed. In order to keep inventory entry simple, you will want to set up your most frequently used tax code as the default tax code for the field. This is done in the Configuration module under Inventory Set Up. (See Section 3.10 Point of Sale Module Options ) TIP: The “D” tax code is normally used when you are first starting with the program. By creating “Department” items, (see Item Numbers above), and using a “D” tax code, you will be able to start selling your existing stock, without entering each individual piece into the system, and you will not be prompted to back order merchandise. As you sell your existing stock under this system, you can enter your new inventory. NOTE: If a customer is tax exempt, his tax status overrides the `Y’ and “D” tax flags. For example, if an item is marked as taxable, but the customer is marked as non‑ taxable, tax will not be charged. Last Cost (10 digits) -- This field is automatically updated by the Purchase Order module and contains the cost of the item when it was purchased the time before last. This cost is used in the average costing method for inventory. Current Cost (10 Digits) -- This is the cost of the item when it was last purchased. It is automatically updated by the Purchase Order module when the item is received, or you may enter the cost as you input inventory directly into the system. The costing method that you choose when configuring the software will determine how this field is updated by the purchase order module. See Section Inventory Setup for more information. TIP: You may also print a Cost Code on your hangtags for an easy reference for your salespeople. See Section 20.6 Cost Code Definition for more information. Margin/Mark-Up (5 Digits) -- This percentage is used to mark up Current Cost to the Resale Price. There are two mark-up calculation methods included in Winsale. The default method is called ‘MARGIN’. If you use a 50% mark-up, enter 50 in this field. (You may also use fractional percentages.) The MARGIN formula uses a Mark‑ Up based on Retail Price as follows: For example, if you have an item that has a retail value of $11.70 and it cost you $5.85, then the Mark‑ Up percentage would be 50%. 78 / 362 The other mark-up calculation method is called ‘MARK-UP’ and is calculated as a percentage of Cost: For example, if you have an item that costs $5.85 and you need $5.85 for a Mark-Up, then the Mark‑ Up percentage would be 100%. To choose the mark-up formula that you want to use, go to the Inventory Setup Menu in the Configuration Module. You will also want to set up a default Margin/Markup for your most frequently used percentage. See Section Inventory Setup. Setting Resale Price “Manually” -- Many stores base their selling price on a “gut” feeling of what the market will pay. In other words, they do not use a keystone (50%) mark-up or a constant mark-up. You may inform the Inventory system not to automatically calculate the selling price by using a 0% Margin. If you enter a 0 in the Margin field, the Inventory module will not automatically calculate the selling price or change the selling price. This is extremely handy when the cost changes but you do not want the cost change to affect your selling price. TIP: Even though you set a margin of 0% for an item, all sales reports will still accurately report on the actual margin of the sales. This field plays no part in reporting of sales. Resale Price (10 Digits) -- This is the price for which you will sell the item unless you set up a sale price. (See Sale Price below.) The Resale price is displayed on the inventory tags and by the Point of Sale module when making sales. In the Inventory screen, if a percentage is entered in the Margin field, the Resale Price will be automatically calculated. If you manually change the Resale price, the Margin will be automatically recalculated. The Resale Price will not change, however, if the Margin changes by less than one dollar. If the change is more than one dollar, the Resale Price will automatically change. TIP: Because the Margin/Markup percentage will sometimes produce Resale Prices with “cents”, you may want to use the Retail Price Table to set up standardized Resale Prices. Whatever you set up as your “standard” price will automatically appear as you add inventory or create purchase orders. NOTE: When adding NEW items into inventory the resale price is automatically calculated based upon the Margin/Markup inputted over and above the Current Cost Price. If the Current Cost gets updated after the item is created Winsale won’t update the Resale Price based on the Margin/Markup Calculation. In other words, the Resale Price will only get calculated when creating NEW items either in inventory or when creating new items with a Purchase Order. List Price (10 Digits) -- This is the manufacturer’s suggested price. This field is for informational purposes only and plays no part in determining the selling price of an item. However, you can print this 79 / 362 price on the hang tag if the Resale Price is lower than the List Price. This is used to show your customers that you are charging a lower price than suggested by the manufacturer. 10 Sale Price (12 digits) -- If you wish to place an item on sale, enter the Sale Price here. If this field is filled in and the ‘On Sale Until’ field is blank or greater than today’s date, the Point of Sale module will use the Sale Price in place of the Resale Price. The Sale Price can be changed manually in the Inventory module, (by typing over any existing sale price), or from the Auto Inventory Update Function under the Utilities Menu. (See Section Automatic Inventory Update) On Sale Until (Date) -- This is the date on which a sale price expires for an item. If there is a Sale Price defined for the item and the On Sale Until date is greater than today’s date, WINSALE will use the Sale Price instead of the Resale Price. If the On Sale Until date is the same as today’s date, the system will use the Resale Price, not the Sale Price. This field is prompted for when using the Automatic Inventory Update program to mark down items. (See Section Automatic Inventory Update) Last Mark Down (Date) -- This is the date of the last mark down for the item. If you are performing your mark downs directly in the Inventory module, you will need to enter this date manually when you specify a Sale Price. If you use the Automatic Inventory Update to take your mark downs, the Last Mark Down Date will be automatically posted to the Inventory record. (See Section 13.1 Automatic Inventory Update) This date will appear on the Stock Status Report to help you determine your next mark down. Reorder Point (10 Digits) - This number is the on hand quantity point at which you want to reorder inventory. When your stock quantity reaches or falls below this level, which is set by you, it is time to reorder. You may generate a reorder report at any time based on this information. Use the Reorder Notification Listing under the ‘Inventory’ heading in the Reports module. (See Section Inventory Reports) You may also use the Matrix table to set up Reorder Points by style. Reorder Amount (10 Digits) - This is the quantity to reorder when the Reorder Point is reached. This number is set by you and will appear on the Reorder Notification Listing report. You may also use the Matrix table to set up Reorder Quantities by style. TIP: The two fields above may be used to create an ‘Model Stock Inventories’ which can be used to automatically create purchase orders through the Matrix Inventory system. (See Section Matrix Inventory) Quantity on Order (10 Digits) -- This is the current quantity on order for the item. The Purchase Order module automatically updates this field whenever the item is ordered. Normally you will not have to directly enter or change the entry in this field. Vendor Item Number (15 A/N) -- The Vendor’s Item Number will allow you to cross-reference your inventory. As you enter this field, the system will default to the number that appears in the Item Number field, but you will gain more benefits if you use the actual vendor’s style number here. For example: 1. You could use the vendor’s style number or your store’s item number for non-matrix Purchase Orders and still reference the same inventory record. 2. When selling an item, you could use the vendor style number if the hangtag with the store item number is lost. When you type a vendor style number into the Quick Sale screen, the program will display a look up table 80 / 362 of items which all contain the vendor’s style number. You can choose the item that you want to sell. You may also set up the Matrix Purchase Order system to automatically create a sequential number for this field when creating new items. The starting sequential item number is defined inside the Configuration Program. (See Section Inventory Configuration) Vendor Account Number (8 Digits) -- The Vendor’s Account Number is entered as defined in the Vendor Profile. By typing in the first few letters of the Vendor Name, you will access an alphabetical listing of vendors, from which you can highlight the vendor that you want and automatically pull the correct number into this field. After you enter the Vendor Account Number, the Vendor Name will appear at the bottom of the Inventory Screen for reference. TIP: Use this field for your primary vendor for the item. You will still be able to order this item from another vendor if you choose to do so. Last PO Number (8 Digits) -- This field will give you the Purchase Order Number under which this item was last ordered. The Purchase Order module will automatically update this field when a new Purchase Order is created and will over-write the PO number currently stored in this field. Label Qty (1 digit, A,1,0) -- The information in this field controls the number of labels printed when you are using the Inventory Screen and Inventory Reports to print labels. Using ‘A’ tells the system to print labels for the total quantity on hand or the total quantity received from the purchase order label routines. ‘1’ tells the label printing feature to print just one label regardless of the quantity recorded in any other part of the system, while ‘0’ (zero) prevents label printing from all areas of the program. ‘Open’ Field (1 digit) -- This field may represent anything that you want it to. For example, some stores use this field as a notifier that an item is re-orderable. The information in this field can be printed on hang tags. Total Received PO’s (10 Digits) -- This field captures a running total for all inventory received of an item since day one. This information is printed out on the Inventory Value By... Report. See Section 19.2 Inventory Reports. MTD Quantity Sold (10 Digits) -- The Month‑ To‑ Date Quantity Sold is updated every time you sell an item. The Monthly Close-Out procedure resets this counter to zero. YTD Quantity Sold (10 Digits) -- The Year-To-Date Quantity Sold is updated every time you sell an item. The Yearly Close-Out procedure will reset this counter to zero. Department (4 Digits) -- This number represents the Department and Classification category for the item. This field is extremely useful for analyzing your sales by Inventory Department and for planning Open to Buy. To fill this field, you may: 1. Type in the department number if you already know it. 2. Type in the first few letters of the department name. You will be taken to the Department Look Up Table, where you can highlight the department that you want to use and press ENTER. As you enter the Department number in this field, the Department Name will appear at the bottom of the 81 / 362 Inventory Screen for easy reference. A Department Listing of currently defined departments is also available from the Reports Module under ‘Miscellaneous Reports’ For some models of Departments and Classifications for different types of stores, see the appendix of this manual and Section 30 Open to Buy. Also see Section Periodic Hot Seller for more information on reporting by Department and Section 30 Open to Buy. Date Code (6 A/N) -- The Purchase Order system will automatically place a Date Code in this field when the item is received, which allows personnel to know, at a glance, the age of the inventory for sale purposes. The Date Code can be printed on the inventory tags, also, so that the manager only has to look around the store to determine how old items are. The Date Code consists of five characters and is encoded so that it can be placed on the inventory hangtag without customers guessing inventory age. The encoding is simple to understand and master. The first character will be a letter between A and L which represents the month that it was received. For example, if the item was received in the month of January, the first character will be the letter A. If the item was received the month of May, the first character will be the letter E. The next two digits represent the day that the item was received during that month. The fourth and fifth digits hold the actual week of the year that the item was received. The final digit represents the last digit of the year it was received. As a final illustration, if the item was received on the 10th day of January 2011, the date code would be ‘A10024’ Alternate Department (4 Digits) -- This field allows you to track your inventory by broader or more specific categories than just department and classification. Sales may be analyzed based on this field, either alone or in conjunction with the Department field, and will be reported in the Periodic Hot Seller report. You may set up alternate departments to track anything that you like—seasons, fabrics, etc. See Departments above for information on filling in this field. Also see Section 30 Open to Buy. Sales GL Account (6 & 6 Digits) -- A Sales G/L Account number allows tracking of different types of sales. If a Sales G/L Account is not found on a particular inventory item, the sale of that item will revert back to the Generic Sales Account in the General Ledger Setup. See Section 8 General Ledger Interface for more information. COGS GL Account (6 & 6 Digits) -- A Cost of Goods G/L Account number allows tracking of different types of sales by cost. If a COGS G/L Account is not found on a particular inventory item, the sale of that item will revert back to the Generic COGS Account as entered in the General Ledger Setup. See Section 8 General Ledger Interface for more information. Inventory GL Account (6 & 6 Digits) -- An Inventory G/L Account number allows tracking of different types of sales by inventory type. If an Inventory G/L Account is not found on a particular inventory item, the sale of that item will revert back to the Generic Inventory Account as entered in the General Ledger Setup. See Section 8 General Ledger Interface for more information. Style (10 A/N) -- This field is used to store the Style Numbers of items, which are used as the connecting field for Matrix Inventory. If you are an apparel store, you may have garments with the same style number but different sizes and colors. By using the Matrix Inventory system, your item number will consist of Style + Color + Size. For example, if the Style is ‘1102’ and the Color is ‘RED’ and the Size is ‘8’, the item number automatically created will be ‘1102RED8’. See Section 5 Matrix Inventory for more information on how to access and use the Matrix Inventory Table. WARNING: The system will not accept duplicate style numbers. If you type in a style number that already exists in the program, a message will appear telling you that the style already exists. This style may not be 82 / 362 in the active inventory file but it may be in the archive inventory file. In this case, you will have to access the archive inventory file and delete the style completely or pull the style back into active inventory. TIP: Style Numbers are used throughout the program to access groups of inventory items, such as setting sale prices and creating reports. See Section Automatic Inventory Update and Section Periodic Hot Seller for more information. Size (7 A/N) -- Size is commonly used as the horizontal row in the Matrix Inventory Table, so, in most cases, this field will be automatically filled in by the Matrix. (See Section 5 Matrix Inventory for more details.) If you are not concerned with tracking Sizes of unique items, you may want to rename this field using the Patcher Utility. (If you elect to change the name of this field, the program will automatically change the name in the Inventory Look up Table.) Size may also be used to set sale pricing and for Sales Analysis. (See Section 13.1 Automatic Inventory Update and Section Periodic Hot Seller.) TIP: If you do not use the Matrix tables for inputting inventory, you can still use the style, size and color fields by filling them in manually. Many of the reports in the system will give you the option of printing the style, color and size in place of the Description. Color (7 A/N) -- Color is commonly used as the vertical column in the Matrix Inventory Table, so, in most cases, this field will be automatically filled in by the Matrix. If you are not concerned with tracking Colors of unique items, you may want to rename this field with the screen modifier utility. This field is commonly renamed to Width for Shoe Stores. If you elect to change the name of this field, you will also want to change the name in the Inventory Look up Table. The color field may also be used to set sale pricing and for Sales Analysis. (See Section Automatic Inventory Update and Section Periodic Hot Seller, for more information.) P.O Due Date (Date) -- This field stores the date that the item is due to be received and is updated when creating a purchase order. The information in this field will also appear on the Point of Sale screen when there are insufficient quantities available for a sale, allowing your salespeople to inform customers as to when the items are due back in stock. See Section Point of Sale Module for more information. Last Date Sold (Date) -- This field contains the last date that the item was sold and is automatically updated by the Point of Sale module. You may also use this field to delete dead stock using the Auto Inventory Update. See Section Automatic Inventory Update. MTD Transfer In/Out -- Multiple Store companies will have a monthly total of item transfers in and out of the current store. This total is solely for a “quick look” at transfer activity. See Section Remote Store Utilities for more information. Label Generation Once an Inventory item has been saved and pulled back up on the screen, you may generate item labels in regular or bar code format, depending on which format you have selected from the Configuration program. See Section Optional Equipment Setup. For example, if the inventory item on the screen has 10 items in stock, press the CTRL‑ L (Label) key combination to generate 10 labels for this item. If you want to print 1 label instead of 10 you will need to 83 / 362 change Field 19 Label Quantity to 1, then press CTRL-L. Once you press CTRL-L, you will be prompted for the device to print to, usually LPT1 (the printer outlet). Inventory labels are user-definable via the Form Definition utility. (See Section Form Definition) TIP: If you use many different hangtag styles, (i.e. hangtags, stickers, etc.), you may want to be prompted for a label form number each time that you print labels. You can turn this feature on in the Configuration module of the program. The prompt will tell you ”Current Form Number is 12. Enter Form Number to Use”. Sub-Assembly Inventory Sub‑ assembly inventory allows you to group different inventory items together as if they were one item. For example, suppose you are a computer reseller. When you sell a computer, you do not want to list all the circuit boards, cables, etc. on the sales ticket, as this could confuse the customer. However, you do want all these items to be relieved from stock when you ring up the sale. With Winsale you can set up one Primary Item number for the entire computer system which would include all of the miscellaneous items. When that system is sold, all of the connected items are sold, too. The sub‑ components can still be printed on the sales ticket, or they can be left off. If you choose not to print the sub-components, the Primary Item Number’s cost will equal zero and the Resale Price will equal the sum of its sub‑ components’ Resale Prices. The sub‑ components’ individual Resale Prices will automatically equal zero when they are attached to a Primary Item Number. However, if the sub-components are sold as standalone units, the Resale Prices will reflect their defined values. How to Connect Inventory Connecting sub‑ components to a primary item number is easy. Follow these steps: 1. Pull up the Primary Item Number in the Inventory Screen. 2. Press the F7 key. You will immediately see a screen with the heading “Sub Component Inventory System”. 84 / 362 3. Choose Chained Item option. 4. Enter the Quantity of the connecting Item Number which will be sold for each one of the primary items. Press ENTER. 5. Enter the Sub‑ Component Item Number and press ENTER. 6. Choose Yes if you want the Sub-Component item to be printed on the sales ticket. The Sub-Component Item is now connected to the Primary Item Number. Whenever you sell the Primary Item, the Sub-Component Item will be sold along with it. If you want to connect more items to the Primary Item number, go back to step 3. How to Disconnect Inventory Disconnecting Sub‑ Component Items is even easier than connecting them. Follow these steps: 1. Pull up the Primary Item Number in the Inventory Screen. 2. Press the F7 Key. You will immediately see a screen with the heading, ‘Sub-Component Inventory System’. 3. Highlight an item you want to disconnect, and hit Delete key on your keyboard. This wont delete the item from your inventory. It will only disconnect it from Primary Item. 85 / 362 Inventory Variance See Section Inventory Variance Overview Steps. Inventory Variance Report See Section Inventory Reports for more information. Item Notes Winsale includes an Item Note system which allows you to notify your salespeople of item features as they are selling the item. The size of the note is based on your hardware memory, but may be up to 100 lines. These notes may be anything that you wish. For example, you could use an item note to notify your salespeople to sell a certain belt with a dress. A note could also be used to specify a possible substitute item. To attach an Item Note to an item: 1. Pull the item up in the Inventory Screen. 2. Click into the Item Note Pad on the bottom right side of the inventory screen. 3. Type your message. Your note will automatically be saved. Once you have saved an Item Note, it will be automatically displayed at the POS screen as the item is entered into a sale. After the salesperson types or scans in the Item Number and presses ENTER, a screen will appear displaying the note. This screen will remain until the sales clerk presses the ESC key. Item Number Modifier There may be cases where you want to change an Item Number but not lose the history already attached to the existing Item. Winsale includes a system to modify an Item Number and all of the historical information automatically. To modify an item number: 1. Pull up the Item in the Inventory 2. Click the Modify Icon on the top of the screen. 3. A box will appear displaying the current item number and prompting you for the new item number 4. Enter the new item number 5. Click OK and all of the historical information is updated to the new number 86 / 362 Item History One of the strongest features of Winsale is the ability to view a complete Item History at the “touch of a key”. To gain access to this information, simply pull the item up in the Inventory Screen and press the CTRL-H key combination. Inventory Screen with Item History The item history box will show the Invoice Number, Date of Sale, Customer Number of the purchaser, Quantity Sold under that Invoice Number, and the Selling Price. You may scroll downward through the information in the box, one line at a time, using the Down-Arrow key. The items are sorted by date sold, with the most recent invoice at the top. Inventory Audit You can verify and in some cases automatically change the inventory values like quantity on hand by using Winsale’s Inventory Auditing ability. This can be done from the inventory screen, the power spreadsheets or from the daily close out menu. The Audit button on the inventory screen will only audit the current item displayed on the screen and therefore will only do one item at a time. On the other hand you can use the either the Inventory Power Spreadsheet or the Power spreadsheet to do any range of inventory that you want. The inventory power spreadsheet will allow you to pull up any range of inventory and audit these items from all historical 87 / 362 history. You can use the Power spreadsheet and pull up any of the other historical files like the Sales History file (HISTORY) or the Purchase Order file (ZPO) and audit the inventory item’s affected. These files can be pulled up in any fashion, but as long as the file contains an inventory item this inventory may be audited in a grouping. Daily Close Out Audit This type of audit will automatically audit the days transactions and make sure that anything that took place that day that the affected inventories will have the correct values in inventory. In any case, when the inventory is audited, it is verified to be accurate based on all the historical information. Any transaction that affects inventory is logged in an historical file. Even inventory variances are logged. Inventory variances have precedence over other historical information. This means that if your store received in two widgets, but one was stolen and you subsequently did a physical inventory the variance is logged to show only one widget in stock. Now whenever an audit is done on this widget item it will correctly report that the item only has one widget on hand 88 / 362 5 Matrix Inventory Inventory entry is very important to your store and can be very time consuming. This process can be simplified with the use of a Matrix Table. Using a Matrix will allow mass entry of inventory for any style, making inventory data entry less time consuming and more efficient. This chapter will give you an overview of how to use a Matrix table for entering inventory. You will see actual screens from the program and will be shown step by step how to enter inventory using a Matrix Table. Matrix Table Using a Matrix Matrix Inventory is a means of working with related items (SKUs) of inventory as a group. These items will all have the same style number, but different color and size combinations. For example, a clothing store may order the same shirt, but in different sizes and colors. Each of these color/size combinations will be a separate SKU and inventory record. The Matrix allows you to enter all of these combinations at one time 89 / 362 (instead of separately), with the Main Inventory screen acting as a template for the style information. Matrix tables are completely user-definable. You may have any number of unique tables of 32 columns by 32 rows. They may be product line specific, (Apparel, Clothing, Men’s’ Shirts, etc.), or they could be Season specific, (by color). The Matrix tables are simply your tool--they are there to make inventory entry quick and efficient. TIP: The matrix tables have color alias that can be setup to alias the three digit values with a more descriptive color name. For example, WHT aliases to WHITE and BLK aliases to BLACK. This allows you to better describe your colors. This works on the matrix tables and matrix reports as well as on the matrix purchase orders. Using the Matrix to enter Inventory gives you one screen to do many things: 1. Add/Change Inventory Quantities on Hand 2. Add/Change Quantities on Order 3. Create/Fill/Modify Purchase Orders 4. Add/Change Reorder Points and Reorder Amounts 5. Create Ideal or Model Stock Inventories 6. Perform Inventory Variances Adding New Inventory using the Matrix To add inventory using a Matrix: 1. Enter into Inventory from the Module Menu. 2. To begin adding inventory, press F2 (NEW). (You will see the function key assignments change to those functions available in the Add Mode.) 3. Now you may start filling in the fields that will be common to each item in the Matrix, starting with Store Number, Description, Taxable, etc. When you get to the Style field, refer to Section 5.1.1. TIP: Fields such as Item Number, Size and Color will automatically be entered in Inventory by the Matrix system, so there is no need to fill in these fields manually. Item Numbers will be created by the system for new items and will consist of Style + Color + Size. For example, if the style is 3102, the color is RED and the size is 10, the Item Number that is created will be `3102RED10’. The common link for the Matrix is the Style field, which is where the Matrix Table is actually accessed. 90 / 362 Gaining Access to the Matrix for New Inventory For new inventory, the Matrix Table is accessed from the Style field in the Inventory record. 1. After you have typed in the Style number, the above dialog will be displayed. (This dialog will only be displayed when you are entering in a new item, while skipping the fields that will be not be common for all of the matrix items. Matrix Table Function Screen 2. Next, select the mode of action. Choose ‘On Hand Quantities Only’ to add an item to inventory or work with an existing style already in inventory. See Section 5.3 Matrix Table Functions for more specific information. (This screen is also used when working with matrix items. You can use this screen for updating Cost and Retail prices for the entire style. You can also set the inventory feature set for the style you are working with my choosing the button entitled ‘Assign this Style to a feature Set’.) This screen is also used when working with matrix items. You can use this screen for updating Cost and Retail prices for the entire style. You can also set the inventory feature set for the style you are working with by choosing the button entitled “Assign this Style to a feature”. 91 / 362 3. Select the matrix table that you wish to work with. Simply highlight the correct table and press ENTER. See Section 5.2, Defining the Matrix Table for more information. Matrix Table 92 / 362 5. Once the Matrix table is on the screen, enter as many unique, related items as you like. (Each of these item records will contain the common fields that you entered into the Inventory screen.) Use the arrow keys to highlight the color and size combinations that you want to add. For example, if you wish to enter a shoe width EE in sizes 090, 095, 100, and 105, use the down arrow key to highlight ‘EE’, then use the right arrow key to move the highlighted area to the size ‘090’ column. Type ‘1’ and press ENTER. The cursor box will move to the size ‘095’ column automatically. Type in the quantity of black EE’s, pressing ENTER afterward. You can continue to add your inventory in this manner, using the arrow keys to direct the cursor box to the correct color and size combination. When you are finished, press F9 to SAVE your information. The system will create and insert the new item records and return to the Inventory screen. Defining the Matrix Table/Changing Headers In order to define new matrix tables you should start with one of the default matrix tables and edit it to meet your needs. To begin, enter the Inventory screen from there enter into the matrix screen. 1. Click the Edit Menu and choose either Edit Color Header or Edit Size Header 2. To Add new values into the chosen header, type in the value into the text box and Click the Add button. 3. To Remove an existing item from the chosen header, highlight entry that you want to remove from the column of headers on the right and click Delete. 4. To Modify an existing header, highlight it from the column of values on the right and change the value in the text box, then press modify. 5. When you are finished entering the table headers (top and side), Click Exit and the new table will be updated. The matrix table is not updated on disk until you click Row/Col Save. 93 / 362 TIP: The DEFAULT.MTX has colors down the left hand side of the grid and sizes across the top. (The SHOE.MTX has widths down the left hand side and sizes across the top.) Working With Matrix Tables Matrix tables are really just simple text files with an operating extension of MTX. These files are located in your data folder (typically located under the Winsale folder.) They are simply text files that consist of two sets of 32 values each. The first set of values defines the Colors (or Widths) and the second set defines the Size values. The first value in every matrix is a blank item. The values are listed sequentially inside the actual matrix file but are displayed here in two columns for brevity’s sake. “” 10 A 15 A2 20 A3 25 B 30 C 35 D 41 E 45 These values may easily be changed with a text editor such as Notepad or WordPad that is supplied with the Windows Operating System. Working with an Existing Style To work with a style which is already in Inventory: 1. Enter the Main Inventory screen. 2. Click the Matrix Button on the top menu. 3. Enter the style to work with and press ENTER. 94 / 362 Matrix Table Functions When the Matrix is entered initially, 9 modes are presented (See Matrix Table Function Screen): 1. 2. 3. 4. On Hand Quantities Only On Order Quantities Only Redline Quantities Re-Order Amount Quantities On Hand Quantities This mode may be used to add inventory (without using a purchase order) or to view existing inventory. When you are prompted for a style number, just enter the style that you want to view or add. The matrix table will be displayed showing all quantities on hand for the style. If you are adding new inventory, add your quantities into the matrix. Redline and Reorder Amounts See Section 19 Purchase Orders. Inventory Variance The Matrix can also be used to adjust and add quantities by style. You can enter quantities on hand for already existing stock or add new quantities for items that do not currently exist in inventory. See Section 22 Taking Physical Inventory for more information. 95 / 362 6 Inventory Look Up Table The Inventory Look Up Table allows you to view your inventory quickly using a number of sort criteria and gives you an easy way to access your inventory without knowing the correct Item Number. The Inventory Table is available from Point of Sale, Inventory, Purchase Orders, Inventory Variance, etc., or anywhere that you need to lookup inventory by item number. This chapter will give you a general overview of how to search your inventory using the look-up table. Inventory Look Up Table Accessing the Look Up Table from Inventory To access the Inventory Look Up Table from the Inventory Module, press the (F4) Search key twice. 1. After pressing F4 once, you will be prompted to “Enter Item Number or F4 for table”. 2. The second time that you press F4 the Inventory Look Up Table will appear. 3. You can also choose to load the inventory table by clicking on the icon labeled ‘Table’ on the top of the inventory screen. 96 / 362 Accessing the Look Up Table from the Quick Sale Screen There are two ways to search for Inventory from the Quick Sale, Sales Refund or Sales Order screen: 1. Place the cursor in the Item Number field and press the F3 key. When there is no number entered into the current item number position, the system will bring you to a blank inventory look up table. 2. With the cursor in the Item Number field, enter just a part of the item number and press ENTER. If an exact match is not found in inventory, the system will call upon the Inventory Table resources to further narrow down the choice. The Inventory Look Up Table will list all matches to the partial item number that you typed in. Use the arrow keys to highlight the number that you are looking for and press ENTER to pull that item into the Quick Sale screen. Searching with the Look Up Table In the Inventory Look Up Table there are many ways to search your inventory: 1. Decide on the main criteria that you are looking for and press the corresponding function key. 2. After pressing the function key that you want to use for your search, type the criteria that you are searching for and press ENTER. Type in just enough information to make your criteria unique. a. For example, if you pressed the F5 (Color) function key, you will be searching on the Color Field of inventory. If you entered the letters `BL', you may see entries for Black and Blue. b. After the look up table provides the first list of inventory to meet your criteria, the cursor will go back to the lower right hand corner of the screen to wait for additional criteria. 3. You may decide that you actually only want to view Black items. TIP: If you want to cancel your search and start over again, you may press the F7 (New View) to undo the search criteria. Then start again by choosing a sort option. a. Press F5 again, type ‘BLK’ and press ENTER. This time, only black items will appear on the screen. 4. After viewing all of the black items, you may only be interested in black blouses. a. Press the F3 (Description) function key, type in the word `BLOUSE' and press ENTER. This is your second criterion of the search. The system will re-look at every item with the color 'BLK' and scan those for the ones that are Blouses. TIP: If you have a business which will frequently use a Description search, you will want to consider beginning your descriptions with a single key identifying word, such as “Blouse” or “Pants”, followed by a full description of the item. Using this type of description will speed up your search. 5. You may continue to narrow down your search until only the items that you are looking for are displayed. TIP: If you are using the Vendor Number field or Department field in your search, you may simply type the first few letters of the name, (once the cursor is in the Vendor Number or Department field), to bring up an alphabetical listing of the vendors or departments. Then you can highlight your choice and press ENTER. a. For example, you might only be interested in black blouses which are size S. In this case, you 97 / 362 would add a third criteria by pressing F4 for Size, typing in ‘S’ and pressing ENTER. 6. You can easily search the Item Number and Description fields in inventory for any partial string located inside of these fields. For example, if you know that you have an item that has the word ‘SUPER’ inside of the description you can surround the word you are looking for inside of ? marks and search the description field. The inventory table will know that you are doing a wildcard search and it will search the entire inventory database for every occurrence of that string. In the above example you would type ?SUPER? to look for any item in inventory with the word SUPER in the description. 7. If your company has multiple store locations, with one inventory, you can limit the search by local store only. To do that, you have to set the checkmark near “Show For Single Store”. Multiple Stores: If your stores are sharing inventory information: 1. If you access the look up table from Inventory, the table will show all of your stores’ inventories. 2. If you access the look up table from the Quick Sale, Transfer or Inventory Variance modules, the look up table will only show the store’s inventory that is performing the transfer or variance. In order to view another store’s inventory by itself or to view all stores’ inventories combined: 1. Enter your criteria like normal and then load the table 2. Select you multiple store options on the top of the screen. 3. The additional stores information will be displayed. Remember, you will not be able to sell another store’s inventory, even though you may view it. Exiting, Bringing the Item Once you have found the item you are looking for and highlighted it, press ENTER or the Exit (F10) function key. The highlighted item will be brought into the module that you are working from. Exiting, Without Bringing the item If the item you were looking for does not exist, or you do not want to bring the item into the module that you were working from, press the ESC key or click exit. No items will be carried over into other modules. Getting a New View in Inventory Look Up After you have entered search criterion, you may decide that you want to look at some other inventory. This can be done by pressing the F7 (New View) function key. This simply erases any existing search criteria and allows you to start with new criteria. 98 / 362 7 Customers The key to business growth and prosperity is Customer focus. Winsale gives you the ability to keep all customer history intact and to view it with the stroke of a key. To have strong customer history you must first have a strong customer database. The customer profile is the first step to establishing a strong database. This chapter will guide you through setting up your customer profiles to get the most out of the information you put in. Menu Map: F10 F3 F9 F4 Ctrl-L F8 F7 Ctrl-H This document makes reference to the above functions. It defines the functions by the hotkey that initializes the function instead of the icon name. 99 / 362 Where is Customer Information To gain access to Customer Information: 1. 2. 3. 4. Press the right arrow key twice from the system's Module menu. The menu bar will slide to the right and 'Profiles' will be highlighted. 'Customer' is the first menu option under the Profiles menu. Highlight Customer using the arrow keys and press ENTER. TIP: Always use either all CAPS or all Upper and Lower case when adding customers, including any customers added at Quick Sale. Never switch styles once you have begun. Following this rule will keep your customer look up efficient! NOTE: Winsale includes Smart Capitalization to make entry easier using upper and lower case. All you have to do is type—you never need to ‘Shift’ to a capital letter! When adding customers, always enter the last name first, followed by a comma and a space. Use the following format: LAST NAME, FIRST NAME If you have customers that need a post fix added to the 100 / 362 end of their name, such as, Jr., Sr., etc., enter them in the following fashion: Smith Jr., John A. This format will be used by the mailing program to print first name first on mailing labels. It will also keep your customer look up efficient! How To Add Customer Information 1. As soon as you enter the Customer screen you are in the Add mode. 2. The customer number that is displayed is the next available customer number. You do not have to use the number as shown. You may, for example, use a phone number for the customer number. TIP: Although the system can automatically number your customers for you, it is best to use the customer's phone number as their account number. This is how the Point of Sale module expects this information and it will make customer identification easier at point of sale. WARNING: You should never reuse or delete a customer profile unless it is absolutely necessary. If you reuse a customer number, you will reattach old sales history to the new customer, since sales history is not deleted unless the profile is deleted. You should never delete a customer profile—all of the sales history will be gone! 3. Type in a phone number, (over the existing number), and press Enter or just press Enter to accept the number that appears on the screen. Note: If you don't use eight numbers, then leading zeros will be used to fill in up to an eight digit number. 4. Fills in the pertinent fields, pressing ENTER to leave them. See Customer Fields Defined, for field definitions. 5. When you are finished entering information for this customer, press ENTER after the last information entered, then press the SAVE (F9) key. Nothing will be saved unless you press the F9 key. TIP: If this customer has a balance, you must move that balance to the Accounts Receivable system via Customer Initial Balance Loader. You may also add Customer Information during a transaction from the Quick Sale, Refund or Layaway screens. See Customer Fields Defined for more information. How to Exit If you decide you don't want to save what you have entered, press the MENU (F10) key. The screen will change back to the Main Menu without saving anything. 101 / 362 How to Search There are three ways to search for a specific customer: Customer Number, Customer Look Up and Customer Name. Search By Customer Number 1. Upon entering the customer screen, type in the customer number to be searched. 2. If the account number is found, the information recorded for that customer is immediately brought to the screen for viewing or modification. 3. If the customer number is not found, the system will assume that you want to add another customer with this new number, and the cursor will move to the Name field. a. If you do not want to add a new customer, press ESC. b. If you want to add a new customer, proceed with adding information. 4. If the customer that appears on the screen is not the correct customer, use the F5 and F6 keys to locate the correct customer. See Previous & Next keys for more information. Search By Customer Look Up 1. 2. 3. 4. 5. When the cursor is at the customer number prompt, begin typing the first few letters of the customer’s last name. This will display an alphabetical listing of Customers by Customer Name, (last name first if that’s how you have entered them). If you typed in letters, you will be in the section of the listing which contains the letters that you typed. Use the directional arrows to highlight the customer that you are looking for. Once the customer is highlighted press the ENTER key to view and/or modify the customer profile. How to Modify Customer Profiles Once you have the customer information on the screen, you will be in the Modify Mode and can modify or delete this customer. To modify: 1. Use your arrow keys to go to the field that you wish to change. (If your cursor is in the Name field, press the up‑ arrow to go to the FYI field.) 2. Type over the information in the field or add to it. 3. If you make any changes that you want to save, press the F9 (Save) key. 4. If you wish to cancel any changes and have not pressed the F9 (Save) key, press the F10 (Menu), F5 (Previous) or F6 (Next) keys. TIP: Remember that nothing is ever saved to the disk unless you specifically save it with the F9 (Save) 102 / 362 key, or enter through the last field on the screen. Previous & Next Keys The F5 (Previous) key and F6 (Next) keys allow for movement to the Previous and Next records. The previous and next positions are determined by the searching method used. For example, if you searched the Customer Name field for 'Ad' this might bring up Adams. Press the NEXT key once and you might get Adamson. Likewise, if you searched the Customer Number field for 12 you would get 00000012. Press the PREVIOUS key once and you would get 00000011. How To Delete Once you have searched and found the account you are looking for, you may delete it from the customer file. 1. 2. 3. 4. 5. Press the F3 (Delete) key. A window will pop up to verify that you want to delete the account. By answering No you will return to modify mode. By answering Yes the account will be removed permanently from the customer file. TIP: The system will not allow you to delete an account that has an A/R balance. You will have to remove the balance before deleting the account. To Delete a Customer Profile with an A/R Balance: 1. 2. 3. 4. 6. 7. Use the arrow keys to move the cursor to the ‘Cur Balance’ field. Change the Balance to 0.00. Press ENTER. Press F9 (Save) Pull the Customer Profile up again and press F3 (Delete) Follow the directions above. WARNING: Once a Customer Profile is deleted, you will not be able to access any Customer History or the A/R account! Save Customer Information to Outlook Customer Information can be saved to Microsoft Outlook’s Contacts Folder. This gives you the ability to enter information into one place (Winsale) and then save it to be used in Microsoft Outlook or any smartphone that uses Outlook. Microsoft Active sync can then automatically transfer your information to and from a personal information management device. The Quick Save to Outlook key is F11 and can be used from the customer screen. 103 / 362 Save to Outlook warning message Customer History Point-of-Sale screen with Customer History You have access to complete Customer History from the Profile screen: 104 / 362 1. Pull up the Customer Profile for the customer that you want to view. 2. From anywhere in the profile screen, press the Ctrl-H key combination. This history will show you sales by invoice number, date and item number, with the exact price that the customer paid for each item. This is the same history that is available from the Quick Sale screen. You can also view and sort customer history from newest dates to latest dates. Customer Notes There are two types of customer notes available: 1. F8 Customer Notes that appear on the Customer Profile and Quick Sale screens 2. F7 Statement Notes which print on Customer Statements. Customer Notes These are user-definable notes which can be used to store any information that you like. You may want to keep track of birthdays and anniversaries, sizes, family members, credit information, etc. These notes can be viewed and edited from both Customer Profiles and Quick Sale, so they are a good place to store information that you want your sales people to refer to. To create, view or edit customer notes from the profiles screen: 1. Pull up the Customer Profile for the customer that you want to view. 2. From anywhere in the profile screen, press the F8. 3. Type in the note that you want to save, or type over any part of the note that you want to change. 4. If you want to delete an existing note, press F3 when the note is on the screen. The entire note will be deleted. 5. Press ESC and your note, with any changes, will be saved. In the Quick Sale screen: If a Customer has a note attached, it will appear on the right upper corner of the sales screen. Simply double click note field with left mouse button to change it, and hit OK when you are done. See Section 15 Point of Sale Module and Section 10 Note Pads for more information. From the Received on Account screen: To view notes on Received on Account Screen, double click on Customer Number, and start typing customer name to initiate a search. After you found customer, click once, highlighting it’s name. On the bottom of the screen you will see Note Viewer, that you will easily be able to edit, just by clicking on “Click me to add a note” . If you need to make any changes to the note, just type them in and press OK. See Section 14 for more information. (This option is only available in Winsale.) Customer Notes are also sortable from the Mailing Label program. If you use a code for birthdays such as B[month], (ex: B08 for an August birthday), you can perform a sort from the Mailing label program for all notes that contain B08. See Section 19.3 Customer Reports for more information. Statement Notes 105 / 362 Statement Notes can be attached to customers from the Customer Profile screen: 1. Pull up the Customer Profile to which you want to add a statement note. 2. From anywhere in the profile screen, press the F7. 3. Type in the note that you want to save, or type over any part of the note that you want to change. 4. Press OK and your note will be saved. 5. When you print monthly statements, any statement notes in the system will automatically print on the statements. NOTE: These notes will be deleted automatically from the system when you run statements. You will need to enter new notes for the following month. See Section 10 Note Pads for more information. Customer Letters Winsale includes the ability to create a simple letter to your customers: 1. Pull up the Customer Profile for the customer to whom you want to send a letter. 2. Press F2 (Letter). 3. The program will present a screen with today’s date, the customer name and address and a 4. 5. 6. 7. “Dear…” line using the customer’s first name. Type in your letter, along with your closing, as if you were using a simple word processor. When you are finished, press the ALT-P key combination to print the letter. You will be given a choice of printer options. Choose your printer and print driver and your letter will print. When you are finished, press ESC. Your letter will be saved until you overwrite it by pressing F2 and typing a new letter over the old one. Customer Fields Defined Customer Number (8 Digits) - The customer number is automatically generated for your convenience. As you add new customer accounts to the system, the next number is entered automatically for you. Note however, that you do not have to use the system's auto numbering. You may use any numbering system of your choice. In fact, we recommend the use of the customer's phone number for their account number. This will make using account numbers easier for customers and salespeople. The system is able to hold up to 99,999,999 customers. TIP: If you have multiple customers using the same telephone number, you can use the eighth digit as a suffix to create unique customer numbers. You will always be able to look your customers up by name, so the number actually becomes irrelevant. Customer Name (30 A/N) - You should always be consistent when adding or modifying this field. Always let Winsale capitalize the first letter of proper nouns, or always use all CAPITAL letters. Do NOT have some names in all capital letters and the rest otherwise. This makes searching the customer look up table very difficult. Winsale's searching capabilities are case sensitive. Always use Last Name first, followed by a comma and a space, and then the first name. This format will make look up easier and will be used to properly produce mail labels. 106 / 362 Address Lines 1 & 2 (30 A/N) - This address will be printed on the sales ticket, unless otherwise instructed by the Forms Definition program. Zip Code (9 A/N) - This field is automatically filled in for you if you entered a default zip code in the configuration program. If you need to change this zip code, simply type over the default zip code and press ENTER. You may use either 5 or 9 digits. Do not put a hyphen in between the Zip Code and the '+ 4'the software will do that for you when printing labels. If you type in a zip code and press the ENTER key, the system will look at the built-in Zip Code database and automatically fill in the City & State fields for you. If you would like to use Upper and Lower case letters for the city and state, you may make modifications in the Zip Code Modifier. The Zip Code database supports Canadian Postal Codes. IT will allow 6 character postal codes with a space in between the first 3 characters and the last 3 characters. In order for this new database format to work, you must delete the ZIP.BTR file from the WinSale folder on each of your computers before installing the latest version. City (20 A/N) - This field is automatically filled in for you if you entered a default city in the configuration program. If you need to change this city, simply type over the default city and press ENTER. If you typed in a zip code that was found in the zip code database, the City will be filled in for you automatically. Simply press ENTER to accept this city. In some cases the zip code database may have a different city name connected to a zip code than the one that your customers use. If this occurs, you may type in the correct city name over the name that the system uses. You may also make a permanent change in the zip code database by using the Zip Code Modifier. State (3 Char) - This field is automatically filled in for you if you entered a default state in the configuration program. If you need to change this state, simply type over the default and press ENTER. If you typed in a zip code that was found in the zip code database, the State will be filled in for you automatically. Simply press ENTER to accept this city. Phone Numbers 1 & 2 - The area code is filled in automatically if you entered a default area code in the configuration program. If you need to change this area code, simply type over the default. Use the 2nd telephone number field for the customer’s main number. This field will appear in the reports for easy reference. FAX Number - If the customer doesn't have one, this can be used as another phone number field. The area code is filled in automatically if you entered a default area code in the configuration program. Shipping Address Lines 1 (30 A/N) - This field defaults to the Name field as entered above. If this is correct, press ENTER. Shipping Address Line 2 (30 A/N) - This field defaults to the Address Line 1 entered above. If this is correct, press ENTER. Multiple Shipping Addresses - Clicking on Shipping Addresses button, opens up new window, that allows you to create multiple shipping addresses per client. Shipping City (20 A/N) - This field defaults to the City field entered above. If this is correct, press ENTER 107 / 362 Shipping State (3 Char) - This field defaults to the State field entered above. If this is correct, press ENTER. Shipping Zip Code (9 A/N) - This field defaults to the Zip Code field entered above. Do not put a hyphen in between the Zip Code and the '+ 4', the software will do that for you whenever printing. Email/FYI (20 A/N) - This field is used for a Customer Contact or for information you might want to search for later, using the Customer Profile searching capabilities or the Mailing Label Program. We recommend placing codes in this field that will notify you of birth dates, anniversary dates, etc. These codes can be anything as simple as A12 or B05, Anniversary in December and Birthday in May, respectively. This way it’s easy to generate mailings to everyone who has a birthday in a certain month through the Customer Mailing Label Program. (You may also store this information in Customer Notes.) You may also use this field for storing your customers email address. Employee Number – This field is used to add more detailed information about Customer for Major Account Invoicing. This allows quick data retrieval, for companies that have been invoiced. Division Number – Department, which customer works in. Birth Date – Collecting Birth Dates allows you to create different promotions for customer’s birthday, send them a company’s postcard (e-card). SSN – optional data that can be collected on your request/store policy. Tax Code (2 Digits) – This is the sales tax code for the customer's city and state. In most cases your tax code will also be your customer’s, so it will already be entered in the Configuration program and you will just enter through this field. If this field is left blank, the default tax code will be used. If you have a new tax code or you need to set one up as new, you may press the CTRL‑ F1 key combination to temporarily exit to the Tax Code Definition Table. Once there, you may view existing codes or define a new code. Discount (2 Digits) - Enter this number as a percent. For example, if you want to give this customer a 20 percent discount, enter 20 as the discount rate. This discount is not automatic. In Quick Sale, you must choose to make an adjustment to the sale in order to discount the selling price. When you choose to make this adjustment, the percentage entered into the Customer Profile will appear so that the salesperson does not have to ‘guess’ about the customer’s discount. Exempt (10 A/N) -- If this customer is tax exempt, you may enter the tax exempt number in this field. However, this is not mandatory and serves only as a reference. For a tax exempt customer, the tax code should be 00. Territory (2 Digits) -- This is the primary salesperson or sales territory for this customer. This salesperson’s number will be displayed by the Point of Sale Module automatically whenever you sell something to this customer. You may override it at the time of sale by typing over it. Using Territory in this way will allow you to run the Sales By Territory report. See Section 19 Reports. If you don’t need to track sales territories, you may use this field to departmentalize your customers. For example, you may have A/R customers who should not receive a statement. Because statements can be 108 / 362 run by Sales Territory, you can code customers to receive or not receive statements. Terms Code (2 Digits, or 'D' + 1 digit) - The terms code represents a discount that you have agreed to give your customers. It is defined through the Terms Code Definition function that you use to set up terms for vendors. If you will not be using Terms Codes for your customers, fill this field with 00 or just press ENTER. If you need to look up your existing terms codes or define a new terms code for a customer, press CTRL-F1 from this field to access the Terms Definition Table. Then you can highlight the terms that you want to use and press ENTER, or add a terms code. The terms code information may be printed on sales tickets with the following fields (each of these fields can be found in the form definition)--DUE DATE, SHIPPED DATE, DISCOUNT DATE, and the written out terms definition. Service Charge (5 Digits) - A factor by which this customer's overdue transactions are charged per billing cycle. (Overdue is defined as a transaction that has exceeded the first aging category defined in the Configuration module.) For example, if you charge 1‑ 3/4 percent interest per month (21% Annually) for overdue accounts, enter .0175 as the service charge factor. A/R Type Open Item/Balance Forward/Revolving - This code represents the type of Accounts Receivable account that the customer is using. That is a Balance Forward Type, Open Item type, or Revolving. If the customer is not an Accounts Receivable customer or if they are a Balance Forward type of customer, you can leave this field blank. The default is Balance Forward if nothing is entered here. Use a 'O' for an Open Item type of Accounts Receivable customer. Use an 'R' for a Revolving type of Accounts Receivable customer. Your customer database may be intermixed with all three of these types of customer A/R Setups or you may assign all of your customers to the same type. Balance Forward is defined as maintaining the customer’s account balance as a running total and not by each individual transaction. Open Item is defined as keeping the balance for each individual sales ticket until it is completely paid off. Revolving is much like Balance Forward except that Revolving works on a single-month basis and is never overdue unless the customer does not make the minimum payment for the month. In the case where the minimum payment is missed or underpaid, the remaining amount becomes delinquent and is added to the next month’s minimum charge. The A/R statement form definition allows for all of the pertinent information to print on statements. See Section 14 Received on Account for more detailed information. Credit Hold (1 Digits) - This is a flag that notifies the Point of Sale Module that this customer is currently on credit hold. Enter a `Y' to place this customer on credit hold, or `N' for no credit hold. If a customer is on credit hold when you try to charge a sale to A/R, the Point of Sale module will not allow any more credit to issued to this customer unless the clerk has the proper password rights to over-ride the credit hold. Credit Limit (5 Digits) - You may assign a credit limit for each customer. This field will only accept whole numbers up to 32,767. When this field is set, the point of sale module will alert salespeople if the customer is about to exceed the credit limit defined. If the salesperson has the correct password rights, they will be able to over-ride the credit limit in order to complete the sale. MTD Payments - The total amount of payments applied to this account during the current month. This number is automatically updated by the system from the Received on Account screen. It is reset to 0 during the monthly close out if you run MTD Figure Close Out. 109 / 362 MTD Charges - The total amount of charges applied to the account during the current month. This number is automatically updated by the system from the Received on Account screen. It is reset to 0 during the monthly close out if you run MTD Figure Close Out. BOM Balance (Beginning of Month Balance) - The amount of this customers Accounts Receivable balance at the beginning of the current month. This amount is automatically updated by the system from the A/R close of the Monthly Close out menu. YTD Payments - The total amount of payments applied to the account during the current year. This number is automatically updated by the system from the Received on Account screen. It is reset to 0 during the yearly close out if you run YTD Figure Close Out. YTD Charges - The total amount of charges applied to the account during the current year. This number is automatically updated by the system from the Received on Account screen. It is reset to 0 during the yearly close out if you run YTD Figure Close Out. Current Balance (12 Digits) - This field is automatically updated by the Point of Sale module and the Received on Account module. It will reflect all charges and payments made to an account on a real time basis.Month to Date Sales (12 Digits) - The total amount of sales during the current month. This number reflects all sales to the customer, not just A/R sales. This number is automatically updated by the system from the Point of Sale screen. It is reset to 0 during the monthly close out if you run MTD Figure Close Out. Year to Date Sales (12 Digits) - The total amount of sales during the current month. This number reflects all sales to the customer, not just A/R sales. This number is automatically updated by the system from the Point of Sale screen. It is reset to 0 during the yearly close out if you run YTD Figure Close Out. See Section 17 Close Out Menu. Delinquent Amount -- The amount that is over due based on the minimum payment percentage and the customer’s Accounts Receivable balance. This field is filled in on Balance Forward and revolving type accounts when you close the A/R period It will only be added to when the customer has not made the minimum payment as specified. When payment is made on an account from the Received on Account screen, this delinquent amount will be depleted by the amount paid on account. You may have this field printed on the customer statements to show the customer the amount that they are currently in default on. Last Payment Amount – This is the amount of the customer’s last payment to the account. This number is automatically updated by the system from the Received on Account screen and is reset each time a payment is made.Last Payment Date - The date of the customer’s last payment to the account. This number is automatically updated by the system from the Received on Account screen and is reset each time a payment is made. Date Opened - This field represents the date that any new customer profile is added. This date will automatically be set to the current date when adding any new customer profiles. Last Date Sold - The date of the last sale made to this customer. This field is automatically updated by the Point of Sale Module. This date begins the aging process for Accounts Receivable customers when you first move the balance over to the Accounts Receivable program. Price Levels The Customer Profile contains a field called Price Level. This field can be one of 4 choices: A,B,C, or D. These price levels are used in conjunction with the price levels that can be defined with each inventory 110 / 362 item or up from the current cost as defined in the inventory screen. From the inventory screen you can press the ALT-D key combination to define price levels per inventory SKU. Price Level ‘A” is the default and id defined when you enter the resale price on the inventory screen. When you have given the customer a price level of A,B,C, or D, the POS module will look up the price defined for the SKU and that will be the default selling price. This will give you the ability to automatically associate a discount percentage as defined by a discount key and have the discount automatically applied to any customer or major account employee when an item is being rung up. These keys are matched up by Price Level B through Price Level E and are matched up to the Discount keys F5 through F8 respectively. Customer Look Up With Winsale you never have to memorize or know a customer account number. There is full look up capability in alphabetical order from any customer number field in the program. To access this look up: 1. From a Customer Number field, type in the first few letters of the customer’s last 2. 3. 4. 5. name. You will be taken to the alphabetical listing of customers whose names begin with the letters that you typed in. Use the arrow keys to highlight the correct customer and press ENTER. The customer will be pulled into the field that you did the search from. If you made a mistake, press the ESC key and start again. OR 1. Press the CTRL-F1 key combination from a Customer Number field. 2. You may type in the first few letters of the customer’s name or just use the arrow keys to locate the customer you are looking for. 3. Highlight the correct customer and press ENTER. 4. If you made a mistake, press the ESC key and start again. TIP: In order to make the customer look up efficient, all customer names should be typed in Last Name first, followed by a comma and a space, then First Name. All entries should be entered the same way-either all Capitals or all Upper and Lower case. It is very important not to mix styles because the Look Up is case sensitive! TIP: If the Customer has an Employee Number entered into the system, the lookup table will display that number as you scroll through the names to help you make sure that you are selecting the correct customer. TIP: You may also renumber accounts directly from the customer look up table. Simply select the Customer account you want to renumber and then click on the ReNum button. You will be prompted for the new account number to renumber to. 111 / 362 Customer Look Up Screen 112 / 362 8 General Ledger Interface Modules Menu with General Ledger Option What is the General Ledger Interface? The Winsale General Ledger module is the heart of our accounting side solution and is our most intensive module. Combining flexibility with ease of use, the General Ledger module gives you the critical information you need to make timely and informed business decisions. The General Ledger module maintains current financial information, as well as transaction history and budget information for up to nine fiscal years. This module also allows a virtually unlimited number of accounts in the chart of accounts, each with up to 9999 departments. The General Ledger module not only organizes all of your financial information from our other Winsale modules, it can also combine information from multiple stores into a single consolidated company for financial reports. Accurate financial statements and associated reports generated by a general ledger system are critical for timely decision making. Therefore, it is imperative that a general ledger system be powerful, flexible and informative to management, yet still be easy to use and operate. With Winsale, you can rest assured that your crucial accounting information is precise and accessible whenever and wherever you need it. Winsale can also interface directly with two other 3rd party software packages. This functionality has been 113 / 362 maintained from earlier releases because Winsale does not include a payroll system per se. Therefore, you may elect to use one of the different software packages that we interface to calculate your payroll as well as be the backend General Ledger Accounting system . 114 / 362 Getting Started with General Ledger Winsale must have certain accounts defined for the General Ledger system to function. These bare minimum accounts are created when you enter the Chart of Accounts screen for the very first time. You will want to set up additional General Ledger Accounts if you will be using Winsale’s Accounts Payable System to write checks. You can set up any number of accounts in Winsale, but you should never delete the default accounts that Winsale has automatically defined for you. You may change Winsale’s default Account numbers, but do not change the names. Winsale has been designed like this so that you can arrange your chart of Accounts by account number. It only looks at the description of the account name when analyzing your transactions Magnum Software strongly recommends that you consult with your Accountant to get the proper accounts and accounting categories before proceeding any further. It is much less painful to set up your General Ledger correctly the first time then it is to try and figure out why things don’t balance after the fact. Note: If you will be interfacing with a 3rd party general ledger software package, you must set up your general ledger accounts in both Winsale and the G/L software that you choose. There are some default accounts which are crucial to the operation of the software. To initiate these 115 / 362 accounts, you must enter into the General Ledger Chart of Accounts to have the default accounts be installed and activated. Entering General Ledger Accounts G/L accounts are entered in the General Ledger Account Definition screen. If you will be interfacing with a 3rd party general ledger software package you will have to enter the accounts manually according to the directions that you receive with the 3rd party software. However, Winsale’s interface with Quick Books Pro will automatically create the account in Quick Books if it found to be absent on the Quick Books side. When you first enter the General Ledger Account Definition screen, you will see a list of some G/L accounts. These accounts are the basic accounts for the functions in the program. They must be entered into the program using the exact names of the accounts, including the exact spacing, but you may change the account number. These accounts should be entered into the general ledger definition screen as follows: Acct Main Category Acct Name 1020 Current Asset BANK 1025 Current Asset CASH DRAWER 1200 Current Asset ACCOUNTS RECEIVABLE 1300 Current Asset INVENTORY 1301 Expense DEFECTIVE INVENTORY 1550 Liability GIFT CERTIFICATES 2000 Liability ACCOUNTS PAYABLE 2235 Liability LAYAWAY 3000 Equity RETAINED EARNINGS 3010 Equity CONTRIBUTED CAPTIAL 4100 Income SALES 4150 Cost of Goods Sold RETURNS AND ALLOWANCES 4160 Income INTRA STORE XFER 4170 Income INTER STORE XFER 4175 Expense DISCOUNTS ALLOWED 116 / 362 4180 Income SALES ALLOWANCES 4500 Cost of Goods Sold COST OF GOODS 5085 Liability SALES TAX 5240 Income MISC INCOME 5250 Expense FREIGHT IN 6123 Expense CASH DRAWER OVER & SHORT 6133 Expense FREIGHT OUT 6137 Expense BAD DEBT 7100 Other Income & Expense FINANCE CHARGE INCOME TIP: The General Ledger system allows you to run any period within a two year boundary. NOTE: You can now have up to nine general ledger BANK accounts. To do this, add to your chart of accounts up to nine bank accounts by naming them BANK 1, BANK 2, BANK 3 and on up to BANK 9. These numbers map to the default checking account as defined in the Accounts Payable setup. This is useful when you have multiple stores sharing the same data base but using different configurations with different store numbers and checking account numbers. With this new setup the general ledger will automatically map any transaction for the BANK account to the BANK # account. With this setup the default BANK account is no longer used but must still exist. Of course for a more human readable name you can set up aliases for the different BANK accounts. If you accept credit cards and want to track these credit cards in the G/L, you will need to add credit card general ledger accounts. The numbering of these accounts should correspond to the order in which they are set up in the Configuration program. The credit card accounts should be entered into the General Ledger Definition as “CREDIT CARD 1”, “CREDIT CARD 2”, etc. NOTE: Account order may also be identified by accessing the `BANKCARD.DEF' file in the data directory. At a \WINSALE\DATA prompt, you may look for ‘BANKCARD.DEF’ and open it with Notepad to see a list of your credit card options in their numbered order. Adding General Ledger Accounts 1. From the General Ledger Module, click on the‘Chart of Accts’ button. 2. Type in the Main account number that you want to add and press ENTER. NOTE: Account Numbers may be any numbers that you want to use up to 6 digits. These numbers must match the account numbers that you use in the General Ledger software and will be governed by any account numbering rules in the 3rd party general ledger software package. 3. If you want to assign a sub account to this new account name, type in the sub account number (up to 117 / 362 4. 5. 6 characters) and press ENTER or press ENTER to skip the sub account field. Select the Account type then press ENTER or click into the Account Name column. Type in the name of the account and press ENTER Modifying General Ledger Account Names 1. From the General Ledger Module, click on the‘Chart of Accts’ button. 2. Click into the field you want to modify and make any changes necessary. Deleting General Ledger Accounts 1. From the General Ledger Module, click on the‘Chart of Accts’ button. 2. Click on the far left box of the line that you want to remove. This action will highlight the line being clicked on. 3. Click the Delete Button on the bottom of the screen. Modifying Account Numbers WARNING: Account numbers may be changed, but the account names must remain exactly the same. All spelling and spacing must be identical. To change an account number: 1. Add the new account number with the name appearing exactly as it does in the old account number. All words and spacing must be exactly matched to the original! Follow the directions in Section 8.3.1 for adding an account. 2. Delete the old account number. Follow the directions in Section Deleting General Ledger Accounts for deleting accounts. Adding Accounts to the General Ledger Software Follow the instructions that have been supplied with your G/L software for adding accounts. Make sure that the account numbers match the account numbers entered in WinSale. NOTE: You may rename the accounts in your 3rd party general ledger software to names other than those entered into your POS software, but the account numbers must match those in the POS software. 118 / 362 Printing a List of G/L Accounts You may print a listing of the G/L accounts in your POS software from chart of Accts section of the General Ledger. You will find a button labeled PRINT. To print a listing of the accounts in your 3rd party general ledger software, follow the instructions that came with the software. How do Transactions affect G/L? The table below shows the effect on the General Ledger for each type of transaction. CHARGE SALE DEBIT CREDIT ACCOUNTS RECEIVABLE SALES COST OF GOODS SALES TAX INVENTORY FREIGHT OUT CASH SALE DEBIT CREDIT BANK SALES COST OF GOODS SALES TAX FREIGHT OUT INVENTORY CREDIT CARD SALE DEBIT CREDIT CREDIT CARD NUMBER OR BANK SALES COST OF GOODS SALES TAX INVENTORY FREIGHT OUT PAYMENT ON ACCOUNT DEBIT CREDIT CASH DRAWER ACCOUNTS RECEIVABLE LAYAWAY TAKEOUT DEBIT CREDIT 119 / 362 LAYAWAY SALES LAYAWAY DEPOSIT DEBIT CREDIT BANK LAYAWAY LAYAWAY FORFEIT DEBIT CREDIT LAYAWAY MISC INCOME PAID OUT DEBIT CREDIT ACCOUNT NUMBER CASH DRAWER GIFT CERTIFICATE DEBIT CREDIT BANK GIFT CERTIFICATE CASH DRAWER OVERAGE DEBIT CREDIT BANK CASH DRAWER OVER & SHORT CASH DRAWER SHORTAGE DEBIT CREDIT CASH DRAWER OVER & SHORT BANK BANK DEPOSIT DEBIT CREDIT BANK CASH DRAWER SERVICE CHARGE DEBIT CREDIT ACCOUNTS RECEIVABLE FINANCE CHARGE INCOME WAIVE FINANCE CHARGE DEBIT CREDIT FINANCE CHARGE INCOME ACCOUNTS RECEIVABLE A/P PAYMENT DEBIT CREDIT ACCOUNT NUMBER BANK SALES REFUND 120 / 362 DEBIT CREDIT TAX BANK OR A/R RETURNS AND ALLOWANCES COST OF GOODS FREIGHT OUT INVENTORY RECEIVE PURCHASE ORDER DEBIT CREDIT INVENTORY ACCOUNTS PAYABLE Chart of Accounts Current Asset - A balance sheet account that represents the value of all assets that are reasonably expected to be converted into cash within one year in the normal course of business. Account Names are: Bank, Cash Drawer, Accounts Receivable, Inventory, Defective Inventory and Intra Store Xfer. Current Liability - A company's debts or obligations that are due within one year. Current liabilities appear on the company's balance sheet and include short term debt, accounts payable, accrued liabilities and other debts. Account Names are: Gift Certificates, Accounts Payable, Sales Tax and Layaway. Equity is the residual claim or interest of the most junior class of investors in assets, after all liabilities are paid. Account Names are: Retained Earnings and Contributed Capital. Income - is the consumption and savings opportunity gained by an entity within a specified time frame, which is generally expressed in monetary terms. Account Names: Sales, Returns and Allowances and Sales Allowance. Other Income - Term on an earnings report used to represent income from activities other than normal business operations. Account Names are: Inter Store Xfer, Misc Income, Finance Charge Income. Expense - Any cost of doing business resulting from revenue-generating activities. Account Names are: Discounts Allowed, Freight In, Cash Drawer Over and Short, Freight Out and Bad Debt. Cost of Goods Sold (COGS) - An income statement figure which reflects the cost of obtaining raw materials and producing finished goods that are sold to consumers. Account Names are: Cost Of Goods, Cost Of Transfers. Cost of Goods Sold = Beginning Merchandise Inventory + Net Purchases of Merchandise Ending Merchandise Inventory. Unreported – Category of Reports that will not be considerate a part of G/L accounts, won’t be displayed in Reports and usually includes accounts such as Loss Due To Shrinkage. NOTE: The chart of Accounts will only display balances for the fiscal year for the income statement accounts. 121 / 362 General Ledger Trial Balance The first step in preparing to print financial statement or to transfer information to a 3rd party general ledger software is to run a Trial Balance in Winsale to make sure that your accounts are balanced. For the first run of this report, you will only need to look at the Trial Balance Summary (no account detail). The page is sorted by account number not description. This way the accounts may be viewed by Assets at the top, Liabilities and income in the middle and expenses at the bottom. The debits are correctly placed in the left hand column and credits are in the right hand column. If this report balances and you don’t receive any errors when running it, you can proceed with printing a Profit and Loss Report, Posting to Winsale internal files so that you can print a Balance Sheet. The trial balance must also balance in order to transfer to any 3rd party G/L. If, however, this summary does not balance and/or you get error messages when running it, you will need to print this report with full detail. To print the General Ledger Trial Balance report: 1. 2. 3. 4. 5. From the General Ledger Module. Select the dates that you want to work with on the calendars Click the Trial Balance Button Click ‘NO’ when prompted to print Only GL Journal Entries. When prompted to print the detail of what makes up the balance, answer YES to show Detail or NO to hide the detail. You only need to show detail when the period does not balance and you need to research why it doesn’t. a. If you found a problem with the Trial Balance Summary or have had a problem transferring information to the 3rd party general ledger, press ENTER to print the report with account detail. 6. You may see Warning messages on the screen as the report is being processed: These warnings will tell you that there is an undefined account in the POS General Ledger. You 122 / 362 could see these warnings for any transaction in the program. There are two possibilities for these errors: 1. An account number was typed incorrectly in a transaction or no account number was entered. In this case, you need to go back to the transaction and edit it to include a valid G/L number. (See Section 8.5.1 for more information.) 2. You have used an account number that has not yet been added to the General Ledger Account Definition. Add the account, following the instructions in Section Adding General Ledger Accounts. Press ENTER to clear these warnings from the screen and proceed with the report printing. General Ledger Trial Balance Summary Balancing the General Ledger Trial Balance After you print the Trial Balance report, check to make sure that the Credits and Debits totals are the same and that there are no 0’s for account numbers. WARNING: If you have any zeroes (0’s) for account numbers, your data will not transfer to the G/L software program. If your credits and debits do not balance, you will transfer inaccurate information to the G/L software. 123 / 362 If you find any of the above errors in the Trial Balance Summary, then you should run the Trial Balance with detail to identify the transactions and accounts that are causing the problems. To run the Trial Balance with detail: 1. Follow the directions outlined in General Ledger Trial Balance. 2. When you get to Step 5, choose to print detail. Proceed with the rest of the directions as written for printing the report. Sample Trial Balance report with Detail 3. The Trial Balance report with Detail will show subtotals for each transaction type. Check each of the subtotals to make sure that the credits and debits match. 4. If you find a subtotal where the credits and debits are different, look at the detail, by transaction, to make sure the credits and debits match by transaction. 5. If you find transactions in which the debits and credits don’t match, use the transaction charts to make sure that all of the correct accounts are listed for the transaction. a. If you find that an account number is missing or appears on the report as 0, then you will need to add the correct account, according to the transaction charts, to the General Ledger Account Definition. 6. If you can’t get your Trial Balance to balance after following the directions above, call Magnum Software. 124 / 362 NOTE: The Trial Balance Report prints the Beginning balance for all Accounts and then calculates an ending balance for these accounts. The beginning balance is taken from prior posted periods and typically will be the ending balance as shown in the Chart of Accounts unless you are running a trial balance for an earlier period that has already been posted. Updating Quickbooks Pro GL The interface to Quick Books Pro is very easy as no initial set up has to take place. All of the General Ledger Accounts that are needed to update Quick Books Pro from Winsale will automatically be generated into Quick Books by Winsale. In addition, any Customer or Vendor profiles that are needed are also automatically created on the Quick Books side. Thus, literally you can simply install Quick Books and update it with your Winsale data with answering only a few simple questions. The following procedures are all that are needed to update Quick Books. Quick Books Side: 1. Run Quick Books Pro and open your company within Quick Books. 2. Back up your company data. Winsale Side: 1. Run a trial balance for any period within a one year boundary. This trial balance must balance before you can update Quick Books. 2. When the trial balance is in balance the ‘Update Quick Books’ will be enabled. 3. Press the ‘Update Quick Books’ button to start the connection between Winsale and Quick Books. Winsale warning message 4. Winsale will warn you about backing up Quick Books before proceeding. This is very important because the updating Quick Books is non-reversible. 5. Quick books will take over from this point as it accepts information into it from Winsale. QuickBooks Side: 125 / 362 1. The first time that Winsale communicates with Quick Books it will display a security message. You should answer Yes, Always. 2. A final dialog is displayed to ask you the same question again (only worded a little different). Again, you should answer ‘Yes’ 3. After answering the above dialogs, you will not be prompted for anything else. The communications will proceed between the two programs. You can now switch back and forth between Winsale and Quick Books to watch the communication of information or you can simply watch Winsale’s progress. In either event, the information will be passed to Quick Books from Winsale. 126 / 362 9 Vendor Information Vendor Profile Screen Where is Vendor Information? To gain access to Vendor Information: 1. Locate the Profile Menu on the Main Winsale Window. 2. Select Vendor Profile from the Profile Menu. Adding a New Vendor in the Vendor Profile TIP: Always use either all CAPS or all Upper and Lower case when adding vendors, including any vendors added from Purchase Orders. Never switch styles once you have begun. Following this rule will keep your vendor look up efficient! NOTE: Winsale includes Smart Capitalization to make entry easier using upper and lower case. All you have to do is type—you never need to ‘Shift’ to a capital letter! 1. As soon as you enter the Vendor screen you are in Add mode. 2. The vendor number displayed is the next available vendor number. You do not have to use the number as shown. You may, for example, use a phone number or some other unique number. TIP: If you use the system’s vendor numbering system, it’s easier to keep track of the next available number so that there aren’t any vendor number mix-ups. 127 / 362 3. Press ENTER to accept the vendor number that appears or type in a different number over the default number and press ENTER. Note: If you choose to use your own number, leading zeros will be used to fill the leading spaces of the number up to eight digits. 4. Fill in the pertinent fields, pressing ENTER to leave them. See Section 9.10 Vendor Fields Defined for field definitions. 5. When you are finished entering information for a vendor, press ENTER after the last information entered and press F9 (SAVE). Nothing will be saved unless you press the F9 key or click Save. Save Vendor Information to Outlook Vendor Information can be saved to Microsoft Outlook’s Contacts Folder. This gives you the ability to enter information into one place (Winsale) and then save it to be used in Microsoft Outlook or any smartphone that uses Outlook. Microsoft Active sync can then automatically transfer your information to and from a personal information management device. The Quick Save to Outlook key is F11 and can be used from vendor profile screen. Save to Outlook warning message How to Exit If you decide that you don't want to save what you have entered, press the F10 (Menu) key or Click Exit. The screen will change back to the Main Menu without saving anything. How to Search There are three ways to search for a specific vendor: 1. By Vendor Account Number 128 / 362 2. By Vendor Look Up 3. By Vendor Account Name Search by Vendor Account Number 1. Upon entering the Vendor screen, type in the vendor number to be searched. 2. If the account number is found, the information recorded for that vendor is immediately brought to the screen for viewing or modification. a. If the information that appears on the screen is not the correct vendor, you may use the up/down arrow to narrow down. 3. If the information is not found, the system will assume that you want to add another vendor with this number. Press F10 or click Exit to exit the module. Search By Vendor Look Up 1. 2. 3. 4. 5. When the cursor is at the vendor number prompt, begin typing the first few letters of the vendor’s name. This will display an alphabetical listing of vendors. You will be in the section of the listing which contains the letters that you typed. Use the directional arrows on the keyboard or click on the chosen vendor profile. You can now view and/or modify the vendor profile. TIP: Vendor Lookup will also allow you to specify to view only your stores vendors. To be able to do so, click on Show Only My Vendors option. How to Modify Vendor Profiles Once you have the vendor information on the screen, you are in the Modify Mode and can modify or delete this vendor. To modify: 1. Click in or use the arrow keys to go to the field you wish to change. (If the cursor is in the Name field, press the up arrow to go to the Contact field.) 2. Type over the information in the field or add to it. 3. If you make any changes that you want to save, press the F9 (Save) key or click Save. 4. If you wish to cancel any changes and you have not pressed the F9 (Save) key, press either the F10 (Menu). TIP: You may also renumber vendors via the Power Spreadsheet functions. Doing so will also renumber all history associated with the vendor to a new Vendor number. This function makes it very easy to mass update ranges of vendors and alleviates the one at the time method that the vendor look up provides. 129 / 362 How To Delete Once you have searched and found the account you are looking for, you may delete it from the vendor file. 1. If there are any notes attached to the vendor that you are deleting, press F8 to view the note, then press F3 to delete it. Press ESC when you are finished. 2. 3. 4. 5. Press the F3 (Delete) or click Delete. A window will pop up to verify that you want to delete the account. By answering `No' you will return to modify mode. By answering `Yes' the account will be permanently removed from the vendor file. However, all history is still retained for this vendor. WARNING: In order to avoid confusion and maintain file integrity, you should only delete vendor profiles for very old vendors that you are sure you will never purchase from again. If you are using Accounts Payable, you may set an old vendor’s status to ‘N’ to insure that no checks are written to the vendor. See Section 9.10 Vendor Fields Defined for more information. Vendor Notes There are two types of vendor notes available: 1. F8 Vendor Notes that appear on the Vendor Profile and Purchase Order screens. 2. F7 PO Notes which print on Purchase Orders. Vendor Notes (F8) These are user-definable notes which can be used to store any information that you like. You may want to keep track of salespeople’s names, credits due, special order or discount information, etc. These notes can be viewed and edited from both Vendor Profiles and Purchase Orders. To create, view or edit vendor notes from the profiles screen: 1. Pull up the Vendor Profile for the vendor that you want to view. 2. From anywhere in the profile screen, press the F8 or click notes. 3. Type in the note that you want to save, or type over any part of the note that you want to change. 4. If you want to delete an existing note, click Delete when the note is on the screen. The entire note will be deleted. 5. Click Exit and your note, with any changes, will be saved. 130 / 362 Purchase Order Notes (F7) Purchase Order notes can be attached to PO’s in two ways: 1. From the Vendor Profile screen - Any PO notes attached through Vendor Profiles will print on all purchase orders for the vendor. This type of note is good for shipping directions that never change. To add these notes: 1. Pull up the Vendor Profile to which you want to add a Purchase Order note. 2. From anywhere in the profile screen, press the F7 key or click Note. 3. Type in the note that you want to save, or type over any part of the note that you want to change. 4. If you want to delete an existing note, click Delete when the note is on the screen. The entire note will be deleted. 5. Click Save and your note will be saved. 6. Any purchase order notes in the system for a vendor will automatically print on all purchase orders for that vendor. NOTE: These notes will not be deleted until you manually delete. See Section 10 Note Pads for more information. 2. From Purchase Orders Modules - PO Notes attached through a purchase order are attached permanently to the purchase order that you were working on when you wrote the note. This allows you to reprint purchase orders with the notes that you wrote about them. This type of note is good for any special pricing that you negotiated. To add these notes: 1. Type in the Vendor to which you want to add a Purchase Order note. 2. From anywhere in the purchase order, press the F7 key. 3. Type in the note that you want to save, or type over any part of the note that you want to change. 4. If you want to delete an existing note, Click Delete when the note is on the screen. The entire note will be deleted. 131 / 362 Vendor Letters Winsale includes the ability to create a simple letter to your vendors: 1. Pull up the Vendor Profile for the vendor to whom you want to send a letter. 2. Press F2 (Letter) or click Letter. 3. The program will present a screen with today’s date, the vendor name and address and a “Dear…” line. 4. Type in your letter, along with your closing, as if you were using a simple word processor. 5. When you are finished, click Print to print the letter. 6. You will be given a choice of printer options. Choose your printer and print driver and your letter will print. See Section 10 Note Pads for more information. Vendor Fields Defined Vendor Number (8 Digits) -- The vendor number is automatically generated for your convenience. As you add new vendor accounts to the system, the next number is entered automatically for you. The system has the capacity to hold up to 99,999,999 vendors. Name (30 A/N) -- The name of this vendor; e.g., Nike, Inc.. You should always be consistent when adding or modifying this field. Always let Winsale capitalize the first letter of proper nouns, or always use all CAPITAL letters. Do NOT have some names in all capital letters and the rest otherwise—this makes searching for vendors very difficult. Winsale’s searching capabilities are case sensitive. Address Lines 1 & 2 (30 A/N) -- The mailing address(es) for the vendor. This address will appear on the purchase orders. Zip Code (9 Char) -- Type in the zip code for the vendor. Do not type the dash for Zip Codes with 9 digits. Press ENTER when you are finished typing. The system will look at the built-in Zip Code database and automatically fill in the City and State fields for you. If you would like to use Upper and Lower case letters for the city and state, you may make modifications in the Zip Code Modifier. ( Zip Code Modifier can be found in the Profiles Menu) City (20 A/N) -- This field will automatically be filled in based on the Zip Code that you entered. Simply press ENTER to accept this city. In some cases the zip code database may have a different city name connected to a zip code than the one that your vendors use. If this occurs, you may type in the correct city name over the name that the system uses. You may also make a permanent change in the zip code database by using the Zip Code Modifier. ( Zip Code Modifier can be found in the Profiles Menu) State (3 Char) -- This field will automatically be filled in based on the Zip Code you have entered. Press ENTER to accept this date. Phone Numbers 1 & 2 -- The vendor's phone numbers. Use the second telephone number field for the vendor’s main number. This field will appear in the reports for easy reference. 132 / 362 FAX Number -- If the vendor doesn't have a fax, this field can be used as another phone number field. Payee Address Line 1 (30 A/N) -- This field defaults to the Vendor name entered above. If this vendor does not use a factor, press ENTER. If this vendor uses a factor, type the factor name over the default name and press ENTER. This is the name that will print on checks through the Accounts Payable module. Payee Address Line 2 (30 A/N) -- This field defaults to Address Line 1 entered above. If this is correct for the Payee, press ENTER. If this address is not correct, type the correct address over the default address and press ENTER. When the Accounts Payable module is installed, this is the address that will appear on the checks. Payee City (20 A/N) -- This field will default to the Vendor’s city entered above. If it is correct, press ENTER. Payee State (3 Char) -- This field will default to the Vendor’s state or province entered above. If it is correct, press ENTER. Payee Zip Code (9 Digits) -- This field defaults to the Vendor’s zip or postal code entered above. If it is correct, press ENTER. FYI & FYI2 (24 A/N) – These fields are user-definable and can be used to store any information, including a salesperson’s name. If you prefer to leave them blank, just press ENTER two times. MTD Purchases (12 Digits) – The total amount of purchases during the current month. This field is automatically updated by the Purchase Order Module. It is reset to 0 during the monthly close out if you run MTD Figure Close Out. YTD Purchases (12 Digits) -- The total amount of purchases during the current year. This field is automatically updated by the Purchase Order Module. It is reset to 0 during the yearly close out if you run YTD Figure Close Out. YTD Discounts Taken (12 Digits) -- The year‑ to‑ date amount of discounts that this vendor has allowed you to take because of meeting or beating discount dates. This field is automatically updated by the Accounts Payable Module. It is reset to 0 during the yearly close out if you run YTD Figure Close Out. Terms Code (2 A/N) -- The vendor's terms code which represents the discount that the vendor has agreed to give you. See Section 12 Terms Definition for more information on how to define this field. If you need to look up your existing terms codes or define a new terms code, press CTRL-F1 from this field to access the Terms Definition Table. You can highlight the terms that you want to use and press ENTER or add a new terms code. If Accounts Payable is installed, this terms code may be overwritten at the time of purchase order entry and receipt. This field must be filled in. Status A/N (1 A/N) -- The payment status for this vendor. The vendor may be put on universal payment hold by using an `N' for non‑ active status. This means that the Accounts Payable module will not allow checks to be issued to this vendor. When receiving a purchase order for a vendor on non‑ active status, a hold flag is automatically placed on the transaction in the Accounts Payable Module. If this field contains an `A', the vendor is put on active status. In this case the Accounts Payable module will issue checks for this vendor on demand (unless over‑ ridden in the Accounts Payable module.) 133 / 362 First Transaction Date (Date) -- The date of the first transaction with this vendor. This date is automatically updated by the Purchase Order Module. Last Transaction Date (Date) -- The date of the last transaction with this vendor. This field is automatically updated by the Purchase Order Module. Vendor Look Up With Winsale you never have to memorize or know a vendor account number. There is full look up capability in alphabetical order from any vendor number field in the program. To access this look up: 1. From a Vendor Number field, type in the first few letters of the vendor’s last name. 2. You will be taken to the alphabetical listing of vendors whose names begin with the letters that you typed in. 3. Use the arrow keys to highlight the correct vendor and press ENTER or click on the vendor profile that you want to view. 4. The vendor will be pulled into the field that you did the search from. 5. If you made a mistake, press the ESC key and start again. 6. TIP: In order to make the vendor look up efficient, all entries should be entered the same way-- either all Capitals or all Upper and Lower case. It is very important not to mix styles because the Look Up is case sensitive! TIP: You may also renumber accounts directly from the vendor look up table. Simply select the Vendor account you want to renumber and then click on the ReNum button. You will be prompted for the new account number to renumber to. 134 / 362 Vendor Look Up Screen 135 / 362 10 Notes This chapter with discuss the availability of attaching notes in Vendors profiles, customer, sales and many more! What Are Notes? Winsale’s built-in note pads are like electronic POST-IT Notes® that can be attached to nearly any part of the system. They are used to attach ideas, reminders, suggestions to sales clerks to customer records, vendor records, inventory, etc. They can later be called up for viewing or printing to a printer. Adding Notes Adding notes to the system is an extremely easy process: Pull up the file to which you want to attach a note. Press the hot key (‘F’ key) or click the note icon for the type of note that you want to add. (Hot keys are usually defined in [] on the tool tip of a menu choice.) 3. Type in the note that you want to save. 4. Click Save then Exit on the Notepad. Note pads can be used for Customers, Vendors, Inventory and Salespeople as described below. 1. 2. Customer Notes Customer Notes are user-definable which can be used to store any information that you like. You may want to keep track of birthdays and anniversaries, sizes, family members, credit information, etc. These notes can be viewed and edited from Customer Profiles, Quick Sales and Received on Account, so they are a good place to store information that you want your sales people to refer to. To create, view or edit customer notes: Customer notes are visible on the customer lookup table the point of sale screen and customer profile screen. If the customer is an employee of a major account the parent account is also visible from the customer lookup screen and the point of sale screen. From the Profiles screen: 136 / 362 Customer Note from the Customer Profile Screen Pull up the Customer Profile for the customer that you want to view. From anywhere in the profile screen, press the F8 key or click Note. Type in the note that you want to save, or type over any part of the note that you want to change. 4. If you want to delete an existing note, click Delete when the note is on the screen. The entire note will be deleted. 5. Click OK and your note, with any changes, will be saved. 1. 2. 3. Customer Notes are also sort able from the Mailing Label program. If you use a code for birthdays such as B[month], (ex: B08 for an August birthday), you can perform a sort from the Mailing label program for all notes that contain B08. See Section 19.3 Customer Reports for more information. TIP: Keep any information that you will use with the Mailing Label program consistent and simple. This will make the sort a lot easier. Customer Letters Winsale includes the ability to create a simple letter to your customers from the Customer Profile screen: 1. Pull up the Customer Profile for the customer to whom you want to send a letter. 2. Press F2 (Letter) or click on Letter. 3. The program will present a screen with today’s date, the customer name and address and a 4. 5. 6. 7. “Dear…” line using the customer’s first name. Type in your letter, along with your closing, as if you were using a simple word processor. If a letter has already been entered for this customer, the old letter will be displayed so that you may edit it. If you want to start a new letter, press the F3 key to delete the old letter. When you are finished, click Print to print the letter. You will be given a choice of printer options. Choose your printer and print driver and your letter will print. When you are finished, click OK. Your letter will be saved until you overwrite it by pressing F2 and type a new letter over the old one. 137 / 362 Customer Profile screen with the Letter Note Pad Sales Tickets Notes These notes can be attached to any sales ticket from the Quick Sale screen. The note will be automatically printed when the receipt is printed. Sales Ticket Notes then become a part of the permanent record for that sales receipt number. They can be used for printing instructions, such as special washing instructions for a garment, or comments to the customer as simple as “I appreciate your business”. To attach a note to sales ticket: 1. 2. 3. 4. Enter the Quick Sale screen. From anywhere in the Quick Sale screen, press the Ctrl-F8 key. Type in your note. Press the OK button to save it. Vendors Vendor notes are user-definable notes of up to 100 lines which can be used to store any information that you like. You may want to keep track of salespeople’s names, credits due, special order or discount information, etc. These notes can be viewed and edited from both Vendor Profiles and Purchase Orders. To create, view or edit vendor notes: From the Profiles screen: 1. Pull up the Vendor Profile for the vendor that you want to view. 2. From anywhere in the profile screen, press the F8 key or click Note. 3. Type in the note that you want to save, or type over any part of the note that you want to change. 4. If you want to delete an existing note, click Delete when the note is on the screen. The entire 138 / 362 note will be deleted. 5. Click OK and your note, with any changes, will be saved. From the Purchase Order screen: 1. 2. 3. 4. 5. Enter the Vendor that you want to work with. From anywhere in the Purchase Order screen, press the F8 key. Type in your note or any changes that you want to make to an existing note. Click Save and you note will be saved. If you want to delete an existing note, Click Delete when the note is on the screen. The entire note will be deleted. Vendor Letters Winsale includes the ability to create a simple letter to your vendors: 1. Pull up the Vendor Profile for the vendor to whom you want to send a letter. 2. Press F2 (Letter) or click Letter. 3. The program will present a screen with today’s date, the vendor name and address and a “Dear…” line. 4. Type in your letter, along with your closing, as if you were using a simple word processor. 5. When you are finished, click the Print button to print the letter. 6. You will be given a choice of printer options. Choose your printer and print driver and your letter will print. 7. When you are finished, press ESC. Your letter will be saved until you overwrite it or press F3 to delete it. Purchase Order Notes Purchase Order notes can be attached to PO’s in two ways: From the Vendor Profile screen: Any PO notes attached through Vendor Profiles will print on all purchase orders for the vendor. This type of note is good for shipping directions that never change. To add these notes: 1. Pull up the Vendor Profile to which you want to add a Purchase Order note. 2. From anywhere in the profile screen, press the F7 key or click PO Note. 3. Type in the note that you want to save, or type over any part of the note that you want to change. 1. If you want to delete an existing note, click Delete when the note is on the screen. The entire note will be deleted. 2. Click Save and your note will be saved. 3. Any purchase order notes in the system for a vendor will automatically print on all purchase orders for that vendor. NOTE: Vendor notes will not be deleted until you manually delete them using F3. This means that, if you want to delete a Vendor and the notes that are attached to the Vendor, you must delete the notes first. 139 / 362 See Section 9.7 for more information. From Purchase Orders Modules: PO Notes attached through a purchase order are attached permanently to the purchase order that you were working on when you wrote the note. This allows you to reprint purchase orders with the notes that you wrote about them. This type of note is good for any special pricing that you negotiated for a special PO. To add these notes: In the Purchase Order screen, type in the Vendor to which you want to add a Purchase Order note. 2. From anywhere in the Market Matrix Purchase Order screen, press the F7 key. Type in the note, or type over any part of the note that you want to change. 3. If you want to delete an existing note, click Delete when the note is on the screen. The entire note will be deleted. Click Save and your note will be saved. 1. Inventory Notes Winsale includes an Item Note system which allows you to notify your salespeople of item features as they are selling the item. These notes may be anything that you wish. For example, you could use an item note to notify your salespeople to sell a certain belt with a dress. A note could also be used to specify a possible substitute item. Inventory screen with Item Note To attach an Item Note to an item: 140 / 362 1. Pull the item up in the Inventory Screen. 2. If a matrix is shown on the bottom right of the screen, then click the button above it labeled Note. The mini matrix will be removed and the note pad will be displayed in its place 3. Click into the notepad 4. Type your message and press the OK button. Your note will automatically be saved. 5. If you want to delete a note, press the Delete button. Viewing an Item Note from the Quick Sale screen: Once you have saved an Item Note, it will be automatically displayed at the Quick Sale screen as the item is entered into a sale. After the salesperson types or scans in the Item Number, a screen will appear in the upper right hand corner displaying the note. This screen will remain until the sales clerk enters another item number into the system. To print Item Notes on the Sales Receipt: 1. When the Item Note appears on the Quick Sale screen, click the Print button. 2. You will be asked for the printing device and print driver. 3. The Item Note will print immediately on the sales receipt 141 / 362 11 Sales Person Definition Sales Person Profile screen Where is Sales Person Information? To gain access to Sales Person Information: 1. From the Profile Menu 2. ‘Sales Person’ is the third menu option on the Profiles menu. Adding Sales Person Information As soon as you enter the Sales Person Profile screen you are in the Add mode. 1. The cursor will be in the Sales Person Number field. The next available Sales Person Number will be displayed. Press the ENTER key to accept this Sales Person number or type in a different number. TIP: Each Sales Person must have a unique Sales Person Number in order for sales credit to be applied correctly. Although you may use your own Sales Person Numbers, it is best to let the system assign numbers in order to avoid duplication. 2. Fill in the pertinent fields, pressing ENTER to leave them. (See Section Sales Person Fields Defined for field definitions.) 3. When you are finished defining the Sales Person, press the F9 (SAVE) key or click Save. 142 / 362 Nothing will be written to the disk unless this is done. TIP: The Sales Person Name will appear throughout the program exactly as it appears in this profile! Exiting (F10) If you decide that you don't want to save what you have entered, press the F10 (MENU) key or click Exit. The screen will go back to the Profile menu without saving anything. Modifying Sales Person Profiles Once you have the Sales Person information on the screen, you are in the Modify Mode and can modify or delete this Sales Person. To modify: 1. 2. 3. 4. Use the arrow keys or click to go to the field you wish to change. Type over the information in the field or add to it. If you make any changes that you want to save, press the F9 (Save) key or click Save. If you wish to cancel any changes and you have not pressed the F9 (Save) key, press either the F10 (Exit) or click Exit Deleting (F3) Once you have searched and found the Sales Person you are looking for, you may delete it from the Sales Person file. 1. 2. 3. 4. Press the F3 (DELETE) key. A window will pop up to verify that you want to delete the Sales Person. By answering `N' and pressing ENTER you will return to modify mode. By typing `Y' and pressing ENTER the Sales Person will be permanently removed from the Sales Person file. However, all history is still retained for this Sales Person. Sales Person Fields Defined Sales Person Number (3 Digits) -- A unique number that represents a Sales Person. This number will automatically advance to the next available number as new salespeople are added. Sales Person's Name (25 A/N) – The name of the Sales Person. The Sales Person’s name will appear throughout the program the way that it is entered in this field. You may use first and last names, or first names only. (Sales Person’s names may also be printed on sales receipts). Instead of Sales Person names, you may choose to use this field as a Category name, which would allow you to divide your customers into different categories. Gross Profit or Total Sales -- A code that is used to determine how commission is calculated. If Gross 143 / 362 Profit is used, commission is calculated by first subtracting total cost from total sales. For example, if total sales equals $100.00 and total cost equals $80.00, and the employee factor (commission percentage) equals .10, then commission would be $2.00 [($100.00 ‑ $80.00) X .10 = $2.00]. If Total Sales is used, commission is calculated on total sales, without regard to cost. For example, if total sales is $100.00 and the employee factor is .10, then commission would be $10.00 ($100.00 X .10 = $10.00). Hourly Base Pay $ (12 Digits) -- This field is used for informational purposes and to calculate gross pay on the Commission Report. Weekly Factor (6 Digits) -- A number representing a percentage that is multiplied by Gross Profit or Total Sales, depending on which you have set up, to give you a weekly commission amount. For example, if you want to pay your employee(s) 20% of Gross Profit, you would enter .2 into this field. The weekly commission amount will appear on the Employee Sales Commission report. (See Section 19 Reports for more information.) The weekly factor may also be used in conjunction with the ladder pay scale as a “draw” for your commissioned sales people. You can use the weekly commission amount to pay your employees on a weekly or bi-weekly basis. Then, at the end of the pay period, you can deduct the total amount of weekly commissions paid out for the period from the Monthly commission, (determined according to the ladder pay scale), to determine the end of the month pay amount. (Both the Weekly and Monthly commissions appear on the Employee Sales Commission report. See Section 19 Reports for more information.) Under $ (12 Digits) – This is the first rung on the commission ladder pay scale. Enter a dollar amount. If the employee sells less than this amount during a pay period, the corresponding employee factor will be used to calculate the commission for the period. From $ ‑ To $ (12 Digits each) -- Different rungs on the ladder pay scale, with each level being greater than the last. If the employee's sales for the pay period fall into these categories, the corresponding employee factor will be used to calculate the commission for the pay period.. Employee factor (6 Digits each) -- The number, representing a percentage, by which to multiply Gross Profit or Total Sales to get the commission for the pay period. Over $ (12 Digits) -- The last rung on the ladder pay scale. Enter a dollar amount. If the employee sells over or equal to this amount, the corresponding employee factor will be used to calculate the commission for the pay period. TIP: The pay period that the computer uses is determined by the date range that the user specifies when printing the Employee Sales Commission report. This time period can not exceed one calendar month. See Section 19 Reports for more information. Setting up the Commision Ladder Pay Scale 1. If you will not be using the program to determine pay for your employees, you may press F9 to save the Employee Profile after you have entered the employee name. 2. If you will not be paying any commission, enter the Hourly Base Pay rate and enter ‘0’ for the Pay Factor. Fill in the rest of the profile as specified in Step 3. 3. If you will not be using the Commission Ladder to determine commissions, enter "0" in All fields. 144 / 362 4. Other Uses for Sales Person Profiles Some stores like to “departmentalize” their customers into different categories. If this is the case for your store, you may use Sales Person Profiles as categories instead of individual salespeople. For example, you may want to track your customers as men and women. In this case, you would set up employee profiles called ‘MEN’ and “WOMEN”. You would enter the corresponding categories into the sales territory field of your Customer Profiles. (See Section 7 Customers for more information.) This would give you customer category information on the Accounts Receivable Aging report, Sales by Territory report and Employee Sales Commission report. If you also used these “category salespeople” at point of sale, you could run the Periodic hot seller report by category. TIP: If you use the Sales Person Profiles as described above, you would lose the ability to track sales by individual salespeople. You may want to consider setting up a separate set of Sales Territory codes to use in Customer Profiles. (See Section 7 Customers for more information.) You may also want to set up an Employee called ‘HOUSE ACCOUNTS’ for those sales that you will not be paying commission on. Time Clock Winsale includes a built-in time clock which tracks the hours worked by each employee. In addition, you will be able to determine the sales per hour made by each employee, thereby determining the best performing employees and the most profitable times of operation. Time Clock 145 / 362 Where is the Time Clock? Beginning at the main Module Menu, press the right arrow key seven times until Time Clock is highlighted. Clocking In / Clocking Out There are two types of time clock entry: 1) Clock in / Clock out - This type of time clock entry is used in the calculation of hours worked for each employee. 2) Break in / Break out - This type of time clock entry is not used in the calculation of hours worked. It is simply information for store management. To Clock in / Clock out or Break in / Break out: 1. Choose the appropriate function from the Time Clock menu. 2. If you have given employees the password right to allow the employee to change the date and time, the cursor will stop in the date and time fields. If this information is correct, press ENTER in each field. Otherwise, make any necessary changes and press ENTER. TIP: Depending on the password setting, the employee may or may not be prompted for the date and time of clocking in or out. (See the Section 22 Passwords for more information. 3. If you have not allowed employees to change the date and time, the employee will be brought to the salesman number prompt. Type in the Salesman Number and press ENTER. a. The employee’s name will be automatically displayed. The cursor will advance to the next field. b. After this has been typed in, click Clock Stamp to complete the transaction. NOTE: There is an ability to leave a note for a single or all sales people that will be displayed when they clock in or out. To leave a note for a single salesperson, enter their salesperson number as if you were clocking in (or out), then click the Note button on the bottom left of the screen. This will pull up notepad and you can leave any length note that will be displayed once the employee clocks back in or out. If you wish to leave a note for all salespeople you will need to click the Manager menu and then choose the ‘Create Master Note’ choice, now type in the note to be viewed for all employees like in the above step. The Master note will have to be deleted from the manager menu. Explanation of Time Calculations Time is calculated as follows: 146 / 362 Clock in Clock out 09:26 17:25 09:23 17:31 Add Total Times: Clock out Clock in 17:25 09:26 17:31 09:23 34:56 18:49 Convert Hours to Minutes: 34 * 60 = 2040 Hours to Minutes 18 * 60 = 1080 Hours to Minutes + 56 Actual Minutes + 49 Actual Minutes ______ Total 2096 Total Find the difference between Clock out and Clock in Minutes: 2096 Clock Out Minutes -1129 Clock In Minutes _____ 967 Minutes Worked Convert Minutes back to Hours: 967 / 60 = 16.11 Decimal Hours Worked 147 / 362 1129 Convert Fractional part of Decimal Hours back to Hours and Minutes by multiplying remainder of Decimal Hours by .60 .11 * 60 = 6.60 Minutes Round up or down as appropriate, thus leaving 07 Minutes. TOTAL HOURS WORKED : 16 HOURS AND 7 MINUTES Employee Performance Reports Using Hours Worked Employee Reports Menu Reporting of hours worked is displayed from two different locations from the Reports Module: 1. Employee Performance report, located on the Employee Reports menu. This report shows each individual time clock entry and the total hours worked for the time period requested. The time period can be any date range within a calendar month period. You may report on time clock entries for all employees or just one employee at a time. In addition to hours worked, this report also shows Total Sales for the time period and Sales per Hour. 2. Employee Sales Commission Report, located on the Employee Reports menu. This report will give you all of the information that you need to determine employee pay amounts. It includes complete sales information, commission and bonus amounts and total hourly pay based on the time clock data. The time period can be any date range within a calendar month period. You may report on pay information for all employees or just one employee at a time. 148 / 362 12 Terms Definition Terms Definition Screen What Are Term Codes? Term Codes are user definable codes that represent the discount that vendors give to you if you pay on or before a given date. (Winsale also uses the same codes for customer terms and discounts.) The payment date to receive a discount is calculated from the date that you enter the vendors invoice, or from the date that you ship out goods to your customer. For example, you may have terms of Net 10, 2%. The vendor would give you a 2 percent discount if you paid the invoice on or before 10 days from the date of receipt. Additionally, you may instruct the computer to set the discount date to a specific day of the month. For example, common vendor terms are 10, EOM,2. With these terms the vendor would give you a 2 percent discount if you pay the invoice on or before the 10th day of the next month. You can set up two‑ digit codes to represent terms information. Winsale uses this code to determine the best time to pay your bills in order to receive the largest discount. See Section 24 Accounts Payable and Section 9 Vendor Information. 149 / 362 Where is the Terms Definition Screen? You have access to the Terms Definition screen from 5 different places, including almost all Terms fields: Terms Definition Screen - To gain access to the Terms Definition screen from the main Module Menu, click the ‘Profiles’ menu, then “Terms Definition”. 2. Vendor Profile Screen - To gain access to the Terms Definition screen from inside the Vendor Profile screen, double click in the Terms Code field. 3. Accounts Payable Module - To gain access to the Terms Definition screen from the Accounts Payable module: Click on “Program” – “Post Payable Entries” and double click on Terms Code field (highlighted yellow) located in lower part of the window. From the Payables Entry/Modify screen, place the cursor in the ‘Terms Code’ field and double click on the terms code field. 1. 4. Customer Profile Screen - To gain access to the Terms Definition screen from inside the Customer Profile screen, click on “Profiles” in main module, then “Customer Profile” amd then double click on Terms Code field. Terms Fields Defined Terms Code (2 A/N) -- The terms code is a unique code that represents a user‑ definable terms definition. The only limitation is that, if the terms code involves a particular day of the month, (vs a number of days), as in EOM terms which refer to the 10th of the month, you must use a "D" as the first digit so that the system will recognize it as such. TIP: To keep your terms codes simple, it is best to relate them to the actual terms. For example, if you are to receive a 10% discount with Net 30 terms, use a terms code of 10. For EOM terms of 2%, use a terms code of D2. Discount Days (3 Digits) -- The number of days the vendor allows you to make payment in order to receive a discount. If a "D" was used in the Terms Code (see above), the system will follow the discount days with a `th', ‘rd' or `st' to represent that this day is a particular day of the month. For example, if your discount will be used up to and including the 10th day of the month after the invoice was received, (an EOM term), then enter the number `10' for the discount days and use a ‘D’ terms code. If you are receiving a straight percentage discount of Net 30, use ‘30’ for the discount days. Discount Percent (4 Digits) -- The percentage taken off of the vendor's invoice, less shipping, etc, if payment is made on or before the discount days. This number should be entered as a whole number. For example, 10% should be typed in as 10.0. Due Days/Break Day (3 Digits) -- The number of days this vendor allows you to make payment of its invoice before it is considered overdue. 1. For Net terms, the Accounts Payable module will add this number of days to the Date of Receipt/Invoice, (depending on which date you use), in order to determine the invoice due 150 / 362 date. 2. For EOM terms, (those that use a ‘D’ terms code), this number represents a Break day which is a day of the month. For example, if your terms are 10,EOM and you use a break day of 25, (for the 25th day of the month), and your goods are received on or before the 25th day of the month, then your invoice due date would be the 10th of the next month. If your goods are received after the 25th of the month, your invoice due date would be the 10th of the month after next month. How To Add Term Codes 1. After accessing the Terms Definition table, type the new Terms Code in the Terms Code 2. 3. 4. 5. column and press ENTER. Use "D" as the first digit of the terms code only if you want to specify that the discount day is going to be a constant day of the month and not one that is calculated from the receipt/invoice date. Type in the Discount Days that the vendor allows and press ENTER. Type in the Discount Percent, as a whole number, that the vendor allows and press ENTER. Type in the Due Days or the Break Day that the vendor allows and press ENTER. As you press ENTER in the last column, the new terms code is added to the table. How To Modify 1. After you enter the Terms Definition screen, choose the Terms Code that you wish to modify. 2. Type that Terms Code into the Terms Code column. The cursor will automatically jump to the Discount Days. 3. Enter the new values for the other fields, pressing ENTER after each entry. 4. As you press ENTER in the last column, the modified terms code is added to the table. How To Delete 1. After you enter the Terms Definition screen, Highlight the Terms Code that you wish to delete. 2. Click on the Delete button at the bottom of the screen. Sample Terms Code Terms Code Explanation 02 = 2%,10 You will receive a discount if you pay within 10 days of the receipt/invoice date. Total invoice is due within 30 days. 08 = 8%,10 You will receive a discount if you pay within 10 days of the receipt/invoice date. Total invoice is due 151 / 362 within 30 days. 30 = Net 30 There is no discount offered. Total invoice is due within 30 days. D2 = 10,EOM,2% You will receive a 2% discount if you pay by the 10 of the month. If goods were received by the 25 , th you must pay by the 10 of the following month to receive a discount. If goods were received after th th the 25 , you must pay by the 10 of the month after next in order to receive a discount. D8 = 10,EOM,8% This is the same as D2 above, except that you will receive an 8% discount. th 152 / 362 th 13 Power Spreadsheet Power Spreadsheet Important: All Power Spreadsheets are only accessible to the holder of the master password. Even the master password holder cannot delegate the permissions to access the Power Spreadsheets to another user-level. What Are Power Spreadsheets? The Power Spreadsheets embedded into Winsale were developed as a tool to allow the store owner/manager to have full access to the data they have collected within Winsale. It allows you to work with the data individually or in groupings. You can use the Power Spreadsheets to simply report on your data or to use the built in functionality to modify large masses of data without having to do repetitive work on individual pieces of data. There are three distinct Power Spreadsheets built into Winsale and they are; Inventory Power spreadsheet, Customer Power spreadsheet, and Power Spreadsheet. Depending on which power spreadsheet that you use it has different functionality. 153 / 362 Why have separate Inventory Power Spreadsheets? The inventory Power Spreadsheet has some features that are unique solely to the Inventory file and would not be useful to other databases within Winsale. Archive Any This function will remove the item(s) from inventory and place them into the Archive Inventory file. The difference between this function and its related function Archive Dead is that it will remove the inventory from inventory without relation to any kind of quantity values or sold dates found on the item in question. See Archive Dead for more information. Delete The item(s) is deleted totally and is not placed into the Archive Inventory file. The Deletion is logged into the Variance file for auditing purposes. Audit The items(s) are audited against all historical information recorded into Winsale. If variations from history is found the item is corrected to reflect the historical records. All history is looked at in order since the last inventory variance was recorded for the item or since it’s creation. As with all Inventory Auditing inventory variances take precedence. Print Labels Barcode labels are generated from the selected items(s). The number of items that are printed is based on the quantity on hand. You may consider doing an Audit on the inventory preceding the inventory label generation to ensure that you print the correct number of labels. Sale Price All items that are selected will have sale price set. The sale price is the same for all selected items and therefore should always be in a related grouping such as by style number. You will be prompted for the expiration date of the sale pricing. Margin/Markup All items selected will have its Margin / Markup field updated to a new 154 / 362 user supplied value. The Power Spreadsheet will update the Resale Price based on using either the Margin or the Markup formula depending on how the inventory is set up in the configuration program. The List Price is not effected by this change, only the Margin/Markup Field and the Resale Price. Resale Price All Selected Items will have the Resale Price updated to a new price. The Resale Price is the same for all selected items and therefore should always be in a related grouping such as by style number. This is a permanent change and is non-reversible. (You may be able to set the Resale Price to the List Price with the Select field to update function) Current Cost All Selected Items will have the Current Cost updated to a new cost. The Current Cost price is the same for all selected items and therefore should always be in a related grouping such as by style number. This is a permanent change and is non-reversible. (You may be able to set the Current Cost to the Last Cost with the Select field to update function) Archive Dead This function will remove the item(s) from inventory and place them into the Archive Inventory file. You will be prompted to enter a date that you want Winsale to base it archiving on. Winsale will compare the date you enter to the items last date sold date and will archive the item if it hasn’t been sold since this date. The item will also have to have 0 as the quantity for the following fields: On hand, On Order, Layaway (allocated). The records that pass the above test will be sent to the Inventory Archive file and removed from the active inventory file. List = Resale All selected items will have the List Price field in inventory set to the Resale Price field. The List Price field is really only informational and is not used in any calculations within the system. It can be printed on barcode stickers to show comparison pricing if your resale price is less expensive to the List Price. Vendor Number, Tax Flag, Department, Alternate Department All selected items will have the chosen field modified. You will be prompted for the corresponding field value to update the selected fields to. Select Field to Update This is a special and powerful function that lets you choose and field level variable and do any one of the following functions to it 1. Over-Write – Over write the field completely with the new value 2. Replace Partial – Replace only the first x characters where x = length of the replacement value 3. Append – Add to the end of the existing value the new value 4. Prefix - Add to the beginning of the existing value the new value 5. Truncate – Truncate the existing value by the length of the new 155 / 362 value Instead of supplying a value to the field update you will have the option of supplying another existing field to supplant the current field with. For example, you can have this function replace the Vendor Item Number field with the Item Number field. As this value changes with each item number it would be impossible to set the vendor item number field without this functionality. Why have separate Customer Power Spreadsheet? The Customer Power Spreadsheet has some features that are unique solely to the Customer file and would not be useful to other databases within Winsale. 156 / 362 Export to Mailing Label Program You can use this function to create an export file to be used by the Mailing Label Program. The Mailing Label program has the ability to read in a list of account numbers and cross reference those account numbers to the corresponding customer database. The same ability as found here is also found within other areas of Winsale. The Periodic Hot Seller has the ability to export the underlying customer number of any transaction to the Mailing Label program. Postage Creator You can use this function to create postage with our Stamps.com® interface. Viewing Data in Power Spreadsheet The Customer and Inventory Power Spreadsheets are working with the Customer and Inventory files respectively. When working with the main Power Spreadsheet you will be prompted with the database to work with. This is usually intuitive as most databases are self-explanatory. For example, to work with Purchase Orders simply select Purchase Orders, or to work with History simply select History. Some databases are not always so easy to know what is in them. If you cannot figure out the correct database then please call our tech support team and they will be glad to help. To operate the power spreadsheets you must load the information into it by one of the selected ‘group by’ categories. These ‘group by’ categories will be different with each database. For example, note the differences between the Inventory and Customer databases. INVENTORY CUSTOMER Item Number Customer Number Vendor Number Customer Name Size Sales Territory Color City Style State Department Zip Code Date Code Alternate Department 1. Choose your ‘group by’ category that is most logical to you in your circumstance. Then in the criteria range use values that are reflectable of that ‘group by’ category. For example, to look at inventory that for of a certain vendor, you would group by “vendor number” of the vendor that 157 / 362 you are wishing to query and, for the ‘criteria range’ use the vendor number in both the ‘from’ and ‘to.’ 2. Press the Load button Hide/Un-Hide Dialog This will load the spreadsheet with only the vendor that you want. However, it will load so much information that it may be over-whelming. This is why we have implemented the Hide/Un-Hide button in the tools section. Hide/Un-Hide allows you to select the fields that you want to see and hide the fields that you don’t want to see. (This setting is persistent between viewing of the same database. This means the next time that you view this same database it will be pulled up with the same fields hidden.) Load Where … The LOAD WHERE… button will allow you load data into the power spreadsheet within a relationship of another database, or even the same database. The easiest way to explain this powerful capability is to use an example. Let us suppose that we want to set the sales territory field in the customer file to 999 for any customer that has purchased the item CONSULTATION. So in order to do this we will have to find every customer that purchase this item and have the power spreadsheet load only those customers into the spreadsheet so that we can modify this field Here are the steps: 158 / 362 1. Load the power spreadsheet with the customer database. 2. Press the LOAD WHERE button 3. 4. 5. 6. 7. Choose the History database Choose the Item Number field Choose Equal to Type in the item number into the text box (CONSULTATION). Press OK 159 / 362 The power spreadsheet will now load up with only your customers that have purchased the item number ‘CONSULTATION’. You can now press the select all power tool button. This will select every customer found on the grid. 8. Press the ‘Select Field to update’ button located in the power buttons section. 9. Highlight the Sales Territory field and enter 99 into the new field value. 10. Press OK to update the customer records. Without relational ability of the LOAD WHERE button it would not be possible to accomplish this in the power spreadsheet. Display Item History – very handy tool that allows you to view the item history in just a few clicks. Click on any row that has an item number and store number in. You will then see a popup menu that says “Display Item History”. If you then click on it, the item history will be displayed. 160 / 362 Note: The load where button can be used on the same file as the underlying file that you want to work with. For example you could use it’s capability to load only your customers that are in the State of South Carolina. Power spreadsheet will bring back only the exact record and not all matches to the group by setting. Printing Data with Power Spreadsheet Now that you have hidden the un-needed fields you will have a cleaner work area. You may now use the file/print menu functionality to print out this spreadsheet exactly as it is viewed. You may select certain rows and use the file/print selected menu to print only the selected rows. In either case, only the information that is not hidden will be printed. Selecting Rows in the Power Spreadsheet When you work with the Power Spreadsheets remember that only the selected rows are affected with any or the built in functions. You therefore, must manually select the rows that you want to work with one at a time or by using standard windows selecting mechanisms (see below) or use the selection tools. TIP: If you want to custom select rows in a database based on specific criteria, load database you will be searching in, and click on “Custom Select” button. It will open up a window that allows you to specify data you are looking for. For example, you could always use this function to automatically select all rows in inventory where the Store number field of the record was equal to 36, or select all rows where the quantity on hand is greater than quantity zero. This function will let you select any rows of data that do not have historical information tagged with the item number. This is handy to automatically delete any items in inventory or archive inventory that do not have any historical data belonging to that item number on that row. This insures that no historical data gets orphaned from its parent inventory item. If you are interested in learning more about this functionality, please call Magnum Tech Support. Select type Selection Description Select All Select All will highlight (select) every row on the spreadsheet. (Ctrl+A) Select None Select None will un-highlight (un-select) every row on the spreadsheet. Custom Select Custom Select will give you logical ability to select rows on the grid based on field values within the database. (See below for an example of selecting every row found on the spreadsheet where the Customer Name is greater than ‘W’) 161 / 362 Select every row where customer names is greater than ‘W’ Standard Windows Selecting Methods Range Selection – Selects a contiguous range of rows. Zig Zag Selection – Selects any row you want even skipping over unwanted rows in the middle. 1. Click on the block to the left of the first row in the range to be selected. 2. Locate the last row in the range that you want to select and 3. Hold down the SHIFT key while clicking oh the block to the left of the last row in the range. Hold Down CTRL and click on the block to the left of any row that you want selected. Understand that if you click anywhere on the grid without holding down the appropriate key (Ctrl or Shift) will un-select every other row that is selected. This can cause an amazing amount of frustration. Modifying Data in a Power Spreadsheet As stated above any function that takes place in a power spreadsheet must have its row selected. There is one exception to this rule and that is when modifying a line item one cell at a time. You may simply enter into any cell on a spreadsheet and modify its contents to suit your needs. The data is written once you leave the cell that you have edited and enter into another cell. It is important to remember that you must leave the cell and enter into another cell as any changes won’t be written until this is done. You cannot edit a cell and then click Exit to leave the spreadsheet as this is basically an escape mechanism that lets you exit without saving. That said, to make any other changes to data the row must be a selected row. 162 / 362 To modify data simply select it in any way that you want and then press one of the power buttons on the bottom right-side of the Power Spreadsheet window. NOTE: If you want to mass update your item numbers, you have to be careful doing so, especially if you already have tags or labels created with the old item numbers on them. If you are using WinSale UPC database, there should be no problem modifying item numbers. The only time that you should have to modify item numbers is when you have matrix items that are not assigned Matrix Style Item Numbers and you wish to change them to be equal to the Style + Width or Color + the size. Select Column to Update This is a special and powerful function that lets you choose and field level variable and do any one of the following functions to it 1. Over-Write – Over write the field completely with the new value 2. Replace Partial – Replace only the first x characters where x = length of the replacement value 3. Append to Field – Add to the end of the existing value the new value 4. Prefix to Field- Add to the beginning of the existing value the new value 5. Truncate – Truncate the existing value by the length of the new value 6. Upper Case - Turns any column you choose to have upper case letters. 7. Last Name, First - If you have customer power spreadsheet loaded, it will display they Last names before thier first names. 8. Append Seq. No - Add a sequence to the end of the existing value by specifying the starting number. Instead of supplying a value to the field update you will have the option of supplying another existing field to supplant the current field with. For example, you can have this function replace the Vendor Item Number field with the Item Number field. As this value changes with each item number it would be impossible to set the vendor item number field without this functionality. Importing Data with Power Spreadsheet 1. Start with the Power Spreadsheet. 2. Press the ‘Import from file’ button and answer ‘Yes’ to the confirmation dialog 3. Navigate to the file that you want to import. This file must be a CSV (comma separated value) file. These types of files are common and are easily created with many software programs. 163 / 362 4. The above screen will be shown. It is used to map the fields from the file to be imported and the Winsale database that you want to import into. a) Click on a field from the left hand column (the file being imported in.) b) Click on the matching field of the winsale database. c) Finally click on Map Field. Follow this step for every field that you want to import in. 5. To complete the importation process click on the import button. You may also choose to use the memorize function before choosing the import button. This will memorize the current settings for the mappings and is typically only used for occasions when you will have to import multiple files of the same structure. You could then use the Recall button to reload the file mappings if you have to import the same file again. If the file was exported with Winsale you could use the Use Defaults button. This would use the same field mappings as the Winsale Structure. There are five special importable attributes that can be used. These attributes are used in special circumstances as explained in the following table. [comma] You can use this to insert a space in between two fields that you are importing. For example you might be importing a database that has separate first and last name fields, you can use the [comma] and [space] attributes to separate the name into one contiguous name structure like; Smith [comma] 164 / 362 [space] John The imported database record would be Smith, John [space] The space attribute is similar to the [comma] attribute please see above [comma] explanation for more information. [prompt sequential number] Account Numbers are something not easily importable as many databases simply are without the use of account numbers. You can use the [prompt sequential number] attribute to have Winsale prompt you for the starting number of the first record and it will then use the next number in sequence for the next record and so on. Account Number fields in Winsale are 8 digits and this attribute will ensure that the account number has leading zeros to fill out the 8 digits. [store number] The store number field is a very common record in Winsale databases as most every data file as this field that is mandatory to segregate the individual stores in a chain of stores. The [store number] attribute allows you to assign this number to those store number fields. The current store number is always used as defined in the configuration program. Removing Duplicate Records When working with Power Spreadsheet, you can easily remove duplicate records in any database. Highlight any duplicate record entries and press the remove duplicates button and every duplicate entry will be removed less one. In other words 1 entry will remain after this function has been run. 165 / 362 14 Backup Utility Utility program, located at the Data Menu that will back up your data and configuration files. This utility is optimized for Windows XP/Vista/ 7. Your data can be backed up to CD/DVD or thumb drive, depending on your preference. To choose the thumb drive over CD/DVD method, just choose drive letter corresponding your thumb drive by un-checking Use Windows Writing Ability, and clicking Backup. WinSale Backup Utility In any case, all files will be backed up for you with just the click of the mouse. 166 / 362 Backup Process Restore From Backup After you saved you backup and restored your computer, or bought a new one and installed WinSale on it, there is really easy way to restore all your files and settings back to the way they were. a. You would need to have WinSale installed and registered with Magnum Software. b. Insert your CD/DVD/Thumb drive with WinSale backup and browse to open it (My Computer – DVD drive/ Removable Disk), choose appropriate Backup folder you want to use and double click it. c. you will see a lot of files that were backed up. Search for ZDEFLTS.BTR d. right-click on the file and select COPY. e. Browse to your current WinSale folder location (e.g. My Computer – Local Disc – WinSale) and right click on the WinSale folder and choose Paste. This file (ZDEFLTS.BTR) is responsible for restoring all your settings in WinSale (store name, 167 / 362 number, etc.), so it is vital that you copy it to your local WinSale folder. f. Browse back to your backup, and select all files in the folder, by clicking Ctrl+A to select all files and then Ctrl+C to copy all of them. g. Return to your WinSale folder and find a folder DATA, open the folder by double clicking on it, and press Ctrl+V to paste every file we copied from your backup. This might ask your permission to replace files, allow it to replace all files. Next Steps are required only if you are restoring your backup to a brand new computer or restoring after OS reinstallation/upgrade. h. After you have copied all the files to your DATA folder, search for file with the name winsale.reg Double click on that file, Registry Editor window will pop up. Click Yes. This will input needed information and values to your computer in order for WinSale to work correctly with your data. 168 / 362 15 Accounts Receivable The Accounts Receivable module is a complete and flexible management system for your in-house charge accounts. There are three methods available in the program for handling accounts receivable, all of which can be used simultaneously for different customer categories: Open Item - This method applies payments against specific sales invoices. Payments are applied to invoices until the invoices are completely paid off. Finance charges for this type of account are calculated against any unpaid balance since the last closing date. You also have the option to set up minimum payment amounts with this method. When using the Monthly Close out procedure the payments will be rolled into the Charge line showing Remaining Balance. Balance Forward - Payments made using this method are applied to the entire account balance, not just specific invoices. The account balances are aged and finance charges are calculated against any unpaid balance as of the last closing date. Other options available with this method are setting minimum payments, splitting finance charges according to account balances and calculating delinquent amounts. Revolving Charge - This method applies payments against the total balance but calculates finance charges based on the last payment date so that no aging occurs as long as a minimum payment is made. If a minimum payment is missed or underpaid, the unpaid amount becomes delinquent and is added to the following month’s minimum payment. The main difference between Balance Forward and Revolving is that a minimum payment must be set up for Revolving and the Delinquent amount is tracked and added to the minimum payment. You may also split finance charges based on a balance total. NOCREDIT.FLG – You may create a file in the Servers Winsale folder called NOCREDIT.FLG. This will inform the POS module to not allow over-riding Credit Holds. This does not affect Credit Limits. If this is done then the system will not allow a user to over-ride accounts that are on Credit Hold. It will allow them to over-ride Credit Limits. To create this file: 1. From a Winsale prompt, type edit NOCREDIT.FLG. 2. Once you have created this file screen, press Alt-F and Alt –X. When prompted to save the file, press Enter on ‘YES’. There are three program modules involved in managing Accounts Receivable: 1. Customer Profiles - The Customer Profiles module is where you tell the program the type of accounting system to use for a customer, the finance charge percentage, the credit limit applicable and other relevant information, such as address and phone numbers. 2. Point of Sale - The Point of Sale screen is where you will be charging or crediting accounts and receiving payments on account. 3. Monthly Close Out - The Monthly Close Out includes the procedures to assess finance charges, calculate aging and run monthly statements. 169 / 362 Setting Up In-House Charge Accounts (Accounts Receivable) The first step for setting up an in-house charge account is to set up your customer in Customer Profiles. This is the “template” that the program will use to calculate finance charges and run monthly statements. You also have the option of adding charge account customers from the Quick Sale screen. Setting Up In-House Charge Accounts using Customer Profiles Customer Profile screen If you are just starting up with Winsale, or if you control Credit Approval in the “back office”, you will want to use the Customer Profile screen to add new charge accounts. See Section 7 Customers for directions on adding basic customer information. The bottom third of the screen contains the fields of information crucial to the Accounts Receivable module. They are, specifically: 1. AR Type - This is the field which tells the program how you will be handling the account balance and finance charges. The three choices are described above and in Section 7.11 Customer Fields Defined. NOTE: You may use all three types of accounting, simultaneously, for different customers. If you choose to do this, though, you may want to use different statement formats. In order to categorize your customers by accounting/statement type, you will need to either assign the different types of accounts to a specific sales territory, or begin the customer numbers with a code based on account type. For example, you may want to put all of your Open Item customers in Sales Territory 1, while your Balance Forward accounts are in Sales Territory 2 and Revolving accounts are in Sales Territory 3. Or you may begin your customer numbers with a 1,2 or 3. 170 / 362 NOTE: Split Finance Charges are handled during the Monthly Close Out procedure. For the Service Charge field in the Customer Profile, use the percentage rate for the first balance category. 2. Service Charge -This is the field which specifies the monthly percentage rate for the customer. If you charge 1,75% interest per month, type ‘.0175’ into this field and press ENTER. See Section Customer Fields Defined for more information. 3. Credit Hold - You may decide not to allow a customer to charge to their account. In this case, you can access the customer profile and change the credit hold flag to ‘Y’ for YES. If you are setting up a new account, you will want to type ‘N’ into this field for NO so that they can use their account. TIP: When you place a customer on credit hold and a sales person tries to ring up a sale to the customer’s A/R account, a note will appear on the screen: “This customer is on Credit Hold. You must have him make payment or release him from this status. Release? (Y/N)” If you press ‘Y’ for YES, the system will continue with the sale to A/R. You may password protect this override option so that your sales people do not have that ability to release a credit hold. See Section 16 Point of Sale Module and Section 23 Passwords for more information. TIP: When a customer attempts to charge a purchase which will put the account over the credit limit, a warning screen will appear at point of sale: “This customer is on Credit Hold. You must have him make payment or release him from this status. Release? (Y/N)” If you press ‘Y’ for YES, the system will continue with the sale to A/R. You may password protect this override option so that your salespeople do not have that ability to release a credit hold. See Section 16 Point of Sale Module and Section 23 Passwords for more information. 4. Credit Limit - You may assign a different credit limit for each customer. This limit may be any ‘whole’ amount up to 32,767. If you need to set this credit limit to unlimited then you now set the credit limit to zero to signify unlimited credit limit. The rest of the information in the Customer Profile is A/R ‘summary’ information that will be updated by the program. You may also press ALT-H to look at a detailed sales history for the customer. (See Section 7 Customers for more information.) Setting Up In-House Charge Accounts from Point of Sale You may also add customer charge accounts directly from the Customer Quick Add screen in Point of Sale: 171 / 362 Customer Quick Add screen from Point of Sale 1. Enter the Customer information as you would for any customer. ( See Section 16 Point of Sale Module for more information.) a. Most State’s Driver’s Licenses have an embedded magnetic stripe on them that contains the owners Name and Address. This information can be read with a magnetic stripe reader that you already have for credit card processing. Winsale can read this information and add it without you having to type a thing. This is done by using the new Swipe Driver’s License function (F2). Simply press the ‘Swipe Driver’s License’ (F2) button from the Quick Add screen and then swipe the driver’s license with your credit card reader. The name and address will be filled in for you automatically including their birth date. 2. Make sure the Credit Hold check box is not checked. NOTE: If you place a check mark in the Credit Hold, the system will assume that this is not an A/R account and skip the other A/R related prompts. 3. At the ‘Credit Limit’ prompt, type in a whole dollar amount and press ENTER. If you do not want to establish a limit, leave this field blank and press ENTER. 4. At the ‘Finance Charge Factor’, type in the monthly finance charge percentage in decimal format and press ENTER. Starting A/R for the first time: If you are just starting up on Winsale, you will want to enter your existing customers and balances using the Customer Initial Balance Loader. TIP: If you are switching from another software package to Winsale, we may be able to convert your customer information from the other program and download it directly into Winsale. Contact Magnum Software for more information. 172 / 362 WARNING: DO NOT RUN AN A/R INTEGRITY CHECK UNTIL ALL BALANCES ARE ENTERED AND CLOSE OUT A/R PERIOD PROCEDURE HAS BEEN COMPLETED. The Customer Initial Balance loader is a utility that is used to open the Accounts Receivable balances for each of your current customers that have an existing Accounts Receivable balance. This should include store credits as well. This utility is found off of the Utilities/Customer Utilities menu. To use the Customer Initial Balance loader; 1. Select the group by option button to either Customer Number or Customer Name. 2. If you have already classified your accounts to be Major Accounts place a check mark in the only Major Accounts check box field. 3. Click ‘Load Customers’. Every customer will be loaded according to the grouping that you chose in steps 1 & 2. 4. Type in the beginning balances into the balance column that corresponds with the Customer displayed in the left hand columns. The balance is inserted into the A/R file as soon as you click off the current row of the grid. There is no save or update button that needs to be clicked as it writes the information immediately. If the customer already has a balance, this utility will not let you change it from here. You will have to 173 / 362 use the Received on Account screen from the Register menu on the POS screen to change an existing balance. Received on Account (Point of Sale) Besides charging purchases and issuing credits to accounts receivable from the point of sale module, you will also find the Received on Account module in the Point of Sale ‘Register’ menu. This module is used for accepting payments on account and making changes to accounts. All ROA transactions will be given a number. This way multiple invoices paid off using the Quick Payment on Accounts are grouped together. Also, when reprinting an ROA, the entire payment is listed on the Received on Account receipt instead of only the single line entry being selected for reprint. The Received on Account Module may also be used to enter beginning balances for customers. For information on charging purchases and issuing credits to A/R accounts, see Section 15 Point of Sale Module. Remember: If a customer is on credit hold or has exceeded his/her credit limit, you will see warning screens at point of sale and you will not be able to complete a transaction to their A/R account. Accessing the Received on Account Screen 1. From the main ‘Module’ menu, highlight ‘Point of Sale Module’ and press ENTER, or press ‘S’. 2. From the Register Menu, highlight ‘Received on Account (Detailed)’ and press ENTER, or Ctrl- D. Received on Account screen 174 / 362 Applying Payments Quick Payment on Account: TIP: To prevent any accidental damage to a customer’s account information, Quick Payment on Account should be the option used by salespersons to apply payments to customer accounts. The Received on Account option should only be used when it is necessary to Add or Modify information regarding a customer’s account. This is a fast and easy interface at the Point of Sale screen that will allow taking of payments on Account quickly without having to leave the Point of Sale screen. NOTE: The Received on Account option may be password protected to prevent sales person usage. See Section 23 Passwords for more information. To Enter Quick Payment on Account through Register screen: 1. Click on “Register” then “Quick Payment on Account” or press Ctrl-Q. 2. You will be prompted for certain criteria concerning the payment. a. Enter the sales person number and press ENTER. b. Enter the customer number and press ENTER . (You may also press F1 for lookup table) c. Enter amount received and press ENTER. d. At the tender screen enter the tender type and press ENTER. e. Once tender type is entered the receipt will be printed. NOTE: Payments entered through the Quick Payment on Account screen will automatically update the Customer’s Account History. Received on Account Screen: When you enter the Received on Account screen, the cursor will be in the ‘Sales person Number’ field. 1) Type in the Sales person number and press ENTER 175 / 362 2) Type in the customer number and press ENTER or type in the first letter(s) of their last name, which will take you to the Customer Look Up table where you can use the arrow keys to highlight the customer you are looking for. When you press ENTER, the highlighted customer will be carried into the Received on Account screen. (See Section 7 Customers for more information. a. If you enter the wrong customer number by accident, just press ESC. You may enter a new customer number using one of the two options above or press ESC again to go back to the Quick Sale (Register) menu. 3) As soon as you enter a customer number, all of the pertinent A/R information will be displayed. On the bottom portion of the screen you will see all transactions since the last closing period. a. If you are looking for a particular transaction and you don’t see it on the bottom portion of the screen, click the History button to look at a complete history of this customer’s transactions. 2. Select the ‘Payment Type’ button. 3. When using a credit card for the payment select the correct credit card from the list box provided. 4) At the ‘Amount’ prompt, type in the amount of the payment and press ENTER. TIP: If the payment is for a whole dollar amount, you do not need to type in ‘.00’. For example, if the payment is for $25.00, just type in ‘25’ and press ENTER. 5) The cursor will move to the ‘Reference’ prompt. This line will appear on monthly statements. The default for this prompt is ‘Payment on Account’. If you would like to use this reference, press ENTER. a. If you would like to type in a different reference, type in into this field and press ENTER. (Your reference may be as many as 17 characters.) TIP: Since this reference appears on monthly statements, you may want to type in the check number of the payment, the credit card number for the payment or a “Thank you for Payment”. 6) Printer prompts will appear. Highlight the correct printer and press ENTER 7) A receipt for the payment will be printed and all relevant files will be updated. TIP: When multiple sales tickets were paid with the same check they are recorded as paid at the same time. If you need to reprint this ROA receipt it will list out each sales ticket and the amount paid against that receipt automatically. Adding a Line There may be instances when you want to add or subtract an amount from an A/R account without affecting the Daily Sales. For example, you may decide to remove a finance charge from an account. 1. Type In the Sales person number and press ENTER 2. Type in the customer number and press ENTER or type in the first letter(s) of their last name, which will take you to the Customer Look Up table where you can use the arrow keys to highlight the customer you are looking for. When you press ENTER, the highlighted customer will be carried into the Received on Account screen. (See Section 7 Customers for more information. a. If you enter the wrong customer number by accident, just press ESC. You may enter a new customer number using one of the two options above or press ESC again to go back to the Quick Sale (Register) menu. 3) As soon as you enter a customer number, all of the pertinent A/R information will be displayed. On the bottom portion of the screen you will see all transactions since the last closing period. 176 / 362 4) Click ‘Add Line’ 5) At the ‘Amount’ prompt, type in the amount of the payment and press ENTER. If you are issuing a credit to the account, type in a negative amount. Ex. -25. TIP: If the payment is for a whole dollar amount, you do not need to type in ‘.00’. For example, if the payment is for $25.00, just type in ‘25’ and press ENTER. 6) The cursor will move to the ‘Reference’ prompt. This line will appear on monthly statements. The reference which will appear in this field is the reference for the line that is highlighted. For modifications to an account, you should use some other reference that is more representative of the reason you are making the modification. a. If you would like to type in a different reference, type it in this field and press ENTER. (Your reference may be as many as 18 characters.) TIP: Since this reference appears on monthly statements, you may want to type in the check number of the payment, the credit card number for the payment or a “Thank you for Payment”. 7) The screen will clear and return to an empty Received on Account screen with the customer’s number in a button. If you click on this, you will see the line that you added with an ‘A’ in the ‘TYPE’ column. This ‘A’ is used as a reminder that this line was added to the account, versus a point of sale transaction. Also, the Customer file will be automatically updated so that all account balances match. NOTE: Lines which are added to Accounts Receivable will NOT appear in the Daily Sales Journal or the Transaction File Line Editor. These additions will only appear in the Daily Close-Out Audit report and they will be reflected in the A/R Aging balance. Therefore it is very important that you run the Daily Close-Out Audit every day to make sure that your A/R total is correct. Modifying a Line There may be instances when you need to change a line in an A/R account without affecting the Daily Sales. For example, you may have added a line using the wrong amount or reference. NOTE: If you limit the user’s rights to Accounts Receivable in the Password module, the user will not be able to modify lines in Accounts Receivable. See Section 22 Passwords for more information. 1. Type In the Sales person number and press ENTER 177 / 362 2. 3) 4) 5) 6) 7) Type in the customer number and press ENTER or type in the first letter(s) of their last name, which will take you to the Customer Look Up table where you can use the arrow keys to highlight the customer you are looking for. When you press ENTER, the highlighted customer will be carried into the Received on Account screen. (See Section 7 Customers for more information. b. If you enter the wrong customer number by accident, just press ESC. You may enter a new customer number using one of the two options above or press ESC again to go back to the Quick Sale (Register) menu. As soon as you enter a customer number, all of the pertinent A/R information will be displayed. On the bottom portion of the screen you will see all transactions since the last closing period. Click on the line you want to modify Click ‘Modify Line’ Modify the information as desired. Click on the Process button to Record. NOTE: You will only be able to modify lines that appear on the bottom, or active, portion of the Received on Account screen. You cannot modify lines that are in history. TIP: If the payment is for a whole dollar amount, you do not need to type in ‘.00’. For example, if the payment is for $25.00, just type in ‘25’ and press ENTER. NOTE: Lines which are modified in Accounts Receivable will NOT appear in the Daily Sales Journal or the Transaction File Line Editor. These changes will only appear in the Daily Close-Out Audit report and they will be reflected in the A/R Aging balance. Therefore, it is very important that you run the Daily Close-Out Audit every day to make sure that your A/R total is correct, (See Section 18 Close Out Menu) Deleting a Line WARNING: Do NOT delete Sales or Refund transactions from Accounts Receivable! These transactions must be deleted from the point of sale module so that all files are updated correctly. If you try to delete them from the account, the sale or refund amount will not be deducted from your sales amount. (See Section 16 Point of Sale Module for information on deleting transactions. NOTE: If you limit the user’s rights to Accounts Receivable in the Password module, the user will not be able to delete lines in Accounts Receivable. See Section 23 Passwords for more information. WARNING: If the line that you are deleting is a payment, it will be subtracted from today's payments on the daily sales journal. If you want the deleted payment to appear on another day’s sales journal, change the system date before deleting the payment line. If you do not want the deleted payment to affect the sales journal at all, first modify the line to a payment amount of zero using the Modify function, then delete the payment. 1. Type In the Sales person number and press ENTER 2. Type in the customer number and press ENTER or type in the first letter(s) of their last name, which will take you to the Customer Look Up table where you can use the arrow keys to highlight the customer you are looking for. When you press ENTER, the highlighted customer will be carried into the Received on Account screen. (See Section 7 Customers for more information. 178 / 362 If you enter the wrong customer number by accident, just press ESC. You may enter a new customer number using one of the two options above or press ESC again to go back to the Quick Sale (Register) menu. 3) As soon as you enter a customer number, all of the pertinent A/R information will be displayed. On the bottom portion of the screen you will see all transactions since the last closing period. 4) Click on the line you want to Delete 5) When the line is highlighted, click Delete Line then answer Yes to the confirmation dialog. c. Reprint Transaction To reprint sales ticket, or transaction that already occurred, at Point Of Sale, choose Register menu and then Reprint (or click Ctrl+P). In new window choose the transaction that you want to reprint, from a drop down menu and to send it to the printer, click OK. If you want to see the details of the transaction, click Details, which will open a new window with extensive details about the sale (item number, price, etc). You can click Reprint to send the invoice to a printer queue or E-Mail to email this sales ticket as an attachment. (Requires Outlook 2000 and up (NOT Outlook Express) to be installed to work properly). Write Off Use the write off function to write off the books a valid sale that is un-collectable. You may write off just one sale if there is a dispute on the billing, or you may elect to write off the entire account balance. To write off just one sale: 1. Highlight the line that you wish to write off and press the Write off payment button. 2. Click the NO button to write off this one single line. To write off just one sale: 1. Highlight the first line of the account detail and press the Write off Payment button. 2. Click Yes when prompted to write off the total account balance. 3. All of the detail lines will be wrapped up into one line that encompasses the entire 179 / 362 balance of the account. 4. Select Yes to delete this line and lock in the write off. NOTE: The general ledger will debit the bad debt account and credit the Accounts Receivable account. Transaction Type Codes for Monitoring and Auditing A/R Accounts The Received on Account screen contains a column labeled ‘TYP’. This column helps to identify transaction types for auditing purposes. The codes that will appear in this column are: 2 = Quick Sale Transactions This includes Quick Sales with negative amounts. 1. These transaction lines will appear in 2. 3. 3 = Sales Refunds - This code will appear only for transactions processed through the Sales Refund option on the ‘Register’ Point of Sale menu. 1. 2. 180 / 362 the Sales Journal and Sales Register reports. (See Section 17Close Out Menu for information on using these reports.) If you need to make corrections to these lines, use the point of sale module to void, modify or rering sales. (See Section 15 Point of Sale Module.) Do not delete Quick Sale transactions from the Received on Account screen! If you void a sale that is in A/R history, (and not on the current A/R screen), a line will appear in the Received on Account screen with a ‘V’ in front of the invoice number and a negative amount. These transactions will appear in the Sales Journal and Sales Register reports. (See Section 17 lose Out Menu for information on using these reports.) If you need to make corrections to these lines, use the point of sale module to void, modify or rering sales. (See Section 15 Point of Sale Module.) Do not delete a sales refund transaction from the Received on 3. L = Layaway - For any layaway deposits or payments charged to the customer’s A/R account, you will see a code of ‘L’. 1. 2. P = Payment - A code of ‘P’ signifies a Payment on Account. Once an open item invoice has been paid in full it will also have a payment type of ‘P’ 1. 2. 3. 4. M = Modify - A line with a code of ‘M’ has been modified in the Received on Account screen. 1. B = Balance - A ‘B’ code will appear on all Balance Brought Forward lines in the Received on Account screen. 1. 181 / 362 Account screen! If you void a sales refund that is in A/R history, (and not on the current A/R screen), a line will appear in the Received on Account screen with a ‘V’ in front of the invoice number and a positive amount. These transactions will appear in the Sales Journal and Sales Register reports. (See Section 17 lose Out Menu for information on using these reports.) If you need to make corrections to these lines, use the point of sale module to void, modify or rering the layaway. (See Section 15 Point of Sale Module.) Do not delete a sales refund transaction from the Received on Account screen! These transactions will appear in the Sales Journal and Sales Register reports. (See Section 17 Close Out Menu for information on using these reports.) The only way to remove a payment on account is to delete it from the Received on Account screen. If you delete a payment using the Delete option, the payment will be removed from the day’s sales journal. If you modify the payment to a 0 amount and then delete it, the payment will not affect the sales journal at all but will appear in the Daily Close Out Audit report. The change will not be reflected in the Sales Journal or Sales Register, but it will appear in the Daily Close Out Audit report and it will be reflected in the A/R Aging balance. These lines will appear on Monthly Statements, but will not appear on the Daily Close Out reports. 16 Point Of Sale Module In Winsale everything that would normally be done manually at the Point-of-Sale is performed automatically for you, saving hours and hours of work every week. Now that sales data is stored in the History file, you have statistical data that was unattainable prior to Winsale, and you will have complete customer purchasing history, obtainable with the touch of a key, to use for promotions and marketing. This chapter will guide you through the steps to perform each function in the Point-of-Sale Module. It is complete with actual screens from the program and helpful tips to make any sales transactions as easy and efficient as possible. Point of Sale Register Menu in Winsale The Point of Sale Module should be considered to be the “cash register” of Winsale. All of the functions normally handled by a cash register are handled here with a major addition: When completing any type of transaction, all related files are updated automatically. For example, when you sell an item, the following operations take place automatically without any additional effort by you: 1. 2. 3. 4. 5. 6. Inventory is depleted by the quantity of the items sold. The Customer Balance will appear on the tender screen and will reflect any unpaid charges. Any new charges will be automatically posted to Accounts Receivable. The Sales Person gets credit for the sale and any commission is calculated. The transaction is placed into the History file for later sales analysis or reprinting. A sales ticket prints, with the customer’s name and all transaction details. 182 / 362 7. All tender amounts are “posted” for later reporting and bank deposit calculation. Quick Sale The Quick Sale option on this menu is used to perform all sales and exchanges, no matter what tender type the customer uses. (i.e. accounts receivable, cash or credit card). Quick Sale has been designed to be just that: QUICK. You will be asked for the least amount of information possible to complete a sale. You will have many options available which will allow you to perform many other POS features such as discounting, shipping charges, etc. To Access Quick Sales 1. From the main Module Menu, highlight and choose Point of Sale Module. 2. You will be automatically at the Quick Sale Screen. Quick Sale Overview The following are the basic steps for completing a Quick Sale. Each step is detailed in the Sections specified. Also note the boxes in the bottom left corner of the Quick Sale screen. Most of these options will be mentioned there. A. Enter the Customer Number 1. You may elect to not collect customer sales history by pressing ENTER to skip this promp, OR 2. Start typing customer's name, it will automatically bring up the Customer Look Up table, which will allow you to search by name. 3. If this is a new customer, type in their phone number and add their name and address through the customer Quick Add screen. Remember to be consistent using upper and lower case! Enter the customer’s name Last name first, followed by a comma and a space and then the customer’s first name. B. Enter the Sales Person Number 1. Type in the Sales Person number for the sale and press ENTER, OR 2. Use the Salesman Look Up table identify the Sales Person by name. Highlight the correct name and press ENTER. 183 / 362 C. Enter Item Information 1. Scan a Bar Code, OR 2. Type in an Item Number and press ENTER, OR 3. Type in a partial Item Number. You will be taken to the Inventory Look Up table. Highlight the item that you are looking for, OR 4. Press F3 to access the Inventory Look Up table. Use the selection criteria to pinpoint your choice and highlight it, OR 5. Type in the Vendor Item number and press ENTER. (In order for this option to work, the vendor item number must be entered into the Item Number field of the Inventory record.) OR 6. You can search item number by it’s description, surrounding the text of what you are looking for inside of question marks (?). For example, if you were looking for an item that had the word sports embedded inside of the description you would type ?SPORTS? for the item number. When you press enter every item in your inventory would be scanned and only the descriptions that have the word sports inside of it would then be displayed inside of the inventory table. You can also use the inventory table and do searches for the Item Number and Description fields in the same manner, by surrounding them with question marks (?). NOTE: When a UPC code is scanned at the Point of Sale screen that is attached to multiple items in the same store the lookup table will appear. The user can then choose the appropriate item to bring back to the sale screen. This only pertains to duplicate UPC numbers found for the current store number. D. Enter the Unit Price 1. Accept the unit price that appears at the cursor by pressing ENTER, OR 2. Enter a new unit price by typing over the existing price, OR 3. Take a percentage discount by typing in the discount amount in the appropriate field OR 4. Cancel the sales tax for an item by clicking on the Tax Field on the bottom of the page ad choosing one of the appropriate options. E. Accept Payment for the Sale 1. Type in the code for the tender option that you want to use and press ENTER, OR 2. Accept the default of full payment for the tender type or type in the amount of the tender and press ENTER. 3. If the customer is using additional types of payment, type in the second tender code and follow the steps above until the Payment Due = 0, and the sales receipt prints. NOTE: If you need to open the drawer when cash or check has to be tended, there is an Open option on the POS Screen. You can turn this on/off from the POS Options from the miscellaneous menu on the Point of Sale screen. Entering the Customer Number When you enter the Quick Sale screen the cursor will be in the Customer Number field. There are four ways to fill in this information: A. B. C. D. Do not use any customer number Type in the Customer’s Account Number Add a new customer with the Quick Add screen Use the Customer Look Up table 184 / 362 A. If you do not wish to track customer history, press ENTER. This will allow you to complete the transaction without attaching any customer information. TIP: If you do want to track customer information for every sale, you can block the ability to press ENTER in this field using the Password Protection module. This means that your salespeople will not be able to complete a sale without customer information attached. See Section 23 Passwords for more information. B. You may type the customer’s number, and press ENTER. If this customer is in your files, their name and address will appear in the right hand corner of the screen. TIP: The Quick Add Screen may also be accessed by pressing F11 C. If the number that you typed in is not found in the customer file, the Customer Information Quick Add screen will appear so that you can add the customer. Type in the Customer Name, (last name first, followed by a comma and a space, and then the first name), Street Address, Zip Code, etc. (Since this information is the same as the Customer Profile, see Section 7 Customers for more information on how to fill this in.) The ‘A/R Type’ and ‘Finance Charge Factor’ fields will be filled in automatically by the program. After you have entered the pertinent information, the cursor will go back to the Customer Number field and flash on the new customer number that you entered. Press ENTER to accept this number for your sale. Customer Information Quick Add screen from Quick Sale D. If a customer is already in the database, you can type in the first letter(s) of their last name or double click on this field. This will take you to the Customer Look Up table where you can use the arrow keys to highlight the customer you are looking for. When you press ENTER or hit Accept button, the highlighted customer will be carried into the Quick Sale screen. (See Section 7 Customers for more 185 / 362 information about the Customer Look Up table.) Customer Look Up table from the Quick Sale screen TIP: Since it is possible to enter the same customer using different customer numbers, the best rule of thumb when entering customers is to look them up in the Customer Look Up table by last name. E. If you enter the wrong customer number by accident, just press ESC. You may enter a new customer number using one of the three options or press ESC, to go back to the Quick Sale menu. F. After you press ENTER on the Customer Number, you may see a previously assigned note for this customer in the upper right hand corner. See Section 7 Customers for information on customer notes. Entering the Sales Person Type in the Sales Person’s number for the Sales Person receiving commission and press ENTER. The Sales Person’s name will appear on the screen. NOTE: Even if you are not interested in tracking sales commission, you must have at least one Sales Person set up in the Sales Person Profile section of the program. You may wish to define this 'Sales Person' as 'House Account'. See Section 11 Sales Person Definition for more information. If you can’t remember the Sales Person’s number that you need, you may press the first letter(s) of the Sales Person’s name or double click on this field to go to the Sales Person Look Up table. Use the arrow keys to highlight the correct Sales Person and press ENTER. The Sales Person will be carried to the Quick Sale screen. (See Section 11 Sales Person Definition for more information.) TIP: The system may be configured to automatically enter the Sales Person number that was used for the last sale. This is handy if you only have one Sales Person on the floor at a time, so that they don’t have to keep entering their number. See Section 3 Configuration for more information TIP: You may set up the program to not accept more than one Sales Person per invoice. See Section 3 Configuration for more information. 186 / 362 Entering Sales Person (SP) for Line Items After you press ENTER on the Sales Person number, the cursor will jump to either the Quantity or Item Number field, depending on how the program has been configured. (See Section 3 Configuration for information.) If you would like to change the Sales Person’s number in order to do a split sale, click into the SP column. Type the Sales Person number into this column and press ENTER. NOTE: If your program is configured not to accept split sales, you will not be able to change the Sales Person’s number on a line item. When you try to type in the new number, the old number will automatically reappear. See Section 3 Configuration and Section 11 Salesman Definition for information on split sales. Entering Quantity After you press ENTER on the ‘Sales Person’ number at the top of the screen, the cursor will jump to the Quantity or Item Number field, depending on how the program is configured. TIP: The system will automatically enter a 1 in the quantity column. If you commonly sell quantities of more than one, you may elect to be prompted for the quantity on every line item. See Section 3 Configuration for more information. A. If your cursor is in the ‘Item Number’ field, the screen will be showing a quantity of 1. If you need to change this, press ESC one time to go to the QTY field. Type in the quantity that you want to sell and press ENTER. B. If your cursor goes directly to the QTY column, type in the correct quantity and press ENTER. Entering Item Information There are a number of ways that you can add items to an invoice: Scan a Bar Code Type in a complete Item Number Type in a partial Item Number Press F3 to access the Inventory Look Up table. Type in the Vendor Item Number Each of these options is described below in more detail. Also note the gray box in the bottom left corner of the screen, which gives you the options for entering item numbers. A. B. C. D. E. A. Scan Bar Code: 1. With the cursor in the ‘Item Number’ field, scan the bar code on the item tag. (Make sure that the scanners redline is running down the length of the bar code.) 187 / 362 2. When the scanner beeps, you will see the Item Number and Description appear on the screen. The cursor will be blinking under the Unit price. 3. If the Unit price is correct, press ENTER. 4. If you need to change the unit price, see Section Entering the Unit Price B. Type in a complete Item Number: 1. With the cursor in the ‘Item Number’ field, type in the item number from the item tag. 2. The Description will appear on the screen and the cursor will be blinking under the Unit price. 3. If the Unit price is correct, press ENTER. 4. If you need to change the unit price, see Section Entering the Unit Price C. Type in a Partial Item Number: 1. If you type a partial item number into the item number field and then press the ENTER key the number that you entered will be used as the starting point for a search. 2. If there is only one item number that matches the partial item number, it will immediately be pulled into the Point of Sale Module. 3. If there are many different items, you will be taken to the Inventory Look Up table. All of the items that match your partial number will appear on the table. You may select the item you want by highlighting it and pressing ENTER. You may also narrow down the search by selecting other search criteria. See Section 4 Inventory for more information on how to use the Look Up table. 4. Once the item is highlighted, press the ENTER key to carry the item back to the Point of Sale Module. 5. The Description will appear on the screen and the cursor will be blinking under the Unit price. 6. If the Unit price is correct, press ENTER. 7. If you need to change the unit price, see Section Entering the Unit Price. D. Access the Inventory Look Up table: 1. With the cursor in the Item Number column, press F3 to access the Look Up table. 2. Choose a method(s) to search for the inventory item that you need. See Section 4 Inventory for more information on how to use the Inventory Look Up table. 3. Once the item is highlighted, press the ENTER key to carry the item back to the Point of Sale Module. 4. The Description will appear on the screen and the cursor will be blinking under the Unit price. 5. If the Unit price is correct, press ENTER. 6. If you need to change the unit price, see Section Entering the Unit Price. E. Type in the Vendor Item Number: You may also use the Vendor Item Number defined in the Inventory file as a ‘cross reference number’. That is, if you enter the vendor’s item number in Item Number field of the Inventory record, you may use that number at Point of Sale. The system will look at the vendor number and pull in the actual inventory item number. If you have the same vendor item number entered in two different inventory items, the system will display the items in the Inventory Look Up table to allow you to choose the correct one. See Section 4 Inventory for information on inventory record fields and the look up table. F. Item Notes: 188 / 362 Quick Sale screen with Inventory Note displayed If an inventory item has a note attached to it, the note will automatically be displayed on the Quick Sale screen when you enter the Item Number. Besides viewing this note, you may also edit it by typing over or deleting parts of it. When you are finished with the note, click OK. Any changes will be saved with the note. See Section 4 Inventory and Section 10 Notes for more information. After you press ENTER on an Item Number, you will see the Department Name, Quantity On Hand and Vendor Name appear in the bottom right corner of the screen for you convenience. Entering Description The description of the item is automatically displayed after you scan a bar code or press ENTER on the Item Number so that you can be sure that the correct item has been chosen. There may be instances when you want to change the description of an item for just one sales ticket, only. For example, if you are starting up on the system and are using general ‘department’ item numbers, you may want to change the description to provide the customer with a clearer description of what they purchased. Or, if you are using the special item number ‘COMMENT’, you will be prompted to type in a new description. (The cursor will stop in the Description field after you press ENTER.) See Section 4 Inventory for more information. To change an item description for one sale: 1. Click into the description cell and edit it. NOTE: There is no limit on the number of characters in Comment Field. 189 / 362 Entering the Unit Price With the cursor in the Unit price field, you may: A. Accept the Unit price B. Enter a new Unit price C. Enter a percentage discount (These options also appear in the gray box at the bottom left corner of the Quick Sale screen.) A. Accept the Unit Price: 1. With the cursor in the Unit price column, press ENTER. 2. The Unit price will be multiplied by the Quantity to give an Extended price. 3. The cursor will go to the Item Number or Quantity column, (depending on the configuration), and wait for input of the next item. B. Enter a New Unit Price: 1. With the cursor in the Unit price column, type in the new price and press ENTER. TIP: If the new price is a whole number with 00 cents, just type in the whole number. Ex: for 89.00, type in 89. 2. The Unit price will be multiplied by the Quantity to give an Extended price. 3. The cursor will go to the Item Number or Quantity column, (depending on the configuration), and wait for input of the next item. C. Enter a Percentage Discount: 1. Double click in the Discounts box area in lower right , type in a discount amount, followed by a percent (%) sign. Ex: To take a 30% discount, type 30 then hold down the SHIFT key and press ‘5’. Or, just type in the discount dollar amount. 2. NOTE: You have four automatic discount keys at your disposal. These keys are: F5= 5%, F6= 10%, F7= 15%, and F8=20%. At the unit price, simply press the discount key of your choice and press Enter. The discount will be automatically applied to the unit price of the item. TIP: You may also enter an adjustment for the entire sale 190 / 362 Accepting Payment For The Sale Quick Sale screen with Tender Screen As you are adding items to the Quick Sale, you will see the Sub-Total, Tax and Payment Due amounts changing. The Payment Due amount is the total amount of the sale. When you are finished adding items to the sale, proceed as follows to accept payment: 1. Press F9 or click End Sale 2. If you are ready to accept payment, you will see the cursor blinking at the Code prompt. (See screen above.) The code is the number (0,1,2..) or the letter (A,B,C,E) that corresponds to the tender types available. (See Section 3 Configuration for information on setting up tender types.) NOTE: Option ‘A =CHARGE’ stands for Accounts Receivable. This tender type is used for In-House Charge accounts and Store Credits WARNING: Winsale will not let a user exit from the POS Screen or Stop a sale in Progress when a credit card has already been approved by XCharge. The user will have to proceed with the sale and then perform a void if necessary. This is a safety measure that will not allow a transaction to be recorded in one program and debited from your customer’s Credit Card but not show up in Winsale. 3. Type the code for the tender that you want to use and press ENTER. For example, if the customer is paying with Cash, type 0 and press ENTER. 4. The cursor will go to the tender type that you choose and will carry the total amount due for the sale to this tender type. To accept full payment for the tender type chosen, press ENTER. TIP: If there is a tender type that your store uses more often than the other options, you can enter the code for this tender as the default, so that it will always appear at the Code prompt. See Section 3 Configuration for more information. TIP: If the customer is giving you more money than the amount due, (For example Cash of $20 for a sale 191 / 362 of $16.95, or a Travelers’ Check), type in the total amount that you are receiving and press ENTER. The program will show you the amount of change due. NOTE: When a credit card transaction is processed more than once with the same price and the same credit card on the same day an error is displayed. The credit card processor declines these transactions because it is considered a duplicate transaction. NOTE: WinSale will force the re-tendering of Credit Cards that don't get approved. When tendering multiple credit cards with WinSale/XCharge and the 2nd and 3rd fails to be approved, WinSale will force the re-tendering in the amount of the unapproved transaction. The transaction cannot be canceled until all funds are approved. 6. If the customer will be using multiple tender types for the sale: a. Type the code for the first tender type and press ENTER. b. When the cursor goes to this tender type and shows the total due for the sale, type the amount that the customer is paying with this tender over the total amount. Because the amount that you type in will be less than the total amount due for the sale, the cursor will go back to the CODE prompt. (You will also see the DUE: amount in the bottom right corner change to reflect the first tender.) d. Type in the code for second tender type and press ENTER. e. The cursor will go to this tender type and show the full balance due. You may accept this balance by pressing ENTER or type in a different amount and press ENTER. f. You may split tend the sale as many times as you like until the amount due is reduced to 0. c. Quick Sale screen showing Change Due 7. When the amount due is 0, the program will display the change due screen. 192 / 362 9. If you select A=CHARGE for any portion of the payment, you will be prompted for the following information (This option is only available with Winsale): a. You will be taken to the Options/Adjustments screen first. Press ENTER. b. Enter the P O Number - Enter the customer's purchase order number, if applicable, and press ENTER. c. Mode of Shipping - If you are going to ship the items to the customer, enter the manner in which you will ship it and press ENTER. d. A/R Reference Line - This should be a ‘reminder’ about what the invoice is for. Whatever you type in here will appear in the A/R account and on non-detailed monthly A/R statements. Press ENTER when you are finished. The printer options will appear or, if you are using hidden print drivers, the sales receipt will begin printing. Special Tender Options There are a few special tracking options that are available for tender types: 1. Gift Certificate Tracking 2. Billing to a Major Account Options 2-4 are configurable items and must be turned on from the POS Options located on the POS modules Tools Menu. (See Section 17) 1. Gift Certificate Tracking If you have the “Ask Gift Certificate number” option turned on in the Configuration module, the system will track Gift Certificates by number. (See Section 3 Configuration for more information) a. Type ‘E’ in the ‘Code’ field for the Gift Certificate tender option. b. The Redeem gift certificate screen will appear. c. The cursor will be in the “Gift Certificate No:”. Type in the gift certificate number and press ENTER. d. The system will check the Gift Certificate table for the number. e. If the gift certificate number is found and the gift certificate has a balance you will be able to use that gift number f. You may use any number of gift certificates on one transaction. g. Press OK (F9) when you are done. h. The cursor will be blinking under the maximum amount of the sale that can be charged to the Gift Certificate numbers chosen. For example, if the sale is for $100 but the gift certificates redeemed only add up to $75, then 75.00 would appear in the E=Gift Certificate tender option. You will also see the gift certificate balance displayed at the top of the tender screen. 1. To accept the amount at the cursor, press ENTER. The sale will complete itself and a sales receipt will print. 2. Billing to a Major Account This feature was designed to allow customers to charge work related goods, such as work boots, 193 / 362 uniforms, etc., to the company for which they work. In addition, this option gives you the ability to drop ship to one customer while billing another. The sales history will remain with the original customer, who will have a $0 charge added to their account, while the actual amount of the sale will be charged to the ‘Bill To’ customer. To use this feature: Major Account Billing a. Perform the sale as you normally would, make sure that you enter a customer number for the customer who is physically purchasing the goods. (Not the company!) b. At the tender screen, type a code of ‘A’ for the Charge tender option. c. You will be asked for the account being billed to. (See above diagram) 1. If this is the correct account, press ‘OK’. 2. If this is not the correct account you may change it by double clicking in the yellow account number box. 3. If this is not the correct customer, press Cancel. The tending of the sale will be canceled. You will have to re-tend the sale in another fashion. How to make Invoice Adjustments Quick Sale screen with Adjustment options There are four invoice adjustments available that affect all line items on the invoice. You must use these options before you choose any tender types. 194 / 362 1. Click in the Discounts total on the bottom right of the screen. This option will allow you to take a percentage or dollar amount off of an invoice. It is useful if, for example, you have a customer who always gets a 20% discount or if you offer a store-wide discount on every purchase. (Also see Section 7 Customers to set up a standard discount for a customer.) a. The program will prompt you to “Enter Amount or Percent”. To use an amount, type in the dollar amount - 20. To use a percentage, type in the percentage amount and the percentage sign—20%. TIP: You may also adjust line item prices from the Unit price field by typing a percentage amount with a percent sign (%). You may also click into the sub-total field and simply change it to the price that you want sell the items for. Winsale will automatically mark down each individual item down on the sale appropriately. Similarly, you may click into the Due field. Simply change it to the price that you want sell the items for. Winsale will automatically mark down each individual item down on the sale appropriately. 2. Shipping: You can add shipping costs to an invoice which will be non-taxable. a. Click into the Shipping field. b. The program will prompt you to “Enter Amount of Shipping Charge”. Type in a dollar amount c. and press ENTER. The program will return to the Tender screen with the Amount of the invoice adjusted to include the shipping charges. 3. Payment: If you click into the Payment field, you will be returned to the Tender screen. 4. Manual Tax: Quick Sale screen with Manual Tax adjustment You may adjust the tax on an invoice. For example, if a customer is shipping their purchase out of state, the tax will need to be adjusted to 0. (Also see Section 7 Customer for information on setting up a permanent tax code for customers) 195 / 362 a. b. c. d. Click into the Tax. Field. Select the appropriate taxable option If you selected manual tax, type in the amount of the tax and press ENTER. The program will return to the tender screen with the adjusted tax amount. To turn off manual tax, click into the tax field again and you will be prompted to turn off manual tax. Possible Quick Sale Warnings Winsale has been written to try to avoid as many user errors as possible. From time to time while you are performing point of sale functions, you may see error or warning messages on your screen. Some of these errors are described below: 1. “Selling price seems abnormal. Press any key to remove this box.” This message will appear if an item has a resale price other than 0 in the inventory record, but you try to enter a 0 Unit price at point of sale. This statement is just a warning--once the box is removed, you will be able to continue the sale with the 0 Unit price. If you want to change the price, press ESC until you are on the line that needs correcting, then press ENTER until you get to the Unit price column. Type in the correct price and press ENTER. You will also see this message if the Unit price that you entered is greater than two times the amount of the Resale price stored in the Inventory record. Follow the directions above to make corrections. 2. Insufficient Stock screens (Back Orders) If you are trying to sell more of an item than you have in stock, the program will tell you that you don’t have enough of the item to sell, according to the computer’s records. 3. Locked Files After you complete a Quick Sale, the program will update all of the necessary files so that customer and item history is recorded, inventory is updated and all bank deposit records are recorded. If you are on a computer network and another user has a particular file open, such as the customer who you are selling to, you may see a message that the “Customer is currently locked. Press any key to try again”. You will continue to get this message until the file is closed by the other user. At that point your sale will complete itself. 4. Point of Sale Check – this ensures that if an item is sold for nothing that it is brought to the sales clerk’s attention. This is only warned against when the item in inventory has a resale price set for it. If the resale price in inventory is 0, then point of sale will not warn about selling this item. Back Orders If you try to sell more of an item than you currently have On Hand, the system will inform you that selling the item will create a negative On Hand quantity. The screen will also show you any On Order quantities for the item so that you can make an informed decision about back ordering. You have three choices in this situation: 196 / 362 Insufficient Stock (Back Order) screens from Quick Sale 1. Sell it anyway, Leave off Back order— this is the default option which will be highlighted when you see the insufficient stock screens. This option allows you to ignore the fact that the computer does not have the item in stock, (since the customer is standing in front of you with the physical item!), and allows you to sell it anyway. This option will not create a back order. To accept this option, press ENTER and continue with the sale. 2. Don’t Sell, But Place on Back Order— when you choose this option you will create a back order. The item will appear on the invoice with a Unit price, but the Extended Price will be 0 and the item will not be included in the Sub Total, Total or Payment Due fields. At the same time, a Back Order will be created so that the item can be special ordered from the vendor. Back Orders have an invoice number beginning with ‘QP’ and can be converted to a sale at a later date. See Section 17 Purchase Order for more information on creating Purchase Orders from Back Orders. To use this option, highlight choice 2 and press ENTER. 3. Sell it and place on Back Order (Special Orders)— this option should only be used for special orders in conjunction with a ‘Special Order’ item number. It allows you to sell an item as a special order even though the item does not exist in the store yet. This is a good option to use if you require customers to pay for special orders up front. The Back Order will have an invoice number beginning with ‘QP’ and can be converted to a sale at a later date. See Section 19 Purchase Order for more information on Back Orders. Before using this special order function, you must set up an item in inventory called “Special Order”. This item will have a 0 cost and 0 resale. All other fields can be blank. NOTE: Use this option only if you do not usually take special orders. You may have Winsale create and track special orders throughout the system process. Please see Special Orders later in this section. 197 / 362 To create a special order: a. Ring a sale as normal, but use the ‘Special Order’ number as the item number. b. After you enter the item number and press enter, the cursor will go to the unit price of 0. c. Press the Up arrow key to edit the description, (the description field will ‘open up’), and type in information for the item that needs to be special ordered and press ENTER. This information can be a description or, if you are ordering from a catalogue, it may be a vendor item number. This information will be used to special order the item. d. After making this change the cursor will go to the unit price. Type in the price for the special order number. Press ENTER when the price is correct. e. The back order screen will appear. Highlight Option 3 and press ENTER. f. Proceed with the sale as normal. Converting Back Orders to Sales When you have received a back ordered item and are ready to sell it to the customer, you will need to modify the back order and turn it into a sale transaction: 1. On the Register menu, click Modify Transaction. 2. You will be prompted to Enter Invoice Number for the invoice that you want to change. Type in the ‘QP’ number of the back order that you want to close out. For example, QP000002. (Note you can simply type QP2) NOTE: You may also use Layaway procedures to perform a back order while at the same time taking a down payment from you customer. See Layaway Back Orders for more information. 3. The sale will appear on the screen with a prompt confirming that this is the correct invoice. If it is 4. 5. 6. 7. 8. correct, press Yes. If it is not correct, press No and you will be returned to the Register menu. The system will void the original transaction. When the voiding process is complete, the Register menu will reappear. The system needs to know what type of transaction the new transaction will be. Highlight Quick Sale and press ENTER. The invoice will reappear. Make any changes necessary. For any parts of the sale that do not need to be changed, just press ENTER. When you are finished making the necessary changes, press F9 to end the sale as you normally would. You will be prompted to print a sales receipt. The back order will be converted to a sale with an invoice number. Converting Special Orders to a Sale 1. Follow Step 1 through 8 from Section Converting Back Orders to Sales. TIP: You may modify a QP number at any time. You do not need to worry about the date of the original back order. 2. After the QP appears on screen, enter until you get to the item number. This item number will be the Special Order item number that you used in the original special order. Since the customer is not purchasing this item, press ESC until the cursor is in the quantity field. Type ‘-1’ for the quantity and press ENTER. This will automatically change the Extended Price for this item to a negative amount. 198 / 362 3. At the next item number prompt, type in the item number for the special order item. Enter through this line. The extended price for this line should be a positive number. 4. The Subtotal for this transaction should be 0. You are exchanging the ‘Special Order’ item for the actual item being purchased by the customer. 5. Complete the sale as normal. Deleting Back Orders If you have back orders that have been created accidentally or that have never been cleaned out of the system, proceed as follows: 1. Follow Step 1 through 8 from Section Converting Back Orders to Sales. 2. When the back order appears on the screen the second time, press ESC until you see a screen which says, “New Sale?” Press Yes. This will delete the back order. Multiple Stores It is very important that Multiple Store companies delete all outstanding back orders, as they can interfere with correct communication of inventory information. Quick Save/Quick Load If you are working on a sale and the customer decides that he/she should take another look at an item before you complete the sale, you may press Ctrl+F2 to save the information that you have already entered. This allows you to ‘ring’ a sale for another customer while the first customer is shopping. When the customer returns, You may close the new Point of Sale screen by clicking on the X in the upper right hand corner of the screen or Choose Exit from the Register menu. The First Quick Sale screen and your sale will reappear. Then you can complete it as usual. Sales Refund vs Void Sale There are two ways to remove a sale - Sales Refund and Void Sale. 1. Sales Refunds are: a. Used to refund one or two items from a sales ticket or to refund sales from prior days. b. Entered into the History file so that you have a complete history of what your customers have returned. c. Used to give tender refunds, such as cash and credit card refunds or store credits. d. The New Date option may be used to change the date back to the original date of the transaction for giving a sales refund. The New Date option may be found under the MISC MENU in Point-of-Sale. 199 / 362 2. Voided Sales are: a. Used to erase an entire sale from the computer's files. b. Only possible on the same day that the sale occurred. c. Stored in the History file and Transaction File Line Editor for auditing purposes. When a sale is voided, a 'V' will appear as the first character of the invoice number. d. Not used to give tender refunds. A void just erases a sale. e. The New Date option cannot be used to Void a Sale. You must go to New User on the Main Module menu to change the date to do a Void Sale. How To Make A Sales Refund There are four ways to do Sales Refunds: A. From the Quick Sale screen – This is a good place to do a refund for one or two items or to perform a merchandise exchange. B. From the Sales Refund option – You should use this method for large merchandise returns of three or more items. (With this many items, the Sales Refund option will cut down on keystrokes.) C. Exchanges – If your customer is purchasing another item in place of the item being returned, you will want to make an exchange in one transaction. D. Store Credit – You may decide not to offer your customers money back for returns, but would like to offer a credit to be used in your store. NOTE: There will be a difference in how sales receipts look for these options. A refund done from the Quick Sale screen will show negative quantities and amounts, but the word “Sale” will appear at the top of the receipt. The Sales Refund receipt will say “Sales Refund” at the top, but will show positive quantities and line amounts with a negative sale total. A. From the Quick Sale screen: 1. Follow the steps outlined in Section 16 Point Of Sale Module for performing a Quick Sale, with the following exception: 2. You must enter a Negative Quantity for returned items. Ex: If the customer is returning 1 piece of an item, you will need to enter -1 for the quantity. (See Section Entering Quantity for information on how to enter quantities.) 3. Enter a Positive Unit Price. Ex: If the item is being returned for $10, enter 10 under unit price. 4. The system will multiply the negative Quantity by the positive Unit Price to give you a Negative Extended Price and Negative Payment Due. (Tax will also be negative.) 5. The sales receipt will print with negative quantities and prices and a negative total, but the word ‘Sale’ will appear at the top. B. From the Sales Refund screen: 1. On the Register menu, choose Sales Refund. You will see the words ‘Sales Refund’ in red and yellow at the top of the screen in the ‘Type:’ field. 2. Follow the steps outlined in Section 16 Point Of Sale Module for performing a Quick Sale. 3. Enter all Quantities and Prices as positive numbers. In fact, the screen will look exactly like a Quick Sale, except for the words ‘Sales Refund’ at the top of the screen. 4. The sales receipt will print positive quantities and prices with a negative subtotal and negative payment due. The words ‘Sales Refund’ will appear at the top of the receipt. C. With an Exchange: 1. Follow the steps outlined in Section 16 Point Of Sale Module for performing a Quick Sale, with the following exception: 200 / 362 2. You must enter a negative Quantity for returned items and a positive Unit Price. Ex: If the customer is returning 1 piece of an item, you will need to enter ‘-1’ for the quantity. If the item is being returned for $10, enter ‘10’ under unit price. 3. Enter a positive Quantity and Unit Price for the item(s) being purchased. 4. The system will multiply the negative Quantity by the positive Unit Price to give you a Negative Extended Price and negative tax for the item(s) being returned. For the item(s) being purchased, you will see a positive Extended Price and tax. The Sub-Total and Payment Due will reflect the difference between these two amounts. 5. The sales receipt will print with negative quantities and prices for the returned item(s) and positive quantities and amounts for the purchased items. The difference will be reflected in the Payment Due amount and the word ‘Sale’ will appear at the top of the receipt. D. Store Credits – These transactions are processed through either the Quick Sale or the Sales Refund screens as above. The only difference is the way in which they are tendered. 1. Store Credits in Winsale: a. Proceed with one of the Sales Refund methods above. b. When you get to the tender screen, use the ‘A=Charge’ tender option. This will create an A/R account for the customer that will have a negative balance. c. When the customer comes in to make a purchase, you can check the customers history using F10 to find out the balance of the store credit. This amount will also appear at the top of the Tender screen. d. When you are ready to complete the purchase using the store credit, choose ‘A=Charge’. The amount of the purchase will be deducted from the store credit. If the purchase amount is greater than the store credit, the cursor will go back to the Code: field so that you can tender the rest of the sale. E. Gift Certificate – this transaction is processed through Sales Refund screen. a. Proceed with a sales refund method above. b. To quickly access recently purchased items, just click on the light bulb near item number, and choose appropriate item. c. When you get to the tender screen, choose “E=Gift Certificate” tender option. d. Verify the amount is correct. e. Click OK and choose appropriate printer. Voiding Sale 1. Choose Void Sale on the Register menu. 2. A screen will prompt you to Enter Invoice Number. The number that appears on this screen will be the last sale that was entered on the system. You may accept this number by pressing ENTER or you may type the sales invoice number that you want to void and press ENTER. (You may press ESC to cancel this operation.) 3. If you receive a message that says Not Found. then the system was not able to locate the invoice, either because it was already voided. 4. The sales invoice will be displayed on the screen. A prompt will appear ask if this is the correct transaction. The module will show the actual date the sale was rung up to enable you to tell when the transaction transpired. If this is the sale you want to void, click Yes. If this is not the right sale, click No, and you will be returned to the Register menu. 5. If you press Yes, the sale will be voided and all of the relevant files will be updated, including inventory. 201 / 362 After a sale is voided, you will not be able to reprint it. You will also not be able to reuse the sales invoice number. The voided sale will remain in all of the history files and the Transaction File Line Editor, but the invoice number will begin with a ‘V’ to signify a void. You will also see a total number of voided invoices for each day on the Sales Journal report. Reprint Sale 1. Highlight Reprint Sale on the Register menu and press ENTER. 2. A screen will prompt you to Enter Invoice Number. The number that appears on this screen will be the last sale that was entered on the system. You may accept this number by pressing ENTER or you may type the sales invoice number that you want to reprint and press ENTER. (You may press ESC to cancel this operation.) 3. The sales invoice will be displayed on the screen. The module will show the actual date the sale was rung up to enable you to tell when the transaction transpired. If this is the sale you want to reprint, click Yes. If this is not the right sale, click No, and you will be returned to the register menu. 4. If you press Yes, you will be prompted for a print device and the sale will be reprinted. TIP: When you reprint a sale you can also select to view it in the report viewer instead of reprinting it to a printer. This will allow you to save the reprinted sale so that you can email it to a customer. You can save the file to HTML or PDF and then attach the document to an email. When selecting the sale to reprint you will see a check box; select it to view the sale instead of reprinting it to paper. Layaway The Layaway option makes it possible to layaway item(s) for customers who wish to purchase them but would like to make payments over a period of time instead of paying for the whole purchase up front. Layaway functions include: A. B. C. D. E. F. G. H. I. J. Creating New Layaways Accepting Payments and Filling Layaways Adding/Modifying Items on Existing Layaways Removing Items from Existing Layaways Removing Payments Deleting Layaways Approvals Layaway Detail Layaway Back Orders Exit A. Creating New Layaways: 1. Highlight and click Layaway under the Register menu. 2. Press ENTER to accept the next available layaway number. You may also over-write the new 202 / 362 Layaway Number as it is prompted for. This way you may follow preprinted layaway tags without having to re-adjust the default next layaway number from the configuration program. 3. Follow the steps outlined in Section 16 Point Of Sale Module for performing a Quick Sale. When you are through adding items, press the F9 key. NOTE: You will be required to enter an account number for Layaways in order to keep track of payments. Use the customer number that is entered into the system! Layaways are kept completely separate from Accounts Receivable, so there should be only one account number per customer in the system. If this is a new customer, you can type in their telephone number to access the Customer Quick Add screen. 4. You may require a layaway deposit or create layaways without a deposit. If you do not require a deposit, skip to Step 6. 5. If you are accepting a deposit: a. Select the method of payment by entering a tender code in the ‘Code:’ field. b. Type the amount of the deposit and press ENTER. c. The ‘Payment Due’ amount will be decreased by the amount of the deposit and the cursor will return to the ‘Code:’ field. 6. Select tender code ‘D=Left Open’ to leave the unpaid balance on the layaway. Press ENTER when the Payment Due amount is in the D tender option. 7. You will be prompted to print the layaway receipt. B. Accepting Payments and Filling Layaways: 1. Highlight 'Layaway' on the ‘Register’ menu and press ENTER, or press ‘L’. 2. If you know the layaway number, type the number to be looked up and press ENTER. If the system finds the number, the layaway will appear on the screen. If it doesn’t find the number, the system will assume that you want to add a new layaway. A blank layaway screen will appear with the cursor at the Customer Number prompt. 3. If you don’t know a layaway number, you may search for existing layaways by customer name. Press the F1 key combination, highlight the correct customer layaway and press ENTER. TIP: The Layaway Look Up table also shows you the age of the open layaways. This will help you to identify the correct layaway if a customer has more than one open. 4. Once the layaway is found by either of the two methods, it will appear on the screen. You will see a box confirming that the layaway is correct. If it is the correct layaway, press ENTER. If it is not the correct layaway, press N to go back to the ‘Register’ menu. The module will show the actual date the Layaway was rung up to enable you to tell when the transaction transpired 5. After verification of the layaway, select the method of action. 203 / 362 Layaway Screen with Layaway Options TIP: In the bottom right corner of the Layaway screen you will see a negative amount in the ‘Payment’ field. This is the total amount of the payments that have been made on the layaway, along with the Balance (Payment) Due. 6. To accept a payment, highlight ‘1=Make Payment/Remove Payment’ and press ENTER. 7. The system will go to the tender screen, with the cursor blinking in the ‘Code:’ field. Type the tender code for the payment and press ENTER. 8. You will see the entire Payment Due amount appear at the tender type. To accept this amount and close the layaway, press ENTER. Or you may type in the payment amount and press ENTER. 9. If you are making a payment for less than the Payment Due: a. the cursor will return to the ‘Code:’ field. b. Type ‘D’ to leave the remaining layaway balance open. c. When the balance appears at the ‘D=Left Open’ tender option, press ENTER. d. You will be given print options to print a receipt. 10. If you are making the final payment for the amount of Payment Due, the system will convert the layaway to a sale, update all relevant files and give you a print option for the receipt. C. Adding/Modifying Items on Existing Layaways 1. Access the Layaway that you want to add to, as in Steps B1-B5 above, Accepting Payments and Filling Layaways. 2. When the Layaway Options screen appears, highlight ‘Modify/Add/Remove Items’ 3. The system will remove the layaway from its files and the cursor will appear in the Item Number field. 4. To add an item, go to the first blank line and type in the Item Number, etc. 5. When you are finished press F9 to access the tender screen. a. If the customer is making another payment, proceed with steps B8-B10 above. b. If the customer is not making a payment, choose any tender type and enter a 0 for the payment. Then choose the ‘D=Left Open’ tender option for the balance. 8. You will be prompted to print a receipt. 204 / 362 D. Removing Items from Existing Layaways: 1. Proceed with Steps C1-C4 as above. 2. Highlight the line that the item number is on and press Delete. The item will disappear from the layaway. 3. Proceed with Steps C7-C8 as above. Multiple Stores Multiple store companies will not be able to use the delete layaway lines. If you try to do this, you will receive a warning suggesting that you make a negative quantity entry to offset the line that you want to delete. This insures that the correct layaway history is communicated between locations. To make a negative entry, follow Steps C1-C8 above, but use a negative quantity. E. Removing Payments: 1. There may be situations when the customer wants to take an item off of layaway and purchase it. In these cases the customer may ask to have the layaway deposit or a portion of it applied to the purchase of the item. This is a two step process: a. Follow Steps D1-D2 above for deleting an item from a layaway. b. Press F9 to go to the tender screen. Choose ‘0’ for a cash tender option. c. Type a negative amount for the portion of the layaway deposit to be used and press ENTER. d. Go to the Quick Sale screen and ring up a sale for the item that you removed from the layaway. e. Use a tender type of ‘0’ and type in the positive dollar amount that you took out of the layaway. This will balance out the negative ‘payment’ that you made in Step c. f. Complete the sale. 2. If you make a payment to the wrong layaway, or a customer changes their mind about the layaway: a. Follow Steps C1-C3 above. b. With the cursor in the Item Number field of the first item, press F9 to go to the tender screen. c. Choose the same tender type that you used to apply the payment and type a negative amount for the portion of the layaway deposit to be removed so that the two payments cancel each other out. d. Complete the transaction. F. Deleting Layaways: 1. Access the Layaway that you want to delete by following Steps B1-B5 above in Accepting Payments and Filling Layaways. 2. To delete a layaway, highlight ‘Remove Layaway from files’ and press ENTER. 205 / 362 Layaway Screen with Payment Refund/Forfeit Options 3. A screen will appear with options to refund or forfeit the total amount of layaway payments. a. If you will not be refunding the layaway payments to the customer: 1. Press ENTER at ‘Forfeit Amount:’. This will automatically forfeit the entire amount of layaway payments. 2. Press ENTER on the next two options. 3. You will be given print options to print a receipt. 4. This option will retain the payment amount in your bank deposit. The forfeited amount will also appear on the Sales Journal as Miscellaneous Income and an addition to whatever tender type was used originally. b. To give a cash refund for the layaway payments: 1. Type ‘0’ at the ‘Forfeit Amount’ prompt and press ENTER. 2. You will see the total payment amount appear at the ‘Cash Back Amount:’ prompt. Press ENTER. 3. Press ENTER at the ‘Credit to Account:’ prompt. 4. You will be given a choice of print options to print the receipt. 5. Give the customer cash back from the cash drawer so that your day will balance. c. To give a store credit or credit to an account: 1. Type ‘0’ at the ‘Forfeit Amount’ prompt and press ENTER. 2. Type ‘0’ at the ‘Cash Back Amount’ prompt and press ENTER. 3. You will see the total payment amount appear at the ‘Credit Account:’ prompt. 4. You will be given a choice of print options to print the receipt. Receipt will display store credit as the tending type. 4. If you make a mistake in selecting a refund/forfeit option, just press ESC before you enter through the entire option screen. Once a layaway is deleted, there is no way to recover it! If you deleted the layaway by mistake, you will have to reenter it and make a payment for the total payments that you refunded or forfeited. Approvals: The Layaway system is a great way to process Approvals (merchandise that you allow out of the store for the customer to try). Approvals are handled exactly like layaways, except that you don’t receive a deposit. Instead, just choose ‘D=Left Open’ for the entire balance. When the customer returns the merchandise, you can either delete the layaway or, if they have decided 206 / 362 to purchase all or part of the merchandise, you can add/remove items from the layaway. You may then accept the full amount due as a payment so that the layaway converts to a sale. TIP: In order to distinguish approvals from layaways on the Layaway Report, you may want to set up an item number ‘APPROVAL’. When this item is entered onto a layaway, it will appear on the Layaway Report so that you know you are looking at an approval. To enter this Approval item, go to ‘Inventory’ and press F2. Use ‘APPROVAL’ as the item number and ‘Approval’ as the description. Leave all other fields blank and press F9. (See Section 4 Inventory for more information.) Layaway Back Orders: You may use the layaway procedures to perform a back order while at the same time taking a down payment from your customer. When you place an item on layaway that is not in stock you will be asked to back order the item. The inventory item that is to be back ordered must have a ‘Y’ or ‘N’ tax code assigned to it. To fill the back order, bring up the layaway and modify it. Enter through the items and press the F9 key to complete. Paid Out Paid Out Screen The Paid Out option is used when money is removed from the cash drawer for miscellaneous expenses, such as COD’s, postage, etc. By using paid out’s you will be maintaining an audit trail and insuring that your cash drawer will balance out at the end of the day. Accessing Paid Out 1. From the main Module Menu, highlight ‘Point of Sale Module’ and press ENTER, or just press ‘S’. 2. On the ‘Register’ menu, highlight 'Paid Out’ and press ENTER or just press ‘P’. 207 / 362 How to do a Paid Out 1. When you enter the Paid Out screen, the cursor will be blinking at the ‘Amount to Pay Out:’ 2. 3. 4. 5. 6. 7. prompt. Type in the dollar amount that is being removed from the cash drawer and press ENTER. (EX: 23.50, 20.00) The cursor will move to the ‘What for:’ prompt. Type in a brief description of what the money is being used for and press ENTER. (EX: postage, cod, etc.) The cursor will appear at the ‘ Acct Main:’ prompt. If you aren’t using G/L accounts, press ENTER at this prompt. If you are using General Ledger accounts, enter the main account to be debited. See Section 8 General Ledger Interface for more information. There are three ways to enter the G/L account: a. Type in the G/L account number and press ENTER. b. Type in the first letter of the G/L account name. This will take you to the G/L Account Look Up table. Highlight the correct account and press ENTER. c. Press the CTRL-F1 key combination to be taken to the G/L Account Look Up table. Highlight the correct account and press ENTER. After the account number has been pulled into the Paid Out screen, press ENTER to accept it. The cursor will move to the ‘Sub:’ prompt. If you aren’t using G/L accounts, press ENTER at this prompt. If you are using G/L accounts, you may enter a Sub-G/L account number here as above in Step 3. After the account number has been pulled into the Paid Out screen, press ENTER to accept it. You will be given a choice of printer options to print the receipt. Purchase Gift Certificate Purchase Gift Certificate screen This option is used to Purchase Gift Certificates. To redeem Gift Certificates, use the Quick Sale option and 208 / 362 follow the instructions in Section 16 Point Of Sale Module. Accessing Purchase Gift Certificates 1. From the main Module Menu, highlight and click Point of Sale Module. 2. On the Register menu, choose Purchase Gift Certificate. Purchasing Gift Certificates 1. When you enter this module, the cursor will be blinking at the Clerk ID prompt. After typig your clerk number, you will be asked Customer Number. If you aren’t concerned about tracking gift certificate purchases by customer, you may press ENTER at this prompt. If you want the gift certificate purchase to appear in the customers history, enter a Customer Number. (See Section 7 Customers for more information 2. The cursor will go to the ‘Gift No’ prompt. Gift Certificate numbers are user-definable and are extremely important in the operation of this system since they are the key to tracking gift certificates. The number entered here should match the gift certificate number on the document that you are issuing to the customer. After you type in the certificate number, press ENTER. NOTE: If you have Auto Numbering function on (File – Auto Numbering), it allows you have consistency with your issued gift certificate numbers. It is recommended for use by stores that do not have prenumbered gift certificate forms. You will be prompted for the initial number to start the auto numbering with. From then on, every gift certificate number will be sequentially numbered starting with the initial number chosen. TIP: If you have the ‘Ask Gift Number’ option turned ON in the Configuration module, you will be required to enter a valid gift certificate number when the gift certificate is used for a purchase. At the same time, the gift certificate balance will be tracked. If this option is turned off, you will not be prompted for a valid Gift Certificate number. See Section 3 Configuration and Section Special Tender Options for more information. 3. The cursor will go to the Amount Of Gift Certificate prompt. Type in the amount of the gift certificate and press ENTER. 4. Repeat Steps 2 and 3 as many times as you like. 5. Press F9 (End Sale) to finish the purchasing of gift certificates. 6. The tender screen will appear with the cursor blinking at the ‘Code:’ prompt. You may use any tender(s) to pay for the gift certificate. See Section Accepting Payment for the Sale for more information on accepting tender types. 209 / 362 Voiding Gift Certificates 1. Type in the Gift Certificate number that you want to void and press ENTER. 2. Choose “Void”. The tender screen will appear so that you can choose the tender type for the refund of the gift certificate balance. (See Section Accepting Payment for the Sale for more information on tender types.) Modify Transaction Modify Transaction allows you to ‘change’ a sale after it has been completed. For example, if you entered an item number incorrectly, or forgot to enter an item, you can choose modify transaction to alter the sale. This function is very useful when you want to change a sale without changing the invoice number. 1. Click on Modify Transaction on the Register menu. 2. You will be prompted to ‘Enter Invoice Number’ for the invoice that you want to change. Type in the number and press ENTER. 3. The sale will appear on the screen with a prompt confirming that this is the correct invoice. If it is correct, click Yes. If it is not correct, press No and you will be returned to the Register menu. The module will show the actual date the sale was rung up to enable you to tell when the transaction transpired. 4. After you pressed ENTER, a note will appear stating that modifying the transaction will mean that you would have to void it first, asking you again if you still want to do this. 5. When the voiding process is complete, the ‘Register’ menu will reappear. The system needs to know what type of transaction the new transaction will be. In most cases, you will be changing a Quick Sale that will still be a Quick Sale after the modification, so you would press ENTER with Quick Sale highlighted. If you need to choose another transaction type, highlight it and press ENTER. 210 / 362 6. The invoice will reappear. Make any changes necessary. For any parts of the sale that do not need to be changed, just press ENTER. 7. When you are finished making the necessary changes, press F9 to end the sale as you normally would. At this point, you may change the tender used, if that was the reason that you modified the sale to begin with. (For tender changes, you may press F9 from the first item number entry instead of entering through the entire sale.) 8. You will be prompted to print a new sales receipt. The old transaction will be voided, but still in the system's memory, and the new sale will take its place, but the invoice number will change. TIP: Modify Transaction can only be done on the same day that it was originally entered. If you are modifying a transaction from a prior day, you may change the system date, modify the sale, then change the system date back to today’s date. Escaping from a Transaction There may be instances when you start a transaction and the customer changes their mind. Or you may need to look at Customer History without proceeding with a sale. In this type of situation you will need to get out of a sale without completing it. 1. Press the Stop menu icon Once you escape from a transaction, there is no record that the transaction was ever begun. Additional Features Available in the Point of Sale Module In order to make the Point of Sale module as efficient as possible, there are some additional features from other sections of the program which are also available from the Point of Sale module. 1. Customer History - Full Customer History is available from the Quick Sale, Sales Refund and Layaway modules. This history gives you complete A/R information, including minimum payment amount and Delinquent amount ,along with item purchases, which is invaluable for identifying the selling date and price of returned items. It is also very helpful for identifying sizes purchased in the past. 211 / 362 Customer History from the Quick Sale screen a. You may access Customer History from any point in the transaction after you have entered a customer number (See Section Entering the Customer Number) and pressed ENTER. b. Simply press F10 and the Customer History will appear. c. You may scroll through the listed transactions using the up and down arrow keys. d. When you are finished viewing the history, press ESC. 2. Printing Shipping Labels You may print shipping labels directly from the Customer Look Up table. 212 / 362 Customer Look Up Screen 3. Note Pads There are a number of notes which can be viewed and edited from the Point of Sale screens. Customer Notes - If a customer has a note attached, you will see it in the upper right hand portion of the point of sale screen once the customer is pulled up. You may double click on the note to edit it. Sales Ticket Notes - These notes are printed on sales receipts and become permanently attached to the sales receipt number so that they will appear on reprints. They are useful for giving customers special instructions for a purchase or just saying a personal “thank you”. To create a sales ticket note, press the F6 key from the Quick Sale, Sales Refund or Layaway screen. A screen will appear; type in any message you like. When you are finished press ESC and continue with your transaction. TIP: To use Sales Receipt Notes, you should have your Sales Ticket form definition set up to use both Description 1 and 2 from the Inventory file. This will allow you to print Sales Ticket Notes which are 40 characters per line. If you are only using Description 1 in your form definition, your Sales Ticket Notes will only print 20 characters per line. See Section 21 Form Definition for more information. 213 / 362 Item Number Notes - If you enter an inventory item which has a note attached, the note will automatically appear at the bottom of the screen. If you need to make any changes or additions, just type them in. When you are finished with the note, press ESC and continue with the transaction. 4. Accessing Inventory You may view, add or modify inventory directly from the Point of Sale transactions. To access inventory, press the F4 key or ALT-I key combination when the cursor is in the Item Number field. The inventory screen will appear and you will have all of the normal inventory functions available. If you enter a number into the Item Description field before pressing F4, you will see that item on Inventory screen. If you have an item on the inventory screen and press F10, that inventory item will be carried back to your transaction. Generate Sales Order Sales Orders are exactly that - an order for a future sale. Sales Orders are used for special orders or merchandise which is not physically present in the store to be sold. They can also be created from the Quick Sale screen when there is no quantity on hand for an item. Work with Sales Orders Sales Orders are designed to be transformed into sales at a later point. The Work with Sales Order screen allows you to Edit, Print or Convert Sales Orders to sales. This is an module is located in Register menu at Point Of Sale screen. Received on Account Besides charging purchases and issuing credits to accounts receivable from the point of sale module, you will also find the Received on Account module in the Point of Sale Register menu. This module is used for accepting payments on account and making changes to accounts. For information on charging purchases and issuing credits to A/R accounts, see Section 16 Point of Sale Module. Remember: If a customer is on credit hold or has exceeded his/her credit limit, you will see warning screens at point of sale and you will not be able to complete a transaction to their A/R account. TIP: You may create a file in the POS directory called NOCREDIT.FLG to inform the POS module no to allow Overriding credit holds. This does not affect credit limits. If this is done then the system will not 214 / 362 allow a user to override accounts that are on credit hold. It will allow them to continue to override credit limits as usual. Call Magnum Software at 843 476 4767 Accessing The Received on Account Screen 1. From the main ‘Module’ menu, choose Point of Sale Module 2. From POS Screen, choose Register menu and click on Received on Account. Received on Account screen See Section Received on Account for more information. 215 / 362 Quick Payment on Account This is a fast and easy interface at the Point of Sale screen that will allow taking of payments on Account quickly without having to leave the POS Screen. TIP: To prevent any accidental damage to a customer’s account information, Quick Payment on Account should be the option used by Sales Persons to apply payments to customer accounts. The Received on Account option should only be used when it is necessary to Add or Modify information regarding a customer's account. To Enter Quick Payment on Account through Register screen: 1. Choose Quick Payment on Account. 2. You will be prompted for certain criteria concerning the payment. a. Enter the Sales Person number and press ENTER b. Enter the customer number and press ENTER . (You may also press F1 for lookup table or just start typing customer's name) c. Enter amount received and press ENTER. d. You will see the Spread AR Payment Screen 216 / 362 e. If you have a lot of pending Invoices with this Major Account, you can either search and Mark by Invoice, or pay by ticket number/transaction. If you prefer to make payments on invoices rather than on a separate transactions, to keep your records clean and exclude the possibility of an error, you can choose Hide Receipts/ Show Invoice No's option to better serve your needs. f. After you hit OK you will get to the Split Tender Screen and will have to choose payment type. g. Once tender type is entered the receipt will be printed. NOTE: Payments entered through the Quick Payment on Account screen will automatically update the Customer's Account History. NOTE: The Received on Account option may be password protected to prevent Sales Person usage. See Section 23 Passwords for more information. Minimum Payment Properties While accepting payment on account, you can specify in properties menu if you want the customer to have certain minimum payment to be made. E.g. with a purchase of a $200 shoes, their minimum payment has to be 15% or $20, whichever is greater. In this example thou, customer is going to be charged a minimum payment of 15% ($30). NOTE: This is a store wide configuration setting. Once you set it up, it will be applied to any customer that is using store credit, layaway, etc. 217 / 362 17 Point Of Sale Menus The Tools in the Point of Sale module has many of the functions offered by the function keys on the Help menu, with some additions. The only difference is that you may perform these functions by choosing them off of the menu instead of remembering function key assignments. Accessing the Tools Menus From the Register menu in the Point of Sale module, press the right arrow key one or more times until the menu you desire is activated. Tools Menu Tools Menu 218 / 362 Inventory (F4) While working on sales transactions in the POS module, you may temporarily go to the Inventory module at any point in the transaction. From the Tools menu, click Inventory. From within the Transaction screen, you can access Inventory by pressing the F4 function key. If the cursor is blinking under an item number in the Item Number column, that item will automatically be pulled up and presented for modification in the Inventory screen when you press F4. TIP: This is very useful for checking costing information or item history on an item that you want to sell. When you press the F10 key to exit the inventory module, you will be brought back to exactly the same position that you left in the Point of Sale module. See Section 15.25 for more information. New POS Module If you are working on a sale and the customer decides that he/she should take another look at an item before you complete the sale, you may press Ctrl+F2 to save the information that you have already entered. This allows you to ‘ring’ a sale for another customer while the first customer is shopping. When the customer returns, you may close the new Point of Sale screen by clicking on the X in the upper right hand corner of the screen or Choose Exit from the Register menu. The First Quick Sale screen and your sale will reappear. Then you can complete it as usual. This function is really just starting another instance of the Point of Sale module. You may have any number of POS screens open at a time. Open Cash Drawer There are times when you will want to open the Cash Drawer (if one is installed) without performing a sale. From within the transaction screen, press the F7 key. If you have any problems getting your cash drawer to open, you may need to change the cash drawer set up in the Configuration module. See Section 3 Configuration for more information. 219 / 362 POS Options This function will load the POS Configuration settings. Please refer to Section 3 Configuration for more information. Receipt Policy You can edit your different receipt policies. There are 3 policies that can be printed based on the type of transaction being performed. The default policies are: [receipt.*] Normal sale SHOES NOT WORN MAY BE RETURNED FOR ADJUSTMENT OR REFUND PLEASE BE SURE OF FIT PRODUCTS ARE WARANTIED AGAINST DEFECTS IN MATERIAL AND WORKMANSHIP ONLY, NO WARRANTY AGAINST MISUSE OR IMPROPPER CARE [ccard.*] Credit Card [Authorization No.] . ____________________ Signature The cardholder agrees to the credit card amount shown and agrees to pay as set forth in the cardholders agreement. [layaway.*] Layaway policy No default. When a transaction is being performed, Winsale will determine if it is a sale or a layaway. If the transaction is layaway then the layaway.imp file will be used (if found) instead of the receipt.imp. NOTE: * - file extension of these documents depends on the store number. E.g. if the store number is 5, then file name will be receipt.5 220 / 362 Winsale also uses the policy.storenumber file. This allows multiple stores running over the Internet to use their own store policy options. The positioning of the policies is laid out from inside the form definition utility located from inside the utilities menu on the main screen. To be able to use Receipt Policy, you have to make sure that several conditions are met: 1.The printer being printed to is connected to the computer to a port that is software addressable using an addressable LPT or COM port. 2. The Windows Driver is configured to be skipped under the POS Options on the Tools Menu of the Point of Sale Screen. Mobile Import From Mobile Unit This function is used to take information that you have collected with your notebook (or other mobile) computer at a customer’s site and import into the main store system. This function is typically done on the main store computer. The information should have already been exported out from the mobile computer. You will be prompted for the path of the files to import in. Once the data has been found and verified it will be inserted into your main store computers databases. This function relies on remote store setup files. You must set up a remote site from inside of the configuration program. This needs to be done on both the main store computer and the mobile computer. See Section 3 Configuration for information on how to configure this. 221 / 362 Mobile Menu Export From Mobile Unit This function is the inverse of the above explained function. You will use this on the mobile computer to export the information that you have collected on to some media like a CD or a thumb drive, etcetera. You can then take that media and read in to the main store computer. View Sales Statistics Sales Statistic can give you up to the second sales statistics for the day, month and year. It will also compare how your store is doing compared to the current day in the prior year. The day it compares to is the day of the week not the actual date. This way the comparisons are from Monday to Monday, and Tuesday to Tuesday, not Monday to Sunday. 222 / 362 View Menu Major Account This menu allows you to view the major account information. Major Accounts can be setup so that they receive all accounts receivable billings from their employees’ purchases at your store. This is a parent-child relationship that allows the billing of items purchased by one party to be billed to another party. This is commonly used in business to business sales. 223 / 362 Customer History Displays the customer history window for the current customer on this sale. Note This function allows the editing of the current sales ticket note that will be printed out on the receipt. Inventory Table This function displays the inventory table. You can research inventory by category from here. It also allows you to change prices and costs by Style number. It’s very handy for when costs and prices are different for the larger sizes of the style. When the table is loaded it lists all of the sizes and dimensions for every item within the style sorted by size. You can change any cost or price that you want on one easy table. The unique feature of this table is that it allows you to copy the costs and prices from any point in the file usually starting at a large size through each larger size until the last size is updated. This way you can set one cost and price for the smaller sizes and another cost and price for the big and tall sizes in one simple adjustment. This table is located on the inventory screen and can also be used when creating new items with the external UPC file database. End Of Day 224 / 362 Drawer Reconciliation This option will call up the Drawer Reconciliation screen. This may be used to simply see where sales are currently for the day or it may be used to actually close out the day without having to go to the close out menu. TIP: You may reconcile multiple computers cash drawers with one reconciliation session. This is done by entering in multiple terminal IDs’ when performing the drawer reconciliation. This is helpful for when two computers share the same cash drawer. Store To Store Transfer For stores with more than one location set up, you can use this function to transfer inventory from one location to another location. This information will get sent to the other stores(s) locations when either one of the two transaction types below is used. You can use the data collector interface when doing store to store transfer for bulk order, by importing files. Send Out Today's Transactions For stores with more than one location is set up, you can use this function to build the information that has taken place for today and have it communicated to the other store locations that you have set up in the Remote Store Configuration. This function will also read in any email awaiting insert to this store from the other remote store locations. This procedure should only be done at the end of the day when all transaction have taken place for the current store. You will be warned if trying to build for this same day more than once as this would cause inaccuracies for the other stores when they read in the information that you have sent. Send And Receive Transfers Now This procedure may be done any number of times per day. Although the store to store transfers move to the other stores during the Send out today’s transactions they can also be sent independently from the days sales transactions. Thus, allowing you to quickly transfer information to your other store locations, without having to wait until the end of day to send out the complete information build. Every time that you use this function, the transfers waiting to be sent are emptied and will not be sent out again when you use the Send out today’s transactions at the end of the day. Quickly Add New Customer 225 / 362 You can use the F11 key from inside of the POS module to either add a new account or modify the existing account displayed on the screen. This function will add a new account if there is no account number entered into the sale, and will modify the account displayed if it is present. 226 / 362 18 Close Out Menu 1. From the main Module Menu, press the Close-Out menu. 2. Highlight one of the three available close out menus. Close Out Menu Daily Close Out The Daily Close Out is a very simple process that not only balances your cash drawer and total sales for the day, but also gives you the ability to discover any mistakes on a timely basis. This is an extremely important part of your daily process because it is the first step in your auditing process. All of your employees should be experienced at and comfortable with the close out procedure. Experience has shown that it is much simpler to balance cash drawers at the end of the day when the day’s transactions are fresh in the minds of your sales people. The close out procedure is also much more effective if it is done by the sales people who actually worked on the register. Once they are responsible for balancing the cash drawer, paperwork becomes better kept and organized! The Daily Close Out is actually made up of two operations: 1. The first is the Drawer Reconciliation that occurs each day at closing. This should be performed by your sales people. 2. The second step is the Auditing/Correction process which should be performed by your back office staff or store manager. This includes checking A/R transactions and making any corrections necessary to balance cash drawers. 227 / 362 Drawer Reconciliation screen The first step in the daily close out procedure is to count the actual cash, checks and credit card receipts in the cash drawer and reconcile that to the records stored in the computer. This is accomplished using the Drawer Reconciliation screen. When accessing the Drawer reconciliation the cash drawer will automatically open to allow the money to be counted. In order to make sure that you are closing for the correct day, the computer will show you the current date. If this is not the correct date, you will need to determine if your sales for the day were rung on the correct date and take the appropriate corrective action. 1. Highlight ‘Drawer Reconciliation…’ and press ENTER. Drawer Reconciliation Screen 228 / 362 3. There are two choices for printing the daily Sales Journal - Receipt Style or Report Style. a. If you are working at a point of sale register with a 3” - 4” receipt printer, highlight Register Receipt Tape Style. (With this option, the report will print correctly on the receipt paper.) b. If your printer is a report printer, (dot matrix, ink jet or laser), or if you are in the back office, highlight 80 Column Printer Style. Multiple Stores If you are a multiple store company, the next screen will ask if you want to report on all stores or a single store. In most cases, you will only be working with one store at a time. c. If you are closing out the entire store, select Reconcile all Registers. 1. The cursor will be blinking on Starting Cash in Drawer:. Type in the amount of cash that you started your day with and press ENTER. For example, you may always start off with $200 in your cash drawer. Type in ‘200’ and press ENTER Note: The starting cash in drawer number will automatica2500lly be remembered for you and will be the default the next time that you close the cash drawer. 2. You will see a figure appear in ‘Cash in Drawer Should be:’. This is the amount of cash, checks and credit cards, minus paid outs, that the system thinks should be in your cash drawer. 3. The cursor will be blinking at ‘Actual Cash in Drawer:’. This is where you will need to actually count your drawer. a. Begin by counting your cash, (tender and coins). Compare this amount to the computer amount as follows: (STARTING CASH IN DRAWER) + (TOTAL CASH RECEIVED) = ACTUAL CASH b. Add up all of your credit card receipts, including American Express, Travelers Checks, Visa, Master Card, Discover, etc. All of these should add up to the ‘Total Credit Cards Rcvd:’ amount. c. Add up all of the personal checks in your drawer. This amount should match the amount in ‘Total Personal Checks:’ d. Add up your receipts for Paid Outs. This amount should match the amount in ‘Total Paid Outs:’. e. All of these amounts added together should equal the ‘Actual Cash in Drawer:’ amount. Type in the amount and press ENTER. 4. The system will compare the ‘Cash in Drawer Should be:’ amount to the ‘Actual Cash in Drawer:’ amount and arrive at an ‘Overage/Shortage:’ amount. This amount represents the amount that your actual cash drawer is either over or under the amount recorded in the computer. a. If your Overage/Shortage amount is 0, then your cash drawer balances and you can finish with the closing procedure in Step 5. b. If your Overage/Shortage amount is not 0, but is an amount which is acceptable to store management, then you can proceed with the closing procedure in Step 5. c. If the Overage/Shortage amount is not 0 and not explainable, then you should postpone the closing procedure until the problem is identified and corrected. Skip Step 5 and proceed to Step 6. 229 / 362 5. To finish the closing procedure: a. Type in the ‘Actual Cash in Drawer:’ amount and press ENTER. b. The cursor will go to the ‘Store Number:’ Confirm that this is the correct Store Number by pressing ENTER. c. You will be asked to confirm again The Sales Journal report will automatically print out on your printer. d. As a result of this closing procedure, the bank deposit amount will be automatically posted into Checking Account #1 in the Check Register for the Store Number that you confirmed in ‘b’. NOTE: The daily close out procedure can only be completed ONCE a day. You should not close out a day until the Over/Short amount is 0 or until all questions/problems have been resolved. Major Account Invoicing Major account Invoicing is one of the big and most functional features of WinSale. You can access it from the main WinSale screen, by clicking on the Close-Out – Daily Close Out Menu – Major Account Invoicing. Major Account Invoicing Menu On the next screen, you will see multiple options that will help you build the invoice according to your specific needs. 230 / 362 Major Account Invoicing screen There are few options you can modify: choose the dates of Invoice run for single store/all stores run for your register only/all registers narrow invoicing by vendor number choose payment due date After you finish with modifying all necessary fields, click OK. It will bring a new screen with options of which invoices do you want to choose. Check those that you want to be posted and click OK. You can sort, change and print by PO number from this screen and this will also update the sales history. If you choose the option to “Reprint to Excel” it will export all data you specified automatically to Excel with the following data in columns: SALE DATE SALE NO. EMP NAME QTY SOLD ITEM NUMBER UNIT PRICE EXT PRICE TAX AMT PAYMENT REG PRICE DIVISION CLOCK NO. REFERENCE PO NUMBER EMP DEDUCT DESCRIPTION These columns of data will automatically be sent to Excel. You have full control of what columns of data and at what position they are sent. This information is defined in form number 70 of the Form Definition 231 / 362 program and can easily be added to or removed from the default form definition. Once in Excel you can manipulate it anyway that you like before sending it on to your industrial customer. Only Data that would be printed in the body of a paper invoice can be used. TIP: You can also put dunning messages on your Major Accounts Invoices. This way you can alert your accounts of past and old invoices that are overdue. To do this there is a choice in the Form Definition area under Major Account invoices labeled dunning messages. The messages that will get printed are stored in 4 different files labeled Dunning30-.txt, Dunning30+.txt, Dunning60+.txt, and Dunning90+.txt. The placement of these files needs to be in your data folder and can be created with notepad. These file should contain messages that get stronger and stronger in each file. In other words, the message for accounts that are over 60 days old (Dunning60+.txt) should be stronger than the message contained in the file for accounts only over 30 days overdue (Dunning30+.txt). Likewise, the message for accounts that are over 90 days old should be stronger than the message contained in the file for 60 days overdue. Before invoicing, you should always run an A/R integrity check in the monthly closeout wizard. This needs to be done before invoicing so that the dunning messages get the right aging messages printed onto the invoices. NOTE: The Major Account Business Rules are store number centric. In other words if you have multiple Stores that use the same Major Account, the Business rules assigned to the major account profile can be different for each unique store number. These rules contain items, such as credit limit, copies of receipts, Blanket PO Numbers, etc. Monthly Close Out The Monthly Close Out Menu is used for a number of month end procedures, most of which are involved with printing monthly Accounts Receivable statements. If you use in-house Accounts Receivables, then you will need to follow the monthly close out menu stepby-step. It is very important that Steps 1 through 5 are completed in the order that they appear on this menu. You do have the option of closing out your A/R period and then printing your statements at a later time. If you don’t have in-house Accounts Receivables then you will only have to be concerned with a couple of options. These options are not mandatory, however, You may decide not to update your MTD fields or you may not use Layaways or Open to Buy at all. This close out is completely up to your discretion and use of the program. 232 / 362 A/R Integrity Check The A/R Integrity Check balances the Accounts Receivable file and the Customer File. It uses a two step process to accomplish this task. The first step sets each customer’s current balance to zero in the Customer file. The second step goes through each account in the A/R File and determines the open balance. It then resets the customer file current balance to the balance found in the A/R file. Network Users While the A/R Integrity Check is being performed, the Customer and A/R files will be completely locked. Other users in a network environment will not be able to access these files in any way. In network environments, all other users should be out of Winsale. To run the A/R Integrity Check: 1. In the ‘Monthly Close Out Menu’, click the ‘Process Now’ button on the right side of ‘ A/R Integrity Check’ 2. A warning will appear on the screen: “If you are on a network, make sure that all other users are no longer on the system”. Make sure that all users are out of Winsale and press ENTER. If you decide not to proceed, click Cancel 3. A second warning will appear: “This function uses accelerated access to increase speed. Customer Data will automatically be backed up.” When you are ready to proceed, press ENTER. If you decide not to proceed, click Cancel 4. The system will automatically back up the Customer file (ZCUSTMRS.BTR). It will create a new file in the DATA directory with a .BAK extension. This back up is performed because the system turns off all file protection in order to increase the speed of the process. 5. When the process is complete, the Monthly Close Out Menu will reappear. 233 / 362 Finance Charges Finance charges are used to age any transactions that have exceeded the aging categories defined in the configuration module. (See Section 3.3 Configuration for further information.) To compute finance charges, the system will look at each record in the Customer and Accounts Receivable files to determine the account age based on the type of account that you have set up (Open Item, Balance Forward or Revolving). If the account exceeds the aging categories, it will be given a finance charge. Network Users While the Finance Charge function is being performed, the Customer and A/R files will be completely locked. Other users in a network environment will not be able to access these files in any way. In network environments, all other users should be out of Winsale. NOTE: Adequate time should be allotted for this procedure. The time allocated is strictly determined by the speed of your computer and the number of A/R accounts in your store. NOTE: If the software detects that you have already run the finance charges in the current month it will pause and warn you of this condition. This should alleviate running double service charges by mistake. To run Finance Charges: 1. In the ‘Monthly Close Out Menu’, click the ‘Process Now’ button on the right side of ‘Finance Charges’. 2. A warning will appear on the screen: “If you are on a network, make sure that all other users are no longer on the system”. Make sure that all users are out of Winsale and press ENTER. If you decide not to proceed, click Cancel 3. A second warning will appear: “This function uses accelerated access to increase speed. Customer and A/R Data will automatically be backed up.” When you are ready to proceed, press ENTER If you decide not to proceed, click Cancel 4. The system will automatically back up the Customer file (ZCUSTMRS.BTR), the Accounts Receivable file (ZARFILE.BTR) and Archive Accounts Receivable file (ZAROLD.BTR). It will create new files in the DATA directory with a .BAK extension. This back up is performed because the system turns off all file protection in order to increase the speed of the process. 5. The Finance Charge screen will appear. 234 / 362 Finance Charge Screen 7. Minimum Payment Percentage - This prompt specifies a minimum required payment as a percentage of the account balance. a. The program first determines the balance of the account as of the last billing cycle. b. It then finds any credits, payments, etc. to be applied to the account since the last billing cycle. If these credits and payments meet or exceed the Minimum Payment amount no Finance charges will be applied to the account. d. If the credits and payments fall short of the Minimum Payment amount then finance charges will be applied to the account. e. The finance charge factor is taken from the customer record as it was set up in Customer Profiles. c. To fill in this field: a. Type in the percentage, (as a decimal), of the balance that you want to set up as a ‘minimum payment amount’. If you do not require a minimum payment, type ‘0’ . b. If you want finance charges applied to accounts regardless of whether payments have 235 / 362 been received or not, type ‘.99’ into this field. 8. Date of Close of Last Billing Cycle - This is the date of the last time that you ran finance charges. When you run finance charges, the date will be saved and will automatically appear in this field the next time that you run finance charges. This date determines which credits and payments are applied to the account for a billing period. a. If this date is correct, press ENTER. b. If you need to enter a different date, type in the date. 9. Enter Line of Reference to print on Statement - This is the reference that will appear on the Received on Account screen when a finance charge is posted to the account. This reference will also be printed on the statement. a. The default for this prompt is “Finance Charge”. If this is acceptable, press ENTER. b. If you want to use a different reference, type in the reference and press ENTER. 10. Adjust Finance Charge Factor To - In some cases, businesses like to offer a slightly lower finance charge percentage on accounts which reach a certain balance. Winsale will handle a single finance charge factor or a split finance charge. a. For a single finance charge factor, you should type your normal service charge factor, as a decimal, at this prompt. This factor should be the same one that is entered into the Customer Profiles. b. If you wish to adjust the finance charge up or down once a certain account balance is reached, then type in the second finance charge percentage, as a decimal, and press ENTER. The total finance charge will be based on the finance charge factor in the customer profile screen until the account reaches the specified balance. At that point the finance charge factor entered at this prompt will be used. So the finance charge is actually a combination of two finance charge factors. 11. After $ - This is the account balance at which the finance charge factor will change. a. For a single finance charge factor, you should enter a high dollar amount, 9999999, so that the new finance charge factor is never used. If the customer’s balance never reaches this amount, only the single finance charge factor is considered. b. If you do need to adjust the finance charge factor to a second percentage, then enter the account balance at which the new finance charge will be applied and press ENTER. 12. If you are using Revolving credit accounts, then you will have a minimum payment percentage set up in the Statement Form Definition. (See Section 20 Form Definition for information and directions to set up or change a minimum payment percentage or dollar amount) When the program finds this information, a prompt will appear on the screen: “The statement Definition Shows a Minimum Payment Percentage of __%. Should the Delinquent field be assigned a value of __% of the Balance? YES”. The blanks will contain the minimum payment 236 / 362 percentage that you set up in the Statement Form Definition. a. The default for this prompt is ‘YES’. To accept this and use the percentage that is already set up in the Statement Form Definition, press ENTER. b. If you want to make a temporary change to the minimum payment percentage, press ‘N’ for NO. A prompt will appear: “Enter the percentage value for calculating the Delinquent Field of the Customer Record. Enter 00 for No Delinquency Calculation.” 1. The default for this prompt will be the percentage that you entered in the Form Definition. If you decide to keep this percentage, press ENTER. 2. If you want to change the percentage, type in the new percent as a whole number and press ENTER. TIP: You may also set up a minimum payment dollar amount in the Statement Form Definition. (See Section 21 Form Definition for more information.) 13. The program will calculate finance charges. When it is complete, the Monthly Close Out Menu will reappear. WARNING: Do NOT interrupt the system while finance charges are being calculated, or you will be at risk of file damage. A/R Aging Report The A/R Aging Report is a list of accounts showing the aging breakdown of all accounts receivable transactions made by the customer. The aging categories used in the report are the categories set up in the Configuration Module. (See Section 3 Configuration) TIP: Since Accounts Receivable is constantly updated and can not be “captured” for a time period, it is very important that you print the Aging report onto paper each month to be kept for reference. To run the Aging Report: 1. From the ‘Monthly Close Out Menu’, click the ‘Process Now’ button on the right side of ‘A/R Aging (This report can also be run from the ‘Customer Reports’ module. See Section 20 Reports for more details.) 237 / 362 2. When you enter the A/R Aging Report screen, the cursor will be in the ‘Starting Customer’ prompt with the name of the first customer, (from an alphabetical listing). You may: a. Press ENTER to accept this customer. b. Type in a beginning customer name, or partial name and press ENTER. c. Press ESC to leave this report. 3. The cursor will move to the ‘Ending Customer’ prompt with the name of the last customer, (from an alphabetical listing). You may: a. Press ENTER to accept this customer. b. Type in an ending customer name, or partial name and press ENTER. c. Press ESC to leave this report. 4. The next prompt is Print Payment/Charge Detail. You may print the Aging Report with all of the invoices listed for the period, or you may choose to only print totals. To show Account Invoice Balance, instead of all individual sales and payment details click on Collapse Receipt Detail to Major Account No. 5. The cursor will move to the ‘Group Payment with Charge’ prompt. This will group payments with the charges they are logged against and makes the report easier to analyze. By default this option is enabled. When running this report, you should leave it enabled to group payments with charges unless you have some special circumstances. 6. You can choose to ‘Print Credit Accounts’. Credit accounts are those accounts which have a negative balance. By default this option is enabled, and you will get a more accurate reading of your actual accounts receivable. (If you are running this report as a future reference, then you should enable it so that you have a complete A/R record.) 7. The next prompt is ‘Only Entries Older than’. This prompt refers to the age of the account and can make the report much easier to interpret. For example, you may only want to run this report for accounts over 60 days old. Instead of wading through each account, you can just type ‘60’ at this prompt. The default is ‘0’, which would show you all of your A/R accounts. a. To look at all of your accounts, press ENTER. b. If you only want to look at a certain aging category, type the number of days old and press ENTER. 238 / 362 8. The next prompt is for ‘Last Payment Dates Less Than’. This means that account information will print for any accounts with a payment older than the date that you enter. The default for this prompt is the current system date, which causes the report to pick up every account. a. To accept the current system date, press ENTER. b. To enter a different last payment date, type in the date and press ENTER. 9. Limit to Account in Range - this will allow you to print Accounts Receivable Aging Report only within specified account range. 10. Limit to Sales Territory - by default this option is disabled and will allow you to run your report in even more detailed state 11. A box will appear on the screen: “Building Report File. Please Wait.” This box will remain on the screen until the report begins to print. As long as it appears on the screen, the report is being built and should not be interrupted. (See the A/R Aging Report sample on the next page.) 12. If you change your mind about running the report any time prior to pressing ENTER at the last prompt, press ESC until you return to the Monthly Close Out Menu. 13. The A/R Aging report will list details only up to the date that the Winsale Date is set to. Therefore, you can back date Winsale to any date and the A/R Aging Report will only list A/R Activity through that date and not beyond. However, if a close out has been run then the closed out information will not be a part of the reports information. 239 / 362 Sample A/R Aging Report Close Out A/R Period This is the very last step in the monthly A/R procedure and is used to close the period’s transactions and produce a new beginning balance for each account. In other words, all transactions for the period will be moved into history, and a Balance Brought Forward line will be created. 240 / 362 TIP: DO NOT PROCEED with this step until you are sure that your statements have printed correctly. It is very difficult to make changes to accounts once you have performed this step. You must perform this step BEFORE ringing any new sales to accounts receivable, however. NOTE: Adequate time should be allotted for this procedure. The time allocated is strictly determined by the speed of your computer and the number of accounts receivable accounts in your store. 1. In the ‘Monthly Close Out Menu’, click the ‘Process Now’ button on the right side of ‘Close Out A/R Period’. 2. The system will automatically back up the Customer file, the Accounts Receivable file and 3. 4. 5. 6. 7. Archive Accounts Receivable file. This back up is performed because the system turns off all file protection in order to increase the speed of the process. Starting at Account Number. In most cases, you will want to close out all of your A/R accounts, so you should press ENTER at this prompt. If this is not the case, type in the beginning account number and press ENTER. The next prompt is Ending at Account Number. In most cases, you will want to close out all of your A/R accounts, so you should press ENTER at this prompt. If this is not the case, type in the ending account number and press ENTER. The cursor will advance to the “Reference Line” prompt. This is the reference that will appear in the Received on Account screen and on the Monthly Statements indicating that there is a balance from the prior month. The default for this prompt is “Bal Brought Fwd”. To accept this prompt, press ENTER. If you want to use a different reference, type the line and press ENTER. You will be prompted “Use Multiple Bal Fwd Columns”. This option ages your Balance Brought Forward and creates a Current, Over 30, Over 60 and Over 90 column. The balance brought forward will be posted on multiple lines according to the aging category. The default for this choice is ‘NO’. To accept this, press ENTER. If you want to use aging categories for the balance, type ‘Y’. The system will begin the close out process. When it is complete, the Monthly Close Out Menu will reappear. WARNING: Do not interrupt this process!! You will risk file integrity. NOTE: When running the close out menu, A/R type will be enforced, to stop a mix matches of A/R types from occurring. MTD Figure Close Out Depending on the speed of computer, the size of your inventory, customer and vendor files, running this close out utility can take quite a bit of time. This close out resets all of the MTD (month to date) fields in the program to 0, so that you can begin to accumulate new figures for the current month. Every field in the program that is labeled Month to Date (MTD) is reset to zero. As a part of this close out option, you will have the opportunity to Archive Dead Stock. This function will archive all inventory items that have 0 On Hand, 0 on Layaway and 0 On Order while maintaining item history. Archiving dead stock is not mandatory, but it helps to keep your inventory file current and makes item searches a little quicker. And, because inventory is only archived, you can always get it back into active inventory if it’s archived by accident. 241 / 362 Network Users You will need to make sure that all other users are out of the program before running this close out option. While this process is being performed, the Customer, Vendor and Inventory files will be completely locked, so other users will not be able to use the program in any way. Make sure that all users have exited the program before beginning this operation. Multiple Stores You will need to run this close out procedure in each store if you wish to reset the MTD fields. An item will only be archived if all three criteria are met. The default for this option is not to archive. TIP: An inventory item can always be un-archived. See Section 4 Inventory for more information on archiving and un-archiving inventory. Re-initialize Open to Buy (OTB) The Re-initialize Open to Buy monthly close out program updates the values in the Open to Buy module for the current month. All of the month end sales and inventory figures are calculated and updated for each department, by month and store. If you are not using the Open to Buy system you do not need to run this close out procedure. NOTE: Because of the amount of information that is updated and the calculations that are performed by this operation, you will need to allow for a large, uninterrupted block of time to run this close out. This is especially true if you are running this update for the first time Layaway Statements The Layaway Statements option is used to print Monthly Statements for your customers with activity detail for open Layaways. This is a great way to remind customers that they have put goods on layaway. These statements will print using the default format of the Accounts Receivable statements. Monthly Statements Statements are a means of notifying your accounts receivable customers about their account balances and the payment due on those balances. They are printed once per billing cycle, after finance charges have been calculated and before the A/R period is closed out. There are many options available to customize these statements, including printing transaction line item detail, and statement forms can be developed according to the needs of your business. To print Monthly Statements: 242 / 362 1. From the Monthly Close Out Menu, click the ‘Process Now’ button on the right side of 2. 3. 4. 5. Monthly Statements. The first prompt will be: Statements Can Be Run For The Prioir Billing Cycle Or They Can Be Run For The Current Billing Cycle. If you choose No: This option is recommended if you just closed out a month. That way you will see all detailed monthly charges and payments on the monthly statement since the last time you closed an A/R period. If you choose Yes: This Option will allow you to view the remaining balance without any payment or charge detail. (Current Billing Cycle). After you choose appropriate option, the next prompt will be: Print Invoice Line Item Detail on Statements. This option allows you to choose whether or not to print invoice detail on statements. The actual inventory items that were purchased or returned will be printed, which helps customers understand their statements. By default this option is enabled. a. If you do not want to include invoice detail on statements, uncheck it. b. If you would like to include invoice detail, leave the check mark.. c. If you change your mind about running statements, press ESC. 3. The next prompt will say: ‘Print Statements for All Customer Balances’ You have the opportunity to produce statements for all of your accounts receivable customers, one customer or a range of customers. You may specify which customers to produce statements for by Customer Number, Customer Name, Sales Territory. a. If you want to limit the statements that you print, deselect the option. 1. To print statements by Customer Number, Customer Name, Sales Territory simply choose an appropriate function. You can also Print To Screen, if you want to have digital copy of the file for future printing or email use. TIP: If you only want to print a statement for one customer, type in the same number, (or name), for the ‘Beginning’ and ‘Ending’ fields. TIP: The names that you type into Customer Name prompts must be in the exact same format as the Customer record. All spaces, commas, periods, etc. must be exactly the same! 4. You can also sort the results based on Customer Number/Name/Sales Territory/ Zip Code. 5. Next prompt will be Minimum Cut Off Balance to Produce a Statement is 1.00 and Above. This prompt helps you avoid printing statements for customers who owe less than $1.00. You can always choose from multiple options in the menu to run the report for bigger amounts (e.g. $200, $500 cut-off balances) a. To accept the $1.00 cut off, proceed to the next option. b. To set a new cut off, click on a drop down menu and choose the appropriate option and press ENTER. 6. The next prompt is: Enter Comment (Over-Rides Dunning Messages). If you type in a comment here, it will override all of the dunning messages that you set up in the Configuration program. (See Section 3) This message will be printed at the bottom of all statements. You may want to let your customers know: 'We're having a sale next month!” After you type in the message, press ENTER. a. If you don’t want to enter a separate message, press ENTER (without typing anything.) 243 / 362 7. Enter Date Payment Is Due - This date will print on the statements if it has been included in the statement form definition. Type in the date and press ENTER. (If you do not want to use a due date, press ENTER) 8. Click OK to proceed with choosing a printer. Yearly Close Out Before performing the Yearly Close Out procedures you should run the normal Monthly Close Out procedures, with the exception of the MTD Figure Close Out. The MTD Figure Close Out will automatically take place when doing the YTD Figure Close Out. YTD Figure Close Out Depending on the size of your inventory, customer and vendor files, running this close out utility can take quite a bit of time. This close out resets all of the YTD (year to date) fields in the program to 0, so that you can begin to accumulate new figures for the current year. Every field in the program that is labeled Year to Date (YTD) is reset to zero. As a part of this close out option, you will have the opportunity to Archive Dead Stock. This function will archive all inventory items that have 0 On Hand, 0 on Layaway and 0 On Order while maintaining item history. Archiving dead stock is not mandatory, but it helps to keep your inventory file current and makes item searches a little quicker. And, because inventory is only archived, you can always get it back into active inventory if it’s archived by accident. Network Users You will need to make sure that all other users are out of the program before running this close out option. While this process is being performed, the Customer, Vendor and Inventory files will be completely locked, so other users will not be able to use the program in any way. Make sure that all users have exited the program before beginning this operation. Multiple Stores You will need to run this close out procedure in each store if you wish to reset the YTD fields. 244 / 362 Re-initialize OTB (Open to Buy) Module he Re-initialize Open to Buy yearly close out program updates the values in the Open to Buy module for the past year. All of the year end sales and inventory figures are calculated and updated for each department, by year and store. If you are not using the Open to Buy system you do not need to run this close out procedure. NOTE: Because of the amount of information that is updated and the calculations that are performed by this operation, you will need to allow for a very large, uninterrupted block of time to run this close out. This is especially true if you are running this update for the first time. It is best to start this operation at the end of the business day and allow it to run, uninterrupted, all night. TIP: It is a good idea to make sure that you have a complete system back up before beginning this close out procedure, since so many files are involved in the process. 245 / 362 19 Purchase Orders Overview The purchase order module in Winsale is designed to provide “one step” purchasing and inventory updating. When an item is placed on a purchase order, an inventory record is created so that the item can be sold even though it may not be received. (In this case, the Quantity on Hand would be -1.) When a purchase order is filled, the inventory record is automatically updated with the quantity received and cost information, (including shipping costs, if you decide to average them in). Winsale uses the ‘EMT Matrix Purchase Order’ for purchase orders. EMT stands for Extended Matrix Table. This purchase order system is very versatile and allows you to create matrix items and non-matrix style items on the same purchase order and at the same time. In addition to this powerful capability the EMT system also uses two other powerful utilities to carry purchase order items into itself. NOTE: When adding items to the Purchase Order by Style number and the style requested is not in your inventory database, Winsale will give the user the option to choose which vendor’s items to use when the same style number is found for multiple vendors in UPC database. Quick Scan utility This utility allows you to type or scan items into the PO. The scanner can be a regular hand held data barcode scanner or it may read in bulk items from a hand held data collector. The Quick Scan utility has three modes of operation. 246 / 362 Create Purchase Order Receive Purchase Order Create and Receive Purchase Order These functions can be used hand in hand with each other. For example, you can use the ‘Receive Purchase Orders’ function and read in a large order. If some of the items where not found to be on order, the remaining items can be put on order and received at the same time with the ‘Create and Receive Purchase Order’ function. This is possible because the remaining items don’t dissolve but stay in place on the screen to be ordered. It is also possible to scan and receive PO from multiple vendors at the same time. You are not limited to just doing one single vendor at a time. Winsale will sort the items entered and group them by vendor number internally and do the requested actions automatically by vendor number groupings. Auto Generate Purchase Order This utility allows you to use information contained in the various databases to automatically generate purchase orders. The information is then passed down to the EMT purchase order. The Auto Generate Purchase Order has four modes of operation. Sales: Scan sales for a date range Required Reorder based on reorder points (Red Lines) Back Orders Special Orders These two optional input methods incorporate the largest element of efficiency and accuracy because they require the smallest amount of input from you, and because the shell items have already been set up. They however, cannot be used until you have already created inventory, and in the case of the Auto Generate utility, until you have sold some inventory or set up model stocks. You can create auto – generated purchase orders using one or multiple vendors at the time. If you choose to have multiple vendors, it will automatically split up any auto- generated orders in to separate purchase order numbers accordingly to the vendor number assigned to the item. This greatly simplifies ordering red-lines or any of the other types of auto-generating purchase orders. If you still would like to generate the purchase order by vendor number simply select a single vendor number when selecting your ranges. Otherwise multiple PO’s may be generated automatically. EMT Matrix Purchase Order The EMT Matrix Purchase Order is the underlying frame work for all of the special utilities of the Winsale’s PO System. No matter what method that is used for generating the Purchase Order the EMT will be the engine that actually orders the items. All of the other utilities will drop the items to order onto the EMT engine. 247 / 362 Optional Settings Use Matrix Table for Ordering The EMT purchase order can be used to order matrix style items as well as non-matrix SKUs. The selection between the two styles is done with a check box on the lower right side of the window. If this item is checked you will notice that a matrix table is displayed in the middle of the screen and that the Item Number field changes to Style. When you use a matrix style item the system will generate the item number from the headers of the matrix table that you are using and the style number. 100 105 110 115 B C 1 D 2 E Sample portion of shoe matrix If you were using the above shoe matrix with the style number of 00105, the item numbers that would be created would be 00105C105 and 00105D110. They correspond to the Widths of the shoe going vertically and the sizes going horizontally on the top. S M L XL BLK BRN RED 1 2 YEL Sample portion of clothing matrix If you were using the above clothing matrix with the style number of 00105, the item numbers that would be created would be 00105BRNM and 00105REDL. They correspond to the color of the garment going vertically and the sizes going horizontally on the top. Use Matrix Table for Ordering (non matrix) The item number that you use is totally up to you. It can be up to 15 characters long using both numbers and letters. Using spaces inside of the item number is not recommended. You may have the system generate a sequential number for each new item that is created. This will be done when you have the √ Auto Generate item number option selected in the bottom right portion of the screen. This option is only shown when not using the matrix table for ordering. Auto Receive when placing order This option is used for those times that you will be using the Purchase Order system and desire to receive the goods at the same time that you are placing the order. When this option is checked then when the 248 / 362 line is added to the PO it is marked as received with the same quantity that you placed on order. Note that the item is just marked as received but has not actually updated the inventory until you press the Finish and Print button. Use PO Audit to verify inventory This option uses a sub-set of the inventory audit functionality. However, it does not correct inventory physical quantities, but instead verifies the integrity of the purchase order specific fields. These fields are: o o o Last PO Number Quantity on Order Total PO Received Prompt for disbursement on receival. This option will allow you to disburse or auto transfer to outlaying stores under our corporate umbrella. Simply assign the quantities that you want to transfer to each of the other stores. This dialog will come up at the point of receiving and is only available to the mother store location. Buttons Save and Prompt Next Style This button will save the line item(s) ordered and move them down into the finished grid at the bottom of the screen. If the ‘Auto Receive when placing Order’ option is checked then the Qty Rcvd column will be the same as the Order Qty column. The order is not received into inventory until then Finish and Print button is pressed. Cancel Item(s) in Process This button is used to cancel the process of ordering and may be used at any point prior to pressing the Save and Prompt Next Style button. 249 / 362 Receiving Purchase Order Print Options Screen To receive a purchase order: 1. On the main WinSale screen, click Modules - Purchase Orders. 2. You will see a new window called Extended Matrix Table (EMT) open. 3. Choose File - Print PO. 4. Purchase Order Print Selection window will open where you can choose to Print Receival Report and specify the Purchase Order Numbers. Finish This Order Now This button is used to complete the process of ordering. If you are just ordering and not receiving a purchase order then you will get a new window that will prompt you to print the purchase order. You can print the Purchase Order is one of two formats. Matrix Style This style will print a standard Purchase Order in a grid fashion with all of the appropriate fields that can be sent to your vendor for order. This form type is not customizable with the form definition utility. You may elect for the items to be printed in alphabetical order or in the order that they were entered into the system. Typically, you will want to print alphabetically, unless you want the items to be grouped together in the case of related fashions. Non Matrix Style This style purchase order will print in a linear fashion and not in a matrix format. This type of form is completely definable with the form definition utility. 250 / 362 If you have placed a quantity into the Qty Rcvd column of the finished grid, then you will have additional prompts as follows because you are telling the purchase order to receive goods into inventory. The first prompt you will receive is You may elect to update Accounts Payable when receiving items into inventory from a purchase order. This should only be done when you have in hand the invoice for the goods being received. Otherwise, you will want to use the Accounts Payable entry when the vendors invoice is in hand. If you do want to update Accounts Payables for the Purchase Order that you are receiving you will be prompted for the following information. This information is mainly filled in for you from the information found on the purchase order. Fill in or change as needed and press OK when you are ready to accept the information as displayed. You will be further prompted if a manual check (COD) was already written for this invoice. If a manual check was written then you will be prompted for the check number and amount. This information will then be written to the payables for you as a closed item. 251 / 362 You may print barcode labels, hangtags, etcetera for the items received to streamline your inventory process. Edit Menu Tag Vendor Number (F3) The Tag Vendor Number allows you to select an entire vendor’s purchase orders and display them in the Finished Grid at the bottom of the screen. This way you can receive or edit all of the vendors purchase 252 / 362 order line items without relation to a purchase order number. The only purchase orders that will be loaded will be un-received line items. Tag PO Number (F4) The Tag PO Number allows you to select one particular purchase order and display it in the Finished Grid at the bottom of the screen. This way you can receive or edit this purchase order’s line items. The only line items that will be loaded will be un-received line items. You may also accomplish this same end by simply typing in the PO Number that you desire in the upper right hand corner of the EMT Matrix screen. Receive Complete (Ctrl-F) This function will fill the finished grid with the open purchase order of your choice. The Qty Rcvd column will be filled in for you with the same number as the Order Qty column. A dialog will then be displayed asking you to confirm the function. If you answer affirmatively then the purchase order will be received to completion. Un-Receive PO (Ctrl-U) This function will take any items that had been received prior and give you the ability to un-do the receival process. The quantity in inventory will be reduced by what was received prior. Renumber PO Number 253 / 362 This function allows you to renumber your purchase orders. You will be prompted for an existing Purchase Order Number and a new PO Number you wish to assign. Void (Ctrl-V) This function will void a purchase order that has not had any part of it received. If the PO that you want to void has been received or partially received then you will have to use the Un-Receive PO function first. Copy PO This function will allow you to take an existing PO and copy it so that you can duplicate the entire or partial PO for another store number. You can selectively choose the items that you want to copy. The next PO number is sequence will be used for the new PO number. 254 / 362 Cancel Over Due PO’s With every PO you have the option of giving a cancel date for the order. This is typically done with clothing stores. These stores would not want to order winter coats and then receive them in the spring time. This function will allow you to cancel select purchase orders based on the cancel date. The purchase orders chosen to cancel will be discarded from the purchase order file and the inventory will be adjusted. 255 / 362 Auto Generate PO The Auto Generate PO function allows you to generate your purchase orders based on one of four different criteria. These functions are mutually exclusive and therefore should not be used to create PO’s simultaneously. Scan Sales between two dates Required Reorder based on reorder points Back Orders created at the Point of Sale Special Orders created at the Point of Sale However, you select the items to order they will be carried into the EMT matrix purchase order system for the actual generation of the order. The purchase order will not be generated until you Press the Move to PO button. To generate a purchase order: 1. Select one of the choices for automatically generating your order. 1. Press the Start Process button 2. You will be greeted with the Range Picker dialog. This dialog is used in case you wish to further narrow down your choices of what to order by a range of several different choices. (You will be prompted for the vendor in the next step.) For most applications you will not select any range and should just press the OK button. 3. Enter the vendor number for the inventory you want to be analyzed for possible ordering. 256 / 362 Auto Generate Purchase Order The inventory will be scanned and will display any inventories that are suggested to order. If you want to order what is displayed place a check mark in the first column and the item will be carried into the EMT Matrix Purchase Order when the Move to PO button is pressed. Print The Print button in the lower left hand side of the screen allows you to print the items on this screen so that you can take it and verify it with your inventory. Audit Red Line Inventory When checked you can have the audit routines verify the quantities on hand before suggesting to order any items. Quick Scan Utility The quick scan utility has been designed to take a scanner (keyboard may also be used) or a data collector and scan in items onto the screen. From these items you may do one of the following: 257 / 362 Create a Purchase Order Only Any items entered will be sent to the EMT Matrix Purchase Order and will have a PO created with them. The next PO Number in order is used to generate when generating this PO. Receive a Purchase Order Only Any items entered will be checked against any open orders for the same item numbers entered. If multiple orders are found for the items entered then the oldest will be received against. If no open orders are found for these item numbers then you will be warned of this case and the items not found will remain in the Quick Scan utility so that you may use the the Create and Receive Purchase Order at the same time function. You may elect to be prompted for the PO Number to receive against instead of having Winsale find the oldest open PO. Create and Receive a Purchase Order at the same time Any items entered will have a new purchase order created and subsequently received at the same time. The next PO Number in order is used to generate when generating this PO. NOTE: Quick Scan will display the total quantity being ordered or received. This will help you verify the count that you scanned is what gets read into the computer and matches up to your packing lists. To use a data collector with this utility simply connect it to your computer and click on the button at the 258 / 362 top of the screen. This will take the items found in the data collector and read it into the grid. Nothing will be updated until the Save and Exit button is pressed. To cancel the operation before initiating it, press the Discard and Exit button. NOTE: If the item is not found in inventory for the current store, the Quick Scan PO will now look if it can replicate another stores inventory if the item number is found for another store. If it is possible, then it will replicate the other stores inventory for you automatically, thus saving hours of labor intensive keying. 259 / 362 20 Reports Winsale includes a large number of reports which can give you information about every aspect of your business. All of the reports have range criteria, which give you extreme flexibility with regard to time frames and data. Reports may be printed to the screen or your printer to allow for easy reference and they may be password protected. (See Section 23 Passwords for more information.) The report module is divided into eight sections: 1. Money Reports pertain to sales and income. 2. Inventory Reports give you information about your stock levels. 3. Customer Reports summarize different aspects of the program by Customer. (The Mailing 4. 5. 6. 7. 8. Label program is included in the Customer reports.) Vendor Reports focus on Purchase Order status and vendor performance. Employee Reports summarize sales and profitability by salesperson. Miscellaneous Reports include Department & G/L lists, as well as input for Open to Buy. Matrix Reports analyze your inventory and sales in a matrix format. Sub-Inventory Reports give you information about your ‘connected’ inventory. NOTE: If you print a report to screen, you may search for specific text in the report by pressing the F4 (Search) key and typing in the test that you are looking for. The program will move to the first instance of the text. If you want to look further, press the right arrow key and then press F4 again. NOTE: You can also print reports or copies of sales tickets directly to PDF and then have them automatically send via email to your customer. The customer must have an email address assigned to the customer profile. If not you will be prompted for an email address to send it to when re-printing it to email. Also you must have your email settings setup correctly inside of Winsale in the Internet - Email Properties page. This must be setup on each machine that will be using this functionality. Money Reports These reports all pertain to sales and income information. Sales Journal Report The Sales Journal gives you the following information at the top of the report for daily sales (starting in the upper left corner): 1. The date of the line entry will appear to the far left of the line. 2. Net Sales - This total sales figure does not include sales tax or shipping charges. Any sales refunds have automatically been deducted and A/R charges (sales charged to accounts receivable) are included. a. The Net Sales total will appear as a credit in the Sales G/L account. 260 / 362 3. Sales Tax - The total sales tax amount already has any tax from sales refunds deducted. a. This amount will appear as a credit in the Sales Tax G/L account. 4. Shipping Charges - This is the amount of any shipping that you have charged to your 5. 1. 7. 8. 9. 10. 11. 12. 13. 14. customers using the Options tender screen. a. Shipping appears as a credit in the Freight Out G/L account. A/R Charge - This is the total amount of sales charged to accounts receivable. This amount is included in the Net Sales figure, but is broken out for auditing purposes. a. This total will appear as a debit in the Accounts Receivable G/L account. A/R Payment - The total payments made by customers on their accounts. This amount is not included in the Net Sales amount, since it is a payment and not a sale. a. The total A/R Payments will appear as a credit in the Accounts Receivable G/L account and a debit in the Cash Drawer G/L account. Misc Income refers to total purchases of Gift Certificates and Layaway Forfeits, which are not included in the Net Sales amount. a. You will find this miscellaneous income amount as a credit to the Gift Certificate G/L account and debit to the Bank G/L account for gift certificate purchases. b. For layaway forfeits, the Layaway G/L account will be debited and the Misc Income G/L account will be credited. Layaway Deposits is the amount of money paid as deposits on layaways and is not included in the Net Sales amount. (Layaways are not included as sales until they are completely paid for.) a. This amount will be a credit to the Layaway G/L account and a debit to the Cash Drawer G/L account. Layaway Take Outs - The amount in this column is the total deposits for layaways which were closed out for the day. In other words, if you have a layaway with a $10 deposit and the customer comes in to pay off the balance, you will see the $10 deposit amount in Layaway Take Outs and the total sale (layaway) amount in Net Sales. a. For the G/L, the Layaway Take Out amount will appear as a debit in the Layaway account and a credit in the Bank account. Store Transfer is the dollar amount of merchandise which was transferred to another store over the specified period of time. Sales Refunds - This is the total amount of any refunds that you issued for the day. The sales refund amount will always be negative and does not include sales tax. This amount is automatically deducted from the Net Sales amount, and the sales tax is deducted from the Sales Tax amount. a. The Sales Refund amount will appear as a credit in the Cash Drawer G/L account, (or Accounts Receivable account if the credit is to an A/R account.) Paid Outs will be the total of any paid outs that you did for the day and are not included in the Net Sales amount. a. This amount will appear as a debit to the G/L account that you assign it to. Cash Drawer Over & Short - The Over & Short amount refers to the difference between your computer totals and the actual cash in your cash drawer. This amount will be 0 until you close out for the day, then it may have a positive or negative amount depending on how your cash drawer balanced. a. This amount will appear as either a credit or a debit in the Cash Drawer Over & Short G/L account, depending on how you balanced. Bank Deposit - This is the total amount that should be deposited in your checking account for the day. (If you are using the Accounts Payable module in Winsale, this amount will automatically be posted.) If you add all of the credits across the top of the report and subtract all of the debits, you will arrive at the bank deposit number. (Skip over the Sales Refunds amount since it is already included in your Net Sales figure and is only provided for information.) The Bank Deposit should also match the Total Checks & Cash and Total Credit Cards amounts at the bottom half of the report. a. The Bank Deposit amount will appear as a debit in the Bank G/L account and a credit 261 / 362 in the Cash Drawer G/L account. b. NOTE: The Drawer Reconciliation screen will allow you to make Bank Deposit adjustments. This would typically be used when at the end of the day close-out that your drawer balance is in-sufficient to replenish your starting drawer number. In other words, if today’s cash receivable was less than the starting number that you want to keep in the drawer for opening the cash drawer the next day. In this case you may have to enter a negative drawer adjustment that will offset the next days starting drawer. The amount entered will reduce the following days starting cash in drawer. This amount is a reduction in your bank deposit when it is entered as a negative value and will reflect an increase to the bank when entered as a positive value. 15. The Sales Journal will also list the Total Taxable Sales and Non-Taxable Sales. Across the bottom of the report, you will see a summary of your non-A/R receipts for the time period of the report: NOTE: For all of the totals in the bottom half of the report, the number in parentheses is the number of transactions that make up the total. 1. Total Checks & Cash - This amount should match the amount of checks and cash that you 2. 3. 4. 5. have in your cash drawer and is included in the Bank Deposit. Total Credit Cards - These are the totals of your different credit card transactions for the date range. The credit cards listed here are the same options that appear on the tender screen in Quick Sales. This amount is included in the Bank Deposit. (See Section 3 Configuration for information on setting up or modifying credit card accounts.) Misc Tender - This is the total purchases made using Gift Certificates and the Misc Tender option. This amount is not included in the Bank Deposit. Non-A/R Received is a total of all of the amounts in the bottom half of the screen. This total is for information only. Voids - The report will show you the total amount of voids for the period, along with the number of voids, for your information. Sales Register Report The Sales Register is a detailed listing of all of the transactions that affect the Sales Journal. This report becomes extremely important when the sales journal does not balance with the cash drawer because it gives you invoice detail to track mistakes. This report may be run for a date range for all stores or a single store and for all registers or a single register. (When you are trying to balance a cash drawer, you should only print this report for the register that you are trying to close.) 262 / 362 Sales Register Report Most of this report is self-explanatory. There are, however, some points to note: 1. The Cash Received Total is actually all of your Non-A/R transactions – Cash, Checks, Credit Cards, 2. 3. 4. 5. Traveler’s Checks and Misc Tender. It does not include any cash activity on Layaways or Paid Outs so this total will not match any of the totals on the Sales Journal. (These appear in the bottom portion of the report.) Payments to Accounts Receivable will appear both as transactions in the top half of the report and again at the bottom of the report. These payments are not included in the totals for the ‘Pmt Amt’ or ‘Chg Amt’ columns, however. Split Transactions are divided into 3 detail lines which all have the same invoice number. The first lines are for each tender and the last line shows the total of the sale with no payment type. Voided Transactions are printed on this report. However, they will not get added into the subtotals by salesman or total sales. POS Credit Hold: When a credit status is over-ridden it is recorded and will be shown on this report. The words CR OVERRIDE will be printed out under the Payment Type Heading. NOTE: When printing this report without sub sorting on the sales person who performed the sale, numbers are guaranteed to be listed sequentially. 263 / 362 Tender Detail Report 264 / 362 4 Year Sales Journal This Report allows you to view sales made for the last 4 years on a month-to-month basis. Can be useful for a long-term planning or just for the information on how your store was doing for the last 4 years. 4-Year Sales Journal Report. 265 / 362 Tax Worksheet The Tax Worksheet summarizes taxable transactions, in one easy step, and may be submitted to the state taxing authorities Tax Worksheet 266 / 362 Tax Exemptions are noted as follows: 1. In State Tax Exempt - A sale using an account that has the same state as the store’s state but has a tax code of 0 in the Customer Profile. (See Section 7 Customer for more information.) 2. Out of State Tax Exempt - A sale using an account which has a different state than the store’s state. 3. Non-Taxable Service - A sale which includes an inventory item with a tax code of ‘N’ or ‘L’. (See Section 4 Inventory for more information.) Periodic Hot Seller Report The Periodic Hot Seller is your main report for sales information. It will provide you with a summary of all of your sales within a specified date range, sorted by one of the following inventory keys: Item number, Vendor number, Size, Color, Style, Department, Date Code, Alternate Department, Salesman number, Customer number, Invoice Number or Description. Within each of these sorts, you may determine the date, vendor, department or alternate department ranges, making this an extremely flexible report. This report also includes average ticket in dollars, number of sales tickets, and average number of items on the ticket per criteria. NOTE: To add to this report flexibility, you may also send the corresponding customer information directly to the mailing label program. a. Date Range - The default for the beginning date range will be today’s date. To change this b. c. d. e. f. g. g. h. i. date, type over it and press ENTER, or press ENTER to accept the default. The default for the ending date range will also be today’s date. To change this date, type over it and press ENTER, or press ENTER to accept the default. Show Items On Report - You may choose to show item detail on this report or just show totals for each of your criteria. Limit to Vendor Range - If you want to run this report for all of your vendors. Limit to Department Range - If you want to run this report for all of your departments. Limit to Alt-Department Range - If you want to run this report for all of your alt-departments Limit to Sale Price Exceptions – Only the items that were sold for less than the regular price will be reported on. This can easily help you spot and fix pricing errors. Limit to Sales Person – If you want to run this report for specific Sales Person in your store. This is handy when running the report by Customer and Limiting to sales person for mailings and return calls. Export to Mailing Label System - You may create a list of all of the customers who purchased the items included in this report and send it to the Mailing Label program so that you can print mailing labels Separate Store Sales - If you are a multiple store company, you will probably want to group your sales by store number Swap Description with Style/Color/Size - If you use the manufacturers’ bar code as your store’s bar code, you will not have any style, size or color information on this report. (This information is usually included in the item number/bar code generated by the matrix table in the program.) In this case, you may elect to substitute the style, color and size in place of the description, as long as these fields are filled in the Inventory record. 267 / 362 1. The next prompt allows you to choose the order in which your items will be printed. You may highlight the option that you want to use and press ENTER or just type the line number. The options are: Sort By Units Sold - The items for which you sold the most pieces will print first. Sort By Profit Made - The items on which you made the most money will print first. Sort By Total Sales - The items with the most dollar sales will print first. Sort By Color - This option allows you to identify your most popular colors. Sort by Item Number - This option allows you to identify your most popular items. 2. You will be prompted to use an Descending or Ascending sort. Descending sorts will print the top 3. 4. 5. 6. sellers at the top of the list. Ascending sorts will print the slowest sellers at the top of the list. The system will scan your sales history according to the criteria that you have entered. You will see messages that the report is being calculated, then you will see printer options. Choose the correct printer and print driver, if necessary, and your report will print. When exporting to the Mailing Label/Merge system you will be prompted where to save the export file and whether you wish to append to any existing file or overwrite it. Running report by item number or style number can now be generated to display the Single Item Cost and the Actual Sold Price for the items sold. This is the default action taken but can be turned off by un-checking the check box labeled ‘Only extend Cost and Gross Profit on the bottom of the Report.’ As this label infers, the total Cost of Goods Sold and Gross Profit are still reported upon on the Grand Total Line at the bottom of the report. One of the unique features of the Periodic Hot Seller Report is the ability to report on items that were NOT sold. For that result, you would have to run it by any grouping, not just by style. Periodic Hot Seller Report Features: o o o o o o o o o o o Redline Quantity and short version of the vendor name for each line of the item history Quantity on hand from inventory for any item that is being reported on, which might help planning purchases and transfers. Listing only Price Exceptions on the report. Choosing that option with enable you to spot and fix pricing errors, by selecting only the items sold for less than a regular price. Sales Person limitation – allows you to limit sales activity by sales person, when printing the report. This comes handy when running the report by Customer and Limiting to sales person for mailing and return calls. Running report by Major Account will list Major Accounts only instead of all Customer’s billings. Bill to (or Major) Accounts - With this addition you can now select to run the PHS report by any of its myriad of options and limit the output to a certain Major Account or a range of Major Accounts. This ability tied in with the two below listed new PHS options gives you a great way of supplying your customer with their sales history or employee sales history. Hiding Profitability columns option allows you to generate report without fear of your customer gaining insight into your profit picture. Matrix Print - Simply choose Print Detail in Matrix Format when showing detail from the Periodic Hot Seller. Drill Down Reporting feature integrated into generated reports (to learn more about Drill Down Reporting, See Section 20.52). Report Sales for Single Terminals – if you have 2 or 3 registers at your store, with this option you can report sales for each of the registers separately. Items NOT sold – You can view the Periodic Hot Seller report on items that were not sold 268 / 362 when it is run by any grouping. Periodic Hot Seller Running Periodic Hot Seller reports for multiple stores is very convenient It includes the option to separate the sales by each store number and view grand total separately for the store. All reports in Periodic Hot Seller can be run for single terminals. If you run a report by item number or style number can be generated to display the single Item Cost and the Actual Sold Price for the items sold. This is the default action taken but can be turned off by unchecking the check box labeled ‘Only extend Cost and Gross Profit on the bottom of the Report. As this label infers, the total Cost of Goods Sold and Gross Profit are still reported upon on the Grand Total Line at the bottom of the report. 269 / 362 Periodic hot seller Report by Invoice Number Category Summary The Category Summary gives you a synopsis of inventory information related to sales, markdowns, stock levels and merchandise receipts. Although you may look at all of your inventory items with this report, you will most likely want to look at one of the following categories for a date range: Item Number, Vendor Number, Style, Size, Color, Department, Date Code, Alternate Department or Description. 270 / 362 Category Summary Report by Item Number Sales By Hour This report will allow you to analyze your busiest and least busy periods by day of the week and hour to help you to schedule your employees to your best advantage. This report is found on the Reports/Money menu. 271 / 362 Sales By Hour Sell Through by.. Sell Through/Return On Investment report gives another outlook into the profit picture. The Sell Through/ROI report shows you what investment was made in order to make a single sale. For example, you need to understand the stock to sales ratio that it takes to make that single sale. Winsale's Sell Through report helps you understand how much of an investment is being made. (You may have to purchase 2 or more items just to sell 1) Obviously, the fewer products you have to invest in to make your selling goals is very important. Your Return on Investment (ROI) and Sell through percentage can be a true teller of the profit picture, more than just flat out sales dollars minus the cost of goods sold (COGS). The Sell through report is an excellent tool to analyze sales history to see what best works for your clientèle and your bottom line. For example, it can tell what sizes to buy and which are truly the most profitable vendor lines because it can show the amount of dollars in investment for any variant of product it takes to make a single sale. Of course, to use this report it is necessary to use purchase orders to bring your inventory into Winsale. 272 / 362 Bottom Line Report The Bottom Line report gives you an up-to-the-second picture of the business finances. All of the information is read directly from your POS files at the moment that you run the report. This report may only be viewed on the screen. (You will not be able to print this report.) Bottom Line Report in Winsale Gift Certificate Detail Report This report allows you to track all of the activity related to gift certificates, as well as giving you an outstanding gift certificate total. 273 / 362 Gift Certificate Detail Report Daily Closeout Audit The Daily Close-Out Audit report is used to audit and justify all Accounts Receivable activity for a day. This report uses the Daily Summary Log to capture the prior day’s A/R activity and justify the new A/R Aging balance. Any data on this report that is incomplete is flagged so that errors can be corrected. If you are using Accounts Receivable, you should run this report every day after you have reconciled your cash drawer for the day. WARNING: This report must be run at the end of the business day, before any new transactions are processed, in order to accurately capture the Accounts Receivable totals. There are two options for handling this process: 1. Run the Daily Close Out Audit report at the end of the business day. 2. Run the Daily Close Out Audit report in the morning before any business occurs. To do this, you must change the system date back to the day before in order to maintain accurate records. The Daily Close-Out Audit report is used to audit and justify all Accounts Receivable activity for a day. This report uses the Daily Summary Log to capture the prior day’s A/R activity and justify the new A/R Aging balance. (See Section 14 for information about the A/R Aging report.) Any data on this report that is incomplete is flagged so that errors can be corrected. If you are using Accounts Receivable, you should run this report every day after you have reconciled your cash drawer for the day. 274 / 362 NOTE: If you get a Btrieve (file manager) error the error is logged in a file that will get printed when you print the Daily Close Audit. If the Close Out Audit is printed to the screen the error log will be maintained until the Close Out Audit is printed to a printer. 275 / 362 Inventory Reports Inventory reports supply you with information about your stock levels. Physical Listing by.. The Physical Listing By... report gives you a list of all of the inventory that you own. You may choose to sort this list by a number of criteria -- Item Number, Vendor Number, Size, Color, Style, Department, Date Code, Alt-Department – but no matter how you sort it, the inventory will be listed out by item. Physical Listing By… Report Inventory Value by... The Inventory Value By... report shows the cost and retail value of on hand inventory items. You may choose to sort this list by a number of criteria - Item Number, Vendor Number, Size, Color, Style, Department, Date Code, Alt-Department and PO Received amount – which will give you totals by category. 276 / 362 Inventory Value By… Report Sales Trending This report details each style’s sales by size for the current year and each of the previous 3 years. This allows you to look at sales trends by style. You can limit the report by Style, Vendor, Department and Alternative Department. Style 53059 6609 1145 1150 1234 1234 1234 P89957 P89957 P89957 P89957 P89957 P89957 P89957 P89957 P89957 P89957 PL21323 S W Store 1 1 1 1 1 1 1 1 1 1 1 1 1 1 1 1 1 Size 8 8 L 11 10 15 45 M 120 130 70 75 80 90 95 100 105 Width 1 1 12 12 M M M A A A M M M W W W W W W W On Hand 1 3 -4 0 2 1 0 2 -1 3 -1 -1 0 -2 -1 0 0 9 8 On Order 0 0 0 0 0 0 0 2 1 1 0 0 0 0 -1 0 0 0 0 277 / 362 2011 YTD 2 2 4 5 1 13 3 3 6 2 2 2 1 3 -1 1 1 1 3 2010 0 0 0 0 0 0 0 0 0 0 0 0 0 0 0 0 0 2009 0 0 0 0 0 0 0 0 0 0 0 0 0 0 0 0 0 2008 0 0 0 0 0 0 0 0 0 0 0 0 0 0 0 0 0 Total 2 2 4 5 1 13 3 3 6 2 2 2 1 3 -1 1 1 0 0 0 0 0 0 1 3 Stock Status Summary The Stock Status Summary report gives you a quick sales analysis of your stock by department and item. The most important feature of this report is that it shows sales by week for the past 4 weeks , which is invaluable in identifying selling trends. This report is sorted by item number and sub-totals by class as well as vendor inside of class. Stock Status Summary Report 278 / 362 Item Number Labels Item Number Labels are actually price tag labels for inventory items. Using this report is a great way to print tags for ‘styles’ or ‘vendors’ versus ‘items’. This report will print labels for the quantity of the item that you have on hand. Note: Item Number Labels can also be printed from the Inventory screen, by item, using ALT-L (See Section 4 Inventory for information) or you can print labels from the Purchase Order module (See Section 19 Purchase Order). Reorder Notification Listing The Re-Order Notification Listing will report on items that need to be reordered based on the Quantity on Hand, Quantity on Order, Reorder Point and Reorder Amount. The report will give you a Required Reorder Quantity (RRQ), along with a monthly and yearly sales total, so that you have some guidelines when you order the merchandise. The report will perform a sub sort by item number when creating the report by vendor number. Reorder Notification Report 279 / 362 Inventory Variance Report The Inventory Variance report shows inventory that has been added to or subtracted from manually in the Inventory Variance Utilities module. (You may also print this report from the Variance Utilities module.) Changes involving inventory variance are usually made when the store is taking physical inventory. Inventory Variance Report NOTE: Inventory Variance can be run for multiple store locations concurrently even when they share the same server. Each variance file that is used by Winsale while taking an inventory is now appended with the store number of the store doing the inventory. Be warned however, that if you have multiple stores on the same server that have the same store number (but different data storage locations) then you should NOT do the inventory variance procedure concurrently. Customer Reports Customer reports supply you with information about your customers, their transactions and their purchasing history. The Mailing Label Program is also found in this section of the program. 280 / 362 Mailing Merge/Labels The Mailing Label Program is one of the strongest features of Winsale because it gives you direct access to your customers based on their history with your business. The program searches the history files based on the criteria that you choose and produces mailing labels, which are printed and sorted according to your needs. For example, you can print labels sorted by zip code that only include customers who have purchased over $100.00 this month. In addition to printing labels based on the criteria in the mailing label program, you may also import customer information from reports such as the Periodic Hot Seller and the Customer Sales by Vendor reports. You may also use the Power Spreadsheet to produce a mailing using certain Select criteria. This is a great feature to produce mailings for vendor trunk shows or other special events. You may search your customer base by any one or combination of the following criteria: Everyone - This option will produce labels for every customer record Everyone with Balance Over (X) (This option will only work in Winsale) - This criteria will search the Current Balance field of the Customer profile to find those balances over (X). Your customers will only have a Current Balance if you use the Accounts Receivable module of Winsale. When you highlight this option and press ENTER, you will be prompted for the balance to use for the search. Everyone Who Spent Over (X) This Month Everyone Who Spent Over (X) This Year Everyone Who Spent Under (X) This Month Everyone Who Spent Under (X) This Year - Options 3 - 6 search the MTD and YTD fields of the 281 / 362 Customer profile to identify the correct customers. These sales amounts are derived from the History file. When you highlight this option and press ENTER, you will be prompted for the amount to use for the search. Everyone Who Gets Discounts - For this choice, the program will search the ‘DSC%’ field of the Customer profile and print labels for everyone who has a discount entered. Everyone with NO Payments since (X) - The Last Pay Date field of the Customer profile will searched according to the criteria that you enter. When you highlight this option and press ENTER, you will be prompted for the date to use for the search. Everyone in Sales Territory (X) - This option will search the Territory field of the Customer Profile. When you highlight this option and press ENTER, you will be prompted for the sales territory to use for the search. Everyone in (XX) State - The Customer profiles will be searched for the state abbreviation that matches the one that you type in. When you highlight this option and press ENTER, you will be prompted for the two digit state abbreviation to use for the search. Everyone in (XXXXX) Zip Code - The Customer profiles will be searched for the zip code that matches the one that you type in. When you highlight this option and press ENTER, you will be prompted for the five digit zip code to use for the search. Everyone on Credit Hold Everyone Not on Credit Hold - The program will search the Credit Hold field of the Customer Profile and print labels for everyone that has a ‘Y’ for YES or an ‘N’ for NO, respectively, in this field. All FYI that Contain (X) - If you have entered information into the FYI field of the Customer profiles, you may perform a “key word” search to produce mailing labels. This feature works really well if you use codes for birthdays and anniversaries in the FYI field, such as A05 (Anniversary in May) or B10 (Birthday in October). When you highlight this option and press ENTER, you will be prompted for the information to use for the search. Everyone with NO purchases since (X) Everyone with Purchases since (X) - When you use these options, the program searches the Last DT (Date) Sold field of the Customer profile to find the information that matches your search. When you highlight this option and press ENTER, you will be prompted for the date to use for the search. All Notes That Contain (X) All Notes That Don’t Contain (X) - These two options are similar to the FYI field options, except that Customer Notes are searched. When you highlight this option and press ENTER, you will be prompted for the information to use for the search. You can also save and recall a recipient list for future mailings. In order to do this, generate the list of people that you wish to include in the mailing. Edit out any unwanted recipients from the mail selection tool. Once you have the list that you want to save press the ‘Save Recipient List’ button. Save the file to a location of your choosing. When you wish to recall this list at a later time then enter into the mailing label system and choose ‘From Import file’ as the source for the mailing. Once you press the OK button you will be able to browse to the saved file created in the first step. 282 / 362 Customer Listing The Customer Listing report provides you with a list of your customers for reference, regardless of any sales history. Customer Listing Report For your convenience, after generating the report, you can sort and rearrange any column, print, or export to Microsoft Office readable format. 283 / 362 Account Receivable Aging The A/R Aging report gives you the current status of your receivables. Sample A/R Aging Report Note: Aging is based on last payment date unless last payment date is 00/00/00. Then it is based on last date sold. When account is paid in full , 00/00/00 is placed in last payment date so aging is correct. 284 / 362 Payment Charge Summary The Payment Charge Summary report is a summary listing of charges and payments to Accounts Receivable, sorted by customer number. Payment Charge Summary 285 / 362 Open Layaways This report is extremely valuable in tracking your layaways, since it lists all layaways currently open in the system and all of the activity on those layaways. Layaway Report 286 / 362 Open Back Orders This report will give you information about any open back order in your system. Open Back Orders Report Special Order Listing This report can be used to track the process of special Orders placed in the system. Special Order Listing 287 / 362 Customer Sales By Vendor The Customer Sales By Vendor report is a listing of customers who have purchased from a particular vendor within a certain time frame. This report is great for producing mailings for trunk shows since it can be exported to the Mailing Label Program. Plus, once it is in the Mailing Label Program, you can specify a dollar amounts of sales to qualify the customers who you mail to! Customer Sales By Vendor Report 288 / 362 Customer Book By Sales Person The Customer Book By Salesperson is a great tool for providing your salespeople with the information that they need to follow up on their sales. Customer Book By Salesperson 289 / 362 Major Account Reports These reports supply you with information about your Major Accounts. Major Account Invoice Register Major Account Invoice Register Report provides you with detailed information on all your major accounts activity for the time period you specify. This report provides you with vital information like: Invoice Number, Date, Name and Amount. You can either view or print this report for your convenience. Customer Book By Major Account Running this report will allow you to generate a list of all your Major Accounts with all Customers 290 / 362 Profiles connected to them. Customer Book by Major Account will give you full information in regards to the customers that have their purchases billed to Major Account. Information provided in the report will contain Full Name, Address, Sale Date, Item Description and Price of the Item grouped by the Major Account. 291 / 362 Discount Cost Sheet/Price List This Report is used mostly to generate Price List for items currently in stock. Can be limited to specific style or for the entire stock. Created Price List will contain Style, Retail Price and Description. 292 / 362 Vendor Reports The reports in the Vendor Reports menu will give you all of the information that you need about the status of your purchase orders and merchandise receipts. Vendor Listing The Vendor Listing report supplies you with a list of all of the vendors that you have entered into the program. Vendor Listing Report 293 / 362 For your convenience, after generating the report, you can sort and rearrange any column, print, or export to Microsoft Office readable formats. Purchase Order Status This report lists every item that is on order by vendor and purchase order. Each vendor's purchase orders are subtotaled as to what has been ordered, what has been received, and the open balance remaining. The report lists the date entered, completion date, and cancellation date for the purchase order. Purchase Order Status Report 294 / 362 Future Orders By.. This report summarizes future purchase order information and sorts it by item number, vendor number, size, color, style, single/ multiple department(s) or date code. This report lists the following: Description, Quantity Ordered, Cost, and Price. Future Orders By… Reprint Purchase Orders This option is used to re-print Purchase Orders. You may choose to print one certain Purchase Order or any Range of Purchase Orders. 295 / 362 Purchase Order Check In Sheet This report is an on-screen listing of all purchase orders received since the last printing of this report. It is handy when you need to fill back orders for your customers. If an item was back ordered for a customer, the sales ticket number the item was originally ordered under is displayed, allowing you to fill that order. This report also includes Vendors Invoice Number, freight charges, and total invoice amount. NOTE: The Invoice Number, freight charge and total invoice amount is only included when you post this information to the payables. It may be used as an audit to verify accounts payables. For more information please refer to Purchase Orders - Print Section. Purchase Order Labels Purchase Order Labels are price tag labels for every item received under a purchase order since the last printing of the Purchase Order Received report. If you received 10 of the same item number, 10 labels will be printed. If you selected bar code printing from the Configuration module, the item number will be in the form of a bar code. As a precaution, if you have trouble printing labels, for whatever reason, this option will create a backup file before deleting the original. This is done so you can rename this file back and reprint the labels. For More specific instructions on where to find that file and how to rename it, call Magnum Software at 843 476 4767 Employee Reports The Employee Reports allows you to view Employees Sales Commission, and Performance for any period of time. Sales Commission Report The Sales Commission report shows a summary and/or detailed listing of transactions for any period in a month. The report shows Salesman, Sales, Cost, Weekly Commission, Monthly Commission, Bonus, Margin, Gross Profit, Hours, and Hourly Pay. Employee Performance The Employee Performance report gives employee status information. It shows the following: Employee Name, Date, Clock In/Out, Total Hours, Total Sales, & Sales per Hour. 296 / 362 Miscellaneous Reports Includes reports Such as File Statistics and Transfer File Summary, which help you run your business more efficiently and be better equipped and more informed about the processes in your business. File Statistics File statistics is an on-screen listing of the statistics for every data file. This report lists Files, Total Records ( in each file), and Unique Files (in each file).. Transfer Summary Report The Transfer Summary Report will allow you to look at transfers from one store to another store. Because the Warehouse location communicates will all stores they will have available all transfers from all stores. The Satellite locations will only have any transfers that pertain to them. Drill Down Reporting Feature This feature allows you to click on certain key elements of a report (e.g. invoice number) that will automatically drill deeper into the subject matter. The information is displayed in logical formats based on the type of information being requested. 297 / 362 For example, clicking on a style number in the Periodic Hot Seller causes a matrix table to be generated and since you are looking at sales data, the matrix also generates the like information for all of your other stores information of the same style. Another example is clicking on the Receipt number on an Sales Register report causes the actual sale to be displayed showing all pertinent data regarding to that sale. These two scenarios are just the beginning of where these features are going to be used. 298 / 362 21 Form Definition This section of the manual provides information for designing forms for your business. By providing precise information to this program, WINSALE will understand how to print out the forms the way you want them. This is where you design the layout of your Sales Tickets, Account Receivable Statements, Purchase Orders, Inventory Hang Tags, and Accounts Payable Checks IMPORTANT: Because usage of this program can be complicated for the user that does not understand it, Magnum Software Systems will be glad to design the forms needed. At the date of this manual's printing, the charge for this service is eighty-five ($85) dollars per form. The Form Definition procedure is found in the Utilities Menu. 299 / 362 How to Define a New Form 1. Every form is required to have a form number. Enter a new form number- be sure to choose a number not in use. If there is already a form with the number you selected, that form will be brought up on screen, and otherwise the screen will remain empty. 2. The next step requires the length of the form you are defining. A standard sheet of paper is 8,5 by 11 inches. Since the default of most printers is 6 lines per inch, you would multiply 11 inches by 6 lines per inch to get a length of 66. However, if you are defining a cash register tape, you always input 99 as the length. Ninety-nine is a code informing WinSale it is dealing with a form of fluctuating length. Note: If you wish to print out a 'grid' to assist in laying out a new form, choose print grid from the Utilities menu. The grid printed out will be 66 lines long at 6 lines per inch and 10 characters per inch. 3. The Field Selection Menu has a number of choices available for each new line. Scroll through the list to find one. Highlight and press ENTER. The character will go into the column labeled Code, and the Description will also be entered. In addition to Field Selection, there are a number of choices for formatting and simplification. These option types are as follows: CODE DESCRIPTION Z Constant Text The user may type up to 12 characters on the form. If more than 12 characters are needed, add 'Z' fields together by selecting 'Z' again and offsetting the previous field by 12 characters. (See Code '% Import Text' from file below for another way of producing the same results.) % Import Text from File The user is prompted for the file and the line number in that file to be imported. The file must reside in the POS directory (or the directory in which the program resides), and have the extension 'IMP'. | Repeating Character The user is prompted for the character to repeat and the number of times to repeat it. This is handy for repeating the underline character _ Embedded Printer Codes You are prompted for up to four ASCII Codes to be sent to the printer. This is used to send commands to printers not directly supported by WINSALE. The codes placed in these prompts will automatically expand to three digits. ? Done & Form Feed You control where the form feed is going to take place. Anything left to be printed is discarded, and the system sends a form feed character (ASCII code 12) to the printing device. This option is used for on printers not directly supported by WINSALE 300 / 362 = Left margin. Use this code to increase or decrease the left margin of the paper. This code will instruct the printer driver to set the left margin to the value that you input. A value of 360 = 0,25 of an inch. 1440 = 1 inch. Formatting codes 4. Type the line number to place the selected entry. This line corresponds to the physical line on the form. For example, if you typed in 10, the selected line would be printed at the 10th line of the form, or 1.4 inches down on the paper. If you printed a grid as explained above, you may use it for assistance in selecting a line number. 5. Select the column number for this entry. If you printed a grid as explained above, you may use it for assistance in selecting the column number. 6. The system automatically defaults to the 'Repeat' column when you select a field inside the body of the report. If you are prompted for a Repeat Line number, enter the number of the last line you want on this page. The lines will continue repeating with new values until this line number is reached. (All Repeat values should be the same for all fields inside the body of the report.) 9. On each line there is a choice of print-type styles for the line. They are as follows: Style Description Normal No special codes are sent to the printing device 17 CPI Sets up the printer to print at 17 characters per inch instead of the default 10 characters 10 CPI Returns the printer to the default of 10 CPI. Bold Turns on bold printing. Un-Bold Turns off bold Printing. Hide Hides the item and does not let it print. Un-Hide Turns off the hiding mechanism. Large Turns on Double Width Printing. Un-Large Turns off Double Width Printing. Barcode Turns on Barcode Printing for this Item. (Only found when designing Hang Tag 301 / 362 Labels.) Un-Barcode Turns off Barcode Printing for this Item. (Only found when designing Hang Tag Labels.) These fields are user-definable from the Utilities Menu within the Form Definition program under Font Mapping. These items are shown as both start code and end code. The option should be turned on at the start code and turned off at the end code. In other words, WINSALE should send the start code before printing the item you selected, and directly afterward turn off the enhancement with the end code. With the exception of Barcode and Un-Barcode, the codes sent to the printer are defined in the configuration program under printer setup. They default to the IBM/EPSON printer code definitions. If your printer does not conform to this standard, you may want to set up a new printer driver with the codes your printer uses. The Barcoding ability is turned on and off through the optional equipment setup inside the configuration program and will only work with the IBM or EPSON compatible 9 or 24 wire printers. Deleting A Whole Form To delete the whole form instead of selecting each line before deleting, select the form that you want to delete. 1. Bring up the form to be deleted. 2. Select Delete Form from the Edit Menu Copying The Entire Form You may copy a form from one form number to another. This is often used to make a backup of a form before modifying then existing form. It is also commonly used to use the existing form for the starting point when creating a new form. To copy the whole form, first bring up the form that you want to copy by selecting the form type and then the correct form number. Now choose the Edit Menu and select Copy Form. 302 / 362 Add (x) to all Rows You may want to adjust the offset of the form but keep the entire form intact by adding or subtracting a number to each of the rows. This will move the form up or down the number of lines that you select. Be careful not to move the form above the 1st row, if you do this line will not print. Add (x) to all Columns You may want to adjust the offset of the form but keep the entire form intact by adding or subtracting a number to each of the columns. This will move the left or right the number of lines that you select. Be careful not to move the form left of the 1st column, if you do this line will not print. You may adjust the left margin of a form by using the Left margin code as explained above with the formatting codes. New Form Number At the New Form Number prompt, enter the new form number. This form number must be at least two numbers greater than the current form number. For example, if the form you want to copy is form number 3, you must use 5 or greater for the New Form Number. Note: The original form number will remain as is. This function simply copies the form, it does not erase the old form. IMPORTANT: Be sure the destination form number is not currently being used for another form. Failing to do this may result in merging one form with the contents of another form, effectively destroying the continuity of the already existing form number. 303 / 362 New Form Length Press ENTER to accept the default form length, or enter a new form length. For example, if you want to change the length of the default from `42' to `66', enter 66. Add <X> to all rows If you wish to change the row position during the copying process, enter a number to add to the existing row positions. If you wish to have the row position subtracted from instead of having it added to, use a negative number at the `Add (X) to each row position' prompt. Cost Code Definition You may have the inventory label program print out cost codes if you define them here at the form definition program. The idea behind cost coding is to be able to know what the cost of any item in stock is by decoding the cost code on the inventory items hang tag. The way WINSALE encodes costs on the inventory hang tag is by giving a value to letters in a small ten character group of words. For example, a common word grouping is ROUND MY HAT. Notice that there is no duplicate letter in this word group. This gives us the ability to represent 10 digits to these letters. R O U N D M Y H A T 0 1 2 3 4 5 6 7 8 9 The decimal is always represented with the '/' character. With the above example we would encode the cost of an inventory item of $123.54 to have a cost code of '0UN/MD' When defining inventory hang tags in the form definition program, you may chose option 'N' Cost Code. Once this option is chosen you are asked to define the word grouping to base the 304 / 362 cost encoding on. The default is ROUNDMYHAT, however you may use one of your own choosing. Whatever you use will be what the cost code is based on. After this point simply type in the Row/Column of where to place the cost code on your inventory hang tag and chose the type style of your choice. When you print out new hang tags the cost code will be printed on them. Field Definitions Sales Ticket The following field definitions can be defined when creating or modifying the sales receipt. The code before the equal sign is the internal code representing this option. The number in brackets after the field is the maximum possible length that the field can take up on the printed form. In some cases the field will be variable length. In those cases it is denoted with (Variable). Code Item Chars Description 0 Invoice Number 8 The Invoice number that is created at the time of sale. This number is automatically generated by the Point of Sale. This field is not repeatable 1 Date 10 The date that the sale took place. This field is not repeatable 2 Business Name 30 The name of your store as defined inside the configuration program. This field is not repeatable 3 Street Address 30 The street address of your store as defined inside of the configuration program. This field is not repeatable 4 City, State, Zip Variable The City, State and Zip Code of your store as defined inside of the configuration program. This field is not repeatable. 5 Account Number 6 Account Name 30 The name of the customer sold to as defined inside of the customer record. This field is not repeatable. 7 Account 1st Addrs 30 The first line of address of the customer sold to as defined inside of the customer record. This field is not repeatable. 8 Account 2nd Addrs 30 The second line of address of the customer sold to as defined inside of the customer record. This field is not repeatable 9 Acct_City_State_Zip Variable The City, State and Zip Code of address of the customer sold to as defined inside of the customer record. This field is not repeatable. Your customers account number as defined inside of the customer record. This field is not repeatable. 305 / 362 A (Ship) Account Name 30 The Ship to name of the customer sold to as defined inside of the customer record. This field is not repeatable. B (Ship) Account 1st Addrs 30 The Ship to first address line of the customer sold to as defined inside of the customer record. This field is not repeatable. D (Ship) Acct_City_State_Zip 35 The Ship to second address line of the customer sold to as defined inside of the customer record. This field is not repeatable. E P O Number 15 The Purchase Order (if any) that was entered into the sales screen at the time of charge to account. This field is not repeatable. F Shipping Mode 9 The Shipping mode (if any) that was entered into the sales screen at the time of sale. This field is not repeatable. G Salesman Number 25 The sales clerk that was entered onto the top of the sale. This field is not repeatable. (use lower case “o” for Salesman Name). If you want to make this change and need assistance then please call Magnum Software and we will be glad to help. H Reference 15 The Accounts Receivable reference line that was entered onto the bottom of the charge sale. This field is not repeatable. I Page Number 3 The page number starting at one and incrementing upward for the sales ticket. This field is not repeatable. J Qty Ordered 5 The quantity ordered of this item. This is not necessarily was what was sold of this item. Quantity Shipped and Quantity Back Ordered equals the Qty Ordered, (qty sold). This field must be the first repeating field defined in the body of the sales ticket. However, it may be made invisible so that it won’t actually print out on the form. This can be done by choosing the attribute of hide. This field is and must be a repeated field. K Item Number 15 The item number that was sold on the sales ticket. . This field is and must be a repeated field. L 1st Description 20 The first description of the item number as it was originally input into the inventory screen, or was modified at the time of sale. . This field is and must be a repeated field. M Unit Price 9 The unit price as originally defined for the item number, or as put on sale, on the inventory screen or as a point of sale markdown. . This field is and must be a repeated field. N Extended Price 9 Quantity sold multiplied times the unit price, both of which are defined above. . This field is and must be a repeated field. O Back Order Amount 5 The amount backordered for this line item sale. . This field is and must be a repeated field. P Sub-Total 9 The total of the all the extended prices defined above added together. This field is not repeatable. Q Tax 9 The total sales tax charged. This field is not repeatable. 306 / 362 R Shipping 9 The shipping amount charged on the sale. This field is not repeatable. S Time Of Printing 5 The time the ticket was printed. This field is not a stored field but rather is the actual computer time at the time it is printed or reprinted. This field is not repeatable. T Total 9 This field represents the summing of SUBTOTAL + TAX + SHIPPING. It is the total before subtracting any payments received. This field is not repeatable. U Payment On Account 9 Any payment received applied to this sale. It is the total representation of all tenders that may have been received for this sales ticket. This field is not repeatable. V Balance Due 9 This field represents the TOTAL less PAYMENT ON ACCOUNT as defined above. This field is not repeatable. W Layaway Payment 9 The sales ticket doubles as the definition of the layaway ticket. Therefore this field is required to print on sales tickets to show any layaway payments received for this sales ticket. This number is an accumulation of payments received against this layaway number. For normal sales this field will not print out. This field is not repeatable. X Normal Price 9 The Resale price assigned in the inventory system before any discounts given Y STOP – REPEAT 1 A Form Definition command used for cash register receipt style receipts to demark the location of repeating body definitions Z Text – User Defined Variable A user implemented text box. . Second Description 20 The inventory Item’s Second Description Line / Quantity Shipped 9 The actual Quantity being shipped without relationship to back orders. @ Bus Phone Number 12 The Stores Phone Number : Cus Phone Number 12 The Customer Phone Number ~ Discount Date 12 The Discount Date as defined by the Terms Code + Payment Type and How the Sale was Paid % Import Text from File A predefined line of text from and external import form definition file ^ Customer’s A/R The customer’s Accounts Receivable balance at the time of printing. | Repeating Character Usually used as an underline or a segment devider in the form Definitition. [ Shipping Date 10 The Shipping Date ] Payment Due Date 10 The Payment Due Date as defined by the Terms Code ! Terms Description Variable The written out or verbose description of the Terms given ie., Net 30, 2% 307 / 362 10 days \ Transaction Counter 8 A sequential counter that gets printed on everything printed from the receipt printer in order to audit that all docs are included. ? Done $ Form Feed 0 End the printing of the receipt prematurely * Credit Card Authoriz. ) Terminal ID ; Sequential Number ` Ship 2 Address > Total Discounts Taken The Total Discounts given for the current sale number < List Disc Description The dollar amount discount given at the register based on the MSRP price as set up in the inventory item. = Left Printer Margin An imbedded adjustment to the left printer margin. You can adjust the margin size by a integer number equaling percentages of an inch. Ie. 360 = 1 quarter of an inch. Using negative number is legal. Results will vary by printer manufacturer. ( Billed to Cus Name The Parent customer name for industrial sales # Special Order Flag A Y or N will be printed if this is code is used depending on if the item has been special ordered by the customer or not. - Change Due The Changed Due calculated from over-tending the sale. a Tax 1 b Tax Desc 2 c Tax 2 d Tax Dec 2 A verbose description of the tax code description as defined by the user in the tax code properties. e Tax 3 An amount based upon the tax definition properties assigned to the tax code assigned to the customer. f Tax Desc 3 A verbose description of the tax code description as defined by the user in the tax code properties. g Tax 4 nd The credit card approval number 3 The terminal ID for the register that printed the receipt A sequential counter that gets printed on this form number in order to audit that all docs are included. 30 9 The second line of address defined for the customer An amount based upon the tax definition properties assigned to the tax code assigned to the customer. A verbose description of the tax code description as defined by the user in the tax code properties. 9 9 An amount based upon the tax definition properties assigned to the tax code assigned to the customer. An amount based upon the tax definition properties assigned to the tax code assigned to the customer. 308 / 362 A verbose description of the tax code description as defined by the user in the tax code properties. h Tax Desc 4 i Dept Name 30 The department name as defined by the department code assigned to the current item on the receipt. j Size 3 The size of the items as assigned to the inventory on the receipt k Short Ven Name A shortened version of the vendor name for the current item on the receipt. l Employee Name The Employee Name for an industrial sale m Division No The Employee Number for an industrial sale n SSN The SSN of the employee for an industrial sale. o Clerk Name The sales person’s name who made the sale. p Resale Disc Description from Resale Price The dollar savings given as a discount based upon the resale price assigned to the current item. This differs from List Disc Description as defined above as it uses the resale price and not the list price as the basis for the amount of the discount. NOTE: You may create a file called layaway.imp and place text into this file that explains your layaway policy. This text will print on the receipt at the bottom when you are creating a new layaway or taking a payment on an existing layaway. In order for this to work your form definition for your sales receipt must already be defined to have some import information (store policy) to be read in. The Layaway policy must use the same amount of lines as your normal sales receipt . The layaway policy must use the same amount of lines as your normal sales receipt policy as defined in the form definition program. Purchase Orders Field Definitions The following field definitions can be defined when creating or modifying the line item purchase orders. The code before the equal sign is the internal code representing this option. The number in brackets after the field is the maximum possible length that the field can take up on the printed form. In some cases the field will be variable length. In those cases it is denoted with (Variable). What follows is solely for line item purchase order printing. cannot be adjusted with this form definition. Code Item Chars Description 309 / 362 0 Po Number 8 The purchase order number that is created at the time of creating the Purchase Order. This number is automatically generated by the Purchase Order. This field is not repeatable 1 Date 10 The date that the purchase order was entered. This field is not repeatable. 2 Business Name 7 The name of your store as defined inside the configuration program. This field is not repeatable 3 Street Address 20 The street address of your store as defined inside of the configuration program. This field is not repeatable 4 City, State, Zip 19 The City, State and Zip Code of your store as defined inside of the configuration program. This field is not repeatable. 5 Vendor Number 8 Your vendors account number as defined inside of the vendor record. This field is not repeatable. 6 Vendor Name 30 The name of the vendor purchased from as defined inside of the vendor record. This field is not repeatable. 7 Vendor 1st Addrs 30 The first line of address of the vendor purchased from as defined inside of the vendor record. This field is not repeatable. 8 Vendor 2nd Addrs 30 The second line of address of the vendor purchased from as defined inside of the vendor record. This field is not repeatable. 9 Vendor_City_State_Z ip 35 The City, State and Zip Code of address of the vendor purchased from as defined inside of the vendor record. This field is not repeatable. A (Ship) Account Name 30 The Ship to name of the vendor purchased from as defined inside of the vendor record. The following ship fields double as the factor address information if you are using the payables system. This field is not repeatable. B (Ship) Account 1st Addrs 30 The Ship to first address line of the vendor purchased from as defined inside of the vendor record. This field is not repeatable. D (Ship) Acct_City_State_Zip 35 The Ship to second address line of the vendor purchased from as defined inside of the vendor record. This field is not repeatable. F Shipping Mode 9 The Shipping mode (if any) that was entered into the purchase order screen. This field is not repeatable. G Salesman Name 25 The sales representative that took your order. This field is not repeatable. I Page Number 3 The page number of the Purchase Order. This field is not repeatable J Qty Ordered 5 The quantity ordered of an item. This field is and must be a repeated field. K Item Number (Ours) 15 Your item number that is being ordered. Not e this can be replaced or put on the form in addition to the vendor item number. . This field is and must be a repeated field. L 1st Description 20 The first description of the item as defined on the inventory screen, or as edited on the purchase order. This field is and must be a repeated field. 310 / 362 M Unit Price 9 The cost that you are purchasing the item for from this vendor. This field is and must be a repeated field. N Extended Price 9 The QTY ORDERED multiplied by UNIT PRICE. This field is and must be a repeated field. P Sub-Total 9 The extended price field totaled. This field is not repeatable Q Tax 9 This field is never used but is provided to be compatable with any invoice form that you use. In this way you can use a generic form for both Purchase Orders and Sales Tickets, if need be. This field is not repeatable T Total 9 This field is the same thing as SUB TOTAL. This field is not repeatable X Total Qty Ordered 5 The total quantity ordered of all items on the current purchase order. This field is not repeatable Y Cancel Date 10 The cancel date for a line item on a purchase order. This field is repeatable but need not be in the body. . 2nd Description 20 The second description line for the item being ordered. This field is and must be a repeated field. ] Terms Code 2 The terms code identifier for this particular purchase order. The default is the Terms code as defined in the vendor profile. This field is not repeatable @ Phone Number 12 Your stores phone number as defined in the configuration program. This field is not repeatable # Item Number (Vendors) 15 The vendor item number as cross referenced with yours in the inventory screen. This field is and must be a repeated field. * Due Date 10 The due date for this item on the purchase order. This field is repeatable but need not be in the body. & Phone Number (Vendors) 12 The vendors phone number as defined inside of the vendor profiles. This field is not repeatable ( Fax Number (Vendors) 12 The vendors fax number as defined inside of the vendor profiles. This field is not repeatable Statements - Account Receivables Code Item Chars Description 0 Account Number 8 The customer account number that you are printing the statement for. This field is not repeatable 1 Statement Date 10 The date of the computer that you physically print the statements on. This field is not repeatable 311 / 362 2 Business Name 30 The name of your store as defined inside the configuration program. This field is not repeatable 3 Street Address 30 The street address of your store as defined inside of the configuration program. This field is not repeatable 4 City, State, Zip Va ria bl e The City, State and Zip Code of your store as defined inside of the configuration program. This field is not repeatable. 5 Account Name 30 The name of the customer sold to as defined inside of the customer record. This field is not repeatable. 6 Account 1st Addrs 30 The first line of address of the customer sold to as defined inside of the customer record. This field is not repeatable. 7 Account 2nd Addrs 30 The second line of address of the customer sold to as defined inside of the customer record. This field is not repeatable. 8 Acct_City_State_Zip 35 The City, State and Zip Code of address of the customer sold to as defined inside of the customer record. This field is not repeatable. 9 Transaction Date (1st Repeat) 10 The invoice date or sale date of any detail to be printed out on the statement. This field has to be the first field on the body of the statement. You may elect to give the attribute of HIDE so that it does not physically print. This field is and must be a repeated field A Invoice Number 8 The invoice number of any detail to be printed out on the statement. This field is and must be a repeated field B Reference 15 The A/R reference that is entered at the time of sale and is posted to the Accounts Receivable detail. It can also be added when making payments on to account or when modifying A/R transaction detail. When printing invoice detail on the statement then this field gets replaced with the item description. This field is and must be a repeated field. C Charge Amount 9 When not printing item detail on the statement then this field contains the total charge to the account. When printing item detail on the statement then each inventory item that is attached to the invoice number is printed and the sale price of the item is printed into this field. This field is and must be a repeated field D Payment Amount 9 Any credits applied to account are printed out on this column. This field is and must be a repeated field E Current Due 9 The total amount due from this customer is printed out in this field. This is the customers CURRENT Accounts Receivable balance, not including the following OVER fields. This field is not repeatable F 1st Over 9 Depending on what aging brackets you assigned in the configuration module this will be the first break over the current column that and is over due. This field usually represents the OVER 30 column. This field is not repeatable 312 / 362 G 2nd Over 9 Depending on what aging brackets you assigned in the configuration module this will be the second break over the current column that and is over due. This field usually represents the OVER 60 column. This field is not repeatable H 3rd Over 9 Depending on what aging brackets you assigned in the configuration module this will be the third break over the current column that and is over due. This field usually represents the OVER 90 column. This field is not repeatable I Dunning Message 60 The applicable dunning message if any as defined in the configuration module. This may be replaced by a message that you define just before you print statements. This field is not repeatable J Total Due 9 The customers total Accounts receivable balance. This field is not repeatable K Running Balance 9 As the statement prints this balance is calculated by adding CHARGES and subtracting PAYMENTS or credits as explained above. This field is not repeatable N Minimum Payment 9 A minimum payment that the computer calculates by information that you input when defining the statement. The system can use a percentage owed or a dollar amount that you assign whichever is greater. See below for an example input sheet. This field is not repeatable O Payment Due Date 10 A date that you input just before printing statements. This field is not repeatable P Last Payment Date 10 The date that the customer last made payment on their account. This information is pulled from the customer profile. This field is not repeatable Q Service Chg Exemption 9 A minimum payment that has to be made this month to avoid a service charge in the following month. This information is retrieved from the finance charge module. It is calculated by the factor that you input to apply service charges to your customer base. This factor is multiplied by the customers A/R balance to give a dollar figure that prints out on the customers statement. This field is not repeatable R Delinquent Amount Due 9 An amount that is located in the customer profile. It is calculated when service charges are applied and is based on any overdue charges. This field is not repeatable S Total Due Delinquent 9 The TOTAL DUE as explained above minus the DELINQUENT AMOUNT DUE as explained above. This field simply subtracts the delinquent amount from the total due fields. This field is not repeatable T Minimum Payment + Delinquent 9 The MINIMUM PAYMENT field as explained above plus the DELINQUENT AMOUNT DUE FIELD as explained above. This field simply adds the minimum payment plus the delinquent amount together to give the customer the amount that the customer should make payment for in this month. This field is not repeatable U Previous Balance 9 The balance that was brought foward at the beginning of this month. This field will automatically print in the body of the statement unless you define this field to print elsewhere on the statement form. This field is not repeatable 313 / 362 Total Credits 9 The total amount of payments and credits given to this customer this month. This field is not repeatable W Total Debits 9 The total amount of charges placed on this customers account this month. This field is not repeatable X Finance Charge 9 The amount of finance charge applied to this customers account this month. This field will automatically print in the body of the statement unless you assign this field to print elsewhere on the statement. This field is not repeatable Y Return Credit 9 The amount of return credits applied to the customers account this month. This field will normally print in the body of the statement unless you assign this field to print elsewhere on the statement. This field will only print when printing the statments with line item detail, This field is not repeatable @ Line Item Quantity 9 The line item quantity sold. This is used when printing line item detail statements. This field is and must be a repeated field # Total Discounts Given 9 When printing detail statements you may want to show your customer any discounts that they received by purchasing from you. This field accumulates the total discounts that you gave your customer during the month. This function will only work when you are printing detail statements. This field is not repeatable $ Line Item Discount Given 9 Any line item discounts given to a line on a sale. This field will only print when printing line item detail on the statements. This field is and must be a repeated field ^ Credit Limit The customers credit limit as assigned inside of the customer profile. This field is not repeatable & Extended Selling Price The line item extended price. This field will only print when printing line item detail on the statements. This field is and must be a repeated field * Unit Price W/O Discount The normal price of the item before any markdowns. This field will only print when printing line item detail on the statements. This field is and must be a repeated field V Sales Order See Sales Ticket. All the fields are the same. 314 / 362 Check A/P Code Item Chars 0 Date Check Is Printed 10 1 Payee Name 30 2 Payee First Address 30 3 FYI2 Information 30 4 Payee City_State_Zip 30 5 Check Number 12 6 Reference Line 15 7 Invoice Amount 9 8 Discount Amount 9 9 Shipping Amount 9 A Paid Amount For Transaction 9 B (Numeric) Amount Of Check 9 C (Written) Amount Of Check Va ria bl e D **Partial Listing** 12 E Invoice Date (1st Repeating) 10 F Vendor Name 30 G Invoice Total Amount 9 H Discount Total Amount 9 I Shipping Total Amount 9 Description 315 / 362 Labels - Inventory The following fields match the inventory fields defined in section 4 of this manual. Code Item Chars 0 Item Number 15 1 Store Number 3 2 Description #1 20 3 Description #2 20 4 Qty On Hand 9 5 Layaway Qty 9 6 Tax Flag 1 7 Last Cost 9 8 Current Cost 9 9 Margin/Mark Up 6 A Resale Price 9 B List Price 9 C Sale Until Date 8 D Reorder Point 5 E Reorder Amount 5 F Qty On Order 5 G Vendor Item Number 15 H Vendor Acct Number 8 I Last Po Number 8 J Mtd Qty Sold 5 K Ytd Qty Sold 5 L Department 4 M Size 7 N Cost Code 9 O Location 1 P Dept Name 20 316 / 362 Q Vendor Name 30 ! Color 7 @ Style 10 # Sale Price 9 $ Date Code 7 & Alt Dept 5 * GL Main Acct No 6 ( GL Sub Acct No. 6 ) Last Date Sold 10 Major Account Invoices 1 Invoice Date 10 The date the invoice was generated 0 Account Number 8 The customer account number of the major account. 2 Business Name 30 Your Stores Name 3 Business 1 Address 30 Your Stores first line of address 4 Bus_City_State Zip Variable Your Stores City State and Zip Code 5 Account Name 30 The Major Accounts Name 6 Account 1 Address st 30 The Major Accounts first line of address 7 Account 2 Address nd 30 The Major Accounts second line of address 8 Acct_City_State Zip Variable The Major Accounts City State and Zip Code 9 Transaction Date 10 The transaction sale date of a line in the body of the invoice A Sales Ticket Number 8 The sales ticket number of a line in the body of the invoice B Reference 17 The A/R Reference for the sales ticket in the body of the invoice C Charge Amount 9 The line item charge amount for a line in the body of a sales ticket D FYI 20 Customer Contact or other info that can be added st 317 / 362 E PO Number 8 Purchase Order Number given at the time of the sale F Item Number 15 The Item Number sold on a sales ticket G Current Due 9 Current Accounts Receivable due at the time of the printing of the invoice. H Over 30 60 Portion of A/R that is 30 days but under 60 days old a Over 60 60 Portion of A/R that is 60 days but under 90 days old b Over 90 60 Portion of A/R that is 90 days or older I Dunning Msg (Last Entry) A message to your customer asking for payment based upon the oldest monies due J Total Due 9 The Total Sale amount of the invoice K Bus Phone No 10 The Business Phone Number L MA Employee Name 30 Major Account Employee Name M Invoice No 8 The invoice number of the invoice N Line Item Discount 3 Showing A discount on the original sales ticket O Due Date 10 The date entered that the invoice is to be paid by. P Normal Price 9 The standard price charged for the item sold Q Sold Price 9 The discounted price charge for the item sold R Tax Line Item 3 The tax dollar amount charged for the item sold S Payment Amount 9 The payment amount previously received by the employee of the major account. T Item Description 30 The description of the item sold U Sales Territory V Billed By Account No W Emp Deduction The employee payroll deduction to be given to the employee on a future pay check. X Emp Clock No. The employee’s clock number Y Emp Div No The devision number of the employee c Subtotal Line The sales Territory assigned to the employee making the purchase 15 9 The Parent account number of the employee making the purchase. The sale subtotal line to be printed on the 318 / 362 invoice. d Subsidy(A/R-Payroll Dept) 9 The subsidy amount that the employee paid out of pocket for the item. e Page No 3 Current page number of a multipage invoice f MA Contact 1 Name 30 The Major Account Contact person name g MA Contact 2 Name 30 The Major Account Contact person name h Price Sub Total 9 The selling price page total i Tax Sub Total 9 Tax Charged Page Total j Sub Total Sub Total 9 Total Sale Page Total k Emp Paid Sub Total 9 Employee Paid page total l Subsidy Sub Total 9 Out of pocket paid page total m Pay Deduct Sub Total 9 Payroll deduct page total n Terms Description 15 Vendor Payment Terms Description o Bill Name 30 The name to Bill to p Bill Address 1 30 The address 1 line to bill to q Bill Address 2 30 The address 2 line to bill to r Bill City State Zip 30 City State Zip Bill to line Z Text – User Defined 60 User defined textual % Import Text From File Variable Import a line from an external file | Repeating Character ? Done and Form Feed 0 Prematurely end the printing and exit @ Line Item Quantity 5 Line Item Quantity for the sale line & Extended Selling Price 9 Extended Selling Price for the sale line = Left Printer Margin 4 An imbedded adjustment to the left printer margin. You can adjust the margin size by a integer number equaling percentages of an inch. Ie. 360 = 1 quarter of an inch. Using negative number is legal. Results will vary by printer manufacturer. Usually used as an underline or a segment divider in the form Definition. Created with the Personal Edition of HelpNDoc: Free help authoring tool 319 / 362 WYSIWYG This Stands for What You See Is What You Get. It allows you to use your mouse and drag the fields that make up the form definition to the proper place. The placement of the field is displayed on the bottom of the screen. It is displayed as Line and Column. A form is made up of the header, the body, and the footer. The Header fields make up the top section of the form and usually define what the form is (Sales ticket, Invoice, Statement, etc) and give overall details to the receiver of the document. The body is a detail listing of items that are being reported on. In the case of a sales ticket, these items can include the item being purchased, the description and price. Any items that can be listed in the body of the document have the ability to be assigned a repeat value. This repeat value is used for every item in the body of the document. The footer section denotes the end of the body section and will typically give a totaling of the document. The body of the form is designated by blue bars. Anything located inside of these two blue bars are fields that can repeat. Fields of this type are items like quantity sold, item number, description, and etcetera. You may right click on any field to do the following: 320 / 362 Select for Keyboard movement When you an item for keyboard movement you can then use the keyboard arrow keys to move it to the position desired. The item that you select will turn green. Once it is green then you may use the arrow keys to move the field left, right, up or down. Font Characteristics You decide what font mapping you desire for this field. Font mapping is defined on the Utilities menu. Nudge You will then select either One Character to the left, or right, or up, or down. Constant Text If the field you have clicked on is a Constant Text field you can enter in the text you want displayed on the form. Created with the Personal Edition of HelpNDoc: Free PDF documentation generator 321 / 362 22 Physical Inventory NOTE: The order in which Help Files are located in this chapter is the order you should proceed working with Physical Inventory. Inventory Variance Overview Steps Note: We recommend backing up your inventory prior to starting any inventory. Also, you may want to print an Inventory Value By Department report to understand the valuation of your inventory before changing values. 1. Delete Variance Files - This is the first Step and should be done once upon starting a new inventory variance. This step ensures that you will be starting a new inventory cycle and empties the buckets of prior inventory variances. You should also take this opportunity to erase your data collector (if you are using one) so that no inventory numbers remain from prior inventory taking sessions. 2. Log Current Inventory Levels - This is an optional step that will log the inventory levels before actually doing an inventory variance. This step can be omitted but is recommended. 3. This step is where you should scan your items either with the use of the variance dialog or by using one of the data collector units that Winsale supports. Note: Magnum Software recommends using small chunks of inventory collection rather than one large collection. This way you can take advantage of the control batch ID numbers for better stock taking control. With small batches you can delete a batch and print separate batch reports. Also if there is a 322 / 362 malfunction you will not lose all of your work. Always remember to erase the data collector unit after successfully reading in each inventory batch 4. Read in the data collector using the PDT upload utility. If not using a data collector use the inventory variance dialog. 5. If using a data collector, erase the data collector unit after verifying that the data was read in successfully. You can verify the data read in successfully by running either the Detail Report by control number or the control number summary report. 6. Repeat steps 5 through 7 as many times as needed until you have scanned all of your inventory. 7. Update inventory from scanned items – This step will update your inventory to match what was scanned in steps 5 and 6. This however, does not update any items that were not scanned. 8. Zero un-scanned Inventory - This function will compare what you scanned against the inventory and any items that were not scanned will have the quantity zeroed out. This function uses ranges so that you can do partial inventory. In other words you may decide to just inventory a certain department or vendor line. The zeroing of un-scanned inventory allows for this by just zeroing anything in that department or vendor line that was not scanned. 9. The final step is to print the variance report which will list everything that was changed either by the scanning or by the zeroing of un-scanned inventory. Any items that were not found while scanning will be marked with an asterisk and will be located on the top of the report. Delete Variance Files Delete Variance Files will clear the variance files so they are ready for the next time. \ Log Current Inventory Levels This is a non destructive operation that locks the current value of your inventory into a permanent record for historical purposes. This value can be used for the current starting point of an inventory audit or to determine the valuation of inventory for this point of time. You may use this function at any point in time but it is especially relevant prior to taking physical inventory or at the end of the fiscal year. 323 / 362 Inventory Variance Dialog This screen will allow you to change inventory levels faster than going directly to the item in the inventory module. It permits you to add or subtract a value in addition to putting a new quantity on hand. It will also build a file in the data directory showing each transaction along with the percentage of inventory variance. You may select to have the inventory updated real time or have it updated at a later time by answering Yes on a question that pops up. By waiting to upload the inventory at a later time you may input or scan the inventory in question and have it add it up at a later time automatically for you. With this ability you may have multiple computers updating the inventory counts and then have this information be added together. All information will be read, sorted and added together for one large update of inventory. This is extremely useful at physical inventory time. To enter any Inventory Variance, select Inventory Variance Utilities from the Utilities menu. Then select Inventory Variance Dialog from the Inventory Variance Utilities menu. Enter the item number you want to variance. If the item number you entered exists in the inventory database, it will be displayed on the screen. If it doesn't exist, the system will use the Inventory table. Once you have selected an existing Item Number, enter the actual quantity in inventory. The variance percentage will be displayed along with a running total of all inventory entered during the current session of entering inventory variance. See Section Inventory Variance Report for more information. 324 / 362 PDT Upload Utility This option enables you to extract information from a scanning device (used to take inventory) and enter it into the system. You will be prompted for a control batch number. This number should be a sequential number unique every time that you read in information into the computer from the hand held device. This allows you to batch your input by number. This can be handy for auditing the upload process. You have control to edit these control batches or even delete them completely. Update Inventory From Scanned Items This function will take the saved batches of uploaded inventories and save the updated quantities into the inventory file. Prior to this function your actual inventory file has remained un-touched by the variance inventory functions. Control Number Summary Report This function will give you a report that will list the count totals by control batch number. Detail Report by Control Number This function will report on the details of the control batches of your choice. Delete Control Batch This will remove an uploaded grouping by the control number provided. Zero Range Of Unscanned Inventory This option will zero out anything that was not scanned during a physical inventory. You may zero unscanned inventory by any of the following criteria: Item Number, Vendor Number. Department, Style. You may also limit this to a single vendor when you are running this procedure by Item Number, Style, or Department. This ability will allow you to spot check your inventory and obtain an Inventory variance by a certain criteria. This program will look at the Scanned Inventory file and compare it to your actual 325 / 362 inventory file. The SCANINV.DAT file contains anything that has been inventoried. Therefore you should always choose delete variance files prior to taking any inventories. Print Variance Report The Inventory Variance report shows inventory that has been added to or subtracted from inventory. This report may be run to get a listing of changes in quantity levels put into the Inventory Variance screen or updated with a hand held data collector. The report will duplicate what was viewed while putting in the actual variances; that is, it will show the item number, description, the original inventory quantity, the new inventory quantity, and the percentage variance. (At the time of this writing, the general ledger will not be updated automatically, therefore you will need to make general ledger entries directly.) 326 / 362 23 Passwords Passwords allow you to determine who has access into the various facets of Winsale’s data base. This allows you to grant different levels of access for protection of your valuable data, as well as turning on and off certain procedures. What Are Passwords? 327 / 362 There are three different levels of password protection. They are defined below R = READ only rights When you define a user to READ rights for a particular function, you are only allowing that user to read existing data. The users will not be allowed to change or modify the data in any way. A = ALL rights When you define a user to ALL rights to a particular function, you are granting him or her full Read/Write rights to that particular function. These users will have full rights to change, or add to existing data. This access right should be granted with care, because these employees will be allowed to change customer's balances, take them off credit hold, etc. N = NO rights When you define a user to have NO rights to a particular function, he or she will not be able to look at or change anything for that particular function. This is the opposite of ALL rights. As with ALL rights as explained above this should also be used with care. There is a Master Password that should have all rights for every function of the system. This password is used as the key to the system so you can add and modify new and existing password levels. Whenever the user does not have the proper rights to complete a function, the system will now prompt you for an over-ride password. This over-ride password is only good for the over-ride and reverts back to the original password as put in by the New User menu choice, or upon the password that was put in when first entering the system. How To Add Password The first time you enter Winsale after configuring your business, you will automatically be brought to the Password Input section. You will be asked two questions before actually defining the different user levels. They are: Enter Master Password: This is the master password or pass key into the system. This password can be anything you like, but should be something only you will remember easily. When you type this password it will not be visible on the screen. This is an added security feature so no one will see what you are typing. Enter New Master Password: Once you have added the master password, you will have the chance to change the master password to something else. After accepting or changing the master password, you are brought to the Password Input screen. From here you will set up the different levels of system security. Choose a user level from 1 to 999 and enter it. Give each security level a password and an identifying title such as Clerk or Management. Give each procedure the access right you desire. 328 / 362 Use (R) for Read, (A) for All, and (N) for None. As you fill in the last Access Right for this user level, the information will be written to the disk. You will then return to the User Level prompt to allow you to enter a new user level. How To Change Passwords From the User Level prompt, fill in the level you wish to change and press ENTER. Once you have the desired access level in view, you may change it to suit yourself. How To Delete Passwords From the User Level prompt, fill in the level you wish to delete and press ENTER. Once you have the desired access level in view, click the DELETE USER LEVEL. Password Fields Defined User Level: (Numeric) A management‑ defined user level. This level number allows management to assign different levels of security throughout the system. This number may be from 1 ‑ 999. User Level 0 is reserved for the Supervisor, and is automatically granted ALL rights for all modules and procedures. Password: (Alpha/Numeric) The password for the current user level. This should be something easily remembered by the user and something not be easily guessed by another user attempting to "beat the system." User Category: (Alpha/Numeric) The user category for the current user level. This is a descriptive field only and is normally used to define the type of user level. For example, this could be 'Management', or 'Sales Clerk.' View-Edit Menu: (R,A,N) The key into all items located on the view-edit menu. Give it one of the three attributes as defined above. For example, if you want this user level to have all access rights for view-edit 329 / 362 menu information, choose 'A' for ALL rights. Allow Viewing of Cost: (R,A,N) The key into allowing the user to viewing Costing Options information. Give it one of the three attributes as defined above. For example, if you want this user level to have NO access rights for Costing Options, choose 'N' for No rights. Inventory Information: (R,A,N) The key into Inventory information. Give it one of the three attributes as defined above. For example, if you want this user level to have only Read access rights for Inventory information, choose 'R' for Read only rights. If you have a password level that is assigned to allow the user to only view inventory (Inventory information = N or R), then this level will not be able to delete or archive inventory. Also the transfer Module and Variance Module will not be available to them. Allow Adjustments at POS: (R,A,N) The key into allowing this user to perform mass price adjustments at the Point of Sale. Give it one of the three attributes as defined above. For example, if you want this user level to have ALL access rights to perform mass price adjustments at the Point of Sale, choose 'A' for ALL rights. 'R' and 'A' rights attribute should normally only be given to the management level. Accounts Receivable: (R,A,N) The key into the stores' Accounts Receivable information. Give it one of the three attributes as defined above. For example, if you want this user level to have ALL access rights for Accounts Receivable information, choose 'A' for ALL rights. Default Information: (R,A,N) The key into the Configuration Program and configuration information. Give it one of the three attributes as defined above. For example, if you want this user level to have ALL access rights for the configuration of your store, choose 'A' for ALL rights. 330 / 362 Reports Module: (R,A,N) The key to gain access into the Reports Module and thus to printing reports. Give it one of the three attributes as defined above. For example, if you want this user level to have ALL access rights for the Reports Module, choose 'A' for ALL rights. If you select ‘R’ then you will be shown the above screen. Place an Check Mark by the report that you wish this user level to have access rights to. Payable Information: (R,A,N) The key to gain access into the Accounts Payable module and thus to payable information. Give it one of the three attributes as defined above. For example, if you want this user level to have ALL access rights for the Accounts Payable Module, choose 'A' for ALL rights. Setting the access to Account payables to an “R” will not allow access to the check register, but will allow access to inputting new payable entries. Purchase Orders: (R,A,N) The key to gain access into the Purchase Orders module. Give it one of the three attributes as defined above. For example, if you want this user level to have ALL access rights for the Purchase Orders modules, choose 'A' for ALL rights. 331 / 362 Point of Sale Screen: (R,A,N) The key to gain access into the Point of Sale module. Give it one of the three attributes as defined above. For example, if you want this user level to have ALL access rights for the Point of Sale module, choose 'A' for ALL rights. . If you select ‘R’ then you will be shown the above screen. Place an Check Mark’ by the function that you wish this user level to have access rights to. 332 / 362 Profile Menu Functions: (R,A,N) The key to allow this user level to change various profile menu options. By selecting 'A' this user level will be allowed to change prices at will at the time of the sale. Utilities Menu Functions: (R,A,N) The key to allow this user level to access any and all of the utilities that are found on the Utilities 333 / 362 Menu. This should normally be 'N' for no rights except for the Supervisor user level. Quantity Changes in Inventory: (R,A,N) The key to allow this user level to make any quantity changes in inventory. If this setting isn't set to 'A', the user at this user level will not be prompted to change the quantity fields from inside the Inventory Screen. Monthly/Yearly Closeout Menu: (R,A,N) The key to allow this user level access into the Monthly and Yearly Closeout Menu. If this setting isn't set to 'A', the user at this user level will not be able to access the Monthly or Yearly closeout menus. Allow Time Clock Changes: (R,A,N) The key to allow this user level to change the time and date at the clock in / Clock out function. If this setting isn't set to 'A', the user at this user level will not be able to make time clock time changes. 334 / 362 24 Accounts Payable Accounts Payable Entry Screen Introduction and Features Winsale's Accounts Payable system has been designed to be easy to use, with features that will meet the needs of a single purchasing site or multi-store companies: Check Book Register -- The check book register has been designed to resemble the Check Transaction Register booklets used for personal checking accounts, except that Winsale logs all transactions automatically. All checks and cash drawer deposits are automatically logged into the check book register so that you will always know how much cash is available at any given time. 2. Check Book Reconciliation -- End of the month checking account reconciliation is quick and easy. Simply enter a few numbers from the bank statement, (Ending Balance, etc.), mark cleared checks and you are done. Winsale does the rest! 3. Quick Check Write – The Quick Check writing tool is designed to be the electronic version of 1. 335 / 362 4. 5. 6. 7. 8. 9. 10. 11. 12. 13. 14. handwritten checks. A blank check will appear on the screen and you just type in the correct amount and payee as if you were writing a check by hand. Then the program automatically logs the payment in the check book register and general ledger. Multiple Bank Accounts -- The system accommodates up to nine bank accounts for each company installed. Invoice Entry and Payment -- Due dates, discount dates and discount amounts are calculated automatically based on vendor terms. Automatic Payment Selection -- You can select invoices for automatic payment based upon due date, discount due date and/or vendor. You may also assign reoccurring expenses, such as rent and car payments, to be automatically rescheduled for payment on the following month. Mark for Payment – This is a method for manually selecting checks for payment, so that you have the ability to override payments, regardless of vendor terms. You can also use the Mark for payment screen to mark any line as being paid with a credit card. Payables Entry Screen – This screen allows you to display outstanding invoices on the screen at any time, by vendor. Cash Requirements Report -- You can analyze future cash requirements for any period of time that you choose. This report also lists discounts, by purchase order, that can be taken if payments are made while the vendors’ discounts are in effect, allowing you to analyze the impact of early payment. Check Ledger Report -- The system can produce a check register, by invoice, which shows a detailed listing of the checks that were printed within a specified date range. General Ledger Disbursement Journal -- This report will list amounts paid out in a date range by “category”. (EX. Inventory, Sales Tax, Freight, etc.) You may also display this information in the form of a bar graph for quick analysis. See Section 8 General Ledger for more information about accounts. Check Book Register Report -- This report will print your check book register, for any date range, complete with checks and deposits and totals for both cleared and uncleared checks and deposits. Automatic Updating from the Purchase Orders Module -- As you receive purchase orders, the Accounts Payable system will be automatically updated with the invoice information. You may elect to only update the Payables system when you actually receive an invoice from your vendor instead of when goods are received. Getting Started with Accounts Payable Although the setup for Accounts Payable is not extensive, there is one very important item that must be defined in order to use the module: 1. 2. 3. 4. Terms Definition Setting Up an Initial Checking Account Balance Accounts Payable Configuration Checks Terms Codes Definition Terms Codes are used to define the discount structure that is allowed by your vendors. These codes are the key to figuring out when invoices are due for payment and what the payment amount should be. You may have previously defined your Terms Codes in the Terms Definition module in the Profiles menu. If you have not defined these terms, you must do so before receiving any more Purchase Orders. You can 336 / 362 add these terms in the Terms Definition screen from the Payables Utilities menu or from the Profiles menu. See Section 12 Terms Definition for information on defining vendor terms. Setting Up an Initial Checking Account Balance When you set up the Payables system for the first time, you will need to add an initial balance to the Check Register. To do this, you will need to add a “deposit” using the initial balance date, a reference specifying that the line is an initial balance, and the bank account balance in the DEPOSIT field. Accounts Payable Configuration If you haven’t already done so, you will also need to set up a Default Check Form number and a Default Checking Account number. See Section Accounts Payable Setup. Checks You will need to purchase checks to use with Winsale’s Accounts Payable module. Magnum Software can provide “program-ready” checks preprinted with your store name and address, banking account information and check numbers for a very competitive price. Please contact Magnum Software for more information. If you choose to use some other check form, Magnum Software can create a form definition for your forms for a minimum programming fee. Please contact Magnum Software for more information. NOTE: Standard check stubs allow for 9 invoice lines to be printed. The information which Winsale prints includes an Invoice Number, Invoice Amount, Shipping Amount and Description (such as ‘Multiple Lines’). When printing checks, you may have situations where you have too many invoices to print on the check stub. Instead of wasting checks and throwing your check numbering system off, you should insert a ‘Partial Listing’ line in the check form definition. With this addition, the system will only print the number of invoices which will fit on the check stub and it will include the words “Partial Listing” on the stub. See Section 21 Form Definition and call Magnum Software for more information. NOTE: You have the option of printing a check stub advice when posting the checks. This can help when printing checks that have more than 9 invoices in the detail section. The posting of checks now includes an option box to select the generation of the check stub advice report when posting. Once the checks have been posted you may also print the advice stub from the check register simply by highlighting the check entry and choosing Print Remittance. 337 / 362 Accessing the Payables Entry/Modify screen To access the Payables Entry/Modify screen: 1. From the main Module menu, Click on Accounts Payables Modules 2. Click on Post Payable Entries 3. The payables screen will appear with the cursor in the Vendor Number field. Type in the Vendor Number for the Invoice that you want to add and press ENTER. a. If you don’t know the vendor number, you may access the Vendor Look Up table by double clicking in the yellow box or by typing in the first few letters of the vendor’s name. b. Double Click on the vendor that you are looking. 4. All of the unpaid purchase orders for the vendor will appear in the top half of the screen. 5. At this point, you may add new invoices to the system; make changes to invoices already in the system. NOTE: The latest Debit Account Number assigned to a vendor now becomes the default account number instead of the inventory account number when adding a new entry into the system Adding Invoices to the Payables Module There are two ways to log invoices into the payables module for payment: 1. Payables Entry/Modify - You may enter your invoices manually into the payables module. 2. Purchase Orders - The fastest and easiest way to have invoices recorded is to use the purchase order module to update payables as inventory is received. Adding Invoices in the Payables Entry/Modify screen 1. 2. 3. 4. Follow the directions in Accessing the Payable Entry/Modify screen Section. Press Click The Add icon or press F2 (ADD) to add an invoice to the system. Type the correct information into each of the fields, pressing ENTER after each entry. When you get to field ‘14. Date of Check’, press the F9 (SAVE) key to save the information that you have input. (The system will fill in the balance of the fields when the check is actually written.) The invoice that you input will appear at the top of the invoice list in the top portion of the screen. NOTE: If you are returning goods to a vendor and bypassing the purchase order module, enter the return into the Payables Entry/Modify screen using a negative amount. This negative amount will be deducted from the amount that you owe the vendor when checks are written. 338 / 362 Adding Invoices through the Purchase Order module The easiest way to enter invoices into the Accounts Payable module is to update payables from the Purchase Order module. 1. At the “Update Payables” prompt, click ‘Yes’ and fill in information as prompted. The Accounts Payable module will be automatically updated. NOTE: If you are returning goods to a vendor, create a negative purchase order. When you fill this purchase order and choose to update payables, the returned amount will be transferred to the Payables module so that it is deducted from the amount that you owe the vendor. Payables Entry/Modify Fields Defined 1. PO Number (8 digits) – This field is for the Purchase Order Number that you ordered the goods on. Type in the PO number and press ENTER. 2. Invoice No. (17 chars) – Type in the Vendor’s Invoice number as you want it to appear on the check and press ENTER. If you don’t have an invoice number, you may type a ‘reference’ into this field. The information in this field should give you some idea of what the check was written for. NOTE: If you try to enter an invoice number that is already in the system, a warning will appear “Invoice/Reference already exists”. To remove the warning from the screen, press the ESC key. You may proceed with the invoice entry or use the up arrow to change the invoice/reference that you entered. 3. FYI - You can include notes of various kind to this Purchase order. This field’s length is limited to 11 4. symbols; for more extensive unlimited notes,please use Notes tab. Status Code (P/R/H) (1 Char) – There are actually 4 different status codes that you may use to determine the payment of an invoice: a. ‘P’ for Pay - This is the default code for the field. A ‘P’ tells the system to automatically pay this invoice if you choose to pay “Only Items Marked for Payment”. Using a code of ‘P’ is the same as marking an invoice for payment. b. ‘R’ for Release - If you use an ‘R’ in this field, a check will be written for this invoice based on the Discount and/or Due Date specified by the Terms Code used. When you print checks using ‘R’ status codes, you will be prompted to specify a date range for the discount or due date that you want to print checks for. Any invoice marked with an ‘R’ that falls into this date range will print. c. ‘H’ for Hold - If this field contains an ‘H' then the transaction is placed on hold and the check writing system will not allow a check to be written for this transaction. To release an invoice from hold status, you can modify the invoice and change the status code or mark the invoice for payment. 5. Invoice Amount - Enter the total amount of the invoice before any discounts are subtracted or shipping charges are added. The check writing system will use this invoice amount to calculate the discount amount. 6. Store Number (3 Digit) - Enter the store number for which the entry is applied. If you only have one store, this field should be either 0 or 1 depending on the default value that you set up in the Configuration module. This field will handle digits from 0 to 999. 339 / 362 7. Misc. Charge – Additional expense item that can be added to each Accounts Payable Posting. It could be any item of your choice, but it typically would be used for cases when you are charged shipping insurance, sales tax paid, GST Input Credit, etc. All of the reports will list this additional expense appropriately and the General Ledger will handle this new Miscellaneous Charge automatically. 8. Terms Code (2 digits or `D'+ 2 digits) - Enter the Terms Code that you want to use for this invoice. This code will determine the Discount Date, Due Date and Discount Amount for the invoice. The default for this field is the terms code that is attached to the Vendor profile. (See Section 9 Vendor Information for more information.) If you want to use a different terms code, type in the code and press ENTER. a. If you don’t know the terms code, you may access the Terms Code Look Up table by pressing the CTRL-F1 key combination. b. Identify the terms code that you want to use and press ESC to leave the look up table. Type the code into the field and press ENTER. 9. Date of Trans. (Transaction Date) - This is the date of the invoice, which will be used to calculate the Discount and Due Dates. If you press ENTER in this field, today's date will appear. To accept this date, press ENTER. If you have another date that you want to use, type it in and press ENTER. NOTE: If you use a terms code of ‘00’ then the following dates can be entered in manually. 10. Date of Disc. (Discount Date) - This is the date on which the discount will expire. When you press ENTER on the Invoice Date, the system will automatically calculate the Discount Date, Due Date and Discount Amount based on the Terms Code and the Transaction Date that you have input. The only way to change the Discount Date is to change the terms code or the transaction date. 11. Date Due - This is the date on which the invoice is due to be paid in full. When you press ENTER on the Invoice Date, the system will automatically calculate the Discount Date, Due Date and Discount Amount based on the Terms Code and the Transaction Date that you have input. The only way to change the Date Due is to change the terms code or the transaction date. 12. Disc. Amount (Discount Amount) - This is the amount of the discount allowed. When you press ENTER on the Invoice Date, the system will automatically calculate the Discount Date, Due Date and Discount Amount based on the Terms Code and the Credit Amount that you have input. The only way to change the Discount Amount is to change the terms code or the credit amount. NOTE: If today’s date is later than the Discount Date, the Discount Amount will be zero. 12. Shipping Charge - Type in any shipping charges that the vendor has charged you for this invoice. This figure is not used in the calculation of the Discount amount. 13. Debit G/L Account (12 Chars) - Type in the General Ledger Account number that will be debited once the checks have been posted. The Debit G/L Account field is usually your Inventory G/L Account Number, which is the default for this field. Press ENTER to accept this default. This field is actually made up of two 6 digit fields, one for recording the Main Debit G/L Account number and the second for recording the Sub G/L Account number. In most cases the sub account is not used. See Section 8 General Ledger Interface for more information on G/L accounts. If you need to use an account number other than the default (Ex. Utilities, Rent, etc.), you may type it in and press ENTER. a. If you don’t know the account number, you may access the G/L Look Up table by pressing the CTRL-F1 key combination or by typing in the first few letters of the account name. 340 / 362 b. Highlight the account that you are looking for and press ENTER. 14. Date Paid- This is the date that the check was posted, which will be automatically filled in by the system when the check is posted. You should not enter any information into this field when you are entering an invoice! 15. Check Number (12 Numeric) - This check number will be filled in by the system when the check is written. You should not enter any information into this field when you are entering invoices. 16. Amount of Check - This is the total amount to be paid to the vendor for this single invoice line. The amount is calculated by the system as follows: Check Amount = Invoice Amount ‑ Discount Amount + Shipping Charge + Miscellaneous Amount 17. Checking Acct (1 Digit) - Type the Checking Account code for the checking account that you want to use for this transaction. The default for this code will be the checking account that you set up as the default in the Configuration module. NOTE: You can mix checking account codes for a vendor. In other words, you can use different checking accounts for different invoices, regardless of the vendor. But remember, checks will not print until they are run for the checking account codes entered for the invoices. 18. Date of Posting - This is the date that the check for this invoice was posted. This date will be automatically filled in by the system when the check is posted, so you do not need to enter anything into this field. 19. Sub Expensing Tab - sub entries in accounts payable. This is used for numerous reasons but listed here are two. Sub Expenses allow you to take a single invoice issued by a vendor and then split it up amongst your individual stores. For example, you receive a large order of inventory to a central location but you are going to split this order up to your five locations. With sub expenses you can enter the one invoice line into accounts payable and then break it apart into five portions by using the sub entries. When the check is printed only the one master payable entry will be listed on the check voucher. Another use for sub expenses is posting credit card payments. You would enter one overall entry into the accounts payable system for the entire credit card bill and then break out the individual charges to different account numbers for general ledger breakdown purposes using the sub expenses. For accounting purposes this function credits the large master payable entry as it normally would but then each sub entry debits against the master entry and then credits your chosen sub entry account. 20. Notes Tab – You may assign notes of any length to individual Accounts Payable Entries. This will allow you keep much better detail about payable entries to help in many matters including audits. The payable entry must first be entered as normal via the Post Payable Entries Screen. Once the Entry has been added you highlight the entry and then click Note tab to access Note entry screen. These notes do not get printed out but will permanently be available. 341 / 362 Other Options in the Payables Entry screen When you enter the Payables Entry screen, there are some options available to give you more information and flexibility: ADD The F2 key allows you to add invoices directly to the Payables system, bypassing the Purchase Order module. You can seach for A/P entries here by PO Number, Invoice Number, or Vendor Number. FIND Deletes highlighted line of A/P Entry. DELETE VIEW CHECK Enables you to view the check. Sends selected rows to printer. PRINT DUPLICATE Creates a copy of the current row, in case you have two Entries with different amounts to the same vendor. As with Accounts Receivable, you can look at the aging of your payables. AGING Allows you to split current payment into any number of invoices you want to make. SPLIT Paying Invoices and Printing Checks There are three ways to pay invoices in the Accounts Payable module: 1. Let the system determine which invoices to pay based on the Status Code, Terms Code, Transaction Date and Discount Date. 2. Mark checks for payment, which overrides the Status Code. 3. Use the Quick Check module to “manually” write checks. NOTE: Standard check stubs allow for 9 invoice lines to be printed. The information which Winsale prints includes an Invoice Number, Invoice Amount, Shipping Amount and Description (such as ‘Multiple Lines’). When printing checks, you may have situations where you have too many invoices to print on the check stub. Instead of wasting checks and throwing your check numbering system off, you should insert a ‘Partial Listing’ line in the check form definition. With this addition, the system will only print the number of invoices which will fit on the check stub and it will include the words “Partial Listing” on the stub. See Section 21 Form Definition and call Magnum Software for more information. Paying Invoices by Discount or Due Date Note: In order to have the system automatically pay invoices based on Discount or Due Dates, you must assign a terms code, a status of ‘R’, and an Invoice Date in the Payables Entry/Modify screen. 1. In the Payables module, highlight the Batch menu using the arrow keys. 2. Click on ‘Print Checks’. 342 / 362 Check Printing Options 5. The first check printing prompts are for “Beginning Vendor” and “Ending Vendor”. You may print 6. 7. 4. 5. 6. checks for a single vendor, a group of vendors or all of your vendors. a. To print checks for a single vendor, type in the vendor number in both the Beginning and Ending fields and press ENTER after both. 1. If you don’t know the vendor number, type in the first few letters of the vendor’s name. Double click the vendor that you are looking for. b. To print checks for a range of vendors, type in the beginning vendor number as above or use the vendor look up table as described above and repeat for the Ending vendor. c. To print checks for all of your vendors, simply press ENTER at both the Beginning and Ending prompts. At the “Checking Account Code” prompt, type in the checking account that you want to print checks for. The default will be the checking account that you set up as the default in the Configuration module. To accept the default, press ENTER. The next prompt: “Starting Check No.” tells the system what check number to start with as it logs the printed checks into the system. In most cases, your checks will have a pre-printed number on them. Type the next available check number at this prompt and press ENTER. a. If your checks aren’t pre-numbered, you may press ENTER to accept the system’s next available check number. When printing Accounts payable checks WinSale will display a dialog to tell you how many checks to put into the printer and also the check number range that is required for printing. You can mark an option to post checks in reverse order, in case you have problems with Numbered Laser Checks printing in incorrect order. You also have the option of printing a check stub advice when posting the checks. This can help when printing checks that have more than 9 invoices in the detail section. The posting of checks includes an option box to select the generation of the check stub advice report when posting. Once the checks have been posted you may also print the advice stub from the check register simply by highlighting the check entry and choosing Print Remittance. You should post your checks immediately to insure file integrity. 343 / 362 Paying Invoices with the Mark for Payment screen The mark for payment screen will allow you to “manually” select the invoices that you want to pay. This screen should be used when you do not wish to pay all invoices for a vendor range that fall within a due date or discount range. You may also use this screen to preview the invoices that will be paid when you print checks. You can use Mark for payment screen to record entries that have been or will be paid by a credit card, and will not have an A/P check issued for them. This helps you to still maintain history in the Accounts Payable under the vendor payment history even though you don’t write a check to the vendor. The entry is NOT added to the check register and is NOT noted in the General Ledger. These entries will take place when you write a check to the credit card company. At that time you should either make entries into the quick check to the proper G/L accounts or make a Journal Entry to disburse the charges on the credit card to their proper accounts. Mark for Payment screen 1. From the Payables ‘Program’ menu… 2. Click ‘Mark for Payment’ 3. You will be prompted for a Beginning and Ending Vendor number. You may pull up unpaid invoices for a single vendor, for a range of vendors or for all of your vendors. a. To look at invoices for a single vendor, type in the vendor number, then type the same number into the Ending Vendor. 1. If you don’t know the vendor number, type in the first few letters of the vendor 344 / 362 name to access the vendor look up table. 2. Use the arrow keys to highlight the vendor that you want and press ENTER. b. To look at a range of vendors, type in the beginning vendor number and press ENTER, then type in the ending vendor number and press ENTER. (You may also access the vendor look up table as above in Step a.) c. To look at invoices for all of your vendors, press ENTER at both the beginning and ending vendor number fields. 4. When you enter the Mark for Payment screen, you will see all unpaid invoices for the vendor range that you are working with in order by vendor number. a. Winsale allows you split Accounts Payable payments from both the Mark for Payment screen and also from the Post Payables Entries Windows. You can select how many payments that you want the original invoice to be split into and it will automatically calculate the appropriate payments for you and will bump the invoice date 30 days out for each additional payment. You can of course adjust these payments and payment dates to suit your particular needs. From the Mark for Payment screen right click on the item to split, or from the Post Payables screen highlight the item and click the Split button on the top of the Window. You can split the payment up to ten times. b. Any Cell can be changed directly form Mark for Payment Grid. For example, if you need to change a due date or Discount Amount it can be done directly on the Mark for payment screen without having to exit to the A/P posting screen to make the change. 4. If you want to mark an invoice for payment, place a check mark on the line to be marked in the marked column. NOTE: You will not be able to enter the Mark for Payment screen if you have a batch of unposted checks in the system. You will need to post the outstanding batch of checks before proceeding. NOTE: When you un-mark an invoice for payment, the status code is changed to ‘R’, which means that the invoice will be released in the future based on discount or due date. You may also release this invoice for payment by marking it for payment. 6. If you are ready to print checks now, click the button labeled Print Checks. You will be prompted to print either only marked for payment items or you can choose to print every item on the grid without relation to marked payable items. You should post your checks immediately to insure file integrity. a. Winsale also lets you choose the date when printing batch checks. Just as you select the vendor number and checking account numbers to print you can change the default check date for the check printing and posting. TIP: You may limit the loading of the mark for payment items to a specific checking account number. The default for this value is the default checking account number as defined in the configuration program under the A/P Setup tab. This has been added so that multiple stores that are sharing a common database location can quickly work with a single checking account number. This typically corresponds to a single store location, but can also be a shared account for multiple stores. 345 / 362 Paying Invoices with Quick Checks This quick check writing tool will allow you to “write” an electronic check as if you were writing it by hand. This method of paying bills is great for paying COD’s or invoices where the discount is not an issue. The Check Register and General Ledger are automatically updated, so you do not have to perform a manual posting for Quick Checks. NOTE: Use the Quick Check system for checks that you write by hand so that they can be posted to your checking account. Cancel the printing function when choosing a printer option, instead of printing the check again. Quick Checks are also the best way to input authorized electronic checking account deductions. Use the date of the deduction for the check number. Quick Check screen 1. From the Payables Program menu, choose Quick Check. NOTE: You will not be able to write a Quick Check if you have a batch of unposted checks in the system. You will need to post the outstanding batch of checks before proceeding. NOTE: When Using a Quick Check to pay an invoice, the discount will not be taken automatically. The 346 / 362 discount amount (if applicable) must be taken manually. Discounts will only be calculated automatically through the Paying Checks option. 2. When you enter the Quick Check screen, you will be prompted for the Store Number to work with. The default will be the current store number defined in the Configuration. To accept this default, press ENTER. a. If you want to work with a different store number, type in the number and press ENTER. 3. The next prompt is for “Checking Account Number to Work With”. The default will be the default checking account that you set up in Configuration. (See Section 3.16 for information.) To accept the default account number, press ENTER. a. If you want to work with a different account number, type the number and press ENTER. 4. The cursor will move to the Date field in the upper right corner of the check. The default will be 5. 6. 7. 8. 9. 10. today’s date. To accept this date, press ENTER. a. If you want to use a different check date, type over today’s date. The cursor will move to the Check Number field. The default will be the next available check number in the Check Register. To accept this default number, press ENTER. a. If you are using checks which are pre-numbered, you should type the next available check number over the default number and press ENTER. The Vendor Look Up table will appear so that you can choose the vendor that you want to write a check for. a. Type in the first few letters of the vendor’s name and/or use the arrow keys to highlight the vendor that you are looking for. Press ENTER. b. The ‘Payee’ name and address will automatically appear on the check, but the payment will be logged to the vendor. (See Section 9 Vendors for information on setting up payees.) You will also see a note after the factor name specifying the vendor that the payment is for. The cursor will move to the dollar amount field. The default amount will be the amount of the last check that you wrote to this vendor. To accept this default, press ENTER. a. To use a different check amount, type in the amount over the default and press ENTER. The program will automatically write out the check amount in English. The cursor will be in the ‘Memo’ field. This field should be used for the invoice number that you are paying or any reference that will tell you what the check is for. The default for this field will be the reference for the last check that you wrote to this vendor. To accept this default, press ENTER. a. To enter a different invoice number/reference, type over the default and press ENTER. The cursor will move to the G/L account field. This is the Debit G/L Account that the check is being written for. Ex. Inventory, Rent, Utilities, etc. a. Type the account number that you want to use and press ENTER or type the first few letters of the account name to access the G/L Account Look Up table. Use the arrow keys to highlight the account that you want and press ENTER. Highlight the correct printer and print driver and press ENTER. The check will print. NOTE: If you assign multiple G/L accounts to a Quick Check, the Payables Entry/Modify screen will show a separate line for each G/L account, but each line will have the same check number. NOTE: If you change your mind about printing the check you may press ESC to exit without saving the check. However, once you are prompted for the printing device you will not be able to ESC. If you do not want to print the check at this point you must print it to the screen, then it must be voided from the check register and re-written. 347 / 362 Posting Checks If you print checks using the Discount/Due Date method or the Mark for Payment method, you will need to post the checks to the Check Register. Posting means that the check number is assigned by the system to the line entries in the Payables Entry/Modify screen and the Check Register. The General Ledger Accounts are also updated and posted to the G/L Disbursement Journal. Posting is a separate function from check printing and should be performed as soon as checks are printed in order to maintain file integrity. Un-Posted Checks Warning screen Until you post the checks that you have written, you will continue to see this screen each time that you try to perform a new function in the Payables module. To remove this screen, press any key. NOTE: You will not be able to print any other checks until you post the outstanding batch of checks. Also, if you don’t post checks until a few days after printing, the discount may not remain valid . 1. Find and click on Program menu. 2. Click Post Payable Entries. a. Remove the check mark from any entry that should not be posted. NOTE: This is your last opportunity to catch any incorrect checks before they are posted as paid. Please review all of the printed checks before performing the posting. It is more difficult to delete checks after they have been posted. If you want to delete an entire batch, see Deleting Checks. 348 / 362 4. Your checks will be posted and you will be returned to the Payables Screen. NOTE: You can use the Accounts Payable Posting screen to record entries that have been or will be paid by a credit card, and will not have an A/P check issued for them. This helps you to maintain history in the Accounts Payable under the vendor payment history even though you don’t write a check to the vendor. The entry is NOT added to the check register and is NOT noted in the General Ledger. These entries will take place when you write a check to the credit card company. At that time you should either make entries into the quick check to the proper G/L accounts or make a Journal Entry to disburse the charges on the credit card to their proper accounts. Deleting Checks There are different methods of deleting checks in Winsale, based on whether the checks have been posted or not. Deleting Un-posted Checks If you have printed checks by the Discount/Date Due method or Mark for Payment method but have not yet posted them, you may delete them in two ways: 1. If you only have a few checks in the batch to delete, proceed with the posting but enter these check numbers as exceptions. 2. If you need to delete the entire batch of checks, (i.e. your printer jammed), then proceed as follows: a. Access the Batch menu. b. Choose Delete Batch of Un-Posted Checks. c. A prompt will appear: “You have Selected Delete Batch. Are you sure?” a. The current batch of unposted checks will be deleted after you choose Yes. NOTE: Once the 'Post Checks' function has been performed, you will not be able to delete the batch. 3. In both of the situations above, the invoices for which you deleted checks will be left as Unpaid in the Payables Entry/Modify screen and they will also be marked with a check mark on the Mark for Payment screen. Deleting Posted Checks and Quick Checks Since posted checks and Quick Checks have already been written to the Check Book Register, they must be deleted from the Check Book Register and the Check Ledger. Winsale can do this for you in one easy step: 349 / 362 1. From the Program menu, choose Check Register. 2. Enter the Report Dates to Work With. The default is your current month. And Specify the Checking 3. 4. 5. 6. 6. Account Number. a. To accept this default, press ENTER. b. To work with different checking Account number, type it in the box. Enter the Checking Account Number to Work With. The default will be the default checking account number that you set up in the Configuration program. a. To accept the default checking account, press ENTER. b. To work with a different account, type in the code for the account. All of the checks which have been posted for this store and checking account will appear. Find the check that you want to delete. The edit options are located at the bottom of the window. At the top, highlight the check that you want to delete. (Check Numbers appear in the ‘Numbers’ column.) Once you have highlighted the correct check, click Delete to delete it. The entry will now be left as if the check were never printed. The invoice will reappear as Unpaid in the Payables/Entry screen and it will appear as marked for payment in the Mark for Payment screen. NOTE: You may also use the VOID function from inside of the Edit Menu to completely remote the transaction from the Accounts Payable file. This will leave the check register entry without an amount and it will be shown as a voided entry. The Payables entry will completely be removed. 350 / 362 Adding Deposits The method that you use for adding deposits depends on the type of deposit and whether or not you want it reflected in your General Ledger. Deposits may be added directly into the Payables module so that they are entered into your checking account, but deposits will only be reflected in the General Ledger if they are entered through the Point of Sale module. The majority of the deposits for your business will be automatically entered through the point of sale module. Deposits through the Point of Sale Module Most of the deposits that are made into your business are made through sales in the point of sale module. These deposits include sales, received on account payments, layaway payments, gift certificate purchases, etc. This money is automatically posted as a deposit in the Payables module when you close out each day. Once you complete the close out routine and assign an over/short amount to the close out, a line is logged into the Check Book Register and the General Ledger for the daily deposit. Occasionally you may have deposits to make that are not a direct result of sales. For instance, you may receive a refund check from a vendor or you may borrow money that you want to deposit into the business’s check account. 1. If you want a deposit to be entered into the Check Book Register and the General Ledger, you must enter it using the Miscellaneous Deposit/Payment function of the program. 2. If you do not need the deposit to go to the General Ledger, you may enter it directly into the Check Book Register. Deposits through the Miscellaneous Deposit function If you want a deposit entered into both the Check Book Register and the General Ledger, proceed as follows: Miscellaneous Deposit screen as used for Deposits 351 / 362 1. Enter the date that should be posted to the Check Register and General Ledger. 2. Enter the Store Number to receive this entry 3. For the ‘Amount, (use a negative sign (dash) for Miscellaneous Payments), type in the amount of the deposit and press ENTER. Using a negative at this prompt tells the system that this is actually a “Payment” and not a Deposit. 4. At the ‘What for’ prompt, type in a reference that will remind you what the deposit was for and press ENTER. 5. For the ‘G/L Account Main’, type in the Debit account that you want the deposit recorded in and press ENTER. a. You may also access the G/L look up table by typing in the first few letters of the account name. Highlight the account that you want to use and press ENTER. 6. At the ‘G/L Account Sub’ prompt, you may type in the Debit Sub Account, if applicable, or press ENTER to skip this field. a. You may also access the G/L look up table by typing in the first few letters of the account name. Highlight the account that you want to use and press ENTER. 7. After G/L Journal Entry is complete, a statement of Transaction will be printed. Deposits through the Check Register If you are making a deposit that does not need to be entered in the General Ledger, or if you intend to enter the deposit as a manual entry into the General Ledger, you may enter the deposit directly into the Check Ledger. NOTE: If you are adding an initial checking account balance, you will only need to fill in the Date, Reference and Deposit fields. 1. From the Program menu, choose Check Register. 2. Enter the Report Dates to Work With. The default is your current month. a. To accept this default, press ENTER. 3. Enter the Checking Account Number to Work With. The default will be the default checking account 4. 5. 6. 7. 8. 9. 10. number that you set up in the Configuration program. (See Section 3 Configuration for more information.) a. To accept the default checking account, press ENTER. b. To work with a different account, type in the code for the account and press ENTER. All of the checks which have been posted for this store and checking account will appear in the top half of the screen. Press F2 (ADD). At the ‘Date:’ prompt, you will see today’s date as the default. a. To accept this date, press ENTER. b. To use a different date, type in the date. Since you are entering a deposit, skip the ‘Check Number’ prompt by pressing ENTER. You will most likely want to skip the ‘Vendor Number’ prompt by pressing ENTER. a. If you would like to enter a vendor number as a reference, type it in and press ENTER. At the ‘Reference’ prompt, type in a reference that will remind you of what the deposit is for and press ENTER. For the ‘DR. (Debit) Account’ prompt, press ENTER to skip it since a deposit entered in this way will not be posted to the General Ledger. Press ENTER on the DR. Sub Account prompt, also. Press ENTER at the ‘Payment’ prompt, since you are not entering a payment. 352 / 362 11. At the ‘Deposit’ prompt, type in the amount of the deposit and press ENTER. 12. Press ENTER at the ‘Clear Flag’ prompt. This field is filled in by the system to mark checks which have been cleared during reconciliation. The ‘Store Number’ will default to the store that you are currently working in. To accept this default, press ENTER. a. If you want to work in a different store number, type in the store number and press ENTER. 14. The ‘Checking Acct’ will default to the checking account number that you have set up as the default in the Configuration. Press ENTER to accept this account or type in a different account number. 15. The screen will return to the Store Number prompt and your deposit will be added to the Check Register. Modifying Invoices/Deposits There may be instances when you realize that you have made a mistake entering an invoice or deposit into the Payables system. If you need to change a line before you have posted checks, you may: 1. Modify Invoices in the Payables/Entry screen. 2. Modify Deposits in the Check Register screen. In both cases: 1. Follow the directions in the sections above to locate the invoice or deposit entry that you need to modify. Once you have highlighted the line that you are looking for, you will see all of the information for that line appear in the fields at the bottom of the screen. 3. Use the arrow keys to move to the field(s) that you need to change and make you change by typing over the information already in the field. 4. Press ENTER after you have entered the new information. 5. When you are through making all of the necessary changes, choose Overwrite. You will see that the information for the line has changed. 2. NOTE: If you need to make changes to an invoice after you have posted the check, you must make the changes in both the Payables/Entry screen and the Check Register as explained above. Check Register The Check Register is used to capture all check book activity from the date that you begin using the system—it is not “cleaned out” by the close out procedures—so that you have a complete record of your checking account activity. NOTE: You can use Check Register to modify check numbers. If you update the check number field of an existing check on the check register it will be updated throughout the system. 353 / 362 Check Register screen 1. After checks are posted, all of the invoices that have been paid under a check number are added together and placed in the check register as a check total. 2. When a Daily Close Out is performed, the daily deposit is posted into the check book register for the checking account that you set up as the default in the Configuration module. (See Section 3 Configuration for more information.) This deposit is composed of all of the income from the point of sale module functions for the day. The deposit is broken into a cash and credit card total, which are posted separately. TIP: Printing Check Register Report will be performed directly to printer without preview ability in WinSale. Be sure to select the date range that you will want to print by only loading the portion of the check register. You may also reprint checks from the check register. To do this highlight the check register line that is displaying the check that you wish to reprint and then press the Re-Print button on the top of the screen or choose the Re-Print option from the File Menu. The check will then be reprinted to the printer of your choice. Multiple Stores Daily Deposits are deposited in the individual store’s default checking account. They are not carried back to the Mother Store’s checking account. If you need to change the store number and checking account number after you have entered the Check Register to view another ore’s account, click the Reload button. 354 / 362 Reconciling the Check Register Reconciling the Check Register to your monthly bank statement is a very simple process in Winsale. 1. From the Payables Program menu, Choose Reconcile Check Register 2. Enter the Report Dates to Work With. The default is your current month. a. To accept this default, press ENTER. 3. Enter the Checking Account Number to Work With. The default will be the default checking account number that you set up in the Configuration program. (See Section 3 Configuration for more information.) a. To accept the default checking account, press ENTER. b. To work with a different account, type in the code for the account and press ENTER. Check Register Reconciliation screen 4. The Check Reconciliation screen will appear. The prompt will be in the ‘Bank Statement Opening Balance’ field. Types in the opening balance for the period as it appears on your checking account statement and press ENTER. 5. Type in the ‘Bank Statement Ending Balance’ for the period as it appears on your checking account statement and press ENTER. 6. Type in the ‘Statement Opening Date’ from the checking account bank statement. 7. Type the ‘Statement Closing Date’ from the checking account bank statement. 8. Type the ‘Service Charge’ amount from the checking account bank statement and press ENTER. 355 / 362 9. The ‘Category’ prompt refers to the G/L account number that you want to use for the service charge. Type in the account number and press ENTER. a. You may also access the G/L Look Up table by typing the first few letters of the account name. Highlight the correct account and press ENTER. 10. You may type in a G/L Sub Account and press ENTER, or press ENTER to skip this field. 11. Type in the date of the service charge from the checking account bank statement. 12. Type the ‘Interest Earned’ amount from the checking account bank statement and press ENTER. 13. The ‘Category’ prompt refers to the G/L account number that you want to use for the interest. Type in the account number and press ENTER. a. You may also access the G/L Look Up table by typing the first few letters of the account name. Highlight the correct account and press ENTER. 14. You may type in a G/L Sub Account and press ENTER, or press ENTER to skip this field. 15. Type in the date that the interest was applied from the checking account bank statement. 16. Using the mouse, place a check mark into each check or deposit which appears on the checking account bank statement as cleared. a. The totals for Checks and Deposits should increase as you mark cleared items. b. The Difference should decrease. This number is the difference between the Check Register balance and the ending balance as it appears on the checking account statement. 17. Once the Difference reaches zero, you will see a dialog that informs you to press the OK button to complete the process. Any item that you marked with a check mark will be changed to a ‘C’ for cleared. 18. If you can’t get the difference to decrease to 0 because of a mistake, you may exit the reconciliation screen and make any modifications necessary. a. When you enter back into the Reconciliation screen, press ENTER through all of the fields of the first screen. As you press ENTER, all of the information which you entered will reappear. b. When you enter the check marking screen, you will see that all of your previous work was saved. Accounts Payable Aging In order to get a quick picture to your outstanding payables for a vendor, you may access the Vendor Aging screen from the Payables Entry/Modify screen. Vendor Aging screen 356 / 362 1. When a vendor is displayed on the Entry/Modify screen, click the AGING button to display calculated totals for that vendor. See the figure above for an example. 2. When you are finished viewing the Aging Summary, Click OK to be returned to the Payables Entry/Modify screen. Accounts Payable Reports Accounts Payable reports are only accessible from the Accounts Payable module. (You will not be able to access these reports from the Reports module of the program.) They are designed to provide you with all of the information that you need to decide how and when to pay your vendors. To access the A/P reports menu: 1. At the Accounts Payable menu, click on ‘Reports’ menu NOTE: All Accounts Payable Reports ask for the checking account number to report upon. Check Ledger Report The 'Check Ledger' report lists all of the checks which have been posted for a date range. These are the checks which will be transferred to the General Ledger. The report shows the date that the checks were printed, the check number, the vendor they were written to, and the amount of the check. Check Ledger Report 357 / 362 To access the Check Ledger Report: 1. 2. 3. 4. Highlight Check Ledger At the Report Date From prompt, type in the earliest date for posted checks that you want to view. At the Report Date To prompt, type in the last date for posted checks that you want to view. Enter the Checking Account Number. The default for this prompt will be the default checking account which you set up in the Configuration module. Cash Requirements Report The 'Cash Requirements' report is a worksheet which will show you the cash required to pay outstanding invoices for any date range that you choose, by Due Date or Discount Date. This report lists the Debit Account Number, total invoice amount before discounting takes place, along with the possible discount amount , so that you can analyze the amount that can be saved if invoices are paid early. Cash Requirements Report To access the Cash Requirements Report: Highlight Cash Requirements At the Starting Vendor prompt, type in the first vendor number that you want to view. At the Ending Vendor prompt, type in the last vendor number that you want to view. a. You may view this report for a single vendor by typing in the same Beginning and Ending vendor number. 4. Enable or disable Print only those Accounts Payable Items that are Marked for Payment. a. If you only want to view those items which are currently marked for payment, press ENTER. 1. 2. 3. 358 / 362 b. If you want to view outstanding invoices by Discount, Due. Transaction or Entry Date, remove the check mark. 1. At the From prompt, type the first date that you want to use for outstanding invoices. 2. At the To prompt, type the last date that you want to use for outstanding invoices. 3. Chose the Date type from the options available. G/L Disbursement Journal The G/L Disbursement Journal will list the disbursement of checks within the General Ledger debit and credit accounts for any date range that you specify. This report is a good starting point when you have problems with “Account Not Found” errors while downloading to the General Ledger. ( See Section 8 General Ledger Interface for more information.) G/L Disbursement Journal To access the General Ledger Disbursement Journal: 1. Highlight G/L Disbursement Journal. 2. Specify the Date Range for the report. 3. Enter the Checking Account Code. The default for this prompt will be the default checking account which you set up in the Configuration module. Press ENTER to accept the default. NOTE: You can limit the GL Disbursement Journal to Sub Accounts. To do this when entering in the account number range use a period to designate the sub account portion of the account number. 359 / 362 For example, if you wanted to run the disbursement journal for Main Account Number 4105 with a sub account of 1 you would enter 4105.1 for the beginning Account Number and 4105.1 for the ending account number. A/P Aging Report The Accounts Payable Aging Report will give you a quick status report of your payables for the next three months. You may run this report for all of your vendors, a range of vendors or a single vendor. Accounts Payable Aging Report To access the A/P Aging Report: 1. Highlight A/P Aging Report 2. If you are set up as a Multiple Store company, you will be prompted to Process for All Stores or Process for Single Store Only. a. To view outstanding invoice totals for all of your stores combined, press ENTER. b. If you only want to view invoice totals for one store alone, highlight Process for Single Store Only. 1. You will be prompted to Enter the Store Number to Process. Type in the store number that you want to view and press ENTER. 3. The next prompt is to Process for All Checking Accounts or Process for Single Checking Account. a. To view payables for all checking accounts combined, press ENTER. b. If you only want to view payables for one checking account, highlight Process for Single 360 / 362 Checking Account. 1. You will be prompted to Enter the Checking Account Number to Process. Type in the account code and press ENTER. 4. You will be prompted for Starting Vendor and Ending Vendor. a. To view all of your vendors on one report, press ENTER to accept the default, which is your first vendor in alphabetical order, and press ENTER again at the ‘Ending Vendor’ default, which is the last vendor in alphabetical order. b. To view the report for a single vendor or range of vendors, type in the name of the beginning vendor and press ENTER, then type in the name of the ending vendor and press ENTER. (If you want to view a single vendor, type in the same name for both fields.) c. Specify the Checking Account Number 5. Choose the printer to use for the report. The report will first be generated for on-screen viewing. You may then choose to print it or save as PDF file. Vendor Payment History Report The Vendor Payment History report is designed to supply you with information on every check that you have written to a vendor within a date range, including that total amount of the check, the discount, any shipping charges, etc. 361 / 362 Vendor Payment History Report To access the Vendor Payment History Report: 1. Highlight ‘Vendor Payment History’ 2. At the ‘Beginning Vendor’ prompt, type in the first vendor number that you want to view and press ENTER. a. If you don’t know the vendor number you can access the vendor look up table by typing the first few letters of the vendor’s name. Highlight the correct vendor and press ENTER. 3. At the ‘Ending Vendor’ prompt, type in the last vendor number that you want to view. To accept the default of ‘99999999’ and view all of your vendors, press ENTER. a. You may view this report for a single vendor by typing in the same Beginning and Ending vendor number. b. If you don’t know the vendor number, type in the first few letters of the vendor name, highlight the correct vendor and press ENTER. 4. At the ‘Beginning Date’ prompt, type in the earliest date for the activity that you want to view. 5. At the ‘Ending Date’ prompt, type in the last date for the activity that you want to view. To accept the default presses ENTER. 362 / 362