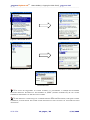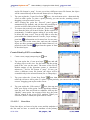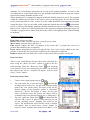
1
User Manual
DigiTerra Explorer v5 ®
version 5.8.4.17
English
4/3/2008 4:57 PM
V5.8.3.20.
1. pages / 64
4/21/2008
Copyright note
DigiTerra Information Services Ltd.
H-1025 Budapest,
Csévi u. 6.
www.digiterra.hu
The product and the information contained here in maybe changed at any
time without prior notification.
This manual or any parts of it may not be reproduced, transmitted in any
form either electronically or mechanically without the express written
consent of DigiTerra Ltd.
© Copyright 1996-2008, DigiTerra Ltd.
All rights reserved!
V5.8.3.20.
2. pages / 64
4/21/2008
DigiTerra Explorer v5 ®
User Guide © Copyright 1996-2008, DigiTerra Ltd.
_____________________________________________________________________________________________________________________________________________________________________________________
Table of contents
1
INSTALLATION, REGISTRATION, THE FIRST START OF THE PROGRAM .. 5
1.1
Handling the touchscreen of the Pocket PC ......................................................................................... 5
1.2
Installing and using ActiveSync............................................................................................................. 5
1.3
Install DigiTerra Explorer to a desktop PC ......................................................................................... 7
1.4
Update DigiTerra Explorer Software ................................................................................................... 8
1.5
Connect the Pocket PC to the Bluetooth GPS ...................................................................................... 8
1.6
Start DigiTerra Explorer on your Pocket PC .................................................................................... 11
1.7
The program set up, and how to use it................................................................................................ 11
1.8
Basic user settings ................................................................................................................................. 12
2
MAPPING.......................................................................................................... 14
2.1
The view................................................................................................................................................. 14
2.1.1
Load / create / save a map .................................................................................................................. 14
2.1.2
Link maps .......................................................................................................................................... 15
2.1.3
Map publications, using DMP formats .............................................................................................. 16
Zoom the view in / out, move.............................................................................................................................. 16
2.1.4
Zoom in / out the map ........................................................................................................................ 16
2.1.5
2.2.2 Pan map..................................................................................................................................... 18
2.1.6
2.2.3 Rotate and tilt the map, plan view............................................................................................. 18
2.1.7
Using saved views settings ................................................................................................................ 19
2.2
Handling the layers of the view............................................................................................................ 19
2.2.1
Add, display, save layer(s)................................................................................................................. 20
2.3
Display vector layers, thematic mapping............................................................................................ 22
2.3.1
Thematic mapping of points contain geometrical items .................................................................... 23
2.3.2
Thematic mapping of line objects ...................................................................................................... 24
2.3.3
Thematic mapping of the areas .......................................................................................................... 26
2.3.4
Labels................................................................................................................................................. 27
2.3.5
Display symbols................................................................................................................................. 28
2.3.6
Operations on the map ....................................................................................................................... 29
2.3.7
Selection............................................................................................................................................. 29
2.3.8
Display information ........................................................................................................................... 31
2.3.9
Measure on the view .......................................................................................................................... 31
2.3.10
Draw and edit a map ..................................................................................................................... 33
2.4
To export and import a map, the supported formats ........................................................................ 41
2.4.1
Export................................................................................................................................................. 42
2.4.2
Import................................................................................................................................................. 42
2.5
Handling attribute ................................................................................................................................ 42
2.5.1
Edit datafields .................................................................................................................................... 43
2.5.2
Using datatable template.................................................................................................................... 44
2.5.3
Link datatables ................................................................................................................................... 45
V5.8.3.20.
3. pages / 64
4/21/2008
DigiTerra Explorer v5 ®
User Guide © Copyright 1996-2008, DigiTerra Ltd.
_____________________________________________________________________________________________________________________________________________________________________________________
2.5.4
2.5.5
2.5.6
2.5.7
2.5.8
2.5.9
2.5.10
2.5.11
Create new record .............................................................................................................................. 46
Delete record(s).................................................................................................................................. 46
Enter data ........................................................................................................................................... 46
Sort the records .................................................................................................................................. 47
Filter................................................................................................................................................... 48
Show on map the object ..................................................................................................................... 48
Show geometry by the primary datatable...................................................................................... 48
Import and export records, supported formats .............................................................................. 48
2.6
GPS survey ............................................................................................................................................ 49
2.6.1
GPS settings....................................................................................................................................... 49
2.6.2
Set Custom projection........................................................................................................................ 51
2.6.3
Reading and handling the GPS state panel......................................................................................... 52
2.6.4
Setting the GPS survey, handling the measure panel......................................................................... 52
2.6.5
The methods of the GPS Surveying, effect the survey....................................................................... 53
2.7
Printing maps and (field surveying) reports....................................................................................... 58
2.7.1
Printing maps ..................................................................................................................................... 58
2.7.2
Print report(s) ..................................................................................................................................... 60
3
TERMINOLOGY................................................................................................ 61
3.1
Geoinformatical elements..................................................................................................................... 61
3.2
GPS elements......................................................................................................................................... 63
V5.8.3.20.
4. pages / 64
4/21/2008
DigiTerra Explorer v5 ®
User Guide © Copyright 1996-2008, DigiTerra Ltd.
_____________________________________________________________________________________________________________________________________________________________________________________
1 Installation, registration, the first start of the program
1.1 Handling the touchscreen of the Pocket PC
Single tap: Firmly touch the screen to choose or to open a data. Lift the stylus after touching
the screen. Touching the screen on the Pocket PC is equivalent to clicking with the left-button
of the mouse on the Desktop PC.
Drag and drop: Tap the display with your stylus and drag a data through the screen until you
finish the assignment. Dragging is equal to push the „SHIFT” button on the keyboard and
scroll your mouse in the same time on your desktop PC.
Tap and hold: Tap and hold the stylus a data until a menu appears. Tap and hold is equal to
click with the right button of the mouse on the desktop PC. Holding the stylus the screen, the
red points around the stylus indicate the appearance the menu shortly.
1.
Before you install and use DigiTerra Explorer v5 software to your Desktop PC first
you are required to install Microsoft ActiveSync to the Desktop PC to ensure the
connection between the Pocket PC and the desktop PC! (There is no need to install
Microsoft ActiveSync to the Pocket PC or Window CE.)
2.
Finish installation of the Microsoft ActiveSync then install the DigiTerra Explorer to the
desktop PC (and to the Pocket PC).
3.
DigiTerra Explorer is a preinstalled and registered software on an SD Card. When
you put the SD Card into your Mobile Device at the first time, the program will
start automatically. If the DigiTerra Explorer does not start when you put the SD
Card into the slot, you may click on the “dtExp.exe” file manually in the “SD
Card\Bin\dtExp.exe” path.
4.
DigiTerra Explorer is a registration liable product protected with a unique
registration code whitch is stored on your Secure Digital Memory Card (SD Card)!
5.
The GPS receiver has to be registered on your Pocket PC to be able to receive its data for
the very first time.
1.2 Installing and using ActiveSync
Using Microsoft ActiveSync:
• You can synchronize your data between the Pocket
PC and desktop PC, to have the last information on
both appliances
• You can change the settings and schedule the synchronization
• You can copy files between the Pocket PC and desktop PC
• You can make backup about the data stored in the Pocket PC
• You can install applications to the Pocket PC.
V5.8.3.20.
5. pages / 64
4/21/2008
DigiTerra Explorer v5 ®
User Guide © Copyright 1996-2008, DigiTerra Ltd.
_____________________________________________________________________________________________________________________________________________________________________________________
Connecting to the PC
The Pocket PC and the desktop PC can be connected by the help of ActiveSync through either
a USB cable, a cradle or an infrared connection.
Synchronize with your PC
TO
SYNCHRONIZE, INSTALL
POCKET PC AND DESKTOP PC!
MICROSOFT ACTIVESYNC
FIRST BEFORE YOU CONNECT THE
During installing ActiveSync:
You can create „Partnerships” that allows you to synchronize the information for more PC-s.
You can select the information you want to synchronize with your Pocket PC, for ex.
Contacts, Calendar, Files etc.Copy the selected files to the „Synchronization” directory on the
desktop PC, these files will automatically appear on the Pocket PC at synchronization.
TO CHANGE THE SYNCHRONIZATION’S SETTINGS, WHEN CONNECTING THE POCKET PC YOU
HAVE TO SELECT „STANDARD PARTNERSHIP” IN THE APPEARING WINDOW ON THE DESKTOP PC!
SELECTING „GUEST PARTNERSHIP” EFFECTS A CONNECTION AS A GUEST AND ALLOWS NO
SYNCHRONIZATON SETTINGS, MERELY COPY ING AND MOVING DATA IS POSSIBLE!
Installing ActiveSync to the desktop PC:
1.
Insert the DigiTerra Explorer Install CD into the CD drive. The installation will start
automatically. In case installation does not start automatically click the Start button then
select „Run”. Type in the „D:\autorun.exe” command (where „D” is the CD drive), and click
the „OK” button!
2.
3.
4.
Choose the „Install Microsoft ActiveSync 4.x” button!
Follow the instructions of the „Installation Wizard”! If you need more help, please
click the ActiveSync „Help” during the installation!
When the installation is complete connect your Mobile Computer to the desktop PC!
If your Pocket PC is connected to the desktop PC, ActiveSync will start automatically and its
program icon becomes green in the right corner on the tray.
TAP THE „EXPLORER” ICON OF THE PROGRAM, THE STORED DIRECTORIES AND FILES APPEAR
IN YOUR POCKET PC. THE BASIC FILE OPERATIONS (COPY, CUT, DELETE, CREATE A NEW
DIRECTORY) CAN BE EFFECTED IN WINDOWS EXPLORER AS USUAL.
OFFICIAL DOWNLOAD OF UPDATED ACTIVESYNC VERSIONS:
HTTP://WWW.MICROSOFT.COM/WINDOWSMOBILE/ACTIVESYNC/DEFAULT.MSPX
If you have any question with regard to ActiveSync please use Microsoft Active Sync Help,
or visit the Products and Supports services site of Microsoft. HTTP://SUPPORT.MICROSOFT.COM
V5.8.3.20.
6. pages / 64
4/21/2008
DigiTerra Explorer v5 ®
User Guide © Copyright 1996-2008, DigiTerra Ltd.
_____________________________________________________________________________________________________________________________________________________________________________________
1.3 Install DigiTerra Explorer to a desktop PC
BEFORE
THE INSTALLATION PLEASE CHECK IF MICROSOFT ACTIVESYNC PROGRAM HAS
ALREADY BEEN INSTALLED TO THE DESKTOP PC AND IT IS READY FOR OPERATION, OTHERWISE
THE REGISTRATION TO A POCKET PC WILL NOT BE AVAILABLE AND DATA SYNCHRONIZATION
AND COPY FILES CAN NOT BE EFFECTED BETWEEN THE POCKET PC AND DESKTOP PC!
AN APPEARING GREEN
STATUS OF ACTIVESYNC!
ICON IN THE RIGHT CORNER OF THE TRAY SHOWS THE ACTIVE
The installation is essentially an automatic process. Basically it is enough if you always click
the „Next” button. To change default installation settings you will have the opportunity in
appearing windows later on during the installation. Please read carefully the comments in the
windows!
Install DigiTerra Explorer to a Pocket PC
1.
DigiTerra Explorer is preinstalled and registered
software on an SD Card. When you put the SD Card
into your Mobile Device at the first time, the program
will start automatically. If the DigiTerra Explorer does
not start when you put the SD Card into the slot, you
may click on the “dtExp.exe” file manually in the “SD
Card\Bin\dtExp.exe” path.
2.
DigiTerra Explorer is a registration liable product
protected with a unique registration code which is stored
on your Secure Digital Memory Card (SD Card)!
Install DigiTerra Explorer to a desktop PC
1. Insert the DigiTerra Explorer Install CD into the CD drive. The installation will start
automatically. In case installation does not start automatically click the Start button then
select „Run…”. Type in the „D:\autorun.exe” command (where „D” is the letter of the CD
drive), and click the „OK” button!
2. Select one „Install DigiTerra Explorer button” and follow the instructions of the
“Installation Wizard”!
3. Before you start DigiTerra Explorer on your Desktop PC please check that the Microsoft
ActiveSync program has already been installed to the Desktop PC and it is ready for
operation; then connect the Mobile Device to your PC, otherwise the Registration to the
Desktop PC will not be available and data synchronization and copy files can not be
effected between the Pocket PC and desktop PC!
4. Start DigiTerra Explorer v5 on the Desktop PC.
V5.8.3.20.
7. pages / 64
4/21/2008
DigiTerra Explorer v5 ®
User Guide © Copyright 1996-2008, DigiTerra Ltd.
_____________________________________________________________________________________________________________________________________________________________________________________
BEFORE YOU START THE DIGITERRA EXPLORER ON YOUR DESKTOP PC PLEASE CHECK
THAT THE MICROSOFT ACTIVESYNC PROGRAM HAS ALREADY BEEN INSTALLED TO THE
DESKTOP PC AND IT IS READY FOR OPERATION; THEN CONNECT THE MOBILE DEVICE TO
YOUR PC, OTHERWISE THE REGISTRATION TO THE DESKTOP PC WILL NOT BE AVAILABLE
AND DATA SYNCHRONIZATION AND COPY FILES CAN NOT BE EFFECTED BETWEEN THE
POCKET PC AND DESKTOP PC!
1.4 Update DigiTerra Explorer Software
You can update your software with the update package downloaded from our website
(http://www.digiterra.hu) or manually from the received CD. To update you will find detailed
information on the Internet.
If you have any problem while update please visit the Products and Supports services of our
website or send an e-mail to our office [email protected].
1.5 Connect the Pocket PC to the Bluetooth GPS
1. Turn on the GPS, then tap to run „Bluetooth Manager” program on the Pocket PC.
2. Select „NewÆConnect” at the bottom bar. Bluetooth connection wizard starts, a list
appears with the potential devices.
3. Select „Explore a Bluetooth device”, click „Next”.
4. Through the next pages simple set the acquired device.
V5.8.3.20.
8. pages / 64
4/21/2008
DigiTerra Explorer v5 ®
User Guide © Copyright 1996-2008, DigiTerra Ltd.
_____________________________________________________________________________________________________________________________________________________________________________________
5. To establish a connection you will be required to enter passkey, by default „0000”.
Enter this passkey: the connection is established and your GPS is ready to measure.
6. Tap „Next” to continue or „Back” to return to the previous screen.
7. See below the Connection Wizard step-by-step.
V5.8.3.20.
9. pages / 64
4/21/2008
DigiTerra Explorer v5 ®
User Guide © Copyright 1996-2008, DigiTerra Ltd.
_____________________________________________________________________________________________________________________________________________________________________________________
Explore a Bluetooth device
Select a device
Select the found device
Establish an SPP connection
Standardization
YOU
WILL BE REQUIRED TO ENTER PASSKEY TO ESTABLISH A PAIRED RELATIONSHIP
BETWEEN DEVICES. BY DEFAULT TEH PASSKEY IS „0000” (ARABIC NUMERAL 0), BUT IT CAN BE
DIFFERENT DEPENDING ON THE MANUFACTURER.
TO ESTABLISH A CONNECTION TO A NEWER VERSION PDA OR NOTEBOOK, THE STEPS CAN BE
DIFFERENT, PLEASE READ THE USER GUIDE RECEIVED IN THE PACKAGE OF YOUR BLUETOOTH
APPLIANCE.
V5.8.3.20.
10. pages / 64
4/21/2008
DigiTerra Explorer v5 ®
User Guide © Copyright 1996-2008, DigiTerra Ltd.
_____________________________________________________________________________________________________________________________________________________________________________________
1.6 Start DigiTerra Explorer on your Pocket PC
Start the program
1.
Tap „Start menu” and select „Programs” with the stylus.
2.
Tap the „DigiTerra Explorer v5”
icon.
On Windows CE (like MobileMapper CE) you can start the program directly on the Desktop
too. Double Tap the „DigiTerra Explorer v5”
icon.
To send back the program
Tap the
at the upper-right corner of the handheld screen. The program will close and work
in the background.
Exit from the program
Select and tap the exit icon
from the first menu from the left.
On Windows CE (like MobileMapper CE) you can exit the program, when tap the “x” in
bottom right corner.
THE
APPLICATIONS WILL BE CLOSED AUTOMATICALLY DEPENDING ON THE AVAILALBLE
MEMORY. IF THE POCKET PC IS TOO SLOW, YOU CAN CLOSE THE APPLICATIONS BY ITASK OR
MANUALLY.
Closing by iTask
1.
2.
3.
Tap the „iTask” button („Start”Æ”Programs”Æ”iTask” )
Tap and hold your stylus on the application you want to close.
In the pop-up menu select „Close This Task” operation.
Closing manually
1.
2.
3.
Tap „Start” and select „Settings”ÆSystem and tap the Memory icon.
Tap „Running Programs”.
Tap „Stop all” or select an application and tap „Stop”.
1.7 The program set up, and how to use it
Our effort was during the set up of the program to reach all major function directly, by
tapping the screen without using the menu. The views are displayed on the screen of the
Pocket PC.
In the corners of the screen appear different information depending on which part of the
program is in use. In the upper-left corner you can see editable layers, in the lower-left corner
the measure scale, in the lower-right corner the measure rate by default. When connecting to
the GPS device, in the upper-right corner the status information will appear, or in move the
actual speed will be shown.
V5.8.3.20.
11. pages / 64
4/21/2008
DigiTerra Explorer v5 ®
User Guide © Copyright 1996-2008, DigiTerra Ltd.
_____________________________________________________________________________________________________________________________________________________________________________________
Measuring on the screen or GPS based field surveying the geometric information of the
measure/edit (length, area) will appear. To change the appearing data on the screen or to
define these data, you can find further information in the relevant chapters. Around the screen
that displays the view an active frame can be seen by default. With this frame you can move
the view towards the arrows, and can reach the most often used functions (layers, attributes,
full zoom, GPS survey, zoom in/out, rotate and tilt the map). The active frame can be turned
on/off optionally, the settings’visibility can be made through the „Settings” icon. The
functions of the application can be reached through the menu from the button of the screen, or
on the opening panel(s) select a menu (for ex.: layer list-handling, attributes….).
1.8 Basic user settings
The functions of DigiTerra software can be affected on a defined way at some points. The
basic settings can be reached through the „Settings” panel.
Map precision: The geometric precision of the added and created geometric items. By default:
„Projected: 1 dm”. The projected map precision means for ex.: 1 dm projected coordinates,
the precision is 1 decimeter (0.1 meter). At the settings of the map precision you can select
among different values of the projected or geographic precision.
PROJECTED PRECISION: 1 M, 1 DM, 1 CM, 1 MM PROJECTED COORDINATES. THIS SETTINGS
RESULT IN A PROJECTED FITTING MAP. GEOGRAPHIC PRECISION: 10 M, 1 M 1 DM, 1 CM,
PROJECTED COORDINATES. THE GEOGRAPHIC CCORDINATES AS FI, LAMBDA ARE IN USE AT
(GLOBAL) MAPS.
Automatic save: The automatic save refers only the created vector geometric items (point,
line, area) and its related attribute, does not refer saving the view. Using this function can
avoid losing any data from inattention. By default „Creation” is set, that means that the
created point, line or area will be saved automatically. Saving the map you can find further,
detailed information in the chapter 2.1.1.
GPS logfile: Having a GPS connection the surveyed position are saved into a separated
„dtGps.log” file, that let you check the data of the position surveyed by the GPS device or
using permanently in a vehicle even for following up the vehicle. The saving path of
logfile can be set in the textbox.
GPS position loading: Set the type of geometry for processing of GPS positions from the
drop list. You can select points, lines, polylines, or area.
Points: Creates points from every GPS position with ID, Date datafields from the recorded
data in the logfile.
Lines: Creates lines between GPS positions with ID, Date, Length, Speed datafields from the
recorded data in the logfile.
PolyLine: Connects the GPS positions (recorded in the logfile) and create one polyline (one
object) from it. Datafields are: Label, Date, Length, and Area.
V5.8.3.20.
12. pages / 64
4/21/2008
DigiTerra Explorer v5 ®
User Guide © Copyright 1996-2008, DigiTerra Ltd.
_____________________________________________________________________________________________________________________________________________________________________________________
Area: Connects the GPS positions (recorded in the logfile) and create one polygon (area)
from it. Datafields are: Label, Date, Length, and Area.
New record panel: Shows the attribute panel of the created geometric object.
Field surveying: During the GPS survey the „Length” and „Area” datafields appear and fill
out automatically of the created vector geometry (point, line, area) on the „Record” panel.
Raster smoothing: Enable the bilinear interpolation of raster pixels.
No Raster Smoothing picture Raster smoothing picture
Active frame: A navigation frame, enables the pan and zoom
of the map
Toolhelp: Displays information about the PC tools
Speed-dependant scale: Change the current scale on the basis
of the actual speed. When active: if the speed is higher than 40
km/hour than at 60 km/hour decreases the scale to the half, at
80 km/hour to the third-part of it.
Select the program language: The program language depends
on the „Country settings” in the operation system. For
Hungarian language set the „Country settings” to Hungarian.
On Windows CE (like MobileMapper CE), if the selectable regional option does not exist on
the “Regional Settings” list, you
can set the program language
directly in DigiTerra Explorer.
Tap the Dictionary icon, then
select the language file in the
installation directory (usually
this is the “SD Card\Bin” path in
the Mobile Device and “Program
Files\DigiTerra Explorer v5\”
path in the Desktop PC), then
click OK.
V5.8.3.20.
13. pages / 64
4/21/2008
DigiTerra Explorer v5 ®
User Guide © Copyright 1996-2008, DigiTerra Ltd.
_____________________________________________________________________________________________________________________________________________________________________________________
2 MAPPING
2.1 The view
We display the vector and raster layers of the geographic objects in a view. The view is built
up from layer(s) and to display the views we use a thematic classification. Imagine the layers
as superposed translucent foils, where one foil matches to one single layer. The view comes
from the combination of these thematic. The view not only saves the sort of the layers but
saves the attribute of their geometric items (point, line, area) too. These layers can be
organized in a list, saved and backup. Simultaneously you only can see one view. The created
views can be stored in map files.
DigiTerra Explorer map types:
EXP-DigiTerra Explorer Map
DMP- DigiTerra Map Pack
2.1.1 Load / create / save a map
The layers of the view(s) created in advance, you can load as a
„Template” if you tap „Open map” icon. By the settings of the
saved view the program loads the source data through the
matching path. In case of „Opening Map failed” because of the
incorrect path (for ex. because data was moved) the program
will ask you for a new path.
Creating a new map you can create the layers as free as you want using the „Layers” panel,
and afterwards you can save it.
Open Map
icon.
1.
Tap „ Open Map”
2.
Through the “\SD Card\Maps\Hungary\" path select
Hungary.exp file. (“\Program Files\DigiTerra Explorer
v5\Maps\Hungary\" path on Desktop PC)
3.
Tap „OK”.
THE SAMPLES IN THE USER GUIDE RELATE TO THE MAP
HUNGARY.EXP (PATH: “\PROGRAM FILES\DIGITERRA EXPLORER
V5\MAPS\HUNGARY\"ON
DESKTOP
PC,
AND
“\SD
CARD\MAPS\HUNGARY\" PATH ON MOBILE DEVICE) AND ITS
LAYERS. IN CASE OF DELETING THE SAMPLE FILES THEY CAN BE
REINSTALLED FORM THE INSTALLER CD.
Create a new map
1.
2.
3.
Tap the „ New map”
icon
Set the path where you want to save the created map.
Enter the „Name „ field.
V5.8.3.20.
14. pages / 64
4/21/2008
DigiTerra Explorer v5 ®
User Guide © Copyright 1996-2008, DigiTerra Ltd.
_____________________________________________________________________________________________________________________________________________________________________________________
4.
Tap „OK.”
Save the Map
1.
2.
3.
Tap the „Save the current map”
icon.
This function means save the changes of the edited layers and save the map, in all at
once. If you do not want to save the changes of the layers, unmark the square
in
front of the layer’s name, which you do not want to save.
Saving the map, tap „OK”.
Save the map as (under new name)
1.
2.
3.
4.
5.
icon.
Tap the „Save the current map”
Tap the „Map” button on the „Save” panel.
Set the saving path and give a new name of the map.
Tap „OK”.
The name and the path are set, to save tap „OK”.
SAVING THE MAP, SAVING THE MAP AS…. CAN HAPPEN IF YOU OVERWRITE THE PATH AND
THE NAME OF THE MAP FILE!
BY DEFAULT THE PROGRAM USES THE EXP FILE FORMATS TO SAVE THE VIEWS.
2.1.2 Link maps
When opening views the program enables to load and display more map files saving the
settings of each map. The linked views can be saved as a new view.
All the views you want to link place in one directory. On the „Open Map” panel select the
views you want to link, than tap „OK”.
V5.8.3.20.
15. pages / 64
4/21/2008
DigiTerra Explorer v5 ®
User Guide © Copyright 1996-2008, DigiTerra Ltd.
_____________________________________________________________________________________________________________________________________________________________________________________
2.1.3 Map publications, using DMP formats
Concerning the publications of maps, DigiTerra Explorer 4
version made a significant improvement. In the DigiTerra Map
Package the vector and the raster layers, the attribute and the
settings of the view can be stored altogether. Using DMP
formats, the size can be decreased to the half or quarter size of
the original files and everything (layers, settings as scale, type
of rotation, classes, linetype, fill colour, etc.) will be stored in
one file.
The DMP format can be the standard format of publication
maps, just think of the PDF formats, developed by Adobe. The
DMP files are readable with the DigiTerra Explorer v5, if you
have the right authority (you registered), layers can be edited
and views can be printed. The DMP format is a safe solution to
public maps.
Map publication in DMP format
1.
Open the (already get known) „Hungary.exp” view,
2.
icon.
tapping the „Open Map”
To save the view in DMP, tap the „Save the current
3.
4.
5.
6.
map”
icon.
Tap the „Map „ button.
Select the file format as „DMP”.
Set the saving path of the map than press „OK”.
In the returning window tap „OK” again.
To limit the editing and printing layers select the „saving type”
on the „Saving DMP” panel. The default setting is „No save”.
Saving the DMP, it provides facilities to save the objects
filtered through their attributes, or to save the geometry on the
screen. The publication of the DigiTerra Map Package can be related to users, or serial
numbers. (The user name and the serial number display the registration data).
Zoom the view in / out, move
2.1.4 Zoom in / out the map
There are following operations to „zoom in” the map:
Dynamic zoom
The dynamic zoom tool zooms in the map continually. To effect, drag your stylus on the
touchscreen of your Pocket PC.
1.
2.
Tap the„Zoom Map”
icon. Zoom in: with your stylus tap a point on the view and
drag upright ↑ to the top of the screen continually. Zoom out: with your stylus tap a
point on the view and drag uprightly down ↓ to the bottom of the screen continually.
Take away your stylus from the display.
V5.8.3.20.
16. pages / 64
4/21/2008
DigiTerra Explorer v5 ®
User Guide © Copyright 1996-2008, DigiTerra Ltd.
_____________________________________________________________________________________________________________________________________________________________________________________
USING THE PROGRAM ON THE DESKTOP YOU CAN SELECT
BUTTONS: ZOOM IN=1(NUMERICAL) ; ZOOM OUT=2 (NUMERICAL)
THROUGH THE FOLLOWING
Zoom Window
The „Zoom window” tool zooms the area assigned as a window
to the size of the boundary box. Dragging the window, the
program counts and displays the size and perimeter of the
window. Drag your stylus on the touch-screen to select the area
of the window.
1.
2.
3.
Tap the „Zoom windows”
icon.
Place your stylus to a point of the displayed view and
drag through the screen diagonally as if you draw the
diagonal of a tetragon.
Take away your stylus form the screen.
Zoom to full screen
„Zoom to full screen” tool zooms to the boundary box of the view layers.
Tap the „ Zoom to full screen” icon, the function gets active right away.
„Zoom to active layer”
„Zoom to active layer” zooms to the boundary box of the selected (active) layer.
TO SELECT THE ACTIVE LAYER ON THE „LAYERS”
Tap the „Zoom to active layer”
PANEL TAP THE NAME OF THE LAYER.
icon, the function turns active right away.
Zoom to active item (Zoom to selected entity)
The „Zoom to active item (selected entity)” tool (active item
means the selected item in the vector layer) zooms to the
boundary box of the selected item.
To select active item tap the „Information”
icon and tap
the item you want to select. The outline of the selected item
turns red.
Tap „Zoom to active item (selected entity)”
icon. The
function gets active right away. There have to be always a
selected item.
V5.8.3.20.
17. pages / 64
4/21/2008
DigiTerra Explorer v5 ®
User Guide © Copyright 1996-2008, DigiTerra Ltd.
_____________________________________________________________________________________________________________________________________________________________________________________
Set scale
Using the „Set scale” function the map appears in the scale that was set. The actual scale is
displayed in the lower-left corner of the screen.
1.
2.
3.
Tap the „Set scale”
icon.
Enter the required scale in the field.
Tap „OK”.
2.1.5 2.2.2 Pan map
There are two ways to pan map:
Central-point pan: Without changing the scale the map will be placed in the middle of the
screen by the selected point.
Drag: Using drag the view is movable toward any direction (as you moved a paper on the
screen). As you take away the stylus from the screen the new view will be drawn.
Central-point pan:
1.
2.
3.
Push the „Pan Map”
icon.
Place your stylus to a point on the screen.
Take away your stylus.
Drag
1.
2.
Push the „Pan Map”
icon.
Place your stylus to a point on the screen and drag it through the screen.
ON THE DESKTOP PC VERSION THE „PAN MAP” FUNCTION CAN BE REACHED IF YOU TAP
SPACE. WITHOUT CHANGING THE SCALE THE MAP WILL BE PLACED IN THE MIDDLE OF THE
SCREEN BASED ON THE POSITION OF THE CURSOR.
Moving the map planar
To move the map planar you can use the arrows on the active frame. Tap one of the arrows
with your stylus than take it away. The map will be moved toward the arrow.
Scroll map
Using scroll map function the map is movable to any direction likewise using drag, but the
view changes counter-move according to drag, as fast as you drag the map.
1.
2.
Tap the „Scroll Map”
icon.
Place your stylus to a point on the screen and drag it through the screen.
2.1.6 2.2.3 Rotate and tilt the map, plan view
„Rotate and tilt Map” function means rotate and tilt the map planar. The program uses
perspective projection to display the map. Using this function, looking ahead we can see
larger area - despite the small screen of the Pocket PC - if we used the sheer/normal
V5.8.3.20.
18. pages / 64
4/21/2008
DigiTerra Explorer v5 ®
User Guide © Copyright 1996-2008, DigiTerra Ltd.
_____________________________________________________________________________________________________________________________________________________________________________________
projection. Using the rotate and scroll functions together, we can have a feeling if we were
flying above the field.
1.
2.
Tap the „Rotate and tilt map”
icon.
Place your stylus to a point on the screen and drag it through the screen.
Moving the map planar
To move the map planar you can use the arrows on the active frame. Tap one of the arrows
with your stylus than take it away. The map will be moved toward the arrow.
Plan view
The plan view set back the rotated view to normal screening and orientates the map towards
north.
Tap the „Plan view”
icon, the function gets active right away.
2.1.7 Using saved views settings
Last view, next view
The program saves the settings of the views (scale, angles of rotation). Using the last view,
the next view functions, there is the possibility to display again the already saved views in
chronology order.
Tap the„Last view”
icon or the „Next view”
icon to display the previous or next view.
Using bookmarks
Using the bookmarks you can mark different display settings (scale, angles of rotation) that
are important to you. To use this function tap the „Bookmark”
icon. Set a scale and
rotation position using the „Zoom Map”, „Pan map” and „Rotate and tilt map” icons. Enter a
name and tap the „Store” button. To delete the bookmark tap „Delete” button. Saving the
view, the added bookmarks will be saved too.
2.2 Handling the layers of the view
Views are built up from layers. By the model methods of the real world’s geometrical objects
the program can display two basic, planar model ways. Vector files and its datatables, and
raster files. Handling and editing the layers use the „Layer setting”
icon. To open tap the
icon or touch the button in the upper-left corner on the active frame.
Handling the layers happens by an open datasource, which means their processing (reading
and writing) happens in original format. There is no need to convert files. The program
assures opportunities to export the layers, so the gathered data in the area are available and
usable for other GIS softwares.
DigiTerra Explorer v5 supported file formats
Vector files: BNA, DAT, DXF, LOG, MAP, MIF, SHP
Data tables: DBF, TAB, TXT
Raster files: BIL, BMP, ECW, ERS, JPG, JP2, LAN, PCX, TIF
V5.8.3.20.
19. pages / 64
4/21/2008
DigiTerra Explorer v5 ®
User Guide © Copyright 1996-2008, DigiTerra Ltd.
_____________________________________________________________________________________________________________________________________________________________________________________
Vector layers
The vector layers can display three type of object:
• Point
• Line
• Area (polygon)
Top display the items, you can select from different display settings using the thematic
classification. Within the classes you can sort: display all geometric data, or only a subset of
the data.
The basic parameters of the selected items you can display:
• Line color
• Fill color
• Symbol
• Type of line
• Fill type
• Raster texture
The thematic classification is a group of data, which is created by some kind of condition. The
condition is set by the geometrical data attribute. All class contents parameters concerning to
the line color, fill color, symbol, type of line, fill type, and raster texture.
To create a thematic class usually it is enough to select the datafields and the program creates
the number of the classes, set theirs parameters, and even labels the class, that means that it
makes the key of the thematic map.
There is the possibility to display the label in the center of gravity of the geometrical items –
as in the insert point.
The further display settings - the draw items, labels, and symbols -depends on the scale - scale
interval.
Raster layers
DigiTerra Explorer has no independent settings opportunity concerning to the displaying of
raster layers, but there is a possibility to interpolate the bilinear raster datasource, the
displaying scale range, the scale interval.
2.2.1 Add, display, save layer(s)
2.2.1.1 Add new layers to the view
1.
Create a new map
.
2.
Tap the „Add layer(s)” icon
(on the layer panel you
also can use the
icon). This panel helps you to find the path
of the map and you can set the type of the map. The setting
masks the loadable filetypes from the selected directory.
3.
Find the ”Countries.map” layer in the Europe directory
inside the sample database. (\SD Card\Maps\Europe) Tap the
V5.8.3.20.
20. pages / 64
4/21/2008
DigiTerra Explorer v5 ®
User Guide © Copyright 1996-2008, DigiTerra Ltd.
_____________________________________________________________________________________________________________________________________________________________________________________
name of the layers, if the green check-mark appears in front of the layers name, you selected
successfully. In the „Name” field you can see all selected layers. If you made a false selection,
tap again the name of the layer to unselect it. (In the desktop PC version use the general way Ctrl or Shift+Click on the panel of Windows) to add new layer(s) to the view.)
4.
Tap OK to add the two layers to the view without changing the path.
5.
Tap again the „Add new layer(s)” icon
(on the layer panel you also can use the
icon). Find and add to the view as new layer the „cities.map”.
OPENING
THE ”LAYER SETTINGS”
PANEL, YOU CAN SEE THAT THE NEWLY SELECTED
LAYER APPEARS IN THE FIRST ROW IN THE LIST.
2.2.1.2 Displaying the layers and changing the order of the displayed layers
Displaying the layers
check-mark you can terminate displaying
After opening the Layers panel, by tapping the
the layers. In front of the displayed layers you can see the check-mark, but there is no check
mark in front of the invisible layers. Dragging your stylus through the „mark-squares” of the
layers, all layers can be marked or unmarked. If you tap the
icon, all layers can be marked
or unmarked all at once, too.
Layers display order
First time will be displayed the layer that is in the last row on the „Layers” panel (in the list),
and last will appear the layer that is in the first row. The later displayed layers overwrite the
(area ) after
earlier displayed ones. Therefore you have to display first the raster layers
the lines , and by the end the points. Using this display order areas will not hide points,
lines, labels and symbols.
Changing the Layers display order
In case the display order is not suitable, you can change it moving the layers.
1.
Apply the „Add new layers to the view” task.
icon, or the button in the upper-left corner
2.
Open the „Layer settings” panel: tap the
on the active frame.
3.
Tap with your stylus to the panel named „Lakes” and drag this layer under the
„County” layer. (The dark background color shows, that the „Lakes” layer is the active layer)
4.
Tap OK in the upper right corner on the panel. Changing the order, in the recent order
the „County” layer overlies / hides the „Lakes” layer.
5.
To make the right order open again the „Layer settings” panel and drag the „Lakes”
layer between the „Rivers” and „County” layers.
6.
Tap OK and have a look at the view.
YOU
WILL FIND FURTHER INFORMATION ABOUT THE DISPLAY SETTINGS OF VIEWS
(THEMATIC CLASSIFICATION, SCALE, LABELING … ETC.) IN THE FOLLOWING CHAPTERS.
V5.8.3.20.
21. pages / 64
4/21/2008
DigiTerra Explorer v5 ®
User Guide © Copyright 1996-2008, DigiTerra Ltd.
_____________________________________________________________________________________________________________________________________________________________________________________
2.3 Display vector layers, thematic mapping
The thematic mapping illustrates the subset of data in accordance with their geometrical
position. The thematic map is a combination of several layers, which contains all information
we are interested in.
Displaying is the thematic classification of points, lines and geometrical items by their
attributes. The attributes are organized into datatables in the datasource. The primary
datatable contains the attributes of the geometry; other datatables contain other records. The
program adds automatically the primary datatables to the geometrical items.
Thematic display
•
Objects with points extension: set the line color, fill color, settle symbol on the point,
display point-labels
•
Line type objects: set the line color, the line type, settle symbol on the line (polyline),
display line-labels
•
Area type objects: set the line color, the line type (only the thickness of the line can be
changed!), set the fill color, select fill type, texture, settle symbol on the area, display
area-labels
Steps of the thematic classification
Load the layers (geometrical data). Loading the layers also loads the primary datatable. Set
the display scale of the layer(s). Scale by default: Zoom to selected entity, which means that
when loading the layers the program zooms to the boundary box of the layers. Filter the
classification attribute on the basis some conditions. Select the classification method.
Create classes. We would like the data to group, to classify and to organize in thematic classes
to display. The borders of the classes depend on the types of the data. In case of certain data
we can create standard classes with given number of classes. For ex. the age of species of
threes: species of threes between 0-140 years old can be classified into 14 classes. In this case
the borders of the classes change by age rate. We can create classes on that way, that all,
single data in the database create a separate class. For ex. the automatically display of the
symbols.
To create a class can happen automatically, but we also can create separate, single classes
(manually)
Using the automatically classification method:
•
•
•
•
•
•
•
No classification: Every item is sorted to the other class.
Unique values: Create classes by the unique values of the datafield.
Modulo: Create classes by the modulo operator (remainder calculation).
Natural breaks: The classes contains same amount of items. The class borders pick
up the values of the field.
Equal quantities: The classes contains same amount of items.
Equal interval: Create classes with the same interval between the minimum and
maximum values of the field.
Given interval: Create given number of classes between the minimum and maximum
values of the field.
V5.8.3.20.
22. pages / 64
4/21/2008
DigiTerra Explorer v5 ®
User Guide © Copyright 1996-2008, DigiTerra Ltd.
_____________________________________________________________________________________________________________________________________________________________________________________
•
Normal distribution: Create classes with the same interval between the mean2*deviation ... mean+2*deviation of the field. The central class will contain the items
with average values.
Set the records of the classes: We can add to the created classes line color, line type, fill color,
fill type, texture, symbol, and label. The settings of the thematic classes can be developed by
automatic and manually methods.
Automatic method: Displays the set values and transition color or unique color basis on the
given methods algorithms.
Manually method: We have to develop the draw settings of all separate thematic classes.
1.
Give a name of the layer (on the „Layer settings” panel in the list) and the thematic
classes (on the classes panel in the thematic key) make available to identify them.
2.
Give the scale interval: this is the interval within the layer will be displayed.
3.
Turn on/off the display option of the layer
4.
Turn on /off the display option of the layer attribute
2.3.1 Thematic mapping of points contain geometrical items
Displaying the points is the result of thematic classes. The geometrical file of the points is
stored in the sample database as point.map file. The primary datatable is stored as point.tab
file. The points are encoded with types and labels.
We can display points as draw items (as a point) and we can settle symbols and labels on
them basis on the primary datatable. We do not link further datatables to the points in the
sample database.
IN CASE THE POINT TYPES LAYER IS DISPLAYED AS A DRAW ITEM OR
SYMBOL, THE POINT OR THE GIVEN SYMBOL APPEARS IN ITS STANDARD SIZE.
CHANGING THE SCALE DOES NOT CHANGES THE GEOMETRY.
Displaying points simple
Display the point.map layer as a green circuit with thin red outline, the scale interval is 1:11:1.000.000. To display the points load the point.map layer and without any further
classification settle the line color and the fill color of one class.
Create a new map and save the new view under an optional selected name.
icon (you can also use on the „Layers” panel the
1.
Tap the „Add new layer(s)”
push-button) and find the “cities.map” layer (following the sample file path) then add to the
view.
2.
Tap the „ Layer settings”
icon (In case you used the
„Layers” panel is still open you can skip this step)
push-button and the
3.
Set active the layer named point (select) and point your stylus to the „Classes”
icon.
V5.8.3.20.
23. pages / 64
4/21/2008
DigiTerra Explorer v5 ®
User Guide © Copyright 1996-2008, DigiTerra Ltd.
_____________________________________________________________________________________________________________________________________________________________________________________
4.
Tap the line under „Line color„
button and select (fast double tap) the red color
from the appearing line color palette, than tap OK.
5.
To set the fill color of the circle tap the square under
button and select (fast double tap) the green color from the
appearing fill color palette, than tap OK.
6.
To set the line type tap the line under
button and
select the „line type 1” from the appearing palette than tap OK.
7.
To close the „Classes” panel, tap the OK in the upperright corner.
icon on the „Layer settings”
8.
To set the scale, tap the
panel. Select from the list the „Point” layer. In the field
„Minimum scale” enter „1” and in the „Maximum scale” field enter „1.000.000” value. From
that time the cities.map layer will appear in the 1:1-1:1.000.000 scale interval.
9.
To close the „Layers” panel tap OK in the upper-right corner, and save the view.
2.3.2 Thematic mapping of line objects
We display the view contain lines by the attribute of its primary datatable. To the line objects
– alike the areas – further datatables can be linked, that datatables contain the further data of
the lines. For ex. the „owner / proprietarily registration of the electric cables”
Displaying lines simple
Display the „motorway.map” layer (\SD Card\Maps\Hungary\motorway.map) by the „Name”
datafield, the classification method is unique values. To set the line color use the line color
palette, the linetype is „3”. Collective set the linetype.
1.
Create new map and save the new view under an
optional selected name.
2.
Tap the „Add new layer(s)” icon
(you can also use
on the „Layers” panel the
push-button) and find the
motorway.map layer (following the sample file path) then add
to the view.
3.
Tap the „ Layer settings” icon
(In case you used the
push-button and the „Layers” panel is still open you can
skip this step)
4.
Set active the „highway” layer (select) and point your
stylus to the „Classes”
icon.
5.
From the „Field” drop list select the „Name” datafield, the method will be set
automatically as unique values.
V5.8.3.20.
24. pages / 64
4/21/2008
DigiTerra Explorer v5 ®
User Guide © Copyright 1996-2008, DigiTerra Ltd.
_____________________________________________________________________________________________________________________________________________________________________________________
6.
To set the line colour of the created 5 thematic classes tap the „Menu” and from the
appearing list select the „Palette” menu. Select „Spectrum” on the Color palette, than close
the panel (tap OK in the upper-right corner).
7.
Set active the first item in the list of the classes, tap the name of the highway”M0 (2).
To set the line type tap the line under the
button, and select the „line type 1” from the
appearing palette, than tap OK.
icon on the header of the list. All
8.
To the collective selection of the line types tap
line types will change to the type of the active (selected) class item in the list.
9.
To close the panels first tap OK on the „Class” than tap OK on the „Layer settings”
panel. Save the view.
V5.8.3.20.
25. pages / 64
4/21/2008
DigiTerra Explorer v5 ®
User Guide © Copyright 1996-2008, DigiTerra Ltd.
_____________________________________________________________________________________________________________________________________________________________________________________
2.3.3 Thematic mapping of the areas
We display the areas by the attribute of theirs primary datatable.
Displaying areas simple
Display the ”county.map” (\SD Card\Maps\Hungary\county.map): Effect a thematic
classification on the „county.map”, by the „Name” datafield, the classification method is
unique values. Place a „Zoom” symbol (symbol 20) in the center of gravity of that polygon
that contains Budapest. Display the area of Baranya county using the ”3” fill type.
Display all polygons of the „belterület.map”, using „urban” texture in the given „County”
scale interval.
1.
Create new map and save the new view under an optional selected name.
2.
(you can also use on the „Layers” panel the
Tap the „Add new layer(s)” icon
push-button) and find the „county.map” and the „settlement.map” layers (following
the sample file path) then add to the view.
3.
Tap the „Layers” icon
(In case you used the
still open you can skip this step)
4.
5.
Set active the „county” layer (select) and point your stylus to the „Classes”
icon.
From the „Field” drop list select „Name” datafield, the method will be set
automatically as unique values.
Select the „Budapest (1)” item, point your stylus the empty square under the Symbol
push-button and from the appearing symbol palette select the „Symbol 20”, than close
the panel (tap OK in the upper-right corner).
Point your stylus the empty square under the „Fill type”
button in the first line of
the list („Baranya county (1) ) and from the appearing fill type palette select the
„Filltype 3” than tap OK to close the panel.
Tap OK again, to close the „Classes” panel.
6.
7.
8.
9.
10.
11.
button and the „Layers” panel is
Set active the „settlement” layer (select) and point your stylus to the „Classes”
icon.
Point your stylus the empty square under the „Texture” push-button
and from the
appearing list select „Urban” menu, than tap OK to close the palette.
Tap the
icon on the „Layer settings” panel. Select the „settlement” layer from the
list, than tap the „County” button. To close the panels first tap OK on the „Scale” than
on the „Layer settings” panel.
V5.8.3.20.
26. pages / 64
4/21/2008
DigiTerra Explorer v5 ®
User Guide © Copyright 1996-2008, DigiTerra Ltd.
_____________________________________________________________________________________________________________________________________________________________________________________
2.3.4 Labels
Labels: Displaying the attribute of the draw items (point, line, area) as characters. To display
the labels happens in different insert points, depending on the type of the objects. There is no
possibility to change manually the position of the label.
Displaying labels of a vector map layer: From the primary datatable simultaneously 3 Label
fields can be selected. The characters come from the settled fonts.
Label properties
Displaying scale interval
Font
Size (in picture point or in real map unit –Select when you turn on Scaling option)
Color (Foreground color, Background color)
Style (Bond, Italic, Underline, Outline, Frame)
Scaling (basis on the datafield or displaying scale)
Rotation (only can be used at lines /polylines)
Plan view (at rotation)
We can display labels in the insert points of different geometric items. The position of
the labels insertion:
- in case of points: the geometric position of the point
- in case of lines:
• Polyline from odd numbers sections: on the middle line section above the line,
rotated to the line
• Polyline from even numbers of sections: above that one of the two middle line
sections that is settled down at the side of the beginner vertex, rotated to the line
- in case of areas: in the centre of gravity of the area
There is no possibility to change the place of insertion and the rotations angle of the labels in
the given geometric position. In case of labels that cross each other the cross label is invisible.
Display labels on the map simple
Display the contents of the datafield „Name” of the „county.map” layer: font size „12”, font
type „Tahoma”, red color, black outline. The labels shall be visible from the 1:5.000.000 scale
interval.
1.
Create new map and save the new view under an optional selected name.
2.
Tap the„Add new layer(s)” icon
(you can also use on the „Layers” panel the
push-button) and find the „county.map” layers (following the sample file path) then
add to the view.
3.
Tap the „ Layers” icon
(In case you used the
button and the „Layer settings”
panel is still open you can skip this step) Tap the „Labels”
icon on the panel. From
the drop list of the „1. label field” select „Name” datafield. In the first raw of the panel
V5.8.3.20.
27. pages / 64
4/21/2008
DigiTerra Explorer v5 ®
User Guide © Copyright 1996-2008, DigiTerra Ltd.
_____________________________________________________________________________________________________________________________________________________________________________________
4.
5.
enter the 5.000.000 value in the empty datafield. Be sure that there is a check-mark in
front of the „Labels” field.
From the drop list select „Tahoma” font type and set the font size „12”.
Tap the „Forecolor” button, point your stylus to the red color. To close the panel, tap
OK. Tap the „Backcolor” button, point your stylus to the black color. To close the
panel, tap OK. Make a check-mark in front of the „Outline” to be able to display the
black outline. To close „Labels” panel tap OK, than save the view.
2.3.5 Display symbols
To display the symbols on the view we mean the symbolic picture placed in the insert point of
the draw items (point, line, area). To display the symbols happens in different insert points,
depending on the type of the objects. There is no possibility to change manually the position
of the symbol.
Symbols attribute
Display interval of the symbols
The displaying is normal to the planar of the layer and the screen (rotate)
Displaying the symbols on the screen
Display the symbol Nr.19 in the insert point of the polygon in the „county.map” layer. The
symbols shall be visible from the 1:5.000.000 scale interval.
1.
Create new map and save the new view under an optional selected name.
2.
Tap the „Add new layer(s)” icon
(you can also use on the „Layers” panel the
push-button) and find the „county.map” layers (following the sample file path) then add to
the view.
3.
Tap the „ Layers” icon
(In case you used the
button and the „Layer settings”
icon on the panel. Point your
panel is still open you can skip this step) Tap the „Classes ”
stylus the empty square under the Symbol
push-button and from the appearing symbol
palette select the „Symbol 19”, than close the panel (tap OK in the upper-right corner). Tap
OK again to close the Classes panel too.
4.
Tap the „Labels”
icon on the panel. Place a check mark in the square in front of
the „Symbol” than enter the 5.000.000 value in the empty datafield. Tap OK to close „Labels”
panel, save the view.
V5.8.3.20.
28. pages / 64
4/21/2008
DigiTerra Explorer v5 ®
User Guide © Copyright 1996-2008, DigiTerra Ltd.
_____________________________________________________________________________________________________________________________________________________________________________________
2.3.6 Operations on the map
Map operations: graphic selection operations on the map layer, information requests, position, distance-, azimuth angle and area surveys on the view.
2.3.7 Selection
Select the items of the map means the assignment of the objects displayed on the layer. The
selection concerns the filtered data of the layer. The selection searches the draw items of the
actual subject within a selection interval starting at the position of the tap on the touch-screen.
The value of this interval is a fix value, there is no possibility to change it manually. In case
the program finds no draw item in the given interval, the selection will failure. The selected
item appears with red outline.
There are 2 ways to select the graphic objects (point, line, area) on the view:
1.
Graphic selection
2.
Browsing the record panel of the primary datatable
One object can be selected at a time in the program.
1. Graphic selection
1.
To select use the „Information” tool
on the view.
2.
Select by graphic selection on the „county.map” layer the polygon, which illustrates
Pest County.
3.
Tap the „Add new layer(s)” icon
(you can also use on the „Layers” panel the
push-button) and find the „megye.map” layer (following the sample file path) then add to the
view.
4.
Tap the „Information” icon
.
5.
Tap the object that illustrates Pest County, on account of
the selection the outline of the polygon turns red.
6.
To delete the selection tap an „empty” space on the view.
TO
BE ABLE TO SELECT ON OBJECT ON THE VIEW USING THE
„INFORMATION"
TOOL, ON THE
„LAYER SETTINGS” PANEL IN
THE ROW OF THE SELECTED LAYER THE „INFORMATION”
HAS TO BE APPEARED THE SQUARE.
ICON
2. Selection on the Record panel
There is the possibility to select an object by its record using the horizontal scrollbar on the
„Record” panel. As you scroll the data, the outline of the object - which records are visible on
the screen - turns red.
1.
Select the Pest object’s polygon by its record using the „Record” panel.
V5.8.3.20.
29. pages / 64
4/21/2008
DigiTerra Explorer v5 ®
User Guide © Copyright 1996-2008, DigiTerra Ltd.
_____________________________________________________________________________________________________________________________________________________________________________________
2.
Tap the „Add new layer(s)” icon
(you can also use on the „Layers” panel the
push-button) and find the „county.map” layer (following the sample file path) then add to the
view.
3.
Tap „Display data records”
icon.
4.
Use the horizontal scrollbar to select the „ID = 5; Name = Pest” record. Close the
panel.
5.
On account of the selection the outline of the object turns red.
V5.8.3.20.
30. pages / 64
4/21/2008
DigiTerra Explorer v5 ®
User Guide © Copyright 1996-2008, DigiTerra Ltd.
_____________________________________________________________________________________________________________________________________________________________________________________
2.3.8 Display information
) point your stylus
To display the records by graphic selection (using the information tool
the draw item within the limited interval of the selection. The icon displays the records of the
layers on the view or on the „Record” panel.
TO BE ABLE TO SELECT AN OBJECT ON THE VIEW USING THE „INFORMATION"
THE „LAYER SETTINGS” PANEL IN THE ROW OF THE SELECTED LAYER THE
ICON HAS TO BE MARKED IN THE SQUARE.
TOOL, ON
„INFORMATION”
1. Display records on the view
tool, when you tap the draw item, the information of the graphic
Using the „Information”
object appear in a window, that shows the „source” and the datarecords of the selected object
datafields. The number of these datafields is limited, maximum 16.
2. Display records on the „Record” panel
Opening the „Record” panel the information of the selected graphic object can be displayed in
„Record view” or in „Relation view”. It is suggested to use the „Relation view” when you
want to display linked datatables, further information see in „Attribute handling” chapter. To
select the „Record view” or the „Relation view”, on panel tap the „Menu” button.
2.3.9 Measure on the view
We can measure position, distance, perimeter, and angle on a view. When measuring, the
program uses the layers to snap the vertices within the limited selection interval. You can use
the vertex snapping only when the layer „Information”
property is on. To lay the vertex
on the view, tap your stylus the screen (point) or drag your stylus (use the marking crosses).
The measurement begins with placing the vertex, and finishes with the displaying, the
distance, the perimeter, the area, the angle and the position of the vertex. When placing the
vertex the program counts in real time the area (hectare) and the length of the line (meter).
These data are displayed in the lower-left corner on the screen.
You have the opportunity to select from 3 basic measurement ways. The only different
between these ways is the manner of placing them on the view.
1. Measure – general measure
Lay the vertex with pointing or dragging your stylus on the view. When you drag your stylus,
the marking crosses appear and using this solution can effect a more precise, detailed
determination of the position.
DETERMINE THE DISTANCE OF TWO POINTS OF THE BUDAPEST ILLUSTRATED POLYGON OF
THE „COUNTY.MAP” LAYER, PLACING THE VERTEX LINKING THE POLYGON AS THE PICTURE
SHOWS BELOW.
Open „Hungary.exp” sample file and zoom in the Budapest illustrated polygon.
V5.8.3.20.
31. pages / 64
4/21/2008
DigiTerra Explorer v5 ®
User Guide © Copyright 1996-2008, DigiTerra Ltd.
_____________________________________________________________________________________________________________________________________________________________________________________
Select from the tools the „Measure” tool, and lay the first vertex at the west side and the
second vertex at the east side of the polygon, as the picture shows below. In case the vertex
really links the polygon, its outline turns red. To lay the vertex using the marking crosses, lay
the first vertex and drag your stylus with a strong-willed movement on the screen, so the
marking crosses will be activated.
You can see the measurement data (area-hectare; length-meter) in the lower-right corner on
the screen. You only can measure an area if you lay at least 3 vertices that determine a twodimensional figure on the screen. To see the geometric data of the distance measurement, tap
and hold your stylus on the screen and from the appearing window select „Finish”.
DETERMINE THE POSITION OF A POINT OF THE BUDAPEST ILLUSTRATED POLYGON OF THE
„MEGYE.MAP” LAYER, PLACING THE VERTEX NEAR THE NORTHEAST SIDE OF THE POLYGON AS
THE PICTURE SHOWS BELOW.
Determination of two points on the
Budapest illustrated polygon
1.
Appearing window, select „Finish”
menupoint
Finish measurement, show
geometric data.
Take the first point of the previous measurement.
2.
Select the „Measure” tool and lay the vertex near the northeast side of the polygon. To
lay the vertex using the marking crosses, lay the first vertex and drag your stylus with a
strong-willed movement on the screen, so the marking crosses will be activated.
3.
To see the geometric data of the measurement, tap and hold your stylus on the screen
and select „Finish” from the appearing menu.
V5.8.3.20.
32. pages / 64
4/21/2008
DigiTerra Explorer v5 ®
User Guide © Copyright 1996-2008, DigiTerra Ltd.
_____________________________________________________________________________________________________________________________________________________________________________________
Lay a vertex to determine the
position of the point
Appearing window, select
„Position” option
Finish measurement, show geometric
data.
2. Free measure
Lay vertices with pointing or dragging your stylus (freehand drawing) on the view. It is
suggested to use the free measurement if we quickly need some kind of information about
data of area, perimeter or distance.
To measure an area you have to make the same steps as in case of „Determine the position of
a point” or „Determine the distance of 2 points” operations.
Correct the measurement
To correct the vertex that is not in the right position: tap and hold your stylus on the screen
and from the appearing window select „Back”. (At the PC version simple push backspace).
The vertex will disappear from the screen. To start a new measurement tap and hold your
stylus on the screen and from the appearing menu select „Restart”.
3. Radius measure
To determine the distance using radius measurement you have to lay center and endpoint.
Determine the distance of two points using „Radius measurement” on an empty view.
1.
Create an empty view than select „Radius measure” from the menu.
2.
Tap and drag your stylus straightforward, the radius, as the distance will appear.
3.
Take away the stylus from the screen. The geometric data will appear right away on
the screen.
2.3.10 Draw and edit a map
By editing a map we create new vector views. The full geometric content is built up as
objects, from points, lines and areas. Because of the open datasources we can save the files in
the selected fileformat (the selected format has to be able to store vector and attributes file.)
There are two ways to create a view:
V5.8.3.20.
33. pages / 64
4/21/2008
DigiTerra Explorer v5 ®
User Guide © Copyright 1996-2008, DigiTerra Ltd.
_____________________________________________________________________________________________________________________________________________________________________________________
1. Drawing and editing on the screen
2. GPS surveying
The attribute of the geometric items can be found on the „Record” panel on the primary
datatables – after the creation of the geometric object.
2.3.10.1 Map settings
Before creating new vector files, first we have to set the precision of the geometric items. On
the „Settings” panel select from the drop list the „Map precision” menupoint the wanted
precision. These settings get stored in the database of the Windows registration, therefore the
program loads with the new values when you restart. The deafult map precision setting is:
„Projected: 1 dm”.
Map precision settings:
•
•
•
•
•
•
•
•
Projected: 1 m projected coordinates, precision is 1 meter.
Projected: 1 dm projected coordinates, precision is 1 decimeter (0.1 meter).
Projected: 1 cm projected coordinates, precision is 1 centimeter (0.01 meter).
Projected: 1 mm projected coordinates, precision is 1 millimeter (0.001 meter).
Geographic: 10 m geographic coordinates, precision is 10 meters.
Geographic: 1 m geographic coordinates, precision is 1 meter.
Geographic: 1 dm geographic coordinates, precision is 1 decimeter (0.1 meter).
Geographic: 1 cm geographic coordinates, precision is 1 centimeter (0.01 meter).
To be able to use link the new object to a point, a line or a breakpoint, before starting the
editing on the screen, the „Information”
icon has to be marked in the square of the selected
layer (that layer that will link the edited object) on the „Layer settings” panel. When the
setting was successful, the outline of the selected object turns red. DigiTerra Explorer does
not handle topology, therefore the link does not happen by topological way either.
To create the new vector layers the primary datatables are created by the default set datafields.
There is the possibility to form this primary datatable using a table template or customizing
the datatable, see the Attribute handling Chapter.
2.3.10.2 Draw and edit a new map
Draw a new map means draw point, line and area type files. Laying draw items on the view
can happen graphically, drawing and editing on the screen or using GPS survey.
After creating graphic objects, we have to give their records.
THE „RECORD” PANEL (BY DEFAULT) APPEARS AUTOMATICALLY WHEN FINISHED DRAWING
THE GRAPHIC OBJECT. TO DISPLAY THIS PANEL OPTIONAL, YOU HAVE TO SET IT ON THE
„SETTINGS” PANEL.
As mentioned before, the records are the data of the primary datatable. When creating a new
draw item, the program simultaneously records its „ID” (identification number) in the primary
datatable. By default, the program fills out with the same values of the new object’s datafields
V5.8.3.20.
34. pages / 64
4/21/2008
DigiTerra Explorer v5 ®
User Guide © Copyright 1996-2008, DigiTerra Ltd.
_____________________________________________________________________________________________________________________________________________________________________________________
as the previous record’s datafields. To save different data as the default data, you can use
datatable template(s) or it has to be set manually. For further information using table
templates see the „Attribute settings” chapter. Recording the data can happen by manually
typing the values - using the keyboard – or in case of encoded fields, using the decoded - by
the code dictionary -values.
In the PC version, during editing an object on the view, we can make movements using the
„hot keys” as follows:
Arrows: make a half screen size offset
Number „1” and 2”: zoom in/out
Space: place the cursor in the middle of the screen
2.3.10.2.1 Creating points
Creating a point can happen by giving the projected or geometric position of the point, and
encode the primary datatable. To record different data besides the data stored in the primary
datatable, add new datafields, or on the new datatable create related fields. For further
information about the related datafields see the „Attribute handling” chapter.
The connection between the primary datatable and the view can
be made through a „linked field”. In this case, to record the data
happens as you see below:
1. When creating a new draw item, simultaneously we record
the primary data on the „Record” panel in Record view.
2. Record further data in „Related view” on the „Record” panel.
Geometric editing of the points:
Create Point: creates a new point
Delete: delete points and its records one at a time
Move entity: select an object and move it
Edit vertex: acquires the EOV co-ordinates of the point and / or
places the point to a position determined by its co-ordinates
Insert vertex: after selecting the point, using this tool, a block
can be built up from the points
Remove vertex: this tool deletes the selected point, or the points
of the block one-by-one
Undoes the last action
Turn on the normation acquire
switch
Insert / remove points on the screen
1.
Create a new (empty) map using its
2.
Tap your stylus the „Create new layer”
icon and add an
empty layer to the view. Set the name and the saving path
of the view on the panel. The name of the file by default
settings of the operation system is „date-hour-minute-sec.”
V5.8.3.20.
icon
35. pages / 64
Delete point
4/21/2008
DigiTerra Explorer v5 ®
User Guide © Copyright 1996-2008, DigiTerra Ltd.
_____________________________________________________________________________________________________________________________________________________________________________________
and its file format is „map”. In case you select a different vector file format, the object
will be created directly in the selected format (for ex. Shape.shp.)
3.
4.
5.
Tap your stylus the „Create New Point”
icon – the tool turns active – than touch the
screen to add a point. To place a point precisely you can use the „marking crosses”
dragging your stylus on the screen.
After creating the point the „Record” panel appears
automatically (by default), and you have the possibility to
save the records of this point in the primary datatable.
To remove the point tap your stylus the „Erase entity”
icon, than the point you want to delete. Before remove it
permanently, a window appears asking if you really want
to delete this item, or not. You are only able to erase the
point within the limited interval if on the „Layer settings”
„Information tool is turned on. In case more
panel the
layers are open at the same time, and near the selected
object are more geometry within the limited interval, it is
practical to take out the
of the other layers.
sign from the square in front
Create Point by EOV co-ordinates
1.
Create a new (empty) map using its
2.
Tap your stylus the „Create new layer”
icon and add
an empty layer to the view. Set the name and the saving
path of the view on the panel. The name of the file by
default settings of the operation system is „date-hourminute-sec.” and its file format is „map”. In case you
select a different vector file format, the object will be
created directly in the selected format (for ex. Shape.shp.)
3.
icon, than
Tap your stylus the „Create New Point”
touch the screen to add a point. To place a point precisely you can use the „marking
crosses” dragging your stylus on the screen.
4.
Tap your stylus the „Edit vertices”
icon, than tap and
hold your stylus on the point. In the appearing window
enter the new East and North co-ordinates, than tap the
„Modify” menu point. On account of this step, the point
will be placed in the given EOV position. When you
select the „Delete” button, the point will be erased.
2.3.10.2.2
icon
Draw lines
Draw line object, we have to lay the vertex and the endpoint of
the line and we have to encode the attribute of the primary
V5.8.3.20.
36. pages / 64
4/21/2008
DigiTerra Explorer v5 ®
User Guide © Copyright 1996-2008, DigiTerra Ltd.
_____________________________________________________________________________________________________________________________________________________________________________________
datatable. To record further data beside the records in the primary datatable, we have to add
new datafields or create linked fields in a new datatable (the linked fields develop the contact
between the primary datatable and the view).
When drawing line/s creating links happens within the limited interval (8 pixel). The program
within the limited interval links to the nearest vertex or meeting-point, in case does not find
such a point, than links to a line, if there is no line either than links to the uppermost polygon
among the layers. You are only able to link within the limited interval if the
„Information
tool is on. Order of the linking: within the editable limited interval to a vertex, if there is none,
than to a line, if there is no line founded than to the uppermost polygon among the layers, but
if neither a polygon can be found, than places the vertex to the right position, without linking
to anything.
Geometric editing of the lines:
Draw lines: creates new lines
Delete: deletes lines, polyline and there’s records one at a time
Move entity: select an object and move it
Edit vertex: acquires the EOV co-ordinates of the vertex and / or places the vertex to a
position determined by the co-ordinates
Insert vertex: using this tool after selecting the line, new vertex can be added on the line,
polyline or beside the line, beyond the endpoint as the continuation of the line
Remove vertex: this tool deletes the vertices of the selected line, polyline one-by-one
Draw free lines
There is only one difference between draw lines and draw free
lines: using the „Draw free lines” option is equal to the free
icon and drag
hand drawing. Select the „Draw free lines”
your stylus as if you were drawing by free hand. Tap and hold
the stylus on the screen, a window will appear, from its menu
select „Create” button.
Draw and remove lines
icon
1.
Create a new (empty) map using its
2.
Tap your stylus the „Create new layer”
icon and add
an empty layer to the view. Set the name and the saving
path of the view on the panel. The name of the file by
default settings of the operation system is „date-hourminute-sec.” and its file format is „map”. In case you
select a different vector file format, the object will be
created directly in the selected format (for ex. Shape.shp)
3.
Tap your stylus the „Draw lines”
icon, than touch the
screen to add a vertex. To place a vertex precisely you can
use the „marking crosses” dragging your stylus on the
screen. Tap and hold the stylus on the screen a window
will appear, from its menu select „Create” button. To
remove vertices from the same menu select „Back” or use
V5.8.3.20.
37. pages / 64
4/21/2008
DigiTerra Explorer v5 ®
User Guide © Copyright 1996-2008, DigiTerra Ltd.
_____________________________________________________________________________________________________________________________________________________________________________________
4.
5.
Backspace on the keyboard. If you select „Restart” you can start on creating your new
object.
After creating the line the „Record” panel appears automatically (by default), and you
have the possibility to save the records of this line in the primary datatable.
To remove the line one-by-one tap your stylus the „Erase entity”
icon, than the line
you want to delete. Before remove it permanently, a window appears asking if you
really want to delete this item, or not. You are only able to erase the line within the
limited interval if on the „Layer settings” panel the
„Information tool is on. In case
more layers are open at the same time, and near the selected object are more geometry
within the limited interval, it is practical to take out the
of the other layers.
sign from the square in front
Edit the vertices of the line on the screen
Follow the first 3 steps of the previous point, create a polygon from optional number of
vertices.
1.
2.
Tap your stylus the „Edit”
icon, than the polygon. This function will mark off all the
vertices of the polygon.
You can edit a vertex dragging the vertex with your stylus, or when you tap and hold the
stylus on the vertex in the appearing window („Available vertex”) enter the EOV coordinates. To insert a vertex you can use the „Insert vertex”
„Remove vertex”
icon, to delete the
icon.
WHEN MODIFY THE VERTEX, THE GEOMETRIC LENGTH -AS A RECORD- AUTOMATICALLY
CHANGES.
2.3.10.2.3
Create area drawing on the screen
Create an area means, lay vertices and encode the data of the primary datatable. Handling the
attribute and laying vertices (snapped) happens the same way as in case of a line or a point.
Geometric editing of the area:
Create area: creates new area
Delete: deletes areas it’s records one at a time
Move entity: select an object and move it
Edit vertex: acquires the EOV co-ordinates of the vertex and / or places the vertex to a
position determined by the co-ordinates
Insert vertex: using this tool after selecting the line, new vertex can be added on the line,
polyline or beside the line, beyond the endpoint as the continuation of the line
Remove vertex: this tool deletes the vertices of the selected line, polyline one-by-one
Free areas
There is only one different between create area or draw free areas: using the „Draw free
areas” option is equal to the free hand drawing. Select the „Draw free areas”
icon and drag
your stylus as if you were drawing by free hand. Tap and hold the stylus on the screen, a
window will appear, from its menu select „Create” button.
V5.8.3.20.
38. pages / 64
4/21/2008
DigiTerra Explorer v5 ®
User Guide © Copyright 1996-2008, DigiTerra Ltd.
_____________________________________________________________________________________________________________________________________________________________________________________
Create rectangle
The rectangle is the same type of object as the area. There are 2 ways to create it:
Tap: By the first tap the upper-left endpoint will be laid, the second tap lays the opposite
endpoint and shapes the rectangle.
Draw: Tap and drag your stylus (as if you were dragging the lower-right endpoint) simple
draws the rectangle.
Draw circle
The circle is the same type of object as the area. There are 2 ways to draw it:
Tap: First tap lays the central point of the circle, the second tap creates the endpoint on the
outline of the circle. The distance of these two points is the radius of the circle.
Draw: Tap and drag your stylus simple draw the circle.
Draw ellipse
The ellipse is the same type of object as the area. There are 2 ways to draw it:
Tap: First tap lays the central point of the ellipse, the second tap creates the endpoint on the
outline of the ellipse.
Draw: Tap and drag your stylus simple draw the ellipse.
Create / delete areas on the screen
1.
Create a new (empty) map using the
icon.
2.
icon and add an empty layer to the view. Set
Tap your stylus the „Create new layer”
the name and the saving path of the view on the panel. The name of the file by default
settings of the operation system is „date-hour-minute-sec.” and its file format is „map”.
In case you select a different vector file format, the object will be created directly in the
selected format (for ex. Shape.shp)
3.
Tap your stylus the „Create area”
icon, than touch the screen to lay vertices. To
place vertices precisely you can use the „marking crosses” dragging your stylus on the
screen. Tap and hold the stylus on the screen a window will appear, from its menu select
„Create” button. To remove vertices from the same menu select „Back” or use
Backspace on the keyboard. If you select „Restart” you can start on creating your new
object.
4.
After creating the line the „Record” panel appears automatically (by default), and you
have the possibility to save the records of this line in the primary datatable.
5.
To remove the area tap your stylus the „Erase entity”
icon, than the area you want to
delete. Before remove it permanently, a window appears asking if you really want to
delete this item, or not. You are only able to erase the area within the limited interval if
„Information tool is on. In case more layers are
on the „Layer settings” panel the
open at the same time, and near the selected object are more geometry within the limited
interval, it is practical to take out the
layers.
V5.8.3.20.
sign from the square in front of the other
39. pages / 64
4/21/2008
DigiTerra Explorer v5 ®
User Guide © Copyright 1996-2008, DigiTerra Ltd.
_____________________________________________________________________________________________________________________________________________________________________________________
Create area inside another area (polygon in polygon)
1.
Create new (empty) map using its
icon.
2.
icon and add an empty layer to the view. Set
Tap your stylus the „Create new layer”
the name and the saving path of the view on the panel. The name of the file by default
settings of the operation system is „date-hour-minute-sec.” and its file format is „map”.
In case you select a different vector file format, the object will be created directly in the
selected format (for ex. Shape.shp)
3.
Tap your stylus the „Create area”
icon, than touch the screen to lay vertices. To
place a vertex precisely you can use the „marking crosses” dragging your stylus on the
screen.
4.
If you laid all the vertices of the area that will be outside, tap and hold the stylus on the
screen, a window will appear, from its menu select the „New part” button, to be able to
lay vertices inside the area. To delete the last vertex from the same menu select „Back”
or use Backspace on the keyboard. If you select „Restart” you can start on creating your
new object.
5.
After laid the vertices of the polygon that is inside, tap and hold your stylus, from the
appearing window select „Create” menu to create the polygon.
6.
After creating the line the „Record” panel appears automatically (by default), and you
have the possibility to save the records of this line in the primary datatable. The data that
can be recorded (the area of the object) in this case is the area of the outside polygon
reduced with the area of the inside polygon.
Modify the vertices of an area
It happens the same way as to modify the vertices of a line
WHEN MODIFY THE VERTEX OF AN AREA, THE GEOMETRIC LENGTH-AS A RECORDAUTOMATICALLY CHANGES.
2.3.10.3 Edit an existing vector map
Editing the existing vector map:
Delete: deletes the area and its record one at a time
Move entity: select an object and move it
Edit vertex: acquires the EOV co-ordinates of the vertex and / or places the vertex to a
position determined by the co-ordinates
Insert vertex: using this tool after selecting the line, new vertex can be laid on the line,
polyline or beside the line, beyond the endpoint as the continuation of the line
Remove vertex: this tool deletes the vertices of the selected line, polyline one-by-one
V5.8.3.20.
40. pages / 64
4/21/2008
DigiTerra Explorer v5 ®
User Guide © Copyright 1996-2008, DigiTerra Ltd.
_____________________________________________________________________________________________________________________________________________________________________________________
The previous chapter contents all details how to use these operations!
2.4 To export and import a map, the supported formats
Due to the program’s data integration facility, data processing happens in original data
formats without any conversion.
The open datasource gives the possibility to display without conversion an ESRI Shape,
MIF/MID format, or even work directly in any vector formats of numerous geoinformation
system.
The 2.3 chapter details all the supported formats. The list about the supported formats:
Vector files: BNA, DAT DXF, LOG, MAP, MIF, SHP
Atlas Boundary (*.BNA)
Co-ordinate file (*.TXT, *DAT, *.XYZ)
Leica GS20 export file (*.TXT)
Autodesk R12 DXF (*.DXF)
Trimble GPS log file (*.LOG)
MGL-30 NMEA logger GPS log file (*.LOG)
Berty GPS log file (*.LOG)
Magellan GPS Track log file (*.LOG)
Magellan GPS Waypoint log file (*.LOG)
RoyalTek BlueGPS log file (*.LOG)
SR33 GPS log file (*.LOG)
DigiTerra Explorer GPS log file (*.LOG)
DigiTerra Map (*.MAP)
Mapinfo MIF/MID (*.MIF)
ESRI Shape (*.SHP)
ITR ASCII data exchange format (*.ITR)
DAT data exchange format (*. DAT)
Datatables: DBF, TAB, TXT
dBASE (*.DBF)
DigiTerra TAB (*.TAB)
Text file (*.TXT)
Raster files: BIL, BMP, ECW, ERS, JPG, LAN, PCX, TIF
ESRI BIL (*.BIL)
Windows bit picture (*.BMP)
ERS Compressed Wavelet (*.ECW)
ER-Mapper raster (*.ERS)
JPEG format (*.JPG, *.JPEG)
JPEG 2000 format (*.JP2)
ERDAS 7.x raster (*.LAN)
ZSoft Paintbrush (*.PCX)
Tagged Image File Format (*.TIF, *. TIFF)
V5.8.3.20.
41. pages / 64
4/21/2008
DigiTerra Explorer v5 ®
User Guide © Copyright 1996-2008, DigiTerra Ltd.
_____________________________________________________________________________________________________________________________________________________________________________________
2.4.1 Export
Export means saving the active layer in another file format. The function can be reached from
the „Layer settings” panel, „Save as….”
filetype the layer can be saved.
icon. After selecting the desired name and
1. Tap the „Add new layer(s)” icon
(you can also use on the „Layers” panel the
push-button) and find the „county.map” layer (following the sample file path) then add
to the view.
2. Tap the„ Layers” icon
(In case you used the
still open you can skip this step)
button and the „Layers” panel is
icon.
3. Set active the „county” layer (select) and point your stylus to the „Save as…”
After selected the file type (export format), the layer can be saved in the desired format.
(To save the layer under another name, enter the file name than tap OK.)
2.4.2 Import
Loading the text co-ordinate files (*.TXT, *.DAT, *.XYZ) as a layer, vector point map can be
developed by the EOV co-ordinates of the text file. To display the points, load the text files as
a layer, than on the „Layers” panel tap the „Source”
icon, in the appearing window you
can set the X,Y co-ordinates of the point from the drop list of the „X position field” and the
„Y position field”.
2.5 Handling attribute
In the software, there is a built-in data structure management subsystem. This system is able
to do the following data management tasks, by self-supporting
• edit datafields
• create new datatable
• link datatables by a selected datafield
• save new record, delete record
• data input
• sort data records
• filter data records
• search data
• display the geometric data of the object on basis its data in the primary datatable
• display the object on the screen on basis its data in the primary datatable
• display geometric data on basis the primary datatable
• export records to Text file (*.TXT), Excel file (*.XLS), Report file (*.HTM)
• use data collector template
V5.8.3.20.
42. pages / 64
4/21/2008
DigiTerra Explorer v5 ®
User Guide © Copyright 1996-2008, DigiTerra Ltd.
_____________________________________________________________________________________________________________________________________________________________________________________
You can create contact with the geometrical data through the primary datatable. The
geoinformation data management takes place only in the primary datatable. To query further
datatables linked to the primary datatable happens by related database management. That
means that only those records will be processed, which data -in the related fields-are equal.
Through the map data relation, the record can be traced back to the object on a map using the
„Show object on the map” operation.
You can reach the record of the map objects using the „Information”
chapter 2.5.2 Display information)
function. (See
There are two ways to display records
Displaying the records of an object on the view (max. 16 datafields can be displayed)
Displaying the datatable records on the „Record” panel
A, In record view
B, In relation view
The data records can be selected on the
„Record panel” by using the horizontal
scrollbar, the datatables can be selected
from the drop list of the menu. To edit the
datafield tap the name of the field, to edit
value tap the value. To finish editing
fields and records tap OK, or use Enter
on the keyboard. In case the name of the
field in the Code dictionary and in the
attribute is completely equal, than tap the
value automatically displays the value of
the datafields, which consist the listed
codes of the Code dictionary.
2.5.1 Edit datafields
The first step to create a database is to develop the data structure of the datatables. Editing
datatables is a very important task to be able to solve efficiently data collection in the field.
Steps of the data structure planning
1.
2.
3.
4.
create datatable
create datafields
set the datafields type
set the records of the datafields
Create the primary datatable, set the type and properties of the datafields
Open the program and create a new layer under „Measurement in the field” name tapping the
„Create new layer”
icon. Enter the saving path of the layer than tap OK. This layer as an
active layer will be displayed on the „Layer settings” panel. After created the geometric object
the Measurement in the field.map and the Measurement in the field.tab files will be created
automatically.
V5.8.3.20.
43. pages / 64
4/21/2008
DigiTerra Explorer v5 ®
User Guide © Copyright 1996-2008, DigiTerra Ltd.
_____________________________________________________________________________________________________________________________________________________________________________________
1.
Tap the „Display data records”
icon, and create the following datafields as you tap
the datafields one by one. To set the properties in the ID datafields, tap „ID” than set:
Name: ID
Type: Short, integer (2)
Default: Increment last value
Rule: None
2.
Create the following datafield:
Name: area
Type: Float (4)
Decimal places: 4
Default: Area of Geometry HA
Rule: Read only
The datafield stores the area of the geometry (HA) with 4 decimal precision, this value cannot
be modified
3.
Create the following field:
Name: Perim of Geometry
Type: Float (4)
Decimals places: 2
Default: Perim of Geometry
Rule: Read only
The datafield stores the perimeter of the geometry (m) with 2 decimals precision, this value
can not be modified
4.
Create the following field:
Name: Label
Type: Text (N)
Default: Zero
Rule: None
This datafield stores the labels of the created objects.
5.
Create the following field:
Name: Date
Type: Date (4)
Default: Creation time
Rule: Read only
This datafield stores the date of the created object, this value cannot be modified. After
created the datafields, close the „Record” panel.
Create an area, than on the „Record” panel set its „ID” value for „1”. The default values of
every further created geometry will be stored in the primary datatable. In our example, the
only datafield that has to be set manually is the „Label” field.
NEW DATATABLE CAN BE CREATED BY THE „CREATE NEW LAYER”
ICON.
2.5.2 Using datatable template
The datatable templates store datatable structures stored in files:
V5.8.3.20.
44. pages / 64
4/21/2008
DigiTerra Explorer v5 ®
User Guide © Copyright 1996-2008, DigiTerra Ltd.
_____________________________________________________________________________________________________________________________________________________________________________________
•
•
•
•
•
•
Field Name
Field Type
Width
Number of decimals
Default
Rule
Using template
1.
Effect the first 6 points of the previous task (2.7.1 Create the primary datatable, set the
types and the properties of the datafields), than tap the
icon on the „Layer settings”
panel and save the layer as an empty datatable template in *.MAP format. Close the
panel. The datatable templates can be the following file formats:
MAP
SHP
TXT
DBF
2.
Tap your stylus the „Map options, settings”
icon than tap the „Record” button. Enter
or select (Tap default datatable and select) the path of the created template, than tap OK.
3.
Create a new (empty) view, or quit and restart the program, to finish the settings of the
datatable template.
4.
Create a new layer by the
icon and draw a new entity. The datatable structure of the
entity will be created by the sample of the previously set datatable template.
2.5.3 Link datatables
There are two ways to load and make the relation of existing datatables:
Manually: in case we make a query of the record without its view, we have to load the
datatables manually and we have to make the relation
Automatically: in case we open the record panel from the view (Information
icon) or we
open the record panel through a loaded view, the datatables of the actual layer will load
automatically.
DigiTerra Explorer v5 software is able to link an external datatable to the selected layer
through a related field. The datatable relation saves automatically.
Link datatable to the primary datatable of the layer
1.
Load the layer form the „Layer settings” panel, to which you want to link external
datatable.
2.
Display the datatable which you would like to link to the layer.
3.
To be able to make the relation the primary datatable of the layer and datatable you
want to link, they have to have a datafield that is equal (name, type of the datafield)
4.
On the "Layers" panel set active the layer you want to link
V5.8.3.20.
45. pages / 64
4/21/2008
DigiTerra Explorer v5 ®
User Guide © Copyright 1996-2008, DigiTerra Ltd.
_____________________________________________________________________________________________________________________________________________________________________________________
5.
Tap the „Source”
icon and select from the drop list of the „Related field” that links
the loaded datatable to the layer, than tap OK.
6.
Open the „Record” panel and tap your stylus the „Menu” button and select „Related
view”. In the „Related view” the program displays in editable tree structure the datafields of
the layer, and the records and the datafields of the linked datatable.
7.
Tap the „Information”
icon and tap an object to display its records in „Related
view”
8.
To save the datatable relation save the view.
IN CASE DATATABLE RELATION THE RECORDS CAN BE DISPLAYED IN THE „RECORD VIEW”.
ONE LAYER CAN BE LINKED TO ONE DATATABLE ONLY! IF YOU WANT TO LINK FURTHER
DATATABLES, YOU CAN DO THIS THROUGH A RELATION FIELD.
2.5.4 Create new record
By using this function you can add a new record to the datatable concerning its datafields
settings, which means, that the new record will be created by the default settings.
To create new record, open „Record” panel and show your stylus the „Menu” button, than
select the „New record” option.
CREATING A NEW GEOMETRY, THE NEW RECORD WILL BE ADDED AUTOMATICALLY TO THE
PRIMARY DATATABLE. DO NOT CREATE MANUALLY A NEW RECORD ON THE PRIMARY
DATATABLE!
2.5.5 Delete record(s)
By using this function you can delete records from the datatable, one by one. Deleting record
from the primary datatable deletes the geometry, because the primary datatable is in one-inone relation with the records of the geometry.
To delete record(s) open the „Record” panel, using the scrollbar select the record you would
like to delete, than tap „Menu” button and from the list select the ”Delete record” option. To
delete all records on the datatable open the „Record” panel, tap the„Menu” button and from
the list select the „Delete all records” option. Delete all record from the primary datatable
deletes all geometry, because the primary datatable is in one-in-one relation with the records
of the geometry.
2.5.6 Enter data
To enter data you can use the keyboard or it can happen with selection from the Code list of
the Code dictionary. When using keyboard the program stores and displays the characters you
entered.
V5.8.3.20.
46. pages / 64
4/21/2008
DigiTerra Explorer v5 ®
User Guide © Copyright 1996-2008, DigiTerra Ltd.
_____________________________________________________________________________________________________________________________________________________________________________________
To select the Code values from the automatically appearing code list tap the stylus the
”Value” column. In case of a specification list tapping the item in the list, the code value will
be filled in the cell automatically. In the datatable will be stored the code value, that will be
displayed decoded by the Code dictionary. Using the „Record” panel there is the possibility to
copy the decoded datatable to the clipboard and to export it, in case we need the decoded
value. The function is in the menu of the „Record” panel.
To edit the codes, find attached the header of the General.cdt Code dictionary, which explains
in details how to edit codes. This General.cdt is a simple text file that can be edited in a word
processing program. This file has to be placed near the Dtexp.exe file in the installation
directory of the program.
In case you made any changes in the General.cdt file, you have to restart the program to take
effect the changes.
Code Dictionary CDT for DigiTerra Map and Explorer softwares.
Made by: Digiterra Ltd. 1996-2007. All rights reserved.
Please do not modify the codes, even do not delete any of it!
To create new codes please previously check with us.
The names and the labels of the field can be modified optional.
Enter the name of the fields after the ’#’ or ’$’ signs in the row.
The fields name cannot contain space, dot and comma characters.
The program cuts the numerical characters in the name.
More fields name can be added separating them by comma.
The ’#’ sign defines a numerical, the „$’ sign a text codeset.
In the rows after the names are the codes.
The set-up of the code: code name (description) (color) (type)
Tabs separate the items. The last three items can be left.
The order of the description, the color and the type is optional.
You have to start the description with an alphabetical, the color 0x, the
type with numerical characters.
The specification will be closed by an empty row, or a row that does not
start with numerical value.
Until the next ’#’ or ’$’ signs optional comments can be placed.
2.5.7 Sort the records
We can sort the records by three datafields, in descending or
ascending order. To sort, open „Record” panel, tap the menu
button, and select from the list the „Sort” option. To clear the
sort conditions, select the „Clear sorting conditions” button on
the panel.
V5.8.3.20.
47. pages / 64
4/21/2008
DigiTerra Explorer v5 ®
User Guide © Copyright 1996-2008, DigiTerra Ltd.
_____________________________________________________________________________________________________________________________________________________________________________________
2.5.8 Filter
The datatable records can be filtered by conditions. Set the filter
condition on the „Edit Filter” panel. We can filter in the selected
datatable by 3 datafields. The filter conditions of the primary
datatable filter all geometries too, because the primary datatable
is in one-in-one relation with the records of the geometry. Using
this function to display the geometry or the subset of the
geometry items can be conditioned.
To filter records, on the „Record” panel select a datatable you
want to filter, than tap your stylus the „Menu” button and select
from the list the „Filter” option. To delete the filter conditions
select „Delete the filter conditions” option from the list.
2.5.9 Show on map the object
In case the datatable links to the geometry records by the primary datatable, the selected
object can be displayed on the view.
Select the datatable on the „Record” panel of a geometry of that records you want to display
on the view, than select a record and tap your stylus the menu button on the „Record” panel.
Select from the list the „Show on map” option. The geometry of the selected record will be
displayed in the middle of the view.
WHEN USING THE „SHOW ON MAP FUNCTION” WE SUGGEST
TO SET THE SIZE (ZOOM IN / OUT) TO THE ELIGIBLE MEASURE
RATE, AND ALSO TAKE INTO CONSIDERATION THE SETTINGS OF
THE DISPLAYING MEASURE RATE INTERVAL.
2.5.10 Show geometry by the primary datatable
To display the geometry of a record can happen through its
primary datatable.
To use this function, select the datatable of the geometry you
want to display, select a record, tap the menu on the „Record”
panel and select from the list the „Geometry” option. The
appearing window displays the records of the geometry.
2.5.11 Import and export records, supported formats
Due to the program’s data integration facility, data processing happens in original data
formats without any conversion.
The open datasource gives the possibility to load without any import dBASE, DigiTerra TAB
or Textfiles formats, or even work directly in any of these formats.
V5.8.3.20.
48. pages / 64
4/21/2008
DigiTerra Explorer v5 ®
User Guide © Copyright 1996-2008, DigiTerra Ltd.
_____________________________________________________________________________________________________________________________________________________________________________________
Record formats:
Datatables: DBF, TAB, TXT
dBASE (*.DBF)
DigiTerra TAB (*.TAB)
Textfile (*.TXT)
There are 2 ways to export a record:
1. By the „Menu/Export” option on the „Record” panel
2. Using the „Save as..”
icon on the „Layers” panel
1.
To use this function open the „Record” panel, select a datatable, of which records you
want to export, tap the „Menu” button, and select from the drop list the “Export” option. The
program saves the datatable in the selected file format.
2.
To save / export the primary datatable under another name, tap the „Add layer”
icon, and to save the displayed layer in the selected file format tap the „Save as..”
icon.
TO COPY THE SELECTED RECORD TO THE CLIPBOARD, FROM THE DROP LIST OF THE MENU
SELECT THE „COPY” OPTION.
2.6 GPS survey
The GPS survey creates point, line, area type geometry alike the „Draw map layer”. To
determine the position of a point, or vertices of a polyline or area, the GPS survey uses the
records of the satellite determination GPS position, instead of editing on the screen by the
stylus or the cursor. This way the geometry that comes into effect this way is fully equal to the
vector type objects created by drawing. In this chapter we review the settings and the methods
of the GPS survey. Before you read this chapter, we suggest you to revise the whole User
Guide.
2.6.1 GPS settings
At the GPS settings you can set the parameters of the GPS position displaying-recording and
the data transmission between the GPS and the PC. To set the parameters tap the „GPS state”
icon. There is the „Settings” button on the button of the appearing „GPS State” panel,
select it and set the parameters. Tap OK to save the settings in the registration database of
Windows. Every time of making any changes in the settings, tapping OK the program
reconnects to the GPS receiver.
Settings of the GPS displaying-recording
• Projection
• Display
• PDOP limit
• DGPS position only
• SNR limit
• 3D position only
V5.8.3.20.
49. pages / 64
4/21/2008
DigiTerra Explorer v5 ®
User Guide © Copyright 1996-2008, DigiTerra Ltd.
_____________________________________________________________________________________________________________________________________________________________________________________
Settings for the data transmission between the GPS-PC
• Port
• Parity
• Baud
• Databits
• Stopbits
Connect the PC to the appliance you use for surveying before you start GPS survey. Only
those GPS appliances can be used with this program, that are able to forward the position
records determined by the GPS, through NMEA 0183 GPS protocol. The settings concerning
the data transmission between the GPS-PC, has to be set only once. In case you connect
through a new GPS appliance from the program during the survey, the settings have to be
renewed. To set some parameters regarding the data transmission, you can find information in
the technical support guide of the GPS appliance.
The program reads and transforms to the selected projection systems in real time the NMEA0183 sentence from the GPS appliance. The position displays on the screen, according to the
position displaying settings. To display the position when static (Stand) use the icon, when
icon.
move use the
The precision of the GPS surveys is pliant by the filter conditions regarding the recorded GPS
position. The software takes the precision of the GPS as a basis (for example the GPS
appliance nominally is able to position sub-meter accuracy), but this precision will not always
be proved to cm precision during the survey due to several external factors. (The satellite
geometry suddenly changes; horizon limitation comes up; in case of the termination of the
GPS differential correction; suddenly descending numbers of the satellites in view…etc.)
These factors can be eliminated from the survey when using filters.
The settings of the PDOP limit is by default 12, the suggested value when surveying is
between 3-6, when there is no information in the technical guide regarding the PDOP limit.
The determination of the position will not be under processing until the PDOP value is over
the value that was set.
V5.8.3.20.
50. pages / 64
4/21/2008
DigiTerra Explorer v5 ®
User Guide © Copyright 1996-2008, DigiTerra Ltd.
_____________________________________________________________________________________________________________________________________________________________________________________
In case of using a GPS appliance that is able to receive for ex. WAAS/EGNOS GPS
correction, we suggest to use the „DGPS position only” filter condition. While there is no
GPS correction when positioning, any data received from the GPS will not be under
processing, that means that the surveying is suspended while there is no DGPS correction.
We suggest to use the „ 3D position only” filter conditions to position, if there are at least 4
satellites in view. If there are lass than 4 satellites, any data received from the GPS will not be
under processing.
Optional settings: A sound signal when the GPS position is recorded:
Record: sounds a low beep
Record failure: sounds a high beep
2.6.2 Set Custom projection
At the GPS settings you can set the parameters of the GPS position displaying-recording and
the data transmission between the GPS and the PC. To set the parameters tap the „GPS state”
icon. There is the „Settings” button on the button of the appearing „GPS State” panel. Tap
the Setting button and tap the Projection Drop list then select the “Custom projection” option
and set the parameters. Tap OK to save the settings in the registration database of the
Windows. Every time of making any changes in the settings, tapping OK the program
reconnects to the GPS receiver.
V5.8.3.20.
51. pages / 64
4/21/2008
DigiTerra Explorer v5 ®
User Guide © Copyright 1996-2008, DigiTerra Ltd.
_____________________________________________________________________________________________________________________________________________________________________________________
2.6.3 Reading and handling the GPS state panel
Tap the „GPS state and settings” icon to open the GPS state Panel.
Tap the „Activate” button, to receive the NMEA sentences from the GPS receiver, the
program reads and displays these sentences as a position on the screen. Not only the
displaying of the position, but further information can be received from the NMEA sentences,
please see the picture above.
FINISHING THE SURVEY TAP THE „DEACTIVATE” BUTTON TO DISCONNECT THE GPS
RECEIVER! THERE ARE SOME EXPERIENCES, THAT IN CASE THE DATA TRANSMISSION WORKS
THROUGH A BLUETOOTH CONNECTION, TO HAVE THE SUFFICIENT BLUETOOTH CONNECTION YOU
HAVE TO DEACTIVATE THE GPS RECEIVER!
2.6.4 Setting the GPS survey, handling the measure panel
One part of the GPS survey settings (displaying-recording the GPS position) is already
reviewed in the chapter 2.8.1. The further settings possibilities regarding the GPS surveying
are written in this chapter.
V5.8.3.20.
52. pages / 64
4/21/2008
DigiTerra Explorer v5 ®
User Guide © Copyright 1996-2008, DigiTerra Ltd.
_____________________________________________________________________________________________________________________________________________________________________________________
The GPS survey can be accessed only through the „GPS surveying panel”. Tap the „Activate”
button on the „GPS state” panel to connect the GPS receiver to the PC. The panel can be
displayed only in this case. After the selecting the layer you would like to edit, the type of the
object (point, line, area) and the settings regarding the surveying, the survey is available.
The settings of the GPS surveying depending on the selected surveying method can be
modified. Further information concerning to the surveying method can be found in the next
3.8.4 chapter.
2.6.5 The methods of the GPS Surveying, effect the survey
The GPS surveying can be used for the mapping of the points, lines, areas type objects on the
Earth, using the position received from the GPS receiver. The surveying methods can be
sorted in three main groups by the type of the object we would like to survey.
I. Survey point type objects
A. Survey points using the momentary GPS position (1 sec point surveying)
B. Surveying points using the average of the GPS positions
II. Survey line type objects
A.
B.
Surveying lines - determination vertices using the momentary GPS position
Surveying lines - determination vertices using the average of the GPS positions
III. Survey of area type objects
A. Surveying fields - determination vertices using the momentary GPS position
B. Surveying fields - determination vertices using the average of the GPS positions
V5.8.3.20.
53. pages / 64
4/21/2008
DigiTerra Explorer v5 ®
User Guide © Copyright 1996-2008, DigiTerra Ltd.
_____________________________________________________________________________________________________________________________________________________________________________________
IV. Multiple surveys
A. Survey area(s) within an area
1.
Field surveying – vertices determination using the momentary GPS position
2.
Fields surveying - determination vertices using the average of the GPS positions
B. Surveying using an external point
1. Surveying area using an external point
- determination vertices using the momentary GPS position
- determination vertices using the average of the GPS positions
2. Surveying line using an external point
- determination vertices using the momentary GPS position
- determination vertices using the average of the GPS positions
USING THE GPS SURVEY, THE PROCESSING OF THE GPS POSITIONS HAPPENS REGARDING THE
FILTER CONDITIONS THAT WERE SET ON THE GPS STATE PANEL. IN CASE THE CURRENT GPS
POSITION DOES NOT FULFILL THE REQUIREMENTS OF THE FILTER CONDITIONS, THE GPS POSITION
WILL NOT BE UNDER PROCESSING.
General TO DO before start GPS survey
Turn on the GPS receiver, if a special warning refers to the determination of the fix position
(for ex. led, beep(s)..etc.) than connect to your computer through the available interface
(cable, CF slot, Bluetooth). If a driver requires connecting the GPS receiver, first install it to
the computer by the user guide from the manufacturer, than establish the connection. If the
connection is active, start DigiTerra Explorer program.
At the first connection to the GPS receiver tap „GPS state and settings”
icon, than tap the
„Settings” button on the „GPS state” panel. Use the settings as in the chapter 2.8.1 is written,
than tap OK to close the panel. The software re-connect to the GPS receiver after every
modification on the „GPS state” panel after tapping OK. Close the „GPS state” panel tapping
OK.
1.
Create a new layer using the „Create the new layer”
icon or add a layer (the same
type layer you would like to survey) using the „Add layer(s)”
icon, to place the emergent
object during the surveying in the right order. In case you would like to use background map
(view) or map layer, please load it.
icon to open the GPS surveying panel, than
2.
Tap the stylus the „GPS surveying”
select for editing that vector layer, in where you would like to place the emergent objects
during the survey.
2.6.5.1 Surveying point type objects
Take the 1-4 points of the General TO DO before starting GPS surveying in the chapter 2.8.4
as written. Select the object type „Point” and open that part of the GPS surveying panel that
contains the settings option.
V5.8.3.20.
54. pages / 64
4/21/2008
DigiTerra Explorer v5 ®
User Guide © Copyright 1996-2008, DigiTerra Ltd.
_____________________________________________________________________________________________________________________________________________________________________________________
A.) Surveying a point at the current GPS position
1.
2.
Be sure, that the „Average” switch is not turned on, on the „GPS surveying” panel.
Tap „Start surveying”. In case the position- that we would like to record as a point
object type - is eligible of the filter conditions that were set on the „GPS settings” panel,
the point will be displayed on the screen. By default appears the primary datatable of the
points on the „Record” panel, on this panel we can record the further data of the point.
3.
In case you do not see the point on the screen, tap the „Zoom to selective entity”
icon.
B.
Surveying a point by the average of the GPS positions
1.
2.
Be sure that the „Average „ switch is on, on the „GPS surveying” panel.
Enter the number of the GPS positions that you want to average, than tap „Start
surveying” button. In case the position that you want to record as a point type object
fulfils the filter conditions, the position will be averaged, and surveying the given
number of positions will be displayed on the screen as an averaged point. In the lower –
right corner of the screen you can follow up, that how many positions have already been
averaged from the given number of positions.
3.
In case you do not see the point on the screen, tap the „Zoom to selective entity”
icon.
Surveying line type objects
Effect the 1-4 points of the General TO DO before start surveying as it is written in the
chapter 2.8.4. On the „GPS state” panel select the „Line” as object type, Open that part of the
„GPS surveying panel” that contains the settings of the GPS survey. The default value of
„Right „ and „Forwards” is „0.00”, the „Upwards” is the average height of the GPS antenna –
1.50 meter.
A.
Surveying line by the momentary GPS position
1.
Be sure that the „Average” switch is not turned on, on the „GPS surveying” panel.
2.
Stand at the start point of the line type object (where you want to start the survey) you
want to survey, than set the values of „Skip” and „Distance”. The default value of the
„Skip” is „0” (Zero) that means there is no skip, all positions will be processed. The
more value of the distance will be set, the more vertices of the object will be displayed
(more detailed).
3.
Tap the „Start surveying” button and in the same time go along the line you want to
survey, holding the GPS above the object. The „Start” button after the survey started
changes to „Finish” position. When you tap the „Pause” button, the program suspends
the surveying until you tap the button again. Go along the line of the object all the way
to survey it.
V5.8.3.20.
55. pages / 64
4/21/2008
DigiTerra Explorer v5 ®
User Guide © Copyright 1996-2008, DigiTerra Ltd.
_____________________________________________________________________________________________________________________________________________________________________________________
4.
When you reached the end of the object, tap the „Finish surveying” button. By default
appears the „Record” panel with the primary datatable of the object, where you can set
further records of the object.
5.
In case you do not see the line on the screen tap „Zoom to selective entity”
B.
Surveying line – vertices determination using the average of the positions
icon
1.
Be sure that the „Average „ switch is on, on the „GPS surveying” panel. Enter the
number of the vertices positions that you want to average.
2.
Stand at the start point of the line type object (where you want to start the survey) you
want to survey.
3.
Tap the „Start surveying” button to start surveying and wait until the program records
the position standing above the first vertex and lays the first vertex on the screen. In case
you do not see the vertex, use the „Zoom in” or „Offset” functions to find it. As you
surveyed the point, the „Finish survey” button automatically turns back its default
position („Start survey”)
4.
Select the next vertex of the object you survey, and repeat the 2. and 3. points. Repeat
this task until you reach the end of the object you are surveying. The more detailed line
object want you to see on the screen, the more often survey averaged vertices in the
given location.
When you reached the end of the object, tap the „Finish surveying” button. By default
appears the „Record” panel with the primary datatable of the object, where you can set
further records of the object.
5.
6.
In case you do not see the line on the screen tap „Zoom to selective entity”
icon
2.6.5.2 Survey area type object
Effect the 1-4 points of the General TO DO before start surveying as it is written in the
chapter 2.8.4. On the „GPS state” panel select the „Area” as object type, Open that part of the
„GPS surveying panel” that contains the settings of the GPS survey. The default value of
„Right „ and „Forwards” is „0.00”, the „Upwards” is the average height of the GPS antenna –
1.50 meter.
A.
Surveying area by the momentary GPS position
1.
Be sure that the „Average” switch is not turned on, on the „GPS surveying” panel.
2.
Stand at the start point of the area type object (where you want to start the survey) you
want to survey, than set the values of „Skip” and „Distance”. The default value of the
„Skip” is „0” (Zero) that means there is no skip, all positions will be processed. The
more value of the distance will be set, the more vertices of the object will be displayed
(more detailed).
V5.8.3.20.
56. pages / 64
4/21/2008
DigiTerra Explorer v5 ®
User Guide © Copyright 1996-2008, DigiTerra Ltd.
_____________________________________________________________________________________________________________________________________________________________________________________
3.
Tap the „Start surveying” button and in the same time go along the line of the area you
want to survey, holding the GPS above the object. The „Start” button after the survey is
started changes to the „Finish” position. When you tap the „Pause” button, the program
suspends the surveying until you tap the button again. Go along the line of the object all
the way to survey it.
4.
When you reached the first vertex tap „Finish survey” button. If between the first vertex
and the last point on the sector in front of the finishing surveying is a straight line, you
can finish the survey, because the program connects the start point and the endpoint with
a straight line. . By default appears the „Record” panel with the primary datatable of the
object, where you can set further records of the object.
5.
In case you do not see the line on the screen tap „Zoom to selective entity”
B.
icon
Surveying area – vertices determination using the average of the positions
1.
Be sure that the „Average „ switch is on, on the „GPS surveying” panel. Enter the
number of the vertices positions that you want to average.
2.
Stand at the start point of the line type object (where you want to start the survey) you
want to survey,
Tap the „Start surveying” button to start surveying and wait until the program records
the position standing above the first vertex and lays the first vertex on the screen. In case
you do not see the vertex, use the „Zoom in” or „Offset” functions to find it. As you
surveyed the point, the „Finish survey” button automatically turns back its default
position („Start survey”)
3.
4.
Select the next vertex of the object you survey, and repeat the 2. and 3. points. Repeat
this task until you reach the end of the object you are surveying. The more detailed line
object want you to see on the screen, the more often survey averaged vertices in the
given location.
5.
Getting closer to the selected start point of the area you surveying, survey the last vertex
(do not return to the start point, because the program connects the start point and the
endpoint with a straight line) and tap the „Finish survey” button. By default appears the
„Record” panel with the primary datatable of the object, where you can set further
records of the object.
6.
In case you do not see the line on the screen tap „Zoom to selective entity”
icon
2.6.5.3 Compound surveys
Survey an area within another area: Survey an optional partial section of the ”external area”,
than tap the „Survey polygon in polygon” button on the „GPS survey panel”. After tapping
this button the program suspends the surveying provisionally. Walk to an optional point on
the perimeter of the „internal area„ (island) than tap the Start button to survey. To finish the
survey of the „island” tap the „Stop” button to stop the surveying. After tapping this button
the program suspends the surveying provisionally. Walk back to that point of the „external
V5.8.3.20.
57. pages / 64
4/21/2008
DigiTerra Explorer v5 ®
User Guide © Copyright 1996-2008, DigiTerra Ltd.
_____________________________________________________________________________________________________________________________________________________________________________________
area” where you stopped the surveying (tapped the Survey polygon in polygon button) and
continue the surveying all way long until you get back to the point you started the surveying.
Tap the „Stop” button to finish the survey.
2.7 Printing maps and (field surveying)
reports
2.7.1 Printing maps
To print maps or the compiled views use the „Print
Map”
program.
function in the desktop version of the
Print map
1.
Tap the „Add layer(s)”
icon to display the map
or tap the „Open Map(s)
view you would like to print.
2.
3.
4.
icon and select the
Tap the „Print Map(s)
icon and enter the Printing scale, the title and the label of the
map. Select the print type, (vector or raster print) tan tap OK.
Select the printer you would like to use than tap OK.
A small panel will appear to inform you the success of the printing.
IF YOU LIKED TO PRINT THE VIEW THAT IS DISPLAYED ON THE SCREEN, SET THE
SCALE (ON THE „PRINT MAP”PANEL) TO THE SCALE OF THE VIEW.
V5.8.3.20.
58. pages / 64
PRINTING
4/21/2008
DigiTerra Explorer v5 ®
User Guide © Copyright 1996-2008, DigiTerra Ltd.
_____________________________________________________________________________________________________________________________________________________________________________________
V5.8.3.20.
59. pages / 64
4/21/2008
DigiTerra Explorer v5 ®
User Guide © Copyright 1996-2008, DigiTerra Ltd.
_____________________________________________________________________________________________________________________________________________________________________________________
2.7.2 Print report(s)
The „Print Report” function is for printing the default datatables of the GPS surveying. On the
desktop version of the software, open „Record” panel, tap the „Menu” button and from the
drop list select „Report” option.
Print Report
icon to open the layer which records you would like to print
1.
Tap the „Add layer(s)
as a report.
2.
Tap the „Record”
icon and select from the drop list -in the header of the panel- the
primary datatable of the layer you want to print.
Tap „Menu” button and select from the list the „Report” option.
Enter an optional title and the subtitle of the report and tap OK.
Select the printer you would like to use than tap OK.
A small panel will appear to inform you the success of the printing.
3.
4.
5.
6.
WHEN THE „PRINT THROUGH METAFILE” OPTION IS ON (ON THE „PRINT REPORT” PANEL), IT
MAY HELP TO SOLVE THE POTENTIAL PRINTING PROBLEMS WHEN USING WIN9X OPERATION
SYSTEM.
V5.8.3.20.
60. pages / 64
4/21/2008
DigiTerra Explorer v5 ®
User Guide © Copyright 1996-2008, DigiTerra Ltd.
_____________________________________________________________________________________________________________________________________________________________________________________
3 TERMINOLOGY
3.1 Geoinformatical elements
Geoinformation System (GIS)
There is an acknowledged, honored role of the spatial information processor geoinformation
systems among the information systems. The distinction is reasonable on account of the
special information management of the location and spatial.
The systems that process spatial information about the Earth as our direct environment are
called geographical information or geoinformatical systems.
On the English speech area these systems common name is GIS - Geographical Information
Systems.
The target of the GIS to help people to make decisions, taking into consideration the few
section of the real world, that the users are really interested in.
Digital Map
Displaying on the computer the natural and artificial surface and day shapes trustworthily (on
occasional with generalization) and to state theirs mutual interrelationship through detailed
contents.
Vector
The characterization of the geographical objects happens by the co-ordinates of the geometry
items: point, line, area (polygon).
Geometry
item
Point
Line
Area
(polygon)
Extension Geographical object
0D -none
Points contain objects:
line post, well, cave,
(high) lurking-place, etc..
1D -linear Line contains objects:
road, railway, cable, and
river, ect. …)
3D
– Areas: lake, forest,
spatial
cornfield…ect.
Vector data model
In case of vector data model, the shape of the geographical object is made of irregular
geometry items. The vector map is the composition of several points, lines, and polygons. The
map will be complete only, if we connect to each geometry item to its record, attributes.
Attribute
Text or numerical value for non-geometrical characterization of the geographical objects. The
map will be complete only, if we connect to each geometry item to its attributes. These
attribute consist all the information of the geographic object. We call records the group of the
datafields of one object. The datatables are built up from several, same type of records.
V5.8.3.20.
61. pages / 64
4/21/2008
DigiTerra Explorer v5 ®
User Guide © Copyright 1996-2008, DigiTerra Ltd.
_____________________________________________________________________________________________________________________________________________________________________________________
Datatable structure
D A T A T A B L E
D A T A
F
I
E
L
D S
D A T A R E C O R D S
P la c e
M e m b e r
D e ta il
S o p ro n
1
A
S o p ro n
2
B
...
...
D A T A
More datatables make up the database. The build up of a database:
Data > (data)field > (data)record > (data)table > database
The type of the datafields can be numerical, text, date or document. We can refer with a
proper name to certain fields, tables. The reference to the records happens with the serial
number, a unique ID of the record.
Raster
To geometrical characterization of the geographical objects happens by the help of squares or
maybe rectangles in regular grids.
Raster data model
The raster data model builds up from elemental cells (pixel). Every single pixel covers a
certain area unit. The values of the pixels are called thematic codes. The thematic codes
characterize the area covered by the pixel. The pixels are placed in rows and columns as a
grid. The raster data model contains several significant information beside the pixels that give
the number of the rows and columns of the pixels that build up the raster and georeference
data (usually the center point co-ordinates of the pixel in the upper-left corner and the size of
the area covered by the pixel) The raster database is built up from several rasters. Concerning
the raster the regular grid and the georeference data compose the geographical
characterization. The value of the pixels (the thematic codes) represents the attribute of the
geographical object.
Raster data illustration
pixel
raster
Pixel value
sx
15 15 16 14 17
13 11 19 12
15 10
14
sy
size of the
elemental pixel
10 x 13 pixels that build up the
raster
The sizes of the cells affect the scanning of the raster. The smaller the size of a cell the bigger
is the scanning of the raster and the size of the file. The raster data model requires pretty much
V5.8.3.20.
62. pages / 64
4/21/2008
DigiTerra Explorer v5 ®
User Guide © Copyright 1996-2008, DigiTerra Ltd.
_____________________________________________________________________________________________________________________________________________________________________________________
large bay. Usually the raster database consists more rasters, so the required place multiply
with the number of the rows*columns. We suggest you compress the rasters.
Thematic maps (layers)
The thematic maps (layers) are special map illustration of the geographical objects. The view
of the object depends on the pending data of the object that is sorted by some kind of regular
precept. (classification rule) That means for ex.: The more darker or brighter is the objects on
the screen, the more bigger is the value in the selected datafield.
View
The views are built up from layers. The display of the view is combination of layers. The
layers can be organized in lists, can be saved and backup without modifying the stored
database. In the same time only one layer can be displayed. The generated view can be saved
in the new DigiTerra Explorer view file (the extension is: *.exp). The saved view secures the
order of the layers, theirs displaying attribute and the certain layers objects classification and
displaying rules.
3.2 GPS elements
The GPS device is the biggest perspective and most common used appliance that is based
upon satellites. The satellites move around the Earth as determined position points at the sky,
the GPS receiver is the point on the Earth which position has to be determined. The position
of the GPS receiver all around the world can be defined in any time, because of the incoming
data from the satellites.
Because of the optimal spaced orb(s) on any point of the world, in the same time 4-10
satellites are in view. The precision of the GPS receiver in absolute measure method is about
10-15 meters. Using the WAAS/EGNOS correction (free) this accuracy can be proved to 2-5
meters.
To be able to make the survey the GPS antenna has to have a clear sight to the sky.
PDOP (Position Dilution of Precision)
The accuracy of the GPS data depends on the three factors:
1.
False orb- and time data of the satellites
2.
False determination of the distance
3.
Not eligible geometry position of the satellites
Taking into consideration these potential geometry effects, the GPS use the PDOP (Position
Dilution of Precision) quantity. Higher is the PDOP value the bigger is the potential fault
because of the not eligible geometry position of the satellites.
V5.8.3.20.
63. pages / 64
4/21/2008
DigiTerra Explorer v5 ®
User Guide © Copyright 1996-2008, DigiTerra Ltd.
_____________________________________________________________________________________________________________________________________________________________________________________
false PDOP
eligible, good PDOP
The false orb- and time data of the satellites and the false determination of the distance can be
proved by different processing method, but the not eligible satellite-geometry can not be
proved, however the surveying with high PDOP values (false satellite-geometry) can be
omitted.
To survey area the PDOP value shall be less than 6.
DGPS
Differential GPS is a correction method, which proves the accuracy of the data from the GPS
satellites (2D position 10-15 m, 3D position 15-25 m, field surveying 2-5%). The basis of the
method, that we take into the survey one or more reference- or base GPS station(s) which
position(s) are known. The type of the connection between the base GPS station and our GPS
device can be different, for ex. URH, GSM/GPRS, or communications satellite. From this last
one the most widespread is the OmniStar system, that can ensure sub meter precision; and the
EGNOS system (see below) of that tentative data were received on the summer of 2004. The
DGPS system is able to ensure the 3-5 m, the 1-3 m, sub meter, 1 dm and even 1-2 cm
precision, depending on the distance of the GPS base station and the GPS device, and of
course the technological parameters (and price) of the GPS device.
EGNOS
Special type of the DGPS systems. The system is built in Europe, developing by the European
Union (EU), European Space Agency (ESA), and the EUROCONTROL, can be used for free.
The basic of its functioning is the more than 40 reference stations placed on the continent and
the bordering seas, oceans. These stations survey the orbs and signs of the American satellites
that orbit around the Earth. The data are forwarded to one from the 4 Central processors. In
case on the continent there is an EGNOS compatible GPS receiver, and there is connection
between the GPS device and at least one satellite, than the GPS device automatically effects
the correction of its own GPS surveying. The complete spread can be realized by 2005.
Depending on the technical parameters of the EGNOS compatible GPS device, the available
survey accuracy can be 3-5 m (in case of a cheaper GPS receiver) or 1-2 m (in case of a more
expensive GPS receiver).
Note: The EGNOS correction do not has to be set manually in the DigiTerra Explorer
software, because the receiving of the data depends on the GPS receiver, and the data will be
forward automatically to the software to process.
V5.8.3.20.
64. pages / 64
4/21/2008