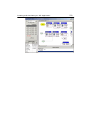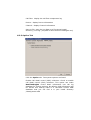
1
CONTAX IVR V.2.1 User Guide
User’s Manual
First Edition
(C)2002-2004 Eletech Enterprise Co., Ltd.
All Rights Reserved.
IBM is a registered trademark of IBM Corporation.
Intel is a registered trademark of Intel Corporation.
Microsoft, Windows 2000/XP, IIS, SQL Server, Access, MSDE are either registered
trademarks or trademarks of Microsoft Corporation in the USA and/or other countries.
All referred trademarks or registered trademarks not listed above are the trademarks or
registered trademarks of their respective owners.
All telephone numbers in the figure of this manual contain unassignable central office
codes. All the user names in this manual are entirely fictitious. They are hypothetical
examples only. We intend not to violate any person or organization’s privacy.
Contacting Eletech Enterprise Co., Ltd.
Tel: +886 (2) 2218-0068
Fax: +886 (2) 2218-0254
Email: [email protected]
Web: www.eletech.com
Eletech Enterprise Co., Ltd
3F, No.531, Chung-Chean Rd., Hsin-Tien,
Taipei Hsien 231, Taiwan
Copyright© 2002, Eletech Enterprise Co., Ltd.
All Rights Reserved.
Table of Contents
ABOUT THIS USER GUIDE ............................................................................................. 0-2
Audience ...................................................................................................................... 0-2
Conventions ................................................................................................................. 0-2
CONTACTING Eletech.................................................................................................... 0-4
Call .............................................................................................................................. 0-4
Fax............................................................................................................................... 0-4
E-Mail.......................................................................................................................... 0-4
Website ........................................................................................................................ 0-4
Write ............................................................................................................................ 0-4
CHAPTER 1 .................................................................................................................... 1-1
PRODUCT OVERVIEW.................................................................................................. 1-1
1.1 FEATURES .................................................................................................................. 1-1
1.2 BASIC CONFIGURATION .............................................................................................. 1-1
1.3 FUNCTION MODULES.................................................................................................. 1-3
1.3.1 CONTAX IVR Flow Designer............................................................................. 1-3
1.3.2 CONTAX IVR Portal Manager ........................................................................... 1-3
1.3.3 CONTAX IVR Voice Production......................................................................... 1-4
1.3.4 CONTAX IVR Flow Collection ........................................................................... 1-4
1.3.5 CONTAX IVR Runtime Engine ........................................................................... 1-4
1.3.6 CONTAX IVR Speech Processor ........................................................................ 1-5
1.3.7 CONTAX IVR System Monitor............................................................................ 1-5
CHAPTER 2 .................................................................................................................... 2-1
INSTALLATION AND REGISTRATION ..................................................................... 2-1
2.1 INSTALLING THE CONTAX IVR................................................................................ 2-1
2.1.1 System Requirements .......................................................................................... 2-1
2.1.2 Installation Steps ................................................................................................ 2-1
2.2 SOFTWARE LICENSE ................................................................................................... 2-5
2.3 REGISTER SOFTWARE ................................................................................................. 2-5
CHAPTER 3 ...................................................................................................................... 3-1
USING CONTAX IVR FLOW DESIGNER ................................................................... 3-1
3.1 THE MAIN WINDOW ................................................................................................... 3-1
3.2 TOOLBARS .................................................................................................................. 3-2
3.2.1 The Side Toolbar ................................................................................................ 3-2
3.2.2 The Top Toolbar ................................................................................................. 3-7
3.3 DESIGN PANE ............................................................................................................. 3-9
3.3.1 Create a Cell Icon on the Design Pane .............................................................. 3-9
3.3.2 Select and Deselect Cell Icons.......................................................................... 3-10
3.3.3 Delete a Cell Icon on the Design Pane............................................................. 3-11
3.3.4 Place Link Trace between 2 Cell Icons............................................................. 3-11
3.3.5 Delete a Trace Line between 2 Cell Icons ........................................................ 3-13
3.3.6 Drag and Drop (Move) Cell Icons.................................................................... 3-13
3.3.7 Cut/Copy Cell Icons and Link Traces............................................................... 3-14
3.3.8 Paste Cell Icons and Link Traces ..................................................................... 3-14
3.4 PROPERTY TABLE PANE ........................................................................................... 3-15
3.4.1 Drop-Down Cell List ........................................................................................ 3-16
3.5 VARIABLE TABLE PANE ........................................................................................... 3-16
3.5.1 Adding Variables to The Variable Table .......................................................... 3-17
3.5.2 Assign a Variable.............................................................................................. 3-18
CHAPTER 4 .................................................................................................................... 4-1
FLOW DESIGNER TOOL CELLS................................................................................. 4-1
4.1 TOOL CELLS ............................................................................................................... 4-1
4.1.1 Common Properties ............................................................................................ 4-1
4.2 FLOW CONTROL CELLS .............................................................................................. 4-3
4.2.1 Start .................................................................................................................... 4-3
4.2.2 End...................................................................................................................... 4-4
4.2.3 LinkIn.................................................................................................................. 4-5
4.2.4 LinkOut ............................................................................................................... 4-5
4.2.5 Counter ............................................................................................................... 4-6
4.2.6 Condition ............................................................................................................ 4-6
4.2.7 SubFlow.............................................................................................................. 4-8
4.3 CALL CONTROL CELLS ............................................................................................... 4-9
4.3.1 Greeting............................................................................................................ 4-10
4.3.2 Recorder ........................................................................................................... 4-12
4.3.3 GetDTMF ......................................................................................................... 4-14
4.3.4 GetKeys............................................................................................................. 4-15
4.3.5 SendTone .......................................................................................................... 4-19
4.3.6 Transfer ............................................................................................................ 4-19
4.3.7 Conference........................................................................................................ 4-21
4.3.8 MakeCall .......................................................................................................... 4-22
4.3.9 Switch ............................................................................................................... 4-24
4.4 MEDIA CONTROL CELLS .......................................................................................... 4-25
4.4.1 Speech............................................................................................................... 4-25
4.4.2 DBQuery........................................................................................................... 4-28
4.4.3 CallURL............................................................................................................ 4-31
4.4.4 SendFax ............................................................................................................ 4-32
4.4.5 RecvFax ............................................................................................................ 4-34
4.4.6 SendEmail......................................................................................................... 4-36
4.4.7 RecvEmail......................................................................................................... 4-39
4.4.8 SendSMS ........................................................................................................... 4-41
4.5 VARIABLES, OPERATIONS, AND FUNCTIONS ............................................................ 4-43
4.5.1 Variables........................................................................................................... 4-43
4.5.2 Operations ........................................................................................................ 4-44
4.5.3 Functions .......................................................................................................... 4-46
4.5.4 Functions Detail ............................................................................................... 4-47
CHAPTER 5 .................................................................................................................... 5-1
CREATING AND SIMULATING AN IVR APPLICATION ....................................... 5-1
5.1 CREATING AN APPLICATION ....................................................................................... 5-1
5.2 SIMULATING AND TESTING......................................................................................... 5-4
5.2.1 Simulating An Existing Call Flow ...................................................................... 5-5
CHAPTER 6 .................................................................................................................... 6-1
IVR SYSTEM MONITOR AND RUNTIME ENGINE ................................................. 6-1
6.1 SYSTEM MONITOR ...................................................................................................... 6-1
6.2 RUNTIME ENGINE ....................................................................................................... 6-1
6.2.1 Channel Tab ....................................................................................................... 6-1
6.2.2 Console Tab........................................................................................................ 6-5
6.2.3 Option Tab.......................................................................................................... 6-6
CHAPTER 7 .................................................................................................................... 7-1
IVR FLOW COLLECTION............................................................................................. 7-1
7.1 PRESS KEY SAMPLE ................................................................................................... 7-2
About This User Guide
Audience
This CONTAX IVR User Guide is written for IVR application
designers and administrators who have basic industry
knowledge required to develop and implement useful IVR
applications. Some programming background will be a plus
while composing the operation and variable functions.
Conventions
Boldface
Boldface font is used for function names,
buttons, commands, folder names, menu
names, and chapter and section names.
Italic
Italic font is used for Internet addresses or
email addresses as well as arguments or
syntax items that you need to replace with
values or expressions.
->
The arrow symbol is used for a sequential
operation from a drop-down menu or list.
For example, File -> Send To -> My
Documents represents “click the File
button then click the Send To item and then
click the My Documents item”.
Click “an item”
This means to move the mouse pointer to
the item and then press or click the mouse’s
primary button once (usually the left button
is the primary button for right-handed users).
Double-click
This means to press or click the mouse’s
primary button twice within the Double-click
speed that has been set in the mouse
properties (Start -> Settings -> Control
Panel -> Mouse) under the “Double-click to
open an item (single-click to select)” mode
set also in the mouse properties.
Drag and drop
Drag means to move the mouse pointer over
the icon you want to select, then press the
mouse’s primary button down to highlight it
and while not releasing the mouse button,
you move the mouse and watch your
selected object move on screen. Drop means
release the mouse button when you have
reached your destination. Drag and drop is
used to move icons, files, or folders on the
screen from one location to another.
Announcement
An IVR greeting that informs but does not
instruct the caller to act. Contrast to
“Prompt”.
Prompt
An IVR greeting that instructs the caller to
respond. Contrast to “Announcement”.
Press
Press is used to ask a caller to press a single
key (e.g., to select an option from a list).
Enter
Enter is used to ask a caller to press multiple
keys (e.g., to input an account number or a
password).
Most of the terms follow international standards or guidelines.
We encourage application designers to follow HFES 200.5,
ISO 13714, or TSSC standards and guidelines for their user
interface in IVR and telephony. Thus the terminology used
will be consistent throughout an application and among
integrated applications.
HFES: Human Factors and Ergonomics Society
ISO:
International Organization for Standardization
TSSC: Telephone Speech Standards Committee
Contacting Eletech
Call
+886 (2) 2218-0068
Fax
+886 (2) 2218-0254
E-Mail
[email protected]
Website
www.eletech.com
Write
3F, No.531, Chung-Cheng Rd., Hsin-Tien, Taipei Hsien 231, Taiwan,
R.O.C.
Product Overview
C h a p t e r
1-1
1
Product Overview
1.1 Features
GUI and Web Based
Centralized administration
Support TAPI 3.0/NMS T1 Card (MVIP Version)
Support SAPI 5.0 (TTS/ASR Engine)
User function and Customize Component
Provide Template Wizard
Reports Facility
1.2 Basic Configuration
Usually a computer based IVR system is connected as one or
more analog extensions on the corporate phone system (PBX,
Private Branch eXchange). A Web based IVR system is also
connected to the Internet.
IVR systems use remote touchtone telephones for entering
data just like computers use keyboards for inputting
information. An IVR system uses TTS (Text To Speech) to
read the information to its callers just like a computer uses a
screen to display the information to its users. The bridge of
voice and data for an IVR system is called voice board or
telephone board.
A voice board installed on an IVR computer system is able to
process voice signals from its telephone interfaces. It also has
a computer bus connection (ISA, PCI, or CompactPCI) to
accept computer commands. So a voice board bridges
between telephone and computer/data communication as well
as analog and digital.
A voice board can simulate to interact with a PBX. It can send
flash hook and dial digits. It can detect hang-up signal and
notify termination of a call. It can also answer, initiate, and
terminate a call.
CONTAX IVR supports voice boards that support TAPI
(Telephony API). TAPI is a programming interface from
Microsoft and Intel. So CONTAX IVR can work with those PBX
that work with the voice boards that support TAPI.
Internet
Router
Intranet
IVR
Computer
System
Channel
Lines
Voice
Board
PBX
P S T N
Other Extensions
Database
Product Overview
1-3
1.3 Function Modules
1.3.1 CONTAX IVR Flow Designer
This module allows designers to create, edit, test, and debug
their call flows. This is also the module that this CONTAX IVR
User Guide discusses the most. Please refer to Chapter 3,
Chapter 4, and Chapter 5 for detail.
1.3.2 CONTAX IVR Portal Manager
The CONTAX IVR Portal Manager is a single entry window to
manage IVR flow services.
1.3.3 CONTAX IVR Voice Production
This CONTAX IVR Voice Production is the recording
mechanism for IVR call flows. Developers can use this module
to
record
and
produce
their
respective
greetings
(announcements and prompts) as wav files corresponding to
their call flow cell’s property tables.
1.3.4 CONTAX IVR Flow Collection
Eletech collects 50 sample call flows, which are classed into
17 kinds of application for your reference. You can learn to
familiarize yourself with the use of cells by studying these
samples.
Start -> Programs -> CONTAX IVR v2.1 -> FlowDesigner. The
CONTAX IVR Flow Designer main window will appear. On the
main window, File -> Open -> Sample Folder -> Sample
File to open a sample call flow.
1.3.5 CONTAX IVR Runtime Engine
The CONTAX IVR Runtime Engine contains Registration,
Channel, and Console function.
Product Overview
1-5
You can use the Registration function to register your
software license. When you grow with more telephone lines,
you can update your less line license with more line license
by using the Registration function without reinstalling your
software.
The Channel function allows you to add and remove channel
lines on your system, assign channel lines to work in inbound
and/or outbound mode.
The Console function displays real time activity information
for a selected channel line.
Start -> Programs -> CONTAX IVR v2.1 -> RuntimeEngine to
display the Runtime engine dialog box.
1.3.6 CONTAX IVR Speech Processor
CONTAX IVR builds in speech pre-processor for the Text-toSpeech (TTS) and Automatic Speech Recognition (ASR)
functions.
CONTAX IVR supports Microsoft Speech API (SAPI) engine.
Microsoft Windows XP already includes Text-to-Speech (TTS)
function. For other Windows operating systems, you can
install the TTS function from CONTAX IVR CD (run setup.exe
under SAPI51 folder to install Microsoft Speech SDK5.1 and
run setup.exe under SAPI51LangPack folder to install
Microsoft Speech SDK5.1 Language Pack).
1.3.7 CONTAX IVR System Monitor
The CONTAX IVR System Monitor contains system log and
system report. System log records all system activities.
System report records incoming, outgoing, and abandoned
call information.
Start -> Programs -> CONTAX IVR v2.1 -> LogViewer.
Installation and Registration
C h a p t e r
2-1
2
Installation and Registration
2.1 Installing the CONTAX IVR
2.1.1 System Requirements
Intel Pentium III 450 MHz/128 MB RAM/10 MB HD Space
Microsoft Windows 2000 / XP, with IIS 5.0 server
Analog Voice boards with TAPI driver
Fax boards with COM port driver
Microsoft SAPI 5.0 (standard in Windows XP, provided with
CONTAX IVR CD)
PBX connected with the voice board that support TAPI
2.1.2 Installation Steps
Insert CONTAX IVR CD in your CD-ROM drive.
Double-click the setup.exe file to execute the installation
process. The following CONTAX IVR v2.1 install wizard will
appear. Follow its instructions to complete your installation.
Installation and Registration
2-3
Installation and Registration
2-5
2.2 Software License
There are two kinds of licenses:
1. Operation License, which has no defined life span, but is
based on the number of voice lines supported.
2. Evaluation License, valid for 2 voice lines and 30 days trial.
2.3 Register Software
To ensure continued support for your purchased software copy,
CONTAX IVR should be registered with Eletech Ent. or its authorized
distributor in your country.
This registration will authorize the runtime engine of CONTAX IVR to
support a defined number of lines/channels for the voice board
installed in the server (web-based or application-based server)
corresponding to the number-of-line license purchased. For example,
if a customer purchases an 8-line IVR Runtime License, after
registration, the customer’s server can support up to 8 lines for their
voice board to run IVR applications developed by CONTAX IVR. Their
IVR applications will not support any voice line exceeding 8 unless
they upgrade their license to support a larger number of lines.
CONTAX IVR uses typed codes, known as ‘software keys’, for product
registration.
There are two keys that you will need for registration. These are:
1. Register ID: After the installation of your software copy, a Register
ID will be generated, automatically, based on the hardware
environment of your computer.
2. License Key: Each Register ID has a corresponding License Key.
This key is the product license for your copy of the software. It is
machine dependent and cannot be used on a different server. To get
this License Key for your product copy, you must contact Eletech Ent.’s
authorized distributor in your country or Eletech Ent.’s sales department.
When you upgrade from evaluation license to Operational license
(unlimited time and different number of lines support), or from one kind
of formal license to another (with a different number of lines support),
you will be given a new set of the register ID and the license key. You
can enter the license key in the RunTime Engine’s registration tab and
register, without re-installing your CONTAX IVR software. Please
follow the steps given here:
Start -> Programs -> CONTAX IVR v2.1 -> RuntimeEngine. An
icon will appear on the Windows taskbar’s right.
Double-click this icon. The CONTAX IVR RunTime Engine dialog box
appears. Click the Registration tab. Then click the License Key box
and enter the License Key in the box and then click the Registration
button.
If it is a 30 days evaluation license, then you can leave the License
Key box blank. You don’t need to register. By default, the license
authorizes you with 2 lines and 30 days evaluation.
You can click the About tab on the CONTAX IVR RunTime Engine
dialog box to check your license status.
Installation and Registration
2-7
Note: After installing and registering the software, if you upgrade your
system hardware then you must contact Eletech Ent. to get an updated
license key.
When you install your evaluation software, you will be automatically
given a register ID, a license key and a 30-day evaluation period
validity, during which you can use the software without any formal
registration. If this 30-day period is not sufficient for your evaluation
purposes, you can contact Eletech Ent. sales department to get a
temporary extension. To continue using this software after the
evaluation period, you must formally register by receiving and
manually inputting a license key.
3-1
Using CONTAX IVR Flow Designer
C h a p t e r
3
Using CONTAX
Designer
IVR
Flow
3.1 The Main Window
Start -> Programs -> CONTAX IVR v2.1 -> FlowDesigner. The
CONTAX IVR Flow Designer main window will appear. You will
notice that there are two toolbars, one along the top and
another along the left side.
There are also three panes in the main window: the Design
pane, the Property table pane, and the Variable table pane.
You can adjust the size of each pane by moving the mouse
pointer to the boarder between two panes then dragging and
dropping the boarder line to your desired position while the
mouse pointer turns to one of the following.
3.2 Toolbars
3.2.1 The Side Toolbar
The toolbar along the left side of the main window contains
tool cells for the designer to select.
3-3
Using CONTAX IVR Flow Designer
There are Flow Control, Call Control, and Media Control
cells. The default main window displays the 7 Flow Control
cells as shown on the above left picture.
Click the Call Control button to switch to view the Call
Control cells. To view more Call Control cells, just click the
down arrow at the bottom right corner of the side toolbar as
shown on the above middle picture.
Click the Media Control button to switch to view the Media
Control cells as shown on the above right picture.
Click the Flow Control or Call Control button to switch back
to view the Flow Control cells or the Call Control cells.
You can click to select one of the cells from the side toolbar,
move the mouse pointer towards the design pane, then click
to place that cell at an insertion point on the design pane.
Then an icon for that cell appears on the design pane with the
cell icon’s upper left corner positioned at the insertion point.
The table below lists a summary of the cell buttons on the
side toolbar, the corresponding cell icons, and their function
descriptions:
Flow Control Cells:
Cell
Button
Cell Icon
Function Description
Start
Start a call flow
End
End a call flow
LinkIn
Go to LinkOut cell with the same
name in the same call flow
Come from LinkIn cell with the same
LinkOut
name in the same call flow
Counter
Count a loop
Condition
Execute on condition
Go
to
SubFlow
(another call flow) in the same channel line
a
sub-flow
Call Control Cells:
Greeting
Play a greeting
Recorder
as a (.wav) file
Record an audio message
3-5
Using CONTAX IVR Flow Designer
GetDTMF
Get one touch-tone input
(DTMF) from a (caller’s) phone keypad
Get a certain number of
GetKeys
touch-tone (DTMF) inputs from a (caller’s) phone keypad
SendTone
Send DTMF tones
Transfer
extension via a PBX
Transfer a call to another
Conference
extension via a PBX
Connect a call with another
MakeCall
execute a new call flow
Call via another channel to
Switch
Connect two channels
Media Control cells
Speech
Convert text to speech
DBQuery
operation
Execute
CallURL
Link to an URL page
SendFax
Send Fax
a
Database
3-7
Using CONTAX IVR Flow Designer
RecvFax
Receive Fax
SendEmail
Send Email
RecvEmail
Receive Email
SendSMS
Send Short Message
Please refer to Chapter 4 for the detailed description and
usage of each tool cell.
3.2.2 The Top Toolbar
The toolbar at the top of the main window has the following
cell buttons:
File:
Open a new IVR file.
Open an existing IVR file.
Save the current IVR file.
Save the current IVR file as another file name.
Print out the IVR call flow layout as a document.
Edit:
Cut the selected cell icon(s), its property table(s), and
link trace(s) on the design pane.
Copy the selected cell icon(s), its property table(s),
and link trace(s) on the design pane.
Paste the copied cell icon(s) and link trace(s) to the
position at 20 pixels lower and right of the original cell icon(s).
The cell’s property table(s) is/are also be pasted.
Delete the selected cell icon(s) and link trace(s) on the
design pane as well as its/their property table(s) on the
property table pane.
Select All (in the Edit drop-down function list)
Delete a trace line between two cell icons.
Refresh (in the Edit drop-down function list): Automatically
rearrange the layout of all trace lines after individual trace
line connection was completed separately.
View:
Show properties Table.
Show Global Variable Table.
Run:
Using CONTAX IVR Flow Designer
3-9
Run the current call flow.
End the current call flow.
3.3 Design Pane
The design pane is a working area (size = horizontal A4) for
the IVR designer in the main window. You can click to select a
cell from the side toolbar then place that cell on the design
pane. After your desired cells are placed on the design pane,
you can click to select the cell to move them and arrange
their relative positions, place link trace between two cells,
and finally form the call flow for your IVR applications.
3.3.1 Create a Cell Icon on the Design Pane
From the side toolbar, click on a cell button once, move the
mouse pointer towards the design pane, you will notice that
the mouse pointer turns to a small cell symbol on the design
pane as shown below:
Move your mouse pointer to a desired position (which will be
an insertion point) on the design pane, click your mouse
again, the desired cell icon will appear with its upper left
corner at the insertion point.
3.3.2 Select and Deselect Cell Icons
On the design pane, after a cell icon is placed or it is selected
by clicking on it, you will see 4 small square blocks at its
corners (as shown above).
To deselect a cell icon, you need to click on a point on the
design pane anywhere outside the cell icon’s imaginary
rectangular area defined by its 4 corners.
You can also search and select a cell icon from a number of
cell icons in a call flow by clicking its caption name from the
cell drop-down list on the property table pane. Please refer to
section 3.4 Property Table Pane for detail.
To select multiple cell icons, you can do it with either way of
the following:
1. Click on a point outside the cell icons, drag the pointer to
make a dot sided rectangular to contain all the cell icons
you want to select, then release your mouse.
2. Click to select one of the cell icons, its 4 small square block
corners appear. Move your mouse pointer to another cell
icon, hold down the control key <Ctrl> and then click on
the cell icon. Continue move your mouse pointer and hold
down the <Ctrl> + click on the next cell icon until all cell
icons you want to select are selected.
Using CONTAX IVR Flow Designer
3-11
To deselect multiple cell icons, you need to click on a point on
the design pane anywhere free from any selected cell icon’s
imaginary rectangular area defined by its 4 corners.
To deselect only one of the selected multiple cell icons, move
your mouse pointer to the cell icon you want to deselect, hold
down the control key <Ctrl> and then click on the cell icon.
3.3.3 Delete a Cell Icon on the Design Pane
Select the cell icons you want to delete.
Click the delete button on the top toolbar.
The cell icon and the property content in its property table
(please refer to section 3.4 Property Table Pane) will be
deleted. All trace lines connected to this cell icon will be
deleted too.
3.3.4 Place Link Trace between 2 Cell Icons
A cell icon represents a set of program with predefined
functions. Most cell icons have pins in both sides. Cell icon
Start and LinkOut have only right side pin. Cell icon End
and LinkIn have only left side pin. Left side pin is the
entrance of a cell icon. Right side pin or pins is/are the exit or
exits of the cell icon. Depending on conditions, the program
will exit from one of the right side pins during runtime.
Connecting a cell icon’s right side pin to another cell icon’s
left side pin means linking two program sets with the right
cell being executed after the left cell.
Every cell icon has one to many pins for its connection with
other cell icons. The pin area includes pin itself and the dark
gray pin text area shown below. Note that some cell icons’
pin areas have pin itself only and have no pin text area with
them (e.g. Start, End, LinkIn, LinkOut, and SubFlow).
To connect pins between two cell icons, click the pin area at
the right side of one cell icon, move your mouse pointer
towards the pin area at the left side of the other cell icon. A
pink bent line will follow your mouse pointer trace. When your
mouse pointer touches the pin area of the other cell icon,
click your mouse again.
You will see that the pink trace line be fixed and turned to
gray as shown below. Thus the two cell icons are connected
via their respective specified pins.
If the pink line appears (perhaps by your unintentional click)
and you do not want to connect it to any other cell icons,
before it turns fixed and gray, just click one more time at any
point free from any left side pin area on the design pane, the
pink line will disappear.
Using CONTAX IVR Flow Designer
3-13
3.3.5 Delete a Trace Line between 2 Cell Icons
Click the Delete Trace Line button on the top toolbar. You
see the mouse point turns to a pair of small scissors on
design pane. Move the scissors mouse pointer to touch
trace line you want to delete. Click on the trace line, and
trace line will be deleted as shown below:
will
the
the
the
3.3.6 Drag and Drop (Move) Cell Icons
Select the cell icon you want to move. Place your mouse
pointer within the selected cell icon’s rectangular area. Drag
the selected cell icon to your desired location then drop it.
Please be careful not to place your mouse pointer at any right
pin area before you drag the selected cell icon. Because thus
will generate a pink line to connect to another cell icon. So
place your mouse pointer at the cell name (caption) area will
be an easy way to drag or move the selected cell icon.
Move a single cell icon will change the relative position for
this cell icon to other cell icons. All link traces connected to
this cell icon will automatically be rerouted.
If you want to drag or move multiple cell icons at the same
time, place your mouse pointer at the cell name (caption)
area of any of the selected cell icons. Move multiple cell icons
at the same time will keep their relative positions and link
traces among the moved/dragged cell icons the same.
3.3.7 Cut/Copy Cell Icons and Link Traces
Select the cell icons you want to cut/copy.
Click the cut or copy button on the top toolbar.
The cell icon and the property content in the cell’s property
table (please refer to section 3.4 Property Table Pane) will
be cut/copied. All trace lines connected from outside to the
selected cell icons will be deleted after cut/copy. All trace
lines connected among the selected cell icons remain the
same and will be stored in the memory buffer/clip board after
cut/copy. You can paste them to other positions on the design
pane of the same call flow as well as of other call flows.
3.3.8 Paste Cell Icons and Link Traces
After cut/copy the selected cell icons, click the paste button
on the top toolbar. The selected cell icons that have been cut
or copied will appear at the position 20 pixels lower and right
to that of the original cell icons. You can drag/move these cell
icons and link traces to your desired position after they are
pasted.
The cell icon and the property content in its property table
(please refer to section 3.4 Property Table Pane) as well as
all trace lines connected among the cut/copied cell icons will
be pasted.
If you paste the cut/copied cell icons to another call flow,
they will appear at the same relative position on the design
pane as if they are pasted to the same call flow.
You can move these cell icons and link traces to the desired
position to form a duplicated part of call flow. So you do not
need to create their property tables and variable table from
zero. Edit or change the captions and/or variables in the
property tables and/or variable table to form a similar call
flow.
3-15
Using CONTAX IVR Flow Designer
3.4 Property Table Pane
The property table pane is next to the design pane and is
located on the upper right portion of the main window. Each
cell created on the design pane carries its own property table.
A cell’s property table will appear on the property table pane
if you click to select a cell icon on the design pane. Otherwise
the property table pane will display the property table of the
last placed or displayed cell.
A sample property table
A drop-down cell list
A cell’s property table records property values and
parameters
for
that
cell.
The
number
of
properties/parameters for different kind of cell varies. Varied
kinds of cells carry various property and parameter items.
Different cell of the same kind carries the same property
items and the same number of properties with different
property values (at least the table name (Caption) will be
different). Property items include Caption (table name),
Variable Assign, KeepLive, TimeOut value, Max. key
Length, Quick Keys, Invalid Keys, etc. You can define and
edit a property table on the property table pane by clicking its
value fields and then entering values in those fields. Please
refer to Chapter 4 about the property details for each cell.
If an item in the field is too long to be displayed completely,
you can always adjust the column’s width by moving the
mouse pointer to the edge of the top field and then dragging
and dropping the separator line to your desired position when
the mouse pointer turns to the following:
3.4.1 Drop-Down Cell List
There is a drop-down cell list at the top of the property table
pane (as shown above). If there are many cells in a call flow,
you can also switch to a specified cell’s property table by
clicking its name from the drop-down cell list.
3.5 Variable Table Pane
The variable table pane is below the property table pane and
is located on the lower right portion of the main window. It
displays the variable table for a call flow. Usually each IVR file
contains a single call flow, which carries its own variable table.
The values in a call flow’s variable table are shared among
the call flow and its sub-flows. You can define and edit a
variable table on the variable table pane by clicking its value
fields then entering values in those fields.
Using CONTAX IVR Flow Designer
3-17
3.5.1 Adding Variables to The Variable Table
ProgDir, WavePath, WebServer, ChannelNo, CallerID,
CallerName, CalledID, CalledName, CallData ana
ServiceID are default variables for every call flow.
In addition to the above nine default variables, when you
need to define a new variable in the property table, you need
to add this variable to the variable table in order to be shared
throughout the call flow.
Variables can be added in the variable field (at the left portion)
of the variable table. Move the mouse pointer to the last row
of the variable table and click on it. The cursor will appear on
the last row (either on the variable field or on the value field).
Press the down arrow key to create a new row of variable and
value fields. Press the up arrow key or Delete key to delete a
created row.
After creating a variable in your variable table, you can set an
initial value to this variable. Click to select the value field for
the variable you want to set an initial value to. Click the field
again to edit the field. You will notice that an empty field with
a blinking cursor at the first character of the field appears.
Enter either a number or a string in this field as an initial
value for this variable.
You can set another variable or string combination of other
variables as the initial value here by using a pair of
parentheses ([]) to enclose a variable name in the value
fields (e.g. set the initial value for variable A to be Dial [B] for
[C], when B=123 and C=Mary, then A=Dial 123 for Mary. A
will change its content when B or C changes its content, e.g.
when B=1-800-7661234, C=help, then A=Dial 1-8007661234 for help). Later you can use Speech (text to speech)
function to read variable A.
You cannot set the initial value of a variable in the variable
table to be inclusive of the variable itself (e.g. to set A to be
Dial [A] for [C] is incorrect).
3.5.2 Assign a Variable
Variables can be assigned in the value fields (at the right
portion) of a cell’s property table. You need to use a pair of
parentheses ([]) to enclose a variable name in the value
fields,
for
example,
[IDnumber],
[UserNo],
[MyPhoneNumber], etc. Thus the program will not mistakenly
regard the variable as a text string.
Whenever a cell is executed in a call flow, its variable assign
field will be executed once too.
Using the Expression Builder
You can use the Expression builder dialog box to create an
expression in the value field of a property table:
Using CONTAX IVR Flow Designer
3-19
Click to select the value field of the variable assign property
in a property table. Click the value field again to edit the field.
You will notice that an empty field with a blinking cursor at
the first character of the field appears. Also a button with
ellipses (three periods) mark appears at the right edge of the empty
value field. You can direct enter an expression in this field. You
can also double click the empty field or just click the ellipses
button, and then the expression builder dialog box appears.
Enter a Constant
Click the constant field in the constant section of the
Expression builder dialog box to enter a constant.
If you enter a number as a string here, you need to select
this constant to be string instead of numeric type. Click the
down arrow in the constant section. Select and click String
from the drop down list. Click the Add button to add this
constant to the expression pane.
Instead of using the Expression builder, if you direct enter
a number as a string in the value field of the property table,
please remember to use a pair of apostrophes (e.g. ‘123’) to
enclose the number.
Using CONTAX IVR Flow Designer
3-21
If you use the expression builder to enter a number string, a
pair of apostrophes will automatically be added.
Enter a Function
Click to select a function from the function list in the function
section of the Expression builder dialog box. The
description of that function will also appear at the lower
portion of the function section. Click the Add button to add
the function onto the expression pane. The function
containing a number of vertical bars (|) separated by commas
(,) appears in the expression pane. You can replace any |
with an expression by direct entering it or by using the
Expression builder again to enter it.
Enter a Variable
Click to select a variable from the available variable list in the
variable section of the expression builder dialog box. Click the
Add button to add the variable to the expression pane.
Enter an Operator
Click an operator button in the operators section of the
Expression builder dialog box to add the operator onto the
expression pane.
Enter Expressions in a Property Table
If you want to enter more expressions after one expression is
entered in the expression pane, then press the Enter key on
your keyboard to change to the next line of the expression
pane to enter the next expression. Repeat the above method
until all your desired expressions are entered.
After all expressions have been entered in the expression
pane, then click the OK button at the bottom of the
expression builder dialog box. You will notice that all
expressions are entered onto the value field of a cell’s
property table and that a semicolon (;) separates them
between two adjacent expressions.
4-1
Flow Designer Tool Cells
C h a p t e r
4
Flow Designer Tool Cells
Each cell represents a set of programs executing a specific
function. You can easily link various cells to form a call flow.
A cell contains its own property and variables. Variables can
be carried over throughout a call flow.
4.1 Tool Cells
Each cell represent a functional program defined by its
property table and variable table.
Except that cell Start, End, LinkIn, and LinkOut have one
pin on only one side, every cell has pins on its both sides
(one pin on its left side and at least one pin on its right side).
A left side pin represents an entry point to this cell of
functional program. The right side pin or pins represent the
exit point of this cell. It will lead to the entry point of the next
cell. Depending on situations, a cell may have one to many
right side pins. Thus the program will exit from one of the
right side pins based on given conditions.
4.1.1 Common Properties
Caption, Description, Variable Assign, and KeepLive are
the four common properties to all tool cells.
Caption
CONTAX IVR will give
according to the order
dropped from the side
Greeting1, Greeting2, …,
a default caption name to a cell
of that cell’s being dragged and
toolbar to the design pane (e.g.
Recorder1, Recorder2, …, etc.)
A cell’s caption will be displayed on that cell’s icon as its
identification in the call flow chart on the design pane.
To replace a default given caption name, you need to enter a
name for a cell in a call flow. Using the same Caption name
for different cells in a call flow is OK providing no one gets
confused. Usually we name a cell by what it does in a call
flow. For example, Enter Account #, Listen Messages, and
GetDate, etc are all clear captions. This will help yourself and
other people more easy to understand the call flow when
simulating or maintaining it at a later time.
Description
Give further description of what the cell is doing in a call flow.
Variable Assign
Variables can be assigned in the value fields here. Whenever
a cell is executed in a call flow, its variable assign field will be
executed once too. So the variable can be updated. The
update value of the variable may be used at other places in a
call flow.
You can use the Expression builder dialog box to create an
expression in the value field of a property table.
Please refer to section 3.5.2 Assign a Variable for detail.
KeepLive
A call flow is opened and executed after the phone call goes
through. When the telephone is hung up during a call flow
execution, the program will check the current cell’s KeepLive
value. If the value is false, then the call flow will end
accordingly.
The default value for KeepLive is false.
If the telephone is in hang up status and the KeepLive field
of the currently executing cell is selected to be true, then the
4-3
Flow Designer Tool Cells
program won’t be end until it executes a next cell with a false
KeepLive value.
Usually a call flow ends when the phone is hung up. The
KeepLive feature will be very convenient to database
operation while a call flow won’t immediately end after the
telephone is hung up. So the call flow can execute count or
other required functions after hang-up.
Click the KeepLive value field. An empty field with a down
arrow button appears. Click the down arrow button, the drop
down list appears. Select and click true from the drop down
list to assign the KeepLive value to be true.
4.2 Flow Control Cells
The following cells control a call flow.
4.2.1 Start
Start a call flow
This cell starts a call flow. When a telephone call goes
through a channel line, CONTAX IVR will trigger the call flow
file defined in the Incoming Call-flow file field of Channel
Configuration section in the Channel Setting dialog box
(please refer to Channel Setting in Section 6.2.1).
When you are simulating or testing only part of a call flow,
you can insert a temporary Start and End cell at the
beginning and the end of the partial call flow you want to test
or simulate. Then the testing or simulating will only execute
from this Start cell to this End cell instead of the whole call
flow.
4.2.2 End
End a call flow
This cell ends a call flow. If you do not place an End cell at
the end of a call flow, CONTAX IVR system will hang up the
call after execution of the last cell.
If you place an End cell at the end of a call flow, two
situations may happen:
1. If there is no other call flow calls this call flow via a
SubFlow cell, then CONTAX IVR system will hang up the
call after execution of the End cell.
2. If there is another call flow calls this call flow via a
SubFlow cell (the called flow file name is defined in the
calling flow SubFlow cell’s property table, please refer to
Section 4.2.7 SubFlow), then CONTAX IVR system will
return to that SubFlow cell after execution of the End cell
and then continue to execute the SubFlow‘s next cell.
When you are simulating or testing only part of a call flow,
you can insert a temporary Start and End cell at the
beginning and the end of the partial call flow you want to test
or simulate. Then the testing or simulating will only execute
from this Start cell to this End cell instead of the whole call
flow.
Flow Designer Tool Cells
4-5
4.2.3 LinkIn
Go to a LinkOut cell with the same name in the
same call flow
This cell is used with a corresponding LinkOut cell. They are
often used in a call flow that contains many cells at different
locations all connect to the same next cell. Using of LinkIn
and LinkOut will decrease the complexity of too many link
trace lines going to a same cell. This will also avoid
connecting a link trace line between two distant cells of a call
flow chart on the design pane. In a call flow, there are always
many LinkIn cells corresponding to one LinkOut cell.
Link Name: enter a name consistent with that of the
corresponding LinkOut cell. This name will be displayed on
the cell’s icon as the cell’s identification.
4.2.4 LinkOut
Come from LinkIn cell with the same name in
the same call flow
This cell is used with many corresponding LinkIn cell. They
are often used in a call flow that contains many cells at
different locations all connect to the same next cell. Using of
LinkOut and LinkIn will decrease the complexity of too
many link trace lines going to a same cell. This will also avoid
connecting a link trace line between two distant cells of a call
flow chart on the design pane.
Link Name: enter a name consistent with that of the
corresponding LinkIn cell. This name will be displayed on the
cell’s icon as the cell’s identification.
4.2.5 Counter
Count a loop
While executing, this cell will exit from its Next pin if the
Count is not over and exit from its Over pin if the Count is
over.
Count: Enter a number.
4.2.6 Condition
Execute on condition
Flow Designer Tool Cells
4-7
While executing, this cell will exit from one of its Case pin if
the condition stated in that case’s value field of its property
table is evaluated to be true. The cell will exit from its Else
pin if no case is evaluated to be true.
Case1 thru Case6: Enter variable operation, function, or
expression. If a Case’s value field of a Condition cell is left
blank, then that case will not be evaluated.
You can use the Expression builder dialog box to create an
expression in the value field of a property table:
Click to select the value field of the variable assign property
in a property table. Click the value field again to edit the field.
You will notice that an empty field with a blinking cursor at
the first character of the field appears. Also a button with
ellipses (three periods) mark appears at the right edge of the empty
value field. You can direct enter an expression in this field. You
can also double click the empty field or just click the ellipses
button, and then the expression builder dialog box appears.
Please refer to Using the Expression Builder in Section
3.5.2.
If you need the number of condition cases to be larger than 6,
you can link a second Condition cell from the Else pin of the
first Condition cell to form a 12 cases condition as shown
below.
4.2.7 SubFlow
Go to a sub-flow (another call
flow) in the same channel line
While executing, this cell will go to run a sub call flow defined
here and then the program will return to exit from this cell’s
right pin if there is an End cell at the end of that sub call flow
(if there is no End cell at the end of that sub call flow,
CONTAX IVR will hang up the phone after execution of that
sub call flow).
Call flow Filename: Enter a partial file path if the Use
ProgDir value is selected to be True.
Flow Designer Tool Cells
4-9
Use ProgDir: Select True or False
ProgDir is a variable defined in the variable table that is
shared throughout the whole call flow. In the example
variable table shown below,
ProgDir = C:\Program Files\Eletech\ContaX IVR\
So if in the property table you select True in the Use
ProgDir field, and you fill in a call flow file name e.g.
01sub.IVX in the Call Flow Filename field, then the
sub-call-flow file to go to will be:
C:\Program Files\Eletech\ContaX IVR\01sub.IVX
If you select False in the Use ProgDir field, you need to fill in
the full path of a call flow file in the Call flow Filename field.
An example of Variable Table
After development, when you copy the call flow files to run on
another computer, please copy the sub call flow files to the
same folder with the main call flows. Otherwise you need to
select Use ProgDir to be False and enter the absolute file
path of the sub call flow into the Call flow Filename field.
4.3 Call Control Cells
The following cells control a call process. It is based on a
computer and voice board perspective. For example,
Transfer means the computer and voice board transfers a
call via the PBX connected to the voice board.
4.3.1 Greeting
Play a greeting
The cell will be executed from its left (Start) pin, then play
greeting file, and then exit from its right (Next) pin.
Play Filename: Enter the file name of a greeting to play.
Stop by Key: Select True or False. If True is selected, then
pressing any key any time while playing may terminate the
greeting. If False is selected, then the greeting will be done to
its end without being interrupted by pressing any key during
it’s playing.
Keep Stop Key: Select True or False. Default is True. Usually
we select it to be true.
True: means keep the stop key in the memory buffer.
Normally a caller has no idea of stop key. He or she may
input the DTMF required by the next cell while the greeting of
this cell is still playing. So we need to keep these DTMF input
for the next cell.
False: means to clear the memory buffer that stores the stop
key pressed during greeting. If a caller is informed of the stop
key, before executing the next cell (may be GetKeys) and
the caller interrupts the greeting and then inputs DTMF (that
will also be stored in the memory buffer) for the next cell,
Flow Designer Tool Cells
4-11
clearing the memory buffer will let the next cell have correct
DTMF information without mixing it with the stop key pressed
for the previous cell.
Use WavePath: Select True or False
WavePath is a variable defined in the variable table that is
shared throughout the whole call flow. In the example
variable table shown below,
WavePath = [ProgDir]Waves\
ProgDir = C:\Program Files\Eletech\ContaX IVR\
So
WavePath = C:\Program Files\Eletech\ContaX IVR\Waves\
If in the property table you select True in the Use WavePath
field, and you fill in a wave file name e.g. 01.wav in the Play
Filename field, then the greeting will play the file:
C:\Program Files\Eletech\ContaX IVR\Waves\01.wav
If you select False in the Use WavePath field, you need to
fill in the full path of a greeting wave file in the Play
Filename field.
An example of Variable Table
After development, when you copy the call flow files to run on
another computer, please copy the wave files to the same
folder with the main call flows. Otherwise you need to select
Use WavePath to be False and enter the absolute file path
of the wave file into the Play Filename field.
4.3.2 Recorder
file
Record an audio message as a (.wav)
The cell will be executed from its left (Start) pin, record a
message on the channel line, and then exit from its right
(Next) pin.
Record Filename: Enter the file name to be recorded as.
Stop by Key: Select True or False. If True is selected, then
pressing any key any time while recording may terminate the
recording. If False is selected, the message will be recorded
till its end (MsgLength) without being interrupted by
pressing any key during its recording.
Keep Stop Key: Select True or False. Default is True. Usually
we select it to be true.
True: means keep the stop key in the memory buffer.
Normally a caller has no idea of stop key. He or she may
input the DTMF required by the next cell while the greeting of
this cell is still playing. So we need to keep these DTMF input
for the next cell.
Flow Designer Tool Cells
4-13
False: means to clear the memory buffer that stores the stop
key pressed during greeting. If a caller is informed of the stop
key, before executing the next cell (may be GetKeys) and
the caller interrupts the greeting and then inputs DTMF (that
will also be stored in the memory buffer) for the next cell,
clearing the memory buffer will let the next cell have correct
DTMF information without mixing it with the stop key pressed
for the previous cell.
Use WavePath: Select True or False
WavePath is a variable defined in the variable table that is
shared throughout the whole call flow. In the example
variable table shown above,
WavePath = [ProgDir]Waves\
ProgDir = C:\Program Files\Eletech\ContaX IVR\
So
WavePath = C:\Program Files\Eletech\ContaX IVR\Waves\
If in the property table you select True in the Use WavePath
field, and you fill in a wave file name e.g. 02.wav in the
Record Filename field, then the message will be recorded as
the file:
C:\Program Files\Eletech\ContaX IVR\Waves\02.wav
If you select False in the Use WavePath field, you need to
fill in the full path of a wave file in the Record Filename,
Before Greeting, and Beep Sound field.
MsgLength (Sec.): enter message length in seconds.
Before Greeting: The greeting file played before the
recording starts.
If this field is left blank, then no before greeting will be
played.
Fill in a full path here if the Use WavePath field is selected
to be False,
e.g. C:\Program Files\Eletech\ContaX IVR\Waves\03.wav
Enter partial file name here if the Use WavePath field is
selected to be True, e.g. 03.wav
Beep Sound: The beep sound file played after the Before
Greeting and before the recording starts.
If this field is left blank, then no beep sound will be played.
Fill in a full path here if the Use WavePath field is selected
to be False,
e.g. C:\Program Files\Eletech\ContaX IVR\Waves\04.wav
Enter partial file name here if the Use WavePath field is
selected to be True, e.g. 04.wav
4.3.3 GetDTMF
Get one touch-tone input (DTMF)
from a (caller’s) phone keypad
Flow Designer Tool Cells
4-15
This cell is executed from its left (Start) pin, gets input from
one of the 12 touch-tone keys, depending on which touchtone key is input, the cell then exits from one of its
corresponding right pin.
TimeOut (ms): in millisecond (a thousandth of a second,
3000 ms = 3 second). The program will wait the DTMF input
for this TimeOut value of time. If there’s no DTMF input
before the TimeOut value, the program will exit from the
TimeOut pin on the right side of the cell.
Invalid pin: If any message other than the 12 keys (0, 1, 2,
3, 4, 5, 6, 7, 8, 9, *, and #) is input, then the program exits
from the Invalid pin on the right side of the cell.
4.3.4 GetKeys
Get a certain number of touch-tone
inputs from a (caller’s) phone keypad or a voice input from a
(caller’s) phone
This cell is executed from its left (Start) pin, gets touch-tone
key inputs, and then exits from its right (Next) pin.
Clear key buffer first: Clear any DTMF that buffered in the
variable assign by Key Variable property before GetKey cell
detect input.
Max. Length: The maximum number of touch-tone inputs.
End Key: This key (usually #) denotes the end of a series of
key inputs.
Clear Key: This key clears the input buffer and then starts to
receive the input from the beginning (the first key).
Flow Designer Tool Cells
4-17
Delay Check (ms): Time value in millisecond allowable
between two touch-tone inputs. If the time between two
touch-tone inputs exceeds this Delay Check, then the
program exits from the Next pin on the right side of the cell.
TimeOut (ms): Enter a value in millisecond (a thousandth of
a second, 5000 ms = 5 second). The program will wait the
first touch-tone input for this TimeOut value of time. If there
isn’t any touch-tone input before TimeOut, the program will
exit from the TimeOut pin on the right side of the cell.
Key Variable: Enter a variable name. The touch-tone input
will be assigned to this variable and then will be used by
other cells or other call flows.
Quick Keys: When pressing the quick keys defined here,
the program will exit from the Quick pin on the right side of
the cell.
Invalid Keys: Enter keys that are not defined in the voice
menu, extension, Quick Keys, Clear Key, or End Key. For
example, the voice menu uses key 1 through key 5. You can
define 6,7,8 as Invalid Keys (use comma between two keys).
Invalid Voice: When invalid keys are input, play the Invalid
Voice file defined here. If this field is left blank, then no
invalid voice will be played.
Before Voice: The voice file played before this cell.
If this field is left blank, then no before voice will be played.
Fill in a full path here if the Use WavePath field is selected
to be False,
e.g. C:\Program Files\Eletech\ContaX IVR\Waves\05.wav
Enter partial file name here if Use WavePath field is selected
to be True, e.g. 05.wav
After Voice: The voice file played after touch-tone inputs.
If this field is left blank, then no After Voice will be played.
Fill in a full path here if the Use WavePath field is selected
to be False,
e.g. C:\Program Files\Eletech\ContaX IVR\Waves\06.wav
Enter partial file name here if the Use WavePath field is
selected to be True, e.g. 06.wav
Retries Count: If invalid keys are input, this is the number
of times that the program will retry executing from the Start
pin of the cell. If the retry count is over, then the system
exits from the TimeOut pin.
Stop by Key: Select True or False. If True is selected, then
pressing any key any time while CONTAX IVR is playing
Before Voice, After Voice, or Invalid Voice may terminate
the playing. If False is selected, then the voice will be played
to its end without being interrupted by pressing any key
during it’s playing.
Use WavePath: Select True or False
Please refer to Use WavePath in section 4.3.1 Greeting.
ASR Enabled: Select true to enable ASR engine to translate
user voice input into strings as GetKey's input. Touch-tone
output by ASR will be stored in Key Variable; Keyword
string output will be stored in ASR Keyword Variable.
ASR Commands: Click to edit, a text edit box will appear,
enters the grammar rules for ASR engine.
ASR Invalid Key: Enter keys that are defined in the voice
menu, extension, Quick Keys, Clear Key, or End Key.
When ASR cannot detect any useful information from user
voice input. GetKey will follow this setting to perform next
step. For example, if you define ASR Invalid Keys as End
Key. When ASR fails to recognize input voice, it will exit to
next cell.
ASR Keyword Variable: Enter a variable name. The
keyword output by ASR will be assigned to this variable and
then can be used by other cells or other call flows.
4-19
Flow Designer Tool Cells
4.3.5 SendTone
Send DTMF tones
This cell sends touch-tones (DTMF) out. It is usually used in
communication and control over the telephone line. You can
also use this cell to send account number, password
information, or system respond voice menu.
DTMF String: enter a number of keys from the 12 keys in
the keypad (0 through 9, *, and #).
Wait complete: select True means to wait for the DTMF
string to be sent completely (it takes definite time to send
DTMF tones to be received by the receiving end) before
executing the next cell.
4.3.6 Transfer
Transfer a call to another extension
via a PBX
This cell transfers a call to an extension or to an outside
phone then exit from its Next pin. If a busy tone is detected,
exit from its Busy pin. If the phone keeps ringing without
answering, then exit from its NoAnsw pin.
Target: enter an extension number or an outside phone
number. E.g. 2385 or +1 (408) 766-1234.
If you set 0 or 9 for Outgoing prefix dialing in the Channel
Setting section of 6.2 Runtime Engine, you do not need to
enter the prefix here to get an outside line.
If country code and area code are entered in Target and the
number is a local phone number, then the country code and
area code will be screened providing you have set them in
your Windows system (Start -> Settings -> Control Panel
-> Phone and Modem -> DialingRules/My Location). The
system will only dial the local number for you.
You may enter the local phone number without country code
and area code in Target if you are sure it is a local number.
Blind Transfer: select True or False. If true is selected,
Transfer cell perform blind(automatic) transfer. In this
method, Runtime Engine let the switch (PBX) to handle the
transfer task.
Note: By default, Transfer cell perform supervised transfer.
Not every PBX support this method.
Conference: select True or False. If true is selected, then
the system will connect three parties (caller, transferrer
Flow Designer Tool Cells
4-21
(computer), and transferred target) like a conference instead
of only two (connects caller and transferred target, hangs up
transferrer (computer)). Hanging up the transferrer
(computer) means to end up the call flow. If you want the call
flow to monitor or record a call after transfers it, you need to
select True for the Conference property of the Transfer cell.
If False is selected, then the system performs transfer
function without conferencing.
The difference between Transfer cell with Conference
property and the following Conference cell is that
Conference cell can connect more than three parties by
chain linking of many Conference cells while Transfer cell
with Conference property can only connect three parties.
4.3.7 Conference
Connect a call with another extension
via a PBX
This cell connects a call with an extension or with an outside
phone then exit from its Next pin. If a busy tone is detected,
exit from its Busy pin. If the phone keeps ringing without
answering, then exit from its NoAnsw pin.
Target: enter an extension number or an outside phone
number. E.g. 2385 or +1 (408) 766-1234.
If you set 0 or 9 for Outgoing prefix dialing in the Channel
Setting section of 6.2 Runtime Engine, you do not need to
enter the prefix here to get an outside line.
If country code and area code are entered in Target and the
number is a local phone number, then the country code and
area code will be screened providing you have set them in
your Windows system (Start -> Settings -> Control Panel
-> Phone and Modem -> DialingRules/My Location). The
system will only dial the local number for you.
You may enter the local phone number without country code
and area code in Target if you are sure it is a local number.
4.3.8 MakeCall
Call
via
another
channel
line
to
execute a new call flow
Via another channel line of the voice board, this cell calls to
an extension or an outside line to execute a new call flow and
then exit from its Next pin.
Flow Designer Tool Cells
4-23
If the specified channel line (entered in the Select Channel
field of the cell’s property table) is not available (may be
occupied), then this cell will exit from its UnAvail pin.
While the system is making the call, if a busy tone is detected,
the cell exits from the Busy pin. If the phone keeps ringing
without answering, the cell then exits from the NoAnsw pin.
For all other fails, the cell exits from the Fail pin.
Target: enter an extension number or an outside phone
number. E.g. 2385 or +1 (408) 766-1234.
If you set 0 or 9 for Outgoing prefix dialing in the Channel
Setting section of 6.2 Runtime Engine, you do not need to
enter the prefix here to get an outside line.
If country code and area code are entered in Target and the
number is a local phone number, then the country code and
area code will be screened providing you have set them in
your Windows system (Start -> Settings -> Control Panel
-> Phone and Modem -> DialingRules/My Location). The
system will only dial the local number for you.
You may enter the local phone number without country code
and area code in Target if you are sure it is a local number.
Select Channel: enter a channel number (which is defined in
section 6.2.1 Channel Tab of the Runtime Engine).
Call flow Filename: Enter the call flow file name that
CONTAX IVR system will trigger when the Target is dialed
through successfully.
Call flow Parameters: Assign variables of this call flow to
variables of the new call flow. For example, A is a variable of
this call flow. F is a variable of the new call flow. We can
assign A to F. Because F is not a variable of this call flow, no
parentheses ([]) to enclose F are needed.
Delay Call (ms): The value is in millisecond (a thousandth
of a second, 300 ms = 0.3 second). This property is used to
delay a certain amount of time before executing this cell.
Often it is used to wait previous cell to fully complete PBX
hang up action. If the delay time is zero or too short, the
channel line may be still unavailable when MakeCall starts to
execute.
4.3.9 Switch
Connect two channels
This cell is used to connect two channels in T1/E1 connection.
Target Channel: enter a channel number (which is defined
in section 6.2.1 Channel Tab of the Runtime Engine).
Switch Action: Select from the drop down list.
Connect: The cell connects the other channel then exits
from its Next pin.
Monitor: The cell monitors the other channel then exits
from its Next pin. If the other channel hangs up,
the cell then exits from the Close pin.
Disconnect: The cell disconnects the other channel then
exits from its Next pin.
4-25
Flow Designer Tool Cells
4.4 Media Control Cells
The following cells control various media (voice/speech,
data/database, Web page, Fax, Email, and SMS).
4.4.1 Speech
Convert text to speech
CONTAX IVR supports Microsoft Speech API (SAPI) engine.
Microsoft Windows XP already includes Text-to-Speech (TTS)
function. For other Windows operating systems, you can
install the TTS function from CONTAX IVR CD (run setup.exe
under SAPI51 folder to install Microsoft Speech SDK5.1 and
run setup.exe under SAPI51LangPack folder to install
Microsoft Speech SDK5.1 Language Pack).
Text: enter texts directly here or you can enter texts with a
Text Builder by clicking the button with ellipses (three periods)
mark appears at the right edge of the field after clicking on the Text
field. The text can contain variables enclosed by a pair of
parentheses
Stop by Key: Select True or False. If True is selected, then
pressing any key any time while executing the TTS will
terminate the TTS. If False is selected, then the TTS will be
executed till the end (of the text/file) without being
interrupted by pressing any key during it’s executing.
Keep Stop Key: Select True or False. Default is True. Usually
we select it to be true.
True: means keep the stop key in the memory buffer.
Normally a caller has no idea of stop key. He or she may
input the DTMF required by the next cell while the TTS or
greeting of this cell is still playing. So we need to keep these
DTMF input for the next cell.
False: means to clear the memory buffer that stores the stop
key pressed during TTS. If a caller is informed of the stop key,
before executing the next cell (may be GetKeys) and the
caller interrupts the TTS (or greeting) and then inputs DTMF
(that will also be stored in the memory buffer) for the next
cell, clearing the memory buffer will let the next cell have
correct DTMF information without mixing it with the stop key
pressed for the previous cell.
Flow Designer Tool Cells
4-27
Voices: click the Voices field and then click the down arrow
at its right end. The Voice drop down list appears. Select a
voice from the list.
Microsoft Mary is a woman’s voice.
Microsoft Mike is a young man’s voice.
Microsoft Sam is an adult man’s voice.
Microsoft Simplified Chinese is a man’s voice for converting
simplified Chinese text to speech.
Currently Microsoft does not provide the TTS for traditional
Chinese text. You may use Microsoft WORD to convert the
traditional Chinese to simplified Chinese first.
Rate: It is the speed of the speech. Ranged from –10 to +10.
0: normal speed
Negative integer: slower
Positive integer: faster
Volume: Can be adjusted from 0 to 100
Speech from file: Enter a text (.txt) or XML file name. TTS
will convert its text to speech.
Speech to Wave file: Enter a Wave (.wav) file name. The
speech of the text will be saved to this Wave file.
.
4.4.2 DBQuery
Execute a Database operation
This cell executes a Database operation and then exits from
its Next pin. If the operation result is out of range, not found,
or database empty, the cell then exits from its OoR pin. If
the operation is not successful, the cell then exits from its
Fail pin.
Conn Name: The default name is Db1. You can create your
own connection name. This connection name is a dynamic
variable. All column names under Db1 will also become
dynamic variables (e.g. Db1.Name, Db1. Order_No, etc).
Connect String: If the Action field below is selected to be
Query Open, then you need to select this field (otherwise
leave this field bank).
Click the field and a button with ellipses (three periods) mark
appears. Click the button. The Data Link Properties dialog box
appears. Select a Database defined by Windows from the list
in the Provider tab of the Data Link Properties.
Flow Designer Tool Cells
4-29
SQL Command: If the Action field below is selected to be
Query Open, then you need to enter this field (otherwise
leave this field bank). Enter the SQL command you want the
cell to execute.
In other words, the first time a DBquery cell opens a
database (with Query Open Action) in a call flow, it is
needed to specify the Connect String and SQL Command
field. Afterwards in the same call flow for the same database,
unless you operate with a different command in Query Open
Action, you can use other Actions (Move, Find, Insert,
Delete, or Update) to operate the database without respecifying the Connect String and SQL Command field.
CONTAX IVR system will not check the Connect String or
the SQL Command field if any other Action than Query
Open is selected.
Action: Click the field. The down arrow at the right end of the
field appears. Click the down arrow. The Action drop down
list appears. Select an action item from the Action drop down
list. If your selection is Query Open, then you need to select
the Connect String field and enter the SQL Command field
on above.
The Action drop down list
RecordCount Variable: If you want the system returns the
total number of rows in a database table after execution of
this cell’s database operation, you need to assign a variable
here for the total number of rows. Otherwise leave this field
blank.
Key Field Name: This field is used only if the Find Row
Action is selected.
Click this field. The down arrow at the right end of the field
appears. Click the down arrow. The Key Field Name drop
down list appears. Select an index key from the Key Field
Name drop down list for the database to find a row (or rows)
by the selected index key.
Key Field Value: This field is used only if the Find Row
Action is selected.
4-31
Flow Designer Tool Cells
Same as the Key Field Name, enter an index key value for
the database to find a row (or rows) by the entered index key
value.
Auto Refresh: Select True or False.
True means after writing back the database tables from
memory to disk, the system reads them back to the memory
again. Because different callers or users may update different
fields of the table at the same time, Auto Refresh ensures
the tables in the memory to be the latest updated one.
4.4.3 CallURL
Link to an URL page
This cell links to an URL page then exit from its Next pin. If
after the Web sever is connected but no information is
returned for a period of time, the cell then exits from its
TimeOut pin. For all other fails including network failure and
any error code returned from the Web server, the cell exits
from its Fail pin.
The Internet address or Web page may be an Active Server
Page (ASP) that contains HTML and embedded programming
code written in VBScript or Jscript. When Microsoft's Internet
Information Server (IIS) encounters an ASP page requested
by the browser from this cell, it executes the embedded
program. This will allow the call flow to interact with
databases and other programs via the called Web pages.
Web URL: Enter the Uniform Resource Locator (URL) or the
Internet address you want the call flow to call (for example,
http://www.eletech.com/Sample.ASP) containing the access
protocol (http), the domain name (www.eletech.com), and the
path to a file or resource residing on that Web server (Sample.
ASP).
4.4.4 SendFax
Send Fax
This cell sends Fax to a specified Fax number after that Fax
number is dialed successfully by previous cell(s), then it exits
from its Next pin. If it fails to send the Fax, then it exits from
its Fail pin.
Flow Designer Tool Cells
4-33
Source File(s): Click to select the Source File(s) field. Click
the field again to edit the field. You will notice that an empty
field with a blinking cursor at the first character of the field
appears. Also a button with ellipses (three periods) mark
appears at the right edge of the empty field. You can direct
enter the source Fax file(s) you want to send in this field. You
can also double click the empty field or just click the ellipses
button, and then the open file dialog box appears. From it
you can select the source Fax file(s) you want to send.
Multiple files will be separated with semicolons (;). They will
be sent in the order of your input or selection.
File format supported are text (.txt), TIFF (.tif), JPEG (.jpg),
GIF (.gif), BMP (.bmp), PCX (.pcx), and DCX (.dcx) files.
Header Line: This header line will appear on each page of
the Fax received by the recipient. The space between two
tags is shown as on the field. You can edit those spaces on
the field.
$R is the tag for the recipient’s name defined in the Header
Recipient property item. It has a variable length.
$F is the tag for the sender’s name defined in the Header
Sender property item. It has a variable length.
$I is the tag for the station ID defined in the Station ID
property item. It has a variable length.
$D is today’s date in MM/DD/YY format. Total 8 characters.
$T is current time in HH:MMam or HH:MMpm format. Total 7
characters.
Header Title: Enter the title of the Fax, e.g. Invitation or
Quotation.
Header Recipient: Enter the recipient name or variable.
Header Sender: Enter the sender name or variable.
Header Font: Double-click the field and the Font dialog box
appears. Select the Font, Font style, Size, and Effects for the
header.
Text Font: Double-click the field and the Font dialog box
appears. Select the Font, Font style, Size, and Effects for the
text file.
Station ID: Enter the station ID to identify your organization,
e.g. Eletech Ent. You can also enter different Station ID for
different departments or cost centers of your organization.
Then it will be easy to do statistics for each Station ID.
Fax Class: Click the field. A down arrow button will appear at
the right edge of the field. Click the down arrow button. The
Fax Class drop down list appears. From the drop down list,
select Auto Detect, Class1, Class2, or Class2.0 for the target
Fax machine.
Remote ID Variable: Enter a variable name. The remote ID
will be captured while handshaking. Assign the remote ID to
the variable for later use, e.g. statistics.
4.4.5 RecvFax
Receive Fax
Flow Designer Tool Cells
4-35
This cell receives incoming Fax and save the Fax to an
assigned file, then it exits from the Next pin. If it fails to
receive the Fax, then it exits from the Fail pin.
In an incoming call instead of Fax situation, if the caller hangs
up, then the cell exits from its Next pin. Otherwise it exits
from its Fail pin.
Name mode: The incoming Fax will be saved as image files.
One file is saved for each Fax page. The Name mode will
define how to automatically assign the file name.
From the drop down list, select Channel-Serial-page or
Channel-MonthDay-page.
Channel-Serial-page: Each Fax page will be saved as a file
with the file name automatically assigned by Channel
Number- System-wise Serial Number (accumulated from total
Fax events in the system) – page number. For example, file
5-28-1 means the 1st page for Fax serial number 28 on
channel 5.
Channel-MonthDay-page: Each Fax page will be saved as a
file with the file name automatically assigned by Channel
Number- DateTime – page number. For example, file 704101731-1 means the 1st page at 17:31 of April 10th on
channel 7. The time is acquired when the cell completes
receiving the Fax and before saving as image files. Usually a
Fax process including handshaking will exceed one minute. So
the file name won’t be duplicated.
Output file type: Select TIFF, JPEG, GIF, BMP, PCX, or DCX
from the drop down list.
Destination Path: Enter a file path for the Fax files, for
example, C:\Sales. So the above mentioned Fax page file
name will be C:\Sales\5-28-1.
Fax Class: From the drop down list, select Auto Detect,
Class1, Class2, or Class2.0 for the incoming Fax machine.
Station ID: Enter the station ID for the receiving end to
identify your organization, e.g. Eletech Ent. You can also enter
different Station ID for different departments or cost centers
of your organization. While handshaking, the sending Fax will
acquire this Station ID and then it will be easy for the sending
Fax to do their statistics.
Remote ID Variable: Enter a variable name or select it from
the drop down variable list. The remote Station ID of the
sending Fax will be assigned to this variable.
Receive files variable: Enter a variable name or select it
from the drop down variable list. The received files will be
assigned to this variable. This variable will contain a string of
file names separated with semicolons (;).
4.4.6 SendEmail
Send Email
Flow Designer Tool Cells
4-37
This cell sends email via the SMTP server then exits from the
Next pin. If fails to send the email, it will exit from the Fail
pin.
From Address: Enter the sender’s email address. This
address is also where the returned email goes to if the
recipient replies.
Recipients: Enter recipient email address. Separate multiple
recipients with semicolons (;).
You can also click the ellipses (three periods) button at the
right edge. The Recipient builder dialog box appears. Enter
email address on the Email address field at the top of the
box. Separate multiple recipients with semicolons (;). Click
the Recipients button to copy and paste the email addresses
to the Recipients box. You can also click the CC or Bcc button
to copy and paste the email addresses to the CC or Bcc box.
You can use a string variable to represent an email address or
many email addresses. For example, [sales] to represent all
email addresses for the sales department.
Email address variables can be used with database operation
to create powerful e-commerce or v-commerce tools. For
example, when a caller purchases a product, an email will
automatically be sent to the product’s supplier and/or its
dealer. The email Subject and/or content (Body) may be
different regarding whom it is sent to.
After all the required email addresses are pasted on the
recipients boxes, click the OK button to paste them to the
respective property fields.
CCList: same as above Recipients property.
BccList: same as above Recipients property. Here Bcc
means Blind carbon copy. The Bcc recipients are not
displayed in the message header. The TO and CC recipients
will not know that a copy has sent to these addresses.
Subject: Enter the subject of the email. You can also enter a
string variable here.
Body: Click the ellipses (three periods) button at the right
edge of the field. The Text builder dialog box appears. Enter
the content on the Text String box. You can insert variables
among the text to have a programmable content by selecting
variables from the Available variables box and then clicking
the Add button.
You can also copy the content of a file and paste it to the
Text String box. Click the Load button at the left bottom.
The open file dialog box appears. Click to select a text file
then click the Open button. The text content of the selected
file will be pasted to the Text String box.
To clear the content of the Text String box, click the Clear
button.
To save the content of the Text String box, click the Save
button.
Click the OK button to paste the content of the Text String
box to the Body property field.
Attachment: Enter the attachment file names. You can also
click the ellipses (three periods) button at the right edge of
the Attachment property field. The Open file dialog box
4-39
Flow Designer Tool Cells
appears. Click to select the files you want to attach with the
email.
SMTP Server: Enter the SMTP (Simple Mail Transfer Protocol)
server name that routes your messages.
SMTP Port: Use the default value 25 unless it has been
changed during email server installation.
4.4.7 RecvEmail
Receive Email
This cell receives email from the POP3 server then it exits
from its Next pin. If it fails to receive email from the POP3
server then it exits from its Fail pin.
POP3 Server: Enter the POP3 (Post Office Protocol 3) server
name that stores the incoming emails.
POP3 Port: Use the default value 110 unless it has been
changed during the email server installation.
Userid: Enter the User ID for the email account. Usually
enter a variable here to get input from a caller via a
GetDigits cell.
Password: Enter the Password for the email account. Usually
enter a variable here to get input from a caller via a
GetDigits cell.
Action: Click the down arrow button at the right edge of the
field. From the drop down list, click to select Retrieve Mail
or Query Message Count.
Retrieve Mail: Retrieve the sender, Cc, Subject, Date, Time,
mail body, and attachment information from the mail server.
Query Message Count: Count the total number of emails
stored in the mail server for the email account.
Message Index: Enter a number to index which email to
retrieve. 1 means the first email, 2 means the second email,
etc. You can also enter a variable here.
Delete: Select True or False. True means to delete the
email from the mail server after this retrieval. False means do
not delete the email from the mail server after this retrieval.
Retrieve Attachment: Select True or False to retrieve the
attachment or not.
Retrieve Body: Select True or False to retrieve the email
body or not.
4-41
Flow Designer Tool Cells
MessageCountVariable: Define a valuable to store current
total email number for the email account in the mail server.
Sender Variable: Enter a valuable to store the sender
information. You can also click to select from the drop down
available variable list by clicking the down arrow button at
the right edge of the field.
Date Variable: Enter a valuable to store the date
information. You can also click to select from the drop down
available variable list by clicking the down arrow button at
the right edge of the field.
Subject Variable: Enter a valuable to store the subject. You
can also click to select from the drop down available variable
list by clicking the down arrow button at the right edge of the
field.
Body Variable: Enter a valuable to store the email body.
You can also click to select from the drop down available
variable list by clicking the down arrow button at the right
edge of the field.
Attachment Path: Enter a file path to save the attachment
after this retrieval.
Attachment Variable: Enter a valuable to store the
attachment path. You can also click to select from the drop
down available variable list by clicking the down arrow button
at the right edge of the field.
4.4.8 SendSMS
Send Short Message
This cell sends SMS (Short Message Service) to a target
mobile phone and then the cell exits from its Next pin. If it
fails to send the SMS, then it exits from its Fail pin.
SMS Model: This is the model of the mobile phone installed
beside CONTAX IVR runtime server. The mobile phone is
connected to one of the COM ports on the server. It is used to
send out short messages for the server.
Click to select a model from the drop down list.
SMS Port: Click to select a serial port on CONTAX IVR
runtime server to send this short message from the server
via the mobile phone selected in the above SMS Model
property item. You can connect 8 mobile phones with COM1
through COM8.
SMS Mode: Select the connection data cable or infrared
connection between the server and mobile phone to send this
short message.
Target: Enter the target mobile phone number you want to
send the SMS to.
The SMS is sent through a mobile phone installed beside the
CONTAX IVR runtime server. You do not need to enter the
prefix here to get an outside line.
Contents: Click the ellipses (three periods) button at the
right edge of the field. The Text builder dialog box appears.
Enter the content on the Text String box. You can insert
Flow Designer Tool Cells
4-43
variables among the text to have a programmable content by
selecting variables from the Available variables box and
then clicking the Add button.
You can also copy the content of a file and paste it to the
Text String box. Click the Load button at the left bottom.
The open file dialog box appears. Click to select a text file
then click the Open button. The text content of the selected
file will be pasted to the Text String box.
There is no limit to the maximum number of characters you
can enter in the Text String box. However, generally no
more than 140-160 characters in length (depending on the
mobile service system) will be sent and transmitted. If a
double-byte mobile phone set is used (e.g. in China, Japan,
Korea, Taiwan, Hong Kong, etc.), the character length is
around 70. The mobile phone will truncate all extra
characters, which exceed 140-160 or 70 in length.
To clear the content of the Text String box, click the Clear
button.
To save the content of the Text String box, click the Save
button.
Click the OK button to paste the content of the Text String
box to the Contents property field.
4.5 Variables, Operations, and Functions
4.5.1 Variables
In addition to the eight default variables, the additional
variables are created in the variable table of a call flow. These
variables can be assigned as operations of other variables, as
functions of other variables, or as an expression (combination
of both).
4.5.2 Operations
The following operators are supported (usually the operand
types are automatically identified/converted):
Binary Arithmetic Operators
Operator
Operation
------- -
--------------------
+
addition
-
subtraction
*
multiplication
/
division
div
integer division
mod
modulo
(resulting the remainder of a
division. For example, 17 MOD 5 result in 2
(17/5 = 3 with a remainder of 2)).
Unary Arithmetic Operators
Operator
Operation
----------
----------------
+
sign identity
-
sign negation
String Operator
Operator
Operation
4-45
Flow Designer Tool Cells
---------
-----------------
+
concatenation
Boolean Operators
Operator
Operation
----------
--------------
not
negation
and
logical and
or
logical or
xor
logical xor (returns a true value if one of its operands,
but not both, is true. Also called exclusive OR)
Bitwise Operators
Operator
Operation
----------
------------------------
not
bitwise negation, flip
and
bitwise and
or
bitwise or
xor
bitwise xor
Relational Operators
Operator
Operation
----------
--------------------------
=
equal
<>
not equal
<
less than
>
greater than
<=
less than or equal to
>=
greater than or equal to
4.5.3 Functions
The following functions are supported. For a full description of
these functions and their parameters, please refer to the next
section (4.5.4 Functions Detail).
String Functions
CHR, COPY, POS, LENGTH, UPPER, LOWER, GETITEM,
GETITEMCOUNT
Arithmetic functions
ABS, INT, TRUNC, ROUND, PI, SIN, COS, ARCTAN, EXP, LN,
POWER, SQR, SQRT, FRAC
Time Functions
TIMER, NOW, DATE, TIME
4-47
Flow Designer Tool Cells
Type Cast
BOOLEAN, STRING, INTEGER, FLOAT
IF Function
IF (Condition, TrueResult, FalseResult)
Condition is a Boolean expression. When the function is
evaluated, it returns TrueResult if Condition else
FalseResult. TrueResult and FalseResult need not be of the
same type and the type of the IF expression may change
depending on Condition.
4.5.4 Functions Detail
String Functions
CHR
Return s the character for a specified ASCII value.
CHR( X: integer ): string
COPY
Returns a sub-string of a
characters staring at Index.
string
Copy(S, Index, Count: integer): string
Description
containing
Count
S is an expression of a string. Index and Count are
integer-type expressions. Copy returns a sub-string
containing Count characters starting at Index.
If Index is larger than the length of S, Copy returns an
empty string.
If Count specifies more characters than are available, only
the characters from Index to the end of S are returned.
POS
Returns the index value of the first character in a specified
sub-string that occurs within a given string.
Pos(Substr: string, S: string): integer
Description
Pos searches for a sub-string, Substr, in a string, S. Substr
and S are string-type expressions.
Pos searches for Substr within S and returns an integer
value that is the index of the first character of Substr
within S. Pos is case-sensitive. If Substr is not found, Pos
returns zero.
LENGTH
Returns the number of characters in a string.
Length(S): integer
Flow Designer Tool Cells
4-49
Description
Length returns the number of characters actually used in
the string.
For single-byte (AnsiString) and multi-byte strings, Length
returns the number of bytes used by the string. For
Unicode (WideString) strings, Length returns the number
of bytes divided by two.
S is a string-valued expression.
UPPER
Returns a copy of a string in uppercase.
Upper(S: string): string
Description
Upper returns a copy of the string S, with the same text
but with all characters between 'a' and 'z' converted to
uppercase.
LOWER
Converts an ASCII string to lowercase.
Lower(S: string): string
Description
Lower returns a string with the same text as the string
passed in S, but with all letters converted to lowercase.
The conversion affects only characters between 'A' and 'Z'.
GETITEM
Get the nth item of a string separated by character(s)
SepChar.
GETITEM(n, S: string, SepChar: string): string
Here n is a positive integer.
GETITEMCOUNT
Get the items count of string separated by character(s)
SepChar.
GETITEMCOUNT(S: string, SepChar: string): integer
Arithmetic functions
ABS
Returns the absolute value of the argument X.
ABS(X)
INT
Returns the integer part of a real number.
INT(X)
Flow Designer Tool Cells
4-51
TRUNC
Truncates a real number to an integer.
TRUNC(X)
ROUND
Returns the value of X rounded to the nearest whole
number.
ROUND(X)
PI
Returns 3.1415926535897932385.
SIN
Returns the sine of the angle X in radians.
SIN(X)
COS
Returns the cosine of the angle X, in radians.
COS(X)
ARCTAN
Returns the arctangent of X.
ARCTAN(X)
EXP
Returns the exponential of X.
EXP(X: real): real
LN
Returns the natural log of a real expression.
LN(X: real): real
POWER
Raises Base to any power.
Power(Base, Exponent)
SQR
Returns the square of a number.
SQR(X)
SQRT
Returns the square root of X
SQRT(X)
FRAC
Returns the fractional part of a real number.
Flow Designer Tool Cells
4-53
FRAC(X)
Time Functions
TIMER
Retrieves the number of milliseconds since the computer
was started.
NOW
Returns the current date and time.
DATE
Returns the current date.
TIME
Returns the current time.
Type Cast
BOOLEAN
Boolean Typecast.
BOOLEAN(X)
STRING
String Typecast.
STRING(X)
INTEGER
Integer Typecast.
INTEGER(X)
FLOAT
Float Typecast
FLOAT(X)
IF Function
IF (Condition, TrueResult, FalseResult)
Condition is a Boolean expression. When the function is
evaluated, it returns TrueResult if Condition else
FalseResult. TrueResult and FalseResult need not be of the
same type and the type of the IF expression may change
depending
on
Condition.
Creating and Simulating an IVR Application
C h a p t e r
5-1
5
Creating and Simulating an
IVR Application
5.1 Creating an Application
In order to understand your customer needs, you need to
analyze your customer’s requirements. Turn the requirements
to a structured draft flow will increase the communication
with customers and with future maintenance persons. This
method will also ease your design effort with clear function
blocks and expansions.
Here are a few guidelines for the draft flow. You may adapt
them for use with your organization’s methodology.
1. use a pair of quotation mark “ ” to include a DTMF input.
2. underlines the equivalent of voice input for the Automatic
Speech Recognition (ASR).
3. Place the content of greetings in the function blocks and
the wav file names at the right bottom corner of the blocks.
So it will be easy for you to complete the voice recording
production.
4. If a block is too complex to be described in the box,
expand the sub-modules to a detailed flow in the next
page (e.g. in the following example, VR_Recording block is
expanded on the next page).
Voice Portal
Comment Description
_: Voice Input (underline)
"": DTMF Input
Intalic:Event
Intalic:Setting
VP
Welcome to Eletech
0-0.wav
press 1 to introduce
press 2 to message center
presss 3 to recording
press 4 to transfer
0-1.wav
"1" introduce
"2" message
You have new message
eletech.com
0-2.wav
VP_Recording
VP_Transfer
0-3.wav
VP
VP
Eletech Ent.
"4" transfer
"3" recording
Project
Auto Attendant
Date
Designer
James Chen / SW dept.
Note
Module
Voice Portal main menu
Version
2001/12/10
1.0.1
No. / Total
01 / 03
5-3
Creating and Simulating an IVR Application
VP_Recording
Comment Description
_: Voice Input (underline)
"": DTMF Input
Intalic:Event
Intalic:Setting
Recording
Please recording after
hear beep sound; and
press any key to stop
recording
1-2.wav
Beep
1-3.wav
anykey
Press 1 to listen
Press 2 to re recording
Press 3 ready to send
Press * cancel
Valid
"1" listen
Recording message
1-5.wav
1-4.wav
"2" recording
Send successful
goto 1-2
VM
1-6.wav
goto 1-4
Eletech Ent.
"*" cancel
"3" send
VM
Project
Auto Attendant
Date
Designer
James Chen / SW dept.
Note
Module
VP Recording
Version
2001/12/10
1.0.1
No. / Total
02 / 03
5.2 Simulating and Testing
When you complete designing an IVR call flow using CONTAX
IVR Flow Designer, you can save the call flow as an .ivx file.
Before saving you call flow. Click View/Information on the
menu bar of the main window, an Information dialog box
appears. Enter detail information for this .ivx file. The details
for call flow file will appear on the printed call flow layout.
You can click File/Print… to perform this printing job.
Creating and Simulating an IVR Application
5-5
If you click Run button
from the top toolbar without
saving it, a Save dialog box will appear to ask you to save the
call flow first.
5.2.1 Simulating An Existing Call Flow
Click the Run button to run the CONTAX IVR program on your
computer or from Internet connection. The CONTAX IVR main
window with an empty design pane will appear.
Click File/Open on the menu bar of the main window, a
CONTAX IVR file open dialog box appears. Click to select an
existing call flow file (.IVX file) from the file open dialog box
or from the Look in drop down list. The selected call flow file
name will appear on the File name field.
Click the Open button on the file open dialog box. The
selected call flow will appear on the design pane of the main
window. The variable table of the call flow is also displayed on
the variable table pane.
Click the Run button on the top toolbar, the Phone Emulator
window appears.
Creating and Simulating an IVR Application
5-7
Click the Call button on the phone emulator to run the call
flow. You will notice that the executing current cell icon is
highlighted with yellow color. The global variable table at the
left lower portion of the window is updated accordingly during
the executing process of the call flow. A debug window in
below displays step-by-step status and variable content for
each cell’s execution. The call flow will stop at a cell that
needs keypad input (e.g. GetDTMF). Click the number key
on the phone emulator keypad to input the digits. The call
flow execution will continue based on your input information.
edit field can be used to specify
The
the CallerID for this simulation session. Click the button near
by the edit field, a CallInfo Editor dialog will appear. This
dialog allows you to view/edit additional call information that
associates with global variables. Include "ChennelNo",
"PhoneNumber", "CallerID", "CallerName", "CalledID",
"CalledName", "CallData" And "ServiceID".
You can check
to enable step-by-step capability.
When enabled, you need to click the Next button in the "Next
Step" panel to make the simulator continues until next break
point. In this panel, you can also supervise witch branch the
flow goes on. For example, you can assume transfer no
answer to force call flow run into a branch that handling this
situation.
To run the flow again, you need to stop the current running
call flow. Just click the highlighted End button
the Run button again.
then click
Creating and Simulating an IVR Application
5-9
IVR System Monitor and Runtime Engine
C h a p t e r
6-1
6
IVR System Monitor
Runtime Engine
and
6.1 System Monitor
The CONTAX IVR System Monitor contains system log and
system report. System log records all system activities.
System report records incoming, outgoing, and abandoned
call information.
Start -> Programs -> CONTAX IVR v2.1 -> LogViewer to
display the LogViewer window.
IVR System Monitor and Runtime Engine
6-1
6.2 Runtime Engine
Start -> Programs -> CONTAX IVR v2.1 ->
RuntimeEngine to display the Runtime engine dialog box.
6.2.1 Channel Tab
Add Channel
Click the Channels tab. Click the Add Channel button. The
Add Channel dialog box appears. Click to select a channel line
and then click the Add button. The selected channel will be
added on the Runtime engine dialog box.
Remove Channel
To remove an added channel line, click the Remove Channel
button. A Confirm dialog box appears. Click Yes to confirm it.
Channel Setting
To set a channel line, click the Channel Setting button. The
Channel Setting dialog box appears.
If you have many channel lines to set with the same content,
you can check to select the Apply to all channels item at
the bottom of the Channel Setting dialog box. After you check
the Apply to all channels item, if you enter values to an
item field, you will see the item name will change its color
from black to red. This means this item value will be applied
and duplicated to all other channel lines. So you don’t bother
with entering this value for other channel lines repeatedly.
IVR System Monitor and Runtime Engine
6-3
Phone Number: Enter the PSTN/PBX phone number for this
channel.
Incoming Call Flow File: Click to select the field of the item
box. Enter a full path of the file so
that an incoming call of this channel
line will trigger to run this call flow.
You can also click the button with
ellipses (three periods) mark at the right
edge of the field. The file open dialog
box will appear. Click to select an
ivx file then click the Open button.
The selected file will be entered in
the field.
CallURL Web Server: Enter the web server IP address that
this channel’s call flow file will use a
CallURL cell to call an URL. (If the
field is blank, the Web Server in the
call flow will use its declaration, if
you specify a value, all the Web
Server in the call flow will be
replaced to this value)
Internal prefix dialing: leave it blank if no prefix is
required for dialing an internal
extension. Enter the prefix key if
required.
Outgoing prefix dialing: Enter the prefix key (usually 0 or
9). The CONTAX IVR system will
add the prefix to dial an outside
phone
number
for
Tranfer,
Conference, and MakeCall cell in
the call flow. Usually we attach one
comma to 0 0r 9 (to be 0, or 9,).
One comma means one second of
pause give by the voice board to
wait to get PBX’s outside line tone.
Voice Encoding Format: Click to select the WAV file format
of the item box that this channel’s
call flow file will use selected format
to open, play and record voice.
FaxDevice( ComPort ): Click to select the RS232 COM port
of the item box that this channel’s
call flow file will use selected port to
perform fax operations.
Enabled Inbound: Check to select. If you do not check this
item, then this channel line will be
not available for inbound calls.
Enabled Outbound: Check to select. If you do not check
this item, then this channel line will
be not available for outbound calls.
OK: Click the OK button after you complete entering the
above values.
IVR System Monitor and Runtime Engine
6-5
Channel Stop
Click to select a channel line you want to stop on the
Channel tab. Click the Channel Stop button. The selected
channel’s runtime activities will be stopped.
6.2.2 Console Tab
Click the Console tab. From the Select Channel drop-down
list, click to select a channel you want to monitor or debug.
You will see the runtime activities of the channel displayed on
the Console tab window.
There are some click buttons to display different information
for debug.
Call-flow: display the call flow components log
Device: display Device information
Channel: display Channel information
Save to file: save the Log Data to a file named install
directory \ ChX.log. (file path is same as RunTimeEngine.exe)
6.2.3 Option Tab
Click the Option tab. Two system options are listed.
Enable Call detail record (CDR) collection: Check to enable
call detail record (CDR) collection. This option can make
RunTimeEngine record detail information into call log
database for further analysis. By default, CDR information will
be stored into CallLog table in a Microsoft Access MDB
database that you can find it in your install directory
/data/system.mdb
IVR System Monitor and Runtime Engine
6-7
Disable outbound call-processing: This option allow
RunTimeEngine to read the OutBound table in a Microsoft
Access MDB database that you can find it in your install
directory /data/system.mdb then make outbound calls.
IVR Flow Collection
C h a p t e r
7-1
7
IVR Flow Collection
Eletech collects 50 sample flows, which are classed into 17 kinds of
application for your reference. You can learn to familiarize yourself with
the use of a cell by studying these samples. You can also collect your
own samples and add them to the sample folders.
Start -> Programs -> CONTAX IVR v2.1 -> FlowDesigner. The
CONTAX IVR Flow Designer main window will appear. On the
main window, File -> Open. The file open dialog box appears.
Double-click the sample folder. A list of 17 classes of call flow
folder will appear on the box. Double-click a folder you want
to refer to. The call flows under that folder will appear for
your reference.
7.1 Press Key Sample