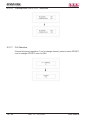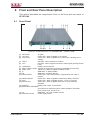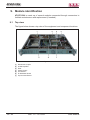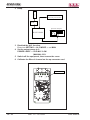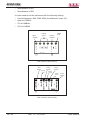
1
BLUE VIDEO
(mod. ATVST-CNV)
User Manual
Volume 1
Manufactured by
Italy
File Name:
03_ATVST-CNV_ING_1.2.indd
Version:
1.2
Date:
11/12/2008
Revision History
Document History
Date
Version
07/12/2007 1.0
01/07/2008
1.1
11/12/2008
1.2
Reason
First Edition
Internal or external adjustment
addendum
VHF version integration
Editor
P. Tassin
E. Montagna
E. Montagna
ATVST-CNV - User Manual
Version 1.2
© Copyright 2007-2008
R.V.R. Television
Via del Fonditore 2/2c - 40138 - Bologna (Italia)
Telephone: +39 051 6010506
Fax:
+39 051 6011104
Email:
[email protected]
Web:
www.rvr.it
All rights reserved
Printed and bound in Italy. No part of this manual may be reproduced,
memorized or transmitted in any form or by any means, electronic
or mechanic, including photocopying, recording or by any information storage and retrieval system, without written permission of the
copyright owner.
ATVST-CNV
Table of Contents
1.
2.
3.
3.1
3.2
4.
4.1
4.2
5.
5.1
5.2
6.
6.1
6.2
6.3
7.
8.
8.1
8.2
8.3
8.4
8.5
8.6
8.7
8.8
9.
9.1
10.
10.1
10.2
10.3
11.
11.1
Preliminary Instructions
Warranty
First Aid
Treatment of electrical shocks
Treatment of electrical Burns
Unpacking
General Description
Composition
Installation and configuration procedure
Transmitter Maintenace
Management Firmware
Front and Rear Panel Description
Front Panel
Rear Panel
Connector Pinouts
Technical Specifications
Operating principles
ALC
Display/Precorrector
IF Modulator Board
Up converter board
RF amp unit
Power Supply Unit
Directional Coupler
Optional Precorrector
Module Identification
Top View
Internal Adjustment
Operation for the change of channel
Calibration for the filter of channel
Tables
External Adjustment
Operation for the setting of pre-corrector
User Manual
Rev. 1.2 - 12/11/08
1
1
2
2
2
3
3
4
5
5
6
19
19
20
21
22
23
23
25
25
27
28
29
29
30
32
32
33
33
35
38
41
41
i
ATVST-CNV
This page was intentionally left blank
ii
Rev. 1.2 - 12/11/08
User Manual
ATVST-CNV
IMPORTANT
The lightning flash with arrowhead, within a triangle, is intended to alert the user of the presence
of dangerous voltage that may constitute a risk of electric shock.
The exclamation point within an equilateral triangle is intended to alert the user to the
presence of important operating and maintenance (servicing) instructions in the literature
accompanying the equipment.
1.
Preliminary Instructions
• General Warnings
This equipment should only be operated, installed and
maintained by “trained” or “qualified” personnel who are familiar
with risks involved in working on electric and electronic circuits.
“Trained” means personnel who have technical knowledge of
equipment operation and who are responsible for their own
safety and that of other unqualified personnel placed under
their supervision when working on the equipment.
“Qualified” means personnel who are trained in and
experienced with equipment operation and who are
responsible for their own safety and that of other unqualified
personnel placed under their supervision when working on
the equipment.
WARNING: Residual voltage may be present inside
the equipment even when the ON/OFF switch is set to
Off. Before servicing the equipment, disconnect the
power cord or switch off the main power panel and
make sure the safety earth connection is connected.
Some service situations may require inspecting the
equipment with live circuits. Only trained and qualified
personnel may work on the equipment live and shall be
assisted by a trained person who shall keep ready to
disconnect power supply at need.
R.V.R. Television shall not be liable for injury to persons or
damage to property resulting from improper use or operation
by trained/untrained and qualified/unqualified persons.
WARNING: The equipment is not water resistant.
Any water entering the enclosure might impair proper
operation. To prevent the risk of electrical shock or
fire, do not expose this equipment to rain, dripping or
moisture.
Please observe local codes and fire prevention rules when
installing and operating this equipment.
Operation of this equipment in a residential area may cause
radio interference, in which case the user may be required
to take adequate measures.
The specifications and data contained herein are provided
for information only and are subject to changes without
prior notice. R.V.R. Television disclaims all warranties,
express or implied.While R.V.R. Television attempts to
provide accurate information, it cannot accept responsibility
or liability for any errors or inaccuracies in this manual,
including the products and the software described herein.
R.V.R. Television reserves the right to make changes to
equipment design and/or specifications and to this manual
at any time without prior notice.
• Notice concerning product intended purpose and use
limitations.
This product is a radio transmitter suitable for frequencymodulation audio radio broadcasting. Its operating
frequencies are not harmonised in designated user countries.
Before operating this equipment, user must
obtain a licence to use radio spectrum from the
competent authority in the designated user country.
Operating frequency, transmitter power and other
characteristics of the transmission system are subject to
restrictions as specified in the licence.
2.
1
WARNING: This equipment contains exposed
live parts involving an electrical shock hazard. Always
disconnect power supply before removing any covers
or other parts of the equipment.
Ventilation slits and holes are provided to ensure reliable
operation and prevent overheating; do not obstruct or
cover these slits. Do not obstruct the ventilation slits under
any circumstances. The product must not be incorporated
in a rack unless adequate ventilation is provided or the
manufacturer’s instructions are followed closely.
WA R N I N G : T h i s e q u i p m e n t c a n r a d i a t e
radiofrequency energy and, if not installed in compliance
with manual instructions and applicable regulations,
may cause interference with radio communications.
WARNING: This equipment is fitted with earth
connections both in the power cord and for the chassis.
Make sure both are properly connected.
User Manual
Warranty
La R.V.R. Television warrants this product to be free from
defects in workmanship and its proper operation subject to
the limitations set forth in the supplied Terms and Conditions.
Please read the Terms and Conditions carefully, as purchase
of the product or acceptance of the order acknowledgement
imply acceptance of the Terms and Conditions.
For the latest updated terms and conditions, please visit our web
site at WWW.RVR.IT. The web site may be modified, removed
or updated for any reason whatsoever without prior notice.
The warranty will become null and void in the event the
product enclosure is opened, the product is physically
damaged, is repaired by unauthorised persons or is used for
purposes other than its intended use, as well as in the event
of improper use, unauthorised changes or neglect.
In the event a defect is found, follow this procedure:
Contact the seller or distributor who sold the equipment;
provide a description of the problem or malfunction for
the event a quick fix is available.
Sellers and Distributors can provide the necessary
information to troubleshoot the most frequently encountered
problems. Normally, Sellers and Distributors can offer a
faster repair service than the Manufacturer would. Please
note that Sellers can pinpoint problems due to wrong
installation.
2
If your Seller cannot help you, contact R.V.R. Television
and describe the problem; if our staff deems it
appropriate, you will receive an authorisation to return
the equipment along with suitable instructions;
3
When you have received the authorisation, you may
return the unit. Pack the unit carefully before shipment;
use the original packaging whenever possible and seal
the package perfectly. The customer bears all risks of
loss (i.e., R.V.R. shall not be liable for loss or damage)
until the package reaches the R.V.R. factory. For this
reason, we recommend insuring the goods for their full
value. Returns must be sent on a C.I.F. basis (PREPAID)
to the address stated on the authorisation as specified
by the R.V.R. Service Manager.
Rev. 1.2 - 12/11/08
1 / 44
ATVST-CNV
4
Units returned without a return authorisation may
be rejected and sent back to the sender.
•
Do not stop chest compressions while giving
artificial breathing.
Be sure to include a detailed report mentioning all
problems you have found and copy of your original
invoice (to show when the warranty period began) with
the shipment.
•
Call for medical help as soon as possible.
3.1.2
Please send spare and warranty replacement parts orders to
the address provided below. Make sure to specify equipment
model and serial number, as well as part description and
quantity.
R.V.R. Television
Via del Fonditore, 2/2c
40138 BOLOGNA ITALY
Tel. +39 051 6010506
3.
3.2
First Aid
3.2.1
All personnel engaged in equipment installation, operation
and maintenance must be familiar with first aid procedures
and routines.
3.1
Electric shock treatment
3.1.1
If the victim is unconscious
Follow the first aid procedures outlined below.
•
Lay the victim down on his/her back on a firm
surface.
•
the neck and tilt the head backwards to free
the airway system (Figure 1).
If the victim is conscious
•
Cover victim with a blanket.
•
Try to reassure the victim.
•
Loosen the victim’s clothing and have him/her
lie down.
•
Call for medical help as soon as possible.
Treatment of electric burns
Large burns and broken skin
•
Cover affected area with a clean cloth or
linen.
•
Do not break any blisters that have formed;
remove any clothing or fabric that is stuck to
the skin; apply adequate ointment.
•
Administer adequate treatment for the type of
accident.
•
Get the victim to a hospital as quickly as
possible.
•
Elevate arms and legs if injured.
If medical help is not available within an hour, the victim is
conscious and is not retching, administer a solution of table
salt and baking soda (one teaspoon of table salt to half
teaspoon of baking soda every 250 ml of water).
Have the victim slowly drink half a glass of solution for four
times during a period of 15 minutes.
Stop at the first sign of retching.
Do not administer alcoholic beverages.
3.2.2
Figure 1
•
If needed, open the victim’s mouth and check
for breathing.
•
If there is no breathing, start artificial respiration
without delay (Figure 2) as follows: tilt the head
backwards, pinch the nostrils, seal your mouth
around the victim’s mouth and give four fast
rescue breaths.
Minor burns
•
Apply cold (not ice cold) strips of gauze or dress
wound with clean cloth.
•
Do not break any blisters that have formed;
remove any clothing or fabric that is stuck to
the skin; apply adequate ointment.
•
If needed, have the victim change into clean,
dry clothing.
•
Administer adequate treatment for the type of
accident.
•
Get the victim to a hospital as quickly as
possible.
•
Elevate arms and legs if injured.
Figure 2
•
Check for heartbeat (Figure 3); if there is
no heartbeat, begin chest compressions
immediately (Figure 4) placing your hands in
the centre of the victim’s chest (Figure 5).
Figure 3
2 / 44
Figure 4
Figure 5
•
One rescuer: give 2 quick rescue breaths after
each 15 compressions.
•
Two rescuers: one rescue breath after each 5
compressions.
Rev. 1.2 - 12/11/08
User Manual
ATVST-CNV
4. Unpacking
The package contains:
1 ATVST-CNV
1 User Manual
1 Mains power cable
The following accessories are also available from Your R.V.R. Dealer:
•
4.1
Accessories, spare parts and cables
General Description
RVR Elettronica’s exciter ATVST-CNV is designed for to match important parameter
in broadcast world.
Infact principal demand of broadcasting corporation is rudgness and reliability.
The transmitter ATVST-CNV has been built in a 19”standard rack 1U, 550 mm
depth.
The equipment is inside modularised, designed for an easy maintenance and
service due to a failure of one module of the system. Final power amplifier is
located on rear panel, performed by forced air cooling.
The power supply unit is fitted in a box for servicing and can be easily removed
in case of failure.
The frontal board identified as ALC PRECORRECTOR It integrate function of
MOTHER BOARD, ALC PRECORRECTOR and CPU.
The ALC PRECORRECTOR with an analogical signal present on its 15 pin
connector type D can control the output power of an external power amplifier
within ±1dB.
An high performance 16 bit microcontroller is “supervisor unit” of all Exciter.
Complete information of many measurement are shown on LCD display. Infact
operative channel, direct power to load, reflect power from load, voltage supply,
temperature of heat sink and video/sync level are measurement selectable with
rotary encoder on front-panel
A RS232 standard interface is available for remote controll of transmitter. All
information can be send to remote PC for monitoring main functions.
User Manual
Rev. 1.2 - 12/11/08
3 / 44
ATVST-CNV
4.2
Composition
In standard configuration, ATVST-CNV exciter is composed by:
ALC
Controller of all Exciter- RS 232 interface – Analog measurement acquisition.
Interconnection with other board.
Display/Pre-corrector
User interface and standard predistorsion unit for pre-correction final
power.
IF modulator module
Vision/audio IF carrier generator and modulator.
UP converter module
High performance mixer for frequency conversion IF to RF channel
Frequency synthetizer PLL oscillator with very low phase noise.
RF amp unit
Power RF amplifier 5 W o 10W.
Directional Coupler
For direct/reflect power measurement.
Switching supply unit
Power converter with thermal and short circuit protection. Low ripple
and noise. Mains voltage from 100 to 250 Vac (47-63Hz).
Additional precorrector
As alternative to resident precorrector in Prec. ALC. Furnish more
performance for RF amp 10W.
General performance:
4 / 44
•
Internal Modular System.
•
Forced air cooling.
•
Precorrection with three slope control on front panel.
•
Predisposition to professional precorrector, it furnish more performance at
10W.
•
Synthesized oscillator with 25Hz step (precision 1Hz).
•
Low noise.
•
Low cost.
•
The principal function are regulated from frontal panel by rotary encoder.
Rev. 1.2 - 12/11/08
User Manual
ATVST-CNV
5.
Installation and configuration procedure
The equipment features an LCD with two lines by 16 characters that displays a
set of menus.
5.1
5.1.1
Transmitter Maintenace
Installing and Switching-On Operations
√ Verify that the equipment earth cable is correctly connected either to a chassis
ground point or to other earthing point. Connect the cable to the earth clamp
placed in the equipment back side.
√ Verify by a tester that the power supply voltage is into the request tolerance
and that is V=110 or 220 VAC +/- 20% and F= 50-60Hz. Connect the feeder
cable to the standard Europa socket , placed in the equipment back side.
√ Connect either a transmitting antenna or a load of 20W 50 ohm. to the RF
output connector.
On the DISPLAY LCD will appear all the function, controls, measures and the
failure (if present).
IF THE EXCITER OPERATES CORRECTLY, THE FOLLOWING SITUATIONS
WILL BE PRESENT:
All green leds on, all leds red off, PREC OFF led on, EXT 5MHZ led on (if is
present).
5.1.2
Preliminary Checks by Diplay Module
Unpack the exciter and immediately inspect it for transport damage. Ensure that
all connectors are in perfect condition.
SIGNAL
VIDEO
SYNC
PUD
PUR
TEMP
IF LEV
DEV
+7V
+15V
-15V
+26V
User Manual
NOMINAL VALUE
700mV
300 mV
Depending the power request
during the order
0,10W
54°C
0dbm
50KHz
7V
15V
-15V
+26V
0
CONDITION O %
White Signal
r 5%
Standard
< 0,15
27°C Ambient
r1
r 10%
> +6,5V
> +14,0V
> -14,0
> +26V
In Fault (Economy, OL not Lock
External disable etc.)
Rev. 1.2 - 12/11/08
5 / 44
ATVST-CNV
5.2
5.2.1
Management Firmware
ATVST-CNV Transmitter Function
ATVST-CNV Start, first screen for 5 sec.
Default screen (after 2 minuts return in Default screen).
Turn the rotatory switch to scroll to the next screen.
6 / 44
Rev. 1.2 - 12/11/08
User Manual
ATVST-CNV
5.2.2
Menu
Push rotatory switch for to enter to the function, or turn counter-clockwise for
scroll.
User Manual
Rev. 1.2 - 12/11/08
7 / 44
ATVST-CNV
5.2.3
Measure Level Selection
Push to rotatory switch to enter. There are some measure:
8 / 44
Rev. 1.2 - 12/11/08
User Manual
ATVST-CNV
5.2.4
Power Level Selection
If the ALC is MANUAL: turning the knob you can change the power output.
5.2.5
Power Level Selection
If the ALC is AUTOMATIC: turning the knob you can change the power output.
5.2.6
Precorrector On/Off Selection
Push the rotatory switch to enter: indicates the state of Precorrector.
User Manual
Rev. 1.2 - 12/11/08
9 / 44
ATVST-CNV
5.2.7
Setting Selection
Push to rotary switch to enter to the menu.
10 / 44
Rev. 1.2 - 12/11/08
User Manual
ATVST-CNV
5.2.8
Video Setting Selection
Regulation of video settings.
5.2.9
Video Level Selection
Video level regulation.
5.2.10
White Clipper Selection
Set by default to 751mV.
User Manual
Rev. 1.2 - 12/11/08
11 / 44
ATVST-CNV
5.2.11
Group DLY On/Off Selection
Insert Group delay function (ON or OFF)
5.2.12
Sound Settings Selection
Regulation of audio settings.
12 / 44
Rev. 1.2 - 12/11/08
User Manual
ATVST-CNV
5.2.13
Audio Level Selection
Input audio level regulation.
5.2.14
IF Audio Level Selection
5.2.15
IF Audio ON or OFF Selection
User Manual
Rev. 1.2 - 12/11/08
13 / 44
ATVST-CNV
5.2.16
Preemphasis ON or OFF Selection
5.2.17
CH Selection
Channel frequency regulation. Turn for change channel, press to select OFFSET,
turn for change OFFSET, enter for ESC.
14 / 44
Rev. 1.2 - 12/11/08
User Manual
ATVST-CNV
5.2.18
ALC MODE Selection
Indicates power control (AUTOMATIC or MANUAL).
5.2.19
IF Source INT/EXT Selection
External IF channel selection.
5.2.20
APL ON/OFF Selection
APL function ON / OFF.
User Manual
Rev. 1.2 - 12/11/08
15 / 44
ATVST-CNV
5.2.21
Economy On/Off Selection
Economy function ON / OFF.
5.2.22
Timer Selection
In this menu you can select the date and time to switch the IF input between
internal and external.
16 / 44
Rev. 1.2 - 12/11/08
User Manual
ATVST-CNV
5.2.23
Time Selection
Rotating the knob we can regulate the parameters. Push to confirm.
5.2.24
Date Selection
Rotating the knob we can regulate the parameters. Push to confirm.
5.2.25
Set IF Ext Selection
Rotating the knob we can regulate the switching hours. Push to confirm.
5.2.26
Set IF Int Selection
Rotating the knob we can regulate the switching hours. Push to confirm.
User Manual
Rev. 1.2 - 12/11/08
17 / 44
ATVST-CNV
5.2.27
Set IF Int Selection
Rotating the knob we can regulate the switching hours. Push to confirm.
5.2.28
Status Alarms Selection
In this screen it visualizes the list of the possible alarms.
18 / 44
Rev. 1.2 - 12/11/08
User Manual
ATVST-CNV
6. Front and Rear Panel Description
This section describes the components found on the front and rear panel of
ATVST-CNV.
6.1
Front Panel
Figure 6.1: 5/10W UHF SYNT. TV TRANSMITTER - FRONT VIEW
[1] AIR FLOW
[2] LO LOCK
[3] ALC LOCK
[4]
[5]
[6]
[7]
[8]
[9]
[10]
[11]
[12]
[13]
[14]
[15]
[16]
[17]
[18]
User Manual
Air grille.
Green LED - When is lighted LO is coupled.
Green LED - When is lighted ALC is ON, when is blinking ALC is
working.
FAULT
Red LED - When is lighted is in failure.
A.P.L.
Red LED - When is lighted not there is Video signal (Average Power
Limit).
CONTRAST
Display contrast trimmer.
BIAS, PHASE, LEVEL Trimmer for equipment precorrection (standard precorrection).
PREC. OFF
Yellow LED - When is lighted the PREC is OFF.
IF
SMB Male - IF Monitor 0dBm.
RF
SMB Male - Outlet RF Monitor.
VIDEO PRES
Green LED - Input Video present, is lighted when the video is
present.
GROUP DELAY
Green LED - When is lighted inserted Group Delay correction.
ECO
Green LED - When is lighted the A.P.L. is over of 2 minuts.
WHITE CLIP
Green LED - When is lighted white level is over predefined
threshold.
DISPLAY
Display LCD 2 raws, 16 characters.
ROTATORY ENCODER
Scroll menù for read the measure, outlet regulation, inlet Video
level, Carrier level, Sound IF, etc..
LO
SMB Male - LO Local oscillator monitor
SWITCH ON OFF
Power supply switch.
Rev. 1.2 - 12/11/08
19 / 44
ATVST-CNV
6.2
Rear Panel
Figure 6.2: 5/10W UHF SYNT. TV TRANSMITTER - REAR VIEW
[1] MAINS
[2] AIR FLOW
[3] IF IN
[4] RF IN
[5] VIDEO IN
[6] LEFT
[7] RS232
[8] FUSE MAINS
[9] 5 MHZ IN
[10] 5 MHZ OUT
[11] RIGHT
[12] TELEMETRY
[13] RF OUT
20 / 44
Connectors for 100-240 V 50-60 Hz mains power supply.
Air grille.
BNC Male - IF external input.
RF Input (Repeater configuration).
BNC Female - Video input.
Mini XLR 3 pin audio connector - Audio input left channel.
DB9 Female - RS232 connector.
Mains power supply fuse.
BNC female - External 5Mhz input.
BNC female - 5Mhz output.
Mini XLR =3 pin audio connector - Audio input left channel.
DB15 Female - IN / OUT Telecontroller signal.
N-type - RF ouput connector.
Rev. 1.2 - 12/11/08
User Manual
ATVST-CNV
6.3
6.3.1
Connector Pinouts
RS232
Type: Female DB9
1
2
3
4
5
6
7
8
9
6.3.2
NC
SDA
SCL
NC
GND
NC
NC
NC
NC
Left / Right
Type: Female mini XLR
1
2
3
User Manual
GND
Positive
Negative
Rev. 1.2 - 12/11/08
21 / 44
ATVST-CNV
7. Technical Specifications
General
Frequency range
Output power
Standard
Power supply
Power consumption
Operating temperature
5 W power amplifier
470÷860 MHz (UHF version)
170÷230 MHz (VHF version)
5/10 Watt
B,G,M,I,K PAL/NTSC
90-230 Vac 50-60 Hz
50 VA / 80VA / 160 VA
0 ÷ +45 °C
IMD (-8; -10; -16 dB)
-56 dB @ 2 W (pre-correction off)
IMD (-8; -10; -16 dB)
-65 dB @ 2 W (pre-correction on)
10 W power amplifier
Power stability
Harmonics suppression
Video connector
Audio connector
Enabling IN/OUT ed ALC connector
RS 232 connector
Video
Input level
Differential gain
Differential phase
Group delay
Level frequency response
Signal to noise ratio
Audio
Input level
Level frequency response
Harmonic distortions
Signal to noise ratio
IMD (-8; -10; -16 dB)
-52 dB @ 10W(pre-correction off)
IMD (-8; -10; -16 dB)
-60 dB @ 10W(pre-correction on)
± 0,5 dB
<- 60 dBc (with output filter)
BNC female
Mini XLR
15 pin tipo D
9 pin type D
1 Vpp / 75Ω
< 5%
< 5°
± 50 nS
± 0,5 dB
<-60 dB (weighted)
0 dBm ± 6dB / 600Ω (optional 10 KΩ)
± 0,3 dB
(30Hz±15Khz)
< 0,4 %
> 65 dB
(30Hz±15Khz not weighted RMS with deemphasis)
Protections
Max VSWR
Max Idc
Max Temperature
Max output power
22 / 44
Rev. 1.2 - 12/11/08
User Manual
ATVST-CNV
8. Operating principles
The figures below provide an overview of ATVSC-CNV.
To
antenna
Directional
Coupler
P.A
Audio Right
Stereo Coder
(Optional)
Video In
Audio Left
Video/Audio
Modulator
Up
converter
+15V -15V +5V
+26V
Power supply
A.L.C
Mains
Display +
Pre-Corrector
Optional Precorrector
Figure 8.1
Following is a brief description of the different module functions; all diagrams and
board layout diagrams are included in the “Technical Appendix” Vol.2.
8.1
ALC
Brief functional description of main unit in Exciter ATVST-CNV.
Functional Description:
•
Analog and digital acquisition of all signal measurement and readout on LCD
display. Setting (with I2C bus protocol) frequency of PLL local oscillator for
operative channel .Detecting of functional failure and inhibit of RF power
amplifier in critical situation.
•
Remote communicationwith RS 232 interface .
•
Microcontroller
: pic 18F8620 Microchip 16 bit.
•
Clock processor
: 19.66 MHz.
•
Data speed of RS 232
: 9600 Bps
•
Video analog processorfor complete predistortion video signal.
User Manual
Rev. 1.2 - 12/11/08
23 / 44
ATVST-CNV
8.1.1
•
Sync compressor-expander.
•
Luminance predistortion 0->100%.
•
Phase variation of luminance signal. ALC function with programmable attenuator
in feedback mode with rf directional coupler.
•
Automatic or manual commutation (through timer) on external IF.
CPU- Function
The function CPU is realized by MICROCONTROLLER PIC 18F8620 from the
MICROCHIP (U12). This processor realizes all the measures, the signalings and
the necessary controls to the correct operation of the apparatus, besides the CPU
communicates with the outside through a serial port RS232 (U15).
The CPU also manages the visualization on the display (2 lines for 16 characters)
and the ROTARY SWITCH. It is implement the software operational of the
AUTOMATIC LEVEL CONTROL on the outout power.
Here are present all the signals of measure, and there are the 2 peak detectors
that respectively measure the PUD RF and PUR RF. Besides the connector is
present for the remote controls and the indications.
8.1.2
5MHZ Function
The 5MHZ RF contains the necessary circuits to recognize the presence or less than
a external 5MHZ or a HIGH STABILITY BOARD (Rif. 5MHZ TXCO OPTIONAL).
The automatic commutation gives priority to the presence of the external 5MHZ ;
in lack of this, the inside reference is selected (Optional). If both are not present,
the led 5MHZ, present on the outside it will be off.
8.1.3
PWS Function
In this board is present the Power Connector (J10); It goes to the powers necessary
to the operation of the board. The powers will be distributed to the various DIN
connectors 52x2 of the function MOTHER. There are 2 regulators that stabilize
the + 5VD and +5VA and the -5VA. The +15V is filtered only.
8.1.4
Mother Board Function
The Mother Board function is the “interconnection ” for 3 module (UP Converter,
IF Modulator, Stereo Modulator), and unit of Exciter.
There are three 52x2 F Eurocard connector with two minicoaxial connector (Not
used).
Mother board includes also ALC rectifier amplifier and control logic for 5 MHz
TXCO optional High Stability oscillator.
24 / 44
Rev. 1.2 - 12/11/08
User Manual
ATVST-CNV
8.2
Display/Precorrector
Provides user interface, consists of display, led and rotatory switch. It furthermore
includes standard precorrector composed of 9 adjustments divided into three
cells.
The precorrector is composed from N° 3 cells for the distorsion, where for each
they are available the regulation of BIAS, phase and amplitude. The insertion
and the disconnection of precorrector can be done selecting the menù from the
rotatory switch.
The precorrector function is realized through a circuit to diodes commonly used
that it produces the necessary precorrection to according to of as the diodes are
polarized.
8.3
IF Modulator Board
Functional Description:
8.3.1
•
Video if carrier generator.Audio if carrier generator.Video and Audio modulation.
Analog processor for sync extraction.
•
Video and sync level acquisition.
•
White and black clipping block.
•
Group delay correction .Audio preenphasis correction. Video-audio intercarrier
PLL logic.
•
Video Carrier frequency
: 38.9 (PAL B,G) / 45.75 (NTSC M) MHz
•
Audio Carrier frequency
: 33.4 (PAL B,G) / 41.25 (NTSC M) MHz
•
Audio input impedance
: 600 Ohm @ 1 KHz
•
Video input impedance
: 75 Ohm
•
IF output level
: 0 dBm ( typical) –50 Ohm
Vision Function
The signal Video enters through the Connector MCX (J1) and it goes to the varying
gain amplifier (U29) LMH6504. The output of amplification goes to the circuit DC
RESTORE (U23) EL4093. The output of DC RESTORE drives the circuit WHITE
CLIPPER (U24) AD8036. The signal so essay is modulated to 38.9 MHZs by the
circuit U26 MC1496 (Balanced Modulator). The signal so gotten is filtered by the
filter SAW (FLT1) that it eliminates the lateral band and it realizes the vestigial
modulation (VSB) .The filter SAW attenuates around 30dB, so to output filter, has
been inserted an amplifier (U27) AG30363.
The regulations of the threshold of the WHITE CLIPPER and the input Video
Gain are realized by the electronic trimmer (U25) AD5242, that it is checked by
the CPU.
User Manual
Rev. 1.2 - 12/11/08
25 / 44
ATVST-CNV
In this board the circuits are inserted also: Synchronisms detector (U21) LM1881,
circuit for indication of the happened WHITE CLIPPER (U20) LM393, and
synchronism level measure circuits ,and the Video level signal (U22).
The relay K2 inserts or it disconnects the Precorrector of Group Delay.
8.3.2
Sound Function
The Audio signal (balanced) enters from the audio connector (CM2) and it goes
toward the operational amplifier (U18B) LF353. This Amplifier brings unbalanced
audio signal. The output level is regulated by the electronic trimmer (U19) AD5242
piloted of the CPU. The operational circuits U18A, and U16A implement the
preenphasy function. The circuit U16B drives the VCO (Q2) SST310, for to effect
the modulation FM. This integrated in stereo configuration accept in input audio
signal of the stereo channel (S1), this with the purpose to effect the correct coding
of the stereo signal.
The VCO constituted by Q2 and by the diodes VARICAP DV1, DV2, DV3, DV4,
and of the Buffer Q3 is hooked through a PLL to the frequency video 38.9 MHz
so that to center on the standard frequency 33.4 MHZs (system PAL B/G). In this
way the difference between the carrying IF Video and IF Audio remains always
5.5MHZ. The operational amplifier U13 realizes the filter PLL of the VCO. The
output signal of the VCO (Q3) SST310 passes through a diodes attenuator pin D2,
D3 HSMP3814, and it is filtered and envoy to the connector 52x2. The attenuation
of the audio signal is realized by the CPU through the electronic trimmer (U19)
AD5242. The relay K1 commanded by the CPU allows the insertion or the exclusion
of the preenphasy.
The operational circuit U17A measures the deviation level, while U14B checks the
state of “LOCK” PLL of the vco circuit.
8.3.3
Logic Function
In the Logic is present U9 EPM3164. It is a programmable logic that realizes all
the necessary digital functions to effect: DC RESTORE, PLL SOUND and hookup
of the VCTXO 38.9MHZ with the external 5 MHZ (if present).
8.3.4
Group Delay Function
The circuit GROUP DELAY is composed from N.° 6 circuits cells ALL PASS, whose
resonance frequencies are opportunely been calculated for realizing the curve
of group delay precorrection according to the various standards (PAL B/G, D/K
etc.); the values in the scheme, are to the standard PAL B/G.In particularly U7 is
an amplifier that has been inserted after the first group of 3 cells of delay with the
purpose to adjust the output gain and equalizer the band.
26 / 44
Rev. 1.2 - 12/11/08
User Manual
ATVST-CNV
8.3.5
PWS Function
The connector is brought with all the various signals, measures, commands and
controls and power supply. Besides the regulators are present to stabilize the
+5VD, +5VD, +3.3VD, -5VA. The +15V is alone filtered.
8.4
Up converter board
Functional Description:
8.4.1
•
Up-converting (frequency traslation) of IF Audio - Video carriers to UHF band
( ie: operative uhf channel).
•
Selective filterirng with tunable high Q passive filter.
•
Rf amplification to adeguate level for RF final amplifier driving.
•
IF level input
•
Frequency synthetizer PLL Local Oscillator
•
RF level output
: 13 dBm typical – 50 Ohm
•
Internal LO Monitor
: 10dBm typical – 50 Ohm
•
RF synthetizer PLL generator for local frequency source in up-convert
process.
•
Fine and coarse tuning function with internal high performance pll.
•
Out-locking detector for inhibit RF amplifier in no-locking condition.
•
Internal high stability TXCO for very low drift frequency (long term stability).
•
Very low phase noise VCO for high spectral purity (short term stability).
: 0 dBm typical – 50 Ohm
UP CONV Function
In the output it is present connector RF OUT MCX, the input signals IF IN and
other Control Signals originate from connector DIN 52x2.
IF IN signal is filtered by LOW Pass Filter and envoy to the Mixer U11 ELCM-25MH
that it effects the Up Converter using the signal LO IMP coming from the VCO. In
the board the are present stadiums amplifiers RF, U12 and U13, among which a
diodes attenuator pin D2 has been inserted, D3 HSMP3814. The output of U13
goes toward the connector MCX (J5) and it represents RF Output. The output level
is checked by the CPU through the CTRL-ALC signal.
8.4.2
VCO Function
The VCO is a component of purchase (U16) MW0512. The output goes to a divider
6dB, they output are respectively amplified by U15 and U17 AG403-86. The circuit
of PRE-SCALER, (setted to divides for 10), it allows the function of PLL.
User Manual
Rev. 1.2 - 12/11/08
27 / 44
ATVST-CNV
8.4.3
Logic Function
The integrated circuit U6 EPM3064 is a programmable logic that realizes the
functions of PLL for the hookup to the various frequencies of channel (UHF, VHF).
Its reference is an oscillator VTCXO 38.9MHZ that it can be hooked to the external
5MHz (if it present). The circuit U7B is the filter of the PLL.
8.4.4
Logic Function
The integrated circuit U1 AD9952 is a DDS (Direct Digital Sinthesis). It is a fractional
digital divisor, it is as frequency generator of reference for hooking the PLL to the
frequency of channel volute. The resolution of this integrated allows to effect the
Precision Offset in the case is present the reference external 5MHZ.
The frequencies produced by such component are equal to the frequency to the
channel frequency to divide 10.
8.4.5
PWS Function
The connector is brought with all the various signals, measures, commands and
controls and power supply. Besides the regulators are present to stabilize the
+3.3VD, +5VD, The other tensions are alone filtered.
8.5
RF amp unit
Functional Description
•
Final RF Power Amplifier is need for power amplification of rf signal.
This unit give a gain of 30 dB over 470-860 (UHF vers.) / 170- 230 (VHF vers.)
Mhz broadcast band. Input and output impedance matching is very good for
hybrid couplers used.
Rf semiconductor are LD-mos transistor , with high gain, Low intermodulation
distortion and low thermal resistance.They are ideal for ultralinearity
application. The supply voltage is +32V with a current of 1,2 Amp in quiescent
mode for Class A 5W e 300mA in quiescent mode for Class A/B 10W.
Two type of RF amplification are available: 5W and 10W.
The performances for 5W module are:
•
Power gain
: +30dB
•
Band frequency
: 470-860 (UHF vers.) / 170- 230 (VHF vers.) Mhz
•
Power output
: 5 W p-sync – 50 Ohm load
•
IMD(-8,-10,-16)
: -56dBc@2W p-sync (senza precorrettore)
•
Class A
Rf signal is connected to “input” pin of input hybrid coupler IB1. Two signal of
identical amplitude ,but quadrature phase are connected to input matching network
formed by microstrip line TL1-TL2 and C1-C2-C5. TL5 is a ¼ λ stub for matching
28 / 44
Rev. 1.2 - 12/11/08
User Manual
ATVST-CNV
impedance and also connect Gate pin of TR1 to “ gate polarization circuit”,formed
by IC1 and other passive components. In particular ,supply voltage (+28 Vcc) is
filtered and reduced to 12V by IC1. then a resistor divider ,formed by R8,R5 and
Resistive trimmer R6 is used for select the quiescent drain current for LD-mos
TR1. This value is around 600mA.
Drain pin of TR1 is connected to output matching network.This is formed by
microstrip line TL3,TL4 and capacitors C15-C16. TL4 is a ¼ λ stub for matching
impedance and also connect Drain pin of TR1 to supply voltage (+28V) with a
Low Pass Filter formed by L1-C11-C12. Power resistor R10 is need for current
sensing and for reduced Q factor of stub TL5.
The other RF path, formed by TR2 is identical ! The two quadrature signal are
combined in output hybrid coupler IB2.The power signal is available to pin “out” of
IB2. In mismatching out situation, reflected power go into inbalance power resistor
, connected to “load” pin of IB2.
The performances for 10W module are:
8.6
•
Power gain
: +30dB
•
Band frequency
: 470-860 (UHF vers.) / 170- 230 (VHF vers.) Mhz
•
Power output
: 10 W p-sync – 50 Ohm load
•
IMD(-8,-10,-16)
: 54dBc@5W p-sync (senza precorrettore)
•
Classe A/B
Power Supply Unit
Functional Description
•
8.7
Switching power supply is a power conversion unit. High efficency conversion
device are used. Is full range with power supply from 90 to 230VAC.
Circuital configuration is “non isolated” Forward- (Buck type)- Operative frequency of
70 KHz is used for reducing magnetic an capacitive loss in components .
Magnetic-loss in ferrite-core are low for used frequency and
magnetic-flux sweep density.
Fast recovery diode are used for more efficient conversion.
Monolithic IC are used.This switching regulator offer also thermal protection
and overload protection. TO220 case of all regulator are mounted in
main heatsink.
There is a monolithic temperature sensor for temperature monitoring of main
heatsink.
Directional Coupler
Functional Description
•
Directional coupler is used for measurement level of Direct
Power and Reflected Power.
This information is send to CPU-Display unit, for easy readout of
Forward and Reflected power on LCD display. The directional coupler
User Manual
Rev. 1.2 - 12/11/08
29 / 44
ATVST-CNV
is frequency equalizer over 470-860 (UHF vers.) / 170- 230 (VHF vers.)
Mhz broadcast band. Is directivity is more better than 20 dB and insertion
loss on main line is more lower than 0.05 dB.
All the directional coupler is made with microstrip line technology,
for very reliable application.
There is a coplanar microstrip for auxiliary output (RF
monitor), connected to bnc connector (50 Ohm impedance).
Coupling level for this monitor signal is around –50 dB.
The Rf input is sma connector (RF IN) and is the input of RF final amplifier.
The Rf output power signal is available to N connector (RF out).
8.8
Optional Precorrector
As alternatives to precorrettor provided on the card when used ALC RF amplifier
from 10W.
It allows you to make a correction more effectively and achieve a level of
intermodualzioni good over the whole frequency range.
By connecting internal 2 connectors excludes the precorrettore front integrated and
include that with additional adjustments placed on the side of the modulator.
Standard
Precorrector
Figure 8.2
Optional
Precorrector
Figure 8.3
30 / 44
Rev. 1.2 - 12/11/08
User Manual
ATVST-CNV
The function of precorrection is realized with the technique I and Q. The signal is
divided into two components and distorted through diodes pin. At the end of the
distortion process the I and Q components are summed and put out. The distortion
type control is implemented by 12 trimmer seats on the side of equipment. These
trimmers are organized into four cells, each one has three settings (Bias, Phase
and Gain). Each cell works in a certain range of input signal, in particular one cell
working on White level, one on Gray level and one on Black level, the fourth is
used to perform a compression on the black level.
User Manual
Rev. 1.2 - 12/11/08
31 / 44
ATVST-CNV
9. Module identification
ATVST-CNV is made up of several modules connected through connectors to
facilitate maintenance and replacement (if needed).
9.1
Top view
The figure below shows a top view of the equipment and component locations.
Figure 9.1
[1]
[2]
[3]
[4]
[5]
[6]
[7]
32 / 44
Directional Coupler
5/10W Amplifier
Filter
Power Supply
ALC Board
IF Modulator Board
Up Converter Board
Rev. 1.2 - 12/11/08
User Manual
ATVST-CNV
10. Internal Adjustment
10.1
10.1.1
Operation for the change of channel
Introduction
The procedure about change of channel must be performed by qualified and
experienced staff. Moreover, since some calibration must be executed, you must
work within an equipped laboratory.
The operations to be performed can be summarised in the following three steps
•
Calibrate the filter of channel on the up-converter card.
•
Set the new channel on the display.
•
Adjust the reading power.
•
Calibrate the pre-corrector.
The calibration of filter and the selection of channel must follow the table of
frequencies in conformity with the standards in use. It is important, before you
start, checking the standard of exciter; this is possible during the start-up operation
after that the machine is switch-on.
10.1.2
10.1.3
Tools
•
One calibrated wattmeter to measure 10Wps.
•
One network analyzer.
•
One spectrum analyzer.
•
One dummy load (20W).
•
One video signal generator.
•
Cables and various tools.
Procedure
1 Verify the standard of the exciter.
This is important to define what table in the appendix must be taken into
account.
User Manual
Rev. 1.2 - 12/11/08
33 / 44
ATVST-CNV
2 Setup.
L
O
A
D
VIDEO GENERATOR
(in according to the standard)
POWER
METER
Spectrum Analyzer
BLUE VIDEO
3 Disabled the ALC function.
Enter into SETTING ⇒ ALC MODE ⇒ set MAN
4 Set the output power to 0.
POWER LEVEL ⇒ PUD MLC 0.0W
MANUAL 0.0%
5 Switch-off the equipment, then remove the cover.
6 Calibrate the filter of channel on the up-converter card.
P/N T0981-11
C1
C2
C3
C4
C5
C6
ADAPTER
CELL 1
CELL 2
CELL 3
ADAPTER
NOTCH
Filter of channel
J1
J2
P/N T0982-11
P/N T0994-11
34 / 44
Rev. 1.2 - 12/11/08
User Manual
ATVST-CNV
The calibration of this filter must be done setting the instrument with markers
as indicated in tables of appendix (for details see chap. 10.3).
7 Switch-on the equipment and set the channel.
SETTING ⇒ CH SETTING ⇒ TX CHANNEL xx
OFFSET xx
8 Set the output power to 10% and check that the signal
is present on output.
POWER LEVEL ⇒ PUD MLC 0.0W
MANUAL 10.0%
9 Adjust the reading power.
• Switch-off and switch-on holding down the encoder for 5 seconds.
• Set the output power to 10W.
POWER LEVEL ⇒ turn the encoder clockwise to increase the power.
• Select the INSTALLATION menu to make the calibration.
INSTALLATION ⇒ CALIBRATION ⇒ PUD ⇒ Set 10W.
• Select ESC to store the settings.
10 Enabled the ALC function.
Enter into SETTING ⇒ ALC MODE ⇒ set AUT
11 Before connecting the equipment to an amplifier or to the antenna, you
must adjust the output power to 0W.
Warning: before connecting the exciter with a system, check that the output
power is set to 0W. The power level must be adjusted successively based
on the amplification system.
12 Calibrate the pre-corrector.
In any operation for the change of channel is necessary to adjust the precorrection to optimize the intermodulations.
10.2
Calibration for the filter of channel
Network analyzer
C1
C2
C3
C4
C5
C6
CELL 1
CELL 2
CELL 3
ADAPTER
NOTCH
S11
ADAPTER
S21
J1
J2
P/N T0982-11
IN
OUT
Attenuator 10/20dB
Before connecting the filter with the instrument is necessary to perform the
procedure of normalization to eliminate undesirable effects of cables. This consists
of two points:
User Manual
Rev. 1.2 - 12/11/08
35 / 44
ATVST-CNV
•
Normalization of S11
•
Normalization of S21
It is also need to set the instrument with the following setting:
•
Central frequency, MK1, MK2, MK3 (for details see chap. 8.3).
•
Span at 100MHz.
•
S11 at 10dB/div.
•
S21 at 10dB/div.
Tuning
lines
C2
C3
C4
C5
CELL 2
CELL 3
ADAPTER
J1
C6
NOTCH
C1
CELL 1
Output
Adapter
ADAPTER
Input
Adapter
Notch
Freq.
J2
P/N T0982-11
Filter Channel (UHF Version)
Tuning
coupler 1
Input
Adapter
Tuning
line 1
Tuning
line 2
Tuning
coupler 2
Tuning
line 3
Output
Adapter
Filter Channel (VHF Version)
36 / 44
Rev. 1.2 - 12/11/08
User Manual
ATVST-CNV
PAL B,G CH46
Plot PAL B,G of Filter Channel (UHF Version)
NTSC M CH45
Plot NTSC M of Filter Channel (UHF Version)
User Manual
Rev. 1.2 - 12/11/08
37 / 44
ATVST-CNV
10.3
10.3.1
38 / 44
Tables
Standard M-NTSC UHF
CHANNEL
mid freq
21
22
23
24
25
26
27
28
29
30
31
32
33
34
35
36
37
38
39
40
41
42
43
44
45
46
47
48
49
50
51
52
53
54
55
56
57
58
59
60
61
62
63
64
65
66
67
68
69
474,00
482,00
490,00
498,00
506,00
514,00
522,00
530,00
538,00
546,00
554,00
562,00
570,00
578,00
586,00
594,00
602,00
610,00
618,00
626,00
634,00
642,00
650,00
658,00
666,00
674,00
682,00
690,00
698,00
706,00
714,00
722,00
730,00
738,00
746,00
754,00
762,00
770,00
778,00
786,00
794,00
802,00
810,00
818,00
826,00
834,00
842,00
850,00
858,00
video freq.
MK1
471,25
479,25
487,25
495,25
503,25
511,25
519,25
527,25
535,25
543,25
551,25
559,25
567,25
575,25
583,25
591,25
599,25
607,25
615,25
623,25
631,25
639,25
647,25
655,25
663,25
671,25
679,25
687,25
695,25
703,25
711,25
719,25
727,25
735,25
743,25
751,25
759,25
767,25
775,25
783,25
791,25
799,25
807,25
815,25
823,25
831,25
839,25
847,25
855,25
audio freq.
MK2
476,75
484,75
492,75
500,75
508,75
516,75
524,75
532,75
540,75
548,75
556,75
564,75
572,75
580,75
588,75
596,75
604,75
612,75
620,75
628,75
636,75
644,75
652,75
660,75
668,75
676,75
684,75
692,75
700,75
708,75
716,75
724,75
732,75
740,75
748,75
756,75
764,75
772,75
780,75
788,75
796,75
804,75
812,75
820,75
828,75
836,75
844,75
852,75
860,75
Rev. 1.2 - 12/11/08
notch freq
MK3
510,15
518,15
526,15
534,15
542,15
550,15
558,15
566,15
574,15
582,15
590,15
598,15
606,15
614,15
622,15
630,15
638,15
646,15
654,15
662,15
670,15
678,15
686,15
694,15
702,15
710,15
718,15
726,15
734,15
742,15
750,15
758,15
766,15
774,15
782,15
790,15
798,15
806,15
814,15
822,15
830,15
838,15
846,15
854,15
862,15
870,15
878,15
886,15
894,15
f. min
470,00
478,00
486,00
494,00
502,00
510,00
518,00
526,00
534,00
542,00
550,00
558,00
566,00
574,00
582,00
590,00
598,00
606,00
614,00
622,00
630,00
638,00
646,00
654,00
662,00
670,00
678,00
686,00
694,00
702,00
710,00
718,00
726,00
734,00
742,00
750,00
758,00
766,00
774,00
782,00
790,00
798,00
806,00
814,00
822,00
830,00
838,00
846,00
854,00
f. max
478,00
486,00
494,00
502,00
510,00
518,00
526,00
534,00
542,00
550,00
558,00
566,00
574,00
582,00
590,00
598,00
606,00
614,00
622,00
630,00
638,00
646,00
654,00
662,00
670,00
678,00
686,00
694,00
702,00
710,00
718,00
726,00
734,00
742,00
750,00
758,00
766,00
774,00
782,00
790,00
798,00
806,00
814,00
822,00
830,00
838,00
846,00
854,00
862,00
User Manual
ATVST-CNV
10.3.2
Standard B,G PAL UHF
CHANNEL
mid freq
14
15
16
17
18
19
20
21
22
23
24
25
26
27
28
29
30
31
32
33
34
35
36
37
38
39
40
41
42
43
44
45
46
47
48
49
50
51
52
53
54
55
56
57
58
59
60
61
62
63
64
65
66
67
68
69
70
71
72
73
74
75
473,00
479,00
485,00
491,00
497,00
503,00
509,00
515,00
521,00
527,00
533,00
539,00
545,00
551,00
557,00
563,00
569,00
575,00
581,00
587,00
593,00
599,00
605,00
611,00
617,00
623,00
629,00
635,00
641,00
647,00
653,00
659,00
665,00
671,00
677,00
683,00
689,00
695,00
701,00
707,00
713,00
719,00
725,00
731,00
737,00
743,00
749,00
755,00
761,00
767,00
773,00
779,00
785,00
791,00
797,00
803,00
809,00
815,00
821,00
827,00
833,00
839,00
User Manual
video freq
MK1
471,25
477,25
483,25
489,25
495,25
501,25
507,25
513,25
519,25
525,25
531,25
537,25
543,25
549,25
555,25
561,25
567,25
573,25
579,25
585,25
591,25
597,25
603,25
609,25
615,25
621,25
627,25
633,25
639,25
645,25
651,25
657,25
663,25
669,25
675,25
681,25
687,25
693,25
699,25
705,25
711,25
717,25
723,25
729,25
735,25
741,25
747,25
753,25
759,25
765,25
771,25
777,25
783,25
789,25
795,25
801,25
807,25
813,25
819,25
825,25
831,25
837,25
audio freq
MK2
475,75
481,75
487,75
493,75
499,75
505,75
511,75
517,75
523,75
529,75
535,75
541,75
547,75
553,75
559,75
565,75
571,75
577,75
583,75
589,75
595,75
601,75
607,75
613,75
619,75
625,75
631,75
637,75
643,75
649,75
655,75
661,75
667,75
673,75
679,75
685,75
691,75
697,75
703,75
709,75
715,75
721,75
727,75
733,75
739,75
745,75
751,75
757,75
763,75
769,75
775,75
781,75
787,75
793,75
799,75
805,75
811,75
817,75
823,75
829,75
835,75
841,75
notch freq
MK3
517,00
523,00
529,00
535,00
541,00
547,00
553,00
559,00
565,00
571,00
577,00
583,00
589,00
595,00
601,00
607,00
613,00
619,00
625,00
631,00
637,00
643,00
649,00
655,00
661,00
667,00
673,00
679,00
685,00
691,00
697,00
703,00
709,00
715,00
721,00
727,00
733,00
739,00
745,00
751,00
757,00
763,00
769,00
775,00
781,00
787,00
793,00
799,00
805,00
811,00
817,00
823,00
829,00
835,00
841,00
847,00
853,00
859,00
865,00
871,00
877,00
883,00
Rev. 1.2 - 12/11/08
min. freq
470,00
476,00
482,00
488,00
494,00
500,00
506,00
512,00
518,00
524,00
530,00
536,00
542,00
548,00
554,00
560,00
566,00
572,00
578,00
584,00
590,00
596,00
602,00
608,00
614,00
620,00
626,00
632,00
638,00
644,00
650,00
656,00
662,00
668,00
674,00
680,00
686,00
692,00
698,00
704,00
710,00
716,00
722,00
728,00
734,00
740,00
746,00
752,00
758,00
764,00
770,00
776,00
782,00
788,00
794,00
800,00
806,00
812,00
818,00
824,00
830,00
836,00
max freq
476,00
482,00
488,00
494,00
500,00
506,00
512,00
518,00
524,00
530,00
536,00
542,00
548,00
554,00
560,00
566,00
572,00
578,00
584,00
590,00
596,00
602,00
608,00
614,00
620,00
626,00
632,00
638,00
644,00
650,00
656,00
662,00
668,00
674,00
680,00
686,00
692,00
698,00
704,00
710,00
716,00
722,00
728,00
734,00
740,00
746,00
752,00
758,00
764,00
770,00
776,00
782,00
788,00
794,00
800,00
806,00
812,00
818,00
824,00
830,00
836,00
842,00
39 / 44
ATVST-CNV
76
77
78
79
80
81
82
83
10.3.3
845,00
851,00
857,00
863,00
869,00
875,00
881,00
887,00
843,25
849,25
855,25
861,25
867,25
873,25
879,25
885,25
7
8
9
10
11
12
13
177,00
183,00
189,00
195,00
201,00
207,00
213,00
842,00
848,00
854,00
860,00
866,00
872,00
878,00
884,00
848,00
854,00
860,00
866,00
872,00
878,00
884,00
890,00
video freq.
audio freq.
notch freq.
MK1
MK2
MK3
175,25
181,25
187,25
193,25
199,25
205,25
211,25
179,75
185,75
191,75
197,75
203,75
209,75
215,75
221,00
227,00
233,00
239,00
245,00
251,00
257,00
f. min f. max
174,00
180,00
186,00
192,00
198,00
204,00
210,00
180,00
186,00
192,00
198,00
204,00
210,00
216,00
Standard B,G PAL VHF
CHANNEL mid freq
5
6
7
8
9
10
11
12
40 / 44
889,00
895,00
901,00
907,00
913,00
919,00
925,00
931,00
Standard M-NTSC VHF
CHANNEL mid freq
10.3.4
847,75
853,75
859,75
865,75
871,75
877,75
883,75
889,75
177,50
184,50
191,50
198,50
205,50
212,50
219,50
226,50
video freq.
audio freq.
notch freq.
MK1
MK2
MK3
175,25
182,25
189,25
196,25
203,25
210,25
217,25
224,25
180,75
187,75
194,75
201,75
208,75
215,75
222,75
229,75
214,15
221,15
228,15
235,15
242,15
249,15
256,15
263,15
Rev. 1.2 - 12/11/08
f. min f. max
174,00
181,00
188,00
195,00
202,00
209,00
216,00
223,00
181,00
188,00
195,00
202,00
209,00
216,00
223,00
230,00
User Manual
ATVST-CNV
11. External Adjustment
11.1
11.1.1
Operation for the setting of pre-corrector
Introduction
The calibration of the pre-corrector must be performed by qualified and experienced
staff.
The ATVST-CNV can be supplied with two types of pre-correction card, they called
respectively “standard pre-corrector” and “optional pre-corrector”.
11.1.2
11.1.3
Tools
•
One spectrum analyzer.
•
One TV analyzer.
•
One dummy load.
•
One video signal generator.
•
Cables and various tools.
Procedure
1 Verify the type of pre-corrector installed.
Check on the right side of the equipment if are present 12 trimmer, this identified
that is installed the “optional pre-corrector”. Otherwise is installed the “standard
pre-corrector”.
Satandard pre-corrector
User Manual
Optional pre-corrector
Rev. 1.2 - 12/11/08
41 / 44
ATVST-CNV
2 Setup.
L
O
A
D
TV analyzer
Spectrum Analyzer
RF IN
RF IN
Power
Amplifier
(optional)
VIDEO GENERATOR
(in according to the standard)
BLUE VIDEO
3 Enabled the ALC function.
Enter into SETTING ⇒ ALC MODE ⇒ set AUT
4 Enabled the ALC function.
Enter into PRECORRECTOR ⇒ set ON
5 Verify that the setted power is the same of working power.
6 Adjust the pre-corrector (see chap 11.1.3.1 or 11.1.3.2 based on the own
pre-corrector).
11.1.3.1
Adjust “optional pre-correction”
This pre-corrector consists of 4 cells, each of which has 3 settings. Each
cell acts on a specific video signal level, while the settings define the
type of distortion.
The cells, from 1 to 3, introduce an expansion distortion, while the cell 4 introduces
a compression distortion.
1
2
3 4
Each cell has three settings: bias, phase and level.
With the trimmers of bias and level is possible adjust the type of distorition, while
with the trimmer of phase is possible to compensate for the phase.
42 / 44
Rev. 1.2 - 12/11/08
User Manual
ATVST-CNV
2
1
3
4
Bias
Phase
Level
For the cells 1, 2 and 3:
The adjustment of BIAS is nothing when the trimmer is fully rotated clockwise.
The adjustment of LEVEL is nothing when the trimmer is fully rotated counterclockwise.
The adjustment of PHASE is nothing when the trimmer is centrally
located.
For the adjustment of each cell is recommended to operate as follows:
•
With nothing BIAS and nothing PHASE enter the LEVEL slowly (turn the trimmer
clockwise).
•
Rotate the BIAS trimmer counter-clockwise up to see the first effects.
• Adjust the PHASE.
For the cell 4:
The adjustment of BIAS is nothing when the trimmer is fully rotated clockwise.
The adjustment of LEVEL is nothing when the trimmer is fully rotated
counter-clockwise.
The adjustment of PHASE is nothing when the trimmer is centrally located.
For the adjustment of this cell is recommended to operate as follows:
11.1.3.2
•
With nothing BIAS and nothing PHASE completely turn the LEVEL trimmer
clockwise.
•
Rotate the BIAS trimmer counter-clockwise up to see the first effects.
•
Adjust the PHASE.
Adjust “standard pre-correction”
This pre-corrector consists of 3 cells, each of which has 3 settings. Each
cell acts on a specific video signal level, while the settings define the
type of distortion.
All the cells introduce an expansion distortion.
1
2
3
Bias
Phase
Level
User Manual
Rev. 1.2 - 12/11/08
43 / 44
ATVST-CNV
For the cells 1, 2 and 3:
The adjustment of BIAS is nothing when the trimmer is fully rotated clockwise.
The adjustment of LEVEL is nothing when the trimmer is fully rotated
clockwise.
The adjustment of PHASE is nothing when the trimmer is fully rotated counterclockwise.
For the adjustment of each cell is recommended to operate as follows:
44 / 44
•
With nothing BIAS and nothing PHASE enter the LEVEL slowly (turn the trimmer
counter-clockwise).
•
Rotate the BIAS trimmer counter-clockwise up to see the first effects.
•
Adjust the PHASE.
Rev. 1.2 - 12/11/08
User Manual