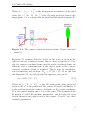
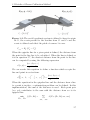
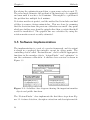
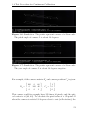
1
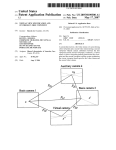
Continuous Calibration of 3D Vision Systems John Magne Røe Master of Science in Engineering Cybernetics Submission date: June 2013 Supervisor: Tor Engebret Onshus, ITK Co-supervisor: Håvard Knappskog, NOV Norwegian University of Science and Technology Department of Engineering Cybernetics Problem Definition Background 3D vision systems consist of two or more cameras used to recover three-dimensional images. The applications are numerous, spanning from home entertainment to industrial applications where position of objects may be measured. Accurate 3D reconstruction requires precise estimation of calibration parameters. Such parameters involve rotation and translation between cameras as well as lens and camera geometry. Although an accurate calibration may be performed at a given time, these parameters are subject to drift or change due to vibration, material degradation and misalignment. Therefore, long-term reliable operation depends on updating the calibration data regularly or continuously. Main tasks • Background study • Evaluate common methods for multi-camera calibration. • Investigate/develop a method for continuous calibration of multiple cameras. • Implement computer software to process multiple streams of video. • Perform continuous calibration. Supervisor: Tor Engebret Onshus, ITK Co-supervisor: Håvard Knappskog, NOV i Preface When I started out on this assignment, it seemed like a simple enough task. After a few rounds of literature searches with unhelpful outcomes and non-working system implementations, my opinions changed. Yet with guidance and persistence, useful literature was found, good models were developed and software implemented! My perspective has been broadened, and I can see that the potential of improvement is tremendous. First of all, I would like to thank co-supervisor Håvard Knappskog at National Oilwell Varco (NOV) for being helpful in every aspect regarding this task. He has been discussing various methods of calibration and has helped me by giving feedback on the report several times. I am also grateful for being able to work on my system at NOV’s offices in Trondheim and getting to meet the people there. Thanks to my supervisor, Professor Tor Engebret Onshus, for helping me construct a time schedule and giving me advice whenever unsuspected situations occurred. Last but not least, thanks to Vivi Rygnestad Helgesen, for continuously pushing me forward and helping me finalize this report. iii Abstract and Conclusion This report is about continuous calibration of 3D camera systems. It seeks to make it possible for two freely moving cameras to know each others relative position as long as they are monitoring a common frame. The short conclusion of this paper is that it is possible to a certain extent. The system presented is capable of computing the relative orientation of the cameras, which leaves the distance between the cameras as a free variable to be decided by other means. Simulations of the calibration model indicates that the relative orientation of the cameras can be estimated within a 0.2 degree deviation, while estimation of the relative position needs to be perfected. Live system tests confirm that the relative orientation can be estimated accurately. They also show that accurate estimation of relative position will require more work. Utilizing three or more cameras is an alternative way of estimating relative position, since the relative position can be calculated by using the relative orientations. The yaw angle was estimated with high precision in the simulation, while during the live tests the system had trouble estimating the angle correctly about 0 degrees. This might be a field for further work, but it is believed that having a good spread of matched features will make the problem disappear. In the test, the feature points was not only close to each other, they were also located in the same plane. The test environment is believed to have affected the results negatively because of this. This master’s thesis was initiated by the wish of National Oilwell Varco to be able to estimate the relative orientation of cameras mounted on their crane systems, using the output calibration for depthmapping the environment. This is one possible usage area, but the continuous calibration system is not limited to this application. In v theory, it could be applied to any multiple camera system. The system used for testing was two initially calibrated web cameras, which demonstrates the minimal requirements for using the continuous calibration. vi Contents Problem Definition i Preface iii Abstract and Conclusion v 1 Introduction 1 2 Camera Theory 2.1 Camera Modelling . . . . . . . . . 2.1.1 Pinhole Camera Model . . . 2.1.2 Nonlinear Effects on Camera 2.1.3 Epipolar Constraint . . . . . 2.1.4 Triangulation . . . . . . . . 2.2 Calibration . . . . . . . . . . . . . . . . . . . . . Model . . . . . . . . . . . . . . . . . . . . . . . . . . . . . . . . . . . . . . . . . . . . . . . . 3 . 3 . 3 . 6 . 7 . 9 . 10 3 Methods 3.1 Choice of Continuous Calibration Method 3.2 Details of Chosen Calibration Method . . . 3.3 Software Implementation . . . . . . . . . . 3.4 Test Procedure for Continuous Calibration 3.4.1 Simulation Procedure . . . . . . . . 3.4.2 Live Test Procedure . . . . . . . . 3.5 Analysis of the Example Video . . . . . . . . . . . . . . . . . . . . . . . . . . . . . . . . . . . . . . . . . . . . . . . . . . . . . . . 13 14 15 18 19 19 22 28 4 Results 4.1 Test Results from Simulated Test 4.1.1 Roll Simulation . . . . . . 4.1.2 Pitch Simulation . . . . . 4.1.3 Yaw Simulation . . . . . . . . . . . . . . . . . . . . . . . . . . . . . . . . . . 29 29 29 31 31 . . . . . . . . . . . . . . . . . . . . vii 4.2 Test Results from 4.2.1 Roll Test . 4.2.2 Pitch Test 4.2.3 Yaw Tests Live Video Streams . . . . . . . . . . . . . . . . . . . . . . . . . . . . . . . . . . . . . . . . . . . . . . . . . . . . . . . . . . . . . . . . . . . . . . . . . 36 36 36 39 5 Discussion 43 5.1 Sensitivity of the Estimated Angles . . . . . . . . . . . 43 5.2 Relative Position Estimation . . . . . . . . . . . . . . . 44 6 Further Work 47 Short User Manual 49 Contents Overview of CD 53 Bibliography 55 viii 1 Introduction People use their vision to control actions and movements in many tasks, computer vision aims to duplicate this. How you pick up a glass of milk is one of an endless amount of examples. You have to know where the glass is to pick it up, the angle of the glass to ensure that no milk is spilled and more. Cameras get images of the three-dimensional (3D) space by projecting it down to the two-dimensional (2D) plane. This results in a tremendous loss of information. Today, there are cameras which can compute the depth in the image by utilizing an extra array of lenses which adds directional information to the light rays arriving at each point in the 2D plane. The cameras in question are called light-field cameras and more can be read about them in [1]. Another way to compute the depth of a scene is by deploying multiple cameras to get multiple perspectives of the same scene. When using two cameras, this is called stereo vision. When using multiple cameras, it is possible not only to get depth information in one image, but whole 3D objects can be reconstructed since images from every perspective can be used. When a multiple camera system is constructed, it has to be calibrated. The attributes of the camera such as field-of-view and optical center as well as the position and orientation relative to the other cameras in the system has to be computed. This can be done accurately at system setup, but the materials used for keeping the cameras in place might experience degradation over time. Material degradation might cause the orientation and position of the cameras to vary and this will in turn affect the quality of the 3D reconstruction. The sensitivity of 3D reconstruction to erroneous camera calibration has been estimated in [2]. To handle the drifting camera problem, a continuous calibration might 1 Chapter 1 Introduction be applied. It would be beneficial to be able to estimate new camera positions and orientations without the need of operator interaction. An automatic system for calibrating the drifting cameras should then be able to estimate new positions and orientations by analyzing ordinary video streams watching the same scene. 2 2 Camera Theory In order to use multiple cameras for 3D reconstruction of the scene, it is important to have equations which relate the camera frames to the 3D space which is pictured. These equations are affected by two sources: the inner workings of the camera and the cameras relative position and orientation. The parts of the equations affected by the inner workings of the camera is typically called intrinsic parameters, while the relative position and orientation is called extrinsic parameters. Both of these will be explained further in this chapter. Calibration of a 3D camera system is typically done by analyzing known shapes. By using the camera models on points of which the relative position is known, the camera model equations can be solved to reveal both the intrinsic- and extrinsic parameters. Camera calibration will also be discussed in this chapter. 2.1 Camera Modelling Cameras project the 3D world onto a 2D plane and in the transformation there is a certain loss of information. In the work described by this report, the pinhole camera model is used. The pinhole camera model is a linear model of the camera. To account for non-linearities, a non-linear pixel transform is applied in addition to the pinhole camera model. 2.1.1 Pinhole Camera Model Imagine a black box with a single pinhole which would let light into the box. Each point on the opposite side of the pinhole would then 3 Chapter 2 Camera Theory be hit by light rays originating from a direction given solely by the coordinates for that point. This is illustrated in Figure 2.1. Figure 2.1: The object in the scene is projected to the camera lens. The field of view of the camera is decided by the distance f . This figure is borrowed from [3]. If we define the coordinate system with the origin at the camera position and the z-axis pointing perpendicular to the image plane outwards from the camera, illustrated in Figure 2.2, some equations relating the object position to the pixel coordinates can be established. If the pixel value on the x- and y-axis is defined by u and v, we can derive the following equations: X + pu Z Y v = f + pv Z u = f Where the object in the image at (u, v) is at the position given by (XC , YC , ZC ) in the camera-centered reference frame. pu and pv defines the origin of the image frame. This can be written on matrix form, giving the following relation: f 0 pu ρm = 0 f pv MC 0 0 1 4 (2.1) 2.1 Camera Modelling Where m = h u v 1 i> is the homogenous coordinates of the pixel i> h is the 3D point projected down to the value, MC = XC YC ZC image plane, ρ is a scaling constant which in this equation equals ZC . Figure 2.2: The camera-centered reference frame. Figure borrowed from [3]. Equation 2.1 assumes that the object in the scene is given in the camera-centered coordinate frame, this is often not practical. Usually, the camera coordinate frame and the world coordinate frame are different, and a transformation of the object point to the cameracentered coordinate frame is required. This is done by straightforward translation and rotation: MC = R> (M − C). If we put this into Equation 2.1, we end up with the equation given in 2.2. ρm = KR> (M − C) h (2.2) i> Where M = X Y Z is the 3D world point being projected down to 2D, C is the position of the camera in world coordinates, R is the rotation from the camera coordinate to the world coordinate, K is the camera matrix and ρ is a scalar value. The elements of the K matrix is called the intrinsic parameters, and describe the focal length, skewness and optical axis of the camera. R and C are called extrinsic parameters. 5 Chapter 2 Camera Theory 2.1.2 Nonlinear Effects on Camera Model A camera perfectly matching a linear model is theoretically possible to construct, but in reality all cameras have some nonlinear distortion. Most of the distortions can be described as radial and tangential distortions. Radial distortions are commonly known as “barrel” or “pincushion” effects, this is caused by the fact that the camera lens is not perfectly parabolic. This causes the pixels away from the image center to appear either farther away or closer than they should, examples are shown in Figure 2.3. (a) (b) Figure 2.3: Examples of radial distortion, (a) shows the “barrel” effect, while (b) shows the “fish-eye” effect. Both are applied to the test scene in Figure 3.8. Radial distortions can be modelled mathematically by using Equation 2.3, which is borrowed from [4]. xcorrected = x (1 + k1 r2 + k2 r4 + k3 r6 ) ycorrected = y (1 + k1 r2 + k2 r4 + k3 r6 ) (2.3) Here, x and y are the pixel values subtracted by the origin of the camera, r is the euclidean distance from the origin, ki , i [1, 3] are the radial distortion parameters and xcorrected and ycorrected are the new pixel values without radial distortion. Tangential distortion appears as skewed images, and is caused by the lens not being perfectly aligned with the image sensor in the camera. 6 2.1 Camera Modelling The effect looks similar to the effect seen when taking a picture of a plane which is not parallel to the camera lens, examples are shown in Figure 2.4. (b) Source: [4] (a) Figure 2.4: (a) shows an example of tangential distortion applied to Figure 3.8, while (b) shows a possible cause of tangential distortion. Tangential distortion can be modelled mathematically using Equation 2.4, which is borrowed from [4]. xcorrected = x + (2p1 y + p2 (r2 + 2x2 )) ycorrected = y + (p1 (r2 + 2y 2 ) + 2p2 x) (2.4) As in Equation 2.3, x and y represents the pixel values subtracted by the origin of the camera, r is the euclidean distance from the origin, pi , i [1, 2] are the tangential distortion parameters and xcorrected and ycorrected are the new pixel values without tangential distortion. 2.1.3 Epipolar Constraint When two cameras are recording the same object and the camera parameters for both cameras are given, a point in one of the frames has to be on a line in the second frame. This line is given by the epipolar constraint and can be calculated by using equation 2.2. ρ1 m1 = K1 R1> (M − C1 ) , ρ2 m2 = K2 R2> (M − C2 ) 7 Chapter 2 Camera Theory Solving camera 1’s equation for M and inserting it into the equation for camera 2 results in a new equation [3]. ρ2 m2 = K2 R2> ρ1 R1 K1−1 m1 + C1 − C2 ρ2 m2 = ρ1 K2 R2> R1 K1−1 m1 + K2 R2> (C1 − C2 ) ρ2 m2 = ρ1 Am1 + ρe2 e2 (2.5) Equation 2.5 describes what is called the epipolar line. Am1 is the vanishing point of m1 in camera 2 while e2 is the location of camera 1 in camera 2’s view. Basically, this means that a given point m1 in camera 1 has to lie on the line between the vanishing point of m1 in camera 2 and the epipole of camera 1 in camera 2. This is shown graphically in Figure 2.5. Figure 2.5: On the left, the relation between the point m1 in camera 1 and the line l1 in camera 2 is shown. On the right, the epipole of e2 and the vanishing point Am1 is added. Equation 2.5 can be manipulated further. That m2 lies on the line between Am1 and e2 means that the three vectors are linearly dependent. The algebraic way of expressing this is by saying that the determinant of the matrix with these vectors as its column vectors is equal to zero. 8 m2 e2 Am1 = 0 2.1 Camera Modelling By using the definition of the cross product, this can be written as: m2 e2 Am1 = m2 · (e2 × Am1 ) Expressing the cross product as a matrix multiplication, a × b = [a]× b 0 −a3 a2 a1 0 −a1 [a]× = a3 , a = a2 −a2 a1 0 a3 has some benefits which makes it possible to write the relation between m1 and m2 as a linear matrix equation [3]: m2 · (e2 × Am1 ) = m> 2 [e2 ]× Am1 = m> 2 F m1 (2.6) Where F is called the fundamental matrix. This also leads to an alternative way of expressing the line called l1 in Figure 2.5. a l1 = b = F m1 c (2.7) Where the line is is defined by the following equation: m> 2 l1 = h a x y 1 b = ax + by + c = 0 c i 2.1.4 Triangulation When the equations relating the camera frame to the 3D space are in place, any point on the camera frame can be traced to a line in the 3D space. A typical 3D camera system consists of two cameras of which the intrinsic- and extrinsic parameters are known. When an object can be found in these two separate camera frames, they can be traced 9 Chapter 2 Camera Theory back to two lines in the 3D world. With a noise free measurement and perfect equations, those two lines would intersect at the position of the object and a 3D reconstruction is accomplished. Figure 2.6 illustrates three points defined by the two camera positions and the object position in a 2D drawing. The lines from the camera positions to the object passes through the points xl and xr (called m1 and m2 in earlier equations) on the camera frames, and the position of P (called M in the earlier equations) can be estimated. By solving equation 2.2 with respect to M for both camera 1 and camera 2, the following equations arise: M = ρ1 R1 K1−1 m1 + C1 M = ρ2 R2 K2−1 m2 + C2 The unknowns in this equations are M , ρ1 and ρ2 . This results in a total of five variables and six equations which will have one solution for data perfectly fitting the linear model, and no solution if there is noise present. If there are no solutions to the equations, a minimization problem can be solved to estimate an optimal solution. min ρ1 R1 K1−1 m1 + C1 − ρ2 R2 K2−1 m2 + C2 ρ ,ρ 1 2 2.2 Calibration A typical calibration uses known geometrical shapes often called calibration objects. Such calibration objects are shown in Figure 2.7. A typical calibration algorithm follows the following steps [3]: • Construct a calibration object (either 3D or 2D). Measure the 3D positions of the markers on this object. • Take one or more (depending on the algorithm) pictures of the object with the camera to be calibrated. • Extract and identify the markers in the image. 10 2.2 Calibration Figure 2.6: Model of triangulation. cx is the center of the image and x is the projection of P to the image frame. Assuming noiseless image data, Z can be computed if f is known. Figure is borrowed from [4]. • Fit a linearized calibration model to the 3D-2D correspondences found in the previous step. • Improve the calibration with a non-linear optimization step. Continuous calibration is quite different from initial calibration. A goal of continuous calibration is to update the extrinsic parameters of an initial calibration which may have changed due to aging. The intrinsic parameters can also be updated by a continuous calibration method, but they can be assumed to be constant. Requiring calibration objects would make operator interaction necessary during calibration, which is undesired. Continuous calibration therefore use other algorithms to find corresponding points in two or more camera frames watching the same scene, and use these points to update the initial calibration. Not all information about the scene can be extracted from these corresponding points. For instance, the cameras may not know the distance between two points. This makes it necessary to make some assumptions if this information cannot be gathered 11 Chapter 2 Camera Theory Figure 2.7: Left: 3D calibration object. Right: 2D calibration object. Figure borrowed from [3]. by other means. 12 3 Methods Calibration of 3D camera systems are divided into two main categories: active and passive. Active calibration means that there are markers in the images which are used to calibrate the camera parameters, whereas passive has to find points (called interest points or feature points) for usage in calibration automatically. Figure 3.1: The different steps needed for online calibration. The method which is used in this paper is an initial active calibration, where checkerboards are used for finding both nonlinear parameters, intrinsic parameters and possibly initial extrinsic parameters. The focus of this paper is the continuous calibration of extrinsic parameters which occurs after the initial calibration. A common factor 13 Chapter 3 Methods of all the calibration methods is the system structure which is shown in Figure 3.1. First of all, feature points has to be found. Several algorithms for finding feature points exist, the feature finder which is used by default in the current system is an open-source implementation of the FAST algorithm [5]. When the features are detected, something called descriptors have to be extracted. The descriptors distinguish the points from one another, and a descriptor matcher is used to find the points in each camera that seems to be different perspectives of the same point. The default descriptor extractor used in the current system is an open-source implementation of the BRIEF descriptors [6]. The default descriptor matcher is a simple open-source implementation of a brute-force matcher. The parts of the system structure which are not common for all different approaches attempted in this paper is the noise suppression and the calibration. In fact, the noise suppression was developed for the chosen calibration approach after the initial tests. The noise suppression is present because the descriptor matcher would often match non-matching points which would corrupt the calibration. The calibration part of the system structure is the main focus of this paper, and is where most of the work have been focused. In this chapter, the three calibration methods which were a part of the initial test will be briefly mentioned. The method which was chosen after the initial testing will be explained in further details. The system implementation and test procedures will be explained. A short analysis of the videos which the calibration system originally was made for is also included. 3.1 Choice of Continuous Calibration Method The background search done during the initial phase of the work did not lead to a conclusion concerning the choice of calibration method, this resulted in a trial period where three different approaches were attempted. One method is based on approximating the fundamental 14 3.2 Details of Chosen Calibration Method matrix, a second method is based on triangulation and the third is based on minimizing the distance between a point on the camera frame and its corresponding epipolar line. The first method approximated the fundamental matrix based on the feature points, Festimate , and seeked to minimize the difference between Festimate and Fcalibration . Fcalibration is the fundamental matrix computed using the calibration. min extrinsic parameters |Festimate − Fcalibration | It ran well on tests, but was abandoned due to noisy results on live data. The second method needed a correct calibration to start with. It would compute 3D points based on the feature point matches and the current calibration. The next time step it would try to find these stored 3D points and update the calibration based on the movement since the last time step. This worked well on paper, but testing it on live data wasn’t successful and the method was shelved. In retrospect, the reason why these methods failed on live data may have been caused by nothing but erroneously matched points which was passed to the calibration algorithm. The last method, based on minimizing the distance between feature points and its epipolar lines, was chosen due to better performance than the other two. It performed well in initial simulations, and testing it on live data seemed to output correct data. It was discovered that as soon as the descriptor matcher started passing non-matching points to the calibration algorithm, the algorithm would fail and the calibration would be corrupted. This made it necessary to construct a simple noise suppression algorithm, which is described in chapter 3.2. 3.2 Details of Chosen Calibration Method The chosen calibration method relies heavily on the epipolar constraint which is described in section 2.1.3. The epipolar constraint 15 Chapter 3 Methods states that a point in camera frame 1 will appear somewhere on a line in camera frame 2. The feature detector and -matcher will compute a list of corresponding points in camera frame 1 and camera frame 2. By using this list of points, it is then possible to minimize the sum of distances from points to corresponding epipolar lines. First of all, the equations for the epipolar line has to be established. This has been done in chapter 2.1.3, where equation 2.7 is repeated here: a l1 = b = F m1 c ax + by + c = 0 The fundamental matrix in this case is calculated from the calibration parameters. Equation 2.6 defines that F = [e2 ]× A, and the following equation is obtained by inserting matrices from equation 2.5. h i F = K2 R2> (C1 − C2 ) × K2 R2> R1 K1−1 Here, K1 and K2 is intrinsic parameters, which are assumed constant. C1 − C2 is defined to be [−d, 0, 0]> , where d is the distance between camera 1 and camera 2. This makes it possible to define the fundamental matrix as a function of R1 and R2 . Fcal R1 , R2 h i = K2 R2> (C1 − C2 ) × K2 R2> R1 K1−1 The definition of C1 − C2 above is caused by the choice of world coordinate system. The x-axis is chosen to be parallel to the baseline from camera 1 to camera 2 while the z-axis is chosen to have the same pitch angle as camera 1. This makes the relative position from camera 1 to camera 2 always be parallel to the x-axis. The rotation matrix for camera 1 can also be computed by two angles, roll and yaw, since the pitch is defined to be 0 degrees. This world coordinate system is pictured in Figure 3.2. This can easily be translated to orientation and position relative to the orientation and position of camera 1: Rrel = R1> R2 16 3.2 Details of Chosen Calibration Method Figure 3.2: The world coordinate system is defined to have its origin in C1 , the x-axis parallel to the baseline from C1 and C2 and the z-axis is defined such that the pitch of camera 1 is zero. Crel = R1> (C2 − C1 ) When the epipolar line for a given point is defined, the distance from the point to the line has to be calculated. When the line is defined as it is in equation 2.7, the shortest distance from the point to the line can be computed by using the following expression d (x, y) = |ax + by + c| √ a2 + b2 We can rewrite this equation to define a function which accepts the line and point in vector form. d h a, b, c i> h , x, y i> = |ax + by + c| √ a2 + b2 When the equation for the epipolar line and the distance from a line to a point is in place, a optimization problem can be defined. In this implementation, the sum of the distances is used. Each point pair (m1 , m2 ) contributes to the sum with the distance from m2 to its epipolar line. X min f (R1 , R2 ) = d (Fcal (R1 , R2 ) m1 , m2 ) R1 , R2 m1 , m2 17 Chapter 3 Methods For solving the optimization problem, a open-source solver is used [7]. The solver used estimates the gradient of the function to be optimized and runs until it reaches a local minima. This might be a problem if the problem has multiple local minima. No feature matcher is perfect, and the method had to include som kind of filter to remove obvious mismatches. This was done by assuming that the deviation from the previous calibration was small. Any point which was farther away from the epipolar line than a certain threshold would be invalidated. The epipolar line was calculated by using the rotation matrices most recently estimated. 3.3 Software Implementation The implementation is a part of a greater framework, and its output is shown in a graphical user interface except for debug prints. The controlling class is called “FeatureStream”, and it calls the appropriate functions in the member objects “featureFinder” and “optimizer” to run the continuous calibration. A shallow class overview is shown in Figure 3.3. Figure 3.3: A shallow class diagram showing the important member objects and public functions. The “FeatureFinder” class implements the first three steps from Figure 3.1: feature detection, descriptor extraction and descriptor match- 18 3.4 Test Procedure for Continuous Calibration ing. The “Optimizer” class implements the last two steps: noise suppression and calibration. The software implementation uses two third-party libraries which are open-source: OpenCV [8] and Dlib [7]. The feature finding algorithms of OpenCV is used, and Dlib is used for solving the optimization. The workflow for the application is basic. It runs continuously as fast as the hardware allows it to, looping through the different steps of the system structure. The graphical user interface allows the user to choose various options, and a short user manual is written in Appendix 6. 3.4 Test Procedure for Continuous Calibration The test procedure is split up in two parts, a simulation and a live test using web cameras. The simulation creates virtual feature points based on calculated intrinsic camera parameters and camera rotation based on user input. The live test, on the other hand, uses live images in which it detects and matches features before finally calculating camera rotations. 3.4.1 Simulation Procedure Simulating a real system is a good way of checking the correctness of the application. A simulation successfully removes the unwanted random variables which is applied by the real world. This means that the negative effects of bad feature detection, feature matching, image noise and more is non-existent. Thirty-two 3D points which are spread out in box-like shape are generated and equation 2.2, the pinhole camera model, is used to generate simulated feature points for both the cameras. The feature points will appear slightly different in each of the camera frames based on their position and orientation. Figure 3.4, 3.5, 3.6 and 3.7 show how the 19 Chapter 3 Methods different rotations affect the perspective for eight points in a box-like shape. Figure 3.4: Simulation: No camera rotation, the points represent corners of a 20cm cube. The translation of camera 2 can be seen by looking at the perspective of the cube. Figure 3.5: Simulation: The points represent corners of a 20cm cube. The roll angle of camera 2 is about 10 degrees. 20 3.4 Test Procedure for Continuous Calibration Figure 3.6: Simulation: The points represent corners of a 20cm cube. The pitch angle of camera 2 is about 10 degrees. Figure 3.7: Simulation: The points represent corners of a 20cm cube. The yaw angle of camera 2 is about 10 degrees negative. For example, if the camera matrix K2 and camera position C2 is given: 100 0 60 1 K2 = 0 100 40 , C2 = 0 0 0 1 0 This camera could for example have 120 times 80 pixels, and the optical center is at (60, 40). To calculate the pixel value of a 3D point M when the camera is rotated 30 degrees about z axis (roll rotation), the 21 Chapter 3 Methods rotation matrix have to be calculated and pinhole camera equations applied. √ 3 2 −0.5 0 √ 3 Rz (30◦ ) = 0 0.5 2 0 0 1 m = 1 K2 R2> (M − C2 ) ρ2 √ 1 1 100 0 60 23 0.5 0 √ 1 3 100 40 −0.5 = 0 0 1 − 0 2 ρ2 2 0 0 0 1 0 0 1 170 85 1 = 167 = 83 ρ2 2 1 Without rotation, the point would have been [60, 90, 1]> . The simulated test is a part of the FeatureFinder algorithm, and is activated through setting the “Use simulated values” option. When the simulated test is activated, the “Euler angle” x, -y and -z values, which are changed under the FeatureFinder algorithm, sets the pitch, yaw and roll angles used for making simulated feature points. The test was done by manually setting the simulated roll, pitch and yaw angles using the mechanics described in the last paragraph. The test was done for individually for each axis. The roll was first set to 0◦ , then gradually moved to 45◦ , −45◦ and back to 0◦ again. This was repeated for pitch and yaw axis. 3.4.2 Live Test Procedure The objective of the test procedure is to verify that the calibration application is able to calibrate the cameras. The calibration application consists of multiple steps described in Figure 3.1, and the test procedure should minimize the effect of poor feature detection, description and matching. 22 3.4 Test Procedure for Continuous Calibration A way of minimizing the effect of feature detection performance is by making a scene consisting of good features. In this case, it was decided to use a checkerboard. Figure 3.8 shows the kind of checkerboard used. The test was first designed to use two checkerboards, the reason for this was to avoid having all feature points in the same plane in space. When all the feature points are in the same plane, the calibration may be less accurate. In this case, the hardware was too weak for running tests with two checkerboards, which caused excessive computation time. The tests therefore consist of only one checkerboard in the scene, which is pictured in Figure 3.8. Figure 3.8: The test scene. Camera 2 is placed about 15 cm to the right of camera 1. The camera setup consisted of two cameras which were called camera 1 (left) and camera 2 (right). Camera 1 was stationary while camera 2 was rotated in a controlled fashion. There was a lack of time to set up positioning for the cameras, therefore the cameras was moved by hand and detailed error analysis could not be made of the results. The results did however give a good visualization of the calibration problems local convexity and the correctness of the output calibration. 23 Chapter 3 Methods Figure 3.9: Screenshots of the test procedure showing roll angle rotation. There was one test for each of the axes: roll, pitch and yaw. For each test, camera 2 started at 0 degrees and was rotated to either 45 degrees or −45 degrees, depending on which direction kept the checkerboard in sight. It was then rotated back to 0 degrees. For the roll test, the angle of the camera was estimated visually by looking at the orientation of the checkerboard. In the pitch test, the angle of camera 2 was taken picture of and estimated after the test. In the yaw test, a piece of paper with a 45 degree angle drawn on it was used to guide the movement of camera 2. These various methods are pictured in Figure 3.12. 24 3.4 Test Procedure for Continuous Calibration Figure 3.10: Screenshots of the test application showing pitch angle rotation. 25 Chapter 3 Methods Figure 3.11: Screenshots of the test application showing yaw angle rotation. 26 3.4 Test Procedure for Continuous Calibration (a) Roll angle visual estimation. When looking at the checkerboard, angles of 45 degrees increment can be estimated quite well. (b) The camera pitch angle was pictured at the start of the test and at max pitch angle. A graphical measurement tool was used to measure the relative angle. (c) Guide lines was drawn on a piece of paper to estimate the yaw angle during tests. Figure 3.12: Various methods used to estimate the actual angle rotated during live test. 27 Chapter 3 Methods 3.5 Analysis of the Example Video Videos monitoring an offshore installation by cameras mounted on a crane was provided by National Oilwell Varco. The video was provided to show the challenges which are present in the target usage area. By analysing the example video, a few problem areas were easily spotted. This analysis is included due to being the systems target area, even though no system tests have yet been run on the example video. Firstly, the cameras were mounted to a crane which was mobile. This makes the timing of the images extremely important. If the system starts matching a 500 milliseconds old image from camera 1 with a fresh image from camera 2, great errors may arise. The crane itself might have rotated 5 degrees and the calibration will then be 5 degrees off. Another problem which was identified by the footage was waterdrops on the lens. This will not affect the calibration algorithm directly, but it will affect the feature detection, -description and -matching, which is a difficult problem already! 28 4 Results The calibration software was run through two different tests. One test used simulated values with no noise and the other used live video streams. 4.1 Test Results from Simulated Test The simulated test was run as described in Chapter 3.4.1. In this section, figures with plots of the test results will be presented. There are three rotation axes: roll, pitch and yaw (rotation about z-, x- and y-axis, respectively). For each rotation axis, there are three figures: plot of simulated and estimated angles, plot of estimation error of camera 2 and a plot of estimation error of the angle between camera 2 and camera 1. 4.1.1 Roll Simulation Figure 4.1 plots the simulated versus the estimated angles. The estimates follow the simulated angles closely, but some deviation can be noticed. The fact that the estimates of camera 1 is non-zero implicates that the relative position estimation is incorrect. The relative orientation error is shown in Figure 4.2 and it seems to be within 0.2 degrees. The orientation error relative to the baseline between the cameras can be seen in Figure 4.3, it is about 3 degrees off. This orientation error indicates that the relative position is poorly estimated, which is discussed in chapter 5. 29 Chapter 4 Results Figure 4.1: Simulation output for each time step, “Sim” values are the simulated angles for camera 2, “Estimate” values are the estimated values for camera 1 and camera 2. Figure 4.2: Estimation error of the relative orientation from camera 1 to camera 2. 30 4.1 Test Results from Simulated Test Figure 4.3: Error in the estimated orientation for both camera 1 and camera 2 relative to the baseline between the cameras. 4.1.2 Pitch Simulation The plot of the estimated orientation in Figure 4.4 shows that the estimates follow the simulated angles fairly well. It can though be seen that the pitch simulation peaks at about ±27 degrees, where the estimates suddenly stops following the simulated angle. This is due to the noise suppression algorithm and will be discussed further in chapter 5. The pitch simulation results shows the same tendencies as the roll simulation results. The relative orientation estimate is quite accurate, and Figure 4.5 shows that it deviates by less than 0.2 degrees when not counting the situations where the noise suppression algorithm invalidates all the points. The orientation relative to the baseline between the cameras is in this case just as accurate since the pitch angle of camera 1 is defined to be 0 degrees. 4.1.3 Yaw Simulation The results from the yaw simulation is similar to the results from both roll and pitch simulation. Figure 4.7 plots the simulated orientation 31 Chapter 4 Results Figure 4.4: Simulation output for each time step, “Sim” values are the simulated angles for camera 2, “Estimate” values are the estimated values for camera 1 and camera 2. Figure 4.5: Estimation error of the relative orientation from camera 1 to camera 2. 32 4.1 Test Results from Simulated Test Figure 4.6: Error in the estimated orientation for both camera 1 and camera 2 relative to the baseline between the cameras. versus the estimated, and it can be seen in Figure 4.8 that the relative orientation estimate is mostly within ±0.05 degrees. The orientation relative to the baseline between the cameras, shown in Figure 4.9, like the roll simulation also states, is less accurate and suggests a deviation in the relative position estimate. 33 Chapter 4 Results Figure 4.7: Simulation output for each time step, “Sim” values are the simulated angles for camera 2, “Estimate” values are the estimated values for camera 1 and camera 2. Figure 4.8: Estimation error of the relative orientation from camera 1 to camera 2. 34 4.1 Test Results from Simulated Test Figure 4.9: Error in the estimated orientation for both camera 1 and camera 2 relative to the baseline between the cameras. 35 Chapter 4 Results 4.2 Test Results from Live Video Streams The results from the live tests are presented in figures. Each test has two figures. One figure plots all the camera angles individually, and the other plots the relative angles between camera 2 and camera 1. A total of four tests are shown, one pitch test, one roll test and two yaw tests. All the live tests output noisy calibrations while moving the camera, this is because the camera was moved by hand. 4.2.1 Roll Test In the roll test, camera 2 was rolled to an angle of a little less than 45 degrees in negative direction. The reason why it was not rotated to fully 45 degrees was because of limitations in the software when detecting the checkerboard. The checkerboard would be processed erroneously when passing 45 degrees and result in corrupted estimation. Figure 4.10 shows that even though only camera 2 is rolled, it is estimated that both camera 1 and camera 2 is actuated. Figure 4.11 indicates that the relative roll angle is correct. This means that, yet again, the relative orientation is estimated with good precision, but the relative position is not. 4.2.2 Pitch Test In the pitch test, camera 2 was pitched to about 15 degrees. This was because it had to keep the checkerboard in sight, which would be more complicated if tested with larger pitch angles. Other than the fact that the rotation is not continued to 45 degrees, the results shown in Figure 4.12 and 4.13 seem to be correct. Notice that the pitch angle of camera 1 is defined to be 0 degrees, which makes the relative pitch angle between the cameras the same as the pitch angle relative to the baseline. 36 4.2 Test Results from Live Video Streams Figure 4.10: The estimated orientations relative to the baseline between the cameras is plotted for each time step. Figure 4.11: The estimated relative orientation between camera 1 and camera 2 is plotted for each time step. 37 Chapter 4 Results Figure 4.12: The estimated orientations relative to the baseline between the cameras is plotted for each time step. Figure 4.13: The estimated relative orientation between camera 1 and camera 2 is plotted for each time step. 38 4.2 Test Results from Live Video Streams 4.2.3 Yaw Tests There are two yaw tests shown. The yaw test was especially sensitive and there was therefore a need of showing the different results. In Figure 4.14 and 4.15 the results of the first test is graphed. Here, the estimate doesn’t return completely to 0 degrees relative yaw angle, but ends up at about −6 degrees. Figure 4.16 and 4.17 shows the second test, where the estimate of relative angle “overshoots” and ends up at 10 degrees. These tests also show the same problem with relative position estimates as the simulations and roll test. Figure 4.14: The estimated orientations relative to the baseline between the cameras is plotted for each time step. 39 Chapter 4 Results Figure 4.15: The estimated relative orientation between camera 1 and camera 2 is plotted for each time step. Figure 4.16: The estimated orientations relative to the baseline between the cameras is plotted for each time step. 40 4.2 Test Results from Live Video Streams Figure 4.17: The estimated relative orientation between camera 1 and camera 2 is plotted for each time step. 41 5 Discussion Overall, the chosen calibration model based on minimizing the distances between points and their corresponding epipolar lines seemed to be working well. The tests have proved the model to be quite precise in some aspects, while weaknesses in others have been highlighted. This chapter will be divided into sections of discussions on these weaknesses. 5.1 Sensitivity of the Estimated Angles The simulation results clearly states that all angles can be estimated with good accuracy. The relative angle between the two cameras can be estimated with as low as 0.2 degrees deviation. The simulation also shows that the difference in position contributes less to the optimization function than the difference in angle of the two cameras. Even with simulated measurements with close to no noise the position is not estimated perfectly, the only noise present would be caused by the precision of the C++ float type. As shown in chapter 3.2, the relative position is closely related to the angle of camera 1. The angles of camera 1 should be stationary at 0 degrees during the simulation, yet they deviate by up to 3 degrees, as shown in Figure 4.3, 4.6 and 4.9. This corresponds to a deviation of the relative position by 5% of the distance between the cameras, which is discussed in section 5.2. Looking at the simulation results of the pitch it can be seen that the noise suppression part of the calibration application, which is described in section 3.2, invalidated all the feature points at about ±27 degrees. This makes sense since rotating the camera in the pitch angle moves the feature points further away from the epipolar lines 43 Chapter 5 Discussion compared to rotating the camera in roll- or yaw angles. The points move further when at high angles because the Z-value of the point relative to the camera frame decreases at an increasing rate. This most likely not be a problem in live setups since the feature point would disappear out of the camera frame before this effect appears. A related problem with this noise suppressing algorithm should though be kept in mind: it will be highly effective at invalidating noise which is perpendicular to the epipolar line, while not removing any noise which is parallel to it. Another weakness of the chosen calibration model is the yaw sensitivity. Rotating the camera in yaw angle will not affect the optimization function as much as rotating the camera in any other angle. This is a problem which can be observed in the live tests, where the yaw estimates deviate by 5 to 10 degrees when the camera yaw angle is returned to 0 degrees. This effect might be reduced by using more spread feature points. The live test utilizes no more than nine points which are all on the same plane in the 3D space. Using points in one plane when calibrating means that we are missing information [4]. Only one plane was used in this test to ensure good features using a checkerboard, and the lost information should not be crucial since the application is updating a given calibration instead of computing a new one. It is possible to detect two checkerboards in different planes, this was originally done in the test application, but was omitted due to slow computation on the laptop used for testing. 5.2 Relative Position Estimation The roll-, pitch- and yaw angles of camera 1 is easily converted to get the relative position between the cameras based on the orientation of camera 1. Figure 4.3, 4.6 and 4.9 show that the estimated orientation of camera 1 in the simulation deviates from the correct value. This is believed to be caused by dominating effects from the angle error in the optimization problem. The relative position of the cameras is still a major part of the calibration, and further work needs to be done to ensure that the relative position can be calculated with good 44 5.2 Relative Position Estimation accuracy. Ideas for solving this problem is presented in chapter 6. The angular direction which seems to produce the most relative position error is the roll angle. In the simulation, the roll error is up to 3 degrees, which corresponds to a deviation of relative position of about 5% compared to the distance between the cameras. The roll test results, shown in Figure 4.10, also suggest that the calibration application is having a hard time estimating relative position when the roll angle is varying. 45 6 Further Work The calibration system presented in this report is far from finished! The areas of improvement are summarized by the following list. • Enhancing the relative position estimation • Improving the noise suppression algorithm • Testing with different feature detection and -matching algorithms • Adding functionality for estimating the distance between cameras to remove the last free variable Enhancing the relative position estimation is probably the most important point, and a few ideas of how to do it is presented in this section. Adding an extra camera is one of the ideas. By using an extra camera, the relative orientation between each of the three cameras can be used to calculate relative positions as long as one of the distances is known. Adding an extra camera is perhaps the easiest, and is likely to give good estimates without much work. A downside of this is the need of increased computation power, since it has to update three calibrations as opposed to one. The other idea is to add an extra optimization problem, or perhaps modifying the existing one. The existing one looks for a local minimum, which is not guaranteed to take it to the global minimum. An algorithm for finding the global minimum may be applied to the current optimization problem, but it might be more effective to split the problem in two. This can be done by using the relative orientation output by the current optimization algorithm to formulate a similar problem. This new problem would consist of three variables instead of the original six, which might lower the computational costs. 47 Kapittel 6 Further Work The current noise suppression algorithm, which is described in chapter 3.2, calculates the distance from the point to the corresponding epipolar line and invalidates any points farther away than a given threshold. This means that non-matching points may be considered valid by as long as they are close to the epipolar line. Reducing the threshold would help, but this would again possibly invalidate valid points caused by movement of the camera frame perpendicular to the epipolar line. During the work on this calibration system the weight has been on the calibration model, which has left little attention to testing different feature detection and -matching algorithms. The features have a huge impact on the quality of the calibration, and achieving good features might even make the need for a noise suppression algorithm fade away. The distance between the cameras can be calculated by knowing a single distance in the scene. If an initial distance is known, existing calibrations can be used to calculate distances between all matched feature points. These distances and points could be stored and matched with future features to calculate the updated distances between the cameras. If this is attempted, a paper from 1995 about self-calibration of extrinsic parameters might be interesting [9]. Although the paper is old, it presents a relevant method of calibration which uses a known distance in the scene. While working on the system, a relevant paper from 2009 was found [2]. The problem described in the article share great commons to the problem described in this report. The paper from 2009 had a more complex problem than presented here due to less simplification. The algorithm described also had a more complex optimization problem. The paper claimed less than 5% 3D reconstruction error. There was no comparison of actual- and estimated extrinsic camera parameters. This paper was discovered too late to take into account when implementing the calibration system, which is why it is commented here as further work. 48 Short User Manual Startup procedure 1. The application is started by running continuous calibration.exe 2. The user is then asked about the kind of input to use. Either “Web cameras” or “Files” can be chosen 3. In case of “Web cameras”... a) A new box will ask for camera 1 ID, this is usually a number between 0 and 2 depending on the system setup. Trying 0 or 1 usually works b) Another box asks for camera 2 ID. This cannot be the same as camera 1 ID. Try incrementing the last answer 4. In case of “Videos”... a) A file browser will pop up asking for camera 1 video file. Locate the video file for camera 1 and open it (If running test videos, this would be the file ending with “_1”) b) A file browser will pop up asking for camera 2 video file. Locate the video file for camera 2 and open it (If running test videos, this would be the file ending with “_2”) 5. A file browser will now pop up asking for a calibration file, locate the .xml file which has stored the calibration data (If running the test videos, this will be cameracalibration.xml) 6. A box will appear asking for “Run mode”. The available options will be “9x9 Checkerboard”, “Simulation” and “Free”. Notice that this can be altered by modifying parameters while application is running (If running the test video, the correct option would be “9x9 Checkerboard”) 49 Kapittel Short User Manual 7. The application should now load the appropriate input and attempt updating the calibration Altering application parameters To start altering parameters, select “View”->”Parameter window” while running the application. The parameters are stored in a tree structure under “Feature”. Use simulated points This option enables feature point simulation, the “Euler angle” options will then be used for controlling simulated points. This option should not be enabled at the same time as “Find calibration patterns”. Euler angle: * X: control the simulated rotation about the world X axis (pitch) for camera 2. Y: control the simulated rotation about the world Y axis (yaw) for camera 2. Z: control the simulated rotation about the world Z axis (roll) for camera 2. Find calibration patterns This option makes the FeatureFinder look for a 9x9 checkerboard instead of ordinary feature points. This option should not be enabled at the same time as “Use simulated points” Max feature point matches The max number of feature point matches which should be sent to the Optimizer. The N closest matches will be kept. DescriptorExtractor: * Change the algorithm for extracting descriptors, default is BRIEF. GoodFeaturesToTrack detector Enable the GFTT detector, if unchecked, the FAST feature detector will be used. Default is FAST. Feature point threshold How far away a feature point can be from its corresponding epipolar line before being invalidated. Default is 100. 50 Short User Manual Run continuous Unchecking this will pause the application, allowing for taking screenshots or setting parameters without calibration running. 51 Contents Overview of CD A CD is stuck to the cover of the physical edition of the thesis. It contains the following; • A compiled version of the continuous calibration application • Test videos used for the live test • System debug output prints from the live tests and simulations • Python scripts for processing the output prints from tests and simulations • The source files of the application which are relevant for the thesis • An .xml file which contains the calibration of the cameras used for the test The structure of the CD is as follows application c o n t i n u o u s c a l i b r a t i o n . exe [ p l u s t he needed . d l l s f o r running th e a p p l i c a t i o n ] s o u r c e code F e a t u r e F i n d e r . cpp FeatureFinder . h FeatureStream . cpp FeatureStream . h Optimizer . cpp Optimizer . h test results live a p p l i c a t i o n output p r o c e s s _ l i v e _ o u t p u t . py 53 Kapittel Contents Overview of CD [ 6 output . t x t f i l e s ] videos [ 6 x2 v i d e o s o f t e s t s ] c a m e r a c a l i b r a t i o n . xml simulation process_sim_output . py [ 4 output . t x t f i l e s ] If cameras are to be used with the application, they would have to be initially calibrated in advance. The structure of the calibration file can be seen in “cameracalibration.xml”. However, by running the application with the given input videos, the correct initial calibration is stored in “cameracalibration.xml”, and that file should be selected when prompted by the application. The python scripts utilize the matplotlib module of python, which will have to be installed in addition to python 2.7 or later. The system debug output prints are there to allow the python scripts to make plots, and may not make much sense if read in a text editor. The source files include the files of the application which consist of the calibration algorithms. They rely on a framework which was provided by National Oilwell Varco for running the graphical user interface, yet the files can easily be ported to a standalone project. 54 Bibliography [1] R. Ng and S. U. C. S. Dept, Digital light field photography. Stanford University, 2006. [2] T. Dang, C. Hoffmann, and C. Stiller, “Continuous stereo selfcalibration by camera parameter tracking,” Image Processing, IEEE Transactions on, vol. 18, no. 7, pp. 1536–1550, 2009. [3] T. Moons, L. Van Gool, and M. Vergauwen, 3d Reconstruction from Multiple Images: Part 1: Principles. No. pt. 1 in Foundations and trends in computer graphics and vision, Now Publishers, 2009. [4] G. Bradski and A. Kaehler, Learning OpenCV: Computer Vision with the OpenCV Library. O’Reilly Media, 2008. [5] E. Rosten and T. Drummond, “Machine learning for highspeed corner detection,” in Computer Vision - ECCV 2006 (A. Leonardis, H. Bischof, and A. Pinz, eds.), vol. 3951 of Lecture Notes in Computer Science, pp. 430–443, Springer Berlin Heidelberg, 2006. [6] M. Calonder, V. Lepetit, C. Strecha, and P. Fua, “Brief: Binary robust independent elementary features,” in Computer Vision ECCV 2010 (K. Daniilidis, P. Maragos, and N. Paragios, eds.), vol. 6314 of Lecture Notes in Computer Science, pp. 778–792, Springer Berlin Heidelberg, 2010. [7] D. E. King, “Dlib-ml: A machine learning toolkit,” Journal of Machine Learning Research, vol. 10, pp. 1755–1758, 2009. [8] G. Bradski, “The OpenCV Library,” Dr. Dobb’s Journal of Software Tools, 2000. [9] H. Zhuang, “A self-calibration approach to extrinsic parameter estimation of stereo cameras,” Robotics and Autonomous Systems, vol. 15, no. 3, pp. 189 – 197, 1995. 55