1
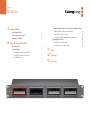
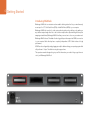
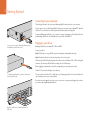
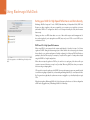
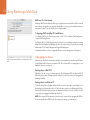
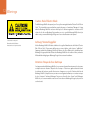
Installation and Operation Manual Blackmagic MultiDock Mac OS X™ Windows™ July 2013 Welcome Welcome to Blackmagic MultiDock! Blackmagic MultiDock is an extremely fast SSD and HDD docking solution that lets you mount up to 4 x 2.5" drives on your Mac or Windows PC. Using Thunderbolt technology, Blackmagic MultiDock is capable of handling multiple simultaneous commands between drives, and gives you reliable video editing, color grading and transfer of your media. SSDs have no moving parts, so they are very fast and unbelievably robust. You can even stripe drives as a RAID for increased performance! This instruction manual contains all the information you need to start using your Blackmagic MultiDock disk array. Please check the support page at www.blackmagicdesign. com for the latest version of this manual and support notes. Keeping up to date will always ensure you get all the latest features. When downloading software, please register with your information so we can keep you updated when new software is released. We are constantly working on new features and improvements, so we would love to hear from you! Grant Petty CEO Blackmagic Design Contents MultiDock 4 6 Getting Started Setting up a RAID for High Speed Performance and Data Security 9 Introducing MultiDock 4 RAID Level 0 for High Speed Performance Connecting to your Computer 5 RAID Level 1 for Data Security 10 Plugging in your Drives 5 Configuring a RAID using Mac OS X and Windows 10 Unplugging your Drives Using Blackmagic MultiDock Identifying Drives 6 Formatting Drives 6 Formatting your Drives on Mac OS X 7 Formatting your Drives on Windows 7 Fast SSDs for Video 8 11 12 13 9 10 Ejecting a drive on Mac OS X 10 Ejecting a drive on a Windows PC 10 Help Warnings Warranty Getting Started 4 Getting Started Introducing MultiDock Blackmagic MultiDock is an attractive rack mountable docking station that lets you simultaneously mount up to 4 x 2.5" Solid State Drives (SSDs) or Hard Disk Drives (HDDs) to your computer. Blackmagic MultiDock is perfect for video post production tasks such as editing, color grading, or any task that requires large video files to be stored on multiple drives. By minimizing the time spent swapping external drives, Blackmagic MultiDock allows you more time to focus on your creative work. Blackmagic MultiDock uses Thunderbolt technology, which provides a super fast 10 Gb/s connection to your computer. Each drive bay has a completely independent SATA 3 disk interface for high performance. A RAID can be configured by simply plugging in multiple disks and using your operating system disk utility software to "stripe" the disks into a single storage volume. This operation manual is designed to give you all the information you need to help you get the most out of your Blackmagic MultiDock. 5 Getting Started Connecting to your Computer The first thing you’ll want to do is power your Blackmagic MultiDock and connect to your computer! Plug your power source into Blackmagic MultiDock’s mains power input using a standard IEC cable and connector. The power indicator on the front panel will illuminate when power is supplied. ION! CAUT CTRIC EN! OF ELE T OP RISKCK- DO NO L SHO Fuse T5A 60Hz A 500V 1.7 100-24 Connect your power supply to Blackmagic MultiDock using a standard IEC power cable and connector. Connecting Blackmagic MultiDock to your computer is as easy as plugging in a Thunderbolt cable from your Blackmagic MultiDock to the Thunderbolt port on your Mac or Windows PC. Plugging in your Drives Blackmagic MultiDock uses formatted 2.5" SSDs and HDDs. To plug in your drive: Step 1. Hold the drive so its gold SATA contacts are facing down and towards the drive bay. Step 2. Gently push the drive into the drive bay until you feel it slot into place. The drive bay’s red LED will briefly illuminate when a drive is detected. When an SSD or HDD is being read or written to, the drive bay’s LED will flash according to the level of disk activity. When plugging in formatted drives, they will be recognized by your computer and mounted. On Mac OS X, your drives will appear on your desktop. Connect Blackmagic MultiDock to your Mac or Windows PC using a Thunderbolt cable. To find your drive on a Windows PC, click the Start icon, or Start page, and click on Computer. A window will open containing icons for your connected drives. Now that you have plugged in your power source, connected to a computer and plugged in your drives, you can now start using Blackmagic MultiDock. Plug SSDs or HDDs into any of Blackmagic MultiDock's 4 drive bays. Using Blackmagic MultiDock 6 Using Blackmagic MultiDock Identifying Drives Blackmagic MultiDock has 4 independent drive bays. We recommend naming or renaming your drives so you can easily identify them. You can name your drives when formatting using the Disk Utility application on Mac OS X, or Windows Disk Management on Windows. Renaming your drive is as easy as right clicking on your drive in Finder or Windows Explorer. It’s also helpful to physically label your drives so you can visually identify the drive in each drive bay. Formatting Drives You can use any 2.5" SSD or HDD with Blackmagic MultiDock. New drives need to be formatted so your computer can read and write to the them. If you are working with Blackmagic cameras or HyperDeck, your drives will need to be formatted to either HFS+ or exFAT. These disk formats allow large file sizes and long video clips captured as single files. You can easily rename your drives using Finder in Mac OS X, or Windows Explorer. HFS+ This format is also known as Mac OS Extended and is natively supported by Mac OS X. HFS+ supports “journaling” which means your data is more likely to be recovered in the rare event of corruption, or a hardware or software malfunction. ExFAT This format is supported natively by Mac OS X and Windows. ExFAT does not support journaling which means data is less likely to be recovered in the event of corruption, or a hardware or software malfunction. You can format drives at any time, even if you already have data written on them. However, formatting a drive deletes all its data so be sure to back up anything important on your drive before it is formatted. A new drive will need to be initialized so your computer can use it to read and write data. 7 Using Blackmagic MultiDock Formatting your Drives on Mac OS X The Disk Utility application included with Mac OS X can format a drive in the HFS+ or exFAT formats. Step 1. Plug your new drive into Blackmagic MultiDock. A window will open asking you to initialize your disk. Click Initialize. Step 2. The Disk Utility application will open. On the left of the window you’ll see a list of icons for your connected drives. Click on the disk icon for your new drive. Step 3. Select the Erase tab in Disk Utility’s top menu. Step 4. Set the Format to Mac OS Extended (Journaled) or exFAT. Step 5. Type a Name for the new volume and then click Erase. Click Erase again to confirm your selection. Your new drive will quickly be formatted and made ready for use with Blackmagic MultiDock. Formatting your Drives on Windows Use Disk Utility on Mac OS X to format, or erase, your drive in the Mac OS Extended (Journaled) or exFAT format. Windows uses the Disk Management application to format a new drive in the exFAT format. Step 1. Plug your new drive into Blackmagic MultiDock. Step 2. Go to Control Panel/Administrative Tools/Computer Management/Storage/Disk Management. Step 3. Right click on your new drive from the list of connected drives and select New Simple Volume. New unformatted drives will be described as Unallocated. Step 4. A window will open asking for the volume size. Leave the volume size defaulted to the drive’s maximum capacity. Click Next. Step 5. Assign a drive letter and click Next. Step 6. Set the file system to exFAT. Type a volume label, select Quick Format and click Next. Your new drive will quickly be formatted and made ready for use with Blackmagic MultiDock. You can also format drives in the exFAT format using the Format dialog box feature in Windows. It can be found by right clicking on the drive's icon. 8 Using Blackmagic MultiDock Fast SSDs for Video You can use any 2.5" SSD or HDD with Blackmagic MultiDock for every day tasks. When working with Blackmagic cameras, HyperDeck, or Blackmagic capture devices, such as Blackmagic UltraStudio 4K, you will need to use fast SSDs. You can even stripe multiple SSDs as a RAID for fast, reliable handling of Ultra HD and 4K video. In our testing, we have found newer SSDs with larger capacities are generally faster. SSDs recommended for uncompressed 10 Bit HD and ProRes Ultra HD 4K video capture include: Intel 335 Series 240GB SSD Sandisk Extreme 480GB SSD Digistor – 128GB SSD Professional Video Extreme Digistor – 240GB SSD Professional Video Series Digistor – 480GB SSD Professional Video Series Intel 335 Series 240GB SSD Intel 520 Series 240GB SSD Intel 520 Series 480GB SSD Kingston 64GB SSDNow V+100 Kingston 128GB SSDNow V+100 Kingston 240GB SSDNow V+200 Kingston HyperX 240GB OCZ 240GB Deneva 2 (firmware 2.22) OCZ 240GB Vertex 3 OCZ 480GB Vertex 3 OWC Mercury Extreme Pro 6G SSD PNY 240GB Prevail SSD (firmware 5.0.2) Sandisk Extreme 480GB Please check the tech notes on the Blackmagic Design website for the latest information. If you find an SSD that isn’t fast enough for uncompressed HD, Ultra HD or 4K capture, try a faster SSD, configure a set of SSDs as a level 0 RAID, or change your capture device settings to use a compressed format, such as ProRes or DNxHD. These compressed formats have a much lower data rate and are easier for a single SSD to handle. Kingston HyperX 240GB SSD 9 Using Blackmagic MultiDock Setting up a RAID for High Speed Performance and Data Security Blackmagic MultiDock supports 2 levels of RAID (Redundant Array of Independent Disks). RAID level 0 stripes your drives together so they are recognized by your computer as one single drive to increase performance. RAID level 1 configures two drives so one is always mirrored by the other, which increases data security. Striping your drives as a RAID shares data over a set of drives which requires careful management. It’s also worth noting that if you’re striping drives as a RAID, stripe only a set of SSDs or a set of HDDs, not a combination of both. RAID Level 0 for High Speed Performance 3 SSDs being striped as a level 0 RAID using Disk Utility on Mac OS X. When using HDDs for uncompressed video capture and playback, it's beneficial to stripe 2 to 4 drives together as a RAID. Sharing the data amongst a pair of drives doubles the total capacity, plus decreases their workload, so you get faster performance. Similarly, configuring 3 or 4 drives as a RAID level 0 triples or quadruples, their total drive capacity. For example, a computer will recognize 4 x 1 terabyte drives striped using level 0 RAID as 1 single 4 terabyte drive. When drives are striped together in a RAID set, be careful not to unplug any of the drives while your computer is powered, otherwise you may lose all your data. When using RAID, shut down your computer before removing or swapping drives. SSDs can also be striped together as a level 0 RAID, however, performance increases are generally limited to workflows using large sequential files, such as reading and writing Ultra HD, 4K, or uncompressed video files. For general every day tasks, the performance increase is negligible so you should probably use single SSDs. When detecting drives, Blackmagic MultiDock looks for drive names, therefore a set of drives configured as a RAID can be plugged into any of Blackmagic MultiDock’s 4 drive bays. 10 Using Blackmagic MultiDock RAID Level 1 for Data Security Blackmagic MultiDock has 4 drive bays which let you configure 2 pairs of mirrored SSDs or HDDs. A mirrored pair of drives are recognized as one single drive. Using RAID level 1 gives you an immediate back up as you write data to the drive. If one drive fails, the other is instantly available. Configuring a RAID using Mac OS X and Windows To configure a RAID use the Disk Utility application on MAC OS X, or Windows Disk Management to configure a RAID using Windows. You’ll find the Mac OS X Disk Utility application by clicking Go on the desktop menu bar, then selecting Utilities/Disk Utility. Windows Disk Management can be opened by clicking Control panel, then selecting Administrative Tools/Computer Management/Storage/Disk Management. For detailed information on how to configure a RAID, refer to your operating system’s online support. Unplugging your Drives 2 SSDs being mirrored as a RAID level 1 using Disk Utility on Mac OS X. Make sure your drives have been properly ejected before removing them from their drive bays. HDDs have longer initialize and shut down times compared to SSDs. This is because HDDs use spinning discs to store data which take time to reach speed. Ejecting a drive on Mac OS X Right click on the drive icon on your desktop and select Eject. Blackmagic MultiDock's drive bay LED will flash briefly and your drive will disappear from the desktop. Your drive is now ready to be unplugged from Blackmagic MultiDock. Ejecting a drive on a Windows PC Click on the Safely Remove Hardware and Eject Media icon at the bottom right of your desktop. A list of drives and devices will appear above the icon. Click on the drive you wish to eject. Blackmagic MultiDock's drive bay LED will flash briefly, and your drive will disappear from the device list on the desktop. Your drive is now ready to be unplugged from Blackmagic MultiDock. NOTE: When using a RAID it’s important you shut down your computer before unplugging the RAID set. Never unplug a drive from a RAID set while the computer is operating or you’ll risk data loss. Help 11 Help Getting Help The fastest way to obtain help is to go to the Blackmagic Design online support pages and check the latest support material available for your MultiDock. Blackmagic Design Online Support Pages The latest manual, software and support notes can be found at the Blackmagic Support Center at www.blackmagicdesign.com/support. Contacting Blackmagic Design Support If you can't find the help you need in our support material, please use the "Send request" button, on the support page for your MultiDock model, to email a support request. Alternatively call your nearest Blackmagic Design support office at www.blackmagicdesign.com/company. Blackmagic Forum It's always worth browsing the Blackmagic forum. You may quickly find a solution by reading experiences from other Blackmagic MultiDock users. The forum can be found at http://forum.blackmagicdesign.com. Warnings 12 Warnings Caution: Risk of Electric Shock On the Blackmagic MultiDock rear panel you will see a yellow warning label marked ‘Caution: Risk of Electric Shock’. This is intended to warn users that there may be the presence of uninsulated “dangerous” voltage within the Blackmagic MultiDock enclosure which may be of sufficient magnitude to constitute a risk of electric shock to the user. Blackmagic Design advises you not to open the Blackmagic MultiDock unit, but rather contact your nearest Blackmagic Design service center should assistance be required. Caution label on rear panel Warnetikett auf der Rückseite Avertissement sur le panneau arrière Achtung: Stromschlaggefahr Auf der Blackmagic MultiDock-Rückseite befindet sich ein gelbes Warnetikett mit der Aufschrift 'Caution: Risk of Electric Shock’. Dieses warnt den Benutzer vor einer möglichen, nicht isolierten, "gefährlichen" Spannung innerhalb des Blackmagic MultiDock-Gehäuses, die einen Elektroschock verursachen kann. Blackmagic Design empfiehlt das Gehäuse des Blackmagic MultiDock nicht selbst zu öffnen, sondern bei Hilfebedarf das nächstgelegene Blackmagic Design Servicecenter zu kontaktieren. Attention: Risque de choc électrique Sur le panneau arrière du Blackmagic MultiDock, vous verrai une étiquette d’avertissement de couleur jaune sur laquelle est inscrit « Attention : Risque de choc électrique ». Cette mise en garde est destinée à avertir les utilisateurs de la présence possible d’une tension « dangereuse » non isolée à l’intérieur du boîtier du Blackmagic MultiDock, laquelle tension pouvant avoir une magnitude suffisante pour constituer un risque de choc électrique à l’utilisateur. Blackmagic Design vous déconseille donc d’ouvrir l’unité Blackmagic MultiDock, et vous recommande de contacter votre centre de service Blackmagic Design le plus proche en cas de nécessité. Warranty 13 Warranty 12 Month Limited Warranty Blackmagic Design warrants that this product will be free from defects in materials and workmanship for a period of 12 months from the date of purchase. If a product proves to be defective during this warranty period, Blackmagic Design, at its option, either will repair the defective product without charge for parts and labor, or will provide a replacement in exchange for the defective product. In order to obtain service under this warranty, you the Customer, must notify Blackmagic Design of the defect before the expiration of the warranty period and make suitable arrangements for the performance of service. The Customer shall be responsible for packaging and shipping the defective product to a designated service center nominated by Blackmagic Design, with shipping charges pre paid. Customer shall be responsible for paying all shipping charges, insurance, duties, taxes, and any other charges for products returned to us for any reason. This warranty shall not apply to any defect, failure or damage caused by improper use or improper or inadequate maintenance and care. Blackmagic Design shall not be obligated to furnish service under this warranty: a) to repair damage resulting from attempts by personnel other than Blackmagic Design representatives to install, repair or service the product, b) to repair damage resulting from improper use or connection to incompatible equipment, c) to repair any damage or malfunction caused by the use of non Blackmagic Design parts or supplies, or d) to service a product that has been modified or integrated with other products when the effect of such a modification or integration increases the time or difficulty of servicing the product. THIS WARRANTY IS GIVEN BY BLACKMAGIC DESIGN IN LIEU OF ANY OTHER WARRANTIES, EXPRESS OR IMPLIED. BLACKMAGIC DESIGN AND ITS VENDORS DISCLAIM ANY IMPLIED WARRANTIES OF MERCHANTABILITY OR FITNESS FOR A PARTICULAR PURPOSE. BLACKMAGIC DESIGN’S RESPONSIBILITY TO REPAIR OR REPLACE DEFECTIVE PRODUCTS IS THE WHOLE AND EXCLUSIVE REMEDY PROVIDED TO THE CUSTOMER FOR ANY INDIRECT, SPECIAL, INCIDENTAL OR CONSEQUENTIAL DAMAGES IRRESPECTIVE OF WHETHER BLACKMAGIC DESIGN OR THE VENDOR HAS ADVANCE NOTICE OF THE POSSIBILITY OF SUCH DAMAGES. BLACKMAGIC DESIGN IS NOT LIABLE FOR ANY ILLEGAL USE OF EQUIPMENT BY CUSTOMER. BLACKMAGIC IS NOT LIABLE FOR ANY DAMAGES RESULTING FROM USE OF THIS PRODUCT. USER OPERATES THIS PRODUCT AT OWN RISK. © Copyright 2013 Blackmagic Design. All rights reserved. ‘Blackmagic Design’, ‘DeckLink’, ‘HDLink’, ‘Workgroup Videohub’, ‘Multibridge Pro’, ‘Multibridge Extreme’, ‘Intensity’ and ‘Leading the creative video revolution’ are registered trademarks in the US and other countries. All other company and product names may be trade marks of their respective companies with which they are associated.