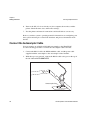
1
Gas Chromatograph
Site Preparation and
Installation Manual
TRACE™ GC Site Preparation and Installation Manual
June 2001 Edition
Part Number M31709190
© 2001 ThermoQuest Italia S.p.A. All rights reserved.
Printed in Italy
Published by ThermoQuest Italia S.p.A., Strada Rivoltana, 20090 Rodano - Milan - Italy
Tel: +39 02 95059355 Fax: +39 02 95059388
Printing History: First Edition, released June 1998.
Second Edition, released November 1998.
Third Edition, released June 1999
Forth Edition, released June 2001.
Disclaimer
Technical Information contained in this publication is for reference purposes only and is subject to change without notice. Every effort has
been made to supply complete and accurate information; however, ThermoFinnigan assumes no responsibility and will not be liable for any
errors, omissions, damage, or loss that might result from any use of this manual or the information contained therein (even if this information
is properly followed and problems still arise).
This publication is not part of the Agreement of Sale between ThermoFinnigan and the purchaser of a TRACE™ GC system. In the event of
any conflict between the provisions of this document and those contained in ThermoQuest’s Terms and Conditions, the provisions of the
Terms and Conditions shall govern.
Reference to System Configurations and Specifications supercede all previous information and are subject to change without notice.
Trademarks
TRACE™ is a trademark of ThermoQuest Italia S.p.A.. Other brand and product names may be trademarks or registered trademarks of their
respective companies.
Declaration
Manufacturer:
ThermoQuest Italia S.p.A.
ThermoQuest Italia S.p.A. is the manufacturer of the instrument described in this
manual and, as such, is responsible for the instrument safety, reliability and
performance only if:
•
installation
•
re-calibration
•
changes and repairs
have been carried out by authorized personnel and if:
•
the local installation complies with local law regulations
•
the instrument is used according to the instructions provided, and if its
operation is only entrusted to qualified, trained personnel
ThermoQuest Italia S.p.A. is not liable for any damages derived from the noncompliance with the aforementioned recommendations.
ThermoQuest Italia S.p.A.
Strada Rivoltana
20090 Rodano (MI)
ITALY
Contents
About This Manual.................................................................................................................................ix
Overview ................................................................................................................................... ix
Conventions Used in This Manual............................................................................................. x
Instrument Markings and Symbols ..........................................................................................xii
Using the TRACE GC Document Set.....................................................................................xiv
SECTION I
Site Preparation
Chapter 1
Laboratory Preparation ..................................................................................................................... 3
Entrance...................................................................................................................................... 4
Space and Load Requirements ................................................................................................... 5
Power Requirements .................................................................................................................. 7
120 V ac Power Requirements...................................................................................... 7
230 V ac Power Requirements...................................................................................... 7
Power Quality ............................................................................................................... 7
Effects of Voltage Disturbances ...................................................................... 8
Wall Outlets .................................................................................................................. 8
Technical Assistance................................................................................................... 11
Operating Environment............................................................................................................ 11
Temperature ................................................................................................................ 11
Cooling Requirements ................................................................................... 12
Oven Exhaust ................................................................................................. 13
Altitude........................................................................................................................ 13
Humidity ..................................................................................................................... 13
Particulate Matter........................................................................................................ 13
Electrostatic Discharge ............................................................................................... 14
Vibration ..................................................................................................................... 14
Lighting....................................................................................................................... 14
Other Environmental Factors ...................................................................................... 15
Exhaust System ........................................................................................................................ 15
Gas and Plumbing Requirements ............................................................................................. 15
Gas Purity.................................................................................................................... 17
Traps .............................................................................................................. 17
Purity Requirements....................................................................................... 18
Gas Regulators and Fittings ........................................................................................ 19
Site Preparation and Installation Manual
v
Contents
Secondary Gas Regulators............................................................................. 20
Gas Tanks ................................................................................................................... 20
Gas Lines .................................................................................................................... 20
Gas Lines for Cold On-Column Injectors ..................................................... 21
Cryogenic Cooling...................................................................................................... 21
Liquid Nitrogen ............................................................................................. 22
Liquid Carbon Dioxide.................................................................................. 23
Telephone ................................................................................................................................ 24
Required Tools......................................................................................................................... 24
Supplemental Equipment......................................................................................................... 25
Hardware and Software Minimum Requirements ................................................................... 26
ChromQuest Data System .......................................................................................... 26
Hardware Requirements ................................................................................ 26
Operating System Requirements ................................................................... 26
ChromCard Data System ............................................................................................ 27
Hardware Requirements ................................................................................ 27
Operating System Requirements ................................................................... 27
Chapter 2
Instrument Arrival ..............................................................................................................................29
Shipping Information............................................................................................................... 29
Origin............................................................................................................. 29
Destination..................................................................................................... 30
Receiving Instruments ................................................................................................ 30
Installation ............................................................................................................................... 31
Training.................................................................................................................................... 32
SECTION II
Installation
Chapter 3
Before You Begin…............................................................................................................................35
Verify Site Preparation ............................................................................................................ 35
Unpacking the Instrument........................................................................................................ 35
Gas Plumbing Basics ............................................................................................................... 37
How to Use a Tubing Cutter....................................................................................... 37
How to Use Teflon Tape on Pipe Threads ................................................................. 37
How to Use Swagelok Tube Fittings.......................................................................... 38
vi
Site Preparation and Installation Manual
Contents
How to Attach a Swagelok Tee or Cross .................................................................... 40
Chapter 4
Plumbing the Gas Supply to the GC ................................................................................................ 41
Using Hydrogen ....................................................................................................................... 42
Using the Hydrogen Sensor ........................................................................................ 43
Building the Gas Lines............................................................................................................. 44
Connecting the Gas Supply Cylinders ........................................................................ 44
Adding Traps to the Gas Supply ................................................................................. 45
Purging Gas Lines .................................................................................................................... 46
Connecting the Gas Supply to the Inlet Manifold.................................................................... 47
Connecting the Gas Supply to the Detector Manifold ............................................................. 47
Connecting Coolant to the Cryogenic System ......................................................................... 50
Column Oven Cryo System ........................................................................... 50
PTV Injector Cryo System............................................................................. 50
Testing for Leaks...................................................................................................................... 51
Chapter 5
Getting Connected............................................................................................................................. 53
Mounting Peripheral Devices................................................................................................... 53
Remove the TRACE Cover......................................................................................... 53
Connect the Data System Computer ........................................................................... 54
Connect the Autosampler Cable ................................................................................. 56
Computing Integrators ................................................................................................ 58
System Power Up..................................................................................................................... 59
Appendix A
Preinstallation Checklist ......................................................................................................................61
Appendix B
Customer Communication ...............................................................................................................63
How To Contact Us.................................................................................................................. 63
Technical Support ....................................................................................................... 66
Reader Survey ............................................................................................................. 67
Glossary ................................................................................................................................................69
Index ......................................................................................................................................................75
Site Preparation and Installation Manual
vii
Contents
Figures
Figure 1-1
Figure 1-2
Figure 1-3
Figure 1-4
Figure 1-5
NEMA 5-20P and 5-15P Power Plugs and Outlets: 120 V ac .................................... 9
Shuco 230 V ac Power Plugs and Outlets ................................................................... 9
Dual-Stage Gas Regulator ........................................................................................... 19
N2 Tank Configuration ................................................................................................ 22
CO2 Tank Configuration ............................................................................................. 23
Figure 3-1
Figure 3-2
Figure 3-3
Swagelok Ferrule and Nut Assembly .......................................................................... 38
Swagelok and Inlet Connection ................................................................................... 39
Tightening Swagelok Fittings ......................................................................................39
Figure 4-1
Gas Trap Configuration ...............................................................................................45
Figure 5-1
Figure 5-2
Removing the Top Cover ............................................................................................ 54
Integrator Cable Connections ......................................................................................58
Tables
Table 1-1
Table 1-2
Table 1-3
Table 1-4
Table 1-5
Table 1-6
Table 1-7
Table 1-8
Minimum Space and Weight Requirements: TRACE Standard System ..................... 6
Space and Weight Requirements: TRACE Optional Instruments .............................. 6
Maximum Current Requirements for the TRACE Standard System .......................... 10
Maximum Current Requirements for TRACE Optional Instruments ......................... 10
Heat Output: TRACE Standard System ...................................................................... 12
Heat Output: TRACE Optional Instruments ............................................................... 12
Capillary and Wide-Bore Column Gas Recommendations ........................................ 16
Packed Column Gas Recommendations ..................................................................... 16
Table 4-1
Detector Gas Connections ........................................................................................... 49
viii
Site Preparation and Installation Manual
About This Manual
Overview
The Site Preparation and Installation Manual, along with the TRACE
Preinstallation Help File, will help you prepare for the arrival and installation of
your TRACE GC gas chromatograph. Following the procedures and guidelines in
this manual will help the installation process go smoothly.
This manual is organized as follows:
Section I, Site Preparation, contains the information you need to prepare for the
arrival of your TRACE GC gas chromatograph system. In addition to laboratory
and operating environment standards, this section contains information about the
shipping and delivery of your TRACE system.
Chapter 1, Laboratory Preparation, gives you all the information you need to
prepare your laboratory for the arrival of your TRACE GC system.
Chapter 2, Instrument Arrival, gives an overview of shipping and receiving
procedures, installation, and training.
Section II, Installation, contains information to help you set up and install your
TRACE GC gas chromatograph.
Chapter 3, Before You Begin…, contains unpacking instructions and provides
a brief tutorial of basic gas plumbing operations you must know before you
can continue the installation process.
Chapter 4, Plumbing the Gas Supply to the GC, explains the proper gas
supply connections and configuration information for your GC.
Chapter 5, Getting Connected, explains the TRACE power connections, and
helps you mount and configure peripheral devices and data systems.
Appendix A, Preinstallation Checklist, contains a step-by-step list of items you
should complete before your TRACE system arrives.
Appendix B, Customer Communication, contains contact information for
ThermoFinnigan offices worldwide. Use the Reader Survey in this section to give
us feedback on this manual and help us improve the quality of our documentation.
Site Preparation and Installation Manual
ix
Conventions Used in This Manual
About This Manual
The Glossary lists and defines terms used in this guide and the Site Preparation
Help File. This includes are abbreviations, acronyms, metric prefixes, and
symbols.
The Index contains an alphabetical list of key terms and topics in this guide with
cross references and the corresponding page numbers.
Conventions Used in This Manual
The following symbols and typographical conventions are used throughout this
manual.
x
Bold
Bold text indicates names of windows, menus, dialog boxes,
buttons, and fields.
Italic
Italic text indicates cross references, first references to
important terms defined in the glossary, and special
emphasis.
Monospace
Monospace, or Courier, indicates filenames and filepaths, or
text the user should enter with the keyboard.
Monospace
Bold
Monospace Bold indicates messages or prompts displayed on
the computer screen or on a digital display.
»
This symbol illustrates menu paths to select, such as
File»Open…
KEY NAME
Bold, uppercase sans serif font indicates the name of a key on
a keyboard or keypad, such as ENTER.
CAUTION
This symbol alerts you to an action or procedure that, if
performed improperly, could damage the instrument.
NOTE
This symbol alerts you to important information related to the
text in the previous paragraph.
Site Preparation and Installation Manual
Conventions Used in This Manual
About This Manual
This symbol alerts you to an action or procedure that, if
WARNING! performed improperly, could result in damage to the
instrument or possible physical harm to the user. This symbol
may be followed by icons indicating special precautions that
should be taken to avoid injury.
This symbol indicates electric shock hazard.
This symbol indicates danger from hazardous chemicals.
This symbol indicates danger from high temperature surfaces
or substances.
This symbol indicates a fire hazard.
This symbol indicates an explosion hazard.
This symbol indicates a toxic hazard.
This symbol indicates the presence of flammable materials.
This symbol indicates the presence of radioactive material.
This symbol indicates an operation or procedure that must
NOT be performed by the user. A ThermoFinnigan
authorized Customer Support Engineer must perform this
procedure.
Site Preparation and Installation Manual
xi
Instrument Markings and Symbols
About This Manual
This symbol indicates all metal objects, such as watches,
jewels, etc., must be taken off.
This symbol indicates an eye hazard. Eye protection must be
worn.
This symbol indicates the user must wear a protective screen
when performing the procedure.
This symbol indicates the user must wear protective shoes
when performing the procedure.
This symbol indicates the user must wear protective clothing
when performing the procedure.
This symbol indicates the user must wear gloves when
performing the procedure.
Instrument Markings and Symbols
The following table explains the symbols used on ThermoFinnigan instruments.
Only a few of them are used on the TRACE GC gas chromatograph.
Symbol
Description
Direct Current
Alternating Current
Both direct and alternating current
Three-phase alternating current
3
xii
Site Preparation and Installation Manual
Instrument Markings and Symbols
About This Manual
Symbol
Description
Earth (ground) terminal
Protective conductor terminal
Frame or chassis terminal
Equipotentiality
On (Supply)
Off (Supply)
Equipment protected throughout by DOUBLE
INSULATION or REINFORCED INSULATION
(Equivalent to Class II of IEC 536)
Indicates that the user must refer to the manual for
specific Warning or Caution information to avoid
personal injury or damage to the product.
Caution, risk of electric shock
Caution, hot surface
Caution (refer to accompanying documents)
Site Preparation and Installation Manual
xiii
Instrument Markings and Symbols
About This Manual
Symbol
Description
In-position of a bistable push control
Out-position of a bistable push control
xiv
Site Preparation and Installation Manual
Using the TRACE GC Document Set
About This Manual
Using the TRACE GC Document Set
The TRACE GC Document Set (CD-Rom PN 317 095 00) includes all manuals in
electronic format, and serves as your library for information about the TRACE
hardware and software.
The TRACE GC Document Set (PN 317 093 00) as paper copy is also available
Furthermore,ThermoFinnigan part numbers (PN) for the paper copy manuals are
provided for each book title.
Site Preparation and Installation Manual (PN 317 091 90)
This manual and diskette describes how to set up a workspace for the TRACE GC
and how to connect the TRACE GC to the gas supplies and peripheral devices.
Acceptance Package (PN 317 092 20)
This folder contains required shipping documents and quality report forms.
Getting Started (PN 317 092 30)
This guide contains procedures for checking configuration, installing detectors,
and making a first analysis with the TRACE GC.
Operating Manual (PN 317 091 70)
This manual provides descriptions of the TRACE GC hardware and software and
instructions for their use.
Quick Reference Card (PN 317 092 40)
This reference card contains guidelines for carrier gas use and injection
procedures.
K-Factor Quick Reference (P/N 317 092 41)
This reference card contains information to interpretate results from a Column
Evaluation.
Preventive Maintenance Schedule (PN 317 092 80)
This document provides a list of recommended scheduled maintenance and a
year-long log book to record maintenance, observations, supply lists, and service
records.
Site Preparation and Installation Manual
xv
Maintenance and Troubleshooting Guide (PN 317 091 80)
This manual contains instructions for diagnosing and resolving operational
problems.
Standard Operating Procedures (PN 317 092 00)
This manual contains instructions, operating procedures, and test criteria for final
testing of the TRACE GC.
Spare Parts Catalog (PN 317 092 10)
This catalog contains a list of spare parts for the TRACE GC.
SECTION
I
Site Preparation
The Site Preparation section contains the information you need to
prepare for the arrival of your TRACE GC gas chromatograph. In
addition to laboratory and operating environment standards, this section
contains information about the shipping and delivery of your TRACE
system.
Chapter 1, Laboratory Preparation, gives you all the information you
need to prepare your laboratory for your TRACE system.
Chapter 2, Instrument Arrival, gives an overview of shipping and
receiving procedures, installation, and training.
Laboratory Preparation
1
This chapter gives you all the information you need to prepare your site for the
arrival of your TRACE GC system. It also includes a list of tools and supplies you
need to install your gas chromatograph. The information in this chapter will help
you plan, construct, and fully equip your laboratory. Your laboratory must meet
the requirements for power, exhaust systems, and environmental conditions
explained in this chapter before your gas chromatograph can be installed.
Your laboratory preparations should be completed before the TRACE GC is
unpacked. Complete any work that creates dust, high humidity, or corrosive
vapors before you begin unpacking the instruments.
Chapter at a Glance…
Entrance.................................................................................................................. 4
Space and Load Requirements ...............................................................................5
Power Requirements............................................................................................... 7
Operating Environment ........................................................................................ 11
Exhaust System .................................................................................................... 15
Gas and Plumbing Requirements ......................................................................... 15
Telephone ............................................................................................................. 24
Required Tools...................................................................................................... 24
Supplemental Equipment......................................................................................25
Hardware and Software Minimum Requirements................................................ 26
Site Preparation and Installation Manual
3
Chapter 1
Laboratory Preparation
Entrance
TRACE GC systems operate reliably under controlled environment conditions.
Operating or maintaining a system outside the specifications outlined in this guide
may cause many different types of system failures. The repair of such failures is
specifically excluded from the standard warranty and service contract coverage.
Use this chapter to ensure that your site meets all the criteria of the Preinstallation
Checklist in Appendix A.
NOTE
In addition to the information in this chapter, you must also obey the building and safety
rules and regulations for construction that apply in your area.
Entrance
The entrance to your facility and the width of all hallways, elevators, and
doorways should be at least 92 cm (37 in.).1 However, you should allow
additional room for maneuvering the system around corners, into elevators, or
through doorways.
The TRACE GC and accessories are shipped in a container with the following
dimensions:
l—92 cm (37 in.), w—76 cm (30 in.), h—88 cm (35 in.)
The container and its contents weigh approximately 65 kg (145 lbs). Other
modules, such as the computer, monitor, and options, are shipped in their own
containers. Their dimensions and weights are less than those of the TRACE
container.
1.
4
Your instrument is shipped in a container, the smallest dimension of which is 92 cm (37 in.). If the entrance
to your laboratory will not accommodate a 92 cm (37 in.) container, you can remove the individual
modules from the container before moving them into the room. If the instrument is removed from its
shipping container before it is delivered to the lab site, be sure that all the contents of the container remain
with the instrument.
Site Preparation and Installation Manual
Chapter 1
Laboratory Preparation
Space and Load Requirements
Space and Load Requirements
We recommend the following space allowances for the area around the gas
chromatograph:
•
The working area should be at least 1.5 m (5 ft) wide.
•
The working area should be 1.5 m (5 ft) deep. The depth includes a 75 cm
(30 in.) bench for the gas chromatograph.
•
The area behind the instrument should be a minimum of 30 cm (12 in.).
Provide enough space around the instrument for operators to work beside it and in
front of it. Keep in mind that the GC oven vents to the rear. Any material exposed
to the oven exhaust must withstand repeated exposure to temperatures of up to
400 °C (750 °F).
The space requirements and weights for the standard system components are
given in Table 1-1. Similar information for TRACE optional instruments is
provided in Table 1-2.
The TRACE system should be placed on a workbench that has minimum
dimensions of 0.75 × 2 m (2.5 × 6 ft.). The workbench must also be capable of
supporting the weight of the data system computer or computing integrator, 27 kg
(60 lb), plus the weight of any options. Be sure there is at least 16 cm (6 in.) of
space behind the workbench for connections. In addition, there must be at least
92 cm (36 in.) of vertical clearance from the top of the TRACE system. Therefore,
you should avoid placing the instrument below cabinets or shelves.
NOTE
To keep the data system computer or integrator close to the electrical connections, we
recommend placing it on the right side of the GC.
Site Preparation and Installation Manual
5
Chapter 1
Laboratory Preparation
Space and Load Requirements
Use Table 1-1 to determine the minimum space and weight requirements for a
standard TRACE system.
Table 1-1. Minimum Space and Weight Requirements: TRACE Standard System
Height
Instrument
Width
Depth
Weight
cm
in.
cm
in.
cm
in.
kgs
lbs
TRACE GC gas chromatograph
51
20
61
24
66
26
48
105
computer
18
7
44
17
44
17
12
27
monitor
39
15
39
15
39
15
14
30
keyboard
5
2
51
20
21
8
1
2
The total load on the workbench is 75 kg (164 lbs).
NOTE
Use Table 1-2 to determine the space and weight requirements for optional
instruments for your TRACE system.
Table 1-2. Space and Weight Requirements: TRACE Optional Instruments
Height
Instrument
Width
Depth
Weight
cm
in.
cm
in.
cm
in.
kgs
lbs
AS 2000 Control Module
8.5
3.3
18
7
61
24
6
13
HS 2000 Control Module
8.5
3.3
18
7
61
24
6.5
14
AS 2000 Turret/Tray
50
20
30
12
30
12
8
18
HS 2000 Turret/Tray
64
25
39
15
33
13
10
22
inkjet printer/plotter
20
8
43
17
38
15
4
8
laser printer
29
12
42
17
41
16
20
44
Autosamplers
Printers
NOTE
6
Other peripheral devices, such as purge and trap units, may be connected to the
TRACE 2000. These peripheral devices may have additional bench space requirements.
Consult your local ThermoFinnigan Customer Support Engineer (CSE) for assistance.
Site Preparation and Installation Manual
Chapter 1
Laboratory Preparation
Power Requirements
Power Requirements
It is your responsibility to provide an acceptable source of power. You should
provide a dedicated power line with a circuit breaker capable of withstanding the
power ratings listed in the following sections.
120 V ac Power Requirements
For TRACE GC systems installed in the US and other countries using 120 V ac
power, the minimum power requirements are as follows:
•
120 V ac +6, –10%
•
frequency of 50/60 Hz ± 2 Hz
•
three duplex outlets (single-phase power) with a minimum power rating of
20 A at each duplex outlet
•
earth ground hard-wired to the main panel
230 V ac Power Requirements
For TRACE GC systems installed in countries using 230 V ac power, the
minimum power requirements are as follows:
•
230 V ac ± 10%
•
frequency of 50/60 Hz ± 2 Hz
•
three duplex outlets, with a minimum power rating of 16 A at each duplex
outlet
•
earth ground hardwired to the main panel
Power Quality
The quality of power supplied to your TRACE GC system must be stable and
within the specifications listed in this guide. The line voltage must be free of
fluctuation due to slow changes in the average voltage, surges, sags, transients,
and harmonics.
Site Preparation and Installation Manual
7
Chapter 1
Laboratory Preparation
Power Requirements
The TRACE GC system operates in an Overvoltage Category II environment, as
defined in International Standard EN 61010-1: 1993.
Below are definitions for the most common voltage disturbances:
Slow average is a gradual, long-term change in average root mean square (RMS)
voltage level, with typical durations greater than 2 s.
Sags and surges are sudden changes in average RMS voltage level, with typical
durations between 50 µs and 2 s.
Transients (or impulses) are brief voltage surges of up to several thousand volts,
with durations of less than 50 µs.
Harmonic distortion is a high-frequency disturbance that appears as distortion of
the fundamental sine wave. Total harmonic distortion should be less than 3%.
Effects of Voltage Disturbances
Constant high line voltage or surges in voltage can cause overheating and
component failures. Constant low line voltage or sags in voltage can cause the
system to function erratically. Transients, even of a few microseconds duration,
can cause electronic devices to fail catastrophically or to degrade, shortening their
lives significantly. Harmonic distortion can cause noise in power supply lines and
degrade the performance of the instrument. Therefore, it is important to establish
the quality of the line power in your laboratory prior to the installation of your
TRACE system.
NOTE
The interconnected power outlets for the TRACE system require a common point to one
ground connector. If there are two such points, with each connected to separate external
grounds, noise current will flow through the ground system via the ground loop that is
formed.
Wall Outlets
The power cable from the TRACE GC is approximately 3 m (9 ft) long.
NOTE
8
Use an Uninterruptible Power Source (UPS) to protect your data system against possible
loss due to power outages. At this time, we do not recommend using a UPS with the GC.
Site Preparation and Installation Manual
Chapter 1
Laboratory Preparation
Power Requirements
Most UPS systems are not designed to provide high-quality distortion-free power for
scientific equipment.
The 120 V ac systems are fitted with U.S. standard National Electronics
Manufacturers Association (NEMA) 5-20P power plugs. A NEMA 5-20P power
plug and its corresponding outlet are rated at 20 A and 125 V ac.
The power cables from the personal computer, monitor, and printer are
approximately 2 m (6 ft) long. The 120 V ac systems are fitted with NEMA 5-15P
plugs. For optional instruments, the plug requirements may vary. Refer to your
product’s user manual for specifications.
Figure 1-1 shows the NEMA power plugs and outlets.
Outlet
Plug
Outlet
NEMA 5-20P
Plug
NEMA 5-15P
Figure 1-1. NEMA 5-20P and 5-15P Power Plugs and Outlets: 120 V ac
The 230 V ac systems are fitted with Shuco German-type power plugs. Plug
requirements are dictated by country. Figure 1-2 shows the Shuco power plug and
outlet.
Outlet
Plug
Shuco Plug
Figure 1-2. Shuco 230 V ac Power Plugs and Outlets
Site Preparation and Installation Manual
9
Chapter 1
Laboratory Preparation
CAUTION
Power Requirements
You should never connect the TRACE GC and its peripheral devices to the same
electrical wall outlet. You will run the risk of overloading the circuit.
Tables 1-3 and 1-4 show maximum current requirements for the TRACE GC
system and optional instruments.
Table 1-3. Maximum Current Requirements for the TRACE Standard System
120 V Current
Requirement
(in amperes)
230 V Current
Requirement
(in amperes)
TRACE GC
20
10
computer
4
2
monitor
2
1
Total
26
13
Instrument
Table 1-4. Maximum Current Requirements for TRACE Optional Instruments
120 V Current
Requirement
(in amperes)
230 V Current
Requirement
(in amperes)
AS 2000
0.8
0.4
HS 2000
1.6
0.8
1.8
0.9
7
3.5
Instrument
GC Autosamplers
Printers
ink jet printer/plotter
laser printer
NOTE
10
Other peripheral devices, such as purge and trap units, may be connected to the
TRACE GC. These peripheral devices may have additional power requirements. Consult
your local ThermoFinnigan CSE for assistance.
Site Preparation and Installation Manual
Chapter 1
Laboratory Preparation
Operating Environment
Technical Assistance
Occasionally, unacceptable quality in line power sources may adversely affect the
operation of a TRACE system. It is the user’s responsibility to correct line voltage
problems.
Specifying power conditioning equipment is a complex task that is best handled
by a company or consultant specializing in that field.
Contact your ThermoFinnigan CSE for assistance in locating a power consultant.
Refer to Appendix B for a ThermoFinnigan office in your area.
Operating Environment
The operating environment in your laboratory is affected by such factors as
temperature, humidity, particulate matter, and electrostatic discharge. It is your
responsibility to provide an acceptable operating environment for your TRACE
system.
Attention to the operating environment will ensure continued high performance of
your gas chromatograph.
Temperature
The room temperature must be maintained between 18 and 35 °C (65 and 95 °F),
and should remain consistent. As the laboratory temperature increases, system
reliability decreases.
NOTE
All electronic components generate heat while operating. This heat must be dissipated to
the surrounding air for the components to operate reliably.
Site Preparation and Installation Manual
11
Chapter 1
Laboratory Preparation
Operating Environment
Cooling Requirements
There must be a good flow of air around the system, and the air conditioning must
be capable of maintaining a constant temperature (within the operational limits).
Any costs for air conditioning are more than offset by good sample throughput
and reduced repair costs.
CAUTION
Do not directly expose the GC system to any cooling duct outlets.
The air conditioning load for a basic TRACE system is approximately 2,650 W
(9,100 Btu h-1). Table 1-5 and Table 1-6 show the approximate heat output for a
TRACE standard system and TRACE optional instruments.
Table 1-5. Heat Output: TRACE Standard System
Instrument
Heat Output
(in BTU h–1)
TRACE GC
6,600
computer
1,650
monitor
850
Total
9,100
Table 1-6. Heat Output: TRACE Optional Instruments
Instrument
Heat Output
(in BTU h–1)
GC Autosamplers
AS 2000
550
HS 2000
820
Printers
ink jet printer/plotter
laser printer
NOTE
12
200
2,900
Other peripheral devices, such as purge and trap units, may be connected to the
TRACE GC.. These peripheral devices may have additional cooling requirements.
Consult your local ThermoFinnigan CSE for assistance.
Site Preparation and Installation Manual
Chapter 1
Laboratory Preparation
Operating Environment
Oven Exhaust
The GC oven exhaust vents are in the rear of the instrument. Hot air
(400 °C [750 °F]) exits through these vents during GC operation. As stated under
Space and Load Requirements in this chapter, there should be at least 30 cm (12
in.) free space behind the instrument to allow the exhaust to dissipate. Any
material exposed to the oven exhaust must be able to withstand repeated exposure
to temperatures of up to 400 °C (750 °F).
WARNING! Oven exhaust can cause severe burns. Avoid working behind the instrument when
the oven vents during cooling-down cycles. Do not expose gas tanks or bottles,
chemicals, regulators, electrical cords, or other temperature-sensitive items to oven
exhaust.
Altitude
The maximum operating altitude for the TRACE GC is 2,000 meters above sea
level.
Humidity
The relative humidity of the operating environment must be between 40 and 80%
with no condensation.
Operating your TRACE GC system in low humidity will cause the accumulation
and discharge of static electricity, which shortens the life of electronic
components. Operating your GC system in high humidity causes condensation,
which can lead to short circuits. High humidity also blocks traps on cooling fans.
We recommended you equip your laboratory with temperature and humidity
monitors to ensure your laboratory is always within the required temperature and
humidity specifications.
Particulate Matter
The air in your laboratory must not have excessive dust, smoke, or other
particulate matter. The air should contain fewer than 1,000,000 particles per cubic
meter (100,000 particles per cubic foot) larger than 5 µm.
Site Preparation and Installation Manual
13
Chapter 1
Laboratory Preparation
Operating Environment
Dust can clog the air traps causing a reduction in air flow around electronic
components. Dust will also form a layer on electronic components that will act as
an insulating blanket, reducing the transfer of heat from the components to the
surrounding air.
Electrostatic Discharge
The TRACE GC, with all its covers in place, is not susceptible to static discharge.
However, laboratory conditions that expose instrumentation and laboratory
personnel to repeated high levels of static discharge should be considered a safety
hazard.
Therefore, we recommend you take the following precautions, especially if you
are operating your system at the lower end of the relative humidity specification
listed above.
•
Use a static-dissipating floor covering (such as tile or conductive linoleum) in
the room housing your instrument.
•
Use laboratory chairs covered with natural fibers or other static-dissipating
material.
•
Wear laboratory coats and clothing made from natural fibers or other staticdissipating material.
•
Do not place polystyrene (foam) cups or packing materials on the instrument.
Vibration
Place your instruments on surfaces that are free of vibration. Be aware of
vibrations caused by equipment in adjoining locations.
Lighting
Overhead lighting is recommended to light your work area.
14
Site Preparation and Installation Manual
Chapter 1
Laboratory Preparation
Exhaust System
Other Environmental Factors
The TRACE GC operates in an environment where normally only non-conductive
pollution occurs, but in which temporary conductivity due to condensation must
be expected. This is a Pollution Degree 2 environment, as specified in
International Standard EN 61010-1: 1993.
Exhaust System
Specialized exhaust systems generally are not required for GC detector systems.
However, it is your responsibility to see that local exhaust codes are followed.
You should be aware that certain detectors require the use of hydrogen for fuel
gas. Be sure to read Using Hydrogen in Chapter 4, Plumbing the Gas Supply to
the GC, if you plan to use hydrogen with your TRACE system. Testing for Leaks,
also in Chapter 4, contains information about leak testing to ensure that excessive
amounts of flammable gases are not released into the lab atmosphere. The TRACE
Operating Manual also discusses leak testing in detail.
Laboratories meeting the heating and cooling requirements specified in this
manual will sufficiently circulate lab air to prevent accumulation of gases and
fumes vented during normal GC use. Extensive leaks in plumbing lines to the GC
may present hazards. Be sure to follow all local codes regulating plumbing of
gases.
Gas and Plumbing Requirements
You must provide the gas supplies for your gas chromatograph. Be sure to order
your gases and regulators far enough ahead of time to have them ready for the GC
installation process.
WARNING! All ThermoFinnigan gas chromatographs are designed to use an inert gas as the
carrier gas. If you wish to use hydrogen as a carrier gas, you must install a hydrogen
sensor. Contact a ThermoFinnigan sales representative if you plan to use hydrogen
as the carrier gas in your new TRACE GC. If you don’t have the hydrogen sensor,
you must use an inert carrier gas.
Site Preparation and Installation Manual
15
Chapter 1
Laboratory Preparation
Gas and Plumbing Requirements
Table 1-7 lists the gas recommendations for capillary column systems.
Table 1-7. Capillary and Wide-Bore Column Gas Recommendations
Detector Type
1.
2.
Carrier Gases
Fuel Gases
Make-Up Gas
Helium
Nitrogen
Hydrogen
Hydrogen + Air
Helium
Nitrogen
(if necessary)
NPD1
Helium
Nitrogen
Hydrogen
Hydrogen + Air
Helium
Nitrogen
PID1
Helium
Nitrogen
Hydrogen
None
Helium
Nitrogen
ECD 1, 2
Helium
Nitrogen
Argon
None
Nitrogen
Argon/5% Methane
FPD1
Helium
Nitrogen
Hydrogen
Hydrogen + Air
Helium
Nitrogen
(if necessary)
TCD
Helium
Nitrogen
Hydrogen
Argon
None
Same as carrier
PDD
Helium is the gas used for PDD discharge and carrier supply
FID
1
Maximum delivery pressure—700 kPa. (100 psi) for carrier gas, 420 kPa (60 psi) for detector fuel gases.
Oxygen trap should be installed in gas lines.
Table 1-8 lists the gas recommendations for packed column systems.
Table 1-8. Packed Column Gas Recommendations
Detector Type
16
Carrier Gases
Fuel Gases
Make-Up Gas
FID1
Helium
Nitrogen
Argon
Hydrogen + Air
Not needed
NPD1
Helium
Nitrogen
Hydrogen + Air
Nitrogen
Site Preparation and Installation Manual
Chapter 1
Laboratory Preparation
Gas and Plumbing Requirements
Table 1-8. Packed Column Gas Recommendations (Continued)
Detector Type
1.
2.
Carrier Gases
Fuel Gases
Make-Up Gas
Nitrogen
Argon/5% CH4
None
Same as carrier gas
(if necessary)
FPD1
Helium
Nitrogen
Argon
Hydrogen + Air
Not needed
TCD1, 2
Helium
Nitrogen
Hydrogen
Argon
None
Not needed
PDD
Helium is the gas used for PDD discharge and carrier supply
ECD
1, 2
Maximum delivery pressure—700 kPa (100 psi) for carrier gas, 420 kPa (60 psi) for detector fuel gases.
Oxygen trap should be installed in gas lines.
Gas Purity
If possible, you should use only instrument or chromatographic purity grade gases
in your TRACE GC.
Traps
UHP (Ultra-High Purity) gases should not contain impurities above 1 ppm.
Impurities below 1 ppm generally do not require purification. Gases with higher
impurity levels may require oxygen and hydrocarbon traps. A number of GC
supply and accessory companies carry a variety of traps for gases.
See Figure 4-1, Gas Trap Configuration, on page 45, for the correct trap
installation sequence. For more information on gas purification, contact your local
ThermoFinnigan CSE.
Moisture Traps
Water in the carrier or fuel gas may damage the gas chromatograph column and
contaminate the TRACE system. Water content should be less than 1 ppm in all
cases. If you are using multiple traps, install the moisture trap closest the gas
supply, before the hydrocarbon and the oxygen trap.
Site Preparation and Installation Manual
17
Chapter 1
Laboratory Preparation
Gas and Plumbing Requirements
Hydrocarbon Traps
Hydrocarbon traps remove organic materials from gases. If you are using multiple
traps, install the hydrocarbon trap after the moisture trap, but before the oxygen
trap.
Oxygen Traps
Oxygen content in the carrier and gas lines should be less than 1 ppm. To achieve
a level of oxygen of less than 1 ppm, install an oxygen-removing trap in the
carrier gas line between the gas tank and the GC. If you are using multiple traps,
the oxygen trap should be the last trap in the series.
Purity Requirements
The following sections describe the minimum requirements for gases used in your
gas chromatograph system. Always consider using UHP 99.999% pure gases
when available.
Helium
For carrier gas: 99.995%1 high purity, with less than 1.0 ppm each of water,
oxygen, and total hydrocarbons after purification. One full-size tank that has an
outlet pressure of 400–700 kPa (60–100 psi). Use a regulator with a CGA 580
connection or equivalent. Use water, oxygen, and hydrocarbon traps.
When PDD is used, helium must have a minimum purity of 99.999%, with < 20
ppm Ne impurity.
Hydrogen
For carrier or detector fuel gas: 99.995%1 high purity, with less than 1.0 ppm of
total hydrocarbons after purification. One full-size tank that has an outlet pressure
of 400–700 kPa (60–100 psi). Use a regulator with a CGA 350 connection or
equivalent. Use water, oxygen and hydrocarbon traps.
Air
For detector fuel gas: 99.995%1 high purity. Use a regulator with a CGA 0590
connection or equivalent. Air compressors are not acceptable because they do not
meet pressure, water, and hydrocarbon requirements.
1.
18
99.995% gas requires the use of appropriate traps.
Site Preparation and Installation Manual
Chapter 1
Laboratory Preparation
Gas and Plumbing Requirements
Nitrogen
For carrier or make-up gas: 99.995% high purity, with less than 1.0 ppm of total
hydrocarbons after purification. Use a regulator with a CGA 0580 connection or
equivalent.
Argon/5% Methane
For ECD make-up gas: 99.995%1 high purity. Use a regulator with a CGA 350
connection or equivalent.
Servo Air
For valve actuation and secondary cooling: Commercial grade or filtered air
compressor. Large volume delivery at 400–500 kPa (60–80 psi), free of particles,
oils, and water.
Gas Regulators and Fittings
Gas tanks may be equipped with either single- or dual-stage regulators that
contain stainless steel diaphragms. The regulator output pressure should be
adjustable from 300 to 700 kPa (45–100 psi). Each regulator should be equipped
with a 1/8-in. Swagelok compression fitting, or equivalent. Figure 1-3 shows a
dual-stage gas regulator with 1/8-in. fittings.
Figure 1-3. Dual-Stage Gas Regulator
Verify with your gas supplier the type of CGA fitting on the gas bottles you order.
Be sure these fittings match the regulators described in Purity Requirements in
Site Preparation and Installation Manual
19
Chapter 1
Laboratory Preparation
Gas and Plumbing Requirements
this chapter. If not, contact your gas supplier or your area ThermoFinnigan sales
representative to make the appropriate changes.
Secondary Gas Regulators
Because secondary regulation of carrier, fuel, and make-up gases may be provided
downstream of the cylinder regulator, a single- or dual-stage regulator is
acceptable, but it must use a stainless steel diaphragm.
Gas Tanks
Gas tanks should be placed where they cannot damage cables or gas lines. Use
standard safety practices for securing gas tanks and bottles. Gas supply lines
should terminate with 1/8-in. female Swagelok connectors.
Stored gases should be placed in an area where a wide temperature variation will
not occur. Don’t forget to plan for gas cylinder storage when preparing your
laboratory.
WARNING! Do not place gas tanks in the path of the GC oven exhaust.
Gas Lines
Gas lines should:
•
be refrigeration grade, precleaned copper or new stainless steel
•
be 1/8-in. or 1/4-in. diameter (gas lines longer than 3 m [10 ft] and supplying
more than one GC should be 1/4-in.)
•
be free of oil
•
be free of moisture
•
run to the back or side of the TRACE system
•
be spliced with Swagelok fittings
Precleaned tubing
Properly cleaned tubing is solvent-flushed and purge-dried with an inert gas, such
as nitrogen or helium. Flush gas lines using acetone or hexane. Never use a
20
Site Preparation and Installation Manual
Gas and Plumbing Requirements
Chapter 1
Laboratory Preparation
chlorinated solvent. When flushing gas lines, collect the solvent passing through
the gas line and inspect it for discoloration or residue. Continue to flush gas lines
until all waste solvent is free of discoloration and residue. Purge the gas line for
several minutes to make sure the gas line is free of all traces of solvent.
DO NOT…
•
use any tubing other than new, clean metal tubing of the specified size
•
allow any brazed or soldered plumbing joints to be made in the gas delivery
system without precleaning
•
allow pipe-threaded joints without PTFE tape as a sealant (no other thread
sealant is acceptable)
•
use PTFE tape on compression fitting joints (Swagelok fittings, or equivalent)
•
mix components of one fitting brand with those of another brand (for
example, Swagelok ferrules with Tylok body, etc.)
Gas Lines for Cold On-Column Injectors
Gas chromatographs equipped with a cold on-column injector require secondary
cooling performed by an extra air line with a high flow rate. This line should have
an inside diameter of at least 2 mm (5/64 in.).
Cryogenic Cooling
If you have purchased a cryogenic cooling option for your TRACE GC, you will
need to provide a coolant supply. Your TRACE GC is already configured for
either liquid nitrogen or liquid carbon dioxide. Be sure to identify which
cryogenic cooling option your GC is configured for before you order cryogenic
coolant.
Site Preparation and Installation Manual
21
Chapter 1
Laboratory Preparation
Gas and Plumbing Requirements
Liquid Nitrogen
Liquid N2 must be supplied at pressures below 400 kPa (60 psi). Plumbing to the
GC should be 1/4-in. copper or stainless steel tubing with insulation. It is your
responsibility to ensure the liquid delivery connection from the liquid N2
cryogenic supply is adaptable to 1/4-in. tubing. The liquid N2 cryogenic valve on
the TRACE GC is a 1/4-in. Swagelok fitting. Subambient operation of the PTV
requires liquid N2 cooling. Figure 1-4 shows the proper configuration for an N2
tank.
Cylinder Valve
Insulated 1/4" tubing
Figure 1-4. N2 Tank Configuration
WARNING! High pressures and extremely low temperatures make liquid N2 a hazardous
material. High concentrations of N2 in the air can cause asphyxiation hazard. To
avoid injury, always follow the safety precautions and delivery system design
recommended by your gas supplier.
22
Site Preparation and Installation Manual
Chapter 1
Laboratory Preparation
Gas and Plumbing Requirements
Liquid Carbon Dioxide
Liquid CO2 must be supplied by a high-pressure cylinder with a dip tube. It is your
responsibility to ensure the liquid delivery connection from the CO2 cryogenic
supply is adaptable to 1/8-in. tubing. The CO2 cryogenic valve on the
TRACE GC is a 1/8-in. Swagelok valve. Figure 1-5 shows the proper CO 2
tank configuration.
Dip tube
Correct
Incorrect
Figure 1-5. CO2 Tank Configuration
WARNING! High pressures and extremely low temperatures make pressurized liquid CO2 a
hazardous material. High concentrations of CO2 are dangerous. To avoid injury,
always follow the safety precautions and delivery system design recommended by
your gas supplier.
Site Preparation and Installation Manual
23
Chapter 1
Laboratory Preparation
Telephone
Telephone
We recommended you install a telephone near the instrument so, if necessary, you
can conveniently operate the system while speaking with ThermoFinnigan
Technical Support. (Refer to Appendix B, Customer Communication, for a list of
ThermoFinnigan offices worldwide.) The telephone line should accept digital
transmissions for direct connection to the TRACE. The telephone outlet should be
within 2 m (6 ft) of your system.
Required Tools
The following tools are required for the installation and maintenance of your
TRACE system. Some of them are supplied with the instrument.
24
•
two 16 X 17 mm open-ended wrenches
•
two 12 X 14 mm open-ended wrenches
•
two 8 X 10 mm open-ended wrenches
•
two 7 X 6 mm open-ended wrenches
•
two 7/16 X 3/8-in. open-ended wrenches
•
#1 and #2 cross-recessed (Phillips®) screwdrivers
•
small and large common screwdrivers
•
wire strippers
•
6-in. adjustable (Crescent®) wrench
•
elbow (Channelok®) pliers
•
a pen light
•
steel rule tape
•
Teflon® tape
•
tweezers
•
12-in. adjustable (Crescent®) wrench
•
1/8-in. tubing cutter
Site Preparation and Installation Manual
Chapter 1
Laboratory Preparation
Supplemental Equipment
•
a gas flow meter
•
Allen wrench set including 1.5 mm, 2 mm, 2.5 mm, 3 mm, 4 mm, 5 mm, and
6 mm wrenches
Supplemental Equipment
The following items are supplemental equipment necessary for the installation of
your TRACE system. Some of them are supplied with the instrument.
NOTE
•
carrier gas (refer to Gas and Plumbing Requirements on page 15 for
information about the carrier gas requirements for your gas chromatograph)
•
detector gas (refer to Gas and Plumbing Requirements on page 15 for the
detector gas requirements for your gas chromatograph)
•
dual-stage gas cylinder pressure regulators with an output pressure range of
0–700 kPa (0–100 psi), stainless steel diaphragms, and a 1/8-in. Swagelok
terminate nut
•
sample syringe (5 or 10 µl)
•
columns (a 7 m test column is supplied with each GC)
•
tubing and fittings for carrier and detector gases (refer to Gas Tanks on
page 20 for the tubing and fitting requirements for your gas chromatograph)
•
spare septa
•
column ferrules
•
Swagelok® fittings
•
leak detector (50/50 IPA/water solution or an electronic leak detector)
•
data system or integrator (refer to Hardware and Software Minimum
Requirements on page 26 for the data system requirements)
It is the responsibility of the customer to replace any consumables used during installation.
Site Preparation and Installation Manual
25
Chapter 1
Laboratory Preparation
Hardware and Software Minimum Requirements
Hardware and Software Minimum Requirements
Your TRACE GC produces analog and digital data output when you perform
chromatographic analysis. A computer with a data system or a computing
integrator can be used to process the data from the GC. The following topics
provide the minimum requirements for computer hardware and operating systems
depending on the data system you use to process the GC data.
ChromQuest Data System
The ChromQuest data system has the following minimum computer requirements.
Hardware Requirements
NOTE
•
133 MHz Pentium processor
•
48 MB RAM
•
1 GB hard drive
•
CD ROM
•
mouse (serial port)
Computer compatibility should not be assumed. The computer may not be included with
the TRACE GC ChromQuest data system.
Operating System Requirements
•
26
Windows NT 4.0 with Service Pack 3
Site Preparation and Installation Manual
Hardware and Software Minimum Requirements
Chapter 1
Laboratory Preparation
Chrom-Card Data System
The Chrom-Card data system has the following minimum computer requirements.
Hardware Requirements
•
133 MHz Pentium processor
•
24 MB of RAM
•
1 GB hard drive
•
CD ROM
Operating System Requirements
•
Windows 95/98/2000/NT
Site Preparation and Installation Manual
27
Instrument Arrival
2
This chapter gives an overview of shipping and receiving procedures, installation,
and training. The information in this chapter will give you an idea of what to
expect when your TRACE system arrives.
Telephone and fax numbers for the ThermoFinnigan offices are listed in
Appendix B, Customer Communication.
Chapter at a Glance…
Shipping Information............................................................................................ 29
Installation ............................................................................................................ 31
Training ................................................................................................................ 32
Shipping Information
Instruments are shipped in the manner agreed upon at the time of sale. There are
two categories of shipping: Origin (FOB) and Destination (FOB, CIP, or CIF).
Origin
For instruments shipped Ex-Works, also known as FOB (Free On Board) Origin,
damages incurred in shipment are the responsibility of the purchaser and the
carrier. However, ThermoFinnigan will assist with filing claims and (billable)
repairs, if necessary.
Site Preparation and Installation Manual
29
Chapter 2
Instrument Arrival
Shipping Information
Destination
There are two types of Destination shipping: CIP (Carriage and Insurance Paid to)
Destination and CIF (Carriage Insurance and Freight paid to) Destination. These
are also known as FOB Destination. For all types of Destination shipping,
ThermoFinnigan will file claims against the carrier for any damages incurred in
shipment. Note, however, that ThermoFinnigan will not accept liability for
damage not recorded on the receiving documents.
Receiving Instruments
ThermoFinnigan instruments are shipped by electronic equipment carriers who
specialize in the handling of delicate equipment. Occasionally, however,
equipment inadvertently gets damaged in transit.
Please take the following precautions when receiving the instruments:
•
Check carefully for obvious damage or evidence of rough handling, including
triggering of Shockwatch® and Tiltwatch™ labels.
•
If external damage is apparent, note this fact on all copies of the receiving
documents, and describe briefly the extent of the damage. The driver should
sign (or initial) next to your comments to signify agreement with your
observations. It may be necessary to photograph damaged areas for claims
purposes. Contact the appropriate ThermoFinnigan office to report the
damage.
•
Move the cartons to a protected location, preferably to the installation site.
•
Leave the boxes as complete as possible, and do not unpack the components
unless absolutely necessary.
The Customer Support Engineer (CSE) will also check for damage and verify the
completeness of shipment. This will protect you in the event of missing or
damaged components.
NOTE
30
Freight insurance requires that obvious damage be noted on the receiving documents.
Site Preparation and Installation Manual
Chapter 2
Instrument Arrival
Installation
Installation
If you have purchased the installation option, you must submit a completed
Preinstallation Checklist (Appendix A) to us before a ThermoFinnigan CSE will
install your system.
The CSE will unpack and completely install the system, including optional
instruments. The CSE will also initialize settings, verify that the system is
operating according to specifications, and familiarize you with the system.
Contact your local ThermoFinnigan office for details.
If you have not purchased the installation option, refer to Section II, Installation,
for installation instructions.
Site Preparation and Installation Manual
31
Chapter 2
Instrument Arrival
Training
Training
Valuable training on ThermoFinnigan instruments and software is offered
worldwide.
Experience has shown that maximum value can be derived from a scientific
instrument if there is one person who has a major responsibility for the
instrument.
We recommend that you designate a key operator to manage the operation and
maintenance of the TRACE system. We also recommend that the key operator
receive training at the ThermoFinnigan Institute, at your site, or at one of the local
ThermoFinnigan offices.
For information on courses or enrollment, contact your local ThermoFinnigan
office:
ThermoQuest Italia S.p.A.
Strada Rivoltana km 4
20090 Rodano (MI)
ITALY
39 02 95059 355
ThermoQuest, Austin
2215 Grand Avenue Parkway
Austin, Texas 78728-3812
USA
1 512 251 1400
32
Site Preparation and Installation Manual
SECTION
II
Installation
If you have purchased the installation option for your system, a
ThermoFinnigan authorized CSE (Customer Support Engineer) will
install your system. If you have not purchased the installation option,
this section will help you set up your TRACE GC. Included in this
section are basic installation procedures you will need to be familiar
with before you can install the GC.
Chapter 3, Before You Begin…, contains unpacking instructions and
provides a brief tutorial of basic gas plumbing operations you must
know before you can continue the installation process.
Chapter 4, Plumbing the Gas Supply to the GC, explains the proper gas
supply connections and configuration for your GC.
Chapter 5, Getting Connected, explains the TRACE power connections
and helps you mount and configure peripheral devices and data systems.
Before You Begin…
3
This chapter contains unpacking instructions and a brief tutorial of basic gas
plumbing operations you must know before you can continue the installation
process.
Chapter at a Glance…
Verify Site Preparation ......................................................................................... 35
Unpacking the Instrument .................................................................................... 35
Gas Plumbing Basics............................................................................................ 37
Verify Site Preparation
Before the TRACE system can be installed, your laboratory must be in
compliance with the guidelines and requirements in the Site Preparation section
of this manual.
Use the Preinstallation Checklist in Appendix A to verify your laboratory
conditions conform to the guidelines in Chapter 1, Laboratory Preparation,
before you unpack your GC and begin the installation process.
Unpacking the Instrument
You should have already inspected the exterior of the shipping container for
damage as described in Chapter 2, Instrument Arrival. Carefully unpack the
instrument and do the following:
1. Check the contents of each box or crate against the packing list to verify the
shipment is complete.
Site Preparation and Installation Manual
35
Chapter 3
Before You Begin…
Unpacking the Instrument
2. Inspect each item for damage.
•
If equipment is damaged, keep boxes and their equipment in their existing
condition and immediately notify the carrier.
•
Submit a damage claim directly to the carrier, and send a copy (including
any shortage claims) to your authorized ThermoFinnigan sales
representative.
•
Do not return any equipment to the dealer or the factory without prior
factory authorization.
3. Place the TRACE GC on your bench, allowing space to the rear of the
instrument for venting.
WARNING! The TRACE GC is 47 kgs (105 lbs). Two people should lift the instrument onto the
benchtop.
You should already have configured your laboratory according to the space
requirements in Chapter 1, Laboratory Preparation, and the gas and power
supplies should be accessible.
Optional equipment should be placed near the GC so you can connect it easily.
After placing the TRACE on the bench, open the oven door and remove any
packing material or other debris.
Before continuing with the installation, you should determine the following:
•
the type of detector(s) installed on the GC
•
the type of injector port(s) installed on the GC
•
the type of carrier gas required for each detector
•
the type of makeup gas required for each detector
Refer to Gas and Plumbing Requirements in Chapter 1, Laboratory Preparation,
for a list of detector and injector gas requirements.
36
Site Preparation and Installation Manual
Chapter 3
Before You Begin…
Gas Plumbing Basics
Gas Plumbing Basics
In order to perform the procedures in this section properly, you must first have a
working knowledge of a few basic gas plumbing operations. During the gas
plumbing process, you will frequently perform the operations explained in the
following sections.
How to Use a Tubing Cutter
Use the following procedure to cut your gas supply tubing properly.
1. Attach the tubing cutter where you want to cut the tubing, and tighten the
knob.
2. Rotate the cutter around the tubing and tighten the knob. Continue rotating
and tightening the knob until you deeply score the tubing.
3. Remove the cutter, and snap the tubing in two.
How to Use Teflon Tape on Pipe Threads
To ensure an inert seal around all tank and regulator pipe fittings, use the
following procedure:
1. Wrap the tape around the pipe threads in a clockwise direction about three
times. You should be able to tear the tape easily to separate it from the roll.
2. Make sure the tape does not extend past the threads or obstruct the pipe
opening.
3. Make sure the tape does not twist or bunch up when you connect the pipe.
NOTE
Do not use Teflon tape on Swagelok type compression fittings.
Site Preparation and Installation Manual
37
Chapter 3
Before You Begin…
Gas Plumbing Basics
How to Use Swagelok Tube Fittings
The Swagelok fitting consists of four components: a Swagelok nut, a back ferrule,
a front ferrule, and an inlet body. It becomes a five-piece connection when affixed
to the tubing. The two ferrules merge when the nut is tightened, forming a safe
and leak-free seal between the tubing and body.
Use the following procedure to connect tubing using Swagelok fittings:
1. Place a Swagelok nut over the end of the tubing.
2. Place a back ferrule over the end of the tubing.
3. Place a front ferrule over the end of the tubing. If you are using tubing smaller
than 1/8-in., make sure the tubing extends only 5 mm past the front ferrule.
This will prevent damage to the fritted filter inside the inlet manifold.
Figure 3-1 shows the proper assembly order.
Swagelok
nut
Tubing
Front
ferrule
Inlet
body
Back
ferrule
Figure 3-1. Swagelok Ferrule and Nut Assembly
4. Push the Swagelok nut over the ferrules.
5. Insert the tubing into the inlet body as far as it will go. If you are using tubing
smaller than 1/8-in, make sure the tubing extends only 5 mm past the front
ferrule when you insert it into the inlet body.
38
Site Preparation and Installation Manual
Chapter 3
Before You Begin…
Gas Plumbing Basics
6. Slide the nut over the inlet body, as shown in Figure 3-2, and tighten until
finger-tight.
Inlet body
Tubing, ferrule
and nut
assembly
Figure 3-2. Swagelok and Inlet Connection
7. While holding the inlet body tightly with a backup wrench, tighten the nut
about a 3/4 turn past finger-tight, as shown in Figure 3-3.
3/4 turn
Figure 3-3. Tightening Swagelok Fittings
NOTE
You can mark the nut before tightening. This will help you confirm that you have turned the
nut a 3/4 turn.
Site Preparation and Installation Manual
39
Chapter 3
Before You Begin…
Gas Plumbing Basics
How to Attach a Swagelok Tee or Cross
To use a single gas source for more than one inlet or detector module, use a
Swagelok tee or cross to split the gas flow. Use the following procedure to connect
a Swagelok tee or cross:
1. Use a tubing cutter to cut gas supply tubing where you want to install the tee
or cross.
2. Connect the tubing to the tee or cross with a Swagelok fitting, as described in
How to Use Swagelok Tube Fittings on page 38.
3. Measure the distance from the tee or cross to the inlets or detectors, and cut
tubing in the appropriate lengths.
4. Connect the tubing to the tee or cross ends with Swagelok fittings.
5. Install Swagelok caps on any open ends of the tee or cross that you do not plan
to connect with tubing.
40
Site Preparation and Installation Manual
Plumbing the
Gas Supply to the GC
4
This chapter explains the proper gas supply connections and configuration
information for your GC. Use the information in this chapter to connect your inlet
and detector gas supplies.
Chapter at a Glance…
Using Hydrogen.................................................................................................... 42
Connecting the Gas Supply Cylinders.................................................................. 44
Adding Traps to the Gas Supply........................................................................... 45
Purging Gas Lines ................................................................................................ 46
Connecting the Gas Supply to the Inlet Manifold ................................................ 47
Connecting the Gas Supply to the Detector Manifold.......................................... 47
Connecting Coolant to the Cryogenic System...................................................... 50
Testing for Leaks .................................................................................................. 51
Before you begin plumbing gas to the GC, locate the main power cable and
position it near the appropriate outlet. Do not plug in the power cable at this
time. Follow the procedures in this section to build your gas supply lines for
carrier, make-up, and detector gases.
CAUTION
DO NOT loosen or remove caps from the GC until you have purged your gas lines
and are ready to connect them. Loosening or removing caps early will contaminate
instruments and filters.
Site Preparation and Installation Manual
41
Chapter 4
Plumbing the Gas Supply to the GC
Using Hydrogen
WARNING! Hydrogen is a dangerous gas that, when mixed with air, may create an explosive
mixture. The use of hydrogen as a carrier gas requires the operator’s extreme
caution. Special precautions must be taken because of the risk of explosion. The
gas chromatograph must be equipped with a hydrogen sensor if you use hydrogen
as a carrier gas. Refer to Using Hydrogen on page 42 for more information.
Using Hydrogen
The use of hydrogen as a carrier gas or as fuel for certain flame detectors requires
the operator’s strict attention and compliance with special precautions due to the
hazards involved.
Hydrogen is a dangerous gas, particularly in an enclosed area when it reaches a
concentration corresponding to its lower explosion level (4% in volume). When
mixed with air it can create an explosive mixture. An explosion hazard could
develop in the GC oven when hydrogen is used as a carrier gas if oven elements
are not perfectly connected to each other, or if the connection materials are worn
out, broken, or otherwise faulty.
Use the following safety precautions when using hydrogen:
•
Ensure that all hydrogen cylinders comply with the safety requirements for
proper use and storage. All hydrogen cylinders must be equipped with safety
valves and automatic safety systems.
•
Make sure the gas supply is turned completely off when connecting hydrogen
lines.
•
Perform a bubble test to ensure that the hydrogen lines are leak-tight before
using the instrument. Perform this test after the pressure test described in the
Testing for Leaks portion of this chapter. Repeat this test to eliminate all leaks.
•
Ensure your GC column oven has a ThermoFinnigan hydrogen sensor. A
hydrogen sensor continuously monitors the hydrogen level in the GC column
oven.
If your GC oven does not have a hydrogen sensor already installed, contact
your ThermoFinnigan sales representative. To comply with instrument safety
42
Site Preparation and Installation Manual
Chapter 4
Plumbing the Gas Supply to the GC
Using Hydrogen
requirements, a ThermoFinnigan CSE or authorized service technician should
install the sensor.
If you plan to use a sensor other than the recommended ThermoFinnigan
sensor, you must verify its ability to perform the functions listed above before
installing it. It must comply with your local safety regulations, or with the IEC
10101 regulations if local regulations do not exist.
Using the Hydrogen Sensor
The lower limit of the hydrogen sensor is 0.5% in volume. You should adjust the
detection threshold to 1% in volume, which is 25% of the hydrogen lower limit of
explosion (4% in volume).
In cases where the connections begin to leak or the column breaks, the sensor
alerts the operator. Then it automatically cuts off the gas supply and heating to the
active zones, and sweeps the column oven with forced air ventilation.
If the sensor detects anomalies or leaks during GC operation due to instrument
malfunction, the operator must immediately:
•
close the hydrogen supply
•
switch off the gas chromatograph
•
air out the room
The reliability of the sensor depends on careful maintenance. After the sensor is in
use, you must periodically check its operating performance and calibration as
recommended by the manufacturer. Refer to your hydrogen sensor’s instruction
manual for maintenance guidelines.
WARNING! Never use hydrogen in your TRACE system unless your GC oven has a hydrogen
sensor installed.
NOTE
ThermoFinnigan CSEs are not authorized to install or repair any instrument using
hydrogen as a carrier gas unless the instrument is equipped with the appropriate sensor.
1.
IEC 1010-1, First Edition, September 1990; IEC 1010-1, Amendment 1, September 1992; IEC 1010-1,
Amendment 2, June 1995.
Site Preparation and Installation Manual
43
Chapter 4
Plumbing the Gas Supply to the GC
Building the Gas Lines
Building the Gas Lines
Building the gas supply lines from the supply cylinders to the GC includes
connecting the gas lines to the supply cylinders and adding any traps or filters to
the line.
Connecting the Gas Supply Cylinders
To properly connect the gas lines to the gas tanks, you will need the following
materials:
•
1/8-in. copper tubing
•
a tubing cutter
•
1/8-in. Swagelok nuts, and front and back ferrules
•
two 7/16-in. X 3/8-in. open-ended wrenches
•
Teflon® tape
WARNING! Secure gas cylinders to an immovable structure or wall. Handle and secure all gases
according to local safety regulations.
Use the following procedure to connect regulators and tubing to the gas supply
tanks:
1. Make sure the initial supply valves are turned off.
2. Connect the regulator to the gas supply tank. Fuel gas regulators have reverse
threads. Use an open-ended wrench or adjustable Crescent wrench to tighten
the regulator connection.
3. Determine the length of tubing you need. Use only enough tubing to connect
the instrument to the gas supplies, but allow enough slack to allow the GC to
be moved at least 40 cm (16 in.) from other equipment. This allows enough
room to perform column connections and system maintenance. Also, be sure
to account for tee connections.
4. Use a tubing cutter to cut the tubing.
44
Site Preparation and Installation Manual
Chapter 4
Plumbing the Gas Supply to the GC
Building the Gas Lines
5. Use a Swagelok tube fitting to attach the tubing to the gas outlet. Refer to
How to Use Swagelok Tube Fittings in Chapter 3, Before You Begin…, for
instructions on using Swagelok fittings.
Adding Traps to the Gas Supply
You may wish to use traps, such as moisture or oxygen traps, in your gas supply
line. Traps are especially necessary if you are unsure of the purity of your gas
supplies. Refer to Gas and Plumbing Requirements in Chapter 1, Laboratory
Preparation, for more information about gas purity requirements and appropriate
traps for your GC. Figure 4-1 shows the proper order of traps in a gas supply line.
Refer to your trap’s instruction manual for specific purging and installation
requirements.
Moisture
trap
Hydrocarbon
trap
Oxygen
trap
Figure 4-1. Gas Trap Configuration
Site Preparation and Installation Manual
45
Chapter 4
Plumbing the Gas Supply to the GC
Purging Gas Lines
Use the following procedure to attach traps to your gas line:
1. Determine the location for the trap in your supply line. Figure 4-1 shows the
recommended trap order.
2. Use a tubing cutter to cut the tubing to the desired length.
3. Turn the gas regulator supply handle counterclockwise to reduce line
pressure, then turn the gas supply on and increase the pressure to 35 kPa
(5 psi) for about 15 seconds to purge the line of any unwanted debris.
4. Turn the gas supply off.
5. Use a 1/8" Swagelok fitting to connect the trap inlet to the gas supply tubing
coming from the tank.
6. Turn the gas supply on to 35 kPa (5 psi) for about 30 seconds.
7. Turn the gas supply off.
8. Connect tubing to the trap outlet with a 1/8" Swagelok fitting.
Follow this procedure for all traps you wish to add to your gas supply line.
Purging Gas Lines
You must purge the lines any time you make a cut in the tubing during the gas line
assembly process. This will clear them of any debris from the cut. You will also
need to purge the completely assembled gas lines, including any traps you plan to
use, before you connect the your gas supply to the TRACE.
Use the following procedure to purge the gas lines:
1. Turn the gas supply on, and set the pressure to 35 kPa (5 psi).
2. Allow the line to purge for 10 minutes.
3. Turn off the gas supply.
46
Site Preparation and Installation Manual
Connecting the Gas Supply to the Inlet Manifold
Chapter 4
Plumbing the Gas Supply to the GC
Connecting the Gas Supply to the Inlet Manifold
By now you should have done the following:
•
completely built your gas line from your gas supply, including any traps, tees,
and extra tubing to allow about 40 cm (16 in.) of slack in the line
•
purged the gas line after every tube cut to remove any debris or contaminants
Use the following procedure to connect the gas line to the GC inlet manifold:
1. Make sure the gas supply is turned off.
2. Connect the gas line to the carrier gas inlet with 1/8-in. Swagelok fittings.
NOTE
If the GC has been furnished with a 2x1 mm tube, use the ferrule for 2x1mm/1/8-in
provided in the start-up kit.
Repeat the process if you are connecting the carrier gas supply to more than one
inlet. Be sure to finish all inlet connections before turning on the gas supply.
CAUTION
Inside each 1/8-in. inlet manifold is a fritted filter. If you connect a gas line smaller
than 1/8-in. to an inlet, be sure the tubing does not touch the filter when inserted into
the manifold. To keep the gas line from touching and possibly damaging the filter,
extend the tubing only 5 mm past the front ferrule. This will ensure the tubing does
not touch the filter. Refer to How to Use Swagelok Tube Fittings in Chapter 3, Before
You Begin…, for more instructions on using Swagelok ferrules and fittings.
Connecting the Gas Supply to
the Detector Manifold
Before you connect the detector gas line you should have done the following:
•
built and connected the gas supply lines for your inlet gas supply, as described
in Building the Gas Lines in this chapter
Site Preparation and Installation Manual
47
Chapter 4
Plumbing the Gas Supply to the GC
Connecting the Gas Supply to the Detector Manifold
•
completely built your detector gas line from your gas supply, including any
traps, tees, and extra tubing to allow about 40 cm (16 in.) of slack in the line,
as described in Building the Gas Lines in this chapter
•
purged the gas line to remove any debris or contaminants, as described in
Purging Gas Lines in this chapter
Use the following procedure to connect the gas line to the detector manifold:
1. Make sure the gas supply is turned off.
2. Connect each detector gas line to the appropriate detector gas bulkhead with
1/8-in. Swagelok fittings.
NOTE
If the GC has been furnished with a 2x1 mm tube, use the ferrule for 2x1mm/1/8-in
provided in the start-up kit.
Different detector modules have different gas plumbing requirements. It is
important that you connect the right gases to the right inlet fittings. The inlet
fittings on the detector modules are labeled. Consult Table 4-1 on page 49 for
the proper gas connections of the detector modules installed.
Repeat the process if you are connecting the detector gas supply to more than one
bulkhead. Be sure to finish all detector connections before turning on the gas
supply.
48
CAUTION
Inside each 1/8-in. detector manifold is a fritted filter. If you connect a gas line
smaller than 1/8-in. to an detector manifold, be sure the tubing does not touch the
filter when inserted into the manifold. To keep the gas line from touching and
possibly damaging the filter, extend the tubing only 5 mm past the front ferrule. This
will ensure the tubing does not touch the filter. Refer to How to Use Swagelok Tube
Fittings in Chapter 3, Before You Begin…, for more instructions on using Swagelok
ferrules and fittings.
NOTE
Refer to Gas and Plumbing Requirements in Chapter 1, Laboratory Preparation, for the
type of gas appropriate for each detector.
Site Preparation and Installation Manual
Chapter 4
Plumbing the Gas Supply to the GC
Connecting the Gas Supply to the Detector Manifold
Table 4-1. Detector Gas Connections
Detector
FID
ECD
NPD
PID
FPD
Installed
Module
Connect
Hydrogen to
Connect Air
to
Connect
Make-up
Gas toa
Connect
Sheath
Gas tob
Connect
Reference
Gas to
AB
Gas 2
Gas 1
—
—
—
AC
Gas 2
Gas 1
Gas 3
—
—
AD
Gas 3
Gas 1
—
—
—
AA
—
—
Gas 3
—
—
AB
—
—
Gas 2
—
—
AC
—
—
Gas 3
—
—
AD
—
—
Gas 3
—
—
AD
Gas 2
Gas 1
Gas 3
—
—
AB
—
—
Gas 2
Gas 1
—
AC
—
—
Gas 3
Gas 1
—
AD
—
—
Gas 3
Gas 1
—
AB
Gas 2
Gas 1
—
—
—
—
—
AC
Gas 2
Gas 1
Gas 3
AD
Gas 3
Gas 1
—
—
—
TCD
AB
—
—
Gas 2
—
Gas 1
PDD
Dedicated
a.
b.
c.
d.)
---
c
Inlet
For ECD detectors, the makeup gas is N2 or 5% Ar/CH4.
For PID detectors, the sheath gas is N2 or He.
FPD applications typically do not require Make-up gas.
For PDD detector requires Helium must have a minimum purity of 99.999%, with < 20 ppm Ne impurity. For trace
analysis of fixed gases, it is strongly recommended 99.9999% purity helium with < 0.5 ppm Ne
The discharge and the carrier gases must always flow through the helium purifier.
Site Preparation and Installation Manual
49
Chapter 4
Plumbing the Gas Supply to the GC
Connecting Coolant to the Cryogenic System
Connecting Coolant to the Cryogenic System
The column oven and PTV (Programmable Temperature Vaporizing) injector
cryogenic systems allow you to operate the GC at sub-ambient temperatures.
The cryogenic systems can reach the following temperatures:
•
The column oven cryo system can reach –55 °C with Liquid Nitrogen or
–99 °C with carbon dioxide.
•
The PTV cryo system can reach –50 °C with liquid nitrogen.
Use the following procedure to connect the coolant to your cyrogenic system:
Column Oven Cryo System
1. Connect the supply tubing to the CO2 or LN2 tank. Refer to Figures 1-4
and 1-5 in Chapter 1 for more information about cryo supply tanks.
2. Connect the other end of the supply tube to the 1/8 inch connector on the
column oven cryo solenoid valve. The connector protrudes from the hole on
the GC rear panel labeled Sub Ambient Coolant.
PTV Injector Cryo System
If your GC has a PTV injector, use the following procedure to connect the cryo
supply:
1. Connect the supply tubing to the CO2 or LN2 tank. Refer to Figures 1-4
and 1-5 in Chapter 1 for more information about cryo supply tanks.
2. Connect the other end of the supply tube to the 1/8 inch connector on the PTV
cryo solenoid valve on the upper left corner of the GC rear panel.
50
Site Preparation and Installation Manual
Chapter 4
Plumbing the Gas Supply to the GC
Testing for Leaks
Testing for Leaks
Once you have connected your gas supplies to the GC inlets and detectors, you
need to test the supply lines for leaks. Turn on your gas supply and use the
following information to set the gas pressures for the leak test.
•
Set the carrier gas pressure to approximately 50 kPa (7 psi) higher than the
maximum pressure of the GC regulator.
•
Set the detector gas pressures to approximately 350 kPa (50 psi).
Next you need to check all Swagelok fittings for leaks. Use the following
procedure to check the fittings for leaks:
1. Use a handheld electronic leak detector (Sciences, Inc., Model LD-228, or
equivalent) to check each fitting for leaks.
2. If you detect a leak, tighten the connection and retest it.
3. Repeat this process until all Swagelok connections are leak free.
CAUTION
Do not use liquid soap leak detectors to check for leaks. Liquid soap leak detectors
may contaminate you system. A mixture of 50% H2O/50% methanol or isopropyl
alcohol may be used as a liquid leak detector.
WARNING! Never use liquid leak detectors on or around electronic pneumatic circuits.
Site Preparation and Installation Manual
51
Getting Connected
5
This chapter explains the TRACE power connections, and helps you mount and
configure peripheral devices and data systems.
Chapter at a Glance…
Mounting Peripheral Devices ............................................................................... 53
System Power Up ................................................................................................. 59
Mounting Peripheral Devices
If you plan to use any peripheral devices with your GC, such as an autosampler or
data system, you will need to unpack them and follow any setup instructions
included with them. Follow the instructions in the sections below to connect your
peripheral devices to the GC.
Remove the TRACE Cover
Before you can connect a data system or an autosampler, you must first remove
the top cover of the GC using the following procedure:
1. Lift the detector cover off the GC top cover.
2. Open the oven door and unscrew the two top cover fastening screws.
3. Push the top cover back about 1 cm and lift it up and off the GC.
Site Preparation and Installation Manual
53
Chapter 5
Getting Connected
Mounting Peripheral Devices
Figure 5-1 illustrates this procedure.
Figure 5-1. Removing the Top Cover
Connect the Data System Computer
There are two types of information transfer techniques between the TRACE GC
2000 and the computer: digital and analog. Use the following procedure to
connect your data system computer to the GC for digital transfer:
1. Connect the computer, monitor, keyboard, mouse, printer (if applicable), and
network connection (if applicable) according to the instructions in the
accompanying documentation.
2. Plug in the computer, monitor, and printer power cables.
3. Connect the RS232 cable supplied with the data system to one of the COM
ports of you computer, taking note of which port you use. You will need this
information for software configuration.
54
Site Preparation and Installation Manual
Chapter 5
Getting Connected
Mounting Peripheral Devices
4. Connect the other end of the cable to the port on the top of the GC labeled
COMPUTER.
Computer Port
5. Snap the cable securing ring into one of the cable slots on the GC.
Site Preparation and Installation Manual
55
Chapter 5
Getting Connected
Mounting Peripheral Devices
6. Turn on the GC (if it is not already on), the computer, the monitor, and the
printer. Check the time, date, and monitor settings.
7. Test the printer and network connections and install drivers as necessary.
Refer to your data system’s operating manual for instructions on configuring your
data system and using it to control GC functions and process information from
the GC.
Connect the Autosampler Cable
You can connect an AS 2000 or HS 2000 autosampler to the TRACE GC.
Use the following procedure to connect the autosampler cable to the GC:
1. Connect the RS232 cable, the DIN handshake cable, and the power cable
supplied with the autosampler to the autosampler control module.
2. With the top cover removed, connect the RS232 cable to the port on the top of
the GC labeled AUTOSAMPLER.
Autosampler Port
56
Site Preparation and Installation Manual
Mounting Peripheral Devices
Chapter 5
Getting Connected
3. Snap the cable securing ring into one of the cable slots on the GC.
4. Connect the handshake cable to the AUTOSAMPLER DIN port on the rear of
the GC.
5. Replace the top cover.
If the GC and autosampler are on, the GC will automatically recognize the
autosampler. Refer to the autosampler operating manual for instructions on
mounting the autosampler turret and tray on top of the GC, and for configuration
instructions.
Site Preparation and Installation Manual
57
Chapter 5
Getting Connected
Mounting Peripheral Devices
Computing Integrators
Setup your integrator and connect it to a power supply according to the
manufacturer’s instructions. Each TRACE GC comes with shielded twoconductor cables for each detector analog output, and a remote ready inhibit, start,
and stop cable (handshake cable). The two-conductor cables consist of a blue
positive wire, a white negative wire, and a shield wire. The handshake cable has a
DIN connector on one end (for connection to the rear panel of the GC), and leads
on the other (for connection to the integrator).
The blue positive (+) and white negative (–) wires of the two-conductor cable
connect the detector output and the integrator. Figure 5-2 shows the cable
connections.
Integrator
GC Detector Board
Blue Positive (+) Wire
0V 1V 10V GND
White Negative (–) Wire
– +
Handshake
Cable
Shield Wire
White Negative (–) Wire
To GC
Blue Positive (+) Wire Two-conductor cable
Shield Wire*
* Cut or insulate the shield wire connector when using an integrator or a data handling system.
If a recorder is used, connect the shield wire to the recorder ground.
Figure 5-2. Integrator Cable Connections
Refer to your integrator’s operating manual for instructions on using the integrator
to process information from the GC.
58
Site Preparation and Installation Manual
Chapter 5
Getting Connected
System Power Up
System Power Up
By now your lab should be equipped with the proper power supply and outlets as
described in Power Requirements in Chapter 1, Laboratory Preparation. You also
should have completed the gas supply plumbing procedure, as described in
Chapter 4, Plumbing the Gas Supply to the GC.
If you have not already done so, connect the power cord to the GC. Plug the power
cord into the appropriate power outlet. The power switch is located on the back
side of the GC. Flip the switch to the ON position.
If the detectors are not already installed on your TRACE GC, you will need to
install them now. Refer to the TRACE Operating Manual for more information
about installing detectors.
You will need to install a column in the GC. Refer to the TRACE Operating
Manual for more information about installing columns.
For system test information, refer to the TRACE Standard Operating Procedures
Manual, and to the user manuals of any accessories you have connected to your
TRACE GC system.
Site Preparation and Installation Manual
59
Preinstallation
Checklist
A
This appendix contains a step-by-step list of items you should complete before
your TRACE GC arrives. Please complete the checklist after reading the Site
Preparation section. This will ensure that your site is suitable for the installation
of your new TRACE GC. Please contact a ThermoFinnigan Customer Support
Engineer (CSE) if you encounter any difficulties preparing your site for
installation.
Ensure that entrances and hallways are at least 92 cm (37 in.) across.
Ensure that your workbench space is at least 1.5 m (4.5 ft) across and can support
a 75 kg (170 lb) load.
Ensure that the instruments can be placed on surfaces that do not vibrate.
Ensure that your work area has proper lighting.
Provide an acceptable power source for your TRACE system.
Provide a wall outlet configuration that meets specifications.
Ensure that the temperature in your laboratory is between 18 and 35 °C (65 and
95 °F).
Ensure that the relative humidity level in your laboratory is between 40 and 80%,
with no condensation.
Ensure that the air in your laboratory is free of excessive dust, smoke, or other
particulate matter.
Site Preparation and Installation Manual
61
Appendix A
Preinstallation Checklist
Ensure that your system is free of electrostatic discharge.
Provide an adequate exhaust system.
Ensure that you meet appropriate gas line requirements.
Install a telephone near your system.
Fax or mail the TRACE Preinstallation Checklist to the appropriate
ThermoFinnigan office.
You can refer to Appendix B, Customer Communication, to select the
ThermoFinnigan office nearest you.
62
Site Preparation and Installation Manual
B
Customer
Communication
This appendix contains contact information for ThermoFinnigan offices
worldwide. This appendix also contains a one-page Reader Survey. Use this
survey to give us feedback on this manual and help us improve the quality of our
documentation.
How To Contact Us
ThermoFinnigan provides comprehensive technical assistance worldwide and is
dedicated to the quality of our customer relationships and services. Use this list to
contact your local ThermoFinnigan office or affiliate.
Europe
AUSTRIA
BELGIUM
ThermoQuest Austria wissenschaftliche Geräte GmbH
Wehlistrasse 27 b, A-1200, Wien
Tel: 1 33350340 Fax:: 1 333503426
Also serving BULGARIA, CROATIA, CZECH REPUBLIC,
HUNGARY, POLAND, RUMANIA SLOVAKIA, SLOVENIA
Interscience SPRL
Scientific Parc Einstein –Avenue Jean-Etienne Lenoir 2
B-1348 Louvain-la-Neuve
Tel: 010 450025 Fax:010 453080
CIS and formerly USSR Republics
DENMARK
Neolab Moskow Office
1 Y Obidenskiy Per. B. 10 - Office 2 119034 Moscow
Tel: ++ 7 (095) 9264148/70/71
Fax:: ++ 7 (095) 9264514
ThermoFinnigan AB - Sweden
Pyramidbacken 3
SE 14175 Kugens Kurva
Tel: (8) 55646800 Fax: (8) 55646808
Site Preparation and Installation Manual
63
Appendix B
Customer Communication
How To Contact Us
FINLAND
FRANCE
Oy G.W. Berg & Co. AB
PO Box 12
Finn 02201 Espoo
Tel: (9) 88664600 Fax: (9) 88664699
ThermoFinnigan France SA
Hightec Sud 12 Avenue des Tropiques – Z.A. de
Courtaboeuf
BP 141 - 91944 Les Ulis Cedex
Tel: (01) 6918 8810 Fax:: (01) 6929 9382
GERMANY
GREECE
ThermoQuest APG Gmbh
Boschring 12, 63329 Egelsbach
Tel: (06103) 4080 Fax: (06103) 408 222
Rigas Labs
5, Salaminos Str.
546 26 Thessaloniki - Greece
Tel: (031) 550669/540410 Fax: (031) 550073
IRELAND
ITALY
ThermoFinnigan U.K.
19 Trentham Lake South
Imex Technology Park, Trentham
ST4 8JF, Stoke on Trent, STAFF
Tel: (1782) 645136 Fax: (1782) 645121
ThermoQuest Italia S.p.A.
Strada Rivoltana
20090 Rodano (Milan)
Tel: (02) 95059226 Fax: (02) 95059256
NETHERLANDS
NORWAY
Interscience B.V.
Tinstraat 16, Postbus 2148, 4800 CC Breda
Tel: (076) 5411800 Fax: (076) 5420088
IT Instrument Teknikk
Skandinavia A/S – PO Box 14
Grins Naeringspark 1 N-1345 Østerås
Tel: (67) 149303 Fax: (67) 149302
PORTUGAL
SPAIN
Unicam Sistemas Analiticos, Lda.
Estrada da Rocha, 2-A-Sala C
2799-508 Linda A Velha
Tel: (21) 4153740 Fax: (21) 414 2006
ThermoQuest – Thermo Instruments S.A.
Avenida Valdelaparra 27
Edifico Alcor – 2a Planta
28108 Alcobendas – Madrid
Tel: (91) 6574930 Fax: (91) 6574937
SWEDEN
SWITZERLAND
ThermoFinnigan AB - Sweden
Pyramidbacken 3
SE 14175 Kugens Kurva
Tel: (8) 55646800 Fax: (8) 55646808
Brechbühler AG
Steinviesenstrasse 3, CH 8952 Schlieren
Tel: (01) 732 3131 Fax: (01) 730 6141
64
Site Preparation and Installation Manual
Appendix B
Customer Communication
How To Contact Us
TURKEY
UNITED KINGDOM
Dolunay Teknik Cihazlar Ltd.
Darulaceze Cad. No 43/A
80290 Okmeydani
Istanbul
Tel: (212) 2105435 Fax: (212) 2105434
ThermoFinnigan U.K.
19 Trentham Lake South
Imex Technology Park, Trentham
ST4 8JF, Stoke on Trent, STAFF
Tel: (1782) 645136 Fax: (1782) 645121
Africa, Asia and Oceania
AUSTRALIA
EGYPT
ThermoQuest Australia PTY LTD
Unit 14, 38-46 South Street
Rydalmere, NSW 2116
Tel: 02 9898 9000 Fax:: 02 9898 9800
Scientic Services
20, Shehab Street, El Mohandeseen
Dokki, Cairo
Tel: (2) 3600482 Fax:: (2) 3481424
INDIA
ISRAEL
Nulab Equipment Co. Pvt. Ltd.
Labhouse Plot No. F-13
Opp. Seepz, Marol M.I.D.C.
Andheri (East) Mumbay 400 093
Tel: (022) 8376701 Fax:: (022) 8368275
Burgal Analytical Instruments & Software Ltd.
4 Wallenberg Raoul Street
Tel Aviv 69719
Tel: (3) 6490823 Fax: (03) 6490826
JAPAN
JORDAN
ThermoQuest K.K.
Nishi-Shinjuku, Toyokuni Building
2-5-8 Hatsudai, Shibuya-ku, Tokyo 151-0061
Tel: (03) 3372 3001 Fax: (03) 3372 7051
Hijaz Electronic & Scientific Supplies Est
P.O. Box 925133
Amman 11110
Tel: (6) 5359761 Fax: (6) 5359761
KOREA
InSung Chromotech Co., Ltd.
LEBANON
InSung Bldg 89-111, Shinjung 2-dong
Yangcheon-Ku – Seoul
Tel: (02) 2644 1991 Fax: (02) 2644 1996
LaboTech Engineering
Ashrafieh, Monot Street, P.O. Box 16
7186 Beirut
Tel: (1) 332707 Fax: (1) 333707
NEW ZEALAND
PAKISTAN
Alphatech Systems Ltd & Co.
P.O. Box 37583 Parnell
Auckland
Tel: (09) 3770392 Fax: (09) 3098514
Total Technology
1st floor, 4-Singhar Centre, 16 Mc Lagan Road
Lahore 54000
Tel: (42) 7236469/7224459 Fax: (42) 7234689
Site Preparation and Installation Manual
65
Appendix B
Customer Communication
How To Contact Us
PEOPLES REPUBLIC OF CHINA
SINGAPORE
Finnigan Beijing Office
Room 912-916, Ping-an Mansion no 23
Finance Street
Xi Cheng District
Beijing
Tel: (10) 66210852 Fax: (10) 6610851
CE Instruments Enterprise Singapore
c/o Sintech Scientific S.E.A. Pte Ltd
No. 196 Pandan Loop #02-18
Pantech Industrial Complex
Singapore 128384
Tel: +65 779 0007 Fax: +65 2346252
Also serving INDONESIA, MALAYSIA, THAILAND,
PHILIPPINES
SOUTH AFRICA
TAIWAN R.O.C.
Premier Technologies
P.O Box 173
Northriding 2162
South Africa
Tel: (011) 4661410 Fax: (011) 4661313
E Hong Instruments Co, Ltd.
2FL, No.157, Sec 2, Fu Hsing S. Road
Taipei 106
Taiwan R.O.C.
Tel: (02= 2755 2266 Fax: (02) 2707 7693
U.A.E
BDH Middle East
P.O. Box 28637
Dubai
Tel: (4) 2852211 Fax: (4) 2861331
North, Central and South America
CANADA
U.S.A
ThermoQuest Americas
Tel: (732) 981-0390 Fax: (732) 981-0029.
.ThermoQuest Americas
Tel: (732) 981-0390 Fax: (732) 981-002
66
Site Preparation and Installation Manual
Reader Survey
Product:
Manual:
Part No.:
TRACE GC
Site Preparation and Installation Manual
A31709190-1
Please help us improve the quality of our documentation by completing and returning this survey.
Circle one number for each of the statements below.
Strongly
Agree
Agree
Neutral
Strongly
Disagree Disagree
The manual is well organized.
1
2
3
4
5
The manual is clearly written.
1
2
3
4
5
The manual contains all the information I need.
1
2
3
4
5
The instructions are easy to follow.
1
2
3
4
5
The instructions are complete.
1
2
3
4
5
The technical information is easy to understand.
1
2
3
4
5
Examples of operation are clear and useful.
1
2
3
4
5
The figures are helpful.
1
2
3
4
5
I was able to install the system using this manual.
1
2
3
4
5
If you would like to make additional comments, please do. (Attach additional sheets if necessary.)
________________________________________________________________________________________
________________________________________________________________________________________
________________________________________________________________________________________
________________________________________________________________________________________
Fax or mail this form to:
ThermoQuest Italia S.p.A.
Strada Rivoltana km 4
20090 Rodano (MI)
ITALY
Fax: 39 02 95059388
Glossary
This glossary lists and defines terms used in this guide and the Site Preparation Help File. Included are
abbreviations, acronyms, metric prefixes, and symbols.
A
A
ampere
ac
alternating current
ADC
analog-to-digital converter
B
b
bit
B
byte (8 b)
baud rate
data transmission speed in events per second
C
ºC
Celsius
CIP
Carriage and Insurance Paid To
cm
centimeter
CPU
central processing unit (of a computer)
CSE
Customer Service Engineer
D
d
depth
DAC
digital-to-analog converter
dc
direct current
DS
data system
Site Preparation and Installation Manual
69
Glossary
E
ECD
Electron Capture Detector
EMC
electromagnetic compatibility
ESD
electrostatic discharge
F
ºF
Fahrenheit
FID
Flame Ionization Detector
FOB
Free on Board
FPD
Flame Photometric Detector
ft
foot
G
g
gram
GC
gas chromatograph
GND
electrical ground
H
70
h
height
h
hour
harmonic
distortion
A high-frequency disturbance that appears as distortion of the
fundamental sine wave
HV
high voltage
Hz
hertz (cycles per second)
Site Preparation and Installation Manual
Glossary
I
IEC
International Electrotechnical Commission
impulse
See transient
in.
inch
I/O
input/output
K
k
kilo (103 or 1024)
K
Kelvin
kg
kilogram
kPa
kilopascal
L
l
length
L
liter
lb
pound
LED
light-emitting diode
M
m
meter (or milli [10-3])
M
mega (106)
µ
micro (10-6)
min
minute
mL
milliliter
mm
millimeter
m/z
mass-to-charge ratio
Site Preparation and Installation Manual
71
Glossary
N
n
nano (10-9)
NPD
Nitrogen Phosphorous Detector
O
Ω
ohm
P
p
pico (10–12)
Pa
pascal
PCB
printed circuit board
PID
Photo Ionization Detector
PN
part number
psi
pounds per square inch
R
72
RAM
random access memory
RF
radio frequency
ROM
read-only memory
RS-232
industry standard for serial communications
Site Preparation and Installation Manual
Glossary
S
s
second
sag
See surge
slow average
A gradual, long-term change in average RMS voltage level,
with typical durations greater than 2 s
surge
A sudden change in average RMS voltage level, with typical
duration between 50 µs and 2 s
T
TCD
Thermal Conductivity Detector
transient
A brief voltage surge of up to several thousand volts, with a
duration of less than 50 µs
V
V
volt
V ac
volts, alternating current
V dc
volts, direct current
VGA
Video Graphics Array
W
w
width
W
Watt
Site Preparation and Installation Manual
73
Index
A
Air
purity 18
Air conditioning
humidity 13
particulate matter 14
temperature 12
user’s responsibility 11
Altitude 13
Ammonia
carrier gases 19
Argon/5% Methane
purity 19
Autosamplers
heat output 12
weight 6
C
Capillary columns
gases 16
Carrier gases 16
ammonia 19
CGA fittings 19
ChromCard
minimum requirements
hardware 27
operating system 27
ChromQuest
minimum requirements
hardware 26
operating system 26
Cold on-column injectors
gas lines 21
Computer
heat output 12
power 10
weight 6
Coolant 21
liquid carbon dioxide 23
hazards 23
liquid nitrogen 22
hazards 22
Cryogenic cooling 21
liquid carbon dioxide 23
hazards 23
Site Preparation and Installation Manual
liquid nitrogen 22
hazards 22
CSE
installation 31
Customer service 63
D
Data System
ChromCard 27
ChromQuest 26
minimum requirements 26
Detectors
gases 16
Doorways 4
Dust 14
E
ECD
gases
capillary and wide-bore columns 16
packed columns 17
Electrostatic discharge 14
Elevators
entrance 4
Entrance 4
Equipment
required 24
supplemental 25
Exhaust system 15
Ex-works. See Shipping, origin.
F
FID
gases
capillary and wide-bore columns 16
packed columns 16
Floors
vibration 14
Flushing gas lines 20
FPD
gases
capillary and wide-bore columns 16
packed columns 17
Freight insurance 30
Frequency
75
Index
power 7
Fuel gases 16
G
Gas lines 20
cold-on column injectors 21
fittings 21
requirements 21
Gases
carrier 16
detectors 16
fuel 16
gas lines 20
cold on-column injectors 21
pre-cleaned tubing 20
requirements 21
gas tanks 20
storage 20
make up 16
packed columns 16
plumbing basics 37, 38, 40
cutting tubing 37
Swagelok fittings 38
Swagelok tees and crosses 40
Teflon tape 37
purity 17–19
air 18
argon/5% Methane 19
helium 18
hydrogen 18
nitrogen 19
servo air 19
recommendations 16
regulators 19
secondary 20
supplies 15–17
traps 17
hydrocarbon 18
moisture 17
oxygen 18
water background 17
Ground 7
H
Hardware
76
minimum requirements 26
Harmonics 8
Heat output
autosamplers 12
computer 12
monitor 12
optional instruments 12
printers 12
TRACE GC 12
Helium
purity 18
Humidity
low/high 13
static discharge 13
Hydrocarbon traps 18
Hydrogen
exhaust 15
purity 18
sensor 15
warning 15
I
Installation 31
Customer Service Engineer 31
equipment
required 24
supplemental 25
purchase option 31
Installation kit
replacement of consumables 25
Instrument arrival 29
freight insurance 30
L
Laboratory entrance
shipping container 4
Lighting 14
Liquid carbon dioxide 23
hazards 23
Liquid nitrogen 22
hazards 22
M
Minimum dimensions
entrance 4
Site Preparation and Installation Manual
Index
Minimum requirements
hardware 26
Moisture traps 17
N
Nitrogen
purity 19
NPD
gases
capillary and wide-bore columns 16
packed columns 16
O
Operating environment
user’s responsibility 11
Optional instruments
heat output 12
power requirements 10
Overvoltage category 8
Oxygen traps 18
P
Packed columns
gases 16
Particulate matter 14
PID
gases
capillary and wide-bore columns 16
Plugs
international 9
USA 9
Plumbing gases
cutting tubing 37
Swagelok fittings 38
Swagelok tees and crosses 40
Teflon tape 37
Pollution 15
Power
120 V ac 7
230 V ac 7
current requirements
optional instruments 10
printers 10
standard system 10
frequency 7
Site Preparation and Installation Manual
harmonics 8
quality of 7
sags and surges 8
slow average 8
technical assistance 11
transients or impulses 8
voltage disturbances 7
wall outlets 8
Power supply
UPS 9
Printers
heat output 12
power 10
weights 6
R
Regulators 19
Required tools 24
S
Sags 8
Secondary gas regulators 20
Servo air
purity 19
Setting up the instrument 36
Shipping 29
container 4
damage 30
destination 30
origin 29
Site preparation
preinstallation checklist 35
user's responsibility 4
verifying 35
Slow average 8
Solvent
in gas lines 20
Static discharge
See Electrostatic discharge
Sub-ambient operation 21
Supplemental equipment 25
Surges 8
Swagelok fittings 38
Swagelok tees and crosses 40
77
Index
T
W
TCD
gases
capillary and wide-bore columns 16
packed columns 17
Technical assistance
line power problems 11
See also Customer service
Teflon tape 37
Telephone 24
support 24
Temperature
air conditioning 12
laboratory, optimum 11
See also Heat output
system reliability 11
Tools 24
Training 32
Transients or impulses 8
Tubing cutter 37
Wall outlets
GC connections 10
Weights
computer 6
optional instruments 6
printers 6
TRACE system 6
Wide-bore columns
gases 16
Workbench 6
U
unpacking 35
UPS
power supply 9
User’s responsibilities
air conditioning 11
operating environment 11
quality of power 11
spares 25
V
Vibration 14
Voltage disturbances
harmonics 8
sags and surges 8
slow average 8
transients or impulses 8
Voltages
120 V ac 7
230 V ac 7
USA 7
Worldwide 7
78
Site Preparation and Installation Manual