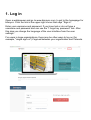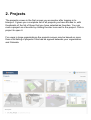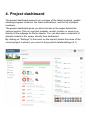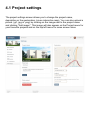
1
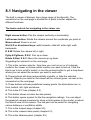
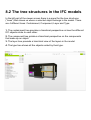
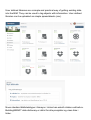
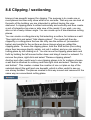
User manual
August 2015
Index
1. Log in
2. Projects
3. Account settings
4. Project dashboard
4.1 Project settings
5. Members
6. Models
6.1 Import
6.2 Export
6.3 Validation
7. Issues
7.1 Creating a new issue
7.2 Milestones
7.3 BCF Import / export
8. Viewer
8.1 Navigating in the viewer
8.2 The trees structures in the IFC models
8.3 Inspect
8.4 Issues in the viewer
8.5 Libraries in the viewer
8.6 Clipping
9. Mobile units
10. Notifications
11. Geo-location
12. API
1. Log in
Open a webbrowser and go to www.bimsync.com to get to the homepage for
bimsync. Click the link in the upper right corner that says "Sign in".
Enter your username and password. If you have lost or do not have a
username and password and can use the "I forgot my password" link. After
this step you change the language of the user interface from the user
settings..
For users in large organizations, there may be other ways to log on (for
example, "single sign-on") if agreed between your organization and Catenda.
2. Projects
The projects screen is the first screen you encounter after logging in to
bimsync. It gives you a complete list of all projects you have access to, with
thumbnails of the list of those that you have selected as favorites. You can
mark a project as a favorite by clicking the star icon next to the project. Click a
project to open it.
For users in large organizations the projects screen may be based on more
than a flat listing of projects if this has be agreed between your organization
and Catenda.
3. Account settings
On the "Account settings" page you can change your password, change your
avatar picture and change the language. All of these are self-explanatory. At
the moment bimsync is available in 6 languages: Norwegian, English, French,
Japanese, Dutch, and Brazilian Portuguese.
The "Account settings" page might look different if you are a member of a
large organization that has agreed with Catenda to use a different solution.
4. Project dashboard
The project dashboard presents an overview of the latest revisions, graphs
showing progress of issues, the latest notifications, and the list of project
members.
The project dashboard gives you direct access to the pages behind the
various reports. Click on a project member, model, revision or issue to go
directly to the subpage for those objects. You can also open a selection of
domain models in the viewer directly from dashboard.
By clicking on "Settings" in the menu on the top left (where the name of the
current project is shown) you come to the project's details/settings (4.1).
4.1 Project settings
The project settings screen allows you to change the project name,
description or the geolocation (via an interactive map). You can also upload a
picture (.gif, .jpg or .png) by clicking on the image next to the project name
and clicking "Add image". This image will also appear on the Project menu for
your favourite projects and on the top left menu for some screen sizes.
5. Members
The member page contains a list of participants who are associated with the
project. The project owner can invite new participants by entering their email
address. You have the option to remove your own connection to the project. If
you click the little envelope close username will email addresses they appear.
NB: If you leave a project, the project owner has to invite you for you to rejoin.
Users in large organizations that have made an agreement with Catenda may
find a more advanced user management system.
6. Models
You access the models screen by clicking on "models" from the menu on the
left. bimsync lets you configure the project as you like. The most common way
is to create one model per domain like Architect, Structure, HVAC etc but feel
free to use any structure you find useful.
The screenshot below has several important aspects:
1.
2.
3.
4.
5.
Adds another model (container for ifc files) to the project
Opens the given model in 3D view
Opens the given model in details view to show all revisions.
Let you open more than one model in one go. Select from the list (by
dragging a selections) and click the 3D icon
Shows a list of existing exports and lets you create new exports.
6.1 Import
The model page shows us the domain models present in the project. By
clicking on a domain model one can then click on "Import" and upload a new
revision (Section 6.3). This is done by choosing an IFC file from your hard
drive or Dropbox. When uploading you will be asked to enter a comment that
describes this upload (brief explanation to the project participants about what
is new in the revison being uploaded). Click "send" to start the upload
process.
When the process is complete bimsync analyzes the IFC file and generates
the geometry in the background. For large models it can take some time
before the file is ready to be worked on in the viewer. If you wish you can
exit bimsync, geometry generation happens uninterrupted anyway. When
importing is complete a notification will pop up in the menu bar in bimsync
and additionally an email will be sent to you stating that a new version is
uploaded to a model for which you have access.
For users in large organizations, there may exist tools for uploading many
models simultaneously without user interaction.
6.2 Export
The export screen gives you the option to download your model to your local
hard drive. You can either download a single model, a merged IFC file
consisting of the models you have selected, or a zip-file consisting of separate
(not merged) models. You can also choose to bake into the exported IFC file
(s) tags and properties (library contents, bsDD or user defined) that you have
added using the viewer.
6.3 Validation
On this page one can enable validation that will be carried out when a model
revision is uploaded. This function checks whether the imported IFC-file
satisfies certain criteria. The rules are written in java and can for instance be
that “lengths shall be in meters or millimeters, areas in m2 and volumes in m3”.
After importing in a project with validation enabled a report is provided that
contains which rules are not satisfied and why that is the case.
You can contact bimsync user support about getting our developers to make
validation rules for you.
7. Issues
The issues screen provides an overview of all issues connected to the project,
to your user, issues you have created yourself, and issues that are not
assigned to anyone. It also shows a graph of the accumulated status
(“burndown”) as an visual aid for the project participants, indicating how many
solved and unsolved issues there are in the project.
Clicking on an issue allows commenting, assigning to a specific user or
changing the type of the issue. The available types are Error, Warning, Info
and Unknown, in addition to the user defined types.
It is possible to create several issue lists so that related issues are collected,
and one can also connect issues to milestones.
bimsync has various graphs that
show the development of issues
over time ->
7.1 Creating a new issue
A new issue can be created from the issues-screen, or from the viewer
(chapter 8.2).
To create a new issue click the “New issue” button on the top right of the
issues screen. Enter the subject and use the textbox for comments to provide
further details. Choose the correct type for the issue and assign it to a specific
user if you know who will be responsible for it. You can also add a picture from
your harddrive.
If you are on a mobile unit you can either use a stored picture or take a new
one with the built-in camera.
All screens are dynamic (“responsive”)
and adapt to the screen size of the unit
you are using.
7.2 Milestones
A milestone consists of a set of issues and a deadline for when they have to
be completed.
You can connect issues to milestones, for instance to organise a list of things
that has to be done before the next meeting in a construction project or
actions that has to be taken in a FM-process.
7.3 BCF import / export
bimsync is 100% committed to open standards, and we have based on that
implemented export and import for BCF (BIM collaboration format).
This means that the user can import and export issues from/to other software
that supports this format (for instance Solibri, Navisworks and many others).
Click the button captioned “Import” and select a BCF-file from the hard drive.
You can for instance import a file with collision control data for the same
model created in another software application. This way you can continue
your workflow inside bimsync.
In the same way you can click “Export” to export the issues in BCF format
from bimsync. Both BCF format 1.0 and 2.0 are supported.
8. Viewer
The viewer is like a workbench for bimsync. In the viewer you can visualize
and enrich the models in the project as one (or separately if you prefer). You
can add properties or link external information to the objects, and you can
inspect them to get the important details.
Click one of the buttons with the “3D” caption in the Models screen to get to
the viewer with the model on the corresponding row visible. Using the
checkboxes on the left of the rows you can choose that all the selected
models are visible initially in the viewer.
In the following subchapters the powerful possibilities of the Viewer are
explained.
8.1 Navigating in the viewer
The built in viewer of bimsync has a large range of functionality. The
screenshot on the next page is divided into 8 parts to better explain the
different functions.
The basic controls for navigating in the viewer are:
Right mouse button: Pan the camera vertically or horizontally.
Left mouse button: Rotate the camera around the coordinate you point at.
Mouse wheel: Zoom in or out.
W,A,S,D or directional keys: walk forwards, slide left, slide right, walk
backwards.
E & W: Rotate the camera left or right.
PgUp & PgDown, R & F: Pan up or down.
Delete & End, X & C: Move the camera up og down.
Regarding the elements on the next page:
1. This is the revision selector, from here you can turn on or of a domain
model in the viewer or choose which revision you want to look at. Click the
black eye to turn on/off a model, or use the revision button to get a drop down
where you can select the revision you want to work with.
2. There buttons will show make partially invisible, or hide the selected
objects. Objects you select in the viewer will be colored green as seen in the
screenshot on the next page.
3. These buttons activate predefined viewing points, the alternatives are: in
front, behind, left, right and above.
4. This is the IFC tree (chapter 8.2).
5. This button shows or hides the side panels.
6. This button opens a panel for the the navigation settings. You can adjust
the speed of camera movements, show or hide spaces in the model, or adjust
the field-of-view of the camera. The last part can be useful for navigating
narrow hallways or ventilation shafts.
7. This is the inspect page (chapter 8.6)
8. This is the viewers issue panel (chapter 8.3)
9. This is the libraries panel (chapter 8.5)
8.2 The tree structures in the IFC models
In the left part of the viewer screen there is a panel for the tree structures
(“trees”) that shows us where a selected object belongs in the model. There
are 4 different trees: Containment, Component, Layer and Type.
1. The containment tree provides a hiarchical perspective on how the different
IFC objects relate to each other.
2. The component tree privides a hiarchical perspective on the components
that make up an object.
3. The layer tree provieds a hiarchical view of the layers in the model.
4. The type tree shows all the objects sorted by their type.
8.3 Inspect
The inspect panel shows all the data for the selected object in the BIM. The
top part has a dropdown that lets you navigate quickly to the desired part of
the information.
In addition to the information from the IFC models(s) it also shows issues
related to the selected object. Clicking on a related issue brings you directly to
the issue-view (chapter 8.4) with this issue selected.
Selecting a bsDD/products/coBuilder tag presents a dropdown box that lets
you either select all other objects with the same tag, or go directly to a web
page with for instance information about the product that is tagged.
Selecting two or more objects shows common properties, issues or tags.
8.4 Issues in the viewer
Issues were explained in chapter 4, but when these are used in the viewer
there are further opportunities. The viewer has a list of all issues that are open
in the project. If you select an issue it will automatically move the camera in
the 3D-model to the place where the issue is located. From there you can
freely navigate in the model the same way as usual (chapter 7.4).
To create a new issue in the viewer proceed like this: Navigate to the place in
the model where you see the objects that you want to create an issue about.
Click the “triangle with an exclamation mark inside” (upper left), then click the
plus-button. You will then enter a menu like the one in the screenshot on this
page.
Automatically an image will be added based on what you see in the 3Dviewer. You can add simple drawings on top of the image or replace it with
one from your hard drive. You have to add a subject for the issue and you can
optionally add a further description about the issue.
You can also assign the issue to a person if you know who will be responsible
for its further progress.
Click “Create issue” when you are done.
8.5 Libraries in the viewer
The libraries function in the viewer, located on one of the tabs on the left part
of the screen, can be used in several ways. Objects can be assigned a status
code, product data, a link or something similar.
The libraries are object libraries that are imported by the user using the
libraries screen. In addition you can assign properties from the
buildingSMART Data Dictionary. If the library has attributes they will be
assigned to the correct IFC property set.
To assign from a library to one or more objects you first select the object(s)
from the 3D-model or the IFC tree. In the screenshot below a window is
selected. After selecting a library you now have 3 options: select all content,
select all content that is assigned, or select all content that is unassigned. The
last two options filter the content of the library so that you get a better picture
of what content has been assigned in the model.
In the example below a library containing several statuses has been used to
mark tag an object with how far in the production process the window currently
is.
To assign content to the object click the small below the selected content to
directly assign this content to all the selected objects. The content that has
been assigned to an object is shown on the inspect tab (chapter 7.7).
All library content and attributes added in bimsync can be merged into the
IFC-files if you choose to export the project (chapter 5).
User defined libraries are a simple and practical way of getting existing data
into the BIM. They can be used to tag objects with information. User defined
libraries can be uploaded as simple spreadsheets (csv).
Noen standard bibliotekstyper i bimsync. Listen kan enkelt utvides ved behov.
BuildingSMART data dictionary er aktivt for alle prosjekter og vises ikke i
listen.
8.6 Clipping / sectioning
bimsync has powerful support for clipping. The purpose is to create one or
more planes and then only show what is on one side. That way we can look at
the parts of the building you are interested in without having the view
obscured. A clipping plane to either horizontally and vertically and thus create
a sort of interactive top view or side view of the model. If you wish, you can
also cut at a freely chosen angle. You can create up to 6 simultaneous cutting
planes.
You can create a cutting plane by first selecting a surface, for instance a wall.
Then right-click and select "Add clipping plane". The model will then be
clipped by a cutting plane that we can only see the outline of (screenshot
below) and parallel to the surface we have chosen when we added the
clipping plane. To move the clipping plane, hold the Shift button (the cutting
plane then becomes directly visible, not just it outline) and you can select a
cutting plane by left-clicking on it. You can move the clipping plane back and
forth by holding the left mouse button down and drag it inward or outward. To
remove the plane, right-click and select "Remove clipping planes".
Another and often useful way to use clipping planes is to for instance choose
a wall that is attached to a storey and then right click and select "Section top
and bottom". This creates makes the creation of one cut plan on top of the
selected object (the wall) and one beneath, which is often useful to see eg.
one storey isolated. The planes created in this way moved and removed in the
same way as conventional cutting plane
9. Mobile units
The user interface in bimsync will automatically adapt to the screen size of the
device you are using (responsive design). In addition to PCs bimsync is also
available on tablets and mobile phones. On mobile units you can work with
issues and upload photos. Only relatively modern units with WebGL (Android,
iOS, Windows Phone) supports the 3D viewer, but on older devices the other
pages work without problems.
10. Notifications
The notification system is useful for keeping track of what happens in the
buildings and sites you want to keep track of. There is a megaphone icon that
is visible in the menu bar on all screens. It tells you if there has been
something new that is relevant for you - for example, if a new revision of a
building is uploaded or if someone has assigned an issue to you.
There is also a separate screen that lists the notifications. In addition, one can
subscribe to email alerts so you get this information even when you are not
actively involved in bimsync.
11. Geo location
The geolocation feature allows you to place the building in the world.
There is also support in bimsync for "the campus guide," which allows for inplace (on-site) navigation and indoor navigation. Contact us if the project
would like to take this into use.
12. API
bimsync has powerful APIs that allow external applications to use its
functionality or exchange data. We have several APIs:
-
data API version 1 and 2
3D viewer API
2D viewer API (coming soon)
BCF API (coming soon)
Several companies relies on bimsync to provide BIM functionality for their
applications.
Catenda, the creators of bimsync, use the viewer and data APIs ourselves in
several projects since it allows us to quickly create applications with BIM
functionality. One example is the “bygglett” demo app where we showcase
how building application permits can be made much more understandable by
visualizing regulations and goverment rules: http://bygglett.catenda.com/
Contact us to learn more about what we can offer and how you can become
an API client.
See here for specific information about our API: https://bimsync.
com/developers/reference/api/1.0
<- the bygglett
demo showing
bimsync 3D
viewer,
government data
and streamed 3D
map data
combined