1
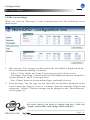
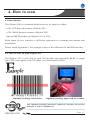
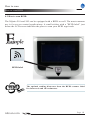
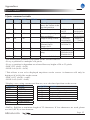
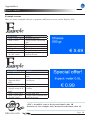
Customer Information Terminal
User Manual
Pre-release version
请更换节标题
Content
Unpack.......................................................................................................1
Declaration of Conformity...................................................................................2
Tips and Cautions......................................................................................3
Specifications.........................................................................................4-5
Product Outline..........................................................................................6
1. General Device Operation.....................................................................7
2. Installation.............................................................................................8
2.1 Mounting...............................................................................................................8
2.2 Power supply.........................................................................................................9
2.3 Connections.........................................................................................................10
3. Configuration........................................................................................11
3.1 General................................................................................................................11
3.2 Network settings..................................................................................................12
3.3 Wireless settings..................................................................................................13
3.4 Idle screen settings..............................................................................................14
3.5 Miscellaneous settings...................................................................................15-16
4. How to Scan........................................................................................17
4.1 Introduction.........................................................................................................17
4.2 How to scan 1D with NQuire 201.......................................................................17
4.3 How to scan 1D/2D with NQuire 202.................................................................18
4.4 How to scan RFID...............................................................................................19
5. Software...............................................................................................20
5.1 Introduction.........................................................................................................20
5.2 NQuire 200 Demo Software..........................................................................20-23
nlscan.com
Page II
Appendices...............................................................................................24
A. NQuire programming codes............................................................................24-25
B. NQuire control.................................................................................................26-28
C. Testing Codes........................................................................................................29
D. Troubleshooting....................................................................................................30
nlscan.com
Page III
Unpack
When you unpack the NQuire, the following hardware should be available to you:
»» NQuire 200 main unit
»» Power Adapter
»» VESA mount and screws
nlscan.com
Page 1
Declaration of Conformity
nlscan.com
Page 2
Tips and Cautions
The following tips and cautions are used in this manual
»» TOOL, facilitates the use of the manual
»» ATTENTION, be aware & read through
»» TIPS, E.g., to help understand the product better
»» EXAMPLE, to clarify a situation
Introduction of the NQuire 200
»» The NQuire 200 customer information terminal is designed to read/scan, inform and
interact with your customer. It is excellent for communicating prices, product information
and loyalty points.
»» This small and attractive information terminal reads multiple data carriers; from 1D
EAN/UPC barcodes to complex 2D barcodes of mobile phone displays. It is even possible
to equip the NQuire 200 with a RFID reader.
»» The NQuire 200 complies with standard VESA brackets enabling easy mounting on
shelves and walls. Furthermore, it is possible to add USB peripherals to expand this solution with a printer, a hand held scanner for scanning large objects, a magnetic stripe reader
and more.
»» The NQuire 200 supports various networking options: 10/100Mbps Ethernet, WiFi
802.11b/g, GPRS and Power-over-Ethernet so it can be easily integrated into your existing
wireless or wired LAN.
»» The NQuire 200 can be used for various applications such as price checking, product
information inquiries, access control, mobile barcode/coupon/ticket validations and more...
nlscan.com
Page 3
4. Specifications
Specifications
Specification
NQuire 201
CPU
NQuire 202
NQuire201/202 + RFID
32-bit ARM9 CPU
SDRAM: 32 MB
Memory
Flash: 8MB
Support Mini SD up to 2GB
Display
Blue-White 240*128 pixels graphical LCD (90mm x 55mm)
Interface
10/100 Mbps Ethernet
Optional
WiFi
IEEE 802.11b/g, 2.4GHz, DSSS,14dBm, WEP 64/128, WPA
Interface
GPRS
GSM 850 / 900 / 1800 / 1900 MHz, 85.4Kbps(Max)
USB
USB Host
GPIO
Free programmable GPIO (2 in - 2 out)
External
ports
Reading Modes
CCD
Symbologies
PDF417,QR
Code,
Data Matrix,

Aztec,Maxicode,
Chinese-Sensible
Code,LP Code
,etc.
Code128,EAN-13,EAN8,Code39,UPC-A,UPC-E, Codabar,
Interleaved 2 of 5,China post 25,ISBN/
ISSN,Code93, etc.
Mifare( ISO 14443A )
TI( ISO 15693)
EM(125K)
Precision
≥6 mil

nlscan.com
Image
≥3 mil
RFID
Page 4
Specifications
Specification
Specification
Power
NQuire 201
NQuire 202
NQuire201/202 + RFID
Adapter
3.7V Li-battery, 2400mAH
P-o-E
Power-over-Ethernet IEEE 802.3af (Optional)
Power
Consumption
12DC 900mA
Operate
Temperature
Environment
Storage
Temperature
Operate Humidity
5% - 90%  (no condensation)
Storage Humidity
5% - 95%  (no condensation)
Drop
Weight
440g
Dimensions
140 mm(H) * 140 (W)mm * 60 (D) mm
Operating System
Linux Kernel 2.6.25
Certificates
FCC Part15 Class B, CE EMC Class B,CCC
nlscan.com
Page 5
Product Outline
Outline
1.Network indicator
4.Beeper speaker
7.Mini SD card Slot
10.Power jack
13.Cable run
nlscan.com
2.Good scan indicator
5.”Where to scan” arrow
8.Ethernet port
11.USB host
3.LCD display
6.Barcode scanner
9.Debug port
12.GPIO connectors
Page 6
1. General Device Operation
How it works
The NQuire 200 is a terminal which receives its input via either:
- a 1D CCD barcode scanner (NQuire 201)
- a 2D CMOS barcode scanner (NQuire 202)
- optional RFID reader (on NQuire 201 or 202)
When the input is received, it is send to the application software which runs on
a remote PC/server elsewhere. The application program will send the appropiate
display information back to the NQuire 200.
The NQuire 200 sends its input according to the information in
the barcode without code identifier and with [CR].
EAN 13 : F
EAN 8
: FF
Code 128: #
EAN128 : P
F
nlscan.com
Page 7
2. Installation
2.1 Mounting
The NQuire 200 comes standard with a VESA mount. Please follow the following
instructions for mounting:
1. Determine the mounting location.
2. Choose a convenient scanning hight for your user environment.
3. Secure the mounting plate on a wall, countertop or shelve.
4. Secure the adjustable VESA plate on the back cover of the NQuire 200 using
the 4 screws and screw inserts.
5. After having connected the appropiate cabling (See chapter 2.2 and 2.3), you
can slide the NQuire into the mounting plate.
SAMPLE PICTURE. DO NOT USE!
nlscan.com
Page 8
Installation
Power supply
2.2 Power Supply
Please select, based on the model you have, between the following power supply
options:
1. Newland AC power supply
2. Power-over-Ethernet
In case of the AC power supply:
1. Remove the right cover on the back of the NQuire 200
2. Plug in the power supply (see page 6)
3. Lead the cable trough the cable run for appropiate routing (see page 6)
4. Wired ethernet: Connect the Ethernet cable to the Ethernet port (see page 6)
and close the cover and fix it with the screw.
5. Wireless ethernet: Close the cover and fix it with the screw.
In case of using Power-over-Ethernet:
1. Remove the right cover on the back of the NQuire 200.
2. Connect the Ethernet cable to the Ethernet port (see page 6).
3. Lead the cable trough the cable run for appropiate routing (see page 6).
4. Close the cover and fix it with the screw.
5. Connect the other end of the Ethernet cable into a PoE module or a Powered
Switch (NOT supplied by Newland). The NQuire supports the Mid-span (using
the 4 unused lines, 4,5,7,8) Power-over-Ethernet protocol.
6. Connect DC power to either the third party PoE module or Powered Switch.
Do not use the AC power supply in conjunction with a Powerover-Ethernet solution. This can cause damage to the NQuire.
nlscan.com
Page 9
Installation
Connections
2.3 Connections
There are 5 physical connectors on the NQuire 200:
1. Power connector:
- It has a positive center and the outer tab is ground
- It is compatible with 100 ~240V ~50/60Hz
2. Debug connector: Not used/needed for operation
3. Ethernet connector:
PIN
Description
1
Tx+
2
Tx-
3
Rx+
4
Not Used / PoE
5
Not Used / PoE
6
Rx-
7
Not Used / PoE
8
Not Used / PoE
4. USB host connector: This can be used to connect external devices such as a
hand held scanner, a printer or magnetic stripe card reader.
When your user environment aks for scanning large objects,
you can connect a Newland HR100 or HR200 hand held
scanner on the USB port.
5. GPIO connectors (General Purpose Input/Output interface):
- Two in (2 pin each)
- Two out (2 pin each)
nlscan.com
Page 10
3. Configuration
3.1 General
The NQuire 200 uses a internal webserver for configuration. This eliminates
Operating System restrictions. You can access the configuration tool by following
this process:
1. Open/Start your web browser.
2. Enter the NQuire IP address in the address bar (default 192.168.1.200).
3. The following screen should open:
4. In the event of an error screen, please try to "ping" the device:
- Make sure your PC is in the same IP range as the NQuire, for instance
192.168.1.198
- Type ping 192.168.1.200 in your "command prompt" (MS Windows: cmd.
exe).
- If this is not succuesful, please double check the IP address and phusical
Ethernet connection.
nlscan.com
Page 11
Configuration
Network settings
3.3 Network settings
When you are using an Ethernet NQuire and you click on "Network" in the
Configuration tool, the following screen should open:
1. IP settings: Use of DHCP (automatic assignment of IP-address to NQuire 200)
or not (NQuire has fixed IP-address).
2. NQuire protocol settings: Define UDP/TCP port and remote IP address
For each setting you want to change and save, click the
"Apply" button after each change and in each box.
nlscan.com
Page 12
Configuration
Wireless settings
3.4 Wireless settings
When you have a WiFi NQuire, two extra boxes should appear in the "Network"
screen as shown below:
1. Network interface: You can choose between either wired or wireless Ethernet
2. ESSID: Please type the ESSID name of your wireless router in this box
3. Wireless key type: You can choose between three security levels:
- None: No encryption key is needed, the NQuire is, via your wireless router,
available to all WiFi enabled devices.
- WEP: Entry-level encryption with a wireless key to limit network access.
- WPA: High-end encryption with a wireless key to limit network access.
It is strongly advised to use a wireless key to avoid third parties
to intrude your network. Please ask your administrator what
network security level is available in your user environment.
4. Wireless key: Type the key which is going to be used to encrypt wireless data
communication.
For each setting you want to change and save, click the
"Apply" button after each change.
nlscan.com
Page 13
Configuration
Idle screen settings
3.5 Idle screen settings
When you click on "Messages" in the Configuration tool, the following screen
should open:
1. Idle message: You can type (on three lines) the text which is displayed on the
screen at moments nothing is scanned:
- X Pos / Y Pos: define the X-and Y positions per pixel on the screen.
- Vert Align / Hor Align: Vertical and horizontal alignment options which have
system default X -and Y screen positions.
- Size: Choose between system default large -and small size text.
2. Error message: You can type (on two lines) the text which is displayed on the
screen when the NQuire receives a timeout from the network (NQuire not
connected / offline). Timeout settings can be changed in the "Miscellaneous"
screen (page 15).
For each setting you want to change and save, click the
"Apply" button after each change and in each box.
nlscan.com
Page 14
Configuration
Miscellaneous settings
3.6 Miscellaneous settings
When you click on "Miscellaneous" in the Configuration tool, the following
screen should open:
nlscan.com
Page 15
Configuration
Miscellaneous settings
1. Device name: You can type a random name which you will use to for your
own administration.
2. Authentication: You can choose wheter or not you want a password protection
to access the NQuire configuration tool via a username and password.
3. Text and messages:
- Idle message timeout: the period of time before the idle message is displayed
again after a scan in seconds.
- Error message timeout: the period of time the NQuire device waits for a
response from the host pc/server in seconds. When this timeout is exceeded,
the error message will be displayed for 5 seconds.
- Font codeset: Choose either UTF-8 (universal fontset which supports most
used language fonts) or one of the following codepages:
Codepage
852
866
874
1250
1251
1252
1254
1257
Description
“Multilingual” West European Latin-1
Cyrillic DOS codepage
Thai
Central and East European Latin
Cyrillic
West European Latin-2
Turkish
Baltic
4. Miscellaneous:
- Decide on the level of contrast of the display dependant on the user
environment.
- Choose between different types of beeper tones and volumes dependant on
the user environment.
For each setting you want to change and save, click the
"Apply" button after each change and in each box.
nlscan.com
Page 16
4. How to scan
4.1 Introduction
The NQuire 200 is a terminal which receives its input via either:
- a 1D CCD barcode scanner (NQuire 201)
- a 2D CMOS barcode scanner (NQuire 202)
- optional RFID reader (on NQuire 201 or 202)
Each input device requires a different approach in scanning movement and
orientation.
Please check Appendix C for example codes of the different 1D and 2D barcodes.
4.2 How to scan 1D with NQuire 201
The NQuire 201 is only able to read 1D barcodes and optionally RFID. A single
line CCD scan engine reads 1D codes via a horizontal red line.
Optimal reading orientation
Optimal reading approach to scanner
The optimal reading distrance from the scanner screen lies
between 5 and 15 centimeters.
nlscan.com
Page 17
How to scan
How to scan 1D/2D with NQuire 202
4.3 How to scan 1D/2D with NQure 202
The NQuire 202 is able to read 1D and 2D barcodes and optionally RFID. A
omnidirectional imager reads 1D and 2D codes via red leds and a green line.
Reading orientation can be 360°
Optimal reading approach to scanner
The optimal reading distrance from the scanner screen lies
between 5 and 15 centimeters.
nlscan.com
Page 18
How to scan
How to scan RFID
4.3 How to scan RFID
The NQuire 201 and 202 can be equipped with a RFID as well. The most common
use is for access control applications. A small sticker with a "RFID label" just
below the LCD screen indicates the place to scan your RFID tags/cards.
RFID label
The optimal reading distrance from the RFID scanner label
lies between 0 and 10 centimeters.
nlscan.com
Page 19
Appendices
A. NQuire programming codes
Programming OFF
Programming ON
Beeper settings
No Beeper
Beeper Volume 1
Beeper Volume 2
Beeper Volume 3
Beeper Volume 4
Beeper Volume 5
Beeper Tone 1
Beeper Tone 2
Beeper Tone 3
nlscan.com
Page 24
Appendices
NQuire programming codes
Programming ON
Programming OFF
LCD display settings
Contrast level 1
Contrast level 2
Contrast level 3
Contrast level 4
Reboot
Reboot
Back to Factory
Default & Reboot
Configuration
On screen
configuration
overview
nlscan.com
Page 25
Appendices
NQuire control
B. NQuire control
Introduction
The NQuire 200 is controlled by means of ESC commands in order to configure:
- Cursor control
- Clear display
- Text alignment
Text
The NQuire uses proportional font widths. This means a "m" is physically wider
than a "i". Consequently, you can not exactly measure how many characters fit on
one line. When a line is "too long", some characters will not fit on the screen and
will not be shown. Twenty characters per line can be shown on average.
ASCII values from 20 - 255 which are not part of a command
are normally displayed on the screen.
The following commands control the position and control of text:
- Carriage return (go to start position next line): ESC 0x0d
- Linefeed (go to start position next line): ESC 0x0a
- Set cursor (for predefined cursor postions): ESC 0x2c
- Set pixel position (placing the cusror on any position): ESC 0x2C
- Align text (easy alignment, such as center of screen, right of screen): ESC 0x2e
The complete command set table is on page 24.
nlscan.com
Page 26
Appendices
NQuire control
NQuire command set table
ESC
HEX
DEC
CHAR
ESC
24 or 25 36 or 37 $ or %
ESC
27
39
‘
ESC
2C
44
,
ESC
2E
46
.
ESC
42
66
B
ESC
ESC
5A
5B
90
91
Z
[
Action
Parameters
Clear Display and
move the cursor to the
top left position
Set cursor position ¹
Set current pixel position on display ²
Align a string of text ³
Select font set
Normal: 0x30
Large: 0x31
Reboot
Enable/Disable scanning
<POS> 0x300x3F
<POS> 0x300xAF
<ALIGN>
0x30-0x3E
<FONTSET>
0x30-0x31
<LINE>
0x30-0x34
<LINE>
0x30-0X6F
<DATA>
“...”[0x03]
<MODE>
Disbale:0x30
Enable:0x31
ESC
5E
94
ˆ
Generate default beep
¹ The actual pixel position is dependant on the selected font set:
- Every x-position is a multiple of 8 pixels
- Every y-position is dependant on selected font set; height of 24 or 32 pixels
- POS: 0-15 (0x30 - 0x3F)
- LINE: 0-4 (0x30 - 0x34)
² This allows a text to be displayed anywhere on the screen. A character will only be
dsiplayed if it fully fits on the screen.
- POS: 0-127 (0x30) - oxAF)
- LINE: 0-63 (0x30 - 0x6F)
³ Display a text, using current used font set, on a calculated position on the screen:
<ALIGN>
0x30
0x31
0x32
0x33
0x34
0x35
0x36
0x37
0x38
Action
Left top
Center top
Right top
Left center
Center
Right center
Left bottom
Center bottom
Right bottom
<ALIGN>
0x39
0x3A
0x3B
0x3C
0x3D
0x3E
Action
Left, using current y-coordinate
Center, using current y-coordinate
Right, using current y-coordinate
Top, using current x-coordinate
Center, using current x-coordinate
Bottom, using current x-coorinate
<DATA> field has a maximum length of 25 characters. If less characters are used, please
use 0x03 (ETX) as last character.
nlscan.com
Page 27
Appendices
NQuire control
Example screens
Here are some example on how to generate different screens on the NQuire 200:
Command
<ESC> 0x42 0x30
<ESC> 0x25
“Cheese”
0x0d
“500 gr.”
<ESC> 0x42 0x31
<ESC> 0x2e 0x38
“€ 5.69” 0x03
Command
<ESC> 0x42 0x31
<ESC> 0x24
<ESC> 0x2e 0x31
“Special offer!”
0x03
<ESC> 0x42 0x30
<ESC> 0x2e 0x34
“6-pack water 0.5L”
0x03
<ESC> 0x42 0x31
<ESC> 0x2e 0x37
“€ 0.99” 0x03
Action
Normal font size
Clear screen, cursor top
left
Text on screen
Carriage return
Text on screen
Large font size
Align right bottom and
text on screen
Action
Large font size
Clear screen, cursor top
left
Align center top and text
on screen
Normal font size
Align center and text on
screen
Large font size
Align center bottom and
text on screen
<ESC> should be sent as the hexadecimal value 1B
Notation of, for example, 0x25 means hexadecimal value 25
nlscan.com
Page 28
Appendices
Testing codes
C. Testing Codes
Code128
UCC/EAN-128
UPC-E
UPC-A
Interleaved 2 of 5
PDF 417
Aztec
nlscan.com
Code 39
QR Code
Data Matrix
Micro QR
Chinese-Sensible Code
Page 29
Appendices
Troubleshooting
D. Troubleshooting
Problem
NQuire does not turn on
Possible Cause
No power to the NQuire
NQuire does not respond
to polls/pings from the host
computer
No communication between
NQuire and the host.
NQuire does not send data to
host computer
Parameter changes made
usingWeb Configuration Tool
were not retained after
the NQuire was re-booted
NQuire is not connected
to the host.
Parameter changes were
not saved.
nlscan.com
Possible Solution(s)
AC outlet power
- Connect the approved
power supply to an AC power
source and to
the NQuire power connector.
See page 6.
Power-over-Ethernet
- Connect Ethernet cable to
NQuire Ethernet port.
- Connect other end of Ethernet cable to Power-OverEthernet (POE) device.
- Connect POE device power
supply to
an AC outlet.
- Perform continuity check on
the Ethernet cable.
Check cables to the NQuire.
Ensure the NQuire IP-address
is the address the host is
polling/pinging.
Check communication parameters.
Check all cabling to host
computer.
For each setting you want to
change and save, click the
"Apply" button after each
change and in each box
Page 30
Headquarters
Fujian Newland Auto-ID Tech. Co., Ltd.
Newland Science & Technology Park
No.1 Rujiang West Rd., Mawei,
Fuzhou, Fujian 350001, China
TEL: 86-591-83979219
WEB: www.nlscan.com
AsiaPac Office
Newland Taiwan Co., Ltd.
7F.-6, No.268, Liancheng Rd., Zhonghe
City, Taipei County, Taiwan
TEL: +886-2-77315388
WEB: www.newland-id.com.tw
EMEA office
Newland Europe BV
Nijverheidsweg 1-d-e 6651 KS Druten,
The Netherlands
TEL: +31 (0) 487 58 88 99
WEB: www.newland-id.com
US Office
Newland North America Inc.
46559 Fremont Blvd., Fremont, CA 94538,
USA
TEL: 510 490 3888
WEB: www.newlandna.com