1
SuperFalcon
Owner’s Manual
DSM-00224-03
© 2002 Alpha Microsystems
REVISIONS INCORPORATED
REVISION
DATE
00
July 2002
01
July 2002
02
December 2002
03
April 2003
SuperFalcon Owner’s Manual
To re-order this document, request part number DSO-00224-00.
This document applies to AMPC versions 6.0 and later
The information contained in this manual is believed to be accurate and reliable. However, no
responsibility for the accuracy, completeness or use of this information is assumed by Alpha
Microsystems.
This SuperFalcon contains SSD number ________________________________________.
The following are registered trademarks of Alpha Microsystems, Irvine, CA 92614:
AMOS
AlphaBASIC
AlphaWRITE
Alpha Micro
AlphaCALC
inSight/am
Alpha Micro
AlphaFORTRAN 77
AlphaRJE
AlphaACCOUNTING
AlphaLAN
The following are trademarks of Alpha Microsystems, Irvine, CA 92614:
AlphaBASIC PLUS
AlphaDDE
AlphaNET
AlphaVUE
AlphaConnect
ESP
AMPC
DART
MULTI
AMTEC
AlphaMAIL
All other copyrights and trademarks are the property of their respective holders.
ALPHA MICROSYSTEMS
17534 Von Karman
Irvine, CA 92614
DSM-00224-03
Table of Contents
CHAPTER 1 -INTRODUCING THE SUPERFALCON
WHAT IS THE SUPERFALCON?
What the SuperFalcon Does
Hardware Specifications
WHAT YOU GET
WHAT YOU NEED
What AMOS Can Do for You
ABOUT THIS BOOK
Graphics Conventions
ADDITIONAL BOOKS
SUPPORT INFORMATION
Post-Sales Support
For Further Assistance
CHAPTER 2 -INSTALLING THE SUPERFALCON SOFTWARE AND HARDWARE
AMPC SOFTWARE OVERVIEW
Native Windows Networking and SCSI Support
Supports Up To 16 COM Ports
Supports Any Printer Seen By Windows
Improved Console Software
New AMOS Disk Creation “Wizard”
Simpler, More Reliable, Unified Shutdown
Simplified Installation
Create Your Own Installation CD
WHAT YOU NEED TO BEGIN THE SOFTWARE INSTALLATION
INSTALLING AMPC
Beginning the Installation
Finishing the Software Installation
SUPERFALCON HARDWARE INSTALLATION
Safety Recommendations
Configuring the SuperFalcon board
SuperFalcon Memory Installation
SuperFalcon Software Security Device
Install the SuperFalcon Board
Completing the Hardware Installation
ATTACHING EXTERNAL DEVICES
CHAPTER 3 -CONFIGURING THE AMPC SOFTWARE
SuperFalcon Owner’s Manual, Revision 03
1-1
1-1
1-1
1-2
1-2
1-3
1-3
1-4
1-4
1-5
1-5
1-5
1-5
2-1
2-1
2-1
2-1
2-1
2-2
2-2
2-2
2-2
2-2
2-3
2-4
2-4
2-4
2-5
2-5
2-5
2-6
2-7
2-7
2-8
2-9
3-1
Page ii
Table of Contents
CONFIGURING THE AMPC SOFTWARE
BOOTING AMOS
ENABLING MULTIPLE AMOS USERS (INSTALLING THE AMOS PIC)
CUSTOMIZING YOUR AMOS32.INI FILE
MODIFYING THE ON-BOARD CMOS SETUP CONFIGURATION SETTINGS
ENABLING FUNCTION KEY TRANSLATION
WHAT NEXT?
CHAPTER 4 -MODIFYING THE AMOS CONFIGURATION
BOOTING AMOS FROM ALTERNATE .INI FILES AND / OR .MON FILES
EASY CONFIGURATION SCREEN CHANGES
MODIFYING PRE-CONFIGURED NETWORK CONFIGURATION FILES
THE SYSTEM INITIALIZATION FILE DETAILS
TESTING YOUR NEW OR MODIFIED INITIALIZATION FILE
ADDING A TERMINAL
Attaching a Job to the Terminal
ADDING A PRINTER
Using Windows Printers
Using Serial Printers
Setting Up The AMOS Spoolers
DEFINE AN AMOS DISK SUBSYSTEM
A Note on AMOS Disk Files
Generating an AMOS Disk
Moving or Changing the Main AMOS Disk
WHAT NEXT?
3-1
3-5
3-5
3-6
3-6
3-7
3-7
4-1
4-1
4-2
4-3
4-4
4-5
4-6
4-7
4-8
4-8
4-9
4-10
4-11
4-11
4-11
4-12
4-13
CHAPTER 5 -MOVING BETWEEN OPERATING SYSTEMS
5-1
USING VIRTUAL TERMINALS
Calling Up AMOS After You Turn on the PC
Switching Between AMOS and Windows
Booting AMOS without Rebooting the PC
SELECTING A SPECIFIC SYSTEM INITIALIZATION FILE
5-1
5-1
5-2
5-2
5-2
CHAPTER 6 -AMOS OVERVIEW
DEVICE NAMES
DISK ACCOUNTS
Ersatz Names
Passwords
Adding New Accounts
USER NAMES
LOGGING ON
PROTECTING YOUR DATA
ANALYZING THE DISK
6-1
6-1
6-1
6-2
6-3
6-3
6-4
6-4
6-5
6-5
SuperFalcon Owner’s Manual, Revision 03
Table of Contents
The REDALL Command
The DSKANA Command
WHERE DO I GO FROM HERE?
Introduction to AMOS Software
Additional Documentation
CHAPTER 7 -COPYING FILES BETWEEN AMOS AND WINDOWS
CONTIGUOUS FILE TRANSFER
HOW TO COPY FILES BETWEEN OPERATING SYSTEMS
Preparing to Copy
Command Formats
AMOS and WINDOWS File Names
Wildcards
SENDING FILES TO WINDOWS FROM AMOS (TODOS)
RECEIVING FILES FROM WINDOWS INTO AMOS (FMDOS)
COPYING FILES TO ANOTHER PC COMPUTER
COPYING FILES TO OTHER ALPHA MICRO COMPUTERS
APPENDIX A -SUPERFALCON CHARACTERISTICS AND LIMITATIONS
RESTRICTIONS DUE TO AMOS/WINDOWS INTERACTIONS
FILE BACKUP AND RESTORE LIMITATIONS
ALTERNATE BOOTING
USING AMOS/WINDOWS FILE TRANSFER IN A COMMAND FILE
SCSI BUS USE CHARACTERISTICS
Page iii
6-6
6-6
6-8
6-8
6-10
7-1
7-1
7-1
7-1
7-2
7-2
7-3
7-3
7-4
7-5
7-6
A-1
A-1
A-1
A-2
A-2
A-2
APPENDIX B -AMPC60 COMMAND SUMMARY
B-1
APPENDIX C -AMPC60 ERROR MESSAGES
C-1
When Windows is Booting:
AMPC and/or Windows Locks Up:
APPENDIX D -PC FUNCTION KEYS UNDER AMOS
USING FUNCTION KEYS
AMOS FUNCTION KEY TRANSLATION
USING FUNCTION KEYS
APPENDIX E -CHANGING THE AMOS DISK FILE BLOCKING FACTOR
WHAT IS THE BLOCKING FACTOR?
SuperFalcon Owner’s Manual, Revision 03
C-2
C-3
D-1
D-1
D-2
D-2
E-1
E-1
Page iv
Table of Contents
CHANGING THE BLOCKING FACTOR
FIXED ALLOCATION DISKS
E-1
E-2
APPENDIX F -SUPERFALCON ON-BOARD SERIAL PORTS
F-1
SUPERFALCON SERIAL PORTS
SuperFalcon RS-232 Pinouts
Terminal Cables
PC Serial Port to SuperFalcon Serial Port
Serial Printer Cable Pinouts
CABLING CONFIGURATIONS FOR PC SERIAL AND PARALLEL PORTS
AM-6X Terminals to PC Serial Ports
Serial Printers to PC Serial Ports
F-1
F-1
F-2
F-2
F-3
F-3
F-4
F-4
APPENDIX G -MODIFYING THE SETUP CONFIGURATION SETTINGS
G-1
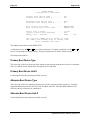
DISPLAYING THE SETUP MENU
Primary Boot Device Type
Primary Boot Device Unit #
Alternate Boot Device Type
Alternate Boot Device Unit #
Boot Monitor File Name
Boot Initialization File Name
Serial Port 0 Speed
Display Console Boot Messages
Memory Size - Refresh Setting
SAVING THE SETUP SETTINGS
G-1
G-2
G-2
G-2
G-2
G-3
G-3
G-3
G-3
G-3
G-3
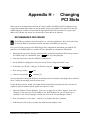
APPENDIX H -CHANGING PCI SLOTS
H-1
RECOMMENDED PROCEDURE
H-1
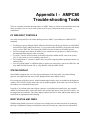
APPENDIX I - AMPC60 TROUBLE-SHOOTING TOOLS
PC SIDE BOOT CONTROLS
STATUS DISPLAY
BOOT STATUS AND CMOS
SELF TEST
APPENDIX J - DYNAMIC ALLOCATION WARNING
I-1
I-1
I-1
I-1
I-2
J-1
INDEX_____________________________________________________________________________1
SuperFalcon Owner’s Manual, Revision 03
COMPLIANCE INFORMATION STATEMENT
Responsible Party:
Address:
Telephone:
FAX:
Type of Product:
Model Name:
Alpha Microsystems
17534 Von Karman
Irvine, CA 92614
(949)250-4180
(949)250-5870
PC Co-processor board
AM-113-40 SuperFalcon
This device complies with Part 15 of the FCC Rules.
Operation is subject to the following conditions:
1) this device may not cause harmful interference, and
2) this device must accept any interference received including interference that may cause
undesired operation.
FCC INFORMATION
1.
IMPORTANT NOTICE: DO NOT MODIFY THIS UNIT!
This product, when installed as indicated in the instructions contained in this manual, meets FCC
requirements. Modifications not expressly approved by Alpha Microsystems may void your authority to use
the product.
2.
IMPORTANT: When connecting this product to accessories and/or another product, use only high quality
shielded cables. Follow all installation instructions. Failure to follow instructions could void your FCC
authorization to use this product.
3.
NOTE: This equipment has been tested and found to comply with the limits for a Class B digital device,
pursuant to Part 15 of the FCC Rules. These limits are designed to provide a reasonable protection against
harmful interference in a residential installation. This equipment generates, uses, and can radiate radio
frequency energy and, if not installed and used in accordance with this instruction manual, may cause harmful
interference to radio communications. However, there is no guarantee that interference will not occur in a
particular installation. If this equipment does cause harmful interference to reaio or televesion reception,
which can be determined by turning the equipment off and on, the user is encouraged to try to correct the
interference by one or more of the following measures:
•
•
•
•
Reorient or relocate the receiving antenna.
Increase the separation between the equipment and receiver.
Connect the equipment into an outlet on a circuit different from that to which the receiver is connected.
Consult your system dealer or an experienced radio/TV technician for help.
SuperFalcon Owner’s Manual, Revision 03
Chapter 1 - Introducing
the SuperFalcon
This chapter discusses:
• What is the SuperFalcon?
• What’s included with the SuperFalcon, and what else do you need to use it?
• What the Alpha Micro Operating System (AMOS ) can do for you.
®
• What information is in this manual, and what other books are available to help you?
• The symbols and conventions this book uses.
• Support information.
WHAT IS THE SUPERFALCON?
The Alpha Micro SuperFalcon lets virtually any PC
(with an available standard PCI bus slot) using
®
Microsoft Windows 98 or later operating systems
software do double duty. Your computer continues to
®
work as a personal computer running Microsoft
Windows, and also becomes a multi-user business
computer running AMOS, Alpha Micro’s operating
system.
The PC Environment…
From here on, whenever we refer to
Windows software or the Windows
environment, we mean any of the
®
following versions of Microsoft
Windows 98, ME, NT 4.0(SP6a),
2000, or XP, whichever environment you
are using on your PC.
SuperFalcon adds the advantages of AMOStrue multi-user capability and all the other features
discussed later in this chapterwithout taking away any of the features you bought your PC for: you can
still use all of the Windows software that runs on your PC. The result is a computer combining all the
personal productivity tools of the PC marketplace with the multi-user business solutions available under
AMOS.
What the SuperFalcon Does
Once the SuperFalcon is installed in your PC, you can work both in Windows and AMOS, enjoying all
the capabilities of both. In the Windows environment, your PC reads, writes, and executes Windows
compatible files on the hard disk, just like any PC.
In the multi-user AMOS environment, your PC reads, writes and executes AMOS files from the hard
disk or from a CD. You can add other terminals and printers to your PC, so different people can use
different AMOS programs at the same time. For example, one person can print a letter or report while
another checks an invoice. And, the SuperFalcon integrates Windows and AMOS. You can switch
between operating systems by selecting another task window, and share information between them using
simple commands. Since text and data files created by your Windows and AMOS programs can be
SuperFalcon Owner’s Manual, Revision 03
Page 1-2
Chapter One
shared, you can have just the information you need in the format you want. For example, you can copy
data from your AMOS application to use in a Windows spreadsheet or graphics software package.
In addition, you can connect your SuperFalcon-based PC to an Ethernet network and communicate with
more PCs or other host computers via true Windows networking. In the AMOS environment, both
AlphaTCP and AlphaNET are supported, and AlphaTCP has its own IP address, distinct from the
Windows IP address.
Hardware Specifications
Processor type:
Motorola MCF5102 CPU
Serial Ports:
Four on-board ports with hardware flow control and RS-232 support.
Standard RJ-45 external connectors compatible with AM-90 and AM359 serial board pinouts.
Memory Options:
32MB, 64MB, 128MB SODIMM compatible on-board connector
interface provided using one 144-pin connector.
Power Consumption:
1.0A - 1.5A, depending upon the amount of memory installed.
Peripheral Support:
The SuperFalcon supports both IDE and SCSI configurations.
Board Dimensions
7.6” long (<PCI ¾ slot length) x 4.3” high (PCI full height)
WHAT YOU GET
The SuperFalcon consists of:
• The SuperFalcon co-processor board that inserts easily into a standard PCI expansion slot in a
PCI-bus based PC. The actual board length is about 7.6”. The SuperFalcon uses the Motorola
5102 ColdFire microprocessor which can be configured with 32MB, 64MB, or 128MB of
memory for use by AMOS.
The SuperFalcon board itself contains four serial ports. Under AMOS, you can use these ports,
the PC main console, and the PC’s serial (COM) ports (including some add-in products) and
Windows printer (including LPT ports), allowing you up to sixteen serial I/O ports and sixteen
Windows printer (including parallel I/O) interface connections, depending on the AMOS
software license you purchased. (Standard minimum license allows four simultaneous users.)
• The AMPC™ software, version 6.0 or later, that supports the SuperFalcon board, converting
your PC into a multi-user AMOS computer. In addition to allowing you to run AMOS on the
SuperFalcon co-processor, the AMPC software enables you to transfer files between Windows
and AMOS.
• The multi-user Alpha Micro Operating System, AMOS, supplied on optional CD-ROM or
downloaded from our ftp web-site, http://www.AlphaMicro.com/AMPC/.
• Documentation. In addition to this manual, you should receive the Product Installation Code
(PIC) for your product, which licenses you to have up to four AMOS users on your PC. If your
SuperFalcon Owner’s Manual, Revision 03
Introducing the SuperFalcon
Page 1-3
software license is for more than four users, contact your Alpha Micro dealer to receive a new
PIC.
WHAT YOU NEED
To use SuperFalcon, you need an IBM-compatible PC running Microsoft Windows 98, ME, NT
4.0(SP6a), 2000, or XP. In addition, your PC must have:
• An available standard PCI board slot in the motherboard of your PC which can accommodate the
SuperFalcon board length, 7.6”. The PC must provide adequate cooling for the board.
• A hard disk drive with at least 50 MB of free space to use for AMOS. (The Internet installation
temporarily uses another 40 MB to 65 MB of disk space.)
• A CD-ROM drive or Internet access.
• Windows TCP/IP protocol installed on your PC.
What AMOS Can Do for You
Here is a brief overview of some of the features of the AMOS operating system:
• More than one person can perform different tasks on the computer at the same time.
• You can use one or more printers at the same time without tying up a terminal.
• You can run multiple tasks at preset times and dates without using a terminal.
• A sophisticated command language lets you invoke a series of commands and program input by
entering a single command.
• The business-oriented AlphaBASIC and AlphaBASIC Plus programming languages are
uniquely suited to programming business application software packages.
®
®
• The AlphaVUE screen-oriented text editor provides an easy-to-use tool for creating documents.
®
• ISAM Plus, a machine language file management system, provides a method for quick
information organization and retrieval.
• The Executive Screen Processor, ESP , lets you design program screens without writing program
code, and can handle screen input and output for your AlphaBASIC programs.
®
• A system initialization file allows you to change the peripheral devices connected to the PC,
change user memory allocations, and customize the computer to your exact needs.
• AMOS supports many different kinds of printers and terminals, and gives you the ability to
define your own type of terminal or printer to the computer.
• Networking is available through the AlphaTCP networking product, which offers the potential
for significant system expansion. Use of an earlier software product, AlphaNET, is also possible.
SuperFalcon Owner’s Manual, Revision 03
Page 1-4
Chapter One
ABOUT THIS BOOK
In addition to this introduction, this book contains these chapters:
• Chapter 2 guides you through the software and hardware installation process.
• Chapter 3 describes how to configure the AMPC software and AMOS on your PC.
• Chapter 4 tells you how you can further modify the AMOS configuration of your computer to
add various peripherals, including subsystem disks, terminals, and printers.
• Chapter 5 shows you how to call up AMOS and switch between AMOS and PC environments.
• Chapter 6 discusses some of the features of AMOS and how you can use them.
• Chapter 7 discusses copying information between WINDOWS and AMOS.
Appendices list AMPC error messages and discuss some differences between the SuperFalcon and other
AMOS computers. SuperFalcon serial port cabling details, modifying CMOS setup configuration
settings, and other AMPC specifics are also described.
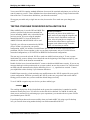
Graphics Conventions
This manual uses the same graphics conventions as most other Alpha Micro publications. We hope these
conventions simplify our examples and make this book easier for you to use.
Symbol
Meaning
TEXT
Bold text in an example of user/computer communication represents the characters
you type. When the text is all capitals, type exactly what’s shown. When it is lower
case, it represents a variable part of an entry, such as a file name.
TEXT
We use text in this type face for: characters the computer displays on your screen,
program examples, and command format. When showing command format, all
capitals indicates a constant part of the command line, such as the command name,
while lower case indicates variable information, such as a file name.
Text
Text in this bold, italic type face is a reference to part of a previous command
format description or sample.
{Option}
Optional parts of a command appear in braces {}. You can enter exactly what is in
the braces or substitute the correct value if it is a parameter. Do not include the
braces themselves.
This says “Halt!” and lets you know an important warning or message is being
presented that could cause serious damage or inconvenience if ignored.
This “Hint” symbol indicates a helpful bit of information, or a “short cut” that could
save you time or trouble.
This “Remember” symbol indicates something you should keep in mind while
following a sets of instructions.
SuperFalcon Owner’s Manual, Revision 03
Introducing the SuperFalcon
Page 1-5
Symbol
Meaning
ENTER
This key symbol refers to a key on your keyboard. The name of the key appears
inside the key symbol.
ALT
/ F10
These symbols tell you to press the first key shown and hold it down while you
press the second key. For example, ALT / F10 tells you to press the ALT key and,
while holding it down, press F10 .
ADDITIONAL BOOKS
You’ll need to know something about the PC and AMOS environments to make the best use of
SuperFalcon’s features. We recommend you refer to the operating system information that came with
your PC. Additionally, any book or computer store has many books available about Windows. For
detailed information about AMOS, please refer to the following manuals available from your Alpha
Micro dealer or on-line at www.AMOS-OnLine.com/AMDocs/ :
AMOS User’s Guide, DSO-00042-00
AMOS System Operator’s Guide, DSO-00001-00
AMOS System Operator’s Guide to the System Initialization Command File, DSO-00002-00
AMOS System Commands Reference Manual, DSO-00043-00
Chapter 6 contains a more detailed list of Alpha Micro books you may find helpful.
SUPPORT INFORMATION
The following sections give support information for the SuperFalcon.
Post-Sales Support
Alpha Micro provides a comprehensive post-sales support program for its entire product line. Our
Technical Support organization is structured to provide your Alpha Micro dealer with fast access to
support assistance and information.
For Further Assistance
If you are unable to contact your dealer, Alpha Micro will be glad to refer you to another one. If you
relocate and want to learn the name and address of an Alpha Micro dealer near you, please call Alpha
Micro at 800-Buy-Alph (800-289-2574) or write us at the address inside the front cover.
For information and the location of the Birmingham Data Systems service location nearest you, call their
toll free service number, 800-968-0860 (East Coast) or 800-461-8410 (West Coast).
SuperFalcon Owner’s Manual, Revision 03
Chapter 2 -
Installing the
SuperFalcon
Software and Hardware
This chapter describes both the SuperFalcon Software and Hardware and takes you through the basic
installation process. The software installation is done initially, thereby preparing your PC for the actual
SuperFalcon hardware installation. After installing both the Software and Hardware, you will need to
configure your SuperFalcon system, as described in Chapter 3.
AMPC SOFTWARE OVERVIEW
AMPC 6.0 is a fully Windows compliant 32-bit application. In additional to providing a vehicle to run
the multi-user, multi-tasking AMOS operating system environment on your PC, it provides the
following:
Native Windows Networking and SCSI Support
AMPC 6.0 supports AMOS communication protocols AlphaTCP and AlphaNET via true Windows
networking. AlphaTCP has its own IP address, distinct from the Windows IP address.
SCSI devices such as streamer, DAT, and CD-ROM drives are supported via native Windows SCSI. You
can access ATAPI compatible CD-ROMs as well.
Supports Up To 16 COM Ports
AMPC 6.0 works with up to 16 COM port devices. Any device that Windows sees as a COM port can be
accessed by AMPC. This includes PCI COM port boards, certain proprietary “Digiboard®-like” multiport boards, and USB-to-COM port adapters.
Supports Any Printer Seen By Windows
AMPC 6.0 works with up to sixteen printers - any printer that is defined in Windows. This includes PCI
LPT port devices, USB, and network printers. You can set up different fonts and page layouts for a
physical printer and assign LPT ports to these different printer configurations.
SuperFalcon Owner’s Manual, Revision 03
Page 2-2
Chapter Two
Improved Console Software
Special versions of ZTERM and AlphaLAN LiTE called AMPCTERM and AMPCLITE, respectively,
are included with AMPC 6.0 to serve as the console for the user running AMOS on the PC containing the
SuperFalcon. Both of them support the virtual terminal feature present in the previous console software,
although each virtual terminal in use is counted in the AMOS user license calculation. On-line help is
provided for each type of terminal emulator.
If you are using the same PC that contains the SuperFalcon to connect to another Alpha Micro system,
you will also need the “regular” versions of AlphaLAN/LiTE or ZTERM for that purpose. “Regular”
AlphaLAN/LiTE and ZTERM install in different directories and use separate registry entries to track
their settings. For all practical purposes, they are distinct and separate products.
AMPCTERM and AMPCLITE communicate with AMPC 6.0 through Windows’ network loopback
mechanism. Consequently, you need to have the Windows TCP/IP protocol installed on a PC running
AMPC 6.0, even if you do not intend to use other network functions on that PC.
New AMOS Disk Creation “Wizard”
On the AMOS Disks configuration tab in the diagnostic program, you can click on the “Create” button
and be stepped through a new, more user-friendly “Wizard” that will create a new AMOS .DSK file. See
Chapter 3, Figure 3-2.
Each AMOS .DSK file created is limited to a maximum of 2GB in size.
Simpler, More Reliable, Unified Shutdown
You must shut down AMPC by closing the diagnostic window. You will be asked to confirm this shut
down action if the corresponding check box in the AMPC 6.0 Configuration window, General tab, is
checked. See Chapter 3, Figure 1 for details.
Simplified Installation
All of AMPC 6.0, including the networking interface, automatically installs from CD-ROM or from
AMPCi6.EXE, from http://www.AlphaMicro.com/AMPC/.
Create Your Own Installation CD
One of the most significant features of AMPC 6.0 is the ability to create your own installation CD. You
can create your own installation routine, so that AMPC installs pre-loaded with your own application.
You simply include your own pre-configured .DSK file containing AMOS, your programs, and data files.
You can even include your own bitmap logo to display during the installation process. This routine can
be burned onto a CD or made into a downloadable installation file.
SuperFalcon Owner’s Manual, Revision 03
Installing the SuperFalcon PCI Co-processor Board
Page 2-3
To create your own installation routine, first copy the entire contents of the AMPC 6.0 CD release into a
new directory on your PC, for example: \CD-ROM Image\. Every file you place in the \CD-ROM
Image\AMPC60\Data Files\ directory will be copied to the destination directory (usually C:\AMPC60).
This is the place to put your pre-configured .DSK file(s) and User Documentation.
You can replace the SuperFalcon jet logo that displays at installation time with an image of your
choosing. Just replace the Falcon.bmp file in \CD-ROM Image\, the root directory of the new CD, with a
different image with the same file name.
Default settings for each AMPCTERM based virtual terminal can be saved as file name \CD-ROM
Image\AMPC60\DataFiles\Virtual Terminal X.zsc.
Default settings for AMPC 6.0 itself can be saved as file name \CD-ROM Image\AMPC60\Data
Files\Install.cfg.
You can also add your own application documentation and/or files in its own folder under the \CD-ROM
Image\AMPC60\Data Files\ directory, for example, \CD-ROM Image\AMPC60\Data Files\Pawn
Soft\Introduction.htm, etc. If AMPC 6.0 is installed with the defaults, the documentation will end up in
C:\AMPC60\Pawn Soft\Introduction.htm. Notice that the \Data Files\ directory layer has disappeared.
Understanding that the \Data Files\ directory layer disappears is very important so that you provide the
correct path for your users and programs. Any files placed above the \Data Files\ directory will NOT be
automatically copied during the installation.
Burn a CD with the contents of \CD-ROM Image\ as the root and you will have yourself a custom, preconfigured AMOS environment on a CD. AMOS has never been easier to install: Just pop in a
SuperFalcon board, install a CD, and in under half an hour your client is running your application!
WHAT YOU NEED TO BEGIN THE SOFTWARE INSTALLATION
You must have at least 50MB free on your PC’s hard disk before installing AMPC from the CD
(115MB if using the download installation). The default installation builds a dynamically
allocated AMOS disk file with three logical disks. If you want a fixed mode disk, a disk of
another size, or if you want to move the disk to another PC disk device, see Chapter 4 for
instructions on making these changes after AMPC is installed.
These software installation instructions guide you through the procedures for bringing up AMOS on your
PC. To proceed with this installation you need the following:
• The AMPC 5.0 / 6.0 or later CD-ROM, or AMPCi6.EXE from www.AlphaMicro.com/AMPC/.
• Your AMOS PIC, which you will use in Chapter 3. (Remember your old PIC will not work.)
• If you are upgrading from a previous version of AMPC, have a printed copy of the AMOSL.INI
or AMOS32.INI file (or the .INI file that normally boots your application) handy to assist you in
configuring AMPC 6.0. In addition, rename your existing AMPC directory to insure that these
files are not overwritten by the AMPC 6.0 installation process.
Be sure you have these items before continuing with these installation instructions. As with all
installation instructions, it is a good idea to read through this chapter to get an idea of the whole process
before you actually begin the installation.
SuperFalcon Owner’s Manual, Revision 03
Page 2-4
Chapter Two
Before proceeding with these installation procedures, make sure that any existing data on your
disk drive is fully backed up. Also, for reliable operation of AMPC 6.0, you should make sure
any power management features (screen savers, any other settings which shut down the PC based
on inactivity) of your PC are disabled.
INSTALLING AMPC
The AMPC installation is automatedwhenever you need to take action, a message appears on your
screen telling you what to do. Installing the AMPC software is very easy.
Beginning the Installation
Make sure any power management features (screen savers, any other settings which shut down the PC
based on inactivity) of your PC are disabled. Also, make sure you are logged in to the system as
“Administrator” if you are using Windows NT, 2000, or XP.
To begin the installation, insert the AMPC 5.0 / 6.0 or later CD into the CD-ROM drive, or locate
AMPCi6.EXE that you downloaded from our web site.
Check the contents of the root directory of the CD or the web site
http://www.AlphaMicro/AMPC/ to determine if a README file is present. This file will contain
any changes made after the publication of this manual. Please see the README file for
important installation or operator information.
If using the CD, open the AMPC Installation folder, then open the AMPC60 CD-ROM image folder.
Execute the setup application, and follow the installation instructions on the screen.
If using AMPCi6.EXE from the web-site download, double click on that file to start the installation.
Follow the installation instructions on the screen.
If you are using Windows 98 or Windows ME, you may see a message indicating that you need to
update your Adaptec ASPI software. Simply click Yes and proceed with the instructions.
Finishing the Software Installation
Once the installation program is complete, you will see the AMPC 6.0 shortcut on your desktop. Remove
the AMPC software CD from your computer (if you installed the software using that method) and restart
Windows to complete this portion of the software installation. If you see a warning box concerning
WINASPI.DLL being replaced with an older version, click on the Ignore box.
Now, shut down Windows and power off your system.
Next, you will physically install the SuperFalcon board. Follow the details in the remainder of this
chapter to properly install the hardware. Then, move on to Chapter 3 to configure AMPC for your
particular requirements.
SuperFalcon Owner’s Manual, Revision 03
Installing the SuperFalcon PCI Co-processor Board
Page 2-5
SUPERFALCON HARDWARE INSTALLATION
The instructions in the following sections of this chapter describe the procedure for configuring and
installing the SuperFalcon Co-processor board (DWB-00113-40) into your PC.
Safety Recommendations
When installing your SuperFalcon board, do the following to avoid possible electric shock and damage to
your system:
•
Turn off all power to your computer
•
Unplug all cables connected to your computer, including the power cord.
•
Ground yourself by touching a grounded metallic object before handling the SuperFalcon board and
touching some metal on the host PC chassis before installing SuperFalcon into your computer.
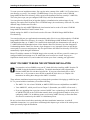
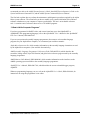
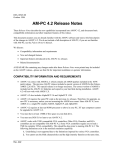
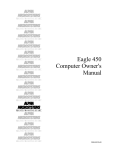
Configuring the SuperFalcon board
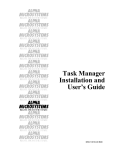
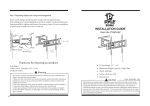
There are no user-configurable jumpers contained on the SuperFalcon board, shown in Figure 2-1. All
jumpers contained on the board are set at the factory and should not be changed by the user. (JP4 and
JP1-S2 installed)
SSD Location
0
3
SODIMM Memory
Serial I/O Ports (0-3)
Figure 2-1 SuperFalcon Board Layout
SuperFalcon Owner’s Manual, Revision 03
Page 2-6
Chapter Two
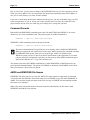
SuperFalcon Memory Installation
The SuperFalcon board has one SODIMM memory connector, at location J2 and shown on Figure 2-1.
Special care must be taken when installing the SODIMM memory module. Make sure you are properly
grounded before removing the SODIMM from its anti-static packaging. By wearing a wrist strap (or
using some other type of static control device), you can prevent static electricity stored on your body or
clothing from damaging your installation.
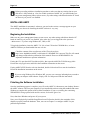
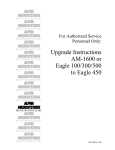
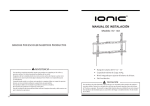
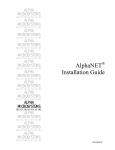
A) Orient the SODIMM so that its edge contacts on the "bottom" line up to the contacts on the
connector and the connector key lines up with the SODIMM outline. Keep the "top" end of the
SODIMM raised so the SODIMM is makes about a 30 degree angle with the SuperFalcon board. See
Figure 2-2.
Figure 2-2 Beginning SODIMM Installation
B) Keeping that 30 degree angle, apply firm, even pressure to the "top" corners of the module until you
feel it slip down into the socket. If you are having problems getting the module to seat properly, try
rocking the module up and down slightly, while continuing to apply pressure. When properly seated,
the contact fingers on the edge of the module will almost completely disappear inside the socket.
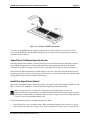
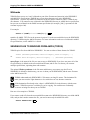
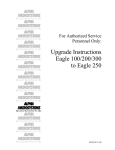
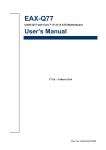
C) Keeping the module seated properly, rotate the "top" corners of the SODIMM straight down toward
the SuperFalcon board. Continue pressing downward until both side latches lock into position. With
most sockets, you will hear a distinctive CLICK, indicating the module is correctly locked. See
Figure 2-3. Then push the SODIMM down against the board to insure that the connector latch
mechanism totally engages.
SuperFalcon Owner’s Manual, Revision 03
Installing the SuperFalcon PCI Co-processor Board
Page 2-7
Figure 2-3 Finishing SODIMM Installation
To remove an SODIMM from its connector, push the plastic socket latches next to the "top" corners
away from the SODIMM. The SODIMM should pop up at an angle to the board and can then easily be
removed from the connector.
SuperFalcon Software Security Device
Each SuperFalcon board contains a Software Security Device (SSD) that identifies that board as unique
to the AMOS Operation System software and many other software packages that run in the AMOS
environment. The SSD is located in a socket at U12 on the SuperFalcon board, as shown on Figure 2-1.
Please locate the SSD and determine the SSD number on the face of the SSD. Write the number down in
the space provided on the back of the title page of this manual. You will need to refer to this SSD number
during AMOS related software installation in the future.
Install the SuperFalcon Board
Because the SuperFalcon board is Plug & Play ready, you need not worry about setting I/O addresses and
IRQs. All this will be handled for you automatically through Plug & Play functionality.
When you open your PC, see where the cooling fans are positioned relative to where the
SuperFalcon board will be installed. It is important that the SuperFalcon board be properly cooled.
If necessary, consider adding an additional fan to your PC to improve its overall cooling capability,
if your PC chassis accommodates adding a fan.
Follow the instructions below to install the SuperFalcon board:
1. Turn off the power to your computer and any other connected peripherals. Make sure the AC power
switch at the back of the power supply is OFF. If the computer does not have a power switch on the
SuperFalcon Owner’s Manual, Revision 03
Page 2-8
Chapter Two
back at the power supply, then unplug the AC power cord to the computer. (Some ATX mother
boards keep power on the PCI bus.)
2. Remove the cover to your computer to gain access to the computer’s card cage. Follow the
instructions in your computer manual.
3. Prior to touching any components inside the computer or the SuperFalcon board, you should ground
yourself to the chassis. The best grounding is to wear a wrist-grounding strap attached to the bare
metal of the chassis. If one is not available, ground yourself by briefly touching an unpainted piece of
metal and repeating this any time you return to the chassis.
4. Locate an available PCI expansion slot, one that is long enough to accommodate the length of the
SuperFalcon board. Remove that PCI expansion slot’s cover bracket from the rear panel of your
computer.
5. Align the SuperFalcon board with the selected PCI expansion slot and gently, but firmly insert the
board. Make sure the board is seated snugly and oriented correctly.
6. Fasten the board to your computer’s case using the screw you removed in step 4.
7. Reconnect the AC power, re-install the cover to your computer, following the details in your
computer manual.
You are now ready to power-up your computer and insure that Windows recognizes the new hardware
you have just installed.
Completing the Hardware Installation
The following instructions will complete the hardware related portion of the SuperFalcon product
installation. These instructions will insure that Windows recognizes the SuperFalcon board and has
configured it correctly.
Remember to make sure you are logged in to the system as “Administrator” if you are using
Windows NT, 2000, or XP.
1. Turn on your computer and bring up Windows. On Windows 2000 and XP, the New Hardware
Wizard should be launched automatically. On Windows 98 and ME operating systems, you may have
to launch the Add / Remove Hardware Wizard from the Control Panel.
For Windows NT, skip steps 2 through 6 below and follow the instructions at the end of this
section.
2. Verify that the New Hardware Wizard is trying to install the SuperFalcon board. It should be referred
to as AM-113-40 PCI Falcon Coprocessor, Intelligent I/O Controller, Multifunction board, PCI
device, or something to that effect, depending on which version of Windows you are using.
3. Click on Install from a list or specific location, select Search for the best driver in these locations,
and browse to C:\AMPC60 (or wherever you installed the AMPC60 software in the software
installation procedure done earlier in this chapter). Windows XP automatically selects the correct
driver, but on other Windows operating system versions, you will need to select the AM11340.INF
driver and click Next.
SuperFalcon Owner’s Manual, Revision 03
Installing the SuperFalcon PCI Co-processor Board
Page 2-9
4. You may get a message box indicating that the hardware has not passed Windows Logo testing.
Click Continue Anyway.
5. Follow the default instructions to complete the installation.
6. Click finish and then restart your computer.
At this point, your SuperFalcon product should be installed and ready for you to configure to your
specific requirements. Chapter 3 will take you through the configuration process.
For Windows NT based systems only:
Open Windows Explorer and navigate to the folder in which the AMPC 6.0 software was installed (default
is C:\AMPC60).
Right-click on the AM113NT.INF file and then left-click on the Install option.
The system must now be re-started for the driver installation to complete.
The AMPCLite terminal emulator requires SHLWAPI.DLL from Microsoft. This file is normally
included with Microsoft Internet Explorer 4.0 and later. You may need to install an appropriate
version of Internet Explorer before using AMPC 6.0 with the AMPCLite terminal emulator.
At this point, your SuperFalcon product should be installed and ready for you to configure to your
specific requirements. Chapter 3 will take you through the configuration process.
ATTACHING EXTERNAL DEVICES
Attaching an additional device to your computer is a two-step process: first, you physically connect the
device, such as a terminal or printer, to the computer; second, you define the device to the operating
system as shown in the next chapter.
Your PC owner’s manual and/or the documentation provided with the device describes how to install
each PC hardware device, such as a printer or a tape drive. In general, for any device you want to use
from both WINDOWS and AMOS, you should perform and test the WINDOWS installation before you
define it to AMOS.
If you want to attach additional serial terminals for AMOS use only, refer to Appendix F, The
SuperFalcon On-Board Serial Ports for pin-out and cabling information.
SuperFalcon Owner’s Manual, Revision 03
Chapter 3 - Configuring
the AMPC Software
After you have installed both the SuperFalcon board and AMPC 6.0 operating system software, you are
ready to begin tailoring the AMPC software to your specific system requirements.
In this chapter you learn how to:
• Configure the AMPC software using the AMPC configuration screens.
• Enter your AMOS Product Installation Code (PIC).
CONFIGURING THE AMPC SOFTWARE
1. Now that you’ve installed the AMPC software and SuperFalcon hardware, you should see the
AMPC 6.0 shortcut on your desktop. Before executing the shortcut to launch AMPC in the
normal fashion, you will need to configure AMPC to your specifications. To do that, go to the
Task bar, Start button, Programs, and locate AMPC 6.0 in the Program list. Choose Configure to
bring up the AMPC 6.0 Configuration Window. You will step through each tab in the remainder
of this section to initially configure the AMPC 6.0 product.
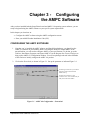
2. Click on the General tab, as shown in Figure 3-1. Set up the parameter as indicated Figure 3-1.
Click the upper check box if you want the
diagnostic window minimized when
AMPC starts up.
Click the lower check box to get a
“confirm on exit” screen to insure that you
really want to shut down AMPC.
Figure 3-1 – AMPC 6.0 Configuration – General tab
SuperFalcon Owner’s Manual, Revision 03
Page 3-2
3.
Chapter Three
Now click on the AMOS Disks tab. When AMPC 6.0 was installed, the standard system disk
(DSK) was created as a three logical dynamic disk structure, initially about 32 MB each in size.
The size of the physical disk file grows only as required as data is written to the disk.
Additional disk subsystems may be defined, as shown in Figure 3-2.
Up to nine additional disk subsystems can be
defined. You can either define your own disk
files using the Create button, or select other
existing disk files using the Browse button.
Using the Create button, you can specify either
dynamic or fixed (recommended) disk types, and
specify the number of logicals for the disk, the
size of each logical drive up to a maximum of
2GB, and the blocking factor.
If you are upgrading from a previous version of
AMPC, all of your former .dsk files can be
entered as subsystem disks. Browse your
previous AMPC directory (AMPC42 if you
renamed it that from instructions earlier in this
section) and select the appropriate .DSK files.
Figure 3-2 – AMOS Disks tab
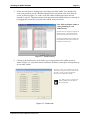
4.
Next, click on the Virtual Terminals tab. You can define up to eight virtual terminal windows,
depending upon your software license, using either terminal emulator that comes with AMPC
6.0. Figure 3-3 shows the screen used to set up these virtual terminals.
AmpcLiTE is a version of the AlphaLAN LiTE
terminal emulator
AmpcTerm is a version of the ZTERM terminal
emulator
On-line help is available for both terminal
emulators
Note: Each virtual terminal counts
as a user pertaining to your
AMOS license.
Figure 3-3 – Virtual Terminals tab
SuperFalcon Owner’s Manual, Revision 03
Installing the AMPC Software
5.
Page 3-3
Define the serial ports by clicking on the Serial Ports tab. When AMPC 6.0 is installed, the
serial ports present on your PC should be identified in the left portion of the Serial Ports tab
screen, as shown in Figure 3-4. A red x in the left window indicates these ports were not
detected on your PC. The detected ports can be associated with AMOS serial ports 1 through 16
by dragging the selected PC serial port to the AMOS serial port desired.
Note: Each serial port counts as
a user pertaining to your
AMOS license.
Note that when a PC serial port is mapped to an
AMOS serial port, a yellow double-headed
arrow replaces the green check and /or red x.
To unassign an AMOS serial port, simply drag
the double headed arrow from the right to the
left Windows box and drop it.
Figure 3-4 – Serial Ports tab
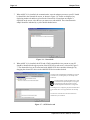
6.
Clicking on the Printers tab, you can define up to sixteen printers to the AMOS system as
shown in Figure 3-5. All printers must be installed as Windows printers prior to setting them up
for use under AMOS.
The "LPT1", "LPT2", etc., "Parameters" here have no
relationship to the physical LPT ports on the host PC.
The "LPT1", "LPT2", etc. here provide logical
references for the AMOS side of AMPC.
See “Adding a Printer” in Chapter 4 for
details on AMOS mode and Windows
Mode configuration.
Figure 3-5 – Printers tab
SuperFalcon Owner’s Manual, Revision 03
Page 3-4
7.
Chapter Three
When AMPC 6.0 is installed, the communication / network adapters present on your PC should
be identified in the Network tab screen, as shown in Figure 3-6. If none are displayed, try
displaying another tab and then go back to the Network tab. If more than one adapter is
displayed on the screen, select the one you want to use with AMOS. The selected network
adapter should be indicated by a yellow double-headed arrow.
Figure 3-6 – Network tab
8.
When AMPC 6.0 is installed, the SCSI and ATAPI compatible devices present on your PC
should be identified in the upper portion of the SCSI Devices tab screen, as shown in Figure 37. The detected devices can be associated with AMOS SCSI device numbers 0 through 6 by
dragging the selected PC device to the AMOS SCSI device number desired.
Note that ATAPI compatible IDE CD-ROM drives are listed
as SCSI devices, even though they are not actually on the
SCSI chain.
Even though other ATAPI compatible devices, such
as disk drives and Tape Backup drives, may appear
in the SCSI and ATAPI devices listed, only the
ATAPI compatible CD-ROM device is supported.
To unassign a device, simply drag the yellow double-headed
arrow from the lower to the upper Windows box and drop
it.
The devices do not need to have the same addresses in
AMOS as they do in Windows.
Figure 3-7 – SCSI Devices tab
SuperFalcon Owner’s Manual, Revision 03
Installing the AMPC Software
9.
Page 3-5
After setting up all the above configuration screens, click OK. Then, make sure to shut down
and restart your PC in order for the new settings to be activated.
BOOTING AMOS
Now that you have configured AMPC, you can boot AMOS by double-clicking on the new AMPC icon
on your desktop.
As you boot AMOS, you see the AMOS system diagnostics windows appear, followed by the console
screen, utilizing the terminal emulation software you selected in the previous section displaying the
AMOS system configuration information. Be patient. The initial boot can take quite awhile.
ENABLING MULTIPLE AMOS USERS (INSTALLING THE AMOS PIC)
So far, you’ve been using AMOS in single-user mode. To enable multiple users, you need to enter the
Product Installation Code (PIC). The PIC is coded to your specific SuperFalcon board. The standard PIC
to allow four AMOS users with your board is included with SuperFalcon. If you want additional users,
please contact your Alpha Micro dealer.
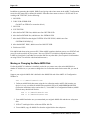
To enter the PIC, from AMOS command level, type:
INSTPC
ENTER
This displays a prompt requesting your PIC, as shown in Figure 3-8. Type it in, being sure to use the
correct capitalization and include the “-” between the 4 sets of 5 characters, and press ENTER .
The next prompt asks you to confirm that you want to install AMOS using this PIC. Check your entry,
and if it’s correct, type Y ENTER . This enables multiple AMOS users. (Note that the PC console counts
as one AMOS user, and each additional virtual terminal counts as an AMOS user.)
SuperFalcon Owner’s Manual, Revision 03
Page 3-6
Chapter Three
Figure 3-8 – PIC Code Installation Screen
Reboot to verify that the new PIC code properly comes up with the proper amount of port licenses. At the
AMOS dot prompt, log into SYS: and type INSTPC/P to determine the number of simultaneous AMOS
users authorized.
CUSTOMIZING YOUR AMOS32.INI FILE
Edit the AMOS32.INI file (or your old .INI file or one of the pre-canned .INI files supplied with the
AMPC release) as necessary to make further modifications to your installed AMOS system. See Chapter
4 for additional information on editing and testing your .INI files as well as information on how to boot
from different .INI files and / or AMOS monitors.
For network operation, you will need to change the network ID and IP addresses to match your specific
network configuration and parameters. See Chapter 4 for further information.
MODIFYING THE ON-BOARD CMOS SETUP CONFIGURATION
SETTINGS
When booting, the SuperFalcon uses data stored in its on-board CMOS Setup parameters to find the
primary and alternate boot devices, the system monitor and initialization files to use (unless the boot
device is the normal PCI interface), and other system options. The data is stored in a non-volatile CMOS
memory circuit on the SuperFalcon board.
SuperFalcon Owner’s Manual, Revision 03
Installing the AMPC Software
Page 3-7
You can change the CMOS configuration even if you can’t boot the SuperFalcon under AMOS. This can
be very useful in case of certain system problems.
See Appendix G for details on modifying the SuperFalcon CMOS Setup configuration settings.
ENABLING FUNCTION KEY TRANSLATION
Both terminal emulators, ZTERM and LiTE, included in AMPC 6.0 and later have function key support.
Refer to the on-line help information provided with each emulation for information on function key
support.
WHAT NEXT?
AMOS should now be now up and running. Chapter 5 tells you how to switch between AMOS and
Windows. Chapter 6 contains information on basic AMOS procedures, such as how AMOS files are
organized, using the printer, and disk diagnostic procedures. Chapter 7 contains information on
transferring files between AMOS and WINDOWS.
Before you move on, however, you should go to Chapter 4 if you want to:
• Change or customize your AMOS configuration
• Add terminals.
• Connect a printer.
• Change virtual terminal emulations.
• Define an AMOS disk subsystem.
• Change the AMOS disk allocation or location.
• Use a SCSI device.
• Create or modify system .INIs and boot from them.
SuperFalcon Owner’s Manual, Revision 03
Chapter 4 -
Modifying the AMOS
Configuration
This chapter discusses how to modify the AMOS system to:
• Boot using various customized desktop icons and .INI and/or .MON files.
• Define an AMOS disk subsystem.
• Customize your network configuration files for your specific network.
• Define I/O ports.
• Define terminals and jobs.
• Define a printer to AMOS.
• Change the parameters of an AMOS disk file.
• Allow AMOS to use SCSI disk drives, tape drives, and other devices.
BOOTING AMOS FROM ALTERNATE .INI FILES AND / OR .MON FILES
You can boot AMOS on the SuperFalcon board utilizing other .INI files and / or .MON files that you
have generated simply by creating additional icons on your Windows desktop.
Several pre-configured .INI files are included in the AMPC 6.0 release, and you can easily create
you own versions by modifying any of these pre-configured .INI files, as discussed later in this
chapter.
The .INI files can reside in the AMOS file structure in SYS:, or in the Windows file structure in the
AMPC60 folder. Use the following procedure to create the additional desktop icons:
1.
Right click your mouse on the Windows desktop, and select New and Shortcut.
2.
Click the browse button and locate your AMPC60 folder. Within that folder, click on
AMPC60.exe, then click Open. Depending upon how you installed AMPC 6.0, your shortcut
command line should read something like C:\AMPC60\Ampc60.exe.
3.
To specify an alternate .INI file to boot AMOS from, edit the command line to add either a /I or /L
switch followed by the name of the .INI file. A typical shortcut command line to boot AMOS from
TEST.INI would appear as:
C:\AMPC60\AMPC60.EXE /I:TEST.INI /B
where:
/B forces the SuperFalcon through a hardware reset.
/I indicates the .INI file is on DSK0:[1,4] under AMOS, or
/L indicates the .INI file in the AMPC60 folder in the Windows disk structure.
TEST.INI is the name of the file you want to use to boot AMOS.
SuperFalcon Owner’s Manual, Revision 03
Page 4-2
Chapter Four
If no /I or /L switch is specified, the AMOS32.INI is used in the boot process.
Other AMPC60.EXE command switches you can use are:
/C brings up the AMPC 6.0 configuration screen only, and does not execute AMOS.
/M allows you to specify an alternate .MON file that you have already created and
want to use in the booting process. If no /M switch is specified, the default
AMOS32.MON file is used in the booting process.
/T enables trace in the trace window for diagnostic purposes.
Trace will eventually consume all of Windows' memory and cause Windows
programs to shutdown automatically.
To specify an alternate .MON file that you have already created on the PC side and want to use in
the booting process, use the /M switch as follows:
C:\AMPC60\AMPC60.EXE /M:AMOS2.MON /I:TEST.INI /B
Make sure you put a space before each /, as shown in the example above.
4.
Click Next, then specify the icon name for your desktop icon to launch AMOS using your new .INI
file, such as Test.ini.
5.
Click Finish and your new icon should appear on your desktop. If you want to change the
appearance of the icon, right click on the icon, click on Properties, then click on Change Icon.
Click the Browse button in the Change Icon window, and navigate to the AMPC60 folder. Open
the AMPC60 folder and double click on AMPC60.EXE. Several AMPC icons should appear.
Select one, click OK and your new icon should be set up.
6.
Simply double click this icon each time you want to boot AMOS using your specified .INI file and
/ or .MON file.
7.
Make sure you test your new or modified .INI file or .MON file as described later in this chapter to
insure that the .INI file or .MON file works the way you intend it to work.
EASY CONFIGURATION SCREEN CHANGES
If you want to be able to easily change AMOS configuration settings without booting AMOS, select the
Configure item in Start | Programs | AMPC 6.0. You can also create a shortcut of this on your desktop or
Start menu by right clicking it, dragging it to where you want it, and selecting "Create shortcut(s) here"
when you drop it.
This shortcut uses the /C option described above, for example:
C:\AMPC60\AMPC60.EXE /C
SuperFalcon Owner’s Manual, Revision 03
Modifying the AMOS Configuration
Page 4-3
The /C switch brings up the AMPC configuration window, allowing you to easily change any
configuration information contained in the configuration tabs without booting AMOS.
MODIFYING PRE-CONFIGURED NETWORK CONFIGURATION FILES
AMPC 6.0 comes configured for network operation, but the network parameters must be modified for
your specific network. Before booting a network-enabling configuration, make the following changes to
the network configuration files contained in the TCP: account:
Depending upon your complete network configuration, other AMOS files may need to be updated,
in addition to the files listed below. Consult the AMOS TCP documentation for additional details.
1. If your network is actively using AlphaNET features, use VUE to modify the ETH101.NIN to
reflect your AlphaNET settings. (If you do not know, then just leave it as is for now.)
2. Log to TCP: from the AMOS prompt.
3. Using VUE, update the following files as indicated below:
a.
NETWRK.
update the Ethernet entry to reflect your network IP address. This
IP address must be distinct from the host PC's Windows IP address.
b.
CONFIG.
update the route IP address at the end of the file to reflect your
router IP address. If you changed the AlphaNET network number in
SYS:ETH101.NIN from 101, the make the same change to the 101
in the "ifconfig ec0 101 arpa 100" line.
c.
MYNAME.
update the entry to reflect your fully qualified Internet domain
name.
d.
RESOLV.
update the desired default Internet domain and nameserver (DNS)
entries to your particular configuration. If you are going to use
HOSTS. as well, then remove the "#" from the " #tryhostfile" line.
If you are NOT using DNS, then ERASE this file!
e.
FTPUSR.
change the pre-configured user names and passwords for FTP
access.
f.
HOSTS.
change the hostname information to reflect your particular
installation. You do not need the HOSTS. file if you are using just
DNS (see d: RESOLV. above).
g.
TIMZON.
adjust the parameters for your local time zone.
4. Log to SYS: and VUE the ETH101.ERZ file. Add any ersatz names for your installation.
5. If you do not have your own network-enabling .INI file, we recommend you use the MIKE.INI,
FULNET.INI, or AMPCAB.INI (Metropolis users) or a modified version of one of these as a
TEST.INI.
6. Shut down the system and then reboot with your network-enabling .INI file.
SuperFalcon Owner’s Manual, Revision 03
Page 4-4
Chapter Four
THE SYSTEM INITIALIZATION FILE DETAILS
The AMOS system initialization file is a special file in account DSK0:[1,4]. On your computer, it’s
called AMOS32.INI, (although other custom .INI files can be set up and used), and we often refer to it
simply as the system .INI file. The system .INI file defines to AMOS all the hardware connected to your
computer and allows you to customize your system to make its operation more convenient and efficient.
When you boot AMOS, the computer consults the specified system .INI file in order to build the
operating system in memory and customize it for your particular hardware. As AMOS boots, each line of
the specified system .INI file displays on the PC console as the computer processes it.
Besides defining the hardware attached to the computer, some of the things your system initialization file
can do are:
• Define a Task Manager system that automates complicated and time-consuming tasks, and
schedules them to run at preset times.
• Set up additional jobs to perform background tasks without tying up your terminal.
• Define print spooler queues to simplify printer use and schedule print requests.
• Optimize system memory use by loading programs into system memory so multiple users can
access the same software without loading it into their area of memory.
• Automatically run software each time you boot AMOS.
• Change user memory allocations.
• Set up and initialize networking access.
It is impossible for us to explain here all the things you can make the system initialization file do. See the
AMOS System Operator’s Guide to the System Initialization Command File for more information.
Never modify the actual system initialization file your computer uses to boot because if you make
a mistake, it’s cumbersome to fix it. It is much safer and easier to make a test copy of the file,
and modify the copy.
With AMOS active, type these commands to make and begin editing the test copy:
LOG SYS: ENTER
COPY TEST.INI=AMOS32.INI
VUE TEST.INI ENTER
ENTER
The TEST.INI file now appears on your screen.
To edit the system .INI file...
you need to use AlphaVUE, Alpha Micro’s text
editor. While AlphaVUE is easy to use, you may
want to refer to the AlphaVUE User’s Guide if
you are unfamiliar with it.
For the most part, this chapter shows you how to
enable already defined configurations. If you
need to do something not provided for in the
supplied system .INI file, you will need to know
more about the system .INI file than we can explain here. See the AMOS System Operator’s Guide and
the AMOS System Operator’s Guide to the System Initialization Command File for more information.
SuperFalcon Owner’s Manual, Revision 03
Modifying the AMOS Configuration
Page 4-5
Your system .INI file contains standard definitions for most of the terminals and printers you are likely to
want to connect to your PC. These definitions have been deactivated by placing a single semicolon at the
front of the line. To activate these definitions, you delete the semicolon.
We suggest you enable only a single item at a time, then test the file to make sure your changes are
correct.
TESTING YOUR NEW OR MODIFIED INITIALIZATION FILE
When AMOS boots, it uses the .INI and .MON files
you have specified in the shortcut command line
you are launching AMOS with, as described in the
previous section. If you are using the standard
unmodified AMPC 6.0 icon, the default files
AMOS32.INI and AMOS32.MON will be used.
Before you reboot...
Any time you plan to reboot AMOS you
must warn everyone using the computer and
give them time to finish their current task.
Also, allow all print jobs to complete. If
someone has entered data or typed text or
program code without saving it onto the
disk, it is lost when you reboot.
Typically, you will want to customize the .INI file
you use so that it is tailored to your specific
configuration. AMPC 6.0 includes several different .INI files that can be used as the basis for your
permanent .INI file. Choose one that is close to your final requirements, such as FULL.INI for nonnetworked configurations, or FULNET.INI or MIKE.INI for networked configurations.
The next step is to test the selected .INI file to make sure AMOS can boot using it. To test a system
initialization file, create a desktop icon as described near the beginning of this chapter and specify your
desired test .INI file in the shortcut command line.
Double click the in test icon and watch the PC screen to check that AMOS boots correctly. If you see any
messages that begin with a question mark or a percent symbol, an error has occurred. Or, if the boot does
not finish (the last statement on the display should be MEMORY 0), a problem has occurred. Contact
your Alpha Micro dealer for help if you encounter difficulties.
If AMOS boots correctly, go back and make any modifications to this .INI file required for your specific
system configuration. Each time you modify the .INI file, make sure you go back and test the AMOS
booting process to make sure you have made the desired changes correctly.
To see if AMOS recognizes any new devices you have enabled, type:
SYSTAT
ENTER
The resulting display lists all the jobs defined on the system, the terminals they’re attached to, and the
amount of memory they have. You will also see the disk devices defined. Use AMOS for awhile and
when you are convinced it is performing up to your expectations, you can make the test system .INI file
your standard system .INI file.
If your SuperFalcon does not boot successfully when you launch AMPC 6.0 using a specific desktop
icon, you can still reboot using another desktop icon with an unmodified .INI file.
SuperFalcon Owner’s Manual, Revision 03
Page 4-6
Chapter Four
If you receive this message during a AMOS boot:
Exceeds maximum number of terminals allowed
you are trying to add more terminals than your AMOS license allows. Check the Software License
Agreement message that displays when AMOS boots to determine the number of terminals your
computer can accept.
ADDING A TERMINAL
When you attach a terminal to your PC to use from AMOS, you need to define it in your system .INI file.
This section tells you how to define a terminal to AMOS, attach a job to it, and adjust the job’s memory
allocation.
First, make a TEST.INI file and edit it as described above.
There are several TRMDEF statements in the sample system initialization file. Each TRMDEF statement
defines a terminal or printer attached to a specific serial port.
Here’s the format of the TRMDEF statement:
TRMDEF term,interface=n:baud,term-driver,200,200,200,EDITOR=5
Here’s what each part of the TRMDEF statement means:
TRMDEF
Identifies this as a terminal definition statement.
term
The terminal name. You can give a terminal any descriptive name of up to six
letters or numbers.
interface
The interface driver name, which tells AMOS how to send and receive data,
usually reflecting the hardware used. Use PCVTM for the "virtual terminal" main
console, PCCOM for serial ports COM1-COM4, and A31810 for the four serial
ports on the SuperFalcon board. If defining a Windows printer of ANY type (see
“Adding a Printer,” below), use the PCLPT interface driver.
=n
The octal port number, which tells AMOS which port on the hardware device the
terminal is attached to. For PCCOM, specify 1-4 for COM1 through COM4. For
A31810 (on-board SuperFalcon serial ports), specify 0 through 3 for all the onboard serial ports. If defining a Windows printer (see “Adding a Printer,” below),
use the PCLPT interface driver and ports 0-7 and 10-17 (16 total).
:baud
The port’s baud rate. This must match the baud rate the terminal is set to. The
maximum baud rate is 57,600 for the four on-board SuperFalcon serial ports and
19,200 for COM1-COM4. For the Windows printer (PCLPT ) ports and Virtual
Terminals, do not specify the baud rate and leave the colon out. Always use the
colon separator when entering the baud rate.
term-driver
The software terminal driver. The terminal driver tells AMOS what type of
terminal is attached to the port. The driver for other terminals depends on the
SuperFalcon Owner’s Manual, Revision 03
Modifying the AMOS Configuration
Page 4-7
terminal type.
200,200,200
Input and output buffer sizes. The values shown are typical for terminals. Most
printers use a smaller value.
EDITOR=5
Specifies the number of lines of typed-in commands the line editor can recall and
modify.
Activate the TRMDEF statement that matches the port you want to connect the terminal to by removing
the semicolon in front of it. Make sure the terminal name and the interface/port number pair do not
duplicate entries in existing TRMDEF statements.
Before you can actually use the terminal, you need to activate other statements to attach a job to it, as
described in the next section.
Attaching a Job to the Terminal
The terminal defined in the first TRMDEF statement and the first job in the JOBALC statement are
automatically attached to each other. These statements define the terminal and job for your PC
consolethe other terminals connected to your PC must be explicitly attached to their respective jobs.
In your TEST.INI, find a statement that begins with SETJOB and refers to the terminal name you
activated. For example, if you have enabled the TRMDEF for terminal COM1, look for this line:
SETJOB COM1,COM1,32K, VER
This statement attaches job COM1 to the terminal COM1, assigns 32KB of memory to the job, and runs
the VER program on the terminal when AMOS boots. To increase the amount of memory you require,
simply change the 32K to a larger number.
To enable the job you want, remove the semicolon at the beginning of the line.
Assigning Memory to Jobs
Under AMOS, you must assign each job an amount of memory to use as workspace; this area is called
the job’s memory partition. Each job’s partition is taken from the total amount of memory available to
AMOSwith SuperFalcon, this total amount may be from 32 MB to 128 MB. Memory is used by many
things:
1. The size of the core system monitor (AMOSL.MON) and its required workspace.
2. The number and features of the terminals, jobs, devices, buffers, internal processes, etc.
dynamically defined prior to the first SYSTEM statement in the .INI file. If defined, this includes
the memory needed for a flash and/or ram disk.
3. The total size of programs and other files loaded in system memory using the SYSTEM
statements. A significant amount will typically be assigned as a disk (DCACHE) buffer.
4. The dynamic system memory, defined as SMEM, will also typically be very large.
5. The background processes started during the last half of the .INI execution, typically including
the task manager, spooler(s), TCP/IP (TCPEMU), various loggers, etc.
SuperFalcon Owner’s Manual, Revision 03
Page 4-8
Chapter Four
6. The pre-defined user jobs.
To determine how much memory is not assigned to the above when you are not in the VUE editor: From
the booting console job, enter MEMORY 0 then MEMORY 200M. The amount assigned to that job is
the largest chunk, and usually the total, uncommitted memory.
As a general rule, you want to give each job enough memory to run any program it may need to, but no
more. This preserves as much memory as possible for other users. On the other hand, it does no good to
give each terminal only a small amount of memory, and end up with the PC console getting much more
than it needs.
Once you’ve assigned the amount of memory you want to each job, leave AlphaVUE and test the
TEST.INI file as described earlier in this Chapter.
ADDING A PRINTER
With AMPC, it is possible to use any printer that Windows uses, as well as most traditional AMOS
printers. Traditional AMOS serial and AlphaTCP LPR network printers are defined as on any other
AMOS system and are NOT covered in this section.
Using Windows Printers
Windows printers include any printer Windows can use: Windows network printers, USB printer,
parallel, serial, etc. These printers can be used for AMOS in two different modes (up to 8 each): AMOS
Mode and Windows Mode. As AMPC uses the Windows printing facilities for access, these printers can
usually be transparently shared between AMOS applications and Windows applications.
Before a Windows printer can be used by AMPC, it must be fully installed and tested from the Windows
side. If it will not work for Windows applications, it cannot be used by AMPC as a Windows printer.
A large number of processes must work together for this printing to work correctly. These are tied
together by logical names, link by link. Many installations use the same logical name for all of the links,
thus reducing installation issues, and we have done so in the actual examples in AMPC release. An
example of this is using the name "lpt1" for all of the links. Others use names that seem appropriate for
that specific process in the chain, such as the printer model, application, location, etc. In these examples
we have used different names for each of these logical links so that you can see the name (and functional)
interdependencies and trouble-shoot problems.
This LPT is NOT the same as the host PC's parallel ports, usually referenced as LPT. (DO NOT GET
THE TWO CONFUSED!)
AMOS Mode Printers (LPT1 through LPT8)
In traditional AMOS printing, each and only each character in the spooled print file is transmitted to the
physical printer. When an application prepares that file, either directly or using an AMOS printer driver
(.PDV), printer hardware specific codes are put into the file.
SuperFalcon Owner’s Manual, Revision 03
Modifying the AMOS Configuration
Page 4-9
To do this with Windows printers, AMPC must let Windows handle the printer (so it can be used for
other things) but keep Windows from changing any byte of data. The first 8 printers, labeled "AMOS
Mode" do this task. You still must define such things as the Windows printer and font information
(which is ignored for the AMOS Mode: LPT1 through LPT8) in the AMPC Configuration, Printers
section (section 3, item 6).
Windows Mode Printers (LPT9 through LPT16)
"Windows Mode" printers use the Windows printer settings defined in the AMPC Configuration, Printers
section (section 3, item 6). When defining these, the font, point size, etc. must be defined. The defined
font, point size, etc. will be used for all text sent from AMOS.
Because each AMPC LPT9-LPT16 configuration also includes the Windows font, the SAME Windows
printer could have multiple LPTx references. For example, AMPC might be configured to use a network
laser printer as LPT1 for Times Roman 10 for letter printing and the same printer as LPT10 for Arial 8
for condensed printing (and again as LPT1 for "AMOS Mode" printing).
Defining Windows Printers in the AMOS .INI file
For each Windows printer configured for AMPC, activate (or add) the appropriate TRMDEF in the line
in the TEST.INI file:
TRMDEF ptr1,PCLPT=1,TELTYP,100,100,100
The "PCLPT=1" matches the LPT1 in the AMPC Configuration, Printers section. PCLPT=2 matches
LPT2, etc. The name given on the TRMDEF line, such as "ptr9" above could be replaced with "Times"
and a "ptr10" with "Conden". Just keep it at six or less characters.
Now skip the next section, "Using Serial Printers" and go to "Setting Up The AMOS Spoolers"
Using Serial Printers
Each serial printer may be defined in either of two distinct ways:
1. As a Windows printer, generally shared with both AMOS and Windows applications. The Windows
configuration of these printers might cause problems with some AMOS applications, or
2. As an AMOS only serial printer. If it is defined as an AMOS serial printer:
• Windows applications cannot directly use it.
• It will consume one AMOS user license.
To define it as a Windows printer, make sure the COM port it is using IS NOT configured for AMPC to
use in the AMPC Configuration, Serial Ports tab (see Chapter 3, "Finishing the Installation and
Configuring AMPC"). Then go to the preceding section, "Using Windows Printers".
SuperFalcon Owner’s Manual, Revision 03
Page 4-10
Chapter Four
As an AMOS only serial printer, it can be plugged into one of the SuperFalcon serial ports or into one of
the host PC's COM ports.
For AMOS only serial printers, if you are using a PC COM port, make sure the COM port IS configured
for AMPC in the AMPC Configuration, Serial Ports tab (see Chapter 3, "Finishing the Installation and
Configuring AMPC"). In the .INI file change the appropriate TRMDEF for that COM port to use the
TELTYP terminal driver, and remove the EDITOR statement. Change the baud rate to one appropriate
for your printer.
If you are using a SuperFalcon port, in the .INI file change the appropriate TRMDEF for that FAL port to
use the TELTYP terminal driver, and remove the EDITOR statement. Change the baud rate to one
appropriate for your printer.
Setting Up The AMOS Spoolers
The print spooler is one or more background
processes that handle the transferring of print
files to the printing device driver. Print "jobs"
can be queued with a spooler by applications or
by the AMOS PRINT command. AMOS offers
three types of print spoolers. For this example
we will illustrate the original version which is
simply a background job for each spooler. The
job will need a terminal to get the spooler
started, followed later by the actual start up
command:
Which print spooler?
AMOS offers three different print spoolers. The
FULL.INI file enables the memory-based spooler. If
you want to use the task manager spooler, or for more
information about the memory-based spooler, refer to
the AMOS System Operator’s Guide. If you wish to use
the spawning task manager spooler, also refer to the
Spawning Task Manager Spooler Information Sheet.
JOBALC spool1
NOTE: The first two lines are
much earlier in the file than the
third.
TRMDEF dummy,PSEUDO,NULL,100,100,100
...
SETJOB spool1,dummy,10K,LPTINI letter.pin
In the above example, the names in lower case are arbitrary, but must match other specific names. The
"spool1" must match a JOBALC statement. "dummy" in SETJOB must match "dummy" in the
TRMDEF statement, and "letter.pin" must be the name of the printer initialization file for this printer.
Exit the AlphaVUE text editor.
Before you can use your printer, you need to create a printer initialization file for it. This is the
"letter.pin" file referred to in the last line above. See your AMOS System Operator’s Guide for a
description of this file, which tells AMOS the characteristics of your printer.
Create the necessary printer initialization file (.PIN) using VUE. Here is a sample "letter.pin" file:
DEVICE = TRM:ptr1
NAME = print1
DEFAULT= FALSE
OPERATOR = CON1
SuperFalcon Owner’s Manual, Revision 03
Modifying the AMOS Configuration
Page 4-11
FORMFEED = TRUE
FORMS = NORMAL
BANNER = FALSE
HEADER = FALSE
LPP = 60
WIDTH = 80
The "DEVICE = TRM:ptr1" is the connection to the TRMDEF for the printer; either the Windows
printer illustrated earlier or a TRMDEF for a serial printer.
Test the TEST.INI file as described in the section “Finishing Up.” Test the spooler installation with the
command (using your names): PRINT print1=test.INI.
DEFINE AN AMOS DISK SUBSYSTEM
A Note on AMOS Disk Files
When you make a new AMOS disk file, you choose
how large to make it (up to a maximum of 2GB),
how many logical devices it will contain (e.g.,
SUB1:, SUB2:, and SUB3:), and how it will be
allocated on the disk:
If you have more than one logical drive…
Each AMOS disk file must be on a single PC
partition. It cannot span multiple partitions nor
drives. Different AMOS disk files can be on
different PC partitions.
• Fixed Allocation Mode. The size of the PC file allocated is equal to the size of the AMOS disk
desired. For example, a 250MB AMOS disk requires 250MB of free space on the PC hard disk.
• Dynamic Allocation Mode allows the AMOS disk file to grow. When you set up an AMOS
disk, you specify its maximum size, but only a fraction of that space is initially used. As more
AMOS disk writes are made to blocks that have not been written to before, the PC file grows.
This technique is transparent to the AMOS software. The more you do under AMOS, the more
space you use on the PC. Dynamic allocation adds a 10 to 15 percent overhead to all disk
operations, so results in slower AMOS operation than when fixed allocation is used. See the
section “Dynamic Allocation Warning,” below, for some cautions to keep in mind if you use
dynamic allocation.
We strongly recommend using the Fixed Allocation Mode. This gives better performance and
reduces the possible problems. AMOS disk requirements are so small compared to the smallest
disks available today, the expense should no longer be an issue. (And the expense of recovering
from some of these problems far exceeds the cost of the space.) Keep the original AMPC60.DSK
as an emergency backup.
Generating an AMOS Disk
The AMOS Disk Creation utility, accessed from the AMPC Configuration screen shown in Figure 3-2, is
used to set up AMOS disks. Follow the instructions in Chapter 3 to set up additional AMOS disks.
SuperFalcon Owner’s Manual, Revision 03
Page 4-12
Chapter Four
In addition to generating the AMOS .DSK file and giving a three letter name in the AMPC Configuration
screen, the disk must also be defined for AMOS. If the three letter name we chose is "SUB" and we are
working with "TEST.INI", do the following:
1. LOG DVR:
2. COPY SUB=PCDSK.DVR
(Do NOT use FIXLOG to create the driver!)
3. LOG SYS:
4. VUE TEST.INI
5. After the first DEVTBL line, add this new line: DEVTBL SUB
6. After the first BITMAP line, add this new line: BITMAP SUB
7. After the SYSTEM line that begins SYSTEM DCACHE.SYS/N, add this new line:
SYSTEM SUB.DVR[1,6]
8. After the MOUNT DSK:, add this new line: MOUNT SUB:
9. Finish out of VUE.
Exit AMOS and reboot using your test.INI. When AMOS completes the boot process, run SYSTAT and
you will see the new disk on your system. Now use SYSACT to initialize it and add accounts, then
LABEL to clean block 0, and otherwise treat the disk like any other disk. (See Chapter 6 for information
on using SYSACT to initialize a disk and add accounts.)
Moving or Changing the Main AMOS Disk
If, after the AMPC 6.0 software is installed, you decide you want to move the main AMOS disk to
another PC disk device, or you want to change the size or allocation mode for the main disk, you can do
so.
Suppose your original AMOS disk is defined in the AMOS Disk tab of the AMPC 6.0 Configuration
Window as:
DSK => C:\AMPC60\AMPC60.DSK
1. Define an AMOS disk subsystem using the size, allocation mode, and PC disk location you
desire. Let’s say you define an AMOS subsystem disk SUB as D:\AMOSDISK\MAIN.DSK.
(Follow the instructions in the section above.) Your AMPC 6.0 Configuration Window (AMOS
Disk tab entry should look like this:
DSK => C:\AMPC60\AMPC60.DSK
SUB => D:\AMOSDISK\MAIN.DSK
2. Boot AMOS and make sure you mount both your original AMOS disk and the new subsystem
disk.
3. SYSACT each logical drive of the new SUBx: dsk file.
4. From AMOS, copy all AMOS files from the original disk to the subsystem:
SuperFalcon Owner’s Manual, Revision 03
Modifying the AMOS Configuration
COPY SUB0:=DSK0:[]*.*
COPY SUB1:=DSK1:[]*.*
.
.
.
Page 4-13
ENTER
ENTER
5. Edit the AMOS Disk tab screen to change the definition of the system DSK definition by
selecting the Browse button and point to your newly generated DSK file to be the main disk,
DSK, and delete the definition for the SUB disk. For example:
(
DSK => D:\AMOSDISK\MAIN.DSK)
delete SUB => D:\AMOSDISK\MAIN.DSK
Make sure you don’t have two DSK devices defined at the same time.
6. Now you can delete the original main disk if you want to, or you can create a subsystem driver
for it and make it a subsystem disk.
Disk Drivers For Building a New Monitor
When building a new monitor using the MONGEN program, you need to provide the proper disk
driver. For AMPC, the selection of the disk driver is different than for other AMOS based systems.
Make sure you specify PCI.DVR when using MONGEN with AMPC 6.0. See the AMOS System
Commands Reference Manual for details about using the MONGEN program.
Disk subsystem drivers should be created using the COPY command, NOT FIXLOG, as shown in the
following example:
•
COPY SUB=PCDSK.DVR
WHAT NEXT?
If you have made all the changes you want, and everything seems to be working well, you can go on to
the next chapter to start learning how to use AMOS.
If you want to see what else you can do in the system initialization file, refer to the AMOS System
Operator’s Guide to the System Initialization Command File for more information. If you need further
help, your Alpha Micro dealer can assist you.
SuperFalcon Owner’s Manual, Revision 03
Chapter 5 - Moving Between
Operating Systems
Once you have installed the SuperFalcon board and the AMPC software, you are ready to use AMOS on
your PC. In this chapter you learn how to:
• Use virtual terminals on the PC console.
• Call up AMOS from Windows.
• Switch between AMOS and Windows.
• Reboot AMOS without rebooting Windows.
USING VIRTUAL TERMINALS
You will find virtual terminals on the PC console very easy to use. Switching from one virtual terminal
to any other is just like switching from one Window to another. As you switch from one virtual terminal
to another, the processing continues for the task running on the virtual terminal you left.
As in any multi-tasking environment, be careful not to run conflicting tasks on multiple virtual
terminals. For example, don’t use one virtual terminal to run DSKANA to analyze the disk while
another virtual terminal is editing a file on that disk, or you may damage one or many files.
See Chapter 3 for more information on setting up virtual terminals and choosing the terminal emulations
they use.
Calling Up AMOS After You Turn on the PC
When you boot your PC, you are normally at the Windows desktop, depending on how your PC is
configured.
To boot AMOS from Windows, double-click on one of the “AMPC” icons you have set up on your
desktop or Start menu.
The Alpha Micro banner and proprietary notice appear on your screen, followed by the system
initialization file. The last statement in the initialization file is MEMORY 0. Next you see the AMOS
system prompt (usually a dot). You can now log on to AMOS. Depending on how AMOS is set up, you
may be logged on and start an application automatically.
You cannot open more than one AMOS window. Attempting to do so will result in an error
message stating that AMPC60 is already running.
SuperFalcon Owner’s Manual, Revision 03
Page 5-2
Now that AMOS is up and
running, you can switch back
and forth between AMOS and
Windows at any time, just as
you switch between different
windows.
Chapter Five
To boot AMOS automatically...
If you want your PC to boot AMOS automatically whenever you turn it on
or restart Windows, move or copy the “Boot AMPC” icon into the Windows
Startup program group (typically: C:\Windows\Start
Menu\Programs\StartUp\). Then, whenever you bring up Windows, AMOS
boots also, and you are transferred to the AMOS prompt.
Switching Between AMOS and Windows
Once you’ve called up AMOS, you can switch between AMOS and Windows with just a keystroke. You
can use any standard method such as ALT / TAB , to activate another window.
Booting AMOS without Rebooting the PC
From time to time, you may want to reboot the AMOS operating system without rebooting the PC. You
do this the same way you boot AMOS for the first time after you turn on the PC.
Before you reboot, make sure all users have returned to the AMOS prompt, and AMOS has
finished writing to the disk. Rebooting before all files are closed can cause the same sorts of
problems as resetting your PC while Windows is still writing to the diskthat is, some or all of
your file data may be lost or program files damaged. Also, insure all network activity has stopped
before rebooting.
Once you have insured that all users have returned to the AMOS prompt, close the AMOS diagnostic
window. If the “confirm quitting AMPC 6.0” check box in the General tab of the Configuration screen
(Figure 3-1) has been marked, you will be asked to confirm the AMOS shutdown. Then, to boot AMOS,
double-click on the “Boot AMPC” icon or any other icon you may have set up for booting AMOS.
AMOS boots and an AMOS window opens.
SELECTING A SPECIFIC SYSTEM INITIALIZATION FILE
To boot with a specific AMOS initialization file, simply use the AMPC60.EXE /I: option by changing
the boot icon properties to include the following line:
AMPC60.EXE /I:ini-file; or
AMPC60.EXE /L:ini-file
ini-file is the initialization file (e.g. TEST.INI or AMOS32.INI) you want to use. You must specify the
file extension. Refer to Chapter 4, and your own AMOS32.INI file for examples of valid system
initialization files. The AMOS initialization file must exist under your boot disk [1,4] account if you used
the /I switch or in the AMPC6.0 folder under Windows if you used the /L switch.
SuperFalcon Owner’s Manual, Revision 03
Chapter 6 -
AMOS Overview
This chapter is a brief overview of the AMOS operating system. The topics and procedures it discusses
are:
• How AMOS recognizes the different devices on the computer.
• How you can organize your data into accounts under AMOS.
• User names and how to log on to AMOS.
• Safeguarding your data and maintaining your computer.
• What’s included with AMOS, and some of the optional software and documentation you can
order from your Alpha Micro dealer.
DEVICE NAMES
Device names are how AMOS identifies the different pieces of equipment that make up your computer.
Each disk drive and other storage device has its own device name.
Alpha Micro device names have a specific format to make it easy for you and the computer to refer to the
same piece of equipment. All device names contain three letters and a number, and end with a colon (:).
Having names for each device lets you specify which device you want to use for a specific command. For
example, you can see a list of files from just one of your disk drives, or copy data from your hard disk to
a streaming tape drive.
You can set up your computer to use the AMOS disk file as if it were two or more separate devices. In
this case, the AMOS disk file simulates a single disk drive, called the “physical device,” and each portion
of it is a “logical device.” This is an important distinction, since in most cases with AMOS you refer to
the logical device name. For example, a single disk could contain devices named DSK0:, DSK1: and
DSK2:. The logical devices making up a single physical drive always have the same three-letter name,
with different numbers, and are always the same size.
The disk device containing your AMOS32.INI file and other system software, the device AMOS “boots
from,” is always called DSK0:. This is the hard disk, or the first logical device on the hard disk. For more
information on device names and defining them in the system initialization file, see the AMOS System
Operator’s Guide and the AMOS System Operator’s Guide to the System Initialization Command File.
DISK ACCOUNTS
Theoretically, everyone could store their files on the disk without any type of organization. A list of all
the files—the system software, your application programs and data, memos, everything—would be at
least several pages long.
SuperFalcon Owner’s Manual, Revision 03
Page 6-2
Chapter Six
A better technique is to organize your files in separate disk accounts in which you store the files you
want together. A disk account is an arbitrary designation for a group of files. Your system software is
already organized into various accounts, and you can add as many or as few additional ones as you need.
Each disk account is identified by a two-part account number. The Hint for WINDOWS users…
two parts of the number are separated by a comma. Often, when
If you’re familiar with
you enter the number, you enclose it in brackets. For example,
WINDOWS, disk accounts are
these are valid account numbers: [1,2], [60,0], [60,100]. Account
the AMOS equivalents of
numbers are octal numbers, so you can’t use the digits 8 or 9. The WINDOWS directories.
highest possible account number is [377,376].The two-part
structure of the account number allows you another level of organization. Besides grouping files into
accounts, you can, if you want, group related accounts in the same project (that is, give them accounts
with the same first number). For example, all the accounts dealing with your payroll might be in project
50 ([50,0], [50,1] and so on).
To move from one account to another, use the LOG command, as described later in this chapter.
The account number list for each device on your system is separate, so you can have duplicate account
numbers on different disk devices. Therefore, to completely specify an account you may need to enter
both the device and account number. For example: DSK0:[7,12]. You have to enter the device name only
if the same account exists on more than one device.
You can see a list of the accounts on any device by using the PPN command. Type PPN followed by the
device name. For example:
PPN DSK1:
ENTER
You can see a list of the files in any account with the DIR command. For example:
DIR/W
ENTER
This command lists the files in the account you’re logged into. You’ll find more information on the PPN
and DIR commands in the AMOS User’s Guide.
Now that you have a general idea of what disk accounts are and how to use them, you can decide how
you want to organize your own files into accounts. If you want to create more accounts on your hard
disk, see the “Adding New Accounts” section later in this chapter.
Ersatz Names
If you find assigning and remembering account numbers cumbersome, you can define an “ersatz” name
for any account. You can then use the ersatz name instead of the account number whenever you refer to
that account. The file ERSATZ.INI in account [1,4] on DSK0: contains several predefined ersatz names,
and you can add more of your own if you wish. For example, one of the predefined ersatz account names
is OPR: for DSK0:[1,2]. So whenever you need to log to this account, you can type LOG OPR: instead
of LOG DSK0:[1,2]. The AMOS User’s Guide contains more information on ersatz names and how you
can use them.
SuperFalcon Owner’s Manual, Revision 03
AMOS Overview
Page 6-3
Passwords
You can assign a password to any account. A password is a mild security measure to prevent anyone
who doesn’t know it from logging into the account. Passwords do not prevent files from being copied
into or out of an account, and can be changed or erased using the SYSACT command described below.
Adding New Accounts
There is no specific number of accounts you must have—you can add as many as you wish from, [1,0] to
[377,376], as long as there is room on the disk. When your system is brand new, the only accounts you
have are the ones the system software is stored in. You may want to add more accounts from time to time
as your business grows.
To add a disk account, follow this procedure:
Log into the System Operator’s account:
ENTER
LOG OPR:
If you want to see a list of the disk devices on your computer, type SYSTAT and press
of the display lists the available disk devices.
ENTER .
The end
Type SYSACT followed by the name of the device you want to add the accounts to. For example:
SYSACT DSK1:
ENTER
SYSACT displays an asterisk (*) as its prompt. To see a list of SYSACT’s options, type H (for Help):
H
ENTER
To add a new account, type A and the account number. For example, to add [100,5], type:
A 100,5
ENTER
You now see
Password:
You can enter a password of up to six characters, or press ENTER if you don’t want to assign a password
to the account. If you enter a password, everyone who tries to log into the account has to type the
password before they can log in.
If you want to see a list of all the account numbers on the disk and their passwords, type L:
L
ENTER
When you are finished using SYSACT and are ready to return to AMOS, type:
E
ENTER
SuperFalcon Owner’s Manual, Revision 03
Page 6-4
Chapter Six
You exit SYSACT and the AMOS prompt symbol appears on your screen.
For complete information on using SYSACT, see the AMOS System Commands Reference Manual.
USER NAMES
Your user name is how you identify yourself to AMOS. The user name system helps you control system
security, allows you to send messages between users, and performs other functions.
You must enter your user name when you first log on to the computer, as described in the next section.
You do not have to re-enter your user name when you switch between disk accounts. There are normally
two user names set up when AMOS is installed: DEMO and SYSTEM SERVICE. You can define new
user names with the MUSER program.
For more information on user names, and instructions on adding new ones, see the AMOS System
Operator’s Guide.
LOGGING ON
The LOG command serves two purposes: it
identifies you to the computer and lets you
choose what disk account you want to
access. When you first log on to the
computer—either after logging off or after
booting the computer—you must tell the
computer who you are and what account
you want to use. You can do this by
entering the disk account you want. For
example:
LOG 25,1
Extra security…
You can assign passwords to both user names and
disk accounts. If the name or account you enter has
a password, AMOS asks you for the password
before logging you in. Once you’re logged on to the
computer, you use LOG to switch to a different
account. You don’t need to enter your user name
again, just the account you want. If the account has
a password assigned, you are asked for the password
before you transfer to the account.
ENTER
LOG then asks for your user name. Type it and press ENTER . You can also enter your user name in the
LOG command instead of an account number. This logs you into the root account defined when your
user name was set up. For example:
LOG LEE JOSEPH
ENTER
This logs you into Lee Joseph’s root account.
If you have duplicate account numbers on different disks, you need to enter both the device name and
account number to completely specify the account you want. For example:
LOG DSK0:7,12
ENTER
SuperFalcon Owner’s Manual, Revision 03
AMOS Overview
Page 6-5
You only have to enter the device name if the same account exists on more than one device. If the
account you enter does not exist, you see a message on your screen indicating you’ve typed an invalid
account number.
For more details about the LOG command, see the AMOS System Commands Reference Manual.
PROTECTING YOUR DATA
Your data is probably one of your most valuable possessions. Computers and data storage devices are
very reliable, but nobody can guard against an unforeseen occurrence like a power outage, spilled cup of
coffee, fire, or hardware malfunction. Such disaster can happen to anyone. So, no matter how smoothly
everything goes with your computer, please remember one important thing—safeguard your data! There
are two ways for you to do this: keep current backup copies of your data and run diagnostic checks to
make sure nothing is going wrong with your disk.
Whatever your backup device, learn to use it! Develop regular backup procedures and follow them. If
disaster strikes, you’ll be glad you had a little foresight. There are two ways to backup your data.
1. When AMPC is NOT running, all the .DSK files can be saved using any Windows backup
device, such as Tape, CD-ROM, Network Drive, DVD-ROM.
2. While AMPC is running, a SCSI device should be used like the Tandberg Streamer tape drive or
DAT tape drive.
To back up your system to tape, use MTUSAV. This command is described in the AMOS System
Commands Reference Manual.
Because both backup and the diagnostic procedures described below must usually be done when only one
job is accessing the disk, it is normally wise, and convenient, to run them when no one else wants to use
the computer—for example, in the middle of the night. You can do this by using the task manager or a
command file with the SLEEPR command. See the Task Manager User’s Manual or the AMOS System
Commands Reference Manual for information on using SLEEPR.
ANALYZING THE DISK
A disk diagnostic program reads data from a disk. If it cannot read an area of the disk, it reports the
problem to you. Checking your system frequently with disk diagnostic programs helps prevent data
loss—the sooner you catch a malfunction, the less data is likely to be affected.
The type of problem found by disk diagnostics is known as a “hard error,” because it means data is lost.
A “soft error” means the computer had trouble reading the data, but no data was lost. The disk diagnostic
programs discussed below do not report soft errors.
If a diagnostic program indicates problems, you may need to restore data from a backup copy or
reconstruct the data on the disk. If you have this type of problem, consult the section “Recovering From
Disk Errors” in the AMOS System Operator’s Guide.
SuperFalcon Owner’s Manual, Revision 03
Page 6-6
Chapter Six
Before running any of the disk diagnostic tests, especially if you suspect a problem, it is a good idea to
use the SET DSKERR command:
SET DSKERR
ENTER
SET DSKERR causes the system to report the location of any errors the diagnostic program finds. If you
don’t use SET DSKERR, the diagnostic tells you only that an error occurred, not where on the disk it
happened. You must run the diagnostic program from the same job where you used SET DSKERR.
The next two sections discuss two very useful diagnostic programs, REDALL and DSKANA. You can
find more information on disk diagnostic programs in the AMOS System Operator’s Guide and the
AMOS User’s Guide.
The REDALL Command
REDALL reads every block of data—or the number of blocks you choose—on the disk you specify, and
reports any hard errors. It does not alter the data on your disk.
It is a good idea to run REDALL for each disk on your PC occasionally, possibly once a week. That way,
if any disk problems develop, you can be sure of detecting them quickly.
To read all the blocks on a disk, enter REDALL followed by the device name of the disk you want to
read. For example:
REDALL DSK2:
ENTER
If you don’t want REDALL to read all blocks on the disk, follow the device name with the number of
blocks you want read, with no space between. This command reads the first 100 blocks of DSK2:
REDALL DSK2:100
ENTER
REDALL displays the number of blocks it is reading. For example:
REDALL DSK2: ENTER
Reading 13800 blocks
EXIT
REDALL ends when it finishes reading the blocks. If any errors occur, REDALL displays the appropriate
error message on your screen.
The DSKANA Command
The DSKANA command is an important part of your disk maintenance routine. DSKANA analyzes the
data on a disk and reports lost and mis-linked disk blocks, inconsistent block counts, and other file errors.
Each file on the disk is stored in one or more disk blocks. AMOS keeps track of which disk blocks are
used in files and which are not by means of a special structure called a bitmap. Each disk has its own
bitmap.
SuperFalcon Owner’s Manual, Revision 03
AMOS Overview
Page 6-7
DSKANA compares the information in the bitmap with the actual data on the disk to make sure the
bitmap is accurate. For example, if DSKANA finds a disk block that is part of a file, but the bitmap
shows the block not in use, DSKANA reports an error. When DSKANA finishes analyzing the disk, it
usually rewrites the bitmap.
Use DSKANA frequently on all of your disks. It is a good practice to use DSKANA on every disk just
before you back up the files on that disk.
For more information on DSKANA, see the AMOS System Commands Reference Manual.
Never use DSKANA (unless you are using the /C option described below) while other users are
accessing the specified disk; doing so may damage the bitmap and the files on the disk.
To use DSKANA, log into OPR: by typing:
LOG OPR:
ENTER
Then, type DSKANA followed by the device name of the disk you want to analyze. For example, to
analyze DSK1:, type:
DSKANA DSK1:
ENTER
As DSKANA checks the disk, it displays the disk account numbers. When it finishes, it displays the
results of its analysis. For example:
DSKANA DSK1: ENTER
[Begin analysis of DSK1:]
[1,2]
.
.
.
[100,20]
[The following blocks were marked in use but not in a file]
1767
1772
2562
3456
6265
[The following blocks were in a file but not marked in use]
[Rewriting BITMAP]
No file errors
If you see the No file errors message, the file structure on the disk is intact. If DSKANA lists file
errors, there is a problem with the disk’s file structure. Your next step is to run DSKANA again, using
either the /L or /E option—discussed below—to see where the errors are.
For the complete procedure to follow if DSKANA finds any file errors, see “Recovering From Disk
Errors” in the AMOS System Operator’s Guide.
DSKANA Options
DSKANA’s options allow you to select exactly what information you want to see. Your choices are:
None
Displays account numbers on disk and summary only.
SuperFalcon Owner’s Manual, Revision 03
Page 6-8
Chapter Six
/C
Same information as default, but does not rewrite bitmap.
/E
Lists files and blocks in which any errors occur.
/L
Lists all files and blocks on the disk.
To use one of these options, place it after the DSKANA command like this:
DSKANA DSK1:/C
ENTER
As mentioned above, you need to use the /L or /E option to find the location of any file errors DSKANA
detects. The /C option is discussed in the next section.
To see the list of DSKANA options, type DSKANA without specifying a device name.
DSKANA’s Check Option and Automatic Backups
At times, you may want to have DSKANA examine a disk without rewriting the bitmap, especially when
using an automated backup method such as a command file or the Task Manager.
The reason for this is simple: assume you run DSKANA at night as part of an automatic backup
procedure. If anyone leaves a file—such as an AlphaWRITE document—open on the device DSKANA is
checking, DSKANA doesn’t take the open file into account when it rewrites the bitmap. When the person
returns in the morning and writes the file to the disk, it causes a bitmap error, because the system didn’t
know the file was open. This could corrupt the disk, causing you to lose data. In a case like this, you
want DSKANA to check the disk for errors, but you don’t want it to rewrite the bitmap, since that could
cause disk problems.
To run DSKANA without rewriting the bitmap, use the /C option. You see DSKANA’s normal display,
except for the [Rewriting BITMAP] message.
WHERE DO I GO FROM HERE?
Your Alpha Micro computer is extremely versatile—it can do so many different things that, at this point,
you might be somewhat undecided as to where to start.
Your next step is to learn something about the software you can run using SuperFalcon. The following
sections give some answers to these two questions:
• What software is available for SuperFalcon?
• What Alpha Micro documents should I refer to next?
Introduction to AMOS Software
This section lists some of the software available for your SuperFalcon.
SuperFalcon Owner’s Manual, Revision 03
AMOS Overview
Page 6-9
The Operating System, AMOS
AMOS, the Alpha Micro Operating System, supervises all of the programs that run on your computer.
Regular updates to the AMOS operating system are available from your dealer.
Programming Languages
The AlphaBASIC and AlphaBASIC PLUS programming languages are a standard part of AMOS. These
are enhanced versions of BASIC, containing many business-oriented features not found in standard
BASIC language implementations. They also provide an ISAM (Indexed Sequential Access Method)
interface.
Please see your dealer for information on other programming languages available for AMOS, such as
AlphaFORTRAN 77 and AlphaC.
AMOS also includes a text editing program designed specifically for programmers, AlphaXED.
AlphaXED includes many features to make creating and updating your program files easier.
Text Preparation
If you are going to create documents on your computer, you will be interested in the word processing
programs available. AlphaXED, a screen-oriented text editor, allows you to move quickly through a file,
correcting and adding words, inserting or deleting lines, moving paragraphs, and so on.
Also, see the section on “Office Information Products” below for information on the AlphaWRITE word
processing package.
Utility Programs
The standard AMOS release contains over 150 utility programs and device drivers. In addition, because
of the unique way AMOS handles commands, you can easily create your own utility programs.
Some of the standard utility programs allow you to do functions such as: copy, rename, and erase files;
sort the data inside files; back up and restore data using various tape devices; print files; use the ISAM
system to organize and retrieve information quickly; and much more.
Application Programs
Your local Alpha Micro dealer has a variety of programs available for your SuperFalcon, many of which
are aimed at specific business needs such as: general accounting, dental office, legal office, real estate
management, manufacturing inventory control, educational learning systems, restaurant management,
medical office billing, laboratory analysis, and many others. Please see your dealer for details.
Office Information Products
Several Office Information Products are available separately from your Alpha Micro dealer. The Office
Information Products series includes:
SuperFalcon Owner’s Manual, Revision 03
Page 6-10
Chapter Six
AlphaCALC, an electronic spreadsheet program that prepares “what if” financial models quickly and
easily.
AlphaWRITE, a word processing package that provides spell checking, hyphenation, form letter
preparation, automatic outlining, tables of contents and indexes, and much more.
AlphaTCP, Alpha Micro’ implementation of the industry standard DARPA TCP/IP family of protocols.
AlphaTCP allows your AMOS applications to communicate with applications running on a variety of
systems.
AlphaMAIL, an electronic mail system for sending and receiving messages and reminders among
multiple users.
MULTI, a window-based environment manager, lets you use multiple programs on one terminal at the
same time, and provides a number of desk accessory features, including a phone list, alarm clock,
notepad and others.
See your dealer for more information on these and other Alpha Micro Office Information Products.
Additional Documentation
Now that your system is up and running, you are ready to start exploring the world of Alpha Micro. Your
guide is the Alpha Micro software documentation. This section gives you an idea of which
documentation to consult depending on the path you want to take.
Your SuperFalcon is a member of the AMOS family of Alpha Micro computers, and the software
documentation that applies to other AMOS computers applies to yours, too.
You may separately purchase any book mentioned in this chapter; in addition, a multi-volume software
documentation library is available containing all the AMOS software manuals listed below. You can
order any of these books by calling your dealer. Electronic (.PDF) versions of almost all of this
documentation is also available on the PC compatible side of the AlphaCD and from our documentation
Web site:
http://www.AlphaMicro.com/AMDocs/
Here’s an idea of what to look at next:
“I Want to Start at the Beginning”
If you are new to Alpha Micro computers, we recommend you read the AMOS User’s Guide. This book
is a practical introduction to the Alpha Micro computer, containing instructions for many of the
procedures you’ll use every day. It expands on many of the topics discussed in this chapter.
“I Want to Learn How to Maintain My Computer”
If you are going to be responsible for making data backups, adding new terminals or printers to the
computer, running disk diagnostics, and otherwise managing and maintaining the system, we highly
SuperFalcon Owner’s Manual, Revision 03
AMOS Overview
Page 6-11
recommend you refer to the AMOS System Operator’s Guide, the AMOS System Operator’s Guide to the
System Initialization Command File, and the AMOS System Commands Reference Manual.
The first book explains how to perform the maintenance and diagnostic procedures required by the Alpha
Micro system software. The second tells you how to modify your system initialization file to add new
software or hardware to your computer or improve performance. The last is an invaluable reference
tool—it contains concise reference sheets on over 150 AMOS programs.
“I Want to Write Computer Programs”
If you have programmed in BASIC before, and want to learn how to use the AlphaBASIC or
AlphaBASIC Plus programming language, refer to the AlphaBASIC User’s Manual or the AlphaBASIC
Plus User’s Manual, DSO-00045-00.
If you are an experienced assembly language programmer who wants to write machine language
programs for your Alpha Micro computer, we recommend you read these manuals:
Alpha Micro Instruction Set, which contains information on the assembly language instruction set used
by the Alpha Micro computers. (Not available electronically.)
AMOS Assembly Language Programmer’s Reference Guide, DSO-00052-00, which describes the
assembler, linkage editor, object file librarian, and global cross reference program used by the assembly
language programmer.
AMOS Monitor Calls Manual, DSO-00040-00, which contains information on the interfaces to the
AMOS operating system available to the assembly language programmer.
AlphaFIX User’s Manual, DSO-00017-00, which describes the screen-oriented debugger program,
AlphaFIX.
Whatever programming language you use, refer to the AlphaXED User’s Guide, DSO-00106-00, for
instructions on using this programmer’s text editor.
SuperFalcon Owner’s Manual, Revision 03
Chapter 7 - Copying Files
Between AMOS and WINDOWS
From AMOS, you can copy files between AMOS and WINDOWS. The AMOS commands you use to do
this are:
• TODOS to copy files from AMOS to WINDOWS.
• FMDOS to copy files from WINDOWS to AMOS.
To copy files from one operating system to the other, you must be at the AMOS prompt. The command
names reflect this: you send files from AMOS to WINDOWS and receive files from WINDOWS to
AMOS.
These utilities only support file names containing eight characters and a three character
extension. They do not support long file names.
When you use one of these commands, you do not change the file you copya copy of the file is moved to
the other operating system and the original file remains where it was.
The next section gives some general information about copying files, then specific instructions on using
FMDOS and TODOS. The end of the chapter describes how you can copy AMOS files from your PC to
other computers
CONTIGUOUS FILE TRANSFER
Every file on your PC consists of a series of blocks on the disk. AMOS supports two file types: linked or
sequential access files, and contiguous or random access files. A contiguous file has all of its disk blocks
in adjacent order on the disk, while a linked file’s blocks are in various locations on the disk.
WINDOWS does not support contiguous files. When you transfer a contiguous file from AMOS to
WINDOWS, the file is converted to a linked file. If you transfer such a file back to AMOS, you need to
use FMDOS /R—for random access—option to convert it back into a contiguous file.
HOW TO COPY FILES BETWEEN OPERATING SYSTEMS
The next few sections describe general procedures for copying files between WINDOWS and AMOS.
The first one discusses preparing to copy the files, and the second describes the general command syntax
you use.
Preparing to Copy
Both the TODOS and FMDOS commands work only from the PC console. TODOS and FMDOS allow
you to specify the WINDOWS directory and AMOS disk account for the source and destination files.
SuperFalcon Owner’s Manual, Revision 03
Page 7-2
Chapter Seven
But, for ease of use, you may want to change to the WINDOWS directory you’ll be copying to or from
before you call up AMOS. You can only transfer files between the operating systems from AMOS, so
once you’re in the directory you want, switch to AMOS.
If you aren’t careful about the directory and disk account you use, you may accidentally copy your files
to the wrong location. If you do, at best you’ll cause yourself some extra work to get the files to the
proper location, and at worst you could copy over existing files, erasing data you need.
Command Formats
Both AMOS and WINDOWS command syntax work with both TODOS and FMDOS. You can use
whichever you’re more comfortable with. The general syntax for AMOS commands is:
Command { /option} Destination=Source
WINDOWS / DOS command syntax has the general format:
Command { /option} Source Destination
The source and destination file specifications are in opposite order in AMOS and WINDOWS.
When you separate the file specifications with a space, AMPC interprets the command according
to WINDOWS /DOS syntax; when you use an equal sign, AMPC uses AMOS syntax.
Whichever syntax you use, be sure to put the file specifications in the right order or you could
copy the wrong file, and possibly erase data you want to keep. (Most AMOS commands ignore
spaces before and after an "=" sign. This one does not!)
The options at the end of the FMDOS command line in either WINDOWS or AMOS format let you
select optional command features. The options for FMDOS are described in the FMDOS section. Note
that you must place a space before any option.
AMOS and WINDOWS File Names
WINDOWS file names may be very long, but AMOS file names cannot be longer than six characters.
You need to take this difference into account when you use FMDOS to copy files from WINDOWS to
AMOS. You can either assign new names to the files you copy or FMDOS will automatically truncate
the names to six characters.
When a file name is truncated, the three-character extension which follows the file name in both
WINDOWS and AMOS is not affected.
SuperFalcon Owner’s Manual, Revision 03
Copying Files Between AMOS and WINDOWS
Page 7-3
Wildcards
TODOS allows you to use * and ? wildcards as part of the file name and extension in the WINDOWS
and AMOS file specifications; FMDOS lets you use these characters only in the WINDOWS
specification. * replaces any number of characters in the file name or extension, while ? stands for any
one character. You cannot use any wildcards in the WINDOWS directory or AMOS device specification,
but you can use wildcards in the AMOS account specification (for example, [100,*] represents all disk
accounts in project 100).
For example:
TODOS C:\USER\*.* = *.TXT[23,*]
ENTER
transfers all AMOS .TXT files in the accounts in project 23 on the current disk device to the WINDOWS
directory C:\USER using the AMOS file names. For more information on the use of wildcards in AMOS
file specifications, see the AMOS User’s Guide.
SENDING FILES TO WINDOWS FROM AMOS (TODOS)
TODOS copies files from AMOS to WINDOWS. You can use either of these formats for TODOS:
TODOS {Windows-pathname}=amos-filespec{,amos-filespec,...}
or:
TODOS amos-filespec{,amos-filespec,...} {Windows-pathname}
amos-filespec is the name of the file you want to copy to WINDOWS. If you leave out part or all of the
file specification, it defaults to the current disk and account, and all files. As shown, you can enter
multiple specifications, separating them with commas.
The optional Windows-pathname is the file name and directory you want to copy the file to in
WINDOWS. It defaults to the directory you were in when you left WINDOWS, and the same file name
as the AMOS source file.
TODOS understands only WINDOWS 8.3 file names, not long file names. The destination file
name you enter must be eight characters or less with a three or less character extension.
If the destination file already exists—there is a WINDOWS file in the directory with the same
name—TODOS overwrites it with the file you’re copying. Be careful not to accidentally
overwrite existing files when you use TODOS.
Here are a few examples of TODOS:
If you want to send a file from the current AMOS account to the WINDOWS directory you called AMOS
from, and you don’t need to rename the file, you need to enter only the AMOS file name:
TODOS PAYROL.DAT
ENTER
SuperFalcon Owner’s Manual, Revision 03
Page 7-4
Chapter Seven
If you want to send the file to another directory, and/or give the file a different name on the WINDOWS
side, you can specify something like this:
TODOS C:\USER\ONETEST.TXT=ONE.TXT
ENTER
This example transfers the AMOS file ONE.TXT to WINDOWS with the file name ONETEST.TXT in
the directory C:\USER. C:\USER must already exist—TODOS can’t create a new directory. If
ONETEST.TXT already exists in C:\USER, TODOS overwrites it automatically.
Finally, if the file you want to copy is not in the current AMOS account, you need to use the complete
syntax:
TODOS C:\USER\ONETEST.TXT=DSK2:ONE.TXT[23,4]
ENTER
If the file is on the current disk, you could include just the account number and leave out the device
name.
If you are more familiar with WINDOWS syntax, you can use it instead. The last sample command
would then be:
TODOS DSK2:ONE.TXT[23,4] C:\USER\ONETEST.TXT
ENTER
RECEIVING FILES FROM WINDOWS INTO AMOS (FMDOS)
The FMDOS command lets you copy WINDOWS files to AMOS. You can use either of these formats:
FMDOS {amos-filespec}=Windows-pathname{ /options}
or:
FMDOS Windows-pathname {amos-filespec}{ /options}
The Windows-pathname is the name and directory of the file you want to copy to AMOS. It defaults to
the device and directory you transferred to AMOS from.
FMDOS understands only WINDOWS eight-character file names, not long file names. If you
want to copy a file with a long file name to AMOS, either use the DOS version of the name
(generally ending with ~1) or change the file name under Windows before using FMDOS.
The optional amos-filespec is the disk account and file name you want to copy the file to. It defaults to
the current account and the same name as the WINDOWS file—see below for what to do if the
WINDOWS file name has more than six characters.
If the destination file already exists, FMDOS copies over it unless you include the /NOD switch
described below.
The AMOS account where you want to put the file must already exist—FMDOS cannot create accounts.
SuperFalcon Owner’s Manual, Revision 03
Copying Files Between AMOS and WINDOWS
Page 7-5
The options let you choose various FMDOS features. Note you must place a space before the / that
precedes the option. You can use any combination of the available options:
/NOD
If an AMOS file exists with same name as the file being copied, do not delete
it. If you don’t use /NOD, and there is an existing file with the same name as
your destination file, FMDOS overwrites it.
/R
Make the AMOS file a random access (contiguous) file. This specifies how the
file is arranged on the disk. See the section “Contiguous File Transfer” earlier
in this chapter.
Here are some examples of FMDOS:
If you want to bring a file from the directory you were in when you left WINDOWS into the current
AMOS account, and you don’t need to rename it, you can specify just the WINDOWS file name:
FMDOS PAYROL.DAT
ENTER
If you want to copy a file from a different WINDOWS
directory to another AMOS account, and/or give the file a
different name, you can specify something like this:
FMDOS
ONE.TXT[23,4]=C:\USER\ONETEST.TXT
If you see “Protection Violation”…
AMOS doesn’t let you write to accounts
outside the current project unless you are
logged into [1,2]. If you try to copy to
another account when you are not logged
into [1,2], you receive a Protection
violation error message.
ENTER
This example copies the WINDOWS file ONETEST.TXT from the C:\USER directory to the file
ONE.TXT in account [23,4]. If the destination file already exists, FMDOS overwrites it.
If you are more familiar with WINDOWS command syntax, you can use it. For example, you can enter
the previous command as:
FMDOS C:\USER\ONETEST.TXT ONE.TXT[23,4]
ENTER
FMDOS automatically truncates file names when copying WINDOWS files to AMOS if they are longer
than six characters, so you could let FMDOS shorten the file name for you instead of specifying a
destination file:
FMDOS [23,4]=NEWSYSTM.TXT
ENTER
creates the AMOS file NEWSYS.TXT.
COPYING FILES TO ANOTHER PC COMPUTER
To copy AMOS files to another PC, you can copy the AMOS files to the WINDOWS partition with the
TODOS command, then copy the files to tape or over the network to move them to other PCs.
SuperFalcon Owner’s Manual, Revision 03
Page 7-6
Chapter Seven
COPYING FILES TO OTHER ALPHA MICRO COMPUTERS
One easy way to copy files from computer to computer is to use the AlphaTCP File Transfer Protocol
(FTP) across the network, if you have it installed on both computers. See the AlphaTCP User's Guide
and AlphaTCP Administrator's Guide for more information on this protocol.
If you have a SCSI tape drive attached to the PC, the easiest way to copy files to or from other nonnetworked AMOS computers is by using the MTUSAV and MTURES commands. See the AMOS System
Commands Reference Manual for information on these commands.
SuperFalcon Owner’s Manual, Revision 03
Appendix A SuperFalcon
Characteristics and Limitations
The AMPC software and SuperFalcon processor board combine to turn your PC into a multi-user AMOS
computer. In almost all respects, a PC with an AMOS processor installed works just like any other
AMOS computer. However, there are a few areas where a SuperFalcon either functions differently than
other AMOS computers, or cannot perform a specific task which other AMOS systems can. Also, there
are certain PC/SuperFalcon configurations which may cause problems under AMOS.
This appendix describes these areas:
• AMOS/WINDOWS interaction limitations.
• File backup and restore limitations.
• Using AMOS/WINDOWS file transfer in a command file.
• SCSI bus use characteristics.
Also, refer to the Release Notes for your version of the AMPC software for compatibility information
and other characteristics of your version of AMPC.
RESTRICTIONS DUE TO AMOS/WINDOWS INTERACTIONS
While SuperFalcon allows AMOS and WINDOWS to coexist, the operating systems are essentially
separate computers running on the same hardware—WINDOWS does not know what AMOS is doing at
any given time, and vice versa. Therefore, you need to make sure AMOS and WINDOWS do not try to
use the same system resource at the same time. Specifically:
• Do not use a serial mouse in WINDOWS and attempt to TRMDEF the same COM port under
AMOS.
• Do not access the same SCSI device from both operating systems at the same time. See the SCSI
limitation section, below, for more information.
FILE BACKUP AND RESTORE LIMITATIONS
You can back up the AMOS disk files of your SuperFalcon to any supported SCSI tape device. However,
the following are not supported:
• STRSAV/STRRES and associated utilities. You must use MTUSAV and MTURES.
• VCR backup or restore is not supported.
• Write Cache is not supported.
• Warm booting from a tape drive is not supported. Refer to the section below for information on
alternate booting.
SuperFalcon Owner’s Manual, Revision 03
Page A-2
Appendix A
ALTERNATE BOOTING
You cannot warm boot SuperFalcon from a tape drive; you can boot it only from flash memory or the
hard disk. You MUST have an alternate boot disk so you can boot AMOS in case of a hard disk problem.
See Chapter 3 for details.
USING AMOS/WINDOWS FILE TRANSFER IN A COMMAND FILE
You cannot use the TODOS or FMDOS command in a command file while the :S (suppress output)
option is in effect.
SCSI BUS USE CHARACTERISTICS
The following restrictions apply to the SuperFalcon SCSI interface:
• As described above, STRSAV and associated utilities are not supported. They have been
removed from the release.
• AMOS supports only one SCSI interface per system. This means any SCSI peripherals to be
used with AMOS must be connected to the first ASPI card you define under WINDOWS.
• You can set up subsystem disk drives on the SCSI bus for use under AMOS provided they are
not used by WINDOWS. How to define a subsystem physical disk (as opposed to the subsystem
disk file discussed in Chapter 3) to AMOS is described in the AMOS System Operator’s Guide.
• You must use FMTSCZ or FMTS2 on any subsystem disks before defining them to AMOS.
• If you do use SCSI subsystem drives, you must still have a bootable AMOS disk file on another
drive. Subsystem drives controlled with the SCZDVR driver cannot be made bootable, so you
cannot MONTST from them. To define a SCSI subsystem drive, generate a driver using
FIXLOG and specify SCZPC as the base driver as set forth in the AMOS System Operator’s
Guide.
• You can’t use write buffering under AMPC. This is due to the lack of a DMA controller for SCSI
data movement under AMOS.
• There is no SCSI interlock between AMOS and WINDOWS. You must ensure that WINDOWS
and AMOS don’t try to access the same resource at the same time. For example, don’t start a
SCSI tape backup under WINDOWS and then try an MTUSAV under AMOS.
• We don’t recommend you attempt to swap back to WINDOWS while doing something with the
SCSI bus. Wait until SCSI activity has finished before switching back to WINDOWS.
• If you remove the SCSI card from your PC, or the SCSI card dies, any attempt to boot AMOS
will hang at the SCZPC.SYS command because AMOS is waiting for a response from the ASPI
manager. If this happens, return to WINDOWS and select the SCSI tab in the Configuration
Screen in AMPC60. Then drag the SCSI disk that was removed back up to the top window to
deselect it for AMOS use. Next, boot AMOS using your original INI without mounting any
related SCSI devices and remove the SCZDSP SCZPC.SYS line from the problem .INI.
If your PC’s drive C: is a SCSI disk, AMOS can access it even if you don’t have an
ASPI manager.
SuperFalcon Owner’s Manual, Revision 03
Appendix B AMPC60
Command Summary
The following table summarizes the WINDOWS commands you can enter to use the AMPC software.
The reference column indicates where in this manual you can look for more information about the
command:
Command
Function
Reference
AMPC60
/option
Launches AMOS from Windows shortcut.
Chapter 4
Options are:
/B
/B forces the SuperFalcon through a
hardware reset.
/C
Launch AMPC Configuration Window
- without booting AMOS.
/I:{filename}
Boot AMOS using specified file.INI
stored in AMOS file system in SYS: If
no /I or /L switch is specified, the
default AMOS32.INI file is used in the
booting process.
/L:{filename}
Boot AMOS using specified file.INI
stored in Windows file system in
AMPC60 folder.
/M:{filename}
Boot AMOS using specified file.MON
stored in Windows file system in
AMPC60 folder. if no /M switch is
specified, the default AMOS32.MON
file is used in the booting process.
/T
Enables trace in the trace window for
diagnostic purposes. (Will eventually
force all Windows jobs to close.)
The following table summarizes the AMOS commands specific to AMPC60. For information on other
AMOS commands, see the AMOS System Commands Reference Manual.
SuperFalcon Owner’s Manual, Revision 03
Page B-2
Appendix B
Command
Function
Reference
FMDOS /option Windows
amos
Copies the WINDOWS file Windows to the
AMOS file amos. Options are:
Chapter 7
or:
FMDOS /option
amos=Windows
/NOD
/D
/Q
/NOQ
TODOS amos Windows
or
TODOS Windows=amos
Do not copy over existing file
(no delete)
Overwrite the existing file
Ask for confirmation
No confirmation
Copies the AMOS file amos to the
WINDOWS file Windows.
SuperFalcon Owner’s Manual, Revision 03
Appendix C AMPC60
Error Messages
Below are listed the different error messages displayed by AMPC60 when you are booted under AMOS.
Additional error messages may appear in the diagnostic window as AMOS is booting, and these error
messages are self explanatory. For information on additional messages displayed by AMOS and
WINDOWS, see the reference manuals for those operating systems.
CD-ROM driver xxx not found
This message indicates that the non-SCSI CD-ROM device driver is not in DVR: or not defined
in the SCSI tab of the Configuration screen.
Cannot open COMn port
This error indicates that the COM port specified in one of the COMn=.... entries in AMOS32.INI
cannot be found. When running AMPC60, this can mean that the COM port specified is not
available because another task (such as the Windows mouse driver) is using the port.
Illegal PCCOMn assignment xxx
The COMn=.... entry in AMOS32.INI is incorrect. PCCOMn=.... entries must be a octal number
0-7,10-17 followed by a “:” and baud rate.
Illegal terminal assignment xxx
This message indicates that the displayed VTMn=.... entry in AMOS32.INI is incorrect.
Illegal CD-ROM assignment xxx
The ACD=.... entry in AMPC60.INI is incorrect and does not reflect a valid PC device driver
name.
Illegal disk assignment xxx
The disk definition entry shown in AMPC60 configuration tab is incorrect.
The following messages may appear in the diagnostic window as AMPC is booting:
•
•
•
•
•
Unrecognized packet type n received
Packet received for unassigned channel #n
Memory allocation failed trying to get n bytes
Invalid WINDOWS system channel packet
Invalid AMOS system channel packet
Any of these error messages indicates a problem with either the PC or AMOS sides of AMPC. If
you receive any of these error messages first check your configuration of both AMPC and AMOS.
If everything looks correct, contact Alpha Micro for further assistance.
Disk Error: WINDOWS Phantom file full
SuperFalcon Owner’s Manual, Revision 03
Page C-2
Appendix C
This error indicates there isn’t enough free space on your PC’s disk for the AMOS disk to grow
to its maximum size. See Dynamic Allocation Warning in Appendix J. It should be followed by
another error message such as:
?Cannot output file - device full
%Unsuccessful copy - device full
Cannot open file - LOKSER queue is full
%17 files transferred
If the dynamic allocation issue arises during a process which, in spite of errors, continues, such
as a multiple file copy, the error message may scroll off your screen. If enough files queue up
waiting to be copied, you may see this message or something similar. See Dynamic Allocation
Warning in Appendix J.
Falcon Board Not Found on the diagnostic window
One cause of this is moving the SuperFalcon to a different PCI slot. Handling this problem is
discussed in Appendix H- Changing PCI Slots.
Stops when trying to talk to a SCSI device, such as a tape drive. Typically at the SCZDSP SCZPC.SYS
line when booting.
This can happen if you remove the SCSI card from your PC, or the SCSI card dies. AMOS is
waiting for a response from the ASPI manager. If this happens, return to WINDOWS and select
the SCSI tab in the Configuration screen in AMPC60. Then drag the SCSI disk that was
removed back up to the top window to deselect it for AMOS use. Then boot AMOS using your
original INI without mounting any related SCSI devices and remove the SCZDSP SCZPC.SYS
line from the problem .INI.
Exceeds maximum number of terminals allowed
You are trying to add more terminals than your AMOS license allows. Check the Software
License Agreement message that displays when AMOS boots to determine the number of
terminals your computer can accept.
When Windows is Booting:
Dialog box:
Title:
Text:
Box:
Choices:
System File Warning
The following system files have been
replaced with older version by a program
you recently ran…
C:\WINDOWS\SYSTEM\WINASPI.DLL
[OK] [Ignore]
Please press [Ignore]. If you press [OK], then it will repeat this message the next time it boots.
Pressing [OK] will not do any damage.
This message occurs because we install a version of WINASPI.DLL which we finds works best
with AMPC. If you wish to check the version, run ASPICHK.EXE in the AMPC60 directory. All
components listed should be version 4.60 (1021).
SuperFalcon Owner’s Manual, Revision 03
AMPC60 Error Messages
Page C-3
AMPC and/or Windows Locks Up:
One cause is the PC powering down while AMPC is still trying to run. Usually, the Power
Management settings for the PC's BIOS and Windows should be disabled. For the BIOS, this
must be done in the BIOS setup screen accessed when the PC first starts to boot. For Windows,
access the "Power Management" in the Control Panel. Be sure to set anything that AMOS may
use, such as the hard disks, networking, etc., to NEVER.
SuperFalcon Owner’s Manual, Revision 03
Appendix D -
PC Function Keys
Under AMOS
Many Alpha Micro software packages, such as AlphaWRITE and AlphaCALC, contain function key
translation files that let you use the function keys on your terminal to perform actions while using the
software. For example, when using AlphaWRITE on an AM-65 terminal, pressing F13 at your document
display takes you to the Editing Menu.
Each software package has a separate translation table file for each Alpha Micro terminal driver
(AM62.TDV, AM65.TDV, and so on).
When using AlphaWRITE, using the function keys may insert spaces. To avoid this, be sure to
set ACKWAIT=TRUE in your AlphaWRITE initialization file.
Unless you are using the AM-70 emulation, the correct translation table for the PC’s function keys is the
same as the translation table for an AM62A terminal.
USING FUNCTION KEYS
Both the AM62A and AM-70 terminals have sixteen function keys. However, most PCs have twelve. To
make up for the “missing” function keys, the PC uses the CTRL and ALT keys.
AMPC uses the same function key translation as other popular Alpha Micro communications products,
such as inSight and AlphaLAN, except that function keys F11 and F12 are also used.
The following keys (or combinations of keys) on the PC correspond to the sixteen function keys—and
some other keys many PC keyboards lack—on an Alpha Micro keyboard:
SuperFalcon Owner’s Manual, Revision 03
Page D-2
Appendix D
AMOS FUNCTION KEY TRANSLATION
AMOS Function Key
ALT
FUNCT
F1
to
F10
F11
and
F13
to
F1
F12
F11
(for example, for
to
and
/ F11 and
/ F13 to
and
/ F10
F12
or
CANCEL
and
/ F11 and
CTRL
/ F1 and
/ HELP
CTRL
/ F7
CTRL
/ F8
/ NEWLINE
CTRL
/ F9
/ CANCEL
CTRL
/ F10
INS CHAR
CTRL
/ F3 to
/1)
CTRL
/ F2
/ F6
/ F10
/ F12 or
/ CTRL / F1 and
/ CTRL / F2
/ CTRL / F3 to
/ CTRL / F6
/ INSERT
/ INSERT or
CTRL
/ PAGE UP
/ DELETE or
CTRL
/ PAGE UP
CTRL
INS LINE
DELETE
/ DELETE
DEL WORD
CTRL
DEL LINE
PREV SCREEN
PAGE UP
NEXT SCREEN
PAGE DOWN
PREV WORD
CTRL
/
NEXT WORD
CTRL
/
COMPOSE
ALT
INSERT
INS WORD
DEL CHAR
press
CTRL
/ F16
EXEC
NEWLINE and
/ F1 to
/ F12
FUNCT /1,
F10
F16
/ F1 to
HELP
PC Key
/ CTRL /Q
For example, to use AlphaWRITE’s menu key F13 on AM62 terminalson the PC console, press
CTRL / F3 .
USING FUNCTION KEYS
Both terminal emulators, ZTERM and LiTE, included in AMPC 6.0 have ADDITIONAL function key
support features. Refer to the on-line help information provided with each emulation for information
about these additional function key support features.
SuperFalcon Owner’s Manual, Revision 03
Appendix E - Changing the AMOS
Disk File Blocking Factor
The AMOS Disks tab in the AMPC 6.0 Configuration Screen, which allows you to create an AMOS disk
file, also allows you to change the blocking factor for that disk. Changing the blocking factor is not
usually done, but can be quite useful in special circumstances, and this appendix discusses when and how
to do it. Remember this can only be done at the DSK file creation process and not after the file is in use.
For general information on AMOS disk files, see Chapter 4.
WHAT IS THE BLOCKING FACTOR?
The AMOS disk file blocking factor controls the size of the entries in the index section of a dynamically
allocated disk file. A disk file with a blocking factor of 1 means that for each disk block under AMOS, a
four-byte entry in the index is created. With this blocking factor, each time AMOS needs to read or write
a block, the index area must be examined, which can slow down the operation of AMPC. However, on
the plus side, the size of the dynamically allocated disk only grows by one block at a time when new
writes are made, therefore ensuring efficient use of the PC hard disk.
If the blocking factor is changed to 4, the size of the index will decrease, because now four AMOS blocks
are allocated each time a previously allocated AMOS block is written to the disk. Also, access to
subsequent sequential blocks will be faster because AMPC knows that three more AMOS blocks can be
found directly after the first without having to read another entry from the index. The downside of this
larger blocking factor is that each time a single AMOS unallocated block gets written to the disk, four PC
blocks are allocated.
As you can see, there is a direct relationship between the blocking factor and the number of AMOS
blocks allocated on the PC. A small blocking factor takes longer for overall operation because more reads
of the index have to be made, but ensures that the AMOS disk file grows only by the number of blocks
used. A large blocking factor generally means faster operation, but less efficient use of the PC disk.
The “best” blocking factor to use depends on the application being used and the underlying behavior of
the PC hardware and software. Generally, a blocking factor of eight works for most situations, but if your
application performs a lot of random writes on the disk, consider using a smaller blocking factor as the
size of the PC disk file may be growing faster than you anticipated. As a reference, the .DSK shipped
with AMPC has a blocking factor of four.
CHANGING THE BLOCKING FACTOR
To change the blocking factor of an AMPC disk, click on the Create button on the AMOS Disks Tab in
the AMOS 6.0 Configuration Window. This will launch the AMOS Disk Generation Wizard, which will
SuperFalcon Owner’s Manual, Revision 03
Page E-2
Appendix E
guide you through the AMPC disk generation process. The actual blocking factor is a power of two; and
you are presented with the valid blocking factor options in Step 5 of the AMOS Disk Generation Wizard.
As you change the blocking factor, you’ll see the size of the index change as wellthe larger the
blocking factor, the smaller the index because more blocks are represented by a single index entry.
After selecting the desired blocking factor, click Finish to create or re-initialize the disk. This final step is
required as the blocking factor is a non-dynamically allocated entity; therefore, note that if you change
the blocking factor of a file with existing data, that data will be lost.
FIXED ALLOCATION DISKS
When using a fixed allocation disk, AMPC uses a 1:1 mapping scheme that does not require an index
(which is why fixed allocation disks are slightly faster than dynamically allocated disks). Therefore fixed
allocation disks do not need a blocking factor but, of course, occupy all of the PC disk space that has
been allocated to AMOS all of the time.
SuperFalcon Owner’s Manual, Revision 03
Appendix F - SuperFalcon
On-Board Serial Ports
SUPERFALCON SERIAL PORTS
The SuperFalcon has four on-board serial ports that support RS-232 protocol. These ports are identified
to the AMOS software as serial ports 0 through 3, with port 0 being the top connector at the rear edge of
the board. Signal pinouts for these four ports are identical to the serial ports used on AM-359 I/O boards
and AM-90 I/O Protection boards. The sections that follow describe how to cable terminals, other PCs,
and printers to the SuperFalcon serial ports.
SuperFalcon RS-232 Pinouts
The following table shows the RS-232 signal-to-pin orientation applicable to all of the RJ-45 serial ports
on the SuperFalcon.
PIN
DIRECTION
1
2
3
4
5
6
7
8
Bi-directional
Input
Output
Output
Input
Output
Bi-directional
Input
RS-232 SIGNAL NAME
Cable Shield (Chassis Ground)
CTS - Clear to Send
TXD - Transmitted Data
RTS- Request to Send
RXD - Received Data
DTR - Data Terminal Ready
Signal Ground
DCD - Data Carrier Detect
Table 1. SuperFalcon RS-232 Pinout and Signal Descriptions
SuperFalcon Owner’s Manual, Revision 03
Page F-2
Appendix F
Terminal Cables
Table 2 shows a standard cabling configuration for creating an RS-232 connection between a
SuperFalcon serial port and a terminal. This configuration is supported by most Alpha Micro terminals
(e.g., AM-62, AM-65, etc.)
Terminal End
(DB-25 Connector)
SuperFalcon Serial Port
(RJ-45 Connector)
Signal
Pin #
Direction
Pin #
Signal
RXD
TXD
Ground
DTR
3
2
7
20
Å
Æ
Æ
3
5
7
2
TXD
RXD
Ground
CTS
Table 2. Pinouts for RS-232 Terminal-to-SuperFalcon Cables
The DTR connection between pin-20 on the terminal and pin-2 on the SuperFalcon serves as
“READY/NOT BUSY” handshake line to prevent “overrunning” the terminal with data. This same
protocol is also effective for several printers used by Alpha Micro.
PC Serial Port to SuperFalcon Serial Port
RS-232 pin assignments for connecting a standard 9-pin PC serial port to a SuperFalcon serial port are
listed in Table 3 below.
PC Serial Port
(DB-9 Connector)
Signal
Pin #
SuperFalcon Serial Port
(RJ-45 Connector)
Direction
Pin #
Å
Æ
Æ
Å
RXD
2
3
TXD
3
5
Ground
5
7
RTS
7
2
DCD,
1,6,8*
4
DSR,
CTS
* pins 1, 6, and 8 are tied together at the DB-9 connector
Signal
TXD
RXD
Ground
CTS
RTS
Table 3. Pinouts for PC to-SuperFalcon Cables
SuperFalcon Owner’s Manual, Revision 03
SuperFalcon On-Board Serial Ports
Page F-3
With PCs, the DCD, DSR, and CTS connection (pins 1, 6, &8 tied together) is often required for reliable
operation. Most PC software requires one or more of these to have valid signals from the AMOS system.
These also provide a hardware flow of data from the PC to the AMOS system, critical when transferring
files through the PC. We strongly recommend using hardware flow control and not using XON/XOFF
(software flow control).
Serial Printer Cable Pinouts
The diagram shown in Table 4 represents a standard cabling configuration for creating an RS-232
connection between a SuperFalcon serial port and a serial printer.
Printer End
(DB-25 Connector)
SuperFalcon Serial Port
(RJ-45 Connector)
Signal
Pin #
Direction
Pin #
Signal
RXD
TXD
Ground
DTR
3
2
7
20
Å
Æ
Æ
3
5
7
2
TXD
RXD
Ground
CTS
Table 4. Pinouts for RS-232 Printer-to-SuperFalcon Cables
The DTR connection between pin-20 on the printer and pin-2 on the SuperFalcon serves as
“READY/NOT BUSY” handshake line to prevent “overrunning” the printer with data. The printer pin
generating this "hardware flow control" varies by printer - consult the manufacturer's documentation.
While XON/XOFF (software flow control) is available, we strongly recommend using only hardware
flow control. A mixture of both can cause unexpected printer lockups.
The data line from the printer (pin 2) to the SuperFalcon (pin 5) is often not needed. However, if the wire
is attached to pin 2 of the SuperFalcon, then the other end must be connected for reliable system
operation.
CABLING CONFIGURATIONS FOR PC SERIAL AND PARALLEL
PORTS
In addition to the four AMOS style serial ports on the SuperFalcon board, you may want to connect a
terminal or printer to one (or more) of the PC compatible serial or parallel ports on your computer. The
following tables show various cable configurations for connecting terminals and printers.
SuperFalcon Owner’s Manual, Revision 03
Page F-4
Appendix F
AM-6X Terminals to PC Serial Ports
To connect an Alpha Micro AM-6X series terminal to a PC serial port, use a cable with the following pin
configurations:
AM-6X Terminal End
(DB-25 Connector)
PC Serial Port
(DB9 Connector)
Signal
Pin #
Direction
Pin #
RXD
TXD
Ground
DTR
3
2
7
20
Å
Æ
Æ
3
2
5
1,6,8*
Signal
TXD
RXD
Ground
DCD, DSR,
CTS
*pins 1, 6, and 8 are tied together at the DB-9 connector
Table 5. Pinouts for RS-232 Terminal-to-PC Serial Port Cables
Serial Printers to PC Serial Ports
This section contains pin configurations for connecting a serial printer to a PC serial port.
Serial Printer End
(DB-25 Connector)
PC Serial Port
(DB9 Connector)
Signal
Pin #
Direction
Pin #
RXD
TXD
Ground
DTR
3
2
7
20
Å
Æ
Æ
3
2
5
1,6,8*
Signal
TXD
RXD
Ground
DCD, DSR,
CTS
*pins 1, 6, and 8 are tied together at the DB-9 connector
Table 6. Pinouts for RS-232 Serial Printer-to-PC Serial Port Cables
SuperFalcon Owner’s Manual, Revision 03
Appendix G - Modifying the
SETUP Configuration Settings
As summarized in Chapter 3, the SuperFalcon contains a non-volatile on-board CMOS circuit to store
various default information relative to booting and other system options. This information includes data
used to find the primary and alternate boot devices, the system monitor and initialization files to use, and
other system options.
You can change the Setup configuration even if you can’t boot the computer under AMOS. This can be
very useful in case of certain system problems. To change the Setup configuration, you must have a
terminal attached to port 0 on the SuperFalcon board. The first time you access Setup, this terminal must
be set to 19.2K baud; you can then change the terminal speed setting if you want.
It’s a good idea to write down the CMOS setup parameters. You may need the original settings if
you make a change and then need to go back to the previous settings.
DISPLAYING THE SETUP MENU
To enter CMOS Setup, first make sure no one else is using the computer. Then, boot AMOS using one of
the desktop icons you have set up previously, as described earlier in Chapter 4. Make sure to use an icon
that has been configured with the /B switch so that a hardware reset is generated on the SuperFalcon
board.
The following message will appear on the terminal attached to serial port 0 on the SuperFalcon board:
Welcome to Alpha Micro Computer System...
Press <ESC> to enter setup.
Press
press
on the terminal to access the Setup Configuration menu. You have about three seconds to
ESC
ESC
.
The port 0 terminal’s baud rate must match the current Setup setting (default is 19.2K), or Setup
will not recognize the ESC character.
The Setup menu looks like this:
SuperFalcon Owner’s Manual, Revision 03
Page G-2
Appendix G
ALPHA MICRO
Configuration Setup Menu
Primary boot device type . . . . . .
Primary boot device unit # . . . . .
PCI
00
Alternate boot device type . . . . .
Alternate boot device unit # . . . .
None
00
Boot monitor file name . . . . . . .
Boot initialization file name . . .
AMOS32.MON
AMOS32.INI
Serial port 0 speed . . . . . . . .
Display console boot messages . . .
Memory size - Refresh . . . . . . .
19,200
Yes
AUTO
- 4K
Use [UP] and [DOWN] keys to select an item.
Use [LEFT] and [RIGHT] keys to change item.
Press [ESCAPE] when done.
The displayed items above are the DEFAULTS.
As indicated, you use the and keys to select a parameter. To change a parameter, use the
keys to cycle through its possible settings. The only exceptions are file names, which you type.
and
The Setup menu fields are:
Primary Boot Device Type
This is the type of device to boot from if the attempt to boot from the alternate device fails or no alternate
device is selected. For the SuperFalcon, the options are PCI and Flash.
Primary Boot Device Unit #
For the SuperFalcon, this parameter should be set to 00.
Alternate Boot Device Type
This is the type of device to attempt to boot from first, before using the primary boot device. Currently
supported alternate boot devices are PCI, Flash, Xmodem, and None. Note that 4MB of RAM will be
reserved at the top of memory for a RAM drive.
Alternate Boot Device Unit #
For the SuperFalcon, this parameter should be set to 00.
SuperFalcon Owner’s Manual, Revision 03
Modifying the Setup Configuration Settings
Page G-3
Boot Monitor File Name
For the SuperFalcon, this parameter is ignored when booting from PCI. When booting from Flash, type
the name of the monitor file to be loaded during boot. Any valid file name, with an .MON extension, can
be used. The monitor file must exist in Flash. You can use the backspace and the arrow keys to edit this
field.
Boot Initialization File Name
For the SuperFalcon, this parameter is ignored when booting from PCI.
Serial Port 0 Speed
By default, Setup requires a port 0 terminal set to 19.2K baud. You can change this to 1200, 9600, or
38.4K. The speed you set here should match the on-board port 0 definition in the system initialization
file. If the terminal’s baud rate does not match this setting, you won’t be able to re-enter the Setup menu,
since ESC will not be recognized when it is depressed.
Display Console Boot Messages
When set to Yes, this option displays status messages on the operator terminal (port 0) during booting.
Memory Size - Refresh Setting
Memory size can be set to AUTO, 32MB ras1, 64MB ras2, or 128MB ras2. Typically this should be
set to AUTO so that the SuperFalcon boot process determines the amount of memory installed. If not set
to AUTO, it should be set to match the amount of physical RAM installed.
Refresh can be set to either 4K or 8K and should match the refresh requirements of the installed memory.
If you don't know what you have and are unable to find out try 8K. 8K should work for 4K memories
with some loss of performance but selecting 4K refresh for memories that require 8K refresh may result
in memory reliability problems.
SAVING THE SETUP SETTINGS
When you are finished making changes press ESC . A message will appear at the bottom of the screen
asking if you wish to save any changes made. Type Y to save the changes in the CMOS, or N to abandon
any changes made. After you enter your response, the system will boot using the new parameters, if you
saved them.
SuperFalcon Owner’s Manual, Revision 03
Appendix H -
Changing
PCI Slots
When you move the SuperFalcon from one PCI slot to another, the BIOS PNP/PCI configuration may
not get fully updated and/or the driver used by AMPC may not get updated. The result will be that the
AMPC Diagnostic window will report that the SuperFalcon board was not found. (If it reports a port
address like 294, that was carried over from the ISA Falcon and can be ignored.)
RECOMMENDED PROCEDURE
The BIOS key sequences, menu item names, etc. varies by manufacturer. We will reference those
for Award's BIOS. You should be familiar with those of the BIOS you are using.
First, you will need to make sure the BIOS Plug-N-Play configuration information gets updated. The
goal here is for the BIOS PNP to re-scan the PCI bus and update its configuration information:
1. When powering up for the first time after physically moving the SuperFalcon PCI board, go into the
PC's BIOS setup. For Award BIOS, press DELETE the key when prompted.
2. From the main menu, select the "PNP/PCI Configuration".
3. On the PNP/PCI Configuration screen, move to the "Reset Configuration Data:" item.
4. It normally says "Disable". Change it to "Enable" using the
5. Now exit by pressing
ESC
6. Then save by pressing
F10
PAGE UP
and
PAGE DOWN
keys.
once.
and then [Y].
Now you should be booting into Windows. It should spot the PCI hardware, and change and re-install the
driver. Usually the messages just flash on the screen.
If, after the above process, AMPC still cannot find the SuperFalcon board, then the driver needs to be
"updated" (really re-installed, but the update driver process is fast).
1. Open the Windows "Device Manager". (One way is to right click on "My Computer", then select
"Properties", then select the "Device Manager" tab. With Windows XP, you will need to go to
"Hardware", then "Device Manager" section, then click on the "Device Manager" button.)
2. Now you should see a "tree menu" - with lots of [+] buttons and some [-] buttons.
3. Find and open (click on the [+] button) the "Multi-function adapters" item.
SuperFalcon Owner’s Manual, Revision 03
Page H-2
Appendix H
4. Inside, you should see the SuperFalcon board. (As of this writing, the actual name is "AM113-40
PCI Falcon Coprocessor".)
5. Highlight it and then click on the [Properties] button at the bottom of that window.
6. Open the "driver" tab, and click the [Update Driver] button in the lower right.
7. Now the Windows driver update wizard should begin. Select the defaults and it will basically reinstall the same driver, but in doing so will get the new "Plug'N'Play" information.
8. Now do a restart of Windows and the SuperFalcon should work as before.
SuperFalcon Owner’s Manual, Revision 03
Appendix I - AMPC60
Trouble-shooting Tools
There are a number of trouble-shooting features of AMPC. Many are similar to other AMOS systems and
others are unique. Here is a list of some of these tools for your consideration when you need to
troubleshoot.
PC SIDE BOOT CONTROLS
One of the most powerful set of trouble-shooting tools for AMPC is provided by the AMPC60.EXE
command.
•
•
•
•
•
The ability to specify different AMOS .MON and .INI boot files allows you fall back to SAFE.MON
and SAFE.INI in the /AMPC60/ directory. If you wish to modify SAFE.INI, please make and modify
a copy, such as TEST.INI. This replaces the CMOS selections in other recent AMOS systems.
The various diagnostic windows of AMPC let you examine the start up process in detail, including
the traditional Status Display codes (see below).
Use of the /T facility allows tracking of all traffic between the AMOS and PC sides of the system.
(Use /T with caution as it will eventually crash the PC.)
The Configuration (/C) control of AMPC allows easy disk swapping without opening the chassis nor
renaming files.
You can re-install AMPC in a different path, or rename your critical files, such as the .DSK files, and
copy AMPC60.DSK from the CD or, using WinZIP, from the AMPCi6.EXE.
STATUS DISPLAY
Most AMOS computers have a two hex digit status display on the front panel. For trouble-shooting
purposes, the SuperFalcon has some similar, though limited, status display facilities.
First, during part of the boot process, AMOS standard status display codes are included in the Diagnostic
window. This will NOT display status codes sent by AMOS programs. Notice that you can scroll back in
the window to re-examine the boot process.
Secondly, a 26-pin front panel status display connector is included on the SuperFalcon. Any standard
AMOS 26-pin status display, such as that used in the current Eagle chassis or the old Classic chassis, can
be plugged into this connector. This status display functions the same as other AMOS status displays and
can be used for application trouble-shooting.
BOOT STATUS AND CMOS
CMOS-booting AMOS systems use serial port zero to display the boot status and allow for modifying
the Setup Configuration settings, including the initial port zero baud rate. Sometimes this information,
SuperFalcon Owner’s Manual, Revision 03
Page I-2
Appendix I
can help in trouble-shooting. See Appendix G, "Modifying the Setup Configuration Settings" for more
details.
SELF TEST
The standard AMOS Self Test can be run from a terminal attached to serial port 0 on the SuperFalcon
board. See Appendix G - Modifying the SETUP Configuration Settings for the terminal configuration
information.
To start the Self Test, first make sure no one else is using the computer. Then, boot AMOS using one of
the desktop icons you have set up previously, as described earlier in Chapter 4. (The .INI you choose
does not need to define a serial port - in fact the .INI will never get executed.) Make sure to use an icon
that has been configured with the /B switch so that a hardware reset is generated on the SuperFalcon
board.
The following message will appear on the terminal attached to serial port 0 on the SuperFalcon board:
Welcome to Alpha Micro Computer System...
Press <ESC> to enter setup.
At this point, press <CTRL>D on the terminal keyboard. Self Test should start on the terminal display.
The Status Codes will NOT appear in the PC monitor's Diagnostic window.
For more information about Self Test, see the System Self Test User's Guide (V3.0 and Later) at
www.AMOS-OnLine.com/AMDocs/.
SuperFalcon Owner’s Manual, Revision 03
Appendix J - Dynamic Allocation
Warning
When you set up an AMOS disk using dynamic allocation, you specify a maximum size for the disk, but
only part of that space is initially allocated. So, what happens if there isn’t enough free space on your
PC’s disk for the AMOS disk to grow to its maximum size?
The answer is that you will receive one of these error messages when you try to write to the AMOS disk:
Disk Error: WINDOWS Phantom file full
(followed by another device error)
?Cannot output file - device full
%Unsuccessful copy - device full
If this condition occurs during a multiple file copy, the error message may scroll off your screen. If
enough files queue up waiting to be copied, you may see this message:
Cannot open file - LOKSER queue is full
%No files transferred
If you receive one of these messages, use the SYSTAT command. If it shows that you still have blocks
available, then the problem is that the WINDOWS disk, not the AMOS disk file, is full. If this happens
to you, follow the “Corrective Action” procedure below. To prevent this problem from happening again,
or from happening to you at all, follow one of the suggestions in “Preventive Measures.”
Corrective Action
Do not try to write to the AMOS disk!
First, log to OPR: and use DSKANA on each logical device. (See your AMOS System Commands
Reference Manual for instructions on using DSKANA.) If the only file errors are on the logical disk you
were writing to when the error occurred, this should correct any existing file problems. You can continue
with one of the preventive measured below.
If DSKANA shows file errors on other logical devices, the AMOS map blocks may be damaged. First,
fix all file errors. Then, follow this procedure:
1. Create a new AMOS.DSK file on a different WINDOWS disk (one with more free space), using
the same method you initially used to create your original .DSK file.
2. Reboot AMOS and MOUNT the new disk device.
3. SYSACT each logical device of the new disk.
4. Copy all files from your old disk to the new one.
SuperFalcon Owner’s Manual, Revision 03
Page J-2
Appendix J
5. Exit to WINDOWS and erase the old AMOS disk file.
6. Go to the Configuration window for AMOS Disks and use the Browse button and point to the
new disk filename.
7. Shutdown AMPC 6.0 and re-execute the boot Shortcut to restart AMOS with your newly
expanded disk file.
Preventive Measures
If you have actually received an error because you’re out of WINDOWS disk space, perform the
“Corrective Action” above before using any of these options.
There are three ways to keep this problem from happening to you:
1. Use Fixed Allocation when you create your AMOS disk.
2. Make sure there is always enough free space on the PC disk for the AMOS disk to expand to its
maximum size. You can erase unused WINDOWS files if you need to.
3. Move the AMOS disk file to another WINDOWS device (the WINDOWS C: drive will tend to
fill up faster than other devices).
SuperFalcon Owner’s Manual, Revision 03
Index
A
B
Account
adding · 6-3
ersatz name · 6-2
password · 6-3
AlphaCALC · 6-10
AlphaMAIL · 6-10
AlphaTCP · 6-10
AlphaWRITE · 6-10
AlphaXED editor · 6-9
Alternate boot device · G-2
AMOS · 1-1, 1-3
application programs · 6-9
booting · 5-1
booting for the first time · 3-5
defined · 6-9
disk file · 4-11
disk file, allocating · 4-11
disk file, changing · 4-12
disk file, moving · 4-12
documentation · 1-5, 6-10
electronic mail · 6-10
exiting · 5-2
features · 1-3
file names · 7-2
networking · 6-10
office information programs · 6-9
product installation code · 3-5
programming languages · 6-9
spreadsheet program · 6-10
system initialization file · 4-5
transferring data to WINDOWS · 7-1
transferring files to · 7-1
using under Windows · 5-1
utility programs · 6-9
window-based environment · 6-10
word processing · 6-10
AMOS32.INI · 4-4, 4-5
modifying · 4-4
SETJOB · 4-7
AMPC · 1-2
installation · 2-4, 3-1
AMPC command
booting AMOS · 5-2
booting with specific .INI file · 5-2
AMPC60 Command Switches · 4-1
AMPCAB.INI · 4-3, 4-4
Application programs · 6-9
ASPI software · 2-4
Backing up · 6-5
on tape (MTUSAV) · 6-5
Baud rate · 4-6
for operator terminal in Setup · G-3
Bitmap · 6-7
Blocking factor
Disk Configuration · E-1
Boot monitor file · G-3
Booting · 3-5
AMOS · 5-1, 5-2
AMOS, automatically · 5-2
Booting AMOS · 4-1
Booting the computer
alternate device · G-2
displaying messages on operator terminal · G-3
memory size - refresh · G-3
primary device · G-2
Buffer sizes · 4-7
SuperFalcon Owner’s Manual, Revision 03
C
Cables, PC Serial and Parallel · F-3
Cables, Terminal · F-2
CMOS
menu options · G-1, I-2
setup procedure · 3-6, G-1
CMOS Configuration Settings · 3-6
COM port · 1-2
sharing · A-1, C-1
commands
AMPC 6.0 · B-1
Configuration
boot monitor file · G-3
CMOS settings · 3-6, G-1
system initialization file · G-3
configuration changes · 4-2
Conventions · 1-4
Co-processor · 1-2
D
Data, transferring · 7-1
desktop icons, creating · 4-1
Device
name · 6-1
system disk · 6-1
system disk sharing (AMOS/WIN) · 4-4
Page ii
Diagnostic test
DSKANA · 6-6, 6-7
REDALL · 6-6
DIR · 6-2
/W option · 6-2
Directory · 6-2
Disk
account · 6-1, 6-3
account password · 6-3
account, list · 6-2
adding new accounts · 6-3
analysis · 6-6
blocks · 6-7
diagnostic programs · 6-5, 6-6, 6-8
maintenance procedures · 6-6
Disk Creating, AMOS · 4-12
Disk file
allocation method · 4-11
dynamic allocation · 4-11
dynamic allocation warning · J-1
fixed allocation · 4-11
Disk File blocking factor · E-1
Disks Tab
Software Installation · 3-2
Documentation, AMOS · 6-10
Dskana
options · 6-7
DSKANA · 6-6, 6-7, 6-8
check option · 6-8
Dynamically allocated disk · 4-11
warning · J-1
E
Electronic mail · 6-10
Error messages · C-1
Ersatz name · 6-2
External Devices
installation · 2-9
F
File
names (AMOS) · 7-2
names (WINDOWS) · 7-2
Fixed mode allocated disk · 4-11
FMDOS · 7-1, 7-4, 7-5
command format · 7-2
options · 7-5
wildcards · 7-3
FULL.INI · 4-5
FULNET.INI · 4-3, 4-4, 4-5
Function key · 3-7, D-1
summary · D-2
terminal emulators · D-2
using · D-1
Index
G
General Tab
Software Installation · 3-1
Graphic conventions · 1-4
Graphics
printing · 4-8
I
Icons, desktop · 4-2
Initializing disk · 4-12
Installation
AMPC · 2-4, 3-1
External Devices · 2-9
Memory SODIMM · 2-6
SuperFalcon Board · 2-7
INSTPC · 3-5
ISAM · 6-9
ISAM Plus · 1-3
J
Job
assigning memory · 4-7
attaching terminal · 4-7
defining · 4-7
L
Line editor · 4-7
LOG · 6-3, 6-4
LPT ports · 1-2
setup · 4-10
sharing · 4-10
M
Memory · 4-7
Memory Installation · 2-6
Memory Removal · 2-7
MIKE.INI · 4-3, 4-4
Modifying AMOS32.INI · 4-4
MTUSAV · 6-5
MULTI · 6-10
MUSER · 6-4
N
Network Configuration Files · 4-3
Network Tab
Software Installation · 3-4
SuperFalcon Owner’s Manual, Revision 03
Index
Page iii
Parallel printer · 1-2
port · 1-2
Password · 6-3
PC console emulation · 4-7
PCI slot
changing · H-1
Pinouts
SuperFalcon Serial Ports · F-1
Port · 1-2
number · 4-6
PPN · 6-2
Primary boot device · G-2
Print spooler · 4-4
Printer
buffer sizes · 4-7
defining · 4-6
printers
adding · 4-8
Printers
graphics · 4-8
serial · 4-9
Windows · 4-9
Product Installation Code (PIC) · 1-2, 3-5
entering · 3-5
Programming languages · 6-9
Serial port · 1-2
SET DSKERR · 6-6
SETJOB · 4-7
Setting up AMOS disks · 4-12
Setup
saving settings · G-3
Setup Procedure · G-1
Software
Installation requirements · 2-3
Software Configuration · 2-4, 3-1
Disks Tab · 3-2
General Tab · 3-1
Network Tab · 3-4
Printers Tab · 3-3
SCSI Devices Tab · 3-4
Serial Ports Tab · 3-3
Virtual Terminals Tab · 3-2
Software Security Device (SSD) · 2-7
Specifications · 1-2
Spreadsheet program · 6-10
SuperFalcon · 1-1
characteristics · A-1
components · 1-2
defined · 1-1
features · 1-2
I/O ports · 1-2
serial ports · 1-2
SuperFalcon Board
installation · 2-7
SuperFalcon Serial Port Pinouts · F-1
SuperFalcon Serial Ports · F-1
Support information · 1-5
telephone number · 1-5
Switching between AMOS and WINDOWS · 5-2
Switching between Windows and AMOS · 5-1
SYSACT · 4-12, 6-3
SYSTAT · 4-5
System disk, defined · 6-1
System initialization file · 1-3, 4-4, 4-5, 5-2, G-3
modifying · 4-4
testing · 4-12
System status · 4-5
R
T
REDALL command · 6-6
Removal
Memory SODIMM · 2-7
Task manager · 4-4
Terminal
adding · 4-6
adding virtual terminal · 4-6
attaching job · 4-7
baud rate · 4-6
buffer sizes · 4-7
defining · 4-6
defining to AMOS · 4-6
driver · 4-7
emulation · 4-7
interface driver · 4-6
port number · 4-6
Networking · 6-10
TCP/IP · 6-10
O
Office information programs · 6-9
Operator terminal
displaying boot messages · G-3
memory size - refresh · G-3
parameters · G-1
setting baud rate in Setup · G-3
P
S
Safety Recommendations · 2-5
Saving Setup settings · G-3
SCSI
restrictions · A-2
SCSI Devices Tab
Software Installation · 3-4
SuperFalcon Owner’s Manual, Revision 03
Page iv
Terminal Cables · F-2
Testing system initialization file · 4-12
Text preparation · 6-9
TXTFMT · 6-9
TODOS · 7-1, 7-3
command format · 7-2
wildcards · 7-3
Transferring data · 7-1
Transferring files · 7-1
between Alpha Micro computers · 7-6
source and destination · 7-1
to other PCs · 7-5
TRMDEF · 4-6
statement format · 4-6
trouble shooting · I-1
TXTFMT · 6-9
U
Index
Utility programs · 6-9
V
Virtual terminal
switching between · 5-1
using · 5-1
W
Wildcards · 7-3
Windows
using AMOS with · 5-1
WINDOWS
file names · 7-2
transferring data to AMOS · 7-1
transferring files to · 7-1
User name · 6-4
default · 6-4
SuperFalcon Owner’s Manual, Revision 03