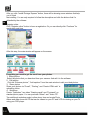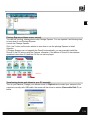
1
Manual de Usuario / User Manual
Cámara Digital
PC-4324D
ESTIMADO CLIENTE
Felicitaciones por su compra!
Por favor lea cuidadosamente este manual, y guárdelo para su
futura referencia
DEAR CUSTOMER
Congratulations for your purchase!
Please read this manual carefully, and keep it for future reference.
LÍNEAS DE SERVICIO AL CLIENTE
Venezuela:
Colombia:
Panamá:
0800 – ELECTRIC (353-2874)
01-900-331-PEJC (7352)
300-5185
SP
NOTA
Nos reservamos el derecho de modificar las especificaciones, características y/u operación de
este producto sin previo aviso con el fin de continuar las mejoras y desarrollo del mismo.
ÍNDICE
INTRODUCCIÓN ............................................................................................................................ 3!
CARACTERÍSTICAS....................................................................................................................... 3!
ÍTEMS INCLUIDOS EN EL EMPAQUE .......................................................................................... 3!
REQUERIMIENTOS DEL SISTEMA PARA WINDOWS 2000 XP .................................................. 4!
REQUERIMIENTOS DEL SISTEMA PARA WINDOWS VISTA/7 .................................................. 4!
REQUERIMIENTOS DEL SISTEMA PARA MACINTOSH ............................................................. 4!
DESCRIPCIÓN DE LA UNIDAD ..................................................................................................... 5!
PREPARAR LA UNIDAD PARA SER USADA ................................................................................ 5!
INSTALAR LA BATERÍA DE LITIO ............................................................................................. 5!
INSTALAR LA TARJETA DE MEMORIA SD .................................................................................. 6!
COMO SOSTENER LA UNIDAD CORRECTAMENTE CUANDO TOMA FOTOGRAFÍAS............ 7!
USO DE LA UNIDAD ...................................................................................................................... 7!
ENCENDER................................................................................................................................. 7!
APAGAR ...................................................................................................................................... 7!
SELECCIÓN DE MODO .............................................................................................................. 7!
MODO DE CÁMARA ................................................................................................................... 8!
MODO DE VIDEO ..................................................................................................................... 16!
MODO DE REPRODUCCIÓN ................................................................................................... 16!
REPRODUCIR UN ARCHIVO AVI ................................................................................................ 19!
INSTALACIÓN DEL SOFTWARE PHOTAGS EXPRESS ............................................................ 19!
TODO LO NECESARIO PARA OBTENER LO MEJOR DE SUS FOTOS.................................... 21!
DESCARGAR LAS FOTOS A SU PC ........................................................................................... 21!
MANUAL DE USUARIO DE PHOTAGS EXPRESS ..................................................................... 24!
TRANSFERIR FOTOS Y VIDEOS A SU COMPUTADOR MANUALMENTE ........................... 25!
TRANSFERIR FOTOS Y VIDEOS A SU MAC MANUALMENTE ............................................. 26!
MANTENIMIENTO DE LA UNIDAD .............................................................................................. 26!
ESPECIFICACIONES TÉCNICAS ................................................................................................ 26!
SOLUCIÓN DE PROBLEMAS ...................................................................................................... 27!
P-2
INTRODUCCIÓN
Todo lo que necesita para tomar fotos y videos de alta calidad esta incluido en esta cámara
digital.
Esta cámara digital también puede ser usada con un disco removible cuando una tarjeta SD (De
SP
hasta 32GB) este insertada en la unidad.
Lea este manual de usuario cuidadosamente con el fin de que obtenga los mejores resultados
de su cámara digital.
CARACTERÍSTICAS
•
•
•
•
•
•
•
•
•
•
•
•
Resolución de video digital: 1280-720 pixeles (720P), 640x480 pixeles (VGA), 320x240
pixeles (QVGA)
Cámara de 14.1 Mega pixeles (Interpolados) con posibilidad de elegir 9 resoluciones para la
cámara digital:
! (14M)4416x3312 Pixeles, (12M) 4000X3000 Pixeles ,(10M) 3648X2736
Pixeles, (9M) 3456x2592 Pixeles (7M HD) 3648x2048 Pixeles, (5M)
2592x1944 Pixeles, (3M) 2048x1536 Pixeles,(2M HD) 1920x1080 Pixeles,
(VGA) 640x480 Pixeles.
Pantalla LCD TFT de 2.7”
Zoom Óptico x 5
Zoom digital x 4
Estabilizador de imagen
Detector de rostro
Captura de sonrisa
Disparo continuo
Ranura para tarjetas de memoria con capacidad de hasta 32 GB
Flash incorporado
“Software PhoTags Express” para manejar y ordenar sus fotos, Impresiones, enviar fotos por
mail y mucho mas.
ÍTEMS INCLUIDOS EN EL EMPAQUE
•
•
•
•
•
•
•
P-3
Cámara digital
CD de instalación de software PhoTags Express
Cable USB
Manual de usuario
Correa de mano
Estuche
Batería de litio
REQUERIMIENTOS DEL SISTEMA PARA WINDOWS 2000 XP
Para descargar fotos en su computador, necesitara la siguiente configuración mínima:
• Procesador Pentium III ó superior con Windows 2000 XP
SP
•
•
•
•
•
RAM 128 MB, con 150 MB de espacio libre en disco.
Interfaz USB disponible
Unidad de CD-ROM
Resolución de pantalla recomendada 1024x768
Color de 16 bits ó superior adaptador de pantalla
REQUERIMIENTOS DEL SISTEMA PARA WINDOWS VISTA/7
Para descargar fotos en su computador, necesitara la siguiente configuración mínima:
• Windows vista o 7
• Procesador de 800 MHZ y 512 MB de memoria en el sistema
• Disco duro de 20 GB con al menos 15 GB de espacio disponible.
• Soporte para gráficos súper VGA
• Interfaz USB disponible
• Unidad de CD-ROM
REQUERIMIENTOS DEL SISTEMA PARA MACINTOSH
•
•
•
•
Potencia Macintosh G3 500 MHz ó Superior
Versión Mac OS X 10.5x ó posterior
128 MB ó mas sistemas disponibles de RAM (Recomendado 256MB). 150 MB de espacio
libre en disco.
800x600 ó mayor resolución del monitor que muestre millones de colores.
P-4
DESCRIPCIÓN DE LA UNIDAD
Obturador
SP
Micrófono
Luz flash
Agujero de
la correa
Luz LED
Botón de encendido
Parlante
Lente
Pantalla LCD Indicador de Carga/Funcionamiento
W/T (Alejar /
Acercar imagen)
Botón de modo
Flash / Arriba
Derecha / Borrar
Botón OK
Conector USB
Puerta de la batería / Ranura de Tarjeta SD
Soporte para trípode
Izquierda / Escena
Abajo / Temporizador
PREPARAR LA UNIDAD PARA SER USADA
INSTALAR LA BATERÍA DE LITIO
Esta cámara digital necesita una batería de litio para funcionar. Para
instalarla de manera correcta, observe la imagen a continuación:
1. deslice y abra la puerta de la batería ubicada en la parte inferior
de la cámara digital.
2. Inserte la batería correctamente, teniendo en cuenta su polaridad
3. Cierre la puerta de la batería
4. Cuando encienda la cámara digital el icono de la batería
aparecerá en la parte inferior derecha de la pantalla LCD:
Potencia de la Batería Llena
Potencia de la batería a la mitad
Potencia de la batería Baja
Nota:
• Para cargar la batería de litio, asegúrese que esta se encuentre correctamente instalada y
luego conecte su cámara al PC con el cable USB suministrado. El indicador LED rojo se
encenderá, indicando que la batería esta en modo de carga. El indicador LED se apagara
cuando la cámara este completamente cargada.
P-5
•
•
•
El indicador de potencia baja “
” se vera intermitente en la pantalla, indicando que la
carga es insuficiente y luego la cámara digital se apagara.
Remueva la batería de la unidad cuando no la use por periodos de tiempo prolongados
Fotos de prueba tomadas con la cámara digital deben ser descargadas a su computador , de
lo contrario se perderán si la cámara pierde potencia y se apaga ó cuando la puerta de la SP
batería es abierta para reemplazar la batería.
INSTALAR LA TARJETA DE MEMORIA SD
Es requerida una tarjeta de memoria SD para uso normal. Esta cámara digital soporta cualquier
tarjeta de memoria SD compatible (De hasta 32 GB).
Insertar una tarjeta de memoria en la cámara digital le permitirá
aumentar la capacidad de memoria de la cámara antes de
descargar las fotos y videos a la PC.
1. Ubique la ranura para tarjeta de memoria en la base de la
cámara digital
2. Inserte la tarjeta de memoria en la ranura y en la dirección
correcta, mire la imagen a continuación:
3. Presione la tarjeta hasta que sienta que esta ha entrado
completamente. El icono “SD” aparecerá en la pantalla LCD
luego de que encienda la cámara digital.
4. Una vez la tarjeta de memoria externa ha sido insertada en la cámara digital, todas las
imágenes serán guardadas en la tarjeta.
5. Asegúrese que la tarjeta no este bloqueada, ya que no se podrán transferir archivos a la
tarjeta si esta se encuentra bloqueada.
Nota:
• Una memoria interna limitada es suministrada para imágenes de prueba. La imagen se
borrara cuando la cámara digital se apague, por lo tanto descargue las imágenes antes de
que esto suceda.
• Si hay una foto en la memoria interna cuando inserte la tarjeta de memoria en la cámara
digital, esta será trasferida a la tarjeta de memoria externa si usted lo desea.
• Si formatea, serán borrados todos los archivos en la tarjeta de memoria SD, incluyendo los
archivos protegidos.
• No remueva la tarjeta de memoria SD durante el formateo, ya que se puede dañar la tarjeta
definitivamente.
• Cuando la tarjeta esta llena, descargue los archivos al PC y bórrelos de la tarjeta para que
pueda seguir guardando imágenes y videos en la misma.
P-6
COMO SOSTENER LA UNIDAD CORRECTAMENTE CUANDO TOMA
FOTOGRAFÍAS
Encienda la unidad y sostenga la cámara estable y correctamente, como lo indica el siguiente
diagrama.
SP
Nota:
No toque o mueva el lente una vez este abierto ó en uso, ya que esto puede dañar la cámara.
USO DE LA UNIDAD
ENCENDER
Presione el botón de encendido en la parte superior de la cámara para encenderla. La pantalla
LCD se encenderá y el lente se extrae, indicando que la cámara digital esta encendida y lista
para ser usada.
APAGAR
Presione el botón de potencia para apagar la cámara digital. Cuando la carga de la batería es
insuficiente, un icono rojo “
” aparecerá en la pantalla LCD indicando que la batería debe ser
cargada. La cámara se apagara automáticamente después de algunos segundos.
SELECCIÓN DE MODO
Esta cámara digital tiene 3 modos principales: Modo de cámara, Modo de video y Modo de
reproducción.
•
El modo de cámara es para que pueda tomar fotos fijas, realice los ajustes de la cámara.
•
Puede capturar videos en el modo de video.
•
En modo de reproducción, Puede pre visualizar fotos y videos. También puede rotar,
proteger, borrar, cortar, etc.
Para seleccionar el modo deseado siga los siguientes pasos:
1. El modo de cámara aparece una vez es encendida la unidad.
2. Presione el botón de modo para intercambiar entre los 3 modos
P-7
3. Al seleccionar el modo, aparecerá el icono correspondiente en la esquina superior izquierda
de la pantalla LCD.
(Modo de cámara),
(Modo de Video), (Modo de reproducción).
MODO DE CÁMARA
SP
Este modo esta preestablecido cuando la cámara se enciende.
TOMAR FOTOS:
1. Enfoque la imagen que desea capturar usando la pantalla LCD
2. Sostenga la cámara digital con firmeza y presione el obturador para tomar la fotografía
3. Mantenga sus dedos en el obturador y espere a que la cámara enfoque el objeto.
4. Centre el objeto con el marco blanco que aparece en la pantalla LCD.
5. Cuando el marco se vuelve verde la imagen será capturada.
6. Hay una pequeña demora mientras la cámara guarda la foto JPEG en la memoria.
•
•
Cuando la memoria de la cámara esta llena, aparecerá un mensaje en la pantalla LCD
indicando que debe insertar una tarjeta de memoria SD.
Descargue las fotos en su PC usando el software PhoTags Express y luego bórrelas de la
tarjeta de memoria ó inserte otra tarjeta SD para continuar tomando fotos.
Nota:
Esta cámara necesita una tarjeta de memoria SD para operar normalmente. La memoria interna
limitada de la cámara le permite tomar muy pocas fotografías, y estas serán borradas una vez se
apaga la cámara.
ZOOM ÓPTICO:
Es posible ampliar el sujeto hasta 5 veces con el Zoom Óptico presionando el botón “T” y el
botón “W” para alejar.
Nota: Cuando use esta función la cámara automáticamente ajustara el lente. No toque el lente
mientras la cámara se esta ajustando.
ZOOM DIGITAL:
Es posible ampliar el sujeto hasta 4 veces usando el zoom digital. Presione el botón “T” y el
botón “W” para alejar.
El siguiente icono aparecerá en la pantalla LCD:
FLASH:
En condiciones de poca luz es mejor utilizar el flash incorporado. También puede utilizar el flash
para compensar las condiciones con luz de fondo.
Auto
Flash forzado
Reducción de ojos rojos
Sin flash
P-8
Siga los siguientes pasos para ajustar el flash:
Nota: El flash solo puede ser usado cuando la cámara esta en modo de “Distancia”
SP
.
1. Presione el botón Flash / Arriba
2. El icono de flash auto “ ” aparece en la pantalla LCD. El flash se activara automáticamente.
3. El icono “ ”, así como el indicador LED rojo empezaran a parpadear indicando que el flash
esta cargando.
4. Presione el botón flash / arriba de nuevo para que el icono de Flash forzado “ ” aparezca en
la pantalla LCD. Esto significa que la función de flash será manual
Si el flash no esta listo, el indicador LED rojo se encenderá y el icono “ ” parpadeara
repetidamente esperando a que el flash este listo antes de tomar la foto.
Nota: La advertencia “Batería baja” aparecerá en la pantalla si hay insuficiente potencia de
batería para operar el flash.
5. Presione el botón de flash / arriba hasta que el icono de Reducción de ojos rojos “
”
aparezca en la pantalla LCD.
6. Presione el botón de flash / arriba hasta que el icono “
” aparezca en la pantalla LCD.
BOTONES RÁPIDOS DEL MENÚ
Esta cámara digital tiene 4 botones rápidos en el dial del menú para un acceso rápido a las
siguientes funciones:
(Escena: Botón Izquierdo / Temporizador: Botón Abajo / Borrar: Botón Derecho / Flash: Botón
Arriba)
• Escena: las 9 opciones de escena aparecen en la pantalla LCD para su selección:
Auto, Retrato nocturno, Escena nocturna, Retrato, Paisaje, Deportes, Fiesta, Playa, Alta
sensibilidad.
Seleccione la escena de acuerdo con la luz y las condiciones del medio ambiente en el
momento de tomar la fotografía.
1. Presione el botón OK
2. Presione el botón de derecha ó izquierda para seleccionar el icono de escena.
3. El menú de escena aparecerá en el centro de la pantalla LCD
4. Presione el botón de arriba ó abajo para seleccionar la escena que desea usar.
Auto
Retrato Nocturno
Escenario Nocturno
Retrato
Paisaje
Deportes
Fiesta
Playa
Alta Sensibilidad
5. Presione el botón OK para confirmar, guardar su selección y salir.
6. El icono seleccionado aparece siguiente al icono de la cámara en la parte superior izquierda
de la pantalla LCD.
•
Temporizador: Presione el botón de temporizador para activar una de las 4 opciones de
temporizador: 2 Seg., 5 Seg., 10 Seg. ó apagado.
• Borrar: Presionando este botón borrara la imagen anterior (Fotos o videos capturados)
1. Presione el botón Borrar (Derecho)
P-9
2. Un mensaje de confirmación aparecerá en la pantalla LCD con las opciones “SI” ó “NO”.
Seleccione la opción “SI” si desea borrar la foto, de lo contrario elija “NO” con los botones
Derecho e Izquierdo.
3. Presione el botón OK para confirmar la selección.
•
Flash
SP
Tamaño de imagen: los ajustes de tamaño de imagen determinan la calidad y el numero de
fotos que pueden ser guardadas y la cantidad de memoria requerida para cada foto. Entre
mayor calidad tenga la foto, mas memoria ocupara.
El tamaño de la imagen y la calidad también afectaran el tamaño máximo de impresión de la
foto. Para ajustar el tamaño de la foto siga los siguientes pasos:
1. Presione el botón OK
2. Presione el botón de derecha e izquierda para seleccionar el icono “ ”
3. El menú del tamaño de imagen aparecerá en el centro de la pantalla LCD
4. Presione los botones de arriba y abajo para seleccionar el tamaño de la imagen que desea
usar.
(14M)4416x3312,(12M)4000X3000, (10M) 3648X2736, (9M) 3456x2592, (7M HD)
3648x2048, (5M) 2592x1944, (3M) 2048x1536, (2M HD) 1920x1080 y (VGA) 640x480
5. presione el botón OK para confirmar, guardar y salir al modo de espera de cámara
6. el icono del tamaño de imagen seleccionado aparecerá en la parte superior de la pantalla
Nota:
• Para un tamaño de imagen mayor a 3M, es necesario que inserte una tarjeta SD en la
cámara digital.
• La cámara tiene dos tamaños de imagen de alta definición HD “7M” y “2M”.
•
Anti-vibración: Esta cámara digital tiene una función que previene que las fotos queden
borrosas como resultado de temblor o vibración cuando esta tomando la fotografía. No es
necesario usar un trípode para tomar fotos de alta calidad.
1. Presione el botón OK
•
2. Presione los botones de izquierda y derecha para seleccionar el icono “ ”
3. El menú de la función Anti-vibración aparece en el centro de la pantalla LCD
4. Presione los botones de arriba y abajo para seleccionar si desea activar o desactivar la
función
5. presione el botón OK para confirmar, guardar y salir al modo de espera de cámara
6. el icono de Anti-vibración aparecerá en la parte inferior de la pantalla
•
1.
2.
3.
4.
Macro: esta cámara digital tiene la función que le permite capturar objetos con el ajuste de
distancia hiperfocal, ya sea para distancias cortas (Hasta 80cm) ó para distancias largas.
Presione el botón OK
Presione los botones de izquierda y derecha para seleccionar el icono “ ”
El menú de la función Macro aparece en el centro de la pantalla LCD
Presione los botones de arriba y abajo para seleccionar si desea activar o desactivar la
función
P-10
SP
Fotografía Macro - Activar
Captura a largas distancias - Desactivar
5. presione el botón OK para confirmar, guardar y salir al modo de espera de cámara
6. el icono de Anti-vibración aparecerá en la parte superior de la pantalla
Nota: la captura a largas distancias es el modo pre ajustado por fabrica.
•
1.
2.
3.
4.
5.
6.
•
1.
2.
3.
4.
5.
•
1.
2.
3.
4.
5.
•
1.
2.
3.
4.
5.
6.
P-11
Detección de rostro: esta cámara soporta la función de detección de rostro, lo cual permite
capturar mejores fotografías de retratos.
Presione el botón OK
Presione los botones de izquierda y derecha para seleccionar el icono “ ”
El menú de la función de detección de rostro aparece en el centro de la pantalla LCD
Presione los botones de arriba y abajo para seleccionar si desea activar o desactivar la
función
presione el botón OK para confirmar, guardar y salir al modo de espera de cámara
el icono de detección de pantalla aparecerá en la parte superior de la pantalla
Captura de sonrisa: Esta cámara digital le permite capturar rostros con sonrisas sin
necesidad de presionar ningún botón
Presione el botón OK
Presione los botones de izquierda y derecha para seleccionar el icono “ ”
Presione los botones de arriba y abajo para seleccionar si desea activar o desactivar la
función
presione el botón OK para confirmar, guardar y salir al modo de espera de cámara
capture el rostro sonriente con su cámara y esta tomara y guardara automáticamente la
fotografía si esta función esta activada.
Disparo continuo: Puede tomar 6 fotos seguidas después de presionar el obturador y si
esta función se encuentra activada.
Presione el botón OK
Presione los botones de izquierda y derecha para seleccionar el icono “ ”
Presione los botones de arriba y abajo para seleccionar si desea activar o desactivar la
función
Presione el obturador, y la cámara tomara 6 fotos continuas si la función ha sido activada
Presione el botón OK nuevamente para confirmar
Medición: Este ajuste le permite seleccionar la medición mas apropiada para ser usada en
una variedad de condiciones de iluminación.
Presione el botón OK
Presione los botones de izquierda y derecha para seleccionar el icono “ ”
El menú de la función de medición aparece en el centro de la pantalla LCD
Presione los botones de arriba y abajo para seleccionar compensación en el centro / Multi /
Puntual.
presione el botón OK para confirmar, guardar y salir al modo de espera de cámara
el icono de medición aparecerá en la parte superior de la pantalla
•
1.
2.
3.
4.
5.
6.
Modo AF: Puede seleccionar la manera adecuada de enfocar un objeto automáticamente
Presione el botón OK
Presione los botones de izquierda y derecha para seleccionar el icono “ ”
El menú de Modo AF aparece en el centro de la pantalla LCD
Presione los botones de arriba y abajo para seleccionar AF Sencillo / AF Multi
presione el botón OK para confirmar, guardar y salir al modo de espera de cámara
el icono de Modo AF aparecerá en la parte superior de la pantalla
SP
Temporizador: Usted puede estar en la foto usando esta característica, ya que al momento
de presionar el obturador la cámara se demora un momento en tomar la fotografía. Es
recomendado que use un trípode o que coloque la unidad en un lugar plano y estable
cuando use esta función.
1. Presione el botón OK
•
2.
3.
4.
5.
6.
7.
Presione los botones de izquierda y derecha para seleccionar el icono “ ”
El menú del Temporizador aparece en el centro de la pantalla LCD
Presione los botones de arriba y abajo para seleccionar una de las opciones de temporizador
presione el botón OK para confirmar, guardar y salir al modo de espera de cámara
el icono del temporizador aparecerá en la parte superior de la pantalla
presione el obturador hasta que vea que el tiempo del temporizador empieza a descender. La
cámara digital contara 2, 5 ó 10 segundos según el ajuste realizado por usted, y el indicador
LED parpadeara y luego se tomara la fotografía automáticamente.
• Configuración: Hay 14 opciones para configurar su cámara digital:
1. Exposición: Este ajuste le permite controlar el brillo de sus imágenes
! Presione el botón OK
! Presione los botones de arriba y abajo para seleccionar una valor de
exposición (Siendo 3 el mas brillante y -3 el mas oscuro).
! presione el botón OK para confirmar, guardar y salir al modo de espera de
cámara
! el icono de exposición para la opción que usted selecciono aparecerá en la
parte inferior de la pantalla
2. ISO: Esta función le permite compensar las condiciones de luz, cuando la fuente de
iluminación no es buena y también específicamente si no desea usar flash o trípode. Cuando
use la sensibilización ISO, elija el valor bajo para evitar que puntos o manchas aparezcan en
la fotos.
! Presione los botones de arriba y abajo para seleccionar las opciones ISO en
el menú de configuración.
! Presione el botón OK
! Presione los botones de arriba y abajo para seleccionar un valor ISO desde
el menú que aparece.
! presione el botón OK para confirmar, guardar y salir al modo de espera de
cámara
! el icono ISO para la opción que usted selecciono aparecerá en la parte
inferior de la pantalla.
P-12
3. Balance de blancos: Este ajuste le permite ajustar el color de sus fotos según el color de la
fuente de luz.
! Presione los botones de arriba y abajo para seleccionar las opciones de
balance de blancos en el menú de configuración.
! Presione el botón OK
SP
! Presione los botones de arriba y abajo para seleccionar las opciones desde
el menú que aparece:
Auto
Luz de día
Nublado
Fluorescente
Incandescente
! Presione el botón OK para confirmar, guardar y salir al modo de espera de
cámara
! La pantalla LCD será ajustada de acuerdo a la opción que usted selecciono.
4. Nitidez: Esta función le permite ajustar la nitidez de la imagen haciendo los bordes mas ó
menos distintos.
! Presione los botones de arriba y abajo para seleccionar las opciones de
nitidez en el menú de configuración.
! Presione el botón OK
! Presione los botones de arriba y abajo para seleccionar las opciones desde
el menú que aparece:
! Presione el botón OK para confirmar, guardar y salir al modo de espera de
cámara
! La pantalla LCD será ajustada de acuerdo a la opción que usted selecciono.
5. Calidad: la calidad de las fotos también afecta el numero de fotos que puede tomar. Un
mayor ajuste significa que puede tomar menos fotos, pero estas serán de mejor calidad. El
ajuste predeterminado es Fino.
! Presione los botones de arriba y abajo para seleccionar la opción de
Calidad en el menú de configuración.
! Presione el botón OK
! Presione los botones de arriba y abajo para seleccionar las opciones desde
el menú que aparece:
! Presione el botón OK para confirmar, guardar y salir al modo de espera de
cámara
! El icono de Calidad para la opción que usted selecciono aparecerá en la
esquina izquierda inferior de la pantalla.
Súper fina
Fina
Normal
6. Zoom digital: Puede activar o desactivar esta función
! Presione los botones de arriba y abajo para seleccionar la opción de Zoom
digital en el menú de configuración.
! Presione el botón OK
! Presione los botones de arriba y abajo para seleccionar Activar o Desactivar
! Presione el botón OK para confirmar, guardar y salir al modo de espera de
cámara
P-13
7. Fecha: Esta función le permitirá ajustar la fecha que será mostrada en las fotos
! Presione los botones de arriba y abajo para seleccionar la opción Fecha en
el menú de configuración.
! Presione el botón OK
! Presione los botones de arriba y abajo para seleccionar las opciones de SP
fecha del menú que aparece:
Si selecciona la opción “ON” la fecha aparecerá en las fotos una vez
tomadas.
Si selecciona la opción “OFF” la fecha no aparecerá en las fotos.
Si selecciona la opción “Establecer Fecha” la pantalla de ajuste de
fecha aparecerá. Con este ajuste usted podrá cambiar los ajustes de
fecha que aparecen en la foto una vez es tomada.
8. Ajustar la fecha:
! Presione los botones de arriba y abajo para seleccionar la opción de ajuste
de fecha
! Presione el botón OK
! Presione los botones de izquierda y derecha para seleccionar
y resaltar el año, mes, día, hora, minuto, segundo y tipo de
formato de la fecha. Presione los botones de arriba y abajo
para ajustar la fecha, hora y formato.
! Presione el botón OK para confirmar, guardar y salir.
9. Pitido (Sonido “Beep”): Puede activar o desactivar esta función
! Presione los botones de arriba y abajo para seleccionar la opción de pitido
en el menú de configuración.
! Presione el botón OK
! Presione los botones de arriba y abajo para seleccionar Activar o Desactivar
! Presione el botón OK para confirmar, guardar y salir al modo de espera de
cámara
10. Apagado automático: Usando esta función la cámara digital se apagara automáticamente si
no es usada por 60 segundos. Use las opciones para cambiar el ajuste.
! Presione los botones de arriba y abajo para seleccionar la opción de
apagado automático en el menú de configuración.
! Presione el botón OK
! Presione los botones de arriba y abajo para seleccionar la opción de
apagado automático de el menú que aparece
! Presione los botones de arriba y abajo para seleccionar el tiempo en que
desea que la cámara se apague automáticamente.
Nota: Si selecciona la opción “None” (Ninguna), la cámara no se apagara
automáticamente y usted deberá apagarla manualmente o esta se apagara
una vez la carga de la batería esta agotada.
! Presione el botón OK para confirmar, guardar y salir al modo de espera de
cámara
P-14
SP
11. Idioma: Esta cámara digital soporta muchos idiomas.
! Presione los botones de arriba y abajo para seleccionar el menú de idioma.
! Presione los botones de arriba y abajo para seleccionar el idioma deseado.
! Presione el botón OK para confirmar, guardar y salir.
12. Frecuencia: seleccione la frecuencia para el medio ambiente local. Generalmente, 60Hz es
para E.U y 50Hz para Europa y Japón. La frecuencia predeterminada es 60Hz.
! Presione los botones de arriba y abajo para seleccionar la Opción de
frecuencia en el menú de configuración.
! Presione el botón OK
! Presione los botones de arriba y abajo para seleccionar una opción de
frecuencia del menú que aparece.
! Presione el botón OK para confirmar, guardar y salir.
13. Formato: Esta función formateara la tarjeta de memoria y borrara todos los archivos de la
memoria, incluyendo los archivos que han sido protegidos.
Importante!
Use esta función con precaución. Una vez formateada todas la imágenes que hay en la memoria
serán borradas. Este proceso es irreversible. Antes de formatear la memoria recomendamos
descargar todos los archivos al computador.
! Presione los botones de arriba y abajo para seleccionar la Opción de
Formato en el menú de configuración.
! Presione el botón OK
! Presione los botones de arriba y abajo para seleccionar OK
! Presione el botón OK para confirmar.
! Un mensaje de confirmación aparecerá en la pantalla
Presione los botones de derecha e izquierda para seleccionar si desea
formatear la tarjeta de memoria o no.
! Presione el botón OK para confirmar la opción deseada.
14. Ajustes predeterminados: Usted puede restaurar la cámara digital a los ajustes
predeterminados por fabrica.
! Presione los botones de arriba y abajo para seleccionar la Opción de ajustes
predeterminados en el menú de configuración.
! Presione el botón OK
! Presione los botones de arriba y abajo para seleccionar OK
! Presione los botones de arriba y abajo para seleccionar la opción deseada
! Presione el botón OK para confirmar.
! Si selecciono “OK”, aparecerá un mensaje en la pantalla:
!
!
P-15
Presione los botones de derecha e izquierda para seleccionar “SI” ó
seleccionar “NO” y salir del menú.
MODO DE VIDEO
Presione el botón de modo para seleccionar el modo de video.
Nota: Debe insertar una tarjeta de memoria para capturar videos.
” aparece en la esquina izquierda superior de la pantalla, usted esta en
Cuando el icono “
SP
modo de video.
1. Prepare el objeto que desea grabar
2. Presione el obturador para iniciar la grabación.
3. El tiempo transcurrido aparecerá en la parte superior derecha de la pantalla y el icono “ ”
parpadeara en la pantalla LCD.
4. Presione el obturador nuevamente para detener la grabación y guardar el archivo en formato
AVI.
Nota: Puede pre visualizar los archivos AVI en modo de reproducción ó descargarlos a su
computador usando “Quick Time” y el reproductor Media de Windows.
La cámara digital tiene función de audio. Cuando la cámara graba un video las voces serán
grabadas. En modo de video hay 3 opciones de configuración: Balance de blancos, Tamaño y
Macro.
• Balance de Blancos: (Refiérase a la sección anterior (Configuración / Balance de
blancos) para ajustar las opciones de balance de blancos)
• Tamaño: (Refiérase a la sección (BOTONES RÁPIDOS DEL MENÚ / Tamaño de
Imagen) para ajustar el tamaño de las fotos)
• Macro: (Refiérase a la sección (BOTONES RÁPIDOS DEL MENÚ / Macro) para ajustar
las opciones)
MODO DE REPRODUCCIÓN
Presione el botón de modo para seleccionar el modo de reproducción.
Cuando el icono “ ” aparece en la esquina izquierda superior de la pantalla, usted esta en modo
de reproducción.
En este modo usted puede pre visualizar fotos y videos que ha capturado y que estas
guardados. Con esta función usted puede rotar, proteger, borrar y cortar sus fotos y proteger y
borrar video clips. Puede además imprimir fotos directamente desde su cámara usando
“PictBridge”.
Nota: El mensaje “No Existen Archivos” aparecerá en la pantalla si no hay fotos o videos en la
cámara digital. Presione el botón de modo para ir al modo de imágenes o video y empezar a
tomar imágenes o videos.
•
1.
2.
3.
4.
Pantalla completa para mostrar imágenes en miniatura: Cuando la cámara esta en modo de
reproducción y una imagen ó video aparece en la pantalla LCD:
Presione el botón W
Se abrirá una pantalla con imágenes en miniatura
Presione los botones Arriba / Abajo / Derecha / Izquierda y seleccione una imagen en
miniatura de una foto o un video.
Presione el botón OK para mostrar la foto o el video en la pantalla completa.
• Acercar o alejar la foto:
1. Seleccione la foto
P-16
2. El icono “ ” aparecerá en la esquina superior izquierda de la pantalla indicando que esta en
modo de reproducción
3. Presione el botón T para acercar la foto
4. Presione los botones Arriba / Abajo / Derecha / Izquierda para moverse a través de la foto
SP 5. Presione el botón W para alejarse.
Funciones de operación para las fotos: Seleccione la foto de la pantalla de imágenes en
miniatura ó visualice las imágenes una por una presionando el botón de derecha e izquierda.
Seleccione la foto que desea rotar, proteger, borrar, cortar o imprimir y siga las siguientes
opciones:
•
Rotar: Esta función solo funciona con imágenes guardadas en la tarjeta SD
1. Presione el botón OK
2. Presione los botones de derecha e izquierda para seleccionar la opción Rotar.
3. Presione el botón de arriba y abajo para seleccionar la opción Rotar del menú que aparece
4. Presione el botón OK para confirmar cuantos grados desea rotar la foto
5. Espere un momento mientras la foto es rotada
6. La foto será rotada y guardada.
Nota:
1. Un archivo protegido no puede ser rotado.
2. Es necesario que inserte una tarjeta SD para usar esta función.
Proteger: Puede proteger sus fotos o videos de borrado accidental, seleccionado la
característica “Bloquear”.
1. Presione el botón OK
.
2. Presione los botones de derecha e izquierda para seleccionar la opción Proteger
3. Presione el botón de arriba y abajo para seleccionar las opciones de protección que
aparecen en el menú.
4. Presione el botón OK para confirmar
Nota: Para desbloquear el archivo, siga los anteriores pasos y seleccione “Desbloquear” y
presione el botón OK para confirmar.
Borrar: Borre fotos o videos que no desee conservar con el fin de aumentar el espacio en la
memoria. Puede borrar una foto o video ó puede borrar todos los archivos excepto los que
están protegidos.
1. Presione el botón OK
2. Presione los botones de derecha e izquierda para seleccionar la opción Borrar.
3. Presione el botón de arriba y abajo para seleccionar Borrar esta imagen / Borrar Todas las
imágenes / Cancelar.
4. Presione el botón OK para confirmar la opción deseada
Nota: Los archivos protegidos no pueden ser borrados.
Si elije la opción Borrar Todo, todos los archivos, excepto los que están protegidos, serán
borrados de la tarjeta de memoria SD. Este proceso es irreversible.
P-17
Cortar una imagen: Corte sus fotos para resaltar y guardar una parte especifica de la imagen.
Esta característica le permite guardar la parte de la imagen que corto como una nueva foto.
Nota: solo las fotos en la tarjeta SD pueden ser cortadas
1.
2.
3.
4.
5.
6.
7.
SP
Presione el botón OK
Presione los botones de derecha e izquierda para seleccionar la opción Cortar
Presione los botones de arriba y abajo para seleccionar Cortar o Cancelar.
Presione el botón OK para confirmar
Si selecciona la opción cortar, un rectángulo azul aparecerá en la pantalla
Con los botones W y T determine el tamaño del área que desea cortar
Presione los botones Arriba / Abajo / Derecha / Izquierda para navegar por el área de la foto
que desea cortar
8. Presione el obturador para confirmar el área que va a cortar ó el botón OK para salir
9. La parte de la foto cortada es guardada como una nueva foto en la memoria de la tarjeta SD.
Pictbringe: Puede imprimir fotos directamente desde la cámara con una impresora compatible.
1. En modo de reproducción, seleccione la foto que desea imprimir presionando el botón
derecho e izquierdo.
2. Presione el botón OK
3. Presione los botones derecho e izquierdo para seleccionar la función “PictBringe” .
4. Presione los botones arriba y abajo y seleccione “PictBringe” para imprimir las fotos o
presione Cancelar para salir.
5. Presione el botón OK para ingresar al modo “PictBringe”.
6. Aparecerá un mensaje en la pantalla LCD “Por favor conecte el dispositivo”
7. Conecte su cámara digital a una impresora compatible con el cable USB suministrado para
imprimir las imágenes.
8. Si selecciona la opción “Esta imagen”, hay 4 opciones para su selección:
a) Presione el botón OK y seleccione la opción OK para iniciar la impresión.
b) Presione el botón de arriba y abajo para seleccionar la opción cancelar y
salir del menú.
c) Presione el botón de arriba y abajo para seleccionar la opción “No. De
Copias” desde el menú “Esta Imagen”. Si selecciona por ejemplo “10”
significa que usted desea imprimir 10 copias de esa imagen.
d) Presione el botón de arriba y abajo para seleccionar la opción “Tamaño”.
En esta opción puede ajustar el tamaño de impresión.
9. Si desea imprimir las fotos seleccionadas, necesita seleccionar la opción “Seleccionar
imágenes”.
Luego seleccione “Seleccionar” desde el menú y presione el botón OK para
confirmar. En ese momento, puede seleccionar otra foto.
a) Presione el botón Ok una vez, la imagen será seleccionada y el icono
“ ” aparecerá en la esquina izquierda de la pantalla. Si presiona el
botón OK nuevamente, se cancela la selección.
b) Presione los botones de izquierda y derecha para visualizar otras
fotos, luego presione el botón OK para confirmar.
Cuando el icono “ ” aparece, es por que esa foto ha sido seleccionada
P-18
10. Cuando la impresión a finalizado, presione el botón de menú para regresar al menú del modo
“PictBringe”
REPRODUCIR UN ARCHIVO AVI
SP 1. En modo de reproducción, presione los botones derecho e izquierdo para seleccionar un
archivo de video AVI que desee reproducir.
2. Presione el botón W para ingresar al modo de imágenes en miniatura y seleccione un video.
El video tiene el icono “
” en la imagen en miniatura. Presione el botón OK para que el
video seleccionado aparezca en la pantalla completa.
3. Presione el obturador para reproducir el video AVI seleccionado
4. Presione el botón de arriba para detener la reproducción del video
5. Presione el obturador nuevamente para pausar la reproducción del video.
Nota: Igual que con las fotos, los videos pueden ser también protegidos para evitar borrarlos por
accidente.
INSTALACIÓN DEL SOFTWARE PHOTAGS EXPRESS
Nota: Asegúrese que la cámara digital no esta conectada al computador.
Inserte el CD del software a su computador. Después de algunos segundos, se mostrara una
ventana de instalación en la pantalla.
Opciones:
“Install AP”
“Install DirectX”
“Browse CD”
“Exit”
INSTALAR PHOTAGS EXPRESS
Haga clic en “Install AP” para iniciar el proceso de instalación. La ventana de idiomas aparecerá
en la pantalla y usted podrá elegir el idioma que desea usar.
P-19
Luego la ventana del instalador será mostrada
SP
Después de dar clic en el botón “Instalar Photags Express”, serán mostradas algunas ventanas
que lo ayudaran a finalizar la instalación. Solo es necesario que siga las descripciones y haga
clic en los botones que están preestablecidos por el software.
REGISTRO EN LÍNEA
Haga clic en el botón “Registrarse en línea” para registrarse ó puede hacer clic en “Continuar”
para registrarse en otra ocasión.
Después de este paso, la ventana principal aparecerá en la pantalla
P-20
TODO LO NECESARIO PARA OBTENER LO MEJOR DE SUS FOTOS
1. Seleccionar la foto: Seleccione la foto que usted descargo desde su cámara digital y edítela
en el software.
2. Editar fotos: Haga clic en “Mejorar fotos” y “Añadir títulos” desde la ventana principal para
SP
editar sus fotos
3. Compartir fotos: comparta sus fotos a través de “E-mail”, “Impresión” y “Crear Web HTML”
para subir sus fotos en línea.
4. Taller: Cree “Calendarios, “Tarjetas de Presentación” y “Postales” en papel fotográfico
estándar. Puede comprar “Álbum” y “CD de video”.
DESCARGAR LAS FOTOS A SU PC
Encienda la cámara digital y conéctela al computador correctamente con el cable USB
suministrado. En la ventana del computador aparecerá una ventana (Disco removible H:) de la
siguiente manera:
P-21
Nota: Ahora puede copiar las fotos al computador. Siga los siguientes métodos:
1. Descargue las fotos directamente desde las ventanas
Elija la opción “Copiar imágenes de una carpeta en mi computador” en la ventana del disco
removible (H:). Después de que haga clic en la opción OK, serán mostradas unas ventanas en la SP
pantalla. Solo necesita seguir las descripciones y hacer clic en los botones que este
predeterminados por el sistema para finalizar la transferencia.
O puede seguir los siguientes pasos:
• Haga clic en el botón INICIAR en la ventana.
• Haga clic en el icono “MI PC” en el escritorio.
• Su tarjeta de memoria aparecerá como un “Dispositivo de almacenamiento removible”.
• Haga clic en la opción “Dispositivo de almacenamiento removible” para visualizar las
imágenes. Las imágenes serán almacenadas en una subcarpeta llamada “DCM100”.
• Puede ahora copiar y pegar las imágenes en cualquier directorio que elija.
2. Descargar fotos usando PhoTags Express
en el escritorio para iniciar la
Haga doble clic en el icono de PhoTags Express
aplicación.
• Haga clic en el botón “Obtener fotos” en la ventana principal.
• El modo de asistente de la opción “Obtener fotos” aparecerá en la pantalla, puede
seleccionar “Copia personalizada” para descargar las fotos.
• Ó puede seleccionar la opción “Express” para descargar todas las fotos al computador sin
tener que seleccionar fotos. En este modo usted no podrá pre visualizar las fotos
descargadas.
Copia personalizada:
•
Este modo es usado para seleccionar manualmente las fotos que desee copiar a su computador.
El modo de “Selección del dispositivo” aparecerá. Su cámara digital y la tarjeta de memoria
aparecerán en la lista de “Dispositivos Activos”.
Seleccione “Copia personalizada” y haga clic en “Siguiente” para continuar.
Nota: En este momento, puede seleccionar la opción “Express” para copiar todas las fotos al
computador.
P-22
SP
seleccione sus fotos y haga clic en “Siguiente” para continuar.
Añada activar títulos en la imagen. con esta función puede añadir una fecha, palabras clave y
categorías. Haga clic en “Siguiente” para continuar.
P-23
Elija el lugar donde quiere colocar las fotos. Haga clic en “Finalizar” para copiar las fotos en el
lugar seleccionado.
Nota: Todas las imágenes que usted importo aparecerán en la ventana principal de “Selección
de fotos”. Puede editarlas y luego descargarlas a su computador. Para obtener información
sobre como editar las fotos, puede referirse a la guía de “Quick Start” en el PhoTags Express.
SP
MANUAL DE USUARIO DE PHOTAGS EXPRESS
Puede editar, imprimir y compartir fotos con PhoTags Express.
Lea atentamente los siguientes pasos para operar PhoTags Express:
Haga clic en la opción “Tour” en la ventana principal para saber como usar en detalle PhoTags
Express.
Atención:
Si PhoTags Express no puede actualizar el “DirectX” automáticamente, usted puede hacerlo
manualmente instalando el “DirectX” en el CD antes de usar la cámara, de lo contrario, si la
edición de “DirectX” en las ventanas de operación es menor a 8.1 el formato AVI no podrá ser
reproducido.
Clic Aquí!
P-24
TRANSFERIR FOTOS Y VIDEOS A SU COMPUTADOR MANUALMENTE
SP
Encienda la cámara digital, y cámbiela a modo de reproducción. Conecte la cámara
correctamente al computador usando el cable USB suministrado.
La pantalla mostrara una ventana (Disco removible F:):
Nota: Ahora puede descargar las fotos y videos a su computador siguiendo los dos métodos que
encontrara a continuación:
1. Descargar las fotos directamente desde la ventana
Elija la opción “Copiar imágenes de una carpeta en mi computador” en la ventana del disco
removible (F:). Después de que haga clic en la opción OK, serán mostradas unas ventanas en la
pantalla. Solo necesita seguir las descripciones y hacer clic en los botones que están
predeterminados por el sistema para finalizar la transferencia.
2.
•
•
•
•
P-25
Puede seguir los siguientes pasos:
Haga clic en el icono “MI PC” en el escritorio.
Su tarjeta de memoria aparecerá como un “Dispositivo de almacenamiento removible”.
Haga clic en la opción “Dispositivo de almacenamiento removible” para visualizar las
imágenes. Las imágenes serán almacenadas en una subcarpeta llamada “DCM100”.
Puede ahora copiar y pegar las imágenes en cualquier directorio que elija.
TRANSFERIR FOTOS Y VIDEOS A SU MAC MANUALMENTE
El software PhoTags Express no es compatible y no instalara en un computador MAC.
Siga los siguientes pasos para transferir fotos y videos a su computador MACINTOSH
1. Conecte la cámara digital a un puerto USB disponible
2. Una nueva unidad se montara en el escritorio, la cual almacena las fotos y videos que han SP
sido tomados.
MANTENIMIENTO DE LA UNIDAD
Esta cámara digital es un dispositivo delicado, sosténgala con cuidado para evitar dañarla.
ESPECIFICACIONES TÉCNICAS
Sensor de imagen
Resolución de imagen
Resolución de video
Formato de archivos
Memoria externa
Pantalla LCD
Lente
Zoom
Exposición
Balance de blancos
Escena
Flash
Temporizador
Anti-Vibración
PictBridge
Detección de rostro
Interfaz
Requerimientos del sistema
Batería
Temperatura de funcionamiento
Sensor CCD
4416x3312(14MP), 4000x3000(12MP), 3648x2736(10MP),
3456x2592(9MP), 3648x2048(7MPHD), 2592x1944(5MP),
2048x1536(3MP), 1920x1080(2MP) HD, 640x480(VGA)
1280X720 Pixeles (720P). 640x480 Pixeles (VGA),
320x240 Pixeles (QVGA).
JPEG/AVI
Tarjeta de memoria AD (De Hasta 32 GB)
TFT 2.7”
Lente Óptico x 3 Zoom
Zoom Digital x 4, Zoom Óptico x 5
-3.0EV ~ +3.0EV
Auto, Luz de día, Nublado, Incandescente, Fluorescente
Auto / Retrato de Noche / Escenario de Noche / Retrato /
Paisaje / Deporte / Fiesta / Playa / Alta Sensibilidad
Si, IGBT (Auto / Forzado / Apagado / Reducción de Ojos
Rojos)
Espera de 2, 5 ó 10 segundos
Si
Si
Si
USB 2.0
Windows 200 / XP / Vista
MAC OS X (10.5x ó mayor)
Batería de litio (650mAh)
0~40ºC
P-26
SOLUCIÓN DE PROBLEMAS
Pregunta: He tomado fotos, pero me aparece un aviso en mi computador que dice “No hay fotos
en la cámara”, que puedo hacer?
Respuesta: Primero asegúrese si tiene fotos en su cámara. Presione el obturador algunas
SP veces para tomar algunas fotos y luego trate de descargarlas.
Si sigue teniendo problemas para descargar las fotos, puede ser debido a que su computador no
cumple con los requerimientos del sistema:
Al menos un Pentium III 300Mhz, AMD Athlon 300Mhz ó un Celeron 400Mhz ó mayor de al
menos 128 MB de RAM. En un procesador anterior a AMD K6 no funcionara.
Pregunta: Como me aseguro de no perder información Importante?
Respuesta: con el fin de usar su cámara adecuadamente, es necesario que inserte una tarjeta
de memoria SD de hasta 32 GB. Todas sus imágenes serán guardadas en esa tarjeta. Se
recomienda que descargue las imágenes y videos a su computador lo antes posible, para evitar
perdida de información y para aumentar la memoria de almacenamiento de la tarjeta.
Pregunta: Si tengo un computador MAC, el dispositivo funcionara?
Respuesta: vEl dispositivo funciona con un disco extraíble en MAC OS X (10.5x ó mayor). Y las
imágenes pueden ser guardadas manualmente
P-27
•
User Manual
PC Camera
PC-4324D
DEAR CUSTOMER
Congratulations for your purchase!
Please read this manual carefully and keep it for future reference.
EN
CAUTION
RISK OF ELECTRIC
SHOCK, DO NOT
OPEN
Caution: To reduce the risk of electric shock do not open
this device, there are not serviceable parts for customers.
Please refer any maintenance or repair to qualified
personnel.
This sign means the existence of dangerous voltage at
the inside of the unit, which states a risk of electric shock.
This sign means that there are important instructions of
operation and handling in the manual that comes with this
device.
CLIENT CUSTOMER SERVICE
Venezuela:
Colombia:
Panama:
Website:
E-mail:
0800 – ELECTRIC (353-2874)
01-900-331-PEJC (7352)
300-5185
www.premiermundo.com
[email protected]
NOTE
This unit may be submitted to changes in specifications, characteristics and/or operation without
prior notice to the user, in order to continue improving and developing its technology.
INTRODUCTION
In order to achieve the best performance of your product please read this instruction manual
carefully before using it.
P-2
Introduction
Thank you for purchasing the 14.1 Mega-Pixel Digital Camera with Optical zoom lens. Everything
you need to take quality digital photos and videos is included with your camera.
Your digital camera can also be used as a removable disk when a SD cardup to 32GBis
inserted into the camera.
EN Please read this manual carefully first in order to get the most out of your digital camera.
Key Features
! Digital Video resolutions-1280x720 Pixels (720P), 640x480 Pixels (VGA), 320x240 Pixels
(QVGA).
! 14.1 mega pixels camera with choice of 9 digital camera resolutions (14M)4416x3312 pixels, (12M) 4000X3000 pixels ,(10M) 3648X2736 pixels,
(9M) 3456x2592 pixels(7M HD) 3648x2048 pixels, (5M) 2592x1944 pixels,
(3M) 2048x1536 pixels,(2M HD) 1920x1080 pixels, (VGA) 640x480 pixels.
! 2.7 inch TFT LCD
! 5x Optical Zoom Function
! 4x Digital Zoom Function
! Anti-Shake
! Face Detecting
! Smile Capture
! Continue Shot
! SD memory card slot compatible with memory card up to 32GB.
! Built in Flash
! PhoTags Express software for managing and enhancing your photos, printing, sending
photos by e-mails and much more.
What your camera package includes
! Digital Camera
! PhoTags Express software Installation CD
! USB cable
! User’s manual
! Hand Strap
! Hop-Pocket
! Lithium Battery
Computer System Requirements for Windows 2000 XP
To be able to download photos to your PC, you will need the following minimum configuration:
! Pentium III processor or above with Windows 2000 XP
! 128 MB RAM, with 150MB of free disk space
! Available USB interface
! CD-ROM Drive
! 1024 x 768 Recommended screen resolution
! 16-bit color or higher display adaptor
P-3
Computer System Requirements for Windows Vista/7
To be able to download photos to your PC your will need the following minimum configuration:
! Windows Vista or 7
! 800MHz processor and 512 MB of system memory
! 20GB hard driver with at least 15GB of available space
! Support for Super VGA graphics
! Available USB Interface
! CD-ROM drive
EN
Computer System Requirements for Macintosh
! Power Macintosh G3 500 MHz or higher
! Mac OS X version 10.5.x or later
! 128 MB or more available system RAM (256 MB recommended), 150 MB free disk space
! 800 x 600 or higher-resolution monitor displaying millions of colors
A Quick Look at Your Camera
P-4
Preparing Your Camera for Use
Install lithium battery
Your digital camera needs a lithium Li-ion battery in order to operate. To install it correctly see the
diagram below:
EN 1. Slide and open the battery door on the bottom of the camera.
2. Insert the battery correctly with the correct polarity facing up.
3. Close the battery door.
4. On powering on your camera the battery icon will appear on the bottom right of the LCD
screen.
Full battery power
Medium battery power
Low battery power
Note:
1. In order to charge your lithium battery, make sure the battery is inserted correctly and then
connect your camera to PC with the USB cable provided. The red LED will light up indicating
that your camera is in charging mode. The LED will switch off when your camera is fully
charged.
2. A “Low battery” message will flash on the LCD when the battery power is insufficient. Shortly
thereafter your camera will power off.
3. Please remove your battery when you don’t intend to use your camera for a long time.
4. Test photos taken with the camera should be downloaded otherwise they will be lost when
the camera loses power and turns off or when the battery door is opened to replace the
battery.
Installing SD Memory Card
An external memory card is required for normal use. Your camera supports
any compatible SD memory card (up to 32GB).
Adding a memory card will allow you to increase the capacity of camera
before you have to transfer test photos and videos to PC.
1. Locate the Memory Card slot at the base of the camera.
2. Insert the Memory card into the slot in the correct direction, see the
sketch below:
P-5
3. Push the card in until you feel it “click” into position. An icon “SD” will appear on the LCD
screen after you turn on your camera.
4. Once the external memory card is inserted into the camera all the images will be stored on
the card.
5. Please make sure the card is not locked. No images can be transferred to the card if it is
EN
locked.
Note:
1. Limited internal memory is provided for test images. The images will be deleted when the
power is turned off. Please download the images before turning off.
2. If there is a photo in the internal memory when you insert the card into your camera, a “Copy
to card” message will appear on the LCD with Yes or No options. On selecting ‘Yes’ the photo
will now be copied to your card.
3. Formatting will delete all data on the SD memory card including protected data.
4. Don’t remove the SD card during formatting as this may damage the card and render it
unusable.
5. When your card is full, download the media on the SD card to PC and delete the photos and
videos from it in order to continue using camera to capture more high quality photos and
videos.
How to hold your camera correctly when capturing images
Turn on the Power button to activate the Optical zoom lens to open out like a periscope.
Hold the camera steady and correctly as shown is the diagram below.
Note: Do not touch or move the lens once it opens and in use. This will cause damage to the
camera.
P-6
Starting Your Digital Camera
Power on
Press the Power button on the top of the camera to turn on your camera. The LCD will light up
and the Auto-Focus zoom lens will extract out indicating that your camera is on and ready for
EN use.
Power off
Press the Power button to turn off your camera. When there is insufficient battery power a red
icon
will appear on the LCD screen. Your camera will automatically power off after a few
seconds.
Mode selection
Your digital camera has 3 main modes - Camera mode, Video mode and Playback mode.
The Camera mode is for you to take still photos, adjust the camera settings.
You can shoot video files while in Video mode.
In Playback mode you can preview photos and videos as well as being able to rotate,
protect, delete, crop and pictbridge.
In order to select the mode, please follow the below steps:
1. By default the Camera mode appears first on turning on the camera.
2. Press the MODE button to toggle between the 3 modes.
3. The Camera mode will have icon in the top left corner of the LCD screen. The Video mode
icon and the Playback mode icon.
will have
•
•
•
Camera Mode
This is the default mode when turning on your camera.
Taking Photos
1.
Compose your shot using the LCD screen.
2.
Hold the camera steady and press the Shutter button to take photo.
3.
Keep your finger on the Shutter button and wait for the camera to focus in on the object.
4.
Center your object with the white frame that appears on the LCD.
5.
When the frame turns green the image will be captured.
6.
There will be a short delay while the camera saves the JPEG photo to memory.
After each photo is taken (when the camera returns to icon mode) the numbers of photos left to
shoot at the selected resolution is displayed on the top right of the LCD screen.
• When the camera's memory (photo capacity) is full, the LCD screen will display a message
“Memory Full, Insert a SD Memory Card To Transfer and Take More Than One Test
Photos!”
• Download the photos to your computer using the Photags Express software as described
below in the section “Download photos and videos to your PC” and then delete them
from your SD card or insert another SD card to continue taking more photos.
Note: This camera needs a SD memory card to operate normally. The limited internal memory
allows you to take very few test photos that will be erased when the camera power off.
P-7
Optical Zoom
You can magnify your subject up to 5 times using the optical zoom by pressing the T button or
press the W button to zoom back out.
Note: When using this function, the camera will automatically adjust the lens. Be careful not to
touch the lens while the camera is adjusting.
EN
Digital Zoom
You can magnify your subject up to 4 times using the digital zoom. Press the T button to zoom in
the object and press the W button to zoom back out.
The following icon
will appear on your LCD screen.
Flash
In low light conditions it is best to use the built-in flash. You can also use the flash to
compensate for backlight conditions.
Auto,
Force Flash,
Red eye reduction,
No Flash
To set the flash:
Note: The flash can only be use when the camera is in Far mode
.
1.
Press the Flash/Up button.
2.
The
icon appears on the LCD screen. This will activate the automatic flash.
icon as well as the red LED will begin to flash indicating that the flash is charging.
3.
The
4. Press the Flash button again for the icon to appear on the LCD screen. This means the
flash function has been "forced on" (manual flash).
If the flash is not ready, a red LED will light up and the icon will flash repeatedly wait until
the flash is ready before taking a photo.
Note: A “low battery” warning will appear on the LCD screen if there is insufficient battery power
to operate the flash.
5.
Press the Flash button until the
icon appears on the LCD indicating that Red-Eye
reduction is on.
6. Press the Flash button until the icon appears again, it will turn off the flash function. This is
the default flash setting.
Short cut buttons on the MENU dial
The camera has 4 short cut buttons on the MENU dial to make for quick access to the following
settings:
Scene (Left button), Self-timer (Down button), Delete (Right button), Flash (up button).
Pressing the relevant button will activate the setting options.
•
Scene – the 9 scene options appear on the LCD for you to select:
Auto, Night Portrait, Night Scenery, Portrait, Scenery, Sport, Party, Beach, High Sensitivity
•
Self-timer – Press the Self-timer button to toggle through the 4 self-timer options:
2 sec, 5 sec, 10 sec or Off
P-8
EN
•
Delete – Pressing this button will delete the last image (Photos or Videos) captured.
1.
2.
Press the Delete (Right) button .
A “Delete This Image” confirmation message appears on the LCD with “Yes” or “No”
options.
Press the Left/Right button to choose “Yes” to delete the photo or “No” to cancel the
delete.
Press the OK button to confirm, If you selected Yes, the last image is deleted.
3.
4.
Flash
1. Press the Up button repeatedly until the
icon shows on the LCD screen.
2. Press the Up button repeatedly until the icon appears on the LCD screen. This means the
flash function has been "forced on" (manual flash). If the flash is not ready, a LED will light
up and the icon will flash repeatedly wait until the flash is ready before taking a photo.
icon shows on the LCD The red eye reduction
3. Press the Up button repeatedly until the
is open.
4. Press the Up button repeatedly until the icon appears. This will turn off the flash function.
Each setting will be explained in its own section below.
"
Scene
Your camera comes supplied with many scenes for you to take photos in almost any
environment. Scene included with your camera are - Auto, Night Portrait, Night Scenery,
Portrait, Scenery, Sport, Party, Beach or High Sensitivity.
Choose the scene in accordance with the light and environmental conditions prevailing at the
time of taken the photo.
1. Press the OK button.
2. Press the Right/Left button to select the Scene icon .
3. The Scene menu appears in the center of the LCD.
4. Press the Up/Down buttons to select the scene you want to use.
Auto
Night Portrait
Night Scenery
Portrait
Scenery
Sport
Party
Beach
High Sensitivity
5. Press the OK button to confirm, save your choice and exit to the camera standby mode.
6. The selected icon appears next to the camera icon on the top left of the LCD screen.
Image Size
The image size settings determine the quality and number of photos that can be saved and the
amount of memory required for each photo. The higher the photo quality the more memory it
will take. The image size and quality will also affect the maximum size you can effectively print
your photo. To set the Image size:
1. Press the OK button.
2. Press the Right/Left button to select the
icon.
3. The Image Size menu appears in the center of the LCD.
4. Press the Up/Down buttons to select the image size you want to use.
P-9
(14M)4416x3312,(12M)4000X3000, (10M) 3648X2736, (9M) 3456x2592, (7M HD)
3648x2048, (5M) 2592x1944, (3M) 2048x1536, (2M HD) 1920x1080 and (VGA) 640x480
5. Press the OK button to confirm, save and exit to the camera standby mode.
6. The selected image size icon will appear on the top of the LCD screen.
Note:
1. For a Image size higher than 3M, a SD card need to be inserted into the camera.
2. Your camera has two HD “7M” and “2M” high definition image sizes.
EN
Anti-Shake
Your Digital Camera has a function that prevents photos coming out blurry as a result of
trembling or shaking when taking the photo. You are not required to use a tripod in order to
take good quality photos.
1. Press the OK button.
2. Press the Right/Left button to select the icon
3. The Anti-Shake menu appears in the center of the LCD.
4. Press the Up/Down button to select Anti-Shake On or Off.
5. Press the OK button to confirm, save and exit to the camera standby mode.
6. The Anti-shake icon selected will appear on the bottom of the LCD screen.
7.
Macro
The camera has the function that allows you to capture objects with the Hyperfocal distance
setting of either Macro very near (up to 80cm) or Far distances.
1.
Press the OK button
2.
Press the Right/Left button to select the icon .
3.
The Macro menu appears in the center of the LCD.
4.
Press the Up/Down button to select Macro On or Off.
: Macro shooting – On
: Far shooting - Off
5.
Press the OK button to confirm, save your choice and exit to the camera standby mode.
6.
The selected icon appears on the top of the LCD screen.
Note: The camera is by default in Far shooting mode.
Face Detect
Your camera supports face detecting that allows you to take better portrait photos.
1. Press the OK button.
2. Press the Right/Left button to select the icon .
3. The Face Detect menu appears in the center of the LCD.
4. Press the Up/Down button to select Face Detect On or Off.
5. Press the OK button to confirm, save your choice and exit to the camera standby mode.
6. The Face Detect icon selected will appear on the bottom of the LCD screen.
Smile Capture
You can capture the smile face without pressing any buttons.
1. Press OK button.
2. Press Right/Left to select icon
.
3. Press Up/Down button to select On or Off.
P-10
4. Press the OK button to confirm, save your choice and exit to the camera standby mode.
5. Capturing the smile face with your camera and it will take and save the photo automatically if
this function is on.
EN Continue Shot
You can take 6 photos continuously after pressing the shutter button with this function on.
1. Press OK button.
2. Press Right/Left to select icon .
3. Press Up/Down button to select On or Off.
4. Press the shutter button, it will take 6 photos continuously if this function is on.
5. Press OK button again to confirm.
Metering
This setting allows the user to select the most appropriate one for use in a variety of lighting
condition.
1. Press OK button.
.
2. Press Right/Left to select icon
3. The metering menu appears in the center of the LCD.
4. Press Up/Down button to select Center-Weighted/Multi/Spot.
5. Press OK button again to confirm, save your choice and exit to the camera standby mode.
6. The metering icon selected will appear on the bottom of the LCD screen.
AF-Mode
You can select the appropriate way to focus the object automatically.
1. Press OK button.
2. Press Right/Left to select icon .
3. The AF-mode menu appears in the center of the LCD.
4. Press Up/Down button to select Single-AF/Multi-AF.
5. Press OK button again to confirm, save your choice and exit to the camera standby mode.
6. The AF icon selected will appear on the bottom of the LCD screen.
Self-Timer
You can include yourself in a photo by using this feature to delay the time between pressing
the Shutter button and when the photo is actually taken. It is recommended that use a tripod or
place the camera on a flat and sturdy surface when using the self-timer.
1. Press the OK button.
2. Press the Right/Left button to select the icon .
3. The Self -Timer menu appears in the center of the LCD.
4. Press the Up/Down button to select one of the self timer options:
5. Press the OK button to confirm, save your choice and exit to the camera standby mode.
6. The Self-Timer icon selected will appear on the top of the LCD screen.
7. Press the Shutter button until you see the self-timer count-down begin in the center of the
green frame that appears on the LCD. Your camera will count down 2, 5 or 10 seconds as
per your choice, the LED will flash and then automatically take the photo.
P-11
Setup
You can adjust the way your camera is setup with 13 setup option:
Exposure, ISO, White Balance, Sharpness, Quality, Digital Zoom, Date, Beep sound, Auto
Power off, Language, Frequency, Format, Default Setting and Cancel.
1.
2.
3.
4.
EN
Press the OK button.
Press the Right/Left button to select the icon
.
The Setup menu appears in the center of the LCD.
Press the Up/Down button to select one of the setup options:
Exposure
This setting allows you to control the brightness of your images.
1.
Press the OK button.
2.
Press the Up/Down buttons to select an Exposure value (from 3 brightest to -3 darkest)
from the Menu.
3.
Press the OK button to confirm, save and exit to the camera standby mode.
4.
The Exposure icon for the option you selected appears on the bottom of the LCD.
ISO
This is a special function that allows you to compensate the light conditions when the light source
is not good and you also specifically do not wish to use flash or tripod. When using ISO
sensitization, please choose the low value ISO to prevent spots or blotches appearing on your
photo.
1. Press the Up/Down buttons to select the ISO option in the Setup menu.
2. Press the OK button.
3. Press the Up/Down buttons to select an ISO value from the Menu that appears:
4. Press the OK button to confirm, save and exit to the camera standby mode.
5. The ISO icon for the option you selected appears on the bottom of the LCD.
White Balance
This setting allows the camera to adjust the color of your photos according to the color of your
light source.
1. Press the Up/Down buttons to select the White Balance option in the Setup menu
2. Press the OK button.
3. Press the Up/Down buttons to select a White Balance option from the Menu that appears:
Auto
Day light
Cloudy
Fluorescent
Incandescent
4. Press the OK button to confirm, save and exit to the camera standby mode.
5. The LCD screen will be adjusted as per the White Balance option you selected.
P-12
Sharpness
This setting allows you to adjust the sharpness of images, making edges more or less distinct.
1. Press the Up/Down buttons to select the Sharpness option in the Setup menu
2. Press the OK button.
EN
3. Press the Up/Down buttons to select a Sharpness option from the Menu that appears:
4. Press the OK button to confirm, save and exit to the camera standby mode.
5. The LCD screen will be adjusted as per the Sharpness option you selected.
Quality
The quality of your photos also affects the number of shots you can take. A high setting means
you can take fewer photos, but they will be of better quality. The default value is Fine.
1.
2.
3.
4.
5.
Press the Up/Down buttons to select the Quality option in the Setup menu.
Press the OK button.
Press the Up/Down buttons to select a Quality option from the Menu that appears:
Press the OK button to confirm, save and exit to the camera standby mode.
The Quality icon for the option you selected appears on the bottom left corner of the LCD.
Super Fine
Fine
Normal
Digital Zoom
You can set the digital zoom function On or Off.
1. Press the Up/Down button to select the Digital Zoom option in the Setup menu.
2. Press the OK button.
3. Press the Up/Down button to select On or Off.
4. Press the OK button to confirm, save and exit to the camera standby mode.
Date
This allows you to set the system time which will be displayed on the photos.
1.
Press the Up/Down buttons to select the Date option in the Setup menu.
2.
Press the OK button.
3.
Press the Up/Down buttons to select a Date option from the Menu that appears:
•
On selecting “On” the date will appear on the photo once it is taken.
•
On selecting “Off” no date will appear on the photo.
•
On selecting “Set Date” the Set Date settings screen will appear. You will be able to
change the date settings that will appear on the photo once it is taken.
To Set the date:
1. Press the Up/Down button to select Set date option.
2.Press the OK button.
3. Press the Right/Left button to select and highlight the Year, Month, Day, Hour, Minute,
Second
and Date Format type. Press the Up/Down button to set the Date, time and format.
P-13
4.
Press the OK button to confirm, save the changes and exit.
Beep sound
You can set the beep sound function On or Off.
1. Press the Up/Down button to select the Beep sound option in the Setup menu.
2. Press the OK button.
3. Press the Up/Down button to select On or Off.
4. Press the OK button to confirm, save and exit to the camera standby mode.
EN
Auto Power Off
By default, if your camera is idle for 60 seconds it will automatically be powered off. Use the
Auto Power Off option to change this setting:
1. Press the Up/Down button to select the Auto Power Off option in Setup menu.
2. Press the OK button.
3. Press the Up/Down buttons to select Auto Power Off option from the Menu that appears:
4. Press the Up/Down button to select a time that the camera will automatically power off.
Note: If you select None, the camera will not be powered off until the battery power is depleted
or the camera is turned off manually.
5. Press the OK button to confirm, save and exit to the camera standby mode.
Language
Your camcorder supports many kinds of languages.
1. Press the Up/Down button to select the Language Menu.
2. Press the Up/Down button to select English/French/Spanish!
3. Press the OK button to confirm, save and exit.
Frequency
Select the frequency for the local environment. Generally, 60HZ is for the U.S. and 50HZ for
Europe and Japan. The default setting is 60HZ.
1.
Press the Up/Down button to select the Frequency option from the Setup menu.
2.
Press the OK button.
3.
Press the Up/Down button to select a Frequency option from the Menu that appears:
4.
Press the OK button to confirm, save and exit to the camera standby mode.
Format
This function will format the memory card and will erase all files in memory including files that
have been protected.
Important: Please use this function with caution. Once formatted all the images stored in the
memory will be erase. This process is irreversible. Please download all images to the PC
before formatting the card.
1. Press the Up/Down button to select the Format option from the Setup menu.
2. Press the OK button.
3. Press the Up/Down button to select OK.
P-14
4. Press the OK button to confirm.
5. A Format confirmation message appears.
6. Press the Right/Left button to select “Yes” to format, “No” to exit.
7. Press the OK button to confirm and begin the format.
8. Once the SD card is formatted all the images sitting on the card will be erased and the
camera will revert to the camera standby mode.
EN
Default Setting
You can restore your camera to the original factory settings.
1. Press the Up/Down button to select Default Setting in the Setup menu.
2. Press the OK button.
3. Press the Up/Down button to select OK.
4. Press the Up/Down button to select OK to set to default setting or Cancel to exit.
5. Press the OK button to confirm.
6. If you selected OK, a Default Setting confirmation message will appear:
7. Press the Right/Left button to select “Yes” to reset or “No” to exit the menu.
8. Press the OK button to confirm and reset the camera to the original factory settings.
Video Mode
Press the MODE button to select the Video mode.
Note: You must insert a SD memory card for shooting videos.
When the
icon appears on the top left corner of the LCD screen this indicates that you are
in Video mode.
1.
Prepare the object you wish to record.
2.
Press the Shutter button to begin shooting.
3. The elapse time will appear on the top right of the LCD screen and the icon
will flash on
the LCD screen.
4.
Press the Shutter button again to stop recording and save this file in AVI format.
Note:
1. You can preview the AVI files in Playback mode or downloaded to your computer by using
Quick Time and Windows Media Player.
2. The camera has Audio function. When the camera record video, the voices will be recorded.
You can play the recording voice on your computer.
In Video mode there are 3 setup options - White Balance, Size and Macro
White Balance
You can select 5 different White Balance light conditions for shooting videos.
P-15
1. Press the OK button.
2. Press the Right/Left button to select the
option.
3. Press the Up/Down buttons to select a White Balance option from the Menu that appears:
Auto
Daylight
Cloudy
Fluorescent
Incandescent
4. Press the OK button to confirm, save and exit to the video standby mode.
5. The LCD screen will be adjusted as per the White Balance option you selected.
EN
Size
Your camera supports 3 video resolutions-1280x720(720P), 640x480 (VGA) pixels, 320x240
(QVGA) pixels.
1. Press the OK button.
2. Press the Right/Left button to select the
option.
3. Press the Up/Down button to select Image Size option from the Menu that appears:
720P 1280x720
VGA 640x480
QVGA 320x240
4. Press the OK button to confirm, save and exit to the video standby mode.
5. The Image Size icon selected will appear at the top of the LCD screen.
Macro
The camera has the function that allows you to capture objects either at very near or very far
distances.
1.
Press the OK button
2.
Press the Right/Left button to select the option for the Macro menu to appear.
3.
Press the Up/Down button to select a Macro option from the Menu that appears
: Macro shooting - On
: Far shooting - Off
4.
Press the OK button to confirm, save your choice and exit to the video standby mode.
5.
The selected Macro icon appears on the top of the LCD screen.
Playback Mode
Press the MODE button to enter the Playback mode.
When the icon appears on the top left corner of the LCD screen this indicates that you are in
Playback mode.
Here you can preview the photos and videos you have captured and recorded. In Playback mode
you can rotate, protect, delete and crop your photos and you can protect and delete video clips.
You can also print photos directly from your camera using PictBridge.
Note: The message “No File Exist” will appear on the LCD screen if there are no photos or
videos in your camera. Press the MODE button to return to the camera or video mode and begin
to take photos or videos.
Full screen to Thumbnail display
When the camera is in the Playback Mode and an image or video appears on the LCD screen:
1.
Press the W button.
P-16
2.
3.
4.
This will open up the thumbnail display.
Press the Up/Down/Left/Right buttons and select a thumbnail of a photo or video.
Press the OK button to display the photo or video in full screen.
EN Zoom In or Zoom Out of the Photo
1.
2.
3.
4.
5.
Select a JPEG photo.
The icon will display on the top left corner of the LCD screen.
Press the T button to 4x zoom in to the photo.
Press the Up/Down/Left/Right button to navigate around the photo.
Press the W button to zoom back out it.
Operation functions for still photos
Select the still photo in the thumbnail view or view the images one by one by pressing the
Right/Left buttons to toggle through the images that appear on the LCD.
Select the photo you wish to rotate, protect, delete, crop or print.
Rotate
The rotate feature will only work for images on the SD card that is inserted.
1.
2.
3.
4.
5.
Press the OK button.
Press the Right/Left button to select the rotate option.
Press the Up/Down buttons to select the Rotate option from the Menu that appears.
Press the OK button to confirm how many degrees you want to rotate the photo.
A “Rotate & Saving” message will appear on the screen. Please wait while the photo is
rotated as per your choice.
6. The photo will now be rotated and saved.
Note:
1. You cannot rotate a protected file. On attempting to rotate protected file a “This file is writeprotected” message will appear on the screen.
2. “No card inserted” will appear on the screen if no SD card is insert. Please insert a SD
memory card to use this function.
Protect
You can protect your photos/videos from accidental deletion by selecting the “lock” feature.
1. Press the OK button.
2. Press the Right/Left button to select the
protect option.
3. Press the Up/Down button to select the Protect options that appear in the menu.
4. Press the OK button.
5. If you select Lock, a lock icon
selected.
will appear at the top of the LCD for the photo or video
Note: To “Unlock” the current file follow steps 1 through 4. Select “Unlock” and press the OK
button to unlock the current file.
P-17
Delete
Delete unwanted photos and videos at any time in order to free up memory. You can delete one
image or video clip at a time or delete all except the protected photos and videos that are
currently stored and saved on the memory card.
1. Press the OK button.
2. Press the Right/Left button to select the Delete option.
3. Press the Up/Down button to select Delete This Image / Delete All Images/Cancel.
4. Press the OK button to confirm.
5. A Delete confirmation message appears.
6. Press the Right/Left button to select “Yes” or “No”.
7. Press OK button to confirm and delete the image(s).
Note: You cannot delete file that is locked.
If you choice the All option, all the unprotected images on your SD card will be deleted.
This process is irreversible and all your images will be lost forever unless you have saved them
or downloaded them to your computer previous to the deletion.
EN
Crop Image
Crop your photos to show and save a specific portion of an image or to highlight certain focal
points. The Crop feature lets you zoom in on image and then save that part of the image as a
new photo.
Note: Only photos on the SD Card can be cropped.
1. Press the OK button.
2. Press the Right/Left button to select the Crop option.
3. Press the Up/Down button to select Crop or Cancel.
4. Press the OK button.
5. If you select “Crop”, a blue crop rectangle appears on the photo in the LCD screen.
6. Press the W or T buttons to determine the size of the area to crop.
7. Press the Up/Down/Right/Left buttons to navigate the area of the photo you wish to crop.
8. Press the Shutter button for the crop confirmation or press the OK button to exit.
9. The cropped photo is saved as a new photo to SD memory card.
Pictbridge
You can print the photos directly from the camera with a compatible printer.
1. In playback mode, select the photo you wish to print by pressing the Left/Right button..
2. Press the OK button.
3. Press the Right/Left button to select the
Pictbridge menu.
4. Press the Up/Down button and select Pictbridge to print photos or press Cancel to exit the
menu.
5. Press the OK button to enter the Pictbridge mode.
6. A message will appear on the LCD to “Please connect to device”.
7. Connect your camera to a compatible printer with the USB cable provided to begin printing.
8. If you select the “This Image”, there are 5 options for your selecting:
a) Press the OK button and select “OK” to start Printing.
b) Press the Up/Down button to select Cancel that means exit this Menu option.
P-18
c) Press the Up/Down button to select “NO. Of copy” option from “This image” menu. That
you selected number is 10 means you need printing 10 copies of this image.
d) Press the Up/Down button to select “N-up Layout” option from “This image” menu. There
is only one option “Default setting”.
EN
e) Press the Up/Down button to select “Size” option from “This image” menu. You can set
the size of printing.
9. If you want to print your selected photos, you need to select “Select Images” option from
menu.
Then select “select” option from menu and Press OK button to confirm. At this time, you can
select another photo.
i.
Press OK button once, the photo will be selected and this icon
will appear in the left
corner of LCD screen. If you press OK button again, you would cancel your selection.
But if you press the Up/Down button, you will enter the Select Images menu.
ii. Press Left/Right button to view other photos, then you need press OK button to confirm.
When the icon
appears that photo has been selected.
10. When the printing is finished, press the menu button would goback to Pictbridge Menu.
Playing the AVI video file
1. In Playback mode, press the Left/Right buttons to select an AVI video file you wish to play.
2. Alternatively, press the W button to enter the thumbnail mode and select a video. Video have
icon on the thumbnail. Press the OK button for the selected video to appear in full
an
screen.
3. Press the Shutter button to play the current AVI file.
4. Press the Up button to stop playing the AVI and revert back to the Playback mode.
5. Press the Shutter button again to pause.
Note: Just as with Photos so too Videos can be protected from accidental deletion as well as can
be deleted.
Protect
You can protect your videos from accidental deletion by selecting the “lock” feature.
1.
Press the OK button.
2.
Press the Right/Left button to select the protect option.
3.
Press the Up/Down button to select Lock/Unlock.
4.
Press the OK button.
will appear at the top of the LCD for the video selected.
5.
If you select Lock, a lock icon
Note: To “Unlock” the current file follow steps 1 through 4. Select “Unlock” and press the OK
button to unlock the current file.
Delete
Delete unwanted videos at any time in order to free up memory. You can delete one video clip at
a time or delete all except the protected videos that are currently stored and saved on the
memory card.
1.
2.
P-19
Press the OK button.
Press the Right/Left button to select the Delete option.
3.
Press the Up/Down button to select This Video/Delete All Images/Cancel.
4.
Press the OK button to confirm.
5.
A Delete confirmation message will appears.
6.
Press the Right/Left button to select “Yes” or “No”.
7.
Press the OK button to confirm and delete.
Note: You cannot delete files that are locked.
Caution: If you choice the All option, all the unprotected videos or images on your SD card will
be deleted.
This process is irreversible and all your video and images will be lost forever unless you have
saved them or downloaded them to your computer previous to the deletion.
EN
Install PhoTags Express Software
NOTE: Make sure that your camera is not connected to the computer.
Insert software CD to your computer. After a few seconds, there will be shown an installing main
window on the screen.
You can “install AP”, “Install DirectX”, “Browse CD”, and “Exit” in this installing main window.
Install Photags Express
Click on the “Install AP” to start installing process. The language window will be shown on the
screen and you can choose the language you want to use.
And then the installer window will be show as below.
P-20
EN
After you click “Install Photags Express” button, there will be showing some windows that help
you to finish
the installing. You are only required to follow the description and click the buttons that it’s
defaulted by the software.
Register online
Click “Register online” button to have a registration. Or you can directly click “Continue” for
registration next time.
After this step, the main window will appear on the screen.
Everything you need to get the most from your photos
1. Select photos
Select the photos that you download from your camera. And edit it in the software.
2. Edit photos
Click the “Enhance photos”, “Add captions” from the main window to edit your ideal photos.
3. Share photos
Share your photos via “E-mail”, “Printing”, and “Create HTML web” to
uploading online.
4. Workshop
Create “Calendars”, two sides “Greeting cards” and “Postcards” on
standard photo paper. You can purchase “Album” and “Video CD”.
Two additional workshop project online at any time and create Photo
Album and slide shows on CD that can be viewed on your PC and VCD for viewing on your TV
using your DVD player.
P-21
Download photos to your PC
Turn on your camera, connect your camera to the computer correctly with USB cable, a “MSDC”
will show on the LCD screen. The screen of PC will be shown a window (Removable Disk H:) as
below:
EN
NOTE: Now you can copy the photos to your computer with two methods as below:
1. Download photos directly from windows
Choose “copy pictures to a folder on my computer” on the Removable Disk (H:) window. After
you click “OK”, there will be shown some windows on the screen step by step, you are only
required to follow the description and click the buttons that are defaulted by the system to finish
transferring.
Or you can:
1. Click on the START button in Windows.
2. Click on the MY COMPUTER Icon on the desktop.
3. Your memory card will appear as a REMOVABLE STORAGE DEVICE.
4. Click on the REMOVABLE STORAGE DEVICE to view the images. The images are stored in
the subfolder called DCM100.
5. You can now copy and paste the images to any directory you choose.
2. Download photos using Photags Express
on the desktop to launch the application.
Double click the Photags Express icon
Click the “Get Photos” button on the main window.
The “Get Photos” wizard mode will appear on the screen, you can select “custom copy” to
download photos with your individuation.
Or you can select “Express” option to download all photos to the computer without the option of
selecting photos. In this mode you will not see a preview of the photos transferred.
Custom copy
P-22
This mode is used to manually select the photos you wish to copy to your computer.
The “Device selection” mode will appear. Both your camera and the memory card will each
appear in the “Active Devices” list
Select “Custom copy” click “Next” to continue.
EN Note: At this moment, you can select “Express” option to copy all photos to your computer.
Select your photos click “Next” to continue.
Add active captions to the picture. With this feature you can add a date, keywords and
categories. Click “Next” to continue.
Choose a position where you want to place the photos. Click “Finish” to copy the photos to the
location you selected.
Note:
All of the picture you imported will appear in the “Select Photos” main window. And now, you can
edit your photos per your idea, and then download it to your computer. For how to edit the
photos, you can refer to the Quick Start guide in the Photags Express.
P-23
EN
Photags Express software owner manual
You can edit, printing, sharing photos with Photags Express. You can operate it as following step
to know how to use Photags Express:
Launch the Photags Express.
Click “tour” button on the main window to view how to use the photags Express in detail.
Attention
If Photags Express can not upgrade the DirectX automatically, you can manually install the
DirectX in the CD before using the Camera, otherwise ,if the edition of DirectX in the windows
operation is less than 8.1,then the AVI file can not be played. Click here
Transferring photos and videos to your PC manually
Turn on your camera, Change your camera mode to Playback and connect your camera to the
computer correctly with USB cable, the screen will be shown a window (Removable Disk F:) as
below:
P-24
NOTE: Now you can download the photos and videos to your computer with two methods
as below:
EN 1. Download photos directly from windows
Choose “copy pictures to a folder on my computer” on the Removable Disk (F:) window.
After you click “OK”, step by step instructions will appear. Follow the description and click the
buttons that are defaulted by the system to finish transferring.
2. Alternatively you can:
1. Click on the MY COMPUTER Icon on the desktop.
2. Your memory card will appear as a REMOVABLE STORAGE DEVICE.
3. Click on the REMOVABLE STORAGE DEVICE to view the images. The images are stored in
the subfolder called DCM100.
4. You can now copy and paste the images to any directory you choose.
Transferring photos and videos to your MAC manually
The Photags Express software is not compatible and will not install on a Mac.
In order to transfer photos and videos from your camera to your Macintosh computer:
1.
2.
Plug the camera into an available USB port
A new drive should mount on the desktop which stores any photos or videos that have
been taken.
Maintenance of Your Digital Camera
The digital camera is a delicate device. Please handle your camera with care to avoid damaging
it.
P-25
Appendix A: Technical Specifications
Image Sensor CCD Sensor
4416x3312(14MP),4000x3000(12MP),3648x2736(
10MP),
Image
3456x2592(9MP), 3648x2048(7MPHD),
Resolution
2592x1944(5MP),
2048x1536(3MP),1920x1080(2MP) HD,
640x480(VGA)
Video
1280X720 Pixels (720P). 640x480 Pixels (VGA),
Resolution
320x240 Pixels (QVGA).
File Format
JPEG/AVI
External
SD Card (up to 32GB)
Memory
LCD Display
2.7 Inch TFT
Lens
Optical 3X ZOOM LENS
Zoom
4X Digital Zoom,5x Optical zoom
Exposure
-3.0EV ~ +3.0EV
Auto, Daylight, Cloudy, Incandescent ,
White Balance
Fluorescent
Auto/Night Portrait/Night
Scene
Scenery/Portrait/Scenery/Sport/Party/Beach/High
Sensitivity
Flash
YES , IGBT (Auto/Force/Off/Red eye reduce)
Self-timer
2, 5 or 10 sec delay
Anti-Shake
Yes
PictBridge
Yes
Face Detect
Yes
Interface
USB 2.0
System
Window 2000/ XP/Vista/ 7Mac OS X (10.5.x or
Requirements higher)
Battery
Lithium Battery(650mAh)
Working
0~40 ºC
Temperature
EN
P-26
Appendix B: Troubleshooting
Q: I have taken photos but my computer says, “No photos in camera.” What do I do?
A: First ensure that you have in fact taken photos. Press the Shutter button a few times to take
some sample photos and then try downloading them again.
EN If you still get a “no photos” error this may mean that your computer may not meet the minimum
system requirements:
At least a Pentium III 300Mhz, AMD Athlon 300Mhz or a Celeron 400MHz or higher as well as at
least 128 MB ram. Please note that the older AMD K6 processors will not work. More information
about determining your computer’s specifications can be found in the General Computer
Information section.
Q: How do I make sure I don't lose important pictures?
In order to use your camera properly you will need to insert a SD card of up to 32GB. All your
images will be stored on this card. It is recommended to download the images from the card as
often as possible, so as to free up space on the card. This also is a backup if your card gets lost
or damaged.
The test photos are saved in limited SDRAM, which requires a constant electric current to store
your photos. Should your camera lose power (for instance if the battery dies or run out of power)
the test pictures will be lost.
Q: If I have a MAC, will the device work?
The device will work as a removable drive on Mac OS X (10.5.x or higher). And images can be
accessed manually.
A00-110813
P-27