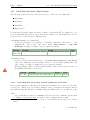
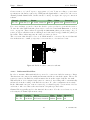
1
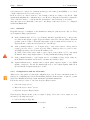
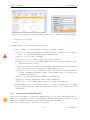
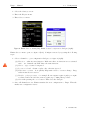
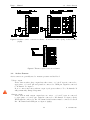
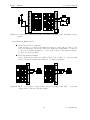
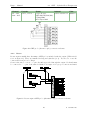
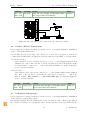
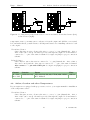
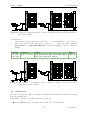
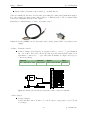
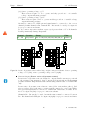
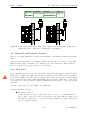
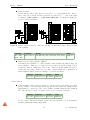
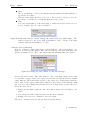
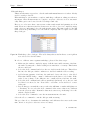
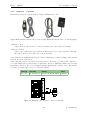
Daqu Manual Kanardia November 8, 2013 © Kanardia d.o.o. Daqu manual Daqu — Manual 2 © Kanardia 2013 Daqu — Manual Contact Information Publisher and producer: Kanardia d.o.o. Ulica heroja Rojška 70 SI-3000 Slovenia Tel: +386 40 360 512 Email: [email protected] A lot of useful and recent information can be also found on the Internet. See http://www. kanardia.eu for more details. Copyright This document is published under the Creative Commons, Attribution-ShareAlike 3.0 Unported licence. Full license is available on http://creativecommons.org/licenses/by-sa/ 3.0/legalcode web page and a bit more human readable summary is given on http: //creativecommons.org/licenses/by-sa/3.0/. In short, the license gives you right to copy, reproduce and modify this document if: you cite Kanardia d.o.o. as the author of the original work. you distribute the resulting work only under the same or similar license to this one. Credits This document was written using TeTeX (LATEX) based document creation system using Kile integrated LaTeX environment running on Linux operating system. Most of the figures were drawn using Open Office Draw and Inkscape applications. Photos and scanned material was processed using Gimp. All document sources are freely available on request under the licence mentioned above and can be obtained by email. Please send requests to [email protected]. Revision History The following table shows the revision history of this document. Revision 1.0 1.1 1.2 Date Apr 2013 May 2013 October 2013 Description Initial release Added sensor connections Added documentation for Rotax 912iS Document File DaquManual-100.pdf DaquManual.pdf DaquManual.pdf The document can be downloaded from http://www.kanardia.eu/downloads/daqu 3 © Kanardia 2013 Daqu — Manual 4 © Kanardia 2013 Daqu — Manual CONTENTS Contents 1 Introduction 1.1 General Description . . . . . . . . . . . . . . . . . . . . . . . . . . . . . . . . 1.2 Technical Specification . . . . . . . . . . . . . . . . . . . . . . . . . . . . . . . 1.3 Icons Used Trough the Manual . . . . . . . . . . . . . . . . . . . . . . . . . . 2 DAQU Installation 2.1 Installation . . . . . . . . 2.2 Intake Manifold Pressure . 2.3 Configuration . . . . . . . 2.3.1 Channels . . . . . 2.3.2 Configuration with 2.3.3 Configuration with 3 Wiring in General 3.1 Ground . . . . . 3.2 Resistive Sensors 3.3 Thermocouples . 3.4 Active Sensors . 3.5 Potentiometers . 3.6 Digital Sensors . . . . . . . . . . . . . . . . . . . . . . . . . . . . . . . . . . . . . . . . . . . . . . . . . . . . . . . . . . . . . . . the Nesis unit Emsis unit . . . . . . . . . . . . . . . . . . . . . . . . . . . . . . . . . . . . . . . . . . . . . . . . . . . . . . . . . . . . . . . . . . . . . . . . . . . . . . . . . . . . . . . . . . . . . . . . . . . . . . . . . . . . . 4 Installation of Sensors, Probes and Transducers 4.1 EGT – Exhaust Gas Temperature . . . . . . . . 4.1.1 Hose Clamp type EGT Probe . . . . . . . 4.1.2 Bayonet type EGT Probe . . . . . . . . . 4.2 CHT – Cylinder Head Temperature . . . . . . . 4.2.1 Rotax . . . . . . . . . . . . . . . . . . . . 4.2.2 Jabiru . . . . . . . . . . . . . . . . . . . . 4.2.3 Lycoming and Continental . . . . . . . . . 4.3 Oil Temperature . . . . . . . . . . . . . . . . . . 4.4 Coolant (Water) Temperature . . . . . . . . . . . 4.5 Carburetor Temperature . . . . . . . . . . . . . . 4.6 Airbox, Gearbox and other Temperatures . . . . 4.7 Oil Pressure . . . . . . . . . . . . . . . . . . . . . 4.7.1 Rotax . . . . . . . . . . . . . . . . . . . . 4.7.2 All Other Engines . . . . . . . . . . . . . 4.8 Fuel Pressure . . . . . . . . . . . . . . . . . . . . 4.9 Hydraulic and Pneumatic Pressure . . . . . . . . 4.10 Fuel Level . . . . . . . . . . . . . . . . . . . . . . 5 . . . . . . . . . . . . . . . . . . . . . . . . . . . . . . . . . . . . . . . . . . . . . . . . . . . . . . . . . . . . . . . . . . . . . . . . . . . . . . . . . . . . . . . . . . . . . . . . . . . . . . . . . . . . . . . . . . . . . . . . . . . . . . . . . . . . . . . . . . . . . . . . . . . . . . . . . . . . . . . . . . . . . . . . . . . . . . . . . . . . . . . . . . . . . . . . . . . . . . . . . . . . . . . . . . . . . . . . . . . . . . . . . . . . . . . . . . . . . . . . . . . . . . . . . . . . . . . . . . . . . . . . . . . . . . . . . . . . . . . . . . . . . . . . . . . . . . . . . . . . . . . . . . . . . . . . . . . . . . . . . . . . . . . . . . . . . . . . . . . . . . . . . . . . . . . . . . . . . . . . . . . . . . . . . . . . . . . . . . . . . . . . . . . . . . . . . . . . . . . . . . . . . . . . . . . . . . . . . . . . . . . . . . . . . . . . . . . 7 7 7 7 . . . . . . 8 8 8 9 10 10 11 . . . . . . 13 13 13 13 14 15 15 . . . . . . . . . . . . . . . . . 17 17 18 18 19 20 21 21 21 22 22 23 24 27 27 27 30 30 © Kanardia 2013 Daqu — Manual CONTENTS 4.10.1 Tank Calibration with Nesis . . . . . . . . . . . . . . . . . . . . . . . . 4.11 Pitch/Roll/Yaw Trim, Flap Position . . . . . . . . . . . . . . . . . . . . . . . 32 35 4.11.1 Pitch/Roll/Yaw Trim, Flap Position Calibration with Nesis . . . . . . 35 4.12 Engine RPM – Tachometer . . . . . . . . . . . . . . . . . . . . . . . . . . . . 36 4.13 Rotor RPM . . . . . . . . . . . . . . . . . . . . . . . . . . . . . . . . . . . . . 4.14 Fuel Flow . . . . . . . . . . . . . . . . . . . . . . . . . . . . . . . . . . . . . . 37 38 4.14.1 Differential Fuel Flow . . . . . . . . . . . . . . . . . . . . . . . . . . . 39 4.15 Amperes – Current . . . . . . . . . . . . . . . . . . . . . . . . . . . . . . . . . 40 4.16 Voltage . . . . . . . . . . . . . . . . . . . . . . . . . . . . . . . . . . . . . . . 41 5 Rotax 912 iS Engine – Daqu iS 5.1 Connection to Rotax iS CAN 43 . . . . . . . . . . . . . . . . . . . . . . . . . . 6 44 © Kanardia 2013 Daqu — Manual 1 1. Introduction Introduction First of all, we would like to thank you for purchasing our product. Daqu is data acquisition unit, designed especially for monitoring engine parameters. Daqu reads various engine sensors, processes the readings and transmits them to the CAN network, where other units can make use of these readings. We strongly recommend you to carefully read this manual, before you start connecting Daqu unit with your engine sensors. The manual provides information about the installation of the Daqu unit and connecting it with sensors, probes and transducers. The introduction chapter contains some general information, later chapters reveal the details. 1.1 General Description Device is enclosed in thin anodized aluminum case. It is connected with the Nesis or Emsis system over single cable, which serves as power supply and data link. Daqu uses modified CANaerospace protocol over CAN bus for communication. Daqu has four twelve pin connectors to connect with sensors or probes, one five pin CAN connector and ϕ 5 mm outer diameter intake manifold pressure connector. 1.2 Technical Specification Table 1 shows some basic technical specification of Daqu unit. Description Weight Size Operational voltage Power consumption Current (sensors not connected) Operating temperature Value 142 g 125x80x18 mm (LxWxH) 7–32 V 720 mW 60 mA at 12 V 30 mA at 24 V –30 ◦ C to +85 ◦ C Table 1: Basic technical specifications. 1.3 Icons Used Trough the Manual A few icons appear on the side of the manual, which have special meanings: This icon denotes information that needs to be taken with special attention. This icon denotes background information about the subject. This icon denotes an installation tip. 7 © Kanardia 2013 Daqu — Manual 2 2. DAQU Installation DAQU Installation This section instructs how to install and configure Daqu. However, this section does not tell much about installation of sensors, probes and transducers, which installation is covered in a separate section 4 starting on page 17. 2.1 Installation Daqu shall be installed close to the engine in order to keep the sensor cables short. It can be installed even on the engine side of the firewall, if it is protected from the direct engine heat. The orientation or position of Daqu is not critical. Just make sure that Daqu connectors are easily accessible and sensor cables are guided properly. Daqu must not be mounted directly on the motor or on a place where significant vibrations may occur. Daqu is not waterproof. When installing the unit in a location where it will be exposed to fluids or moisture, install it in a waterproof enclosure. Daqu gets the required electrical power from the CAN bus, which means, that the CAN cable is the only cable that connects it with the Nesis or Emsis system. Physical dimensions are given in the Appendix. Please allow additional 6 cm clearance for the CAN connector on one side and about 8 cm (depends on the manifold pressure tube) for the manifold pressure connector on the other, see figure 1 for details. Figure 1: Daqu top view. Daqu is not shipped with the mounting hardware. You may use any appropriate removable fittings that suit the need – just do not use rivets. 2.2 Intake Manifold Pressure Daqu has a built in MEMS sensor that is used to measure the intake manifold pressure. Use a ϕ 5 mm inner diameter tube to connect the manifold pressure engine source with the Daqu manifold connector. Secure the tube on all connections using pipe clamps. Please, consult your engine manual to locate the source of the manifold pressure on your engine. On most engines you need to remove the protection cap and the protection nipple first. 8 © Kanardia 2013 Daqu — Manual 2.3 Configuration We strongly recommend installing a restrictor with a small hole in the middle of the tube. Install the restrictor as close to the manifold pressure source as possible. This is mostly due to the safety reasons. 2.3 Configuration Daqu can be configured for myriad sensor configurations. Configuration is performed in two steps. In the first step sensors are physically wired to individual pins. In the second step sensor parameters are entered using the Nesis or Emsis unit. Daqu and Nesis/Emsis unit must be both connected to the CAN bus, of course. Figure 2 (right) shows Daqu top view, where all pins and channels are visible. Figure 2: Daqu pins and channels A1 – A6 (left), Daqu all pins and channels (right). Each channel has three labels. See figure 2 (left). 1. Connector pin number – when connector is disconnected, this number helps to find the correct pin. 2. Default usage of the channel – it will suit most of the needs, but the channel is not limited to the default use. 3. General channel label – this label tells the general channel meaning – which type of channel it belongs to and the number of the channel. 9 © Kanardia 2013 Daqu — Manual 2.3 Configuration Some pins are not connected to channels and they provide either ground (GND) or +5/+12 V output, which is needed by active sensors. In most cases you connect sensors to the default positions according to the labels. This significantly simplifies the configuration process. However, Daqu is an extremely configurable device and there may be occasions when non-standard connections may be necessary. After the sensors are physically connected to the Daqu, each sensor needs to be configured with Nesis/Emsis unit. 2.3.1 Channels Daqu has four type of channels. Some channels are using two pins and some only one. They are designated using capital letters. A – analog channels with –2.5 V to +2.5 V input, which are typically used to connect resistive sensors and thermocouples. Typical resistive sensors are various VDO or Westach pressure sensors, VDO or Westach temperature sensors, many fuel level sensors, etc. Typical thermocouples used in aviation are J and K type. B – analog channels with 0 to +5 V input, used to read active sensors. Active sensors require power in order to operate properly. Hence, Daqu provides +5/+12 V source and GND (ground) connection near B channel ports. Do NOT connect any sensor with a signal output greater than +5 V to any input B channel. Any voltage higher than +5 V will permanently damage Daqu unit. C – analog channel with 0 to +30 V input, used to read higher voltage levels. Only one such channel is available and is used to measure the system voltage. Z – digital channels used to measure time between pulses, such as engine or rotor RPM signals or fuel flow. Z2 and Z3 channels allow up to 24 V input signals, while Z1 is special and allows input signals up to 150 V. 2.3.2 Configuration with the Nesis unit This section only guides you through configuration process. For more information and details about configuring the sensors and handling with the Nesis software, download or print Nesis User Manual from http://www.kanardia.eu/downloads/nesis. Follow the next procedure to enter the Airplane Engine menu: 1. Select the Setup screen. 2. Enter the Service Mode 1 screen. 3. Open the Airplane Engine menu. Nesis Airplane Engine menu opens, see figure 3 (left). Select the correct engine for your aircraft by following next steps: 1. Select the Engine Type list. 1 You will need a valid service code for your Nesis unit. 10 © Kanardia 2013 Daqu — Manual 2.3 Configuration Figure 3: Nesis Airplane Engine menu (left), Nesis channel configuration dialogue (right). 2. Select the correct engine. 3. Save. Configure sensors by repeating the following steps: 1. Select a channel to open configuration dialogue, see figure 3 (right). (a) Function – what is sensor function. Make sure that one function is not activated twice – two channels can NOT share the same function. (b) Sensor – type of sensor being used. (c) Is sensor isolated – thermocouples only, otherwise ignored. (d) Filter time constant – how quickly Daqu unit reacts to a sensor change. Large value means slower reaction. (e) Pulses per event – for example, Rotax engines require 1 pulse per engine revolution and some fuel flow sensors require up to 8000 pulses per liter. (f) Correction factor – needed by fuel flow sensors. A value larger than one increases the fuel consumption indication, while a value smaller than one decreases fuel consumption indication. (g) Save to accept new parameters. This closes the dialogue. (h) Reset to reset the channel (use this on unused channels). (i) Close to close the channel editing without accepting new parameters. 2. Once all channels are set, you must again Save in order to transfer the new configuration to Daqu. This also makes new configuration active. Close will not save new configuration! 2.3.3 Configuration with Emsis unit This section only guides you through configuration process. For more information and details about configuring the sensors and handling with the Emsis unit, download or print Emsis User Manual from http://www.kanardia.eu/downloads/emsis. Follow the next procedure to enter the Sensors menu: 11 © Kanardia 2013 Daqu — Manual 2.3 Configuration 1. Select the Settings screen. 2. Enter the Engine menu. 3. Enter Sensors menu. Figure 4: Emsis Sensors menu (left), Emsis channel configuration dialogue (right). Emsis Sensors menu opens, see figure 4 (left). Configure sensors by repeating the following steps: 1. Select a channel to open configuration dialogue, see figure 4 (right). (a) Function – what is sensor function. Make sure that one function is not activated twice – two channels can NOT share the same function. (b) Sensor – type of sensor being used. (c) Is sensor isolated – thermocouples only, otherwise ignored. (d) Filter time constant – how quickly Daqu unit reacts to a sensor change. Large value means slower reaction. (e) Divider – pulses per event – for example, Rotax engines require 1 pulse per engine revolution and some fuel flow sensors require up to 8000 pulses per liter. (f) Save with pressing the cross button. This closes the dialogue. 2. Once all channels are set, Emsis transfers the new configuration to Daqu. This also makes new configuration active. 12 © Kanardia 2013 Daqu — Manual 3 3. Wiring in General Wiring in General This section guides you through various sensor type connection schemas. Not all options are described, but just typical and most common ones. Use following schemas as general wiring help. There are also other sensors Daqu can make use of and are not described here. When you encounter a problem, contact Kanardia and we will try to provide you with a solution. See your sensor manual and specifications before wiring and installing sensor. Follow the sensor instructions. Make sure that the wires are secured and they will not get loose due to vibrations. 3.1 Ground NEVER connect Daqu ground pin (GND) directly to the aircraft or engine block common ground. Routing ground through aircraft/engine block will not damage Daqu unit, but will cause incorrect readings from the engine sensors. Daqu ground pin should be used only when: 1. Active sensor is installed and GND pin is used for grounding. In this case also +5/+12 V pin is used for sensor power and sensor signal is connected to B or Z channels. 2. Isolated resistive (two wire) sensor is installed and GND pin is used as a reference ground for the sensor. In this case sensor is connected to some A channel. Special caution should be applied when dealing with fuel sensors. 3.2 Resistive Sensors Resistive sensors are generally used as various temperature probes. They can be also used as pressure and fuel level probes. Two standard schemas are used. Non-isolated Sensors Non-isolated sensors have just one wire. Wire is connected to “+” pin of A channel. Ground is provided through the engine block and must be connected to “–” pin of the same A channel. See figure 5 (left). Isolated Sensor Isolated sensors have two wires. One wire is connected to “+” pin and the other wire is connected to “–” pin of the same A channel. ”–“ pin must be also connected with GND pin. See figure 5 (right). 3.3 Thermocouples Thermocouples are commonly used as EGT or CHT probes. Positive wire is connected to “+” pin and negative wire is connected to “–” pin of the same A channel. See figure 6. If you do not know if thermocouple is isolated or not, use a meter to do a continuity test between the wire ends and the sheathing of the probe. If thermocouple is non-isolated you will have a closed circuit; isolated will result in an open circuit. 13 © Kanardia 2013 Daqu — Manual 3.4 Figure 5: Resistive sensor connection schema. (right). Active Sensors Non-isolated sensor (left), isolated sensor Figure 6: Thermocouples connection schema. 3.4 Active Sensors Active sensors are generally used to measure pressure and fuel level. Voltage output Active sensors with voltage output have three wires. +5/+12 V input is connected to appropriate +5/+12 V pin and ground is connected to GND pin. Signal is connected to B channel. See figure 7. Do not connect any sensor with an output signal greater than +5 V to B channels. It will permanently damage Daqu unit. Current output Active sensors with current output have two wires. +5/+12 V input is connected to appropriate +5/+12 V pin. Signal is connected to B1 channel, see figure 8 (left). When signal is connected to B2 – B6 channel, 220 Ω resistor must be connected between B2 – B6 channel and GND pin, see figure 8 (right). 14 © Kanardia 2013 Daqu — Manual 3.5 Potentiometers Figure 7: Active sensor with voltage output connection schema. Figure 8: Active sensor with current output connection schema. Connection to B1 channel (left), connection to B2 – B6 channels (right). 3.5 Potentiometers Position sensors/potentiometers are used to change trim or flap position. Measuring Resistance (recommended) Connect potentiometer one end with ”+“ pin and potentiometer other end to ”–“ pin of the same A channel. Also connect ”–“ pin with GND pin. See figure 9 (left). Measuring Voltage Connect potentiometer one end with +5 V pin (never connect to +12 V) and potentiometer other end with GND pin. Connect sliding contact to B channel. See figure 9 (right). When measuring voltage, no matter which variable resistor is used, selected sensor on Nesis/Emsis unit must be Linear 5V ! 3.6 Digital Sensors Digital sensors measure time between pulses. They are used for measuring engine/rotor RPMs and fuel flow. 15 © Kanardia 2013 Daqu — Manual 3.6 Digital Sensors Figure 9: Potentiometer connection schema. Measuring resistance (left), measuring voltage (right). Active Inductive RPM Sensors NPN (Open Collector Output) Connect sensor +5/+12 V input with appropriate +5/+12 V pin according to your sensor specifications. Ground is connected to GND pin. Signal must be connected to the correct channel (default is ”+“ pin on Z1, but Z2 or Z3 channels can also be used. See figure 10 (left). PNP (Open Drain Output) Sensor wiring is the same as for NPN sensors, but you have to connect 10 kΩ resistor between Z channel and GND pin. See figure 10 (right). Figure 10: NPN – open collector output sensor connection schema (left), PNP – open drain output sensor connection schema (right). 16 © Kanardia 2013 Daqu — Manual 4 4. Installation of Sensors, Probes and Transducers Installation of Sensors, Probes and Transducers This section guides you through various sensor installation details that are commonly found in practise. In this section only connections to Daqu are described. For precise installation of sensors, probes and transducers to your engine, please consult your engine manual. 4.1 EGT – Exhaust Gas Temperature All standard EGT sensors (probes) are using K type thermocouples. The thermocouples wires should not be extended using standard wires (copper or similar). When extended, the same metal must be used for extension – otherwise Daqu unit will give false readings. When shortened to length, ALL wires must be the same length. K type thermocouples are made of chromel-alumel metals. Positive electrode wire is cromel and negative electrode wire is alumel. EGT labels (K type) correspond to different colors, see table 2. Color code IEC (international) BS (Great Britain) ANSI (USA) DIN (Germany) NFC (France) + green brown yellow red yellow – white blue red green purple Table 2: K type thermocouple – wire colors standards. EGT probes are typically placed on the exhaust pipes. Correct placement is important to get precise readings. The placement may vary between engine type and model. Consult your engine manual for proper EGT probe placement. Most appropriate position is 5 – 20 cm from the cylinder. For best results, mount all probes the same distance from each cylinder. In most cases, each exhaust pipe gets its own probe. However, if you opt for less probes, you should install them on the exhaust pipes that get less cooling air in cowling. These are typically the rear exhaust pipes. We recommend installing at least two EGT probes on the opposite sides for proper temperature comparison. EGT probes come in two basic forms as seen on figure 11. Figure 11: Hose clamp type EGT probe (left), bayonet type EGT probe (right). 17 © Kanardia 2013 Daqu — Manual 4.1 EGT – Exhaust Gas Temperature A probe can come loose during the flight due to vibrations and can come in contact with the propeller or engine parts. Use safety wire on each probe to prevent this and to keep the probe in its place. Any leak in the exhaust system can cause carbon monoxide to enter the cockpit (cabin), which may cause severe (lethal) poisoning. We recommend a good inspection of the final installation and purchase of the Nesis carbon monoxide sensor, which will give you early visual and audio warning on carbon monoxide presence. Channels A7 – A12 on Daqu are supposed to connect with EGT probes (channels A1 – A6, A14 or A15 can also be used). Connect positive wire to “+“ pin and negative wire to ”–“ pin of the same A channel. See figure 12 for proper connection schema. Channel A1 – A12, A14 – A15 Function EGT 1, EGT 2 ... Sensor K type, J type Isolated refer to section 3.3 Filter 1000 ms Figure 12: EGT probe connection schema. 4.1.1 Hose Clamp type EGT Probe Mark a spot on the exhaust pipe, where the probe will be installed. Make sure that the spot is on the straight portion of the pipe to ensure better grip for the hose clamp. Make also sure that the probe does not interfere with the cowl or any other obstacle or engine part. Drill appropriate hole on the marked spot and carefully clean any chips and burrs. Insert the probe and fasten it by tightening the clamp with a screwdriver. Check that the clamp provides a firm grip and secure fit, but do not over-tighten it. Example for hose clamp EGT probe can be seen on figure 11 (left). 4.1.2 Bayonet type EGT Probe Bayonet type EGT probe requires a nut welded on the exhaust pipe. Below the nut is a hole, where a probe enters the tube. If there is no hole, measure the probe tip diameter and drill a hole that matches the measured diameter. Typicall diameter is 1/8" (10 mm). Some probes have adjustable tip length. 18 © Kanardia 2013 Daqu — Manual 4.2 CHT – Cylinder Head Temperature Thread the probe into welded nut and adjust the tip so that the tip is in the middle of the tube. Tighten all the nuts, one used to adjust the tip and the other which holds the probe in the pipe. Example for bayonet EGT probe can be seen on figure 11 (right). 4.2 CHT – Cylinder Head Temperature Standard CHT sensors (probes) are J type thermocouples, but several different sensor types are also supported: K type thermocouples, VDO 120◦ /150◦ thermistor probe, PT 100/1000 and other thermistor type probes. The thermocouples wires should not be extended using standard wires (copper or similar). When extended, the same metal must be used for extension – otherwise Daqu unit will give false readings. When shortened to length, ALL wires must be the same length. J type thermocouples are made of iron-constantan metals. Positive electrode wire is iron and negative electrode wire is constantan. CHT labels (J type) correspond to different colors, see table 3. Color code IEC (international) BS (Great Britain) ANSI (USA) DIN (Germany) NFC (France) + black yellow white red yellow – white blue red blue black Table 3: J type thermocouple – wire colors standards. CHT probes come in very different forms and strongly depend on the engine type as seen on figure 13. Figure 13: From left to right: 12 mm ring-terminal type CHT thermocouple, bayonet spring type CHT thermocouple with insert, bayonet type CHT thermocouple and VDO 150◦ thermistor type CHT probe. Channels A1 – A6 on Daqu are supposed to connect with CHT probes (channels A7 – A12, A14 or A15 can also be used). Connect positive wire to ”+“ pin and negative wire to ”–“ pin of the same A channel. See figure 14 for proper connection schema. 19 © Kanardia 2013 Daqu — Manual Channel A1 – A12, A14 – A15 4.2 Function CHT 1, CHT 2 ... CHT – Cylinder Head Temperature Sensor J type, K type, VDO 100/120/150/200, PT100/1000, NTC Flybox N1K Isolated refer to section 3.3 Filter 1000 ms Figure 14: CHT probe (thermocouple) connection schema. 4.2.1 Rotax Rotax engines usually have thermistor CHT probes included with the engine (VDO 150◦ C, seen on figure 13). They are installed in diagonal cylinders (1, 3). You need to route the connections from probes to Daqu. Connect the wire to correct ”+“ pin. Ground is provided through the engine block and must be connected to ”–“ pin of the same A channel. See figure 15 for proper connection schema. Figure 15: Rotax engines CHT probe (thermistor type) connection schema. 20 © Kanardia 2013 Daqu — Manual 4.2.2 4.3 Oil Temperature Jabiru Jabiru engines require a CHT probe to be installed under the spark plug on each cylinder. To install the probe, remove the spark plug and remove the compression washer from the spark plug. Slide the 12 mm ring-terminal type CHT probe on the spark plug, then slide the compression washer back and reinstall the spark plug into the spark plug hole. Example for 12 mm ring-terminal type CHT probe can be seen on figure 13. See also your Jabiru engine manual for more details. 4.2.3 Lycoming and Continental Lycoming and Continental engines have many different types and the best approach is to study your engine manual or ask an experienced mechanics about mounting the CHT probes. In most cases, there is a threaded hole near the bottom of the cylinder. A bayonet type CHT probe with the adjustable tip can be used in this case. Example for the probe can be seen on figure 13. Install the adapter nut into the hole in the cylinder. Slide the tip so that it hits the bottom of the cylinder hole. Tighten the nut to keep the tip in the position. 4.3 Oil Temperature Refer to your engine manual for details on the oil temperature sensor installation. In many cases, your engine will be already equipped with proper sensors. If this is not the case, we provide two sensors that differ in thread size, see figure 16. 1/8 – 27 NPT thread is normally used on Rotax and Jabiru engines. 5/8 – 18 UNF thread is normally used on Lycoming and Continental engines. Several different sensors are also supported. Please see section 4.2 for sensors, as the sensors for the oil temperature are (in most cases) the same as for the CHT. Figure 16: 1/8 – 27 NPT thread sensor (left), 5/8 – 18 UNF thread (right). Sensor has just one wire. Connect the wire to correct ”+“ pin (default channel is A15, channels A1 – A12 or A14 can also be used). Ground is provided through the engine block and must be connected to ”–“ pin of the same A channel. See figure 17 for proper connection schema. 21 © Kanardia 2013 Daqu — Manual Channel A1 – A12, A14 – A15 4.4 Function Oil temp Coolant (Water) Temperature Sensor VDO 100/120/150/200, PT100/1000, LM335, NTC Flybox N1K, NTC Westach Filter 1000 ms Figure 17: Oil temperature sensor (non-isolated) connection schema. 4.4 Coolant (Water) Temperature If your engine is not equipped with proper sensor, refer to your engine manual for installation of the coolant temperature sensor. Several different sensors are supported. Please see section 4.2 for sensors, as sensors for coolant (water) temperature are (in most cases) the same as for the CHT or oil temperature. Non-isolated Sensor Sensor has just one wire. Connect the wire to correct ”+“ pin (default channel is A14, channels A1 – A12 or A15 can also be used). Ground is provided through the engine block and must be connected to ”–“ pin of the same A channel. See figure 18 (left) for proper connection schema. Isolated Sensor Sensor has two wires. One wire is connected to ”+“ pin (default channel is A14, channels A1 – A12 or A15 can also be used) and the other wire is connected to ”–“ pin of the same A channel. Also connect ”–“ pin with GND pin. See figure 18 (right) for proper connection schema. Channel A1 – A12, A14 – A15 4.5 Function Water temp Sensor VDO 100/120/150/200, PT100/1000, LM335, NTC Flybox N1K, NTC Westach Filter 1000 ms Carburetor Temperature If your engine is not equipped with proper sensor, refer to your engine manual for installation of the carburetor temperature sensor. It is usually installed after the main nozzle, before the throttle valve. Remove the plug in the carburetor housing below the throttle valve. In case carburetor is not pre-drilled for the 22 © Kanardia 2013 Daqu — Manual 4.6 Airbox, Gearbox and other Temperatures Figure 18: Coolant (water) temperature sensor connection schema. Non-isolated sensor (left), isolated sensor (right). temperature sensor, you must remove carburetor from the engine and drill the correct-sized hole and make thread yourself. Remove all chips and burrs before installing carburetor back to the engine. Non-isolated Sensor Sensor has just one wire. Connect the wire to correct ”+“ pin (channels A1 – A12 or A14 or A15 can be used). Ground is provided through the engine block and must be connected to ”–“ pin of the same A channel. See figure 19 (left) for proper connection schema. Isolated Sensor Sensor has two wires. One wire is connected to ”+“ pin (channels A1 – A12 or A14 or A15 can be used) and the other wire is connected to ”–“ pin of the same A channel. Also connect ”–“ pin with GND pin. See figure 19 (right) for proper connection schema. Channel A1 – A12, A14 – A15 4.6 Function Carburetor temp Sensor VDO 100/120/150/200, PT100/1000, LM335, NTC Westach Filter 1000 ms Airbox, Gearbox and other Temperatures If your engine is not equipped with proper sensor, refer to your engine manual for installation of the temperature sensor. Non-isolated Sensor Sensor has just one wire. Connect the wire to correct ”+“ pin (channels A1 – A12 or A14 or A15 can be used). Ground is provided through the engine block and must be connected to ”–“ pin of the same A channel. See figure 20 (left) for proper connection schema. 23 © Kanardia 2013 Daqu — Manual 4.7 Oil Pressure Figure 19: Carburetor temperature sensor connection schema. Non-isolated sensor (left), isolated sensor (right). Isolated Sensor Sensor has two wires. One wire is connected to ”+“ pin (channels A1 – A12 or A14 or A15 can be used) and the other wire is connected to ”–“ pin of the same A channel. Also connect ”–“ pin with GND pin. See figure 20 (right) for proper connection schema. Channel A1 – A12, A14 – A15 Function Airbox / Gearbox S ensor VDO 100/120/150/200, PT100/1000, LM335, NTC Flybox N1K, NTC Westach Figure 20: Airbox/Gearbox temperature sensor connection schema. (left), isolated sensor (right). 4.7 Filter 1000 ms Non-isolated sensor Oil Pressure In order to measure the engine oil pressure, sensor that operates in the 0 – 10 bar (0 – 150 psi) range is typically used. Kanardia provides two oil pressure sensors, see figure 21. Active (MEMS based) oil pressure sensor with 1/8 – 27 NPT thread. 24 © Kanardia 2013 Daqu — Manual 4.7 Oil Pressure Passive VDO oil pressure sensor with 1/8 – 27 NPT thread. Sensors normally fit directly to Rotax (after year 2008), Lycoming and Continental engines. For other engines you may require either adapter or different sensor. We recommend that sensor is not installed directly on the engine. Kanardia recommends usage of active oil pressure sensor. Figure 21: Active (MEMS based) oil pressure sensor (left), passive VDO oil pressure sensor (right). Passive – Resistive Sensors Connect passive (non-isolated) oil pressure sensor to correct ”+“ pin (channels A1 – 12 or A14 – A15 can be used). Ground is provided through the engine block and must be connected to ”–“ pin of the same A channel. See figure 22 for proper connection schema. Channel A1 – A12, A14 – A15 Function Oil pressure Sensor VDO 5/6/8/10 bar Filter 1500 ms Figure 22: Passive (non-isolated) oil pressure sensor connection schema. Active Sensors Voltage Output Sensor has three wires. Connect +5/+12 V input to appropriate +5/+12 V pin according to: 25 © Kanardia 2013 Daqu — Manual 4.7 Oil Pressure (a) Sensor operating voltage +5 V These sensors require +5 V to operate and they provide 0.5 – 4.5 variable voltage output indicating pressure. (b) Sensor operating voltage +12 V These sensors require +12 V to operate and they provide 0 – 5 variable voltage output indicating pressure. Ground is connected to GND pin and signal must be connected to the correct channel (default channel is B1, channels B2 – B6 can also be used). See figure 23 for proper connection schema. Do not connect any sensor with an output signal greater than +5 V to B channels. It will permanently damage Daqu unit. Channel B1 – B6 Function Oil pressure Sensor Act 5V 100/150/200/250/300/500 psi Filter 1500 ms Figure 23: Active oil pressure sensor with voltage output connection schema. Sensor operating voltage +5 V (left), sensor operating voltage +12 V (right). Current Output (Rotax active oil pressure sensor) Rotax active oil pressure sensor is designed to output variable current proportional to the pressure being measured. Sensor output at 0 bar is 4 mA and at maximum pressure is 20 mA. Daqu measures this current using built-in resistor on channel B1 only. Rotax active oil pressure sensor has two wires (older versions have three). Red wire provides power for the sensor operation and is connected to +12 V pin. White wire provides signal and is connected to channel B1. Black wire, if exists, is not used. See figure 24 (left) for proper connection schema. Channels B2 – B6 can also be used, but 220 Ω resistor must be connected between B2 – B6 channel and GND pin. See figure 24 (right) for proper connection schema. 26 © Kanardia 2013 Daqu — Manual 4.8 Fuel Pressure Channel B1 B2 – B6 Function Oil pressure Sensor Rotax Int. Res. Rotax Active Filter 1500 ms Figure 24: Rotax active oil pressure sensor with current output connection schema. Connection to channel B1 (left), connection to channels B2 – B6 (right). 4.7.1 Rotax Rotax engines usually come equipped with the oil pressure sensor. Models shipped before 2008 have a passive VDO 0 – 10 bar (0 – 150 psi) range sensor, see figure 22 for connection schema. Rotax engines shipped after 2008 have installed Rotax active oil pressure sensor, see figure 24 for connection schema. 4.7.2 All Other Engines Lycoming, Continental and Jabiru engines usually come equipped with 1/8 – 27 NPT thread passive oil pressure sensor. See figure 22 for connection schema. On second installation Kanardia recommends usage of active pressure sensor. 4.8 Fuel Pressure In order to measure fuel pressure, sensor that operates in the 0 – 2 bar (0 – 30 psi) range shall be used for carbureted engines. Injected engines require fuel pressure sensor with higher range. See your engine manual for specifications. Fuel pressure sensor must not be mounted directly on the engine due to potential vibration problems. Kanardia provides two fuel pressure sensors and fittings, see figure 25. Active (MEMS based) fuel pressure sensor with 1/8 – 27 NPT thread. Passive VDO fuel pressure sensor with 1/8 – 27 NPT thread. Passive – Resistive Sensors 27 © Kanardia 2013 Daqu — Manual 4.8 Fuel Pressure Figure 25: Active (MEMS based) fuel pressure sensor (left), passive VDO fuel pressure sensor (middle), fuel pressure sensor fitting ϕ 6 or ϕ 8 mm (right). Non-isolated Sensor Sensor has just one wire. Connect the wire to correct ”+“ pin (default channel is A14, channels A1 – A12 or A15 can also be used). Ground is provided through the engine block and must be connected to ”–“ pin of the same A channel. See figure 26 (left) for proper connection schema. Isolated Sensor Sensor has two wires. One wire is connected to ”+“ pin (default channel is A14, channels A1 – A12 or A15 can also be used) and the other wire is connected to ”–“ pin of the same A channel. Also connect ”–“ pin with GND pin. See figure 26 (right) for proper connection schema. Channel A1 – A12, A14 – A15 Function Fuel pressure Sensor VDO 2/5 bar, Skytech 15 psi Filter 1500 ms Figure 26: Passive fuel pressure sensor connection schema. Non-isolated sensor (left), isolated sensor (right). Active Sensors Voltage Output Sensor has three wires. Connect +5/+12 V input to appropriate +5/+12 V pin according to: 28 © Kanardia 2013 Daqu — Manual 4.8 Fuel Pressure (a) Sensor operating voltage +5 V These sensors require +5 V to operate and they provide 0.5 – 4.5 variable voltage output indicating pressure. (b) Sensor operating voltage +12 V These sensors require +12 V to operate and they provide 0 – 5 variable voltage output indicating pressure. Ground is connected to GND pin and signal must be connected to the correct channel (default channel is B1, channels B2 – B6 can also be used). See figure 27 for proper connection schema. Do not connect any sensor with an output signal greater than +5 V to B channels. It will permanently damage Daqu unit. Channel B1 – B6 Function Fuel pressure Sensor Act 5V 15/30/50/100/150/200 psi Filter 1500 ms Figure 27: Active fuel pressure sensor with voltage output connection schema. Sensor operating voltage +5 V (left), sensor operating voltage +12 V (right). Current Output Active fuel pressure sensor is designed to output variable current proportional to the pressure being measured. Sensor output at 0 bar is 4 mA and at maximum pressure is 20 mA. Daqu measures this current using built-in resistor on channel B1 only. Active fuel pressure sensor has two wires (older versions have three). Connect +5/+12 V input with appropriate +5/+12 V pin according to your sensor specifications. Signal is connected to channel B1. Third wire, if exists, is not used. See figure 28 (left) for proper connection schema. Channels B2 – B6 can also be used, but 220 Ω resistor must be connected between B2 – B6 channel and GND pin. See figure 28 (right) for proper connection schema. 29 © Kanardia 2013 Daqu — Manual 4.9 Channel B1 B2 – B6 Function Fuel pressure Hydraulic and Pneumatic Pressure Sensor Rotax Int. Res. Rotax Active Filter 1500 ms Figure 28: Active fuel pressure sensor with current output connection schema. Connection to channel B1 (left), connection to channels B2 – B6 (right). 4.9 Hydraulic and Pneumatic Pressure Refer to your engine manual for details on the hydraulic or pneumatic pressure sensor installation. Sensors used for hydraulic or pneumatic pressure are the same as for fuel or oil pressure. Difference may only be in fitting to the existing ports – they may have a different thread. Refer to section 4.8 for proper connection of your sensor. 4.10 Fuel Level Before installing fuel level sensor into fuel tank, ensure that the tank is completely empty. Make sure to ventilate the tank – fuel vapours are highly explosive. Fuel level sensor must be grounded at all time. Ground connection must never break to prevent any electrical sparks near or inside the fuel tank. When uninstalling fuel level sensor, make sure to disconnect other wires before the ground wire. When (re)installing fuel level sensor, connect the ground wire first. You can connect up to two fuel tanks to the Daqu unit. Passive – Resistive Sensors Non-isolated Sensor Sensor has just one wire. Connect the wire to correct ”+“ pin (channels A1 – A12 or A14 – A15 can be used). Ground is provided through the engine block and must be connected to ”–“ pin of the same A channel. See figure 29 (left) for proper connection schema. 30 © Kanardia 2013 Daqu — Manual 4.10 Fuel Level Isolated Sensor Sensor has two wires. One wire is connected to ”+“ pin (channels A1 – A12 or A14 – A15 can be used) and the other wire is connected to ”–“ pin of the same A channel. Also connect ”–“ pin with GND pin. See figure 29 (right) for proper connection schema. Figure 29: Passive fuel level sensor connection schema. Non-isolated sensor (left), isolated sensor (right). Channel A1 – A12, A14 – A15 Function Fuel level 1/2 Sensor Res 400 ohm, Res 5/10 kohm, Fuel Junior Filter 2500 ms Connected via Voltage Divider (FLVV) Sometimes it is advisable to connect resistive sensors indirectly using voltage divider principle. This type of connection forces larger electrical current to flow trough the sensors, which may solve some contact problems within the sensor. Connecting via voltage divider we get voltage output, which can be measured on any B channel. Figure 30 shows example of connection schema. Channel B1 – B6 Function Fuel level 1/2 Sensor Linear 5V Filter 2500 ms Active Sensors Sensor has three wires. Connect sensor +5/+12 V input to appropriate +5/+12 V pin according to your sensor specifications. Ground is connected to GND pin and signal must be connected to the correct channel (default channel is B1, channels B2 – B6 can also be used). See figure 31 for proper connection schema. Channel B1 – B6 Function Fuel level 1/2 Sensor Linear 5V Filter 2500 ms Do not connect any sensor with an output signal greater than +5 V to B channels. It will permanently damage Daqu unit. 31 © Kanardia 2013 Daqu — Manual 4.10 Fuel Level Figure 30: Passive fuel level sensor connected via voltage divider. Two fuel level channels are shown. Figure 31: Active fuel level sensor connection schema. 4.10.1 Tank Calibration with Nesis Before tank calibration can be performed, fuel level sensor(s) must be configured. Refer to section 2.3.2 on page 10. Enter the Tank Calibration icon on Service Mode screen. Three options are displayed: Setup tanks This option combines sensors, hardware units and tank names. It must be done first. See figure 32. After calibrating tank, other two options will become available. Tank name Give tank a name. Use very short names – just one letter when possible. 32 © Kanardia 2013 Daqu — Manual 4.10 Fuel Level Shape Choose a tank shape. Select your tank aircraft and tank model when available or specify the user shape. When non-user shape is selected, proceed to the min/max calibration. For the user shape, you must proceed with the Edit tank shape option. Unit Select the serial number of the Daqu unit, to which the fuel level sensor is connected. Usually, only one option is available. Figure 32: Tank setup dialogue. In the dialogue the tank C has User defined shape. The tank is connected to the device with serial number ”1145“ – Daqu. Your Daqu will have different serial number, of course. Calibrate sensors (min/max) Is used to calibrate a tank, which shape is already known – all non-user shapes. See figure 33. For user specified shapes, this option is available only, if the tank shape was already determined before. Here, only empty tank and full tank limits are required. Figure 33: Defining the sensor limits on a known tank shape. Observe the sensor value. This value must be ”alive“ and must change as the tank becomes full or empty. At the end, empty value and full value labels should be significantly different. The actual values depend on the sensor type. It may happen that the sensor value for the empty tank is larger than the sensor value for the full tank. This is not an error and it simply indicates that sensor is working in the opposite direction. Follow the steps below: 1. Empty the fuel tank completely. Once the tank is empty, select the Empty command. 2. Now, fill up the tank completely and select the Full command. 3. Finally, select the Save command to save the results. The Close command closes the dialogue without saving changes. 33 © Kanardia 2013 Daqu — Manual 4.10 Fuel Level Edit tank shapes This is an alternative approach to edit the tank with manual insertion of values. Mostly used for serial production. Edit tank shapes option makes a complete tank shape calibration, taking several measurements. After measurements are complete, min/max calibration is done automatically. This option can be used for the User shape tank only. Here we record a curve that connects sensor values with actual fuel quantity stored in tank. Please note that most fuel level sensors are not able to detect a completely empty tank – they stop indicating before the tank is truly empty. The same is true for the full tank. Sensors stop indicating before the tank is completely full. See figure 34 for tank shape dialogue. Figure 34: Tank shape editor dialogue. The table always shows fuel in liters, even if gallons were selected for the fuel units. In order to calibrate sensor against tank shape, please follow these steps. 1. Make sure the tank is completely empty. Add the inaccessible amount of fuel into the tank. You may also consider adding a few extra liters – for safety. This defines the zero fuel level. 2. Select the Add command and select the zero fuel from the dialogue. This adds a line into the dialogue, which combines zero fuel level with the sensor reading. 3. Add a known quantity of fuel into the tank and observe the Sensor value label. This value MUST change – must be different from the last recorded value. If the value does not change or the difference is too small, add more fuel into the tank. 4. Select the Add command and tell how much fuel (in liters!) above the zero fuel level has been entered so far. Press OK to add a line, a new fuel level – sensor value pair. 5. Repeat this process until the sensor reaches the full limit or tank is full (whatever comes first). Do not select the Add command, if the sensor value is not different from the previous value. Remember that most sensors stop indicating before the tank is completely full. 6. Select the Save command to save the measurements into the unit. Select the Close command to exit the dialogue without saving. The procedure above determines the tank shape and calibrates the sensor at the same time, therefore min/max calibration is not necessary. 34 © Kanardia 2013 Daqu — Manual 4.11 4.11 Pitch/Roll/Yaw Trim, Flap Position Pitch/Roll/Yaw Trim, Flap Position The following position sensors/potentiometers can be connected to the Daqu unit: Pitch Trim Roll Trim Yaw Trim Flap Position Potentiometers (variable resistors) ranges of 400 Ω, 5 kΩ and 10 kΩ2 are suitable for connection with Daqu unit. Refer to the potentiometer datasheet for pin identification. Potentiometers can be connected in two different ways: Measuring Resistance (recommended) Connect potentiometer one end with ”+“ pin and potentiometer other end to ”–“ pin (channels A1 – A12 or A14 – A15 can be used). Also connect ”–“ pin with GND pin. See figure 35 (left) for proper connection schema. Channel A1 – A12, A14 – A15 Function Pitch/Roll/Yaw trim, Flap position Sensor Res 400 ohm, Res 5/10 kohm Filter 50 ms Measuring Voltage Connect one end of the potentiometer to +5 V pin (never connect to +12 V) and other end to GND pin. Connect sliding contact to correct channel (channels B1 – B6 can be used). See figure 35 (right) for proper connection schema. When measuring voltage, no matter which variable resistor is used, selected sensor on Nesis/Emsis unit must be Linear 5V ! Channel B1 – B6 4.11.1 Function Pitch/Roll/Yaw trim, Flap position Sensor Linear 5V Filter 50 ms Pitch/Roll/Yaw Trim, Flap Position Calibration with Nesis Once you have installed potentiometer and calibrated a channel for it, you need to set values for min/max. This is done by selecting channel for the potentiometer in Airplane Engine menu and selecting the Min/max command. Dialogue similar as the one on figure 36 opens. Min Set potentiometer position to minimum and select Set min command. In the Real column you can insert a value you want to have on display, like 0 for Min. 2 If a different range of variable resistor is needed, please contact Kanardia and we will provide you with a solution. 35 © Kanardia 2013 Daqu — Manual 4.12 Engine RPM – Tachometer Figure 35: Potentiometer connection schema. Measuring resistance (left), measuring voltage (right). Figure 36: Specify pitch trim min/max value (left), flap position min/max value (right). Max For maximum set potentiometer position to maximum and select Set max command. In the Real column you can insert a value you want to have on display, like 100 for Max. Once you have configured your potentiometer position setting, select Save command. Also, do not forget to select Save command in the Airplane Engine menu. 4.12 Engine RPM – Tachometer Your engine may already be equipped with engine RPM sensor. Refer to your engine manual for wiring. If your engine is not equipped with RPM sensor, refer to your engine manual for installation. For correct readings, you need to know the divider 3 for your engine RPM sensor. To enter the value with Nesis unit, please refer to section 2.3.2 and with Emsis unit to section 2.3.3, on page 10. ECU ECU unit has a digital engine RPM output. Two wires are used, signal is connected to ”+“ pin on Z1 channel and ground is connected to ”–“ pin on Z1 channel. See figure 37 for proper connection schema. 3 Pulses per event – number of sensor output pulses per engine/rotor revolution or fuel flow readings. 36 © Kanardia 2013 Daqu — Manual 4.13 Rotor RPM Variable–Reluctance (Magnetic) Pickup Two wires are used. One wire is connected to ”+“ pin on Z1 channel and the other wire is connected to ”–“ pin on Z1 channel. See figure 37 for proper connection schema. Trigger Coil Rotax (912) engines usually come equipped with a trigger coil for monitoring RPM. One wire is connected to ”+“ pin on Z1 channel and the other wire is connected to ”–“ pin on Z1 channel. See figure 37 for proper connection schema. Figure 37: Engine RPM signal connection schema. Channel Z1 Function Engine RPM Sensor Rotax, Rotax ECU, Jabiru, Simonini Filter 600 ms Pulses divider value3 Active Inductive RPM Sensors NPN (Open Collector Output) Connect sensor +5/+12 V input with appropriate +5/+12 V pin according to your sensor specifications. Ground is connected to GND pin. Signal must be connected to the correct channel (default is ”+“ pin on Z1, but Z2 or Z3 channels can also be used). See figure 38 (left) for proper connection schema. PNP (Open Drain Output) Sensor wiring is the same as for NPN sensors, but you have to connect 10 kΩ resistor between Z channel and GND pin. See figure 38 (right) for proper connection schema. Channel Z1 – Z3 4.13 Function Engine RPM Sensor Linear 5V Filter 600 ms Pulses divider value Rotor RPM For rotor RPM indication, you need a sensor to measure rotor rotation. Sensor is usually connected to Z3 channel. 37 © Kanardia 2013 Daqu — Manual 4.14 Fuel Flow Figure 38: Active inductive RPM sensor connection schema. NPN – Open collector output (left), PNP – open drain output (right). Your aircraft may already be equipped with rotor RPM sensor. Refer to your aircraft manual for wiring. If your rotor is not equipped with RPM sensor, refer to your sensor manual for installation. For correct readings, you need to know the divider for your rotor RPM sensor. To enter the value with Nesis unit, please refer to section 2.3.2 and with Emsis unit, to section 2.3.3 on page 10. Active Inductive rotor RPM Sensors NPN (Open Collector Output) Connect sensor +5/+12 V input with appropriate +5/+12 V pin according to your sensor specifications. Ground is connected to GND pin. Signal must be connected to the correct channel (default channel is Z3, but Z2 channel channel can also be used). See figure 38 (left) for proper connection schema. PNP (Open Drain Output) Sensor wiring is the same as for NPN sensors, but you have to connect 10 kΩ resistor between Z channel and GND pin. See figure 38 (right) for proper connection schema. Channel Z2 – Z3 4.14 Function Rotor RPM Sensor Linear 5V Filter 600 ms Pulses divider value Fuel Flow Install the fuel flow sensor at an angle so that no bubbles can be trapped in the impeller section. This could cause incorrect readings. Make also sure, that no dirt or debris from fuel tank can lodge inside the fuel flow sensor. It may not block fuel flow but could jam the impeller inside the sensor. For precaution install fuel filter first, preferably with a small reservoir between the fuel pump, fuel flow sensor second and fuel pump last. For best fuel flow readings, fuel tube should be placed a little uphill when leaving the fuel flow sensor. Fuel flow sensor is not intended to be mounted on the engine! 38 © Kanardia 2013 Daqu — Manual 4.14 Fuel Flow Connect sensor +5/+12 V input to appropriate +5/+12 V pin according to your sensor specifications. Ground is connected to GND pin and signal must be connected to the correct channel (default channel is Z2, but Z3 can also be used). See figure 39 for proper connection schema. Channel Z2 – Z3 Function Fuel flow 1/2 Sensor UL Power, Linear 5V Filter 500 ms Pulses divider value Correction correction value For correct readings, you need to know the divider - pulses per liter for your fuel flow sensor. To enter the value with Nesis unit, please refer to section 2.3.2 and with Emsis unit, to section 2.3.3, on page 10. These values are typically in 2000-10000 pulses per liter range. A good sensor producer sells their sensors calibrated and each sensor is tagged with the pulses per liter value. These values may vary in 5-10% per sensor producer. The correction value should be set to 1.0, which means no correction. If you feel that fuel flow indication is too small, you specify a correction factor > 1.0 and vice versa. Figure 39: Fuel flow sensor connection schema. 4.14.1 Differential Fuel Flow In order to measure differential fuel flow you need to connect two fuel flow sensors to Daqu. The first sensor is connected normally and measures fuel flow towards the engine. The second sensor is connected as Fuel flow 2 and measures flow from the engine back into the tank. When Fuel flow 2 is configured and sensor is connected, its reading will be automatically subtracted from the reading of the Fuel flow 1 sensor. No other configuration is necessary. In the differential case (two sensors connected), you should specify correction factor 1.0 for each sensor. Also note that each sensor has its own pulses per liter value. Channel Z2 is typically used for the first fuel flow sensor. For the second sensor you can select any free Z channel (Z3 in most cases). Channel Z2 – Z3 Z2 – Z3 Function Fuel flow 1 Fuel flow 2 Sensor UL Power, Linear 5V UL Power, Linear 5V 39 Filter 500 ms 500 ms Pulses divider divider Correction 1.0 1.0 © Kanardia 2013 Daqu — Manual 4.15 4.15 Amperes – Current Amperes – Current Kanardia provides two current sensors. Figure 40 illustrates both. Figure 40: Kanardia current sensor ± 30 A (left), Kanardia current sensor ± 160 A (right). Current ± 30 A Sensor uses two M6 screws for connection with power cable and sensor fitting. Current ± 160 A Sensor can be fitted into place with four M3 screws. Power cable is guided ”through“ the sensor, hence power cable is not cut at any place. Sensor has a label with illustrated arrow. Sensor will indicate positive readings, if the current flows in direction of the arrow. Sensor has three wires. Red wire provides power for the sensor operation and connects to +5 V pin. Black wire provides sensor ground and connects to GND pin. White wire provides signal and connects to the correct channel (default channel is B5, but B1 – B4 or B6 can also be used). See figure 41 for proper connection schema. Channel B1 – B6 Function El. current 1/2 Sensor Current 30/60/80/160 A Filter 1500 ms Figure 41: Kanardia current sensor connection schema. 40 © Kanardia 2013 Daqu — Manual 4.16 4.16 Voltage Voltage Daqu can measure voltages from 0 to +30 V DC. Choose the point where you want to monitor the voltage and guide the wires to Daqu. Daqu default and only channel for measuring voltage is C1. Connect positive pole to ”+“ pin and negative pole to ”–“ pin on C1 channel. See figure 42 for proper connection schema. Channel C1 Function Battery voltage 41 Sensor Voltage Filter 1000 ms © Kanardia 2013 Daqu — Manual 4.16 Voltage Figure 42: Voltage connection schema. 42 © Kanardia 2013 Daqu — Manual 5 5. Rotax 912 iS Engine – Daqu iS Rotax 912 iS Engine – Daqu iS In order to support Rotax 912 iS engine, we slightly modified Daqu shown in the manual so far. Manifold pressure sensor was removed and an additional three pin connector was added instead. This connector is used to connect Daqu and the Rotax iS engine. See figure 43. Figure 43: Daqu iS top view. The Rotax iS engine comes with a complete set of sensors. ECU unit on the engine reads the sensors and transmits the information on the outgoing CAN bus using CANaerospace protocol. Daqu reads this CAN bus and retransmits the same information using Kanardia protocol. See figure 44. Figure 44: Illustration of the connection principle. Allmost all information comes from the ECU. Rotor RPM and fuel tanks can be still connected directly to Daqu. Rotax iS ECU unit transmits the following information: engine RPM, fuel flow rate, manifold pressure, oil pressure, oil temperature, coolant temperature, EGT 1–4, manifold air temperature, engine ambient temperature, throttle position, engine ambient pressure, ECU bus voltage, engine status, engine hours, ECU hours, sensors status. You can see that most of the information comes directly from the ECU and most of Daqu connectors remain empty. But you can still use Daqu to connect rotor RPM, fuel level and any other sensor that is not covered by ECU. 43 © Kanardia 2013 Daqu — Manual 5.1 5.1 Connection to Rotax iS CAN Connection to Rotax iS CAN The iS engine comes equiped with an ECU connector and from this connector you have several long wires. Out of these you need to find wires labeled as: Cockpit display CAN high, Cockpit display CAN low, Cockpit display GND. At the end of these three wires you need to fit our connector (comes with Daqu). If you open the connector, you can see markings 1, 2 and 3. Figure 45 shows the back side connector with pins. Solder the wires onto the connector as it is marked on the photo. Figure 45: Photo of connector back side. Note the three small numbers, which define the pin positions. Once the connector is made, plug it into Daqu and the installation is ready. Do not forget to set (or to verify) correct engine model in Nesis/Emsis. 44 © Kanardia 2013