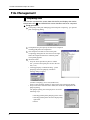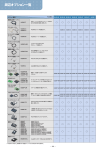
1
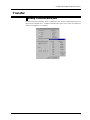
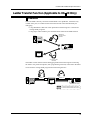
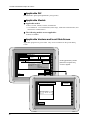
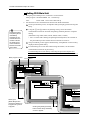
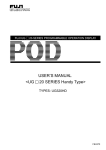
FUJI UG
20 SERIES PROGRAMMABLE OPERATION DISPLAY
USER’S MANUAL <REFERENCE>
Additional Specifications
TYPE: UG00S-CW
FEH351a-2
Preface
UG Series
Thank you very much for purchasing the FUJI UG520/420/320/221/220 Series
Programmable Operation Display (POD) (hereinafter called “UG 20 Series” or “POD”).
This manual describes only the functions newly added to the screen editor UG00S-CW
Ver. 2.50 (Ver. 2.5.0.0) which are not described in the Reference Volume of the UG Series
User’s Manual (FEH351a). Please read this manual together with the Reference Volume
of the UG Series User’s Manual (FEH351a).
This manual is an English version based on the Japanese user’s manual (No. FH351b-2)
[ Notes ]
(1) No part of this manual may be reproduced in any form without prior permission of the
publisher.
(2) The contents of this manual, including the specifications, are subject to change for
improvement without notice.
(3) This manual was prepared with utmost care. However, if you find any ambiguity, errors, etc.,
please contact any of our sales offices that are listed at the end of this manual. In so ding,
please tell the manual number shown on the cover of this manual.
[About trade marks and others]
*
*
*
*
MS-DOS is a trademark of U.S.-based Microsoft Corporation.
PC9801/9821-Series computers are products of NEC.
The name of each device used in the programmable controller (PLC) is the product name of its
manufacturer.
Product names used in this manual are trademarks or registered trademarks of the
corresponding companies.
Contents
System Setting ............................................................ 1
PLC models ........................................................................... 1
Printing Bit Samples in Displayed Format ............................. 3
Converting DIO Input Memory Bits ....................................... 3
About Sampling Mode .................................................. 4
Alarm Display (UG 20 Only) ................................................. 4
About Macros (Applicable to UG 20 Only) .................... 6
Adding Macro Commands ...................................................... 6
Transfer ...................................................................... 7
Adding communication port .................................................. 7
File Management ......................................................... 8
Comparing Files .................................................................... 8
Using Satoh’s MR400 Series Barcode Printer
(Applicable to UG 20 Only) .......................................... 9
Connecting Cables ................................................................ 9
Using Memory Card ............................................................... 9
Setting in UG00S-CW .......................................................... 10
Format Table ................................................................................ 11
Macros Added for MR400 Series .................................................... 15
Bar code type CODE39 .................................................................. 16
Ladder Transfer Function (Applicable to UG 20 Only) 19
Overview ............................................................................. 19
Applicable PLC .................................................................... 20
Applicable Models ............................................................... 20
Applicable Versions and Local Main Screen ......................... 20
Connection ......................................................................... 21
Setting Procedure and Communications .............................. 22
Precautions for Using Ladder Transfer Function .................. 24
About Ladder Transfer Function Errors ............................... 24
Transferring Screen Data Using Modem
(Applicable to UG 20 Only......................................... 25
Preparation and Setup Procedure ........................................ 25
Setting AT commands ......................................................... 26
Setting POD Main Unit ........................................................ 28
Connection ......................................................................... 29
Transmitting Screen Data ................................................... 31
Transfer Errors Displayed on UG00S-CW ............................. 32
Error Display ............................................................. 33
UG00S-CW Additional Specifications
System Setting
PLC models
The following models marked (5 models) have been added in order to adapt to PLC’s
from 31 makers.
The models marked * cannot be set by the UG400/210.
< Model >
< Calendar >
FUJI MICREX-F (T-link)
depends on the model
FUJI MICREX-SX (T-link)
provided
FUJI MICREX-SX (JPCN1)
not provided
FUJI FLEX-PC (JPCN1)
not provided
FUJI MICREX-SX (SX bus)
provided
FUJI MICREX-F Series
depends on the model
FUJI MICREX-SX Series
provided
FUJI MICREX-SX CPU
provided
FUJI FLEX-PC Series
depends on the model
FUJI FLEX-PC CPU
depends on the model
FUJI FLEX-PC COM
provided
FUJI FLEX-PC (T)
depends on the model
FUJI FLEX-PC CPU (T)
depends on the model
MITSUBISHI AnA/N/U Series
provided
MITSUBISHI QnA Series
provided
provided
* MITSUBISHI QnH (Q) Series
MITSUBISHI A CPU port
provided
MITSUBISHI FX Series
depends on the model
provided
* MITSUBISHI Net10
MITSUBISHI QnA CPU port
provided
provided
* MITSUBISHI QnH CPU port (A)
MITSUBISHI
QnH
CPU
port
(Q)
provided
*
provided
* MITSUBISHI FX Series (A protocol)
provided
* MITSUBISHI AnA/N/U (JPCN1)
MITSUBISHI
FX2N
Series
provided
*
provided
* MITSUBISHI FX1S Series
provided
* MITSUBISHI A Series CC-Link
provided
* MITSUBISHI QnA CC-Link
provided
* MITSUBISHI QnH (Q) Series CC-Link
provided
* MITSUBISHI QnA Series (Ethernet)
provided
* MITSUBISHI QnH (Q) Ethernet
OMRON SYSMAC C
depends on the model
OMRON
SYSMAC
C
(JPCN1)
depends
on the model
*
OMRON SYSMAC CV
provided
provided
* OMRON SYSMAC CS1
OMRON
SYSMAC
CS1
DNA
provided
*
SHARP JW Series
provided
SHARP JW100/70H COM port
provided
SHARP JW20 COM port
provided
provided
* SHARP JW (FL-Net)
HITACHI HIDIC-H
provided
HITACHI HIDIC-S10/2
not provided
HITACHI HIDIC-S10/ABS
not provided
HITACHI
HIDIC-S10
(JPCN1)
not provided
*
MATSUSHITA MEWNET
depends on the model
YOKOGAWA FA500
provided
YOKOGAWA FA-M3
provided
* YOKOGAWA FA-M3/FA-M3R (Ethernet) provided
1
UG00S-CW Additional Specifications
*
*
*
*
*
*
*
*
*
*
*
*
*
*
*
*
*
*
*
*
*
*
*
*
*
*
*
*
*
*
*
*
*
2
YOKOGAWA FA-M3R
provided
YOKOGAWA FA-M3R (FL-Net)
provided
YASUKAWA Memo-bus
depends on the model
YASUKAWA CP9200SH/MP900
not provided
TOYOPUC
provided
KOYO SU/SG
provided
KOYO SR-T
provided
KOYO SR-T (K protocol)
not provided
KOYO SR-T (K-Sequence)
provided
A.B PLC-5
not provided
A.B SLC500
provided
A.B Micro Logix 1000
not provided
A.B Control Logix
not provided
GE Fanuc 90 Series
not provided
GE Fanuc 90 Series (SNP-X)
not provided
TOSHIBA T Series
provided
TOSHIBA MACHINE TC200
provided
SIEMENS S5
not provided
SIEMENS S7
not provided
SIEMENS S7 PROFIBUS-DP
not provided
SIEMENS S5 UG400 compatible
not provided
SIEMENS TI500/505
provided
SIEMENS TI500/505 (UG400 compatible) provided
SIEMENS S7-200 PPI
provided
SIEMENS S5 PG port
not provided
SIEMENS S7-300MPI (HMI ADP)
not provided
SIEMENS S7-300MPI (PC ADP)
not provided
SHINKO SELMART
provided
SAMSUMG SPC Series
not provided
SAMSUMG N-Plus
provided
SAMSUMG SECNET
depends on the model
KEYENCE KZ Series
not provided
KEYENCE KZ-A500 CPU port
provided
KEYENCE KV Series
not provided
KEYENCE KZ24/300 Series CPU
not provided
KEYENCE KV10/24 Series CPU
not provided
KEYENCE KV7000 Series CPU
provided
LG MASTER-K10/60/200
not provided
LG MASTER-K500/1000
not provided
LG LGMKX00S
not provided
LG MASTER-KxxxS CENT
not provided
LG GLOFA CENT
not provided
FANUC Power Mate
not provided
FATEK AUTOMATION FACON FB Series
provided
IZUMI IDEC MICRO3
provided
MODICON Modbus RTU
depends on the model
YAMATAKE MX Series
provided
TAIAN Electric Co., Ltd. TP02
provided
SAIA PCD
provided
MOELLER PS4
not provided
Telemecanique TSX Micro
not provided
Automationdirect Direct LOGIC
provided
Automationdirect Direct LOGIC (K-Sequence) provided
VIGOR M Series
depends on the model
DELTA DVP Series
not provided
General-purpose FL-Net
not provided
General-purpose serial
UG00S-CW Additional Specifications
Printing Bit Samples in Displayed Format
This does not apply
to the UG400/210.
Printing bit sampling data causes all data stored in the buffer including ON/OFF
conditions to be printed. From the next version, selecting [Print out the data of bit
sampling with the display type] allows printing only the data of the current display
format.
Setup procedure:
1
2
Update the main program.
Select [System Setting], [Others...], [Others/P3], and then [ Print out the data
of bit sampling with the display type].
Converting DIO Input Memory Bits
This does not apply
to the UG400/210.
Set [DIO input
Mem] and [DIO
output Mem] by
selecting [Others/
P2] from [System
Setting].
For PLC with special bit assignments (see the description below), bit conversion should
be carried out inside the POD. Currently, bit conversion is not carried out for the DIO
input memory and done for the DIO output memory, therefore, the bit assignment
image is different between input and output.
From the next version, selecting [Convert DIO Input Memory to bit memory] causes bit
conversion to be carried out also for the DIO input memory.
* Currently supported PLC models that require bit conversion
Fuji MICREX-F (other than T-LINK I/O memory):
Bit weight inverted
Hitachi HIDIC-S10 α (other than JPCN-1 I/O memory):
Bit weight inverted
SIEMENS S5 Series (only device memory at byte address): Byte weight inverted
SIEMENS S7 Series (only device memory at byte address): Byte weight inverted
Setup procedure
Select [System Setting], [Others...], [Others/P3], and then [ Convert DIO Input
Memory to bit memory].
3
UG00S-CW Additional Specifications
About Sampling Mode
Alarm Display (UG 20 Only)
Two functions have been added to alarm display:
This does not apply
to the UG400/210.
1
Selecting whether or not to store message for each bit
This function enables to select whether or not to store the alarm message
depending on its severity.
Example
Line1 Stop bit
OFF
Line1 Service bit
OFF
When Line1 Stop and Line1 Service bits are set to
[Memorize].
Line1 Stop
Line1 Service
Line1 Stop
Line1 Service
Line1 Stop
15 : 42 : 20
15 : 43 : 59
15 : 44 : 20
15 : 46 : 00
15 : 46 : 30
15 : 43 : 50
15 : 44 : 10
15 : 45 : 50
15 : 46 : 20
15 : 47 : 20
When [Memorize] is not selected for the Line1 Service bit,
the history of the Line1 Service bit is not saved. In this case,
the following display will not appear:
Occurrence time
Line1 Stop
Line1 Stop
Line1 Stop
15 : 42 : 20
15 : 44 : 20
15 : 46 : 30
Reset time
15 : 43 : 50
15 : 45 : 50
15 : 47 : 20
Setup procedure
From the [Message Edit] window, select [Display] and click [Display
Change...] to change the display.
By selecting [No.], [Relay No.], and [Memorize] from
[Display], whether or not to display the line numbers, relay
numbers, and stored messages can be set.
4
UG00S-CW Additional Specifications
Acquiring alarm memory information
The number of the message used for alarm display with [Memorize] set
OFF can be read with macro command SYS (GET_BUF).
• [SYS (GET_BUF) F1]
Reads the alarm memory information.
Available devices
F0
F1
Indirect
PLC
Memory
Internal memory memory Constant
W-word
card specification
Command name
GET_BUF:Alarm mask information read
SYS(GET_BUF) F1
Message group No.
Alarm mask information (related to each message line) (← UG)
F1+1 Bit 0: 0’th line of message
Bit 1: First line of message
F1+16
Bit 2: Second line of message
~
~
F1+0
F1+1
F1+16 Bit 15: 255th line of message
Setting a message group No. in memory F1+0 causes to store the message
No. masked to F1+1 through F1+16.
2
Displaying alarm occurrence time
Displaying alarm occurrence time as the time information attached to the error
message.
Alarm occurrence time
Alarm occurrence time
Alarm occurrence time
Line1 Stop bit
OFF
Line1 Service bit
OFF
Alarm occurrence time
Alarm occurrence time
Alarm occurrence time
Line1 Stop
Line1 Service
Line1 Stop
Line1 Service
Line1 Stop
0 : 1 : 30
0 : 0 : 11
0 : 1 : 30
0 : 0 : 20
0 : 0 : 50
Setup procedure
From the [Alarm Display] dialog, select [Display Mode] and then [Occurrence
Time Display].
5
UG00S-CW Additional Specifications
About Macros (Applicable to UG 20 Only)
Adding Macro Commands
Bar code printer MR400 Series (See page 9.)
Description
Command name
MR_REG
Executes MR400 format table registration set number.
MR_REG F0
MR_OUT
Executes MR400 format table call set number.
MR_OUT F0
SYS command
Command name
GET_BUF
6
Description
Alarm function.
SYS (GET_BUF) F1 (See page 4.)
UG00S-CW Additional Specifications
Transfer
Adding communication port
To enable transfer to/from the editor (US00S-CW) side, set the communication ports on
the personal computer (PC). Available communication ports were COM1 to COM4, but
COM1 to COM8 are now available.
7
UG00S-CW Additional Specifications
File Management
Comparing Files
This function compares the screen data with the file and displays the results.
Note that the UG 20 and UG400/210 screen data files cannot be compared.
Setup procedure
1
From [File], select [File Managing] and click [File Comparing...] to open the
[File Comparing] dialog.
2
Click [Reference] and specify the files to be compared.
Clicking [OK] starts the comparison.
The comparison results are listed in the [File
Comparing] dialog like the one shown in the right.
When all comparison data have matched, [Data
corresponds] appears.
About the menu
• Only the items specified in [Save to TEXT
file...] selected from [File] are saved in the text
file (*.txt).
• Clicking [Display Condition Setting...] from
[Display] causes the [Display Condition
Setting] dialog to appear.
3
4
(Number of display] (10 to 100) (default: 20)
Errors of the specified number are listed in the [File Comparing] dialog.
• Only for the error items that have details, the results are displayed in the
[Report] dialog.
The [Report] dialog can be displayed in one of the
following ways:
• Selecting [Detail] from [Display] in the menu.
• Selecting [Detail] from the menu displayed by
right-click.
• Return
8
UG00S-CW Additional Specifications
Using Satoh’s MR400 Series Barcode Printer
(Applicable to UG 20 Only)
When Satoh’s MR400 Series Barcode Printer is connected to the POD, bar code can be
printed.
Before using this function, be sure to read and understand the User's Manual
and Command Reference Manual for the Satoh's MR400 Series Barcode
Printer.
Connecting Cables
For connecting the MR400 Series printer to the POD, use Fuji Electric’s printer cable
UG00C-C (2.5m) for parallel interface.
Using Memory Card
This function requires a memory card installed on the MR400 Series
printer. For available memory cards and memory card installation
procedure, refer to the MR400 Series User's Manual.
Memory card
formatting is
analogous to floppy
disk initialization.
Specifying card slot number and formatting memory card
Before using a memory card, specify the number of the slot to insert the memory
card and format the memory card.
1 Check that the MR400 Series printer power is OFF and insert the memory card
to the card slot on the MR400 Series printer rear panel.
2 While pressing the LINE key on the MR400 Series printer front panel, set the
power switch ON.
3 When “USER MODE” is displayed on the front panel, simultaneously press the
LINE and FEED keys. When “ADVANCED MODE” appears, press again the
LINE and FEED keys simultaneously. Then, “CARD MODE” appears.
4 Press the FEED key until “CARD DRIVE NO/ 1 2” appears on the display as
shown in the right. Now, set the card drive number. (Use the LINE key for
selecting and the FEED key to confirm.) The drive number set here is used as
the memory card slot number.
5 Using the FEED key, set the items up to “CARD FORMAT” as shown in the
right. For “CARD FORMAT/ YES NO,” select YES to start formatting.
Formatting completes if no error messages appear.
6 Set the printer power switch OFF to exit CARD MODE.
When registration or change has been made by [MR400 Format Table
(Register Setting)] described later, formatting is necessary.
9
UG00S-CW Additional Specifications
Formatting memory card from POD
By outputting an MR400 Series control command from the POD, the memory card
can be formatted. (See page 15.)
Setting in UG00S-CW
1. From [Item], select [System Setting], [Others...], [Others/P1], [Printer], and then
[MR-400].
2. [Register Setting] and [Call
Setting] selected from [Item],
[System Setting], and [MR400
Format Table (M)], allow
registering and setting a
command group. For details, see
“Format Table” in the next page.
3. For printing with an external command, set the following:
From [System Setting], select [Others...], [Others/P3], and then [MR400 I/F
Memory].
This memory has the following configuration:
MR400 I/F memory + 0
Control memory
Printing by setting “1” in bit 0.
MR400 I/F memory + 1
Memory specified by format table number
(Call setting: 1 to 256)
When I/F memory bit 0 is set ON, the contents of the specified format call set
number are printed. After printing is over, this bit is automatically set OFF for
preparing for the next printing.
The format call set number can also be specified with macro MR_OUT for printing.
(See pages 15 and 16.)
10
UG00S-CW Additional Specifications
Format Table
The format table
allows setting the
format of data input
to MR400, including
the number of print
columns, print
position, print
character type, bar
code, etc.
Using a combination of MR-400 Series commands enables printing in flexible format.
In UG00S-CW, the format tables for setting this command group are [Register Setting]
and [Call Setting].
[Register Setting] (1 to 128)
Use [Register Setting] for registering a format. Once a format is registered, it can be
used from the next time without specifying the same command group.
For formatting and registering the memory card installed in the MR400 Series
printer, use macro MR_REG (see page15).
Setup procedure
1
From [System Setting], select [MR400 Format Table (M)]
and click [Register Setting...] to display the [MR400
Format Table (Register Setting)].
2
Specify the number to be set and click [OK].
Then, [MR400 Format Table (Register Setting)] like the one shown below
appears.
Changes the format table number.
Copies the open format table to the specified
copy destination number.
3
For example, for registering the format shown below, enter as shown on the
next page.
<A>
<Specifies starting data transmission>
<CC> 2
1 2 3 4 5
123456
<Specifies the card slot to be used> Slot number
<YS>, 10
<Specifies format registering>, Format registration number
We recommend to make it the same
as the registration set number.
</N>, 1, 10
<Specifies field registration>, Field number, Number of print columns
11
UG00S-CW Additional Specifications
g
,
,
<V> 10 <H> 50
<Specifies the vertical print position> Number of dots <Specifies the horizontal print position> Number of dots
<B> 2 02 080 1 2 3 4 5 6 7 8 9 0
Data to be
registered
in field 1
<Specifies bar code> Bar code type, Bar width magnification ratio, Top and bottom sizes of bar (dots), Data
</N>, 2, 5
<V> 100 <H> 50 <L> 0 2 0 2 <P> 2
<X22>, 1 2 3 4 5
Data to be
registered
in field 2
<Specifies X22 characters>, Data
</N>, 3, 6
<V> 200 <H> 300 <L> 0101 <P> 2
<X22>, 1 2 3 4 5 6
Data to be
registered
in field 3
<Z>
<Specifies end of data transmission>
Description format in format table
We recommend to
make these the same.
The escape characters (ESC) to be placed at the beginning of the escape
sequence should be “1B (H)” in hexadecimal (HEX) enclosed in <> for the
MR400 Series printer.
(Example)
In the format table, the HEX data should be
preceded by “\.” For example, “1B” should be
written as “\1B.” When writing character \ itself,
it should be written as “\\.”
<X22>,12345
1BX22,12345
\1BX22,12345
When registration setting has been changed, the memory card should be
reformatted.
12
UG00S-CW Additional Specifications
[Call Setting] (1 to 128)
Calls the format registered by [Register setting], allowing to change the print
contents for individual field numbers. When printing, use macro [MR_OUT] (see
page 15) or [MR400 I/F memory] (see page 10).
Setup procedure
1
2
From [System Setting], select [MR400 Format Table (M)] and
click [Call Setting] to display the [MR400 Format Table...]
dialog.
Specify the same number as the [MR Format Table (Register Setting)] number
to be used and click [OK].
Then, the [MR400 Format Table (Register Setting)] like the one shown below
appears.
Format table
number
Memory
card slot
number
Field number
3
In the space next to the field number, enter the data to be printed.
<When printing fixed text>
Enter the data directly to the related field number. The data is converted to
ASCII code by POD and output to the MR400 Series printer.
Example: To print “ABCDE” in field No.1, enter “ABCDE” to field No.1.
<When printing data stored in memory>
Check [ Memory] for the related field No.
13
UG00S-CW Additional Specifications
[Detail...] button appears.
Clicking the [Detail...] button causes the [Detail] dialog to appear.
Selecting [Text] from [Type]
(See the figure in the right.)
Data of the specified number of bytes,
beginning with the data at the address specified
in [Memory] is sequentially output from the
memory.
Example:
To print 1-byte characters “ABCDEF,” specify
ASCII code as shown below.
D 100
D 101
D 102
4241
4443
4645
[ Add start/end code.]
Set this item when using bar code type CODE39.
See “Bar code type CODE39” in page 16.
Selecting [num.] from [Type]
(See the figure in the right.)
Selecting [num.] causes the BIN data to be
converted to text (ASCII) and output.
Example:
When numeric data “0100” (BIN) is contained
in D100, it is printed as text “0100” (=“100”).
[Memory]
[Bytes]
Prints the contents of the specified memory as numeric data.
Allows specifying the number of bytes matching the display
format.
When [Zero Suppress] is checked, suppressed zeros in the
specified bytes are padded with spaces.
[Decimal Point] Specify the number of positions below a decimal point.
[Display Type] Allows selecting one from DEC-, HEX, OCT, DEC, or BIN.
DEC- means a decimal number with a sign.
[Zero Suppress] Specifies whether or not to suppress zeros.
14
UG00S-CW Additional Specifications
[Data Length]
[Character]
[
Specifies the numeric data length (1- or 2-Word).
Specifies the character size (1- or 2-Byte).
The 2-byte size is allowed only for a kanji field for format
registering.
Add start/end code.]
Set when using bar code type CODE39.
See “Bar code type CODE39” in page 16.
Macros Added for MR400 Series
• [MR_REG]
Available devices
Internal
memory
PLC
memory
Constant
Indirect
Memory
specification W-word
card
F0
MR_REG: Executes the MR400 format table register set number.
MR_REG F1
Registers the contents of the MR400 format table register set number set by
F1 as the MR400 Series format.
Example 1. MR_REG 22
When the command shown below is set in format table register
set number 22, the memory card is formatted.
Example 2. When MR_REG1 is set with a switch-ON macro and the
command shown below is set in format table register set number 1.
Pressing the switch once registers the MR400 Series format.
Pressing the switch again causes printing to occur, allowing to
confirm the print format.
15
UG00S-CW Additional Specifications
• [MR_OUT]
Prints the contents of the MR400 format table call set number set by F1.
Available devices
Internal
memory
PLC
memory
Constant
Indirect
Memory
specification W-word
card
F0
MR_OUT: Executes the MR400 format table call set number.
MR_OUT F1
Example: MR_OUT 50
Prints the contents of MR400 format table call set number 50.
Bar code type CODE39
For bar code type CODE39, the bar code is usually preceded and succeeded by “*.”
When using the MR400 Series printer, “*” is processed in two ways:
Setting [MR400 Format Table (Register Setting)]
The byte count in the format registration specification includes “*.”
For example, in the case shown below, 12 positions (10+2) are set.
16
UG00S-CW Additional Specifications
Setting [MR400 Format Table (Call Setting)]
Selecting [Text] from [Type]
(See the figure in the right.)
[Bytes]
Specifies the byte count including “*.”
[ Add start/end code.]
• Checked: When data at [Memory] contains no “*.”
• Unchecked: When data at [Memory] contains “*.”
Selecting [num.] from [Type]
(See the figure in the right.)
[ Add start/end code.]
• Checked: When data at [Memory] contains no “*.”
• Unchecked: When data at [Memory] contains “*.”
17
UG00S-CW Additional Specifications
Set how to process “*” when reading bar code with a barcode reader
in the procedure given below.
1
2
Select [Item] and [System Setting] and then click [BarCode Setting...].
The [Barcode Setting] dialog appears.
When CODE39 is selected from [Type], the [ Use start/end code.] item
appears.
[ Use start/end code.]
• Checked: Saves data with start/end code in [I/F Memory].
• Unchecked: Saves data without start/end code in [I/F Memory].
18
UG00S-CW Additional Specifications
Ladder Transfer Function (Applicable to UG 20 Only)
Overview
When the POD is directly connected to Mitsubishi’s PLC QnHCPU, which has only
one RS-232C port, two cables must be disconnected and connected alternately for
debugging.
• Using Mitsubishi’s RS-232C cable QC30R2 for monitoring PLC contents and
writing ladder programs
• Using Fuji's cable UG00C-Q for communications between the POD and PLC
Mitsubishi’s
RS-232C cable
QC30R2
disc
GPPW
RESET
Personal computer
(PC)
MELSEC
RS-232C
connector
Mitsubishi QnH Series
POD
POD
Connecting cable
UG00C-Q
The ladder transfer function allows debugging without disconnecting and connecting
the cables. The personal computer (PLC programming software) connected to the POD
can be used for writing ladder programs and monitoring the PLC.
UG00C-T
GPPW
(UG00S-CW)
Personal computer
(PC)
COM
CN1
MJ1/2
UG00C-Q
RS-232
MELSEC
POD
POD
Mitsubishi QnH Series
: Communications between PC and PLC
: Communications between POD and PLC
19
UG00S-CW Additional Specifications
Applicable PLC
Mitsubishi PLC Q02, Q02H, Q06HCPU port (Q mode)
Applicable Models
Applicable models
UG221, UG320, UG420, UG520, UG420H-EL
* Unavailable for 1:n communication (multi-drop), multi-link communication, and
multi-link 2 communication.
The following models are not applicable:
UG220, UG320HD
Applicable Versions and Local Main Screen
Applicable programs are given below. They can be confirmed on the [Local Main]
screen.
Local Main
UG420H-TC1
System Information
SYSTEM PROG. VER. 1.280
Screen Data Information
Size: 2883584
1998-5 -5 07:23:30
FONT
VER.1.100/1.100/1.000
ENGLISH
I/F DRV VER.1.240
MELSEC QnH Q
CPU Port
Model: Mitsubishi QnHCPU Port (Q)
Comment:
Error: Stop
Time-Out: 0.50 sec
Retry: 3
Connection Signal: 1:1 Baud Rate: 57600
Signal Level: RS-232C Data: 8
Stop: 1
Station No.: 0
Parity: Odd
Transmission Delay: 0 msec
Clicking [Extension] causes
[Extension Program Info.]
screen to appear.
Extension
Information
Editor:
Memory
Card
I/O
Test
Extension Program Info.
Ladder Comm. Program
VER. 1.000 MELSEC QnH Q
CPU Port
Editor:- - - - -
20
Local Main
UG00S-CW Additional Specifications
*1. The ladder communication program is the program added by the ladder transfer
function. This program is used by the POD at the repeating point when
communicating between the personal computer (PLC programming software)
and PLC.
Connection
For connecting between the POD (CN1) and PLC (RS-232C port), use
Fuji’s UG00C-Q cable.
For connecting between the personal computer (PLC programming
software) and POD (MJ1/2), use Fuji’s UG00C-T cab le.
UG00C-T
GPPW
(UG00S-CW)
CN1
MJ1/2
COM
UG00C-Q
RS-232
MELSEC
POD
Personal computer
(PC)
Mitsubishi QnH Series
POD
When using UG00S-CW and PLC programming software
• When there are two UG00C-T’s available
If the personal computer has two COM ports, use the COM port and cable
(UG00C-T) separately for UG00S-CW and PLC programming software.
: Communications between PLC programming software and PLC
: Communications between UG00S-CW and POD
: Communications between POD and PLC
UG00C-T
Personal computer
(PC)
CN1
MJ1
COM1
GPPW
(UG00S-CW)
UG00C-Q
RS-232
MELSEC
POD
MJ2
COM2
UG00C-T
Mitsubishi QnH Series
POD
• When there is only one UG00C-T available
One port of the personal computer cannot be shared by UG00S-CW and PLC
programming software. One of the communications should be stopped.
UG00C-Q
UG00C-T
COM1
GPPW
(UG00S-CW)
Personal computer
(PC)
CN1
MJ1
RS-232
MELSEC
POD
POD
Mitsubishi QnH Series
21
UG00S-CW Additional Specifications
Setting Procedure and Communications
1
Setting PLC type
Select [Item], [System Setting], and [PLC Type...]. From the [Select PLC type]
dialog, set [MITSUBISHI: QnHCPU Port (Q)].
2
Setting PLC programming software port
Select [Item], [System Setting], and [Others...]. From the [Others/P2] dialog, set
[Modular Jack 1] or [Modular Jack 2] to [Ladder Tool].
About communications with UG00S-CW (screen data transfer, etc.)
UG00S-CW and POD are not available for online editing. If it is attempted,
communications between the PLC programming software and PLC are not
carried out normally.
Local Main
UG420H-TC1
System Information
SYSTEM PROG. VER. 1.280
Screen Data Information
Size: 2883584
• When [Ladder Tool] has been assigned to MJ2 and the POD is switched to
Local Main screen, MJ1 becomes the [Editor Port], enabling communications
with UG00S-CW.
• When [Ladder Tool] has been assigned to MJ1 and the POD is switched to
Local Main screen, communications with the PLC programming software
remain enabled and communications with UG00S-CW are disabled.
To start communications with UG00S-CW, press and
hold the F2 key for three seconds. [Editor:---]
changes to [Editor:MJ1], enabling communications
with UG00S-CW.
FONT
VER.1.100/1.100/1.000
ENGLISH
Model: Mitsubishi QnHCPU Port (Q)
Comment:
1998-5 -5 07:23:30
I/F DRV VER.1.240
MELSEC QnH Q
CPU Port
Error: Stop
Time-Out: 0.50 sec
Retry: 3
Connection Signal: 1:1 Baud Rate: 57600
Signal Level: RS-232C Data: 8
Stop: 1
Station No.: 0
Parity: Odd
Transmission Delay: 0 msec
Extension
Information
Editor:
22
Memory
Card
I/O
Test
Communications with
PLC programming
software enabled
Editor:
Communications with
UG00S-CW enabled
Editor:MJ1
When the F2 key is again pressed and held three
seconds, [Editor:MJ1] changes to [Editor:---],
enabling communications with the PLC
programming software.
UG00S-CW Additional Specifications
• States of communications between PLC programming software and PLC
during communications between UG00S-CW and POD
UG00S-CW
3
PLC programming software
Writing to POD
Disconnected (Normal communications
after completing writing)
Normal communications
Reading from POD
Collating with POD
Reading from POD
Setting communications for PLC programming software
When setting the conditions for communications between the PLC
programming software and PLC, use the parameters for communications
between the POD and PLC. Check the [Comm. Parameter] dialog, which is
displayed by selecting [Item], [System Setting], and [Comm. Parameter...].
About baud rate
The [Baud Rate] value set from [Comm. Parameter] on UG00S-CW may be
different from the baud rate of the PLC programming software. When
communications with the PLC programming software (monitoring, etc.)
have started, the baud rate of the PLC programming software is activated.
When the power is set OFF and then set ON, the [Baud Rate] value set from
[Communication Parameters] is activated.
4
Transferring ladder communication
program
Normally, when screen data is transferred,
the ladder communication program is also
transferred. When transferring only the
ladder communication program, carry out
the procedure given below.
i) From the [Transfer] dialog, select
[Ladder comm. program], and click
[PC->].
ii) The dialog like the one shown below
appears. Select [MelQHCpQ.lcm] and
click [Open] to start transfer to the
POD.
23
UG00S-CW Additional Specifications
Precautions for Using Ladder Transfer Function
1
During communications between POD and PLC, monitor registration is inhibited,
lowering the performance than usual.
2
During POD running, ladder program transfer is carried out synchronously,
lowering the performance of both the POD and PLC programming software than
usual.
About Ladder Transfer Function Errors
An error number related to ladder transfer appearing on the POD has been added (see
page 33).
24
UG00S-CW Additional Specifications
Transferring Screen Data Using
Modem (Applicable to UG 20 Only)
Transmit screen data, etc. from a remote POD using a modem.
POD
Modem
Telephone
line
Modem
Personal
computer
Preparation and Setup Procedure
Requirements
<<On the receiving side (POD)>>
• Modem (Accessories: RS-232C cable, modular cable, AC adapter)
• UG00C-T
• RS-232C cross cable (See pages 29 and 30.)
• UG00S-CW or communication software (hyper-terminal, etc.)
<<On the transmitting side (PC)>>
• Modem (Accessories: RS-232C cable, modular cable, AC adapter)
• UG00S-CW
Setup procedure
<<On the receiving side (POD)>>
1 Make sure that the POD main program and font version are applicable (see
page 28).
If not applicable, upgrade them.
2 Connect the receiving-side (POD) modem to the personal computer (PC),
referring to the User’s Manual.
3 Register AT commands to the modem (see the next page).
4 Disconnect the modem from the PC and connect it to the POD (see page 29).
5 Set the baud rate for communications between the POD and modem (see page
28).
<<On the transmitting side (PC)>>
1 Connect the transmitting-side (PC) modem to the personal computer (PC),
referring to the User’s Manual.
2 Start UG00S-CW and register AT commands (see the next page).
3 Set conditions for communications between the PC and modem (see page 31).
4 Transmit the POD screen data. (Online editing is disabled.)
25
UG00S-CW Additional Specifications
Setting AT commands
1. Start UG00S-CW and click [Send AT command...] from [File].
(If there is no UG00S-CW on the receiving side, set the conditions given below
using communication software such as hyper-terminal.)
2. The [AT command] dialog like the one shown below appears.
3. Select [Serial Port] from the pull-down menu.
4. Select [AT] from the pull-down menu and click the [Send] button.
5. When [OK] appears as shown above, the modem and personal computer have been
normally connected to each other.
6. Transmit the commands given below.
The set items and their contents may vary depending on the modem. Confirm the
set contents, referring to the User’s Manual of the modem used.
<<AT command settings on receiving (POD) side>>
Contents
Set item
Set presence or absence of
result code
Result code display format
Q0 (presence)
Echo back
E1 (presence)
Select communication protocol
B0 (ITU-T protocol definition)
ER signal control
&D0 (ER signal always ON)
Flow control (*1)
Number of rings before call
terminating
Writing to nonvolatile memory
(*2)
&K0 (No flow control)
S0=1 (Specify a digit other than 0.)
V1 (word format)
Current operation conditions written to &W0
“STORE PROFILE0.”
*1. Never use the XON/XOFF flow control.
*2. This command setting is also necessary to set the modem power OFF after setting
the AT commands.
26
UG00S-CW Additional Specifications
<<AT command settings on transmitting (PC) side>>
Contents
Set item
Set presence or absence of
result code
Result code display format
Q0 (presence)
Echo back
E1 (presence)
Select communication protocol
B0 (ITU-T protocol definition)
&D2 (Circuit opened by setting ER signal from ON
to OFF)
&K0
Current operation conditions written to &W0
“STORE PROFILE0.”
ER signal control
Flow control (*1)
Writing to nonvolatile memory
(*2)
V1 (word format)
*1. Never use the XON/XOFF flow control.
*2. This command setting is also necessary to set the modem power OFF after setting
the AT commands.
If the contents of the items above are the same as the modem used, select the
command given below from the pull-down menu, and make transmission.
Receiving (POD) side
AT B0 E1 Q0 V1 &D0 &K0 S0=1
Transmitting (PC) side
AT B0 E1 Q0 V1 &D2 &K0
When [OK] appears, transmission has completed normally.
The transmitted settings will be erased when the modem power is set OFF.
Therefore, select “AT&W0” from the pull-down menu and make transmission.
When [OK] appears, transmission has completed normally.
If the contents of the items above are not the same as the modem used, delete the
described AT commands, directly input the correct AT commands confirmed
referring to the User’s Manual of the modem used, and then make transmission.
Input AT command
directly here.
7. Now, AT command setting has completed.
27
UG00S-CW Additional Specifications
Setting POD Main Unit
1. Using the [Local Main] screen, confirm the versions below.
Main program: SYSTEM PROG. Ver. 1.280 and up
Font:
FONT VER. 1.100/1.100/1.000 and up
2. Set the baud rate for communications between the POD and modem.
1 On the [Local Main] screen, click [Editor:MJ1] to display [Extension Program
Info.].
2 Using the [↑] and [↓] buttons for [Settimg Value], select the modem
communication baud rate and click the [Setting Finished] button to complete
setting.
(Selectable range: 4800, 9600, 19200, 38400, 57600, 115200)
* For 15 seconds after clicking the [Setting Finished] button, the switches on
the [Local Main] screen and the function switches are inactive.
3 The [Local Main] screen appears automatically, with [Modem connect mode]
displayed below [Editor:MJ1].
4 For transferring the screen data without using the modem, set the modem
communication baud rate to [Not used].
For transferring the screen data by connecting the personal computer and
UG00C-T to each other, the modem communication baud rate should be set to
[Not used].
Clicking the [?Set
Complete?] button
immediately
transmits the AT
commands to the
modem and sets
the baud rate for
communications
between the POD
and modem.
Main program version
Local Main
Font version
UG420H-TC1
System Information
SYSTEM PROG. VER. 1.280
Screen Data Information
Size: 2883584
1998-5 -5 07:23:30
FONT
VER.1.100/1.100/1.000
ENGLISH
I/F DRV VER.1.240
MELSEC QnH Q
CPU Port
Model: Mitsubishi QnHCPU Port (Q)
Comment:
Error: Stop
Time-Out: 0.50 sec
Retry: 3
Connection Signal: 1:1 Baud Rate: 57600
Signal Level: RS-232C Data: 8
Stop: 1
Station No.: 0
Parity: Odd
Transmission Delay: 0 msec
Extension
Information
Editor : MJ1
I/OInfo.
Extension
Memory Program
Card
Test
Local Main
Setting Value
Modem Comm. Baud Rate: Not used
UG420H-TC1
Local Main
System Information
SYSTEM PROG. VER. 1.280
Screen Data Information
Size: 2883584
Model: Mitsubishi QnHCPU Por
Comment:
Setting Finished
Clicking the
[Editor:MJ1] button
causes the [Extension
Program Info.] screen
to appear.
28
Connection Signal: 1:1
Signal Level: RS-232C
Station No.: 0
Editor : MJ1
Clicking the [Setting Finished]
button causes the [Local Main]
screen to appear.
FONT
VER.1.100/1.100/1.000
ENGLISH
Modem connect mode
UG00S-CW Additional Specifications
Connection
<<Receiving side>>
RS-232C cable (straight)
(UG00C-T + cross cable + RS-232C cable attached to modem)
1
MJ1
LINE
Modem
POD
PW
ER OH CD DA
2
Modular cable
attached to modem
Telephone line
modular receptacle
Telephone line
<<Transmitting side>>
Telephone line
modular receptacle
RS-232C cable
(straight)
attached to modem
3
Modular cable
2
attached to modem
disc
Modem
PW
ER OH CD DA
LINE
RESET
1
Personal
computer
(PC)
Connection between POD and modem
• Connect MJ1 on the POD rear panel to UG00C-T.
• Connect the RS-232C cable attached to the modem to the RS-232C connector on
the modem rear panel.
• For connecting the RS-232C cable attached to the modem to UG00C-T, use a
cable purchased on the market.
<<Cross cable connection diagram>>
UG00C-T is a cross cable. Make a cross cable to return it to straight.
For 9-pin modem
Modem side (9 pins)
UG00C-T side (9 pins)
Signal name
Pin No.
Signal name
Pin No.
RD
2
RD
2
SD
3
SD
3
SG
5
SG
5
RTS
7
CTS
8
* Set a jumper to RTS and CTS only for a modem
that cannot be set to No Flow Control.
29
UG00S-CW Additional Specifications
For 25-pin modem
Modem side (25 pins)
UG00C-T side (9 pins)
Signal name
Pin No.
Signal name
Pin No.
RD
3
RD
2
SD
2
SD
3
SG
7
SG
5
RTS
4
CTS
5
* Set a jumper to RTS and CTS only for a modem
that cannot be set to No Flow Control.
30
2
Connecting modem to telephone line
Connect the telephone line modular jack (LINE) on the modem rear panel to the
telephone line modular receptacle using the modular cable attached to the modem.
If the modular cable attached to the modem is too short, extend the cable using a
modular cable and repeating connector available on the market. Note that extending
the cable to tens of meters or more will cause troubles in data transmission and
reception.
3
Connecting modem to personal computer
Connect the RS-232C connector on the modem rear panel to the personal computer
RS-232C connector using the RS-232C cable attached to the modem.
UG00S-CW Additional Specifications
Transmitting Screen Data
1. Start UG00S-CW and open the screen file to be transmitted.
2. From [File], click [Transfer].
3. The [Transfer] dialog like the one shown below appears.
4. Check [ MODEM] and click the [Detail Setting...] button.
5. The [Modem Comm. Setting] dialog like the one shown below appears.
[Serial Port] (COM1 to COM8)
Set the communication port.
[Baud Rate] (9600, 19200, 38400, 57600)
Set the speed of communications between the personal computer and modem.
[TONE/PULSE]
Select the type of the telephone line from TONE (push type) or PULSE (dial
type).
[Telephone No.]
Set the telephone number of the distant party.
[Dial timeout] (sec)
Set the timeout period to wait for a response from the distant party. The default
value is 60 sec.
6. After setting the [Modem Comm. Setting] dialog, click [OK] to return to the
[Transfer] dialog.
7. From [Transfer], click [PC->] to start transmitting the screen data.
31
UG00S-CW Additional Specifications
Note:
When the screen data is transmitted using the modem function while the [Local
Main] screen is being displayed, [Transferring Data] appears in the lower-left
corner of the screen and it disappears upon completion of the transmission. For
approximately 15 seconds after [Transferring Data] disappears, the switches on the
[Local Main] screen and the function switches are inactive.
Transfer Errors Displayed on UG00S-CW
The following transfer errors displayed on UG00S-CW have been added together with
the modem function:
Error messages
Meanings and reactions
No responses from distant party.
- Check the distant party if the power is ON, the line is connected,
and so on.
- A timeout may have occurred before receiving the response.
Extend the dial timeout period.
Line is disconnected.
The telephone of the distant party has been rung OFF.
Command error
The transmitted command is not applicable to the modem of the
distant party.
The distant party line is busy.
The distant party line is busy.
The telephone number has not been set. Set the telephone number.
No dial tone has been detected.
32
NO DIAL TONE has been returned.
UG00S-CW Additional Specifications
Error Display
For “Check” errors like the one shown below, a new error number has been added.
Check
Data error
Error:160 (24:)
Error No.
Error:160 (24:)
Error No.
Related
UG400/ Error
UG 20
No.
function
210
Ladder
transmission
Meanings
Item No.
Reactions
170 Though [Ladder Tool] has been
selected from [Modular Jack 1] or
[Modular Jack 2] on the screen, the
POD main unit has no ladder
communication program.
When not carrying out ladder transfer,
uncheck [Ladder Tool] for [Modular
Jack 1] or [Modular Jack 2].
When carrying out ladder transfer,
transfer the ladder communication
program MelQHCpQ.lcm to the main
unit.
171 The PLC model set from the screen
does not match the ladder
communication program model.
Transfer the ladder communication
program of the PLC model set from
the screen (applicable only to
Mitsubishi QnHCPU port (Q)).
172 This error occurs when the ladder
communication program is being
stored, but no [Ladder Tool] has been
set for both of MJ1 and MJ2 from the
screen.
Set [Ladder Tool] for one of MJ1 or
MJ2 from the screen.
173 This error occurs when [Modular Jack
1] or [Modular Jack 2] has been set to
[Ladder Tool] from the screen and
[Connection] of [Comm. Parameter]
has been to a value other than 1:1.
(Ladder transfer is only available for
1:1.)
When not carrying out ladder transfer,
uncheck [Ladder Tool] for [Modular
Jack 1] or [Modular Jack 2]. Thus,
communications in the set connection
type are enabled.
When carrying out ladder transfer, set
[Connection] of [Comm. Parameter] to
1:1.
174 This error occurs if the I/F driver is
UNIPLC even when the PLC model
set for ladder transfer from the screen
matches the ladder communication
program model code. (No simulator is
available for ladder transfer.)
When transferring the screen data,
uncheck [Use Simulator for transfer
dialog]. Transfer the I/F driver of the
PLC applicable to ladder transfer set
by the editor from the screen
(applicable to Mitsubishi
MelQHCpQ.tpb Versions 1.240 and
up).
33
UG00S-CW Additional Specifications
Error No. (See the table below.)
Besides the error numbers listed above, there is an error number given below, which
does not normally appear.
If this error number should appear, please contact Technical Support.
Error No.
*94: Text count error for language setting
34
Fuji Electric Co., Ltd.
ED & C · EDrive Systems Company
Gate City Ohsaki, East Tower
11-2, Osaki 1-chome, Shinagawa-ku, Tokyo, 141-0032, Japan
Phone:
+81-3-5435-7135~8
Fax:
+81-3-5435-7456~9
URL
http://www.fujielectric.co.jp/kiki/
Information in this manual is subject to change without notice.