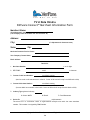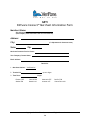
1
PAYWARE CONNECT
CORPORATE PORTAL MAN UAL
AUGUST 29, 2012
Notice
VeriFone, the VeriFone logo, PAYware, PAYware PC, PAYware SIM, PAYware Transact, PAYware Mobile,
PAYware Connect, PAYware STS, VeriShield Protect, and PCCharge are either trademarks or registered
trademarks of VeriFone Systems, Inc. in the United States and/or other countries.
All other brand names and trademarks appearing in this publication are the property of their respective
holders.
NO WARRANTY
The information contained in this publication is subject to change without notice. Although VeriFone
has attempted to ensure the accuracy of the contents of this publication, this publication may contain
errors or omissions. This Program Guide is supplied “as-is,” without any warranty of any kind, either
expressed or implied, including the implied warranties of merchantability and fitness for a particular
purpose.
LIMITED LIABILITY
In no event shall VeriFone be liable for any indirect, special, incidental, or consequential damages
including damages for loss of business, profits, or the like, even if VeriFone or its representatives have
been advised of the possibility of such damages.
CONTACT INFORMATION
VeriFone Systems, Inc.
8001 Chatham Center Drive
Suite 500
Savannah, GA 31405
PAYware Connect Technical Support: (800) 839-0947
www.verifone.com
Printed in the United States of America
Copyright © 2012 VeriFone Systems, Inc. All rights reserved
No part of this publication may be copied, distributed, stored in a retrieval system, translated into any
human or computer language, transmitted in any form or by any means without prior written
permission of VeriFone Systems, Inc.
© Copyright 2012. VeriFone Systems, Inc. All Rights Reserved.
2
Service Agreement
PAYWARE CONNECT TERMS OF SERVICE
THIS AGREEMENT IS A LEGAL AGREEMENT BETWEEN YOU ("MERCHANT") AND VERIFONE, INC. (“VERIFONE”) REGARDING YOUR
USE OF VERIFONE’S PAYWARE CONNECT SERVICE. ALL REFERENCES HEREIN TO VERIFONE’S PAYWARE CONNECT SERVICE
INCLUDE PAYWARE CONNECT VIRTUAL TERMINAL, PAYWARE MOBILE OR DIAL SERVICES, AS APPLICABLE. ALL REFERENCES
HEREIN TO “YOU” AND “MERCHANT” MEAN YOU AND THE COMPANY OR OTHER LEGAL ENTITY YOU REPRESENT. BY USING
THE PAYWARE CONNECT SERVICE, YOU ACKNOWLEDGE THAT YOU HAVE READ THIS AGREEMENT, UNDERSTAND IT AND AGREE
TO BE BOUND BY ITS TERMS.
1. RIGHT TO USE. If you have purchased the PAYware Connect Service, subject to the terms and conditions of this
Agreement, and your payment of the applicable fees, VeriFone hereby grants to Merchant a limited, non-exclusive, nontransferable, non-sublicensable right and license to (a) access and use the PAYware Connect Service via remote network
access; (b) execute, download and display the features, functions and graphical interface components of PAYware Connect
Service to communicate, transfer and collect data; and (c) display, download, print and reproduce any documentation
provided by VeriFone as reasonably required for the use of the PAYware Connect Service. If you have purchased VeriShield
Protect with the PAYware Connect Service, you may access and use the PAYware Connect Service with the VeriShield
Protect data encryption service in the United States via remote network access.
If you have purchased PAYware Mobile, subject to the terms and conditions of this Agreement and Merchant’s payment of
the applicable fees, VeriFone hereby grants to Merchant a limited, non-exclusive, non-transferable, non-sublicensable right
and license to (a) access and use the PAYware Connect Service with the VeriShield Protect data encryption service in the
United States via remote network access; (b) execute, download and display the features, functions and graphical interface
components of PAYware Connect Service to communicate, transfer and collect data; (c) display, download, print and
reproduce any documentation provided by VeriFone as reasonably required for the use of the PAYware Connect Service, and
(d) use VeriFone’s PAYware Mobile application on Merchant’s iPhone or other VeriFone-designated device solely for the
purpose of using PAYware Mobile.
Your licenses shall terminate upon any termination of this Agreement, or upon any suspension or termination of your access
to the PAYware Connect Service. VeriFone may modify the PAYware Connect Service from time to time in its reasonable
discretion, provided that such modifications shall not materially diminish the functionality thereof. You understand and
agree that you shall be solely responsible for establishing and maintaining the appropriate and necessary connection
between your POS systems and/or website(s) and the PAYware Connect Service. You shall be liable for the accuracy and
legitimacy of all orders and information provided to VeriFone and you may not process orders on behalf of any other entity
or individual.
2.
ACCOUNT INFORMATION. Prior to using the PAYware Connect Service, you will be required to register your account. You
agree: (a) when registering for the PAYware Connect Service, to provide VeriFone with true, accurate, current, and
complete information about yourself, and (b) to inform VeriFone promptly of any changes to such information to keep it
true, accurate, current and complete. If you provide VeriFone with any information that is untrue, inaccurate, not current
or incomplete, or VeriFone has reasonable grounds to suspect so, VeriFone has the right to suspend or terminate your access
to the PAYware Connect Service. Merchant warrants and represents that it is engaged in a lawful business and is duly
licensed to conduct such business and agrees that it shall fully comply with all applicable laws and regulations in connection
with its use of the PAYware Connect Service.
3.
PAYMENT. In consideration of your use of the PAYware Connect Service, you agree to pay the applicable monthly fee for
the PAYware Connect Service as quoted by VeriFone. All fees are exclusive of applicable taxes, including without limitation
sales tax.
VeriFone may increase the monthly fee or add new fees for any new feature of the PAYware Connect Service by written
notice. Any such increase shall be effective (a) at the end of the service month following the service month in which such
notice is received, if the PAYware Connect Service was purchased on a monthly recurring basis, or (b) for the subsequent
renewal term, if the PAYware Connect Service was purchased on a term basis.
You may pay by credit card or by ACH. If you choose to pay by credit card, you will be required to provide VeriFone with a
valid credit card for such purpose. If you choose to pay by ACH, you will be required to provide VeriFone with the ACH
account information required by VeriFone for such purpose. VeriFone may charge such credit card or ACH account, as
applicable, for such monthly fee on a monthly basis, on or about the anniversary date of your activation date. If payment
cannot be charged to your credit card or ACH account, as applicable, or your credit card charge is returned to VeriFone for
any reason, or you otherwise fail to pay the charges for the PAYware Connect Service when due, VeriFone reserves the right
to pursue any and all legal remedies to collect the amounts owed by you, and to terminate your access to the PAYware
Connect Service. If you choose to pay by ACH, the terms set forth at the end of this Agreement shall apply.
© Copyright 2012. VeriFone Systems, Inc. All Rights Reserved.
3
IF YOU HAVE PURCHASED THE PAYWARE CONNECT SERVICE FROM A RESELLER, THIS SECTION 3 SHALL NOT APPLY TO YOU.
PAYMENT TERMS SHALL BE AS BETWEEN YOU AND YOUR RESELLER.
4.
MAINTENANCE. VeriFone conducts routine maintenance to the PAYware Connect Service. Maintenance is generally
scheduled during time periods when overall end user online activity is limited. VeriFone reserves the right to shut down the
PAYware Connect Services with no notice should emergency maintenance become necessary. VeriFone’s support policies for
the PAYware Connect Services are available upon request.
5.
SECURITY. VeriFone reserves the right to remove any user from the PAYware Connect Service should VeriFone determine,
in its sole discretion, that the PAYware Connect Service has been compromised or in any way used inappropriately. In
extreme cases, removal may occur immediately without prior notification.
6.
DISCLAIMER OF WARRANTIES. THE PAYWARE CONNECT SERVICE AND PAYWARE MOBILE APPLICATION ARE PROVIDED "AS
IS”, WITH ALL FAULTS AND, TO THE MAXIMUM EXTENT PERMITTED BY LAW, WITHOUT ANY WARRANTY OF ANY KIND,
EXPRESS, IMPLIED OR STATUTORY, INCLUDING WITHOUT LIMITATION THE IMPLIED WARRANTIES OF MERCHANTABILITY,
FITNESS FOR A PARTICULAR PURPOSE AND NON-INFRINGEMENT OF THIRD PARTY RIGHTS. NEITHER VERIFONE NOR ITS
LICENSORS WARRANT THAT THE FUNCTIONS OF THE PAYWARE CONNECT SERVICE OR THE PAYWARE MOBILE APPLICATION
MEET THE REQUIREMENTS OF MERCHANT. NEITHER VERIFONE NOR ITS LICENSORS WARRANT THAT THE OPERATION OF THE
PAYWARE CONNECT SERVICE OR PAYWARE MOBILE APPLICATION WILL BE UNINTERRUPTED OR ERROR FREE. MERCHANT
ACKNOWLEDGES THAT UNDER NO CIRCUMSTANCES DOES VERIFONE OR ITS LICENSORS REPRESENT OR WARRANT THAT ALL
PROGRAM ERRORS WITH RESPECT TO THE PAYWARE CONNECT SERVICE OR THE PAYWARE MOBILE APPLICATION CAN BE
REMEDIED. VERIFONE SHALL NOT BE RESPONSIBLE FOR ANY SERVICE INTERRUPTIONS, INCLUDING, WITHOUT LIMITATION
POWER OUTAGES, SYSTEM FAILURES OR OTHER INTERRUPTIONS. NO ADVICE OR INFORMATION OBTAINED BY YOU FROM
VERIFONE OR FROM ANY THIRD PARTY ABOUT THE PAYWARE CONNECT SERVICE OR PAYWARE MOBILE APPLICATION SHALL
CREATE ANY WARRANTY NOT EXPRESSLY STATED IN THIS AGREEMENT.
7.
LIMITATIONS OF LIABILITY. NOTWITHSTANDING ANYTHING TO THE CONTRARY CONTAINED IN THIS AGREEMENT, EXCEPT TO
THE EXTENT PROHIBITED BY LAW: (A) VERIFONE AND ITS LICENSORS SHALL HAVE NO LIABILITY TO MERCHANT OR ANY THIRD
PARTY FOR SPECIAL, INCIDENTAL, INDIRECT, EXEMPLARY, OR CONSEQUENTIAL DAMAGES (INCLUDING, BUT NOT LIMITED TO,
LOSS OF USE, LOSS OF BUSINESS, LOSS OF PROFITS OR REVENUE, GOODWILL OR SAVINGS, DOWNTIME, OR DAMAGE TO, LOSS
OF OR REPLACEMENT OF DATA OR TRANSACTIONS, COST OF PROCUREMENT OF SUBSTITUTE SERVICES) RELATING IN ANY
MANNER TO THE PAYWARE CONNECT SERVICE OR PAYWARE MOBILE APPLICATION (WHETHER ARISING FROM CLAIMS BASED IN
WARRANTY, CONTRACT, TORT OR OTHERWISE), EVEN IF VERIFONE OR ANY LICENSOR HAS BEEN ADVISED OF THE POSSIBILITY
OF SUCH CLAIM OR DAMAGE; (B) IN ANY CASE, VERIFONE'S ENTIRE LIABILITY RELATING IN ANY MANNER TO THE PAYWARE
CONNECT SERVICE AND PAYWARE MOBILE APPLICATION, REGARDLESS OF THE FORM OR NATURE OF THE CLAIM, SHALL BE
LIMITED IN THE AGGREGATE TO THE FEES ACTUALLY PAID BY MERCHANT FOR THE PAYWARE CONNECT SERVICE UNDER THIS
AGREEMENT DURING THE SIX (6) MONTHS PRIOR TO THE CLAIM ARISING; AND (C) VERIFONE SHALL NOT BE LIABLE FOR ANY
CLAIMS OF THIRD PARTIES RELATING TO THE PAYWARE CONNECT SERVICE OR PAYWARE MOBILE APPLICATION, AND
MERCHANT SHALL DEFEND VERIFONE FROM, AND INDEMNIFY AND HOLD VERIFONE HARMLESS AGAINST, ALL SUCH CLAIMS.
THE LIMITATIONS CONTAINED IN SECTION 6 ABOVE AND THIS SECTION 7 ARE A FUNDAMENTAL PART OF THE BASIS OF
VERIFONE'S BARGAIN HEREUNDER, AND VERIFONE WOULD NOT PROVIDE THE PAYWARE CONNECT SERVICE AND PAYWARE
MOBILE APPLICATION TO MERCHANT ABSENT SUCH LIMITATIONS.
8.
TERM; TERMINATION. This Agreement shall remain in effect until 12 months from date of activation, and shall continue in
effect for annual renewals thereafter unless one party notifies the other party of non-renewal at least thirty (30) days prior
to the renewal date. IF YOU HAVE PURCHASED THE PAYWARE CONNECT SERVICE FROM A RESELLER, THE TERM OF YOUR
PAYWARE CONNECT SERVICE SHALL BE AS AGREED WITH YOUR RESELLER.
VeriFone may terminate this Agreement upon notice to Merchant if Merchant breaches any of the terms in this Agreement,
fails to pay the applicable fees for the PAYware Connect Service or upon termination of Merchant's business. Merchant may
terminate this Agreement upon notice if VeriFone breaches any of the terms in this Agreement and fails to cure such breach
within thirty (30) days of receipt of notice of such breach. IF YOU HAVE PURCHASED THE PAYWARE CONNECT SERVICE
FROM A RESELLER, THIS AGREEMENT SHALL ALSO TERMINATE IMMEDIATELY UPON ANY TERMINATION OF YOUR AGREEMENT
WITH YOUR RESELLER FOR THE PAYWARE CONNECT SERVICE.
Upon the expiration or termination of this Agreement, you shall immediately discontinue any use of the PAYware Connect
Services and PAYware Mobile Application. You are responsible for retrieving any data stored with VeriFone prior to any
termination date. VeriFone does not provide data retrieval services. Notwithstanding anything to the contrary contained in
this Agreement, Sections 3, 6, 7, 8 and 9 shall survive any expiration or termination of this Agreement.
9.
GENERAL. Merchant acknowledges that the PAYware Connect Service and PAYware Mobile Application are proprietary products
of VeriFone and its licensors and that (as between VeriFone and Merchant) ownership of all patents, copyrights, trademarks,
trade names and other intellectual property rights relating to the PAYware Connect Service and PAYware Mobile Application will
remain with VeriFone and its licensors. Except as set forth above with regard to a signed agreement, this Agreement
constitutes the entire agreement between VeriFone and Merchant and supersedes all prior or contemporaneous
communications and proposals, whether electronic, oral or written, relating to the subject matter hereof. VeriFone may
unilaterally modify, amend, supplement or otherwise change this Agreement at any time without notice. This Agreement will be
© Copyright 2012. VeriFone Systems, Inc. All Rights Reserved.
4
governed by the laws of the State of California, without regard to its conflict of law provisions. Each party consents to the
exclusive jurisdiction and venue of the appropriate courts in Santa Clara County, California for all disputes arising out of or
relating to this Agreement. The failure of a party to exercise or enforce any right or provision of this Agreement will not
constitute a waiver of such right or provision. Merchant may not assign this Agreement, in whole or in part, without
VeriFone’s prior written consent. Subject to the preceding sentence, this Agreement shall bind Merchant and its permitted
successors and assigns. VeriFone may assign or delegate this Agreement, or any of its rights or obligations hereunder, in its
sole discretion. If any provision of this Agreement is found by a court of competent jurisdiction to be invalid, the parties
agree that the court should endeavor to give the maximum effect to the parties' intentions as reflected in the provision, and
that the other provisions of the Agreement shall remain in full force and effect. Notices made by VeriFone to you under this
Agreement that affect VeriFone customers generally (e.g., notices of amended Agreements, updated fees, etc.) may be
posted on the VeriFone Merchant Portal or may be provided upon access of the PAYware Connect Service. Notices made by
VeriFone under this Agreement for you or your account specifically (e.g., notices of breach and/or suspension) will be
provided to you via the email address provided to VeriFone in your registration for the PAYware Connect Service or in any
updated email address you provide to VeriFone in accordance with standard account information update procedures
VeriFone may provide from time to time. It is your responsibility to keep your email address current and you will be deemed
to have received any email sent to any such email address, upon VeriFone’s sending of the email, whether or not you
actually receive the email. Notices made by you to VeriFone under this Agreement must be sent to VeriFone at
[email protected]. Either party may also send notices by overnight courier or certified mail. Such notices shall be
deemed effective when sent. Such mailed notices for VeriFone must be sent to VeriFone’s General Counsel at 2099
Gateway Place, Suite 600, San Jose, CA 95110 or such other address as shall have been given to Merchant in writing. Such
mailed notices for Merchant must be sent to the address in VeriFone’s customer database, or such other address as shall
have been given to VeriFone in writing. Such mailed notices shall be deemed effective upon the earliest to occur of: (a)
actual delivery; or (b) three days after mailing, addressed and postage prepaid, return receipt requested.
ACH INFORMATION
Prior to signing this Agreement, Merchant shall confirm with the bank it identifies that VeriFone’s ACH Company ID number
(4990206064) is not blocked by such bank and hereby represents and warrants that it has confirmed same.
Merchant hereby authorizes VeriFone, and irrevocably constitutes and appoints VeriFone (and any officer or agent thereof, with full
power of substitution) as its true and lawful attorney-in-fact with full irrevocable power and authority in the place and stead of
Customer and in the name of Customer or in its own name (which appointment is coupled with an interest), to (a) debit directly from
the banking account maintained by Customer and set forth above, the amounts owed by Customer under the Agreement (including
any and all interest, taxes, fees and other amounts chargeable to the Customer under the Agreement), and (b) if necessary to
initiate credit entries to the Account to reverse all or a portion of a debt. VeriFone and Customer agree that ACH transactions
involving the Account must comply with the provisions of U.S. law.
Merchant undertakes to provide VeriFone with any changes to the account information set forth above. Any such change shall
become effective thirty (30) days after receipt by VeriFone and Merchant expressly authorizes VeriFone to continue to debit
funds from the Account in accordance with the Agreement until the effective date of such change.
If Merchant believes that any payment transactions initiated by VeriFone (or its agent) with respect to the Account is erroneous,
or if Merchant needs more information about any such transaction, Merchant should contact VeriFone as soon as possible. In any
event, VeriFone must hear from Merchant no later than 90 days after the date the questionable transaction FIRST appeared on
the Account in order to receive a credit. VeriFone will attempt to determine whether an error occurred within ten (10) business
days after VeriFone hears from Merchant and will correct any error promptly. If VeriFone needs more time, however, VeriFone
may take up to forty-five (45) days to investigate Merchant’s complaint or question.
This ACH billing arrangement shall remain in full force and effect until the earlier of (a) VeriFone has received written
notification from Merchant of its termination in such time and such manner as to afford VeriFone and its financial institution a
commercially reasonable opportunity to act on it or (b) termination of Merchant’s obligation to pay VeriFone under the
Agreement. In addition, VeriFone may terminate this ACH billing arrangement upon written notice if Merchant fails to pay any
fees or other payments when due, if VeriFone is unable to direct debit Merchant’s Account because there are insufficient funds,
the Account has closed or VeriFone’s direct debit attempt has been blocked. Any termination of this ACH billing arrangement
shall not relieve Merchant of its payment obligations under the Agreement.
Rev Date: 02-01-12
© Copyright 2012. VeriFone Systems, Inc. All Rights Reserved.
5
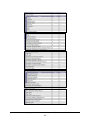
Table of Contents
Notice ....................................................................................................................... 2
Service Agreement ....................................................................................................... 3
Introduction ............................................................................................................... 9
System Requirements ................................................................................................ 9
Using This Manual .................................................................................................... 9
Comments and Suggestions ......................................................................................... 9
Important Security Notice ............................................................................................ 10
Introduction and Scope ....................................................................................... 10
Applicability .................................................................................................... 10
Distribution and Updates ..................................................................................... 10
What Does PA-DSS Mean to You? ............................................................................ 10
Third Party Applications...................................................................................... 11
PA-DSS Guidelines ............................................................................................. 12
More Information .............................................................................................. 18
PAYware Connect Tutorial ........................................................................................... 19
Accessing PAYware Connect ...................................................................................... 20
Logging In ............................................................................................................ 22
Corporate Portal .................................................................................................... 24
Service Type Maintenance ........................................................................................ 25
Reseller Hierarchy .................................................................................................. 28
Creating an Agent .................................................................................................. 29
Creating an Agent's Account ................................................................................. 29
Setting an Agent's Rates ...................................................................................... 33
Searching for an Agent's Account ........................................................................... 35
Editing an Agent's Account ................................................................................... 36
Deactivating an Agent's Account ............................................................................ 37
Activating an Agent's Account ............................................................................... 38
Merchant Hierarchy ................................................................................................ 39
Creating a Merchant ............................................................................................... 40
Creating a Merchant's Account .............................................................................. 40
Creating a New Site ........................................................................................... 48
Searching for a Merchant's Account ........................................................................ 48
Completing a Merchant’s Account .......................................................................... 49
Editing a Merchant's Account ................................................................................ 51
Editing a Merchant’s Processor Information; AVS, CVV2, and Duplicate Check Levels ........... 52
Editing a Merchant's Rates ................................................................................... 52
Deactivating a Merchant's Account ......................................................................... 53
Reactivating a Merchant's Account ......................................................................... 53
Conclusion of Tutorial ............................................................................................. 54
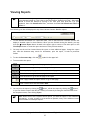
Reports .................................................................................................................... 55
Report Types ........................................................................................................ 55
Viewing Reports .................................................................................................... 57
Merchant Summary ................................................................................................. 58
Merchant Detail Report ....................................................................................... 61
Merchant Processor Report .................................................................................. 62
Users Report .................................................................................................... 63
Transaction Detail Report .................................................................................... 64
© Copyright 2012. VeriFone Systems, Inc. All Rights Reserved.
6
Merchant Activity Summary ......................................................................................
Reseller Service Types .............................................................................................
New Merchant Setups ..............................................................................................
Service Level Exceptions ..........................................................................................
Agent Summary .....................................................................................................
Console Users .......................................................................................................
Commission History ................................................................................................
Current Estimated Commission ..................................................................................
Unsettled Merchants ...............................................................................................
VSP100 - Device Encryption Summary ..........................................................................
VSP200 - Transaction Encryption Exceptions ..................................................................
Merchant Console Access Report ................................................................................
Settlement Summary ..............................................................................................
LP Token Summary .................................................................................................
LP Token Export ....................................................................................................
Invoice Summary ...................................................................................................
66
67
69
71
73
76
77
79
81
82
84
86
87
89
91
92
Account Administration ............................................................................................... 93
User Management .................................................................................................. 94
Creating a New User .......................................................................................... 94
Finding an Existing User ...................................................................................... 97
Editing a User .................................................................................................. 98
Deactivating a User ........................................................................................... 99
Reactivating a User .......................................................................................... 100
Unlocking a User .............................................................................................. 101
Changing a User's Password ................................................................................. 102
Security Maintenance ............................................................................................. 104
Creating a Role ............................................................................................... 105
Editing an Existing Role ..................................................................................... 106
Deactivating a Role .......................................................................................... 112
Reactivating a Role .......................................................................................... 112
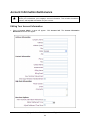
Account Information Maintenance.............................................................................. 114
Editing Your Account Information ......................................................................... 114
Merchant Activation Email ....................................................................................... 115
API Merchant Activate ............................................................................................ 116
Service Type Maintenance ....................................................................................... 118
Processor Default Maintenance ................................................................................. 120
Agent Console Access ............................................................................................. 122
Merchant Console Access......................................................................................... 124
Corporate API Key Management ................................................................................ 126
CITI Program/Plan Maintenance ................................................................................ 127
Creating a New Program .................................................................................... 128
Creating a New Plan ......................................................................................... 131
Edit an Existing Program or Plan ........................................................................... 132
Delete an Existing Program or Plan ....................................................................... 133
Copy an Existing Program or Plan ......................................................................... 133
CITI BIN (Bank Identification Number) Management ................................................... 134
Creating a New BIN Range .................................................................................. 134
Edit an Existing BIN Range .................................................................................. 135
Delete an Existing Program or Plan ....................................................................... 135
Copy an Existing Program or Plan ......................................................................... 136
Processor-Specific Information .....................................................................................137
Loyalty Partner Setup........................................................................................ 137
First Data Atlanta (Buypass) Setup ............................................................................. 138
ECHO Setup ......................................................................................................... 140
© Copyright 2012. VeriFone Systems, Inc. All Rights Reserved.
7
EVO Setup ........................................................................................................... 141
Fifth Third St. Pete Setup ........................................................................................ 142
First Data Nashville ISO Setup ................................................................................... 144
First Data North Setup ............................................................................................ 146
First Data Omaha Setup .......................................................................................... 148
GETI Setup .......................................................................................................... 150
Givex Setup ......................................................................................................... 151
Global Payments East (NDC) Setup ............................................................................. 152
Elavon (Nova) Setup ............................................................................................... 154
Chase Paymentech Tampa Setup ............................................................................... 156
ProPay Setup ....................................................................................................... 158
WorldPay Setup .................................................................................................... 160
SVS Setup ........................................................................................................... 162
TSYS Setup .......................................................................................................... 163
ValueLink (SVDOT) Setup ......................................................................................... 167
Valutec Setup ...................................................................................................... 168
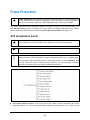
Fraud Protection ......................................................................................................169
AVS Acceptance Level ............................................................................................ 169
CVV2 Acceptance Level .......................................................................................... 171
Duplicate Check Level ............................................................................................ 172
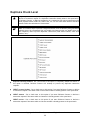
Appendix A – SoftPay Connect ......................................................................................174
Device Maintenance ............................................................................................... 174
Setting Up a New POS Device .............................................................................. 174
Editing an Existing Device................................................................................... 177
Deleting a Device ............................................................................................. 179
Resetting a Device ........................................................................................... 179
Receipt Email Setup .............................................................................................. 179
Configuration Master .............................................................................................. 180
Appendix B – Processor Setup Forms..............................................................................182
First Data Atlanta (Buypass) ..................................................................................... 183
ECHO ................................................................................................................. 185
EVO................................................................................................................... 186
Fifth Third St. Pete ............................................................................................... 188
First Data Nashville ISO ........................................................................................... 190
First Data North .................................................................................................... 192
First Data Omaha .................................................................................................. 194
GETI .................................................................................................................. 196
Givex................................................................................................................. 197
Global Payments East (NDC) Host .............................................................................. 198
Elavon (NOVA) ...................................................................................................... 200
Chase Paymentech Tampa ....................................................................................... 202
ProPay ............................................................................................................... 204
WorldPay ............................................................................................................ 206
SVS ................................................................................................................... 208
TSYS .................................................................................................................. 209
ValueLink (SVDOT) ................................................................................................ 212
Valutec .............................................................................................................. 213
© Copyright 2012. VeriFone Systems, Inc. All Rights Reserved.
8
Introduction
Congratulations on becoming a reseller of PAYware Connect™ (formerly IPCharge)--the most advanced
online payment solution available for processing credit cards over the Internet. This service provides
you with a fast, reliable, and secure way to process credit card transactions in an easy-to-use online
environment.
System Requirements
PAYware Connect requires the following:
●
●
An Internet-ready computer
Microsoft's Internet Explorer version 7.0 , 8.0 , or 9.0
o When using Internet Explorer version 9.0:
From Menu Bar, click Tools > Internet Options.
Click Security tab.
Click Trusted Sites.
Click Sites and Add ipcharge.com to the trusted sites.
Click Custom Level... (scroll down to the bottom) and click radio buttons to Enable
the following: Scripting of Java Applets and Active Scripting.
We recommend a screen resolution of 1024 x 768.
Using This Manual
As you use this manual, you may encounter the following text boxes. These are meant to draw your
attention to certain concepts, and are easily identifiable by their icons.
Simple Explanation: The simple explanations found in this manual will provide you with
an easy-to-digest summary of the information in that section. If you want to get through
the manual as quickly and easily as possible, pay special attention to the simple
explanations.
Note: A note is important information that either helps to explain a concept or draws
attention to ideas that should be kept in mind. We recommend that you carefully review
the notes you encounter.
WARNING: We HIGHLY recommend that you read ALL warnings in the sections of the
manual that you read. These warnings will help to prevent serious issues from occurring.
Comments and Suggestions
Please direct any comments or suggestions regarding your PAYware Connect documentation to
[email protected]. Please note that this address should not be considered as a source for
technical support. Any such requests should be directed to the normal support channels.
© Copyright 2012. VeriFone Systems, Inc. All Rights Reserved.
9
Important Security Notice
Introduction and Scope
The Payment Card Industry Payment Application Data Security Standard (PCI PA-DSS) is comprised of
fourteen requirements that support the Payment Card Industry Data Security Standard (PCI DSS). The
PCI Security Standards Council (PCI SSC), which was founded by the major card brands in June 2005,
set these requirements in order to protect cardholder payment information. The standards set by the
council are enforced by the payment card companies who established the Council: American Express,
Discover Financial Services, JCB International, MasterCard Worldwide, and Visa, Inc.
PCI PA-DSS is an evolution of Visa’s Payment Application Best Practices (PABP), which was based on the
Visa Cardholder Information Security Program (CISP). In addition to Visa CISP, PCI DSS combines
American Express’ Data Security Operating Policy (DSOP), Discover Network’s Information Security and
Compliance (DISC), and MasterCard’s Site Data Protection (SDP) into a single comprehensive set of
security standards. The transition to PCI PA-DSS was announced in April 2008. In early October 2008,
PCI PA-DSS Version 1.2 was released to align with the PCI DSS Version 1.2, which was released on
October 1, 2008. On January 1, 2011, PCI PA-DSS Version 2.0 was released. This extends the PCI DSS
Version 1.2, which was released on October 1, 2008 and is effective as of January 1, 2011.
Applicability
The PCI PA-DSS applies to any payment application that stores, processes, or transmits cardholder data
as part of authorization or settlement, unless the application would fall under the merchant’s PCI DSS
validationPAYware PC, PAYware Transact, PAYware SIM, PAYware STS, PAYware Mobile, and PCCharge
(collectively the “PAYware NA Payment Applications”) were developed by VeriFone for use by third
parties, and therefore are subject to PA-DSS validation. PAYware Connect (also included under
“PAYware NA Payment Applications”) falls under PCI DSS. See the PCI PA-DSS Program Guide to
determine if PCI PA-DSS validation is required for any other payment applications used at the merchant
location. It is important to note that PA-DSS validated payment applications alone do not guarantee
PCI DSS compliance for the merchant. The validated payment application must be implemented in a
PCI DSS compliant environment. If your application runs on Windows XP, you are required to turn off
Windows XP System Restore Points.
Distribution and Updates
This guide will be provided to VeriFone’s customers including processors, resellers, ISOs, and
integrators along with the PAYware NA payment applications. It is the responsibility of these parties to
ensure the information contained in this guide is passed on to their customers (the merchant), in order
to illustrate the requirements for complying with PCI DSS.
Additional information about PA-DSS and VeriFone’s PA-DSS Training can be found on our website at
www.verifone.com/padss.
What Does PA-DSS Mean to You?
VeriFone submits its PAYware NA payment applications to an annual PA-DSS audit in order to maintain
PA-DSS validation. In addition, if any major version change is made in any PAYware NA payment
applications, VeriFone submits that application for a full PA-DSS audit again. An example of a major
version change would be PCCharge 5.8 moving to PCCharge 5.9. For minor changes, such as PCCharge
5.8.1 to 5.8.2, an attestation form for minor change revisions is required. These minor change revisions
are submitted to VeriFone’s Qualified Security Assessor (QSA), which creates a report to submit to PCI
SSC.
All
validated
applications
are
listed
on
the
PCI
SSC
web
site
at
© Copyright 2012. VeriFone Systems, Inc. All Rights Reserved.
10
https://www.pcisecuritystandards.org/security_standards/vpa/. Always review the full PCI and PA-DSS
compliance requirements at the PCISecurityStandards.org web site. Summary PA-DSS requirements
material given by VeriFone is not intended to be viewed/used as the full PCI/PA-DSS compliance
requirement.
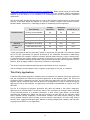
The following table provides opening points to cover in any discussion with merchants on data storage
and why a merchant should use PAYware PC, PAYware Transact, PAYware SIM, PAYware Connect,
PAYware Mobile, PAYware STS, or PCCharge to assist in maintaining PCI-DSS compliance.
Cardholder Data
Data Element
Storage
Permitted
Protection
Required
PCI DSS Req. 3, 4
Primary Account Number
Yes
Yes
Yes
Yes
1
No
Yes
Yes
1
No
Yes
Yes
1
No
No
N/A
N/A
CAV2/CID/CVC2/CVV2
No
N/A
N/A
PIN/PIN Block
No
N/A
N/A
Cardholder Name
Service Code
Yes
1
Expiration Date
Sensitive
Authentication
Data 2
1
1
Full Magnetic Stripe Data
3
1
These data elements must be protected if stored in conjunction with the PAN. This protection should
be per PCI DSS requirements for general protection of the cardholder environment. Additionally,
other legislation (for example, related to consumer personal data protection, privacy, identity theft,
or data security) may require specific protection of this data, or proper disclosure of a company's
practices if consumer-related personal data is being collected during the course of business. PCI DSS,
however, does not apply if PANs are not stored, processed, or transmitted.
2
Do not store sensitive authentication data after authorization (even if encrypted).
3
Full track data from the magnetic stripe, magnetic-stripe image on the chip, or elsewhere.
Third Party Applications
A PAYware NA payment application validation does not extend to any external third party application
that has integrated such PAYware NA payment application as the payment engine. The end-to-end
transaction process, beginning with entry into the third party application until the response from the
payment engine is returned, must meet the same level of compliance. In order to claim the third party
application is end-to-end compliant, the application would need to be submitted to a QSA for a full PADSS audit.
The use of a PAYware NA payment application also does not exempt a third party integrator’s
application from a PA-DSS audit. The end user and/or P.O.S. developer can integrate and be compliant
in the processing portion of a payment transaction. A brief review (given below) of the PA-DSS
environmental variables that impact the end user merchant can help the end user merchant obtain
and/or maintain PA-DSS compliance. Environmental variables that could prevent passing an audit
include without limitation issues involving a secure network connection(s), end user setup location
security, users, logging and assigned rights. Remove all testing configurations, samples, and data prior
to going into production on your application.
© Copyright 2012. VeriFone Systems, Inc. All Rights Reserved.
11
PA-DSS Guidelines
The following PA-DSS Guidelines are being provided by VeriFone as a convenience to its customers.
Customers should not rely on these PA-DSS Guidelines, but should instead always refer to the most
recent PCI DSS Program Guide published by PCI SSC.
1. Sensitive Date Storage Guidelines.
Do not retain full magnetic stripe, card validation code or value (CAV2, CID, CVC2, CVV2), or PIN block
data.
1.1
Do not store sensitive authentication data after authorization (even if encrypted):
Sensitive authentication data includes the data as cited in the following Requirements
1.1.1 through 1.1.3.
PCI Data Security Standard Requirement 3.2
Note: By prohibiting storage of sensitive authentication data after authorization, the
assumption is that the transaction has completed the authorization process and the customer
has received the final transaction approval. After authorization has completed, this sensitive
authentication data cannot be stored.
1.1.1 After authorization, do not store the full contents of any track from the magnetic
stripe (located on the back of a card, contained in a chip, or elsewhere). This data is
alternatively called full track, track, track 1, track 2, and magnetic-stripe data.
In the normal course of business, the following data elements from the magnetic stripe may
need to be retained:
The accountholder’s name,
Primary account number (PAN),
Expiration date, and
Service code
To minimize risk, store only those data elements needed for business.
Note: See PCI DSS and PA-DSS Glossary of Terms, Abbreviations, and Acronyms for additional
information. PCI Data Security Standard Requirement 3.2.1
1.1.2 After authorization, do not store the card-validation value or code (three-digit or fourdigit number printed on the front or back of a payment card) used to verify card-not-present
transactions.
Note: See PCI DSS and PA-DSS Glossary of Terms, Abbreviations, and Acronyms for additional
information.
PCI Data Security Standard Requirement 3.2.2
1.1.3 After authorization, do not store the personal identification number (PIN) or the
encrypted PIN block.
Note: See PCI DSS and PA-DSS Glossary of Terms, Abbreviations, and Acronyms for additional
information.
PCI Data Security Standard Requirement 3.2.3
1.1.4 Securely delete any magnetic stripe data, card validation values or codes, and PINs or
PIN block data stored by previous versions of the payment application, in accordance with
industry-accepted standards for secure deletion, as defined, for example by the list of
approved products maintained by the National Security Agency, or by other State or National
standards or regulations.
PCI Data Security Standard Requirement 3.2
© Copyright 2012. VeriFone Systems, Inc. All Rights Reserved.
12
Note: This requirement only applies if previous versions of the payment application stored
sensitive authentication data.
1.1.5 Securely delete any sensitive authentication data (pre-authorization data) used for
debugging or troubleshooting purposes from log files, debugging files, and other data sources
received from customers, to ensure that magnetic stripe data, card validation codes or values,
and PINs or PIN block data are not stored on software vendor systems. These data sources must
be collected in limited amounts and only when necessary to resolve a problem, encrypted
while stored, and deleted immediately after use. PCI Data Security Standard Requirement 3.2
2. Protect stored cardholder data
2.1
Software vendor must provide guidance to customers regarding purging of cardholder
data after expiration of customer-defined retention period. PCI Data Security Standard
Requirement 3.1
2.2
Mask PAN when displayed (the first six and last four digits are the maximum number of
digits to be displayed).
Notes:
This requirement does not apply to those employees and other parties with a
legitimate business need to see full PAN;
This requirement does not supersede stricter requirements in place for displays of
cardholder data—for example, for point-of-sale (POS) receipts. PCI Data Security
Standard Requirement 3.3
2.3
Render PAN, at a minimum, unreadable anywhere it is stored, (including data on
portable digital media, backup media, and in logs) by using any of the following approaches:
One-way hashes based on strong cryptography with associated key management
processes and procedures
Truncation
Index tokens and pads (pads must be securely stored)
Strong cryptography with associated key management processes and procedures.
The MINIMUM account information that must be rendered unreadable is the PAN. PCI Data
Security Standard Requirement 3.4
The PAN must be rendered unreadable anywhere it is stored, even outside the payment
application.
Note: “Strong cryptography” is defined in the PCI DSS and PA-DSS Glossary of Terms,
Abbreviations, and Acronyms.
2.4
If disk encryption is used (rather than file- or column-level database encryption),
logical access must be managed independently of native operating system access control
mechanisms (for example, by not using local user account databases). Decryption keys must not
be tied to user accounts. PCI Data Security Standard Requirement 3.4.2
2.5
Payment application must protect cryptographic keys used for encryption of cardholder
data against disclosure and misuse. PCI Data Security Standard Requirement 3.5
2.6
Payment application must implement key management processes and procedures for
cryptographic keys used for encryption of cardholder data. PCI Data Security Standard
Requirement 3.6
2.7
Securely delete any cryptographic key material or cryptogram stored by previous
versions of the payment application, in accordance with industry-accepted standards for secure
deletion, as defined, for example the list of approved products maintained by the National
Security Agency, or by other State or National standards or regulations. These are
© Copyright 2012. VeriFone Systems, Inc. All Rights Reserved.
13
cryptographic keys used to encrypt or verify cardholder data. PCI Data Security Standard
Requirement 3.6
Note: This requirement only applies if previous versions of the payment application used
cryptographic key materials or cryptograms to encrypt cardholder data.
3. Provide secure authentication features
3.1
The payment application must support and enforce unique user IDs and secure
authentication for all administrative access and for all access to cardholder data. Secure
authentication must be enforced to all accounts, generated or managed by the application by
the completion of installation and for subsequent changes after the "out of the box" installation
(defined at PCI DSS Requirements 8.1, 8.2, and 8.5.8–8.5.15) for all administrative access and
for all access to cardholder data. PCI Data Security Standard Requirements 8.1, 8.2, and 8.5.8–
8.5.15
Note: These password controls are not intended to apply to employees who only have access to
one card number at a time to facilitate a single transaction. These controls are applicable for
access by employees with administrative capabilities, for access to servers with cardholder
data, and for access controlled by the payment application. This requirement applies to the
payment application and all associated tools used to view or access cardholder data.
3.1.10
If a payment application sessioin has been idle for more than 15 minutes, the
application requires the user to re-authenticate. PCI Data Security Standard
Requirement 8.5.15.
3.2
Software vendors must provide guidance to customers that all access to PCs, servers,
and databases with payment applications must require a unique user ID and secure
authentication. PCI Data Security Standard Requirements 8.1 and 8.2
3.3
Render payment application passwords unreadable during transmission and storage,
using strong cryptography based on approved standards
Note: “Strong cryptography” is defined in PCI DSS and PA-DSS Glossary of Terms, Abbreviations,
and Acronyms.
PCI Data Security Standard Requirement 8.4
4. Log payment application activity
4.1
At the completion of the installation process, the “out of the box” default installation
of the payment application must log all user access (especially users with administrative
privileges), and be able to link all activities to individual users. PCI Data Security Standard
Requirement 10.1
4.2
Payment application must implement an automated audit trail to track and monitor
access.
PCI Data Security Standard Requirements 10.2 and 10.3
5. Develop secure payment applications
5.1
Develop all payment applications in accordance with PCI DSS (for example, secure
authentication and logging) and based on industry best practices and incorporate information
security throughout the software development life cycle. These processes must include the
following: PCI Data Security Standard Requirement 6.3
5.1.1 Live PANS are not used for testing or development. PCI Data Security Standard
Requirement 6.4.4.
5.1.1.1 Validation of all input (to prevent cross-site scripting, injection flaws,
malicious file execution, etc.)
© Copyright 2012. VeriFone Systems, Inc. All Rights Reserved.
14
5.1.1.2
5.1.1.3
5.1.1.4
5.1.1.5
Validation of
Validation of
Validation of
Validation of
proper error handling
secure cryptographic storage
secure communications
proper role-based access control (RBAC)
5.1.2 Separate development/test, and production environments
5.1.3 Removal of test data and accounts before production systems become active
development. PCI Data Security Standard Requirement 6.4.4.
5.1.4 Review of payment application code prior to release to customers after any
significant change, to identify any potential coding vulnerability.
Removal of custom payment application accounts, user IDs, and passwords before
payment applications are released to customers.
Note: This requirement for code reviews applies to all payment application components (both
internal and public-facing web applications), as part of the system development life cycle
required by PA-DSS Requirement 5.1 and PCI DSS Requirement 6.3. Code reviews can be
conducted by knowledgeable internal personnel or third parties.
5.2
Develop all web payment applications (internal and external, and including web
administrative access to product) based on secure coding guidelines such as the Open Web
Application Security Project Guide. Cover prevention of common coding vulnerabilities in
software development processes, to include:
5.2. .1 Injection flaws, with particular emphasis on SQL injection, Cross-site scripting
(XSS) OS Command Injection, LDAP and Xpath injection flaws, as well as other injection
flaws.
5.2.2 Buffer Overflow.
5.2.3 Insecure cryptographic storage.
5.2.4 Insecure communications.
5.2.5 Improper error handling.
5.2.6
All “HIGH” vulnerabilities as identified in the vulnerability identification
process at PA-DSS Requirement 7.1.
5.2.7
Cross-site scripting (XSS)
5.2.8
Improper access control such as insecure direct object references, failure to
restrict URL access and directory traversal.
5.2.9 Cross-site request forgery (CSRF)
Note: The vulnerabilities listed in PA-DSS Requirements 5.2.1 through 5.2.9 and in PCI DSS at
6.5.1 through 6.5.9 were current in the OWASP guide when PCI DSS v1.2 / PCI DSS v2.0
(01/01/10) were published. However, if and when the OWASP guide is updated, the current
version must be used for these requirements.
5.3
Software vendor must follow change control procedures for all product software
configuration changes. PCI Data Security Standard Requirement 6.4. 5.The procedures must
include the following:
5.3.1 Documentation of impact
5.3.2 Management sign-off by appropriate parties
5.3.3 Testing functionality to verify the new change(s) does not adversely impact the
security of the system. Remove all testing configurations, samples, and data before
finalizing the product for production.
5.3.4 Back-out or product de-installation procedures
5.4
The payment application must not use or require use of unnecessary and insecure
services and protocols (for example, NetBIOS, file-sharing, Telnet, unencrypted FTP must be
© Copyright 2012. VeriFone Systems, Inc. All Rights Reserved.
15
secured via SSH, S-FTP, SSL, IPSec and other technology to implement end to end security). PCI
Data Security Standard Requirement 2.2.2
6. Protect wireless transmissions
6.1 For payment applications using wireless technology, the wireless technology must be
implemented securely. Payment applications using wireless technology must facilitate use of
industry best practices (for example, IEEE 802.11i) to implement strong encryption for
authentication and transmission. Controls must be in place to protect the implemented
wireless network from unknown wireless access points and clients. This includes testing the end
users wireless deployment on a quarterly basis to detect unauthorized access points within the
system. Change wireless vendor defaults, including but not limited to default wireless
encryption keys, passwords, and SNMP community strings. Maintain a detailed updated
hardware list. The end to end wireless implementation must be end to end secure. The use of
WEP as a security control was prohibited as of 30 June 2010. PCI Data Security Standard
Requirements 1.2.3, 2.1.1, 4.1.1, 6.2, 11.1a-e and 11.4a-c.
7. Test payment applications to address vulnerabilities
7.1
Software vendors must establish a process to identify newly discovered security
vulnerabilities (for example, subscribe to alert services freely available on the Internet) and to
test their payment applications for vulnerabilities. Any underlying software or systems that are
provided with or required by the payment application (for example, web servers, third-party
libraries and programs) must be included in this process. Remove all test configurations,
samples, and data after testing and before promoting the changes to production. PCI Data
Security Standard Requirement 6.2
7.2
Software vendors must establish a process for timely development and deployment of
security patches and upgrades, which includes delivery of updates and patches in a secure
manner with a known chain-of-trust, and maintenance of the integrity of patch and update
code during delivery and deployment.
8. Facilitate secure network implementation
8.1
The payment application must be able to be implemented into a secure network
environment. Application must not interfere with use of devices, applications, or
configurations required for PCI DSS compliance (for example, payment application cannot
interfere with anti-virus protection, firewall configurations, or any other device, application,
or configuration required for PCI DSS compliance). PCI Data Security Standard Requirements 1,
3, 4, 5, and 6.
9. Cardholder data must never be stored on a server connected to the Internet
9.1
The payment application must be developed such that the database server and web
server are not required to be on the same server, nor is the database server required to be in
the DMZ with the web server.
PCI Data Security Standard Requirement 1.3.7
10. Facilitate secure remote software updates
10.1
If payment application updates are delivered securely via remote access into
customers’ systems, software vendors must tell customers to turn on remote-access
technologies only when needed for downloads from vendor and to turn off immediately after
download completes. Alternatively, if delivered via VPN or other high-speed connection,
software vendors must advise customers to properly configure a firewall or a personal firewall
product to secure authentication using a two factor authentication mechanism. PCI Data
Security Standard Requirement 8.3
© Copyright 2012. VeriFone Systems, Inc. All Rights Reserved.
16
10.2
If payment application may be accessed remotely, remote access to the payment
application must be authenticated using a two factor authentication mechanism. PCI Data
Security Standard Requirement 8.3
10.3
Any remote access into the payment application must be done securely. If vendors,
resellers/integrators, or customers can access customers’ payment applications remotely, the
remote access must be implemented securely. PCI Data Security Standard Requirements 1, 8.3
and 12.3.9
11. Encrypt sensitive traffic over public networks
11.1
If the payment application sends, or facilitates sending, cardholder data over public
networks, the payment application must support use of strong cryptography and security
protocols such as SSL/TLS and Internet protocol security (IPSEC) to safeguard sensitive
cardholder data during transmission over open, public networks.
Examples of open, public networks that are in scope of the PCI DSS are:
The Internet
Wireless technologies
Global System for Mobile Communications (GSM)
General Packet Radio Service (GPRS)
PCI Data Security Standard Requirement 4.1
11.2
The payment application must never send unencrypted PANs by end-user messaging
technologies (for example, e-mail, instant messaging, and chat). PCI Data Security Standard
Requirement 4.2
12. Encrypt all non-console administrative access
12.1
Instruct customers to encrypt all non-console administrative access using technologies
such as SSH, VPN, or SSL/TLS for web-based management and other non-console administrative
access. Telnet or remote login must never be used for administrative access. PCI Data Security
Standard Requirement 2.3
13. Maintain instructional documentation and training programs for customers, resellers, and
integrators
13.1
Develop, maintain, and disseminate a PA-DSS Implementation Guide(s) for customers,
resellers, and integrators that accomplishes the following:
13.1.1 Addresses all requirements in this document wherever the PA-DSS
Implementation Guide is referenced.
13.1.2 Includes a review at least annually and updates to keep the documentation
current with all major and minor software changes as well as with changes to the
requirements in this document.
13.2
Develop and implement training and communication programs to ensure payment
application resellers and integrators know how to implement the payment application and
related systems and networks according to the PA-DSS Implementation Guide and in a PCI DSScompliant manner.
13.2.1 Update the training materials on an annual basis and whenever new payment
application versions are released.
© Copyright 2012. VeriFone Systems, Inc. All Rights Reserved.
17
More Information
VeriFone Systems, Inc. highly recommends that merchants contact the card association(s) or their
processing company and find out exactly what they mandate and/or recommend. Doing so may help
merchants protect themselves from fines and fraud.
For more information related to security, visit:
http://www.pcisecuritystandards.org
http://www.visa.com/cisp
http://www.sans.org/resources
http://www.microsoft.com/security/default.asp
https://sdp.mastercardintl.com/
http://www.americanexpress.com/merchantspecs
CAPN questions: [email protected]
© Copyright 2012. VeriFone Systems, Inc. All Rights Reserved.
18
PAYware Connect Tutorial
Simple Explanation: The following sections explain how to perform some basic PAYware
Connect functions:
Creating an easy-to-access desktop shortcut
Logging in to this payment processing service
Understanding and using the interface
Creating a merchant
Creating an agent
Viewing a report
Note: The following sections are grouped as a simple "follow-along" tutorial explaining
some of the basic functions of the PAYware Connect Corporate Portal. Information
regarding PAYware Connect's other features can be found later in this manual.
WARNING: This section—Using PAYware Connect—contains essential information on the
general use of the PAYware Connect Corporate Portal. We highly recommend that you
read this section to learn how to use PAYware Connect.
WARNING: As with other applications, use caution when working with PAYware Connect
drop-down lists in conjunction with your mouse scroll wheel. When the focus is on a dropdown field and you use your mouse scroll wheel to scroll down the page, the scroll may
take effect at the drop-down field and inadvertently change the selected value. Always
review your selections before saving them.
© Copyright 2012. VeriFone Systems, Inc. All Rights Reserved.
19
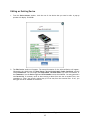
Accessing PAYware Connect
Simple Explanation: This section describes how to set up an easy-to-access shortcut icon
to PAYware Connect. You only have to do this once, and you will have a shortcut added to
your desktop for future use.
If you would rather just manually enter the web address into your browser, do so now.
Then continue on to the next section, Logging In.
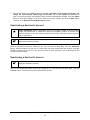
1. Press and hold the Windows key () on your keyboard (near the bottom-left, next to the Ctrl and
Alt keys), and then press and hold the "D" key on your keyboard. Release both keys.
2. You should now see the Windows desktop.
3. Move your mouse pointer over a blank area (without any icons or shortcuts). Single-click the right
mouse button, and a small menu will appear. Left-click the word New, and then left-click the word
Shortcut.
4. Windows will prompt you to enter a web address. Left-click the box below the words Type the
location of the item:. Type in the web address provided to you, and then click the Next button
(Example: www.ipcharge.com).
© Copyright 2012. VeriFone Systems, Inc. All Rights Reserved.
20
5. Windows will prompt you to enter a name for this shortcut. This name should be something easy for
you to recognize. Enter it now, then left-click the Finish button.
6. Windows will return you to the desktop. You should now see a new shortcut icon with the title you
specified in the previous step.
7. This completes the setup of your shortcut. You can double-click this icon whenever you want to
access PAYware Connect. Do so now, and continue to the next section, Logging In.
© Copyright 2012. VeriFone Systems, Inc. All Rights Reserved.
21
Logging In
Simple Explanation: Complete the following detailed instructions, or simply enter the
Reseller ID, Username, and Password you received upon signing up for PAYware Connect.
You may then click Login and continue on to the next section, Corporate Portal.
You should have received a Reseller ID, Username, and Password when you registered as a reseller of
this payment processing service. If not, check with your Sales Representative or Technical Support
Representative.
1. Type in the Reseller ID provided to you. This number identifies you as a reseller registered with
PAYware Connect.
Note: Should you ever forget your Login Credentials, you may click the link Forgot
Credentials to view the PAYware Connect support number.
2. Type in the Username provided to you (may also be described as Login or Login Name). This login
identifies you as a user representing your company. PAYware Connect allows for multiple users per
reseller.
3. Type in the Password associated with the Username specified in step two. Enter the password
exactly as it was provided to you.
Note: The Password field is case-sensitive; so make sure you use upper case or lower case
letters as necessary. PAYware Connect requires ‘strong’ passwords; review the warning
following step four for requirements.
4. Click the Login button. If your login credentials are correct, you will proceed to the Corporate
Portal. If not, double-check your information and re-attempt the login.
WARNING: Your user ID will be temporarily locked if there are three unsuccessful login
attempts. Only a user who has access to the User Manager window can unlock a locked
user ID (see page 101).
© Copyright 2012. VeriFone Systems, Inc. All Rights Reserved.
22
WARNING: PAYware Connect requirements for ‘strong’ passwords:
Must be minimum of eight alpha/numeric characters in length and maximum of 14
alpha/numeric characters in length
Must differ from the previous six password submissions
Must be case sensitive
Must contain at least three upper case characters
Must contain at least two numeric characters
Must contain at least three lower case characters
Must not contain repeating characters of the same case and/or numeric value (e.g.,
AA, aa, 22)
Must not contain any group of 3 sequential numbers or characters within the same
case (e.g., 234, fgh, ABC, etc.)
Passwords expire after 90 days, including a 10 day warning period
Note: If one of your merchants' Administrator users has been locked out of his account,
he must either call you or wait thirty minutes for the account to unlock. If he cannot
contact you, he may contact PAYware Connect Technical Support.
If your merchant loses his Administrator password, you must reset it. Administrator
passwords are encrypted and cannot be retrieved—a new password must be generated.
Please review with your merchants that they will need to change the newly generated
password upon login, or they will be unable to run any transactions. This is a security
feature.
5. Continue to the next section, Corporate Portal.
© Copyright 2012. VeriFone Systems, Inc. All Rights Reserved.
23
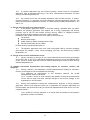
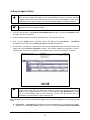
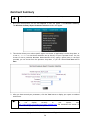
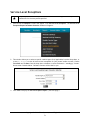
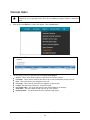
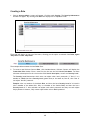
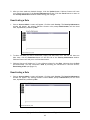
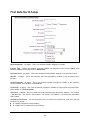
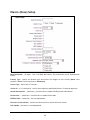
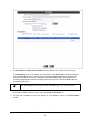
Corporate Portal
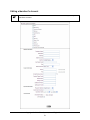
Simple Explanation: The Corporate Portal is your interface to PAYware Connect. It
allows you to create/edit merchant accounts, create/edit agent accounts, view reports,
manage your account(s), and access help information. Each button describes its function,
so you can either read the more detailed descriptions given below, or skip ahead to the
next section, Reseller Hierarchy.
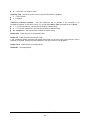
Every payment processing function available to you can be accessed through the Corporate Portal.
1
2
1. The five buttons in the Corporate Portal’s tool bar allow you to access specific functions within
PAYware Connect.
Resellers – allows you to create and edit your agent accounts, if applicable
Merchants – allows you to create and edit your merchant accounts
Reports – allows you to access the different reporting functions (reports are detailed records of
your merchants' and resellers' activity)
Account Admin – allows you to view/edit information specific to your account, your merchants'
accounts, and your resellers' accounts
Help – allows you to access help information
2. The login information in the upper-right corner of the Corporate Portal consists of your Username,
your Reseller ID, and your Reseller Name. The Username and Reseller ID are the same as what
you entered in the Login Credentials window (already described in the section Logging In). The
Reseller Name should already be set up for you (this can be edited and is addressed later in this
manual). Clicking Log Out will return you to the Login Credentials window. Click Log Out to exit
PAYware Connect or to log in using different login credentials.
A billing icon in this area
indicates there are messages from the Oracle billing system. Click
to view messages for all merchants with billing issues.
© Copyright 2012. VeriFone Systems, Inc. All Rights Reserved.
24
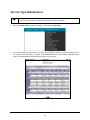
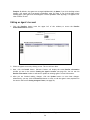
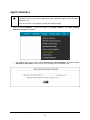
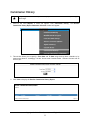
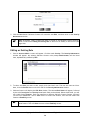
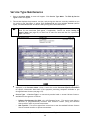
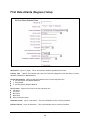
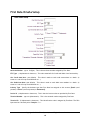
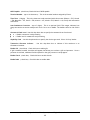
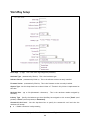
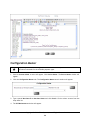
Service Type Maintenance
Simple Explanation: Prior to setting up any agents or merchants, you must set up your
pricing for the payment processing services that you will be reselling.
1. Point to Account Admin. A menu will appear. Click Service Type Maint.
2. This window displays the processors, services, and pricing tiers that are currently available to you
for resale to your merchants or agents. Each Processor ID can have multiple Services (service
types), and each Service can have multiple Tiers (pricing levels).
© Copyright 2012. VeriFone Systems, Inc. All Rights Reserved.
25
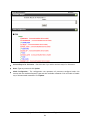
Note: This window also allows you to edit your default Service Type Maintenance fees
and rates for new merchants (and agents if applicable). Consult the section Setting an
Agent’s Rates (page 33) to learn how to edit the rates and fees for a particular agent's
services.
Agent pricing that you enter into Service Type Maintenance is for reference purposes
only. PAYware Connect is not set up to bill agents.
Note: If VeriFone bills you directly for your merchant’s service fees, you are not required
to enter any information into the Service Type Maintenance window.
Processor ID –Processor ID is the PAYware Connect abbreviation for the processing company
displayed in the Processor Name column. Consult the section Processor-Specific Information
for specific information about each of the payment processing companies available to you
through PAYware Connect (see page 137).
Service Type – A Service Type is a connectivity method used to access PAYware Connect.
Some available service types are as follows:
o
o
o
Software Development Kit (SDK) a.k.a. API/Payment Server – This service type allows a
merchant to programmatically interface with PAYware Connect (using the PAYware
Connect SDK) in order to process transactions.
Web Terminal – This service type allows a merchant to use the standard PAYware Connect
Virtual Terminal interface to process transactions.
On the Spot Service Types: -- This service type allows PAYware Connect to communicate
with a handheld VeriFone wireless or GPRS terminal. Please refer to your contract for
service types and descriptions.
Each Service Type has the following fields associated with it:
o
o
o
o
o
o
Buy Mnth – The Buy monthly fee is the monthly service fee that VeriFone charges to the
reseller.
Buy Setup – The Buy Setup is a setup fee that VeriFone charges to the reseller.
Mnth Min – (for use by resellers only, n/a to agents) – The Mnth Min fee for each Service
Type is the base monthly fee that you will charge each of your agents (per account) to
access this service. This field is only applicable if you are a reseller that VeriFone bills
directly.
Setup – (for use by resellers only, n/a to agents) – The Setup Charge for each Service Type
is a one-time fee that you will charge each of your agents (per account) to access PAYware
Connect. This field is only applicable if you are a reseller that VeriFone bills directly.
Merch Mnth – The Merch Mnth for each Service Type is the base monthly fee that you will
charge each of your merchants (per account).
Merch Setup – The Merch Setup is a one-time fee that you will charge each of your
merchants to access each PAYware Connect service.
Each Service Type has at least one Tier associated with it:
o
Tier – Each Tier is a "pricing level" with its own per-transaction rate.
‐ Min Tran – Minimum number of transactions allowed for this tier.
‐ Max Tran – Maximum number of transactions allowed for this tier.
‐ Buy Rate – If your agent’s merchant or your merchant exceeds the number of
transactions included per-month with his account, the Buy Rate is the per-transaction
© Copyright 2012. VeriFone Systems, Inc. All Rights Reserved.
26
‐
‐
cost that you pay to VeriFone (or your PAYware Connect reseller). Please note that this
is in addition to whatever per-merchant account monthly fee you pay to VeriFone (or
your PAYware Connect reseller).
Sell Rate – (for use by resellers only, n/a to agents) – If the total per-month number of
transactions processed by an agent's merchant is between the Min Tran and Max Tran
values, then the agent will pay his reseller the Sell Rate per-transaction for the
number of transactions in excess of those included (in addition to his Mnth Min fee).
Example: An agent has 3000 "free" transactions included per month to pass on to each
of his merchants. If the number of transactions processed by one of his merchants
exceeds that number by 100, then the agent must pay his reseller the Sell Rate pertransaction for those 100 transactions in addition to his Mnth Min fee. This field is only
applicable if you are a reseller that VeriFone bills directly.
Merch Rate – If the total per-month number of transactions processed by your
merchant is between the Min Tran and Max Tran values, then the merchant will pay
you the Merch Rate per-transaction for the number of transactions exceeding those
included (in addition to his Mnth Min fee).
PAYware Connect allows you to edit some of the values found in this window. To edit any of the
following values, click that field's value. Type in the desired value for that field.
Mnth Min
Setup Charge
Merch Mnth
Merch Setup
Sell Rate
Merch Rate
3. After you have made the desired changes, click the Update button. PAYware Connect will save
your changes.
© Copyright 2012. VeriFone Systems, Inc. All Rights Reserved.
27
Reseller Hierarchy
Simple Explanation: Before you start to use the Reseller Accounts section of the
PAYware Connect Corporate Portal, consult the following diagram to get a better
understanding of the PAYware Connect reseller/merchant structure. This hierarchy is
further explained in the following sections.
Note: The following diagram is only an example hierarchy.
More Resellers…
More Resellers…
Reseller
(YOU)
Merchant
Merchant
Merchant
Merchant
Merchant
Merchant
Agent
Agent
Merchant
Merchant
Merchant
Merchant
Agent
Merchant
Merchant
Merchant
Merchant
Merchant
Merchant
Merchant
Merchant
© Copyright 2012. VeriFone Systems, Inc. All Rights Reserved.
28
Creating an Agent
Simple Explanation: The Reseller Search/Maintenance window allows you to create new
agent accounts and edit existing agent accounts.
An agent purchases the PAYware Connect service from you and resells it to his customers.
If you are a reseller that VeriFone bills directly, you may want to review this section just
to get an idea of the optional tools PAYware Connect can offer you.
Note: This feature is intended for use by PAYware Connect resellers/aggregators or
managed accounts only and is not applicable to PAYware Connect agents. Agent setups
are only available to resellers and managed/aggregator accounts that VeriFone bills.
Creating an Agent's Account
1. To access the Reseller Search/Maintenance window, click the word Resellers (near the upper left
of the interface).
2. The Reseller Search/Maintenance window will appear onscreen. This window lists any agents you
have set up (if you are a new reseller, none will be listed). This window also allows you to:
Create a New agent
Edit the Details of an existing agent
Deactivate an existing agent
Activate a deactivated agent
Search for an existing agent
3. Click the New button (on the left side of this Reseller Search/Maintenance window) to create a
New agent.
© Copyright 2012. VeriFone Systems, Inc. All Rights Reserved.
29
© Copyright 2012. VeriFone Systems, Inc. All Rights Reserved.
30
4. Use this Reseller Information window to enter all available information for the agent you are
creating. Use the following information as a guide.
Company Name: ABC Payment Solutions
Address: 123 Main Street
Address (cont.): Secondary address line, if applicable. Example: Suite 1000
City: Anytown
State: GA
Zip: 31405
Phone: 912-555-1212
Fax: 912-555-1212
Contact/Setup Name: Specify the primary contact for this agent. This name will be used in the
"Welcome to PAYware Connect" activation email that includes the agent's login information.
Example: George Adrian
Contact/Setup Email: Specify the primary contact's email address. This address will receive the
"Welcome to PAYware Connect " activation email that includes the agent's login information.
Billing Name: Specify the billing contact (or company name) for this agent. All accounting
issues will be sent to this contact's attention (using the Billing Email address). Example:
Brett Thomas
Billing Email: Specify the billing contact's email address. PAYware Connect will send an email
message to the Billing Email address if there is an issue with collecting monthly fees and
charges from this agent's account. Example: brett@abc_pay.com
Reseller Bills Merchants: Check this box if this reseller bills merchants.
Deactivate: This is simply another way of deactivating an agent. Leave this box unchecked
(unless you want to initiate this agent's account in a "suspended" state).
In the section labeled Processor Service Type Selections, you will see the processor selections and
service types available for you to grant to agents. Put a check next to the options you want for this
agent.
Click Next.
Note: VeriFone (or whoever signed you up as a PAYware Connect reseller) has already
determined which processor types and service types are available to you. This can be
edited (by whoever set up your PAYware Connect account), just as you can edit what
processor types and service types are available to your agent(s).
5. PAYware Connect will display the next step in the agent creation process: the Create Reseller
Administrator window. Fill out this window using the following information as a guide.
User ID: Henry
Full Name: Henry John
Password: You may either create your own password, or you can have PAYware Connect
randomly generate a password for you. Whichever option you select, make sure to note this
information for distribution to the account administrator.
o
o
If you want PAYware Connect to randomly generate a password for you, click the Generate
button. Next, click the Save button and continue on to step 5.
If you want to create your own password, it must meet the following requirements.
Example: HENhen01!
A password must be at least eight characters in length
A password must contain at least three upper case characters
A password must contain at least three lower case characters
A password must contain at least two numeric characters
© Copyright 2012. VeriFone Systems, Inc. All Rights Reserved.
31
-
A password must not contain repeating characters of the same case or numeric value
A password must not contain any group of three sequential characters of the same case
nor any group of three sequential numeric characters
A password must differ from the previous six password submissions
All passwords expire after 90 days, including a 10 day warning period
(Re-Key) Password: Re-enter the password and click the Save button.
6. PAYware Connect will confirm that your agent's account has been created, and will automatically
send an email message containing account and login information to the Contact/Setup Email
address you specified earlier. As PAYware Connect states in the confirmation message, the next
step is to set your agent's rates and service types if desired.
7. Click the word Resellers (near the upper left of the interface) to return to the Reseller
Search/Maintenance window. Your newly created reseller will be displayed. Continue on to the
next section, Setting An Agent's Rates.
© Copyright 2012. VeriFone Systems, Inc. All Rights Reserved.
32
Setting an Agent's Rates
Simple Explanation: After you have created an agent, and if desired, you can set the
rates you will charge that agent for the various PAYware Connect services. PAYware
Connect allows you to select each service that you wish to be available to your agent.
Additionally, this window allows you to add new Service Types to existing processors.
Note: This feature is intended for use by PAYware Connect resellers only and is not
applicable to PAYware Connect agents.
1. If you are not already at the Reseller Search/Maintenance window, click the word Resellers (near
the upper left of the interface).
2. Select the desired agent's account by clicking its row. The row will turn blue.
3. Next, click the Details button. PAYware Connect will display the same Reseller
window you saw in the section Creating An Agent's Account (see page 29).
Information
4. Scroll down to the bottom of this window and click the Processors button. PAYware Connect will
display the second Reseller Information window. This window displays the processors, services,
and tiers that are currently available to this agent for him to resell to his merchants or agents.
Note: This window gives you the ability to set the rates and fees for this particular agent's
service types. This does not affect your universal service type settings (used as the
defaults for new agent setups). Consult the section Service Type Maintenance to learn
how to set the default rates for the processors, services, and pricing tiers that are
available to your merchants or agents (see page 25).
Each Processor ID can have multiple Service Types, and each Service Type can have multiple pricing
Tiers.
Processor ID – A Processor ID is the PAYware Connect abbreviation for the processing company
displayed in the Processor Name column. Consult the section Processor-Specific Information
© Copyright 2012. VeriFone Systems, Inc. All Rights Reserved.
33
for specific information about each of the different payment processing companies available to
you through PAYware Connect (see page 137).
Service Type – A Service Type is a connectivity method used to access PAYware Connect.
Available service types are as follows:
o
o
o
Software Development Kit (SDK) a.k.a. API/Payment Server – This service type allows a
merchant to programmatically interface with PAYware Connect (using the PAYware
Connect SDK) in order to process transactions.
Web Terminal – This service type allows a merchant to use the standard PAYware Connect
Virtual Terminal interface to process transactions.
On the Spot Service Types – This service type allows PAYware Connect to communicate
with a handheld VeriFone wireless or GPRS terminal. Please refer to your contract for
service types and descriptions.
Each Service Type has the following fields associated with it:
o
o
Mnth Min – The Mnth Min for each Service Type is the base monthly fee that you will
charge each of your agents (per account) to access this service.
Setup Charge – The Setup Charge for each Service Type is a one-time fee that you will
charge each of your agents (per account) to access PAYware Connect.
Each Service Type has one or more pricing Tiers associated with it:
o
Tier – Each Tier is a "pricing level" with its own per-transaction rate.
‐ Min Tran – Minimum number of transactions allowed for this tier.
‐ Max Tran – Maximum number of transactions allowed for this tier.
‐ Buy Rate – If your agent’s merchant or your merchant exceeds the number of
transactions included per-month with his account, the Buy Rate is the per-transaction
cost that you pay to VeriFone (or your PAYware Connect reseller). Please note that this
is in addition to whatever per-merchant account monthly fee you pay to VeriFone (or
your PAYware Connect reseller).
‐ Sell Rate – (for use by resellers only, n/a to agents) – If the total per-month number of
transactions processed by an agent's merchant is between the Min Tran and Max Tran
values, then the agent will pay his reseller the Sell Rate per-transaction for the
number of transactions in excess of those included (in addition to his Monthly fee).
Example: An agent has 3000 "free" transactions included per month to pass on to each
of his merchants. If the number of transactions processed by one of his merchants
exceeds that number by 100, then the agent must pay his reseller the Sell Rate pertransaction for those 100 transactions in addition to his Monthly fee.
Note: This window also allows you to add new Service Types to those already available
for an existing agent. To add a Service Type, click the New button. Select the desired
Service Type from the drop-down box that will appear near the bottom of this window.
Click the Save button to save your changes, or click the Cancel button to avoid adding a
Service Type.
5. PAYware Connect allows you to edit the following values from this window. To edit a specific field,
click that field's value. Type in the desired value.
Mnth Min
Setup Charge
Sell Rate
© Copyright 2012. VeriFone Systems, Inc. All Rights Reserved.
34
6. After you are finished making changes, click the Update button to save those changes. If you do
not want to save the changes you have made, just click the Back button to return to the first
Reseller Information window. Next, click the Cancel button to exit the first Reseller Information
window.
7. Your agent has now been set up and configured.
All that remains is for your reseller to log in and begin selling accounts. You may now continue
reviewing the remaining sections pertaining to agent account management. After you are done,
proceed to the section Conclusion of Tutorial (see page 54).
Searching for an Agent's Account
Note: This feature is intended for use by PAYware Connect resellers only and is not
applicable to PAYware Connect agents. This feature is only available to resellers whose
contract specifies that the reseller be billed for all fees.
1. Click the Resellers button (near the upper left of this window) to access the Reseller
Search/Maintenance window.
2. If you only have a few agents, you do not have to scroll down or search for them. However, if you
have a large number of agents, you can use the search tools at the top of this page. You can search
by Reseller ID or Reseller Name.
3. Enter the Reseller ID or Reseller Name. You may search using the entire reseller name or a portion
of it. If you enter information into both fields, PAYware Connect will search by Reseller ID.
4. Next, click the Search button. PAYware Connect will display those agents that meet your search
terms.
5. You can also use the column headings at the top of this table to sort your agents.
© Copyright 2012. VeriFone Systems, Inc. All Rights Reserved.
35
Example: By default, the agents are arranged alphabetically by Name. If you click the City column
heading, your agents will be arranged in alphabetic order (by City). If you click the City column
heading again, your agents will be arranged in reverse alphabetic order (by City). This applies to all
other columns as well.
Editing an Agent's Account
1. Click the Resellers button (near the upper left of this window) to access the Reseller
Search/Maintenance window.
2. Select an agent's account by clicking its row. The row will turn blue.
3. Next, click the Details button. PAYware Connect will display the same Reseller Information
window you saw in the section Creating An Agent's Account (see page 29). You can use this
Reseller Information window to edit and/or update an existing agent's account information.
4. After you are finished making changes, click the Update button to save those changes.
Alternatively, you may click the Processors button to view or edit the agent's rates (explained in
the section the section Setting An Agent's Rates, see page 33).
© Copyright 2012. VeriFone Systems, Inc. All Rights Reserved.
36
Deactivating an Agent's Account
Note: This feature is intended for use by PAYware Connect resellers only and is not
applicable to PAYware Connect agents.
Simple Explanation: When an agent's account is no longer needed, PAYware Connect
allows you to deactivate it. Deactivation does not permanently remove an account from
PAYware Connect. If you ever need to reactivate an account, PAYware Connect will allow
you to reactivate it.
1. Click the Resellers button (near the upper left of this window) to access the Reseller
Search/Maintenance window.
2. Select an agent's account by clicking its row. The row will turn blue.
3. Next, click the Deactivate button. PAYware Connect will ask you to confirm that you want to
deactivate the account. Click OK.
4. PAYware Connect will put an X in the second column of that agent's row, indicating that the
account has been deactivated. Again, PAYware Connect deactivation is not deletion. The next
section—Activating An Agent's Account—describes how to restore an account to active status.
© Copyright 2012. VeriFone Systems, Inc. All Rights Reserved.
37
Activating an Agent's Account
Note: This feature is intended for use by PAYware Connect resellers only and is not
applicable to PAYware Connect agents.
Simple Explanation: PAYware Connect will allow you to reactivate a deactivated agent's
account. Deactivation does not permanently remove an account from PAYware Connect.
1. Click the Resellers button (near the upper left of this window) to access the Reseller
Search/Maintenance window.
2. Select a deactivated agent's account by clicking its row. The row will turn blue. Next, click the
Activate button. PAYware Connect will reactivate the account.
Note: This concludes the Reseller Accounts section of this tutorial. The next section will
provide instructions on some similar functions for PAYware Connect merchant accounts.
© Copyright 2012. VeriFone Systems, Inc. All Rights Reserved.
38
Merchant Hierarchy
Simple Explanation: Before you start to use the Merchant Accounts section of the
PAYware Connect Corporate Portal, consult the following diagram to get a better
understanding of the PAYware Connect merchant structure. This diagram "extends" from
any of the merchants in the Reseller Hierarchy diagram (see page 28). This hierarchy is
further explained in the following sections.
Note: The following diagram is only an example hierarchy. Each merchant and site will be
able to support a configurable number of sites.
Merchant
Other Sites…
Other Sites…
Site
Site
© Copyright 2012. VeriFone Systems, Inc. All Rights Reserved.
39
Creating a Merchant
Simple Explanation: The Merchant Search/Maintenance window allows you to create
new merchant accounts and edit existing merchant accounts.
A merchant is an individual or organization to whom you have sold access to the PAYware
Connect service. If you only expect to resell PAYware Connect to agents and do not
anticipate selling directly to merchants, you may skip ahead to the section Reports (see
page 55).
Creating a Merchant's Account
1. To access the Merchant Search/Maintenance window, click the word Merchants (near the upper
left of the interface).
2. The Merchant Search/Maintenance window will appear onscreen. This window allows you to
search on partial Merchant ID or Merchant Name (by default, no merchants are pre-loaded). By
default, only Active merchants will be returned, but that can be changed to Inactive or All. By
default, only 50 records are returned, but that can be changed up to 1000 (with possible
performance implications).
This window also allows you to:
Create a new Merchant or Site
Edit the Merchant Contact Information of an existing merchant
Edit the Processor Information of an existing merchant
Edit the Rates of an existing merchant
Deactivate a merchant
Activate a deactivated merchant
Search for an existing merchant
WARNING: Resellers must access the Service Type Maintenance window (see page 25) to
set up their merchant pricing and agents, if applicable, before they can set up merchants.
This only applies to resellers that have VeriFone bill their merchants.
If VeriFone is charging your clients directly, then Merch Mnth, Merch Setup, and Merch
Rate must be populated with the pricing you wish for VeriFone to charge your merchants.
The other fields (Mnth Min, Setup, and Sell Rate) may be populated with zeros or left
blank.
© Copyright 2012. VeriFone Systems, Inc. All Rights Reserved.
40
3. Look in the New section on the left side of the Merchant Search/Maintenance window. Click the
Merchant button to create a new merchant.
4. Use this New Merchant Setup window to enter all available information for the merchant you are
creating. Use the following information as a guide for the rest of the setup information:
Company Name: Acme Bikes
(max 24 char, including spaces)
Site Name: Savannah Location
(max 24 char, including spaces. Do not populate this
field unless you are setting up a new site.)
Address: 321 Main Street
Address (cont.): Secondary address line, if applicable. Example: Suite 1000
Country: United States
Zip/Postal Code: 31405
City: Anytown (max 13 char, including spaces)
State/Province: GA
Phone: 912-555-1212
Fax: 912-555-1212
Note: The selection from the Country drop-down list will determine what fields are
displayed for Address Information. Valid Country values: United States, Canada, and U.S.
Virgin Islands.
© Copyright 2012. VeriFone Systems, Inc. All Rights Reserved.
41
Note: Zip code lookup is activated for United States addresses. Key Zip Code and use the
TAB key to move to the next field. PAYware Connect will automatically fill in City name.
Contact/Setup Name: Specify the primary contact for this merchant. This person/company will
receive the "Welcome to PAYware Connect" activation email that includes the merchant's login
information. Example: John Thomas
Contact/Setup Email: Specify the primary contact's email address. This address will receive the
"Welcome to PAYware Connect" activation email that includes the merchant's login information.
Example: john@acme_bikes.com
Note: Click the Copy Name and Email to All icon
to copy the Contact/Setup Name and
Email into the Billing and Settlement Name and Email fields.
Billing Name: Specify the billing contact (or company name) for this merchant. All accounting
issues will be sent to this contact's attention (using the Billing Email address). Example: Jane
Doe
© Copyright 2012. VeriFone Systems, Inc. All Rights Reserved.
42
Billing Email: Specify the billing contact's email address. PAYware Connect may send an email
message to the Billing Email address if there is an issue with collecting monthly fees and
charges from this merchant's account. Example: jane@acme_bikes.com
Settlement Name: Specify the settlement contact for this merchant. PAYware Connect will
notify this contact via the Settlement Email address if there is a settlement issue with this
merchant's account. Example: Michael Knight
Settlement Email: Specify the settlement contact's email address. PAYware Connect will send
an email message to the Settlement Email address if there is a settlement issue with this
merchant's account. Example: michael@acme_bikes.com
Payment Method: Select the method of payment that this merchant will use to pay you
monthly fees and charges. The available options are Credit Card, ACH, and Invoice Reseller.
This is only applicable to those resellers that have PAYware Connect bill their customers (i.e.,
set up for Hybrid or Commission billing).
o Credit Card – Select this option if the merchant will use a credit card to pay monthly
fees and charges.
‐ Specify the merchant's Credit Card Number.
‐ Specify the Expiration Date of the merchant's credit card number.
‐ If you would like to leave the fields blank and have the merchant provide this
information, enable 'Allow Payment Information Maintenance' under Account
Information Maintenance (see page 114).
o ACH – Select this option if the merchant will use ACH to pay monthly fees and charges.
‐ Specify the Bank Routing number. If valid, the Bank Name will be populated.
‐ Specify the Bank Account Holder Name.
‐ Specify the Bank Account number.
‐ If you would like to leave the fields blank and have the merchant provide this
information, enable 'Allow Payment Information Maintenance' under Account
Information Maintenance (see page 114).
If you click the help icon
ACH information:
, the following will display to assist you in entering your
© Copyright 2012. VeriFone Systems, Inc. All Rights Reserved.
43
Invoice Reseller – Select this option to bill this merchant directly. This option will only
be displayed for resellers set up for Hybrid billing.
VeriShield Protect and Date Activated: VeriShield Protect fields.
De-Activate: This is simply another way of deactivating a merchant. Leave this box unchecked
(unless you want to initiate this account in a "suspended" state).
o
5. In the section labeled Select Processors, you will see the processor selections and service types
available for you to grant to merchants. Put a check next to the option you want to be available to
this merchant. Click Next.
Note: Once Next has been clicked, this information will be saved, regardless of the entry
of any additional information. You may use the Back button on your browser, at any time
during a new merchant setup in order to edit the data entered.
If the setup is ended, for any reason, after clicking Next, you may complete the setup at a
later time. To finish an incomplete setup, select a merchant’s account by clicking its row
to highlight. Next, click the Merchant button within the Edit section. PAYware Connect
will display the Merchant Information window. You will then have the opportunity to edit
any of the Merchant information, with the exception of the Processor/Service Type. If a
different processor is required, you will need to set up a new merchant account.
Note: VeriFone—or whoever signed you up as a PAYware Connect reseller—has already
determined which processors and service types are available to you. Similarly, you are
able to choose which processor and service types are available to your merchant(s).
6. PAYware Connect will display the next step in the merchant creation process: the Processor Setup
window. This window allows you to configure the main administrative user for this merchant,
specify the Card Types to be Accepted, and to set up the processing company information for this
merchant.
© Copyright 2012. VeriFone Systems, Inc. All Rights Reserved.
44
Fill out this window using the following information as a guide.
User ID: JohnT123
Full Name: John Thomas
Password: You may either create your own password, or you can have PAYware Connect
randomly generate a password for you. Whichever option you select, make sure to note this
information for distribution to the account administrator.
o
o
If you want PAYware Connect to randomly generate a password for you, click the Generate
button.
If you want to create your own password, it must meet the following requirements.
Example: JONjon01!
A password must be at least eight characters in length
A password must contain at least three upper case characters
A password must contain at least three lower case characters
A password must contain at least two digits
© Copyright 2012. VeriFone Systems, Inc. All Rights Reserved.
45
-
A password must not contain repeating characters of the same case or numeric value
A password must not contain any group of three sequential characters of the same case
nor any group of three sequential numeric characters
A password must differ from the previous six password submissions
All passwords expire after 90 days, including a 10 day warning period
Note: As you are keying in a new password, the red X’s next to each password policy
requirement listed on the right side of the screen will change to green checks as the
requirements are satisfied. All requirements must have green check marks beside them
before the new password will be accepted.
(Re-Key) Password: Re-enter the password. Use this for passwords that you created.
Role: This field cannot be edited, since the only kind of merchant account a reseller can create
is an Administrator account. This Administrator can then create users for this merchant
account.
7. Select the Card Types to be Accepted.
8. Next, you must set up the processing company information for this merchant. The available fields
in this window will vary depending on which processing company you have selected for this
merchant. This is because each processing company has its own setup requirements. Consult the
section Processor-Specific Information for detailed information related to the processor you have
selected (see page 137)
Note: You can obtain this information from whoever set up the merchant with their
merchant account. Click the Save button when you have filled out all of these fields.
9. Depending on which payment processing company you have selected, you also may want to specify
your merchants’ AVS Acceptance Level, CVV2 Acceptance Level, and Duplicate Check Level. If
you are creating a LIVE merchant, you may use the information in the section Fraud Protection as
a guide (see page 167).
10. Click the Save button after you have:
Configured the main administrative user for this merchant
Set up the processing company information for this merchant
Set up the AVS Acceptance Level, CVV2 Acceptance Level, and Duplicate Check Level (if
applicable).
11. PAYware Connect will display the next step in the merchant creation process. This window allows
you to set up or modify the Mnth Min, Setup Charge, and Sell Rate values for this merchant.
© Copyright 2012. VeriFone Systems, Inc. All Rights Reserved.
46
Once you click the Next button, the Total sum of the Mnth Min and Setup Charge will be charged
to this merchant by the Payment Method you specified in a previous step. Payment must be
collected prior to account activation.
12. PAYware Connect will confirm that your merchant's account has been created, and will
automatically send an email message containing account and login information to the
Contact/Setup Email address you specified earlier.
13. Your merchant has now been set up and configured.
WARNING: Before this merchant uses PAYware Connect to do actual "live" business, we
highly recommend that you have him process at least one sale transaction using a real
credit card number—preferably his own. He should then attempt to settle that transaction
(using the process given in the PAYware Connect Merchant Console User's Manual), and
then he should check with his bank to be sure his funds have been applied correctly. This
recommendation applies to all new PAYware Connect merchant accounts.
Remember: the actual transfer of funds can take several business days (depending on
processing company, merchant bank, etc.).
Note: VeriFone’s host based processor certifications do not allow for the initiation of
settlement from PAYware Connect. PAYware Connect will default every host based
processing account to auto close @ 11:59:59 PM. The merchant must have auto close
set up with the processor to settle the batch daily. Once this is set up, the merchant must
find out what time the batch will be closed each day and set the auto close time
accordingly.
The merchant will not be able to use this account until they have accepted the EULA and have been
successfully billed for setup/monthly charges. Depending on your individual reseller contract with
PAYware Connect, your merchants may or may not be billed directly by VeriFone.
© Copyright 2012. VeriFone Systems, Inc. All Rights Reserved.
47
Creating a New Site
Simple Explanation: Your PAYware Connect merchant account includes one PAYware
Connect site account and one PAYware Connect terminal account. When you process
transactions, you are using that default site account and that default terminal account.
Note: From the perspective of each site account, a site is separate from its parent
merchant. Billing and reporting are exclusive to each site.
A site user is able to see the transactions processed at his site as well as the transactions
processed by every other site and terminal associated with his account (as long as he has
been assigned the appropriate permission level).
Note: When setting up a site, the name we send to the processor will be the site name.
A new PAYware Connect site account is created in the same way that a PAYware Connect merchant
account is created. The only difference is that to create a site, you must first click the merchant for
which you wish to create a new site. Then, click the Site button (in the New box, on the left side of
the Merchant Search/Maintenance window). After that, you may provide the required information.
Refer to the section Creating A Merchant for explanations of the required fields (see page 40).
Searching for a Merchant's Account
Simple Explanation: If you have just created a merchant for the first time, you may
decide to skip this section.
Note: You can search for PAYware Connect site accounts in the same way that you search
for merchant accounts.
1. Click the word Merchants (near the upper left of the PAYware Connect interface) to access the
Merchant Search/Maintenance window. You will see a list of the merchants you have signed up
with the PAYware Connect service. If you are following this tutorial for the first time, you shouldn't
see any merchants other than the one you just created.
2. To search for an existing merchant's account, enter the Merchant ID and/or Merchant Name into
the boxes near the top of the Merchant Search/Maintenance window.
Merchant ID – This field allows you to specify the merchant's Merchant ID as it is specified in
PAYware Connect. You may use this field in combination with the Merchant Name field, or you
may search using just the Merchant ID.
© Copyright 2012. VeriFone Systems, Inc. All Rights Reserved.
48
Merchant Name – This field allows you to specify the merchant's Merchant Name as it is
specified in PAYware Connect. You may search using the entire merchant's name or a portion of
it. If you use this field in combination with the Merchant ID field, PAYware Connect will search
by Merchant ID.
3. After you have specified your search terms, click the Search button to generate your search
results. PAYware Connect will display those accounts that match your search.
Note: You can also use the column headings at the top of this table to sort your
merchants. Example: By default, the merchants are arranged alphabetically by Name. If
you click the City column heading, your merchants will be arranged in alphabetic order
(by City). If you click the City column heading again, your merchants will be arranged in
reverse alphabetic order (by City). This applies to all other columns as well.
Completing a Merchant’s Account
Note: Once Next has been clicked on the Merchant Information screen, the data will be
saved, regardless of the entry of any additional information. You may use the Back
button on your browser, at any time during a new merchant setup in order to edit the
data entered.
If the setup is ended, for any reason, after clicking Next, the account will be marked as
incomplete. You may complete the setup at a later time.
© Copyright 2012. VeriFone Systems, Inc. All Rights Reserved.
49
1. To complete an Incomplete Setup, select a merchant’s account by clicking its row. The row will
turn blue. Next, click the Merchant button in the Edit section. PAYware Connect will display the
Merchant Information window. You may edit any of the Merchant Information at this time, with
the exception of Processor/Service type. (If a different Processor is required, you will need to set
up a New Merchant Account.) Click Next.
2. This will bring you to the User/Processor Setup window. Consult the section Creating A
Merchant’s Account for more information on User/Processor Setup (see page 40).
© Copyright 2012. VeriFone Systems, Inc. All Rights Reserved.
50
Editing a Merchant's Account
Note: You can edit PAYware Connect site accounts in the same way that you edit
merchant accounts.
© Copyright 2012. VeriFone Systems, Inc. All Rights Reserved.
51
1. Click the word Merchants (near the upper left of the PAYware Connect interface) to access the
Merchant Search/Maintenance window. Select a merchant's account by clicking its row. The row
will turn blue. Next, click the Merchant button in the Edit section. PAYware Connect will display
the same Merchant Information window you saw in the section Creating A Merchant's Account
(see page 40).
2. You can use this Merchant Information window to edit/update an existing merchant's account
information. After you are finished making changes, click the Update button to save those changes.
If you do not want to save your changes, just click the Merchants button (near the upper left of
this window) or your Internet browser's Back button to return to the Merchant
Search/Maintenance window.
Editing a Merchant’s Processor Information; AVS, CVV2, and Duplicate
Check Levels
1. Click the word Merchant, near the top left of the PAYware Connect interface, to access the
Merchant Search/Maintenance window. Select a Merchant’s account by clicking its row. The row
will turn blue. Next, click the Processor button in the Edit section. PAYware Connect will display
the User/Processor Setup window.
2. The User/Processor Setup window allows you to Edit an existing merchant’s Processor
information, AVS Acceptance Level, CVV2 Acceptance Level, and Duplicate Check Level. After you
have completed any changes, click Save in order to save the edits. If you do not wish to save your
changes, click the Back button on your browser to return to the Merchant Search/Maintenance
window.
Editing a Merchant's Rates
1. Click the word Merchants (near the upper left of the PAYware Connect interface) to access the
Merchant Search/Maintenance window. Select a merchant's account by clicking its row. The row
will turn blue. Next, click the Rates button in the Edit section. PAYware Connect will display the
Edit Merchant Service Type window.
© Copyright 2012. VeriFone Systems, Inc. All Rights Reserved.
52
2. This window allows you to Edit an existing merchant’s Mnth Min, Setup Charge, Dial Charge, VSP
Charge, Per Device Charge, PWM Charge, and Sell Rate. You can also Change the bundle service
type if you have more than one available. After you have completed the changes, click the Update
button to save those changes. If you do not want to save your changes, just click the Back button
to return to the Merchant Search/Maintenance window.
Deactivating a Merchant's Account
Simple Explanation: When a merchant's account is no longer needed, PAYware Connect
allows you to deactivate it. Deactivation does not permanently remove an account from
PAYware Connect. If you ever need to reactivate an account, PAYware Connect will allow
you to reactivate it.
Note: You can deactivate PAYware Connect site accounts in the same way that you
deactivate merchant accounts.
Select a merchant's account by clicking its row. The row will turn blue. Next, click the Deactivate
button. PAYware Connect will ask you to confirm that you want to deactivate the account. Click OK.
PAYware Connect will put an X in the second column of that merchant's row, indicating that the
account was deactivated.
Reactivating a Merchant's Account
Note: You can reactivate PAYware Connect site accounts in the same way that you
reactivate merchant accounts.
Select a deactivated merchant's account by clicking its row. The row will turn blue. Next, click the
Activate button. PAYware Connect will reactivate the account.
© Copyright 2012. VeriFone Systems, Inc. All Rights Reserved.
53
Conclusion of Tutorial
This concludes the PAYware Connect tutorial. We highly recommend that you also review the following
sections:
Reports – PAYware Connect provides you with several in-depth, easy-to-use transaction
reports. We highly recommend that you review the Reports section to learn how to use
PAYware Connect reports (see page 55).
Account Administration – There are multiple user access levels available within PAYware
Connect. Consult the section Account Administration for information on creating and
managing your PAYware Connect users (see page 93).
Processor-Specific Information – PAYware Connect allows you to specify which payment
processing companies will be available to your agents and merchants. Consult the section
Processor-Specific Information for information specific to each processor available with
PAYware Connect (see page 137).
Fraud Protection – Some payment processing companies allow for the configuration of certain
fraud prevention options. Depending on which payment processing company the merchant has
selected, some of the options may or may not be available. Consult the section Fraud
Protection for information related to fraud protection in PAYware Connect (see page 167).
© Copyright 2012. VeriFone Systems, Inc. All Rights Reserved.
54
Reports
Simple Explanation: The PAYware Connect reports provide you with easy access to your
important historical data. Most of these reports will display your Reseller Code, your
Reseller Info (your company name, address, etc.), and the Date / Time that the report
was generated.
All PAYware Connect reports can be viewed from within the PAYware Connect web
interface. Additionally, PAYware Connect can create an Adobe Acrobat PDF version of any
report you generate (useful for sharing your reports or printing purposes).
Report Types
Merchant Summary – This report generates a brief list of the total number of transaction
"clicks" performed by each merchant you have created (within the date range that you specify).
A click is defined as a transaction that has been successfully processed (regardless of whether
the transaction was accepted or declined). Consult the section Merchant Summary for more
information on this report type (see page 57).
Merchant Details – This report generates a detailed list of the transaction types performed and
card types processed by each of your merchants (within the date range that you specify).
Consult the section Merchant Details for more information on this report type (see page 62).
Merchant Activity Summary – This report provides a historical summary of all your merchants’
PAYware Connect transaction activity along with other details related to their accounts.
Consult the section Merchant Activity Summary for more information on this report type (see
page 66).
Reseller Service Types –This report provides a list of the service bundles set up for your
account or your agent’s account (if applicable). Consult the section Reseller Service Types for
more information on this report type (see page 67).
New Merchant Setups – This report lists all new merchants set up for you or your agents (if
applicable) for the time frame specified. Consult the section New Merchant Setups for more
information on this report type (see page 69).
Service Level Exceptions – This report lists all accounts exceeding their monthly minimum
transactions for the time period specified. Consult the section Service Level Exceptions for
more information (see page 71).
Agent Summary – This report will display a summary of all of your agent reseller’s merchant
accounts. If you do not plan to set up agents, you will not need this report. Consult the section
Agent Summary for more information (see page 73).
Console Users – This report will list all console users set up for the Reseller ID created for your
Corporate Portal. This will not display any agent resellers’ merchant’s users. Consult the
section Console Users for more information (see page 76).
© Copyright 2012. VeriFone Systems, Inc. All Rights Reserved.
55
Unsettled Merchants – This report will list all merchants who have not settled their batches
prior to a user-defined cutoff date/time. Consult the section Unsettled Merchants for more
information (see page 81).
LP Token Summary – This report will only be accessible if you are flagged as using Loss
Prevention and are also flagged as a Group Manager. Provides a report of all token usage within
a selectable date range or by reseller/merchant. Consult the section LP Token Summary for
more information (see page 89).
LP Token Export – This report will only be accessible if you are flagged as using Loss
Prevention and are also flagged as a Group Manager. Provides a means of gathering export data
by date range. Consult the section LP Token Export for more information (see page 91).
Invoice Summary – This report will only be accessible if you are billed directly by VeriFone for
your merchants' PAYware Connect fees. Provides a detailed historical summary of all invoices
charged to you by VeriFone. Consult the section Invoice Summary for more information (see
page 92).
VSP100 – Device Encryption Summary – This report is a summary of the encryption status of
the VSP-capable (VeriShield Protect) devices that are connected to PAYware Connect. The
VSP100 Report provides actual transaction activity for a given day. Consult the section VSP100 –
Device Encryption Summary for more information (see page 82).
VSP200 – Transaction Encryption Exceptions – This report is a summary of those transactions
that were processed through devices connect to PAYware Connect and were NOT protected by
VeriShield Protect. The VSP200 Report provides a 30-day view. Consult the section VSP200 –
Transaction Encryption Exceptions for more information (see page 84).
Commission History – This report displays the reseller commission history for a given date
range. Consult the section Commission History for more information (see page 77).
Current Estimated Commission – This report lists the rates and fees incurred by each
merchant. Consult the section Current Estimated Commission for more information (see page
79).
© Copyright 2012. VeriFone Systems, Inc. All Rights Reserved.
56
Viewing Reports
Note to Internet Explorer v8 Users: Viewing large reports may cause IEv8 to assume that
it has become locked up. This is due to the IEv8 feature "SmartScreen Filter". Users may
decide to avoid this feature by turning it off: start IEv8, then press Alt-T on your
keyboard, then click SmartScreen Filter, and then click Turn Off SmartScreen Filter to
disable it.
The following tool bar will display with any of the PAYware Connect Reseller reports:
1. To view detailed information for a particular field, click on that field/row. PAYware Connect will
display a detailed report for that selection. When you are finished viewing the details, you may
click the Parent Report button located in the upper right to return to the main report or the
Close Report button to close the report and return to the previous window.
2. You may use the tool bar located above the report to view additional pages, change the report
size, view the document map, search for information, print the report, or select a particular
format.
3. To view the Document Map, click the
symbol in the upper left.
4. To move within the report:
Click this button to go to the first page in the report
Click this button to go to the previous page in the report
Currently displayed page number / total number of pages
Click this button to go to the next page in the report
Click this button to go to the last page in the report
Enter a page number and press <Enter> to go to that page
Enter a search term and click Find or Next.
5. You can print the report by clicking the
button, refresh the report by clicking the
button,
or you can choose to export the data in a variety of formats by choosing the desired format from
the drop-down menu, then clicking Export.
Note: Within each of the Corporate Portal reports, you have the option to view additional
information. In order to make it as convenient as possible, many of the additional views
are accessible from multiple reports.
© Copyright 2012. VeriFone Systems, Inc. All Rights Reserved.
57
Merchant Summary
Simple Explanation: This report will show your merchants' activity.
1. Move your mouse pointer over the word Reports. A menu will appear. Click Merchant Summary.
The Merchant Summary Report Parameter Selection window will appear.
2. This window allows you to select specific agents’ merchants (if applicable) from the drop-down, or
to use My Account to view those merchants set up directly via your Corporate Portal. You can
choose to view a particular Merchant Name/Merchant ID by typing a partial entry in the field
provided, you can choose from the processor drop-down, or you can choose From Date and To
Date.
3. After you have entered your parameters, click the View button to display your report in standard
web format.
Note: You may need to download and install Adobe's free Acrobat Reader software. If PDFs
do
not
display
correctly
on
your
system,
visit
http://www.adobe.com/products/acrobat/readstep.html and download the version of
Acrobat Reader appropriate for your system.
© Copyright 2012. VeriFone Systems, Inc. All Rights Reserved.
58
4. PAYware Connect will display a list of those merchants you have created, along with the Merchant
ID, the name of the Merchant that processed the transactions, the name of the Site that processed
the transactions, and the number of transaction clicks processed. A click is defined as a transaction
that has been successfully processed (regardless of whether the transaction was accepted or
declined). This includes Sales, Voids, Credits, Pre Auths, Completions, Add Tips, and any other
transaction type. The following screenshot is similar to what you will see if you click the View
button.
5. The Merchant Summary report lists all of the account activity that has occurred utilizing the
criteria you selected. For instance, if you chose All on the parameter selection screen, you would
see all merchants you have set up and all merchants your agents (if applicable) have set up. You
may collapse the individual resellers by clicking on the minus sign (-) located to the left of the
Reseller name (either the Parent or Agent reseller). You may also sort some of the column headers
by clicking on the up/down arrows.
6. The following columns are presented in the Merchant Summary report:
Reseller ID – The Reseller ID is the ID used to identify the reseller or agent in the PAYware
Connect system.
Acct # -- The Acct # column represents the first section of the Merchant Code. The Merchant
Code is made up of Account # + Site + Terminal Number [e.g., Merchant Code= 18400020001
(Account = 184, Site = 0002, Terminal Number = 0001)].
Active –. The Active column states whether an account is active.
Merchant ID – The Merchant ID is the ID used to identify a merchant in the PAYware Connect
system. Clicking on the Merchant ID in this column will take you to the Merchant Details
report, which contains additional information related to the merchant.
Merchant Name – The Merchant Name lists the name of the merchant.
Processor ID – The Processor ID column lists the Processor that the merchant is using. You can
click on this to obtain additional information regarding a merchant’s processor setup
information.
Service Type – The Service Type specifies the service type bundle chosen for the merchant.
Current Clicks –If you are a reseller who has VeriFone charge your merchants directly, then
this will represent the current transactions processed since the last invoice date for the
merchant being reviewed. If you are a reseller who VeriFone bills, this report will represent
the # of transactions processed since the beginning of the month. You can click on this to see
details of transactions processed.
Last Tran Run – The Last Tran Run column will show you the date of the last transaction
processed for a particular merchant.
© Copyright 2012. VeriFone Systems, Inc. All Rights Reserved.
59
If you have agents set up, you will see the name of the Parent Reseller and Agent Reseller (if
applicable) under the main column headings and the number of merchants set up under the agent
reseller accounts.
A legend appears on the final page of the report, providing the following:
Activated – shows that an account is active in the system.
Incomplete Setup – represents an incomplete merchant setup.
De-Activated – shows that an account is de-activated in the system.
Invoice History – shows that there is invoice history available on a client. If you wish to view
the history, simply click on the symbol where it appears in the report.
Over Min Transactions – shows that the client has gone over the minimum # of included
transactions. You can then look within the Current Clicks column for the # of transactions
(which will appear underlined).
Merchant Users – represents users your merchant has set up under the merchant console. Click
to view additional data.
If you click on an underlined Merchant ID number found in the Merchant ID column, the Merchant
Detail Report will be displayed. This report lists the Service Type bundle information that you or your
agent has set for this merchant, along with the date the End User License agreement (EULA) was
accepted, the date the account was set up, and the contact information listed for the account. Within
this report you may also choose to click on a processor listed in the Processor column. If clicked, this
will display the Merchant Processor Report – you can also go straight to this information from within
the Parent Report. When finished viewing the data outside of the Parent report, please click Parent
Report to go back to the main report, or Close Report if you are finished.
© Copyright 2012. VeriFone Systems, Inc. All Rights Reserved.
60
Merchant Detail Report
© Copyright 2012. VeriFone Systems, Inc. All Rights Reserved.
61
Merchant Processor Report
From the Merchant Summary Report, you can choose to click on the merchant users icon
to
display details about the console access users set up for each of your merchants or agents (if
applicable):
Note: Using this report, resellers can easily locate processing Merchant IDs for agents to
reconcile.
© Copyright 2012. VeriFone Systems, Inc. All Rights Reserved.
62
Users Report
The following columns are presented in the Users Report:
User ID – This is the ID used to sign on to the PAYware Connect console.
Full Name of User –. This is the full name of the user set up to use the console.
Role – This is the security role assigned to the user.
Last Login – This is the last time this user logged in to the console.
Locked – This is used to identify a locked user account.
Last Failed Login– This is the time of the user’s last failed login attempt.
Setup Date – This is the date when the user was set up in the system.
Expiration Date – This is the date when the password for the user will expire.
From the Merchant Summary Report you can choose to click the # of transactions listed in the Current
Clicks column to view transactions processed by a particular Merchant ID.
© Copyright 2012. VeriFone Systems, Inc. All Rights Reserved.
63
Transaction Detail Report
The following columns are presented in the Transaction Detail Report:
Trans Time – This is time the merchant processed the transaction.
Invoice – This is the invoice number, if any, the merchant assigned to the transaction.
Trans ID – This is the transaction ID/TROUTD that PAYware Connect assigned to identify the
transaction.
Account Number – This is the masked credit card account number that was processed.
Cmd – This is the type of command sent to PAYware Connect (e.g., sale, void, etc.)
Cardholder– This is the cardholder name, if provided.
Status Code – This is the status code message that PAYware Connect assigned to the
transaction (e.g., Captured).
User ID – This is the user ID that processed the transaction.
Trans Amount – This is the transaction amount.
This report will be sorted by date, and totals will be provided. If you wish to view the details of an
individual transaction, click the transaction ID under the Trans ID column. Details for the individual
transaction will be displayed (see next page).
© Copyright 2012. VeriFone Systems, Inc. All Rights Reserved.
64
Individual Transaction Detail Report
Click Parent Report to return to the main Merchant Summary Report.
© Copyright 2012. VeriFone Systems, Inc. All Rights Reserved.
65
Merchant Activity Summary
Simple Explanation: This report will only be accessible if you are billed directly by
VeriFone for your merchants' PAYware Connect fees. This report will only be accessible if
you are billed directly by VeriFone for your merchants' PAYware Connect fees. Provides a
historical summary of all your merchants' PAYware Connect transaction activity, along
with other details related to their accounts.
1. Point to the word Reports. A menu will appear. Click Merchant Activity Summary.
2. The Merchant Activity Report Parameter Selection window will appear. This window allows
you to choose From Date and To Date from the drop-down calendars or enter the dates in
“mmddyyyy” format. Do not enter forward slashes – PAYware Connect will do that for you. You
might also choose to enter partial Merchant ID or Merchant Name.
3. After you have entered your parameters, click the View button to display your report in
standard web format.
© Copyright 2012. VeriFone Systems, Inc. All Rights Reserved.
66
Reseller Service Types
Simple Explanation: This report will provide a list of the service bundles set up for your
account or your agent’s account (if applicable)
1. Point to the word Reports. A menu will appear. Click Reseller Service Types. The Reseller Service
Type Parameter Selection window will appear:
2. This window allows you to select a specific reseller/agent ID (if applicable) from the drop-down, or
to use My Account to view all service types for your parent reseller account.
3. Click View to display the Reseller Service Types Report. (See next page.)
© Copyright 2012. VeriFone Systems, Inc. All Rights Reserved.
67
4. The following columns are presented in the Reseller Service Types Report:
Processor – This is the processor(s) you have available to choose in your Corporate Portal.
Service Type – These are the names of service types available to you, per processor.
Buy Month Min –. This is the monthly minimum that VeriFone charges you.
Buy Setup Charge – This is the setup fee that VeriFone charges you.
Tier – This is the tier associated with the chosen service bundle.
Min Trans – This is the minimum number of transactions established for this service type.
Max Trans – This is the maximum number of transactions established for this service type.
Buy Rate – This is the per transaction rate that VeriFone charges you.
Merchants Setup – This is the number of merchants set up with the particular service type
being viewed. If you wish to see the details on the merchant’s setup with a particular service
type, click on the underlined number found within this column. The Merchant Summary
Report for that processor and its corresponding service type will be displayed.
5. Once you have finished viewing the setups by service type, you may click
Parent Report to return to the Reseller Service Types Report.
© Copyright 2012. VeriFone Systems, Inc. All Rights Reserved.
68
New Merchant Setups
Simple Explanation: This report will list all new merchants set up for you or your agents
(if applicable) for the time frame specified.
1. Point to the word Reports. A menu will appear. Click New Merchant Setups. The New Merchant
Setup Report Parameter Selection window will appear:
2. This window allows you to choose From Date and To Date from the drop-down calendars or enter
the dates in “mmddyyyy” format. Do not enter forward slashes – PAYware Connect will do that for
you.
3. Click View to display the New Merchant Setups Report. (See next page.)
© Copyright 2012. VeriFone Systems, Inc. All Rights Reserved.
69
4. The following columns are presented in the New Merchant Setup Report:
Reseller ID – This is the ID used to identify the reseller or agent in the PAYware Connect
system.
Setup Date – This is the date the merchant account was set up in the PAYware Connect system.
Active –. This states whether the account is active.
Merchant ID – This is the ID used to identify a merchant in the PAYware Connect system.
Clicking on the Merchant ID in this column will take you to the Merchant Details report, which
contains additional information related to the merchant.
Merchant Name – This is the name of the merchant.
Processor ID – This is the processor that the merchant is using.
Service Type – This is the service type bundle that is chosen for the merchant.
Current Clicks – If you are a reseller who has VeriFone charge your merchants directly, then
this will represent the current transactions processed since the last invoice date for the
merchant being reviewed. If you are a reseller who VeriFone bills, this report will represent
the # of transactions processed since the beginning of the month. You can click on this to see
details of transactions processed.
© Copyright 2012. VeriFone Systems, Inc. All Rights Reserved.
70
Service Level Exceptions
Simple Explanation: This report will list all accounts exceeding their monthly minimum
transactions for the time period specified.
1. Point to the word Reports. A menu will appear. Click Service Level Exceptions. The Service Level
Exception Report Parameter Selection window will appear:
2. This window allows you to select a specific reseller/agent ID (if applicable) from the drop-down, or
to use My Account to view all service level exceptions for your parent reseller account. Choose
From Date and To Date from the drop-down calendars or enter the dates in “mmddyyyy” format.
Do not enter forward slashes – PAYware Connect will do that for you.
3. Click View to display the Service Exception Report. (See next page.)
© Copyright 2012. VeriFone Systems, Inc. All Rights Reserved.
71
4. The following columns are presented in the Service Exception Report:
Merchant ID – This is the ID used to identify the merchant in the PAYware Connect system.
Clicking on the merchant ID in this column will take you to the Merchant Details report, which
contains additional information related to the merchant.
Merchant Name – This is the name of the merchant.
Processor ID – This is the processor that the merchant is using. You can click on this to obtain
additional information regarding a merchant’s processor setup information.
Service Type – This is the service type bundle that is chosen for the merchant.
Min Trans – This is the minimum number of transactions established for this service type.
Current Clicks – If you are a reseller who has VeriFone charge your merchants directly, then
this will represent the current transactions processed since the last invoice date for the
merchant being reviewed. If you are a reseller who VeriFone bills, this report will represent
the # of transactions processed since the beginning of the month. You can click on this to see
details of transactions processed.
© Copyright 2012. VeriFone Systems, Inc. All Rights Reserved.
72
Agent Summary
Simple Explanation: This report will display a summary of all of your agent reseller’s
merchant accounts. If you wish to expand and view a particular agent’s merchant setups,
click on the (+).
If you do not plan to set up agents, you will not need this report.
1. Point to the word Reports. A menu will appear. Click Agent Summary. The Agent Summary
Parameter Selection will appear.
2. This window allows you to enter a partial Merchant ID or Merchant Name. By default, Active
Merchant Account Status is selected, but you can change that to InActive or All.
© Copyright 2012. VeriFone Systems, Inc. All Rights Reserved.
73
3. The following columns are presented in the Agent Summary Report:
Reseller ID – This is the ID used to identify the reseller or agent in the PAYware Connect
system.
Acct – This is the name on the reseller/agent account. Clicking on this account name will take
you to the Reseller Service Types report.
Active – This will state whether the account is active.
Merchant ID – This is the merchant ID. Clicking on the merchant ID in this column will take you
to the Merchant Details report, which contains additional information related to the merchant.
Merchant Name –This is the full name of the merchant.
Processor ID – – This is the processor that the merchant is using. You can click on this to obtain
additional information regarding a merchant’s processor setup information.
Service Type – This is the service type bundle that is chosen for the merchant.
Current Clicks – If you are a reseller who has VeriFone charge your merchants directly, then
this will represent the current transactions processed since the last invoice date for the
merchant being reviewed. If you are a reseller who VeriFone bills, this report will represent
the # of transactions processed since the beginning of the month. You can click on this to see
details of transactions processed.
Last Tran Run – This will display the date of the last transaction run.
A legend appears on the final page of the report, providing the following:
Activated – shows that an account is active in the system.
Incomplete Setup – represents an incomplete merchant setup.
De-Activated – shows that an account is de-activated in the system.
Invoice History – shows that there is invoice history available on a client. If you wish to view
the history, simply click on the symbol where it appears in the report.
© Copyright 2012. VeriFone Systems, Inc. All Rights Reserved.
74
Over Min Transactions – shows that the client has gone over the minimum # of included
transactions. You can then look within the Current Clicks column for the # of transactions
(which will appear underlined).
Merchant Users – represents users your merchant has set up under the merchant console. Click
to view additional data.
© Copyright 2012. VeriFone Systems, Inc. All Rights Reserved.
75
Console Users
Simple Explanation: This report will list all console users set up for the Reseller ID
created for your Corporate Portal. This will not display any agent resellers’ merchant’s
users.
1. Point to the word Reports. A menu will appear. Click Console Users.
2. The following columns are presented in the Console Users Report:
User ID – This is the ID used to sign on to the PAYware Connect console.
Full Name – This is the full name of the user set up to use the PAYware Connect console.
Role – This is the security role assigned to the user.
Last Login – This is the last time the user logged in to the console.
Locked –This will show if the user’s account is locked.
Last Failed Login – This is the last time the user had a failed log in attempt.
Setup Date – This is the date the user was set up in the system.
Expiration Date – This is the date the user’s password will expire.
© Copyright 2012. VeriFone Systems, Inc. All Rights Reserved.
76
Commission History
Simple Explanation: This report will display the reseller commission history for a given
date range.
1. Point to the word Reports. A menu will appear. Click Commission History. The Reseller
Commission History Report Parameter Selection window will appear.
2. This window allows you to specify a From Date and To Date using the drop-down calendars or by
entering the dates in “mmddyyyy” format. Do not enter forward slashes – PAYware Connect will do
that for you.
3. Click View to display the Reseller Commission History Report.
© Copyright 2012. VeriFone Systems, Inc. All Rights Reserved.
77
4. The following columns are presented in the Reseller Commission History Report:
Merchant ID – This is the merchant ID. Clicking on the merchant ID in this column will take you
to the Merchant Details report, which contains additional information related to the merchant.
Bus Name – This is the business name as set up in the PAYware Connect system.
Processor – This is the processor that the merchant is using. You can click on this to obtain
additional information regarding a merchant’s processor setup information.
Service Type – This is the service type bundle that is chosen for the merchant.
Invoice – This is the invoice number assigned, if any.
© Copyright 2012. VeriFone Systems, Inc. All Rights Reserved.
78
Current Estimated Commission
Simple Explanation: This report will list the rates and fees incurred by each of your
merchants.
1. Point to the word Reports. A menu will appear. Click Current Estimated Commission.
2. The following columns are presented in the Merchant Current Estimated Billing/Commission
Report:
Merchant ID – This is the merchant ID. Clicking on the merchant ID in this column will take you
to the Merchant Details report, which contains additional information related to the merchant.
Bus Name – This is the business name as set up in the PAYware Connect system.
Processor – This is the processor that the merchant is using. You can click on this to obtain
additional information regarding a merchant’s processor setup information.
Service Type – This is the service type bundle that is chosen for the merchant.
Count – This is the total number of transactions processed.
Include – This is the number of "free" transactions included with this merchant's per-month
service fee.
Over – This is the number of transactions processed that is over the number of Included
transactions.
Rate – This is the per-transaction fee that you charge this merchant.
Cost – This is the per-transaction fee that VeriFone charges you.
Month Rate – This is the per-month service fee that you charge this merchant.
© Copyright 2012. VeriFone Systems, Inc. All Rights Reserved.
79
Month Cost – This is the per-month service fee that VeriFone charges you.
Billing (Estimated) – This is the estimated billing amount:
[(Over * Rate) + Month Rate]
Commission (Estimated) – This is the estimated commission amount:
Billed – [(Over * Cost) + Month Cost]
The commission totals displayed in this report should only be considered estimates (since the
range specified may not necessarily be only one month, and since per-month rates and fees
cannot be accurately determined until the end of a billing month has passed).
© Copyright 2012. VeriFone Systems, Inc. All Rights Reserved.
80
Unsettled Merchants
Simple Explanation: This report will list all merchants who have not settled their batches
prior to a user-defined cutoff date/time.
1. Point to the word Reports. A menu will appear. Click Unsettled Merchants.
2. The following columns are presented in the Unsettled Merchants Report:
Merchant ID – This is the merchant ID. Clicking on the merchant ID in this column will take you
to the Merchant Details report, which contains additional
Cost – This is the per-transaction fee that VeriFone charges you.
Month Rate – This is the per-month service fee that you charge this merchant.
Month Cost – This is the per-month service fee that VeriFone charges you.
Billing (Estimated) – This is the estimated billing amount:
[(Over * Rate) + Month Rate]
Commission (Estimated) – This is the estimated commission amount:
Billed – [(Over * Cost) + Month Cost]
The commission totals displayed in this report should only be considered estimates (since the
range specified may not necessarily be only one month, and since per-month rates and fees
cannot be accurately determined until the end of a billing month has passed).
© Copyright 2012. VeriFone Systems, Inc. All Rights Reserved.
81
VSP100 - Device Encryption Summary
Simple Explanation: This report is a summary of the encryption status of the VSP-capable
(VeriShield Protect) devices that are connected to PAYware Connect. The VSP100 Report
provides actual transaction activity for a given day.
1. Point to the word Reports. A menu will appear. Click VSP100 - Device Encryption Summary.
2. PAYware Connect will display the VSP100 Device Encryption Summary Parameter Selection
window. Select the Date for which you'd like to view the Device Encryption Summary report.
3. The following columns are presented in the VSP100 - Device Encryption Summary. You can click
on any of these results to view more details.
Device Type – Type of device connected to PAYware Connect on the selected date.
© Copyright 2012. VeriFone Systems, Inc. All Rights Reserved.
82
Device Count – Number of devices of that type connected to PAYware Connect on the selected
date.
Devices No Transactions – Number of devices that have run NO transactions for the selected
date.
Devices Encrypting – Number of devices that are successfully encrypting for the selected date.
Devices Not Encrypting – Number of devices that are not encrypting for the selected date.
© Copyright 2012. VeriFone Systems, Inc. All Rights Reserved.
83
VSP200 - Transaction Encryption Exceptions
Simple Explanation: This report is a summary of those transactions that were processed
through devices connected to PAYware Connect and were NOT protected by VeriShield
Protect. The VSP200 Report provides a 30-day view.
1. Point to the word Reports. A menu will appear. Click VSP200 - Transaction Encryption
Exceptions.
2. PAYware Connect will display the VSP200 - Transaction Encryption Exceptions Parameter
Selection window. Select the Date for which you'd like to view the Transaction Encryption
Exceptions report.
3. The graph is a graphical representation of those transactions that were processed through devices
connected to PAYware Connect and were NOT protected by VeriShield Protect.
© Copyright 2012. VeriFone Systems, Inc. All Rights Reserved.
84
4. The following columns are presented in the Transaction Encryption Exceptions report. You can
click on one the All Transactions links to view more details about that day's transaction.
Not Encrypting – Number of non-VSP-encrypted transactions processed on this row's date.
Total VSP Transactions – Number of VSP-encrypted transactions processed on this row's date.
Percent Encrypting – Percent of VSP-encrypted transactions processed on this row's date.
All Transactions – Shows a detailed list of all devices (by serial number) and TROUTDs/TransIDs
that have had encryption exceptions for the selected day.
© Copyright 2012. VeriFone Systems, Inc. All Rights Reserved.
85
Merchant Console Access Report
Simple Explanation: This report will list all of your PAYware Connect reseller users who
have accessed merchants' accounts via the Merchant Console Access feature within a
specific date range.
1. Point to the word Reports. A menu will appear. Click Merchant Console Access Report.
2. The Merchant Console Login Report Parameter Selection window will appear. This window allows
you to specify a From Date and To Date using the drop-down calendars or by entering the dates in
“mmddyyyy” format. Do not enter forward slashes – PAYware Connect will do that for you. After
you have entered your parameters, click the View button to display your report in standard web
format.
3. You may click on any Merchant ID displayed to obtain further details on that merchant's account.
© Copyright 2012. VeriFone Systems, Inc. All Rights Reserved.
86
Settlement Summary
Simple Explanation: This report will list all settlements performed through your
merchants' accounts within a specific date range.
1. Point to the word Reports. A menu will appear. Click Settlement Summary.
2. The Merchant Settlement Summary Report Parameter Selection window will appear. This window
allows you to choose From Date and To Date from the drop-down calendars or enter the dates in
“mmddyyyy” format. Do not enter forward slashes – PAYware Connect will do that for you. Put a
check in the box marked Errors Only if you only wish to see unsuccessful settlements that returned
errors.
3. After you have entered your parameters, click the View button to display your report in standard
web format. Rejected transactions will display with a red
in the Rejected Trans column.
4. Click on a link in the Detail Report column to view the Settlement Batch Detail Report.
© Copyright 2012. VeriFone Systems, Inc. All Rights Reserved.
87
© Copyright 2012. VeriFone Systems, Inc. All Rights Reserved.
88
LP Token Summary
Simple Explanation: This report will only be accessible if you are flagged as using Loss
Prevention and are also flagged as a Group Manager. Provides a report of all token usage
within a selectable date range or by reseller/merchant.
1. Point to the word Reports. A menu will appear. Click LP Token Summary.
© Copyright 2012. VeriFone Systems, Inc. All Rights Reserved.
89
2. Select from the following options to generate your Token Summary Report:
Entire Group – Put a check here if you want to view a report on the entire group. This option is
available only if you are flagged as a Group Manager.
Reseller ID – Enter a reseller's ID if you want to view a report on that specific reseller. This
option is available only if you are flagged as a Group Manager.
Merchant ID – Enter a merchant's ID if you want to view a report on that specific merchant.
From Date – Required
To Date – Required
Date Type – Specific the type of date used to generate the report: either Transaction Date
(the date/time as reported by PAYware Connect) or Business Date (the date/time as reported
by the POS/merchant).
Minimum Token Count – (default 1) - The minimum token usage to report on.
Max Rows Returned – Maximum number of rows to include in the report.
© Copyright 2012. VeriFone Systems, Inc. All Rights Reserved.
90
LP Token Export
Simple Explanation: This report will only be accessible if you are flagged as using Loss
Prevention and are also flagged as a Group Manager. Provides a means of gathering export
data by date range.
1. Point to the word Reports. A menu will appear. Click LP Token Export.
2. Specify a From Date and To Date, then click View. PAYware Connect will display a report
containing export data by that date range.
© Copyright 2012. VeriFone Systems, Inc. All Rights Reserved.
91
Invoice Summary
Simple Explanation: This report will only be accessible if you are billed directly by
VeriFone for your merchants' PAYware Connect fees. Provides a detailed historical
summary of all invoices charged to you by VeriFone.
1. Point to the word Reports. A menu will appear. Click Invoice Summary.
2. The Reseller Invoice Summary Report Parameter Selection window will appear. Specify a From
Date and To Date, and then click View. PAYware Connect will display a detailed historical
summary of all invoices charged to you by VeriFone.
© Copyright 2012. VeriFone Systems, Inc. All Rights Reserved.
92
Account Administration
Simple Explanation: The Account Administration features of PAYware Connect can help
you to maintain a secure payment-processing environment. You will still be responsible
for limiting physical access to sensitive material (both printed information and software
documents).
WARNING: This section of the PAYware Connect manual gives instructions on the
administration of the security for your account, your resellers' accounts, and your
merchants' accounts (in the form of passwords, configurable levels of access, etc.). We
highly recommend that you carefully review the information presented in this section.
Consult the section Important Security Notice to learn more about the PCI security
standards program and its requirements (see page 10).
The account administration functions include:
User Management – This section of PAYware Connect allows you to manage the users for your different
accounts. In PAYware Connect, a user is defined as an individual who has been given a configurable
level of access to a PAYware Connect account.
Security – This section of PAYware Connect allows you to create and edit security roles for your users
(the employees of your company). These are the users that are listed when you click Account Admin,
then click User Manager, and then click My Users.
Account Information – This section of PAYware Connect allows you to manage your company's account
information. This includes the address and contact information for your company's account.
OTS Device Maintenance – Do not use. Device Master replaces OTS Device Maintenance.
Device Master – This section allows you to set up and maintain certain information associated with
your OTS Device (including mobile phones running PAYware Mobile). If you do not have an OTS device,
you can ignore this section.
API Merchant Activate – This section is not enabled by default on every Reseller Account. Please
contact your VFI Account Manager for additional details.
Service Type Maintenance – This section of PAYware Connect allows you to edit your default Service
Type Maintenance fees and rates for new merchants (and agents, if applicable).
Processor Default Maintenance -- This section of PAYware Connect allows you to set up defaults for
each of the processors available to your reseller account.
© Copyright 2012. VeriFone Systems, Inc. All Rights Reserved.
93
User Management
Simple Explanation: The User Management section of PAYware Connect allows you to
manage the users for your merchant and agent accounts. In PAYware Connect, a user is
defined as an individual who has been given a configurable level of access to a PAYware
Connect account.
Each PAYware Connect merchant account comes with one administrator-level user by
default—this user has complete access to PAYware Connect. Naturally, you may not want
all users to have full access. The following User Management tools will allow account
administrators to create, edit, deactivate, reactivate, and unlock PAYware Connect users.
PAYware Connect allows for the administration of:
My Users – employees of your company
Reseller Users – the initial administrator of the agent accounts you have created
Merchant Users – the initial administrator of the active merchant accounts you have created
The following instructions refer to the administration of your users (employees of your company).
However, the same instructions apply to all three user types: your users, your agents' administrators,
and your merchants' administrators (though the screens may vary slightly between the user types).
The major difference is that agent administrators and merchant administrators cannot be created
through this window - they can only be maintained. Instructions for creating administrators are given in
the sections Creating An Agent (see page 29) and Creating A Merchant (see page 40).
Note: You cannot create, edit, deactivate, reactivate, or unlock PAYware Connect users
for your agents and merchants. If your agents or your merchants want to create and
manage their own users, then their administrators must generate those users.
WARNING: We highly recommend that all account administrators review all the
administrative functions described below. An example of an account administrator would
be a high-level executive or a trusted senior employee. You must make a business decision
regarding which employee(s) will be the administrator(s) of your account.
Creating a New User
Note: The following instructions explain how to create a new user ID for an employee of
your company. Agent and merchant administrators cannot be created through this
window, but some of the functionality will be the same throughout each user group.
Note: Each of your agents and merchants has the ability to create user IDs for his
employees. However, you are not able to manage these users; you are only able to
manage the initial administrator that you created for each of your agent and merchant
accounts.
1. To create a new PAYware Connect user, point to Account Admin. A menu will appear. Point to
User Manager. Click My Users.
© Copyright 2012. VeriFone Systems, Inc. All Rights Reserved.
94
2. The User Search/Maintenance window will appear. Any existing PAYware Connect users will be
listed in this window, alphabetically ordered by User ID. If you have not yet created a user, there
will be only one user shown in this table: the default Administrator-level user provided to you
when you subscribed to this payment processing service.
3. Click the New button. PAYware Connect will display the Create New User window.
© Copyright 2012. VeriFone Systems, Inc. All Rights Reserved.
95
User ID – Enter the desired user ID for this user (maximum length of eight characters for
Merchant Users). This field is not case-sensitive.
Full Name – Enter the user's full name: first name, then a space, and then the last name. This
field is not case-sensitive.
Password – You may either create your own password, or you can have PAYware Connect
randomly generate a password for you. This field is case-sensitive, so PassWord is different
from PASSWORD.
o If you want PAYware Connect to randomly generate a password for you, click the Generate
button. Next, click the Save button.
o If you want to create your own password, it must meet the following requirements.
Example: JONjon01!
A password must be at least eight characters in length
A password must contain at least three upper case characters
A password must contain at least three lower case characters
A password must contain at least two digits
A password must not contain repeating characters of the same case or numeric value
A password must not contain any group of three sequential characters of the same case
nor any group of three sequential numeric characters
A password must differ from the previous six password submissions
All passwords expire after 90 days, including a 10 day warning period
Note: As you are keying in a new password, the red X’s next to each password policy
requirement listed on the right side of the screen will change to green checks as the
requirements are satisfied. All requirements must have green check marks beside them
before the new password will be accepted.
(Re-Key) Password – Re-enter the password to make sure it is correct.
Role – Select the desired level of access for this user. By default, only the Administrator level
of access is available. If you want a different level of access for this user and it does not yet
exist, just save the user as it is. You can modify the user's Role setting later, after you have
created a new Role (described in the section Creating A Role, see page 105). Note: the Role
that you specify will determine which Level is displayed on the User/Search Maintenance
window (also described in the section Creating A Role).
Agent Console Access Role – Select the desired level of agent console access for this user.
Merchant Console Access Role – Select the desired level of merchant console access for this
user.
4. Click the Save button. PAYware Connect will create the new user, then return to the User
Search/Maintenance window.
© Copyright 2012. VeriFone Systems, Inc. All Rights Reserved.
96
Finding an Existing User
Simple Explanation: You may eventually have so many users that it is difficult to keep
track of them all. To accommodate this scenario, we have developed user search
functionality.
1. To find an existing PAYware Connect user, point to Account Admin. A menu will appear. Point to
User Manager. Choose one of the menu items that appear (My Users, Reseller Users, or Merchant
Users). The User Search/Maintenance window will appear. Any existing PAYware Connect users
will be listed in this window, alphabetically ordered by User.
2. You can find a user by User ID or Full Name.
To find a user by User ID, enter any part of what you think the User ID is into the field labeled
User ID, and then click the Search button.
To find a user by Full Name, enter any part of what you think the Full Name is into the field
labeled Full Name, and then click the Search button.
Example: If you enter JON as your search terms, it would return JONAH WHITE, JONATHAN
TEAGUE, and EDWARD JONES (assuming those users were present in your group of users).
3. PAYware Connect will display any or all users that match your search terms. After finding the
desired user, you can edit the user by following the instructions given in the following section,
Editing A User.
© Copyright 2012. VeriFone Systems, Inc. All Rights Reserved.
97
Editing a User
Note: The following instructions explain how to edit a user ID belonging to an employee of
your company. Agent administrators and merchant administrators cannot be edited from
this window. Those administrators can only be edited from within that agent's account or
that merchant's account.
1. Select the desired PAYware Connect user from the User Manager window. To access the User
Manager window, point to Account Admin. A menu will appear. Point to User Manager. Click My
Users. The User Search/Maintenance window will appear. Any existing PAYware Connect users will
be listed in this window, alphabetically ordered by User. You may sort by any of the columns
shown by clicking the desired column header.
2. Each user is listed in a separate row. To select the user you wish to edit, simply click that user's
row. The row will then turn blue. Next, click the Details button on the left side of the User
Manager window. PAYware Connect will display the Edit User window.
© Copyright 2012. VeriFone Systems, Inc. All Rights Reserved.
98
3. The Edit User window allows you to modify the Full Name and Role for the displayed user. You do
not have to edit every field; you may edit only those fields you wish to modify.
User ID –The User ID is permanent and cannot be edited.
Full Name – Enter the user's full name: first name, then a space, and then the last name. This
field is not case-sensitive.
User Type – The User Type is permanent and cannot be edited. The user's account ID is
displayed below the User Type.
Role – Click the drop-down arrow to the right of this field to display the available user roles.
Select the desired level of access for this user. If you want to view the descriptions for the
available roles first, click Cancel and access the Security Maintenance window (see page 104).
Note: By default, only the Administrator level of access is available. If you want a
different level of access for this user and it does not yet exist, just save the user as it
is. You can modify the user's Role setting later, after you have created a new Role
(described in the section Creating A Role, see page 105).
Agent Console Access Role – Click the drop-down arrow to the right of this field to display the
available agent console access roles.
Merchant Console Access Role - Click the drop-down arrow to the right of this field to display
the available merchant console access roles.
4. After you have made the desired changes to the user, click the Update button. PAYware Connect
will save your changes and return to the User Manager window.
Deactivating a User
Simple Explanation: When a user is no longer needed, PAYware Connect allows you to
deactivate it. Deactivation does not permanently remove a user from PAYware Connect. If
you ever need to reactivate a user, PAYware Connect will allow you to reactivate it.
1. Select the desired PAYware Connect user from the User Manager window. To access the User
Manager window, point to Account Admin. A menu will appear. Point to User Manager. Choose
one of the menu items that appear (My Users, Reseller Users, or Merchant Users).
2. The User Search/Maintenance window will appear. Any existing PAYware Connect users will be
listed in this window, alphabetically ordered by User ID. You may sort by any of the columns shown
by clicking the desired column header.
3. Each user is listed in a separate row. To select the user you wish to deactivate, simply click that
user's row. The row will then turn blue. Next, click the DeActivate button on the left side of the
User Manager window. PAYware Connect will ask you to confirm deactivation.
© Copyright 2012. VeriFone Systems, Inc. All Rights Reserved.
99
4. PAYware Connect will display an "x" in the second column for that user, indicating that this user
was deactivated. You may reactivate a user by following the instructions in the next section,
Reactivating A User.
Reactivating a User
1. Select the desired PAYware Connect user from the User Manager window. To access the User
Manager window, point to Account Admin. A menu will appear. Point to User Manager. Choose
one of the menu items that appear (My Users, Reseller Users, or Merchant Users).
2. The User Search/Maintenance window will appear. Any existing PAYware Connect users will be
listed in this window, alphabetically ordered by User ID. You may sort by any of the columns shown
by clicking the desired column header.
© Copyright 2012. VeriFone Systems, Inc. All Rights Reserved.
100
3. Each user is listed in a separate row. PAYware Connect will display an "x" in the second column of
those users who have been deactivated. Select a user to reactivate by clicking its row. The row will
turn blue. Next, click the Activate button on the left side of the User Manager window.
4. PAYware Connect will remove the "x" from the second column for that user, indicating that this
user has been reactivated.
Unlocking a User
Simple Explanation: If a user has made three unsuccessful attempts (in a row) to enter
his password into the Login Credentials screen, PAYware Connect will lock that account.
Only a user with the appropriate level of access (such as an Administrator) can unlock an
account. You must make a business decision regarding when/if it is appropriate to restore
access to a user.
Note: If one of your merchants' Administrator users has been locked out of his account,
he must either call you or wait thirty minutes for the account to unlock. If he cannot
contact you, he may contact PAYware Connect Technical Support.
If your merchant loses his Administrator password, you must reset it. Passwords are
encrypted and cannot be retrieved—a new password must be generated.
1. Select the desired PAYware Connect user from the User Manager window. To access the User
Manager window, point to Account Admin. A menu will appear. Point to User Manager. Choose
one of the menu items that appear (My Users, Reseller Users, or Merchant Users).
2. The User Search/Maintenance window will appear. Any existing PAYware Connect users will be
listed in this window, alphabetically ordered by User ID. You may sort by any of the columns shown
by clicking the desired column header.
© Copyright 2012. VeriFone Systems, Inc. All Rights Reserved.
101
3. Each user is listed in a separate row. PAYware Connect will display a lock symbol in the first
column for those users who have been locked. To select the user you wish to unlock, simply click
that user's row. The row will then turn blue. Next, click the Unlock button on the left side of the
User Manager window. PAYware Connect will ask you to confirm that you want to unlock the user.
4. PAYware Connect will remove the lock symbol from the first column for that user, indicating that
this user is now unlocked.
Changing a User's Password
1. Select the desired PAYware Connect user from the User Manager window. To access the User
Manager window, point to Account Admin. A menu will appear. Move your mouse pointer over the
words User Manager. Click the group of users that contains the user whose password you wish to
change.
2. The User Search/Maintenance window will appear. Any existing PAYware Connect users will be
listed in this window, alphabetically ordered by User ID. You may sort by any of the columns shown
by clicking the desired column header.
3. To select the user whose password you want to change, simply click that user's row. The row will
then turn blue. Next, click the Pwd button on the left side of the User Manager window.
4. The Change Password window will appear. PAYware Connect will display the selected user's User
ID, Password, and the (Re-Key) Password field.
© Copyright 2012. VeriFone Systems, Inc. All Rights Reserved.
102
User ID –The User ID is permanent and cannot be edited.
Password – You may either create your own password, or you can have PAYware Connect
randomly generate a password for you. This field is case-sensitive, so PassWord is different
from PASSWORD.
o If you want PAYware Connect to randomly generate a password for you, click the Generate
button. Next, click the Save button.
o If you want to create your own password, it must meet the following requirements.
Example: JONjon01!
A password must be at least eight characters in length
A password must contain at least three upper case characters
A password must contain at least three lower case characters
A password must contain at least two digits
A password must not contain repeating characters of the same case or numeric value
A password must not contain any group of three sequential characters of the same case
nor any group of three sequential numeric characters
A password must differ from the previous six password submissions
All passwords expire after 90 days, including a 10 day warning period
Note: As you are keying in a new password, the red X’s next to each password policy
requirement listed on the right side of the screen will change to green checks as the
requirements are satisfied. All requirements must be satisfied before the new password
will be accepted.
(Re-Key) Password– Re-enter the password to make sure it is correct.
5. After you have made the desired changes to the user's password, click the Save button. PAYware
Connect will save your changes and return to the User Manager window.
Note: If a Reseller changes a merchant’s password, the merchant will be able to sign on
to his console, but will not be able to run any transactions or settlements until he resets
his password. This is an added security measure.
© Copyright 2012. VeriFone Systems, Inc. All Rights Reserved.
103
Security Maintenance
Simple Explanation: The Security Maintenance section of PAYware Connect allows you to
create and edit security Roles for your users (the employees of your company). These are
the users that are listed when you click Account Admin, then click User Manager, and
then click My Users. The Security Maintenance section also allows you to create and edit
security roles for Agent Console Access and Merchant Console Access (Agent Jump Roles
and Store Jump Roles).
Note: Each PAYware Connect account comes with one security role by default: the
Administrator. This role cannot be edited or deleted, so it is not shown in this window.
Administrator users have complete access to PAYware Connect. Naturally, you may not
want all of your employees to have this level of access. The following tools will allow you
to create, edit, and deactivate PAYware Connect security roles that are separate from the
Administrator role.
© Copyright 2012. VeriFone Systems, Inc. All Rights Reserved.
104
Creating a Role
1. Point to Account Admin. A menu will appear. Click the word Security. The Security Maintenance
window will appear. Any existing User Roles will display here in alphabetic order.
Filter tabs will display at the top of the menu, allowing you the option to maintain User Roles, Agent
Jump Roles or Store Jump Roles.
The examples below assume the User Roles filter.
2. To create a new PAYware Connect Role, click the New button. PAYware Connect will display the
Create New Role window. Enter a name for the role into the field labeled Role Name. You must
also enter a description for the role into the field labeled Description, as well as a Security Level.
The Security Level determines which users can adjust other users' passwords. If "User A" is a
member of a Role that has a Security Level greater than (or the same as) "User B", then "User A"
can adjust "User B's" password.
Example: John is a member of the Admin Role, and that role has a Security Level of 10. Mark is
also a member of the Admin Role. Sally is a member of the Cashier Role, and that role has a
Security Level of 5. John and Mark can adjust each others' passwords and they can each adjust
Sally's password. However, Sally cannot adjust either John or Mark's password.
© Copyright 2012. VeriFone Systems, Inc. All Rights Reserved.
105
3. Click the Save button. PAYware Connect will create the new Role, and then return to the Security
Maintenance window.
Note: By default, newly created roles have no access to any PAYware Connect features.
Refer to the section Editing An Existing Role to learn how to modify a role's access (see
page 106).
Editing an Existing Role
1. Point to Account Admin. A menu will appear. Click the word Security. The Security Maintenance
window will appear. Any existing PAYware Connect roles (except Administrator) will be listed
here, alphabetically ordered by Role.
2. To select the Role you want to edit, simply click that level's row. The row will then turn blue.
Next, click the Details button on the left side of the Security Maintenance window.
3. PAYware Connect will display the Edit Role window. The selected Role Name will appear, followed
by the role's Description and Security Level (each field can be edited). Below those fields, you will
see a table listing Features. Each row represents a different PAYware Connect feature, and each
row has two checkboxes: one to Allow users to access that feature, and one that limits that
feature to ReadOnly access.
Note: If ReadOnly is checked next to a feature, Allow must also be checked next to that
same feature. This will Allow the user to have ReadOnly access.
© Copyright 2012. VeriFone Systems, Inc. All Rights Reserved.
106
© Copyright 2012. VeriFone Systems, Inc. All Rights Reserved.
107
●
●
●
●
Account Info - Ability to access the Account Information Maintenance screen. Consult the
section Account Information Maintenance (see page 114) for more information. The following
items are accessible from this screen:
o State - Ability to edit the State field.
o Update - Ability to click the Update button, to update any changes made.
o Billing Email - Ability to edit the Billing Email field.
o Billing Name - Ability to edit the Billing Name field.
o Address - Ability to edit the Address field.
o Address 2 - Ability to edit the Address 2 field.
o City - Ability to edit the City field
o Fax - Ability to edit the Fax field.
o Company Name - Ability to edit the Company Name field.
o Phone - Ability to edit the Phone field.
o Zip - Ability to edit the Zip field.
o Contact Email - Ability to edit the Contact Email field.
o Contact Name - Ability to edit the Contact Name field.
Agent Summary Report - Ability to access the Agent Summary Report screen. This report will
display a summary of all of your agent reseller’s merchant accounts. Consult the section Agent
Summary (see page 73) for more information.
API Merchant Activate - Ability to access the API Merchant Activation screen. Please contact
your VFI Account Manager for additional details regarding enabling this feature. Consult the
section API Merchant Activate (see page 116) for more information.
Commission History Report - Ability to access the Reseller Commission History Report
Parameter Selection screen. This report will display the reseller commission history for a given
© Copyright 2012. VeriFone Systems, Inc. All Rights Reserved.
108
●
●
●
●
●
●
●
●
●
●
●
●
●
date range. This report will list all console users set up for the Reseller ID created for your
Corporate Portal. Consult the section Commission History (see page 77) for more information.
Console Users Report - Ability to access the Console Users Report screen. This report will list
all console users set up for the Reseller ID created for your Corporate Portal. Consult the
section Console Users (see page 76) for more information.
Device Master - Ability to access the Device Master screen. This allows you to set up POS
devices (including mobile phones that can run PAYware Mobile). Consult the sections SoftPay
Connect (see page 174) and Error! Reference source not found. (see page Error! Bookmark not
defined.) for more information.
Edit Role - Ability to access the Edit Role screen. Consult the section Editing an Existing Role
(see page 106) for more information.
Edit User - Ability to access the Edit User screen. Consult the section Editing a User (see page
98) for more information.
Estimate Commission Report - Ability to access the Current Estimated Commission screen.
This report will list the rates and fees incurred by each of your merchants. Consult the section
Current Estimated Commission (see page 79) for more information.
Invoice Summary Report - Ability to access the Reseller Invoice Summary Report Parameter
Selection screen. This report will only be accessible if you are billed directly by VeriFone for
your merchants' PAYware Connect fees. Provides a detailed historical summary of all invoices
charged to you by VeriFone. Consult the section Invoice Summary (see page 92) for more
information.
Merchant Activation Email - Ability to access the Merchant Activation Email Additional
Information screen. This feature allows you to edit the information that will be appended to
the Merchant Activation Email that PAYware Connect sends out for all new merchant setups.
Consult the section Merchant Activation Email (see page 115) for more information.
Merchant Activity Summary Report - Ability to access the Merchant Activity Report
Parameter Selection screen. This report will only be accessible if you are billed directly by
VeriFone for your merchants' PAYware Connect fees. Provides a historical summary of all your
merchants' PAYware Connect transaction activity, along with other details related to their
accounts. Consult the section Merchant Activity Summary (see page 66) for more information.
Merchant Console Access - Ability to access the Merchant Console Access screen. This feature
will allow you to directly access your merchants' accounts through a temporary login (unless a
merchant has blocked your access to their account). This feature will only be accessible if you
are billed directly by VeriFone for your merchants' PAYware Connect fees. Consult the section
Merchant Console Access (see page 124) for more information.
Merchant Console Access Report - Ability to access the Merchant Activity Report Parameter
Selection screen. This report will only be accessible if you are billed directly by VeriFone for
your merchants' PAYware Connect fees. This report will list all of your PAYware Connect
reseller users who have accessed merchants' accounts via the Merchant Console Access
feature within a specific date range. Consult the section Merchant Console Access Report (see
page 66) for more information.
Merchant Edit - Ability to edit an existing merchant's account. Consult the section Editing A
Merchant's Account (see page 51) for more information.
Merchant New - Ability to create new merchants. Consult the section Creating A Merchant
(see page 40) for more information.
Merchant Search - Ability to access the Merchant Search/Maintenance screen. Consult the
section Searching For A Merchant's Account (see page 48) for more information. The following
items are accessible from this screen:
o Activate Merchant - Ability to activate an existing merchant's account that has been
deactivated. Consult the section Reactivating A Merchant's Account (see page 53) for
more information.
o Delete Merchant - Ability to deactivate an existing merchant's account. Consult the section
Deactivating A Merchant's Account (see page 53) for more information.
o Merchant Details - Ability to edit an existing merchant's account. Consult the section
Editing A Merchant's Account (see page 51) for more information. Same as Merchant Edit.
© Copyright 2012. VeriFone Systems, Inc. All Rights Reserved.
109
New Merchant - Ability to create new merchants. Consult the section Creating A Merchant
(see page 40) for more information. Same as Merchant New.
o New Site - Ability to create new PAYware Connect sites. Consult the section Creating A
New Site (see page 48) for more information.
o New Terminal - Disregard, no longer implemented.
Merchant Service Type - Disregard, no longer implemented.
Merchant Summary Report - Ability to access the Merchant Summary Report screen. Consult
the section Merchant Summary (see page 58) for more information.
Merchant Usage Report - Disregard, no longer implemented.
Merchant Users – Ability to access the Merchant Users screen under Account Admin/User
Manager.
New Merchant Setup Report - Ability to access the New Merchant Setup Report Parameter
Selection Screen. Consult the section New Merchant Setups (see page 69) for more
information.
New Role - Ability to access the New Role screen. Consult the section Creating A New Role
(see page 105) for more information.
New User - Ability to access the New User screen. Consult the section Creating A New User
(see page 94) for more information.
OTS Device Maintenance - Ability to access the OTS Device Maintenance screen. This tool
allows you to set up and maintain certain information associated with your OTS Device. Consult
the section Device Maintenance (see page 174) for more information.
Processor Default Maintenance - Ability to access the Processor Default Maintenance screen.
This feature will allow you to set up defaults for each of the processors available to your
reselle raccount. Consult the section Processor Default Maintenance (see page 120) for more
information.
Program/Plan Maintenance - Ability to access the Program/Plan Maintenance screen. This
feature will allow you to offer merchants access to private label card programs. Consult the
section CITI Program/Plan Maintenance (see page 127)for more information.
Reseller Activity Report - Disregard, no longer implemented.
Reseller Edit - Ability to edit an existing reseller's account. Consult the section Editing an
Agent's Account (see page 36) for more information. Same as Reseller Details.
Reseller New - Ability to create a new reseller's account. Consult the section Creating an
Agent's Account (see page 29) for more information. Same as New Reseller.
Reseller Search - Ability to access the Reseller Search/Maintenance screen. Consult the
section Creating An Agent (see page 29) for more information. The following items are
accessible from this screen:
o Activate Reseller - Ability to activate an existing reseller's account that has been
deactivated. Consult the section Activating an Agent's Account (see page 38) for more
information.
o Delete Reseller - Ability to deactivate an existing reseller's account. Consult the section
Deactivating an Agent's Account (see page 37) for more information.
o Reseller Details - Ability to edit an existing reseller's account. Consult the section Editing
an Agent's Account (see page 36) for more information. Same as Reseller Edit.
o New Reseller - Ability to create a new reseller's account. Consult the section Creating an
Agent's Account (see page 29) for more information. Same as New Reseller.
Reseller ServiceType - Ability to access the Reseller Service Type Parameter Selection
screen. This report will provide a list of the service bundles set up for your account or your
agent’s account (if applicable). Consult the section Reseller Service Types (see page 67) for
more information.
Reseller Summary Report - Disregard, no longer implemented.
Reseller Users – Ability to access the Reseller Users screen under Account Admin/User
Manager.
Security - Ability to access the Security Maintenance screen. Consult the section Security
Maintenance (see page 104) for more information. The following items are accessible from this
screen:
o
●
●
●
●
●
●
●
●
●
●
●
●
●
●
●
●
●
●
© Copyright 2012. VeriFone Systems, Inc. All Rights Reserved.
110
Activate Role - Ability to activate an existing role that has been deactivated. Consult the
section Reactivating A Role (see page 112) for more information.
o Delete Role - Ability to deactivate an existing role. Consult the section Deactivating A
Role (see page 112) for more information.
o Role Details - Ability to access the Edit Role screen. Consult the section Editing An
Existing Role (see page 106) for more information. Same as Edit Role.
o New Role - Ability to access the Create New Role screen. Consult the section A Creating A
Role (see page 105) for more information.
Service Exception Report - Ability to access the Service Level Exception Report Parameter
Selection screen. This report will list all accounts exceeding their monthly minimum
transactions for the time period specified. Consult the section Service Level Exceptions (see
page 71) for more information.
Service Type Report - Ability to access the Reseller Service Type Parameter Selection
screen. This report will provide a list of the service bundles set up for your account or your
agent’s account (if applicable). Consult the section Reseller Service Types (see page 67) for
more information.
Settlement Summary Report - Ability to access the Merchant Settlement Summary Report
Parameter Selection screen. This report will list all settlements performed through your
merchants' accounts within a specific date range. Consult the section Settlement Summary
(see page 87) for more information.
Unsettled Merchants Report – Ability to access the Unsettled Merchants Report . This report
will list all merchants who have not settled their batches prior to a specified cutoff date/time.
Consult the section Unsettled Merchants (see page 81) for more information.
User Manager - Ability to access the My Users Search/Maintenance, Reseller Users, and
Merchant Users screens. Consult the section User Management (see page 94) for more
information. The following items are accessible from this screen:
o Activate User - Ability to activate an existing user that has been deactivated. Consult the
section Reactivating A User (see page 100) for more information.
o Delete User - Ability to deactivate an existing user. Consult the section Deactivating A
User (see page 99) for more information.
o User Details - Ability to access the Edit User screen. Consult the section Editing A User
(see page 98) for more information. Same as Edit User.
o New User - Ability to access the New User screen. Consult the section Creating A New
User (see page 94) for more information.
o Reset Password - Ability to access the Change Password screen. Consult the section
Changing A User's Password (see page 102) for more information.
o Unlock User - Ability to unlock a locked user's account. Consult the section Unlocking A
User (see page 101) for more information.
VSP100 – Device Encryption Summary – Ability to access the VSP100 Device Encryption
Summary Report. Consult the section VSP100 Device Encryption Summary (see page 82) for
more information.
VSP200 – Transaction Encryption Exceptions – Ability to access the VSP200 Transaction
Encryption Exceptions Report. Consult the section VSP200 Transaction Encryption
Exceptions (see page 84) for more information.
o
●
●
●
●
●
●
●
4. Some features expand into sub-features. To grant access to a sub-feature, you must first put a
check in the Allow column of that sub-feature's "main" feature to allow access to that page. You
may then specify Allow or Allow/ReadOnly access for each sub-feature under the main feature.
Note: ReadOnly access to a main feature will override the options selected for a subfeature. For example: if Allow and ReadOnly are both checked for a main feature, all
sub-features will be accessible as ReadOnly (regardless of what is checked next to each
sub-feature).
© Copyright 2012. VeriFone Systems, Inc. All Rights Reserved.
111
5. After you have made any desired changes, click the Update button. PAYware Connect will save
your changes and return to the Security Maintenance window. Click the Cancel button to return to
the Security Maintenance window without saving your changes.
Deactivating a Role
1. Point to Account Admin. A menu will appear. Click the word Security. The Security Maintenance
window will appear. Any existing PAYware Connect roles (except Administrator) will be listed
here, alphabetically ordered by Role.
2. To select the Role you want to deactivate, simply click that level's row. The row will then turn
blue. Next, click the Deactivate button on the left side of the Security Maintenance window.
PAYware Connect will ask you to confirm deactivation.
3. PAYware Connect will display an "x" in the leftmost column for that Role, indicating that this Role
was deactivated. You may reactivate a Role by following the instructions in the next section,
Reactivating A Role (see page 112).
Reactivating a Role
1. Point to Account Admin. A menu will appear. Click the word Security. The Security Maintenance
window will appear. Any existing PAYware Connect Roles (except Administrator) will be listed
here, alphabetically ordered by Role.
© Copyright 2012. VeriFone Systems, Inc. All Rights Reserved.
112
2. To select the Role you want to reactivate, simply click that level's row. The row will then turn
blue. Next, click the Activate button on the left side of the Security Maintenance window.
3. PAYware Connect will remove the "x" from the leftmost column for that user, indicating that this
user was reactivated.
© Copyright 2012. VeriFone Systems, Inc. All Rights Reserved.
113
Account Information Maintenance
Simple Explanation: The Account Information Maintenance section of PAYware Connect
allows you to administer your company's account information. This includes the address,
contact, and helpdesk information for your account.
Editing Your Account Information
1. Point to Account Admin. A menu will appear. Click Account Info. The Account Information
Maintenance window will appear.
© Copyright 2012. VeriFone Systems, Inc. All Rights Reserved.
114
Notes:
In Contact Information: Check the Send Copy Merchant Activation Email box to be CC:d
on merchant setup emails. You must enter a New Merchant Setup Email address to use
this feature.
In Merchant Options: Check the Allow Payment Information Maintenance box to allow
merchants to set up or update the credit card/ACH information associated with their
account—the one billed for access to PAYware Connect. Check the Adjust Settlement
Time Zone box to adjust settlement time to your merchant’s local time zone.
Note: VeriFone’s host based processor certifications do not allow for the initiation of
settlement from PAYware Connect. PAYware Connect will default every host based
processing account to auto close @ 11:59:59 PM. The merchant must have auto close
set up with the processor to settle the batch daily. Once this is set up, the merchant must
find out what time the batch will be closed each day and set the auto close time
accordingly.
2. After you have made the desired changes to your account information, click the Update button.
PAYware Connect will save your changes.
Merchant Activation Email
Note: This feature allows you to edit the information that will be appended to the
Merchant Activation Email that PAYware Connect sends out for all new merchant setups.
1. Point to Account Admin. A menu will appear. Click Merchant Activation Email. The Merchant
Activation Email Additional Information window will appear.
2. Enter the information that you wish to have included in the Merchant Activation Email. Click the
Save button when you are done.
© Copyright 2012. VeriFone Systems, Inc. All Rights Reserved.
115
API Merchant Activate
Note: This feature is not enabled by default on every Reseller Account. Please contact
your VFI Account Manager for additional details regarding enabling this feature.
1. Point to Account Admin. A menu will appear. Click API Merchant Activate. The API Merchant
Activation window will appear.
2. Type the Merchant ID or Merchant Name you wish to activate and click Search. (You may choose
to enter a partial Merchant ID or Merchant Name.) Select the merchant from the drop-down list
that appears. The merchant’s name and address will appear. When Cancel is clicked the form is
reset and a new search can be performed.
© Copyright 2012. VeriFone Systems, Inc. All Rights Reserved.
116
3. Select the name of the application you wish to activate from the Application: drop-down list.
4. Click to select Web Console Activated to activate the account to use the web terminal and/or
click to select Merchant Activated to activate the account to process transactions via integration,
and then click Update.
5. If the activation was successful, you will receive a message stating that “Account xxxxxx
activated”. To display when an account was activated and by whom, navigate back to the API
Merchant Activation screen and search on the merchant ID. The activation user and activation
date/time will be displayed.
© Copyright 2012. VeriFone Systems, Inc. All Rights Reserved.
117
Service Type Maintenance
1. Point to Account Admin. A menu will appear. Click Service Type Maint. The Edit My Service
Types window will appear.
2. This window displays the processors, services, and pricing tiers that are currently available to you
for resale to your merchants or agents. Each Processor ID can have multiple Services (service
types), and each Service has at least one Tier (pricing level) associated with it.
Note: This window allows you to edit your default Service Type Maintenance fees and
rates for new merchants (and agents, if applicable). Consult the section Setting an
Agent’s Rates (see page 33) to learn how to edit the rates and fees for a particular
agent’s services.
Processor ID – A Processor ID is the PAYware Connect abbreviation for the processing company
displayed in the Processor Name column. Consult the section Processor-Specific Information
for specific information about each of the payment processing companies available to you
through PAYware Connect (see page 137).
Service Type – A Service Type is a connectivity method used to access PAYware Connect.
Available service types are as follows:
o
o
Software Development Kit (SDK) a.k.a. API/Payment Server – This service type allows a
merchant to programmatically interface with PAYware Connect (using the PAYware
Connect API) in order to process transactions.
Web Terminal – This service type allows a merchant to use the standard PAYware Connect
Virtual Terminal interface to process transactions.
© Copyright 2012. VeriFone Systems, Inc. All Rights Reserved.
118
o
On the Spot – This service type allows PAYware Connect to communicate with a handheld
VeriFone wireless or GPRS terminal. Please refer to your contract for service types and
descriptions.
Each Service Type has the following fields associated with it:
o
o
o
o
o
o
Buy Mnth – The Buy monthly fee is the monthly service fee that VeriFone charges to the
reseller.
Buy Setup – The Buy Setup is a setup fee that VeriFone charges to the reseller.
Mnth Min – (for use by resellers only, n/a to agents) – The Mnth Min fee for each Service
Type is the base monthly fee that you will charge each of your agents (per account) to
access this service. This field is only applicable if you are a reseller that VeriFone bills
directly.
Setup – (for use by resellers only, n/a to agents) – The Setup Charge for each Service Type
is a one-time fee that you will charge each of your agents (per account) to access PAYware
Connect. This field is only applicable if you are a Reseller that VeriFone bills directly.
Merch Mnth – The Merch Mnth for each Service Type is the base monthly fee that you will
charge each of your merchants (per account).
Merch Setup – The Merch Setup is a one-time fee that you will charge each of your
merchants to access each PAYware Connect service.
Each Service Type has at least one Tier associated with it:
o
3.
Tier – Each Tier is a "pricing level" with its own per-transaction rate.
‐ Min Tran – Minimum number of transactions allowed for this tier.
‐ Max Tran – Maximum number of transactions allowed for this tier.
‐ Buy Rate – If your agent’s merchant or your merchant exceeds the number of
transactions included per-month with his account, the Buy Rate is the per-transaction
cost that you pay to VeriFone (or your PAYware Connect reseller). Please note that this
is in addition to whatever per-merchant account fee you pay monthly to VeriFone (or
your PAYware Connect reseller).
‐ Sell Rate – (for use by resellers only, n/a to agents) – If the total per-month number of
transactions processed by an agent's merchant is between the Min Tran and Max Tran
values, then the agent will pay his reseller the Sell Rate per-transaction for the
number of transactions in excess of those included (in addition to his Monthly fee).
Example: An agent has 3000 "free" transactions included per month to pass on to each
of his merchants. If the number of transactions processed by one of his merchants
exceeds that number by 100, then the agent must pay his reseller the Sell Rate pertransaction for those 100 transactions in addition to his Monthly fee.
‐ Merch Rate – If the total per-month number of transactions processed by your
merchant is between the Min Tran and Max Tran values, then the merchant will pay
you the Merch Rate per-transaction for the number of transactions in excess of those
included (in addition to his Monthly fee).
PAYware Connect allows you to edit some of the values found in this window. To edit any of the
following values, click that field's value. Type in the desired value for that field:
Mnth Min, Setup, Merch Mnth, Merch Setup, Sell Rate, Merch Rate
4. After you have made the desired changes, click the Update button. PAYware Connect will save
your changes.
© Copyright 2012. VeriFone Systems, Inc. All Rights Reserved.
119
Processor Default Maintenance
Note: This feature will allow you to set up defaults for each of the processors available to
your reseller account. If there are items that will remain the same for all of your
merchant setups, it might be helpful to have that data default in the processor setup
screen when setting up the new merchant.
1. Point to Account Admin. A menu will appear. Click Processor Default Maintenance. The
Processor Default Maintenance window will appear.
2. Click to select the processor you wish to work with.
3. A screen similar to the following will appear.
© Copyright 2012. VeriFone Systems, Inc. All Rights Reserved.
120
4. Input the fields you wish to be the same for all of your merchant setups (e.g., AVS, CVV2, Duplicate
check levels, etc.) Once satisfied with the defaults you have created, click Save As Defaults. Once
the defaults are set, a green dot will appear under the Has Defaults column of that processors’ row
on the Processor Default Maintenance screen.
5. In the future, if you wish not to have defaults for a given processor, select that processor on the
Processor Default Maintenance screen, and then click Delete Defaults on the processor’s setup
screen. The green dot will disappear from the Has Defaults column of that processor’s row on the
Processor Default Maintenance screen.
© Copyright 2012. VeriFone Systems, Inc. All Rights Reserved.
121
Agent Console Access
Note: This feature will allow you to directly access your agents' accounts through a
temporary login.
1. Point to Account Admin. A menu will appear. Click Agent Console Access.
2. The Agent Console Access window will appear. Type an Agent ID/Company Name for search
criteria (or leave blank to view all agents) and then click Search.
3. PAYware Connect will list the agents meeting the search criteria.
4. Once you've located your desired agent ID, click its row to highlight it. Then¸ click the Login
button to temporarily access that agent's account. You must have an Agent Console Access Role
assigned to your User ID to access.
© Copyright 2012. VeriFone Systems, Inc. All Rights Reserved.
122
5. Click the Click to Proceed button to display the selected agent console (Corporate Portal).
© Copyright 2012. VeriFone Systems, Inc. All Rights Reserved.
123
Merchant Console Access
Note: This feature will allow you to directly access your merchants' accounts through a
temporary login (unless a merchant has blocked your access to their account). This
feature will only be accessible if you are billed directly by VeriFone for your merchants'
PAYware Connect fees.
1. Point to Account Admin. A menu will appear. Click Merchant Console Access.
2. The Merchant Console Access window will appear. Type the Merchant ID or Merchant Name
(partial entry ok) and click Search. PAYware Connect will list merchants fitting the criteria.
© Copyright 2012. VeriFone Systems, Inc. All Rights Reserved.
124
3. Once you've located your desired merchant ID, click its row to highlight it. Then¸ click the Login
button to temporarily access that merchant's account. You must have a Merchant Console Access
Role assigned to your User ID to access.
4. Click the Click to Proceed button to display the selected merchant console (Store Portal).
© Copyright 2012. VeriFone Systems, Inc. All Rights Reserved.
125
Corporate API Key Management
Note: This option will only be accessible if you are flagged as using Loss Prevention, are
flagged as a Group Manager, and are also the Default Admin user for the active account.
This function allows for the maintenance of API keys used with the Loss Prevention
integration API.
1. Point to Account Admin. A menu will appear. Click Corporate API Key Management. The
Corporate API Key Management window will appear.
2. The value next to API Key: is the value that you should use for Loss Prevention API Integration.
Click the Generate button to generate a new API key.
3. If any changes are made to this window (including Generating a new key or modifying the Enabled
flag), Save and Cancel buttons will appear:
Click the Save button to update the record and move the previous API key into the history
table.
Click the Cancel button to revert to the existing data (no r modifications will be saved).
© Copyright 2012. VeriFone Systems, Inc. All Rights Reserved.
126
CITI Program/Plan Maintenance
Simple Explanation: PAYware Connect allows you to offer your merchants access to CITI's
Private Label card program. CITI's program gives merchants the tools they need to
encourage customer retention/loyalty while providing customizable consumer financing.
Contact CITI for more specific details on how you can offer this program to your
merchants.
1. Point to Account Admin. A menu will appear. Click CITI Program/Plan Maint. The CITI Program
Maintenance window will appear.
2. By default, each of the Program Names will display completely expanded (all Credit Plan
information visible.
3. PAYware Connect allows for the administration of:
New Program – create a new CITI financial program with the logo/graphic of your choice and a
customizable receipt.
New Plan – create new credit plan under the selected CITI program.
Edit – edit an existing CITI financial program or credit plan.
Delete – delete an existing CITI credit plan.
Copy – edit an existing CITI financial program or credit plan (also allows you to modify the
details of the new program or plan).
Manage BINs – allows you to edit the BIN ranges for the credit plans of all existing CITI financial
programs.
© Copyright 2012. VeriFone Systems, Inc. All Rights Reserved.
127
Creating a New Program
Note: The following instructions explain how to create a new CITI financial program. After
creating a financial program, you will need to create the credit plans associated with that
program.
1. Point to Account Admin. A menu will appear. Click CITI Program/Plan Maint. The CITI Program
Maintenance window will appear.
2. Click the New Program button. The New Program window will appear. You may now enter the
data for your new program.
●
●
●
●
●
●
●
●
●
●
Program Name - This can be anything you like.
Partner ID - This data is four characters long and will be provided to you by CITI.
Default Auto Batch Time (2400) – This value will override the settlement time specified for
this Client ID when a new merchant is created.
CITI Call Center Phone # - This value will be reflected in the Pending/Reference screen during
credit application submission.
CITI Helpdesk Phone # - This value will appear in CITI support information.
Logo - Select from the available logos, or contact PAYware Connect Technical Support to see
about uploading a new logo to PAYware Connect.
Print Rate Slip – Check this box to print an automated RSS receipt upon credit application
approval.
Purchase APR - This value will be reflected in the credit application approval response.
Purchase DPR - This value will be reflected in the credit application approval response.
Cash APR - This value will be reflected in the credit application approval response.
© Copyright 2012. VeriFone Systems, Inc. All Rights Reserved.
128
●
●
●
●
●
Cash DPR - This value will be reflected in the credit application approval response.
Default Return Credit Plan – This value overrides the original credit plan number for credit
return transactions.
Create Date/User - This field displays the date and time that the program was created (using
the time zone of user who created it).
Last Maint Date/User - This field displays the date and time that the program was last updated
(using the time zone of user who created it).
Program Receipt - Use the text box to create a receipt that will be issued to your merchants'
customers when they sign up for any of this program's credit plans. The tools provided are
standard text editing tools, and you can hold your mouse cursor over each for a description of
that tool. Additionally, you may use Email Tags to have PAYware Connect automatically insert
data specific to that customer.
Whatever is specified in the Instant Credit section will be used for the new merchant creation.
Without this information, a new merchant cannot do instant credit:
●
●
●
●
Credit Unit Number – CITI assigned credit unit number
Source Code – CITI assigned client source code
Application Source Code – CITI assigned application source code
Counter Offer Indicator – This value will determine the counter offer response during credit
application submission. Valid values: ONLINE, OFFLINE, or NOT_SUPPORTED.
© Copyright 2012. VeriFone Systems, Inc. All Rights Reserved.
129
3. Once you have finished creating your CITI financial program, click the Save button to update the
record and return to the CITI Program Maintenance window. Or, click the Cancel button to
abandon the record without saving.
© Copyright 2012. VeriFone Systems, Inc. All Rights Reserved.
130
Creating a New Plan
Note: The following instructions explain how to create a new CITI credit plan. At least one
CITI financial program must exist before a credit plan can be created.
1. Point to Account Admin. A menu will appear. Click CITI Program/Plan Maint. The CITI Program
Maintenance window will appear.
2. Click an existing CITI financial program, and its line will become highlighted. Next, click the New
Plan button. The New Plan window will appear. You may now enter the data for your new
program.
●
●
●
●
●
●
Program Name - This will display the CITI financial plan associated with this CITI credit plan.
Credit Plan - Enter a number that will be used to help identify this credit plan. For example,
you could enter 12 to represent a "twelve month no interest" credit plan.
Description - You can use this area to provide a more detailed description of the credit plan.
For example: "12 month no interest, monthly payments required".
Minimum Purchase Amount - Enter the minimum purchase amount required for a merchant's
customer to be allowed to participate in this credit plan.
Receipt Legal Disclosure Variable - Enter the legal disclosure that you want to be associated
with any variable-rate interest payment arrangements associated with this credit plan.
Additionally, you can use tags to include this legal disclosure on the Program Receipt that is
issued to your merchants' customers when sign up for any of this program's credit plans. Refer
to the section Creating a New Program (see page 128) for more information.
Receipt Legal Disclosure Fixed - Enter the legal disclosure that you want to be associated with
any fixed-rate interest payment arrangements associated with this credit plan. Additionally,
© Copyright 2012. VeriFone Systems, Inc. All Rights Reserved.
131
●
●
●
●
you can use tags to include this legal disclosure on the Program Receipt that is issued to your
merchants' customers when sign up for any of this program's credit plans. Refer to the section
(see page 128) for more information.
Start Date - This is the date that the credit plan will become active and available to your
merchants. Enter a date in MM/DD/YYYY format or select it using the calendar tool to the right
of the text box.
End Date - This is the date that the credit plan will become inactive and no longer available to
your merchants. Enter a date in MM/DD/YYYY format or select it using the calendar tool to the
right of the text box.
Suspend - Put a check next to this box if you want to temporarily suspend this credit plan.
Credit plans can be suspended at any time in between the Start Date and End Date.
Default Plan - Put a check next to this box if you want this credit plan to appear by default in
the PAYware Connect Store Portal (AKA Merchant Console) when a merchant is set up to use
this CITI financial program and accesses the Private Label screen. Other credit plans (if
created) will also be accessible via a drop-down box.
3. Once you have finished creating your CITI credit plan, click the Save button to update the record
and return to the CITI Program Maintenance window. Or, click the Cancel button to abandon the
record without saving.
Edit an Existing Program or Plan
Note: The following instructions explain how to edit an existing CITI financial program or
credit plan. At least one CITI financial program or credit plan must exist before one can
be edited.
1. Point to Account Admin. A menu will appear. Click CITI Program/Plan Maint. The CITI Program
Maintenance window will appear.
2. Click an existing CITI financial program or credit plan, and its line will become highlighted. Next,
click the Edit button. The Edit Program or Edit Plan window will appear (depending on which you
highlighted). You may now edit the data for your program/plan.
3. The fields accessible through these windows are the same as the fields accessible through the New
Program and New Plan windows. Consult the sections Creating a New Program and Creating a New
Plan for more information on these fields.
4. Once you have finished editing your CITI program/plan, click the Save button to update the record
and return to the CITI Program Maintenance window. Or, click the Cancel button to abandon the
record without saving.
© Copyright 2012. VeriFone Systems, Inc. All Rights Reserved.
132
Delete an Existing Program or Plan
Note: The following instructions explain how to delete an existing CITI financial program
or credit plan. At least one CITI financial program or credit plan must exist before one can
be deleted.
1. Point to Account Admin. A menu will appear. Click CITI Program/Plan Maint. The CITI Program
Maintenance window will appear.
2. Click an existing CITI credit plan or financial program, and its line will become highlighted. Next,
click the Delete button. PAYware Connect will ask you to confirm that you want to delete the
credit plan or financial program.
Copy an Existing Program or Plan
Note: The following instructions explain how to copy an existing CITI financial program or
credit plan. At least one CITI financial program or credit plan must exist before one can
be copied.
1. Point to Account Admin. A menu will appear. Click CITI Program/Plan Maint. The CITI Program
Maintenance window will appear.
2. Click an existing CITI financial program or credit plan, and its line will become highlighted. Next,
click the Copy button. The Copy Program or Copy Plan window will appear (depending on which
you highlighted). You may now edit the data for your program/plan. You can keep all existing data
for the copy, except for Program Name for a copied financial program and Credit Plan for a copied
credit plan. Those fields must be unique for each program/plan.
3. The fields accessible through these windows are the same as the fields accessible through the New
Program and New Plan windows. Consult the sections Creating a New Program and Creating a
New Plan for more information on these fields (see pages 128 and 131).
4. Once you have finished editing your CITI program/plan, click the Save button to copy the record
and return to the CITI Program Maintenance window. Or, click the Cancel button to abandon the
record without saving.
© Copyright 2012. VeriFone Systems, Inc. All Rights Reserved.
133
CITI BIN (Bank Identification Number) Management
Note: The following instructions explain how to view and/or edit the BIN ranges for an
existing CITI financial program. At least one CITI financial program must exist before a BIN
can be created/managed.
1. Point to Account Admin. A menu will appear. Click CITI Program/Plan Maint. The CITI Program
Maintenance window will appear.
2. Click the Manage BINs button. You'll remain at the CITI Program Maintenance window, but now
the BIN ranges for all existing credit plans will be shown (instead of the standard CITI Program
Maintenance window).
3. The following sections explain how to manage your BIN range data.
Creating a New BIN Range
1. Point to Account Admin. A menu will appear. Click CITI Program/Plan Maint. The CITI Program
Maintenance window will appear. Click the Manage BINs button and you'll see any existing BIN
data for all currently available financial programs.
2. Click an existing CITI financial program, and its line will become highlighted. Next, click the New
BIN button. The New BIN window will appear. You may now enter the data for your new BIN range.
© Copyright 2012. VeriFone Systems, Inc. All Rights Reserved.
134
●
●
●
●
●
●
Program Name - This will display the CITI financial plan associated with this CITI credit plan.
Description - You can use this area to provide a more detailed description of the BIN range.
Minimum BIN - Enter the minimum BIN (Bank Identification Number) in this BIN range. This
information will be provided to you by CITI or your merchant account provider.
Maximum BIN - Enter the maximum BIN (Bank Identification Number) in this BIN range. This
information will be provided to you by CITI or your merchant account provider.
Amount Length - This is the length of the card/account number associated with this BIN range.
This information will be provided to you by CITI or your merchant account provider.
Validation Type - Select None, Mod 10, or Mod 10A. This information will be provided to you
by CITI or your merchant account provider.
3. Once you have finished editing your BIN range, click the Save button to copy the record and return
to the CITI Program Maintenance window. Or, click the Cancel button to abandon the record
without saving.
Edit an Existing BIN Range
1. Point to Account Admin. A menu will appear. Click CITI Program/Plan Maint. The CITI Program
Maintenance window will appear.
2. Click an existing BIN range and its line will become highlighted. Next, click the Edit button. The
Edit BIN window will appear. You may now edit the data for your BIN range.
3. The fields accessible through this window are the same as the fields accessible through the New
BIN window. Consult the section Creating a New BIN Range for more information on these fields
(see page 134).
4. Once you have finished editing your BIN range, click the Save button to update the record and
return to the CITI Program Maintenance window. Or, click the Cancel button to abandon the
record without saving.
Delete an Existing Program or Plan
1. Point to Account Admin. A menu will appear. Click CITI Program/Plan Maint. The CITI Program
Maintenance window will appear.
2. Click an existing BIN range and its line will become highlighted. Next, click the Delete button.
PAYware Connect will ask you to confirm that you want to delete the BIN range.
© Copyright 2012. VeriFone Systems, Inc. All Rights Reserved.
135
Copy an Existing Program or Plan
1. Point to Account Admin. A menu will appear. Click CITI Program/Plan Maint. The CITI Program
Maintenance window will appear.
2. Click an existing BIN range and its line will become highlighted. Next, click the Copy button. The
Copy BIN window will appear. You may now edit the data for your BIN range. You can keep all
existing data for the copy, except for Description. That field must be unique for each BIN range.
3. The fields accessible through this window are the same as the fields accessible through the New
BIN window. Consult the section Creating a New BIN Range for more information on these fields
(see page 134).
4. Once you have finished editing your BIN range, click the Save button to copy the record and return
to the CITI Program Maintenance window. Or, click the Cancel button to abandon the record
without saving.
© Copyright 2012. VeriFone Systems, Inc. All Rights Reserved.
136
Processor-Specific Information
Simple Explanation: Each payment processing company has its own account information
requirements. That information must be entered into PAYware Connect in order for a
processing company to identify a merchant's account.
The following sections describe the information required by specific payment processors.
You can usually obtain a merchant's payment processing account information from his
credit card processing company, vendor, or merchant service provider.
The payment-specific information screen will appear during step two (of three) during the New
Merchant Setup process (see page 40). The values for Merchant ID and the Company Name cannot be
modified.
Note: Unless specified as optional, all setup information for each processing company
should be considered as required in order for the merchant's account to be fully set up.
All setup information should be available from the merchant's payment processing
company or service provider.
Loyalty Partner Setup
Simple Explanation: PAYware Connect allows you to offer your merchants access to
Loyalty Partners for rewards processing. The Loyalty Partners section will be displayed at
the top of the processor setup window if you are configured to offer loyalty partners.
Notes:
DRM must be enabled to configure vPromos rewards.
A Cash Only processor setup is available for the Groupon loyalty partner.
The loyalty partner must be configured in merchant setup for reward processing to occur. Check the
Enabled box beside the loyalty partner you wish to configure, and then enter the Merchant ID.
© Copyright 2012. VeriFone Systems, Inc. All Rights Reserved.
137
First Data Atlanta (Buypass) Setup
Merchant ID – (up to 12 digits) – This is the merchant number supplied by First Data.
Industry Type – Specify the business type that First Data has assigned to this merchant's account:
(Direct or Retail or Restaurant).
Partial Authorization – Select partial authorization level from the drop-down list.
0 – No Partial Auth, No Request Balances
1 – Partial Auth
5 – No Partial Auth, Request Balance
Service Level – Select service level from the drop-down list.
Full Serve
Self Serve
Mini Serve
Maxi Serve
Other/Fuel Not Present
Hardware Version – (up to 4 characters) – This is the hardware version currently installed.
Software Version – (up to 8 characters) – This is the software version currently installed.
© Copyright 2012. VeriFone Systems, Inc. All Rights Reserved.
138
Firmware Version – (up to 8 characters) – This is the firmware version currently installed.
Terminal Number – (3 digits)
Time Zone – (3 digits) – This is the time zone code associated with this account (Eastern = 705, Central
= 706, Mountain = 707, Pacific = 708, Arizona = 107, Alaska = 709, Hawaii = 110). Verify this information
with First Data.
Auto Settlement Correction – (up to 2 digits) – This is an optional field. This integer indicates how
many auto-settle correction attempts will occur. Set to 0 to disable. The default value for this field is
3.
Commercial Card Level – Use this drop-down box to indicate the commercial card level that the
merchant will accept.
0 = Disable commercial card processing
2 = Enable level II commercial card processing
Capability Code – Use this drop-down box to specify the ability of the POS terminal or cash register
used.
Unspecified
PIN entry capability
No PIN entry capability
PIN Pad inoperative
RFID capability
Transaction Character Indicator – Use this drop-down box to indicate if this merchant is an
eCommerce business and, if it is, whether it is SSL or non-SSL.
Enable Gift – (check box) – Check this box to enable gift. (Not implemented)
Enable Debit – (check box) – Check this box to enable debit.
© Copyright 2012. VeriFone Systems, Inc. All Rights Reserved.
139
ECHO Setup
Merchant Number – (up to 12 digits) – This is the merchant number supplied by ECHO.
Merchant PIN – (up to 8 digits)
ISP Number – Not implemented at this time.
ISP PIN – Not implemented at this time.
Order Type – Select Self Service or Hosted.
Time Zone – (3 digits) – This is the time zone code associated with this account (Eastern = 705, Central
= 706, Mountain = 707, Pacific = 708, Arizona = 107, Alaska = 709, Hawaii = 110). Verify this information
with ECHO.
Transaction Character Indicator – Use this drop-down box to indicate if this merchant is an
eCommerce business.
Enable Debit – (check box) – Check this box to enable debit.
Enable Check – (check box) – Check this box to enable checks.
© Copyright 2012. VeriFone Systems, Inc. All Rights Reserved.
140
EVO Setup
Terminal Number – (up to 15 digits) – Terminal Number.
Terminal ID – (up to 16 digits) – Optional.
Industry Type – Specify the business type that EVO has assigned to this account [Retail (card present)
or Direct (card not present) or Restaurant]. Only Retail is implemented at this time.
Transaction Character Indicator – Use this drop-down box to indicate if this merchant is an
eCommerce business.
01 = Mail Order
02 = Telephone Order
05 = Ecommerce. Not implemented.
07 = Ecommerce. Not implemented.
Time Zone – (3 digits) – This is the time zone code associated with this account (Eastern = 705, Central
= 706, Mountain = 707, Pacific = 708, Arizona = 107, Alaska = 709, Hawaii = 110). Verify this information
with Givex.
Enable Gift – (check box) -- Check to enable gift. Not implemented.
Enable Check – (check box) – Check to enable checks. Not implemented.
Enable Debit – (check box) -- Check to enable debit.
Enable EBT – (check box) – Check to enable EBT. Not implemented.
© Copyright 2012. VeriFone Systems, Inc. All Rights Reserved.
141
Fifth Third St. Pete Setup
Bank ID – (4 digits) – This is the acquiring bank identification number supplied by bank/processor.
Device ID – Not implemented at this time.
EDC Code – (1 character) – Select H (Host) or T (Terminal)
Merchant Num – (12 digits) – This is the merchant number supplied by First Data.
Terminal Class – Use this drop-down box to specify terminal class.
0=Unspecified (default)
1=Limited amount terminal
2=Unattended (ATM)
3=Unattended (automated dispensing/self service) – CAT transactions
4=Electronic Cash Register (ECR)
7=Telephone device (dial terminal)
Industry Type – Specify the business type that First Data has assigned to this merchant's account:
(Direct or Retail or Restaurant).
© Copyright 2012. VeriFone Systems, Inc. All Rights Reserved.
142
Partial Auth – (check box) – Check this box to indicate support for POS partial authorizations (credit
and debit).
Commercial Card Level – (1 digit) – Use this code to indicate the commercial card level that the
merchant will accept.
0 = Disable commercial card processing
2 = Enable level II commercial card processing
Terminal ID – (3 digits) – This is the terminal ID and it defaults to 001.
Time Zone – (3 digits) – This is the time zone code associated with this account (Eastern = 705, Central
= 706, Mountain = 707, Pacific = 708, Arizona = 107, Alaska = 709, Hawaii = 110). Verify this information
with First Data.
Device Type – Not implemented at this time.
0 = Unknown
C = Personal Computer
E = Electronic Cash Register
Capability Code – Use this drop-down box to specify the ability of the POS terminal or cash register
used.
0 = Unspecified
1 = Limited amount terminal
2 = Unattended (ATM)
3 = Unattended automatic dispensing/self service
4 = ECR
7 = Telephone device
Capability Code 2 – Use this drop-down box to specify the ability of the POS terminal or cash register
used.
0 = Unknown
1 = Terminal cannot read encoded data
2 = Full track read capable
3 = Bar code read capable
4 = OCR read capable
5 = Chip-capable terminal
9 = Altered
Transaction Character Indicator – Use this drop-down box to indicate if this merchant is an
eCommerce business.
0 = Customer present
1 = Customer not present, SAF transaction
2 = Customer not present (mail order and recurring)
5 = Secure Electronic commerce transaction
6 = Non-authenticated security transaction with SET
7 = Non-authenticated security transaction without SET
8 = Non-SSL transactions, will send the eCommerce indicator flag
Enable Debit – (check box) -- Check to enable debit.
Enable Check – (check box) – Check to enable checks.
© Copyright 2012. VeriFone Systems, Inc. All Rights Reserved.
143
First Data Nashville ISO Setup
Merchant Category Code – (4 digits) – This is the merchant type code provided by First Data or the
merchant service provider.
Nashville MID – (15 digits) – This is the merchant number assigned by First Data.
Nashville TID – (8 digits) – This is the terminal number provided by First Data or the merchant service
provider.
Processor Merchant Number – (max 12 digits) – This is the Processor Merchant Number.
Service Entitlement Number – (max 15 digits) – This is the Service Entitlement Number.
Service Phone Number – (10 digits) – This is the Customer Service Phone Number.
CAT Level Indicator – Use this drop-down box to indicate Customer Activated Terminal level.
0 = Not a CAT Trans
1 = Automated Dispensing Machine
2 = Self-Service Terminal
3 = Limited Amount Terminal
4 = In-flight Commerce
6 = Electronic Commerce
© Copyright 2012. VeriFone Systems, Inc. All Rights Reserved.
144
7 = Transponder Transaction
Check Processor – Use this drop-down box to select check processor.
Certegy
Telecheck
ICS
Industry Type – Specify the business type that First Data has assigned to this account [Retail (card
present) or Direct (card not present) or Restaurant].
POS Type – Use this drop-down box to specify the POS type.
0 = Unspecified
1 = Limited Amount Terminal
2 = Unattended Terminal (ATM)
3 = Unattended Terminal (Self Service)
4 = Electronic Cash Register
7 = PAYware Mobile
Capability Code – Use this drop-down box to specify the ability of the POS terminal or cash register
used.
0 = Unknown
1 = Terminal not used
2 = Mag stripe read capability
5 = Integrated circuit card read capability
6 = Contactless chip read
7 = Contactless mag stripe read
9 = Terminal does not read card data
Transaction Character Indicator – Use this drop-down box to indicate if this merchant is an
eCommerce business.
No Ecommerce
Visa-approved auth
Visa-approved auth cardholder
SSL-auth
Non SSL
Time Zone – (3 digits) – This is the time zone code associated with this account (Eastern = 705, Central
= 706, Mountain = 707, Pacific = 708, Arizona = 107, Alaska = 709, Hawaii = 110). Verify this information
with First Data.
Enable Gift – (check box) -- Check to enable gift.
If gift is enabled, another check box will appear that allows you to select a gift card processor. Once a
processor is selected, additional fields required for that gift processor’s setup appear.
Enable Check – (check box) -- Check to enable checks.
Enable Debit - (check box) – Check to enable debit.
Enable EBT – (check box) – Not implemented.
© Copyright 2012. VeriFone Systems, Inc. All Rights Reserved.
145
First Data North Setup
Merchant Number – (12 digits) – This is the merchant number assigned by CardNet.
Industry Type – Specify the business type that CardNet has assigned to this account [Retail (card
present) or Direct (card not present) or Restaurant].
Merchant Tax ID – (15 digits) – This is the tax identification number assigned by the merchant's bank.
MCC/SIC – (4 digits) – This is the merchant type code provided by CardNet or the merchant service
provider.
Terminal Number – (6 digits) – This is the terminal number provided by CardNet or the merchant
service provider. Same number as Terminal ID.
Terminal ID – (6 digits) – This is the terminal ID provided by CardNet or the merchant service provider.
Same number as Terminal Number.
Time Zone – (3 digits) – This is the time zone code associated with this account (Eastern = 705, Central
= 706, Mountain = 707, Pacific = 708, Arizona = 107, Alaska = 709, Hawaii = 110). Verify this information
with CardNet.
Commercial Card Level – Use this drop-down box to indicate the commercial card level that the
merchant will accept.
0 = Disable commercial card processing
2 = Enable level II commercial card processing
© Copyright 2012. VeriFone Systems, Inc. All Rights Reserved.
146
Capability Code – Use this drop-down box to specify the ability of the POS terminal or cash register
used.
0 = Unknown
1 = Terminal can accept PIN (retail and debit)
2 = Terminal cannot accept PIN
Transaction Character Indicator – Use this drop-down box to indicate if this merchant is an
eCommerce business.
Enable Gift – (check box) -- Check to enable gift.
If gift is enabled, another check box will appear that allows you to select a gift card processor. Once a
processor is selected, additional fields required for that gift processor’s setup appear.
Enable Debit – (check box) -- Check to enable debit.
Enable Check - (check box) – Check to enable checks.
© Copyright 2012. VeriFone Systems, Inc. All Rights Reserved.
147
First Data Omaha Setup
Merchant Number – (up to 19 digits) – This is the merchant number assigned by First Data.
ETC Type – (1 alphanumeric character) – This value must be B for Credit and Debit close functionality.
Curr Credit Item Num – (use default) – This value is used to track credit transactions in a batch. (It
starts at 1 and will wrap from 999 back to 1.)
Curr Debit Item Num –(use default) – This value is used to track debit item numbers in a batch. (It
starts at 1 and will wrap from 999 back to 1.)
Industry Type – Specify the business type that First Data has assigned to this account [Retail (card
present) or Direct (card not present) or Restaurant].
Device ID – (4 alphanumeric characters) – This is the site location value as provided by First Data.
Terminal Number – (up to 4 alphanumeric) – This is the terminal number assigned by First Data.
Terminal ID – (5 alphanumeric characters) – This identification code is assigned by First Data. The fifth
byte must be a decimal point. Example: AB12.
© Copyright 2012. VeriFone Systems, Inc. All Rights Reserved.
148
Time Zone - (3 digits) – This is the time zone code associated with this account (Eastern = 705, Central
= 706, Mountain = 707, Pacific = 708, Arizona = 107, Alaska = 709, Hawaii = 110). Verify this information
with First Data.
Commercial Card Level – Use this drop-down box to indicate the commercial card level that the
merchant will accept.
0 = Disable commercial card processing
2 = Enable level II commercial card processing
Capability Code – Use this drop-down box to specify the ability of the POS terminal or cash register
used.
0 = Unknown
1 = Terminal can accept PIN
2 = Terminal cannot accept PIN
Transaction Character Indicator – Use this drop-down box to indicate if this merchant is an
eCommerce business.
Enable Debit – (check box) – Check this box to enable debit.
Enable Gift – (check box) – Check this box to enable gift.
If gift is enabled, another check box will appear that allows you to select a gift card processor. Once a
processor is selected, additional fields required for that gift processor’s setup appear.
Enable Check – (check box) – Check this box to enable checks.
© Copyright 2012. VeriFone Systems, Inc. All Rights Reserved.
149
GETI Setup
Merchant Num – VeriFoneCert
Terminal ID – (up to 6 digits)
Time Zone – (3 digits) – This is the time zone code associated with this account (Eastern = 705, Central
= 706, Mountain = 707, Pacific = 708, Arizona = 107, Alaska = 709, Hawaii = 110). Verify this information
with GETI.
© Copyright 2012. VeriFone Systems, Inc. All Rights Reserved.
150
Givex Setup
Merchant Num – (up to 32 digits) – This is known as the User ID assigned by Givex.
Industry Type – Specify the business type that Givex has assigned to this account [Retail (card present)
or Direct (card not present) or Restaurant.
Time Zone – (3 digits) – This is the time zone code associated with this account (Eastern = 705, Central
= 706, Mountain = 707, Pacific = 708, Arizona = 107, Alaska = 709, Hawaii = 110). Verify this information
with Givex.
© Copyright 2012. VeriFone Systems, Inc. All Rights Reserved.
151
Global Payments East (NDC) Setup
Note: Additional terminals cannot be used with this payment processing company.
Merchant Number – (up to 15 digits) – This is the merchant number assigned by Global East (NDC).
Contents of this field MUST match the Terminal Number field.
Industry Type – Specify the business type that Global East (NDC) has assigned to this account [Retail
(card present) or Direct (card not present) or Restaurant].
Application ID – Use this drop-down box for information needed for authorization. Select Retail or
Direct/MOTO or Restaurant.
Bank ID – (6 digits) – This is the identification number of the acquiring bank (the bank that is hosting
the merchant's bank account). This information can be obtained from the acquiring bank.
Terminal Number – (up to 15 digits) – This is the terminal number assigned by Global East (NDC).
Contents of this field MUST match the Merchant Number field.
© Copyright 2012. VeriFone Systems, Inc. All Rights Reserved.
152
Terminal Type – (3 alphanumeric characters) – This identification code is assigned by Global East
(NDC). Example: GN2
System Information – (8 alphanumeric characters – automatically filled in) – Example: IPC 1.0
Device Type – Use this drop-down box to specify the type of device that will be used by this merchant.
C = Computer
0 (zero) = No terminal or unknown
1 = On premises, attended
2 = On premises, not attended
3 = Off premises, attended
4 = Off premises, not attended
Time Zone – This is the time zone code associated with this account (Eastern = 705, Central = 706,
Mountain = 707, Pacific = 708, Arizona = 107, Alaska = 709, Hawaii = 110, Hong Kong = 008). Verify this
information with Global East (NDC).
Commercial Card Level – Use this drop-down box to indicate the commercial card level that the
merchant will accept.
0 = Disable commercial card processing
2 = Enable level II commercial card processing
Capability Code – Use this drop-down box to specify the ability of the POS terminal or cash register
used.
0 = No electronic authentication code
1 = PIN
Transaction Character Indicator – Use this drop-down box to indicate if this merchant is an
eCommerce business. If this field is set to 7 or 8, then the Industry Type field must be set to Direct.
7 = For SSL transactions, will send the eCommerce indicator flag.
8 = For non-SSL transactions, will send the eCommerce indicator flag.
blank = Will not send the eCommerce indicator flag.
Enable Debit – (check box) – Check this box to enable debit.
Enable Gift – (check box) – Check this box to enable gift.
If gift is enabled, another check box will appear that allows you to select a gift card processor. Once a
processor is selected, additional fields required for that gift processor’s setup appear.
Pinless Debit – (check box) – Not implemented.
© Copyright 2012. VeriFone Systems, Inc. All Rights Reserved.
153
Elavon (Nova) Setup
Bank BIN Number – (6 digits) – This is the Bank BIN number. This information can be obtained from
Elavon.
Industry Type – Specify the business type that Elavon has assigned to this account [Retail (card
present) or Direct (card not present) or Restaurant].
Process Type – Select Host or Terminal.
Version ID – (1 or 2 characters) – Use CV unless otherwise specified by Elavon. CV must be uppercase.
Partial Authorization – (check box) – Check this box to enable FSA/HRA partial authorization.
Pinless Debit -- (check box) – Check this box to enable Pinless debit.
INTERAC Debit – (check box) – Not yet implemented.
Electronic Check Indicator – (check box) Check this box to enable electronic checks.
DCC Capable – (check box) – Not implemented.
© Copyright 2012. VeriFone Systems, Inc. All Rights Reserved.
154
MICR Capable – (check box) Check this box if MICR capable.
Terminal Number – (up to 16 characters) -- This is the terminal number assigned by Elavon.
Time Zone – (3 digits) – This is the time zone code associated with this account (Eastern = 705, Central
= 706, Mountain = 707, Pacific = 708, Arizona = 107, Alaska = 709, Hawaii = 110). Verify this information
with Elavon.
Auto Settlement Correction – (up to 2 digits) – This is an optional field. This integer indicates how
many auto-settle correction attempts will occur. Set to 0 to disable. The default value for this field is
3.
Commercial Card Level – Use this drop-down box to specify the commercial card level used.
0 = Disable commercial card processing
2 = Enable level II commercial card processing
Capability Code -- Use this drop-down box to specify the device type used. Select 3rd Party Vendor.
Transaction Character Indicator
eCommerce business.
– Use this drop-down box to indicate if this merchant is an
Enable Gift – (check box) – Check this box to enable gift.
If gift is enabled, another check box will appear that allows you to select a gift card processor. Once a
processor is selected, additional fields required for that gift processor’s setup appear.
Enable Check – (check box) – Check this box to enable checks.
Enable Debit – (check box) – Check this box to enable debit.
© Copyright 2012. VeriFone Systems, Inc. All Rights Reserved.
155
Chase Paymentech Tampa Setup
Client Number – (4 digits) – This is the client number assigned by Chase Paymentech.
PNS Number – (12 digits) – This is the merchant number assigned by Chase Paymentech.
Industry Type – Specify the business type that Chase Paymentech has assigned to this account [Retail
(card present) or Direct (card not present) or Restaurant].
Commercial Card Level – Use this drop-down box to specify the commercial card level that the
merchant will accept.
0 = Disable commercial card processing
2 = Enable level II commercial card processing
Terminal Number – (3 digits) – This is the division number assigned by Chase Paymentech.
Terminal ID – (3 digits) – This is the terminal number assigned by Chase Paymentech.
Time Zone – (3 digits) – This is the time zone code associated with this account (Eastern = 705, Central
= 706, Mountain = 707, Pacific = 708, Arizona = 107, Alaska = 709, Hawaii = 110). Verify this information
with Chase Paymentech.
Device Type – Use this drop-down box to specify the type of device that will be used by this merchant.
Always set to C.
0 = Unknown
C = Personal computer
© Copyright 2012. VeriFone Systems, Inc. All Rights Reserved.
156
E = Electronic cash register (ECR)
Capability Code – Use this drop-down box to specify POS terminal or Register.
0 = POS Terminal
1 = Register
Transaction Character Indicator – Use this drop-down box to indicate if this merchant is an
eCommerce business. If this field is set to 7 or 8, then the Industry Type field must be set to Direct.
7 = For SSL transactions, will send the eCommerce indicator flag.
8 = For non-SSL transactions, will send the eCommerce indicator flag.
No eCommerce = Will not send the eCommerce indicator flag.
Enable Debit – Check this box to accept debit cards.
Enable Gift – Check this box to accept gift cards.
If gift is enabled, another check box will appear that allows you to select a gift card processor. Once a
processor is selected, additional fields required for that gift processor’s setup appear.
Enable Check – Check this box to accept checks.
Enable EBT – Not implemented.
© Copyright 2012. VeriFone Systems, Inc. All Rights Reserved.
157
ProPay Setup
Merchant ID – (x digits) – This is the merchant ID assigned by ProPay.
Terminal Number – (x digits) – This is the terminal number assigned by ProPay.
Time Zone – (3 digits) – This is the time zone code associated with this account (Eastern = 705, Central
= 706, Mountain = 707, Pacific = 708, Arizona = 107, Alaska = 709, Hawaii = 110).
Auto Settlement Correction – (up to 2 digits) – This is an optional field. This integer indicates how
many auto-settle correction attempts will occur. Set to 0 to disable. The default value for this field is
3.
Commercial Card Level – Use this drop-down box to specify the commercial card level that the
merchant will accept.
0 = Disable commercial card processing
2 = Enable level II commercial card processing
Capability Code – Use this drop-down box to specify the ability of the POS terminal or contact-less
device used.
Unspecified
PIN entry capability
No PIN entry capability
PIN pad inoperative
RFID capability
Transaction Character Indicator – Use this drop-down box to indicate if this merchant is an
eCommerce business.
7 = For SSL transactions, will send the eCommerce indicator flag.
8 = For non-SSL transactions, will send the eCommerce indicator flag.
No eCommerce = Will not send the eCommerce indicator flag.
© Copyright 2012. VeriFone Systems, Inc. All Rights Reserved.
158
Enable Gift – (check box) – Check this box to enable gift.
If gift is enabled, another check box will appear that allows you to select a gift card processor. Once a
processor is selected, additional fields required for that gift processor’s setup appear.
Enable Check – (check box) – Check this box to enable checks.
Enable Debit – (check box) – Check this box to enable debit.
© Copyright 2012. VeriFone Systems, Inc. All Rights Reserved.
159
WorldPay Setup
Check Digit – (1 digit) – This is the check digit assigned by WorldPay.
Hardware Type – (automatically filled in) – This is the hardware type.
Software Version – (automatically filled in) – This is the software version currently installed.
Firmware Version – (automatically filled in) – This is the firmware version currently installed.
Capture Type – Use this drop-down box to select H-Host or T-Terminal. Only H-Host is implemented at
this time.
Merchant Num – (up to 20 alphanumeric characters) – This is the merchant number assigned by
WorldPay.
Industry Type – Specify the business type that WorldPay has assigned to this account [Retail (card
present) or Direct (card not present) or Restaurant].
Commercial Card Level – Use this drop-down box to specify the commercial card level that the
merchant will accept.
0 = Disable commercial card processing
© Copyright 2012. VeriFone Systems, Inc. All Rights Reserved.
160
2 = Enable level II commercial card processing
Terminal Num – (6 digits) – This is the terminal number assigned by WorldPay.
Terminal ID – (up to 2 alphanumeric characters) – Optional. Use this number if you wish to use the
same terminal number across multiple terminals.
Time Zone – (3 digits) – This is the time zone code associated with this account (Eastern = 705, Central
= 706, Mountain = 707, Pacific = 708, Arizona = 107, Alaska = 709, Hawaii = 110). Verify this information
with WorldPay.
Device Type – Use this drop-down box to specify the type of device that will be used by this merchant.
0 = Unknown
C = Personal computer
E = Electronic cash register (ECR)
Capability Code – Use this drop-down box to specify the ability of the POS terminal or contact-less
device used.
0 = Unspecified
1 = Limited Amount Terminal
2 = Unattended (ATM)
3 = Unattended (automated dispensing)
4 = Electronic Cash Register (ECR)
7 = Telephone Device
Transaction Character Indicator – Use this drop-down box to indicate if this merchant is an
eCommerce business.
0 = Customer Present
1 = Customer not present (SAF trans)
2 = Customer not present (mail order and recurring)
5 = Secure Electronic Commerce Transaction
6 = Non-Authenticated security transaction with SET
7 = Non-Authenticated security transaction without SET
8 = non-SSL Transaction will send the eCommerce flag
Enable Debit – Check this box to enable debit.
Enable Gift – Check this box to accept gift cards.
If gift is enabled, another check box will appear that allows you to select a gift card processor. Once a
processor is selected, additional fields required for that gift processor’s setup appear.
Enable Check – Check this box to enable checks.
© Copyright 2012. VeriFone Systems, Inc. All Rights Reserved.
161
SVS Setup
Merchant Number – (6 digits) – This is the merchant number assigned by SVS.
Division Number – (Max 5 digits) – This is the division number as determined by the merchant.
Store Number – (Max 10 digits) – This is the store number assigned by SVS.
Terminal Number – Verify this information with SVS.
Time Zone – (3 digits) – This is the time zone code associated with this account (Eastern = 705, Central
= 706, Mountain = 707, Pacific = 708, Arizona = 107, Alaska = 709, Hawaii = 110). Verify this information
with SVS.
Commercial Card Level – Use this drop-down box to specify the commercial card level that the
merchant will accept.
0 = Disable commercial card processing
2 = Enable level II commercial card processing
Transaction Character Indicator – Use this drop-down box to indicate if this merchant is an
eCommerce business.
No Ecommerce
eCommerce SSL
eCommerce non SSL
Enable Debit – (check box) – Check this box to enable debit.
© Copyright 2012. VeriFone Systems, Inc. All Rights Reserved.
162
TSYS Setup
© Copyright 2012. VeriFone Systems, Inc. All Rights Reserved.
163
Acquirer Bin – (6 digits) – This is the identification number of the acquiring bank (the bank that is
hosting the merchant's bank account). This information can be obtained from the acquiring bank.
Merchant Number – (12 digits) – This is the merchant number assigned by TSYS.
Agent Bank – (6 digits) – This is the agent number supplied by the merchant's bank.
Agent Chain – (6 digits) – This is the chain number supplied by the merchant's bank.
ZIP Code – (5 digits) – This is the zip code/location code.
MCC/SIC – (4 digits) – This is the merchant's category code (also known as SIC or MCC) assigned by TSYS.
Store Number – (4 digits) – This is the store number assigned by TYS.
Industry Type – Specify the business type that TSYS has assigned to this account [Retail (card present)
or Direct (card not present) or Restaurant].
Debit Bin – (6 digits) – BIN number for use with debit-related transactions. This is same as Acquirer Bin.
Leave blank if not accepting debit.
Auto Settlement Correction – (up to 2 digits) – This is an optional field. This integer indicates how
many auto-settle correction attempts will occur. Set to 0 to disable. The default value for this field is
3.
Commercial Card Level – Use this drop-down box to specify the commercial card level that the
merchant will accept.
0 = Disable commercial card processing
2 = Enable level II commercial card processing
Terminal Number – (4 digits) – This is the terminal number assigned by TSYS.
Terminal ID/V Number – (8 digits) – This is the old Terminal, Service, or V number. It is sometimes
necessary to append a 7 to the front of a V number to make it 8 digits long.
Time Zone – (3 digits) – This is the time zone code associated with this account (Eastern = 705, Central
= 706, Mountain = 707, Pacific = 708, Arizona = 107, Alaska = 709, Hawaii = 110). Verify this information
with TSYS.
© Copyright 2012. VeriFone Systems, Inc. All Rights Reserved.
164
Device Type – Use this drop-down box to specify the type of device that will be used by this merchant.
0 = Unknown
C = Personal computer
E = Electronic cash register (ECR)
Capability Code – Use this drop-down box to specify the ability of the POS terminal or cash register
used.
0 = POS Terminal = The device is capable of being used as a POS terminal.
1 = Register = The device is capable of being used as a cash register.
Transaction Character Indicator – Use this drop-down box to indicate if this merchant is an
eCommerce business. If this field is set to 7 or 8, then the Industry Type field must be set to Direct.
7 = For SSL transactions, will send the eCommerce indicator flag.
8 = For non-SSL transactions, will send the eCommerce indicator flag.
blank = Will not send the eCommerce indicator flag.
Enable Debit – (check box) – Check this box to enable debit.
Enable Gift – (check box) – Check this box to enable gift cards.
Enable Check – (check box) – Check this box to enable checks.
Debit-related fields:
Merchant ABA Number – (9 digits or blank) – This is the ABA # which identifies the merchant to the
direct debit switch.
Merchant Settlement Agent Num – (4 digits or blank) – This is the merchant settlement agent number,
it is usually blank.
Reimbursement Fee (Reimburse Attr) – This is the reimbursement fee applicable to a transaction
(usually blank).
Sharing Group -- (up to 30 alphanumeric characters or blank) -- A listing of direct debit and EBT
networks that a POS device can access. Leave blank if not supplied by bank.
Gift-related fields:
Gift Agent Bank – (6 digits) – This is the gift agent number supplied by the merchant's bank.
Gift Agent Chain – (6 digits) – This is the gift agent chain number supplied by the merchant's bank.
Gift Merchant ABA Number – (9 digits) – This is the gift merchant ABA number assigned by TSYS.
Gift Merchant Settlement Agent – (4 digits) – This is the gift merchant settlement agent number
assigned by TSYS.
Gift Reimburse Attribute – (1 digit)
Gift Issuer – (10 characters)
Gift Partial Auth – (1 digit)
Gift Recv Inst ID – (6 digit) – This is the receiving institution ID.
© Copyright 2012. VeriFone Systems, Inc. All Rights Reserved.
165
BAMS Settlement related fields:
Settle via BAMS – (check box) – Check this box to settle via BAMS.
Settle ID – (max 23 characters) – This represents the merchant number/terminal ID when settling via
BAMS. Must start with ‘F.’
Settle Merchant Category – (4 digits) – This is the settlement merchant category.
© Copyright 2012. VeriFone Systems, Inc. All Rights Reserved.
166
ValueLink (SVDOT) Setup
Merchant Number – (11 digits) – This is the merchant number assigned by First Data.
Store Number – (11 characters) – This is the store number assigned by First Data.
Trans Group ID – (up to 6 characters)
Merchant Key – (up to 4 characters)
Multi Trans IND – (1 character) – Y or N
MCC/SIC Code – (4 digits) – This is the SIC Code determined by the merchant.
Time Zone – (3 digits) – This is the time zone code associated with this account (Eastern = 705, Central
= 706, Mountain = 707, Pacific = 708, Arizona = 107, Alaska = 709, Hawaii = 110). Verify this information
with First Data.
Terminal ID – (4 digits) – This is the Terminal ID.
© Copyright 2012. VeriFone Systems, Inc. All Rights Reserved.
167
Valutec Setup
Merchant Num – (10 digits) – This is the merchant number assigned by Valutec.
Terminal ID – (15 characters) – This is the terminal ID assigned by Valutec.
Terminal Num – (15 characters) – This is the terminal ID assigned by Valutec.
Industry Type – Specify the business type that Valutec has assigned to this account [Retail (card
present) or Restaurant].
Time Zone – (3 digits) – This is the time zone code associated with this account (Eastern = 705, Central
= 706, Mountain = 707, Pacific = 708, Arizona = 107, Alaska = 709, Hawaii = 110). Verify this information
with First Data.
© Copyright 2012. VeriFone Systems, Inc. All Rights Reserved.
168
Fraud Protection
Simple Explanation: Some payment processing companies allow for the configuration of
certain fraud prevention options. Depending on which payment processing company the
merchant has selected, some of the following options may or may not be available.
The various fraud prevention configuration options will appear during step two (of three) during the
New Merchant Setup process (see page 40). These options will appear underneath the processorspecific information described in the section Processor-Specific Information (see page 137).
AVS Acceptance Level
Simple Explanation: If you put a check next to an AVS response, PAYware Connect will
allow a transaction to be processed if the transaction returns that AVS response.
Note: If necessary, you may put a check next to multiple options.
WARNING: These settings only apply to merchants who process MOTO and eCommerce Pre
Auth transactions. These settings do not apply to Sale transactions for any company type.
You can always refer to PAYware Connect transaction results to view the Response Text
for that transaction (which includes the AVS response). You can still make a business
decision on whether you want to manually Void the transaction.
All response values accepted – This filter instructs the system to allow transactions that return
any AVS response. As long as the authorization request is accepted (the card is good and the
© Copyright 2012. VeriFone Systems, Inc. All Rights Reserved.
169
purchase amount is available), then the transaction will be accepted regardless of the AVS result
codes.
Non-response accepted – This filter instructs the system to allow transactions even if no AVS
response is returned.
Service not supported – This filter instructs the system to allow transactions that return this
response. In some instances, AVS is not supported. For example, Canada is a country that does not
support AVS; therefore, the AVS response would indicate that AVS is not supported.
Not a mail/phone order – Instructs the system to allow transactions when the issuer system
responds that the transaction is not a MOTO (mail order/telephone order) transaction and is
therefore ineligible for AVS check.
Issuer system unavailable – Instructs the system to allow transactions when the issuer system is
not available to make a comparison.
Address unavailable – Instructs the system to allow transactions when the AVS system is
unavailable for verification.
No address or zip match – Instructs the system to allow transactions that fail address and zip code
matches.
5-digit zip match only – Instructs the system to allow transactions that return a 5-digit zip code
match (but not an address match).
9-digit zip match only – Instructs the system to allow transactions that return a 9-digit zip code
match (but not an address match).
Address match only – Instructs the system to allow transactions that return an address match (but
not a zip code match). (If Discover with Paymentech, address and 5-digit zip match.)
Exact match, 5-digit zip – Instructs the system to allow transactions that return an exact 5-digit
zip code match. (If Discover with Paymentech, address only match.)
Exact match, 9-digit zip – Instructs the system to allow transactions that return an exact 9-digit
zip code match.
© Copyright 2012. VeriFone Systems, Inc. All Rights Reserved.
170
CVV2 Acceptance Level
Simple Explanation: If you put a check next to a CVV2 response, PAYware Connect will
allow a transaction to be processed if the transaction returns that CVV2 response.
Note: If necessary, you may put a check next to multiple options.
WARNING: These settings only apply to merchants who process MOTO and eCommerce Pre
Auth transactions. These settings do not apply to Sale transactions for any company type.
You can always refer to I PAYware Connect transaction results to view the Response Text
for that transaction (which includes the AVS response). You can still make a business
decision on whether you want to manually Void the transaction.
All response values accepted – This filter instructs the system to allow transactions that return
any CVV2 response. As long as the authorization request is accepted (the card is good and has the
purchase amount available), then the transaction will be accepted regardless of the CVV2 result
codes.
Non-response accepted – This filter instructs the system to allow transactions even if no CVV2
response is returned.
Issuer not certified / not provided encryption keys – Issuer has not certified for CVV2 or Issuer has
not provided Visa with the CVV2 encryption keys
Merchant indicated CVV2 not present on card – Issuer indicates that CVV2 data should be present
on the card, but the merchant has indicated data is not present on the card.
Not processed – Issuer did not process CVV2 check.
CVV2 No Match – Issuer indicates that CVV2 data on record does not match CVV2 data provided by
merchant.
CVV2 Match – Issuer indicates that CVV2 data on record matches CVV2 data provided by merchant.
© Copyright 2012. VeriFone Systems, Inc. All Rights Reserved.
171
Duplicate Check Level
Simple Explanation: If duplicate checking is enabled, PAYware Connect will automatically
decline a transaction request if a duplicate transaction already exists in the open batch.
In PAYware Connect, a duplicate transaction is a transaction that was processed using the
same payment media (credit card, debit card, etc.) for the same dollar amount and cents
amount within the same batch of transactions.
Note: This feature helps to prevent a single transaction from accidentally being submitted
multiple times. We recommend that you enable this feature unless you predict that you
will frequently need to process duplicate transactions (same dollar amount, same card
number, etc.).
Duplicate Checking Disabled – Put a check next to this option to completely disable this feature. If
this option is checked, PAYware Connect will attempt to process any duplicate transaction
requests.
CREDIT Account Number – Put a check next to this option if you want PAYware Connect to decline
a transaction request if the same credit card account number is already present in the open batch.
CREDIT Amount – Put a check next to this option if you want PAYware Connect to decline a
transaction request if the same credit card amount is already present in the open batch.
CREDIT Invoice – Put a check next to this option if you want PAYware Connect to decline a
transaction request if the same credit card invoice number is already present in the open batch.
© Copyright 2012. VeriFone Systems, Inc. All Rights Reserved.
172
DEBIT Account Number – Put a check next to this option if you want PAYware Connect to decline a
transaction request if the same debit card account number is already present in the open batch.
Integrated and On the Spot customers only.
DEBIT Amount – Put a check next to this option if you want PAYware Connect to decline a
transaction request if the same debit card amount is already present in the open batch. Integrated
and On the Spot customers only.
DEBIT Invoice – Put a check next to this option if you want PAYware Connect to decline a
transaction request if the same debit card invoice number is already present in the open batch.
Integrated and On the Spot customers only.
EBT Account Number – Put a check next to this option if you want PAYware Connect to decline a
transaction request if the same EBT account number is already present in the open batch.
EBT Amount – Put a check next to this option if you want PAYware Connect to decline a
transaction request if the same EBT amount is already present in the open batch.
EBT Invoice – Put a check next to this option if you want PAYware Connect to decline a transaction
request if the same EBT invoice number is already present in the open batch.
GIFT Account Number – Put a check next to this option if you want PAYware Connect to decline a
transaction request if the same gift card account number is already present in the open batch.
GIFT Amount – Put a check next to this option if you want PAYware Connect to decline a
transaction request if the same gift card amount is already present in the open batch.
GIFT Invoice – Put a check next to this option if you want PAYware Connect to decline a
transaction request if the same gift card invoice number is already present in the open batch.
CHECK Account Number – Put a check next to this option if you want PAYware Connect to decline
a transaction request if the same check account number is already present in the open batch.
CHECK Amount – Put a check next to this option if you want PAYware Connect to decline a
transaction request if the same check amount is already present in the open batch.
CHECK Invoice – Put a check next to this option if you want PAYware Connect to decline a
transaction request if the same check invoice number is already present in the open batch.
© Copyright 2012. VeriFone Systems, Inc. All Rights Reserved.
173
Appendix A – SoftPay Connect
Device Maintenance
Simple Explanation: If you do not have a POS Device or a Mobile Device, you can safely
ignore this section.
This tool allows you to set up and maintain certain information associated with your POS
Device.
PAYware Connect Technical Support: (800) 839-0947
Setting Up a New POS Device
1. Point to Account Admin. A menu will appear. Click Device Master. The Device Master window will
appear.
2. No devices will be shown by default. You may initiate a search for either a Merchant ID/Merchant
Name or Serial Number. When you start typing in one of the fields, a Search button will display.
3. All existing devices for the filter merchant or serial number will display along with associated
status information.
© Copyright 2012. VeriFone Systems, Inc. All Rights Reserved.
174
4. Click the New Device tab. The New Device Entry window will appear.
5. Partially enter the Merchant ID or Merchant Name for which you wish to add a device and click
Search. A drop-down list will appear with the results.
© Copyright 2012. VeriFone Systems, Inc. All Rights Reserved.
175
6. Once a merchant is selected, the New Nevice Setup window displays.
7. Select your Device Type and Model from the drop-down lists, and enter the Serial Number of the
device. PAYware Connect will automatically generate a Device Key that is unique to the device.
Both the Serial Number and the Device Key of the device will be sent with each transaction
submitted.
8. The Parameters table, when available, allows you to provide optional Disclaimer, Header, and
Footer information to print out on the register receipt. Click inside the Value box of the
Parameter you wish to add, and enter up to 42 characters per line.
9. Once you have entered all of the information for the POS device, you may click Save to record your
settings or click Cancel to return to the Device Master window.
© Copyright 2012. VeriFone Systems, Inc. All Rights Reserved.
176
Editing an Existing Device
1. From the Device Master window, click the row of the device that you need to edit. A pop-up
window will display. Click Edit.
.
2. The Edit Device window will appear. The setup information for the selected Device will appear,
followed by the check boxes for Allow Resync, Device De-Activated, Enable VeriShield, and the
receipt Parameters. You can modify the Group Name, Terminal Name, any of the check boxes, or
the Parameters, but the Device Type and Serial Number cannot be modified. You may generate a
new Device Key, if necessary (such as when moving a device from one site to another site). Just
remember to “clear” the current working key (if it has one) from the terminal first. If not, you
many get Host Error 2029999 on the device
© Copyright 2012. VeriFone Systems, Inc. All Rights Reserved.
177
3. The Allow Resync and Device De-Activated boxes are added to the console for extra security.
If the Allow Resync box is not checked, you can generate a new Device Key to be held separately.
Once the Allow Resync box is checked, the newly generated Device Key would automatically be
sent down and used as the live key. Generating a new Device Key would prevent anyone from
processing unauthorized transactions through a particular device once the Allow Resync box was
checked for that device.
Note: Allow Resync should only be used on subsequent keys, not on the initial key.
If you wish to disable a device entirely, check the Device De-Activated box.
4. You may now click Save to record your settings, or click Cancel to return to the Device Master
window.
© Copyright 2012. VeriFone Systems, Inc. All Rights Reserved.
178
Deleting a Device
1. Point to Account Admin. A menu will appear. Click Device Master. Initiate a search from the
Device Master window to list existing devices. Click the device you wish to delete. From the popup window, click Delete.
2. A “Device ‘XXXXXX’ has been deleted” confirmation message will display at the bottom of the
screen.
Resetting a Device
Simple Explanation: The Reset button is used if the key for the device goes out of sync
during a key change. A Reset will allow the device to re-sync and resume processing
transactions.
1. Point to Account Admin. A menu will appear. Click Device Master. Initiate a search from the
Device Master window to list existing devices.
2. From the Device Master window, highlight the device that you wish to reset. Once the pop-up
window appears, click Reset.
3. A “Device ‘XXXXXX’ has been reset. Please run an Admin Packet” confirmation message will display
at the bottom of the screen. (The Admin Packet sends all of the headers, footers, card types,
etc.).
Receipt Email Setup
Simple Explanation: The Receipt Email Setup window is for PAYware Mobile devices only.
If you do not have a PAYware Mobile device, you can safely ignore this section.
1. Point to Account Admin. A menu will appear. Click Device Master. The Device Master window will
appear.
2. Click the Receipt Email Setup tab. The Receipt Email Setup window will appear.
3. Search on the Merchant ID or Merchant Name, and select from the drop-down list.
4. The Receipt Email window will appear.
5. Format the e-mail and click Save. Click Cancel to return to Device Master search window.
© Copyright 2012. VeriFone Systems, Inc. All Rights Reserved.
179
Configuration Master
Simple Explanation: The Configuration Master window allows you to enable/disable
associated commands for the available payment types.
1. Point to Account Admin. A menu will appear. Click Device Master. The Device Master window will
appear.
2. Click the Configuration Master tab. The Configuration Master search window will appear.
3. Type a partial Merchant ID or Merchant Name and click Search. Click to select account from the
drop-down list.
4. The POS Maintenance window will appear.
© Copyright 2012. VeriFone Systems, Inc. All Rights Reserved.
180
Activate Resync for Vericenter – Check this box if you wish to activate resync for Vericenter.
Notes: Type any notes and click Update.
Admin Configuration – The configuration tree represents all processors configured under this
account with the available Payment Types and their available commands. Click to Enable or Disable
any of the associated commands. Click Update.
© Copyright 2012. VeriFone Systems, Inc. All Rights Reserved.
181
Appendix B – Processor Setup Forms
© Copyright 2012. VeriFone Systems, Inc. All Rights Reserved.
182
First Data Atlanta (Buypass)
PAYware Connect™ Merchant Information Form
Merchant Name:
(24 alphanumeric characters max)
(The company name associated with this merchant ID)
Address:
City:
State:
(13 alphanumeric characters max)
Zip:
Merchant Customer Service Phone:
Your Company Contact Name:
Email Address:
Bank Info:
1. Merchant ID:
up to 12 digits
2. Industry type (please indicate):
D=Direct
R=Retail
F=Restaurant
3. Partial Auth (please indicate):
0 – No Partial Auth, No Request Balances
1 – Partial Auth
5 – No Partial Auth, Request Balance
4. Service Level (please indicate): _______________________________
Full Serve
Self Serve
Mini Serve
Maxi Serve
Other/Fuel Not Present
5. Hardware Version ________________________________ up to 4 characters
6. Software Version ________________________________ up to 8 characters
7. Firmware Version ________________________________ up to 8 characters
© Copyright 2012. VeriFone Systems, Inc. All Rights Reserved.
183
8. Terminal Number _______________________________ 3 digits
9. Time Zone:
3 digits
Eastern = 705, Central = 706, Mountain = 707, Pacific = 708, Arizona = 107, Alaska = 709, Hawaii = 110,
Puerto Rico = 104
10. Auto Settlement Correction default value = 3
11. Commercial Card Level (please indicate):
0= disable
2= level II
12. Capability Code (please indicate): ____________________________
Unspecified
PIN entry capability
No PIN entry capability
PIN Pad inoperative
RFID capability
13. Transaction Character Indicator (please indicate):
0= No e-Commerce
7= SSL transaction, will send the e-Commerce indicator flag.
8= non-SSL transaction, will send the e-Commerce indicator flag.
14. Enable Gift: _____________ Yes or No (Not implemented)
15. Enable Debit: ____________ Yes or No
© Copyright 2012. VeriFone Systems, Inc. All Rights Reserved.
184
ECHO
PAYware Connect™ Merchant Information Form
Merchant Name:
(24 alphanumeric characters max)
(The company name associated with this merchant ID)
Address:
City:
(13 alphanumeric characters max)
State:
Zip:
Merchant Customer Service Phone:
Your Company Contact Name:
Email Address:
Bank Info:
1. Merchant Number:
up to 12 digits
2. Merchant PIN:
up to 8 digits
3. ISP Number: ____________________ Optional
4. ISP PIN: ________________________ Optional
5. Order Type (please specify):
1 character
S=Self Service
H=Hosted
6. Time Zone:
3 digits
Eastern = 705, Central = 706, Mountain = 707, Pacific = 708, Arizona = 107, Alaska = 709, Hawaii = 110,
Puerto Rico = 104
7. Transaction Character Indicator (please indicate):
0= No e-Commerce
7= SSL transaction, will send the e-Commerce indicator flag.
8= non-SSL transaction, will send the e-Commerce indicator flag.
5. Enable Debit: _____________ Yes or No
6. Enable Check: _____________ Yes or No
© Copyright 2012. VeriFone Systems, Inc. All Rights Reserved.
185
EVO
PAYware Connect™ Merchant Information Form
Merchant Name:
(24 alphanumeric characters max)
(The company name associated with this merchant ID)
Address:
City:
(13 alphanumeric characters max)
State:
Zip:
Merchant Customer Service Phone:
Your Company Contact Name:
Email Address:
Bank Info:
1. Terminal Number:
up to 15 digits
2. Terminal ID:
up to 16 digits. Optional.
3. Industry type (please indicate – only Retail is implemented at this time):
D=Direct
R=Retail
F=Restaurant
4. Transaction Character Indicator (please indicate):
01 = Mail Order
02= Telephone Order.
05= e-Commerce. Not implemented.
07= e-Commerce. Not implemented.
5. Time Zone:
Eastern=705
Alaska=709
3 digits
Central=706
Hawaii=110
Mountain=707
Arizona=107
Pacific=708
Puerto Rico=104
© Copyright 2012. VeriFone Systems, Inc. All Rights Reserved.
186
6. Enable Gift: _________________________________Yes or No. Not implemented.
7. Enable Check: _______________________________Yes or No. Not implemented.
8. Enable Debit: ________________________________Yes or No
9. Enable EBT: _________________________________ Yes or No. Not implemented.
© Copyright 2012. VeriFone Systems, Inc. All Rights Reserved.
187
Fifth Third St. Pete
PAYware Connect™ Merchant Information Form
Merchant Name:
(24 alphanumeric characters max)
(The company name associated with this merchant ID)
Address:
City:
(13 alphanumeric characters max)
State:
Zip:
Merchant Customer Service Phone:
Your Company Contact Name:
Email Address:
Bank Info:
1. Bank ID: ________________________________________ 4 digits
2. Device ID: ________________ (Not implemented)
3. EDC Code (please specify): _________________________ 1 character
H= Host
T= Terminal
4. Merchant Number: _______________________________ 12 digits
5. Terminal Class: __________________________________ 1 digit
0=Unspecified (default)
1=Limited amount terminal
2=Unattended (ATM)
3=Unattended (automated dispensing/self service) – CAT transactions
4=Electronic Cash Register (ECR)
7=Telephone device (dial terminal)
6. Industry Type (please indicate):
D= Direct/MOTO
R= Retail
F= Food/Restaurant
7. Partial Auth: _________ Yes or No
If Yes, both credit partial authorizations and debit partial authorizations (if applicable) will be enabled
© Copyright 2012. VeriFone Systems, Inc. All Rights Reserved.
188
8. Commercial Card Level (please indicate):
0= disable (default)
2= level II
9. Terminal ID:
3 digits
default value = 001
10. Time Zone: ______________________ 3 digits
Eastern = 705, Central = 706, Mountain = 707, Pacific = 708, Arizona = 107, Alaska = 709, Hawaii = 110,
Puerto Rico = 104
11. Device Type: _____________________ (Optional)
0= Unknown
C= Personal Computer
E= Electronic Cash Register
12. Capability Code: (please indicate) _______________
0=
1=
2=
3=
4=
7=
Unspecified
Limited amount terminal
Unattended (ATM)
Unattended automatic dispensing/self service – CAT transactions
ECR
Telephone device
13. Capability Code 2: (please indicate) _______________
0=Unknown
1=Terminal cannot read encoded data
2=Full track read capable
3=Bar code read capable
4=OCR read capable
5=Chip-capable terminal
9=Altered
14. Transaction Character Indicator (please indicate):
0 = Customer present
1 = Customer not present, SAF transaction
2 = Customer not present (mail order and recurring)
5 = Secure Electronic commerce transaction
6 = Non-authenticated security transaction with SET
7 = Non-authenticated security transaction without SET
8 = Non-SSL transactions, will send the eCommerce indicator flag.
15. Enable Debit: __________________ Yes or No
16. Enable Check: __________________ Yes or No
© Copyright 2012. VeriFone Systems, Inc. All Rights Reserved.
189
First Data Nashville ISO
PAYware Connect™ Merchant Information Form
Merchant Name:
(24 alphanumeric characters max)
(The company name associated with this merchant ID)
Address:
City:
State:
(13 alphanumeric characters max)
Zip:
Merchant Customer Service Phone:
Your Company Contact Name:
Email Address:
Bank Info:
1. Merchant Category Code:
4 digits
2. Nashville MID:
3. Nashville TID:
15 digits
8 digits
4. Processor Merchant Number: _______________________ max 12 digits
5. Service Entitlement Number: __________________________ max 15 digits
(Optional. Contact First Data for more information)
6. Service Phone Number: _________________________________ 10 digits
7. CAT Level Indicator (please indicate): ___________
0 = Not a CAT Trans
1 = Automated Dispensing Machine
2 = Self-Service Terminal
3 = Limited Amount Terminal
4 = In-flight Commerce
6 = Electronic Commerce
7 = Transponder Transaction
© Copyright 2012. VeriFone Systems, Inc. All Rights Reserved.
190
8. Check Processor: (please indicate): __________________
Certegy
Telecheck
ICS
9. Industry type (please indicate):
D=Direct
R=Retail
F=Restaurant
10. POS Type (please indicate): _____________________
0 = Unspecified
1 = Limited Amount Terminal
2 = Unattended Terminal (ATM)
3 = Unattended Terminal (Self Service)
4 = Electronic Cash Register
7 = PAYware Mobile
11. Capability Code (please indicate): ____________________________
0
1
2
5
6
7
9
=
=
=
=
=
=
=
Unknown
Terminal not used
Mag stripe read capability
Integrated circuit card read capability
Contactless chip read
Contactless mag stripe read
Terminal does not read card data
12. Transaction Character Indicator (please indicate):
No Ecommerce
Visa-approved auth
Visa-approved auth cardholder
SSL-auth
Non SSL
13. Time Zone:
Eastern=705
Alaska=709
3 digits
Central=706
Hawaii=110
Mountain=707
Arizona=107
Pacific=708
Puerto Rico=104
14. Enable Gift: _________________Yes or No
15. Enable Check: _______________Yes or No
16. Enable Debit: ________________Yes or No
17. Enable EBT: ________________ Not implemented
© Copyright 2012. VeriFone Systems, Inc. All Rights Reserved.
191
First Data North
PAYware Connect™ Merchant Information Form
Merchant Name:
(24 alphanumeric characters max)
(The company name associated with this merchant ID)
Address:
City:
(13 alphanumeric characters max)
State:
Zip:
Merchant Customer Service Phone:
Your Company Contact Name:
Email Address:
Bank Info:
1. Merchant Number:
12 digits
2. Industry Type (please indicate):
D= Direct/MOTO
R= Retail
1 character
F= Restaurant
3. Merchant Tax ID:
up to 15 digits
4. MCC/SIC:
4 digits
5. Terminal Number:
6 digits (same as terminal ID)
6. Terminal ID:
6 digits (same as terminal number)
7. Time Zone:
3 digits
Eastern = 705, Central = 706, Mountain = 707, Pacific = 708, Arizona = 107, Alaska = 709, Hawaii = 110,
Puerto Rico = 104
8. Commercial Card Level (please indicate):
0= disable (default)
2= level II
© Copyright 2012. VeriFone Systems, Inc. All Rights Reserved.
192
9. Capability Code (please indicate):
0 = unknown
1= terminal can accept PIN (Retail and Debit)
2= terminal cannot accept PIN
10. Transaction Character Indicator (please indicate):
7= SSL transaction, will send the e-Commerce indicator flag.
8= non-SSL transaction, will send the e-Commerce indicator flag.
No e-Commerce
11. Enable Gift: _____________ Yes or No
12. Enable Debit: ___________ Yes or No
13. Enable Check: ___________ Yes or No
© Copyright 2012. VeriFone Systems, Inc. All Rights Reserved.
193
First Data Omaha
PAYware Connect™ Merchant Information Form
Merchant Name:
(24 alphanumeric characters max)
(The company name associated with this merchant ID)
Address:
City:
(13 alphanumeric characters max)
State:
Zip:
Merchant Customer Service Phone:
Your Company Contact Name:
Email Address:
Bank Info:
1. Merchant Number:
1 to 19 digits
2. ETC TYPE:
use B
3. Current Credit Item Number:
use default setting
1 character
(Used to track credit transactions in a batch. Starts at 001 and will wrap from 999 back to 001)
4. Current Debit Item Number:
use default setting
(Current debit item number in the batch. Starts at 999 and will wrap from 001 back to 999)
5. Industry Type (please indicate):
D= Direct/MOTO
R= Retail
F= Food/Restaurant
6. Device ID: ________________________________________4 alphanumeric
The device ID is a 4-character value. It differentiates multiple sites with the same merchant
number. This number is assigned by FDMS Omaha.
© Copyright 2012. VeriFone Systems, Inc. All Rights Reserved.
194
7. Terminal Number: ______________________________________ 4 alphanumeric
8. Terminal ID:
5 alphanumeric
(Fixed 5 bytes. 5th byte must be decimal point. Example: AB12.)
9. Time Zone:
3 digits
Eastern = 705, Central = 706, Mountain = 707, Pacific = 708, Arizona = 107, Alaska = 709, Hawaii = 110,
Puerto Rico = 104
10. Commercial Card Level (please indicate):
0= disable
2= level II
11. Capability Code (please indicate):
Not currently required, can choose unknown
0 = Unknown
1 = Terminal can accept PIN
2 = Terminal cannot accept PIN
12. Transaction Character Indicator (please indicate):
Blank = no e-Commerce
7= SSL transaction, will send the e-Commerce indicator flag
8= non-SSL transaction, will send the e-Commerce indicator flag
13. Enable Debit: _______________Yes or No
14. Enable Gift: ________________ Yes or No
15. Enable Check: ______________ Yes or No
© Copyright 2012. VeriFone Systems, Inc. All Rights Reserved.
195
GETI
PAYware Connect™ Merchant Information Form
Merchant Name:
(24 alphanumeric characters max)
(The company name associated with this merchant ID)
Address:
City:
(13 alphanumeric characters max)
State:
Zip:
Merchant Customer Service Phone:
Your Company Contact Name:
Email Address:
Bank Info:
1. Merchant Number: VeriFoneCert
2. Terminal ID:
up to 6 digits
3. Time Zone:
Eastern=705
Alaska=709
3 digits
Central=706
Hawaii=110
Mountain=707
Arizona=107
Pacific=708
Puerto Rico=104
© Copyright 2012. VeriFone Systems, Inc. All Rights Reserved.
196
Givex
PAYware Connect™ Merchant Information Form
Merchant Name:
(24 alphanumeric characters max)
(The company name associated with this merchant ID)
Address:
City:
(13 alphanumeric characters max)
State:
Zip:
Merchant Customer Service Phone:
Your Company Contact Name:
Email Address:
Bank Info:
1. Merchant Number:
up to 32 digits. Givex User ID.
2. Industry Type (please indicate):
D= Direct/MOTO
3. Time Zone:
Eastern=705
Alaska=709
R= Retail
F= Restaurant
3 digits
Central=706
Hawaii=110
Mountain=707
Arizona=107
Pacific=708
Puerto Rico=104
© Copyright 2012. VeriFone Systems, Inc. All Rights Reserved.
197
Global Payments East (NDC) Host
PAYware Connect™ Merchant Information Form
Merchant Name:
(24 alphanumeric characters max)
(The company name associated with this merchant ID)
Address:
City:
(13 alphanumeric characters max)
State:
Zip:
Merchant Customer Service Phone:
Your Company Contact Name:
Email Address:
Bank Info:
1. Merchant Number:
up to 15 digits
(Must match Terminal Number)
2. Industry Type (please indicate):
D= Direct/MOTO
R= Retail
F=Restaurant
3. Application ID (please indicate):
Retail
Direct/MOTO
Restaurant
4. Bank ID:
6 digits
5. Terminal Number:
up to 15 digits
(Must match Merchant Number)
6. Terminal Type:
3 alphanumeric characters
7. System Information: (automatically filled in)
© Copyright 2012. VeriFone Systems, Inc. All Rights Reserved.
198
8. Device Type:
1 alphanumeric character
0= No terminal
1= On premises, attended
2= On premises, not attended
3= Off premises, attended
4= Off premises, not attended
C=Computer
9. Time Zone:
3 digits
Eastern = 705, Central = 706, Mountain = 707, Pacific = 708, Arizona = 107, Alaska = 709, Hawaii = 110,
Puerto Rico = 104, Hong Kong = 008
10. Commercial Card Level (please indicate):
0= disable
2= level II
11. Capability Code (please indicate):
0= No Electronic authorization Code
1= PIN
12. Transaction Character Indicator (please indicate):
7= SSL transaction, will send the e-Commerce indicator flag.
8= non-SSL transaction, will send the e-Commerce indicator flag.
Blank= No e-Commerce
13. Enable Debit: _________________ Yes or No
14. Enable Gift: ___________________Yes or No
15. Enable Check: _________________ Yes or No
16. Pinless Debit: __________________ (Not implemented)
© Copyright 2012. VeriFone Systems, Inc. All Rights Reserved.
199
Elavon (NOVA)
PAYware Connect™ Merchant Information Form
Merchant Name:
(24 alphanumeric characters max)
(The company name associated with this merchant ID)
Address:
City:
(13 alphanumeric characters max)
State:
Zip:
Merchant Customer Service Phone:
Your Company Contact Name:
Email Address:
Bank Info:
1. Bank BIN Number:
6 digits
2. Industry Type (please indicate):
D=Direct
R=Retail
F=Restaurant
3. Process Type: _______________________________ Host or Terminal
4. Version ID: _______CV_______ up to 2 characters
Use default value of CV unless otherwise specified by Elavon. CV must be uppercase.
5. Partial Authorization: ______________ Yes or No (Set to NO for PAYware Mobile)
6. PINless Debit: ______________ (Not implemented)
7. INTERAC Debit: _____________ (Not implemented)
8. Electronic Check Indicator: ___________ Yes or No
9. DCC (Dynamic Currency Capable): _________ (Not implemented)
© Copyright 2012. VeriFone Systems, Inc. All Rights Reserved.
200
10. MICR Capable: ______________ Yes or No
11. Terminal Number:
up to 16 digits
12. Time Zone:
3 digits
Eastern = 705, Central = 706, Mountain = 707, Pacific = 708, Arizona = 107, Alaska = 709, Hawaii = 110,
Puerto Rico = 104
13. Auto Settlement Correction: default value = 3
14. Commercial Card Level (please indicate):
0= disable
2= level II
15. Capability Code: _3rd Party Vendor__ (Device type drop-down list will be provided. Select 3rd Party
Vendor)
16. Transaction Character Indicator (please indicate):
Blank= No e-Commerce
7= SSL transaction, will send the e-Commerce indicator flag.
8= non-SSL transaction, will send the e-Commerce indicator flag.
17. Enable Gift: _________________ Yes or No
18. Enable Check: ________________Yes or No
19. Enable Debit: ________________ Yes or No
© Copyright 2012. VeriFone Systems, Inc. All Rights Reserved.
201
Chase Paymentech Tampa
PAYware Connect™ Merchant Information Form
Merchant Name:
(24 alphanumeric characters max)
(The company name associated with this merchant ID)
Address:
City:
(13 alphanumeric characters max)
State:
Zip:
Merchant Customer Service Phone:
Your Company Contact Name:
Email Address:
Bank Info:
1. Client Number:
4 digits
2. PNS Number:
12 digits
3. Industry Type: (please indicate):
D= Direct Marketing/MOTO
R= Retail
F= Food/Restaurant
4. Commercial Card Level (please indicate):
0= disable
2= level II
5. Terminal Number (Div #):
3 digits
6. Terminal ID:
3 digits
7. Time Zone:
3 digits
Eastern = 705, Central = 706, Mountain = 707, Pacific = 708, Arizona = 107, Alaska = 709, Hawaii = 110,
Puerto Rico = 104
© Copyright 2012. VeriFone Systems, Inc. All Rights Reserved.
202
8. Device Type:
1 character
0 = Unknown
C = Personal Computer
E = Electronic Cash Register
9. Capability Code:
0 = POS Terminal
1 = Register
10. Transaction Character Indicator (please indicate):
Blank= No e-Commerce
7= SSL transaction, will send the e-Commerce indicator flag.
8= non-SSL transaction, will send the e-Commerce indicator flag.
11. Enable Debit: _______________Yes or No
12. Enable Gift: ________________ Yes or No
13. Enable Check: ______________ Yes or No
14. Enable EBT: ________________ Not implemented
© Copyright 2012. VeriFone Systems, Inc. All Rights Reserved.
203
ProPay
PAYware Connect™ Merchant Information Form
Merchant Name:
(24 alphanumeric characters max)
(The company name associated with this merchant ID)
Address:
City:
(13 alphanumeric characters max)
State:
Zip:
Merchant Customer Service Phone:
Your Company Contact Name:
Email Address:
Bank Info:
1. Merchant ID
max 12 digits
2. Terminal Number:
(optional)
3. Time Zone:
3 digits
Eastern = 705, Central = 706, Mountain = 707, Pacific = 708, Arizona = 107, Alaska = 709, Hawaii = 110,
Puerto Rico = 104
4. Auto Settlement Correction: default value = 3
5. Commercial Card Level (please indicate):
0= disable
2= level II
6. Capability Code (please indicate):
Unspecified
PIN entry capable
No PIN entry capability
PIN pad inoperative
RFID capability
© Copyright 2012. VeriFone Systems, Inc. All Rights Reserved.
204
7. Transaction Character Indicator (please indicate):
Blank= No e-Commerce
7= SSL transaction, will send the e-Commerce indicator flag.
8= non-SSL transaction, will send the e-Commerce indicator flag.
8. Enable Gift: ________________ Yes or No
9. Enable Check: ______________ Yes or No
10. Enable Debit: ______________ Yes or No
© Copyright 2012. VeriFone Systems, Inc. All Rights Reserved.
205
WorldPay
PAYware Connect™ Merchant Information Form
Merchant Name:
(24 alphanumeric characters max)
(The company name associated with this merchant ID)
Address:
City:
(13 alphanumeric characters max)
State:
Zip:
Merchant Customer Service Phone:
Your Company Contact Name:
Email Address:
Bank Info:
1. Check Digit: _________________________ 1 digit
2. Hardware Type: (automatically filled in)
3. Software Version: (automatically filled in)
4. Firmware Version: (automatically filled in)
5. Capture Type (please specify): _________________________ 1 character
H= Host T= Terminal
6. Merchant Number: ______________________________ up to 20 alphanumeric
7. Industry Type (please indicate):
D= Direct/MOTO
R= Retail
F= Food/Restaurant
8. Commercial Card Level (please indicate):
0= disable (default)
2= level II
9. Terminal Num: _____________________________ 6 digits
10. Terminal ID: ________Default = 00__________________ (optional) up to 2 alphanumeric
© Copyright 2012. VeriFone Systems, Inc. All Rights Reserved.
206
11. Time Zone: ______________________ 3 digits
Eastern = 705, Central = 706, Mountain = 707, Pacific = 708, Arizona = 107, Alaska = 709, Hawaii = 110,
Puerto Rico = 104
12. Device Type: (please indicate): __________________
0 = Unknown
C = Personal computer
E = Electronic cash register (ECR)
13. Capability Code: __________________________________ 1 digit
0=Unspecified (default)
1=Limited amount terminal
2=Unattended (ATM)
3=Unattended (automated dispensing)
4=Electronic Cash Register (ECR)
7=Telephone device
14. Transaction Character Indicator (please indicate):
0
1
2
5
6
7
8
= Customer present
= Customer not present, SAF transaction
= Customer not present (mail order and recurring)
= Secure Electronic commerce transaction
= Non-authenticated security transaction with SET
= Non-authenticated security transaction without SET
= Non-SSL transactions, will send the eCommerce indicator flag
15. Enable Debit: _______________Yes or No
16. Enable Gift: ________________ Yes or No
17. Enable Check: ______________ Yes or No
© Copyright 2012. VeriFone Systems, Inc. All Rights Reserved.
207
SVS
PAYware Connect™ Merchant Information Form
Merchant Name:
(24 alphanumeric characters max)
(The company name associated with this merchant ID)
Address:
City:
(13 alphanumeric characters max)
State:
Zip:
Merchant Customer Service Phone:
Your Company Contact Name:
Email Address:
Bank Info:
1. Merchant Number:
6 digits
2. Division Number:
up to 5 digits
3. Store Number:
up to 10 digits
4. Terminal Number: ____________________
5. Time Zone:
3 digits
Eastern = 705, Central = 706, Mountain = 707, Pacific = 708, Arizona = 107, Alaska = 709, Hawaii = 110
Puerto Rico = 104
6. Commercial Card Level (please indicate):
0= disable (default)
2= level II
7. Transaction Character Indicator (please indicate):
No Ecommerce
eCommerce SSL.
eCommerce non SSL
8. Enable Debit: __________________ Yes or No
© Copyright 2012. VeriFone Systems, Inc. All Rights Reserved.
208
TSYS
PAYware Connect™ Merchant Information Form
Merchant Name:
(24 alphanumeric characters max)
(The company name associated with this merchant ID)
Address:
City:
(13 alphanumeric characters max)
State:
Zip:
Merchant Customer Service Phone:
Your Company Contact Name:
Email Address:
Bank Info:
1. Acquirer BIN:
6 digits
2. Merchant Number:
12 digits
3. Agent Bank:
6 digits
4. Agent Chain:
6 digits
5. Zip Code (location code):
5 digits
6. MCC/SIC:
4 digits
7. Store Number:
4 digits
8. Industry Type (please indicate):
D= Direct/MOTO
R= Retail
F= Food/Restaurant
© Copyright 2012. VeriFone Systems, Inc. All Rights Reserved.
209
9. Debit BIN #:
6 digits
Debit related field, Capitalization required, Leave Blank if not accepting Debit
10. Auto Settlement Correction: default value = 3
11. Commercial Card Level (please indicate):
0= disable
2= level II
3= level III
12. Terminal Number:
4 digits
13. Terminal ID/ V Number:
(Please note: if this number includes a V replace it with a 7)
8 digits
14. Time Zone:
3 digits
Eastern = 705, Central = 706, Mountain = 707, Pacific = 708, Arizona = 107, Alaska = 709, Hawaii = 110,
Puerto Rico = 104
15. Device Type (please indicate):
0= Unknown
C= Personal Computer E= Electronic Cash Register
16. Capability Code (please indicate):
0= POS Terminal
Not currently required
1= Register
17. Transaction Character Indicator (please indicate):
Blank= No e-Commerce
7= SSL transaction, will send the e-Commerce indicator flag.
8= non-SSL transaction, will send the e-Commerce indicator flag.
18. Enable Debit: _______________Yes or No
19. Enable Gift: ________________ Yes or No
20. Enable Check: ______________ Yes or No
Debit-Related Fields:
21. Merchant ABA #:
9 digits
Debit related field, Capitalization required
22. Merchant Settlement Agent #:
4 digits
Debit related field, Capitalization required
23. Reimbursement Fee (Reimburse Attr)
Debit related field, Capitalization required
24. Sharing Group:
up to 30 digits
Debit related field
© Copyright 2012. VeriFone Systems, Inc. All Rights Reserved.
210
Gift Related Fields:
25. Gift Agent Bank: ________________________ 6 digits
26. Gift Agent Chain: ________________________ 6 digits
27. Gift Merchant ABA Number: ________________________ 9 digits
28. Gift Merchant Settlement Agent: ____________ 4 digits
29. Gift Reimburse Attribute: _______ 1 digit
30. Gift Issuer: ____________________________10 characters
31. Gift Partial Auth: ________ 1 digit
32. Gift Recv Inst ID: ______________________ 6 digits
BAMS Settlement related fields:
33. Settle via BAMS: ________ Yes or No
34. Settle ID: ___________________________________________________ max 23 characters. Must start
with ‘F.’ Blank if not applicable.
35. Settle Merchant Category: _____________________ 4 digits. Blank if not applicable.
© Copyright 2012. VeriFone Systems, Inc. All Rights Reserved.
211
ValueLink (SVDOT)
PAYware Connect™ Merchant Information Form
Merchant Name:
(24 alphanumeric characters max)
(The company name associated with this merchant ID)
Address:
City:
(13 alphanumeric characters max)
State:
Zip:
Merchant Customer Service Phone:
Your Company Contact Name:
Email Address:
Bank Info:
1. Merchant Number:
11 digits
(contains the Merchant ID)
2. Store Number:
up to 11 characters
(contains the ALT Merchant ID)
3. Trans Group ID:___________________________________ up to 6 characters
4. Merchant Key:
up to 4 characters
5. Multi Trans IND:
Yes or No
6. MCC/SIC Code (optional):
4 digits
7. Time Zone:
3 digits
Eastern = 705, Central = 706, Mountain = 707, Pacific = 708, Arizona = 107, Alaska = 709, Hawaii = 110,
Puerto Rico = 104
8. Terminal ID:
4 characters
(provided by merchant)
© Copyright 2012. VeriFone Systems, Inc. All Rights Reserved.
212
Valutec
PAYware Connect™ Merchant Information Form
Merchant Name:
(24 alphanumeric characters max)
(The company name associated with this merchant ID)
Address:
City:
(13 alphanumeric characters max)
State:
Zip:
Merchant Customer Service Phone:
Your Company Contact Name:
Email Address:
Bank Info:
1. Merchant Number:
up to 10 digits.
2. Industry Type (please indicate):
R= Retail
F= Restaurant
3. Terminal ID :
up to 15 characters.
4. Terminal Number : ____________________________________up to 15 characters.
5. Time Zone:
Eastern=705
Alaska=709
3 digits
Central=706
Hawaii=110
Mountain=707
Arizona=107
Pacific=708
Puerto Rico=104
© Copyright 2012. VeriFone Systems, Inc. All Rights Reserved.
213