1
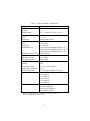
Characteristics and Use of the CCD Slit Camera
on the Italian B&C Spectrograph
Alan Watson, Leonel Gutiérrez, Enrique Colorado, Jorge Valdez,
Gerardo Sierra, Esteban Luna, & Alfonso Ginori
Instituto de Astronomı́a UNAM
Edition 1.5 of 4 June 2002
Abstract
This document describes the characteristics and use of the CCD slit camera
for the Italian Boller and Chivens spectrograph on 2.1-m telescope of the Observatorio Astronómico Nacional on Sierra San Pedro Mártir. This camera
replaced the old intensified video slit camera in March 2002. The slit camera
has a field of about 1.50 × 1.00 and pixels of 0.34600 , and can detecting magnitude 18 stars in exposures of a few seconds. The slit camera makes it easier
to focus the telescope, position the slit on the object, and check the position
of the slit while exposing a spectrum. If a suitable star is present in the field,
the slit camera can be used in guide in place of the offset guide camera.
1
Contents
1
Introduction
3
2
Components
2.1 Mount and Optics . . . . . . . . . . . .
2.2 Camera . . . . . . . . . . . . . . . . .
2.3 Filters . . . . . . . . . . . . . . . . . .
2.4 Control Software . . . . . . . . . . . .
2.4.1 CCD Controls and Displays . .
2.4.2 Image Controls and Display . .
2.4.3 Telescope Controls and Displays
.
.
.
.
.
.
.
5
5
5
7
7
8
8
9
3
Performance
3.1 Sensitivity . . . . . . . . . . . . . . . . . . . . . . . . . . . . . .
3.2 Saturation Limit . . . . . . . . . . . . . . . . . . . . . . . . . . .
12
12
12
4
Procedures
4.1 Starting Up . . . . . . . . . . . . . . . . . . .
4.2 Shutting Down . . . . . . . . . . . . . . . . .
4.3 Taking an Image . . . . . . . . . . . . . . . . .
4.4 Focusing the Telescope . . . . . . . . . . . . .
4.5 Moving the Slit to an Relatively Bright Object .
4.6 Moving the Slit to a Relatively Faint Object . .
4.7 Monitoring the Slit Position . . . . . . . . . . .
4.8 Guiding . . . . . . . . . . . . . . . . . . . . .
4.9 Focusing and Aligning the Slit Camera . . . . .
4.10 Setting the Origin of the Rotator Angle Display
.
.
.
.
.
.
.
.
.
.
.
.
.
.
.
.
.
.
.
.
.
.
.
.
.
.
.
.
.
.
.
.
.
.
.
.
.
.
.
.
.
.
.
.
.
.
.
.
.
.
.
.
.
.
.
.
.
.
.
.
.
.
.
.
.
.
.
.
.
.
.
.
.
.
.
.
.
.
.
.
.
.
.
.
.
.
.
.
.
.
.
.
.
.
.
.
.
.
.
.
16
17
19
19
20
22
23
24
25
26
26
Problems and Solutions
5.1 Some Necessary Details . . . . . . .
5.2 Problems with the Control Software .
5.3 Problems Seeing Your Object . . . . .
5.4 Problems Displaying Images in IRAF
5.5 Problems with imexam . . . . . . . .
5.6 Problems Moving the Telescope . . .
5.7 Problems Guiding . . . . . . . . . . .
.
.
.
.
.
.
.
.
.
.
.
.
.
.
.
.
.
.
.
.
.
.
.
.
.
.
.
.
.
.
.
.
.
.
.
.
.
.
.
.
.
.
.
.
.
.
.
.
.
.
.
.
.
.
.
.
.
.
.
.
.
.
.
.
.
.
.
.
.
.
28
28
28
29
29
30
30
31
5
6
.
.
.
.
.
.
.
.
.
.
.
.
.
.
.
.
.
.
.
.
.
.
.
.
.
.
.
.
.
.
.
.
.
.
.
.
.
.
.
.
.
.
.
.
.
.
.
.
.
.
.
.
.
.
.
.
.
.
.
.
.
.
.
.
.
.
.
.
.
.
.
.
.
.
.
.
.
.
.
.
.
.
.
.
.
.
.
.
.
.
.
.
.
.
.
.
.
.
.
.
.
.
.
.
.
.
.
.
.
.
.
.
.
.
.
.
.
.
.
.
.
.
.
.
.
.
Future Plans
32
Index
33
2
1
Introduction
The Italian Boller and Chivens spectrograph is one of the most heavily used instruments on the 2.1-m telescope of the Observatorio Astronómico Nacional on
Sierra San Pedro Mártir. In March 2002, the old intensified video slit camera was
replaced by a CCD camera. The most important characteristics of the CCD slit
camera are:
• It has a 1.50 × 1.00 field and 0.36500 pixeles. (See §2.2.)
• Is much more sensitive than the old camera. In dark time, it allows you to
see stars of magnitude
– 15.7 in 1 second exposures
– 17.9 in 8 second exposures
– 19.7 in 64 second exposures.
If you can see something on a POSS plate, you can probably see it with the
slit camera in exposures of a few seconds or tens of seconds. (See §3.1 and
especially Figure 2.)
• The limiting magnitudes in bright time are only slightly worse, being 19.2 in
64 second exposures. (See §3.1.)
• It will saturate on stars brighter than about magnitude 5, but tests show that
saturated stars can still be accurately centered on the slit. (See §3.2.)
• It can display images in the control window of the camera and optionally in
IRAF, where you can be examine them with imexam. (See §2.4.1.)
• It can save images as FITS files. (See §2.4.1.)
• It enables you to quickly and accurately place the slit over visible objects,
even when the spectrograph is rotated. (See §4.5.)
• It enables you to quickly and accurately place the slit a known offset from
visible objects, even when the spectrograph is rotated. This allows you to accurately place the slit over very faint objects that are close to visible objects,
provided the offset between the objects is known and provided the offset is
sufficiently small that the visible object falls in the field. (See §4.6.)
• It enables you to quickly and accurately focus the telescope. (See §4.4.)
3
• It gives you the option of guiding using the slit camera rather than the offset
guide camera. (See §4.8.)
The improved capabilities of the slit camera come at a small cost in complexity. A
manual for the old intensified video camera would have been absurd, as all it had
was a gain knob, but a manual is necessary for the CCD camera. One of the aims
of the new camera was to be more sensitive that the old camera, and this manual
explains how to achieve this sensitivity, and another aim was to provide capabilities
to aid you in focusing and placing your object on the slit, and again this manual
explains these.
However, if reading manuals is beneath your dignity, you can get something that
works for bright objects simply by starting up (§4.1), clicking the “Start Movie”
button in the control program window, and shutting it down at the end of the night
(§4.2). You’ll get exposures every seven seconds and should be able to see stars
down to magnitude 15 or 16. If you want to do better, unfortunately you’ll have to
read this manual.
The CCD slit camera is the result of work by Leonel Gutiérrez, Enrique Colorado,
Jorge Valdez, Gerardo Sierra, Esteban Luna, Alfonso Ginori, and Alan Watson with
the assistance of the mountain technical staff of the OAN/SPM. If you have problems with or comments on the slit camera, please address them to Leonel Gutiérrez
([email protected]) and Alan Watson ([email protected]).
This manual was written by Alan Watson with input from Philippe Eenens, Ana Hidalgo, Michael Richer, and Sergei Zharikov. If you have comments on this manual,
please address them to Alan Watson ([email protected]).
4
2
2.1
Components
Mount and Optics
The CCD and filter wheel are mounted on the spectrograph opposite the science
CCD. The current mount is a stop gap. The slit is imaged with a 1:1 lens.
2.2
Camera
The camara is a Santa Barbara Instruments Group (SBIG) ST-7E camera with
a non-intensified Kodak KAF-0401LE CCD. The characteristics of the CCD are
given in Table 1. More information on the camera and CCD is provide in the SBIG
catalog and the Kodak data sheet.
The field of the camera is 1.50 × 1.00 . The scale is 0.34600 per pixel. The orientation
is the same as the sky: if north is up, east is left.
The slit camera CCD has similar characteristics to a science CCD except that it
is physically small, has a lower quantum efficiency (because the anti-blooming
charge drain covers about 30% of the pixel area), and is operated at a higher temperature.
The CCD is not intensified, so over-exposing will not damage it. Furthermore,
each pixel has an anti-blooming drain, which grounds charge in excess of the pixel
full well, and so saturation should not result in blooming up the columns.
The camera maximum frame rate is one frame every seven seconds. This may seem
slow, but in practice it does not present a problem, especially given the capabilities
of the software to automatically place the slit on (or at least near) an object.
The camera has a thermo-electric cooler, and the CCD temperature set point is
set to 0 C by default. This balances avoiding generating excessive heat in the
dome while maintaining a reasonable dark current. The read noise, the dark rate,
and the sky make similar contributions to the noise in exposures of a few tens of
seconds at 0 C with the clear filter in dark time. If you wish, you can change the
set point or disable cooling completely. As the camera has no heater, if the ambient
temperature drops below the set point, the CCD will follow.
To mitigate the dark rate, and especially the tail of hot pixels, the camera software
automatically subtracts a bias image and a dark rate image scaled to the exposure
time from each exposure.
5
Table 1: Camera and Filter Characteristics
CCD
Unbinned format
Binning
Binned format
Binned pixel size
Field
Orientation
ADC
Gain
Read noise
Median dark rate
Unbinned pixel full well
Read Time
Minimum exposure
Maximum exposure
Cooling
Heating
Temperature range
Temperature regulation
Default temperature
Quantum efficiency
Filters
a
b
Kodak KAF-0401LE
765 × 510 pixels of 9 µm × 9 µm
3×3
255 × 170 pixels of 27 µm × 27 µm
0.34600
1.50 × 1.00
North up and east left
16 bits
2.5 electrons
14.1 electrons
8.0 electrons/second/binned pixel at +5 C b
4.4 electrons/second/binned pixel at +0 C b
2.4 electrons/second/binned pixel at −5 C b
50,000 electrons
7 seconds
0.11 seconds
3600 seconds
Single-stage thermo-electric cooler
None
Up to 35 C below ambient
±0.1 C
0 C or ambient, whichever is cooler
0.18 at 4000 Å
0.25 at 5000 Å
0.35 at 6000 Å
0.25 at 7000 Å
0.17 at 8000 Å
0.03 at 9000 Å
Clear
Red (6450 Å/500 Å)
Green (5300 Å/1000 Å)
Blue (4500 Å/1200 Å)
With the slit aligned east-west and the science CCD to the north.
There is a significant tail of hotter pixels.
6
2.3
Filters
The filter wheel is a SBIG ST-8CFW. The filters are SBIG clear, red, green, and
blue parfocal filters (and one unused slot). The red, green, and blue filters were
designed for color imaging and do not correspond to any standard astronomical
filters. The clear filter is used most often, as it gives the best sensitivity. The central
wavelengths and widths of the filters are given in Table 1. More information on the
filter wheel is given in the SBIG catalog and on the filters in an SBIG application
note.
2.4
Control Software
The control software allows you to take single images and movies. Images are
displayed by the software itself and can optionally be displayed in IRAF, where
they can be examined with imexam, and can be saved as FITS files.
The control software interacts with the telescope. You can move the telescope
in the frame of the slit camera even when the spectrograph is rotated. You can
place the slit on (or at least near) an object by simply clicking on the object and
then clicking on a button. If a suitable star is visible, you can use it to guide
automatically.
The camera control software is split into two programs, with the low-level part
running on an embedded Linux PC attached to the back of the telescope primary
mirror cell and the high-level part running on either of the Linux PCs in the control
room. You interact with the high-level program, the high-level program interacts
with the low-level program, and the low-level program interacts with the camera
hardware.
To start the high-level program, click on the “B&C Slit Camera” icon in the “Instrumentos” folder on the desktop of either of the Linux PCs in the control room. The
low-level program starts automatically when the embedded Linux PC is booted.
Figure 1 shows the window of the control program. It looks complicated, but in
practice it is fairly natural to use. The CCD controls and displays are on the left
and the telescope controls and displays are on the right. In the middle is the image
display, a status line, and an “Exit” button. The following sections briefly describes
each item in the window.
7
2.4.1
CCD Controls and Displays
The CCD exposure controls are on the upper left of the window. Clicking the
“Expose” button takes an exposure. You can change the exposure time using either
the “Exposure Time” menu or by editing the adjacent entry field. The exposure
time is given in seconds. There is no way to cancel an exposure once it is in
progress. You can select the filter using the “Filter” menu. After an exposure is
read, a bias image and a dark rate image scaled by the exposure time are subtracted.
The resulting image is is displayed in the central panel.
If you select the “Display in IRAF” option, the image will also be displayed in
IRAF. If you display a slit camera image in IRAF, you can examine with imexam.
For this to work, you have to run imexam without a file name argument, so that
imexam knows to use the image currently being displayed.
Each time you click the “Save” button, the current image is saved as a FITS file.
The image will be saved in the directory /home/observa/imagenes/ on the
Linux PCs in the control room. The image name will be a four-digit sequence
number followed by s.fit, e.g., 0001s.fit. Each time you save an image, the
sequence number is incremented. You can change the sequence number by editing
the field adjacent to the “Save” button.
Clicking the “Start Movie” button starts a repetitive sequence of exposures. During
this sequence, the button changes into a “Stop Movie” button, and clicking this
button will stop the movie after the end of the current exposure.
Clicking “Bias and Dark” button takes a bias image and dark image. Only the
dark image is displayed. The images are used to calculate a dark rate image, and
the bias image and the dark rate image scaled by the exposure time are subtracted
from subsequent exposures. You should select a long exposure time when taking
dark images, to reduce the noise in the dark rate image.
The CCD temperature controls are in the lower left of the window. You can change
the CCD temperature set point using the menu. The panel shows the CCD set point,
the current CCD temperature, and the current air temperature. The temperatures
are quantized in units of 0.4 C. You almost certainly don’t want to change the CCD
set point.
2.4.2
Image Controls and Display
The image is displayed in the center of the window. The field is 1.50 × 1.00 . Each
pixel is 0.34600 .
8
The “+z” and “−z” buttons increase and decrease the display range. The “Normal
z” button restores the default display range of ±5σ. The display range is always
symmetric about the mean value in the image. If you need finer control over the
image display, you should display the image in IRAF.
When you click on the image, the coordinates and value of the pixel under the
cursor are displayed in the above the image.
The magenta arrow shows the direction of north. This is determined from the
rotator angle specified in the telescope panel. The orientation of the image is the
same as the sky: if north is up, east is left.
The yellow square marks the region of interest (ROI). This is used to mark the
object prior to moving the slit to it with the “Move Slit to ROI” button in the
telescope panel and to mark the guide star prior to guiding. You can move the
region of interest by clicking in the image with the left mouse button.
The large elongated cyan cross is the slit mark. This is used, obviously, to mark the
position of the slit for your own reference and also to mark the slit prior to moving
the slit with the “Move Slit to ROI” button in the telescope panel. Initially, the slit
mark is located at the center of the field and will almost certainly not correspond to
the actual slit position. You can move the slit mark by clicking in the image with
the right mouse button.
If you enable the “Mark Reference” option (in the lower right of the window), the
reference mark appears in the image display. This is a small cyan cross. This
reference mark will be offset from the slit mark by the offsets specified in the fields
associated with the “Mark Reference” option. The reference mark is used when
placing the slit on faint objects; see §4.6 for more information about this.
2.4.3
Telescope Controls and Displays
The telescope controls and displays are located on the right of the window.
The most important telescope control is the field that specifies the rotator angle.
Unless this is correct, none of the other telescope controls will work correctly.
When you rotate the spectrograph, you should read the rotator angle display on the
back of the primary mirror cell and enter the rotation angle here. The initial value
of the rotator angle is 0◦ , which is correct for the most common orientation of the
spectrograph with the slit east-west and the science CCD to the north. If the rotator
angle display on the telescope does not read 0◦ in this orientation, you should ask
the mechanical engineer to reset it.
9
Below the rotator angle field is a display of the slit position angle. The rotator
angle and slit position angle are related by
slit position angle = 90◦ − rotator angle.
The rotator angle also determines the direction of the north arrow in the image
panel.
The “+x”, “−x”, “+y”, and “−y” buttons move the telescope parallel to the axes
of the slit camera by the offset specified in the central field. The offset is in arcseconds. Thus, the “+x” and “−x” buttons move the telescope parallel to the slit and
the “+y” and “−y” buttons move the telescope perpendicular to the slit even when
the slit is rotated.
The “Move Slit to ROI” button moves the telescope so that the object in the region
of interest is under (or at least near) the slit mark. The telescope does not move
precisely, even over small distances, and so all of the commands that move the
telescope necessarily are equally imprecise. For example, you should not rely on
the “Move Slit to ROI” command to move the slit precisely to the region of interest;
it should move it roughly to the region of interest, but then you’ll have to make fine
adjustments.
The “Start Guiding” button starts guiding on the star in the region of interest. While
guiding, the button changes to a “Stop Guiding” button, and clicking on this button
will stop guiding at the end of the current exposure.
The “Mark Reference” option places the reference mark, a small cyan cross, on the
image display. The offset of the reference mark from the slit mark is given by the
associated fields. The “Move Reference to ROI” button moves the telescope so that
the object in the region of interest is under (or at least near to) the reference mark.
The reference mark and its associated controls are used when placing the slit over
a faint object; see §4.6 for more information about this.
10
Figure 1: The Control Program Window
11
3
3.1
Performance
Sensitivity
The CCD camera is significantly more sensitive than the old intensified video camera. The sensitivity is best demonstrated with an example. Figure 2 compares a
portion of the DSS scan of the red POSS2 plate with images with the slit camera
taken in dark time. It shows that stars with R ≈ 16 can be clearly seen in 1 second
images, stars with R ≈ 18 can be clearly seen in 8 second images, and faint galaxies
can be seen in 64 second images. If you can see something on a POSS plate, you
can probably see it with the slit camera.
More quantitatively, Table 2 gives the count rates in each filter of a star with magnitude 15 and of the sky. (The dark sky rates were measured directly from observations with the moon below the horizon. The grey and bright sky rates are scaled
from observations about 13◦ from the 35% illuminated moon and refer to the 50%
and 100% illuminated moon.)
Table 3 shows the limiting magnitudes at 0 C for each filter over a range of exposure
times. The limiting magnitudes quantitatively corresponds to S/N = 20 in a 200
diameter aperture and empirically corresponds to the faintest level at which stars
can be clearly seen (see Figure 2 for examples of stars at this S/N).
3.2 Saturation Limit
The slit camera has a saturation limit, corresponding to stars that saturate the ADC
in the shortest exposures of 0.11 seconds (see Figure 3). Obviously, the saturation
limit depends on the image quality. Table 4 shows the saturation limits for image
quality of roughly 100 FWHM.
Saturating the CCD will not damage it and should not result in blooming up the
columns, as the CCD is not intensified and has anti-blooming gates.
Furthermore, tests show that it is possible to accurately center saturated stars.
12
R = 17.9
Galaxies
S/N = 100
R = 13.5
R = 15.9
(a) DSS scan of POSS2 red plate.
S/N = 20
(b) Slit camera 1 second image.
S/N = 20
S/N = 100
(c) Slit camera 8 second image.
(d) Slit camera 64 second image.
Figure 2: Example slit camera images that illustrate its sensitivity. (a) The
DSS scan of a red POSS2 plate showing the field of the Landolt standard PG
0918+029B. The image shows three stars with magnitudes R = 13.5, R = 15.9,
and R = 17.9 and three faint galaxies. (b) A 1 second image with the slit camera.
The R = 13.5 star has S/N ≈ 100 and the R = 15.9 has S/N ≈ 20. (c) An 8 second
image with the slit camera. The R = 15.9 star has S/N ≈ 100 and the R = 17.9 star
has S/N ≈ 20. (d) A 64 second image with the slit camera. The galaxies can be
seen faintly but clearly. Each image is roughly 1.50 × 1.00 and each pixel is 0.34600 .
The filter was the clear filter, the seeing was about 1.000 , and the sky was dark. The
dark horizontal stripe is the slit.
13
Table 2: Count Rates
Filter
15 mag Star
electron/second
Clear
Red
Green
Blue
4700
620
1300
1050
Sky
electron/second/binned pixel
Dark Grey
Bright
4.5
18.0
32.0
0.5
3.7
7.0
0.5
3.7
7.0
0.2
2.2
4.3
Table 3: Limiting Magnitudes for S/N = 20
Filter
1
2
Clear
Red
Green
Blue
15.7
13.5
14.4
14.1
16.5
14.3
15.1
14.9
Clear
Red
Green
Blue
15.7
13.5
14.3
14.1
16.4
14.3
15.1
14.9
Clear
Red
Green
Blue
15.7
13.5
14.3
14.1
16.4
14.3
15.1
14.9
Exposure Time
second
4
8
16
Dark
17.2 17.9 18.6
15.0 15.7 16.4
15.8 16.5 17.2
15.6 16.3 17.0
Grey
17.2 17.8 18.4
15.0 15.7 16.4
15.8 16.5 17.2
15.6 16.3 17.0
Bright
17.1 17.7 18.3
15.0 15.7 16.3
15.8 16.5 17.1
15.6 16.3 16.9
Table 4: Saturation Limits
Filter
Clear
Red
Green
Blue
Saturation Limit
mag
6.5
4.3
5.1
4.9
14
32
64
19.2
17.1
17.9
17.6
19.7
17.6
18.4
18.2
18.9
17.0
17.8
17.6
19.4
17.5
18.3
18.1
18.8
16.9
17.7
17.5
19.2
17.4
18.2
18.1
Figure 3: A 0.11 second exposure of a saturated 2 magnitude star centered on the
slit. Tests show that it is possible to accurately center saturated stars.
15
4
Procedures
Here I’ll give procedures for operating the CCD slit camera. The CCD camera is
sensitive and offers capabilities for making your observing more efficient, but this
comes at a small cost in complexity. I recommend you follow the procedures here
to begin with until you develop a feel for the camera – this should not take long –
and then experiment to discover how to use it to best suits your needs.
Before giving the procedures, I’d like to mention two things that are key to happy
observing:
1. Make sure you set the correct rotator angle.
If you have the wrong rotation angle, none of the controls that interact with
the telescope will work correctly. For example, you’ll try to move the telescope to put the slit over your object, and it will move in the wrong direction.
Also, the reference mark will be in the wrong place, which will doom any
attempt to use it to put the slit over a faint object.
The initial value of the rotator angle is 0◦ , which is correct for the most common orientation of the spectrograph with the slit east-west and the science
CCD to the north. If the rotator angle display does not read 0◦ in this orientation, you should ask the mechanical engineer to reset it. If the spectrograph
is rotated, the rotator angle should be set to the angle given by the rotator
angle display on the back of the primary mirror cell.
Get into the habit of checking the direction of north shown by the magenta
arrow in the image display. This is derived from the rotator angle. If the
software’s idea of north doesn’t agree with your idea of north, at least one of
you must be confused.
2. Make sure you have adequate bias and dark images.
To take bias and dark images, set a suitably long exposure – at least 64
seconds – using the “Exposure Time” menu or the adjacent field and then
click on the “Bias and Dark” button. If you asked for a dark of longer than
64 seconds, you will be asked to confirm the exposure time. (This is because
it is impossible to abort a dark once it has started.) The camera will take first
a bias image and then a dark image. Once the dark image is read, it should
appear in the image panel. Figure 4 shows an example of a dark image.
The purpose of taking bias and dark images is to reduce the effects of hot
pixels on your exposures. After you take a bias image and a dark image,
the control software uses them to calculate a dark rate image. When you
16
subsequently take an exposure, the bias image and the dark rate image scaled
to the exposure time are subtracted.
If you don’t have an adequate dark, your image will have lots of noise from
hot pixels. The dark should be be at least as long as the exposures you plan
to take. Figure 5 shows an image which shows inadequate dark subtraction.
The dark rate depends on the CCD temperature, so if the CCD temperature
changes, you should take a fresh bias image and dark image.
Dark and bias frames are currently lost when the embedded Linux PC is
rebooted, so to be safe you should get into the habit of taking a bias and dark
whenever you restart the control software.
4.1
Starting Up
Starting the camera basically consists of starting up the components in order from
the camera hardware to the high-level control program with appropriate delays.
1. Turn on the camera by plugging the camera power cable into the slit camera
body. This cable is the rightmost cable on the slit camera body when you
face the spectrograph.
2. Turn on the embedded Linux PC on the back of the telescope primary mirror
cell. If you are not sure which one this is, follow the parallel cable from the
slit camera body.
3. Wait one minute for the embedded PC to complete booting.
4. Check that the high-level control program is not already running on either of
the Linux PCs in the control room. If it is, stop it.
5. Start the high-level control program on either of the Linux PCs in the control
room by clicking on the “B&C Slit Camera” icon in the Instruments folder.
6. Make sure you have set the correct rotator angle. See page 16 for more
information.
7. Take bias and dark images. See page 16 for more information.
8. Find and mark the slit. Turn on the HeAr lamp and take an exposure of a
1 second. Images with the lamps have strong gradients perpendicular to the
slit, but the HeAr lamp seems to give a slightly more even illumination than
17
Figure 4: A slit camera dark image of 64 seconds.
Figure 5: Slit camera images that show the importance of subtracting a suitable
dark. The left image has no dark subtracted; the right image has a dark subtracted.
Both images have exposures of 64 seconds and are displayed over the same range
about their median value. The hot pixels in the left image make it difficult to see
the faint galaxies in the lower right of the image.
Figure 6: A slit camera image of the slit illuminated by the HeAr lamp. The HeAr
lamp gives a slightly more even illumination than the quartz lamp.
18
the quartz lamp. Figure 6 shows an example slit camera image with the HeAr
lamp. Click on the position of the slit with the right mouse button to move
the cyan slit mark to coincide with the slit.
4.2
Shutting Down
Shutting down the camera basically consists of shutting down the components in
order from the high-level control program to the camera hardware with appropriate
delays. There is no general need to shut down the camera during the day unless a
storm threatens.
1. Stop the high-level control program by clicking the Exit button or by clicking
the × button in the title bar. You’ll be asked if you want to exit, and you
should reply that you do.
2. Turn off the embedded Linux PC on the back of the telescope primary mirror
cell. If you are not sure which one this is, follow the parallel cable from the
slit camera body.
3. Wait at least a minute, to give the thermo-electric coolers time to settle, and
then turn off the slit camera by unplugging the camera power cable from the
camera body. This cable is the rightmost cable on the camera body when
you face the spectrograph.
4.3
Taking an Image
The fundamental operation of the slit camera is, not surprisingly, to take images
of the slit. This is straightforward, and most of the time only involves the “Expose” button and the “Exposure Time” menu and occasionally the “Bias and Dark”
button.
1. Make sure you have adequate bias and dark images. See page 16 for
more information.
2. Select the exposure time from the “Exposure Time” menu or by editing the
adjacent field. Exposure times are specified in seconds. Exposure times of
less than the minimum of 0.11 seconds are treated as 0.11 seconds.
3. Select the filter from the “Filter” menu. The clear filter is the default and
gives the best sensitivity, so you probably don’t need to change it.
19
4. If you wish to display the images in IRAF, then you should select the “Display in IRAF” option and make sure that IRAF is running on the computer
on which you started the high-level control program.
5. Click on the “Expose” button. If you asked for an exposure of longer than 64
seconds, you will be asked to confirm the exposure time. (This is because it
is impossible to abort an exposure once it has started.) The camera will take
an exposure, read the image, and display it in the image panel. The field is
1.50 × 1.00 . Each pixel is 0.34600 .
The image should also be displayed in IRAF, if you selected this option, and
you can examine with imexam. For this to work, you have to run imexam
without a file name argument, so that imexam knows to use the image currently being displayed.
6. If you see lots of hot pixels, it’s probably because you didn’t take a dark,
because your dark is not long enough, or because the CCD temperature has
changed. Figure 5 shows an example of an image with inadequate dark subtraction. The solution to all of these problems is to take another dark –
possibly longer – and retake you image.
7. If you wish to change the display range, click on the “+z” and “−z” buttons.
To revert to the standard display range, click on the “Normal z” button.
8. If you wish to save your image, click on the “Save” button. The image
will be saved as a FITS file in the directory /home/observa/imagenes/
on the Linux PCs in the control room. The image name will be a four-digit
sequence number followed by s.fit, e.g., 0001s.fit. (The “s” stands for
“slit”.) Each time you save an image, the sequence number is incremented.
You can change the sequence number by editing the field adjacent to the
“Save” button.
4.4
Focusing the Telescope
The resident astronomer should have focused the slit camera on the slit on the
engineering night that precedes each run. Once this is done, you can use the slit
camera to focus the telescope quickly and accurately.
1. Find a star between, say, magnitude 8 and magnitude 15 and place it in the
field of the slit camera.
20
2. If you have not already done so, select the “Display in IRAF” option (which
will, as its name suggests, display subsequent slit camera images both in the
image panel and in IRAF). Make sure that IRAF is running on the computer
on which you started the high-level control program. These steps will allow
you to use imexam in IRAF to give a quantitative measure of the image
quality, which will make focusing much more precise.
3. Take an image by clicking on the “Expose” button. The image should appear both in the image panel and in IRAF. Examine the star using imexam
in IRAF. For this to work, you have to run imexam without a file name argument, so that imexam knows to use the image currently being displayed.
Adjust the exposure time, if necessary, so that the star is well exposed but
not close to saturation.
4. Click on the “Start Movie” button. The camera will repetitively take images.
Again, each should appear both in the image panel and in IRAF.
Focus the telescope while using the r, a, and e commands in imexam to determine the image quality. For this to work, you have to run imexam without
a file name argument, so that imexam knows to use the image currently being
displayed. There is no need to exit from imexam between images; measures
are taken so that IRAF notices that each image is different. The scale is
0.34600 per pixel.
You should focus the telescope by first lowering the secondary and then raising it slowly. When you find an optimum position, you should lower the
secondary and then raise it once more to the optimum position. This procedure keeps the secondary actively supported against gravity and results in
more accurate and repeatable positions.
The secondary is lowered with the “Baja” button and raised with the “Sube”
button on the hand paddle. The encoded secondary position is displayed in
the patch panel in the control room; raising the secondary causes the displayed numbers to become more negative.
5. Stop the sequence of exposures by clicking on the “Stop Movie” button. The
sequence will stop after the current exposure.
6. If you wish, disable the “Display in IRAF” so that subsequent slit camera
images will appear only in the image panel and not in IRAF.
21
4.5
Moving the Slit to an Relatively Bright Object
If your object is relatively bright (roughly magnitude 19 or brighter), you should be
able to see it in exposures of at most a few tens of seconds with the slit camera. This
makes it easy to move the slit to your object, even if the spectrograph is rotated.
1. Make sure you have set the correct rotator angle. See page 16 for more
information.
2. Make sure you have an adequate dark. See page 16 for more information.
3. If necessary, adjust the slit mark to coincide with the actual slit position. The
slit mark is the large elongated cyan cross. Initially, the slit mark will be the
center of the field and will almost certainly not correspond with the actual
slit position. You can adjust the slit position by clicking in the image with
the right mouse button. The position of the slit can be seen clearly in images
taken with the slit illuminated by the HeAr lamp and in images of the sky of
more than a few seconds. You can make the slit more obvious by decreasing
the display range by clicking on the “−z” button.
4. Take an exposure and identify your object in the image. Click on your object
with the left mouse button (which will move the yellow region of interest
mark to that position) and then click on the “Move Slit to ROI” (which will
command the telescope to move the slit to the object).
5. Take another image. Your object should be roughly coincident with the slit
position. However, because the telescope does not offset precisely, your
object will likely not be precisely coincident with the slit position. Adjust
the position of the telescope until you see the slit over your object. You can
adjust the position of the telescope using the “+x”, “−x”, “+y”, and “−y”
buttons to move the telescope, which move it in the frame of the slit camera
regardless of the rotation of the spectrograph. That is, the “+x” and “−x”
buttons always move the telescope parallel to the slit camera rows and the
“+y and “−y” buttons always more the telescope parallel to the slit columns.
Move the slit until the slit mark, and hence the slit, is coincident with your
object.
6. You are now ready to start guiding and taking spectra.
22
4.6
Moving the Slit to a Relatively Faint Object
If your object is too faint to see easily in the slit camera (normally this will only
apply to continuum sources fainter than magnitude 19 or equivalently faint emission line sources), you have to adopt a strategy of offsetting the telescope from a
brighter source that can more easily be seen in the slit camera. However, the telescope does not offset especially accurately, so blind offset from a brighter source
is not especially reliable.
If your object is sufficiently close to a brighter source, you can use the brighter
object as a reference. This avoids most of the uncertainty associated with blind
offsets. The basic idea is to place a reference mark in the slit camera offset from
the slit by an amount that precisely corresponds to the offset from your object to the
reference object. Then, if you place the reference mark over the reference object,
the slit should be over your object.
You will need accurate relative astrometry of your object and reference object,
and you will also need the CCD rows aligned with the slit (see page 26) and the
instrument rotator origin accurately set to zero when the slit is east-west (see page
26). Your reference object has to be close enough to be visible in the slit camera
while your object is on the slit; remember that the field of view of the slit camera
is only 1.50 × 1.00 .
1. Make sure you have set the correct rotator angle. See page 16 for more
information.
2. Make sure you have an adequate dark. See page 16 for more information.
3. If necessary, adjust the slit mark to coincide with the actual slit position. The
slit mark is the large elongated cyan cross. Initially, the slit mark will be the
center of the field and will almost certainly not correspond with the actual
slit position. You can adjust the slit position by clicking in the image with
the right mouse button. The position of the slit can be seen clearly in images
taken with the slit illuminated by the HeAr lamp and in images of the sky of
more than a few seconds. You can make the slit more obvious by decreasing
the display range by clicking on the “−z” button.
4. Enter the reference offset in arcseconds north and east from your object to
the brighter reference object in the fields in the lower right of the window.
The sense of the offset is from your object to the reference object. Thus,
if the coordinates of your object are 12 52 32.66 +15 52 25.1 and the coordinates of your reference object are 12 52 33.21 +15 52 11.6, the offsets
23
should be −13.500 north and +7.900 east. Make sure you remember the factor
of cos δ.
5. Select the “Mark Reference” option. This will place the reference mark, a
second, smaller cyan cross, in the image display. The reference mark will
be offset from the slit mark by an offset equal to the offset of the reference
object from your object. If you move the slit mark, the reference mark moves
to to maintain the relative offset.
6. You now have to move the telescope so that the reference mark coincides
with your reference object.
Take an exposure and identify your reference object in the image.
Click on your reference object with the left mouse button (which will move
the yellow region of interest marker to that position) and then click on the
“Move Reference to ROI” button (which will command the telescope to
move so that the reference mark is coincident with the reference object).
(Note that the “Move Reference to ROI” button is different from the “Move
Slit to ROI” button.)
Take another image. Your reference object should be roughly coincident
with the reference mark. However, because the telescope does not offset
precisely, your reference object will likely not be precisely coincident with
the reference mark. Adjust the position of the telescope until the reference
object and reference mark are coincident. You can adjust the position of
the telescope using the “+x”, “−x”, “+y”, and “−y”, which move it in the
frame of the slit camera regardless of the rotation of the spectrograph.
7. When the reference object is coincident with your reference mark, the slit
should be over your object. You are now ready to start guiding and taking
spectra.
4.7
Monitoring the Slit Position
Happiness is a black stripe through your object. To achieve this, you will want to
monitor the position of the slit while you take spectra.
1. Make sure you have an adequate dark. See page 16 for more information.
2. Take an image. Adjust the exposure time and the display range so that you
can see your object centered on the slit (or, better, so that you could see your
object if all of its light wasn’t going down the slit).
24
3. Click on the “Start Movie” button. This will repetitively take images. You
should be able to monitor the position of the slit.
4. If the slit drifts off your object, you can correct it by stopping guiding with
the offset guide camera (if you are using it), moving the slit with the the
“+x”, “-x”, “+y”, and “-y” buttons, , which move the telescope in the frame
of the slit camera regardless of the rotation of the spectrograph, and restarting
guiding once more.
5. Once you’ve finished taking spectra of this object. Stop the sequence of
exposures by clicking on the “Stop Movie” button. The sequence will stop
after the current exposure.
4.8
Guiding
If a suitably bright star falls in the field of the slit camera, you can guide using the
slit camera rather than the offset guide camera. The advantage is that you avoid
problems of flexure and so guide more accurately.
I’ve only very limited experience with guiding. It works relatively well with bright
stars. My advice would be to guide on stars that have good S/N and to not take
exposures longer than 8 seconds (to avoid a slow correction rate), which limits you
to stars brighter than about magnitude 17.
1. Make sure you have set the correct rotator angle. See page 16 for more
information.
2. Make sure you have an adequate dark. See page 16 for more information.
3. Take an image and select the star on which you wish to guide. Adjust the
exposure time so that the guide star is well exposed.
4. Click on the star in the image with the left mouse button (which will move
the yellow region of interest marker to the position at which you clicked),
then click the “Start Guiding”. The software will repetitively take images,
determine the position of the star in each, calculate the correction necessary
to restore the star to its original position, and send this correction to the
telescope.
5. While guiding, the “Start Guiding” button changes into a “Stop Guiding”
button. To stop guiding, click on the Stop Guiding button. Guiding will stop
after the current exposure.
25
4.9
Focusing and Aligning the Slit Camera
Each time the camera is mounted on the spectrograph, it will require aligning with
the optical axis of the transfer lens, rotating so that the CCD rows are parallel to
the spectrograph slit, and focusing. This can be done during the day, and should be
done by the resident astronomer and the technicians when they mount the spectrograph.
The reasons for focusing the camera and aligning it optically are obvious. The
reason for rotating the camera so that the slit is accurately parallel to the slit is so
that telescope motions in the camera frame will be calculated correctly and so that
the reference mark will appear in the correct place.
1. Turn on the HeAr lamp and take an exposure of a 1 second. Images with
the lamps have strong gradients perpendicular to the slit, but the HeAr lamp
seems to give a slightly more even illumination than the quartz lamp. Figure
6 shows an example slit camera image with the HeAr lamp.
2. Close to slit so that it is as narrow as possible. This gives a clear target for
focusing.
3. Start taking images. Examine the focus and slit alignment while moving the
mount until you encounter an adequate focus and alignment. For reasons
that should be obvious, this is known as “Twist and Shout”. With the current
stop-gap mount, this is somewhat haphazard, which the main motivation for
the plans to replace the current mount.
If you display the images in IRAF, you can use imexam, and especially the
k command, to examine the focus more precisely.
4.10
Setting the Origin of the Rotator Angle Display
Each time the spectrograph is mounted on the telescope, the rotator angle display
needs to be set so that it reads 0◦ when the slit is exactly east-west. This cannot
be done during the day, and should be done by the resident astronomer and the
technicians on the engineering night that normally precedes each run.
The reason for setting the origin accurately so that telescope motions in the camera
frame will be calculated correctly and so that the reference mark will appear in the
correct place.
26
Figure 7: Checking the alignment of the slit by trailing a star along the slit.
1. The basic idea is to rotate the spectrograph until a star trailed east-west is
parallel to the slit.
2. Find a relatively bright star between, say, magnitude 6 and magnitude 10.
Place it at one end of the slit and slightly above or below the slit.
3. Turn on the HeAr lamps to illuminate the slit jaws and select the narrowest
slit (60 µm). This will allow you to clearly distinguish the slit.
4. Start an exposure of, say, 4 seconds, and immediately offset the telescope
east or west as appropriate by 6000 to trail the star along the slit during the
exposure. The result should look something like Figure 7.
5. Rotate the instrument and take more images until the trailed star is exactly
parallel to the slit.
6. Have the mechanical engineer remove the rotator angle display, reset it to
zero, and replace it.
27
5
Problems and Solutions
This section describes some problems we’ve encountered and suggests some solutions.
5.1
Some Necessary Details
First, I’ll describe the control software and physical and network connections in
more detail, so you can better reason about the cause of a problem and about possible solutions.
The computers involved in the control software are “sonaja” and “alpha”, the two
Linux PCs in the control room, “router2m”, a Linux PC, and “buscador”, an embedded Linux PC on the back of the telescope primary mirror.
There are two separate networks at the 2.1 meter: sonaja, alpha, and router2m are
on the observer network; router2m and buscador are on the instrument network;
router2m serves as a communication conduit between the otherwise-separate observer and instrument networks
The camera hardware is connected to buscador by a parallel cable.
The low-level control software runs on buscador. When buscador reboots, it automatically runs /usr/local/sbig/sbig.tcl.
The high-level software actually runs on router2m, rather than sonaja or alpha, as
it needs to be able to talk to buscador. When you click on the “B&C Slit Camera” on sonaja or alpha, you execute xhost to allow router2m access to the X display, then rsh to router2m, and there execute /usr/local/boller_sbig/boller
(or the experimental version /home/observe/boller_sbig/boller) with DISPLAY set back to sonaja or alpha.
To display images in IRAF, the high-level program does an rlogin to the computer
to which is it displaying and executes some IRAF commands.
5.2
Problems with the Control Software
If you have problems with the control software – you can’t start it, it is hung or
confused, or it complains that there are problems – consider the following:
1. Check that you’re not already running the high-level program – possibly on
the other Linux PC.
28
2. Check that buscador and the camera have power.
3. Try shutting down and restarting the high-level control program, buscador,
and the camera (according to the procedures on page 17).
4. Check that you can ping router2m from the Linux PC. If not, there’s a problem either with the network or with router2m.
5.3
Problems Seeing Your Object
If you have problems seeing your object, consider the following:
1. Check your coordinates.
2. Check the pointing of the telescope.
3. Make sure you’re not looking at the back of the offset guide camera mirror.
4. Checking your object in the field of the slit camera. Remember that the field
of the slit camera is only 1.50 × 1.00 .
5. Checking that the slit is not over your object.
6. Make sure you’re got adequate bias and dark images. See page 2 for
more information.
7. Make sure you’re using the clear filter. The other filters are much less sensitive.
8. Make sure you’re taking a long enough exposure.
9. Make sure you know the offsets between the telescope, offset guide camera,
and slit camera by looking at a bright star.
10. Make sure the camera is working by taking an image with the HeAr lamp
on; you should see something that looks like Figure 6.
5.4
Problems Displaying Images in IRAF
If you have problems displaying slit camera images in IRAF, consider the following:
29
1. Make sure you’ve selected the “Display in IRAF” option.
2. Make sure you’re running IRAF on the computer on which you’re displaying
the high-level control program.
3. Restart ximtool or ds9.
4. Make sure /home/observa/imagenes/ is mounted.
5. Make sure /home/observa/imagenes/ is not full.
5.5
Problems with imexam
If you have problems with imexam, consider the following.
1. Stop imexam and start it again, making sure you don’t give it a file name
argument (i.e., just type imexam and press return), so that imexam knows to
use the image currently being displayed.
2. Stop imexam, issue the flpr command a few times, and start it again.
3. Restart IRAF.
5.6
Problems Moving the Telescope
If you have problems moving the telescope with the slit camera control software,
consider the following:
1. Make sure you have set the correct rotator angle. See page 16 for more
information.
2. Make sure you have really set the really correct rotator angle. See page
16 for more information.
3. Make sure you understand that the control software always moves the telescope and not (conceptually) your object.
4. Remember that the telescope offsets imprecisely.
30
5.7
Problems Guiding
If you have problems guiding with the slit camera control software, consider the
following:
1. Make sure you have set the correct rotator angle. See page 16 for more
information.
2. Make sure you have really set the really correct rotator angle. See page
16 for more information.
3. Make sure your star is bright enough. I don’t really know how bright stars
have to be to guide well, but I’d guess the limit would be magnitude 17 with
8 second exposures.
4. Make sure your integrations are not too long. I don’t really know how long
integrations can be and still result in good guiding, but I’d guess 8 seconds.
31
6
Future Plans
Planned modifications to the slit camera include
• Acquiring an Hα filter, to reduce the background when looking at emissionline nebulae and to allow bright stars to be observed without saturation.
• Doubling the field by replacing the 1:1 lens with a 2:1 focal reducing lens.
• Making focusing and aligning the camera easier by replacing the current
stop-gap mount with one that allows fine control of the position of the camera.
• Modifying the guiding algorithm to better account for systematic errors in
the telescope tracking.
Other suggestions which have been made and which are still under consideration
include:
• Allowing exposures to be aborted.
• Encoding the instrument rotator.
• Improving the frame rate.
32
Index
+x button, 10
+y button, 10
+z button, 8
−x button, 10
−y button, 10
−z button, 8
Frame rate, 5, 6, 32
Future plans, 32
Gain, 6
Guiding, 25, 31, 32
Hardware, 28
HeAr lamp, 17
Aborting an exposure, 8
Aligning the camera, 26
Anti-blooming drains, 5
Image display, 8
Image display range, 8
imexam, 30
imexam, 8
IRAF, 8, 29, 30
Bias and Dark button, 8, 16
Bias image, 5, 8, 16
CCD, 5, 6
CCD controls, 8
Control software, 7, 28
Cooling, 5, 6, 8, 19
Coordinates, 9
Count rate, 12
Limiting magnitude, 12
Mark Reference option, 10, 24
Monitoring the slit position, 24
Mount, 5
Move Reference to ROI button, 10
Move Slit to ROI button, 10
Moving the slit to a relatively bright
object, 22
Moving the slit to a relatively faint
object, 23
Moving the telescope, 10, 30
Dark image, 5, 8, 16
Dark rate, 5, 6
Display in IRAF option, 8, 29
Display range, 8
Exit button, 7, 19
Expose button, 8
Exposure time, 8
Exposure Time menu, 8
Normal z button, 8
North, 9
Optics, 5
Orientation, 5
Over exposure, 5
Field, 5, 32
Filter, 8
Filter menu, 8
Filter wheel, 7
Filters, 6, 7
FITS, 8
Focusing the camera, 26
Focusing the telescope, 20
Pixel coordinates, 9
Pixel scale, 5
Pixel values, 9
Position angle, 9
33
Setting the origin of the rotator angle
display, 26
Shutting down, 19
Slit mark, 9
Slit position angle, 9
Start Guiding button, 10
Start Movie button, 8
Starting up, 17
Stop Guiding button, 10
Stop Movie button, 8
Problems, 28
Control software, 28
Displaying images with IRAF, 29
Guiding, 31
imexam, 30
Moving the telescope, 30
Seeing your object, 29
Procedures, 16
Aligning the camera, 26
Focusing the camera, 26
Focusing the telescope, 20
Guiding, 25
Monitoring the slit position, 24
Moving the slit to a relatively bright
object, 22
Moving the slit to a relatively faint
object, 23
Setting the origin of the rotator
angle display, 26
Shutting down, 19
Starting up, 17
Taking an image, 19
Taking an image, 19
Telescope controls, 9
Telescope offset, 10
Temperature, 5, 8
Quantum efficiency, 6
Quartz lamp, 17
Read noise, 6
Read time, 5, 6
Reference mark, 9, 10, 24
Reference offset, 10, 23
Region of interest, 9
ROI, see Region of interest
Rotator angle, 9, 16, 26
Saturation, 5
Saturation limit, 12
Save button, 8
Scale, 5
Sensitivity, 12
Set point, 5, 8
Set point menu, 8
34