1
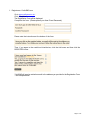
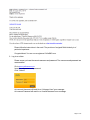
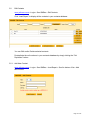
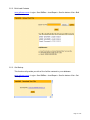
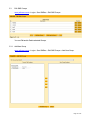
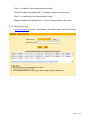
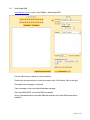
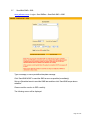
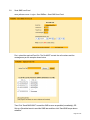
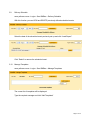
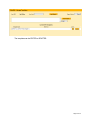
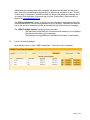
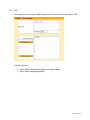
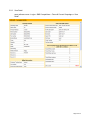
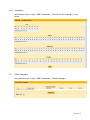
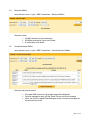
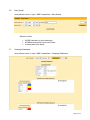
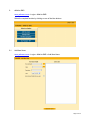
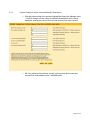
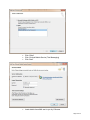
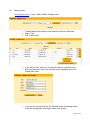
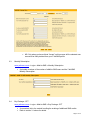
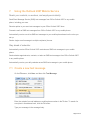
Y’elloSMS User Manual Index Item Page 1. Register as a Y’elloSMS user. 4 2. Log on as a User 5 3. Send SMS 7 3.1 Buy Package – EFT 8 3.2 Edit Contacts 10 3.2.1 Add New Contact 10 3.2.1 Bulk Load Contacts 11 3.2.3 Get Backup 11 3.3 Edit SMS Groups 12 3.3.1 Add New Group 13 3.3.2 Bulk Load a Group 13 3.4 Send Singke SMS 15 3.5 Send SMS to Group/s 15 3.6 Send Bulk SMS < 2000 16 3.6.1 Manual selection from Contacts database 17 3.6.2 Upload Numbers 17 3.7 Send Bulk SMS > 2000 18 3.8 Send SMS from Excel 20 3.9 Delivery Schedule 21 3.10 Manage Templates 21 4 SMS Reports 23 4.1 My SMS Statistics 23 4.2 Sent SMS 24 Page 1 of 45 Item Page 4.3 Replies to my SMSes 24 4.4 Purchase Log 25 4.5 Archived Replies 25 5 SMS Competitions 26 5.1 Create New Campaign 26 5.2 Future & Current Campaigns 27 5.2.1 Edit 28 5.2.2 View Detail 29 5.2.3 View Report 30 5.3 Closed Campaigns 30 5.4 Received SMS 31 5.5 Unread Received SMSes 31 5.6 Entry Search 32 5.7 Campaign Dashboard 32 5.8 Global Campaign Report 33 6 eMail – to – SMS 6.1 34 Add New Users 34 6.1.1 Insert New User details and create new user account 35 6.1.2 Confirm Change in Active Users and Monthly Subscription 36 6.1.3 Generic e2S - eMail with new account details and user instructions 37 6.1.4 Outlook 2007 - e2S - eMail with new account details and user instructions 37 6.1.5 Set up Microsoft Outlook 2007 Text Messaging account 38 6.2 Manage Users 40 6.3 Monthly Subscription 41 6.4 Buy Package - EFT 41 Page 2 of 45 7, Using the Outlook 2007 Mobile Service 42 7.1 Create a new text message 42 7.2 Specify the maximum number of text messages 43 7.3 Send a text message 44 Page 3 of 45 1. Register as a Y’elloSMS user Go to www.yellosms.co.za . Click “Register”. The Registration Form will be displayed. Complete the form. (Please protect your User ID and Password): Please note the instructions at the bottom of the form: Then, if you agree to the conditions listed below, click the tick boxes and then click the REGISTER button: Y’elloSMS will send an activation email to the address you provided in the Registration Form – see example below. Page 4 of 45 Please follow the instructions in the email. The provision of a signed Debit Authority is of particular importance. Congratulations! You are now a registered Y’elloSMS user. 2. Log in as a User Please ensure you have the correct username and password. The username and password are case sensitive. Go to www.yellosms.co.za Insert the username and password Click “Submit” An incorrect Username will result in an “Unknown User” error message. An incorrect Password will result in an “Invalid Password” error message. Page 5 of 45 If you have entered the correct Username and Password, the “Login Successful” message will be displayed and you can now choose which Y’elloSMS module you would like to access: Send SMS SMS Reports SMS Competition eMail-to-SMS Page 6 of 45 3. Send SMS www.yellosms.co.za > Login > Send SMSes Select the required function by clicking on one of the blue buttons. Page 7 of 45 3.1. Buy Package – EFT www.yellosms.co.za > Login > Send SMSes > Buy Package – EFT Complete this form online to order SMS credits. Click the “Purchase The SMS Package” button to register the purchase with the Y’elloSMS Administration Department. Y’elloSMS will display a printable pro-forma invoice with a reference number, the amount payable, the Y’elloSMS banking details and the Y’elloSMS Administration fax number. Page 8 of 45 Deposit the amount payable in the Y’elloSMS bank account. Insert your Username as the reference number in the deposit reference area on the bank deposit slip / EFT form. Fax the proof of deposit to the Y’elloSMS Administration fax number listed on the pro-forma invoice; or request your bank EFT system to email the proof of deposit to [email protected] . When Y’elloSMS Administration receives the proof of deposit, your account will be credited with the SMS credits purchased. Page 9 of 45 3.2. Edit Contacts www.yellosms.co.za > Login > Send SMSes > Edit Contacts Click “Load Report” to display all the contacts in your contacts database. You can Edit and/or Delete selected contacts De-duplicate the cell numbers in your contacts database by simply clicking the “Del Duplicates” button. 3.2.1. Add New Contact www.yellosms.co.za > Login > Send SMSes > Load Report > Scroll to bottom of list > Add New Contact. Page 10 of 45 3.2.2. Bulk Load Contacts www.yellosms.co.za > Login > Send SMSes > Load Report > Scroll to bottom of list > Bulk Load Contacts. 3.2.3. Get Backup This function will provide you with a file of all the contacts in your database. www.yellosms.co.za > Login > Send SMSes > Load Report > Scroll to bottom of list > Get Backup. Page 11 of 45 3.3 Edit SMS Groups www.yellosms.co.za > Login > Send SMSes > Edit SMS Groups. You can Edit and/or Delete selected Groups, 3.3.1. Add New Group www.yellosms.co.za > Login > Send SMSes > Edit SMS Groups > Add New Group. Page 12 of 45 Click “>>” to add ALL your contacts to the new Group. Select a Contact on the left and click “>” to add that contact to the new Group. Click “<<” to remove ALL the contacts from the Group. Select a Contact on the right and click “<” to remove that contact from the Group. 3.3.2. Bulk Load a Group www.yellosms.co.za > Login > Send SMSes > Edit SMS Groups > Bulk Load a Group Page 13 of 45 3.4 Send Single SMS www.yellosms.co.za > Login > Send SMSes > Send Single SMS Use the Alpha keys to display a narrow selection. Double-click the required item to move the number to the “Cell Number” field on the right. Personalise the messages, if required. Type a message, or use a pre-defined template message. Click “Send SMS NOW” to send the SMS immediately. Set up a Scheduled event to send the SMS later and then click “Send SMS as per above schedule”. Page 14 of 45 3.5 Send SMS to Group(s) www.yellosms.co.za > Login > Send SMSes > Send SMS to Group(s) Select the required Group/s. Personalise the messages, if required. Type a message, or use a pre-defined template message. Click “Send SMS NOW” to send the SMSes immediately. Set up a Scheduled event to send the SMSes later and then click “Send SMS as per above schedule”. Page 15 of 45 3.6. Send Bulk SMS < 2000 www.yellosms.co.za > Login > Send SMSes > Send Bulk SMS < 2000 The cell numbers that will be used in the batch will be located in the Middle block. Use the processes described in 3.6.1 and 3.6.2 below to add numbers to the slection in the middle block. Personalise the messages, if required. Type a message, or use a pre-defined template message. Click “Send SMS NOW” to send the SMS immediately. Set up a Scheduled event to send the SMS later and then click “Send SMS as per above schedule”. Page 16 of 45 3.6.1 Manual selection from Contacts database: Above the left-hand block, click “All Contacts” to display all contacts in the database, or use the Alpha keys to display a narrow selection. Click “>>” to add all the displayed contacts to the selection in the middle block. Select a Contact on the left and click “>” to add that contact selection in the middle block. Click “<<” to remove ALL the contacts from the selection in the middle block. Select a number in the middle block and click “<” to remove that contact from the selection. 3.6.2 Upload Numbers: www.yellosms.co.za > Login > Send SMSes > Send Bulk SMS < 2000 > Upload Numbers This can be done as the only source of numbers for this batch, OR it can be done in addition to the manual selection process discussed in 3.6.1 above. Page 17 of 45 3.7 Send Bulk SMS > 2000 www.yellosms.co.za > Login > Send SMSes > Send Bulk SMS > 2000 Type a message, or use a pre-defined template message. Click “Send SMS ASAP” to send the SMS as soon as possible (immediately). Set up a Scheduled event to send the SMS later and then click “Send SMS as per above schedule”. Please read the caution in RED carefully The following screen will be displayed. Page 18 of 45 Upload the file of numbers. Once the ENTIRE file is uploaded the following screen will be displayed. Page 19 of 45 3.8 Send SMS from Excel www.yellosms.co.za > Login > Send SMSes > Send SMS from Excel First, upload the required Excel file. The file MUST contain the cell numbers and the messages as per the example shown below. Then Click “Send SMS ASAP” to send the SMS as soon as possible (immediately), OR Set up a Scheduled event to send the SMS later and then click “Send SMS as per above schedule”. Page 20 of 45 3.9 Delivery Schedule www.yellosms.co.za > Login > Send SMSes > Delivery Schedule With this function you can VIEW and DELETE previously defined scheduled events. Select the date of the scheduled event previously set up and click “Load Report”. Click “Delete” to remove the scheduled event. 3.10 Manage Templates www.yellosms.co.za > Login > Send SMSes > Manage Templates The current list of templates will be displayed. Type the required message and click “Add Templates” Page 21 of 45 The templates can be EDITED or DELETED. Page 22 of 45 4. SMS Reports www.yellosms.co.za > Login > SMS Reports Click the blue buttons to access the different functions. 4.1 My SMS Statistics www.yellosms.co.za > Login > SMS Reports > My SMS Statistics A view – from the date of registration to date – of the status of your SMSes. Page 23 of 45 4.2 Sent SMS www.yellosms.co.za > Login > SMS Reports > Sent SMS View SMSes sent, using a number of selection criteria: 4.3 Select a date range Select the SMS status type All Processed Submitted Sent Rejected Search for a specific cell number Replies to my SMSes www.yellosms.co.za > Login > SMS Reports > Replies to my SMSes View reply SMSes sent to my profile, using a number of selection criteria: Select a date range Search for a specific cell number Download a copy of ALL replies held in the database. Page 24 of 45 4.4 Purchase Log www.yellosms.co.za > Login > SMS Reports > Purchase Log View all financial transactions on my profile, in a number of criteria: 4.5 All transactions Successful transactions Declined transactions Incomplete transactions eCommerce gateway errors Unexpected errors eCommerce Timeout Archived Replies www.yellosms.co.za > Login > SMS Reports > Archived Replies View ALL replies received from a specific cell number. Page 25 of 45 5. SMS Competitions www.yellosms.co.za > Login > SMS Competitions Click the blue buttons to access the different functions. 5.1 Create New Campaign www.yellosms.co.za > Login > SMS Competitions > Create New Campaign The New Campaign form will be displayed. Complete the form and click the “Create Campaign” button at the bottom of the form. The instructions on completing the Create New Campaign entry form are reasonably easy to follow, but there are some points that need to be emphasized. The “Load Last Campaign” button will be very useful when loading your 2nd and subsequent campaigns. When you click this button the system will insert the details of the last campaign you loaded; ie you don’t have to re-capture a lot of static information. The “Campaign Details” section is where you enter information relating to the CLIENT OF THIS CAMPAIGN and is very useful when you are planning on running this campaign on behalf of an outside client or even another division in your company. The “Competition Details” section is self-explanatory, but it is worth mentioning that the details inserted in this section effectively comprise the major cost components of the campaign, eg advertising / prizes, etc. The “Competition Keywords” section Is where you insert the keyword(s) of your campaign. Y’elloSMS uses a single set of 5-digit short codes, ie you will be sharing your 5-digit number with other Y’elloSMS users. Your keyword(s) is, therefore, what Y’elloSMS uses to Page 26 of 45 differentiate your campaign from other campaigns. Keywords are allocated on a first-come basis, hence it is possible that the keyword(s) you request may already be in use. To avoid “over-booking” of keywords Y’elloSMS normally only allows 3 keywords per campaign, but if you want to use more than 3 keywords (eg you have 20 barcodes), please email your request to [email protected] The “Billing Information” section Is where you enter information relating to the entity that will be the beneficiary of the revenue generated by your campaign. Y’elloSMS Accounts will look to this section to determine who will be receiving the net income from your campaign. The “SMS Profit Split Options” section is where you select - The Rand value of the SMS your consumers will be sending to your campaign. - The Start and End dates of your campaign. - The (optional) auto-replySMS that Y’elloSMS will send back to each entrant. 5.2 Future & Current Campaigns www.yellosms.co.za > Login > SMS Competitions > Future & Current Campaigns Page 27 of 45 5.2.1 Edit www.yellosms.co.za > Login > SMS Competitions > Future & Current Campaigns > Edit Use this function to: Insert / Modify / Delete the campaign auto-reply message. Insert / Delete campaign keyword/s Page 28 of 45 5.2.2 View Detail www.yellosms.co.za > Login > SMS Competitions > Future & Current Campaigns > View Detail Page 29 of 45 5.2.3 View Report www.yellosms.co.za > Login > SMS Competitions > Future & Current Campaigns > View Report 5.3 Closed Campaigns www.yellosms.co.za > Login > SMS Competitions > Closed Campaigns Page 30 of 45 5.4 Received SMSes www.yellosms.co.za > Login > SMS Competitions > Received SMSes Selection criteria: 5.5 All SMS received in a given date range. All SMSes received for a given cell number. A combination of the above. Unread Received SMSes www.yellosms.co.za > Login > SMS Competitions > Unread Received SMSes Selection and process criteria: All unread SMS received in a given date range will be displayed. Once the message is read, click the “Read” tick box next to the message When you click the “Update Read Messages” button, the ticked messages will be removed from the list. Page 31 of 45 5.6 Entry Search www.yellosms.co.za > Login > SMS Competitions > Entry Search Selection criteria: 5.7 All SMS received in a given date range. All SMSes received for a given cell number. A combination of the above. Campaign Dashboard www.yellosms.co.za > Login > SMS Competitions > Campaign Dashboard Page 32 of 45 5.8 Global Campaign Report www.yellosms.co.za > Login > SMS Competitions > Global Campaign Report View received SMS statistics for ALL your campaigns. Page 33 of 45 6. eMail-to-SMS www.yellosms.co.za > Login > eMail-to-SMS Select the required function by clicking on one of the blue buttons. 6.1 Add New Users www.yellosms.co.za > Login > eMail-to-SMS > Add New Users Page 34 of 45 6.1.1 Insert New User details and create new user account: eMail address = the eMail address of the new user. Cellno = the cell number of the new user. Description = Name of new user. Type = eMail-to-SMS if the new user does not use MS Outlook 2007 as his mail client. Type = Outlook if the new user uses MS Outlook 2007 as his mail client. The “Email Account Details to new users” o The “Email Account Details to new users” tick box MUST be selected if you want the new account details and user instructions to be emailed to the new user. Now add the new user to the List. Click “>” button. To create the new account click the “Upload New Users” button Page 35 of 45 6.1.2 Confirm Change in Active Users and Monthly Subscription: After the previous step in the process (Upload New Users) the Manage Users – Confirm Change in Active Users and Monthly Subscription screen will be displayed, showing the result of the new user account/s you have created. NB. Only when you have clicked “Accept” on this screen will the new user account/s be finally added to your Y’elloSMS profile. Page 36 of 45 6.1.3 Receive eMail with new account details and user instructions If the generic eMail-to-SMS service was selected, the new user will receive the following eMail. 6.1.4 Receive eMail with new account details and user instructions If the Outlook eMail-to-SMS service was selected, the new user will receive the following eMail. Page 37 of 45 6.1.5 Set up Microsoft Outlook 2007 Text Messaging account Click “New” Page 38 of 45 Click “Other” Click “Outlook Mobile Service (Text Messaging) Click “Next” Insert details from eMail sent to you by Y’ellosms. Page 39 of 45 6.2 Manage Users www.yellosms.co.za > Login > eMail-to-SMS > Manage Users In eMail Address field insert an email address or leave the field blank. Select “Type”. Click “Load Report”. If you click the “Edit” button you can edit the details of a particular user. Note, the “Password” field is only required for the messaging account of Outlook 2007 users. If you select a user and click the “Del Selected” button the Manage Users screen will be displayed, showing the result of the change. Page 40 of 45 6.3 NB. Only when you have clicked “Accept” on this screen will the selected user account/s be finally deleted from your Y’elloSMS profile. Monthly Subscription www.yellosms.co.za > Login > eMail-to-SMS > Monthly Subscription 6.4 A printable overview of the number of eMail-to-SMS users and the Y’elloSMS Monthly Subscription. Buy Package - EFT www.yellosms.co.za > Login > eMail-to-SMS > Buy Package - EFT A convenient link to the module handling the ordering of additional SMS credits. Refer to section 3.1 above for details. Page 41 of 45 7. Using the Outlook 2007 Mobile Service Reach your contacts, co-workers, and employees instantly: Send Short Message Service (SMS) text messages from Office Outlook 2007 to any mobile phone, including your own. Receive replies to your sent text messages to your Office Outlook 2007 inbox. Forward e-mail as SMS text messages from Office Outlook 2007 to any mobile phone. Automatically receive e-mail as SMS text messages to your mobile phone based on the rules you set up. Send a single e-mail message to multiple recipients’ phones. Stay ahead of schedule: Automatically receive Office Outlook 2007 reminders as SMS text messages to your mobile phone. Send calendar appointments, contacts, or tasks as SMS text messages from Office Outlook 2007 to any mobile phone. Automatically receive your daily calendar as an SMS text message to your mobile phone. 7.1 Create a new text message On the File menu, click New, and then click Text Message. Enter the recipient's e-mail address or mobile phone number in the To box. To search for a recipient in an address book, click the To button. Type your message in the message body. Page 42 of 45 If you want, you can insert emoticons in your message. On the Text Message tab, in the Insert group, click Emoticon String, and then click an emoticon that you want to insert. 7.2 Specify the maximum number of text messages Each text message has a default character limit that is specified by the mobile service provider. If you type more characters than this limit in a single text message, then the extra characters are moved automatically to a new message. You can see the total number of messages into which your original message is divided and the contents of each message in the preview pane. You can specify the maximum number of text messages to send at one time. On the Text Message tab, in the Options group, enter the number that you want in the Maximum Messages box. For messages that are divided into more messages than this number, the extra messages are not sent and appear shaded in the preview pane. Page 43 of 45 7.3 Send a text message To send a text message that you have created, you need to specify its recipients. You can either choose recipients from one of your address books, or enter them directly into the To box of your message. Enter recipient information. Do one of the following. Choose recipients from an address book On the Text Message tab, in the Names group, click Address Book. Choose the address book that you want from the drop-down list. You can use any address book, including the Global Address List (GAL), to get your recipient's information. Select the names that you want and click the To button. TIP You can search for recipient information by typing a name in the Search box. Click OK. Enter recipient names directly You can enter recipient information directly in the To box in one of three formats: The recipient's mobile phone number. The recipient's e-mail address The recipient's last name If you enter the recipient's names partially, then you can use the AutoComplete feature to complete them before sending the message. Page 44 of 45 Click Send. After your text message is sent successfully, it appears in the Sent Items folder with next to the subject title to indicate that it is a text message. NOTE Before you can send a text message, you must have at least one valid recipient in the To, Cc, or Bcc box. In addition, the message body cannot be empty. Page 45 of 45