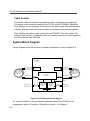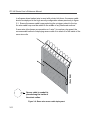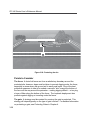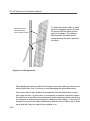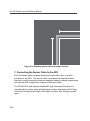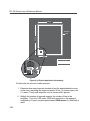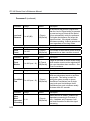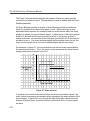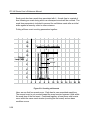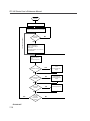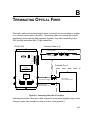
1
FD-340 Series
Fiber Optic Intrusion Detection System
User’s Reference Manual
Fiber SenSys, LLC
2925 NW Aloclek Drive, Suite 130
Hillsboro, Oregon 97124 USA
Tel: +1.503.692.4430
Fax: +1.503.692.4410
E-mail: [email protected]
www.fibersensys.com
998-81185
Rev. D
10/2011
©
Copyright 2004, 2005, 2007 Fiber SenSys, LLC. Printed in the United States
of America. All Rights Reserved Worldwide. No part of this publication may
be copied or distributed, transmitted, stored in a retrieval system or translated
in any form or by any means, electronic, mechanical, magnetic, manual or
otherwise, without the express written permission of Fiber SenSys, LLC, 2925
NW Aloclek Drive, Suite 130, Hillsboro, Oregon, 97124, U.S.A.
This manual is provided by Fiber SenSys, LLC. While reasonable efforts
have been taken in the preparation of this material to ensure its accuracy,
Fiber SenSys, LLC makes no expressed or implied warranties of any kind with
regard to the documentation provided herein. Fiber SenSys, LLC reserves the
right to revise this publication and to make changes from time to time in the
content hereof without obligation of Fiber SenSys, LLC to notify any person or
organization of such revision or changes.
Windows® is a registered trademark of the Microsoft Corporation.
The FD-341/FD-342 has been
supplied in a safe condition. It
has been designed to meet or
exceed the following minimum
operating conditions:
• Altitude up to 2000m
• Temperature 5°C to 40°C
• Maximum relative humidity
80% for temperatures up
to 31°C decreasing linearly
to 50% relative humidity at
40°C.
• Installation category II
• Pollution Degree 2
Refer to the appendix of this
manual for exact product
specifications.
Follow the information and
warnings in this chapter to
ensure safe operation and to
retain the unit in a safe condition.
Safety Terms
Where necessary, the following
terms may appear throughout
the manual and are defined as
follows:
CAUTION - Identifies conditions
or practices that could
result in damage to
equipment or other
property. Cautions may also
indicate a loss of data or
contamination of your files.
WARNING - Identifies conditions
or practices that could
result in non-fatal
personal injury
Safety - 3
DANGER - Identifies conditions
or practices that could
result in loss of life or
limb.
Electrical Safety
The FD-341/FD-342 is meant to
operate on user-supplied 12-24
VDC.
Power connections for the
FD-341/FD-342 are located
on the right-hand side of the
instrument (when viewed from
the front). Follow the procedures
described in the installation and
product description chapters of
this manual for instructions on
connecting the FD-341/FD-342
to a power source.
Whenever it is likely that the
integrity of the product has
been impaired, the apparatus
should be made inoperative and
secured against unintended
operation. The operation is likely
to be impaired if, for example,
the apparatus:
• Shows visible damage
• Fails to perform the intended
functions
• Has been subjected to
prolonged storage under
unfavorable conditions
Covers and Panels
To avoid personal injury, do not
remove any of the product’s
covers or panels. There are no
user-serviceable parts inside.
Product warranty is voided if the
factory seal is broken. Do not
operate the product unless the
covers and panels are installed.
Inspection
The FD-341/FD-342 components
should be inspected for shipping
damage. If any damage is
found, notify Fiber SenSys and
file a claim with the carrier. The
shipping container should be
saved for possible inspection by
the carrier.
Optical Connectors
The FD-341/FD-342 Alarm
Processing Unit (APU) uses STtype connectors. Use of other
types of connectors will reduce
optical performance and may
damage the APU connectors.
Despite this, it is good operating
practice to avoid direct eye
exposure to the output of this
product or to the open end of any
optical fiber cable connected to
this product.
• Has been subjected to severe
transport stresses
Such apparatus should not be
used until qualified servicing
personnel have verified its safety.
Safety - 1
Fiber Handling Precautions
FCC Rules
The optical fiber is made of glass. The ends of a broken fiber can be
sharp and may become lodged in
the skin. Therefore, appropriate
glass-handling precautions should
be taken.
NOTE- This equipment
has been tested and
found to comply with the
limits for a Class B digital device,
pursuant to Part 15 of the FCC
Rules. These limits are designed to
provide reasonable protection
against harmful interference in a
residential installation. This
equipment generates, uses and
can radiate radio frequency energy
and, if not installed and used in
accordance with the instructions,
may cause harmful interference to
radio communications. However,
there is no guarantee that
interference will not occur in a
particular installation. If this
equipment does cause harmful
interference to radio or television
At no time should the optical fiber
be bent in a radius less than 5 cm
(2 inches) in diameter.
Safety Symbols
These symbols are found on
components of the FD-341/FD-342:
CLASS 1 LASER OUTPUT
This product complies with 21 CFR 1040.10
This symbol identifies a Class I
laser product.
The location of key laser safety
labels is shown in the figure below.
CLASS 1
LASER OUTPUT
This product complies
with 21 CFR 1040.10
Safety - 2
reception, which can be determined
by turning the equipment off and
on, the user is encouraged to try to
correct the interference by one or
more of the following measures:
• Reorient or relocate the
receiving antenna.
• Increase the separation
between the equipment and
receiver.
• Connect the equipment into an
outlet on a circuit different from
that to which the receiver is
connected.
• Consult the dealer or an
experienced radio/TV technician
for help.
Table of Contents
1. Introduction
Introduction to the FD-340 Series. . . . . . . . . . . . . . . . . . . . . . . . 1-1
Advantages of the FD-340 Series. . . . . . . . . . . . . . . . . . . . . . . . . . . 1-2
Using This Manual. . . . . . . . . . . . . . . . . . . . . . . . . . . . . . . . . . . . . . . 1-2
Principles of Operation . . . . . . . . . . . . . . . . . . . . . . . . . . . . . . . . 1-3
How Optical Fiber Conducts Light. . . . . . . . . . . . . . . . . . . . . . . . . . . 1-3
How The Sensor Cable Works . . . . . . . . . . . . . . . . . . . . . . . . . . . . . 1-5
Effects of APU Calibration. . . . . . . . . . . . . . . . . . . . . . . . . . . . . . . . . 1-7
2. Product Description
Product Components. . . . . . . . . . . . . . . . . . . . . . . . . . . . . . . . . . 2-1
The Alarm Processing Unit (APU). . . . . . . . . . . . . . . . . . . . . . . . . . .
APU Module Connections and Indicators. . . . . . . . . . . . . . . . . . .
RS-232 Connector Pinout. . . . . . . . . . . . . . . . . . . . . . . . . . . . . . .
Sensor Cable. . . . . . . . . . . . . . . . . . . . . . . . . . . . . . . . . . . . . . . . . . .
Insensitive Lead-in Cable . . . . . . . . . . . . . . . . . . . . . . . . . . . . . . . . .
Cable Conduit . . . . . . . . . . . . . . . . . . . . . . . . . . . . . . . . . . . . . . . . . .
2-2
2-3
2-6
2-7
2-7
2-8
System Block Diagram . . . . . . . . . . . . . . . . . . . . . . . . . . . . . . . . 2-8
3. Site Planning and Assessment
Fenced Perimeters . . . . . . . . . . . . . . . . . . . . . . . . . . . . . . . . . . . 3-1
Possible Threats . . . . . . . . . . . . . . . . . . . . . . . . . . . . . . . . . . . . . . . . 3-1
Fence Line Sensor Cable Deployment Guidelines . . . . . . . . . . . . . . 3-2
Basic Deployment Configurations. . . . . . . . . . . . . . . . . . . . . . . . . 3-4
Common Applications. . . . . . . . . . . . . . . . . . . . . . . . . . . . . . . . . . 3-6
Chain Link Fence. . . . . . . . . . . . . . . . . . . . . . . . . . . . . . . . . . . . . . 3-7
Reinforced Fence Sections. . . . . . . . . . . . . . . . . . . . . . . . . . . . . . 3-8
Outriggers (Barbed or Razor Wire). . . . . . . . . . . . . . . . . . . . . . . 3-10
Corners and Posts. . . . . . . . . . . . . . . . . . . . . . . . . . . . . . . . . . . . 3-12
Service Loops. . . . . . . . . . . . . . . . . . . . . . . . . . . . . . . . . . . . . . . 3-13
Wrought Iron Fence. . . . . . . . . . . . . . . . . . . . . . . . . . . . . . . . . . . 3-14
“Anti-Ram” Barrier Fences. . . . . . . . . . . . . . . . . . . . . . . . . . . . . . 3-15
Glass Walls. . . . . . . . . . . . . . . . . . . . . . . . . . . . . . . . . . . . . . . . . 3-16
Perimeter Walls. . . . . . . . . . . . . . . . . . . . . . . . . . . . . . . . . . . . . . 3-16
TOC-1
Chain Link Fence Specifications. . . . . . . . . . . . . . . . . . . . . . . . . . . 3-19
Non-Fenced Perimeters . . . . . . . . . . . . . . . . . . . . . . . . . . . . . . 3-20
Possible Threats . . . . . . . . . . . . . . . . . . . . . . . . . . . . . . . . . . . . . . .
Buried Cable Deployment Guidelines. . . . . . . . . . . . . . . . . . . . . . .
Gravel . . . . . . . . . . . . . . . . . . . . . . . . . . . . . . . . . . . . . . . . . . . .
Lawn or Sod . . . . . . . . . . . . . . . . . . . . . . . . . . . . . . . . . . . . . . .
Nuisances . . . . . . . . . . . . . . . . . . . . . . . . . . . . . . . . . . . . . . . . . . . .
3-20
3-20
3-22
3-24
3-26
APU Hardware Deployment . . . . . . . . . . . . . . . . . . . . . . . . . . . 3-26
Example Site Assessment. . . . . . . . . . . . . . . . . . . . . . . . . . . . . 3-28
Points to Consider. . . . . . . . . . . . . . . . . . . . . . . . . . . . . . . . . . . . . . 3-29
4. Installation
Fence Line Sensor Cable Installation. . . . . . . . . . . . . . . . . . . . . 4-1
1. Surveying the Site to be Protected . . . . . . . . . . . . . . . . . . . . . . . . 4-2
2. Creating a Strategy for Protecting the Site . . . . . . . . . . . . . . . . . . 4-2
3. Multiple Zone vs. Single Zone. . . . . . . . . . . . . . . . . . . . . . . . . . . . 4-2
4. Protecting Gates . . . . . . . . . . . . . . . . . . . . . . . . . . . . . . . . . . . . . . 4-3
Single or Double Swinging Gates. . . . . . . . . . . . . . . . . . . . . . . . . 4-4
Sliding Gates. . . . . . . . . . . . . . . . . . . . . . . . . . . . . . . . . . . . . . . . . 4-4
Gates Not Requiring Protection. . . . . . . . . . . . . . . . . . . . . . . . . . . 4-5
5. Determining the Amount of Cable Needed . . . . . . . . . . . . . . . . . . 4-6
Single Zone Site Example. . . . . . . . . . . . . . . . . . . . . . . . . . . . . . . 4-6
Multiple Zone Site Example. . . . . . . . . . . . . . . . . . . . . . . . . . . . . 4-10
6. Deploying the Cable . . . . . . . . . . . . . . . . . . . . . . . . . . . . . . . . . . 4-13
Fiber Handling Precautions. . . . . . . . . . . . . . . . . . . . . . . . . . . . . 4-13
Inserting the Cable Into Conduit . . . . . . . . . . . . . . . . . . . . . . . . . 4-14
Terminating the Cable. . . . . . . . . . . . . . . . . . . . . . . . . . . . . . . . . 4-16
Attaching the Sensor Cable to the Fence. . . . . . . . . . . . . . . . . . 4-17
7. Connecting the Sensor Cable to the APU. . . . . . . . . . . . . . . . . . 4-20
Buried Sensor Cable Installation. . . . . . . . . . . . . . . . . . . . . . . . 4-21
Creating a Strategy for Protecting the Site . . . . . . . . . . . . . . . . . . . 4-22
Determining the Amount of Cable Needed . . . . . . . . . . . . . . . . . . . 4-23
Buried Application Site Example. . . . . . . . . . . . . . . . . . . . . . . . . 4-24
TOC-2
Deploying the Cable . . . . . . . . . . . . . . . . . . . . . . . . . . . . . . . . . . . .
Fiber Handling Precautions. . . . . . . . . . . . . . . . . . . . . . . . . . . . .
Laying Down the Cable. . . . . . . . . . . . . . . . . . . . . . . . . . . . . . . .
Terminating the Cable. . . . . . . . . . . . . . . . . . . . . . . . . . . . . . . . .
Covering the Cable. . . . . . . . . . . . . . . . . . . . . . . . . . . . . . . . . . .
Alarm Processor Unit (APU) Installation. . . . . . . . . . . . . . . . . .
Mounting the Enclosure. . . . . . . . . . . . . . . . . . . . . . . . . . . . . . . . . .
Wiring the APU . . . . . . . . . . . . . . . . . . . . . . . . . . . . . . . . . . . . . . . .
Adding Supervisory Resistors. . . . . . . . . . . . . . . . . . . . . . . . . . .
4-29
4-29
4-30
4-30
4-30
4-31
4-31
4-32
4-34
5. System Calibration
Overview. . . . . . . . . . . . . . . . . . . . . . . . . . . . . . . . . . . . . . . . . . . 5-1
Hyperion Hand Held Calibrator. . . . . . . . . . . . . . . . . . . . . . . . . . . . . 5-1
Connecting With a PC. . . . . . . . . . . . . . . . . . . . . . . . . . . . . . . . . . . . 5-4
Programmable Calibration Parameters. . . . . . . . . . . . . . . . . . . . 5-5
Gain. . . . . . . . . . . . . . . . . . . . . . . . . . . . . . . . . . . . . . . . . . . . . . . . . . 5-7
Setup. . . . . . . . . . . . . . . . . . . . . . . . . . . . . . . . . . . . . . . . . . . . . . . . . 5-7
Wind [1]. . . . . . . . . . . . . . . . . . . . . . . . . . . . . . . . . . . . . . . . . . . . . 5-8
Comment [2] . . . . . . . . . . . . . . . . . . . . . . . . . . . . . . . . . . . . . . . . . 5-9
Date [3] . . . . . . . . . . . . . . . . . . . . . . . . . . . . . . . . . . . . . . . . . . . . . 5-9
Calibrate [4]. . . . . . . . . . . . . . . . . . . . . . . . . . . . . . . . . . . . . . . . . . 5-9
Hist. . . . . . . . . . . . . . . . . . . . . . . . . . . . . . . . . . . . . . . . . . . . . . . . . . 5-16
Status. . . . . . . . . . . . . . . . . . . . . . . . . . . . . . . . . . . . . . . . . . . . . . . . 5-16
Version. . . . . . . . . . . . . . . . . . . . . . . . . . . . . . . . . . . . . . . . . . . . . . . 5-16
Calibrating and Testing the System. . . . . . . . . . . . . . . . . . . . . . 5-20
Checking System Loss . . . . . . . . . . . . . . . . . . . . . . . . . . . . . . . . . . 5-20
Setting the Gain. . . . . . . . . . . . . . . . . . . . . . . . . . . . . . . . . . . . . . . . 5-22
Adding Wind Processing and Event Processing. . . . . . . . . . . . . . . 5-23
Wind Processing. . . . . . . . . . . . . . . . . . . . . . . . . . . . . . . . . . . . . 5-23
Event Processing. . . . . . . . . . . . . . . . . . . . . . . . . . . . . . . . . . . . . 5-24
Testing the System . . . . . . . . . . . . . . . . . . . . . . . . . . . . . . . . . . . . . 5-30
Fence Line Applications. . . . . . . . . . . . . . . . . . . . . . . . . . . . . . . . 5-30
Buried Application. . . . . . . . . . . . . . . . . . . . . . . . . . . . . . . . . . . . 5-32
Tamper Test. . . . . . . . . . . . . . . . . . . . . . . . . . . . . . . . . . . . . . . . . 5-34
Line Test . . . . . . . . . . . . . . . . . . . . . . . . . . . . . . . . . . . . . . . . . . . 5-34
TOC-3
6. Maintenance & Calibration
Maintenance. . . . . . . . . . . . . . . . . . . . . . . . . . . . . . . . . . . . . . . . 6-1
General . . . . . . . . . . . . . . . . . . . . . . . . . . . . . . . . . . . . . . . . . . . . . . . 6-1
Support Equipment . . . . . . . . . . . . . . . . . . . . . . . . . . . . . . . . . . . . . . 6-1
Preventative Maintenance. . . . . . . . . . . . . . . . . . . . . . . . . . . . . . . . . 6-2
Troubleshooting. . . . . . . . . . . . . . . . . . . . . . . . . . . . . . . . . . . . . . 6-8
7. Network Integration
Introduction. . . . . . . . . . . . . . . . . . . . . . . . . . . . . . . . . . . . . . . . . 7-1
XML Communication. . . . . . . . . . . . . . . . . . . . . . . . . . . . . . . . . . 7-1
IP Communication Option. . . . . . . . . . . . . . . . . . . . . . . . . . . . . . . . . 7-2
Connecting the APU to the LAN . . . . . . . . . . . . . . . . . . . . . . . . . . 7-3
Setting the IP Address of the APU. . . . . . . . . . . . . . . . . . . . . . . . . 7-3
Network and Serial Setup . . . . . . . . . . . . . . . . . . . . . . . . . . . . . . . . . 7-8
XML Input / Output Messages. . . . . . . . . . . . . . . . . . . . . . . . . . . . . 7-15
Initialization. . . . . . . . . . . . . . . . . . . . . . . . . . . . . . . . . . . . . . . . . 7-17
Events. . . . . . . . . . . . . . . . . . . . . . . . . . . . . . . . . . . . . . . . . . . . . 7-22
Intrusion or Alarm . . . . . . . . . . . . . . . . . . . . . . . . . . . . . . . . . . . . 7-22
Tamper. . . . . . . . . . . . . . . . . . . . . . . . . . . . . . . . . . . . . . . . . . . . . 7-27
Adjusting Device Configuration Options. . . . . . . . . . . . . . . . . . 7-28
Platform Status Report . . . . . . . . . . . . . . . . . . . . . . . . . . . . . . . . . . 7-28
Device Configuration Report. . . . . . . . . . . . . . . . . . . . . . . . . . . . . . 7-30
Device Configuration Parameters. . . . . . . . . . . . . . . . . . . . . . . . . . 7-32
Fiber Security Network (FSN) Option. . . . . . . . . . . . . . . . . . . . 7-33
FSN Addressing Schemes. . . . . . . . . . . . . . . . . . . . . . . . . . . . . . . . 7-35
TOC-4
Appendix A: Connecting Conduit Sections
Connecting Split Conduit (EZ-300SS). . . . . . . . . . . . . . . . . . . . . A-1
Connecting Non-Split Conduit (EZ-300NSS) . . . . . . . . . . . . . . . A-2
Appendix B: Terminating Optical Fiber
ST-Type Connectors. . . . . . . . . . . . . . . . . . . . . . . . . . . . . . . . . . B-3
Appendix C: Product Specifications
Appendix D: Warranty
Index
TOC-5
Introduction
1
Introduction to the FD-340 Series
The Fiber SenSys FD-340 Series Fiber Optic Intrusion Detection System builds upon
a proven design. The optical fiber-based system has been designed to be immune
to the effects of electromagnetic interference (EMI), lightning and radio frequency
emissions. The system has also been designed to resist most environmental factors
that cause nuisance alarms such as animals, wind, trees and other such nonthreatening events. All FD-340 series models provide maximum effective intrusion
detection through their inherent system flexibility and advanced programmability. An improved network capability has been added to the FD-340 series using either
embedded Fiber Security Network (FSN) compatibility or IP/XML communication for
direct network interface. The FD-340 series offers a single-channel model (FD-341)
and a dual-channel model (FD-342).
The key component of the FD-340 series is the fiber optic sensor cable. This
uniquely designed cable, which is sensitive to movement, pressure and vibration,
can be routed along the fabric of a fence to detect climbing and cutting or it may
be routed along the ground and covered over with gravel or sod to detect an
intruder’s footsteps. In both of these applications, referred to as fence line or buried
applications respectively, detection of an intruder triggers an alarm in the Alarm
Processing Unit (APU). The FD-340 series can also be used in rooftop or wall
applications.
1-1
FD-340 Series User’s Reference Manual
Some of the intrusion threats the FD-340 can be used to detect include:
1. Fence climbing (along both the fabric and post)
2. Fabric cutting
3. Digging underneath a fence
4. Ladder assisted climbing of a fence
5. Slow walking, running or crawling across a secure zone
6. Tunneling underneath a secure zone
Advantages of the FD-340 Series
The primary advantage of the FD-340 series is its use of insensitive lead-in cable,
allowing each APU to be mounted up to 20 kilometers (12.4 miles) away from the
protected zone. The FD-340 series operates much like the Model FD-208 of the
previous generation, but a dual-channel option and IP/XML capability make the FD340 series an advanced option.
The FD-340 series can be used with two different types of sensor cable: one for
fence line applications and one for buried applications. A single run of sensor
cable can protect a zone up to 5 kilometers (16,400 feet/3.1 miles) in length.
In addition, with the dual-channel Model FD-342, the APU channels can be
programmed independently, giving users the ability to protect two separate zones
with two entirely different deployments (a buried zone application and a fence zone
application, for example) from the same APU.
Each FD-340 series APU is equipped with firmware capable of distinguishing the
effects of strong wind from those of an intruder.
Using This Manual
This user’s manual covers setup, calibration, operation and maintenance of the FD340 Series Fiber Optic Intrusion Detection System. Theory of operation is covered
in Chapter 1. Chapter 2 provides connection details and system component
description. Chapters 3 and 4 provide instructions for planning and deploying
the system. These chapters should be read as a minimum prior to installing the
system.
1-2
FD-340 Series User’s Reference Manual
Two models are currently available in the FD-340 series: the FD-341 singlechannel model and the FD-342 dual-channel model. Since both units are similar
in construction and operation, the text will refer to the FD-342 throughout the
remainder of this manual, rather than each model individually. Any points on which
the FD-341 differs will be addressed specifically.
Principles of Operation
The FD-342’s effectiveness is based upon the abilities of its fiber optic sensor
cable. The system works because while the sensor cable is immune to the effects of
lightning, electromagnetic interference (EMI) and radio frequency transmissions, it is
still extremely sensitive to movement, vibration and even pressure. The FD-342 uses
this principle by transmitting light from a laser in the APU through the sensor cable
and back to a detector. When the sensor cable is physically disturbed by vibration or
pressure, it induces a phase shift in the transmitted light which the APU receiver then
detects and translates into an event.
How Optical Fiber Conducts Light
Optical fiber conducts light using principles of refraction. Light traveling in a vacuum travels at 3.0 x 10⁸ meters/second; however, light
travels at a slower speed when traveling through a different medium such as glass.
When we compare the speed of light in a vacuum to the speed of light as it travels
through a medium, we end up with a ratio called the index of refraction. This ratio
can be expressed:
n=
speed of light in a vacuum
speed of light in a medium
Where n is the index of refraction.
An optical fiber is constructed so that the light-conducting core (see figure 1-1)
is made of a silicon material with one index of refraction while the cladding that
surrounds it is made of silicon with a lower index of refraction, meaning the material
is less dense and light travels faster through it.
1-3
FD-340 Series User’s Reference Manual
Cladding
n = 1.410
CORE
n = 1. 467
Figure 1-1: Cross-sectional view of a glass fiber
Modes of light entering the core at an angle reach the cladding and bend back into
the core because of a difference in propagation speed (light travels faster in the
cladding – see figure 1-2). This bending of light is known as refraction.
1-4
FD-340 Series User’s Reference Manual
Cladding
Light travels faster
here than it does
here
Core
Cladding
Figure 1-2: Light refraction and propagation in a fiber
Because modes of light traveling at an angle are bent back into the core (a
principle called Total Internal Reflection), they continue to propagate down the
length of fiber, enabling the fiber to conduct light from one end to the other.
How the Sensor Cable Works
The sensor cable is an optical fiber with a specific core size and unique jacket
design that ensures it picks up tiny vibrations while remaining relatively impervious
to the effects of weather and other harsh environmental variables.
While light is launched from the laser into the fiber optic cable, the APU monitors
its phase as it returns. Assuming nothing has disturbed the sensor cable or
propagation of the light, the phase remains the same. However, when the sensor
cable is disturbed by movement or vibration, the conditions of the traveling modes
of light, change.
1-5
FD-340 Series User’s Reference Manual
Undisturbed Fiber
Motion or Vibration
Pressure
Figure 1-3: Effects of motion and vibration
Motion, vibration or pressure induces modal interference resulting in a net phase
shift in the light. The APU receiver detects the phase shift, which is directly
proportional to the amount and type of disturbance detected by the sensor cable.
The detected signal is then processed to determine if it represents a valid event or
if it is something to be ignored. Whether or not a detected signal qualifies as an
event is determined by user-adjusted APU calibration parameters.
1-6
FD-340 Series User’s Reference Manual
Effects of APU Calibration
Each channel of the FD-342 processes signals from a separate run of sensor cable
(figure 1-4).
FD-342 Alarm Processing Unit
Channel B
Optical
Channel B Signal
Processing
Channel A Signal
Processing
Channel A
Optical
Signal
Signal
Figure 1-4: The FD-342 Alarm Processing Unit
Note:
Only one channel is available on the Model FD-341.
Within each channel of the APU, the electronics take the returning optical signal
and convert it into an electrical one. The electrical signal is then sent to an analogto-digital converter (ADC) which digitizes it. A Fourier transform is performed to
convert the signal from the time domain to the frequency domain to look for a
phase shift in the propagating light (caused by a disturbance of the sensor cable).
1-7
FD-340 Series User’s Reference Manual
Two separate processors reside in each channel of the FD-342 APU to process
and evaluate the incoming digitized signal. These processors, labeled Processor
1 and Processor 2, are programmed individually to alarm for different conditions
(figure 1-5). This allows the user to calibrate any given channel of the FD-342 to
take into account how a fence-climbing intruder affects the sensor cable versus
one who is cutting the fence fabric. With the FD-342, Processor 1 default settings
are optimized to detect fence climbing and Processor 2 settings are optimized to
detect fabric cutting. With buried applications, only 1 processor is needed. Thus,
Processor 2 is typically disabled. For more information on these settings, see
Chapter 5.
When a phase shift is detected in the returning optical signal and the magnitude of
the initial disturbance, its corresponding frequency and other conditions meet the
programmed criteria in either Processor 1 or Processor 2, an alarm condition will
result. Figure 1-5 depicts the signal processing diagram for each channel of the
FD-342 APU.
1-8
FD-340 Series User’s Reference Manual
Optical
Energy
Optical Energy
Converted to
Electrical Signal
Electrical Signal
Analog-to-Digital
Converter (ADC)
Digitized Signal
Digital Signal
Processor
Electrical Signal
(Time Domain) is
Converted To
Frequency Domain
Processor 1
Signal
Qualification
Processor 2
Signal
Qualification
Processor 1 Alarm
Processor 2 Alarm
Processor 1 Alarm
OR
Processor 2 Alarm
Alarm Indication
Figure 1-5: FD-342 signal processing block diagram (Channel A or Channel B)
1-9
FD-340 Series User’s Reference Manual
When an alarm condition is met, the APU activates an alarm relay, causing a
corresponding set of normally-open and normally-closed contacts to change state
in the affected channel. The FD-342 does not provide users with any active alarm
signals.
Users can calibrate or adjust the FD-342 parameters to account for the affects of
wind, tree branches, animals and other sources which might generate nuisance
alarms. Proper calibration ensures that nuisances are largely ignored while valid
conditions created by an intruder generate an alarm, regardless of how stealthy.
For more detailed information on system calibration, please see Chapter 5.
1-10
2
Product Description
Product Components
The FD-340 series features two Alarm Processing Unit (APU) types: the singlechannel Model FD-341 and the dual-channel Model FD-342. Both models can come
with or without the optional NEMA 4X enclosure. A complete FD-340 series system
includes the following components:
1. The Alarm Processing Unit (APU)
2. Sensor cable
3. Insensitive lead-in cable
4. Cable conduit (fence-mounted applications only)
5. Optional NEMA 4X enclosure
Insensitive
Lead-in Cable
Alarm Processing
Unit (APU)
Sensor
Cable
Conduit
Figure 2-1: FD-340 Series system components (Model FD-342 shown)
The sensor cable, insensitive lead-in cable and protective conduit are available
through Fiber SenSys. All are compatible with the FD-341 and FD-342.
2-1
FD-340 Series User’s Reference Manual
The Alarm Processing Unit (APU)
The Alarm Processing Unit is a module containing a laser, optical detector and
the electronics for processing return optical signals. The APU is a user-calibrated
instrument, allowing users to define the alarm thresholds. When all pre-defined
alarm conditions are met, the APU activates an alarm relay in the affected channel,
causing its corresponding normally-open and normally-closed relay contacts to
change state. The FD-341 and FD-342 APU do not provide active alarm signals
(figure 2-2).
Alarm Relay K1
Relay Enable
Signal from
Processor
Normally - Open
Contact
Alarm Common
Normally - Closed
Contact
9
8
7
6
FAULT
5
4
TAMPER
3
GND 2
Figure 2-2: FD-342 alarm relay contacts schematic (unpowered
state)
12-24 VDC
+1(National
Each FD-340 series APU can be ordered with or without a NEMA
RS-232
DC 12-24 V
POWER
ALARM A
Electrical Manufacturers Association) enclosure.
2-2
Fiber SenSys, Inc.
FD-340 Series User’s Reference Manual
APU Module Connections and Indicators
The FD-341 APU has 5 input /output connectors; the FD-342 has 7. There are 2
optical connectors (labeled “Input” and “Output”) for each available channel. In
addition, each APU has a terminal connector strip for DC power and relay leads,
an RS-232 connector and an auxiliary 12-24 VDC auxiliary connector. Figure 2-3
shows the layout of the connectors on a Model FD-342 APU.
RS-232
Connector
Auxiliary Power
Connector
Power and
Relay
Connectors
Channel B
Optical Output
Channel A
Optical Output
Channel B
Optical Input
Channel A
Optical Input
Test Buttons
Figure 2-3: The FD-342 APU connectors
A Model FD-341 is identical in layout, but lacks a second channel.
At the right-hand side of the APU module is a 12-pin terminal strip (Model FD342) or a 10-pin terminal strip (Model FD-3 41) for connecting electrical power and
alarm indicators. Each pin is labeled. The terminal pins, from bottom to top of the
terminal strip, are listed in Table 2-1.
2-3
FD-340 Series User’s Reference Manual
Table 2-1
Pin
Description
1
+12 - 24 VDC
2
Ground
3
Tamper Input
4
Tamper Input
5
Fault
6
Fault
7
Channel A Normally-Closed
8
Channel A Common
9
Channel A Normally-Open
10
Channel B Normally-Closed
11
Channel B Common
12
Channel B Normally-Open
Power. Pins 1 and 2. 12 to 24 VDC is connected to these terminal pins. Positive
lead is the bottom-most pin (Pin 1) and ground is the pin immediately above it (Pin
2).
Tamper. Pins 3 and 4. The leads of the tamper switch on the NEMA enclosure are
normally connected here. Whenever the tamper circuit opens (because the tamper
switch is not set or the enclosure door opens, etc.), the alarm relay activates
and remains activated until the circuit closes again or the tamper feature is
disabled. For more information on disabling the tamper switch, see Programmable
Calibration Parameters in Chapter 5.
Fault. Pins 5 and 6. These pins are used to connect the fault relay to a remote
indicator. The normally-closed fault relay contacts open if there is a loss of optical
power or if power drops more than 25 dB below the nominal threshold on either
channel.
2-4
FD-340 Series User’s Reference Manual
One fault relay is assigned to each channel in the APU; however, all fault relays
share a common set of relay contacts. Therefore, while fault indication is displayed
on the APU front panel for each individually affected channel, only one set of fault
relay contacts is provided.
Channel A Alarm (normally-closed contact). Pins 7 and 8. When the APU
determines an alarm condition in the channel is met, the contact opens. In an
unpowered state, this contact is open.
Channel A Alarm (normally-open contact). Pins 8 and 9. When the APU
determines an alarm condition in the channel is met, the contact closes. In an
unpowered state, this contact is closed.
Channel B Alarm (normally-closed contact). Pins 10 and 11. When the APU
determines an alarm condition in the channel is met, the contact opens. In an
unpowered state, this contact is open.
Channel B Alarm (normally-open contact). Pins 11 and 12. When the APU
determines an alarm condition in the channel is met, the contact closes. In an
unpowered state, this contact is closed.
Warning!
Do not apply AC voltage to these pins. The alarm relay
contacts are rated for DC voltage only (100 mA at 24 VDC).
LED indicators. LED indicators for each available channel are found on the front
panel of the module.
• “Fault” indicates a loss or significant degradation of returning optical power
• “Event” indicates a disturbance or event has been detected in the sensor cable
• “Alarm” indicates an alarm condition has occurred
• “Power” indicates the module is plugged in and receiving power
The Test button found below the LED indicators activates the alarm and fault relay.
Pressing the Test button causes the Alarm and Fault LEDs to illuminate and the
corresponding relay contacts to change state.
2-5
FD-340 Series User’s Reference Manual
The front panel of the APU has an RS-232 connector for connecting to a calibration
interface (such as a PC with terminal emulation software or the Hyperion hand held
calibrator). It also features an auxiliary DC power connector for supplying 12-24
VDC
For more information on the RS-232 connection pinout, see RS-232 Connector
Pinout following this section.
RS-232 Connector Pinout
The pinout for each RS-232 connector on the FD-341 and FD-342 APU is as
follows:
5
4
9
3
8
2
7
Pin 1
6
Figure 2-4: The APU RS-232 connector pinout
Table 2-2
Pin Number
Description
1
No connection
2
T x D transmit
3
R x D receive
4
No connection
5
Ground
6
No connection
7
RTS
8
CTS
9
No connection
Note:
Cables connected to the APU RS-232 connector should be straight-pin DB-9
serial cable.
2-6
FD-340 Series User’s Reference Manual
Sensor Cable
The sensor cable for the FD-340 series is distinguished by its dark green or brown
protective jacket. This jacket ensures the cable is resistant to weather, dirt, etc.
The sensor cable forms the backbone of the FD-340 series.
Sensor cable comes in 2 configurations, depending upon the application:
SC-3 (brown jacket) – 3 mm sensor cable used for fence line or wall applications
SC-4 (green jacket) – 4 mm sensor cable used for buried applications
Sensor cable comes in varying lengths, with up to 2000 meters (6500 feet) per
spool.
Insensitive Lead-in Cable
The insensitive lead-in cable, so named because it is relatively unaffected by
vibration, motion and pressure, is distinguished by its gray or blue protective jacket.
Like the sensor cable, the insensitive lead-in cable is made of optical fiber that
is immune to RF and EMI energy. The insensitive lead-in cable is also weather
resistant. The lead-in cable is used to transmit light from the APU to the sensor
cable mounted in the protected zone and back again.
A single run of insensitive lead-in cable has a maximum range of 20 kilometers.
Insensitive lead-in cable comes in 3 configurations, depending upon the FD-340
series’ application:
IC-3 (gray jacket) - 3 mm exterior-grade cable for above ground applications
IC-3D (gray jacket) - 3 x 6 mm exterior-grade duplex cable containing two fibers
for sending and receiving within a single cable (above ground applications)
IC-4 (blue jacket) - 4 mm exterior-grade cable for buried applications
2-7
FD-340 Series User’s Reference Manual
Cable Conduit
The sensor cable is enclosed in a protective cable conduit before it is deployed.
The conduit most commonly used with the FD-342 is the EZ-300NSS, offered by
Fiber SenSys in a kit containing 100 meters of non-split conduit, 500 stainless steel
wire ties, a barrel coupler and a box coupler for connecting two sections together.
Fiber SenSys also offers a split conduit kit, the EZ-300SS. This kit contains 100
meters of split conduit, 4 expansion joints (for coupling sections of conduit together)
and 500 stainless steel twist ties.
System Block Diagram
A block diagram of the FD-342 and its system components is found in figure 2-5:
FD-342 Alarm
Processing
Unit
Insensitive Lead
Channel B
Laser
Sensor Cable Deployed in the
protected zone
Insensitive Lead
Channel A
Laser
Sensor Cable Deployed in the
protected zone
Digital Signal
Processor
eteD
rotc
Insensitive Lead
Dete
ctor
Insensitive Lead
RS232C
Normally Open
Normally Closed
Alarm
Output
Channel B
Alarm Relay
Outputs
Channel A
Alarm Relay
Outputs
Alarm
Output
Normally Open
Normally Closed
FAULT
Figure 2-5: FD-342 system block diagram
For more information on the principles of operation behind the FD-342 and its
components, refer to Principles of Operation on page 1-3 in Chapter 1.
2-8
Site Planning and Assessment
3
The successful installation and operation of the FD-342 is determined by a thorough
understanding of the security needs of the site to be protected as well as proper
deployment of the sensor cable. This chapter will lead the reader through the site
planning and threat assessment procedure.
Prior to installing the FD-342 and deploying the sensor cable, the site to be protected
must be assessed carefully for all security needs and threats against it. For example,
if there is a possibility that a potential intruder could cut the fabric of a perimeter
fence, sensor cable needs to be deployed along the fabric to detect the intrusion.
In addition to the security needs and threat assessment, the system maintenance
requirements and compatibility of the equipment must also be taken into account. If,
for example, the FD-342 alarm relays are wired to activate remote video equipment,
the maintenance requirements and compatibility of the FD-342 and video equipment
should be considered.
Careful assessment of these principles is necessary for a successful installation.
Fenced Perimeters
Possible Threats
There are 6 specific threats against any fence line:
• Climbing the fabric of the fence
• Climbing the fence posts
• Cutting the fabric
• Digging under the fence
• Lifting the fence fabric
• Ladder-assisted climbing of the fence
Successful protection against these threats depends on the proper deployment of
the sensor cable and calibration of the APU.
3-1
FD-340 Series User’s Reference Manual
Fence Line Sensor Cable Deployment Guidelines
Deploying the sensor cable properly will ensure the FD-342 detects threats against
a fence line.
When determining a strategy for protecting the site, there are 3 important points to
keep in mind regarding the sensor cable:
• The sensor cable detects motion, vibration and pressure changes. Therefore,
the sensor cable should be deployed in such a way that it will ideally be free of
these effects until and unless they are caused by an intruder.
• The sensor cable is uniform, meaning it has the same level of sensitivity
throughout the entire length of the cable. Areas which are affected better by
vibrations may need sensor cable run through only once but areas in which
vibration is conducted less readily (such as fence posts or reinforced fence
sections) should have more sensor cable deployed to compensate.
• The detection system is linear, meaning the APU cannot distinguish where
along the sensor cable an event occurs. In order to localize the point where
an intrusion occurs, the FD-342 deployment must be separated into multiple
zones at intervals reasonable enough to help locate an intruder when an alarm
is received.
To ensure a fence line sensor cable successfully detects against intrusions into
fenced perimeters, take these other considerations into account:
3-2
FD-340 Series User’s Reference Manual
Fence noise. The fence should not generate excessive noise. For chain link
fences, re-tensioning the fence fabric and adding additional fence fabric wire ties
to eliminate metal-to-metal banging of the fabric can quiet the fence. The fabric
should also be secured firmly to all fence posts.
Fence material. The entire fence line should be composed of the same material
inside the protected zone (similar gauge and construction). For a chain link fence,
all of the fabric in the zone should be tensioned to the same level.
Fence clearance. There should be a clear area around the fence on both sides,
free from tree limbs, large rocks or structures – man-made or natural – which could
aid an intruder in climbing over. There should also not be any point along the fence
line under which an intruder could easily crawl or dig under the fence.
Man-made and natural barriers. Buildings, structures, waterfronts and other
barriers used in place, or as part of the fence line, should provide adequate
protection against intrusion. Ensure there are no windows, doors, openings or
unguarded means of access.
3-3
FD-340 Series User’s Reference Manual
Basic Deployment Configurations
Figure 3-1 shows the two most common fence line sensor cable deployments
for the FD-340 series based upon the level of the security threat: one for low-tomedium threat levels and one for high threat level security.
Loopback Deployment (Medium Threat Level)
Feed-through
Couplers in
protective
Junction Box
(Sensor Cable)
1/4 Fence Height
Overlapping
Cables at Zone
End
1/4 Fence Height
(Insensitive Leads)
High Threat Level Deployment
(Sensor Cable)
1/4 Fence Height
Overlapping
Cables at Zone
Ends
1/4 Fence Height
(Insensitive Leads)
Figure 3-1: Sensor cable deployment types
Table 3-1 describes these deployment types in detail.
3-4
FD-340 Series User’s Reference Manual
Table 3-1
Loopback
Low to medium threat level deployment where more
sophisticated intrusion attempts are expected from
intruders. Deploying the sensor cable along the lower
and upper levels of the fence places the sensor cable in
closer proximity to the source of the stealthy intrusion (e.g.
intruders attempting to tunnel under the fence, climb fence
posts, etc.)
High Threat Level
Provides maximum detection capability of stealthy
intrusion attempts for high security facilities. Sensor cable
added to the fence outriggers raises the system sensitivity
to intruders trained in security system penetration
In these deployment configurations, note that the sensor cable is routed along
the fence in a loop encompassing the length of the zone (for a maximum total
length of 5 kilometers or 16,400 feet). This is a configuration known as loopback
deployment. The advantage of the loopback deployment is that it increases the
system’s sensitivity to detecting stealthy intrusion attempts.
For all loopback deployments, the sensor cable loop is attached 1/4 of the fence
height from the top and bottom rails of the fence.
To further increase the system sensitivity to stealthy intrusion attempts, the
sensor cable should be routed between the fence fabric and the fence posts
where possible. The sensor cable should also overlap from one zone to the
next to avoid any gaps in sensor coverage. With high threat level installations,
running an additional sensor cable loop up each post to the top of the outrigger
protects against intruders climbing the fence posts. For more information
on protecting fence posts, see Corners and Posts on page 3-12. Details for
protecting top guards are discussed further in Outriggers (Barbed or Razor Wire)
on page 3-10.
The Model FD-342 dual-channel APU is capable of supporting two separate
zones or sensor cable deployments. Users have the option of installing the
sensor cable for both channels in the same type of application or in completely
different applications (figure 3-2). 3-5
FD-340 Series User’s Reference Manual
Common Applications
Zone B
(Sensor Cable)
Zone A
(Sensor Cable)
Junction Box
(Insensitive Leads)
Zone B
(Sensor Cable)
Junction Box
(Sensor Cable)
Zone A
Mixed Applications
Figure 3-2: Applications of the FD-342
There are many ways to deploy the sensor cable to protect a fence line, of which
the deployments in figure 3-1 and figure 3-2 are just a few. Choose a cable
deployment that best protects the fence line against all possible types of intrusion
determined during threat assessment.
While developing a strategy take note of and record:
• The length of the fenced perimeter (not including the gates)
• The number of gates and the length of each
• The number of reinforced sections and their lengths
• Distance from the fence to the APU
• The width of roadways or walkways through all site gates
3-6
FD-340 Series User’s Reference Manual
Note:
Keep a detailed list of these factors and their associated numbers. They will
be used during the installation procedure.
The following sections outline recommended sensor cable deployment strategies for
different barrier types.
Chain Link Fence
Generally, sensor cable deployed across the middle of a chain link fence is
enough to detect any intruder attempting to climb over or cut the fence fabric but
deploying sensor cable in a loop raises the probability of detecting these threats.
The loopback configurations illustrated in figure 3-1 also protect against intruders
attempting to lift the fence fabric.
In order for the sensor cable to be most effective, the fence should meet the
recommended height specifications outlined in this chapter. Fences taller than
2.4 meters (8 feet) may require repositioning of the sensor cable or adding an
additional loop of deployment. For more information, see Chain Link Fence
Specifications later in this chapter.
3-7
FD-340 Series User’s Reference Manual
Reinforced Fence Sections
Because they’re less likely to transmit vibration as readily as non-reinforced fence
sections, reinforced fence sections require additional cable in order to increase
the effectiveness of the cable through the region. The best and simplest way to
accomplish this is to add an additional local “loop” of sensor cable in the reinforced
section as shown in figure 3-3. In effect, adding the loop increases the amount of
sensor cable per unit of area, resulting in a net increase in vibration sensitivity in
the affected section.
8-10 inches
Figure 3-3: Deployment in a reinforced fence section
As a rule of thumb, the extra loop is added to both the top and bottom strands
of sensor cable (for a loopback deployment). Make the width of the loop(s)
between 20 to 25 cm (8 to 10 inches).
Cable deployment in reinforced sections differs when a top guard is used in
tandem with the fence. In such a case, the sensor cable is attached just 5 cm
(2 inches) from the bottom rail of the fence, as shown in figure 3-4. In all nonreinforced sections, the sensor cable is attached 1/4 of the fence height above
the bottom rail.
3-8
FD-340 Series User’s Reference Manual
8-10 inches
24 inches
24 inches
2 inches
Figure 3-4: Detail of a reinforced section with an outrigger
The loop in the top strand of the sensor cable should extend to the top of the
outriggers and top guard. As is done with fence posts, the sensor cable is run
between the fence fabric and the reinforcement bar where possible.
The added loops on the fence posts increases the system sensitivity in the
region. For more information, see Corners and Posts beginning on page 3-12.
3-9
FD-340 Series User’s Reference Manual
Outriggers (Barbed or Razor Wire)
The typical way of protecting an outrigger, such as barbed or razor wire, is to
deploy sensor cable across it. In the case of barbed wire, this means looping the
sensor cable across all strands as shown in figure 3-5. Angled Top Guard
Vertical Top Guard
Angled Top Guard (Reinforced)
Vertical Top Guard (Reinforced)
Figure 3-5: Examples of barbed wire sensor deployment
3-10
FD-340 Series User’s Reference Manual
In all cases where barbed wire is used with a chain link fence, the sensor cable
should be deployed in the high security configuration shown previously in figure
3-1. Ensure the sensor cable loops protecting the outrigger extend to the top.
An extra cable loop must be added to the middle of any reinforced sections.
(Zone End)
If razor wire (also known as concertina or “c-wire”) is used as a top guard, the
recommended method of deploying sensor cable is to attach it to the inside of the
razor wire coils.
Sensor cable in conduit is
placed along the inside of
the wire’s radius
Figure 3-6: Razor wire sensor cable deployment
3-11
FD-340 Series User’s Reference Manual
Corners and Posts
Because corners and posts are rigid and less likely to transmit vibration than the
fence fabric, they should be protected by adding extra sensor cable in a loop as
shown in figure 3-7.
Posts with Outriggers
Posts without Reinforced Sections
Corner Posts with Outriggers
Corner Posts
Figure 3-7: Fence post protection methods
3-12
FD-340 Series User’s Reference Manual
For fences with outriggers, the cable loop should extend up to the top of the
outrigger, protecting both the post and outrigger. Because fence sections at
corners are normally reinforced, the prescribed method for deploying sensor
cable in reinforced sections should be followed. For more information, see
Reinforced Fence Sections on page 3-8.
Service Loops
Loops should be added at periodic intervals to allow the sensor cable to be respliced as necessary without having to remove then redeploy the entire cable. A
good rule of thumb to use when considering service loops is to plan on adding
one every 91 meters (300 feet) or so. Generally, plan on using an additional 1
and a half meters (about 5 feet) of cable with each sensor loop.
1.5 feet
Figure 3-8: Service loop in sensor cable
3-13
FD-340 Series User’s Reference Manual
Wrought Iron Fence
With proper deployment, the FD-342 sensor cable can protect a wrought iron
fence as well as it protects a chain link fence. For such an instance, the sensor
cable is best deployed along the top and bottom fence rail. Because a wrought
iron fence is designed to be rigid, the FD-342 must be calibrated carefully to
ensure that nuisances have a minimal effect while maximum intrusion protection
is afforded the fence.
Sensor Cable on
Fence Rail
Figure 3-9: Deployment on a wrought iron fence
3-14
FD-340 Series User’s Reference Manual
“Anti-Ram” Barrier Fences
Modern fence manufacturers have created various versions of “anti-ram” barrier
fences. These barriers, which resemble wrought-iron fences in appearance,
are made to withstand direct, high-pressure impacts from heavy vehicles. Such
barriers are successful because they have built-in channels, allowing for the
insertion of heavy, rolled-steel reinforcement cable. These channels are also
ideal for inserting sensor cable.
With anti-ram barrier fence, the FD-342 fiber optic sensor cable is deployed
much like with a standard wrought iron fence. The cable is inserted into conduit
(usually black in color) and attached to the top and bottom rails or channels.
Secure the conduit/sensor cable assembly in place using UV-resistant cable ties.
On most anti-ram barrier fences, the channels have been perforated with cutouts
every 15 cm (6 inches) to allow cable ties to be threaded through.
Tie Wrap
Sensor Cable
/ Conduit
Figure 3-10: Adding sensor cable to anti-ram barrier fence
3-15
FD-340 Series User’s Reference Manual
Glass Walls
The sensor cable can be mounted flush against the surface of the glass wall and
detect virtually any threat against the glass. When deploying the cable, consider
the need to place the cable so it is inconspicuous and develop a strategy
accordingly. Also, take the effect of possible nuisances into account, i.e. the
wind, low frequency vibrations from aircraft, animals tapping against the glass,
etc.
Perimeter Walls
Concrete resting caps are used for decorative purposes with many brick wall
perimeters. These resting caps make ideal platforms for concealed sensor cable.
Sensor cable placed under a loose resting cap will detect an intruder attempting
to climb over top of the wall (figure 3-11). Capstone
Sensor cable resting between
the capstone and brick wall
Wall
Figure 3-11: Deployment under a loose resting cap
When deploying a sensor cable in this application, a loopback configuration
should be used to ensure there is equal weight distribution of the resting cap
across the sensor cable (two cable strands can carry the weight evenly, as
opposed to a single strand of cable which forms a fulcrum). Keep in mind that
the resting cap should be secure enough to prevent movement during strong
winds. Likewise, it should be unaffected by the presence of small birds, squirrels,
etc.
3-16
FD-340 Series User’s Reference Manual
SC-4
Sensor Cable
Wall (top view)
APU Enclosure
(top view)
Figure 3-12: Loopback deployment below the capstone (top view)
SC-4 sensor cable must be used for concealment beneath any resting cap.
3-17
FD-340 Series User’s Reference Manual
Sensor cable is deployed on outriggers to protect concrete perimeter walls
lacking resting caps. This configuration also detects intruders attempting to climb
over the top (figure 3-13).
Outriggers used to support the sensor cable should be imbedded in the wall at
least 2.5 cm (1 inch) or more and should have approximately a 10 cm (4 inch)
clearance. Outriggers should also be imbedded near the outside edge of the wall
at approximately a 45° angle. This practice ensures any attempt to scale the wall
using a ladder will be guarded against. As with brick wall/capstone deployments,
the sensor cable should be laid out in a loopback configuration.
Sensor cable in
protective conduit
10 cm
2.5 cm
min
Figure 3-13: Protecting a concrete perimeter wall
All sensor cable should be deployed in protective conduit with this configuration.
3-18
FD-340 Series User’s Reference Manual
Chain Link Fence Specifications
In order for a chain link fence to be most effective against intrusion, there are 8
specifications it should conform to:
Fabric. The fence fabric should be composed of steel chain with a mesh thickness of
at least 9 gauge with openings not larger than 5 cm (2 inches). Additionally, the fabric
should be tensioned consistently across its length throughout the protected zone.
Fabric ties. Only 9 gauge steel or larger ties are recommended. The fabric ties should
be electrolytically compatible with the fence fabric to prevent corrosion. The fence
fabric should be attached to the post using at least 4 evenly-spaced ties. All ties should
be tight enough against the post to eliminate (or significantly reduce) mechanical noise.
Top guard outrigger. Outriggers, when used, should angle out in the direction
of the unprotected area. At least three strands of barbed wire should be installed
perpendicular to and attached to the top guard. The barbed wire should be welltensioned and fastened where needed to eliminate mechanical noise.
Height. The height of the fence should be at least 2.1 meters (7 feet).
Fence posts, supports and hardware. All posts, supports and hardware should be
pinned or welded to prevent disassembly of the fencing or removal of its gates. All
posts and structural supports should be located on the inner side of the fencing. Posts
should be secured in the soil with cement to prevent shifting, sagging or collapse.
Additionally, posts should be placed every ten feet or less.
The use of “hog rings” and aluminum wire is not recommended.
Reinforcement. Taut reinforcing wires should be installed and interwoven or affixed
with fabric ties along the top and bottom of the fence for stabilization of the fabric.
Ground clearance. The bottom of the fence fabric should be within 5 cm (2 inches) of
firm soil or buried sufficiently in soft soil.
Culverts and openings. Culverts under or through a fence should consist of pipe 25
cm (10 inches) in diameter or less. If a larger pipe must be used, it should be properly
grated and equipped with sensors to prevent access.
For more information on these requirements, refer to Security Fence Construction
Requirements, a document available through Fiber SenSys.
3-19
FD-340 Series User’s Reference Manual
Non-Fenced Perimeters
Possible Threats
There are 4 basic threats to any area that is not guarded by a fence:
• Walking across the area
• Running into the area
• Crawling
• Tunneling
These intrusions can each be detected by a proper buried deployment of the
sensor cable around the perimeter of the area.
Buried Cable Deployment Guidelines
A buried sensor cable application is used to detect threats against an open,
unfenced boundary or area. This includes areas unprotected by a fence across
which an intruder may walk, run, crawl or attempt to tunnel under. With the buried
application, the sensor cable is deployed in a serpentine pattern between 7 to 10
cm (8 to 4 inches) under a medium such as sod or gravel. An intruder walking
across or moving into the area exerts pressure and vibrations that are then sensed
by the cable, triggering an alarm state in the APU.
The best type of medium for buried applications is one that readily transmits
vibrations from an intruder directly to the sensor cable. Generally, Fiber SenSys
recommends using gravel for this reason. However, both sand and sod are
acceptable mediums provided some fundamental buried application guidelines are
followed.
Note:
The FD-341 / FD-342 sensor cable is not rated for buried applications where
asphalt or concrete is used as the burial medium.
3-20
FD-340 Series User’s Reference Manual
As discussed previously in this chapter, the Model FD-342 dual-channel APU can
be set up with one channel operating in a buried application, even if the other
channel is being used for a fence line application (refer back to figure 3-2).
Detection Range
(overhead view)
Under ideal circumstances - that is, when the cable is buried in the ideal medium
such as gravel - the sensor cable detects vibrations in a detection range up
between 30 and 46 centimeters (12 and 16 inches) surrounding the cable.
However, in a less fluid medium, such as sod, the detection range drops to about
0.3 meters (12 inches) around the cable. This is because in harder mediums like
sod, the sensor cable detects more pressure than vibration.
12-18"
12-18"
Sensor Cable
12-18"
12-18"
Figure 3-14: Detection range around the buried sensor cable
The SC-4 sensor cable is designed for direct burial. It is not necessary to enclose
the sensor cable in conduit for buried applications.
The following sections outline recommended buried cable deployment strategies
for different medium types.
NOTE:
For additional details on buried cable deployment, please reference the
Application Note Buried Installations prepared by Fiber SenSys.
3-21
FD-340 Series User’s Reference Manual
Gravel
When using gravel as the burial medium, the sensor cable should be laid atop a
bed of gravel measuring at least 8 to 15 cm (3 to 6 inches) deep (figure 3-15). The
cable should be deployed in a serpentine pattern, with the distance between loops
measuring between 12-16 inches (the detection range in gravel is generally 12-16
inches (30 - 40 cm).
Note:
Recall that the detection range surrounding the sensor cable in gravel is
between 12 and 16 inches (30 - 40 cm).
The gravel used should be smooth, round and approximately 2 - 4.8 cm (¾ - 1-1/2
inches) in diameter for best conduction of movement, vibration and pressure. The
absence of sharp edges in round gravel also prevents damage to the sensor cable
in the event the gravel is compacted.
All gravel should be clean of dust and sand to prevent absorption or dampening
of vibration. Water should not be allowed to accumulate if the gravel is deployed
in a region where temperature falls below the freezing level. This is because the
formation of ice dampens vibration.
When creating a buried zone in gravel, a minimum of 4 passes (or 3 loops - see
figure 3-15) is recommended in order to create a zone wide enough that potential
intruders cannot step or leap across it.
3-22
FD-340 Series User’s Reference Manual
(Gravel)
(Gravel)
3 inches (8 cm)
3 - 6 inches
(8 - 15 cm)
(SC-4 Sensor Cable)
Detection Zone (Overhead view)
12 - 16 inches (30 - 40 cm)
12 - 16 inches (30 - 40 cm)
12 - 16 inches (30 - 40 cm)
12 - 16 inches (30 - 40 cm)
12 - 16 inches (30 - 40 cm)
(SC-4 Sensor Cable)
Figure 3-15: Sensor cable layout in gravel
3-23
APU
FD-340 Series User’s Reference Manual
Lawn or Sod
As with gravel, the sensor cable is deployed in sod using a serpentine pattern. The
cable should be laid down at least 2 - 3 inches (5 - 8 cm) below the sod layer to
prevent entanglement in the roots (figure 3-16).
(Sod)
2 - 3 inches
(5 - 8 cm)
(Soil)
(SC-4 Sensor Cable)
Detection Zone (Overhead view)
6 - 12 inches (15 - 30 cm)
6 - 12 inches (15 - 30 cm)
6 - 12 inches (15 - 30 cm)
6 - 12 inches (15 - 30 cm)
6 - 12 inches (15 - 30 cm)
(SC-4 Sensor Cable)
Figure 3-16: Sensor cable layout using sod
3-24
APU
FD-340 Series User’s Reference Manual
Installation begins by cutting through the lawn using a sod cutter and rolling it
up into sections or segments. Place the sensor cable directly atop the ground in
the pattern shown in figure 3-16. If there is hard clay under the sod, a 2.5 cm (1
inch) layer of sand must be laid down before deploying the cable. This layer of
sand ensures the sensor cable is not insulated against the effects of pressure and
vibration (hard clay conducts neither).
Sod Roll
Sand Layer
Sensor Cable
Figure 3-17: Buried application using sod
With sod, the detection range is no more than 12 inches. A minimum of six passes
of sensor cable are recommended for sod applications to ensure the zone is wide
enough to prevent intruders from walking or leaping across.
Roll the sod back into place once the cable is deployed. Water the sod frequently
and keep it moist to ensure it continues to conduct vibration and pressure to the
sensor cable.
3-25
FD-340 Series User’s Reference Manual
Nuisances
As part of the assessment of an area, possible nuisances should be taken into
account and adjusted for. Nuisances are non-threatening trespasses that could
trigger an alarm. Small animals, the wind and tree limbs are all examples of
nuisances that might cause an alarm. To avoid or significantly reduce the number
of nuisance alarms, nuisance factors should be considered and steps taken to
combat them. Such steps include trimming tree branches or shrubs back from the
fence line, removing oversized signs on the fence fabric that could act as a “sail”
when hit with a high wind, and restricting the travel of guard dogs or small animals
in the area.
APU Hardware Deployment
The FD-342 Alarm Processing Unit (APU) is designed for deployment in a central,
remote location up to 20 kilometers (12.4 miles) away from the site. Alternatively,
the APU may also be mounted in a NEMA enclosure and hung from the fence or
mounted near the protected area. Where and how it is installed depends upon the
needs of the site as well as the installer’s preference.
3-26
FD-340 Series User’s Reference Manual
Figure 3-18: APU mounting examples
Access for maintenance, vulnerability to tampering and exposure to adverse
elements (harsh weather, vibration, etc.) should be considered when deciding where
and how to mount the APU. Generally, the APU should be mounted in an area free
of vibration to avoid generating a nuisance alarm. If the fence on which the APU is
to be mounted is prone to repeated movement as the result of wind or vibration from
traffic, it is acceptable to mount the APU enclosure on a pole or standoff next to the
fence.
Although the FD-342 optional NEMA enclosure is equipped with a tamper alarm, it
should be mounted in an area where intruders will not have easy access to it. Mount
the NEMA enclosure in an area that is shaded to avoid excessive temperature
exposure.
For more information on mounting the APU, see Alarm Processor Unit (APU)
Installation in Chapter 4.
3-27
FD-340 Series User’s Reference Manual
Example Site Assessment
The following example illustrates the considerations to take into account when
assessing a site.
A large, isolated area is to be protected using the FD-342 system and a perimeter
fence (figure 3-19). Trees
Lake
Rock Formation
Figure 3-19: Site example illustration
Because the area is so large and spread out, the fence must be divided into multiple
“zones” for monitoring purposes (see Multiple Zone vs. Single Zone in Chapter 4).
Two, FD-342 APUs are required to protect the site, with each zone being monitored
by its own separate channel. All APUs will be mounted in a guardhouse in the center
of the protected site.
A large natural rock formation in the back corner of the area forms a natural
protective boundary. Behind it lies a small lake that touches up against the rock
formation. A collection of trees sits to one corner of the site. A single gate is used for
access to and from the site.
Figure 3-20 illustrates the proposed protection layout of the site.
3-28
FD-340 Series User’s Reference Manual
(Guardhouse)
(Buried Zone 1)
(Insensitive Leads)
(Fence Zone 1)
(Buried Zone 2)
Junction
Box #2
(Fence Zone 2)
Junction
Box #1
Figure 3-20: Protecting the site
Points to Consider
The fence. A chain link fence can form a satisfactory boundary around the
protected site; however, steps must be taken to prevent digging under the fence,
especially in areas where the ground soil is sandy and loose. One of the best
protective measures to take is to embed a concrete “skirt” around the bottom of
the fence all the way around the perimeter – making digging difficult – or burying
a layer of fiber along the bottom of the fence. The loopback deployment also
protects against digging or tunneling under the fence.
The gate. A strategy must be created for ensuring the gate is protected. This
strategy will depend greatly on the type of gate involved. For detailed information
on protecting a gate, see Protecting Gates in Chapter 4.
3-29
FD-340 Series User’s Reference Manual
The rock formation. While the rock formation provides the perfect natural barrier,
it is conceivable for a climber to scale the rocks and drop down into the protected
site, making a fence impractical for protection at the base of the formation.
Instead, steps must be taken to ensure that intruders coming down from the
rocks are detected. Separate protection zones can be created at the base of the
rock formation using buried sensor cable and audible alarms or other indicators
triggered off the APU’s alarm relays. Loose gravel at the base of the rock formation
makes it a suitable medium for the buried cable provided it is smooth and round in
shape.
The lake. While the lake helps protect the rock against climbing, it is still possible
for an intruder to swim or paddle across the lake and scale the rock formation.
Therefore, the lake itself should be protected with either a fence or a buried cable
around its perimeter. If a buried cable is used, it should be installed far enough
away from the water’s edge that the ground is not saturated with lake water
(because the water will freeze in cold weather, making vibration detection difficult).
If a fence is deployed and sensor cable is added to it, a separate APU can be used
to trigger a remote video camera and other protective devices.
The trees. Because the trees overhang the fence, they must be cut back and kept
trimmed in order to prevent them from creating nuisance alarms.
The environment. Wind, weather and wildlife are all factors that can possibly
create nuisance alarms. As one of the last steps in the installation process, each
protected FD-342 “zone” should be calibrated and tested to ensure maximum
sensitivity to intruder detection and immunity to nuisance alarms.
3-30
Installation
4
Fence Line Sensor Cable Installation
As mentioned previously, a fence line sensor cable installation is used to detect
threats against a fence line boundary such as climbing or fabric cutting. Under most
circumstances, the sensor cable is deployed in the “loopback” configuration, with one
strand of the loop running along the top and bottom half of the fence height. In many
cases, the cable is also run along outriggers and fence posts for increased perimeter
protection.
Ultimately, how the FD-342 is installed and deployed is up to the end user. Fiber
SenSys does not recommend or mandate one particular installation setup over
another. However, the general procedure for installing the FD-342 is:
1. Survey the site to be protected
2. Create a strategy for protecting the site. This includes planning the location of the APU, provision of electrical power and routing of sensor cable and insensitive leads
3. Determine if the site will be a multiple zone or single zone system
4. Create a strategy for protecting any gates in the site
5. Determine the amount of cable needed
6. Deploy the cable
7. Connect the sensor cable to the appropriate APU/APU channel
For detailed information on connecting the sensor cable to the APU, see Alarm
Processor Unit (APU) Installation later in this chapter.
4-1
FD-340 Series User’s Reference Manual
1. Surveying the Site to be Protected
As discussed in Chapter 3, the site to be protected should be surveyed thoroughly
and a risk assessment performed, including accounting and compensating for
prospective alarm sources. The strategy for deploying the cable is based on the
results of the survey. For detailed information on site assessment, see Chapter 3.
2. Creating a Strategy for Protecting the Site
Chapter 3 contains detailed guidelines on developing a strategy for fence line
sensor cable deployment. Refer to Chapter 3 for more information.
When developing the deployment strategy, also take note of and record:
• The length of the fenced perimeter (not including the gates)
• The number of gates and the length of each
• The number of reinforced sections and their lengths
• Distance from the fence to the APU
• The width of roadways or walkways through the gate(s)
Keep a detailed list of these factors and their associated numbers. They will be
used to calculate the amount of cable required later on in the procedure.
3. Multiple Zone vs. Single Zone
Decide whether the site will be protected with multiple zones or a single zone.
Whether a site is protected by multiple zones or a single zone is determined in part
by the size of the site and the ability to respond quickly to one or more intruders.
Protected sites requiring more than 5 kilometers (16,400 feet/3.1 miles) of sensor
cable should use a multiple zone system.
Note:
The Model FD-341 is the recommended APU (as opposed to the FD-342) for
monitoring sites requiring only one zone of protection.
4-2
FD-340 Series User’s Reference Manual
Other factors determining the number of zones required can include whether or not
video surveillance is used (requiring a separate zone for each camera), or whether
there are one or more remote sections of the site that need to be monitored in
addition to the main site.
4. Protecting Gates
Gates pose a unique problem to fence line sensor cable deployment because they
are designed to move. While this does pose a challenge, sensor cable can still be
deployed to protect a gate if the following points are kept in mind:
• Gates are sources of nuisance alarms during high wind conditions when they
are allowed to swing on their hinges and bang into restraining posts, locking
mechanisms or their own latches. Therefore, secure all gates against as much
unintended movement as possible.
• Install and use an alarm disabling circuit whenever a gate equipped with sensor
cable is opened or closed for authorized access.
• Establish a separate zone for any gate to maintain a secure perimeter while a
gate is open. In addition, use care to reinforce sections of the fence leading to
the gate(s) by adding additional structural support or posts. Separate the gate
hinge post and fabric supporting posts as necessary. This is recommended
to prevent or reduce vibrations transmitted from the gate to the sections of the
fence with active sensor cable.
There are a number of ways to deploy the sensor cable to protect the gate. Some
of the most common methods are discussed in the following sections.
4-3
FD-340 Series User’s Reference Manual
Single or Double Swinging Gates
For a swinging gate, the simplest method is to run the sensor cable from the
fence fabric to the gate and loop it back. There is no danger in using the sensor
cable as a hinge provided it is adequately shielded in EZ-300NSS or similar
flexible conduit. The sensor cable is then routed below the gate and buried in
hardened PVC conduit 0.3 meters (1 foot) below the roadway surface to make it
insensitive to vibrations from the roadway.
Sensor Cable Loop on each gate
(Sensor Cable in solid conduit under the roadway)
Figure 4-1: Sensor cable deployed on swinging gates
Sliding Gates
Although sensor cable cannot be mounted practically on the sliding gate itself, it
can be mounted on the support rail (figure 4-2) to detect movement of the gate. The support rail conducts any disturbance from the gate to the sensor.
As with the swinging gate application, the sensor cable is routed below the gate
and buried at least 0.3 meters (1 foot) below the roadway surface to make the
cable insensitive to vibrations from the roadway before continuing on with the
deployment.
In some instances where traffic from heavy vehicles is expected, the cable may
need to be buried a full meter (3 feet) blow the surface.
4-4
FD-340 Series User’s Reference Manual
Sensor Cable Loop on the fixed frame
Sliding Gate
Figure 4-2: Sensor cable deployment on a sliding gate
Gates Not Requiring Protection
For gates that do not require protection, it is recommended that the cable be
routed and buried 0.3 meters (1 foot) or more below the roadway in rigid PVC
conduit (as shown in figure 4-1). This creates a gate bypass that is insensitive to
vibration from the roadway.
4-5
FD-340 Series User’s Reference Manual
5. Determining the Amount of Cable Needed
In order to determine how much sensor cable is needed, the installer should know:
• The length of the fenced perimeter (not including the gates)
• The number of gates and the length of each
• The number of reinforced sections and their lengths
• Distance from the fence to the alarm processor
• The width of the roadways or walkways through the gate(s)
These numbers should have been generated in Step 2. The following sections
illustrate how to use the numbers to determine the amount of cable needed.
Single Zone Site Example
Suppose that an area to be protected has a fence measuring 45 meters x 61
meters (147.6 feet x 200.1 feet) with a single swinging gate measuring 5 meters
(16.4 feet) across. There are reinforced sections at each corner and next to the
gate for a total of 10 sections, each measuring 3 meters (9.84 feet) across. An
office where the stand-alone APU module is to reside sits 6 meters (19.7 feet)
back from the fence and 11 meters (36.1 feet) to one side from the gate (refer to
figure 4-3). For this example, the site will be protected by a Model FD-341. For illustration
purposes, the sensor cable will be deployed along the fence in a single pass (non
loopback configuration). Insensitive lead-in cable will be routed from the APU to
the sensor cable deployed on the fence.
4-6
FD-340 Series User’s Reference Manual
61 m
45 m
Office
5m
APU is
installed here
Site: Gemmil Site
Date: 06 June 2003
Revision: Rev. A
Fence Construction Drawing
(Insensitive Lead-in
Cables)
5.5 m
6m
11 m
Figure 4-3: Single zone site drawing
4-7
FD-340 Series User’s Reference Manual
To determine how much cable is needed:
1. Record the length of the fenced perimeter, not including the gate(s). In this example, the length is:
[(45 m + 61 m) x 2] - 5 m = 207 meters or 679 feet
2. Calculate and record the length of cable required for the reinforced sections. Reinforced sections require 1.5 times the section length to account for extra sensor cable. This extra sensor cable is needed to create a small “loop” and increase the sensitivity at the local area. Multiply the length of each section by 1.5 and multiply the result by the number of sections:
10 sections x 3 meters x 1.5 = 45 meters required
3. Record the amount of cable needed for the gates. This number is found by multiplying the length of each gate by 3.5 and adding the results together:
5 meters x 3.5 = 17.5 meters required
Three and a half times the normal amount of cable is required to allow sufficient length to create a loop on the gate fabric and leave enough to route the cable under the roadway – the most common method of protecting a gate. Use this method of calculation for all gate types, including swinging, sliding and unprotected gates.
4. Calculate and record the length of cable needed to connect the APU to the protected zone at the fence. In this example, the installer chooses to run insensitive leads from the APU to the fence; one from the APU directly to the fence and the other from the far end of the sensor cable back to the APU, circumventing the gate (refer to figure 4-3). Thus, a total of 22.5 meters of additional sensor cable will be required:
6 meters + 5.5 meters + 11 meters = 22.5 meters required
5. Calculate and record extra cable length to allow for service loops. To get this number, add 1.5 meters of cable for every 100 meters of perimeter fence. In our example, this would be:
fence length divided by 100 x 1.5 m = 207 divided by 100 x 1.5 = 3.1
4-8
FD-340 Series User’s Reference Manual
6. Add all recorded lengths together for the total amount of cable needed for a single pass of sensor cable. This number is doubled for a loopback deployment.
An example record depicting these numbers is shown in figure 4-4.
Cable Site Survey Data
Length of Perimeter Fencing
207
Reinforced Sections
45
Gates
17.5
Cable Length to NEMA Enclosure
22.5
Extra Service Length
3.1
Total
295.1 meters (967.9 feet)
or
272.6 m (894.1 feet) sensor cable
22.5 meters (73.8 feet) insensitive leads
Figure 4-4: Single zone site example calculations
4-9
FD-340 Series User’s Reference Manual
Multiple Zone Site Example
Figure 4-5 illustrates the site to be protected in this example.
Guardhouse
122 m
97 m
Zone 3
Zone 1
2.5 m
152 m
5m
2.5 m
45 m
76 m
Zone 2
91 m
15 m
45 m
Site: Gemmil Site
Date: 06 June 2003
Revision: Rev. A
Fence Construction Drawing
Figure 4-5: Multiple zone site drawing
4-10
FD-340 Series User’s Reference Manual
Because the system will be linked to 3 surveillance video cameras monitoring
3 different zones, this is being set up as a multiple zone system. A single pass
of sensor cable will be made (versus a loopback deployment) for purposes of
this example. One FD-342 and one FD-341 APU will be used to monitor the
three zones for this site. These APUs will be located in the guardhouse near
the front gate. Insensitive leads will be routed from the protected zones back to
the separate APU channels. Figure 4-6 illustrates the proposed routing of the
insensitive lead-in cables:
Legend
Zone 1
Zone 2
Zone 3
Zone 3
Zone 1
Zone 2
Figure 4-6: Insensitive lead-in cable routing
4-11
FD-340 Series User’s Reference Manual
Note that while the proximity of the guardhouse to the main gate preempts the
need for the gate to be protected with sensor cable, the rule of multiplying the
length of the gate by 3.5 still applies to ensure there is enough length to route
the cable below the roadway. The length of the main gate is 5 meters (16.4 feet)
while the length of the two personnel gates is 2.5 meters (8.2 feet).
There are reinforced sections on either side of each corner and gate. Each
reinforced section is 3 meters (9.84 feet) in length.
Determining how much cable is required is done much the same way as it is for
a single zone system. Cable requirements for the individual zones are added
together for the total cable requirement. An example record depicting these
numbers is shown below:
Conduit Segment 1
Conduit Segment 2
(Couple ends together here)
Figure 4-7: Multiple zone site example calculations
4-12
FD-340 Series User’s Reference Manual
For details on how to calculate the individual line items, see Single Zone Site
Example on page 4-6 of this chapter.
In addition to knowing how many feet of cable are required for ordering purposes,
it’s important to know this number to know how much cable conduit is required.
Fiber SenSys offers EZ-300NSS non-split cable conduit or EZ-300SS split cable
conduit. Prior to deploying sensor cable in fence line applications, it is required
the cable be enclosed in the protective cable conduit. This rule of thumb applies
to both sensor cable and the insensitive leads.
Note:
The sensor cable must be pulled through the conduit before the conduit is
attached to the fence.
6. Deploying the Cable
The FD-342 sensor cable can be deployed in any manner suitable to best protect a
particular site. This section outlines the basic steps and provides some basic tips
for preparing and deploying the sensor cable in a fence line application.
Fiber Handling Precautions
Optical fiber is fragile because it is made of glass. It will break if it is twisted or
bent into too tight a radius. The following precautions should be kept in mind
when handling fiber optic cable:
Caution
Failure to follow these precautions may result in damage
to the fiber and degraded or poor system performance.
• The cable should not be pulled by the connectors. This could damage the
connectors and result in degraded performance
• Avoid twisting the cable or bending it into a radius tighter than 5 cm (2
inches). This could damage the fiber or break it
• In order to keep the connectors free of dirt and dust, keep the connectors
capped until you are ready to make a connection
• Connectors should be cleaned prior to making a connection. If dirt gets onto
the tip of the connector, remove it using isopropyl alcohol and dust-free air or
a clean, lint-free cloth
4-13
FD-340 Series User’s Reference Manual
Inserting the Cable into Conduit
Prior to deploying the sensor cable, it must be inserted into conduit for protection.
Note:
The sensor cable must be pulled through the conduit before the conduit is
attached to the fence.
The SC-3 cable is not designed to be placed directly against the fabric of a fence.
Conduit such as the Fiber SenSys EZ-300NSS conduit provides protection
against intentional cutting, vandalism and extreme weather. It also provides
uniform support of the sensor cable. Fiber SenSys recommends the following
components and tools for inserting every 100 meters (328 feet) of sensor cable
into protective conduit:
• 1 EZ-300NSS Non-Split Conduit Kit or 1 EZ-300SS Split Conduit Kit
• SC-3 Sensor Cable
• 1 EZ-350 Insertion Tool (not required for non-split conduit)
Each of these components is available from Fiber SenSys. One conduit kit
includes 100 meters of flexible split or non-split conduit, 500 stainless steel wire
ties and a conduit-to-box coupler. A conduit kit also contains either 4 expansion
joints for connecting sections of split conduit together or 1 barrel coupler for
connecting non-split conduit sections.
4-14
FD-340 Series User’s Reference Manual
To insert the sensor cable into the conduit:
1. Begin by unrolling one or more of the required lengths of cable conduit. Place sections of conduit that must be connected together end-to-end
2. Connect the sections of conduit together as required. For detailed information on connecting sections of conduit together, see Appendix A
Conduit Segment 1
Conduit Segment 2
(Couple ends together here)
Figure 4-8: Coupling conduit
Note:
If you are using non-split conduit, use care to ensure the pull cord is not lost
while performing this step.
3.
Insert the cable into the conduit. For non-split conduit, this is done by tying the pull string to the cable at a point close to one end (if the fiber has already been terminated, do not tie the pull string to the connector itself) and pulling the cable through the conduit. For split conduit, an insertion tool must be used. An EZ-350 Insertion Tool (shown in figure 4-9) is offered by Fiber SenSys for this purpose
Figure 4-9: The EZ-350 insertion tool
4-15
FD-340 Series User’s Reference Manual
To use the insertion tool, thread the sensor cable through the “corkscrew” at the
front end and lay it into the channel along the top of the tool. Lay the end of the
cable so that it points out the barrel. Insert the horn into the conduit and push the
tool forward (with the corkscrew in front) through the entire length of conduit. The
horn forces the split end apart and allows the insertion tool to advance, leaving
the sensor cable trailing in the conduit behind.
Note:
Secure the trailing end of the cable to ensure it is not unintentionally pulled
into the conduit and lost.
Figure 4-10: Inserting cable into conduit
It is recommended that at least two people be used to insert the sensor cable:
one person to pull or insert the sensor cable and another to help feed it smoothly.
Terminating the Cable
Whether or not a sensor cable is terminated before or after it is inserted into
the conduit depends upon the preference of the installer. Either method is
acceptable. The FD-342 APU uses industry-standard ST-type connectors;
therefore, it is required that the sensor cable also be outfitted with ST connectors. Connector kits are available from Fiber SenSys for connecting SC-3 and SC-4
sensor cables.
Detailed instructions are provided in each connector kit. Additional information
on using ST-type connectors is found in Appendix B.
4-16
FD-340 Series User’s Reference Manual
Attaching the Sensor Cable to the Fence
Where and how the cable is attached depends upon the type of fence and the
possible threats against it. Generally, the sensor cable is attached in such a
way that it detects movement or vibration from intruders but still remains as
insulated against nuisances as possible. In addition, the cable is also attached in
a secure enough fashion to prevent granting intruders easy access to it. This is
accomplished by following Fiber SenSys’ recommended practices.
Once enclosed in conduit, the sensor cable/conduit assembly is attached to
a fence using secure, non-corrosive wire ties. Stainless steel wire ties are
available from Fiber SenSys. In the case of a chain link fence, for example, the
sensor cable is attached to the fabric by threading the wire tie through the fence
square and bending it back around the cable and mesh as shown in figure 4-11.
Bring the wire tie halves
together around both the
fabric and the sensor cable
Figure 4-11: Attaching cable to the fabric
4-17
A tool is then used to twist the
tie so that the conduit/cable
assembly is secure on the
fence but isn’t so tight it inhibits
proper operation of the sensor
or excessively compresses the
conduit.
FD-340 Series User’s Reference Manual
When attaching the sensor cable to chain link fence fabric, secure the cable to
the fabric every 30 cm (12 inches or about 4 squares of most meshes). The
sensor cable should be secured on the joint or intersection between links of the
mesh in order to prevent movement of the cable and minimize any susceptibility
to tampering (refer to figure 4-12). 30 cm
Figure 4-12: Wire tie placement
4-18
FD-340 Series User’s Reference Manual
Re-attach the fabric
after attaching the
sensor cable to the post
To attach the sensor cable to fence
posts or outriggers, secure the wire
tie around both the cable and the
post (or outrigger). For optimum
effectiveness, the cable can be
routed between the fence post and
the fabric.
Figure 4-13: Cable placement
When bending the sensor cable to form loops, ensure the cable is not bent into a
radius tighter than 5 cm (2 inches) to avoid damaging the optical fiber inside.
The sensor cable is also attached to wrought iron fences, barbed wire or razor
wire using wire ties. In each case, it is necessary to consider how best to attach
the cable so it is less likely to be disturbed by minor nuisances without sacrificing
its receptivity to detect the movements or vibrations of an intruder. In the case of
wrought iron fences, the cable is attached to either the top or bottom rail (or both)
using wire ties every two vertical fence stakes or so.
4-19
FD-340 Series User’s Reference Manual
300
Figure 4-14: Attaching sensor cable to wrought iron fence
250 m
7. Connecting the Sensor Cable to the APU
Once the sensor cable has been deployed along the fence line, it must be
connected to the APU. The sensor cable is connected via insensitive leads;
therefore, how the insensitive leads are deployed depends ultimately upon where
and how the APU is deployed in relation to the sensor cable.
The FD-342 APU uses industry-standard ST-type connectors; therefore it is
required that the sensor cable and insensitive leads be terminated with ST-type
connectors throughout the length of the cable run rather than mixing connector
types.
Office
4-20
FD-340 Series User’s Reference Manual
Insensitive leads can be routed back to the APU either above or below ground.
While the insensitive leads are insensitive to vibration, it is necessary to protect the
optical fiber by enclosing the leads in conduit. Because the leads are insensitive,
they can be enclosed in either flexible or rigid conduit.
For detailed information on connecting to the APU, see Alarm Processor Unit
(APU) Installation later in this chapter.
Buried Sensor Cable Installation
A buried sensor cable is used to detect threats against an open, unfenced boundary
or area. This includes areas unprotected by a fence across which an intruder may
walk, run, crawl or attempt to tunnel under. A sensor cable buried in the ground next
to a protected fence can also create a secondary layer of detection.
With the buried application, the sensor cable is deployed between 8 to 10 cm (3 to
4 inches) under a medium such as sod or gravel. An intruder walking across the
sensor cable exerts pressure that the cable senses, triggering an alarm condition in
the APU.
The general procedure for installing the FD-341/FD-342 in a buried application is
much the same as it is for a fence line application:
1. Survey the site to be protected
2. Create a strategy for protecting the site
3. Determine if the site will be a multiple zone or single zone system
4. Determine the amount of cable needed
5. Deploy the cable
6. Cover the cable
7. Connect the sensor cable to the appropriate APU
While the steps are largely the same as they are for a fence line application, there
are some notable differences. SC-4 is used as the sensor cable, for instance, rather
than SC-3. Other differences are detailed in the following sections.
4-21
FD-340 Series User’s Reference Manual
Creating a Strategy for Protecting the Site
The strategy for deploying the cable depends on the medium being used (i.e. sod,
sand, gravel, etc.).
Note:
Sensing cable should not be encased in conduit for most buried applications.
Chapter 3 lists guidelines for burying the cable under different mediums (see
Buried Cable Deployment Guidelines in Chapter 3). To ensure a buried sensor
cable successfully detects against intrusions into non-fenced perimeters, take the
following additional considerations into account:
Medium for deployment. The sensor cable works best in buried applications
when buried in gravel. Sod and sand are also acceptable mediums; however,
items to consider when deciding upon a medium include determining its freezing
point and the ability of the medium to conduct vibration. This is because a solid
medium (such as frozen sod) conducts fewer vibrations than a fluid one (such as
gravel). The depth at which the cable is buried is determined according to these
factors.
Gravel is also the recommended medium in areas where burrowing animals are a
concern.
Layout of the cable. The layout of the sensor cable depends upon the size of
the area it is intended to protect. The best way to protect an open area is to lay
the cable out in “loops” or “switchbacks”. The size of the area to be protected
determines how much distance sits between each loop as well as how much cable
is required.
Accumulation of rainwater. Accumulated rainwater freezes, damping vibration.
Accumulation of dust and dirt. Dust and dirt gathering over top of the medium
ultimately dampen the transmission of vibration.
4-22
FD-340 Series User’s Reference Manual
Determining the Amount of Cable Needed
In most cases, an area is best protected by laying the cable down in a serpentine
pattern, forming “loops” with the sensor cable and leaving at least 30 cm (12
inches) of space between each one. Deployed under ideal circumstances, the
sensor cable has a detection range between 30 and 46 cm (12 and 16 inches)
around each pass of the cable.
30 cm
Detection
Zone
Figure 4-15: Sensor cable loop spacing
The distance between loops and the number of loops required varies with the type
of medium used. Refer to Buried Cable Deployment Guidelines in Chapter 3 for
more information on cable layout with each medium type.
The procedure for calculating the amount of cable required is different for a buried
application. The differences are detailed in the following example.
4-23
FD-340 Series User’s Reference Manual
Buried Application Site Example
Suppose a site measuring 300 meters (984 feet) by 250 meters (820 feet)
needs to be protected by a buried cable. The medium in which the cable will
be placed is sod. Because the cable will be buried in sod, the detection zone
around the perimeter must be at least 2.1 meters (7 feet) in width (following the
minimum recommended practice for sod outlined in Chapter 3 - see Buried Cable
Deployment Guidelines for more information), requiring six passes of sensor
cable (figure 4-16). The area to be protected has a single gate measuring 5
meters (16.4 feet) across.
4-24
FD-340 Series User’s Reference Manual
300 m
250 m
Detection
Zone
Office
9m
5m
Site: Gemmil Site
Date: 06 June 2003
Revision: Rev. A
Buried Construction Drawing
5m
20 feet
5m
18 feet
35 feet
5m
2.1 m
Figure 4-16: Buried application site drawing
To determine the amount of cable required:
1. Determine how many loops are required to form the desired detection zone. In this case, assuming the loops are spaced 30 cm (12 inches) apart, the 2.1 meter (7 foot) wide detection zone is formed with 6 passes
2. Multiply the number of required loops by the number of feet in the perimeter. Thus, the 1100 meter (3608 feet) perimeter in this example, multiplied by 6 loops, requires approximately 6600 meters (21,648 feet) of cable
4-25
FD-340 Series User’s Reference Manual
3.
Determine the number of zones required. As with a fence line application, since more than 5 kilometers (16,400 feet) of sensor cable is required (see Multiple Zone vs. Single Zone on page 4-2 of this chapter), the site has to be broken up into at least 2 zones. Thus, the site in this example is best protected using an FD-342 APU located just inside the office
4. Determine the location and length of sensor cable required for each zone. For this example, we can divide the site roughly in half using the two channels of the FD-342 as shown in figure 4-17
4-26
5.
Determine the length of sensor cable required for each zone. Using figures 4-16 and 4-17, the length for each zone in this example is figured out by calculating the length of the perimeter by the number of passes. The calculations for determining the sensor cable length in each zone comes out as shown in the example worksheet in figure 4-18
6.
The length of the insensitive leads must also be calculated. Based upon figures 4-16 and 4-17, the total length of insensitive lead-in cable required for Zone 1 is 10 meters (2 leads are required for each zone). For Zone 2, the requirement is 20 meters
FD-340 Series User’s Reference Manual
Zone 1
Zone 2
Figure 4-17: Buried site example zones
4-27
FD-340 Series User’s Reference Manual
Cable Site Survey Data
Zone
1
Zone Length
(9 + 250 + 300) x 6
Cable Length
=
3354.0 m (11,001 ft)
+ 50.3 m (for service)
3404.3 m (11,166 ft)
2
(250 + 300 - 9 - 5) x 6
=
3216.0 m (10,548 ft)
48.2 m (for service)
Zone
Insensitive Lead Length
1
2
(5 m) x 2 = 10 meters
(5 + 5 m) x 2 = 20 meters
Figure 4-18: Site example calculations
4-28
FD-340 Series User’s Reference Manual
Deploying the Cable
The FD-342 sensor cable can be deployed in any manner suitable to best protect a
particular site. This section outlines the basic steps and provides some basic tips
for preparing and deploying the sensor cable in a buried application.
Fiber Handling Precautions
Optical fiber is sensitive because it is made of glass. It will break if it is twisted
or bent into too tight a radius. The following precautions should be kept in mind
when handling optical fiber cable:
Caution
Failure to follow these precautions may result in damage
to the fiber and degraded or poor system performance.
• The cable should not be pulled by the connectors. This may damage the
connectors and result in degraded performance
• Avoid twisting the cable or bending it into a radius tighter than 5 cm (2
inches). This may damage the fiber or break it
• Keep the connectors capped until a connection is made in order to keep
them free of dirt
• Connectors should be cleaned prior to making a connection. If dirt gets onto
the tip of the connector, it can be removed using isopropyl alcohol and dustfree air or a clean, lint-free cloth
4-29
FD-340 Series User’s Reference Manual
Laying Down the Cable
Unlike with a fence line application, the sensor cable is not enclosed in flexible
or rigid conduit prior to deployment. The SC-4 cable is left bare in order to
maximize its vibration-detecting ability.
Lay the cable down in accordance with the deployment strategy developed for
the site along with the guidelines discussed previously in Chapter 3 (see Buried
Cable Deployment Guidelines). Lay the fiber down in “loops” with at least 30 cm
(12 inches) of space between each loop. Take extra care to ensure the sensor
cable is not bent at an angle with a radius of less than 5 cm (2 inches).
Terminating the Cable
Whether or not a sensor cable is terminated before or after it is laid down
depends upon the preference of the installer. Either method is acceptable. The
FD-342 APU uses industry-standard ST-type connectors; therefore, it is required
that the sensor cable be outfitted with ST connectors. Crimp-on type connector
kits are available from Fiber SenSys for connecting SC-3 and SC-4 sensor cable
and IC-3 or IC-4 insensitive lead-in cable.
Detailed instructions are provided in each connector kit. In addition, general
instructions for terminating the fiber with ST-type connectors can be found in
Appendix B.
Covering the Cable
Sand or gravel must be deposited over the sensor cable in a layer at least 8 cm
(3 inches) thick for optimal sensor performance. Gravel used should be clean,
round in shape and ideally be at least 2 - 4.8 cm (¾ - 1-1/2 inches) in diameter
for best performance.
A layer of sod can be put down in place over the cable but the sensor cable
must be down far enough that the roots of the sod do not interfere with it. As
mentioned in Chapter 3, the sensor cable should not be buried in or laid atop
hard clay. See Buried Cable Deployment Guidelines in Chapter 3 for more
information.
4-30
FD-340 Series User’s Reference Manual
Alarm Processor Unit (APU) Installation
Caution
Use of control or adjustments, or performance of
procedures other than those described herein may result
in hazardous radiation exposure.
Once the sensor cable has been deployed, the APU must be installed and connected
to it.
The APU can be ordered mounted in a NEMA (National Electrical Manufacturer’s
Association) fiberglass enclosure, which is designed to be waterproof and resistant
to weather extremes. The APU module itself is rated to 55° C (131° F); however, it is
recommended that the enclosure reside indoors or in a shaded area when mounted
in hot climates.
The NEMA enclosure comes with a tamper switch that detects when the enclosure is
opened.
Mounting the Enclosure
The NEMA enclosure measures 42 cm high, 37 cm wide and has a depth of 21
cm (16.5 inches x 14 inches x 8.3 inches). Four tapped holes on the back of the
enclosure allow the enclosure to be mounted using 10-32 screws. Fiber SenSys
provides a mounting hardware kit with each enclosure for this purpose. The kit
contains four feet and four 10-32 screws.
To mount the enclosure:
1. Attach the feet to the enclosure by mating the hexagon of each foot to the hexagonal cavity over each mounting hole. Rotate the foot as necessary to either a vertical or horizontal position for mounting purposes
2. Thread a 10-32 screw into each hole to secure the feet
Refer to the instructions included with the mounting hardware for more information.
4-31
FD-340 Series User’s Reference Manual
The feet can be used for hanging the enclosure from a fence or mounting it on
a flat surface. In all cases, the APU should be mounted in such a way that it will
be free of vibration. This will prevent the fiber optic leads at the input and output
ports from creating false alarm conditions as the result of spurious vibrations of the
APU. For more information on APU mounting considerations, see APU Hardware
Deployment in Chapter 3.
The quick-release latches can be locked shut by punching out the padlock cutouts
and sliding a padlock through them.
Wiring the APU
Conduit entryways must be drilled out of any enclosure the stand-alone APU is to
be mounted in, including the optional Fiber SenSys NEMA enclosure. Insensitive
lead-in cables and electrical power/relay wires should be routed to the enclosure
through separate conduit entryways. These openings must be sealed once the
leads and wires are routed through in order to prevent exposure to dirt or moisture.
The optical cables are secured as they are passed into the enclosure by routing
them through Kell® connectors or box couplers, available from Fiber SenSys, or
other similar connectors that can be made watertight. Kell® connectors are used
for split conduit while the box couplers are used for non-split conduit.
With the Fiber SenSys NEMA enclosure, the optical cables must be routed
through the strain reliefs along the backplate to prevent stress at either the input
or output entryways and connectors of the APU. The use of similar strain reliefs is
recommended for any enclosure in which the APU is mounted.
Ensure the 5 cm (2 inch) minimum radius is observed while routing optical cable to
the APU.
4-32
FD-340 Series User’s Reference Manual
5
cm
ALARM B
RS-232
DC 12-24 V
POWER
ALARM A
FAULT
TAMPER
GND
12-24 VDC
12
11
10
9
8
7
6
5
4
3
2
+1
(Observe Minimum
Bend Radius for
Fiber Optic Cable)
Optical Leads
Fiber SenSys, Inc.
Electrical Leads
Fiber Optic Intrusion Detection System
CLASS 1
LASER OUTPUT
This product complies
Output
ALARM B
RS-232
DC 12-24 V
POWER
ALARM A
FAULT
TAMPER
12-24 VDC
GND
Output
12
11
10
9
8
7
6
5
4
3
2
+1
Fiber SenSys, Inc.
Fiber Defender
Input
FD-342 Alarm Processor
Input
Fiber Optic Intrusion Detection System
503-692-4430
MADE IN U.S.A.
CLASS 1
LASER OUTPUT
This product complies
with 21 CFR 1040.10
Output
CH B
Power
Fault
Output
CH A
Event
Input
Alarm
Test
Insensitive Lead-in
Cables
Input
Power &
Relay
Figure 4-19: Cable routing inside the NEMA enclosure
Although the conduit entryways are generally drilled into the bottom of the NEMA
enclosure (figure 4-19), they may be placed anywhere the application requires. 4-33
FD-340 Series User’s Reference Manual
Once the optical connections have been made, wire the APU for electrical power
and relay connections. These connectors are located on the right-hand side of
the APU. For details on these connectors, see APU Module Connections and
Indicators in Chapter 2.
It is recommended that power leads and relay leads be routed separately through
the enclosure.
Note:
There may be a significant DC voltage drop in smaller gauge wiring. Ensure
the input voltage at Pin 1 is at least 12 VDC following installation.
To increase the security of the installation, it is recommended that either series
or parallel resistors (known as supervisory resistors) be added as necessary to
ensure that a closed contact condition cannot be simulated by shorting the external
relay contact leads together and an open contact condition cannot be simulated
by cutting them or removing power. These resistors should be installed inside the
NEMA enclosure as close to the terminal connector pins of the APU as reasonable.
It should be noted that if the supply voltage fails or the return optical power drops
below the fault threshold (approximately 25 dB below the nominal threshold), the
Fault relay activates and the normally closed Fault relay contacts open.
As a final step in the wiring procedure, connect the leads of the tamper switch to
the tamper contacts on the APU (Pins 3 and 4 – see APU Module Connections and
Indicators in Chapter 2 for more information).
Adding Supervisory Resistors
Adding a series resistor to the normally-closed alarm relay contacts ensures a
closed contact condition cannot be simulated by shorting the external alarm relay
contact leads, preventing an alarm. A series resistance value of 2.74 kilohms is
recommended.
Adding a parallel resistor to the normally-open alarm relay contacts ensures an
open contact condition cannot be simulated by cutting the external alarm relay
contact leads, preventing an alarm. A parallel resistance value of 2.74 kilohms is
recommended.
With the FD-342 properly installed, it is now ready for calibration.
4-34
System Calibration
5
Overview
Calibration of the FD-342 is a crucial component of its success in detecting the
presence of an intruder. A properly calibrated system will not only detect threats
from an intruder, but will ignore most or all nuisances as well. This chapter provides
detailed information on the parameters to be calibrated as well as possible settings
for each.
System calibration should always follow physical installation of the FD-342 hardware
and should precede any attempt to use the system. Each channel of the Alarm
Processing Unit (APU) must be calibrated and its associated zone must be tested
separately. Calibration of the APU can be performed using the Hyperion Hand Held
Calibrator or a PC with terminal emulation software such Fiber SenSys’ SpectraView®
or HyperTerminal®.
Hyperion Hand Held Calibrator
The Hyperion Hand Held Calibrator is a portable calibration tool designed for
outdoor use in all-weather environments. Basically, it is a calibration software
package installed on a rugged, MIL-STD-rated pocket PC. Touch screen controls
plus an included soft plastic stylus make the Hyperion unit easy to operate.
Communication between the APU and Hyperion takes place through an RS-232
serial cable. The Hyperion, and additional detailed documentation about operating
the hand held calibration unit, is available from Fiber SenSys.
5-1
FD-340 Series User’s Reference Manual
Figure 5-1: The Hyperion Hand Held Calibrator
To connect the Hyperion:
1. Connect the RS-232 cable to the pocket PC’s RS-232 serial port and then to the RS-232 interface of the APU
2. Connect power to the APU and verify the green “Power” or “Operate” LED illuminates
5-2
FD-340 Series User’s Reference Manual
Figure 5-2: Connecting the Hyperion to the APU
3.
5-3
Turn Hyperion’s pocket PC on by pressing the power button. If the calibration software is not accessed immediately from this point, simply press the Hyperion hotkey to proceed. Operation of the unit is conducted with Windows Mobile® software platform
FD-340 Series User’s Reference Manual
Connecting With a PC
Any PC with terminal emulation software (such as SpectraView® or HyperTerminal®)
can be used to interface with an APU. This includes laptop portable PCs. To use
the PC, connect a 9-pin RS-232 cable between the PC serial port and the RS232 connector of the APU. Launch the terminal emulation software and establish
communication between the two instruments. Although the emulation software
can vary greatly from one PC to the next, the following general guidelines are
recommended for HyperTerminal® (for Windows 95® or newer Windows-based
software).
1. Connect the PC to the RS-232 port of the APU
Note:
A PC with a straight-through, 9-pin RS-232 port or a straight-through, 25-pin
port with a 25-to-9 pin converter must be used for the procedure.
2. From the desktop, click on the Start button and select Programs >> Accessories >> Communications >> HyperTerminal to launch the HyperTerminal software
3. When the Connection Description window comes up, enter “Fiber SenSys” (or other connection name) in the Name box
4. When the Connect To window comes up, select “Direct to Com1” (or appropriate port) from the Connect Using drop-down list. Click on the OK button. The COM1 Properties box appears
5. Set the following properties using the drop-down lists:
Bits per Second: 9600
Data bits: 8
Parity: None
Stop bits: 1
Flow control: Hardware
5-4
Press the OK button
FD-340 Series User’s Reference Manual
6. When the Hyper Terminal window comes up, press the Enter key. This brings up the system’s password prompt, which reads:
“Unit is LOCKED, Enter Password”
7. Hit the caps lock. All instructions must be entered in capital letters
8. The system is now ready for operation
Note:
SpectraView® or SpectraView® LT is a software package designed to monitor
APU performance, as well as analyze recorded sensor signals. The GUI
program is designed to work in conjunction with a remote PC. Operating
details are available through Fiber SenSys’ SpectraView® User’s Manual.
Programmable Calibration Parameters
This section provides details for all programmable FD-342 system calibration
parameters. Each channel on the FD-342 is calibrated independent of the other
(refer to figures 1-4 and 1-5 in Chapter 1). Therefore, most parameters discussed in
this section are duplicated in both channels.
Upon establishing communication with the APU, the system differentiates which
channel is selected at the password prompt:
“CHa Unit is LOCKED, Enter Password”
--or--
“CHb Unit is LOCKED, Enter Password”
At the password prompt, type either “CHA” for Channel A or “CHB” for Channel B to
switch from one channel to another.
5-5
FD-340 Series User’s Reference Manual
In each channel, there are 5 user-definable “passwords” that provide the user with
access to related APU parameters or submenus. For instance, the “GAIN” password
provides users with access to the gain setting. After entering the password, “GAIN”,
users can make adjustments to the setting as desired. The defaults for these 5
parameter passwords are:
• Gain
• Setup
• Hist
• Status
• Version
A sixth password (“DIR”) is for factory use only and is not covered by this manual.
Note:
The GAIN, SETUP and DIR passwords can be customized by the user.
Each password, and its associated calibration parameters, is explained in detail in
the following pages. Factory default settings for fence line settings were chosen
based upon the performance of an FD-342 used in tandem with a seven foot chain
link fence having a three-strand barbed wire outrigger. Default settings for buried or
non-fence line settings were chosen based upon the performance of an FD-342 in a
buried application, with gravel used as the burial medium.
Note:
Press the Enter key at any time to exit from any menu, submenu or
parameter in terminal emulation software.
5-6
FD-340 Series User’s Reference Manual
Gain
A password of “GAIN” allows access to the gain setting of the APU. The default
setting is 20 and the range is 1 to 50. The gain setting adjusts the sensitivity of the
system to events, with higher settings meaning a higher sensitivity. For example,
a gain setting of 30 is more likely to register an event than a gain setting of 10. For
systems installed in areas where nuisance alarms are likely (from wind, etc.), a
lower gain setting is recommended.
Setup
Access this menu using the “SETUP” password. There are 4 submenus available:
• Wind [1]
• Comment [2]
• Date [3]
• Calibrate [4]
These submenus are accessed by entering their corresponding submenu numbers
(“1” for the Wind submenu, “2” for the Comment submenu, etc.).
5-7
FD-340 Series User’s Reference Manual
Wind [1]
Enabling wind processing via the wind rejection software affects both processors
unless the wind processing option is turned off in Processor 2 (the wind
processing option cannot be turned off independently for Processor 1). There
are 3 adjustable parameters associated with this submenu:
Parameter
Enable
Anemometer
Processing
Parameter
Enable Wind
Rejection
Software
Parameter
Wind Rejection
5-8
Range
Default
Y/N
N
Range
Default
Y/N
N
Range
Default
20 to 80
50
Description
Enables the anemometer option. The
FD-34x is not compatible with an
anemometer. This option should
always be disabled
Description
Enables the wind rejection software.
When enabled, the APU continually
monitors the effects of wind on the cable
and compensates for it based upon the
detected load and the wind rejection value
Description
A selectable parameter that determines
how much the APU will dampen the signal
received from the sensor cable during
windy conditions. A higher wind rejection
factor means more dampening, requiring
a signal higher in magnitude to create an
alarm condition
FD-340 Series User’s Reference Manual
Comment [2]
This submenu allows users to enter comments of up to 15 characters maximum.
Comment text is stored in the APU and is displayed each time this submenu is
accessed until/unless the text is changed.
Date [3]
From this submenu, users can enter the date of the last calibration (15 characters
maximum) or change the time and date setting of the APU’s real-time clock.
Note:
There is only one real-time clock in the APU. Changing the setting affects
both channels.
To change the real-time clock, select option [1] and enter the new time in 24 hour
format followed by the current date.
Select option [2] to change the calibration date. Note that the calibration date,
like most other calibration parameters, must be set independently for each
channel.
Calibrate [4]
The calibrate submenu gives the user access to parameters affecting 5 areas:
• Processor 1 [1]
• Processor 2 [2]
• Details [3]
• Passwords [4]
• Reset [RS]
Note:
The default value for most parameters described in this section changes
depending upon whether the user sets the APU for fence line or buried
(other) applications.
5-9
FD-340 Series User’s Reference Manual
Processor 1 [1]
5-10
Parameter
Range
Default
Description
Enable
Y/N
Y (Fence)
Y (Buried)
Enables the processor
Parameter
Range
Default
Description
Level of
Signal
1 to 40 (dB)
10 (Fence)
10 (Buried)
Sets the level above which the signal
from a sensor cable must exceed before
an event is generated by the processor
Parameter
Range
Default
Description
Lowest
Frequency
10 to 600 (Hz)
200 (Fence)
10 (Buried)
The lowest allowable frequency used
by the processor to evaluate the
presence of an intruder. This may be
set to eliminate lower order frequencies
caused by nuisances such as vibrations
from nearby structures
Parameter
Range
Default
Description
Highest
Frequency
10 to 600 (Hz)
600 (Fence)
120 (Buried)
The highest allowable frequency
used by the processor to evaluate the
presence of an intruder. This may be set
to eliminate higher order frequencies
caused by nuisances such as natural
bending of the fence fabric in wind, etc.
Parameter
Range
Default
Description
Duration of
Signal
1 to 25 (sec / 10)
3 (Fence)
3 (Buried)
Time interval during which any signal
above the Level of Signal setting must
exist to qualify as an event
FD-340 Series User’s Reference Manual
Processor 1 (continued)
Parameter
Default
Description
Low Level
Tolerance
1 to 10 (dB)
5 (Fence)
5 (Buried)
An allowance that permits a signal
lower than the Level of Signal setting
to generate an event as long as it lasts
for the period of time automatically
set by the processor. The higher
the tolerance, the longer the signal
must last. If the signal is outside the
tolerance setting, it cannot generate an
event regardless of how long it lasts
Parameter
Range
Default
Description
Event Count
1 to 100
3 (Fence)
2 (Buried)
The number of times that an event must
be registered for an alarm condition to
occur
Parameter
Range
Default
Description
Event
Window
1 to 200 (sec / 10)
50 (Fence)
90 (Buried)
Length of time after an event occurs
during which another event must be
registered for it to count toward an
alarm condition. See Event Count
above
Parameter
Range
Default
Description
2 (Fence)
0 (Buried)
A period of time after an event during
which any subsequent events or
activities are ignored. This setting is
useful for setting the system to mask or
ignore the effects of oscillations from a
single event, such as a bird striking a
fence. Oscillations from such nuisances
usually die down within 0.5 seconds
Event Mask
Time
5-11
Range
0 to 100 (sec / 10)
FD-340 Series User’s Reference Manual
Processor 2 [2]
Note:
The default value for most parameters described in this section changes
depending upon whether the user sets the APU for fence line or buried (other)
applications.
5-12
Parameter
Range
Default
Description
Enable
Y/N
Y (Fence)
N (Buried)
Enables the processor
Parameter
Range
Default
Description
Level of
Signal
1 to 40 (dB)
10 (Fence)
N/A (Buried)
Sets the level above which the signal
from a sensor cable must meet or exceed
before an event is generated by the
processor
Parameter
Range
Default
Description
Lowest
Frequency
10 to 600 (Hz)
300 (Fence)
N/A (Buried)
The lowest allowable frequency used by
the processor to evaluate the presence of
an intruder. This may be set to eliminate
lower order frequencies caused by
nuisances such as vibrations from nearby
structures, etc.
Parameter
Range
Default
Description
Highest
Frequency
10 to 600 (Hz)
600 (Fence)
N/A (Buried)
The highest allowable frequency used by
the processor to evaluate the presence of
an intruder. This may be set to eliminate
higher order frequencies caused by
nuisances such as natural bending of the
fence fabric in wind, etc.
Parameter
Range
Default
Description
Duration of
Signal
1 to 25 (sec / 10)
1 (Fence)
N/A (Buried)
Time interval during which any signal
above the Level of Signal setting must
remain to qualify as an event
FD-340 Series User’s Reference Manual
Processor 2 (continued)
Parameter
Default
Description
Low Level
Tolerance
1 to 40 (dB)
3 (Fence)
N/A (Buried)
An allowance that permits a signal lower
than the Level of Signal setting to generate
an event as long as it lasts for the period
of time automatically set by the processor.
The higher the tolerance, the longer the
signal must last. If the signal is outside
the tolerance setting, it cannot generate an
event regardless of how long it lasts
Parameter
Range
Default
Description
Event
Count
1 to 100
5 (Fence)
N/A (Buried)
The number of times that an event must be
registered for an alarm condition to result
Parameter
Range
Default
Description
Event
Window
80 (Fence)
1 to 200 (sec / 10)
N/A (Buried)
Length of time after an event occurs during
which another event must be registered for
it to count toward an alarm condition. See
Event Count above
Parameter
Range
Description
Default
Event Mask
7 (Fence)
0 to 100 (sec / 10)
Time
N/A (Buried)
A period of time after an event during
which any subsequent events or activites
are ignored. This setting is useful for
setting the system to mask or ignore
the effects of oscillations from a single
event, such as a bird striking a fence.
Oscillations from such nuisances usually
die down within 0.5 seconds
Parameter
Default
Description
Y (Fence)
N/A (Buried)
Allows the user to disable / enable winddependent processing for Processor 2
only. If disabled, only Processor 1 will
use wind information to affect the signal
processing
Allow
WindDependent
Processing
5-13
Range
Range
Y/N
FD-340 Series User’s Reference Manual
Details [3]
Note:
Adjustment to setting in the DETAILS submenu affects both channels of the
APU simultaneously.
Parameter
5-14
Range
Default
Description
(Fence / Buried)
Sensor on Fence
Y or N
Y
Configures the APU for fence line
or buried (other) applications. A “Y”
value sets the system for fence line
operation
Parameter
Range
Default
Description
Alarm Relay Time
1 to 10 (sec)
1
Specifies the length of time in
seconds that the alarm will remain
active once an alarm condition is set
Parameter
Range
Default
Description
Enable Tamper
Switch
Y/N
N
Enables or disables the tamper
monitoring function. When enabled,
the normally-closed condition of the
tamper circuit is observed by the
APU. If the circuit is opened, or not
connected to the tamper switch in
the enclosure, the tamper alarm will
activate and remain activated until the
tamper circuit is closed or the tamper
switch is disabled with this command.
This command affects both APU
channels simultaneously
Parameter
Range
Default
Description
Anemometer (1) or
Wind Software (2)
1 or 2
2
Selects either the anemometer or
the wind rejection software for wind
processing
FD-340 Series User’s Reference Manual
Passwords [4]
Parameter
Range
Default
Description
Gain Menu
Password
15 characters
maximum
GAIN
Sets the password to access the
Gain menu
Parameter
Range
Default
Description
Setup Menu
Password
15 characters
maximum
SETUP
Sets the password to access the
Setup menu
Parameter
Range
Default
Description
DIR
This menu is for factory use only.
DO NOT change this password:
Some APU functions may be
disrupted
Directive Mode 15 characters
Menu
maximum
Reset [RS]
Selecting this choice will clear all user-defined parameter settings (except
passwords) and restore them to the factory default. From this selection, users
can also reset the FSN device address if the unit is equipped with the FSN
option.
If the unit is equipped with the FSN option, selecting the Reset option brings up
the prompt:
CH Select reset type. FSN Address [1]
or APU Settings [2]:
Select option 1 to reset the FSN device address (affecting both channels).
Select option 2 to reset the APU settings to the factory default (affecting only the
currently selected channel).
5-15
FD-340 Series User’s Reference Manual
Hist
This is a read-only menu that provides a history of alarms beginning with the most
recent alarm first. Alarms are read off according to how long ago they occurred. In
addition, each alarm entry is date/time stamped. For instance, if the alarm history
is read after three alarms occurred, the first report in the alarm history might read:
#3 Alarm, Processor 2 (W=0)
16:41 11/04/06
One can note from this example that the alarm history is provided for each alarm
that occurs for each processor. From this report, the #3 indicates the alarm report
number, Processor 2 indicates the processor in which the alarm occurred and the
date and time on the bottom line of text indicates when the alarm was received.
The “W=” parameter indicates the wind speed when the alarm occurred.
Up to 128 of the most recent alarm events will be stored in volatile APU memory.
Each alarm event exceeding the allowable 128 will overwrite the oldest entry.
Status
This is a read-only command that provides a real-time system diagnostic of
conditions such as system loss, laser current, power supply voltage (to the APU)
and any present fault, event or alarm conditions. The Status menu also provides
wind speed indication. When this menu is chosen, for example, the display reads:
Loss: 10 Las(mA): 17.5 Pwr(V): 15.0
[Evnt1][Evnt2][Alarm][Fault] Wnd:0
“Evnt1” and “Evnt2” refer to event conditions at Processor 1 and Processor 2.
Version
This read-only menu gives the APU model number, serial number, firmware
version, date of manufacture and the number of days the unit has been in
operation.
5-16
FD-340 Series User’s Reference Manual
Table 5-1 summarizes all menus and their associated programmable calibration
parameters for all available channels in the unit.
Table 5-1
Password
Menu
Submenu
GAIN
Parameters
Default
(Fence)
Default
(Buried)
Gain (1 to 50)
20
20
Enable Wind Rejection Software
N
N
Wind Rejection (20 to 80)
50
50
Enable (Y or N)
Y
Y
Level of Signal (1 to 40 dB)
10
10
Lowest Frequency (10 to 600 Hz)
200
10
Highest Frequency (10 to 600 Hz)
600
120
Duration of Signal (1 to 25 sec/10)
3
3
Low Level Tolerance (1 to 10 dB)
5
5
Event Count (1 to 100)
3
2
Event Window (1 to 200 sec/10)
50
90
Event Mask Time (0 to 100 sec/10)
2
0
SETUP
Enter 1, 2, 3 or 4
1
Wind
2
Comment
(15 characters max)
3
Date
Select Real Time Clock [1] or
Calibration Date [2]
(15 characters max for calibration date)
4
Calibrate
Enter 1, 2, 3, 4 or RS
(1) Processor 1
5-17
FD-340 Series User’s Reference Manual
Table 5-1 (continued)
Password
Menu
Submenu
Parameters
Default
(Fence)
Default
(Buried)
(2) Processor 2
Enable (Y or N)
Y
N
Level of Signal (1 to 40 dB)
10
10
Lowest Frequency (10 to 600 Hz)
300
10
Highest Frequency (10 to 600 Hz)
600
120
Duration of Signal (1 to 25 sec/10)
1
1
Low Level Tolerance (1 to 40 dB)
3
3
Event Count (1 to 100)
5
2
Event Window (1 to 200 sec/10)
80
90
Event Mask Time (0 to 100 sec/10)
7
0
Allow Wind-dependent Processing
Y
Y
Default
(All)
(3) Details
(4) Passwords
5-18
CH (Fence/Buried) Sensor on Fence?
Y
Allow Relay Time (1 to 10 sec)
1
Enable Tamper Switch (Y/N)
N
Anemometer (1) or Wind Software (2)
2
Gain Menu: 15 characters max
GAIN
Setup Menu: 15 characters max
SETUP
Directive Mode: 15 Characters max
FACTORY USE ONLY - DO NOT
CHANGE
DIR
FD-340 Series User’s Reference Manual
Table 5-1 (continued)
Password
Menu
Parameters
Parameters
(RS) Reset
CH reset type. FSN Address [1] or
APU Settings [2]:
(FSN enabled units only)
Destroy all present settings and restore
factory settings (Y/N)
5-19
HIST
Read
Only
Note date and time and hit Enter for
alarm history
STATUS
Read
Only
System light loss, laser current, power
supply voltage, real time displays of
Event 1, Event 2, Alarm and Fault
VERSION
Read
Only
Model number, serial number, mfg.
date, firmware revision, days of
operation
Default
(All)
FD-340 Series User’s Reference Manual
Calibrating and Testing the System
Once the system is fully installed and communication is established between the APU
and the programming device (either the Hyperion or PC with terminal emulations
software), the system needs to be calibrated and tested.
Calibration begins by checking system loss, adjusting the gain and then making
adjustments to other system parameters as necessary to ensure the FD-342
operates at top effectiveness. After each adjustment is made, the system should be
tested at length to verify performance.
Note:
Calibration and subsequent system testing should be performed individually
on each available channel of the APU.
Checking System Loss
The integrity of the system connections is checked first to ensure the light circuit
is complete and optical loss is minimal. This is done by powering up the APU and
observing the total loss to the system on each available channel.
To observe the total system loss:
1. Ensure power is being applied to the APU and the APU is properly connected to the sensor cable under test
2. At the password prompt, type “STATUS” into the programming device and press the Enter key. The system power, laser current and loss parameters are displayed
5-20
FD-340 Series User’s Reference Manual
3.Verify system loss is less than 25 (dB). The APU measures system loss by comparing received input power versus a factory-set power factor in its programming; therefore, this number is provided only as a rough test/troubleshooting means. If the system loss is greater than 25 dB, check the cleanliness of the connectors and any optical splice joints along the sensor cable from the input of the APU back to the laser power source. Ensure the cable is not being crimped by any obstacles such as tree limbs
4. Verify the other displayed parameters:
• LAS (mA)## Laser current. Normal operating range is 17 to 35 mA
• PWR (V)## Input voltage at the APU. 12 to 24 VDC is acceptable
5-21
FD-340 Series User’s Reference Manual
Setting the Gain
As mentioned previously, adjusting the gain affects the system sensitivity. A higher
gain is more likely to detect the presence of an intruder; however, a higher gain
is also more likely to allow nuisances to trigger an alarm. A balance needs to be
met when adjusting the gain that can only be determined through adjustment and
subsequent system testing.
Note:
An adjustment to the gain affects both Processor 1 and Processor 2 of the
currently selected channel simultaneously. The gain cannot be adjusted
independently for each processor.
To adjust the gain:
1. At the password prompt, type “GAIN” (or its current password) into the programming device and press the Enter key. The current system gain will be displayed
Gain
Sensitivity Level
2. Simulate the desired level of intrusion for which the FD-342 should protect against and verify that an alarm condition occurs. Adjust the gain as necessary until an alarm occurs
Figure 5-3: Gain adjustment principle
Ensure the system is tested at all areas and ways where intrusion is likely and is
difficult to detect (such as the corner post of a fence). The cutting of chain link
fence can be simulated by temporarily attaching a spare section of fence fabric
to the fence and securing it using cable ties. Cut the squares of the spare fabric
section and check the response of the system.
To aid in preventing nuisance alarms, the gain should be adjusted for the minimal
level that will adequately detect the simulated intruder (see Testing the System later
in this chapter). This ensures the system is no more sensitive than it needs to be.
5-22
FD-340 Series User’s Reference Manual
Adding Wind Processing and Event Processing
The manner in which events are processed can be refined to ensure nuisances
(such as wind) have a minimal effect on the APU processors while genuine
intrusions are detected each time. Wind processing and event processing
parameters provide a way to calibrate the APU and make the necessary
refinements in the detection processing system. Note:
Unlike the gain and wind processing parameters, event processing
parameters can be adjusted individually for Processor 1 and Processor 2.
As is done when the gain is adjusted, system testing should follow each adjustment
made to the wind processing or event processing to verify system performance.
Wind Processing
The effects of wind must be considered and compensated for in all fence
line applications. These effects can be dampened with the use of the wind
processing software and proper adjustment of the wind rejection factor.
1. Ensure the system is configured for fence line operation by accessing SETUP >> CALIBRATE >> DETAILS and selecting “Y” for the fence-
mounted sensor configuration
2. Set the method of wind processing to the “Wind Software [2]” option
3. Enable wind processing by accessing the SETUP menu and entering the wind processing submenu (see Programmable Calibration Parameters earlier in this chapter)
4. Set the Enable parameter to “Y”. Wind processing for Processor 1 is now enabled
5.Select SETUP >> CALIBRATE >> PROCESSOR 2 and choose “Y” to apply wind processing to Processor 2 or “N” to disable it
6. Set the wind rejection factor as needed so that the wind has a minimal effect
5-23
FD-340 Series User’s Reference Manual
As the wind load picks up, the
APU will automatically scale
back (or “dampen”) the gain in
accordance with the wind rejection
factor. A higher wind rejection
factor means more dampening,
requiring a signal higher in
magnitude to create an alarm
condition.
0
2
4
6
8
Gain
Reduction
10
12
(User settable
gain reduction)
14
10
20
30
40
50
60
70
Wind Load
80
The minimum wind rejection factor
is 20 and the maximum is 80.
Figure 5-4: Wind reduction principle
Event Processing
Event processing can be refined by accessing the event parameters through
the SETUP menu and “Calibrate” submenu. Event parameters that can be
programmed or adjusted are:
• Lowest and highest frequency
• Level of signal
• Duration of signal
• Level tolerance
• Event count
• Event window
• Event mask
Adjustment of the event parameters defines what sensor cable signals constitute
events. Therefore, the typical or expected threats against a system can be
characterized by the event processing setup.
Note:
Accurate setting of event parameters is usually determined through
experimentation and testing of the system following installation.
5-24
FD-340 Series User’s Reference Manual
Frequency Filters (lowest and highest). These filters determine the frequency
range at which sensor cable signals will be allowed to pass to the processor.
Recall from Chapter 1 that incoming optical signals from the sensor cable are
converted into electrical signals, digitized and transformed from the time domain
to the frequency domain. This is done to help determine whether a phase shift
in the propagating light has occurred as the result of a disturbance in the sensor
cable.
An intruder or nuisance will leave its own signature frequency as it disturbs the
sensor cable. For instance, the footsteps of an intruder walking across a buried
cable might make a disturbance that oscillates at a frequency of 10 Hz. Selecting
the right frequency range will help filter out events made at frequencies caused
by nuisances.
Determining the best frequency range is a matter of experimentation and testing
the system following installation.
Low Frequency Limit
High Frequency Limit
Power (dB)
50
100 150 200 250 300 350 400 450 500 550 600
Frequency (Hz)
Figure 5-5: Frequency limit principle
Signal Level. The signal intensity of a nuisance is generally lower than that of
an intruder. Setting this level means that a signal from the sensor cable must be
higher than the set level to be counted as an event.
5-25
FD-340 Series User’s Reference Manual
Signal Duration. The duration of the signal can also help to distinguish a
disturbance from an intruder versus a disturbance from a nuisance. Most
nuisances cause disturbances that are generally longer in length than those
caused by a determined intruder but are of lower magnitude. On the other
hand, some disturbances, such as the popping a metal fence makes in changing
temperature, are high in magnitude but very short. In the figure below, this
setting combines with the signal level setting to mean a signal must be higher
than the set signal level for at least 3/10ths of a second or longer to qualify as an
event.
18
16
Only signals in this region are
processed with both Signal Level
and Duration thresholds set.
14
12
10
Signal Level Threshold
Duration Threshold
Signal Level
(dB)
8
6
4
2
0
0
1
2
3
4
5
6
7
8
9
10
11
12
Duration (10ths of a second)
Figure 5-6: Signal duration illustration
Level Tolerance. The tolerance level specifies a lower level tolerance for
incoming signals. This allows a signal at a level lower than the signal level
setting to be considered an event if it lasts for a period of time automatically set
by the processor. The higher the tolerance, the longer the processor will set the
duration for the lower signal.
Event Count, Window and Mask Time. One of the best ways to differentiate
signals generated by an intruder from those of a nuisance is by the number of
times a signal is generated in a given period of time. Generally, a nuisance such
as an animal or tree branch doesn’t make consistent disturbances of the fiber as
an intruder does.
5-26
FD-340 Series User’s Reference Manual
The Event Count parameter specifies the number of times an event must be
received for an alarm to occur. This parameter is used in tandem with the Event
Window parameter.
An Event Window specifies a window of time following an initial event during
which it is possible to increment the alarm counter. Each event has its own
associated event window, but unless at least one event occurs within the event
window of another, the event counter resets. In other words, if the event window
is set for 5 seconds and the event counter is set for 3, this means at least 3
events must occur no more than 5 seconds apart (a total time of 15 seconds) for
an alarm to occur. If an event window expires before another event occurs, the
event counter resets and a new event window begins with the next event.
For example, in figure 5-7, the event window from the first event expires before
the second event occurs. Thus, the event counter resets and the second event
simply sets the event counter from 0 to 1.
18
16
14
5 second event windows
12
10
Event Count Accumulator
1
8
6
4
2nd event
1st event
Signal Level
(dB)
2
0
0
2
4
6
8
10
12
14
16
18
20
22
24
26
Time (seconds)
Figure 5-7: Event windows
If, however, the second event occurs before the first event window expires, the
event counter increments and remains active throughout the event window of the
second event. In figure 5-8, even though the third event falls outside the event
window of the first event, the event counter is still active; thus, it counts toward
an alarm.
5-27
FD-340 Series User’s Reference Manual
18
16
14
5 second event windows
12
10
Event Count Accumulator
2
8
6
4
2nd event
1st event
Signal Level
(dB)
2
0
0
2
4
6
8
10
12
14
16
18
20
22
24
26
24
26
Time (seconds)
18
16
14
5 second event windows
12
10
Event Count Accumulator
3
8
4
3rd event
6
2nd event
1st event
Signal Level
(dB)
2
0
0
2
4
6
8
10
12
14
16
Time (seconds)
Figure 5-8: Creating an alarm condition
5-28
18
20
22
FD-340 Series User’s Reference Manual
Each event also has a mask time associated with it. A mask time is a period of
time following an event during which no subsequent events will be counted. The
mask time parameter is included to account for oscillations made after an initial
strike against a fence by a bird or other nuisance.
Putting all three event counting parameters together:
18
16
Event Count Accumulator
3
14
12
10
Signal
Level (dB) 8
4th event
3rd event
1st event
6
2nd event (not valid)
4
2
0
0
2
4
6
8
10
12
14
16
18
20
22
Figure 5-9: Counting valid events
Here, we see that four events occur. Each has its own associated mask time.
The second event is not counted toward the event counter because it falls within
the mask time of the first event. Combined together, at least three valid events
occur within the same event window (counting the first event) and an alarm
condition occurs.
5-29
FD-340 Series User’s Reference Manual
Testing the System
As the last step of the calibration/installation process, each channel in use on the FD342 should be tested to determine its effectiveness.
Fence Line Applications
System testing begins with reviewing the list of threats against the site. To
determine the Probability of Detection (PD) for those threats, begin by simulating
each threat. Perform each threat simulation 20 times and monitor the response
of the FD-342. For example, to determine the PD of an intruder climbing over the
fence, have a volunteer climb over the fence in the same manner 20 times. Do not
give the individual any knowledge of whether or not an alarm is being generated
(to prevent him or her from changing the manner in which he or she climbs the
fence). Record the number of climbs that produce an alarm. Tally up the number
of climbs that generated an alarm and divide by 20. Multiply the result by 100 to
calculate the PD (in percent). If the PD is too low, adjust the Gain, Event Count
and Signal Level parameters as necessary until the PD reaches the desired level
(see Setting the Gain and Adding Wind Processing and Event Processing earlier in
this chapter).
Repeat this test for each installed zone or channel/APU at the protected site.
Figure 5-10 provides a sample log for calculating the PD of some basic fence line
threats. The list of threats in this log is not exclusive; therefore some or none of the
threats in this log may be applicable to your fence line setup.
5-30
5-31
Intrusion
Detection
Ladder Climb
Test
Intrusion
Detection
Fabric Cut
Test
Intrusion
Detection
Fabric Lift
Test
Zone
No.
Pass
No.
Pass
Fail
Pass
Fail
Pass
Fail
Pass
Fail
Comments
Figure 5-10: Fence line application detection data sheet
Processor Serial No.
Project No.
FSI Intrusion Detection Test Data
Intrusion
Detection
Fabric Climb
Test
Date
Location
FD-340 Series User’s Reference Manual
FD-340 Series User’s Reference Manual
Buried Application
The principles and procedure for testing the FD-342 with a buried application is
generally the same as it is for a fence line application. The types of threats will
be different. To simulate the walk intrusion, it is recommended that the volunteer
“intruder” crouch while walking (or “duck walk”) to simulate the stealth likely to be
used by a walking intruder. As a separate test, it is also recommended that the
same individual attempt to jump across the detection zone as well. Do not let the
individual know how far the detection zone extends when performing this latter test.
Figure 5-11 provides a sample log for calculating the PD of some basic threats
against a buried application. The list of threats in this log is not exclusive;
therefore, some or none of the threats in this log may be applicable to your setup.
For some buried applications, if the cable is buried too close to the fence, it may
pick up vibrations from the fence when the wind blows against it, causing nuisance
alarms. If this is discovered to be the case during the testing process, either deploy
the cable further from the fence or raise the Signal Level (see Event Processing
earlier in this chapter) until the disturbance no longer causes an alarm.
Repeat this test for each installed zone or channel/APU.
5-32
5-33
Intrusion
Detection
Crawl Test
Intrusion
Detection
Run Test
Intrusion
Detection
Jump Test
Zone
No.
Pass
No.
Pass
Fail
Pass
Fail
Pass
Fail
Pass
Fail
Comments
Figure 5-11: Buried application detection data sheet
Processor Serial No.
Project No.
FSI Intrusion Detection Test Data
Intrusion
Detection
Walk Test
Date
Location
FD-340 Series User’s Reference Manual
FD-340 Series User’s Reference Manual
Tamper Test
The tamper feature on APUs installed in NEMA enclosures must also be tested. To
test the tamper switch:
• Verify that all alarms and alarm-indicating LEDs are reset
• Proceed to the first NEMA enclosure to be tested. Open the door and observe
the tamper alarm at the APU. The alarm should set before more than a 1/8”
gap exists between the door and the enclosure
• Record the results in the FSI Test and Acceptance Log (a sample log is
provided in figure 5-12)
• Close and latch the NEMA enclosure door
• Repeat these steps for all remaining NEMA enclosures to be tested
Line Test
This test verifies that a loss of return optical power to the APU results in a “Fault”
condition indicator on the APU.
• Proceed to the first APU. If the APU is mounted in a NEMA enclosure, open
the enclosure door and set the tamper switch to the “maintenance” position by
pulling on the actuator rod
• Ensure that no fault, tamper or alarm indicating LEDs are lit on the APU
• Disconnect the optical cable from the APU input connector. Verify that a Fault
alarm is generated
• Record the rest results in the FSI Test and Acceptance Log (a sample log is
provided in figure 5-12)
• Reconnect the cable. The Fault alarm should clear
• Repeat these steps for all remaining FD-342 APUs
5-34
5-35
Pass
Fail
Tamper Test
Pass
Fail
Comments
Figure 5-12: Test and acceptance log
Processor Serial No.
Zone
No.
Project No.
FSI Line Supervision Test and Acceptance Log
Fiber Optic Cable
Fault Test
Date
Location
FD-340 Series User’s Reference Manual
Maintenance & Troubleshooting
6
Maintenance
General
Operational site maintenance consists of routine preventative maintenance
inspections, fault isolation and removal and replacement of faulty equipment.
Support Equipment
Maintenance equipment is listed as follows:
Table 6-1
Maintenance Tools
Item
Fiber SenSys Part No.
Notes
Hand held Calibrator
Hyperion
Optional
Laptop PC with RS-232
serial port connection
and MSN HyperTerminal
emulation software or
equivalent
N/A
Optional substitute for Hyperion
DB-9 Serial port cable
(straight 9-pin)
N/A
Required with laptop PC
Loopback test cable
N/A
Locally fabricated as illustrated in
this chapter
6 inch screwdriver
N/A
SpectraView advanced
programming and
maintenance software
SpectraView®
®
Optional
6-1
FD-340 Series User’s Reference Manual
Preventative Maintenance
Task
System Visual Inspection
Required ToolsNone
Recommended
Performance
Interval
6-2
90 days
Procedure
1. Carefully inspect the sensor cable conduit for integrity. Verify there are no cracks or kinks in the conduit. Also verify the cable is not pulled into a radius tighter than 5 cm (or 2 inches) at any point
2. Ensure the conduit is attached firmly to the fence (fence line applications only). Add or replace wire ties as needed
3.Inspect the integrity of the fence. Tighten any loose fence hardware and remove any foreign material from the fence fabric
4. Ensure all APU LED indicators are normal (“Power” indicator only is lit). Verify the green “Data” LED is lit for APU’s equipped with the FSN options
5. Check the optical connectors at the APU and ensure they are properly seated. Check the integrity of the conduit where it enters the enclosure and seal any cracks or splits (between the conduit and enclosure) to prevent moisture from getting in
6. Open all APU enclosures and verify they are free of moisture
FD-340 Series User’s Reference Manual
Task
System Performance Test
Required ToolsNone
Recommended
Performance
Interval
6-3
90 days or as required
Procedure
1. Perform the Intrusion Detection Fabric Climb Test (fence line applications) by having an individual climb to the top of the fence fabric. Verify that an alarm is generated at the annunciator equipment
2.Record the test results
3.Reset the annunciator equipment
4.Repeat steps 1 through 3 at various locations throughout the zone to verify zone protection
5.Perform the Intrusion Detection Ladder Climb Test (fence line applications) by having an individual attempt to use a ladder to climb over the fence fabric. Verify that an alarm is generated at the annunciator equipment
6. Record the test results
7. Reset the annunciator equipment
8. Repeat steps 5 through 7 throughout the zone to verify zone protection
9. Perform the Intrusion Detection Fabric Cut Test (fence line applications) by having an individual attempt to cut through the fence fabric. This can be simulated by tapping on the fence with a screwdriver to simulate each cut. Verify that an alarm is generated at the annunciator equipment
FD-340 Series User’s Reference Manual
6-4
10. Record the test results
11. Reset the annunciator equipment
12. Repeat steps 9 through 11, tapping the screwdriver on the fence at various locations to verify zone protection. The number of taps or “cuts” should correspond to the current Event Count setting
13. Perform the Walk Test (buried applications) by having an individual walk slowly across the zone. Verify that an alarm is generated at the annunciator equipment
14. Record the test results
15. Reset the annunciator equipment
16. Repeat steps 13 through 15 at various locations throughout the zone to verify zone protection
17. Perform the Run Test (buried applications) by having an individual run and jump into the zone. The person should jump as high into the air as possible before coming down into the zone. Verify that an alarm is generated at the annunciator equipment
18. Record the test results
19. Reset the annunciator equipment
20. Repeat steps 17 through 19 at various locations throughout the zone to verify zone protection
21. Refer to the troubleshooting section of this chapter if the alarm fails to activate during testing
FD-340 Series User’s Reference Manual
Task
APU Status Check
Required Tools
Recommended
Performance
Interval
Hyperion hand held Calibrator or PC with terminal emulation software
Procedure
1.Connect the Hyperion directly to the APU utilizing the RS-232 cable
2.Once the Hyperion is activated, select the Real-Time mode to proceed
3. Select the “STATUS” tab at the bottom of Hyperion’s s creen to display the following summary of the APU’s opertional status
180 days
• LOSS: Less than 25 dB
• LAS (mA): Between 17 and 35 mA
• PWR: Between 12 and 24 VDC
4. Record these values and compare to the values recorded at the last status check. There should be no greater than a 2-3 dB change in the loss value. A greater difference may indicate the presence of a bad connector. The laser current should not exceed 35 mA
-- or - Launch SpectraView from the PC. Select the “modes” tab at the left hand side of the screen. From the pop-
out menu, select “Terminal”, which launches the TerminalMode screen for checking ‘STATUS”
Note:
For more detailed instructions about Hyperion’s “Status” tab or SpectraView’s
“Terminal” tab, please refer to the respective user’s reference manuals
available through Fiber SenSys.
6-5
FD-340 Series User’s Reference Manual
6-6
Task
1 meter “loopback” cable creation
Required Tools
Recommended
Performance
Interval
CK-200 or equivalent connector kit
Procedure
1.Obtain a 1 meter section of single-mode optical fiber. Only single-mode optical fiber can be connected directly to the FD-342
2.Following the instructions found in the CK-200 connector kit, terminate the ends of the fiber with ST connectors
3. Test the loopback cable by connecting it to the optical connectors of a known-good APU. There should be no fault or alarm indicators illuminated (see figure 6-
1)
4. Run a “STATUS” check on the APU and verify the LOSS number is acceptable
As needed
FD-340 Series User’s Reference Manual
1 meter SC-3 or SC-4
Optical Fiber Sensor Cable
ALARM B
RS-232
DC 12-24 V
POWER
ALARM A
FAULT
TAMPER
12-24 VDC
GND
12
11
10
9
8
7
6
5
4
3
2
+1
Fiber SenSys, Inc.
Fiber Defender
FD-332 Alarm Processor
Anemometer
Fiber Optic Intrusion Detection System
Anemometer
503-692-4430
MADE IN U.S.A.
CLASS 1
LASER OUTPUT
This product complies
with 21 CFR 1040.10
Output
CH B
Power
Fault
Output
CH A
Event
Input
Alarm
Test
Input
Figure 6-1: The loopback cable
6-7
FD-340 Series User’s Reference Manual
Troubleshooting
SYMPTOM:
No alarm at the annunciator panel
RESPONSE: Troubleshoot the system in accordance with the flow chart figure 6-2
1
START
Verify green "Power" or
"Operate" LED is
illuminated on APU face
No
Check power
terminals for +12
VDC
Power
No power
Yes
Connect PC / Hyperion to
APU and run "STATUS"
check. Ensure you are
viewing the affected
channel. Compare the
LOSS to the historical
value
STOP
Restore
correct input
power
High
(> 6 dB
change)
STOP
Replace APU
and perform
testing
STOP
Clean and
check optical
connectors
and inspect
cable
OK
STOP
Clean and
check optical
connectors
and inspect
cable
LED OK
Relay OK
Connect an ohmmeter
across the relay contacts
and simulate an alarm
condition. Does the
alarm LED illuminate and
does the relay change
state?
LED OK
No relay response
Cycle power to the APU.
Connect an ohmmeter
across the relay contacts
and simulate an alarm
condition. Does the
alarm LED illuminate and
does the relay change
state?
LED OK
Relay OK
STOP
Verify the
annunciator
activates the
alarm
LED OK
No relay response
No LED response
No relay response
Adjust the gain to 50 and
simulate an alarm
condition in the zone.
Alarm activates
No alarm
STOP
Re-tune the
system in
accordance
with Chapter 5
STOP
Replace APU
and perform
testing
STOP
Replace APU
and perform
testing
Figure 6-2: Troubleshooting flow chart for a lack of alarm
6-8
FD-340 Series User’s Reference Manual
SYMPTOM:
Constant alarm at the annunciator panel
RESPONSE:
Troubleshoot the system in accordance with the flow chart found in figure 6-3
1
START
Verify green "Power" or
"Operate" LED is
illuminated on APU face
No
Alarm LED on
Fault LED off
Both on
Remove connection to
the annunciator and
check relay contacts with
an ohmmeter. Is the
relay in the correct state?
STOP
Re-tune the
system in
accordance
with Chapter 5
Yes
Connect 1m "loopback"
cable between APU
optical connectors. Do
the LEDs change state?
Set "Enable Tamper"
feature to "N"
Alarm clears
Alarm remains
STOP
Check tamper
circuit wiring
and switch
STOP
Replace APU
and perform
testing
STOP
Replace APU
and perform
testing
No
Yes
No
Alarm remains
STOP
Check the
annunciator
wiring and
connectors
STOP
Restore
correct input
power
Check the alarm and
fault LED status.
Both off
Alarm clears
Cycle the APU power.
Does the relay
change state?
No
STOP
Replace APU
and perform
testing
Yes
STOP
Restore
connections to
the
annunciator
and re-test
Clean and re-connect
sensor cable. Inspect
the sensor cable
Alarm clears
STOP
Repair and
re-test
STOP
Replace APU
and perform
testing
Alarm remains
Clean and inspect
feed-through couplers
throughout the zone
Alarm clears
STOP
Repair and
re-test
feed-through
couplers
Alarm remains
STOP
Repair and
re-test sensing
cable
Figure 6-3: Troubleshooting flow chart for a constant alarm
6-9
Power
No power
Yes
Connect 1m "loopback"
cable between APU
optical connectors. Do
the LEDs change state?
Check power
terminals for +12
VDC
FD-340 Series User’s Reference Manual
SYMPTOM:
Intermittent, unexplained alarms
RESPONSE:
There may be multiple causes. Troubleshoot the system
in accordance with figure 6-5
1
START
Open enclosure. Check
"Power" or "Operate"
LED
Yes
STOP
Replace APU
and perform
testing
No
Connect 1m "loopback"
cable between APU
optical connectors. Does
the alarm clear?
No
Check power
terminals for +12
VDC
Power
No power
STOP
Replace
power supply
STOP
Replace APU
and perform
testing
Yes
STOP
Inspect cable and
connectors in the
zone for physical
changes in
accordance with
this chapter
Figure 6-5: Troubleshooting flow chart for intermittent alarms
6-10
If the flowchart indicates the need to inspect the zone
and adjust the APU sensing parameters, the system may
be receiving nuisance alarms from one or more sources.
As a first corrective step, check the system gain and
adjust it for the lowest possible gain that still allows for
complete intruder detection. This is determined through
experimentation and testing (see Setting the Gain in
Chapter 5).
FD-340 Series User’s Reference Manual
Possible nuisance sources that should be considered
include:
• Wind
• Animals
• Birds
• Loose cable ties
• Loose fence fabric or a clanging gate
• Nearby aircraft
• Large towers or structures that can resonate with the wind and create low frequency oscillations
One of the most difficult steps in countering nuisance
alarms is identifying the source. A tool that can
help assist you in this process is the Fiber SenSys
SpectraView® software, which can help by providing
visual identification of the nuisance signal frequency and
waveform. For more information on this tool, contact
Fiber SenSys.
Investigate and determine where the source of nuisance
is coming from. Once the source is identified, measures
should be taken to reduce the effects of the source,
including recalibration and retesting of the FD-342
system.
Some electrical harmonics can be induced into heavy
electrical equipment. If this equipment is located near
a sensor cable, vibrations from the equipment may be
transmitted to the cable. Knowing the frequency and
waveform of the signal from the suspected nuisance
would help isolate it in this case. Use the frequency filter
to filter out all signals at the suspected frequency.
In addition, a “comb” filter can be employed to filter
out harmonics from the electrical waveform. For more
information on setting up a comb filter, contact Fiber
SenSys.
6-11
Network Integration
7
Introduction
The FD-342 (or FD-341) incorporates communication options intended
to increase the ease with which users can communicate with the system.
The capability exists to plug an FD-342 APU directly into a LAN network.
Alternatively, users can order the FD-342 with embedded Fiber Security
Network (FSN) compatibility.
XML Communication
XML, or eXtensible Markup Language, is a protocol which focuses on
preserving the content of data transferring across a network from one
component to the next. With XML, users “tag” various pieces of data or
messages to indicate the associated semantics, thus creating what are
referred to as XML “documents”. These tags accompany the information in
the document as it is passed between components. When one computer
receives the data from another, for example, it is able to reassemble the
message or document content accurately.
With the FD-342, XML communication allows a network to receive status
messages from an FD-342 (such as alarm / intrusion, tamper or fault
conditions, etc.) and allows a controller to send device configuration
commands to an APU.
XML documents can be created in any text editor (such as Microsoft Word®)
and sent via any program or utility capable of addressing the appropriate
network port. A number of alarm annunciator programs already have IP
addressing capability embedded. For users without such programs, any
terminal emulation software may be used.
7-1
FD-340 Series User’s Reference Manual
IP Communication Option
Each FD-342 ordered with the “IP” communication option comes fitted with an
RJ45 connector for TCP/IP network connection. This connector is located on
the upper left-hand side of the APU (figure 7-1).
Figure 7-1: CAT 5 cable assembly connected to the FD-342 APU
12
11
10
9
8
7
6
5
4
3
GND 2
+1
ALARM B
RS-232
DC 12-24 V
POWER
ALARM A
FAULT
TAMPER
12-24 VDC
Fiber SenSys, Inc.
Fiber Defender
FD-342 Alarm Processor
Fiber Optic Intrusion Detection System
503-692-4430
MADE IN U.S.A.
TCP/IP CONNECTOR
CLASS 1
LASER OUTPUT
Output
ALARM B
RS-232
V
-24 CH
DC 12
B
POWER
12
1
This product complies
with 21 CFR 1040.10
8
Output
ALARM A
6
T CH A
Power FAUL
Fault
TAMPER VDC
Event
12-24
GND
CAT 5 Cable, Assembly
Inc.
1
Input
Alarm
Sys
Fiber SenFiber Defender
Test
rusion De
Int
Fiber Optic
Output
er
stem
tection Sy
Data is sent to and from the APU using XML communication.
Connecting the APU to the LAN
Note:
7-2
Anemomet
SSO1UTPUT s
CLAR
mplie
LASEis
t co
R 1040.10
producCF
Th with 21
CH B
Input
TCP/IP Port
3+
Input
r
Powe
Fau
E
FD-340 Series User’s Reference Manual
This section assumes readers have an operating knowledge of networks and
network administration.
Each FD-342 APU fitted with the IP option comes from the factory
with a default IP address of 0.0.0.0, making it ready for insertion
into a Dynamic Host Communication Protocol (DHCP) type network. Once
connected, the network server will assign an IP address to the APU.
If the APU is not being connected to a DHCP type network, an IP address will
have to be assigned to the APU. For instructions on assigning an IP address
manually, refer to Setting the IP Address of the APU following this section.
The port number of the APU is 10001.
Note:
A default value of 10001 is assigned to the APU port at the factory. For help
in changing this port number, contact Fiber SenSys.
Setting the IP Address of the APU
For networks which are not based upon the DHCP scheme, the IP
address of the APU must be set manually using any PC with the
Lantronix® DeviceInstaller.
To set the IP address using DeviceInstaller:
1. Connect a CAT 5 network cable from the APU to a host PC
Note:
Lantronix® DeviceInstaller installation software and help files are included
with the APU product components.
2. Power the APU
3. Launch Lantronix® DeviceInstaller from the host PC
4. The software may automatically detect Xport devices. If not,
clicking the Search button, figure 7-2, will allow the program to locate
and display, as in figure 7-3, the Xport connected devices
Figure 7-2: Search button
Figure 7-3: Lantronix® DeviceInstaller screen with Xport devices identified
Note:
The MAC address of the APU is found on a removable label which covers the
RJ45 connector upon shipment from the factory. It also appears on the serial
7-3
FD-340 Series User’s Reference Manual
These addresses are for example only. A
unique address for each APU is assigned
at the factory.
number label of the APU (the Hardware Address noted in figure 7-2).
5. By clicking on the Xport device, it is then selected for configuration with
details about the device displayed
Figure 7-4: Device Details screen for selected Xport device
6. Select the Assign IP button, figure 7-5, from the upper right hand
side of the screen
Figure 7-5: Assign IP button
7. The Assignment Method screen displays, from here select “Assign a
7-4
FD-340 Series User’s Reference Manual
specific IP address”, as shown in figure 7-6, then select the Next > button
Figure 7-6: Assignment Method screen for assigning a specific IP address
8. When the IP Settings screen displays, enter the assigned IP address,
7-5
FD-340 Series User’s Reference Manual
at which point the Subnet mask and Default gateway fields are filled in
automatically, as displayed in figure 7-7, then select the Next > button
Figure 7-7: IP Settings screen
9. Once the Assignment screen displays, figure 7-8, press the Assign button
to begin the process of assigning the new IP address. The Assignment status
screen displays, showing the progress of the current task, as seen in figure
7-9
Figure 7-8: Assignment screen with the Assign button
7-6
FD-340 Series User’s Reference Manual
Figure 7-9: Assignment screen with “Progress of task:” bar
10. Once the task has been successfully completed, click the Finish button
11. To assign the Subnet mask and Default gateway identifiers, repeat steps
3 through 9, from the Search function
Caution
Changing any other settings may disrupt operation of the APU’s TCP/IP port.
For assistance with this, contact the factory.
Network and Serial Setup
The steps in this process are used to correctly assign Network and
Serial connections once an IP address has been assigned per the,
Setting the IP Address, procedures outlined earlier in this chapter.
7-7
FD-340 Series User’s Reference Manual
1.Start Internet Explorer or other internet browser
2. In the address box at the top of the internet browser screen, enter the IP
address just assigned during the Lantronix® DeviceInstaller program setup,
as in figure 7-10
Figure 7-10: Address bar where to enter newly assigned IP address
3. When the Xport login screen appears, figure 7-11, simply click the
OK button, leaving the “User name” and “Password” fields empty
Figure 7-11: The login screen with blank data fields
4. From the left-hand side menu that appears at the Home screen, figure
7-12, select Channel 1, Serial Settings. Verify, or change if necessary, the
“Baud Rate” to 230400. Do not change any of the other parameters
Figure 7-12: Menu options for the Device Server Configuration Manager
5. Click the OK button to confirm the changes. A Done! notation will appear
immediately to the right of the button to indicate changes have been applied
6. From the menu again, select Channel 1, Connection, Channel 1. When
7-8
FD-340 Series User’s Reference Manual
the screen appears, figure 7-13, verify or change the Active Connection drop
down menu to “Auto Start”
Figure 7-13: The Channel 1, Connection, Channel 1 screen
7. From the same screen, move to the Endpoint Configuration section and
7-9
FD-340 Series User’s Reference Manual
For example only, each
unit will be assigned its
own unique address
verify or enter the corresponding data as follows:
“‘Local Port”
“Remote Host”
“Remote Port”
XXXXX
XXX.XXX.X.XXX
XXXX
8. Click the OK button to apply the changes. The Done! notation, as seen
earlier, appears indicating the changes have been accepted, figure 7-14
Figure: 7-14: The Channel 1, Connection, Channel 1 screen with applied and
accepted changes
9. In order for the changes to be applied and saved, refer to the left-hand
side menu again. Click “Apply Settings” to save the recently updated
7-10
FD-340 Series User’s Reference Manual
XXXXX
XXXX
XXX.XXX.X.XXX
information. The new settings will not be applied until this step has been
7-11
FD-340 Series User’s Reference Manual
XXXXX
XXXX
XXX.XXX.X.XXX
completed. A status screen, as shown in figure 7-15, will display. Once the
process has completed, the home page will be displayed, and at this time,
Internet Explorer can be closed, completing the assignment of correct Serial
and Network settings
Figure 7-15: The status page for applying the newly assigned settings
The APU is now ready for network operation.
Should assistance be required during this process, contact Fiber SenSys.
XML Input / Output Messages
Note:
The XML documents shown below, as well as others used in the remote
system - APU communication process, are in full compliance with ICD-100
7-12
FD-340 Series User’s Reference Manual
guidelines.
Note:
XML Input / Output messages are provided on the CD accompanying the
APU’s system components.
The flowchart in figure 7-16 displays the systematic approach to input and
output message documents to ensure that the system is communicating
without interruption.
Figure 7-16: Remote system – APU communication structure
7-13
FD-340 Series User’s Reference Manual
Initialization
Once the APU is powered and network connections are established, actual
“dialog” with XML messages will occur. As noted in the flowchart, a Platform
Status Report (PSR), figure 7-17, is sent every 20 seconds, while a Ping Out,
figure 7-18, is sent every 130 seconds. This is done in order for the remote
system to identify what is connected, and to determine whether or not to
communicate with the device.
Note:
In order for the APU to respond to incoming messages, the <DeviceName>
field in the <DeviceIdentification> block must correspond with the name of
the APU.
7-14
FD-340 Series User’s Reference Manual
Figure 7-17: A sample PlatformStatusReport.xml message
Figure 7-18: A sample Ping Out.xml message
The Ping In message, figure 7-19, should be received by the APU
within every 130 seconds. If it is not, the process is diverted to the
beginning where the system awaits the initial PSR and responding
Ping Out messages. Once the Ping In is received, the APU will
send the PlatformStatusReport, Intrusion / Alarm, Fault, Tamper,
DeviceConfiguration and Ping Out messages. This successful round
of communication is known as the “handshake” and normal processing
operations will continue, uninterrupted.
Figure 7-19: A Ping In.xml message is answered with a Ping Out.xml
7-15
FD-340 Series User’s Reference Manual
START
Power On
Ethernet Setup : Xport Connections
the “Handshake”
Output PSR every 20 seconds
Output Ping Response every 130 seconds
Ping Request
received?
No
Yes
APU sends:
PlatformStatusReport
Alarm / Intrusion Report
Fault Report
DeviceConfiguration (for all channels)
Ping Response
Processing
Intrusions / Alarms
Fault
DeviceConfiguration
Parameter change?
Yes
Send
DeviceConfiguration
Report
Yes
Send Response
DeviceConfiguration
Report
No
DeviceConfiguration
received?
No
Ping Request
received?
Yes
No
Yes
document
7-16
130 seconds
since last
Ping Request
received?
No
Send Ping Response
FD-340 Series User’s Reference Manual
Events
There are 3 types of events noted by the APU:
Intrusion or alarm
Fault (broken fiber or hardware malfunction)
Tamper (a switch which indicates whether the device has been opened)
When an event occurs, whether intrusion/alarm, fault or tamper, an ID field
index, <ID>SZ0001</ID>, is updated. This ID field acts as an event counter.
Intrusion or Alarm
An alarm message, such as seen in figure 7-20, signals an intrusion
for either Channel A or Channel B.
7-17
FD-340 Series User’s Reference Manual
Note:
The <DeviceName> in the block <DeviceIdentification> contains the name
of the channel for which the event was detected: <DeviceName>FD34x.CHa
or FD34x.CHb</DeviceName>.
Figure 7-20: Alarm messages for Channel A and Channel B of the APU
The message clearly indicates the type of detection that occurred in the xml
block <DeviceDetectionReport>. The <DetectionEvent> field displays the
value, “Intrusion”, indicating that the cable has been sufficiently disturbed to
incur an Intrusion or Alarm message.
Channel Fault
A fault may occur when, for example, a cable is bent into too tight a radius,
less than 5 cm (2 inches).
The 2 messages, shown in figure 7-21, Fault_CHb_partA_DDR.xml,
followed by Fault_CHb_partB_DSR.xml, figure 7-22, signal a fault. The
tag <DeviceDetectionReport> identifies the type of detection, where the
<DetectionEvent> field contains the value “Fault”. A <DeviceStatusReport>
always follows the first message, Fault_CHb_partA_DDR.xml. The primary
function of the second report is to indicate that the affected channel
is in a fault state and cannot detect an intrusion any longer. The field
<DeviceState> indicates that this channel is in fault condition and the field
<CommunicationState> reflects the status of the “communication” through
the fiber: “Fail” in this instance.
Figure 7-21: Channel Fault alarm messages for Fault_CHb_partA_DDR.xml
Figure 7-22: Channel fault alarm message Fault_CHb_partB_DSR.xml
Once the cable is straightened, the fault condition is eliminated, and the
message, FaultRestore_CHb_DSR.xml, indicates the removal of the fault
condition. The <Detection> block in the Tamper_ and FaultRestore_ DSR
(Device Status Report), figure 7-23, is used to signal the detected event. The
<Status> block before basically performs the same function, but provides
more information, especially in the case of fault restore, where the
zone can be seen as secure once again.
Figure 7-23: Tamper_ and FaultRestore_ Device Status Reports
Note:
The DDR signifies the tag <DeviceDetectionReport>, while the DSR
7-18
FD-340 Series User’s Reference Manual
indicates a <DeviceStatusReport>.
Tamper
7-19
FD-340 Series User’s Reference Manual
FD-34X_”Handshake”.xml
<?xml version="1.0" encoding="UTF-8"?>
<PlatformStatusReport>
<PlatformIdentification>
<DeviceName>CUSTOMNAME</DeviceName>
<DeviceCategory>Sensor</DeviceCategory>
<DeviceType>FD34x APU</DeviceType>
</PlatformIdentification>
<DeviceStatusReport>
<DeviceIdentification>
<DeviceName>CUSTOMNAME.CHA</DeviceName>
<DeviceCategory>Sensor</DeviceCategory>
<DeviceType>FD34x Channel</DeviceType>
</DeviceIdentification>
<Status>
<DeviceState>Secure</DeviceState>
<CommunicationState>OK</CommunicationState>
<UpdateTime Zone="GMT">2007-09-21T13:43:07.000</UpdateTime>
</Status>
</DeviceStatusReport>
<DeviceStatusReport>
<DeviceIdentification>
<DeviceName>CUSTOMNAME.CHB</DeviceName>
<DeviceCategory>Sensor</DeviceCategory>
<DeviceType>FD34x Channel</DeviceType>
</DeviceIdentification>
<Status>
<DeviceState>Secure</DeviceState>
<CommunicationState>OK</CommunicationState>
<UpdateTime Zone="GMT">2007-09-21T13:43:07.000</UpdateTime>
</Status>
</DeviceStatusReport>
</PlatformStatusReport>
<?xml version="1.0" encoding="UTF-8"?>
<DeviceConfiguration MessageType="Report">
<DeviceIdentification>
<DeviceName>CUSTOMNAME.CHA</DeviceName>
<DeviceCategory>Sensor</DeviceCategory>
<DeviceType>FD34x Channel</DeviceType>
</DeviceIdentification>
<ConfigurationSetting Name="Gain" Units="None" MinimumValue="1" MaximumValue="50" CurrentValue="30"/>
<ConfigurationSetting Name="Wind Reject Factor" Units="MilesPerHour" MinimumValue="20" MaximumValue="80" CurrentValue="50"/>
<ConfigurationOptionBlock Name="Wind Processing" Units="None">
<ConfigurationOption Option="Enabled" Selected="true"/>
<ConfigurationOption Option="Disabled" Selected="false"/>
</ConfigurationOptionBlock>
</DeviceConfiguration>
<?xml version="1.0" encoding="UTF-8"?>
<DeviceConfiguration MessageType="Report">
<DeviceIdentification>
<DeviceName>CUSTOMNAME.CHB</DeviceName>
<DeviceCategory>Sensor</DeviceCategory>
<DeviceType>FD34x Channel</DeviceType>
</DeviceIdentification>
<ConfigurationSetting Name="Gain" Units="None" MinimumValue="1" MaximumValue="50" CurrentValue="30"/>
<ConfigurationSetting Name="Wind Reject Factor" Units="MilesPerHour" MinimumValue="20" MaximumValue="80" CurrentValue="50"/>
<ConfigurationOptionBlock Name="Wind Processing" Units="None">
<ConfigurationOption Option="Enabled" Selected="true"/>
<ConfigurationOption Option="Disabled" Selected="false"/>
</ConfigurationOptionBlock>
</DeviceConfiguration>
<?xml version="1.0" encoding="UTF-8"?>
<CommandMessage MessageType="Response" Status="OK">
<DeviceIdentification>
<DeviceName>CUSTOMNAME</DeviceName>
</DeviceIdentification>
<Command>
<SimpleCommand>Ping</SimpleCommand>
</Command>
</CommandMessage>
A tamper alarm is signaled by the message, Tamper_DSR.xml, which
7-20
FD-340 Series User’s Reference Manual
FD34x_Ping_Request.xml
<?xml version="1.0" encoding="UTF-8"?>
<CommandMessage MessageType="Request">
<DeviceIdentification>
<DeviceName>CUSTOMNAME</DeviceName>
</DeviceIdentification>
<RequestorIdentification>
<DeviceName>eTASS-001</DeviceName>
</RequestorIdentification>
<Command>
<SimpleCommand>Ping</SimpleCommand>
</Command>
</CommandMessage>
contains a <DeviceStatusReport> block. The <DeviceState> is set to
FD34x_Ping_Response.xml
<CommandMessage MessageType="Response" Status="OK">
<DeviceIdentification>
<DeviceName>CUSTOMNAME</DeviceName>
</DeviceIdentification>
<Command>
<SimpleCommand>Ping</SimpleCommand>
</Command>
</CommandMessage>
Tamper, as shown in figure 7-24.
Figure 7-24: The tamper alarm signal, Tamper_DSR.xml
Adjusting Device Configuration Options
Options that can be changed via XML are found in DevConfig_CHa.xml
or DevConfig_CHb.xml. These are typical messages that a host system
would send to an APU. It is important that the <DeviceName> is set to
the actual name of the unit, or the unit will not respond, thereby disabling
any proposed changes. Should one of the settings be out of range or a
7-21
FD-340 Series User’s Reference Manual
<ConfigurationSettingName> field is found with a name that does not exist,
the unit will respond with a <DeviceConfiguration> response message with
the message heading:
<DeviceConfiguration MessageType=”Response” RequestId=”X”
Status=”Failed”>
Note:
The RequestId= field, displayed as X here, is dependent on the incoming
RequestId.
The current settings of the APU are contained in this response message, but
only the settings before the error line will be changed. Important to note is
that the only other differences between an incoming message and returned
message are the MessageType= value and the missing Status= parameter.
Upon successful configuration adjustment, an identical message will be
retuned with all the actual parameters and the message heading:
<DeviceConfiguration MessageType=”Request” RequestId=”X”
Status=”OK”>
Platform Status Report
This section describes tags for the Platform Status Report document,
figure 7-25, from the APU.
7-22
FD-340 Series User’s Reference Manual
FD34x_Alarm_CHa.xml
<?xml version="1.0" encoding="UTF-8"?>
<DeviceDetectionReport>
<DeviceDetectionRecord>
<DeviceIdentification>
<DeviceName>CUSTOMNAME.CHA</DeviceName>
<DeviceCategory>Sensor</DeviceCategory>
<DeviceType>FD34x Channel</DeviceType>
</DeviceIdentification>
<Detection>
<ID>SZ001</ID>
<DetectionEvent>Intrusion</DetectionEvent>
<UpdateTime Zone="GMT">2007-09-21T13:43:17.000</UpdateTime>
</Detection>
</DeviceDetectionRecord>
</DeviceDetectionReport>
FD34X_Alarm_CHb.xml
<?xml version="1.0" encoding="UTF-8"?>
<DeviceDetectionReport>
<DeviceDetectionRecord>
<DeviceIdentification>
<DeviceName>CUSTOMNAME.CHB</DeviceName>
<DeviceCategory>Sensor</DeviceCategory>
<DeviceType>FD34x Channel</DeviceType>
</DeviceIdentification>
<Detection>
<ID>SZ002</ID>
<DetectionEvent>Intrusion</DetectionEvent>
<UpdateTime Zone="GMT">2007-09-21T13:43:17.000</UpdateTime>
</Detection>
</DeviceDetectionRecord>
</DeviceDetectionReport>
Whenever a change in the status of the FD-342 APU occurs, a status report
document is sent. All Platform Status documents are sent as they occur.
Figure 7-25: PlatformStatusReport.xml document
Each status report document received from the APU contains the basic
information of the schema outlined in figure 7-25. Bold text indicates fields
which content may vary depending upon the APU model, type of status
7-23
FD-340 Series User’s Reference Manual
change and time the status changed.
<DeviceName>FD34x</DeviceName>. This tag indicates the name of the
APU, and must correspond with the actual device name. Subsequent lines
appearing in the document with either “CHa” or “CHb” indicate the affected
channel.
<DeviceState>Secure</DeviceState>. The status of an APU channel
is indicated by this tag. Possible event states are outlined earlier in this
chapter.
<Update Time Zone=”GMT”>2007-06-20T08:31:10.000</UpdateTime>.
This tag indicates the time and time zone of the APU when the change-ofstate occurred.
Device Configuration Report
Information presented in this section assumes the reader has an operating
knowledge of XML code.
7-24
FD-340 Series User’s Reference Manual
Fault_CHb_partA_DDR.xml
<?xml version="1.0" encoding="UTF-8"?>
<DeviceDetectionReport>
<DeviceDetectionRecord>
<DeviceIdentification>
<DeviceName>CUSTOMNAME.CHB</DeviceName>
<DeviceCategory>Sensor</DeviceCategory>
<DeviceType>FD33x Channel</DeviceType>
</DeviceIdentification>
<Detection>
<ID>SZ003</ID>
<DetectionEvent>Fault</DetectionEvent>
<UpdateTime Zone="GMT">2007-09-21T13:43:17.000</UpdateTime>
</Detection>
</DeviceDetectionRecord>
</DeviceDetectionReport>
Device Configuration documents, shown in figure 7-26, are generated by
Fault_CHb_partB_DSR.xml
<?xml version="1.0" encoding="UTF-8"?>
<DeviceStatusReport>
<DeviceIdentification>
<DeviceName>CUSTOMNAME.CHB</DeviceName>
<DeviceCategory>Sensor</DeviceCategory>
<DeviceType>FD33x Channel</DeviceType>
</DeviceIdentification>
<Status>
<DeviceState>Fault</DeviceState>
<CommunicationState>Fail</CommunicationState>
<UpdateTime Zone="GMT">2007-09-21T13:43:17.000</UpdateTime>
</Status>
</DeviceStatusReport>
the user and sent to the FD-342 via the network. Device Configuration
XML documents are created using any text editor and transmitted using
any program capable of accessing the proper TCP/IP port. Device software
examples include the annunciator.
Figure 7-26: Device configuration document
In the sample document in figure 7-26, Channel A of the FD-342 is having key
calibration parameters set. Device Configuration documents must include the
following tags as a minimum:
7-25
FD-340 Series User’s Reference Manual
FaultRestore_CHa_partB_DSR.xml
<?xml version="1.0" encoding="UTF-8"?>
<DeviceStatusReport>
<DeviceIdentification>
<DeviceName>APUNAME.CHA</DeviceName>
<DeviceCategory>Sensor</DeviceCategory>
<DeviceType>FD34X Channel</DeviceType>
</DeviceIdentification>
<Status>
<DeviceState>Secure</DeviceState>
<CommunicationState>OK</CommunicationState>
<UpdateTime Zone="GMT">2007-09-21T13:43:27.000</UpdateTime>
</Status>
<Detection>
DeviceIdentification.
All APUs use a platform.device notation. The
<DetectionEvent>Other</DetectionEvent>
<Details>Internal line fault</Details>
<DeviceName> parameter is what the platform designation is set to.
<UpdateTime Zone="GMT">2007-09-21T13:43:27.000</UpdateTime>
ConfigurationSetting Name. The APU parameter being changed
</Detection>
is added to this line of text. A list of usable APU parameters and
</DeviceStatusReport>
associated command syntax is found in the following section.
Fiber Security Network (FSN) Option
With the FSN option, the FD-342 is fully compatible with the Fiber Security
Network (FSN). The embedded capability means the APU can be integrated
Tamper_DSR.xml
<?xml version="1.0" encoding="UTF-8"?>
<DeviceStatusReport>
<DeviceIdentification>
<DeviceName>CUSTOMNAME</DeviceName>
<DeviceCategory>Sensor</DeviceCategory>
<DeviceType>FD348R APU</DeviceType>
</DeviceIdentification>
<Status>
<DeviceState>Tamper</DeviceState>
<CommunicationState>OK</CommunicationState>
<UpdateTime Zone="GMT">2007-09-21T13:43:57.000</UpdateTime>
</Status>
<Detection>
<DetectionEvent>Tamper</DetectionEvent>
<UpdateTime Zone="GMT">2007-09-21T13:43:57.000</UpdateTime>
</Detection>
</DeviceStatusReport>
into the network as a component without the need for an FCA-282 or other
7-26
FD-340 Series User’s Reference Manual
intermediate device.
Figure 7-27: The Fiber Security Network (FSN)
FD-342 APUs with the FSN option installed arrive from the factory with two
ST-type FSN connectors located on the upper left-hand side of the unit (figure
7-28).
Figure 7-28: The Fiber Security Network (FSN) connectors
The dark grey connector is used for connecting data from the network to the
APU. The light grey connector is used to connect data from the APU to the
FSN network.
FSN Addressing Schemes
When connected to the FSN, the FD-342 APU is assigned a unique
address like any other network node (“Unit 003”, for example). When
receiving status messages from the APU, however, each message
discriminates between the separate channels. For instance, if an alarm
report is received from Channel A of the APU, the message reads:
“AlarmA Unit 003a”
This message indicates an alarm is received from Unit 003, Channel A.
Alternately, if a status report is received from Channel B, the message reads:
“Sensor Open 003b”
This message indicates a Fault alarm has occurred in Channel B.
7-27
FD-340 Series User’s Reference Manual
For more information on using the Fiber Security Network, contact Fiber
SenSys or refer to the Fiber Security Network manual.
Platform_Status_Report.xml
<?xml version="1.0" encoding="UTF-8"?>
<PlatformStatusReport>
<PlatformIdentification>
<DeviceName>APUNAME</DeviceName>
<DeviceCategory>Sensor</DeviceCategory>
<DeviceType>FD34X APU</DeviceType>
</PlatformIdentification>
<DeviceStatusReport>
<DeviceIdentification>
<DeviceName>APUNAME.CHA</DeviceName>
<DeviceCategory>Sensor</DeviceCategory>
<DeviceType>FD34X Channel</DeviceType>
</DeviceIdentification>
<Status>
<DeviceState>Secure</DeviceState>
<CommunicationState>OK</CommunicationState>
<UpdateTime Zone="GMT">2007-09-21T13:43:07.000</UpdateTime>
</Status>
</DeviceStatusReport>
</PlatformStatusReport>
7-28
FD-340 Series User’s Reference Manual
7-29
FD-340 Series User’s Reference Manual
DC-CHa_ResponseOK.xml
<?xml version="1.0" encoding="UTF-8"?>
<DeviceConfiguration MessageType="Response" RequestId="1" Status="OK">
<DeviceIdentification>
<DeviceName>APUNAME.CHA</DeviceName>
<DeviceCategory>Sensor</DeviceCategory>
<DeviceType>FD34X Channel</DeviceType>
</DeviceIdentification>
<RequestorIdentification>
<DeviceName>ETASS-001.SCP1</DeviceName>
</RequestorIdentification>
<ConfigurationSetting Name="Gain" Units="None" MinimumValue="1"
MaximumValue="50" CurrentValue="32"/>
<ConfigurationSetting Name="Wind Reject Factor" Units="MilesPerHour"
MinimumValue="20" MaximumValue="80" CurrentValue="50"/>
<ConfigurationOptionBlock Name="Wind Processing" Units="None">
<ConfigurationOption Option="Enabled" Selected="true"/>
<ConfigurationOption Option="Disabled" Selected="false"/>
</ConfigurationOptionBlock>
</DeviceConfiguration>
7-30
FD-340 Series User’s Reference Manual
Gain
"Gain"
Units
Low Limit
High Limit
Default Value
"None"
"1"
"50"
"32"
Syntax
<ConfigurationSettingName="Gain" Units="None” MinimumValue="1"
MaximumValue="50" CurrentValue="32"/>
Wind Reject Factor
"Wind Reject Factor"
Units
Low Limit
High Limit
Default Value
"MilesPerHour"
"20"
"80"
"50"
Syntax
<ConfigurationSettingName="Wind Reject Factor" Units="MilesPerHour” MinimumValue="20" MaximumValue="80" CurrentValue="50"/>
Wind Processing
"Wind Processing"
Units
"None"
Syntax
<ConfigurationOptionBlock Name="Wind Processing" Units="None
" <ConfigurationOption Option="Enabled" Selected="true"/> <ConfigurationOption Option=”Disabled” Selected="false"/>
7-31
FD-340 Series User’s Reference Manual
al
ost P
Po
rt
Annunciator:
Relay Output
Module
Alarm Panel
Autodialer
Mimic Panel
Ri
ort
Ca
32 H
in
on
RS2
bb
m
ble
FCA-286
Te
r
Data In
FCA-285
Data Out
Host Module
Data In
FD-205/220
Alarm
Processing
Unit
RS232
Data Out
FCA-282
Fiber Cable
200 Series
Interface
FD-342
APU
}
Integrated APU
and Network Node
Data In
Data Out
FCA-284
Data In
General
Purpose
Module
Data Out
RS23
2
}
Other Sensors
7-32
Remote
Output
Serial
Communications
FD-340 Series User’s Reference Manual
ALARM B
RS-232
DC 12-24 V
POWER
ALARM A
FAULT
TAMPER
12-24 VDC
12
11
10
9
8
7
6
5
4
3
GND 2
+1
Fiber SenSys, Inc.
Fiber Defender
FD-342 Alarm Processor
Fiber Optic Intrusion Detection System
503-692-4430
MADE IN U.S.A.
CLASS 1
LASER OUTPUT
Fiber Security Network
Connectors
Output
CH B
Power
Fault
Output
CH A
Event
Input
7-33
This product complies
with 21 CFR 1040.10
Alarm
Test
Input
FD-340 Series User’s Reference Manual
7-34
Connecting Conduit Sections
A
The flexible, protective conduit used to protect the sensor cable in fence line
applications is available from Fiber SenSys in 100 meter (328 foot) sections.
Creating multiple zones or protecting large areas in fence line applications usually
requires more than one section of protective conduit. Thus, these separate conduit
sections must be joined together as the sensor cable is pulled through.
Connecting Split Conduit (EZ-300SS)
Split conduit (Fiber SenSys part number EZ-300SS) is joined together using an
expansion joint. Each expansion joint consists of 46 cm (18 inch) UV-resistant split
conduit and has an inside diameter that matches the outside diameter of the sensor
cable conduit. These expansion joints are available from Fiber SenSys.
To join 2 sections of split conduit together using an expansion joint:
1. Insert the first section of conduit into one end of the expansion joint. Ensure the split in the conduit is lined up with the split in the expansion joint
Figure A-1: Connecting split conduit sections together
A-1
FD-340 Series User’s Reference Manual
2. Insert the conduit into the expansion joint far enough that it is secure. It should not be easy to pull the conduit back out
3. Repeat the process for the other, second section of conduit
Connecting Non-Split Conduit (EZ-300NSS)
Non-split conduit (Fiber SenSys part number EZ-300NSS) is joined together using a
barrel coupler. These barrel couplers are available from Fiber SenSys.
A barrel coupler consists of the following components:
• 2 end caps
• 2 metal lock rings
• 2 rubber washers
• 2 rubber grommets
Barrel couplers come from Fiber SenSys fully assembled and should not be
disassembled.
To join 2 sections of non-split conduit together using a barrel coupler:
1. Unscrew both barrel coupler end caps several turns but do not remove them
2. Hold the first conduit section in hand and pull the pull cord out about 6 inches
Note:
Use care to ensure the pull cord is not lost while performing this step.
3. Slide the pull cord through the barrel coupler and tie it to the pull cord of the second conduit section
4. Using care to avoid pinching the pull cord as it rests inside the barrel coupler, push the first conduit section firmly into the barrel coupler until it comes to a stop in the center
5. Push the second conduit section into the barrel coupler using the same caution
6. Tighten both end caps to secure the conduit sections
A-2
FD-340 Series User’s Reference Manual
sen
(loo
end
s
cap
or
bef
n)
rtio
se
e in
Figure A-2: Connecting non-split conduit sections together
A-3
B
Terminating Optical Fiber
Fiber optic cable must be terminated in order to connect one sensor cable to another
or to connect sensor cable to the APU. Terminating cable circumvents the need for
permanently fusion splicing fiber segments together. Any cable connecting to the
APU must be terminated with ST-type connectors.
FD-342 APU
Connector Detail (x 2)
Insensitive Cable
ALARM B
RS232
DC 12-24 V
POWER
ALARM A
FAULT
TAMPER
12-24 VDC
12
11
10
9
8
7
6
5
4
3
GND 2
+1
ST Type Connector
Sensor Cable
Feed-through Coupler
Protected Zone 1
Fiber SenSys, Inc.
Fiber Defender
FD-342 Alarm Processor
Fiber Optic Intrusion Detection System
503-692-4430
MADE IN U.S.A.
CLASS 1
LASER OUTPUT
This product complies
with 21 CFR 1040.10
Output
CH B
Power
Fault
Output
Insensitive Cable
(20 km maximum length)
CH A
Sensor Cable
(5 km maximum length)
Event
Input
Alarm
Test
Input
Insensitive Cable
(20 km maximum length)
Figure B-1: Connecting fiber with ST couplers
Following termination, fiber optic cable segments can be joined together using a feed
through coupler (also sometimes referred to as a “mating sleeve”).
B-1
FD-340 Series User’s Reference Manual
Whenever two fiber optic cable segments are joined together, the connected ends
should always be enclosed in a protective capsule to keep the connection point clean
and dry. Fiber SenSys offers the ENKT-661 Encapsulation Kit (figure B-2) for this
purpose. This encapsulation kit contains sealing gel, eliminating the need to mix and
pour sealing compound as required by most other encapsulation kits. In addition, the
sealing gel does not harden, allowing users to remove the connection joint at a later
point in time.
Sealing Gel
Figure B-2: ST Connectors in an ENKT-661 Encapsulation Kit
To use the ENKT-661 Encapsulation Kit:
1. Remove the capsule from the box
2. Gently lay the cable connection joint in the sealing gel in one of the capsule “clamshell” halves (figure B-2). The joint does not have to be pressed down into the sealing gel
3. Close both clamshell halves, ensuring the cable is not pinched during the process
Use a section of UV-resistant PVC pipe to surround and couple the encapsulated
joint to the rest of the conduit (for a fence line application). For a buried application,
the capsule can be placed directly in the ground and buried directly with the sensor
cable.
Alternatively, users may also secure the encapsulated joint in an enclosure or
protective junction box.
B-2
FD-340 Series User’s Reference Manual
ST-Type Connectors
The FD-342 APU is terminated with standard ST-type connectors, requiring any cable
connected to it to be terminated with ST connectors as well.
Fiber optic cable can be terminated with either crimp-on or epoxy-based ST
connectors. Fiber SenSys offers a crimp-on type ST connector kit (Fiber SenSys
part number CK-200). The advantage of the crimp-on type connector is it does
not require an AC power supply to be on hand, as do oven-cured, epoxy-based
connectors.
Generally, the procedure for terminating a fiber optic cable with crimp-on type
connectors involves 7 steps:
1. Slide the strain relief and crimp sleeve over the end of the cable
2. Remove the outer jacket and trim the cable in accordance with the dimensions of the template (figure B-3 shows sample template only)
B-3
FD-340 Series User’s Reference Manual
3.0mm ST, LightCrimp XTC/NeXTC
0.50 (12.7)
0.69 (18)
1.00 (25.4)
Strip Length Template
4.0mm ST, LightCrimp XTC/NeXTC
0.7500 (19.1)
0.50 (12.7)
0.69 (18)
1.00 (25.4)
Strip Length Template
Figure B-3: Sample fiber templates
B-4
FD-340 Series User’s Reference Manual
3. Insert the bare fiber of the trimmed end into the ferrule of the ST connector body, using care to prevent breaking off the unprotected fiber
4. Using a crimp tool, crimp the connector body onto the end of the fiber
5. Cleave the end of the fiber protruding from the ceramic tip of the ST connector so that the fiber is now flush with the edge of the ceramic tip
6. Polish the cleaved fiber in the ceramic tip
7. Inspect the end of the fiber and verify the core and cladding are properly polished, with no pits or jagged, sheared edges. Verify the core of the fiber properly conducts light
For detailed instructions on terminating fiber with crimp-on type ST connectors, refer
to the instructions that come with the kit.
B-5
Product Specifications
C
Specifications
Number of Channels
1 (FD-341) or
2 (FD-342)
Input Power Requirements
Voltage
12 to 24 VDC
Power
3.0 Watts @ 12 VDC, 25° C
Communications
RS-232 serial communciations (standard)
Options
Fiber Security Network (FSN) compatible
(FSN option)
-- or -IP / XML (IP option)
Fault and Alarm Relays
Contact Ratings
28 to 14 AWG
100 mA, 24 VDC non - inductive
Fault relay - Normally Closed (NC)
Relay Defaults
Alarm relay - Normally Open or
Normally Closed (NO / NC)
Environmental
Temperature
-30°C to 55°C (-22°F to 131°F)
Humidity
0 to 90% non - condensing
C-1
FD-340 Series User’s Reference Manual
Dimensions
NEMA Enclosures
41.91 cm x 36.68 cm x 20.98 cm
(16.50 in x 14.44 in x 8.26 in), H x W x D
APU Module
25.55 cm x 14.30 cm x 2.39 cm
(10.06 in x 5.63 in x 0.94 in), H x W x D
NEMA Enclosure
Material
Fiberglass polyester NEMA-EEMAC type
4x UL 508. Type 4 and 5 standards with an
enclosure flammability rating of UL 94 - 5V
Programming / Calibration
RS-232 using laptop PC or Hand held Calibrator
Optical Cables
C-2
Sensitivity
Uniform over the entire length
Maximum Insensitive Lead Length
20 kilometers (12.4 miles) to protected zone
Maximum Sensor Cable Length
5 km (3.1 miles / 16,400 feet)
Maximum Pull Tensile Strength
300 N (60 lb)
Minimum Bend Radius
5 cm (2 inches)
FD-340 Series User’s Reference Manual
SC - 3 Sensor Cable Specification
Fiber Coating Type: Acrylate
Secondary Buffer Type: Hard elastomeric with
aramid strength member (Kevlar)
Outer Jacket: Flame retardant polyurethane
(brown)
Outer Diameter: 3 mm
SC - 4 Underground Sensor Cable Fiber Coating Type: Acrylate
Specification
Secondary Coating Type: Hard elastomeric
with aramid strength member (Kevlar)
Subcable Jacket: Included for reinforcement
Outer Jacket: Flame retardant polyurethane
(green)
Outer Diameter: 4 mm
IC-3/IC-3D Insensitive Lead Cable
Specification
Fiber Coating Type: Acrylate
Secondary Coating Type: Hard elastomeric
with aramid strength member (Kevlar)
Outer Jacket: Flame retardant polyurethane
(grey)
Simplex Configuration Outer Diameter: 3.6 mm
Duplex Configuration Outer Diameter: 3 x 6
mm
IC-4 Insensitive Lead Cable
Specification
Fiber Coating Type: Acrylate
Secondary Coating Type: Hard elastomeric
with aramid strength member (Kevlar)
Outer Jacket: Flame retardant polyurethane
(blue)
Outer Diameter: 4 mm
C-3
Warranty Information
D
The Fiber SenSys product warranty is as follows:
A.
Fiber SenSys warrants the Fiber Defender Model FD-341/FD-342 to be free from electrical and mechanical defects in materials and workmanship for a period of two years from the date of shipment. This warranty does not apply to defects in the product caused by abuse, misuse, accident, casualty, alteration, negligent use of current or voltages other than those specified by Fiber SenSys, application or installation not in accordance with published instruction manuals or repair not authorized by Fiber SenSys. This warranty is made in lieu of any other warranty either expressed or implied.
B.
All returns will be tested to verify customer claims of non-compliance with the warranty described herein. If non-compliance is verified and is not due to customer abuse or the other exceptions described previously, Fiber SenSys will, at its option, repair or replace the FD-341/FD-342 returned to it, freight prepaid. Contact Fiber SenSys and obtain an RMA number prior to returning a product. Fiber SenSys will pay for ground return freight charges only. The customer must pay for any other return shipping options.
C.
Fiber SenSys liability is limited to the repair or replacement of the product only, and not the costs of installation, removal or damage to user’s property or other liabilities. If Fiber SenSys is unable to repair or replace a non-conforming product, it may offer a refund of the amount paid to Fiber SenSys for such product in full satisfaction of its warranty obligation. Maximum liability to Fiber SenSys is the cost of the product.
D-1
Index
A
Aircraft
vibrations from 3-16
Alarm connections 2-4
Alarm entries
maximum number stored 5-16
retrieving 5-16
Alarm indicators 2-4
Alarm Processing Unit (APU)
auxiliary DC power connector 2-6
calibration 5-1
connecting the APU to the LAN 7-3
connectors 2-4
construction 2-2
default IP address 7-3
default settings 5-7
FSN connectors 7-34
locating MAC address 7-4
mounting considerations 3-27
port number 7-3
receiver 1-3
setting the IP address 7-3
TCP/IP connection 7-2
volatile memory 5-16
Alarm processors 1-8
Alarm relay
operation 1-10
Analog-to-Digital Converter (ADC) 1-7
Animals
nuisance alarms 3-16
Anti-ram barrier fence 3-15
Applications 1-2
Asynchronous status messages
receiving from APU 7-7
Attaching sensor cable 4-17
B
Barbed wire
protecting 3-9
Barrel coupler 4-14, A-2
Barrier fences, protecting 3-14
Bend radius 4-13, 4-19
Block diagram
APU signal processing 1-8
FD-342 APU 1-7
FD-342 system 2-8
Box couplers 4-32
Buried testing sample log 5-33
Bypassing gates 4-5
C
Cable conduit
advantages 4-14
available types 2-8, 4-13
enclosing sensor cable 4-13
Cable length
for buried applications 4-24
required for gates 4-8
required for loops 4-8
required for service loops 4-8
Cable sensitivity 3-2
Calibration parameters 5-5
Chain link fence
protecting 3-7
recommended height specifications 3-7
Checking input voltage 5-21
Checking laser current 5-21
Checking system loss 5-21
Cladding 1-3
Comb filter 6-11
Conduit sections
connecting together A-2
Index-1
FD-340 Series User’s Reference Manual
Connectors types
used with the FD-34X 4-16
Core 1-3, 1-5
Corner posts
protecting 3-11
Culverts
protecting 3-20
D
Dampening of vibration
causes 3-22
Default settings 5-6
Deployment
general procedure 4-1
Depth
for buried applications 4-30
Detection range 3-21
in gravel 3-22
in sod 3-25
Determining cable length 4-6
Device Configuration
adjusting 7-28
contents 7-30
parameters 7-32
tags 7-31
Dual-channel model 1-1, 2-1
Dynamic Host Communication Protocol
(DHCP) 7-2
E
Electromagnetic Interference (EMI)
1-1, 1-3
Encapsulation kit B-2
Event count 5-26
Event processing
definition 5-23
Event window 5-26
Events
definition 5-24
Expansion joints 4-14
Extensible Markup Language (XML) 7-1
Index-2
EZ-300NSS conduit
kit contents 2-8
EZ-300SS conduit
kit contents 2-8
EZ-350 Insertion Tool
use of 4-15
F
Fabric
reinforcement 3-19
specifications 3-19
Fabric tension 3-3
Fabric ties 3-19
Fault indicator
causes 2-5, 4-34
Fault relay
connections 2-4
Fault threshold 4-34
FD-341 1-2, 2-1
connectors 2-3
differences in construction 2-3
FD-342
advantages 1-2
connectors 2-3
system components 2-1
TCP/IP connection 7-2
FD-34X
communication options 7-1
Feed through coupler
definition B-1
Fence
attaching cable to 4-17
Fence clearance 3-3
Fence cutting, simulation 5-22
Fence fabric
reinforcement 3-19
specifications 3-19
Fence height
recommended 3-19
Fence line testing sample log 5-34
FD-340 Series User’s Reference Manual
Fence material 3-3
Fence noise
minimizing 3-2
Fence posts
protection 3-5
securing 3-19
Fiber handling precautions 4-13, 4-29
Fiber Security Network (FSN) option
7-33
addressing the APU 7-35
discriminating between channels 7-27
Fourier transform 1-7
Frequency
from the sensor cable 5-25
Frequency filters 5-25
Frequency of intruder signals 5-25
FSI Test and Acceptance Log 5-35
FSN option
resetting the address 5-15
Fusion splicing B-1
G
Gain
definition 5-22
setting and adjusting 5-22
Gates
bypassing 4-5
deployment considerations 4-3
protecting 4-3
sliding type 4-4
swinging type 4-4
Glass walls
protecting 3-16
Gravel
minimum zone width 3-22
specifications 3-22
Ground clearance 3-19
H
Handshake
XML messages 7-21
Index-3
Hard clay 4-30
Harmonics 6-12
Height
recommended 3-19
High threat level sites 3-3
Hyperion Hand Held Calibrator 5-1
connecting 5-2
HyperTerminal 5-1
I
Ice formation 3-22
Index of refraction 1-3
Input voltage
checking 5-21
Input voltage range 6-5
Input/output connectors 2-3
Insensitive lead-in cable
available types 2-7
description 2-7
maximum distance 1-2
purpose 1-2
routing example 4-11
Insertion tool
using 4-15
Installation
general procedure 4-1
Intermittent alarms 6-10
Intrusion Detection Fabric Climb Test 6-3
Intrusion Detection Fabric Cut Test 6-3
Intrusion Detection Ladder Climb Test
6-3
IP address
default 7-3
manually setting 7-3
IP communication option 7-2
J
Junction box B-2
L
Lantronix® Device Installer 7-3
setting the IP address of the APU 7-3
FD-340 Series User’s Reference Manual
Laser 1-3
Laser current
checking 5-21
Laser current range 6-5
Layout of cable for buried applications
4-23
LED indicators 2-5
Length of cable for buried applications
4-24
Length of cable for gates 4-8
Length of cable for service loops 4-8
Length required for cable loops 4-8
Level tolerance 5-26
Light
checking circuit path 5-20
propogation in sensor cable 1-5
Line test 5-34
Linear detection
definition 3-2
Loopback deployment
definition 3-5
Loopback cable
creation 6-6
M
MAC address 7-4
Maintenance 6-1
Mask time
definition and purpose 5-29
Mating sleeve
definition B-1
medium threat level sites 3-4
Mediums
for burying cable 4-22
Motion
effects on sensor cable 1-6
Mounting
APU hardware 3-26
Multiple zones
definition 4-2
Index-4
when required 4-2
N
NEMA enclosure
compatibility 2-2
mounting 4-31
quick-release latches 4-32
Network and serial setup 7-8
changing <DeviceName> 7-17
Non-split cable conduit
connecting sections together A-2
Nuisance alarms 1-10
adjusting gain to minimize 5-22
caused by gates 4-3
Nuisances
definition 3-26
O
Operational site maintenance 6-1
Optical connectors 2-3
Optical fiber
construction 1-3
handling precautions 4-13, 4-29
principles of operation 1-3
Optical loss, acceptable 6-6
Optical loss, checking 5-20
Outriggers 3-19
protecting 3-9
P
Passwords 5-6
PC
calibration with 5-1
Phase shift
caused in light 1-6
Platform Status Report
handshake 7-17, 7-20
Posts
protecting 3-11
securing 3-19
Power connections 2-4
Pressure
FD-340 Series User’s Reference Manual
effects on sensor cable 1-6
Preventative maintenance 6-1
Probability of Detection (PD)
calculation 5-30
definition 5-30
Processor 1 1-8
Processor 2 1-8
Pull cord A-2
PVC conduit 4-4
R
radio frequency emissions 1-1
Radius, minimum 4-13, 4-19
Razor wire 3-9
protecting 3-11
Reinforced fence sections
protecting 3-7
Relay connections 2-3
Resting cap 3-16
Run Test 6-4
S
Sand
use with sod 3-25
Sealing gel, encapsulation kit B-2
Sensitivity
adjusting 5-22
Sensitivity, uniform 3-2
Sensor cable
advantages 1-1
attachment 4-17
available types 2-7
bend radius 4-13
buried application 3-20, 4-22
buried deployment guidelines 3-20
construction 1-5
detection range 3-21
inserting into conduit 4-15
inspection 6-2
installation 4-1
looping deployment 3-8, 3-11
Index-5
protecting gates with 4-3
routing under roadways 4-4
sensing phenomena 3-2
terminating B-3
Serpentine pattern 3-23
Service loops
definition 3-13
Signal duration 5-26
Signal level 5-25, 5-32
Simulating fence cutting 5-22
Single zone 4-2
Single-channel model 1-1, 2-1
Site assessment
strategy 4-2
Site protection
strategy 3-2, 4-22
Sliding gate 4-4
Sod
minimum zone width 3-25
watering requirement 3-25
SpectraView software 6-11
Split cable conduit
connecting sections together A-1
ST-type connectors 4-20
crimp-on type B-3
general procedure B-3
used with the FD-34X 4-16
Strain reliefs 4-32
Supervisory resistors 4-34
parallel 4-34
series 4-34
Swinging gate 4-4
System components 2-1
System optical loss
acceptable level 6-5
checking 5-21
System testing
buried application 5-32
fence line applications 5-30
FD-340 Series User’s Reference Manual
T
Tamper alarm 3-27
Tamper feature, testing 5-34
Tamper switch
connecting to the APU 4-34
connections 2-4
Templates, XML 7-7
Terminal emulation software
calibration with 5-1
communicating with the APU 5-4
Test button
purpose 2-5
Threats
against unfenced areas 3-20
fence line 3-1
site assessment 3-1
types detected 1-2
Total Internal Reflection (TIR) 1-5
Troubleshooting checks 6-8
APU relays activate intermittently 6-10
fault light comes on 6-9
Intermittent alarms 6-10
U
Uniform sensitivity 3-2
V
Vibration
conduction in buried applications 4-22
effects on sensor cable 1-6
of the APU 3-27
Vibrations
in gravel 3-22
W
Walk Test 6-4
Walking intruder
detecting 4-21
Walls
protecting 3-16
Warranty D-1
Wind
Index-6
compensating for 5-23
effects on the FD-34X 5-23
Wind processing
definition 5-23
enabling 5-23
Wind rejection factor 5-23, 5-24
Wrought iron fence
protecting 3-13
Wrought iron fences
cable attachment 4-19
X
XML (eXtensible Markup Language)
definition 7-1
flowchart 7-16
input/output messages 7-15
purpose 7-1
tags 7-1
FD-340 Series User’s Reference Manual
Index-7