1
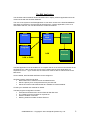
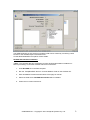
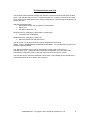
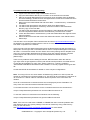
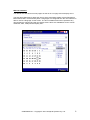
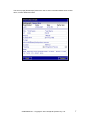
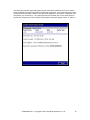
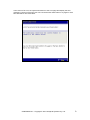
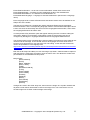
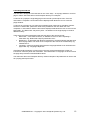
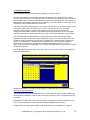
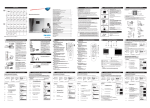
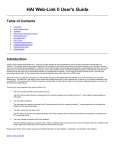
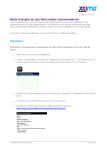
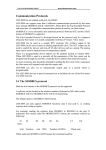
ResPAK Internet Module
This document provides an overview of the ResPAK Internet Module which consists of the
RNI Web Services application and the optional ASP.NET Reservations web site.
Contents
The RNI Application
Overview
Installation
Removal
The Reservation Web Site
Overview
Installing as a IIS Virtual directory
Structure of the web site
Configuration of the web site
Launching the web site
Modifying the web site
The RNI Application
The ResPAK Internet Module allows ResPAK users to deploy external applications that can
communicate with the ResPAK database.
The core of the system is the RNI application. It has direct access to the ResPAK database
and allows an interface to be exposed via Web Services. Custom applications, such as a
reservation web site, can use this interface to make reservations.
Web
Server
RNI
Server Web
Services
ResPAK
Database
Custom
Program
ResPAK
LAN
Stations
LAN or WAN
The RNI application must be installed on a computer that is on the same local network as the
ResPAK server. It also must have access to the network that the client application are
expected to run on – eg for a web site, the web server must be able to communicate to the
RNI server.
Once installed, both ResPAK and RNI must be configured.
ResPAK must be configured to allow
• Reservations to be made for Areas and Meal Periods.
• Set the capacity for a meal period that may be reserved.
• Set the Occasions and Referrals that are available to Internet Module.
Consult your ResPAK User Manual for details.
The RNI program configuration includes
• Username and Password to access RNI via Web Services
• The TCP/IP port used to listen for requests on.
• Session duration in minutes.
• Defining Areas accessible via Web Services.
CONFIDENTIAL – Copyright © 2010 Analytical Systems Pty. Ltd.
2
The WSDL definition of web services provided by RNI can be viewed by connecting a web
browser to the IP address/port of the RNI server.
Consult ResPAKWebServices.pdf for further details.
ResPAK Net Interface Installation
* Note : The computer that is to host RNI must have ResPAK Workstation installed on it
before proceeding. Consult the ResPAK manual for instructions.
1. Insert ResPAK CD in the RNI computer.
2. Run the “SetupRNI.EXE” file from “Internet Module” folder on the ResPAK CD.
3. Enter Installation Password located back of first page in manual.
4. Select the Path where ResPAK Net Interface will be installed.
5. Follow the on-screen instructions.
CONFIDENTIAL – Copyright © 2010 Analytical Systems Pty. Ltd.
3
The Reservations web site
The ResPAK Internet Module package also includes a ASP.NET web site that uses the RNI
server. This web site can be run as is, customised with your company logo/colours, be used
as an insert in your existing web site or simply referenced for a guide during development of a
custom web site.
Web Server Requirements
• MS Windows 2000+ (Server edition recommended)
• MS IIS 5.1+
• MS .NET Framework 1.1+
Requirements for modifying the presentation (HTML/CSS)
• Text editor such as Notepad
Requirements for modifying the ASP code
• MS Visual Studio with VB .NET 2003+
The IIS version can be determined by running “RegEdit” and examining
“HKEY_LOCAL_MACHINE\SOFTWARE\Microsoft\InetStp”. The “VersionString” property will
show the version installed.
The .NET Framework version can be determined by starting the Control Panel ->
Administrative Tools -> Microsoft .NET Framework Configuration tool. The About .NET
Framework Configuration option in the Help menu will show the version number.
The web site can be used and installed in various ways. Only installing as a Virtual directory
on the default web site is covered in this document.
CONFIDENTIAL – Copyright © 2010 Analytical Systems Pty. Ltd.
4
To install the web site as a virtual directory
1. Logon to the web server using a administrator account.
2. Copy the Reservations directory to a location on the web servers hard disk.
3. Start the Computer Management tool (right click on My Computer from the Desktop
and select Manage). Under Services and Applications is Internet Information Services
and the Default Web Site is located here.
4. Right click on the Default Web Site and select New -> Virtual Directory. A Wizard will
be started.
5. You will be then prompted for the directory Alias. Enter Reservations.
6. You will be then prompted for a Directory. Enter the location of the Reservation
directory copy on the local disk.
7. You will be then prompted for Access Permissions. Select Read and Run Scripts.
This will complete the Wizard and the Virtual Directory will have been created.
8. Locate the Reservations Virtual Directory under the Default Web Site. Right click and
select Properties.
9. Select the Documents tab and remove the defined documents. Click Add and enter
Select.aspx.
The web site is now complete. Start a web browser and enter http://localhost/Reservations in
the address bar. Replace localhost with the name or IP of the web server to view the page
from other computers on the network.
If the root node of IIS has limited permissions then the Reservations site will inherit these. To
allow public access right click on the Reservations node in Computer Management and select
All Tasks -> Permissions wizard. Choose “Select new security settings from a template” and
click next. Choose Public Web Site and continue to click next until the wizard is complete.
Follow steps 8 and 9 above as the security wizard disables the default document
(Select.aspx).
There can be problems when installing IIS and the .NET framework when the new file
type .aspx does not get registered correctly with IIS. Microsoft provides a command line tool
to reset the file registration for .NET. Run “aspnet_regiis.exe –i“ which is located in
“Windows\Microsoft.NET\Framework\Version number\” to correctly register the file types with
IIS.
Consult the MS IIS documentation for details on more complex configurations.
Note : If running IIS on a non server edition of Windows (eg 2000 Pro or XP Pro) then the
number of connections to IIS will be limited to 10. This limit can be increased to a maximum of
40 connections. A Server editions of Windows will be required if more connections are
needed.
Once IIS connection limit is reached a 403.9 errors is displayed (Access Forbidden: Too
many users are connected Internet Information Services).
To increase the limit to 40 connections run the command below from the command line :
cscript c:\inetpub\adminscripts\adsutil.vbs set w3svc/MaxConnections 40
To view the number of connections set in Windows run the following :
cscript c:\inetpub\adminscripts\adsutil.vbs get w3svc/MaxConnections
Note : If the site is to used within a FRAME or IFRAME then there could be problems with
ASP Sessions due to IE’s privacy settings. This can be resolved by using a P3P Privacy
Policy on the web server.
See http://support.microsoft.com/default.aspx/kb/323752 for more details.
CONFIDENTIAL – Copyright © 2010 Analytical Systems Pty. Ltd.
5
Web site structure
The default web site has three main pages as well as an error page used to display errors.
The first page (Select.aspx) allows the user to select reservation details such as Restaurant,
Meal Period, Date, Time and Party Size. If languages are configured then the user will also be
able to choose a language on this screen. The list of available times will be updated if any
other details are changed and will only display times if there are availabilities for the chosen
restaurant, date, meal period and party size.
CONFIDENTIAL – Copyright © 2010 Analytical Systems Pty. Ltd.
6
The second page (Details.aspx) allows the user to enter reservation details such as their
name, contact details and notes.
CONFIDENTIAL – Copyright © 2010 Analytical Systems Pty. Ltd.
7
The third page (Confirm.aspx) will display the key reservation details for the user to confirm.
Once confirmed the system will attempt to make the reservation. If successful the user will be
notified and the reservation reference number will be displayed. The system is designed to be
accessed in one of two ways – as a popup window from another site or as a direct link from
another site. Depending on the method, the final button will either display “Close” or “Return”.
CONFIDENTIAL – Copyright © 2010 Analytical Systems Pty. Ltd.
8
In the event of an error, the system will redirect to the error page and display the error
message. From this screen the user can use the browser back button to try again or click
New and start a new reservation.
CONFIDENTIAL – Copyright © 2010 Analytical Systems Pty. Ltd.
9
To configure the web site
There are configuration options available to set RNI server details, Languages and
Confirmation Emails for the web site. The file Web.config is a xml file that can be modified to
set these options. All options are in the <appSettings> section.
RNI setup
The following settings are needed to connect to the RNI server :
Reservations.ResPAK.IASWebServiceservice - The full URL address of the RNI server.
Example “http://192.168.0.100:8000/soap/IASWebService"
Server.UserID – The User ID to login to the RNI server.
Server.Password – The password to login to the RNI server.
The following settings are needed to transmit date and times correctly to the RNI server :
Server.Locale – The locale of the RNI server. See http://msdn2.microsoft.com/enus/library/system.globalization.cultureinfo for a list of locale codes.
Server.DateFormat – The date format in use on the RNI server.
Server.TimeFormat – The time format in use on the RNI server.
See http://msdn2.microsoft.com/en-us/library/az4se3k1 for VB date/time format options.
Language Setup
The following are used for language settings:
Language.Default – The name of the default language, eg “English”.
Language.Path – The full path to the language files on the web server, eg
“C:\inetput\wwwroot\RestaurantSite\Dictionary”
The web site is designed to accommodate up to six languages. When the server starts it
checks the Language.Path directory for LanguageX.txt files where X is a number between 1
and 6. These Language files contain language information and translations that the web site
uses to provide an alternate language option to the user.
To setup a new language option, simply copy the Language.Template.txt file provided (in the
Dictionary directory) and rename it to LanguageX.txt where X is an unused number between
1 and 6. Edit the file in a text editor and complete the Language Name, Locale Code, Flag
File Name lines and enter the appropriate translations. In the Images directory place a flag
image (with the same name as Flag File Name in the Language file). When the server next
starts, the new language will be added and a flag icon will be shown on the first page for
users to click (this may require restarting the web server). The flag order is determined by the
language file number, so Language1 will always be the left most image and Language6 will
be the right most.
These language files can also be used to customise the web site wording without modifying
any code.
Confirmation Email Setup
The following settings exist in the Web.config file that relate to confirmation emails:
Confirmation emails are sent to the customer based on the entered email address.
Notification emails are sent to the establishment at NotificationAddress.
Email.Server – the address of the SMTP server to use to send mails.
Email.SendAsHTML – set to true to send email a HTML, false to send as text.
Email.SenderName – the name of the sender, eg “The Grove Restaurant”.
Email.SenderAddress – the address of the sender, eg [email protected].
CONFIDENTIAL – Copyright © 2010 Analytical Systems Pty. Ltd.
10
Email.SendConfirmation – set to true to send confirmation emails, false will not send.
Email.SendNotification – true/false for send notification emails to the establishment.
Email.NotificationAddress – the address to send Notification to.
Email.NotificationLanguage – Language to send the Notification in (Must match a language
name)
Each Language.txt file contains a Email section that allows custom text to be defined for the
Subject line of the emails.
The body text is defined in a separate file called LanguageX-Email.txt and LanguageXEmail.html where X is the corresponding language number. If the SendAsHTML option above
is set to true then the email body will come form the LangaugeX-Email.html file, if set to false
the LanguageX-Email.txt file will be used.
If a meal period is fully booked a option will appear allowing the user to make a waiting list
reservation. Waiting List reservation confirmation emails are sent and the text can be
configured by altering the LanguageX-WaitEmail.txt and LanguageX-WaitEmail.html.
The Charset option is each Language file is used in relation to emails as it is the character set
used encode the message. UTF-8 should work for all languages and most email servers.
However some email servers may reject the UTF-8 encoding. In this case the Charset will
need to be specified for each language. See
http://msdn.microsoft.com/library/default.asp?url=/workshop/author/dhtml/reference/charsets/
charset4.asp for a list of available character sets.
Both the email Subject and Body can use mail merge style fields – fields that will be replaced
with data from the reservation and patron when the mail is sent. This allows the emails to be
personalised for the establishment and patron.
Merge Fields :
[RESTAURANT]
[DATE]
[MEAL PERIOD]
[PARTY SIZE]
[TIME]
[RESERVATION ID]
[TITLE]
[FIRST NAME]
[LAST NAME]
[PHONE]
[MOBILE]
[EMAIL]
[OCCASION]
[REFERRAL]
[NOTES]
If images are used in the HTML body text, then ensure the image url is a public address that
all patrons email clients will be able to retrieve the image from. The email service can not
encode images into a HTML email message at this stage.
CONFIDENTIAL – Copyright © 2010 Analytical Systems Pty. Ltd.
11
Launching the web site
The web site is designed to be launched in one of two ways – as a popup window or as a full
page or frame. See Index.html in the Examples directory for examples.
To launch as a popup the originating page must execute a javascript function. Once the
reservation is complete a close button will be displayed that allows the user to close the
popup window.
To launch as a full page or in a frame the originating page needs only a standard hyperlink.
However a “ReturnURL” parameter needs to be provided on the link. When the user
completes a reservation a Return button will be displayed that allows the user to return to the
ReturnURL. The ReturnURL may be any URL - the address of the original page or another
address entirely.
There are three optional parameters that the first page of the site will accept.
• ReturnURL – As mentioned above, an address to return to after completing a
reservation. Eg “ReturnURL=http://myrestaurant.com/”.
• Restaurant – A parameter that allows a Restaurant to be automatically selected when
the first page loads. The value must correspond to the Area ID in the RNI setup. Eg
“Restaurant=2”.
• Language – Allows a language other that the Language.Default to be used when the
page loads. Eg “Language=Japanese”.
If the ReturnURL parameter is incorrect then the user will be presented with a Page not
Found error when they finish the reservation. If the Restaurant or Language are incorrect then
the page will proceed to load with default values.
The Index.html file in the Examples directory shows examples of all parameters in use as well
as a popup javascript function.
CONFIDENTIAL – Copyright © 2010 Analytical Systems Pty. Ltd.
12
To modify the web site
The Reservation site was developed using VB.NET, HTML and CSS.
The VB code handles communication with the RNI Web Service and allows logic code to
execute on the web server. The VB files have a .vb extension and while they can be viewed in
any text editor, they can only be modified and compiled in MS Visual Studio. The ResPAK.vb
file includes helper classes that wrap the functionality of the RNI interface. Consult this file for
examples on how the RNI interface can be used.
The HTML files define what appears on each page. Components can be either HTML or ASP
(turned into HTML after processing on the server). Components have “id” and “class”
properties that are used by both the ASP web sever and the CSS style sheet. ASP
components should NOT have their id modified (unless the VB project can be recompiled).
The HTML files have an .aspx extension and can be viewed and modified in any text editor.
The Cascading Style Sheets (CSS) are used to define how HTML components appear.
Attributes for HTML components can be declared for the type, the class or specific ids. It is
possible to alter the appearance of the site by modifying the CSS file without compiling the
project. The extension is .css and the file is called Styles.css. This file is also saved as
Style.Small.css and another example file is included called Style.Large.css. Only the
Style.css file is used by the application, so to view the alternate file or use your own it must be
renamed to Style.css.
The image below shows the Style.Large.css in use. No other code or files were modified to
create this different look.
Detailed specification, manuals and help pages for HTML and CSS are available from the
World Wide Web Consortium.
The Reservations web site allows Reservations to be made and Patron profiles created with
minimal patron information. This site can be used for reference if a more comprehensive site
is needed.
Modifications to ASPX, VB, HTML and CSS pages, as supplied by Analytical Systems Pty.
Ltd., is only permitted for use with ResPAK Hospitality Management Program.
All rights reserved. Copyright © 2006 Analytical Systems Pty. Ltd. Melbourne, Australia.
CONFIDENTIAL – Copyright © 2010 Analytical Systems Pty. Ltd.
13