1
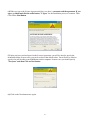
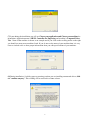
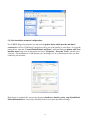
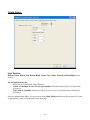
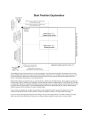
Link
Motion™
by Solustan, Inc.
Tel: 781-449-7666
support @solustan.com
User’s Manual
November 16, 2011
©Copyrights Reserved 2003-2011
1
SOFTWARE LICENSE AGREEMENT
YOU SHOULD CAREFULLY READ THE FOLLOWING TERMS. YOUR INSTALLATION OF THE PROGRAM
INDICATES YOUR ACCEPTANCE OF THESE LICENSE TERMS.
PLEASE READ THIS AGREEMENT CAREFULLY BEFORE INSTALLING THE PROGRAM. SOLUSTAN, INC.
WILL ONLY LICENSE THE PROGRAM TO YOU IF YOU FIRST ACCEPT THE TERMS OF THIS AGREEMENT
BY INSTALLING THE PROGRAM. SOLUSTAN, INC. PROVIDES THE SOFTWARE FOR TRIAL FOR 15 DAYS
OR 15 LAUNCHES OF THE DRIVER TO PROVE THE FUNCTIONING OF THE DRIVER ON YOUR PC BEFORE
PURCHASING THE LICENSE. ONCE THE LICENSE IS PURCHASED, IT IS NON-REFUNDABLE AND NONRETURNABLE.
These license terms apply to Your installation and use of the program, which program includes copyrighted materials
and programs (collectively referred to as "Program"). This license is granted to You by Solustan, Inc. You may not use
the Program contained in this Package to upgrade any existing Programs that You may have. The Programs contained in
this package are intended only for New Users of LinkMotion and/or MaxMotion and not for any other use.
1. License. This Program is licensed and not sold. Title to the Program does not pass to You. Solustan owns
copyrights in the Program. You obtain no rights other than those granted You under this Program License Agreement.
The term "Program" means the original (including any revisions, enhancements, updates, or the like) and all whole or
partial copies of it, including modified copies or portions merged into other programs. You are responsible for the use
of, and results obtained from the Program. This Program may be used only on one machine at any one time. You may
not reverse assemble or reverse compile the Program, except as specifically provided by law, without the possibility of a
contractual waiver. You may not sublicense, rent, lease, or assign the Program.
2. Disclaimer of Warranty and Limitation of Liability. THE PROGRAM AND ANY OTHER PRODUCT WHICH
WE PROVIDE TO YOU AS PART OF OUR SERVICE ARE PROVIDED "AS IS." EXCEPT AS SPECIFICALLY
SET FORTH HEREIN, NEITHER WE NOR OUR LICENSORS MAKE ANY WARRANTIES, REPRESENTATIONS
OR CONDITIONS OF MERCHANTABILITY, QUALITY, AND FITNESS FOR A PARTICULAR PURPOSE
RELATING TO OUR PROGRAM, SERVICES, AND/OR RELATED PRODUCTS THAT WE OR OUR LICENSORS
PROVIDE.
3. IN NO EVENT SHALL SOLUSTAN BE LIABLE FOR ANY DAMAGES RESULTING FROM THE USE OR
MISUSE OF THE SOFTWARE OR THE ACCOMPANYING MANUAL INCLUDING BUT NOT LIMITED TO
DAMAGES FOR INJURY TO ANY PERSON OR PROPERTY. THE PROGRAM IS DESIGNED TO WORK WITH
MACHINES AND AS SUCH, ANY PART OF THE SYSTEM MAY MISBEHAVE. IT IS IMPORTANT TO TAKE
ALL THE NECESSARY PRECAUTIONS IN OREDR TO AVOID EQUIPMENT DAMAGE AND/OR INJURY.
4. WE DISCLAIM ANY WARRANTY OF TITLE OR OTHER WARRANTIES FOR ANY THIRD PARTY'S
OFFERING(S) OR PRODUCT(S). ALL SUCH WARRANTIES AND REPRESENTATIONS ARE HEREBY
EXCLUDED. WITHOUT LIMITATION, NO WARRANTY IS GIVEN THAT THE PROGRAM OR PRODUCTS
ARE ERROR-FREE.
WE, INCLUDING OUR LICENSORS, DISCLAIM ANY LIABILITY OR RESPONSIBILITY ARISING FROM ANY
CLAIM THAT YOUR ACCESS OR USE OF THE PROGRAM, SERVICE, AND/OR RELATED PRODUCTS WE
PROVIDE INFRINGE ANY THIRD PARTY'S INTELLECTUAL PROPERTY RIGHTS.
IN NO EVENT ARE WE OR OUR LICENSORS ARE LIABLE FOR: A) DIRECT, SPECIAL, INDIRECT,
CONSEQUENTIAL OR INCIDENTAL DAMAGES EVEN IF WE HAVE BEEN ADVISED OF THE POSSIBILITY
THEREOF INCLUDING, BUT NOT LIMITED TO, LOST PROFITS, LOST BUSINESS REVENUE, OR FAILURE
TO REALIZE EXPECTED SAVINGS; OR, B) ANY CLAIMS AGAINST YOU BY ANY OTHER PARTY. This
Section applies to all claims by You irrespective of the cause of action underlying Your claim, including, but not limited
to: a) breach of contract, even if in the nature of a breach of condition or a fundamental term or a fundamental breach, or
b) tort including but not limited to negligence or misrepresentation.
2
In no event are We or Our dealers liable for any damages arising from Your failure to perform Your responsibility in
connection with this Program License Agreement, or arising from any cause beyond Our control, including but not
limited to delay in the performance of Our obligations or misuse of Your User IDs. All limitations and disclaimers stated
in this Section also apply to Our Product Licensors as intended beneficiaries of this Program License Agreement. Any
rights or limits stated herein are the maximum for which we are collectively responsible.
5. Termination. This license is effective until terminated. This license will terminate immediately without notice from
Solustan, Inc. if fail to comply with any of its provisions. Upon termination you must destroy the Software and all copies
thereof, and you may terminate this license anytime by doing so.
6. General. You are responsible for payment of any taxes, including Your personal property taxes, resulting from this
Program License Agreement or Your use of the Program. You agree to comply with all export laws and regulations.
Neither party may bring an action under this Program License Agreement more than ONE years after the cause of
actions arose. This Program License Agreement and all Your rights and obligations are governed by the laws of the
State of Massachusetts.
7. LinkMotion driver software is protected with a software protection key. The protection key is tied to your specific PC
computer using appropriate Microsoft Operating System. If the technology was not available to transfer the license to
another PC, you will be required to buy another license at a full price of the software in case of a PC failure beyond
normal repair. It is very important to safeguard the PC with the license.
8. LinkMotion driver software you purchased can also protected with optionally available hardware ID (dongle) key. If
the ID key fails for some reason, you could return it for replacement. As long as Solustan can identify the key to be the
one issued by us, we will replace it for a fee. On the other hand, if you lose the key, you will be required to buy another
license at a full price of the software. It is very important to safeguard the ID key.
Solustan, Inc. 165 Chestnut St., #200, Needham, MA 02492
Tel: 781-449-7666 Fax: 781-449-7759 EMail: [email protected]
3
LinkMotion Detail Installation and Setup Instructions
Computer Requirements:
Windows XP with Service Pak 2 or higher and Microsoft .NET 2.0 Framework installed,
Processor speed of at least 800 Mhz, Minimum RAM memory 512 MB, or 1 GB preferred,
60 MB of Hard drive free space, Screen resolution of at least 800 x 600,
Com port or Parallel port or USB port (This is dependent on your Engraving machine how it is built to
communicate with computer)
CD-ROM drive is not required, if the driver software was down-loaded from the web site.
CD-ROM drive is necessary, if the software was received on a CD.
Microsoft .NET 2.0 Framework is available for a free download from the following site:
Microsoft.com>Downloads & Trials>Download Center>.NET Framework Version 2.0 or
Higher.
Installation required for LinkMotion for HPGL Engraving Machines:
Part 1 - Installation of LinkMotion driver software for HPGL controller Engraving machines.
Part 2 - Software License Code procedure is necessary for full working license.
When you install the LinkMotion software on your computer it is good for 30 days or 30 executions.
Within this period you need to get a license code from Solustan to make it a permanent license for the
computer of your choice. Please make sure and install on the computer that you are planning to use
for long term. All LinkMotion product Licenses are non-transferrable. Price is subject to change
any time. Additional software licenses can be made available for an extra charge.
Part 3 - Installation of Fonts is necessary and provided to the customers who bought engraving fonts.
4
Part 1 - Installation Procedure for LinkMotion HPGL engraving driver
version 2.7 or higher:
Note that you must have administrative privileges on the computer in order to install LinkMotion.
Most of the installation process is self-explanatory with following screens. You can stop the installation
at any time by clicking "Cancel".
If you have received the driver software on a CD then follow steps from (1A). If you have down
loaded form the web then go to step (1B).
(1A) Insert the LinkMotion installation CD into your CD-ROM drive. If the Auto-run feature is
enabled, Windows will start the Installation automatically. If the Auto-run feature is not enabled, browse
the CD drive in Windows explorer and double-click on the "Launcher.exe" and installation will begin.
or
(1B) After downloading, unzip the files and save them by creating a folder name LinkMotion. Now
double click on the file name Setup.exe or Launcher.exe and installation will begin.
(2) Click on the Next Button.
(3) Click on the Next Button.
5
(4) When you get to the License Agreement dialog (see above), you must read the agreement. If you
agree, go ahead and click the radio button, "I Agree" for the installation process to continue. Then
Click on the Next Button.
(5) After you have read and agreed to the License Agreement, you will be asked to specify the
installation folder. In most cases you can leave this at the default value. You will also be asked to
specify who will be able to run LinkMotion on this computer. In most cases you should specify
"Everyone" and then Click on Next button.
(6) Click on the Next button once again.
6
(7) Later during the installation you will see Choose your application and Choose your machine for
installation. Application name is HPGL Controller for Engraving and machine is Vanguard Unica
Vise. Name of the machine is shown as an example and if you click on the scrolling arrow on the right
you should see many more machines listed. If you do not see the name of your machine then it is easy
for us to include once we have proper information from you with specifications of your machine.
(8) During installation, if a dialog pops up warning you that you are installing an untested driver, click
on "continue anyway". This warning will be removed in a future release.
7
(9) Click on "Close" when the installation is complete.
Icon shown above should show up in system tray at the bottom right.
(10) Setting up the Default Printer:
You want the LinkMotion printer to be your default printer. Go to the Start button and open the "Control
Panel>Printers and Faxes" menu and find the printer driver with My Machine-USB name as shown in
the picture below. Right click on this printer and select "Set as Default Printer".
8
(11) Post-installation setup and configuration:
For all HPGL Engraving machines you must tell the printer driver which port the machine is
connected to. (LPT or COM Ports) Usually this will be one of the parallel or serial ports. To set up the
printer driver, open the "Control Panel>Printers and Faxes" menu and find your printer with Your
machine name; right click on this printer and select "Properties". Select the "Ports" tab and select
your port. Our installation is on Nul port but you can change to Com or Parallel port where you have
connected your machine.
Don't forget to configure the com port for the proper baud rate, data bit, parity, stop bit and Hand
Shake information that is necessary. Parallel port does not require this kind of settings.
9
(12) International Customers need to check following:
If you are using Windows operating system for other languages please make sure that following settings
are selected for LinkMotion to work properly.
Win XP: Go to the Start button > Control Panel > Regional and Language Options > Click on the
Customize button. Here Decimal Symbol should be .(Full stop or Period) selected. Do not select
,(Comma). If you had to change click on the Apply button and Click OK.
Installation and setups are complete.
Now refer to Using LinkMotion and the design application you are using and how that works with
LinkMotion and Popular Applications. Document names are as following:
LinkMotion and Corel Draw
LinkMotion and Illustrator
LinkMotion and Auto Cad and More …….
10
Uninstalling LinkMotion:
Please make sure of the following before you uninstall:
Your specific machine related settings are saved as LinkMotion.ini file. This file can be saved from
General Options Menu and simply click on the Save button and give whatever name you prefer. You
can also navigate where in your hard drive you want to save it. Different users can save under different
names. Similarly you can Load that file back after another installation of LinkMotion by going to the
General Options menu and clicking on the Load button. Navigate to the file from your computer where
you saved it earlier. Restore Default button allows you to load default installed INI file that is supplied
with LinkMotion. It is very important to exit LinkMotion applet and Re-launch the applet when
you make any changes for it to be effective.
Uninstall LinkMotion Procedure:
Make sure the LinkMotion applet is closed. Open the Start menu and select the Control Panel.
Double-click on Add or Remove Programs. Look for LinkMotion entry in the list and click on that.
Select "Remove" and answer "Yes" when it asks you if you really want to remove LinkMotion.
LinkMotion.INI file (configuration file) does not get deleted with uninstall
procedure. If you want to delete your existing INI file following is the procedure:
In the hard drive Find folder name Document and Settings> Folder with users (your own name)
name> Folder name Application Data> Folder name Total Graphics Network> Folder name
LinkMotion> LinkMotion.INI. Delete this file.
Re-Launch LinkMotion:
It is extremely important to Re-Launch LinkMotion if you replace or change LinkMotion.INI file
for it to be effective.
Exit the LinkMotion (icon) applet by right mouse click from the systems tray at the bottom right.
LinkMotion icon should go away from the systems tray.
Now launch it back again by following and selecting the path Windows Start button>Program
Files>Solustan>LinkMotion by the arrow of your mouse.
LinkMotion icon should appear again in the systems tray at the bottom right.
11
Part 2 – Software License Key Procedure:
We welcome you for trying out our LinkMotion driver software. You will see the following message on
the screen when LinkMotion is launched from the systems tray every time when you are using the
program as demo.
Click on the Enter key button, whenever you decide to purchase or you have purchased it and you are
ready for full license key. Enter Key will open following dialog box and show the Hardware
fingerprint of your computer.
You need to provide us the proper information for Hardware fingerprint, Business Name, valid email
for Business along with the LinkMotion version and operating system you are using. Fill out this
information in each respective boxes, save the file and email it to us at [email protected]. Solustan
is not responsible for any incorrect Hardware fingerprint code you provide. Please double check
this information before you send it to us. Software license working with Hardware fingerprint and
matching code provided by Solustan, Inc. is intended to work only on the computer with the proper
hardware fingerprint. Key Code will not be generated for any incomplete information.
All LinkMotion product licenses are non-transferrable. User will need to buy another license for
another computer. Additional license can be made available for an extra charge.
Hardware fingerprint:
Name: (Business name or Computer user’s name)
Valid email for Business or User:
12
Your Operating System:
Win 7 64
Win 7 32
Win XP
Your LinkMotion Application:
LinkMotion USB Laser
LinkMotion USB
LinkMotion Lite
LinkCAM M&G
LinkMotion VC-Laser
LinkMotion VC
LinkMotion Galvo
LinkMotion HPGL Eng.
LinkMo HPGLVinyl
LinkMotion USB and LinkMotion Lite users need to verify Serial number of the USB controller
card. Launch your LinkMotion application and select the Help tab(menu). Last thing at the bottom right
it displays the serial number for the USB Controller. Please write this serial number in the box below.
USB Controller Serial Number:
After you send us all of the information in above boxes, we will send you the customized Key Code.
This key code is long text containing numeric numbers as well as alphabet letters.
Key: (Key Code for LinkMotion License)
We highly recommend that you simply copy and paste this in the Key section by bringing back the
same Enter Key screen. Click OK and you are ready to use your LinkMotion driver software license.
If you did not purchase within 30 days or 30 launchings you will see a last reminder as seen in the
following picture. It will be best to purchase at this point.
Once the trial period of LinkMotion expires, you will see the following message.
Click on the Enter key will always give you the Hardware Fingerprint and you can purchase the
software any time if you were using the trial version.
13
Part 3 - Install Engraving Fonts: (Rotary Engraving machine users only.)
Although, any TrueType font can be engraved under the LinkMotion application, Solustan provides
traditional engraving fonts. All the engraving fonts are not only designed as TrueType fonts but they are
also designed such that engraving bit does not lift up to finish any alphabet character once it starts. We
call them Non Lift Fonts. It will engrave faster and smoother. Multi Line fonts are designed and
Optimized to work with 0.5 inch or higher sizes.
Optional Fonts provided with the LinkMotion driver software has the folder name MaxFonts (Basic
Fonts). Fontpak is the optional fonts and you will see this folder only if you have purchased optional
fonts. Customer using Braille option should see a folder name Braille Fonts.
Make sure there is no application launched before starting to install the fonts.
(1A) If you have not removed your CD LinkMotion Installation you can move to the next step. If the CD
was removed you need to put CD back into the CD drive. It will start installing again and you need to
click cancel for automatic Installation.
OR
(1B) If you received this by internet when you unzip the software you should see appropriate fonts
folder names as described earlier.
(2) Now go to the Control Panel. On the left side on the top you will see Switch to Classic View.
Click on it. Select Font folder from the list of items you see on the right side.
(3) Select Install New Fonts from the File menu.
(4) Under Driver section select Your CD drive (D or E) if you received the software on CD or your
hard drive C if you down loaded the software from internet.
(5) Under Folder section open BasicFonts(MaxFonts) folder. Select all fonts from the List of Fonts
on the top and Click OK.
(6) You are done with the Installation. If you have purchased other optional fonts you can install them in
the same way.
Please follow the keyboard layout pictures to enter proper text from each keyboard layouts shown in the
Fonts section of Manual.
14
LinkMotion for HPGL Controller Engraving Machines:
The LinkMotion driver comes with a small application that resides in the System Tray. The System Tray
is the lower right bar of the Windows screen. Double click on the LinkMotion icon to bring up the
application.
Your computer should have Windows XP operating system with Service Pak 2 (SP 2) and
Microsoft .NET Framework Version 2.0 installed, one USB 2.0 port and Com connection for your
engraving machine. SP2 and Microsoft .NET Framework Version 2.0 or higher are available form
Microsoft’s web site for you to download freely:
Microsoft.com>Downloads & Trials>Download Center>.NET Framework Version 2.0
Install LinkMotion following the instruction that you received with your LinkMotion CD. First
part of the installation may be for LinkMotion I.D. Key driver (If you bought hardware key
option) and the second part will be the LinkMotion driver application. Make sure to select proper
application and your machine name during the last part of the LinkMotion installation.
Linkmotion for HPGL Engraving application you need to go to Printers and faxes in windows
control panel and select printer (Name of your machine) with right mouse click and select this to
be the default driver. Select Properties with right mouse button. Go to ports. Here select the Port
where you have connected your machine. It can be LPT1, LPT2 or Com1, Com2. In case you are
selecting COM ports, Set up all parameters like Baud Rate, Handshake, Parity etc. as specified by
your machine manufacturer and Apply. Now go back to the port you selected and apply again. You
are done with basic installation settings.
15
Materials Properties:
Materials:
Pull down the Material Properties menu to observe a selection of various materials. Pre-select the
values of speed and cutter depths and lifts for each of the materials. The default values are simply that.
LinkMotion can be employed to work with many different types of machines. Hence, there is no single
value appropriate for all different machines. User’s experience will dictate the values for his/her
machines. Dwell value should be declared as zero for a motorized Z axis. You may need to declare a
value for dewll for Zaxis if your machine’s Z axis is air controlled for its movements.
The values can be inches per second or millimeters per second or centimeters per second. General
Options menu allows you to make your selection for this measure of units.
16
Job feed rate is the speed when the tool is engaged into material and engraving the job.
Z feed is the speed at which Z axis moves.
Move speed is the speed when the tool is retracted and the machine is moving to the next shape after
finishing the previous one.
Cutter:
Depth is the value declared for tool to travel in the material. Once the top of the material surface is
determined, depth value controls the movement of the tool in the vertical axis.
Lift is the value for tool to lift between the shapes to do the job. If you have several inches of travel
available for Z axis then it saves time to declare a lift value where it does not travel all the way up for Z
axis between the shapes and instead it travels only by the Lift value and saves time.
Dwell is the amount of time in seconds and fraction of seconds the tool will stay at the same position in
the material before making X, Y move and after finishing the shape to cut the material.
17
Machine properties:
If Enable Spindle/Air is checked, it will turn on and off with the job execution. The value of delay can
be entered in seconds and fraction of seconds in the Spindle Delay area. This delay value will allow
the spindle motor to reach its speed before the tool plunges into the material.
Please, beware that some machines do not offer commands to turn spindle on and off using the software.
In such case, operator needs to make sure and turn spindle on or off manually as required.
Engravable area also known as table size is declared here and in the Origin Setup tab. When your
screen page size is the same as the engravable area and your selection of starting position
corresponds with the actual tool position, the job will be engraved exactly where you design on the
screen page. User should follow proper instructions for different design applications provided on
the support section of our web site. Remove of bitmap fill and Hairline or zero line thickness of
your text or graphic object is necessary for proper output to your engraving machine. However,
you can fill enclosed shapes using contour fill routines, if required.
18
Origin Setup:
Start Position:
Bottom Center, Bottom Left, Bottom Right, Center, Top Center, Top Left and Top Right are the
choices.
Job start position may be,
- Where the jig is positioned (Home Position)
- Center of a machine in case of a vise type machine with offset values in X and Y where both
jaws move
- Top center of a machine with offset value in X only in case of a machine where only bottom
jaw moves
In above situations and others, it is necessary to select Start Position and declare offset values for X and
Y appropriately. Also see the diagram on the next page.
19
20
General Options:
Units:
There are just a few things in the General Options screen. Units of choice can be selected from inch,
mm, or cm.
Enable Braille support:
Enable Braille support is an optional feature and it is designed to drill dots. This is used for creating
Braille signs. Adot is the font we provide when Optional Braille support is purchased. Selecting this
option makes your tool travel to the begin point of each shape and go down to create a mark or a hole
and go back up and go to the begin point of the next shape.
Save Settings:
Save:
Once the machine is properly configured and is working well, it is advisable to Save the settings on
the hard disk drive. This is saved as LinkMotion.INI file.
21
LinkMotion.INI file is located on your hard drive C:\ Document and Settings> Folder with
computer users name> Folder name Application Data> Folder name Solustan> Folder name
LinkMotion> LinkMotion.INI.
Click on the Save button and it will ask you to give a file name. Make sure to remember the file name,
and where you are saving it. You can navigate on your hard drive where you want to save. You can also
rename the file with what ever is easy for you to remember. Mostly our customers rename the file with
their machine name.
Load:
In case the LinkMotion needs to be loaded again from the CD supplied by Solustan, or you need to
load upgraded version the user will be able to reload all the settings with your .INI file without
wasting any time. For loading the settings back select Load button and navigate to the saved .INI file
and click on Apply and OK. Now click on the right mouse button when you are on the LinkMotion
appellate and exit the program. Go to the start button and launch back LinkMotion. You should see all
your saved settings here now.
Restore Defaults:
Clicking on this button will load default LinkMotion.INI file that we supply with the LinkMotion
driver.
It is very important to exit Link applet and Re-launch the applet when you change
and select another INI file for it to be effective.
Instructions for I.D. key Upgrade: (Necessary for upgrade for optional hardware
key only)
This is only required when you need to upgrade for some new features or upgrade to use with the
new version of LinkMotion or upgrade the number of executions for the I.D. Key.
To upgrade your I.D. key you will receive a code as a text file from us.
Note pad or Word pad type of utility should open this code.
Simply highlight the code with a cursor.
Make sure that you have copied complete code. This is very important.
Right mouse click and select Copy.
Now launch LinkMotion Icon. Click on the General Options menu. Click on the button Update I.D.
Key. A dialog box will open. Right mouse click inside the Authorization Code box. Select Paste. Click
OK. Click on OK in General Options menu.
Now right mouse click on the LinkMotion icon and select Exit.
Go to the Start button. Select All Programs. Select Solustan folder and select LinkMotion application.
Now you will see a LinkMotion Icon on the bottom right again. You are all set to work with your
updated I.D. Key.
22
ACentury
ABahaus
AVictori
AFuture
AEras
ABlockEuro
A3Roman
ABlock
A3RomanCap
AContempo
A2Roman
AKaufman
ASwiss
AEnglish
ASkribe
ASymbol
A2Skribe
AFifth Ave
AScript
AGothic
A2Script
AGothCon
23
Optional FontPak
A4Swiss (4 Line Swiss)
A6Swiss (6 Line Swiss)
A6Optem (6 Line Optem)
A10Optem (10 Line Optem)
A4Roman (4 Line Roman)
A10Roman (10 Line Roman)
A6Gould (6 Line Gould)
AMicro
ATBlock
ATScript
AInterlock
ASlant
ACircle
A2Symbol (94)
AOrnamet (20)
AOcasion (63)
24
25
aAa
bBb
eEe
fFf
iIi
jJj
AInterlock
cCc
dDd
gGg
hHh
kKk
lLl
mMm
nNn
oOo
pPp
qQq
rRr
sSs
tTt
uUu
wWw
xXx
yYy
26
vVv
zZz
AOcasion
($)
(7)
(0)
(1)
(8)
(H) (I)
(2)
(9)
(J)
(Q) (R)
(S)
(d) (e)
(f)
(o)
(3)
(A)
(4)
(B)
(C)
(K)
(T)
(D)
(L)
(5)
(E)
(g)
(p) (q) (r) (s)
(h)
(t)
(u)
(i)
(v)
(F)
(M)
(U) (V) (W) (X) (Y) (Z)
(j)
(k)
(w)
(6)
(N) (O) (P)
(a)
(b)
(x)
(a)
(g)
(n)
(b)
(h)
(o)
(i)
(p)
(j)
(q)
(d)
(e)
(f)
(k)
(r)
(l)
(s)
(m)
(t)
27
(c)
(l) (m) (n)
(y)
Ornamental Font (AOrnamet) Keyboard Layout
(c)
(G)
(z)
28
Application Compatibility with LinkMotion:
Go to www.solustan.com/support and download instructions for the appropriate design application you
might be using. Some applications have their own limitations and mostly it is listed in the document.
We are adding information as we test with respective applications.
Solustan tests the primary function of accepting hair lines (vector lines) from the third party application
software to make the vector moves on the machine using LinkMotion driver. Solustan may test
additional functions. However, it is not a detailed testing. The developer and marketer of the third party
software make changes to their applications quite often. It is the responsibility of the user to make sure
that the necessary functions are available while making the choice of off-the-shelf application software.
Solustan's liability is limited to the purchase price of the LinkMotion driver software.
1.
Corel Draw version 9, 10, 11, 12, X3, X4 and X5
2.
Corel Paint Shop Pro (Raster Only)
3.
Adobe Illustrator
4.
EngraveLab / SignLab version 6.0 and higher
5.
FlexiExpert
6.
FreeHand MX
7.
Gerber ArtPath and Composer
8.
Vinyl Express
9.
Xenetech
10. AutoCAD version 2000 and higher
11. DesignCad
12. DolphinCAD specially designed version for LinkMotion
13. Instant Engineer 14
14. Rhino 4.0 Beta
15. IntelliCAD (AcceliCAD)
16. BarTender (Raster only)
17. Microsoft Word (Raster only)
18. PhotoShop (Raster only)
19. MaxMotion – Windows XP and 2000 (Not supported in Vista, Win 7 32 or Win 7 64)
29
Frequently Asked Questions:
Section I - Microsoft Windows configuration and computer related
questions:
1. What is the minimum configuration required for the PC?
Windows XP operating system with Service Pak 2 or higher and Microsoft .NET 2.0 or higher
Framework installed and USB 2.0 port,
Processor speed of at least 800 Mhz, minimum RAM memory 512 MB, 1 GB preferred.
40 MB of Hard drive free space, Screen resolution of at least 800 x 600.
Service Pak and .NET 2.0 Framework are (free) downloadable from Microsoft’s website.
CD-ROM drive is not required, if the driver software was down loaded from the web site.
CD-ROM drive is necessary, if the software was received on a CD.
Printer Port or Com port for connection to your machine.
2. How to check if I have installed Service Pak2 or higher on my computer?
Go to the Start button. Select Control Panel. Select System. Now in General menu it should show if
Service Pak 2 is installed. Also you can install and uninstall by windows standard Add/Remove
program procedure. Make sure you install LinkMotion after you install windows operating system
related update first.
3. How to check if I have installed .NET Framework 2.0 or higher on my computer?
Go to the Start button. Select Control Panel. Select Add/Remove programs. Here you should see if
you have installed the .NET Framework 2.0 of Microsoft. This is required to work with our new
version of LinkMotion.
4. How can I check the processor speed and RAM memory on my PC?
Go to the Start button on the System Tray on the bottom left and select Control Panel. Select System
from the Control panel. Here you should see information for the version of your operating system and
under Computer you should see the processor speed and the RAM memory installed on your
computer.
5. How to see hidden folders in windows?
Go to the Start button. Select Control Panel. Select Tools Menu and select Folder option. Click on
the View menu. You should see a folder called Hidden files and folders. Here select the button for
30
Show hidden files and folders. Click on the Apply button. Now you will see all the folders. This is
useful to see the configuration file name LinkMotion.INI for LinkMotion driver application.
Section II - LinkMotion Driver:
1. Do I need to access LinkMotion driver software once loaded?
Generally, you simply deal with your job design software and your machine. We do provide an
accompanied settings application. This application can be invoked from its icon in the System Tray area.
This application will allow you to choose a few settings by going to different tabs (menu) like Material
Properties, Machine parameters, Origin setup and Motion Control Boards. Make proper selection, click
on the apply button and then start the design application.
2. How do I know if my LinkMotion is installed properly?
When you launch LinkMotion applet does it show the title “LinkMotion for My Machine-USB – Ver.
X.XX” (version that you have). If this is not proper you may have installed for the wrong machine.
You need to uninstall and re-install LinkMotion again by windows standard uninstall procedure.
If you had a trial version you need to purchase the full working version.
3. How to see the file for my LinkMotion related configuration settings?
This file is named LinkMotion.INI.
Go to your C:\ > Documents and Settings > Folder with computer User’s name (how ever you
have set up your computer) > Application Data > Total Graphics Network > LinkMotion >
LinkMotion.INI.
This file has all your machine related settings. You can save this file under different name as well
as reload this file from where you might have saved this file.
4. I want to design in millimeters and not inches. How do I change?
Simply go to the General Options tab and change from inches to mm by clicking on the scroll down
arrow and then click on the Apply button. Similarly you can change to cm also. It is that easy.
5. I am sending file for printing and nothing is happening. What am I doing wrong?
This situation may occur due to any of the following:
(A) Check if you have given the Print command from your design application.
31
(B) Check the print queue for any extraneous documents and remove them.
(C) Check the job feed rates and other settings to make sure that they are all correct.
(D) Printer driver installed for your machine may not have been selected as DEFAULT DRIVER.
Please check in Control Panel>Printers and Faxes>Your Machine Driver (this should be selected
as default driver).
(E) You might have selected thick outline or filled object in your design. White fill is also not
proper to send the job to a machine. Use only Hairline for any job you design with graphics or
text. If you sent the file for print by mistake with thick line or the filled object go to the print
spooler and make sure you delete the file properly before sending the new corrected file.
(F) If Service Pak 2 was not installed on your Windows XP operating system you may see the
problem of LinkMotion not sending anything to the machine. You need to uninstall the LinkMotion
and then install the Service Pak 2 and re-install the LinkMotion driver.
(G) Make sure to design the job within the size of plotting area available with your machine table size.
(H) Make sure to check the setting for the port where you have connected the cable that goes from your
computer to the engraving machine. If you are using Com port you need to setup Baud rate, Hardware
handshake, Stop bit type of information.
6. Can I preset or change the values for the speeds of operation for different
materials? Where and How?
Launch LinkMotion from Systems Tray. Go to Material Properties. Set values for Job Feed Rate of
operation for different materials. Click Apply and then send the file again to the machine. Read more
details in the HELP tab under the chapter Using LinkMotion or PDF Manual.
7. I have setup and customized LinkMotion for my needs. Now, you sent me
information for new version of LinkMotion. How can I preserve my settings while
upgrading to a new version?
It is very easy. Remember to first save your older configuration file and then uninstall. Follow the
uninstall instruction (from the end of the document) from installation instructions. Now install the new
version and bring back you older configuration file from General Options tab by Load button. ReLaunch LinkMotion driver one time and then work with your new version.
32
Section III - LinkMotion and Design Applications:
1. My machine moves properly with Control Pad of LinkMotion but when I send the
job I have a problem. Why?
You need to make sure that your page size in the design application is same as the machine (table) size
declared in the machine properties of LinkMotion. Printer driver selection from your application should
be for Linkmotion driver installed for your machine. Shapes you design should have either hair line,
thinnest line or zero width line selected for vector output. Shapes cannot be filled for vector output.
Please refer to the most recent document on help section or LM&USB and LM & Popular applications.
2. Can you tell me briefly the settings I should make sure of in Corel Draw! version
11 or 12 to make Corel and LinkMotion compatible with each other?
Yes, we suggest that you take a look at the HELP section and read the chapter on LinkMotion and
popular applications. We have listed a number of settings and suggestions.
Also check help menu or LM&USB and LM&Popular applications.
3. How can I change starting positions of a job?
Starting position is controlled by your design application as well as what you have selected in Start
Position under Origin Setup of LinkMotion. Please read and understand functions of both
applications from their help section before using it.
4. Why is my job being cut goes back and forth all over the machine?
Most design applications generally will output jobs in the order that it was designed. If you wish to see a
different order then you need to use sorting available from the Design Application. Please check your
design application functions. LinkMotion and specific Design Application document has more detail
explanation.
5. How can I design a job in different colors or layers?
These functions are available from the design Applications. Please check the document of your design
application or the document name LinkMotion with popular applications.
6. How can I duplicate my design to cut several times?
These functions are available from the design Applications. Please check the document of your design
application or the document name LinkMotion with popular applications.
33
7. Can I cut the same job again since it was not cut all the way (depth) properly?
User should always do preliminary testing for proper depth and then send the job for production.
Following conditions will allow you to cut the job again.
Check the box under Origin setup for Return to 0,0 after job. This allows your tool to be parked back
in the same position as before.
Make sure to make changes in the depth selection of Material Properties, Click on the Apply button
for it to be effective.
Now you can select the object or the shapes that did not cut properly and send it again to the machine.
Make sure to look at the preview before you create the file for roper location of the output.
Make sure that roper M & G-Code is enerated.
8. Can I cut any part of the job again without sending a complete job again?
Yes, Follow the same procedure as in answer no. 5 from above.
9. Can I use any design applications to save my job?
Yes, you can use other applications as long as the design application is capable of sending a vector
output file. Design application should allow you to design shapes with thinnest line or hairline or zero
line width and no fill. Word processing type applications are not capable of sending the vector output.
Please check with your supplier for more information. We document the one we do testing with.
10. What can I do to get more help?
Support is freely available by email – [email protected]
34