1
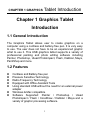
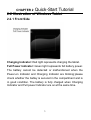
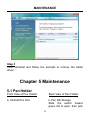
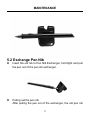
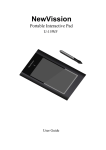
NewVission Portable Interactive Pad U-10WF User Guide Contents CHAPTER 1 GRAPHICS TABLET INTRODUCTION ....................... 1 1.1 GENERAL INTRODUCTION................................................................ 1 1.2 FEATURES........................................................................................ 1 CHAPTER 2 QUICK-START TUTORIAL ............................................ 2 2.1 SETUP STEPS .................................................................................. 2 2.2 ILLUSTRATION OF W IRELESS TABLET.............................................. 3 2.3 WAKE UP TABLET ............................................................................ 6 2.4 SWITCH CHANNEL OF TABLET ......................................................... 6 2.5 BATTERY CHARGING FOR TABLET ................................................... 7 2.6 MATCH CODE OF TABLET ................................................................ 7 CHAPTER 3 USAGE OF PEN .............................................................. 9 CHAPTER 4 INSTRUCTION FOR WINDOWS SYSTEMS ............ 13 4.1 SYSTEM REQUIREMENTS .............................................................. 13 4.2 INSTALLATION ................................................................................ 13 4.3 UNINSTALLING ............................................................................... 14 CHAPTER 5 MAINTENANCE ............................................................ 15 5.1 PEN HOLDER ................................................................................. 15 5.2 EXCHANGE PEN NIB...................................................................... 17 SPECIFICATION............................................................................19 CAUTIONS ...................................................................................... 19 CHAPTER 1 GRAPHICS Tablet Introduction Chapter 1 Graphics Tablet Introduction 1.1 General Introduction The Graphics Tablet allows user to create graphics on a computer using a cordless and battery-free pen. It is very easy to use. The user does not have to be an experienced graphic artist to use it. This USB graphics tablet supports a variety of professional painting and photo editing software including Painter, Photoshop, Ulead Photolmpact, Flash, Dabbler, Maya, PaintShop and more. 1.2 Features Cordless and Battery-free pen Pressure Sensitive Technology Radio Frequency Technology Equipped with Office Assistant Tools Using standard USB without the need for an external power adapter Windows & Mac compatible Software Supported: Painter / Photoshop / Ulead PhotoImpact / Flash / CorelDraw / Dabbler / Maya and a variety of graphic processing software. 1 CHAPTER 2 Quick-Start Tutorial Chapter 2 Quick-Start Tutorial 2.1 Setup steps 1. Install the driver from product CD 2. Connect receiver to USB port on computer. 3. Choose working mode: Wired mode: Connect the receiver to tablet. Wireless mode: Disconnect the receiver from tablet. Note: Either wired or wireless mode requires the receiver connecting to USB port of computer. 2 CHAPTER 2 Quick-Start Tutorial 2.2 Illustration of Wireless Tablet 2.2.1 Front Side Charging Indicator: Red light represents charging the tablet. Full Power Indicator: Green light represents full battery power. The battery cannot be detected or malfunctioned when the Power-on Indicator and Charging Indicator are blinking;please check whether the battey is secured in the compartment and is in good condition. The battery is fully charged when Charging Indicator and Full power Indicator are on at the same time. 3 CHAPTER 2 2.2.2 Wired Mode Quick-Start Tutorial Battery compartment: A compartment stores tablet battery. Channel switch button: To switch channel when multiple wireless tablets use the same channel and interfere each other. Press Channel switch button for once time, the channel can be switched from 0 to 15.Receiver Indicator blinks if the channel was switched successfully. Wake up button: To wake up wireless tablet from sleep mode. USB Connection Interface: To connect the receiver to tablet. The interface is for charging battery and communication between the tablet and receiver at wired mode. 4 CHAPTER 2 Quick-Start Tutorial Reset Key: To reset the tablet when sleep mode or crashing. Code Match Button: Press the code match button of tablet for 3 seconds and receiver indicator will blink, then match the code. Note: Code between tablet and its receiver has been matched during production. 2.2.3 Receiver Cable Connection Interface of Receiver: To connect the receiver to tablet. Code Match Button of Receiver: Press to match code between receiver and tablet. Receiver Indicator: green light blinks when transmitting 5 CHAPTER 2 Quick-Start Tutorial between receiver and tablet. 2.2.4 Wireless Mode 2.3 Wake up Tablet Tablet will be into sleep mode automatically when the tablet idled over about 10 minutes. Press wake up button, then users can use the tablet normally. 2.4 Switch Channel of Tablet Disconnect receiver with tablet, the tablet will be on wireless 6 CHAPTER 2 Quick-Start Tutorial mode. It will be disturbed when multiple tablets using the same channel, for example: multiple tablets being wireless mode, using wireless tablet with RF mouse or wireless telephone together in one room. Press Channel switch button once, receiver indicator will blink, and the channel will be switched. 2.5 Battery Charging for Tablet There is a BL-5C LI battery in the tablet. Please charge the battery when power is low. Charging: Connect receiver to tablet, then connect tablet to computer, 2.6 Match Code of Tablet When use the wireless mode for the first tiime in one computer, you need Match Code . Steps as follow: 1. Connect receiver with the computer, disconnect the receiver with tablet, 2. Install the tablet driver for computer, and run it 3. Press code match button of receiver; when receiver indicator will blink, press code match button of tablet on the back case. 7 CHAPTER 2 Quick-Start Tutorial Then you can see a window like below Select “Enable” and click “OK”. You can see below It means match code successfully. 4. Match code successfully if using the pen tablet normally. Otherwise, please press match code of receiver again, then press match code of tablet. Operate as above until match code successfully. 8 CHAPTER 3 USAGE of Pen Chapter 3 Usage of Pen Holding the pen Hold the pen as usual. The pen will take effect when it comes within 7mm above the tablet. While using the pen, be sure that your thumb or index finger can easily control the button on the pen, which acts as the right-click key of a mouse. 9 CHAPTER 3 USAGE of Pen Positioning Moving the pen in the active area of the tablet will control the cursor’s position on the computer screen. The pen and tablet use the Absolute Coordination method. This means the active area of the tablet represents the entire computer screen. Moving the pen on the tablet creates a corresponding movement of the cursor on the screen. 10 CHAPTER 3 USAGE of Pen Single Click One slight touch of the pen on the tablet has the same effect as a single left-click of the mouse. Double Click Two immediate clicks on the tablet have the same effect as a double left-click of the mouse. Double Click Technology When the cursor is positioned, press the tablet twice immediately with the pen tip, making sure that you do not move the pen tip. The response for the double click can be slow for beginners. You can solve this problem by adjusting the double click speed from the normal setting of the tablet. 11 CHAPTER 3 USAGE of Pen Dragging Select a target by pressing the pen down on it, and do not release the pen till you have moved the target to the new position you want. Pressure Sensitive Painting In applicable software, you can use the pressure sensitivity of the pen to control the painting brushwork for different effects such as direction, stroke width, color and thickness. The software that supports pressure sensitivity includes Adobe Photoshop, Painter, Flash, Ulead PhotoImpact, Art Dabbler etc. 12 MAINTENANCE Chapter 4 Instruction for Windows Systems 4.1 System Requirements CPU Pentium III 1GHz or later RAM 256MB Hard-disk 1 GB OS Windows/Mac & Linux Port USB1.1 or 2.0 4.2 Installation Connect the drawing tablet’s USB cable to the computer’s USB port. Step 1 Insert the driver CD into the CD-ROM drive. 13 MAINTENANCE Step 2 Click on Install Driver for Graphic Tablet button to install the driver. Step 3 After installing the driver and the bundled software, read this manual for detailed information on using and customizing your graphics tablet. Note: If the tablet cannot be used after driver installation, please restart your computer. 4.3 Uninstalling Step 1 Click the Windows Start button and then select Control panel. Step 2 Double click Add/remove program in the control panel window and find Tablet Driver. 14 MAINTENANCE Step 3 Click Uninstall and follow the prompts to remove the tablet driver. Chapter 5 Maintenance 5.1 Pen Holder Front View of Pen Holder Back View of Pen Holder a. Vertical Pen Slot a. Pen Nib Storage Slide the switch toward green dot to open, then pick 15 MAINTENANCE pen nibs from Pen Nib Storage; slide the switch toward red dot to close the Pen Nib Storage b. Horizontal Pen Slot b. Storage hole for extra pen nibs c. Pen Nib Exchanger Front view with pen placed in horizontal slot 16 MAINTENANCE 5.2 Exchange Pen Nib Insert the old nib to Pen Nib Exchanger, hold tight and pull the pen out of the pen nib exchanger. Pulling out the pen nib After pulling the pen out of the exchanger, the old pen nib 17 MAINTENANCE stayed in Pen Nib Exchanger. Insert a new pen nib into the pen. Note: The pen holder is not included in all series of products. If you purchased the product does not have the pen holder as mentioned above, please using tweezers, grasp the nib and draw it out. Once removed, a new nib may be inserted into the pen. 18 Specifications Model No. U-10WF U-15WF Technology Electromagnetic Panel Size 7.5" inch (190mm) 10" inch (254mm) Resolution 4000dpi/Inch 5080dpi/Inch Reading speed 120Dot/S 220Dot/S Pressing Levels 1024Levels 2048Levels Battery Rechargeable Lithium-Ion Battery Wireless 2.4G RF Wireless Technology RF Range Touch Input 5 meters Battery operated Electronic Pen with 2 Button Charging Source USB Only Operating System Microsoft Windows & Linux Working Temperature - 5 to 45 Degree C 590gm Weight Annotation Features 640gm Annotation software included Cautions Do not put the tablet on a metal surface, such as iron or aluminum alloys. Due to a CRT monitor’s electromagnetic radiation, do not use the drawing tablet too close to a CRT monitor. Please do not stack tablets while battery has been installed in compartment; otherwise, the tablet cannot enter sleep mode, and battery power will be consumed very fast. Taking out battery is recommended in this case. 19 XIAMEN INTERACTIVE TECHNOLOGY CO. LTD., 1F No. 45, Wanghai Rd, Xiamen Software Park Phase II, Xiamen, China - 361008 Tel : 86-592-5902910 Fax : 86-592-5902916