1
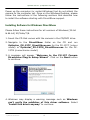
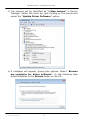
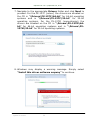
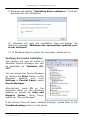
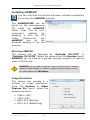
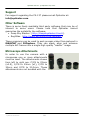
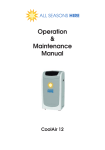
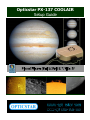
Opticstar PX-137 COOLAIR Setup Guide advanced CCD imaging Opticstar PX-137. Ä Opticstar Ltd, 2012. CONTENTS Introduction................................................................................................................................................................................ 2 Software Support ................................................................................................................................................................. 2 Package Contents................................................................................................................................................................ 2 System Requirements......................................................................................................................................................... 2 Camera Installation................................................................................................................................................................... 3 Installing Software for Windows DirectShow.................................................................................................................. 4 Installing Software Drivers for Windows ......................................................................................................................... 7 Verifying Successful Installation.....................................................................................................................................10 Installing etAMCAP.................................................................................................................................................................11 Running etAMCAP .............................................................................................................................................................11 Image Resolution ...............................................................................................................................................................11 Automatic Exposure Time ................................................................................................................................................12 Manual Exposure Time......................................................................................................................................................12 Colour Settings ..................................................................................................................................................................12 Camera Speed ....................................................................................................................................................................12 Other Settings.....................................................................................................................................................................12 ISCapture..................................................................................................................................................................................13 Installing ISCapture ...........................................................................................................................................................13 Camera Control ..................................................................................................................................................................14 Troubleshooting......................................................................................................................................................................16 USB Requirements ............................................................................................................................................................16 Express Card ......................................................................................................................................................................16 Re-Installing the Software Drivers ..................................................................................................................................17 Re-Installing the Software Drivers ..................................................................................................................................17 Support.....................................................................................................................................................................................18 Other Software.........................................................................................................................................................................18 Microscope Attachments.......................................................................................................................................................18 CAUTION ! 1. Please read and follow the installation instructions on the following pages for a trouble free installation! 2. Do not drop your camera as this can result in serious damage. 3. Only use the supplied power supply unit if you camera comes with one. 4. Do not point the camera to a bright light source like the Sun without the appropriate filters as this will damage the sensor. 5. Disconnect the camera from the computer when not in use. 6. Treat the camera glass window with the same care as you would of a photographic lens. Manufacturer’s Warranty This product has a 1 year back to base warranty. For after sales support please contact Opticstar at: [email protected] Updated: 02/10/2012 1 Opticstar PX-137. Ä Opticstar Ltd, 2012. Introduction The PX-137C (colour) and PX-137M (monochrome) are advanced astronomy video cameras that excel in planetary, lunar and solar imaging. The camera is also suitable for microscopy when fitted with an appropriate attachment. Please note that for solar photography, the camera should be used only with an appropriate solar telescope and/or solar filters. The PX-137 incorporates the advanced Sony IMX035 sCMOS (scientific CMOS) sensor that outperforms CCD sensors such as the Sony ICX618 CCD by a significant margin. The PX-137 achieves frame rates of up to 25 frames per second (FPS) at full resolution: 1280x1038 pixels, or up to 50 FPS at 668x512 pixels. Software Support Two software applications are bundled with the camera: etAMACAP and ISCapture. EtAMCAP works under Microsoft’s DirectShow model. ISCapture supports the camera natively offering image processing and measurement functionality. Package Contents The following items are included in the package: Opticstar PX-137 video camera with removable C ring. In-situ USB 2.0 cable. CS to 1.25” telescope adapter. Software CD. Setup Guide (this document). System Requirements The minimum computer system requirements are the following: Windows (32-bit or 64-bit) XP/Vista/7/8 with the latest Service Pack. USB 2.0 port for the camera. Updated: 02/10/2012 2 Opticstar PX-137. Ä Opticstar Ltd, 2012. The camera does not incorporate any optics and therefore it cannot reach focus by itself. A C/CS mounted lens must be used with the camera or it must be attached to a telescope with the nosepiece adapter that is included with the camera. To attach it to a microscope, please use an appropriate attachment. Camera Installation There are four sets of software to install in order to add support for the PX-137 camera to Windows. They should be installed in the following order: 1. Windows DirectShow software for the PX-137. 2. Windows software drivers for the PX-137. 3. EtAMCAP application software for using the camera. 4. ISCapture application software with more advanced functions and better usability. The first step is to install software that makes the PX-137 compatible with Microsoft’s Windows DirectShow model. Such compliance allows the PX-137 to be used with etAMCAP and possibly with other third party applications. Anti-virus software may attempt to block the installation. In such cases the anti-virus software should be temporarily disabled. Otherwise, when prompted, add the installation files to the trusted list. The installation of the software should be carried out by a user with Windows administrator permissions. Otherwise the installation may fail. Please ensure that the camera is not connected to the computer yet. Updated: 02/10/2012 3 Opticstar PX-137. Ä Opticstar Ltd, 2012. Power up the computer (or restart Windows) but do not attach the camera to the computer yet. Once on the Windows Desktop, please follow the instructions in the following sections that describe how to install the software starting with DirectShow support. Installing Software for Windows DirectShow Please follow these instructions for all versions of Windows (32-bit & 64-bit) XP/Vista/7/8. 1. Insert the CD that comes with the camera in the CD/DVD drive. 2. Navigate to the DirectShow folder on the CD and run Opticstar_PX-137C_DirectShow.exe for the PX-137C (colour model) or Opticstar_PX-137M_DirectShow.exe for the PX137M (monochrome model). 3. A message will appear “Welcome to the PX-137 Camera Directshow Plug-in Setup Wizard”. Click on the Next button to continue. 4. Windows may display a warning message such as Windows can’t verify the publisher of this driver software. Select “Install this driver anyway” to continue. Updated: 02/10/2012 4 Opticstar PX-137. Ä Opticstar Ltd, 2012. 5. The install program will ask if any additional video software should also be installed. Since the camera will typically be used in video mode, the response to this should be yes. Select all the options and click the Next button to continue. Updated: 02/10/2012 5 Opticstar PX-137. Ä Opticstar Ltd, 2012. 6. Eventually, Windows will display “Completing the Opticstar PX-137…”. Click Finish to continue. 7. Finally, if Windows asks to restart the computer, select “Yes”. If at any stage you wish to remove DirectShow support, you can do so from the Windows Control Panel independently of the camera’s Windows software drivers. Click the Add / Remove Programs icon (on XP) or Programs and Features (on Vista/7) and remove the entry headed “PX-137 DirectShow…”. Updated: 02/10/2012 6 Opticstar PX-137. Ä Opticstar Ltd, 2012. Installing Software Drivers for Windows Desktop computers have USB 2.0 ports on the front and the back. Sometimes, the ports at the front are not fully USB 2.0 compliant in terms of bandwidth and power. Please use one of the ports connected directly to the motherboard if possible. Such USB 2.0 ports are typically situated at the back of the computer. 1. Insert the CD in the drive. 2. Connect the camera to a USB 2.0 port on your computer. 3. Windows may try to locate drivers for the camera automatically. Click “Skip obtaining driver software from Windows Update”. The drivers should be installed manually. 4. The following message will appear. Ignore the message and open the Windows Device Manager to install the drivers manually. If you are not sure how to access the Device Manager on your computer, press F1 on the keyboard while on the Windows desktop to access the Help and Support Center. Once there, search for “Device Manager”. Updated: 02/10/2012 7 Opticstar PX-137. Ä Opticstar Ltd, 2012. 5. The camera will be identified as “1.3mp camera” in Device Manager. Select this entry by right-clicking on the mouse and select the “Update Driver Software” option. 6. A message will appear, giving two options. Select “Browse my computer for driver software”. In the following step direct Windows to the Drivers folder on the CD. Updated: 02/10/2012 8 Opticstar PX-137. Ä Opticstar Ltd, 2012. 7. Navigate to the appropriate Drivers folder and click Next to proceed. For the PX-137C (colour) the drivers are situated on the CD in “\Drivers\PX-137C\64-bit” for 64-bit operating systems and in “\Drivers\PX-137C\32-bit” for 32-bit operating systems. For the PX-137M (monochrome) the drivers are situated on the CD in “\Drivers\PX-137M\64bit” for 64-bit operating systems and in “\Drivers\PX137M\32-bit” for 32-bit operating systems. 8. Windows may display a warning message. Simply select “Install this driver software anyway” to continue. Updated: 02/10/2012 9 Opticstar PX-137. Ä Opticstar Ltd, 2012. 9. Windows will display “Installing driver software…” and will proceed with the installation. 10. Windows will copy the installation files and display the following message “Windows has successfully updated your driver software”. 11. If Windows asks to restart the computer, please do so. Verifying Successful Installation The camera will now be visible in Windows Device Manager and can be identified as “Opticstar PX137”. You can access the Device Manager by clicking the Start button on the Windows desktop and from Settings > Control Panel, select Device Manager. Alternatively, press F1 on the keyboard while on the Windows desktop to access the Help and Support Center. Once there, search for “Device Manager” If the drivers have not been installed properly, please refer to the Troubleshooting section in this guide. Updated: 02/10/2012 10 Opticstar PX-137. Ä Opticstar Ltd, 2012. Installing etAMCAP You can test that the camera has been installed successfully by running the etAMCAP program. The etAMCAP.EXE can be found on the accompanying CD inside the etAMCAP folder. Copy this to your computer’s desktop by dragging it from the CD folder. Double-click the etAMCAP icon on the Windows desktop to run the program. Running etAMCAP The camera will be identified as “Opticstar PX-137C” or “Opticstar PX-137M”. Select the camera from the Devices menu. EtAMCAP can be used as a general purpose program to capture video in AVI format. EtAMCAP can be used to capture video in AVI format. It cannot capture single frames. In order to capture single frames as well as video please use ISCapture. Image Resolution The camera can operate in a number of image resolutions. From the Options > Video Capture Pin menu, select the camera resolution: 1280 x 1040 1280 x 800 668 x 512 (Binning) 640 x 512 (SWBinning). Updated: 02/10/2012 11 Opticstar PX-137. Ä Opticstar Ltd, 2012. The camera can be configured from the Options > Video Capture Filter menu. Automatic Exposure Time AE Enable stands for Automatic Exposure. When auto-exposure is used, the user cannot specify the exposure time. However it is still possible to add a “bias” by increasing or decreasing the Target value. Likewise, the Gain value is not user definable in auto-exposure mode. Manual Exposure Time To set the exposure time manually, simply un-tick the AE Enable option. In this mode, the time can be set in milliseconds and Gain can also be set. The Target value cannot be set in manual exposure mode. Colour Settings For colour cameras the colour settings of the captured images can be modified by the slider bars. Additionally, the values for Gamma, Contrast and Saturation can be specified. Camera Speed The camera speed can be set to High, Normal or Low. This refers to the speed at which the camera sends the data to the computer. At lower speeds, the image quality is better but at higher speeds the camera downloads the data quicker. Other Settings The orientation of the captured images can be inverted or reflected by the H Flip and V Flip options. The Mono option produces monochrome images rather than colour. Updated: 02/10/2012 12 Opticstar PX-137. Ä Opticstar Ltd, 2012. ISCapture ISCapture is a more advanced software application that can be used to control the camera, capture single frames or video, perform image processing and take image measurements. It can also be used for a wide range of applications including microscopy. Installing ISCapture 1. To install ISCapture, navigate to the ISCapture folder on the CD and open the ISCapture_setup.exe file. 2. Windows will display “Welcome to the ISCapture Setup Wizard”. Click the Next button to continue. 3. During installation, you will be asked to select the location where the program will be installed and whether to install video processing software. Please select all the additional software video components by ticking the appropriate options. Once the installation is complete, ISCapture can be run by clicking on the Windows Start button and selecting ISCapture from the programs list. Alternatively click the appropriate icon. Updated: 02/10/2012 13 Opticstar PX-137. Ä Opticstar Ltd, 2012. Camera Control Run ISCapture with the camera connected to the computer. On the top panel of the application, the camera will be identified as “Opticstar PX-137C” or “Opticstar PX-137M”. The camera will start running as soon as ISCapture opens. Some of the frequently used camera controls are visible on the left hand side panel of the program. Such controls include data-width and camera speed. Selecting 16-bit data width will capture higher quality images at a slower frame rate. It will also result in larger video files. Selecting high speed will result in larger video files. The image resolution can also be set in the Preview Resolution and Capture Resolution fields. By default they are both set at 1280 x 1038 pixels. Updated: 02/10/2012 14 Opticstar PX-137. Ä Opticstar Ltd, 2012. Selecting the Stop button will cause the camera to stop capturing data. The button will change to Play. Clicking the Play button will start playing video again. The Capture button will write the video data directly to the computer’s hard disk as an AVI file. The number of frames captured can be set in the File Save menu. The file name and the folder can also be specified there. Similarly, the exposure time can be set in the Exposure Control menu. When used in astronomy, the exposure time should be set manually. The time must be specified in milliseconds (ms), seconds (s) and minutes (m). The appropriate length of the exposure time depends on the brightness of the target to capture, the size of the telescope and the focal ratio of the telescope. The Gain function boosts the sensitivity of the camera. It is an electronic amplifier that increases the strength of the captured image. It is possible to reduce the required exposure time by increasing the Gain value. For full instructions regarding ISCapture please refer to the OS_ISCapture.pdf user manual on the CD. It is situated inside the “\ISCapture\” folder. Updated: 02/10/2012 15 Opticstar PX-137. Ä Opticstar Ltd, 2012. Troubleshooting If you experience difficulty in installing the camera software and drivers this may be due to a number of reasons related to your computer, operating system and other devices already connected to it. The following sections outline the most common problems and suggest ways in which you should be able to solve them. Please also refer to the documents in the Articles folder on the CD. USB Requirements Please ensure that your computer runs Windows XP/Vista/7/8 or later, has the latest updates from Microsoft and also has USB 2.0 ports. The PX-137 camera will not work with USB1.1. If your computer has USB1.1 ports you will need to obtain a PCI USB2.0 type card if you have a desktop, or an Express USB2.0 card if you have a laptop. The ExpressCard will need to be fully supported by your computer, in some entry level laptops full ExpressCard and PCI USB2.0 support in not fully implemented. If you have a desktop try both the USB ports on the front and back of your PC if the camera is not recognised on a particular USB port. USB ports attached directly to the motherboard are more efficient. Please note that PCMCIA USB2.0 cards typically do not provide the full USB2.0 bandwidth and will not work with the PX-137 camera. Express Card In some cases it may be possible to resolve such issues by fitting an ExpressCard (with USB2.0 ports) to your computer. ExpressCards run faster than PCMCIA/CardBus cards due to the ExpressCard's superior speed of 2.5Gbit/s (480 Mbit/s through USB 2.0) per slot, for comparison PCMCIA/CardBus devices connected to a computer would share a total 1.06 Gbit/s bandwidth. Express type cards use a 34mm slot where PCMCIA/CardBus cards use 54mm slots. An ExpressCard should be connected directly to the computer and not via a PCMCIA/CardBus card. Please note that using an ExpressCard may still not solve any data bandwidth bottlenecks that are inherent in old computers. Updated: 02/10/2012 16 Opticstar PX-137. Ä Opticstar Ltd, 2012. Re-Installing the Software Drivers DirectShow support can be removed or installed independently from the camera’s software drivers. Please refer to the section Installing Software for Windows DirectShow in this guide for details. Re-Installing the Software Drivers If the camera cannot be identified by Windows then it is possible that the software drivers have not been installed correctly or they have been corrupted. In such cases, it is best to uninstall the drivers. This can be done from the Device Manager in Windows. Click on the Start button on the Windows desktop and from Settings > Control Panel, select Device Manager. The camera should appear in the list under Imaging devices. 1. Right-click on the Opticstar PX-137 entry. 2. On the pop-up menu and select Uninstall. 3. If Windows asks to restart the computer, select “Yes” and continue. When the computer restarts, please re-install the software as normal. To re-install the drivers please follow the instructions in the Installing Software Drivers for Windows section in this guide. Updated: 02/10/2012 17 Opticstar PX-137. Ä Opticstar Ltd, 2012. Support For support regarding the PX-137 please email Opticstar at: [email protected]. Other Software There is some freely available third party software that may be of interest to some users. Please note that Opticstar cannot guarantee the suitability the software. Deep Sky Stacker. (http://deepskystacker.free.fr). RegiStax. (http://www.astronomie.be/registax/) These programs can be used to post-process video files captured in EtAMCAP and ISCapture. They can stack, align and enhance multiple AVI frames into a single high quality “master” image. Microscope Attachments In order to use the camera with a microscope one or more attachments must be used. The attachments shown from left to right are: C/CS to 23mm (x0.5), C/CS to 23mm (x1), C/CS to 30mm and C/CS to 30.5mm. These attachments are not bundled with the Updated: 02/10/2012 18 Opticstar PX-137. Ä Opticstar Ltd, 2012. Specification Image sensor Quantum Efficiency Sensor type Pixel size Max. Resolution Speed Opticstar PX-137 COOLAIR Sony IMX035 1/3” Exmor CMOS 76% @ 500nm Progressive scan 3.63μm x 3.63μm 1280 x 1038 pixels 25fps @ 1280x1038 50fps @ 668x512 12-bit ADC, full 4096 range 15000e3e- (RMS) In hardware 1ms to 60 seconds Automatic or Manual Global shutter 4500:1 (Gain 1X) Clear, no Infra Red cut-off USB 2.0, 480 Mb/s USB 2.0 powered C/CS Mount C/CS to 1.25” (included) C to T-thread (M42 x 0.75) C to 23mm/30mm/30.5mm 1.8 meter long 250g Microsoft Windows (32-bit or 64-bit) XP/Vista/7/8; USB 2.0 ISCapture, etAMCAP, Windows drivers Analogue to Digital Converter Full well capacity Read-out noise Gain Exposure Range Exposure Shutter Type Dynamic Range Window glass Image Output Power Supply Physical interface Mounting to telescope Mounting to lens Mounting to microscope USB Cable Weight Computer requirements Bundled software Opticstar Ltd, 87 Washway Road, Sale, Greater Manchester, M33 7TQ, United Kingdom 0044(0)161 969 9008 [email protected] www.opticstar.com www.opticstar-ccd.com Updated: 02/10/2012 19