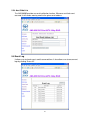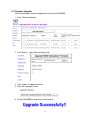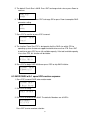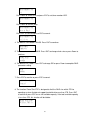
1
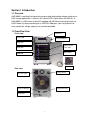
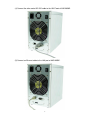
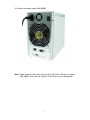
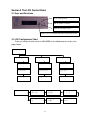
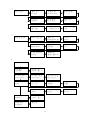
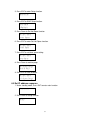
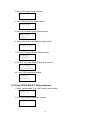
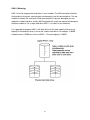
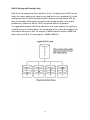
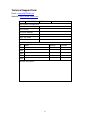
5 HDDs eSATA-to-SATA
RAID-0/1/5 Tower
ANS-9050E
User’s Manual
Version 1.0
Copyright © 2008 2SAN INC.
Release: February 2008
Copyright and Trademark
The information of the product in this quick guide is subject to change without prior notice and does
not represent a commitment on the part of vendor, who assumes no liability or responsibility for any
errors that may appear in this quick guide.
2SAN is the trademark of 2SAN Inc. Windows is the trademark of Microsoft Corporation. All brands
and trademarks are the properties of their respective owners.
This quick guide contains materials protected under International Copyright Laws. All rights
reserved. No part of this quick guide may be reproduced, transmitted or transcribed without the
written consent of the manufacturer.
WEEE Statement
English
In order to cope with the increasing waste electrical and electronic equipment, reduce the use of landfill and
incinerator, and prevent the harmful matter of waste equipment from entering the environment, the European
Union (EU) has set the Directive on Waste Electrical and Electronic Equipment (WEEE) asking manufacturers
to collect, recycle and treat waste electrical and electronic equipment properly. Member nations already
established their free of charge recycle systems of WEEE before August 13, 2005. Accordingly, 2SAN has to
be responsible for recycling all products exported to Germany. You can return your 2SAN product that needs
recycling to a local collector.
WEEE Erklärung
German
Mit dem Ziel die steigende Menge elektrischer und elektronischer Altgeräte zu bewältigen ohne hierzu unnötig
Mülldeponien und Verbrennungsanlagen zu belasten und um die Verschmutzung der Umwelt durch
freiwerdende Stoffe aus den Altgeräten zu vermeiden, hat die Europäische Union (EU) die Richtlinie über
Elektro- und Elektronik-Altgeräte erlassen. Die Richtlinie verpflichtet Hersteller, elektrische und elektronische
Altgeräte umweltgerecht einzusammeln, zu recyceln und zu entsorgen. Die Mitgliedsstaaten der EU haben
bereits ihre kostenfreien Recyclesysteme konform der WEEE vor dem 13. August 2005 eingerichtet.
Entsprechend der Richtlinie ist 2SAN verantwortlich für die umweltgerechte Entsorgung aller nach
Deutschland exportierten 2SAN Produkte. Sie können Ihr zu entsorgendes 2SAN Produkt zu Ihrer örtlichen
Sammelstelle bringen.
AEEA verklaring
Dutch
Met het doel de stijgende hoeveelheid afgedankte elektrische en elektronische apparatuur te beheersen
zonder hiervoor onnodig stortplaatsen en verbrandingsovens te belasten en om de vervuiling van het milieu
door vrijkomende stoffen uit de afgedankte apparatuur te voorkomen, heeft de Europese Unie (EU) de richtlijn
betreffende afgedankte elektrische en elektronische apparatuur besloten. Deze richtlijn verplicht fabrikanten
afgedankte elektrische en elektronische apparatuur in te zamelen, te recyclen en te verwijderen. De lidstaten
van de EU hebben reeds de kosteloze recyclesystemen volgens de AEEA vóór de 13 augustus 2005 ingericht.
Conform de richtlijn is 2SAN verantwoordelijk voor de verwijdering van alle naar Nederland geëxporteerde
2SAN producten. U kunt uw afgedankt 2SAN product naar uw locale inzamelplaats brengen.
Elektrik ve Elektronik Madde Atıkları Demeci
Turkish
Elektrik ve electronik madde atıklarının yukselmesiyle basedebilmek ,arazi doldurma ve cop yakma fırını
kullanımını
azaltmak,atık
madde
zararlarının
cevreye
yayılmasını
onlemek
icin
Avrupa
Birligi
(AB),ureticilerden elektrik ve elektronik madde atıklarını gerektigi gibi toplamalarını,geri donusturmelerini ve
kimyasal isleme tabi tutmalarını talep etmek icin Elektrik ve Elektronik Madde Atıkları uzerine bir direktif
hazırladı.Topluluk uyeleri,13 Agustos 2005' ten once elektrik ve elektronik madde atıklarının ucretsiz geri
donusum sistemlerini coktan olusturmuslardı.Bundan dolayı, 2SAN, Almanya'ya ihrac ettigi butun urunlerin
geri donusumunden sorumludur. 2SAN urunleri geri donusum gerektirirse yerel toplayıcılara geri
verebilirsiniz.
WEEE бюлетень
Чтобы
Russian
справиться
с
увеличивающимся
ненужным
электрическим
и
электронным
оборудованием, уменьшите использование закапывания мусора и использования установки
для сжигания отходов, препятствуйте вредному выбросам загрязнять окружающую среду,
Европейский союз (ЕС)установил Директиву по Ненужному Электрическому и
Электронному
Оборудованию
(WEEE)
для
того,
чтобы
изготовителей
собрали,
перерабатывали и вообще проявили внимание к ненужному электрическому и электронному
оборудованию должным образом. Члены нации установили бесплатную систему переработки
WEEE до 13 августа 2005. Соответственно, 2SAN обязан быть ответственным за то, что
переработал все продукты, экспортируемые в Германию. Вы можете возвратить ваш продукт
2SAN, который нуждается в рециркуляции местному сборщику.
WEEE Statement
French
Afin de gérer la quantité croissante de déchets électriques et électroniques, de réduire l’utilisation des
décharges et des incinérateurs et d’éviter que des déchets nocifs ne polluent l’environnement, l’Union
Européenne a publié la directive WEEE sur les déchets électriques et électroniques. Celle-ci spécifie que les
fabricants doivent collecter, recycler et traiter l’équipement électronique et électrique usagé. Depuis le 13 août
2005, les pays membres ont mis en place un système de recyclage gratuit selon le WEEE.
De ce fait, 2SAN est responsable du recyclage de tous les produits exportés vers l’Allemagne. Vous pouvez
mettre au rebut votre équipement 2SAN usagé dans votre centre local de recyclage.
Pour plus d’informations sur les lieux de mise au rebut des équipements usagés destinés au recyclage,
veuillez contacter votre mairie, votre service de traitement des déchets ménagers ou le magasin où vous avez
acheté le produit.
RAEE
Spanish
Con la finalidad de reducir el incremento de residuos eléctricos y de material electrónico, reduciendo el uso
de los vertederos e incineradoras y prevenir el preocupante aumento del contacto de estos residuos con el
medio ambiente. Por este motivo la Unión Europea ha fijado la Directiva de Residuos de Aparatos Eléctricos
y Electrónicos (RAEE) solicitando a los fabricantes la recolección, reciclaje y tratamiento de ests residuos
correctamente. Los paises miembros ya han establecido su sistema de reciclaje gratuito de RAEE antes del
13 de Agosto del 2005. Por este motivo 2SAN es el responsable del reciclaje de todos los productos
exportados a Alemania. Usted puede devolver su producto 2SAN a un punto de recogida local cuando desee
reciclarlo.
Dichiarazione WEEE
Italian
Per far fronte all’aumento dei residui delle apparecchiature elettriche ed elettroniche, ridurre l'uso di materiale
di riporto e degli inceneritori, ed impedire che il materiale nocivo delle apparecchiature residue entri a contatto
con l'ambiente, l’ Unione Europea (UE) ha stabilito le Direttive sui Residui delle apparecchiature Elettriche ed
Elettroniche (WEEE) chiedendo ai fornitori di raccogliere correttamente, riciclare e trattare le apparecchiature
elettriche ed elettroniche residue. Le nazioni facenti parte dell’ Unione Europea hanno già stabilito il loro
sistema gratuito di riciclaggio di questo materiale (WEEE) prima del 13 agosto 2005. Di conseguenza, 2SAN
è responsabile del riciclaggio di tutti i prodotti esportati in Germania. Potete restituire il vostro prodotto
acquistato da 2SAN che deve essere riciclato da un’ azienda specifica locale.
Table of Contents
SECTION 1 INTRODUCTION.................................................................................... 1
1.1 OVERVIEW.......................................................................................................................... 1
1.2 FRONT/REAR VIEW ........................................................................................................... 1
1.3 SPECIFICATION................................................................................................................... 2
1.4 PACKAGE & COMPONENT ................................................................................................ 2
SECTION 2 INSTALLATION ...................................................................................... 3
2.1 INSTALL THE HARD DRIVES ............................................................................................. 3
2.2 CONNECT ANS-9050E TO COMPUTER .......................................................................... 6
2.2.1 Install ANS-9050E ................................................................................................... 6
SECTION 3 THE LCD CONTROL PANEL...................................................... 10
3.1 KEYS AND FUNCTIONS ................................................................................................... 10
3.2 LCD CONFIGURATION CHART ...................................................................................... 10
3.3 LCD CONFIGURATION MENU ....................................................................................... 13
SECTION 4 THE STATUS INDICATORS......................................................... 16
SECTION 5 THE WEB MANAGEMENT UTILITY...................................... 17
5.1 LOGIN MANAGEMENT UTILITY ..................................................................................... 17
5.2 INFORMATION .................................................................................................................. 18
5.2.1 Disk Information ........................................................................................................ 18
5.2.2 RAID Information....................................................................................................... 18
5.2.3 System Information ................................................................................................... 19
5.3 RAID SETUP ................................................................................................................... 19
5.3.1 Auto RAID .................................................................................................................. 19
5.3.2 Create RAID .............................................................................................................. 20
5.3.3 Delete RAID............................................................................................................... 21
5.4 SYSTEM SETUP ................................................................................................................ 21
5.4.1 Rebuild Rate.............................................................................................................. 21
5.4.2 Cache Policy.............................................................................................................. 22
5.4.3 Consistency Check ................................................................................................... 22
5.4.4 Network Config.......................................................................................................... 23
5.4.5 Change Password..................................................................................................... 23
5.4.6 Restore to Default setting......................................................................................... 24
5.4.7 Restart and Logout ................................................................................................... 24
5.5 ALERT SETUP ................................................................................................................... 25
5.5.1 Alarm Buzzer ............................................................................................................. 25
5.5.2 SMART Polling .......................................................................................................... 25
5.5.3 Alert E-Mail List ......................................................................................................... 26
5.6 EVENT LOG ...................................................................................................................... 26
5.7 FIRMWARE UPGRADE ..................................................................................................... 27
SECTION 6 QUICK START ...................................................................................... 28
6.1 AUTO RAID CREATION SEQUENCE ............................................................................... 28
6.2 5HDD RAID5 CREATION SEQUENCE........................................................................... 28
6.3 4HDD RAID5 WITH 1 SPARE HDD CREATION SEQUENCE ....................................... 29
6.4 5HDD RAID0 CREATION SEQUENCE........................................................................... 31
6.5 2HDD RAID1 CREATION SEQUENCE........................................................................... 32
6.6 DELETE RAID SEQUENCE: ............................................................................................ 34
6.7 DISABLE AUTO SPARE SEQUENCE ................................................................................. 34
6.8 SET IP ADDRESS SEQUENCE ........................................................................................... 35
6.9 CHECK HDD S.M.A.R.T. STATUS SEQUENCE ............................................................ 36
6.10 CHECK EVENT LOG SEQUENCE .................................................................................. 37
APPENDIX A: EVENT LOG ..................................................................................... 38
APPENDIX B: ABOUT RAID ................................................................................... 39
TECHNICAL SUPPORT FORM ............................................................................. 42
Section 1 Introduction
1.1 Overview
ANS-9050E is specifically designed for personal video/audio editing storage and business
RAID storage applications. It features five 3.5inch SATA I/II disk drives with RAID 0,1,5.
ANS-9050E is a RAID tower for Mac/PC equipped with eSATA port connected simply via
eSATA cable. By simply connecting to its eSATA 3.0 Gbps port, your host platform can
freely expand the storage capacity in an extreme bandwidth.
1.2 Front/Rear View
LCD Panel
Front view:
Power LED
4 Control Buttons
Busy LED
RAID Controller
Power LED
Fault LED
Mute Button
HDD LED
Key Lock
Rear view:
Power Switch
AC Power Input
Ethernet LAN Port
RS232 Serial Port
eSATA Port
1
1.3 Specification
● Host Interface
■ One 3.0Gbps eSATA port
● Disk Interface
■ Five 3.0Gbps SATA ports (for 3.5” HDDs)
● RAID Functions
■ RAID levels: 0, 1, 5
■ Automatic online background data rebuilding
■ Automatic disk failure detection
■ Supports S.M.A.R.T
■ Array roaming
■ HDD hot-swap (RAID1, 5 only)
■ HDD hot-spare (RAID1, 5 only)
● Management
■ Driverless: need no driver on host side
■ LCD panel for operation status display
■ LED indicators for disk status display
■ RAID level selection and configuration by LCD panel or UART/ Web console
■ NVRAM for transaction log, event log and system configuration settings
■ Event notification by audible alarm
■ Fan, voltage and system temperature monitoring
■ RS232/Ethernet port for either configuration through VT100 Console or Web
management through HTTP Browser
1.4 Package & Component
Items
Quantity
ANS-9050E
1
Removable tray
5
Power cord
1
eSATA cable
1
External RS-232 cable
1
Accessories bag (screws &1 key)
1
Quick Guide
1
2
Section 2 Installation
2.1 Install the Hard Drives
Follow the steps below to install the hard drives into the trays of ANS-9050E.
(1) Unlock with the enclosed key, and open the front door.
(2) Open the tray by pushing the blue fastener downward.
3
(3) Pull the lever with the tray out.
(4) Unfasten the 2 screws supporting the tray protector.
(5) Remove the tray protector.
4
(6) Place the hard drive into the tray and fasten with 4 screws.
(7) Slide the tray into ANS-9050E.
(8) Push the lever and fasten.
5
(9) Repeat step 2 to 8 for installing the rest hard drives.
(10) Close the door and lock.
2.2 Connect ANS-9050E to Computer
Computer requirement:
(1) A free eSATA port
(2) A free RS-232/UART port (manages ANS-9050E via terminal) or both of IP address
and LAN access (manages ANS-9050E via web browser).
2.2.1 Install ANS-9050E
(1) Insert one end of the eSATA cable into the eSATA port of the computer.
6
(2) Insert the other end of the eSATA cable into the eSATA port of ANS-9050E.
(3) Connect one end of RS-232 cable to the UART port of the computer.
7
(4) Connect the other end of RS-232 cable to the UART port of ANS-9050E.
(5) Connect an Ethernet cable to the LAN port of ANS-9050E.
8
(6) Connect the power cord to ANS-9050E.
Note: Follow step 3 to 5 only when you use either RS-232 or LAN port to manage
ANS-9050E. Please refer to section 6 “Quick Start” for fast configuration.
9
Section 3 The LCD Control Panel
3.1 Keys and Functions
Up: to scroll up menus
ENT: to confirm a selection
Down: to scroll down menus
ESC: to cancel a selection and return to the previous menu
3.2 LCD Configuration Chart
There are 3 major function menus in ANS-9050E as the following charts show in the
pages below.
Booting
Information
Setup
Event Log
RAID Info
RAID Setup
Display Log
System Info
System Setup
Erase Log
Hard Disk Info
Disk Setup
System Up Time
1.
RAID Info
RAID Status:
(Healthy)
RAID Mode:
(RAID-5)
RAID Members:
(1 2 3 4)
Hot Spare:
(5)
Chunk Size:
(64KB)
SID:
(0001)
10
2.
System Info
Model ID:
ANS-9050
Firmware Rev:
V1.00 07/12/03
RAID Chip Rev:
Ver. 1.1
Serial No:
12345678
Cache Policy
Write Back
Temperature:
33°C
Fan Status:
1680 RPM
Total Up Time:
888D 23:59:59
Consistency Chk:
(33%)
Select Disk Tray
1
Model ID:
WD360ADFD-00NLR1
Capacity:
500 GB
Serial No:
WMANS1116467
Firmware Rev:
20.07P20
Temperature:
33°C
S.M.A.R.T State:
Healthy
Membership:
RAID-5 Member #2
3.
Hard Disk Info
4.
RAID Setup
Auto RAID
(Enabled)
Disable Auto?
ENT:Yes, ESC:No
Set Hot Spare
(Auto Spare)
Hot Spare Disks:
*Auto Spare
Hot Spare Disks:
Save & Exit?
Create New RAID
(None)
RAID Members:
(1 2 3 4)
RAID Mode:
(RAID-5)
Chunk Size:
(64KB)
SID:
(0001)
ANS-9050 RAID-5
Create?
ANS-9050 RAID-5
Initial?
Delete RAID
SID:0001
Sure Delete?
ENT:Yes, ESC:No
Rename RAID
(SID:0001)
NEW SID:
_
11
5.
System Setup
Rebuild Rate
(Fast)
Rebuild Rate:
*Fast
Cache Policy
(Write Back)
Cache Policy:
*Write Back
Alarm Buzzer
(Enabled)
Disable Buzzer?
ENT:Yes, ESC:No
S.M.A.R.T.
(Disabled)
Enable SMART?
ENT:Yes, ESC:No
SMART Time
(24) Hours
SMART Time:
024 Hours
Consistency Chk
(Disabled)
Enable Check?
ENT:Yes, ESC:No
Consist Lag Time
(30) Days
Consist Lag Time
030 Days
Consist Chk Rate
(Slow)
Consist Chk Rate
*Slow
Net Mask
255.255.255.0
Gateway
192.168.0.251
Network Config
IP Address
192.168.0.1
DNS Server
192.168.0.251
Password
(Disabled)
Enable Password?
ENT:Yes, ESC:No
Change Password
New Password
0000
Confirm Password
0000
Stagger Power On
(1s)
Stagger Time:
*1s
Standby Time
(5) Min
Set Standby Time
*5 Min
Load Default
Load Default
ENT:Yes, ESC:No
Restart System
Sure to restart?
ENT:Yes, ESC:No
12
6.
Disk Setup
Identify Member
RAID Member:
1
RAID Member #1:
Tray #1
Identify Spare
Spare Disks:
1
Spare Disks #1:
Tray #3
Identfy Free
Free Disks:
Tray #4 5
7.
Event Log
Display Log
10 Events
#010: 025:19:32
NOTICE
MGMT
Erase Log
Erase Log?
ENT:Yes, ESC:No
RAID Created
System Up Time
100D 23:59:59
3.3 LCD Configuration Menu
Read the following instructions before operating:
1. RAID Info
It is to show the details of a RAID set such as: RAID status, RAID mode, RAID
member, hot spare disk, chunk size and system identify number (SID).
2. System Info
2.1 Model ID: to show the model ID: ANS-9050.
2.2 Firmware Rev: to show the current firmware version.
2.3 RAID Chip Rev: to show the version of the RAID chipset.
2.4 Serial No: to show the unique number of each ANS-9050E.
13
2.5 Cache Policy: to show if current cache policy is write back or write through
2.6 Temperature: to show the temperature of ANS-9050E.
2.7 Fan Status: to show the fan rotating speed.
2.8 Total Up Time: to show the amount of working hours since first power on.
2.9 Consistency Chk: to show the consistency check status once it is enabled.
3. Disk Info
It is to show the details of each hard drive such as model, capacity, serial
number, firmware version, temperature, S.M.A.R.T status and membership.
4. RAID Setup
4.1 Auto RAID: after power on, ANS-9050E will search all free hard drives and ask
for automatic RAID creation. The Auto RAID parameters are: RAID5, 64KB
Chunk size, SID=0001.
4.2 Create New RAID: to create a new RAID volume manually. Here you need to
select RAID Members, RAID Mode, Chunk size and SID to create.
RAID Member: to select hard drives for the RAID set.
RAID Mode: the options are RAID0, RAID1 and RAID5
Chunk Size: to set the size of segment written to each disk in the logical RAID
drive.
SID: represents System Identify number. It helps you easily identify each
ARS-9050E.
4.3 Set Hot Spare: to set a hard drive as spare disk. Once a RAID5/RAID1 member
is damaged, the spare disk can replace it.
4.4 Delete RAID: to delete an existing RAID set.
4.5 Rename RAID: to change the SID of a RAID set.
5. System Setup
5.1 Rebuild Rate: ANS-9050E allows you to set rebuilding rate to balance the
foreground host-service tasks and background rebuilding process.
5.2 Cache Policy: like a normal hard drive, the ANS-9050E has a cache to speed
up data access by setting cache policy as write back. It can also be set as write
through mode for high data security applications.
5.3 Alarm Buzzer: to enable or disable alarm buzzer whenever a critical event
occurs.
5.4 S.M.A.R.T.: to enable or disable hard disk S.M.A.R.T. status polling. The range
of SMART polling time is from 1 to 720 hours. The default is 24 hours
5.5 Consistency Chk: to enable or disable the RAID consistency checking. The
consistency check represents a process that verifies all physical sectors of
14
RAID1 or RAID5 drives to make sure there is no bad sector in all drives.
Whenever a bad sector is found during consistency check, ANS-9050 will
automatically recover the data of the bad sector by reading the
redundant/parity disk. The range of consistency checking time is from 1 to 999
days. The default is 30 days.
5.6 Network Config: to set the IP address, Net Mask, Gateway and DNS Server for
you to manage the RAID status via the web browser.
5.7 Password: to enable or disable password protection. You can enable it with a
fourdigit number. The default is 0000.
Note: The password here is a protection for the usage of LCD management. It
is different to the one for Web management.
5.8 Stagger Power On: a transient current from spinning up all drives at once might
overload the power supply, damaging the power, drives or other system
components. However, ANS-9050E supports the Stagger Power On, which
allows the host to stagger the spin-up of all drives. New SATA drives also
support staggered spin-up to boost reliability. Staggered spin-up is useful in
managing multiple drives in a storage subsystem. It enables the host to spin up
the drives sequentially or in-group, allowing the drives to come ready at the
optimum time without straining the system power supply.
5.9 Standby Time: to set the time for system to return to standby mode.
5.10 Load Default: to reset all settings back to default.
Note: All settings including password and network configuration will be reset to
default value. And event logs will be erased, too.
5.11 Restart System: to restart the System.
6. Disk Setup
6.1 Identify Member: to show each hard drive’s role in the RAID set.
6.2 Identify Spare: to show the spare disk in the RAID set.
6.3 Identify Free: to show the free disk in the ANS-9050E.
7. Event Log
7.1 Display Log: to show all critical events in ANS-9050E.
7.2 Erase Log: to clear all events.
7.3 System Up Time: to show the amount of working hours since power on.
15
Section 4 The Status Indicators
There are many LED indicators in ANS-9050E. They represent the following statuses:
LCD Module
Indicators
Description
Power LED
Steady green: power on
Busy LED
Blinking green: data access
Fault LED
Steady red: RAID damaged / RAID uncreated
Blinking red: RAID degraded / fan failed / high temperature
RAID Subsystem
Indicators
RAID
Description
Steady green: power on
Controller
Power LED
HDD LED
1. No light: disk not detected / disk not installed
2. Steady amber: free disk / spare disk
3. Blinking green: disk access
4. Steady green: member disk
5. Blinking red: disk bad sector / disk SMART failed / data rebuilding
6. Steady red: disk damaged / disk removed
Note: The buzzer will beep when a problem occur. Press LCD key or mute button to
stop beeping, and examine in Event log.
16
Section 5 The Web Management Utility
ANS-9050E provides a web browser-based management utility, which allows you to
monitor the disk/RAID/hardware status in ANS-9050E. Furthermore, it allows you to update
firmware easily. Follow the instructions below for operating reference.
5.1 Login Management Utility
1. Give ANS-9050E a proper/available IP address via the LCD UI management.
2. Connect an Ethernet cable to the LAN port of ANS-9050E.
3. Open the web browser such as Windows Internet Explorer, Mozilla Firefox or
Macintosh Safari.
4. Enter http:// and [IP address] in the web browser.
5. Enter the password to login web management
(the default password is 000000)
Note: You must login as administrator with local admin rights on the remote machine to
configure ANS-9050E.
The login page:
After login, you will see functions such as Information, RAID Setup, System Setup, etc.
Refer to the following chapters for operating instructions.
17
5.2 Information
5.2.1 Disk Information
It is to show the details of each hard drive such as model, capacity, serial number,
firmware version, temperature, S.M.A.R.T status and membership.
5.2.2 RAID Information
It is to show the details of a RAID set such as: RAID status, RAID mode, RAID member,
hot spare disk, chunk size and system identify number (SID).
18
5.2.3 System Information
In System Information, it shows the model, serial number, RAID chipset revision,
ANS-9050E firmware, 4700 (web management) firmware revision, and cache policy.
5.3 RAID Setup
In RAID Setup, it allows you to enable/disable auto RAID function, create RAID and
delete RAID.
5.3.1 Auto RAID
After power on, ANS-9050E will search all free hard drives and ask for automatic RAID
creation. The Auto RAID parameters are:
RAID Member: 1, 2, 3, 4, 5 (all available HDDs)
RAID Mode: RAID 5
Chunk Size: 64KB
RAID Capacity: Maximum available size up to 2TB.
SID: 0001
PS: If the amount of available HDDs is less than 3, it will create RAID 0 instead.
19
5.3.2 Create RAID
To create a new RAID volume manually, you need to select RAID Members, RAID
Mode, Chunk size and SID to create.
PS: 2TB Limited function is to limit the RAID size within 2TB for operating systems
that do not support hard disk drive over than 2TB.
20
5.3.3 Delete RAID
It is to delete an existing array. Before deleting, please backup important data in RAID
disks.
5.4 System Setup
It allows you to set rebuild rate, cache policy, consistency check, network configuration,
password, restart system and restore default setting.
5.4.1 Rebuild Rate
ANS-9050E allows you to set rebuilding rate to balance the foreground host-service
tasks and background rebuilding process.
21
5.4.2 Cache Policy
Like a normal hard drive, the ANS-9050E has a cache to speed up data access by
setting cache policy as write back. It can also be set as write through mode for high
data security applications.
5.4.3 Consistency Check
The consistency check represents a process that verifies all physical sectors of RAID1
or RAID5 drives to make sure there is no bad sector in all drives. Whenever a bad
sector is found during consistency check, ANS-9050 will automatically recover the data
of the bad sector by reading the redundant/parity disk. The range of consistency
checking time is from 1 to 999 days. The default is 30 days.
22
5.4.4 Network Config.
It is to set the IP address, Net Mask, Gateway and DNS Server for you to manage the
RAID status via the web browser.
5.4.5 Change Password
The default password is 000000. You can change a new one by giving it a 6-12 digits.
Note: The password here is a protection for the usage of web management. It is
different to the one for LCD management.
23
5.4.6 Restore to Default setting
It is to reset all settings back to default.
Note: All settings including password and network configuration will be reset to default
value. And event logs will be erased, too.
5.4.7 Restart and Logout
To restart the ANS-9050E system and logout web management
24
5.5 Alert Setup
There are alarm buzzer, S.M.A.R.T. polling and alert email list settings in this function.
5.5.1 Alarm Buzzer
It allows you to enable or disable alarm buzzer whenever a critical event occurs.
5.5.2 SMART Polling
It allows you to enable or disable hard disk S.M.A.R.T. status polling. The range of
SMART polling time is from 1 to 720 hours. The default is 24 hours
25
5.5.3 Alert E-Mail List
The ANS-9050E provides an email notification function. Whenever a critical event
occurred, it will send a warning email to the given email address.
5.6 Event Log
It allows user to check events and its occurred time. It also allows user to erase event
logs by clicking “Erase All”.
26
5.7 Firmware Upgrade
Follow the procedures below to upgrade the firmware of ANS-9050E.
1. Click “Firmware Upgrade”.
2. Click “Browse...”and locate the firmware file.
3. Click “Submit” to upgrade firmware.
4. Wait until the progress ends.
5. Restart ANS-9050E to activate the new firmware.
27
Section 6 Quick Start
After hardware installation, let the RAID controller automatically create RAID array with
default setting, or create a new array with your own setting. There are step by step
procedures to show you how to create Auto RAID, create 5HDD RAID5, create 4HDD
RAID5 with 1 spare HDD, create 5HDD RAID0, create 2HDD RAID1, Delete RAID, disable
Auto Spare, set IP address, check HDD S.M.A.R.T status and check event logs.
6.1 Auto RAID creation sequence
1. Power on ANS-9050E. ANS-9050E is booting.
Booting...
2. Auto Create selection.
ANS-9050 RAID-?
Auto Create?(60)
3. Press ENT. It will create an array with the following parameters:
RAID Member: 1, 2, 3, 4, 5 (all available HDDs)
RAID Mode: RAID 5
Chunk Size: 64KB
RAID Capacity: Maximum available size up to 2TB.
SID: 0001
PS: If the amount of available HDDs is less than 3, it will create RAID 0 instead.
6.2 5HDD RAID5 creation sequence
1. Press ESC to cancel RAID auto creation mode.
ANS-9050 RAID-?
5 Disks! Setup?
2. Press ENT to setup.
Create New RAID
3. Press ENT to create a new RAID. The defaults Members are all available HDDs.
Press Down to continue.
RAID Members:
(1 2 3 4 5)
4. The default RAID Mode is RAID 5. Press Down to continue.
RAID Mode:
RAID-5
28
5. The default Chunk Size is 64KB. Press ENT to change chunk size or press Down to
continue.
Chunk Size:
(64KB)
6. The default SID is 0001. Press ENT to change SID or press Down to complete RAID
parameter setting.
SID:
(0001)
7. Press ENT to confirm or press ESC to cancel.
ANS-9050
Create?
RAID-5
8. The function “Force Size 2TB” is designed to limit the RAID size within 2TB for
operating systems that do not support hard disk drive over than 2TB. Press ENT
to confirm or press ESC to use full available capacity. If the total available capacity
is less than 2TB, this function will be hidden.
Force Size 2TB?
ENT:Yes, ESC:No
9. Press ENT to begin RAID initialize or press ESC to skip RAID initialize.
ANS-9050 RAID-5
SID:0001 Init?
6.3 4HDD RAID5 with 1 spare HDD creation sequence
1. Press ESC to cancel RAID auto creation mode.
ANS-9050 RAID-?
5 Disks! Setup?
2. Press ENT to setup.
Create New RAID
3. Press ENT to create a new RAID. The defaults Members are all HDDs.
RAID Members:
(1 2 3 4 5)
Press ENT to enter member selection.
29
RAID Members Sel
*1
Press Down to select HDD and press ENT to set/clear member HDD.
RAID Members Sel
5
Press Down to confirm page.
RAID Members Sel
Save & Exit?
Press ENT to save changes or ESC to cancel.
RAID Members Sel
(1 2 3 4)
4. The default RAID Mode is RAID5. Press ENT to continue.
RAID Mode:
(RAID-5)
5. The default Chunk Size is 64KB. Press ENT to change chunk size or press Down to
continue.
Chunk Size:
(64KB)
6. The default SID is 0001. Press ENT to change SID or press Down to complete RAID
parameter setting.
SID:
(0001)
7. Press ENT to confirm or press ESC to cancel.
ANS-9050
Create?
RAID-5
8. The function “Force Size 2TB” is designed to limit the RAID size within 2TB for
operating systems that do not support hard disk drive over than 2TB. Press ENT
to confirm or press ESC to use full available capacity. If the total available capacity
is less than 2TB, this function will be hidden.
Force Size 2TB?
ENT:Yes, ESC:No
30
9. Press ENT to begin RAID initialize or press ESC to skip RAID initialize.
ANS-9050 RAID-5
SID:0001 Init?
After that, the HDD1~HDD4 will be created as RAID5 members and HDD5 will be
automatically set as spare HDD.
6.4 5HDD RAID0 creation sequence
1. Press ESC to cancel RAID auto creation mode.
ANS-9050 RAID-?
5 Disks! Setup?
2. Press ENT to setup.
Create New RAID
3. Press ENT to create a new RAID. The defaults Members are all available HDDs.
Press Down to continue.
RAID Members:
(1 2 3 4 5)
4. The default RAID Mode is RAID5. Press ENT to enter RAID mode selection.
RAID Mode:
(RAID-5)
Press ENT to change RAID mode to RAID 0.
RAID Mode Sel:
0
Press Down to continue.
RAID Mode:
(RAID-0)
5. The default Chunk Size is 64KB. Press ENT to change chunk size or press Down to
continue.
Chunk Size:
(64KB)
6. The default SID is 0001. Press ENT to change SID or press Down to complete RAID
parameter setting.
SID:
(0001)
31
7. Press ENT to confirm or press ESC to cancel.
ANS-9050 RAID-0
Create?
8. The function “Force Size 2TB” is designed to limit the RAID size within 2TB for
operating systems that do not support hard disk drive over than 2TB. Press ENT
to confirm or press ESC to use full available capacity. If the total available capacity
is less than 2TB, this function will be hidden.
Force Size 2TB?
ENT:Yes, ESC:No
9. Press ENT to begin RAID initialize or press ESC to skip RAID initialize
ANS-9050 RAID-0
SID:0001 Init?
6.5 2HDD RAID1 creation sequence
1. Press ESC to cancel RAID auto creation mode.
ANS-9050 RAID-?
5 Disks! Setup?
2. Press ENT to setup.
Create New RAID
3. Press ENT to create a new RAID. The defaults Members are all available HDDs.
RAID Members:
(1 2 3 4 5)
Press ENT to enter member selection.
RAID Members Sel
*1
Press Down to select HDD and press ENT to set/clear member HDD.
RAID Members Sel
3
Press Down to confirm page.
RAID Members Sel
Save & Exit?
32
Press ENT to save changes or ESC to cancel.
RAID Members sel
(1 2)
4. The default RAID Mode is RAID0. Press ENT to enter RAID mode selection.
RAID Mode:
(RAID-0)
Press ENT to change RAID mode to RAID 1.
RAID Mode Sel:
1
Press Down to continue.
RAID Mode:
(RAID-1)
5. The default Chunk Size is 64KB. Press ENT to change chunk size or press Down to
continue.
Chunk Size:
(64KB)
6. The default SID is 0001. Press ENT to change SID or press Down to complete RAID
parameter setting.
SID:
(0001)
7. Press ENT to confirm or press ESC to cancel.
ANS-9050
Create?
RAID-1
8. The function “Force Size 2TB” is designed to limit the RAID size within 2TB for
operating systems that do not support hard disk drive over than 2TB. Press ENT
to confirm or press ESC to use full available capacity. If the total available capacity
is less than 2TB, this function will be hidden.
Force Size 2TB?
ENT:Yes, ESC:No
9. Press ENT to begin RAID initialize or press ESC to skip RAID initialize.
ANS-9050 RAID-1
SID:0001 Init?
After that, the HDD1 and HDD2 will be created as RAID1 members and HDD3~5
will be automatically set as spare HDDs.
33
6.6 Delete RAID sequence:
1. Under standby mode. Press ENT to enter main function.
Information
2. Press Down to Setup function.
Setup
3. Press ENT to enter Setup function.
RAID Setup
4. Press ENT to RAID Setup function.
Auto RAID
(Enabled)
5. Press Down twice to Delete RAID function.
Delete RAID
SID:0001
6. Press ENT to delete RAID.
Sure Delete?
ENT:Yes, ESC:No
7. Press ENT to confirm and RAID will be deleted.
[NOTE]
Del RAID Success
6.7 Disable Auto Spare sequence
1. Under standby mode, Press ENT to enter main function.
Information
2. Press Down to Setup function.
Setup
34
3. Press ENT to enter Setup function.
RAID Setup
4. Press ENT to RAID Setup function.
Auto RAID
(Enabled)
5. Press Down to Set Hot Spare function.
Set Hot Spare
(Auto Spare)
6. Press ENT to enter Set Hot Spare function.
Set Hot Spare
*Auto Spare
7. Press ENT to set/clear spare setting.
Set Hot Spare
Auto Spare
8. Press Down to confirm page.
Hot Spare Disks:
Save & Exit?
9. Press ENT to save changes.
Set Hot Spare
(No Spare Disk)
6.8 Set IP address sequence
1. Under standby mode, Press ENT to enter main function.
Information
2. Press Down to Setup function.
Setup
35
3. Press ENT to enter Setup function.
RAID Setup
4. Press Down to System Setup function.
System Setup
5. Press ENT to enter System Setup function.
Rebuild Rate
(Normal)
6. Press Down 5 times to Network Config function.
Network Config
7. Press ENT to enter Network Config function.
IP Address
192.168.0.1
8. Use ENT, Up, Down and ESC keys to set new IP.
New IP Address:
192.168.000.002
8-9. Press ENT to confirm changing.
IP Address
192.168.0.2
6.9 Check HDD S.M.A.R.T. Status sequence
1. Under standby mode, Press ENT to enter main function.
Information
2. Press ENT to enter Information function.
RAID Info
36
3. Press Down twice to Hard Disk Info function.
Hard Disk Info
4. Press ENT to enter Hard Disk Info function.
Select Disk Tray
1
5. Use Up and Down to select HDD and Press ENT to confirm.
Model ID:
WDC WD5000KS-00M
6. Press Down 5 times to check S.M.A.R.T. status.
S.M.A.R.T State:
Healthy
6.10 Check Event Log Sequence
1. Under standby mode, Press ENT to enter main function.
Information
2. Press Down twice to Event Log function.
Event Log
3. Press ENT to enter Event Log function.
Display Log
4. Use Up and Down to select event and press ENT to check detail
#003 99D23:59:59
NOTICE
DISK
Please check Appendix A for more information about event log.
37
Appendix A: Event Log
There are many events will be recorded in the ANS-9050E. According to the order of
severity of all events, they were discriminated into three levels, Notice, Warning and Error.
Those events were listed at the following table. Whenever a problem occurred, we can
check the event table to find the root cause and fix it or fill in the technical support form and
contact us for further help.
Level
Type
Item
UPDATE
Firmware Updated
HDD Too Small
DISK
HDD Inserted
HDD# Rebuild Start
HDD# Rebuild Complete
RAID
RAID Created
RAID Deleted
RAID Initial Start
RAID Initial Complete
Consistency Check Start
Consistency Check Complete
RAID Degraded
HWM
System Overheat 46
DISK
HDD# SMART Failed
HDD# Removed
HDD# Failed
HDD# Read Bad Sector (LBA address)
HDD# Write Bad Sector (LBA address)
HWM
Fan Failed
RAID
RAID Failed
Notice
Warning
Error
Event example:
Event number
Event level
Event occurred date and time after power on
#005 99D23:59:59
NOTICE
DISK
Press ENT for detail or ESC to go back
HDD3 Inserted
38
Event type
Appendix B: About RAID
RAID (Redundant Array of Independent Disks) is a system composed of many hard drives;
that is, multiple physical drives form a single virtual drive to be recognized by the system.
The advantages of RAID technology are increasing the read/write speed of a hard drive,
achieving better data protection, and enlarging the capacity of a single drive like Drive C,
Drive D, etc. Different classes of RAID have different composition modes and different
functions.
RAID 0 (Striping)
RAID 0 must be composed of a pair of hard drives at least. When data are written into the
whole hard drive, they will be equally striped and written into each hard drive of the array.
Thus the access speed becomes quicker. The effect of RAID 0 is proportioned to the
number of hard drives. More hard drives mean more read/write heads, and therefore the
speed is quicker. Though RAID 0 is quick in read/write speed, it has no data redundancy,
and accordingly has no fault tolerance.
It is suggested to compose RAID 0 with hard drives of the same capacity. Because the
capacity of striped disk array is the multiplication of the smallest hard drive capacity with the
number of hard drives. For example, a 100GB hard drive and two 120GB hard drives unite
into RAID 0. The total capacity is 300GB (100GB×3).
39
RAID 1 (Mirroring)
RAID 1 must be composed of hard drives in even number. The RAID controller will divide
the hard drives into a pair, and write data simultaneously into the two hard drives. The two
hard drives contain the same data. When one hard drive’s data are damaged, you can
replace the failed hard drive, and the RAID controller will restore the data by the backup on
the other hard drive. For a single hard drive RAID 1 is the best in fault tolerance.
It is suggested to compose RAID 1 with hard drives of the same capacity. Because the
capacity of mirrored disk array is that of the smallest hard drive. For example, a 100GB
hard drive and a 120GB one unite into RAID 1. The total capacity is 100GB.
40
RAID 5 (Striping with Rotating Parity)
RAID 5 must be composed of three hard drives at least. The parity data of RAID 5 are not
fixed in the same hard drive, but stored in every hard drive in turn. Accordingly, it is called
rotating parity. After the RAID controller calculates the parity checking data by XOR, the
parity checking data will be written into each hard drive along with data, so the overall
performance is slower than RAID 0. RAID 5 can provide higher fault tolerance.
It is suggested to compose RAID 5 with hard drives of the same capacity. The capacity of
striped disk array with rotating parity is the multiplication of the smallest drive capacity with
the number of drives minus one. For example, a 100GB hard drive and two 120GB hard
drives unite into RAID 5. The total capacity is 200GB (100GB×2).
41
Technical Support Form
Email: [email protected]
Website: http://www.2SAN.com
Model
ANS-9050E
F/W Version
Host System Configuration
Motherboard
BIOS version
SATA host adapter
Chipset
Other I/O cards
OS Revision
Hard drive configuration
No.
Model
Capacity
HDD1
HDD2
HDD3
HDD4
HDD5
Problem description:
42
Firmware