1
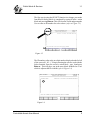
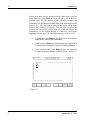
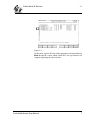
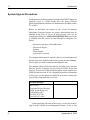
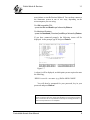
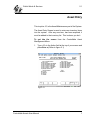
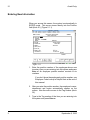
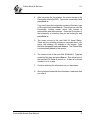
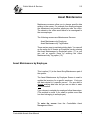
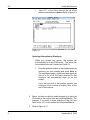
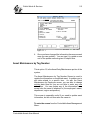
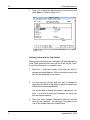
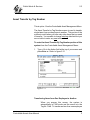
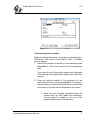
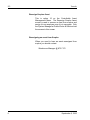
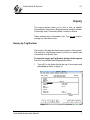
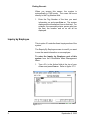
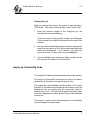
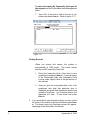
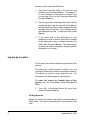
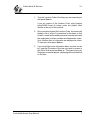
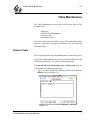
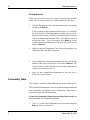
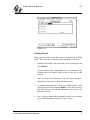
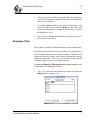
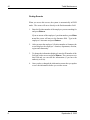
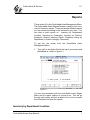
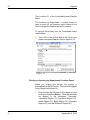
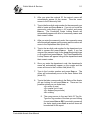
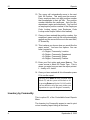
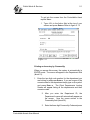
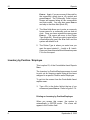
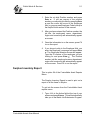
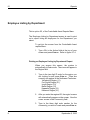
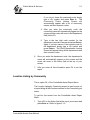
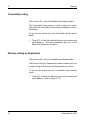
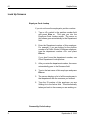
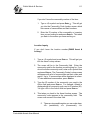
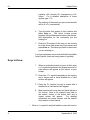
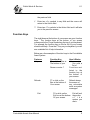
Public Works & Services
1.1
Introduction
In 1992 a Federal audit was conducted on government asset
management which examined the established rules and procedures
regulating assets and their detailed records or inventories. Asset
management in the GNWT was determined to be inadequate.
Included in this review was the capital assets inventory maintained by
the Department of Public Works and Services, which consisted of
government owned and leased buildings, works and facilities. The
Department's inventory was found to be incomplete, with individual
assets and classes of assets missing and inconsistent information on
those assets recorded. It was recommended that both the Departments
of Public Works and Services and Municipal and Community Affairs
examine the feasibility of developing a single comprehensive capital
assets management system, and the current inventory for all owned
and leased property be updated to include all pertinent details as
required by government policy.
In response to this recommendation, the Department of Public Works
and Services has developed the Capital Assets Management System
(CAMS). As part of this process the Departments of Municipal and
Community Affairs and Transportation, along with the N.W.T.
Housing Corporation were solicited for their input and requirements
in establishing a government wide asset system.
What is the Capital Assets Management System
The Capital Assets Management System or otherwise referred to as
CAMS, is a centralized mainframe system or application used to
administer the inventory information on all existing and new capital
assets acquired by the GNWT. In addition, CAMS contains two other
integrated components or modules which are used to administer
separate functions but have a direct relationship or link to capital
assets. These modules are the Lease Management System (LMS) and
the Controllable Assets System (CAS). The Lease system is used to
administer both the Expense and Revenue lease agreements initiated
by the Government of the Northwest Territories (GNWT). The
Controllable Assets system is used to administer the inventory of the
GNWT’s furniture and equipment. Although each of these modules
operate as part of the overall Capital Assets Management System,
their functions are not described as part of this document but are
Controllable Assets User Manual
1
1.1
Introduction
supported in separate manuals.
CAMS, as with all systems, has several features which have been
designed to assist Users in preforming specific tasks along with
navigating through the various functions of the system. These support
functions are described as follows;
System Support Features
Function Keys
Each screen in CAMS has a set of predefined function keys which
may be used instead of typing various commands. These function
keys help simplify the system and eliminate additional keystrokes.
For consistency, the left most keys do not change and the right most
keys vary according to the functions which can be performed on the
current screen. For example, the F1 key is always the "Help" key. To
use a function key, press the keyboard function key (F1, F2...)
corresponding to the system function or, if you have a mouse, click
on the key displayed on the screen.
Help Keys
At any point in the system, whether it be in the action block of a
screen or the entry block of a data item ,on-line help is always
available. The help available from this system is in two formats. The
first being a one line help message which is displayed at the bottom
of screen which provides a very brief description of the input required
or indicate system look up screens are available. To display the one
line help, message press the question mark (?) key. The second
option is a full screen help message which will usually display a more
comprehensive explanation of exactly what the system is expecting
or will accept from you as input. To display the full screen help
message press the question mark (??) key twice.
Moving Backwards
The reverse slash key (\) may be used to move backward from one
field to the previous one. Entering \ in a field and pressing return will
delete the field contents and move the cursor to the previous field.
2
September 6, 2000
Public Works & Services
1.1
Lookup Screens
Lookup screens are a feature of the system which allows a User to
make a selection from a system table or file. It allows for data to be
validated during the data entry process and ensures information is
recorded consistently for later use with system Inquiry and Reporting
functions. Data items in the system which have system Lookup
screens available will always be identified in the on-line help
messages. To access or initiate a Lookup screen, enter "$" in the field
and press Enter #. The screen will blank and a list of the choices
will be displayed (refer to Figure 1.1).
Figure 1.1
If there are more choices or selections available than will fit on one
screen, press Enter # to see the next screen. To make a choice, type
the ID number in the Action block (two digit number to the far left of
the screen) of the record to be selected and press Enter # . Once a
selection has been made the Lookup screen will clear and you will be
returned to the screen which initiated the Lookup function and the
selected value will be displayed.
Controllable Assets User Manual
3
1.1
Introduction
Select Function
The select function is an option available to users from the action
block of most system screens, but in most cases would be used with
the inquiry and lookup screens. The purpose of this function is to
allow users to select additional criteria for the system to compare
against in locating and retrieving data records. This function will
prompt Users for selection values and then retrieve and display all
records matching or meeting the criteria selected. The following
example will illustrate how this function is used.
When you first initiate or start a system Lookup you will be placed
in the action block of the Lookup screen and all associated records
will be displayed. You will note from the upper left corner of the
screen (refer to Figure 1.2) the system is in a mode defined as FIND,
which is displayed on the screen as “F”.
Figure 1.2
4
September 6, 2000
Public Works & Services
1.1
The first step in using the SELECT function is to change your mode
from Find to Select which is completed by typing S in the action
block and pressing Enter #. This will clear the screen and prompt the
User to enter an ID number for select values. (refer to Figure 1.3)
Figure 1.3
The ID number refers to the two digit number displayed at the far left
of the screen (01, 02...) To begin entering the criteria used with the
Select function, from the screen’s action block , type 1 and press
Enter # . This will place you in the entry block identified as Code
which is adjacent the ID code 01 (refer to Figure 1.4)
Figure 1.4
Controllable Assets User Manual
5
1.1
Introduction
At this point there are two options available, either type a value to
select against or press Enter # which will place you in the next
available field. For the purpose of the following example the
community code assigned to Norman Wells is the information being
searched for. Since the code is unknown the search will be done
based on the community description. The first step is to place the
cursor in the entry block of that field. To locate and display all
communities in the system having a Community Description
beginning with the letter ”N”, the following steps would be used.
1.
Type N@ and press Enter #. (The @ key serves as a wildcard
similar to the * used in DOS commands).
2.
Continue to press Enter # until placed back in the action block
or press the forward slash key twice (//) followed by Enter #.
3.
From the action block, press Enter # which will display all
records matching the selection. (Refer to Figures 1.5 and 1.6)
Figure 1.5
6
September 6, 2000
Public Works & Services
1.1
Figure 1.6
At this point, type the ID code of the appropriate selection and press
Enter # and the screen which called the Look up function will
reappear displaying the selected value.
Controllable Assets User Manual
7
1.1
Introduction
System Sign-on Procedures
For the purposes of this document it is assumed all GNWT employees
requiring access to CAMS already have the proper software
(Reflections/Minisoft) and lines of communication available to their
PC or MAC.
Before an individual can sign-on to one of the Government
Mainframe Computer systems the proper authorization must be
obtained in the form of a User Id and password. This can be
completed by filling in a USER UPDATE REQUEST form which
is available from the system Account Manager or designate (see
below).
- First name, last name, and middle initial
- Division or Region
- Position
- Phone number
- System to be accessed
The completed form must be signed by the new user and authorized
by their Supervisor, and forwarded to the system Account Manager.
Faxed copies are valid if outside the Headquarters area.
The completed form will be forwarded to the Supervisor, Customer
Services Section, Computer Services Division, Public Works and
Services. The new user will be notified by phone to pick up their new
USER-ID and Password. If it is a Regional request this information
will be given over the phone and followed up by mail. Usually this
process takes from three days to a week.
Account Manager
Steve Lewis
Corporate Services Division
Public Works & Services
Yellowknife, NWT
Tel (403) 873-7506
Fax (403) 873-0100
Upon complying with each of these steps, you are now ready to
sign on to the Capital Assets Management System. To do so, you
8
September 6, 2000
Public Works & Services
1.1
must initiate or start Reflections/Minisoft. You can then connect to
the Starmaster system in one of two ways, depending on the
microcomputer your are using.
For IBM compatible PC's;
- press the Ctrl and Break keys followed by Enter #.
For Macintosh Systems;
- press the Command (Cloverleaf) and B keys followed by Enter #.
If you have connected properly, the following screen will be
displayed. At the prompt, type C and press Enter #.
Figure 1.7
A colon (:) will be displayed, at which point you are required to enter
the following;
HELLO <user id>.<account> (e.g.) Hello ABC0.CAMSP
You will then be prompted for your password, key in your
password and press Enter #.
NOTE: All Users are required to have their own password. There are different levels of
security connected to each User, therefore the distribution of one’s password to another
User is not allowed. The use of pre-defined Function keys for encoding passwords is a
serious security breach and is not acceptable.
Controllable Assets User Manual
9
Public Works & Services
2.1
Asset Entry
This is option 10, in the Asset/Maintenance part of the System.
The Asset Entry Screen is used to enter new inventory items
into the system. After any new item, has been acquired, it
must be added to the inventory list. This is where you do it.
To get into the screen from the Controllable Asset
Management Menu:
1. Type <10> in the Action field at the top of your screen and
press Enter # (Refer to figure 2.1)
Figure 2.1
Controllable Assets User Manual
1
2.1
Asset Entry
Entering New Information
When you access this screen, the system is automatically in
ENTER mode. This cursor moves directly into the Position
field (block 01). (Figure 2.1.1)
Figure 2.1.1
1. Enter the position number of the employee whose new
inventory item you are entering into the system and press
Enter #. An employee position number consists of six
numbers
If you don’t know the employee’s position number, see
Employee Code Lookup in Helpful Hints at the end of
this manual.
2. After you enter the position number, the employee’s name,
department and region automatically appear on the
screen. Now the cursor moves to the Tag number (block
02).
3. Type in the Tag number of the item you are entering into
the system and press Enter #.
2
September 6, 2000
Public Works & Services
2.1
4. After you enter the tag number, the cursor moves to the
Commodity # field (field 03). Type in the commodity # and
press Enter #.
If you don’t know the commodity number of this item, type
a <$> symbol and press Enter #. This will get you into the
Commodity Lookup screen which lists names of
commodities and their numbers. Enter the ID number of
the commodity or inventory item you are looking for and
press Enter #.
5. The cursor moves to the next field 04, Asset Status.
There are four possible entries you can make here, <A>
active, <M> missing, <D> dispose or <S> surplus. Type
the letter that applies and press Enter #. The Status Date
is automatically added to the system.
6. The cursor moves to the next field, 05 Model #. Type the
model # of the item and press Enter #. This will get you to
the next field, 06 Serial #, and so on. If there is no model
number, it is ok to skip.
7. Continue entering the information as you have been.
8. Once you have entered all the information, make sure that
you save it.
Controllable Assets User Manual
3
Public Works & Services
2.2
Asset Maintenance
Maintenance screens allow you to change specific data
relating to the screen. For example if an employee leaves
the department and another employee uses the office.
The assets in the office would have to be reassigned to
the new employee.
The following screens are Maintenance Screens:
Asset Maintenance by Employee
Asset Maintenance by Tag Number
There are two ways to maintain existing data. You can call
up the entire list of Assets an Employee has by entering
the Asset Maintenance by Employee option (11) or you
can call up specific items by entering the Asset
Maintenance by Tag option (12).
Asset Maintenance by Employee
This is option (11) in the Asset Entry/Maintenance part of
the system.
The Asset Maintenance by Employee Screen is used to
update the inventory for a specific employee. It lets you
edit data related to a specific person. You are able to
change existing data here but you are not able to enter
new information.
If you choose to maintain by employee follow these steps:
(This method is useful if you need to update more than
one item belonging to an employee).
To enter the screen from the Controllable Asset
Management Menu:
Controllable Assets User Manual
1
2.2
Asset Maintenance
1. Type <11> in the Action field at the top of the
menu screen and press Enter # Refer to figure 2.2
Figure 2.2
Updating Information by Employee
When you access this screen, the system will
automatically be in the FIND mode. The cursor will
move directly into the Position field (field 01).
1. Enter the position number of the employee whose
inventory you are updating and press Enter #.
The employees name, department and region as
well as a list of all the items attached to that
employee will automatically show up on the
screen.
If you are not sure of the position number see
Employee Code Lookup in Helpful Hints at the
end of this manual.
2. Select the item you wish to make changes to by typing its
ID number in the Action field and pressing Enter #. For
example, if you want to make changes to the first item
listed, enter <01> in the action field and press Enter #.
3. Refer to figure 2.2.1
2
September 6, 2000
Public Works & Services
2.2
Figure 2.2.1
4. Once you have changed the information there are several
ways you can update it. You can type U to update or use
one of the update methods given in helpful hints.
Asset Maintenance by Tag Number
This is option 12, in the Asset Entry/Maintenance portion of the
system.
The Asset Maintenance by Tag Number Screen is used to
update the information on a selected asset. It enables you to
edit data related to a specific item. As with the Asset
Maintenance by Employee screen, you are able to change
existing data here but you are not able to enter any new
information. You can update any of the information here,
except who the asset is attached to (the employee’s name,
department, region and position).
This screen is especially useful if you need to update asset
information, but do not know who the owner is.
To enter the screen from the Controllable Asset Management
Menu:
Controllable Assets User Manual
3
2.2
Asset Maintenance
1. Type <12> in the Action field at the top of your screen and
press Enter #. Refer to figure 2.2.2.
Figure 2.2.2
Updating Information by Tag Number
When you access this screen, the system will automatically be
in the FIND mode and the cursor will be in the Tag No. Field.
To see the information on a specific item:
1. Enter the 11 digit tag number of the item you wish to
access and press Enter #. All the information about that
item will be displayed on the screen.
2. You may now go into any field you wish to change by
typing the ID number of the field you wish to access in the
action field and pressing Enter #.
You are not able to change the position, department, etc
here. If you need to make such changes you should go
into the transfer screens.
3. Once you have changed information there are several
ways you can update it. You can type U to update or use
one of the update methods in helpful hints.
4
September 6, 2000
Public Works & Services
2.3
Transfer
The transfer screens allow you to transfer inventory to another
person, location or to/from surplus. Transfers between
departments are not common, but are possible.
The following screens are Transfer screens:
Asset Transfer by Employee
Asset Transfer by Tag Number
Asset Transfer to Surplus
Asset Transfer by Employee
This is option 13 of the Controllable Asset Management Menu.
The Asset Transfer by Employee screen is used to transfer all
or individual inventory items from one employee to another
employee.
To enter the screen from the Controllable Asset Management
Menu:
1. Type <13> in the Action field at the top of your screen and
press Enter #. Refer to figure 2.3
Figure 2.3
Controllable Assets User Manual
1
2.3
Transfer
Transferring Items from One Employee to
Another
When you access this screen, the system is
automatically in FIND mode. The cursor is in the
From Employee field. To transfer items from one
employee to another:
1. Enter the position number of the employee whose
items you are transferring and press Enter #. The
cursor moves to the To Employee field.
If you are not sure of the position numbers see
Employee Code Lookup in Helpful Hints in the last
section of this manual.
2. Enter the position number of the employee you
are transferring items to and press Enter #. The
first and last name of the employee whose items
you are transferring from, their division name and
a complete list of their items will be displayed on
the screen.
3. If you want information on a particular item, such
as its commodity number, enter the ID number of
the item you choose in the Action field and press
Enter #. An asterisk (*) will appear beside the tag
number of the item you choose. (If you enter the
wrong ID number simply enter it once more and
the asterisk will disappear). Enter the letters
<DLT> in the Action field and press Enter #. This
will bring up the Asset Inquiry by Employee screen
that will display any information about the item you
may need.
4. Once you have changed information there are
several ways you can update it. You can type U
to update or use one of the methods given in
helpful hints.
2
September 6, 2000
Public Works & Services
2.3
Asset Transfer by Tag Number
This is option 14 on the Controllable Asset Management Menu.
The Asset Transfer by Tag Number screen is used to transfer
single items from one employee to another. This portion of the
system is useful when you have only a few items that you need
to transfer. You are able to change existing data here but you
are not able to enter any new information.
To enter the Asset Transfer By Tag Number portion of this
system from the Controllable Asset Management Menu:
1. Type <14> in the Action field at the top of your screen and
press Enter #. Refer to figure 2.3.1
Figure 2.3.1
Transferring Items from One Employee to Another
When you access this screen, the system is
automatically in FIND mode and the cursor is in the
Tag No. Field. To transfer an item from one employee
Controllable Assets User Manual
3
2.3
Transfer
to another:
1. Enter the tag number of the item you will be
transferring and press Enter #. The cursor will
move to the To Employee field.
If you are not sure of the position number see
Employee Code Lookup in the Helpful Hints at the
end of this manual.
2. Enter the position number of the employee you
are transferring the item to and press Enter #.
The first and last name of the employee whose
item you are transferring, the name of the
employee you are transferring the item to, their
division, name and all the information on the item
will be displayed on the screen.
3. Once you have changed information there are
several ways you can update it. You can type U
to update or use one of the methods given in
helpful hints.
Asset Transfer to Surplus
This is option 15 on the Controllable Asset
Management Menu.
The Asset Transfer to Surplus screen is used to
transfer items that are no longer in use.
To enter the screen from the Controllable Asset Management
Menu:
1. Type <15> in the Action field at the top of your screen and
press Enter #. Refer to figure 2.3.2
4
September 6, 2000
Public Works & Services
2.3
Figure 2.3.2
Transferring Items to Surplus
When you access this screen, the system is automatically in
FIND mode. The cursor is in the Tag No. Field. To transfer
items to surplus:
1. Enter the tag number of the item you are transferring and
press Enter #. The cursor moves to the From Employee
field.
If you are not sure of the position number see Employee
Code Lookup in the Helpful Hints chapter at the end of this
manual.
2. Enter the position number of the employee you are
transferring the item from and press Enter #. The name of
the employee you are transferring the item from and all the
information on the item will be displayed on the screen.
3. Once you have changed information there are
several ways you can update the information.
You can type U to update or use one of the
update methods given in helpful hints.
Controllable Assets User Manual
5
2.3
Transfer
Reassign Surplus Asset
This is option 16 on the Controllable Asset
Management Menu. The Reassign Surplus Asset
screen is used to remove an item from surplus and
assign it to an employee once it is in use again. Only
the System Manager at Public Works & Services has
the access to this screen.
Reassigning an asset from Surplus
When you need to have an asset reassigned from
surplus you should contact:
Warehouse Manager @ 873-7175
6
September 6, 2000
Public Works & Services
3.1
Inquiry
The inquiry screens allow you to find or look up specific
information by Tag number, Employee name, position number,
Commodity code, Commodity Alias, Location or Status.
These screens are for information only. You can not enter or
change any information here.
Inquiry by Tag Number
This is option 20 under the Asset Inquiry section of the system.
The Inquiry by Tag Number screen is used if you want to see
information on a specific item.
To enter the Inquiry by Tag Number portion of this system
from the Controllable Asset Management Menu:
1. Type <20> in the Action field at the top of your screen and
press Enter #. Refer to figure 3.1
Figure 3.1
Controllable Assets User Manual
1
Finding Records
When you access this screen, the system is
automatically in FIND mode. The cursor will move
directly to the Tag Number field.
1. Enter the Tag Number of the item you want
information on and press Enter #. The system
displays all the information it has on that item. For
example, the commodity status, person who has
the item, the location and so on will all be
displayed.
Inquiry by Employee
This is option 21 under the Asset Inquiry section of the
system.
The Enquiry By Employee screen is used if you want
to see the asset information on an employee.
To enter the Inquiry by Employee part of this
system from the Controllable Asset Management
Menu:
1. Type <21> in the Action field at the top of your
screen and press Enter #. Refer to figure 3.1.2
Figure 3.1.2
2
September 6, 2000
Public Works & Services
3.1
Finding Records
When you access this screen, the system is automatically in
FIND mode. The cursor moves directly to the Position field.
1. Enter the position number of the employee you are
searching for and press Enter #.
If you are unsure of the position number, see Employee
Code Lookup in the Helpful Hints section at the end of this
manual.
2. Once you have entered the position number or employee’s
name into the system, a list of all the items that employee
holds will be displayed. Up to thirteen (13) items are
shown at a time. To see more lines, press Enter #.
3. If you would like to see information about one item on the
list, enter its ID number in the Action field.
Inquiry by Commodity Code
This is option 22 under the Asset Inquiry section of the system.
The Inquiry by Commodity Code screen is used if you want a
detailed list of information on specific type of item.
The system then automatically lists the names of all of them
Example: If you want to know where all the clothes irons in the
department are, you would enter the commodity code for
clothes irons <G11>. This will show all employees with clothes
irons, their department number and the Tag number attached
to each iron.
This screen is used only for inquiry purposes, no information
can be changed or entered here.
Controllable Assets User Manual
3
To enter the Inquiry By Commodity Code part of
this system from the Controllable Asset Management
Menu:
1. Type <22> in the Action field at the top of you
screen and press Enter #. Refer to figure 3.1.3
Figure 3.1.3
Finding Records
When you access this screen, the system is
automatically in FIND mode. The cursor moves
directly to the Commodity Code field.
1. Enter the Commodity Code of the item you are
searching for and press Enter #. If you are unsure
of the Commodity Code, see Commodity Code
Lookup under Helpful Hints in the last section of
this manual.
2. Once you give the commodity alias, a list of all
employees who hold that particular item is
displayed, along with their department and the tag
number of their item. Up to thirteen names are
displayed at a time. To see more lines press
Enter #.
3. If you would like to see information about one item on the
list, enter its ID number in the Action field and press Enter
#. The Asset Inquiry by Employee screen will appear,
displaying all the information on the item.
4
September 6, 2000
Public Works & Services
3.1
Inquiry by Commodity Alias
This is option 22 under the Asset Inquiry section of the system.
If you are looking for information on an item and you don’t
know the commodity code or the tag number, this section of
the system will be very useful to you. Inquiry by commodity
alias allows you to look for items by using the item’s familiar
name.
This section is used only for inquiry purposes, no information
can be changed or entered here.
To enter the Inquiry by Commodity Alias part of this
system from the Controllable Asset Management Menu:
1. Type <23> in the Action field at the top of your screen and
press Enter #. Refer to figure 3.1.4
Figure 3.1.4
Fin
ding Records
When you access this menu, the system is
automatically in FIND mode. The cursor moves
Controllable Assets User Manual
5
directly to the Commodity Alias field.
1. Type the Commodity Alias of the item you are
searching for and press Enter #. For example, if
you are looking for information on clothes irons
you can type <Iron> in the Commodity Alias field
and press Enter #.
2. Once you give the commodity alias, a list of all the
employees who hold the item will be displayed,
along with their position number, department and
the tag number of the item. Up to fourteen names
are displayed at a time. To see more lines, press
Enter #.
3. If you would like to see information on one
employee or item on the list, enter the ID number
of the employee or item you wish to access in the
Action field and press Enter #. The Asset Inquiry
by Employee screen will appear, displaying all the
information on the item.
Inquiry by Location
This is option 24 under the Asset Inquiry section of the
system.
The Inquiry by Location screen is useful if you are
looking for information on items in a particular location.
This screen is used for inquiry purposes only. No
information can be changed or entered here.
To enter the Inquiry by Location part of this
system from the Controllable Asset Management
Menu:
1. Type <24> in the Action field at the top of your
screen and press Enter #.
Finding Records
When you access this screen, the system is automatically in
FIND mode. The cursor moves directly to the Location Code
field.
6
September 6, 2000
Public Works & Services
3.1
1. Type the Location Code of the items you are searching for
and press Enter #.
If you are unsure of the Location Code, read Location
Iquiry/CAMS Asset # Lookup under the Helpful Hints
section at the end of this manual.
2. Once you have entered the Location Code, the screen will
display a list of all the Tag numbers for the items in that
location, as well as the employees who have the items and
the employees’ position numbers and department codes.
Up to fourteen lines of information are displayed at a time.
To see more lines press Enter #.
3. If you would like to see information about one item on the
list, type the ID number of the item you wish to access in
the Action field and press Enter #. The Asset Inquiry by
Employee screen will appear, displaying all the information
on the item.
Controllable Assets User Manual
7
Public Works & Services
4.1
Table Maintenance
The Table Maintenance screens allows you to enter, edit or view
detailed lists of:
Employees
Divisions in the Department
Locations, and
Commodity Codes.
All users of this system are able to look at the information listed,
however, only those with special authority can enter and edit
information here.
Division Table
This is option 30 under the Table Maintenance section of the system.
The Division Maintenance screen is used to maintain division codes
within the departments. It is used for reporting purposes.
To enter the Division Maintenance part of this system from the
Controllable Asset Management Menu:
1.. Type <30> in the action field at the top of your screen and press
Enter #. Refer to figure 4.1.1.
Figure 4.1.1
Controllable Assets User Manual
1
4.1
Table Maintenance
Finding Records
When you access this screen, the system is automatically in FIND
mode. The cursor moves directly to the Department Code field.
1.
Type the Department Code of the department you are searching
for and press Enter #.
If you are unsure of the Department Code, enter a <$> symbol in
the field and the Client Departments Lookup screen will be
displayed with a listing of all the Government of the Northwest
Territories Departments and their codes. Up to fifteen items will
be listed at a time. To see more lines, press Enter #. In the
Action field type the ID number of the item you wish to access
and press Enter #.
2.
After you enter the Department Code, the screen displays a list
of division codes and their description.
3.
If you would like to change information on an item, enter the ID
number of the field you wish to access and press Enter #. The
cursor will move to that field and you can edit the information (if
you have the authority to do so).
4.
Once you have changed the information be sure you save it
before you exit this screen.
Commodity Table
This is option 31 under the Table Maintenance section of this system.
The Commodity Maintenance screen is used to maintain information
on a commodity’s description, alias or depreciation. This screen is
also used to enter and edit information.
To enter the Commodity Maintenance portion of this system from
the Controllable Asset Management Menu:
1.
2
Type <31> in the Action field at the top of your screen and press
Enter #. Refer to figure 4.1.2.
September 6, 2000
Public Works & Services
4.1
Figure 4.1.2
Finding Records
When you access this screen, the system is automatically in FIND
mode. The cursor moves directly to the Commodity Code field.
1.
Enter the Commodity Code of the item you are searching for and
press Enter #.
If you are unsure of the Commodity Code, see Commodity Code
Lookup under the Helpful Hints section at the end of this
manual.
2.
After you enter the Commodity Code, the screen displays a
description of the item, it’s alias and depreciation.
3.
To change information on an item, type the ID number of the
field you wish to access and press Enter #. The cursor moves to
that field and you can edit the information (if you have the
authority to do so).
4.
Once you have changed the information, make sure you update
or save the information before you exit the screen.
Controllable Assets User Manual
3
4.1
Table Maintenance
Location Table
This is option 32 under the Table Maintenance section of this system.
The Location Maintenance screen is used to maintain or update
information on locations codes and their descriptions.
To enter the Location Maintenance part of this system from the
Controllable Asset Management Menu:
1.
Type <32> in the Action field at the top of your screen and press
Enter #. Refer to figure 4.1.3.
Figure 4.1.3
Finding Records
When you access this screen, the system is automatically in FIND
mode. The cursor moves directly to the CAMS Asset # field.
1.
Type the Asset number you are searching for and press Enter #.
If you are unsure of the number, see Location Inquiry/CAMS
Asset Number Lookup under the Helpful Hints section at the end
of this manual.
4
September 6, 2000
Public Works & Services
4.1
2.
After you enter the CAMS Asset number, the screen displays a
list of location numbers and descriptions that correspond to the
item you are looking for.
3.
To change information on an item, type the ID number of the
field you wish to access and press Enter #. The cursor will
move to that field and you can edit the information (if you have
the authority to do so).
4.
Once you have changed the information, ensure that you save it
before you exit the screen.
Employee Table
This is option 33 under the Table Maintenance section of this manual.
The Employee Maintenance screen is useful if you are looking for, or
wish to change information on a specific employee. This screen will
display an employees position, name, location, department, division,
region and community. This screen may be used to enter and edit
information only if you have the proper authority.
To enter the Employee Maintenance part of this system from the
Controllable Asset Management Menu:
1.
Type <33> in the Action field at the top of your screen and press
Enter #. Refer to figure 4.1.4.
Figure 4.1.4
Controllable Assets User Manual
5
4.1
Table Maintenance
Finding Records
When you access this screen, the system is automatically in FIND
mode. The cursor will move directly to the Position number field.
1.
Enter the Position number of the employee you are searching for
and press Enter #.
If you are unsure of the employee’s position number, press Enter
# and the cursor will move to the Surname field. Type in the
employee’s last name and press Enter #.
6
2.
After you enter the employee’s Position number or Surname, the
screen displays the employee’s location, department, division,
region and community.
3.
To change the information displayed, enter the ID number of the
field you wish to access and press Enter #. The cursor moves to
that field and you can edit the information (if you have the
authority to do so).
4.
Once you have changed the information ensure that you update
or save the information before you exit the screen.
September 6, 2000
Public Works & Services
5.1
Reports
This is option 40, in the Controllable Asset Management Menu.
The Controllable Asset Reports Screen is used to print out or
view full inventory reports. There are several different reports
you can access according to the information you want. You
can view or print reports on : Inventory by Department/
Location, Inventory by Commodity, Inventory by Position/
Employee, Surplus Inventory Report, Employee Listing by
Department, Location Listing by Community.
To get into the screen from the Controllable Asset
Management Menu:
1. Type <40> in the Action filed at the top of your screen and
press Enter #. Refer to figure 5.1
Figure 5.1
You are now presented with the controllable Asset Report
Menu and six report options to choose from. We will go
through each option and look at what it is for, how to access
the information and print the reports.
Inventory by Department/ Location
Controllable Assets User Manual
1
5.1
Reports
This is option 01, of the Controllable Asset Reports
Menu.
The Inventory by Department / Location screen is
used to print out an Inventory report listing all the
items in a specific Department and/or location.
To get into the screen from the Controllable Asset
reports Menu:
1. Type <01> in the Action field at the top of your
screen and press Enter #. Refer to figure 5.1.2
Figure 5.1.2
Printing an Inventory by Department/ Location Report
When you access this screen, the system is
automatically in ENTER mode. The cursor will appear
in the Region field (block 01).
1. Enter the two digit ID code for the region you are
looking for and press Enter #. There are currently
six regions in the Northwest Territories:
Yellowknife Region (11), Fort Smith Region (21),
Inuvik Region (31), Baffin Region (41), Keewatin
Region (51) and the Kitikmeot Region (61).
2
September 6, 2000
Public Works & Services
5.1
2. After you enter the regional ID, the region’s name will
automatically appear on the screen. Now the cursor
moves to the Community field.
3. Type in the three digit code number for the community you
wish to locate and press Enter #. If you do not know the
community code simply type a <$> symbol and press
Enter #. The Community Codes Lookup Screen will
automatically appear with a list of community names and
their numeric codes.
4. After you enter the community code, the community name
will automatically appear on the screen and the cursor will
move to the Department field (block 02).
5. Type in the two digit code number for the department you
wish to access and press Enter #. Again, if you are
unsure of the numeric code for the department simply type
a <$> symbol and press Enter #. The Client Departments
Lookup Screen will appear listing all the departments and
their numeric codes.
6. Once you enter the department code, the department’s
name will automatically appear on the screen and the
cursor will move to the Location field (block 03).
7. Type in the Location number and press Enter #. The
cursor will automatically move to the Asset Status field
(block 05).
8. Type in the letter corresponding to the Status of the Assets
you are looking for and press Enter #. There are four
possible entries you can make here;
<A> active (in use)
<S> surplus (not in use)
<D> dispose (beyond use)
<M> missing.
9. The cursor moves to the next field, 05 Tag No.
Type the Tag number of the item you are looking
for and press Enter # OR if you wish to access all
the items simply press Enter # and all items will
be selected for the report.
Controllable Assets User Manual
3
5.1
Reports
10. The cursor will automatically move to the next
field, 06 Position. This entry must be numeric.
Every employee has a six digit position number
that corresponds to their job title. The position
number identifies the employee , their job title,
department, region and community. You can find
an employee’s position number in the Employee
Code Lookup screen (see Employee Code
Lookup under Helpful Hints in this manual).
11. Once you have entered the position number, the
employee’s name and job title will automatically
appear and the cursor will move to the next field,
07 Sorted By.
12. This is where you choose how you would like the
report sorted. You have four options. You can
have it sorted by:
<1> Region, Community, Location
<2> Region ,Community, Department
<3> Region, Community, Status
<4> Region, Community, Position.
13. Enter your Sort option and press Enter #. The
cursor moves to block 08, Printer Type. This is
where you enter how you want the report printed:
L - locally or B - batch.
14. Once you have entered all this information press
F4 to run the report.
You may press Enter # at the Location field
(block 03) and the system will default to all.
By pressing Enter # at blocks 03,04, 05 and 06
you may default to all of the assets within your
department in a specific Region/Community.
Inventory by Commodity
This is option 02, of the Controllable Asset Reports
Menu.
The Inventory by Commodity screen is used to print
out an Inventory report listing all the items
4
September 6, 2000
Public Works & Services
5.1
To get into the screen from the Controllable Asset
reports Menu:
1. Type <02> in the Action field at the top of your
screen and press Enter #.Refer to figure 5.1.3
Figure 5.1.3
Printing an Inventory by Commodity
When you access this screen, the system is automatically in
ENTER mode. The cursor will appear in the Department field
(block 01).
1. Enter the two digit code number for the department you
are looking for and press Enter #. If you are unsure of the
numeric code for the department simply type a <$> symbol
and press Enter #. The Client Departments Lookup
Screen will appear listing all the departments and their
numeric codes.
2. After you enter the Department ID, the
Department’s name will automatically appear on
the screen. Now the cursor moves to the
Commodity field (block 02).
3. Enter the three digit Commodity Code and press
Controllable Assets User Manual
5
5.1
Reports
Enter # . Again, if you are unsure of the code for
the commodity, simply type a <$> symbol and
press Enter #. The Commodity Code Lookup
Screen will appear listing all the commodities
and their codes. You may also press Enter #
and skip to the Alias field (block 03).
4. The Alias field allows you to enter a commonly
known name for a commodity such as desk or
chair. Once you have entered the name press
Enter # . The cursor will move to the Printer
Type (block 04). Should you wish to print all the
commodities skip past the Alias field and the
system will default to all.
5. The Printer Type is where you enter how you
want the report printed: L - locally or B - batch.
Once you have entered all this information press
F4 to run the report.
Inventory by Position / Employee
This is option 03, of the Controllable Asset Reports
Menu.
The Inventory by Position/Employee screen is used
to print out an Inventory report listing all the items
assigned to a specific Position and/or Employee.
To get into the screen from the Controllable Asset
reports menu:
1. Type <03> in the Action field at the top of you
screen and press Enter #. Refer to figure 5.1.4.
Printing an Inventory by Position/Employee
When you access this screen, the system is
automatically in ENTER mode. The cursor will
appear in the Position field.
6
September 6, 2000
Public Works & Services
5.1
1. Enter the six digit Position number and press
Enter #. If you are unsure of the position
number you may skip this field by pressing Enter
#, and the cursor will move to the Employee
field, or you may see Employee Code Lookup in
the Helpful Hints section of this manual.
2. After you have entered the Position number, the
job title, the employee’s name, department,
region and community will automatically appear
on screen.
3. Once the information is on the screen, press F4
to run the report.
4. If you chose to skip to the Employee field, you
enter the Employee’s surname and press Enter
#. The Employee Selection Screen will appear.
Type the ID number of the employee you are
looking for and press Enter #. The Position
number, job title, employee’s name, department,
region and community will automatically appear
on the screen. Press F4 to run the report.
Surplus Inventory Report
This is option 04 of the Controllable Asset Reports
Menu:
The Surplus Inventory Report is used to print out a
report of all the items in Surplus.
To get into the screen from the Controllable Asset
reports menu:
1. Type <04> in the Action field at the top of your
screen and press Enter #. This will automatically
take you to the Batch Job Submission Program.
Controllable Assets User Manual
7
5.1
Reports
Employee Listing by Department
This is option 05, of the Controllable Asset Reports Menu.
The Employee Listing by Department screen is used to print
out a report listing all employees for the Department you
select.
To get into the screen from the Controllable Asset
reports Menu:
1. Type <05> in the Action field at the top of your
screen and press Enter #. Refer to figure 5.1.4.
Printing an Employee Listing by Department Report
When you access this screen, the system is
automatically in Enter mode. The cursor will appear in
the Region field.
1. Type in the two digit ID code for the region you
are looking for and press Enter #. There are
currently six regions in the Northwest Territories:
Yellowknife Region (11)
Fort Smith Region (21)
Inuvik Region (31)
Baffin Region (41)
Keewatin Region (51)
Kitikmeot Region (61)
2. After you enter the regional ID, the region’s name
will automatically appear on the screen. Now the
cursor moves to the Community field.
3. Type in the three digit code number for the
community you wish to locate and press Enter #.
8
September 6, 2000
Public Works & Services
5.1
If you do not know the community code simply
type a <$> symbol and press Enter #. The
Community Codes Lookup Screen will
automatically appear with a list of community
names and their numeric codes.
4. After you enter the community code, the
community name will automatically appear on the
screen and the cursor will move to the Department
field (block 02).
5. Type in the two digit code number for the
department you wish to access and press Enter #.
Again, if you are unsure of the numeric code for
the department simply type a <$> symbol and
press Enter #. The Client Departments Lookup
Screen will appear listing all the departments and
their numeric codes.
6. Once you enter the department code, the department’s
name will automatically appear on the screen and the
cursor will move to the Action field at the top of your
screen.
7. After you enter all this information press F4 to run the
report.
Location Listing by Community
This is option 06, of the Controllable Asset Report Menu:
The Location Listing by Community screen is used to print out
a report listing all the Location numbers for the Community you
select.
To get into the screen from the Controllable Asset Report
Menu:
1. Type <06> in the Action field at the top of your screen and
press Enter #. Refer to figure 5.1.5.
Controllable Assets User Manual
9
5.1
Reports
Commodity Listing
This is option 07, of the Controllable Asset Reports Menu:
The Commodity Listing screen is used to print out a report
listing all of the Commodity Codes that are available for use in
this system.
To get into the screen from the Controllable Asset reports
Menu:
1. Type <07> in the Action field at the top of your screen and
press Enter #. This will automatically take you to the
Batch Job Submission Program.
Division Listing by Department
This is option 08, of the Controllable Asset Reports Menu:
The Division Listing by Department screen is used to print out
a report listing all Divisions of the Department you select.
To get into the screen from the Controllable Asset Reports
menu:
1. Type <08> in the Action field at the top of your screen and
press Enter #. Refer to figure 5.1.6.
10
September 6, 2000
Public Works & Services
6.1
Helpful Hints
Contacts
If you’ve gone through all the help options and nothing
seems to be working you can contact the Manager,
Information Technology with Public Works & Services at
(867) 873-7506.
Making Corrections
Use the function key <F3> or click on the Skip Back box at
the bottom of your screen or one forward slash <\> to back
up to any field you wish to correct. To get to the Action
field at the top of the screen, type two backslash <//> and
press Enter #. When the entry is correct, press <F4>, or
with your mouse click on the Done Entry box at the bottom
of your screen, to update the information.
In the action field always remember that F will find an
existing record and E will allow you to enter a new record.
Controllable Assets User Manual
1
6.1
Helpful Hints
Look Up Screens
Employee Code Lookup
If you do not know the employee’s position number:
1. Type a <$> symbol in the position number field
and press Enter #. This gets you into the
Employee Code Lookup screen. The cursor on
this screen goes automatically to the Department
field.
2. Enter the Department number of this employee.
For example, if you are looking for the position
number of a Public Works & Services employee,
type the department number <32> and press
Enter #.
If you don’t know the department number, see
Client Department Lookup below.
3. After you enter the department number, the cursor
automatically goes to the Surname field.
4. Type in the last name of this employee and press
Enter #.
5. The screen displays a list of all the employees in
that department with the surname you entered.
6. Type the ID number of the employee you are
looking for in the Action field. This automatically
takes you back to the screen you are working on.
Commodity Code Lookup
2
September 6, 2000
Public Works & Services
6.1
If you don’t know the commodity number of the item:
1. Type a <$> symbol and press Enter #. This will get
you into the Commodity Code Lookup screen which
lists names of commodities and their numbers.
2. Enter the ID number of the commodity or inventory
item you are looking for and press Enter #. This takes
you back to the screen you were working on.
Location Inquiry
If you don’t know the location number:(CAMS Asset #
Lookup)
1. Type a <$> symbol and press Enter #. This will get you
into the Asset Lookup screen.
2. The cursor will be in the Community field. Enter the
community code for the location you are looking for. If you
do not know the community code, enter a <$> symbol here
and press Enter #. The Community Codes Lookup screen
will appear with a list of communities and their codes and
region. Up to 15 communities will be displayed at a time.
To view additional communities, press Enter #.
3. Type the ID number of the community you need in the
Action field and press Enter #. For example, Aklavik is
displayed with its community code, next to ID number (02).
You type <02> in the Action field and press Enter #.
4. This takes you back to the Asset Lookup screen. The
community code appears in the community field. The
cursor now moves to the class field.
5. There are six possible entries you can make here,
<R> (residential), <C> (commercial), <V>
Controllable Assets User Manual
3
6.1
Helpful Hints
(vehicle), <M> (mixed), <E> (equipment) or <O>
(other). For a detailed description of these
options type <??>.
The majority of the assets you are concerned with
will be in <C> (commercial).
6. Type the letter that applies to this location and
press Enter #.
The Asset Lookup screen
appears, listing all the asset numbers, the classes,
and descriptions for the community you are
looking for.
7. Enter the ID number of the item you are looking
for in the Action field at the top of your screen and
press Enter #. This takes you back to the screen
you are working on.
If you have problems as you work with the Controllable
Asset System, there are many places to get help.
Keys to Know
?
When in doubt about what to type in a field, enter
a <?> symbol anywhere in the system and a list of
valid actions will appear at the bottom of your
screen.
?? Enter two <??> symbols anywhere in the system
and a screen with a more detailed list of valid
actions will appear.
F1 Press the F1 function key and a screen with a
detailed list of valid actions will appear.
$
\
4
Most screens with more than five fields include a
<$> lookup. Enter a <$> symbol in any field on
the screen, except in the Action field, and a
lookup screen will appear.
For detailed
information on lookup screens, see the Helpful
Hints section of this manual.
Enter a <\> symbol in any field and the cursor will move to
September 6, 2000
Public Works & Services
6.1
the previous field.
//
Enter two <//> symbols in any field and the cursor will
return to the Action field.
^^ Enter two <^^> symbols in the Action field and it will take
you to the previous screen.
Function Keys
The eight boxes at the bottom of your screen are your function
keys. The function keys at the bottom of you screen
correspond to the F keys found along the top of your keyboard.
For example the function key on the far left of your screen
should read Help. Press the F1 key on your keyboard, you will
see a detailed list of help information.
Below are a few examples of function keys in the Controllable
Asset System.
Features
Help
Function Key
F1 or click on Box at
The bottom of your
Screen or enter ?
Refresh
Exit
Controllable Assets User Manual
F7 or click on the
Box at the bottom of
Your screen
How it Works
Help presents
yo u wit h a
list of
Fu n c t ions n o t
listed in the
function key at
the bottom of
your screen.
Refresh clears
the screen of
any extra data
such as system
messages.
F8 or click on the
Exit box at the bottom
Of your screen.
Exit will exit
the portion
o f t h e
system you
are in.
5
6.1
Helpful Hints
Computer Details
The Screen
Mode
Near the top of your screen are the Mode and Action
Fields. The Mode tells you what functions you will be
able to perform. For example, if there is an <E> next
to the Mode, you are in <Entry> mode and will be able
to enter new information into the system. If there is an
<F> next to the Mode, you are in <Find> mode and will
be able to view and sometimes update information on
the screen but won’t be able to enter new information.
Action Field
The Action field is where you tell the system what you
want to see on the screen or what you want to do with
the information on the screen. For example, if you
enter option 02 in the Action field from the main menu,
the system will display the Controllable Asset
Management Menu screen. The Action field is like a
gate into the system; if you enter the right key it will
open any screen you wish. If this seems a little
confusing now the system everything will fall into
place.
ID Number
The ID Number is the line number next to the item you
wish to see or change. For example,
Not every screen has this option available.
Function Keys
Once you are in the Controllable Asset Management System
the Function keys may be used to move around in the system.
The boxes at the bottom of the screens correspond with the
Function keys at the top of your keyboard. To use these keys
you may press the Function key or click on to the box at the
bottom of the screen with the mouse.
6
September 6, 2000
Public Works & Services
6.1
The Function keys are as follows:
F1 F2 F3 F4 F5 F6 F7 F8 -
Help
Skip
Skip Back
Done Entry
Blank
Repeat
Refresh
Backout
Asset Entry/Maintenance
In the Asset Entry/Maintenance section of the system you can:
-
enter new inventory items
add new information about inventory
update existing information
transfer items
delete/dispose of inventory that has become obsolete or
has deteriorated (note: all deletions or disposals from
inventory are handled by the warehouse).
Asset Inquiry
In the Asset Inquiry section of the system you can retrieve any
information in the system about an item, its location, status or
who currently has the item.
Table Maintenance
In the Table Maintenance section of the system you can locate
and maintain codes for divisions, commodities, locations and
employees. This is where you find tables of essential
information that form the foundation of the system.
Other
In the Other section of the system you can print out or view full
Controllable Assets User Manual
7
6.1
Helpful Hints
inventory reports. Currently the reports you request are printed
on the laser printers located on the 2nd floor of the Stuart M
Hodgson Building.
Description of Fields
There are a variety of fields in the Controllable Asset
Management System. A field is where you enter your
data. It is just like filling out a form, each field
corresponds to a blank on a form. Below is a list of
the fields you will encounter in the Controllable Asset
Management System.
Position
Entry must be numeric. Every employee has a
position number six digits in length which corresponds
to their job title.
The position number identifies the employee, their job
title, department, region and community. You can find
an employee’s position number in the Employee Code
Lookup screen. (See Employee Code Lookup under
Helpful Hints in this manual).
Employee
Enter the surname (last name) of the employee.
Department
Entry must be numeric. Every Department has a department
number two digits in length. The department number identifies
the department, its region and community. You can find a list
of department codes by typing a <$> symbol in the department
field.
Region
There are six regions in the Northwest Territories: Yellowknife
Region (01), Fort Smith Region (02), Inuvik Region (03), Baffin
Region (04), Keewatin Region (05) and the Kitikmeot Region
(06). Each Region has a two digit code for identification
8
September 6, 2000
Public Works & Services
6.1
purposes. To find a list of the Regions and their corresponding
codes enter the Employee Maintenance screen and type in an
employee’s position number. Once the screen displays the
information on the employee, type the ID Number <07> of the
Region field in the Action field, and press Enter #. This will
bring the cursor to the Region field, once you are there type a
<$> symbol, and press <Enter>. The Region Codes Lookup
screen will appear.
Community
Each community has a three digit numeric code for
identification purposes. For example Aklavik’s community
code is 401. You can find a list of the communities and their
corresponding codes through the Inquiry by Location screen.
Tag Number
When a new item is acquired, an inventory tag is attached to
the item to identify it. On the tag is a Tag Number, an eleven
(11) digit number that must be entered into the system and can
be used to track down an item.
Commodity Number
Each asset has a code which identifies what type of item it is.
The code consists of one letter and two numbers. For
example, the commodity code G11 identifies the asset as an
iron. You can access a list of commodity codes and the
corresponding items by going into the Inquiry by
Commodity section of the system and entering a <$>
symbol in the Commodity Code field.
Asset Status
The Asset Status field identifies the current state of an
item. It tells you if the item is: active (in use), surplus
(not needed), dispose (beyond use), or missing. Your
entry must be a singe letter character. For example;
A for active, S for surplus, D for dispose, and M for
missing.
Controllable Assets User Manual
9
6.1
Helpful Hints
Model Number
Many items have a model number on them
somewhere, which identifies the make of the item.
Some items, such as computers, come in a variety of
models. The model number indicates the type of
computer.
Not all assets will have model numbers.
Having the model number recorded in the Controllable
Asset System is useful if the item is stolen or reported
missing.
Serial Number
An item’s serial number is the individual number given
to it for identification purposes. Each computer, for
example, has a unique serial number. Not all assets
will have a serial number.
Recording the serial number of an asset in the
Controllable Asset System, will be useful if the asset
is stolen or reported missing.
Description
A description of the item. The description should be
clear and short. For example, iron, painting, camera.
Your description may be up to 40 characters in length.
Location
Every floor in every building owned or leased by the
Government of the Northwest Territories has an asset number
assigned to it through the Capital Asset Management System.
These Capital Asset Numbers are to be used as the location
number in the Controllable Asset System. The location
number is ten (10) digits long.
Acquire Date
The date the item was purchased. Enter the acquire date
using the format DD/MMM/YYYY, where D is the day, M is the
month in letters, and Y is the year. For example, to enter June
3, 1996 enter 03/Jun/1996. This entry is optional since it is not
10
September 6, 2000
Public Works & Services
6.1
always possible to find out when an item has been purchased.
Price
The initial purchase price of the item. This entry must be
numeric. You are able to enter up to six (6) dollar digits and
two (2) cent digits. For example, you are able to enter
25,000.00. The purchase price is not always available so this
entry is optional.
Purchase Number
When the Government of the Northwest Territories purchases
an item, it uses a purchase number, usually a PO, Purchase
Order or LCA, Local Contract Authority. The Purchase
numbers are eight (8) digits long, two alpha and six (6)
numeric.
Condition
The Condition field identifies what kind of shape an item is in.
It tells you if the item is in: new (N), good (G), fair (F), or poor
(P) condition. Your entry must be a single letter character.
Revision/Revised
When the information in the Controllable Asset System is
updated or new information is entered, the system
automatically records the date and the ID number of the
person that made the entry. For example, JJD1 1996/Jun/03.
Depreciation
The depreciation rate of the commodity. A numeric entry
which measures the percentage an item has lessened in value.
This is automatically calculated by the system.
Controllable Assets User Manual
11