1
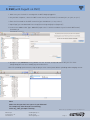
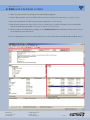
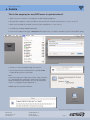
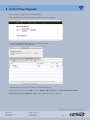
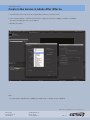
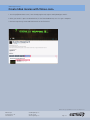
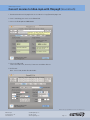
MAG Design PocketVJ - Manual
First of all
1. Connecting
2. Loading files
3. SSH on mac
3. SSH on win
4. Samba
5. Loading from USB
6. Slide Show
7. Sync
8. Other things
9. Control Panel Upgrade
10. Screen Sharing
Create h264 movies with After Effects®
Create h264 movies with Vimeo®
Convert h264 movies with FFmpegX
Convert h264 movies with winFF
Convert h264 movies with YAG
Convert movies online
Technical Data / Specification
Troubleshooting
Create own boot.txt
Rev.: D
© 2015
2
3
4
5
6
7
8
9
10
11
19
20
We don‘t take any responsibilities for errors caused by the user!
MAG Design
Seftigenstrasse 22
CH-3007 Bern
[email protected]
079 651 44 59
www.magdesign.ch
Page 1
MAG Design PocketVJ
First of all
Thank you for buying the PocketVJ!
Before you power up the device with the provided power supply, make sure that:
- Wifi dongle is plugged in
- HDMI cable or display adaptor is connected
- Screen, TV or Projector is powered on*
Now you can plugin the power cord and wait until the device has booted up and the testvideo is running.
Make sure to use the original power supply, if you want to use another one, it must provide 5V and minimum 2A.
The simplest way to manage your files on the PocketVJ, is by connecting through a webbrowser.
For this you need a Wifi compatible device such as a computer, smart phone, tablet or whatever else you have in
your toy box.
Keep in mind that your movie file must be encoded with the h.264 codec, otherwise it might not run smoothly.
If you want to upload big files (300mb and more), we recommend to copy the files to a USB-stick, mount the stick
on the PocketVJ and copy the files with the webinterface from USB to the internal storage.
If you have several PocketVJ’s synced in a network, you can upload large files with SSH directly from your computer connect to the same network (RJ45) (network IP’s are: 192.168.2.***).
There are many great features, if you miss something, tell us for further development.
Never disconnect the power while uploading content!
it can destroy your PocketVJ
Naming your files:
Make sure that you don’t have spaces in your filename!
for example: my video file.mp4 is not working, while: my_video_file.mp4 is working
*the PocketVJ is gathering the perfect resolution for the connected screen while booting, its important that the connected screen is powered
up, otherwise you will get a standard VGA resolution (there is the possibility to change the standard resolution in the configuration panel).
If you powered up the connected screen after boot and it goes to power safe, simply go to the control panel of the PocketVJ and click ‘Screen
power on’.
We don‘t take any responsibilities for errors caused by the user!
MAG Design
Seftigenstrasse 22
CH-3007 Bern
[email protected]
079 651 44 59
www.magdesign.ch
Page 2
MAG Design PocketVJ
1. Connecting to the Control Panel
1. Make sure your PocketVJ is running with the WiFi dongle plugged in.
2. On your computer, phone or tablet, choose the WiFi connection of your PocketVJ
(named vj100, or vj109, or vj***)
3. Enter the Password for the WiFi connection (you should have it, if not, ask us).
4. Open your favourite Webbrowser (we recommend Chrome) and enter:
2.0.0.*** (replace the *** with the number of your PocketVJ WiFi name e.g. VJ100 = 2.0.0.100)
into the address bar.
5. Hit Enter and you see the control panel:
(If you load it for the first time, it may take a minute to be fully accessible)
We don‘t take any responsibilities for errors caused by the user!
MAG Design
Seftigenstrasse 22
CH-3007 Bern
[email protected]
079 651 44 59
www.magdesign.ch
Page 3
MAG Design PocketVJ
2. Loading Files
1. Hit ‘STOP all players’ in the configuration panel.
2. Click ‘OPEN filebrowser’.
3. There opens up a new tab with an Extplorer.
4. Upload and manage your files in the ‘internal’ folder, be patient while uploading!
If you use Google Chrome® you will see the upload progress in the lower left corner.
For uploading large files (more than 500MB) we recommend using SSH or to copy from USB.
Note:
Make sure that you don’t have spaces and special characters
in your filename!
for example: my video file “2014”.mp4 is not working,
while: my_video_file2014.mp4 is working
We don‘t take any responsibilities for errors caused by the user!
MAG Design
Seftigenstrasse 22
CH-3007 Bern
[email protected]
079 651 44 59
www.magdesign.ch
Page 4
MAG Design PocketVJ
3. SSH (with Fugu® on OSX)
1. Make sure your PocketVJ is running with the WiFi dongle plugged in.
2. On your Mac Computer, choose the WiFi connection of your PocketVJ (its named vj112, or vj109, or vj***)
3. Enter the Password for the WiFi connection (you should have it, if not, ask us).
4. Open Fugu (you can download it here: http://sourceforge.net/projects/fugussh/ )
5. In the Server Address Bar Type : 2.0.0.*** (replace the *** with the number of your PocketVJ WiFi name)
Username: pi
Password: *********
6. Navigate to the /internal directory (double click the ‘internal’ arrow) and load or edit your files there
(drag’n’drop), be sure not to modify any other directories.
Note: For speeding up the transfer, stop the player in the control panel before uploading and managing content
Note:
Make sure that you don’t have spaces in your filename!
for example: my video file.mp4 is not working,
while: my_video_file.mp4 is working
We don‘t take any responsibilities for errors caused by the user!
MAG Design
Seftigenstrasse 22
CH-3007 Bern
[email protected]
079 651 44 59
www.magdesign.ch
Page 5
MAG Design PocketVJ
3. SSH (with FileZilla® on Win)
1. Make sure your PocketVJ is running with the WiFi dongle plugged in.
2. On your Win Computer, choose the WiFi connection of your PocketVJ (its named vj113, or vj109, or vj***)
3. Enter the Password for the WiFi connection (you should have it, if not, ask us)
4. Open Filezilla, under Server enter the IP: 2.0.0.*** (replace the *** with the number of your PocketVJ WiFi
name), Username: pi, Password: ******** (you should have it, otherwise ask us!)
5. Hit Enter and you should be able to navigate to the /media/internal/ folder and load or edit your files, be sure
not to modify any other directories.
Note: For speeding up the transfer, stop the player in the control panel before uploading and managing content
We don‘t take any responsibilities for errors caused by the user!
MAG Design
Seftigenstrasse 22
CH-3007 Bern
[email protected]
079 651 44 59
www.magdesign.ch
Page 6
MAG Design PocketVJ
4. Samba
This is the easyway for mac/OSX users to upload content!
1. Make sure your PocketVJ is running with the WiFi dongle plugged in.
2. On your Mac Computer, choose the WiFi connection of your PocketVJ (named vj112, or vj109, or vj***).
3. Enter the Password for the WiFi connection (you should have it, if not, ask us).
4. In Finder go to: GO > Connect to Server
5. In the Server address bar type : smb://2.0.0.*** (replace the *** with the number of your PocketVJ WiFi name).
6. Connect, in the Password Prompt select Guest
7. Your Finder mounts a Network device named: media
Load and edit your files with finder.
Note:
If you move large files, finder may tell you: copy zero bytes
of.... Estimating time remaining... and it looks like finder
hangs showing turning colorball, then just go and grab a
coffee, it is copying in the background :-)
608MB may take around 16 minutes
We don‘t take any responsibilities for errors caused by the user!
MAG Design
Seftigenstrasse 22
CH-3007 Bern
[email protected]
079 651 44 59
www.magdesign.ch
Page 7
MAG Design PocketVJ
5a. Loading from USB to internal
1. Connect to your PocketVJ as described in 1. Connecting
2. Hit ‘STOP player’
3. If you plugged in the USB stick before booting it will be automatically be mounted and you can open up the
filebrowser where you see the internal and the usb drive.
If you plugged in the stick later or it is not visible, click ‘MOUNT USB’
4. Move the files with the mouse from usb to internal.
There might show up an error message: ‘failed to connect to server’ click ok.
5. It is very important that you wait until copying files is finished! Otherwise you can destroy the storage and the
usb stick. If you have a stick with a built in LED, you have to wait until the LED does not blink anymore. Best the
see if copying is finished, is when you try to open the ‘internal’ folder, as long as you are not able to do this, it is
still copying. (1.5GB might take 10min, depends on the speed of your usb stick).
6. After you are finished with moving files from USB, click ‘EJECT USB’
7. Now you can safely remove the USB stick.
Notes:
- If you plugged in the USB after boot, make sure to click ‘MOUNT usb’ on the control panel.
- Make sure to unmount the USB stick before unplugging, otherwise you can’t use it on your computer again, if
this happens, just plug it in back to the PocketVJ and ‘UNMOUNT’ it properly.
- Don’t plug in Harddisks or USB stick which uses high amount of power!
- If you want to connect a Harddisk, you have to use a powered USB hub to provide enough power.
- If after plugging in an USB stick you are not able to connect over WIFI, wait a few minutes, if its still not working
you are using an USB stick which sucks too much power, use another one.
- If you used your USB for booting or install an operation system, it will not be visible. Thats because there is a
hidden EFI partition on your stick, get a new one or ask Google: How to remove EFI partition from USB Stick
http://www.mede8erforum.com/index.php/topic,14019.0.html or this:
http://knowit.net/2013/03/delete-the-efi-partition-from-a-drive-in-os-x-127
- Supported file systems are: vFAT, FAT32, exFAT, HFS, NTFS, EXT4
MAG Design PocketVJ
5b. Playing from USB
1. Connect to your PocketVJ as described in 1. Connecting
2. Hit ‘STOP player’
3a. If you plugged in the USB stick before booting it will be automatically be mounted and you can click in the
Control panel: ‘START in USB mode’
3b. If you always want to play files from USB, you can configure this under Autostart in the Control Panel, click:
‘SET to USB’
We don‘t take any responsibilities for errors caused by the user!
MAG Design
Seftigenstrasse 22
CH-3007 Bern
[email protected]
079 651 44 59
www.magdesign.ch
Page 8
MAG Design PocketVJ
6. Slideshow
1. Connect to your PocketVJ as described in 1. Connecting.
2. Click ‘STOP player’.
3. If not already done, copy some *.jpg images to the the hard drive.
4. Click ‘START image player’.
5. Your slideshow is running until next reboot.
If you want to bootup always with the slideshow click ‘SET to imageplayer’ and reboot.
To set the time for slideshow duration, go to
MAG Design PocketVJ
6.1 Conform images for Slideshow
Since the slideshow function only supports *.jpg files, we made a function to convert other image formats to *.jpg
and resize all images to a maximum resolution of 1920 x 1080.
(This can also be helpful if your *.jpg files have a huge resolution and will not be displayed on a HD screen)
1. Upload your images (.jpg, .bmp, .gif, .tif) to internal storage.
2. Make sure all players are stopped to have all resources for conforming the images.
3. Go to ‘File Handling’ and click Conform all Images.
4. WAIT! (Depending on amount, format and size of your images, it may take a while)
5. When you see the message: “FINISHED! all images converted to jpg and resized to HD”
the task is done and you may start your slideshow.
We don‘t take any responsibilities for errors caused by the user!
MAG Design
Seftigenstrasse 22
CH-3007 Bern
[email protected]
079 651 44 59
www.magdesign.ch
Page 9
MAG Design PocketVJ
7. Sync
Make sure that the movie file on the PocketVJ has the same name on all slaves.
1. Connect to your PocketVJ as described in 1. Connecting.
2. Set only one PocketVJ to master, set all others to slave (otherwise it will not work!)
3. Connect them directly with a RJ45 cable if there is only one slave,
use a switch to connect more players, if you use a router, make sure its configured to 192.168.2.1
Notes:
- We recommend to make the first 10s of the movie black, so there will be no visible syncs for the observer.
- Remove all other files from the internal storage, for example images may cause syncing errors.
- For syncing you must have same conditions for every Pocket VJ, that means:
same output resolutions, movie files with same length, framerate and bitrate and also if there is audio same
output and bitrate (if you use different conditions, you might have to adjust the sync window by hand).
- Sync has an accuracy of ±6 fps (regular its between 0 and1 fps),
if there is always the same offset of synced files you can manually change the sync window and tolerance to fit
your needs. Its depending on the bitrate (check: https://github.com/turingmachine/omxplayer-sync)
- Make sure your files are at least 60s in duration to increase the stability of seamless looping.
- For Syncing with high bitrates (1080p with 10MB/s) you may set the SYNC_WINDOW to ( -0.65, -0.6)
- If the slave always starts again after 5 seconds of playing, make sure it gets signal from master, and make sure
it has the same conditions as the master.
- It is known that when you use a router, it sometimes blocks the traffic, because the PocketVJ has a static Ip
address, restart router and all PocketVJs.
We don‘t take any responsibilities for errors caused by the user!
MAG Design
Seftigenstrasse 22
CH-3007 Bern
[email protected]
079 651 44 59
www.magdesign.ch
Page 10
MAG Design PocketVJ
8. Other things
RESOLUTION
with this function you can get the actual output resolution
edidparser outputs list of supported Resolutions
it will show you a list of resolution modes the connected display supports and which formats are filtered out.
At the end of the output it will show which format is chosen as default.
RESOLUTION of movie
with this function you can get the resolution of internal stored movies
CODEC info
with this function you can get the name, codec and framerate of internal stored movies
Volume UP/DOWN
change the output volume
Audio output
select on which output you want the audio playing
SCREEN Power ON
with this function you can power up a connected screen (useful when screen powered up after booting
the PocketVJ)
SCREEN Power OFF
with this function you can power down a connected screen
BOOT.conf
create your own boot file for setting up custom resolutions
REBOOT
reboots the system
Projector
use the RJ45 port to connect a projector, set its IP to 192.168.2.254 for accessing it thru the webbrowser
Force VGA Adaptor
This forces a resolution of 800x600 for theoptional VGA display adaptor
FIRMWARE Update
To Update the player and sync from an USB stick, copy provided files to stick, mount it, stop player and hit update
to update to newest firmware
CONTROLPANEL Upgrade
To upgrade Control Panel from USB stick.
Check Tutorial: https://vimeo.com/118030944
We don‘t take any responsibilities for errors caused by the user!
MAG Design
Seftigenstrasse 22
CH-3007 Bern
[email protected]
079 651 44 59
www.magdesign.ch
Page 11
MAG Design PocketVJ
9. Control Panel Upgrade
Videotutorial here: https://vimeo.com/118030944
1. Go to http://www.pocketvj.com and download the newest CP Update
2. Copy the downloaded www.zip to the root of an USB-Stick
Extract the www.zip on the USB-Stick
3. Plug the USB-Stick into your PocketVJ (it should reboot itself)
4. Open the Control Panel, Hit ‘STOP’, then hit ‘MOUNT USB‘ and finally hit ‘CONTROLPANEL UPGRADE’
5. Wait until you get the upgrade message, reboot and voila, the CP is updated
We don‘t take any responsibilities for errors caused by the user!
MAG Design
Seftigenstrasse 22
CH-3007 Bern
[email protected]
079 651 44 59
www.magdesign.ch
Page 12
MAG Design PocketVJ
10. Screen Sharing
1. Enable Screensharing in Control Panel and Reboot:
2. Download Vine Server from http://www.testplant.com/dlds/vine/ and install it on your Computer
3. Start Vine Server, in the menu select Server / Reverse Connection.. and fill in the IP which is displayed on the
screen on which the PocketVJ is connected
4. Voilà, you should have your computer display mirrored on the PocketVJ
Note:
Your computer display must have the same resolution as the screen connected to the PocketVJ.
If the display is confusingly stretched, it might be that your computers resolution is set too high. Set your computers resolution to max. 1920x1080 pixel and try it again.
If you use a Retina Macbook, install RetinaDisplay Menu from www.phoenix-dev.com to change your resolution to
low DPI)
We don‘t take any responsibilities for errors caused by the user!
MAG Design
Seftigenstrasse 22
CH-3007 Bern
[email protected]
079 651 44 59
www.magdesign.ch
Page 13
MAG Design PocketVJ
Create h.264 movies in Adobe After Effects®
1. In the Render Queue tab, click on Outputmodule and select Format: H.264
2. Select Format Options.. and check the bitrate settings (for FullHD use 6Mbps, for VGA use 2.4Mbps)
You may use higher bitrates, e.g. 10 Mbit/s*
3. Render your movie
Note:
- For Syncing with high bitrates (10MB/s) you might have to change the Sync Window
We don‘t take any responsibilities for errors caused by the user!
MAG Design
Seftigenstrasse 22
CH-3007 Bern
[email protected]
079 651 44 59
www.magdesign.ch
Page 14
MAG Design PocketVJ
Create h264 movies with Vimeo.com®
1. Go to http://www.vimeo.com, if not already registered, register and upload your movie.
2. After your movie is processed and online, hit the Download button, save it to your computer.
3. You have a perfectly converted h264 movie for the PocketVJ.
We don‘t take any responsibilities for errors caused by the user!
MAG Design
Seftigenstrasse 22
CH-3007 Bern
[email protected]
079 651 44 59
www.magdesign.ch
Page 15
MAG Design PocketVJ
Convert movies to h264.mp4 with ffmpegX (macintosh)
1. Download and install ffmpegX with all the libraries: http://www.ffmpegx.com
2. Start it and drag your movie to the From field.
3. Select the To dropdown: MP4 H.264
4. Select the Video tab,
control the Video Size, Autosize, Framerate and Video Bitrate.
5. Hit Encode
Note: If not used, disable Encode Audio.
We don‘t take any responsibilities for errors caused by the user!
MAG Design
Seftigenstrasse 22
CH-3007 Bern
[email protected]
079 651 44 59
www.magdesign.ch
Page 16
MAG Design PocketVJ
Convert movies to h264.mp4 with winFF (windows)
WinFF
Download the opensource tool WinFF from their website www.winff.org and install it.
After successful installation, open the program:
1. Wählen Sie unter Konvertieren MPEG-4 und unter Profil MPEG-4 H.264
2. Setzen Sie unter 'Ordner wie Quelldatei' das Häkchen (damit die Datei am selben Ort wie die Quelldatei erstellt wird)
3. Ziehen Sie Ihr Video mit der Maus auf das WinFF Programmfenster
4. Drücken Sie Konvertieren (ein Terminal erscheint und zeigt den konvertierungsprozess an)
5. Die fertige Videodatei sollte nun mit der Endung *.mp4 im gleichen Ordner wie die Quelldatei zu finden sein,
falls dies nicht der Fall ist, speichert winFF die Datei im Benutzerverzeichnis unter Dokumente.
6. Nun haben Sie ein H.264 .mp4 zum uploaden auf den Yokto Player!
We don‘t take any responsibilities for errors caused by the user!
MAG Design
Seftigenstrasse 22
CH-3007 Bern
[email protected]
079 651 44 59
www.magdesign.ch
Page 17
MAG Design PocketVJ
Convert movies to h264.mp4 with YAG (windows)
Download the open source tool FFmpegYAG from the website http://code.google.com/p/ffmpegyag/
and unzip on your computer.
Double click ffmpegYAG.exe a program will open:
English:
1. Click Add Files.. and select your movie.
2. If there is no audio track on your movie, remember to untick Audio Processing Include.
3. Also untick Subtitle Processing
4. Under Video Processing select for Container: mp4, Codec: libx264, Bitrate: 3000k
5. Click Encode and wait until your .mp4 movie is rendered.
6. Upload to PocketVJ
Deutsch:
1. Klicken Sie Add Files.. um Ihre Videodatei hinzuzufügen
2. Falls kein Audio benötigt wird können Sie unter Audio Processing das Include abhäkeln
3. Subtitle Processing können Sie ebenfalls abhäkeln
4. Unter Video Processing wählen Sie für Container: mp4, Codec: libx264, Bitrate: 3000k
5. Klicken Sie Encode und warten bis Ihr .mp4 Video erstellet wurde
6. Laden Sie die Datei auf Ihren PocketVJ
We don‘t take any responsibilities for errors caused by the user!
MAG Design
Seftigenstrasse 22
CH-3007 Bern
[email protected]
079 651 44 59
www.magdesign.ch
Page 18
MAG Design PocketVJ
Convert movies to h264.mp4 with Online-Convert
Visit http://www.online-convert.com
Under Video converter select ‘Convert to MP4’
Upload your file and let it convert, for more Info check the FAQ on website.
We don‘t take any responsibilities for errors caused by the user!
MAG Design
Seftigenstrasse 22
CH-3007 Bern
[email protected]
079 651 44 59
www.magdesign.ch
Page 19
MAG Design PocketVJ
Technical Data / Specification
Dimensions:
110 x 76 x 31 mm
Operating voltage:
5V
Power consumption:
~3W
Operating Temperature:
5°- 50° C
Video-Ports:
1 x HDMI (1 x Composite)
Audio-Ports:
1 x 3.5mm mini jack
Media-Ports
2 x USB 2.0
Network-Port:
1 x RJ45 10/100MB
Data-Port:
1 x GPIO
Wifi:
1 x 802.11 150 Mbps 2.4Ghz
Video-Output Resolution:
Various, max. 1920 x 1080 pixel and 10 Mbit/s
Video-Output Formats:
VGA, XGA, HD 720, WXGA, WSXGA, HD 1080
Slideshow:
.jpg (various others when using the conform function)
Storage:
12GB SDHC (28GB on request)
Firmware:
Linux
Supported Containers:
.mp4, .mov, .avi, might support also other container formats
Supported Codecs:
h.264
Optional:
Extension
Push buttons
We don‘t take any responsibilities for errors caused by the user!
MAG Design
Seftigenstrasse 22
CH-3007 Bern
[email protected]
079 651 44 59
www.magdesign.ch
Page 20
MAG Design PocketVJ
Troubleshooting
Movie plays, but stutters
- Check if it is really a h.264 compressed movie
I dont get an IP adress from the pocketvj
- Sometimes there are power peaks which can cause that the Wifi signal is not strong enough.
Known are some issues with Hdmi to VGA adaptors with old VGA devices who suck a lot of power.
Also after plugging in some USB sticks.
If you want to plugin a hard drive, make sure to use a separate powered usb hub!
USB-Stick does not work anymore on my computer
- Plug it back into the PocketVJ and Click UNMOUNT in the control panel.
Make sure to always mount and unmount your USB devices!
Movie is not playing
- Make sure that there is no space or special character in the filename and it is not longer than 16 characters.
- Make sure your video is converted with the h264 codec.
- Make sure your data is in the correct folder.
- Make sure your PocketVJ is not configured to ‘Slideshow’ mode
- Make sure there are no empty spaces in the naming: my_video_file.mp4 (not: my video file.mp4)
Sync Mode errors
- Slave jumps after 5s to the start again
Make sure the RJ45 cable is connected properly
Make sure there are only movie files in the storage (no images, texte files etc.)
- Connected several PocketVJs over a router
Check the Gateway settings of your router, in original mode the pocketvj runs in 192.168.2.1
- The player syncs but its constantly running asynchron
Change the SYNC_WINDOW in omxplayer-sync with any text editor and upgrade it
We don‘t take any responsibilities for errors caused by the user!
MAG Design
Seftigenstrasse 22
CH-3007 Bern
[email protected]
079 651 44 59
www.magdesign.ch
Page 21
MAG Design PocketVJ
Troubleshooting: Create own config.txt (for custom resolution)
Create your own config.txt file, put it to the internal storage and click ‘boot.conf’ custom to copy it to the bootloader. Reboot the system to make changes to take effect.
The standard config.txt looks like:
hdmi_force_hotplug=1
gpu_mem=256
If you use a HDMI to VGA Adaptor, for a resolution of 800x600, write:
hdmi_group=2
hdmi_mode=9
hdmi_drive=2
hdmi_ignore_edid=0xa5000080
hdmi_force_hotplug=1
gpu_mem=256
If you use a HDMI to VGA Adaptor, for a resolution of 1024x768, write:
hdmi_group=2
hdmi_mode=16
hdmi_drive=2
hdmi_ignore_edid=0xa5000080
hdmi_force_hotplug=1
gpu_mem=256
If you need a stronger signal, you can additional write this to the file (range from 0 -7):
config_hdmi_boost=7
hdmi_drive chooses between HDMI and DVI modes:
hdmi_drive=1 Normal DVI mode (No sound)
hdmi_drive=2 Normal HDMI mode (Sound will be sent if supported and enabled)
Display Modes:
You can ignore the screens edid: hdmi_ignore_edid=0xa5000080
edid is a code which the screen sends to the PocketVJ to tell which resolution he prefers
hdmi_group defines the HDMI type:
Not specifying the group, or setting to 0 will use the preferred group reported by the edid.
hdmi_group=1 CEA [is used for TV Screens]
hdmi_group=2 DMT [is used for Computer Screens]
hdmi_mode= defines screen resolution in CEA or DMT format: (see next page)
We don‘t take any responsibilities for errors caused by the user!
MAG Design
Seftigenstrasse 22
CH-3007 Bern
[email protected]
079 651 44 59
www.magdesign.ch
Page 22
Display Modes
****************************
These values are valid if hdmi_group=1 (CEA) [TV Screens]
hdmi_mode=1
hdmi_mode=2
hdmi_mode=3
hdmi_mode=4
hdmi_mode=5
hdmi_mode=6
hdmi_mode=7
hdmi_mode=8
hdmi_mode=9
hdmi_mode=10
hdmi_mode=11
hdmi_mode=12
hdmi_mode=13
hdmi_mode=14
hdmi_mode=15
hdmi_mode=16
hdmi_mode=17
hdmi_mode=18
hdmi_mode=19
hdmi_mode=20
hdmi_mode=21
hdmi_mode=22
hdmi_mode=23
hdmi_mode=24
hdmi_mode=25
hdmi_mode=26
hdmi_mode=27
hdmi_mode=28
hdmi_mode=29
hdmi_mode=30
hdmi_mode=31
hdmi_mode=32
hdmi_mode=33
hdmi_mode=34
hdmi_mode=35
hdmi_mode=36
hdmi_mode=37
hdmi_mode=38
hdmi_mode=39
hdmi_mode=40
hdmi_mode=41
hdmi_mode=42
hdmi_mode=43
hdmi_mode=44
hdmi_mode=45
hdmi_mode=46
hdmi_mode=47
hdmi_mode=48
hdmi_mode=49
hdmi_mode=50
hdmi_mode=51
hdmi_mode=52
hdmi_mode=53
hdmi_mode=54
hdmi_mode=55
hdmi_mode=56
hdmi_mode=57
hdmi_mode=58
hdmi_mode=59
VGA
480p 60Hz
480p 60Hz H
720p 60Hz
1080i 60Hz
480i 60Hz
480i 60Hz H
240p 60Hz
240p 60Hz H
480i 60Hz 4x
480i 60Hz 4x H
240p 60Hz 4x
240p 60Hz 4x H
480p 60Hz 2x
480p 60Hz 2x H
1080p 60Hz
576p 50Hz
576p 50Hz H
720p 50Hz
1080i 50Hz
576i 50Hz
576i 50Hz H
288p 50Hz
288p 50Hz H
576i 50Hz 4x
576i 50Hz 4x H
288p 50Hz 4x
288p 50Hz 4x H
576p 50Hz 2x
576p 50Hz 2x H
1080p 50Hz
1080p 24Hz
1080p 25Hz
1080p 30Hz
480p 60Hz 4x
480p 60Hz 4xH
576p 50Hz 4x
576p 50Hz 4x H
1080i 50Hz reduced blanking
1080i 100Hz
720p 100Hz
576p 100Hz
576p 100Hz H
576i 100Hz
576i 100Hz H
1080i 120Hz
720p 120Hz
480p 120Hz
480p 120Hz H
480i 120Hz
480i 120Hz H
576p 200Hz
576p 200Hz H
576i 200Hz
576i 200Hz H
480p 240Hz
480p 240Hz H
480i 240Hz
480i 240Hz H
H means 16:9 variant (of a normally 4:3 mode).
2x means pixel doubled (i.e. higher clock rate, with each pixel repeated twice)
4x means pixel quadrupled (i.e. higher clock rate, with each pixel repeated four times)
We don‘t take any responsibilities for errors caused by the user!
MAG Design
Seftigenstrasse 22
CH-3007 Bern
[email protected]
079 651 44 59
www.magdesign.ch
Page 23
These values are valid if hdmi_group=2 (DMT) [Computer Displays]
Note: there is a pixel clock limit which means the highest supported mode is 1920x1200 @60Hz with reduced blanking.
hdmi_mode=1
hdmi_mode=2
hdmi_mode=3
hdmi_mode=4
hdmi_mode=5
hdmi_mode=6
hdmi_mode=7
hdmi_mode=8
hdmi_mode=9
hdmi_mode=10
hdmi_mode=11
hdmi_mode=12
hdmi_mode=13
hdmi_mode=14
hdmi_mode=15
hdmi_mode=16
hdmi_mode=17
hdmi_mode=18
hdmi_mode=19
hdmi_mode=20
hdmi_mode=21
hdmi_mode=22
hdmi_mode=23
hdmi_mode=24
hdmi_mode=25
hdmi_mode=26
hdmi_mode=27
hdmi_mode=28
hdmi_mode=29
hdmi_mode=30
hdmi_mode=31
hdmi_mode=32
hdmi_mode=33
hdmi_mode=34
hdmi_mode=35
hdmi_mode=36
hdmi_mode=37
hdmi_mode=38
hdmi_mode=39
hdmi_mode=40
hdmi_mode=41
hdmi_mode=42
hdmi_mode=43
hdmi_mode=44
hdmi_mode=45
hdmi_mode=46
hdmi_mode=47
hdmi_mode=48
hdmi_mode=49
hdmi_mode=50
hdmi_mode=51
hdmi_mode=52
hdmi_mode=53
hdmi_mode=54
hdmi_mode=55
hdmi_mode=56
hdmi_mode=57
hdmi_mode=58
hdmi_mode=59
hdmi_mode=60
hdmi_mode=61
hdmi_mode=62
hdmi_mode=63
hdmi_mode=64
hdmi_mode=65
hdmi_mode=66
hdmi_mode=67
hdmi_mode=68
hdmi_mode=69
hdmi_mode=70
640x350 85Hz
640x400 85Hz
720x400 85Hz
640x480 60Hz
640x480 72Hz
640x480 75Hz
640x480 85Hz
800x600 56Hz
800x600 60Hz
800x600 72Hz
800x600 75Hz
800x600 85Hz
800x600 120Hz
848x480 60Hz
1024x768 43Hz DO NOT USE
1024x768 60Hz
1024x768 70Hz
1024x768 75Hz
1024x768 85Hz
1024x768 120Hz
1152x864 75Hz
1280x768
reduced blanking
1280x768 60Hz
1280x768 75Hz
1280x768 85Hz
1280x768 120Hz reduced blanking
1280x800
reduced blanking
1280x800 60Hz
1280x800 75Hz
1280x800 85Hz
1280x800 120Hz reduced blanking
1280x960 60Hz
1280x960 85Hz
1280x960 120Hz reduced blanking
1280x1024 60Hz
1280x1024 75Hz
1280x1024 85Hz
1280x1024 120Hz reduced blanking
1360x768 60Hz
1360x768 120Hz reduced blanking
1400x1050
reduced blanking
1400x1050 60Hz
1400x1050 75Hz
1400x1050 85Hz
1400x1050 120Hz reduced blanking
1440x900
reduced blanking
1440x900 60Hz
1440x900 75Hz
1440x900 85Hz
1440x900 120Hz reduced blanking
1600x1200 60Hz
1600x1200 65Hz
1600x1200 70Hz
1600x1200 75Hz
1600x1200 85Hz
1600x1200 120Hz reduced blanking
1680x1050
reduced blanking
1680x1050 60Hz
1680x1050 75Hz
1680x1050 85Hz
1680x1050 120Hz reduced blanking
1792x1344 60Hz
1792x1344 75Hz
1792x1344 120Hz reduced blanking
1856x1392 60Hz
1856x1392 75Hz
1856x1392 120Hz reduced blanking
1920x1200
reduced blanking (should work)
1920x1200 60Hz
1920x1200 75Hz
hdmi_mode=70
hdmi_mode=71
hdmi_mode=72
hdmi_mode=73
hdmi_mode=74
hdmi_mode=75
hdmi_mode=76
hdmi_mode=77
hdmi_mode=78
hdmi_mode=79
hdmi_mode=80
hdmi_mode=81
hdmi_mode=82
hdmi_mode=83
hdmi_mode=84
hdmi_mode=85
hdmi_mode=86
1920x1200 75Hz
1920x1200 85Hz
1920x1200 120Hz reduced blanking
1920x1440 60Hz
1920x1440 75Hz
1920x1440 120Hz reduced blanking
2560x1600
reduced blanking
2560x1600 60Hz
2560x1600 75Hz
2560x1600 85Hz
2560x1600 120Hz reduced blanking
1366x768 60Hz
1080p 60Hz
1600x900
reduced blanking
2048x1152
reduced blanking
720p 60Hz
1366x768
reduced blanking
We don‘t take any responsibilities for errors caused by the user!
MAG Design
Seftigenstrasse 22
CH-3007 Bern
[email protected]
079 651 44 59
www.magdesign.ch
Page 24


![20120815_PipeBurst Pro Jr User Manual V1[...]](http://vs1.manualzilla.com/store/data/005915031_1-fc76e6520fc4c8a26c3a91dcf3e505a9-150x150.png)