1
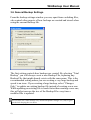
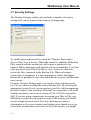
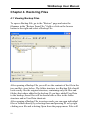
WinBackup User Manual
Table of Contents
Chapter 1 – Getting Started
2
1.1 Introduction
2
1.2 Installing WinBackup
3
Chapter 2 - Overview
4
Chapter 3 – Creating Backups
6
3.1 Backup Jobs
6
3.2 Selecting Files
7
3.3 User Data
9
3.4 Searching
10
3.5 Exclude File Types
11
3.6 General Backup Settings
12
3.7 Security Settings
14
3.8 Scheduled Backups
16
3.9 Saving Backup Files to CD/DVD
17
Chapter 4 – Restoring Backups
18
4.1 Viewing Backup Files
18
4.2 Selecting Files
20
4.3 Target Locations
21
4.4 Restore Settings
22
Chapter 5 – Log
23
5.1 Viewing Log Entries
23
5.2 Log Settings
24
1
WinBackup User Manual
Chapter 1. Getting Started
1.1 Introduction
Creating backups of important files on a regular basis is probably one
of the easiest and cheapest ways to protect irreplaceable data, emails
and personal files from all sorts of technical disasters. Still, billions of
dollars are lost every year because of technical problems and loss of
data. WinBackup is a new backup solution from LI Utilities that
makes it easier for home users as well as corporate users to create and
organize backups that are updated regularly.
System Requirements
• Windows 98, Windows ME, Windows 2000 or Windows XP.
• 10 MB free disk space
• 32MB RAM
• Pentium 400 MHz or higher
Technical Support
If you are having problems using WinBackup, please visit
http://www.liutilities.com/support/ for support and updates.
2
WinBackup User Manual
1.2 Installing WinBackup
If the product was downloaded from the Internet:
• Extract the zip-file to a temporary folder. (Use WinZip or a
similar program)
• Run setup.exe and follow the instructions.
• To launch WinBackup use the Start-Menu.
If the product was delivered on a CD:
• Insert the CD to start the installation. (If the installation doesn't
start automatically, open the CD and run setup.exe)
• Follow the instructions shown on the screen.
• To launch WinBackup use the Start-Menu.
Unlocking the full version with a registration key:
• WinBackup is always unregistered when you first install it on a
computer, even if you downloaded the program from the link
provided in the order confirmation email.
• In the popup window shown when you start the unregistered
version. Click on the button named “Enter Key”.
• Locate your registration key in the order confirmation email
(ESD version) or on the label delivered with your CD (boxed
version). The regkey should look like this EXAM-PLE5-REG8KEY2. We recommend copying the regkey from the email and
pasting it into the registration code field to avoid errors. Also
make sure you do not mix up the letter O with the number 0.
• Enter your full name in the first field labeled “name” and enter
you registration key in the third field labeled “registration code”.
3
WinBackup User Manual
Chapter 2. Overview
Backup Jobs and Backup Files
In WinBackup, all backups are created using Backup Jobs. A Backup
Job is a template that tells WinBackup which files or folders to
backup, how to store the backup and when to run scheduled backups.
You can create any number of Backup Jobs for backing up different
kinds of data. For example you might create a Backup Job named "my
emails" which is used to backup emails on a regular basis. By creating
Backup Jobs you only have to specify once which files to backup and
where to store the backup. The next time you need to backup your
emails you can simply select the "my emails" Backup Job and click
“Run Backup”. A Backup Job does not contain any data. It contains a
list of files and folders to backup as well as backup settings and
scheduling settings.
When you select a Backup Job and click Run Backup a Backup File is
created. The Backup File contains copies of all the files added to the
currently selected Backup Job. You can create any number of Backup
Files using a Backup Job, and you can also update or replace old
Backup Files to reflect any changes made to the original files. Backup
Files can be opened by double clicking on the file in the Windows file
manager or by opening the file from the Restore Section in
WinBackup.
Security Considerations
WinBackup supports password protection as well as strong
encryption. While password protection is probably secure enough for
most home users, advanced users or companies might prefer to use
strong encryption to protect sensitive files or emails even though this
makes backup operations run a little slower. When using encryption it
is very important to select a password that is long enough and cannot
easily be guessed. It is recommended that you use a sentence
containing at least 30 characters. It is also important that you do not
4
WinBackup User Manual
export your Backup Jobs to other computers, or store your Backup
Jobs along with the Backup Files since the Backup Job contains all the
security settings as well as an encrypted version of your password. By
keeping the Backup Jobs on the source computer your encrypted
backups can safely be stored on CDs or even on a shared server.
If you are using password protection and encryption, keep in mind that
if you forget or lose your password you will never be able to open or
restore your backups.
To prevent unauthorized users from starting WinBackup, you can
specify a start-up password from the Security Settings page in the
General Settings dialog. When using this feature, keep in mind that if
you lose the start-up password you will not be able to start
WinBackup on your computer.
You can open the General settings window by clicking on the General Settings
button at the top of the main window.
Organizing Backups
When running backups on a regular basis you will probably want to
schedule your backups to run automatically. If you do not keep your
computer running all night you may have to run scheduled backups
while you are using the computer. Since backing up your entire
harddrive may take several minutes, and can slow down your
computer considerably during this time, it is recommended that you
split your data into several backup jobs and run the more important
jobs more often. For example, you might schedule a backup of your
emails to run every day while a backup of your images is updated
every other week. Since emails does not require much space the first
operation will only take seconds while the second operation may take
several minutes. By splitting your backups into several jobs and by
running less important backups less often, you will get much better
backups that runs much faster.
5
WinBackup User Manual
Chapter 3. Creating Backups
3.1 Backup Jobs
Backup Jobs are used to store a list of the files and folders that you
would like to backup, as well as your backup settings and scheduling
settings for that Job.
To create a new Backup Job, click on the "Create Job" button. A new
Backup Job named “New Backup Job #” will be added to the Job list.
You can rename the backup job at any time by pressing F2, rightclicking and selecting "Rename Job" or by simply clicking on the
name of the currently selected Backup Job.
6
WinBackup User Manual
3.2 Selecting Files
After creating a new Backup Job you will probably want to add some
files or folders to it. To select which files or folders to backup, select a
Backup Job and go to the Add/Remove Files page.
From this page, which should look similar to the Windows file
manager, you can select which files or folders to backup by checking
the small boxes to the left of the names. A green checkmark means
that a file or folder will be included in a backup while a white
checkmark means that a folder contains files or folders that will be
included in a backup.
You can also use ins/del to select/deselect files
7
WinBackup User Manual
To navigate, use the folder tree to the left or double click on a folder
to open it. To backup files from the network you must first map the
network location as a network drive.
Right click the network icon on your desktop and select "Map Network Drive" if the
location is not already mapped.
At the bottom of the “Add/Remove Files” page you can see how many
files have been added to the backup as well as the total size of the
backup and the estimated total compressed size of the backup. These
numbers are updated automatically as you select or deselect files. Use
the estimated compressed size (or total size if you have disabled
compression) to determine if there is enough space on the target media
to store the backup.
Calculating the estimated compressed size is a complicated operation that may take
several seconds or even minutes if you select a large number of files or an entire
harddrive.
You can sort files and folders by name, size, type or last modified by
clicking on the column headers above the file list. Clicking on a
column header a second time cause the files to be sorted in reversed
order. Folders will always be located at the top of the list to simplify
navigation.
As you may have noticed, WinBackup shows the size of folders as
well as files. While file sizes are immediately available folder sizes
must be calculated by adding the size of all files contained in the
folder and all its subfolders. Since some folders may contain
thousands of files it may take a few seconds to calculate the size of the
topmost folders
8
WinBackup User Manual
3.3 User Data
Besides normal files, WinBackup also shows User Data in the tree
view to the left. In the User Data folder you will find shortcuts that
makes it easy to backup a number of important user files that can
otherwise be very difficult to locate. For example, the User Data
folder might include Emails (if you are using Microsoft Outlook),
Internet Favorites, The Desktop and My Documents.
WinBackup will only show User Data shortcuts for the currently
logged in user. To backup user data owned by other users you need to
log in to these accounts and run the backups from there.
When you select a User Data folder the list view to the right will not
be updated and will continue to show the contents of the last normal
folder selected. This is because User Data is stored in different ways
on different systems and consequently it would not be meaningful to
show the actual files. You might also have noticed that on some
systems, selecting the entire user data folder will add more files to the
backup than selecting all of the subfolders one by one. This is because
there are other user files not listed by WinBackup. After selecting a
User Data folder you can always find out exactly which files have
been selected by looking in the normal folder structure.
9
WinBackup User Manual
3.4 Searching
If you want to backup only certain files or folders, or files with a
specific extension that are located in many different folders on your
harddrive you can use the search feature to find and select files or
folders that match your search criterias.
The WinBackup search feature works just like search in the Windows
file manager. First you must select a drive or folder to search. This is
done by entering a path in the "Look In" field or by clicking on the
browse button to the right. After selecting a location you can search
for any file or folder containing the keyword entered in the "Search
For" field. You can use * to represent any string. For example
searching for a*.bmp will return all bitmap files starting with the letter
a. You can select files or folders from the search results list by
clicking on the small box to the right of the name. To cancel the
search operation, click on the search button while searching.
10
WinBackup User Manual
3.5 Excluding File Types
When creating backups you often want to exclude files with certain
extensions to save space and speed up backup operations. For example
you might want to exclude temporary files with the extension .tmp or
bitmaps. To exclude files, go to the Backup Jobs page and open the
Backup Settings dialog.
Check the "Exclude files ending with" box and enter the extensions in
the text field below. To exclude .tmp and .bmp files, enter the
extensions separated by commas (for example "tmp,bmp") in the text
box.
Do not include the dots when entering extensions.
11
WinBackup User Manual
3.6 General Backup Settings
From the backup settings window you can, apart from excluding files,
also control other aspects of how backups are created and stored when
using the current Backup Job.
The first setting controls how backups are created. By selecting “Total
Backup” you will always create a new Backup File, replacing any
Backup File that might already exists with the same name. This is the
recommended setting unless you are creating a very large backup and
speed is an issue. If you creating a large backup, select “Changes
Only” to update an existing backup file instead of creating a new one.
While updating an existing file is much faster than creating a new one,
this will also increase the size of the Backup File every time a
modified file is updated.
You can also run a total backup every month and update changes every day to gain
speed while keeping the size down.
12
WinBackup User Manual
The "Copy existing to" field can be used to copy an existing Backup
File to a new location before updating or replacing it. This feature is
useful if you want to keep two separate backups to ensure that there is
always a valid backup file.
When the "compress files to save space" option is enabled, Backup
Files will be compressed to minimize their size. Compression is
enabled by default and is recommended in most cases. In some cases,
however, you might want to disable compression to speed up backup
operations.
The estimated compressed size tells you in advance approximately how large the
Backup File will be with compression enabled.
If you need to backup files that are usually locked by other programs,
like outlook emails or a database, you can use the “Stop Processes
Before Running Backup” option to stop any process using those files
before the backup operation is started. To stop a program before
running a backup job, add the name of the executable without path to
the stop list. For example, adding outlook.exe to the stop list and
enabling the “Stop Processes Before Running Backup” feature would
stop outlook before running this backup job.
The “split backup into X Mb files” can be used to split your backup
into several files of any size. This option is useful when you want to
store you backup files on floppy disks, zip drives or other medias.
By enabling the verify option your backups will verified after it has
been completed. Since WinBackup automatically detects problems on
the fly when creating backup files, verifying backups is usually not
necessary but can useful if you want maximum security.
13
WinBackup User Manual
3.7 Security Settings
The Backup Settings window also includes a number of security
settings that can be found on the Security Settings page.
To enable password protection, check the "Require Password to
Access Data" box at the top. When this feature is enabled, all Backup
Files created with the current job will require a password to be
opened. When using password protection keep in mind that if you lose
your password you will not be able to view, restore or otherwise
access the files contained in the Backup File. When selecting a
password or a passphrase it is also important to realize that longer
passwords or passphrases are often much harder to guess and therefore
more secure.
From the Security Settings page you can also select which security
level to use when executing the current Backup Job. By selecting the
appropriate security level you can protect your files while minimizing
the time it takes to run a backup. Selecting "no encryption" will make
backups run faster, but is not as secure as 128 or 256 bit encryption.
Still, if you are using compression, accessing your files will be very
difficult even when no encryption is used so this setting is probably
secure enough for most users. If you are backing up sensitive
information or if you are storing your backups on a shared server (or
some other location that can be accessed by other users), you might
14
WinBackup User Manual
prefer to use 128 or 256 bit AES encryption which will make it nearly
impossible to open your backup files without the correct password.
Keep in mind though that no matter what encryption you use, you still
have to select a password that cannot easily be guessed.
It is recommended that you use a sentence containing at least 30 characters.
15
WinBackup User Manual
3.8 Scheduled Backups
For your backups to be of any use at all, it is absolutely critical that
they are updated regularly. If your latest backup is one month old, you
could lose one month of hard work, or even worse, you could lose
irreplaceable data or emails forever. The only way to keep your data
reasonably safe from hardware failures as well as virus attacks is to
run backups on a regular basis. Emails and other data that changes
from day to day should probably be backed up daily.
While you could backup your files manually every day, most users
prefer to schedule backups to run automatically. WinBackup comes
with a built-in scheduler that can be used to start a backup operation at
any time, on daily weekly or monthly basis. To schedule a backup you
must first select a Backup Job. (Since you can use different scheduling
settings for each Backup Job, you can also schedule more important
backups to run more often.) After selecting a Backup Job, click on the
"Schedule Backup" button to open the scheduling settings. To use
schedule the current backup job to run automatically, check the
"Schedule Backup Job" box at the top. (To stop a Job from being
started automatically by the scheduler you simply disable this option.)
You can select how often you would like to run the Backup Job from
the "Run Backup Every:" drop down menu. If you select "Week" or
"Month" you will also have to select on which days of the week or
days of the month to run the Job (You have to select at least one day).
Use the "Run Backup At:" box to select a time of day to run the
Backup Job at.
16
WinBackup User Manual
3.9 Saving Backup Files to CD/DVD
If you have a CD/DVD Writer installed in your computer you can
save backups directly to CDs or DVDs. To save a backup to a
CD/DVD, click on the CD writer icon next to the browse button and
select your CD writer from the popup menu. A default file name will
be created. When writing a backup to CD you can either overwrite the
CD or continue the CD. If you select overwrite the contents of the CD
will be overwritten (A CDRW or DVD-RW will be erased and
formatted). If you choose “continue media”, new backup files will be
added to the inserted disc as long as there is enough free space (Make
sure that the inserted disc has not been closed). If you select the
“changes only” backup mode in file settings, “continue media” will be
enabled automatically.
When writing to CD you should also specify a location for temporary
files.
(Default: C:\Program Files\LIUtilities\WinBackup\Temporary Files\)
If you have multiple harddrives installed, using a second harddrive for
temporary files can improve performance considerably.
If you are using the “Changes Only” setting you should leave the temporary file in
place.
If the “Erase CDRWs without asking” option is enabled, WinBackup
will automatically erase CDRWs before writing the new Backup File.
This option is very useful if you want to schedule a backup to be written to the same
CDRW every night, since you can simply leave the CDRW in the CD Writer. When
using this option you should be very careful not to leave important CDRWs in the
CD Writer while using scheduled backups
If the backup is to large to fit on a single CD or DVD it will
automatically be spanned across multiple discs.
Writing to CDs or DVDs is a complicated and sensitive process. Make
sure there are no other programs interfering with WinBackup while
you are writing to CDs. If you have any problem writing to CDs, visit
our support pages at www.liutilities.com/support/
17
WinBackup User Manual
Chapter 4. Restoring Files
4.1 Viewing Backup Files
To open a Backup File, go to the "Restore" page and enter the
filename in the "Restore From File:" field or click on the browse
button to the right and select a Backup File.
After opening a Backup File you will see the contents of the file in the
tree and list views below. The folder structure in a Backup File should
look exactly like the original structure, containing only the files and
folders that where added to the backup. If you have added User Data
to the backup, those files will be shown both as files in the folder
structure and as User Data shortcuts.
After opening a Backup File in restore mode you can open individual
files or folders directly by selecting them and pressing F9 or by right
clicking on a file and selecting Open from the popup menu. Files will
18
WinBackup User Manual
be opened using the associated program and folders will be opened
using the Windows file manager. When opening files or folders
directly the files will be restored to a temporary directory and opened.
You should not attempt to edit or save changes to files or folders
opened this way since changes will not be saved to the backup file and
will be lost when WinBackup is closed. Files or folders larger than
25MB cannot be opened directly. To access these files or folders;
restore them to an alternate location or to a single folder.
19
WinBackup User Manual
4.2 Selecting Files
Selecting which files to restore works just like selecting files for
backup. To include a file in the restore operation you simply check the
small checkbox to the right of the name. You can also use ins/del to
select/deselect files.
When restoring files you can see the number of files currently selected
at the bottom of the restore page. You can also see the total size of all
selected files. Use this information to decide whether there is enough
space on the target drive to restore the selected files.
20
WinBackup User Manual
4.3 Target Locations
WinBackup allows you to restore files either to the original location,
or to an alternate location or a single folder. You can select how to
restore the files from the "Restore To:" drop down menu. If you select
"Other Location" or "Single Folder" you will also have to specify a
target location in the "Select Location:" field. When restoring to
"Other Location" the original folder structure will be restored in the
target folder. When restoring to a "Single Folder" all selected files will
be restore to the target folder regardless of their original location.
21
WinBackup User Manual
4.4 Restore Settings
To open the "Restore Settings" dialog, click on the "Restore Settings"
button at the bottom of the restore page. The Restore Settings tells
WinBackup when to replace files with the backed up copy and when
to keep the existing file. The default setting is "Don't replace files"
which will cause only missing files to be restored. Use this setting to
restore files that where accidentally deleted or otherwise removed
from your harddrive.
To restore all missing files and replace existing files that are older
than the backed up files, select "Replace Older Files Only". This will
cause files to be replaced whenever their last modified time is older
than the last modified time of the backed up file. This setting is often
useful when you have accidentally replaced your files with an older
copy and would like to restore the newer versions.
If you would like to restore all selected files and replace any file that
might already exists at the target location, select "Replace All Files".
This setting will cause WinBackup to overwrite existing files with the
backed up version, regardless of their last modified times. Use this
setting with care since it is very easy to replace newer files with older
backed up versions. This option can be very useful, for example, if all
your Word Documents have been infected by a script virus and you
need to replace the files with the backed up versions.
When restoring email to outlook express or outlook, keep in mind that
all emails are stored in a single file and that restoring this file will
erase all emails received after the backup was created. We recommend
restoring the email files to an alternate location and importing the
emails from outlook to avoid this problem.
22
WinBackup User Manual
Chapter 5. Log
5.1 Viewing Log Entries
The WinBackup log is shown every time you run a backup or restore
operation and contains detailed information about all executed backup
and restore operations and scheduled operations, as well as
information about any problems that might have occurred. The log can
be opened at any time by clicking on the "Log" button at the top of the
main window. The log contains one line per event. The following
example shows what the log might look like after running two backup
operations, the latest one being cancelled by clicking "Cancel" in the
WinBackup status window.
2002-09-24 12:08:10
2002-09-24 12:08:08
2002-09-24 12:07:58
2002-09-24 12:07:47
Backup Operation Cancelled, Elapsed Time: 00:00:02, Backup Operation Cancelled by user
Backup Operation Started, Job: test, Target: C:\test.wbb
Backup Operation Completed, Elapsed Time: 00:00:10, Target Size: 24,4 MB
Backup Operation Started, Job: test, Target: C:\test.wbb
As you can see the log tells you when the operation was started, which
Backup Job was executed and where the Backup File was saved.
Unless the program is abruptly terminated, a second line will be added
as soon as the operation is completed (or cancelled). If the operation
completed successfully this line will be shown in green and otherwise
it will be shown in red. The colors make it very easy to spot problems
in the log and help you solve problems more quickly. If the backup
operation completed successfully, the second entry will tell you how
long it took to run the backup as well as the size of the resulting
backup file. If, on the other hand, the backup was cancelled, you can
find the elapsed time as well as the reason for cancelling the operation
at the end of the second line.
23
WinBackup User Manual
5.2 Log Settings
Since the log can get quite long after using WinBackup for some time,
you might want to reduce the number of lines actually shown by
changing the "Maximum Number of Log Entries Shown" settings in
the General Settings dialog. You can open the General Settings
window by clicking on the General Settings button at the top of the
main window.
24