1
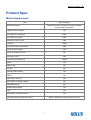
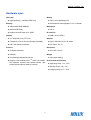
HOLUX FunTrek 132
FunTrek 132
User Manual
Holux Technology Inc.
HOLUX FunTrek 132
Copyright Declaration
HOLUX is trademarks of HOLUX Technology, Inc.
All other trademarks belong to registered companies.
The contents of this manual will be modified without further notice.
Without the written consent of HOLUX Technology, Inc, this manual may not be translated or copied.
Copyright HOLUX Technology, Inc. All rights reserved.
Software Copyright
FunTrek 132 software is China and international copyright law protection. Copyright HOLUX Technology, Inc.
All rights reserved. Other products mentioned herein and company names are trademarks of their respective
owners.
ii
HOLUX FunTrek 132
Product Caution
About operation environment
The operating temperature for the product is between -10℃~60℃.
Operating or recharging in an environment with a temperature over 45℃ might cause the system
malfunction. However, this should be considered a normal phenomenon. Please do not operate under
extreme temperatures.
About the altimeter
The device estimates altitude based on air pressure. Its means that altitude readings for the same location
may vary with air pressure changes.
The semiconductor pressure sensor used by the device for altitude measurements also is affected by
temperature. When taking altitude measurements, make sure the device is not subjected to temperature
changes.
Do not use this device for measuring altitude in applications that demand professional or industrial level
precision.
Do not rely upon this device for altitude measurements or perform button operations while sky diving,
hang gliding, or riding a gyrocopter where there is the chance of sudden altitude changes.
The air inside of a commercial aircraft is pressurized. Because of this, the readings produced by this
device will not match the altitude readings announced or indicated the flight crew.
Power safety precautions
Use the power adapter and USB cable that are included with the package. Using other power adapters or
USB cables than the one provided will result to malfunction and could proof to be dangerous.
The device should only be used with the supplied batteries.
About the power adapter
1.
Do not use the power adapter in a wet environment. When hands and feet are wet, do not touch the power
adapter.
2.
While using the power adaptor, ensure that the area is well ventilated. Do not let paper or other material
cover the power adaptor, as this will interfere with cooling. Do not use the power adaptor whilst it is in a
bag.
3.
Do not attempt to repair the device. If device is damaged or is in a wet environment, replace the device
immediately.
4.
It is not recommended to charge from a PC because the PC power voltage is not enough to supply the
device.
iii
HOLUX FunTrek 132
About the battery
1.
Use only the original factory approved power adapter.
2.
A Lithium battery is built into the device. To prevent fire or skin burns, do not disassemble, pierce, impact,
or expose the battery to fire. The battery will crack, explode, or release dangerous chemicals if placed in a
fire.
Important instructions
1. Note: Replacing with an incorrect battery may result in an explosion. When disposing of the battery, follow
the instructions. The replacement battery must be a factory approved original.
2. Regulations must be observed when recycling or disposing of batteries.
3. The battery should only be used in this device.
Normal care and maintenance
FunTrek 132 is a product of superior design and craftsmanship and should be treated with care. The following
suggestions will help you protect your warranty coverage.
1.
If your device does get wet, remove the battery, allow the device to dry completely and then replace the
battery.
2.
Use a soft clean cloth to wipe the screen.
3.
Do not use or store the device in dusty, dirty areas. Accessories can be damaged.
4.
Do not store the device in hot areas. High temperatures can shorten the life of electronic devices, damage
batteries, and warp or melt certain plastics.
5.
Do not store the device in cold areas. When the device returns to its normal temperature, moisture can
form inside the device and damage electronic circuit boards.
6.
Please do not disassemble the product other than in accordance with the user manual. This may void the
warranty and damage the unit.
7.
Do not drop, knock or shake the device. Rough handling will break internal circuit boards and fine
machinery.
8.
Do not use harsh chemicals, cleaning solvents, or strong detergents to clean the device
9.
Do not paint the device. Paint can clog the moving parts and prevent proper operation.
10. Please remember to back up important information such as track log, waypoints, and routes.
11. Sometimes you can reset the device to ensure the best operation status, please turn off the power and
remove the battery.
These proposals are only applicable to FunTrek 132, its battery, charger or any other accessories.
iv
HOLUX FunTrek 132
Product introduction
Receiver function:
GPS Positioning:
:Hidden antenna design, high-sensitivity GPS receiver chip can do quick positioning.
Electronic compass:
:Provides direction for location information, with compass function.
Altimeter:
:Measure the altimeter by using the GPS altitude and pressure altimeter calibration.
Touch screen LCD: A high resolution color, touch screen TFT LCD with backlight.
Water resistant: IPX6 Waterproof
Language support:
:Simplified Chinese/ Traditional Chinese/ English
Chinese/ English handwriting input: Support Simplified Chinese/ Traditional Chinese/ English
handwriting functions.
Memory:
:Use micro SD card to store waypoints, routes and navigation map. It is can be used as a
removable storage device (flash drive).
Navigation record:
Record information : Store waypoints (including coordinates, altitude etc), track log (including
coordinates, altitude etc), and edit routes.
Display information:Contains waypoints, track log, routes, speed, track distance, moving average speed,
vertical speed, altitude change, heading, location, reducing the carbon content, and slope, and the other
40 Trip Computer. It also displays the changes on altitude maps information chart.
Support Map:
:Support all kinds of navigation maps that were developed for FunTrek 132.
Outdoor function:
Alert setting:
:You can set the alert for altitude, speed, distance and time. It can be used for outdoor
climbing.
ANT+ Heart rate monitor:
:With ANT+ heart rate monitor sensor to measure heart rate.
ANT+ bike cadence sensor:
:With ANT+ cadence sensor to measure cadence.
ANT+ bike speed sensor:
:With ANT+ speed sensor for bike.
v
HOLUX FunTrek 132
Application functions:
:
G-Finder:
:Use the G-Finder feature to calibrate points in order to measure the field area.
Coordinate Datum switching:
:Support Beijing1954, Xian 80, Taiwan TWD 67, TWD 97 and WGS 1984
coordinates system which are switchable. You also can set more than 250 coordinates.
Area calculation:
:Measures area for Resources Field Survey.
Average location:
:Calculate average value of coordinates and average altitude.
Other application:
:Contains calendar, calculator, stopwatch, and Geocaching.
Electronic map database:
:
Maps characteristic:
:FunTrek 132 is pre-installed China’s (or Taiwan) factory for land-based electronic
navigation map on a 2GB microSD card. Its virtual map supports turn-by-turn navigation.
Maps characteristic:
:The map contents include highway, state and provincial roads, and all other road
information; details on the road map of cities across the country generally.
Point of Interest (POI) information:About 5 million in mainland China, Taiwan, more than 310,000 points
of interest, including landmarks, attraction, restaurants, gas station all kind of facilities, institutions,
information-rich to meet the needs of various types of queries. It supports fast and easy search functions
based on the category or the manual text entering query.
FunTrek 132 has a variety of GPS applications, not only hiking, bike, also a best partner for car driving to
outdoor, which is a convenient tool for the measurement work that is truly full-function handheld product.
vi
HOLUX FunTrek 132
Table of Contents
Copyright Declaration............................................................................................................................................ii
Software Copyright................................................................................................................................................ii
Product Caution....................................................................................................................................................iii
Product introduction ............................................................................................................................................. v
Table of Contents ................................................................................................................................................vii
Product Spec ........................................................................................................................................................ 1
Main program spec ....................................................................................................................................... 1
Hardware spec .............................................................................................................................................. 2
Unit Overview................................................................................................................................................ 3
Basic Operation.................................................................................................................................................... 4
Power on and off ........................................................................................................................................... 4
Charging Battery ........................................................................................................................................... 4
Install/ Remove microSD card ...................................................................................................................... 4
Power on and Positioning ............................................................................................................................. 5
Right button................................................................................................................................................... 6
Left button ..................................................................................................................................................... 9
Lock/ unlock the screen .............................................................................................................................. 11
Screenshot .................................................................................................................................................. 12
Main menu list .................................................................................................................................................... 13
Status bar .................................................................................................................................................... 13
Follow Course .................................................................................................................................................... 15
By Track ...................................................................................................................................................... 15
By Route ..................................................................................................................................................... 16
G-Finder ...................................................................................................................................................... 17
View Map............................................................................................................................................................ 18
Create Map ................................................................................................................................................. 19
Tracks ................................................................................................................................................................. 20
Search track log .......................................................................................................................................... 20
Track Detail ................................................................................................................................................. 20
Altitude/ Speed Plot..................................................................................................................................... 21
View Track................................................................................................................................................... 21
Edit track ..................................................................................................................................................... 22
Delete Track ................................................................................................................................................ 22
Copy to new ................................................................................................................................................ 23
View multiple Tracks ................................................................................................................................... 23
Mass Storage ..................................................................................................................................................... 24
Read the microSD card data....................................................................................................................... 24
Folders ........................................................................................................................................................ 24
Application.......................................................................................................................................................... 25
Shortcut....................................................................................................................................................... 25
Using an External Application ..................................................................................................................... 25
Training ....................................................................................................................................................... 27
Area calculation .......................................................................................................................................... 30
vii
HOLUX FunTrek 132
Geocaching ................................................................................................................................................. 34
Calendar...................................................................................................................................................... 36
Alarm clock.................................................................................................................................................. 36
Calculator .................................................................................................................................................... 37
Stopwatch.................................................................................................................................................... 37
Unit Conversion .......................................................................................................................................... 38
Health.......................................................................................................................................................... 38
Emer. (Emergency info) .............................................................................................................................. 38
Tips.............................................................................................................................................................. 38
Waypoints.................................................................................................................................................... 39
Routes......................................................................................................................................................... 45
Settings............................................................................................................................................................... 49
Personal ...................................................................................................................................................... 49
Sensors ....................................................................................................................................................... 52
System ........................................................................................................................................................ 56
Alerts ........................................................................................................................................................... 64
Profiles ........................................................................................................................................................ 65
About........................................................................................................................................................... 65
ezTour Plus Installation ...................................................................................................................................... 66
viii
HOLUX FunTrek 132
Product Spec
Main program spec
Item
Spec parameter
Operation interface
Simplified Chinese/ Traditional Chinese/ English/
Czech switching operation
Support external program
Yes
The numbers of waypoints
2000
The numbers of routes
1000
Waypoints of every route
1000
Track log
10000
The total number of sub-record
1000
Record by time interval
Yes
Record by distance interval
Yes
Atomically record
Yes
Continuous recording time
8 hours
Datum
Yes
Beijing 1954
Yes
Xian 80
Yes
Huzih Mountain system
Yes
TWD 67
Yes
WGS 1984 (TWD 97)
Yes
Users define Coordinate Datum
Yes
Coordinate format
Yes
Latitude and longitude
Yes
UTM
Yes
Users define coordinate format
Yes
Computing DGPS differences feature
MSAS, WAAS and EGNOS receiver system
1
HOLUX FunTrek 132
Hardware spec
GPS chip
Battery
High Sensitivity (-165dBm) GPS Chip.
Up to 15 hrs (Backlight off)
Removable & Rechargeable, Li-Ion 1150mAh
Memory
128M mobile DDR SDRAM
Waterproof
Internal 4GB Flash.
IPX-6
Support microSD card up to 32GB
IO interface
USB 2.0 (mini USB )
Display
3.0 ‘’WQVGA (16:9) TFT LCD
Adaptor
Transflective Touch Screen (Sunlight viewable)
Input: 100~240V, 0.5A, 50~60Hz
240 x 400 Pixels Resolution
DC output: 5V, 1A
Sensors
Dimension:
3D Digital Compass
58 x 105 x 23 mm
Altimeter
Weight
122g (with battery)
Auto backlight adjustment sensor
TM
Support 2.4G wireless ANT+
heart rate straps,
bike cadence sensors, bike speed sensors, and
combined bike speed/ cadence sensors.
Environment temperature
Operating Temp: -10℃~60℃
Storage Temp: -20℃~70℃
Charging temp: 0°C ~ 40°C
2
HOLUX FunTrek 132
Unit Overview
Component Function Description: (Front View)
Item
Description
Touch Screen LCD
The device is using the touch-screen control.
Right button
When the device is powered off, press the right button for 3 seconds to turn on this
device.
When powered on, press this button for 3 seconds to turn off.
Left button
When the device is powered on, press the left button to switch to the Main Menu,
Trip Computer page and Navigation.
LED
1. The LED flashes red when charging
2. The LED stop flashing but lights on when charging is complete.
3. The LED dims when the USB is unplugged.
4. The LED will first light on a second, and the opening screen appears on the
screen.
Component Function Description: (Rear View)
Item
Description
Battery lid
Press and push to open the battery lid for installing or replacing batteries.
Screw holes
Fix and secure screws.
Component Function Description:
Item
Description
USB port
Connect power or PC/NB for charger or data transfer.
Stylus Lanyard
You can attach the bundled stylus to the device.
Low Rear View
Front View
Back View
3
HOLUX FunTrek 132
Basic Operation
Power on and off
When device is turned on, press and hold the right button for 3 seconds to power off the device. The prompt
"Saving data… please wait." will appear while the device is powering off. When device is turned off, press and
hold the right button for 3 seconds to power on.
Note: Please do not power off the devices when you use the “Training” or “Area calculation” functions, the track
log can’t be saved normally.
Charging Battery
You may choose one of the following methods to charge the device.
1. Connect the USB adapter to a wall outlet.
2. Connect the USB cable to your computer. For details, please refer to the charging mode
3. If the supplier includes with a car power adapter, plug the respective ends of the device to the card
cigarette lighter and the USB cable interface in order to charge the device.
Charging mode
Connect FunTrek 132 to the PC with an USB cable. When the device is power off and connect to the PC, enter
charging mode.
Install/ Remove microSD card
Step:
1.
Open the battery lid and remove the battery.
2.
Insert microSD with its chip facing down and flat into the microSD slot and push upward to lock the
microSD card slot.
3.
To remove the microSD card, unlock the SD socket and remove the SD card.
4
HOLUX FunTrek 132
Power on and Positioning
First positioning
Please take the device out of the room, and turn on the device. Then enter into the satellite status page to
displays the position status. When searching satellite signal will display “Acquiring”. “2D Fixed” means the
positioning status mode. “3D fixed” means the coordinate information is available for reference.
Only after the positioning is successfully for the first time, it will begin to record the track.
General positioning
Once starts up, it will automatically do the positioning.
Satellite status page
Positioning precision
Positioning status
Satellite number
WGS1984 coordinate value
User define coordinates value
GPS measured Height
GPS Estimated Position Error
Satellite signal strength
GPS signal's CN value
Cold start
Average location
5
HOLUX FunTrek 132
Right button
Backlight
Step:
Press the right button once to enter the operation page as shown above.
Click the
button to increase/decrease the backlight brightness.
Auto Light
FunTrek 132 is equipped with a sensor that automatically detects the ambient light level and adjusts the
backlight brightness to save power.
Step:
Press the right button once to enter the operation page.
Select
in the backlight adjustment area and the backlight brightness will be automatically adjusted
to suit the ambient light.
New Track
Step:
Press the right button once to enter the operation page.
The middle area of the screen shown as
Automatically record: Users have to complete the satellite positioning and altimeter calibration when they
first powered on. The device will record track log automatically.
Manually record: press the
is the operation area.
button to enter the new a track log. On the page, users can edit name,
6
HOLUX FunTrek 132
notes, and view sport modes.
Press the
button to save the track log, and start to record.
Press the
button to pause recording; press the
Press the
button to stop recording, and save the track data.
button to start/continue recording.
Note:
Track log name can be input up to 20 words, notes can be input up to 50 words.
When device is manually powered off, the track log will be automatically saved.
The track log will be lost if power is accidentally interrupted or the battery is removed after a crash.
New checkpoint
After adding a track, you can create a checkpoint on the track.
Step:
Press the right button once to enter the operation page.
The right bottom of page is the area to mark checkpoint
. Press the
button to enter the checkpoint
edit page. You can edit checkpoint name, add notes, edit checkpoint coordinates location and input
checkpoint altitude.
Click “location” button to define the checkpoint coordinates. Press the
button to set coordinates
formate and system. Press the
button to save the coordinates edit result.
Click “altitude” button to define the altitude information of checkpoint Press the
altitude editing result.
When completed, return to checkpoint edit page, and press the
information.
button to save checkpoint
Note: Checkpoint name can be input up to 20 words, notes can be input up to 50 words.
7
button to save the
HOLUX FunTrek 132
New waypoint
Step:
Press the right button once to enter the operation page.
The bottom of page is the area to mark waypoints
. Press the
button to enter the waypoint edit
page. You can edit waypoint name, select waypoint symbol, add notes, edit waypoint coordinates location
and input waypoint altitude.
Click “location” button to define the waypoint coordinates. Press the
button to save the coordinates edit result.
and system. Press the
Click “altitude” button to define the altitude information of waypoints Press the
altitude editing result.
When completed, return to waypoints edit page, and press the
button to set coordinates formate
button to save waypoints information.
Note: Waypoint name can be input up to 20 words, notes can be input up to 50 words.
8
button to save the
HOLUX FunTrek 132
Left button
Trip Computer
Step:
Press the left button once to enter the Trip Computer.
In the Trip Computer page, you can view travel distance, travel time, current speed and altitude, and the
other 40 Trip Computer.
Use the
button to check more navigation data.
Change Trip Computer Items
Step:
Press the setting button
. You can select the item that you want to change. Click the item to enter the
Trip Computer list, and use the up/down button to flip page and search.
Select the item to be added, press confirmation button to change.
9
HOLUX FunTrek 132
Page Display Selection
In the Trip Computer, press the
displayed on the screen.
button. You can use
and
buttons to change the number of pages
: displays 3 items of Trip Computer on screen.
: displays 8 items of Trip Computer on screen.
View statistical curve
FunTrek 132 can record the height, speed, pressure, time and distance curve for the user to view the analysis.
Step:
Press the left button once to enter the Trip Computer.
Press the
Click the two trip information areas on the top of page, you can switch the item. You can select from the
items: “Time”, “Location”, “ALT”, “Speed”, “Heart Rate”, “Cadence” and “Air Pressure”.
Press the
button to switch axis. User can select the axis item to display to the altitude, speed, Heart
Rate, Cadence, pressure chart according to its changes with time or distance.
Use the
When you change the graph scale, use
button, and enter the statistical curve page.
and
buttons to zoom in and zoom out the altitude chart.
to return normal status.
Note: If you didn’t record track log, the device doesn’t have the altitude, speed, and pressure information and it
also doesn’t display the statistical curve.
10
HOLUX FunTrek 132
Compass
Step:
Press the left button once to enter the Trip Computer.
Press the
button to enter compass page. On the compass page, you can view current direction,
azimuth and compass.
Compass which has not done with its calibration can not accurately show the direction. Press the
button to calibrate the compass. For details, please refer to the Compass.
General information
Step:
Press the left button once to enter the Trip Computer.
Press the
button to enter general page. Users can view GPS coordinates information, GPS signal
strength, DOP and Time.
Lock/ unlock the screen
If the screen is unlocked, press the left button for 3 seconds to lock the screen, the message of "Screen
locked” appears on the screen. The “unlock" message pops up on the screen if press the left button for 3
seconds. Once the screen is locked, press the left button for 3 seconds to unlock the screen.
11
HOLUX FunTrek 132
Screenshot
FunTrek 132 can take a screenshot and save as a picture. Press both the left and right buttons at once to take
a screenshot. If screenshot is successful, a prompt will appear. When the FunTrek 132 is connected to a PC in
storage mode, the saved screenshot can be accessed in the "sc" folder.
Note: Do not use the capture screen function when the screen is locked.
12
HOLUX FunTrek 132
Main menu list
When the device turned is on, the status bar is displayed on the top of main menu. The six icons are function
lists in below of main menu.
Status
Main Menu
Status bar
Satellite information
Icon
/
Description
Operation
The signal strength / GPS positioning
Click the icon to enter the satellite page
Time
Icon
Description
Operation
Time information
Click the icon to enter
Alarm is turned on
Click the icon to enter. Please refer to
Alarm.
Alarm is turned off.
Click the icon to enter. Please refer to
Alarm.
Note:GPS positioning should be enabled to ensure that the correct time is displayed.
Power message
Icon
Description
Operation
Power message
Click the icon to enter.
Storage mode
Icon
Description
Operation
Track and waypoint data stored in microSD card.
Please refer to Storage media
Track and waypoint data store in internal
memory.
Please refer to Storage media
13
HOLUX FunTrek 132
Heart rate monitor (HRM)
Icon
Description
Operation
HRM sensor is turned on.
Please refer to Heart Rate Monitor
HRM sensor is turned off.
Please refer to Heart Rate Monitor
Cadence
Icon
Description
Operation
Cadence sensor is turned on.
Please refer to Cadence
Cadence sensor is turned off.
Please refer to Cadence
Compass
Icon
Description
Operation
Compass calibrated
Please refer to Compass
Compass requires calibration
Please refer to Compass
Description
Operation
Alarm clock
Icon
Alarm is turned on.
Please refer to Alarm
Alarm is turned off.
Please refer to Alarm
Backlight
Icon
Description
Operation
Backlight is on.
Please refer to Backlight
Backlight is off.
Please refer to Backlight
Locked the screen
Icon
Descript
Operation
The screen is locked.
Please refer to Screen Lock/ Unlock
The screen is unlocked.
Please refer to Screen Lock/ Unlock
Track log
Icon
Descript
Operation
The track log was recording.
Please refer to New Track
The track log was paused.
Please refer to New Track
The main menu contains four shortcuts, Application and Settings. For shortcut items can be set, the default is
“Follow Course”, “View Map”, “Tracks”, and “Mass Storage”.
14
HOLUX FunTrek 132
Follow Course
With Follow Course function, it can guide you to your pre-defined destination. The available options are “By
track”, “By route” and “G-Finder”.
By Track
When selecting the saved track, you can set several locations as ”Starting”, “Ending” or “Check point”
waypoints. And the waypoint location can be switched.
Step:
On the main menu, click “Follow Course” to enter the waypoint menu.
Click “By track” icon to enter the track waypoint menu.
On the track list, select the desired track record.
Select ”Starting”, “check point” or “Ending”, then select a location on the track as a waypoint.
After all settings are completed, it will display the G-Finder information.
Press the
button to view G-Finder screen.
Press the
button to import the customized map.
Note:
If the last location in the waypoints need to be set as the starting point, press you press
current location to be the starting point.
To import maps, refer to “Customized Map” section.
15
to switch the
HOLUX FunTrek 132
By Route
When selecting the saved track, you can set two waypoints as “Start point” or “End point”.
The selected track can be set as the destination of designated waypoints, and these two waypoints location
can be switched.
Step:
On the main menu, click “Follow Course” to enter the waypoint menu.
Click “By route” icon to enter the track waypoint menu.
On the track list, select the desired track record.
Select “Route name”, and set “waypoint name” position as the waypoint.
After all settings are completed, it will display the G-Finder information.
Press the
button to view G-Finder screen.
Press the
button to import the customized map.
Note:
If the last location in the waypoints need to be set as the starting point, press you press
current location to be the starting point.
To import maps, refer to “Customized Map” section.
16
to switch the
HOLUX FunTrek 132
G-Finder
The G-Finder enables users to mark their starting points. It helps you get the current position and distance from
where you started. This helps guide you to return to the starting point.
Step:
On the main menu page, click “Follow Course”.
Click “G-Finder”.
Press the
“Current position”: Current location will be set as the G-Finder point.
“User define”: Input coordinates value of the G-Finder point.
“Waypoint”: Select waypoint of the G-Finder point.
After all settings are completed, it will display the G-Finder information.
button to enter G-Finder points list.
Press the
button to view G-Finder screen.
Press the
button to import the customized map.
Note: If GPS has not completed the positioning, the information will not be displayed.
17
HOLUX FunTrek 132
View Map
With the map view, user can browse the tracks, waypoints, routes and areas. Following are the map features:
Press the
button to zoom in/out on the map.
Adding marker on the map: Press the
button to mark the location on the map. Press the
again to locate the position in the middle of the screen which makes it easier to browse.
Press the
If you have created your own map on the device, press
can enter the map screen.
Press the
North up: Maps of the northern part.
Front up: Equipment for the Northern direction.
Course up: Navigate direction up.
The track will show following status:
button
button to set the center of the screen position.
button and select the map name, then you
button to set the display including the three options: “North up”, “Front up” and “Course up”.
- the location is unknown.
- the location is found and at idle state.
- it is moving, and the direction of the movement is indicates by the direction of the arrow.
- the starting point of the path or route,
- the end of the track or route.
Note:
Because of the metal will cause “compass interference”, the “Front up” function will not be worked when
the device was installed on bike stem or put in car.
18
HOLUX FunTrek 132
Create Map
FunTrek 132 supports the Convert Tool to transfer smf map file, which enables user to create a new smf map
to be added in the device.
Steps:
Use Convert Tool to convert bmp, jpg, and other map images into smf map. Please refer to the Convert
Tool’s user manual.
In the Holux device or SD card, create a folder name “hmp”.
Place the converted smf file into the “hmp” folder, and start the FunTrek 132.
After you have created your own map on the device, press
you can enter the map screen.
Click on the map that you want to add, or you can view the converted map while browsing the map. You
can also close the new map.
button and select the map name, then
Note:
Customized map can be used to import tracks, waypoints, routes, or testing area as the map background.
To use Convert Tool to convert the image files (bmp, jpg, etc) into “smf” map image, please refer to
Convert Tool user’s manual.
To zoom in/out the map, you need to convert some images with different sizes into one smf map.
If you only convert to one size picture into the map, you cannot zoom in/out when browsing the map.
19
HOLUX FunTrek 132
Tracks
With Track management, you view, edit, or copy the track, or get the detail information of each track log. You
can also search for a particular track.
Notes: The recording log will automatically stop when the recording time or distance reaches its maximum
limit.
Search track log
Step:
On the main menu page, click “Tracks” to enter the track list.
Press the
After completed, press “confirmation” button to display the search result.
button to enter the input page. Enter the track log name or keywords.
Note: After search, if you exit the track management, it will no longer display the search results page. Next time,
enter the track management page to view all track lists.
Track Detail
Step:
On the main menu page, click “Tracks” to enter the track list.
Select the track that you will operate, click to enter the Track Menu.
Select “Detail”. Details vary with the different modes such as walking mode which includes the amount of
carbon reduction, the tree planting quantity. The car mode does not include the same functions as walking
mode.
20
HOLUX FunTrek 132
Note:
If you edit sport mode, press the
button to refresh the track information.
Altitude/ Speed Plot
With Altitude map, you can playback the track record to view the changes of the altitude.
Step:
On the main menu page, click “Tracks” to enter the track list.
Select the track that you will operate, click to enter the Track Menu.
Click “Altitude/ Speed Plot” to enter the altitude page. After drawing graphics, you can zoom in/out and
drag the graphic, view the altitude, speed, time, coordinates, and air pressure.
Click the two trip information areas on the top of page and you can switch those items. You can select
“Time”, “Location”, “ALT”, “Speed”, “Heart Rate”, “Cadence” and “Air Pressure” item.
Press the
button to switch axis. User can select the axis item to display to curve.
View Track
Step:
On the main menu page, click “Tracks” to enter the track list.
Select the track that you will operate, click to enter the Track Menu.
Select “view map”, the screen will display the track. You can zoom in or zoom out to change the scale. The
track name is shown on the top of the screen. Press the
21
button to set the map display direction.
HOLUX FunTrek 132
Press the
button and click the location on the map to mark a point.
Press the
button to move the point to center of the screen.
Edit track
Step:
On the main menu page, click “Tracks” to enter the track list.
Select the track that you will operate, click to enter the Track Menu.
Select “Edit” to edit track name, notes and sport modes.
If you change the sport mode, press the
button to refresh the track information.
Delete Track
Step:
On the main menu page, click “Tracks” to enter the track list.
Select the track that you will operate, click to enter the Track Menu and select “Delete”.
22
HOLUX FunTrek 132
Copy to new
Step:
On the main menu page, click “Tracks” to enter the track list.
Select the track that you will operate, click to enter the Track Menu.
Select “Copy Track” to enter the edit track page.
Press the confirmation button to copy.
View multiple Tracks
Step:
On the main menu page, click “Tracks” to enter the track list. Check the tracks you want to display.
You can select up to three tracks to be displayed at one time.
Select one of the tracks, you can still view multiple tracks on the map.
Note:
The FunTrek 132 stores one track per GPX file.
If a GPX file with multiple tracks is downloaded from the Internet, FunTrek 132 will display them as one
single track.
23
HOLUX FunTrek 132
Mass Storage
Read the microSD card data
Connect FunTrek 132 to the PC with a USB cable and turn on the device. On the main menu, click “Mass
Storage” icon to enter the storage mode.
Folders
In Storage mode you will be able to see the folders in the memory card.
Folder Name
Description
bg
Stores background pictures. The user can add or delete pictures in this folder.
map
Stores the navigation program.
sc
Store screenshot pictures.
track
Stores track files. The user can add or delete tracks in this folder.
route
Stores route files. The user can add or delete route in this folder.
wpt
Stores waypoint files. The user can add or delete waypoints in this folder.
update
Stores applications.
cache
Maps collection
hmp
Customized map
24
HOLUX FunTrek 132
Application
Application contains all main functions of FunTrek 132.
Shortcut
All functions in application page can be set as shortcuts on the main page.
Step:
On the main menu page, click “Application”.
Press the
Select the function that you will set as shortcut, and click to enter shortcut list. Select the location of the
shortcut, and return to the application page.
button to enter function list.
Using an External Application
User can add any third party navigation software developer (either from other countries or regions) into
FunTrek 132.
For example, SmartMaps installation:
Connect the device to the computer by using the USB cable. On the Storage Card (or SD card), create an
“app” folder. The same operation steps applied to Storage Card or SD card.
To install the third party software, copy the related file to the “Storage\app” folder.
25
HOLUX FunTrek 132
In the “Storage Card\app” folder, place the SmartMaps icon which is in PNG format. For example, the
filename is “smartmaps.png”. In the main menu, this icon represents the third party software’s icon.
In the “Storage Card\app” folder, create an INF file for SmartMaps. For example, “smartmaps.0409.inf”.
Refer to the following guideline:
name=SmartMaps
icon=\Storage Card\app\smartmaps.png
exec=\Storage Card\app\SmartMaps\smartmapspna.exe
To start using the application, launch SmartMaps on the “Main menu/Programs”.
Note:
Basically, user can execute the exe program and PNG images on any storage location on FunTrek 132.
Be sure that the inf file contains the correct path for name, icon, and exec.
Inf file information:
“name=SmartMaps” – the third party software name to be displayed on the main menu. If not specified, it
will be displayed as a “shortcut”;
“icon=\Storage Card\app\smartmaps.png” – the third party software icon in the main menu. If not specified,
or specify with the wrong path, the default short icon is FunTrek 132;
“exec=\Storage Card\app\SmartMaps\smartmapspna.exe” – the execution location. If it is not specified or
specify with the wrong path, the third party software will fail to launch.
Inf file is a setup file. You can create a txt text file, edit and save the file. Rename the txt file to inf file
format.
Inf file naming convention is the “Software name, Language ID number”. Language ID number have to
cooperate with FunTrek 132 languages. If FunTrek 132 main program is the Simplified Chinese version,
26
HOLUX FunTrek 132
the inf file name should be "Software Name .0804." (in Simplified Chinese). If the third-party software
operating language is English, and FunTrek 132 main menu displays third-party software in Simplified
Chinese names. Then English is used for the third-party software operation. If the language ID number
and FunTrek 132 language does not match, an error will occur when running the third-party software.
0409 is 4-digit language ID that represents American English, 0804 represent Simplified Chinese, 0404
represents Traditional Chinese.
Training
Connect your FunTrek 132 with the follow ANT+ sensors: heart rate, bike cadence, bike speed and/ or
combined bike speed and cadence..
Note: Before you use the Training function, please do the positioning first.
Please do not power off the device when you operate “Training” function, the track log can’t be saved
normally.
Step:
On the main menu page, click “Application”.
First connect heart rate monitor, bike cadence and bike speed sensor. Details reference for Screen
When you touch the screen, you can adjust the screen calibration if there is a difference on the response
location.
Step:
On the main menu page, click Settings.
Select “Sensor” to enter the sensor settings menu.
Select “Screen”, a confirmation message will appear on the screen. Press the confirmation button, and
start to calibrate screen.
After calibrating the screen, tap the screen or wait for 30 seconds to exit.
27
HOLUX FunTrek 132
ANT+ Heart Rate Monitor, ANT+ Bike Cadence Sensor and ANT+ Bike Speed Sensors sections. After
connected, it starts to receive the data. Click “Training” button to enter the training page.
“HR Grade”: Before you set the HR grade, please read the message that appears on the screen. Press
the
button to enter HR Grade list and select the appropriate heart rate range.
“Cadence Grade”: Before you set the Cadence grade, please read the message that appears on the
screen. Press the
button to enter cadence grade list and select the appropriate cadence range.
Users can define the cadence range. Click “User Define” to enter the minimum cadence value and press
the “confirmation” button. Next, enter the maximum cadence value and press the “confirmation” button to
save.
“Training Time”: Enter the training time, and then press the “confirmation” button to save.
Click “Last Training” to view the detail information of last training. It only displays the results of the recent
training. To view more information, press
.
“New Training”: Enter training page.
The training information page displays heart rate, cadence rage, speed, and training time, etc.
Note: The heart rate or cadence which is currently lower than the preset minimum value is displayed in green,
higher than the preset maximum value is shown in red, and displayed in white within the default display.
The training information page is based on the connection situation, then display different status:
28
HOLUX FunTrek 132
The sensor is disconnected, it displays as “---”;
The sensor is connected and the signal is good, it displays the data and the icon is blinking;
The sensor is connected, but the signal is poor and the display data shown is below than the minimum
value for 1 to 5 seconds, cadence and speed data decreases, the icon does not blinking;
The heart rate data is displayed as the last time, the icon does not blinking;
The sensor is connected, but the signal is poor or the display data shown is low for 6 seconds to 1 minute,
cadence and speed data are 0, and the icon is not blinking. The signal data is displayed as “???”, the alert
beep is on in every 10 seconds;
The sensor is connected and the poor signal lasts more than 1 minute, the cadence, speed and heart rate
are displayed as “---”.
FunTrek 132 training information range is: Heart rate 30-220bmp, Cadence 20-255rpm, Speed 2.4-244km/h.
Cadence, speed and heart rate data which are higher than the maximum value, the display will continue to
show the maximum value.
On the training information page, press the
button to flip to the HR or Cadence graphics page.
button to switch axis. In the graphics, the dark horizontal bands is the setting rage of heart
Press the
rate/cadence. Browse the charts for reference.
Click the heart rate/cadence chart at the top of the "altitude" or "speed" block to enter the information
option lists. Select different information to display on the chart.
In training process, press the “Back” button and a message appears on the screen. Press the
to exit the training, or press the
button to continue training.
When training is completed, pops up the training is finished. Press the
button to ends the training and
saves records. User can view multiple training records in the track management.
“Last training”: You can review the detail information of last training. Press the
information.
29
button
button to refresh the
HOLUX FunTrek 132
Area calculation
Area calculation can immediately measure the area, and the routes can be saved as a track log.
Available options are “By track”, “By vertices”, and “By fixed-width”.
By track
The track size is measured by the track length. To calculate the length, trace the route of the track log until the
end and return back to the starting point.
Step:
On the main menu page, click “Applications” to enter the Program menu.
Click “Area” icon to enter the area calculation page.
Select “By track” and press
button to enter track display page.
When completed, press the
button to display the measure of the track area.
Press
On the length/area unit page, press the
button to change the unit of length/area. Click “Unit of length”
or “Unit of area” button to enter the unit list. Users can click one of the unit buttons to “Move down”, “Insert
button to complete and save the result.
before”, “Insert behind” and “Delete” the unit. On this page, press the
30
button to add other units.
HOLUX FunTrek 132
Click “Price of length” or “price of area” button and input price of length/area. You can view the total price
of length/area on the track log display page.
Press the
button to save the track, and press the “OK” button to save the track log.
Note: Please do not power off the device when you use the “Area Calculation” function, the track log can’t be
saved normally.
By Vertices
Manually set vertices points to calculate the area enclosed by the vertices.
Step:
On the main menu page, click “Applications” to enter the Program menu.
Click “Area” icon to enter the area calculation page.
Select “By vertices” and press
At each vertex point, press
After determine several coordinates, press
completed.
When completed, press the
Press
button to enter track display page.
button to manually obtain the average surface area.
button to return to track; indicates that the setup has been
button to display the measure of the track area.
button to complete and save the result.
Note: If only one vertex is assigned, set the number of coordinates to 1. If 10 vertices are assigned, set the
number of coordinates to 10. The system will then automatically calculate the average to obtain the average
surface area.
31
HOLUX FunTrek 132
On the length/area unit page, press the
button to change the unit of length/area. Click “Unit of length”
or “Unit of area” button to enter the unit list. Users can click one of the unit buttons to “Move down”, “Insert
before”, “Insert behind” and “Delete” the unit. On this page, press the
button to add other units.
Click “Price of length” or “price of area” button and input price of length/area. You can view the total price
of length/area on the track log display page.
Press the
button to save the track, and press the “OK” button to save the track log.
By fixed-width
Enter the width length to calculate the track area to the destination. With the track distance and width length,
the size of the area can be calculated.
Step:
On the main menu page, click “Applications” to enter the Program menu.
Click “Area” icon to enter the area calculation page.
Select “By fixed-width” icon.
Click “Width” and “Unit” to input the width length and its measurement unit.
32
HOLUX FunTrek 132
Press
button to enter track display page.
Press
button to enter again “Width” and “Unit”.
When completed, press the
Press
On the length/area unit page, press the
button to change the unit of length/area. Click “Unit of length”
or “Unit of area” button to enter the unit list. Users can click one of the unit buttons to “Move down”, “Insert
button to display the measure of the track area.
button to complete and save the result.
before”, “Insert behind” and “Delete” the unit. On this page, press the
button to add other units.
Click “Price of length” or “price of area” button and input price of length/area. You can view the total price
of length/area on the track log display page.
Press the
button to save the track, and press the “OK” button to save the track log.
33
HOLUX FunTrek 132
Geocaching
Visit www.geocaching.com website to download the geocaching documents.
Information
The information includes “Difficulty”, “Terrain”, “Cache Size” and “Trackable” and Hints.
Step:
On the main menu page, click the “Applications” icon to enter the Program menu.
Click the “Geocaching” icon. The cache that has been found will be marked as
as .
Click Geocaching to view the information.
, contrarily, it is marked
Note: The FunTrek 132 can store up to 500 cache locations.
GeoRadar
Step:
On the GeoRadar page, press the
button to view the GeoRadar information.
Press
to mark the cache that has been found and added notes. If you don’t add any
note, it returns to the GeoRadar page directly.
Compass
Step:
On the GeoRadar page, click
Press the
button to view the compass information.
button of compass bottom page to return information page.
Mark Found
Step:
On the GeoRadar page, press the
button to mark found.
34
HOLUX FunTrek 132
Press the
button to mark not found.
Add Geocaching Notes
Step:
On the Compass page, press the
After adding the comments, it returns to the GeoRadar page.
button to mark found and add notes.
35
HOLUX FunTrek 132
Calendar
Step:
On the main menu page, click “Applications” icon to enter the Program menu.
Click “Calendar” icon to view the calendar page. Use the
button to change month.
Alarm clock
Step:
On the main menu page, click “Applications” icon to enter the Program menu.
Click “Alarm clock” icon to enter the Alarm clock page.
Press the
Press the
Press the
button to turn on the alarm clock.
button to save the value.
button to turn off the alarm clock.
Note:
When setting the alarm, do not select a date. When the alarm is on, the system will only ring once on the
set alarm. If you set the alarm earlier than the current time, it will ring on the next alarm.
When the alarm is ringing, select “keep repeat”, it will ring again after 10 minutes. It can be repeated 6
times.
When the device is power off, the alarm clock is still work. However during the power charging time, the
alarm clock will not work.
36
HOLUX FunTrek 132
Calculator
Step:
On the main menu page, click “Applications” icon to enter the Program menu.
Click “Calculator” icon to enter the Calculator page.
Note:
Input with up to 13 digits can be entered into the calculator.
If the result exceeds 13 places, it will be displayed using scientific notation.
Stopwatch
Step:
On the main menu page, click “Applications” icon to enter the Program menu.
Click “Stopwatch” icon to enter the Stopwatch page.
In timing process, users can pause or continue timing.
37
HOLUX FunTrek 132
Unit Conversion
Step:
On the main menu page, click the “Applications” icon to enter the Program menu.
Click the “Unit” icon. Users can converts units of length, area, weight and volume.
Click the input box and enter the value that you want to convert. You can do two conversions at one time.
Click unit name to convert units.
Health
Step:
On the main menu page, click the “Applications” icon to enter the Program menu.
Click the “Health” icon.
Select one of the options, click it to enter and view the Health Info.
Emer. (Emergency info)
Step:
On the main menu page, click the “Applications” icon to enter the Applications menu.
Click the “Emer.” icon to enter browser page.
Tips
Tips function can help user to understand FunTrek 132 and GPS knowledge. The default is
displayed at power on. Users can view all tips content in application function.
Step:
On the main menu page, click the “Applications” icon to enter the Applications menu.
Press the “Tips” icon to view the contents.
38
HOLUX FunTrek 132
Waypoints
Search waypoints
There are plenty of destinations that you can choose. Use the search function to quickly find the desired
destination.
Step:
On the main menu page, click the “Applications” icon to enter the Program menu.
Click the “Waypoints” icon.
Click the
Press the confirmation button to display the searching results.
button to enter the input method page. Enter the key words of the waypoints.
Note: After search, if you exit the waypoints management page, it will no longer display the search results.
Next time, enter the waypoints management page to view all waypoints lists.
Waypoint detail
Step:
On the main menu page, click the “Applications” icon to enter the Program menu.
Click the “Waypoints” icon.
Select the point that you will operate, click to enter the Waypoints menu.
Select “detail” to view the detail information of the selected waypoint.
39
HOLUX FunTrek 132
View map
Step:
On the main menu page, click the “Applications” icon to enter the Program menu.
Click the “Waypoints” icon.
Select the point that you will operate, click to enter the Waypoints menu.
Select "Browse”, the screen will display the waypoint position.
Press the
button and click the location on the map to mark a point.
Press the
button to move the point to the center of the screen.
40
HOLUX FunTrek 132
Edit waypoints
Step:
On the main menu page, click the “Applications” icon to enter the Program menu.
Click the “Waypoints” icon.
Select the point that you will operate, click to enter the Waypoints menu.
Select “Edit” to enter the waypoint edit page. You can edit waypoint name, select waypoint symbol, add
notes, edit waypoint coordinates location, and input waypoint altitude. On “Coordinates input” page, press
the
button to set the condinates format and system.
Press the confirmation button to delete.
Delete waypoints
Step:
On the main menu page, click the “Applications” icon to enter the Program menu.
Click the “Waypoints” icon.
Select the point that you will operate, click to enter the Waypoints menu.
Select “Delete”. The confirmation message appears on the screen.
Press the confirmation button to delete.
41
HOLUX FunTrek 132
Reposition
With reposition, you can use the current point to replace the original coordinates with the updated waypoints
coordinates.
Step:
On the main menu page, click the “Applications” icon to enter the Program menu.
Click the “Waypoints” icon.
Select the point that you will operate, click to enter the Waypoints menu.
Select “reposition” to update the waypoints coordinates to the current location coordinates.
When repositioning is completed, a message appears on the screen. Press the "confirm" button.
If GPS does not acquire the satellite signal, the device can not repositioning.
Average position
“Average position” calculates the average value of altitude the GPS sampling points and coordinates
information in order to obtain the accurate values on both altitude and coordinate information.
Step:
On the main menu page, click the “Applications” icon to enter the Program menu.
Click the “Waypoints” icon.
Select the point that you will operate, click to enter the Waypoints menu.
Select “Average position” to calculate current position and altitude.
When you have achieved the required sampling, press the
42
button to enter waypoint edit page. The
HOLUX FunTrek 132
waypoints’ coordinates value are replaced with the average coordinates value.
On the edit page, press
Press the
button to save the waypoint information.
button to calibrate altimeter by average altitude.
On the Location map of 10 meters, 20 meters or 30 meters radius, when the sampling point is focused on the
center, the average coordinate value is closely paralleled the true value.
On the Altitude map, the height value is the horizontal axis, and the origin of the horizontal axis is the average
height. When the sampling point is achieved, the average altitude value is closely paralleled the true value (as
shown on the first illustration above). If the same circumstances, if there is a sudden altitude changes, the
altitude reading will be inaccurate. It is recommended to measure it again when the GPS signal and situation
are in better conditions.
Copy to new
Step:
On the main menu page, click the “Applications” icon to enter the Program menu.
Click the “Waypoints” icon.
Select the point that you will operate, click to enter the Waypoints menu.
Select “Copy a new” to enter the waypoint edit page. You can edit waypoint name,
select waypoint symbol, add notes, edit waypoint coordinates location, and enter
waypoint altitude. On “Coordinates input” page, press the
condinates format and system.
Press the
button to set the
button to save the new waypoints.
Project to new
“Project to new” is the origin to a waypoint, enter the distance and azimuth to create a new waypoint.
Step:
On the main menu page, click the “Applications” icon to enter the Program menu.
Click the “Waypoints” icon.
Select the point that you will operate, click to enter the Waypoints menu.
43
HOLUX FunTrek 132
Select “Project to new” and enter the distance and bearing. Press the
Enter a new waypoint edit page, a confirmed coordinates and altitude information. Press the
create a project waypoint.
44
button to save.
button to
HOLUX FunTrek 132
Routes
You can use waypoints to build routes, and edit routes name, description, and points.
New routes
Step:
On the main menu page, click the “Applications” icon to enter the Program menu.
Click the “Routes” icon.
Press the
Click “points” to enter the point list. Click the
selects single or multiple waypoints.
After added waypoints, return to new routes page. Press the
button to enter a new routes page.
button to select waypoints add into the routes. User can
button to save the routes.
Notes:
Waypoints mean the route destinations.
Routes name can be input up to 20 words, notes can be input up to 50 words.
45
HOLUX FunTrek 132
Details
The details information contains name, length and area.
Step:
On the main menu page, click the “Applications” icon to enter the Program menu.
Click the “Routes” icon.
Select the route that you will operate, click to enter the Routes Menu.
Select “Details” to view the detail information of the selected route. After you have reached the
destinations, user can view the route name, comments, starting destinations. The starting and ending
points link to a closed areas perimeter and dimension, and the route creates the changes of date and
time.
View map
Step:
On the main menu page, click the “Applications” icon to enter the Program menu.
Click the “Routes” icon.
Select the route that you will operate, click to enter the Routes Menu.
Select “View map”.
46
HOLUX FunTrek 132
Edit
Step:
On the main menu page, click the “Applications” icon to enter the Program menu.
Click the “Routes” icon.
Select the route that you will operate, click to enter the Routes menu.
Select “Edit” to enter the route edit page. You can edit route name, add notes, edit route points.
Click “Points” to enter point list. Click the point that you will operate to enter the point operation menu. On
this page, you can “forward”, “backward”, “insert” and “delete” the points. Click the
waypoints to add into the routes.
button to select
Coordinates location and enter the waypoint altitude. On “Coordinates input” page, press the
to set the condinates format and system.
After edit waypoints, return to new routes page. Press the
button
button to save the routes.
Delete
Step:
On the main menu page, click the “Applications” icon to enter the Program menu.
Click the “Routes” icon.
Select the route that you will operate, click to enter the Routes menu.
Select “Delete” button and then a deletion confirmation message appears on the screen. Press the
button to delect the route.
47
HOLUX FunTrek 132
Copy to new
Step:
On the main menu page, click the “Applications” icon to enter the Program menu.
Click the “Routes” icon.
Select the route that you will operate, click to enter the Routes menu.
Select “Copy a new”, you can copy a new route name, description, and points.
After editing, press the
button to copy a new route.
Reverse to new
With “Reverse to new” function, you can create a route in the opposite direction with the original route.
Step:
On the main menu page, click the “Applications” icon to enter the Program menu.
Click the “Routes” icon.
Select the route that you will operate, click to enter the Routes menu.
Select “Reverse to new” to enter the route edit page.
Press the
button to create an opposite route.
48
HOLUX FunTrek 132
Settings
Personal
The Profile function contains “Odometer”, “Track Log”, “Age & Weight”, and “Background”.
Odometer
You can save trip information in ODO1 or ODO2.
Step:
On the main menu page, click Settings.
Select “Personal” to enter you personal settings list.
Select “Odometer” to enter “ODO1” or “ODO2”.
The default value is “ODO1”.
Note: “ODO1” and “ODO2” are the same functions that can save the trip information.
49
HOLUX FunTrek 132
Track Record
Manually/ Automatically record track
User can set the track record mode, select start tracking manually or automatically, and track the interval
recording time.
Step:
On the main menu page, click Settings.
Select “Personal” to enter your personal settings list.
Select “Track Log” to enter the track log mode.
Select “Manually” or “Automatically”. If "Manually" is selected you must use the right button to create a
new track in order to begin recording.
After restart the device, the new setting will be applied.
Log Interval
Select time or distance for log interval.
Step:
On the main menu page, click Settings.
Select “Personal” to enter your personal settings list.
Select “Log Interval” to open the menu. The two options are "Distance" and "Time".
Select "Distance" or "Time" to enter the enable/disable menu.
Select “Enable” to enter the time or distance interval.
50
HOLUX FunTrek 132
When completed, press the confirmation button.
Age & Weight
Step:
On the main menu page, click Settings.
Select “Personal” to enter your personal settings list.
Select “Age & Weight” to enter the personal information list.
Select each item in turn to enter appropriate information.
When completed, press confirmation button to save your setting.
Background
Step:
On the main menu page, click Settings.
Select “Personal” to enter your personal settings list.
Select “Background” to enter the “Background” menu.
You can add pictures to the list by loading the picture files to the “bg” file folder.
Note: FunTrek 132 only supports the “bmp” file format and the best resolution is 240×400 pixels.
51
HOLUX FunTrek 132
Sensors
Sensors contain “ANT+ Heart Rate Monitor”, “ANT+ Bike Cadence Sensor”, “ANT+ Bike Speed Sensor”,
“Compass”, “Altitude” and “Screen”.
Screen
When you touch the screen, you can adjust the screen calibration if there is a difference on the response
location.
Step:
On the main menu page, click Settings.
Select “Sensor” to enter the sensor settings menu.
Select “Screen”, a confirmation message will appear on the screen. Press the confirmation button, and
start to calibrate screen.
After calibrating the screen, tap the screen or wait for 30 seconds to exit.
ANT+ Heart Rate Monitors (optional)
52
HOLUX FunTrek 132
Search heart rate monitor sensor, the steps are:
On the main menu page, click Settings.
Select “Sensor” to enter the sensor settings menu.
Select “Heart Rate Monitor”, and press the “Search” button.
After searching match heart rate monitor sensor, the device will display the list.
Select the heart rate sensor that you need, and press the confirmation button to enable the function. The
heart rate information will be displayed on the left-key info page.
Users can enable or disable the sensor.
The details page displays the sensor’s information, such as S/N number; manufacture ID, model number,
hardware version, software version and R-R Interval.
The model number of Heart Rate Monitor sensor is 10.
ANT+ Bike Cadence Sensors (optional)
Step:
On the main menu page, click Settings.
Select “Sensor” to enter the sensor settings menu.
Select “Cadence Sensor”, and press “Search” button.
After searching match cadence sensor, the device will display the list.
Select the cadence sensor that you need, and press the confirmation button to enable the function. The
cadence information will be displayed on the left-key info page.
Users can enable or disable the sensor.
53
HOLUX FunTrek 132
The details page displays the sensor’s information, such as Serial number; manufacture ID, model number,
hardware version and software version.
The model number of Cadence sensor is 20.
ANT+ Bike Speed Sensors (optional)
Step:
On the main menu page, click Settings.
Select “Sensor” to enter the sensor settings menu.
Select “Speedometer”, and press “Search” button.
After searching match speed sensor, the device will display the list.
Select the speed sensor that you need, and press the confirmation button to enable the function. The
speed information will be displayed on the left-key info page.
Users can enable or disable the sensor.
User can calculate the wheel speed by specifying the wheel size. Please select the appropriate wheel size
from option lists or enter the specific wheel size.
The details page displays the sensor’s information, such as Serial number; manufacture ID, model number,
54
HOLUX FunTrek 132
hardware version and software version.
The model number of Speedometer sensor is 30.
Compass
To use the compass for the first time, the compass reading is not accurate; please calibrate the compass.
Step:
On the main menu page, click Settings.
Select “Sensor” to enter the sensor settings menu.
Select “Compass”. Press the
button to calibrate the compass.
Altimeter
Users can use GPS to calibrate or manually calibrate the altimeter.
Step:
On the main menu page, click Settings.
Select “Sensor” to enter the sensor settings menu.
Select “Altimeter” to view the option of altimeter calibration mode. You can select “GPS” or “Manual”
calibration.
If "Adopt GPS Altimeter" is selected, a confirmation message will appear on the screen.
If you choose manual calibration, enter the current altitude. The initial value that appears on the keypad
can be used as reference for the current altitude data.
55
HOLUX FunTrek 132
System
Left key- Info pages
Use the “Left key- Info pages” to set the project displayed on Trip information and the auto-flip.
Select pages
You can select 1 ~5 information page to set the shortcuts for the “Left key- Info pages”.
Step:
On the main menu page, click Settings.
Select “System”.
Select” “Left key- Info pages”.
Select” “Select pages”.
You can select by checking items to be displayed for the Left Key operation. Available options are: Trip
Computer1, Trip Computer2, Altitude Graph, Compass and Information.
When completed, it returns to the main menu page.
56
HOLUX FunTrek 132
Time to flip
Flip page time is the selected time interval to automatically switch among Info Page for the Left Key operation.
Step:
On the main menu page, click “Settings” icon to enter the settings page. Select “System Settings”.
Select” “Left key- Info pages” to enter the left menu options.
From the list, select” “Time to flip” to automatic exchange the information page at a preset time. When
completed, it returns to main menu page.
Note: When using the automatic switching mode, you need to select more than one information page.
Altitude mode
Step:
On the main menu page, click “Settings” icon to enter the settings page. Select “System Settings”.
Select “Altitude mode” to enter the altitude mode options. Select your option, and when completed, it
returns to main menu page.
Note: “Auto select”: If GPS is already in the positioning mode or the barometer has not been calibrated, the
device will automatically use GPS to measure the altitude. If both cases happened at the same time, the
default is barometer.
Speed mode
FunTrek 132 provides speed display including speedometer and GPS.
Step:
On the main menu page, click “Settings” icon to enter the settings page. Select “System Settings”.
Select” “Speed mode” to enter the speed mode options. Select your option, and when completed, it
returns to main menu page.
Note: “Auto select”: If GPS is already in the positioning mode or the speedometer has not been calibrated,
the device will automatically use GPS to measure the speed. If both cases happened at the same time, the
default is speedometer.
57
HOLUX FunTrek 132
Screen Lock
Step:
On the main menu page, click “Settings” icon to enter the settings page. Select “System Settings”.
Select “Screen lock” to enter the screen lock mode options. Select your option, and when completed, it
returns to main menu page.
Backlight
Step:
On the main menu page, click “Settings” icon to enter the settings page. Select “System Settings”.
Select “Backlight” to enter the backlight mode options.
Select your option, and when completed, it returns to the main menu page.
Beep
Step:
On the main menu page, click “Settings” icon to enter the settings page. Select “System Settings”.
Select “Beep” to enter the beep submenu. You can change settings for “sound” and “volume”.
Select “Sound” to set the sound setting.
Select “Volume” to set the volume setting.
Note: For details on beep information, refer to the device pop-up message.
Auto shutdown
Step:
On the main menu page, click “Settings” icon to enter the settings page. Select “System Settings”.
Select “Auto Power Off” to set the auto power off setting.
Note:
If FunTrek 132 fails to acquire a fix within the set time, it will automatically power off.
If a satellite fix is acquired within the set time, the timer will be reset.
58
HOLUX FunTrek 132
Coordinates Setup
Coordinates Format
User can choose the appropriate format for their use.
Step:
On the main menu page, click “Settings” icon to enter the settings page. Select “System Settings”.
Select “Set Coordinate” to view the coordinate lists.
Select “Coordinate Format” to set the coordinate format.
When completed, it returns to the previous screen.
User Grid:
Select User Grid in Coordinates Format List, and enter the parameter page.
Select the parameter you want to define, and the digital keyboard appears. In longitude and latitude page,
you can use
and
to change the directions.
Set the respective parameters. When completed, it returns to the previous screen.
59
HOLUX FunTrek 132
Coordinate Datum
Step:
On the main menu page, click “Settings” icon to enter the settings page. Select “System Settings”.
Select “Set Coordinate” to view the coordinate lists.
Select “Coordinate Datum” to set the coordinates.
If you select “Beijing1954” or “Xian80” datum, you have to input the parameter. “a” and “1/f” cannot be
edited.
When completed, it returns to the previous screen.
Customizing the Coordinate Datum:
On the “Datum” page, select “User Datum”.
Set the respective parameters. When completed, it returns to the previous screen.
60
HOLUX FunTrek 132
Units
Users can set the units of Speed/ Distance.
Step:
On the main menu page, click “Settings” icon to enter the settings page. Select “System Settings”.
Select “Units” to enter the options list.
Select “Metric” or “Imperial” units.
When completed, it returns to the previous screen.
Time
Step:
On the main menu page, click “Settings” icon to enter the settings page. Select “System Settings”.
Select “Time”.
Select “Time Format”. Select from the following format: “24 hours” and “12 hours”.
Select “Time Zone” to set the time zone.
Select “Daylight saving time” to set enable or disable.
When completed, it returns to the previous screen.
Storage media
Users can save track log files into the internal memory or the micro SD card.
Step:
On the main menu page, click “Settings” icon to enter the settings page. Select “System Settings”.
61
HOLUX FunTrek 132
Select “Storage media”.
Select “Holux Internal Memory” or “SD card”.
When completed, a “Change will not take effect until the device restarts. Restart it right now?” message
appears on the screen.
User can restart the device to complete the setting.
Language
In the Language setup menu you can change the language interface. Available options are: Simplified Chinese,
Traditional Chinese and English.
Step:
On the main menu page, click “Settings” icon to enter the settings page.
Select “System Settings” to enter menu options.
Select “Language” to enter the language setup menu.
Set your desired language. When completed, it returns to the previous menu.
Clear counters
Clear counters enable users to clear the existing trip information that contains with the Odometer, total
CO2/Tree Saved, and total rising/drop height information.
Step:
On the main menu page, click “Settings” icon to enter the settings page. Select “System Settings”.
Select “Clear counters”, and select the items that you want to reset.
When the “Reset confirmation” message appears on the screen, press the confirmation button to clear the
selected items.
62
HOLUX FunTrek 132
MSAS/WAAS/EGNOS
Enable the function to improve the GPS positioning accuracy.
Step:
On the main menu page, click “Settings” icon to enter the settings page. Select “System Settings”.
Select “MSAS/WAAS/EGNO”. Click “Open” to enable the MSAS/WAAS/EGNO function.
Show tips at start
Step:
On the main menu page, click “Settings” icon to enter the settings page. Select “System Settings”.
Select “Show tips at start”.
Select “Open” to show tips when you restart the device. If you select “Close”, the tips will not appear when
you restart the device.
When you restart the device, you can also disable the tips pop-up by checking the “Do not display tips on
next start up”.
63
HOLUX FunTrek 132
Alerts
Step:
On the main menu page, click “Settings” icon to enter the settings page. Select “System Settings”.
Select “Alert” to enter the alert lists.
Select “Distance”, “BAR Altitude”, “Speed” or “Time” button to set the alert.
Select “On (Click to input)” to enter the Digital Keypad, and then enter the appropriate value.
Note:
Before use altimeter function, please read the section of Product Caution/ About the altimeter.
When current altitude reaches the set value, the altitude alert message will appear ob the screen. The
alert can help climbers to prevent the acute mountain sickness (AMS).
If the altimeter detected current altitude reaches or exceeds the set value within 1 minute, the altitude alert
message will appear on the screen.
If "Repeat Alert" is selected then the alert will continue to appear on the screen when the current altitude is
equal or exceeds the set value. To turn off alert, select "Alert Off".
A warning message will appear on the screen when the current speed has reached its default value.
When the current speed reaches the set value, the speed alert message will appear on the screen.
64
HOLUX FunTrek 132
Profiles
Step:
On the main menu page, click “Settings” icon to enter the settings page.
Click “Profiles” icon to select “Current settings” or “Factory defaults”.
Click “Factory defaults” to restore the factory default settings.
Notes: the device can storage 10 settings.
About
You can get the software version information of the operation system (OS) and applications for this device.
65
HOLUX FunTrek 132
ezTour Plus Installation
To download the recorded track log and view it on your computer, first, you will need to install the bundled
ezTour Plus. Insert the bundled installation CD into the computer’s CD drive to install ezTour Plus. For details,
please refer to the included ezTour Plus user manual.
End of Holux FunTrek 132’s user manual
Wish you a pleasant use
66
HOLUX FunTrek 132
Website: www.holux.com
67