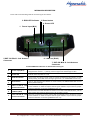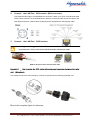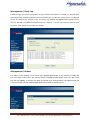
1
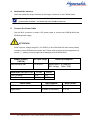
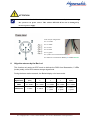
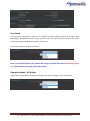
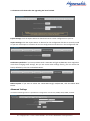
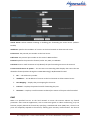
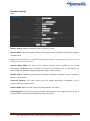
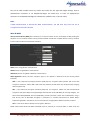
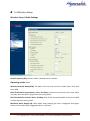
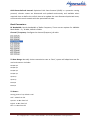
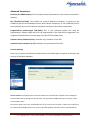
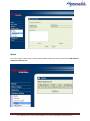
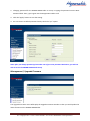
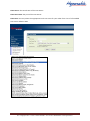
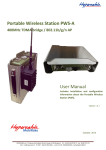
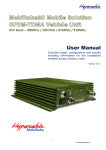
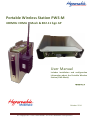
Portable Wireless Station PWS-M 400MHz CDMA Mesh & 802.11 bgn AP User Manual Includes installation and configuration information about the Portable Wireless Station (PWS-Mesh). Version 1.0.1 October. 2014 HYPERCABLE sarl - 74 Avenue Paul Sabatier ZA de la Coupe 11.100 Narbonne Tel : +33 (0) 4 68 70 91 75 - Fax : 04 68 70 91 76 Mail : [email protected] - N° SIRET : 384 007 894 00031 – Code TVA CEE: FR90384007894 - www.hypercable.fr WARNINGS In order to comply with international radio frequency (RF) exposure limits, dish antennas should be laced at a minimum of 8.7 inches (22 cm) from the bodies of all persons. Other antennas should be laced a minimum of 7.9 inches (20 cm) from the bodies of all persons. Ultimate disposal of this product should be handled according to all national laws and regulations. Do not locate the antenna near overhead power lines or other electric light or power circuits, or where it can come into contact with such circuits. When installing the antenna, take extreme care not to come into contact with such circuits, as they may cause serious injury or death. For proper installation and grounding of the antenna, please refer to national and local codes. Only trained and qualified personnel should be allowed to install, replace, or service this equipment. To meet regulatory restrictions, the PWS-M-AUnit and the external antenna must be professionally installed. The network administrator or other IT professional responsible for installing and configuring the PWS-M-AUnit is a suitable professional installer. Following installation, access to the PWS-M-AUnit should be password protected by the network administrator to maintain regulatory compliance. Follow the guidelines in this installation guide to ensure correct operation and safe use of the PWS-M-A Unit. There are four types PWS: A. PWSA041-1xx (400MHz TDMA radio with 2.4GHz 802.11b/g/n AP, without battery) B. PWSM041-1xx (400MHz MESH radio with 2.4GHz 802.11b/g/n AP, without battery) C. PWSA041-118 (400MHz TDMA radio with 2.4GHz 802.11b/g/n AP, with 12VDC 18AH battery) D. PWSM041-118 (400MHz MESH radio with 2.4GHz 802.11b/g/n AP, with 12VDC 18AH battery) HYPERCABLE sarl - 74 Avenue Paul Sabatier ZA de la Coupe 11.100 Narbonne Tel : +33 (0) 4 68 70 91 75 - Fax : 04 68 70 91 76 Mail : [email protected] - N° SIRET : 384 007 894 00031 – Code TVA CEE: FR90384007894 - www.hypercable.fr Sommaire WARNINGS ........................................................................................................................... 2 INSTALL THE PWS-M-ASuscriber Unit ...................................................................... 6 Chapter 3 System Configuration .............................................................................................. 10 3-1 Start-up and Log in of the PWS .............................................................................. 10 3-2 Advanced Setup ...................................................................................................... 12 LAN .................................................................................................................................. 20 BASIC ................................................................................................................................ 21 SECURITY .......................................................................................................................... 22 3-3 Configurations of 400MHz MESH radio ................................................................ 28 3-4 Wireless Setup ......................................................................................................... 31 3-5 Management ............................................................................................................ 35 HYPERCABLE sarl - 74 Avenue Paul Sabatier ZA de la Coupe 11.100 Narbonne Tel : +33 (0) 4 68 70 91 75 - Fax : 04 68 70 91 76 Mail : [email protected] - N° SIRET : 384 007 894 00031 – Code TVA CEE: FR90384007894 - www.hypercable.fr PACKAGE CONTENTS The package you have received should contain the following items: PWS-M-A unit ……………….………………………..……………………....………...……………..x1 455 MHz ½ Lambda FME Flexible antenna ……..……………….………………………..……….x1 2.400 MHz ½ Lambda FME Flexible antenna ……..……………….………………………..……..x1 FME/ N Male antenna adaptor ……………….………………………..…………………….……….x1 RJ45 connector….……………………………………………………………………....................…x1 M12 VDC Power cable…………...…………………………………………………………..…..…...x1 Waterproof IP cable gland…………...………………………………………………………………..x1 If any item on the above list is not included or damaged, please contact your local vendor for support. HYPERCABLE sarl - 74 Avenue Paul Sabatier ZA de la Coupe 11.100 Narbonne Tel : +33 (0) 4 68 70 91 75 - Fax : 04 68 70 91 76 Mail : [email protected] - N° SIRET : 384 007 894 00031 – Code TVA CEE: FR90384007894 - www.hypercable.fr MECHANICAL DESCRIPTION Please refer to the following table for the meaning of each feature. 2. RSSI LED indicator 3. Reset button 4. Power LED 1. Power Input (M12) 5.SHF 2.4 GHz N- Jack Antenna 6. LAN Port (RJ45) Connector 7. UHF 400 MHz N- Jack Antenna Connector Portable/PWS-M-A Subscriber or Base Station Unit Figure 1 Power Input (M12) Feed 10~30VDC power to the PWS-M-AUnit via this power Jack, please follow the pin assignment for correct + / - polarity, mix that might cause the damage of radio. 4 Power LED Indicate status of power on or off. 2 RSSI LED indicator This function only works at CPE mode to indicate the RSSI from Base Station, 5 LEDs (levels) totally, more LEDs means stronger signal level. ( For TDMA PMPT version only ) 3 Reset button 5 SHF 2.4 GHz N- Jack Antenna Connector 6 LAN Port (M12) 7 UHF 400 MHz N- Jack Antenna Connector press it and hold the reset button for 5~10 seconds, the PWS-M-AUnit will back to factory default settings. Here you can attach the proper antenna with the PWS-M-Aunit to wirelessly connect to the networks. In order to improve the RF signal radiation of your antenna, proper antenna installation is necessary.(VSWR less than 1.5) Use the SFTP cat.5 cable with M12 connector to connect to the PWS-M-AUnit, and the other end to other Ethernet device such as PC or switch / router. Here you can attach the proper antenna with the PWS-M-Aunit to wirelessly connect to the networks. In order to improve the RF signal radiation of your antenna, proper antenna installation is necessary.(VSWR less than 1.5) HYPERCABLE sarl - 74 Avenue Paul Sabatier ZA de la Coupe 11.100 Narbonne Tel : +33 (0) 4 68 70 91 75 - Fax : 04 68 70 91 76 Mail : [email protected] - N° SIRET : 384 007 894 00031 – Code TVA CEE: FR90384007894 - www.hypercable.fr INSTALL THE PWS-M-A Subscriber Unit This section show you how to mount the PWS-M-Aunit, please read it carefully before you start to install the hardware. Be safe and step by step to finish the hardware installation. LAN WiFi 2.4 GHz Antenna WAN 400/500 Mhz antenna Antenna Ground plane car roof 10~30VDC Tablet WiFi Ethernet Wireless device Breaker and fuse 10/100 BaseT Ethernet Device Hardware Installation Figure This PWS-M-Aunit can be damaged by incorrect power application. Read and follow the installation instructions carefully before connecting the system to its power source. Please do not forgett the Battery circuit Breaker and or fuse 1. Mounting the PWS-M-A unit in the car Only trained and qualified personnel should be allowed to install, replace, or service this equipment. ATTENTION This product is intended to be mounted to a well-grounded mounting surface such as a metal panel. The – VDC is grounded to the PWS-M-Aand antenna coaxial cable is grounded to the PWS-M HYPERCABLE sarl - 74 Avenue Paul Sabatier ZA de la Coupe 11.100 Narbonne Tel : +33 (0) 4 68 70 91 75 - Fax : 04 68 70 91 76 Mail : [email protected] - N° SIRET : 384 007 894 00031 – Code TVA CEE: FR90384007894 - www.hypercable.fr 2. Connect the LAN Port M12 version. (M12 connector) This PWS-M-AUnit support 10/100M Ethernet connection. Attach your SFTP cat.5 Ethernet cable with the M12 connector on the PWS-M-AUnit, and then connect the other end of the cable to the other Ethernet devices. Please follow the below pinouts assignment for the Ethernet cable. 3. Connect the LAN Port RJ45 version. Welding the shielding parts of the SFTP cable and the RJ-45 connector well to ensure he performance of the system and avoid the moisture leak into the radio. Weld the RJ-45 connector with the SFTP cable Appendix 1 - How to make the SFTP cable with waterproof connector between the radio and LAN network The waterproof connector was formed by 3 pieces components as the following exploded view: Blow is the complete figure for reference: HYPERCABLE sarl - 74 Avenue Paul Sabatier ZA de la Coupe 11.100 Narbonne Tel : +33 (0) 4 68 70 91 75 - Fax : 04 68 70 91 76 Mail : [email protected] - N° SIRET : 384 007 894 00031 – Code TVA CEE: FR90384007894 - www.hypercable.fr 4. Attached the antenna Users can attach the proper antenna to the N-type connector on the PWS-M-AUnit. To meet regulatory restrictions, the PWS-M-AUnit and the external antenna must be professionally installed. ( Grounded and with VSWR less than 1.5) 5. Connect the Power Cable Use the M12 connector to make a DC power cable to connect the PWS-M-AUnit and PWS-M-Apower supply. ATTENTION Feed in proper voltage range DC (10~30VDC) to the PWS-M-AUnit with correct polarity to make sure the PWS-M-AUnit works well. Please refer to below pinouts assignment for correct + / - polarity, mix that might cause damage to the PWS-M-AUnit. Model (Indoor / PWS-M) 400/500 MHz 5W DC input range 10~30V DC MobiRake PWS-M-A Unit 12VDC Pure Tx mode 2 A. Pure Rx mode 1.5A Power cable Power consumption Main board + RF module + 802.11abgn (Max. 25W) 24VDC 1 A. 0.75A MOXA AWG Number 21 AWG (0.723mm) MAX current * 1.2~1.6A Hypercable 20 AWG (0.812mm) 1.5~2A HYPERCABLE sarl - 74 Avenue Paul Sabatier ZA de la Coupe 11.100 Narbonne Tel : +33 (0) 4 68 70 91 75 - Fax : 04 68 70 91 76 Mail : [email protected] - N° SIRET : 384 007 894 00031 – Code TVA CEE: FR90384007894 - www.hypercable.fr ATTENTION You should read and follow the installation instructions carefully before connecting the system to its power source. This wireless PWS-M-AUnit can be damaged by incorrect power supply. Color and pin assignment : Pin 1 – brown Pin 2 – white Pin 3 – blue Pin 4 – black Pin 5 – green Pin 1, 2 & 3 are in common for Battery V+ Pin 4 & 5 are in common for Battery V- and Box Ground 6. Align the antenna by the Bar Led This function only works at CPE mode to indicate the RSSI from Basestation, 5 LEDs (levels) totally, more LEDs means stronger signal level. During the base station research, the Barled display a led scan mode. Signal level 1(Min) 2 3 4 5(Max) RSSI -92~-88dBm -87~-78dBm -77~-63dBm -62~-43dBm -42~+10dBm LED Status 1* Yellow 2 * Yellow 2 * Yellow + 1 * green 2 * Yellow + 2 * green 2 * Yellow + 3 *green HYPERCABLE sarl - 74 Avenue Paul Sabatier ZA de la Coupe 11.100 Narbonne Tel : +33 (0) 4 68 70 91 75 - Fax : 04 68 70 91 76 Mail : [email protected] - N° SIRET : 384 007 894 00031 – Code TVA CEE: FR90384007894 - www.hypercable.fr Chapter 3 System Configuration 3-1 Start-up and Log in of the PWS The LAN port of the PWS radio was physically connected to the 2.4GHz 802.11 b/g/n AP/ROUTER directly, and then switch to the 400MHz TDMA / Mesh radio. Configurations of the 2.4GHz 802.11b/g/n AP/Router The 2.4GHz 802.11b/g/n AP/ROUTER, offers a user-friendly web-based management interface for the configuration. It is recommended to make initial configuration changes by connecting a PC directly to the PWS radio’s LAN port. The 2.4GHz 802.11b/g/n AP/ROUTER has a default IP address of 192.168.2.1 and a subnet mask of 255.255.255.0. You must set your PC IP address to be on the same subnet as the 2.4GHz 802.11b/g/n AP/ROUTER (that is, the PC and 2.4GHz 802.11b/g/n AP/ROUTER addresses must both start 192.168.2.x). To access the 2.4GHz 802.11b/g/n AP/ROUTER’s management GUI interface, follow these steps: 1. Use your web browser to connect to the management interface using the default IP address of 192.168.2.1. 2. Log into the interface by entering the default username “admin” and password “admin,” then click OK. Status Page After logging in to the web interface, the Status page displays. The Home page top-menu-bar shows the Status, Easy Setup, Advanced and Language. HYPERCABLE sarl - 74 Avenue Paul Sabatier ZA de la Coupe 11.100 Narbonne Tel : +33 (0) 4 68 70 91 75 - Fax : 04 68 70 91 76 Mail : [email protected] - N° SIRET : 384 007 894 00031 – Code TVA CEE: FR90384007894 - www.hypercable.fr Easy Setup The Easy Setup is designed to help you to configure the basic settings required to get the 2.4GHz 802.11b/g/n AP/ROUTER up and running. There are only a few basic steps you need to set up the 2.4GHz 802.11b/g/n AP/ROUTER to get the connection. Click on Easy Setup to bring up the wizard Note: For the PWS system, this 2.4GHz 802.11b/g/n AP/ROUTER must be AP Bridge mode only. (Default factory setting is AP router mode) Operation Mode – AP Bridge Choose menu “Easy Setup” and select AP Bridge if you want to configure to an access point. HYPERCABLE sarl - 74 Avenue Paul Sabatier ZA de la Coupe 11.100 Narbonne Tel : +33 (0) 4 68 70 91 75 - Fax : 04 68 70 91 76 Mail : [email protected] - N° SIRET : 384 007 894 00031 – Code TVA CEE: FR90384007894 - www.hypercable.fr Network Name (SSID): SSID (Service Set Identification) must be assigned to all wireless devices in your network. Considering your wireless network security. Security Mode: Select the security method and then configure the required parameters. (Options: Disabled, Open, Shared, WEP-AUTO, WPA-PSK, WPA2-PSK, WPA-PSK_WPA2-PSK, WPA, WPA2, WPA1_WPA2, 802.1X; Default: Disabled 3-2 Advanced Setup In the Advanced Manual Bar, it includes all the settings such as firmware upgrade, LAN, WAN and wireless settings that change the RF behaviors. It is important to read through this section before attempting to make changes. HYPERCABLE sarl - 74 Avenue Paul Sabatier ZA de la Coupe 11.100 Narbonne Tel : +33 (0) 4 68 70 91 75 - Fax : 04 68 70 91 76 Mail : [email protected] - N° SIRET : 384 007 894 00031 – Code TVA CEE: FR90384007894 - www.hypercable.fr Management The Management section is provided for configuration of administrative needs such as language type, user name / Password, firmware upgrade, export and import settings, load factory defaults and reboots system. Password: The new password must not exceed 32 characters in length and must not include any spaces. Enter the new password a second time to confirm it. Software Version - This displays the current firmware version. To upgrade the 2.4GHz AP/Router's firmware, follow these instructions below: 1. Download a more recent firmware upgrade file from our website. 2. Type the path and file name of the update file into the File field. Or click the Browse button to locate the update file. 3. Click the Upgrade button. Note: 1. When you upgrade the 2.4GHz AP/Router's firmware, you may lose its current configurations, so before upgrading the firmware please do a memo for some of your customized settings to avoid losing important settings. 2. Do not turn off the 2.4GHz AP/Router or press the Reset button while the firmware is being upgraded, otherwise, the Router may be damaged. HYPERCABLE sarl - 74 Avenue Paul Sabatier ZA de la Coupe 11.100 Narbonne Tel : +33 (0) 4 68 70 91 75 - Fax : 04 68 70 91 76 Mail : [email protected] - N° SIRET : 384 007 894 00031 – Code TVA CEE: FR90384007894 - www.hypercable.fr 3. The Router will reboot after the upgrading has been finished. Export Settings: Click the Export Button to download current router configuration to your PC. Import Settings: Click the Import Button to browse for the configuration file that is currently saved on your PC. Click Import to overwrite all current configurations with the one in the configuration file. Load Factory Defaults: If you have problems with 2.4GHz 802.11b/g/n AP/ROUTER, which might be a result from changing some settings, but you are unsure what settings exactly, you can restore the factory defaults by click the Load Default Button. Reboot System: If you want to reboot the 2.4GHz 802.11b/g/n AP/ROUTER, click the Reboot Now Button. Advanced Settings The Advanced Settings section is provided for configuration of Time Zone, DDNS, UPnP, SNMP, and SSH. HYPERCABLE sarl - 74 Avenue Paul Sabatier ZA de la Coupe 11.100 Narbonne Tel : +33 (0) 4 68 70 91 75 - Fax : 04 68 70 91 76 Mail : [email protected] - N° SIRET : 384 007 894 00031 – Code TVA CEE: FR90384007894 - www.hypercable.fr Time Zone Settings — The Time Zone Settings allows you to configure, update and maintain the correct time on the 2.4GHz 802.11b/g/n AP/ROUTER’s internal system clock. SNTP Server — Enter the address of an SNTP server to receive time updates. SNTP synchronization (minutes) — Specify the interval between SNTP server updates. DDNS Settings: DDNS lets you assign a fixed host and domain name to dynamic Internet IP address. It is useful when you are hosting your own website, FTP server, or other server behind the 2.4GHz 802.11b/g/n AP/ROUTER. Before using this feature, you need to sign up for DDNS service at www.dyndns.org , a DDNS service provider. User Name: Sets the DDNS user name for the connection. Password: Sets a DDNS password for the connection. HostName: The host name that you selected from the DDNS service provider. UPNP Settings: UPnP permits network devices to discover other network device(s) preference and establish functional network services for data sharing, communication, and entrainment. Default setting is Disabled. SNMP Settings: Managing devices on IP networks. Default setting is Disabled. HYPERCABLE sarl - 74 Avenue Paul Sabatier ZA de la Coupe 11.100 Narbonne Tel : +33 (0) 4 68 70 91 75 - Fax : 04 68 70 91 76 Mail : [email protected] - N° SIRET : 384 007 894 00031 – Code TVA CEE: FR90384007894 - www.hypercable.fr SSH Settings: Secure Shell. Enable your 2.4GHz 802.11b/g/n AP/ROUTER unit to access secure shell (SSH) based network device. Default setting is Disabled. Operation Mode Note: For the PWS system, this 2.4GHz 802.11b/g/n AP/ROUTER must be AP Bridge mode only. (Default factory setting is AP router mode) Firewall Configuration MAC/IP/Port filtering restricts connection parameters to limit the risk of intrusion and defends against a wide array of common hacker attacks. MAC/IP/Port filtering allows the unit to permit, deny or proxy traffic through its MAC addresses, IP addresses and ports. The 2.4GHz 802.11b/g/n AP/ROUTER allows you define a sequential list of permit or deny filtering rules. This device tests ingress packets against the filter rules one by one. A packet will be accepted as soon as it matches a permit rule, or dropped as soon as it matches a deny rule. If no rules match, the packet is either accepted or dropped depending on the default policy setting. MAC/IP/Port Filtering: Enables or disables MAC/IP/Port Filtering. Default Policy: When MAC/IP/Port Filtering is enabled, the default policy will be enabled. If you set the default policy to “Dropped”, all incoming packets that don’t match the rules will be dropped. If the policy is set to "Accepted," all incoming packets that don't match the rules are accepted. (Default: Dropped) MAC Address: Specifies the MAC address to block or allow traffic from. DIP: Destination IP Address. Specifies the destination IP address to block or allow traffic from. SIP: Source IP Address. Specifies the source IP address to block or allow traffic from. Protocol: Specifies the destination port type, TCP, UDP or ICMP. HYPERCABLE sarl - 74 Avenue Paul Sabatier ZA de la Coupe 11.100 Narbonne Tel : +33 (0) 4 68 70 91 75 - Fax : 04 68 70 91 76 Mail : [email protected] - N° SIRET : 384 007 894 00031 – Code TVA CEE: FR90384007894 - www.hypercable.fr Destination Port Range: Specifies the range of destination port to block traffic from the specified LAN IP address from reaching. Source Port Range: Specifies the range of source port to block traffic from the specified LAN IP address from reaching. Action: Specifies if traffic should be accepted or dropped. (Default: Accept) Comment: Enter a useful comment to help identify the filtering rules. Current Filtering rules: The Current Filter Table displays the configured IP addresses and ports that are permitted or denied access to and from. No. — The table entry number. MAC Address — Displays a MAC address to filter. Destination IP Address (DIP) — Displays the destination IP address. Source IP Address (SIP) — Displays the source IP address. Protocol — Displays the protocol type. Destination Port Range (DPR) — Displays the destination port range. Source Port Range (SPR) — Displays the source port range. Action — Displays if the specified traffic is accepted or dropped. Comment — Displays a useful comment to identify the filter rules. Virtual Server Settings Virtual Server (sometimes referred to as Port Forwarding) is the act of forwarding traffic from one network node to another based on received protocol port number. This technique can allow an external user to reach a port on a private IP address (inside a LAN) from the outside through a NAT enabled router. (Maximum 32 entries are allowed.) HYPERCABLE sarl - 74 Avenue Paul Sabatier ZA de la Coupe 11.100 Narbonne Tel : +33 (0) 4 68 70 91 75 - Fax : 04 68 70 91 76 Mail : [email protected] - N° SIRET : 384 007 894 00031 – Code TVA CEE: FR90384007894 - www.hypercable.fr Virtual Server: Selects between enabling or disabling port forwarding the virtual server. (Default: Disable) IP Address: Specifies the IP address of a server on the local network to allow external access. Private Port: The protocol port number on the local server. Public Port: The protocol port number on the router’s WAN interface. Protocol: Specifies the protocol to forward, either TCP, UDP, or TCP&UDP. Comment: Enter a useful comment to help identify the port forwarding service on the network. Current Virtual Servers in System — The Current Port Forwarding Table displays the entries that are allowed to forward packets through the 2.4GHz 802.11b/g/n AP/ROUTER’s firewall. No. — The table entry number. IP Address — The IP address of a server on the local network to allow external access. Port Mapping — displays the port mapping for the server. Protocol — Displays the protocol used for forwarding this port. Comment — Displays a useful comment to identify the nature of the port to be forwarded. DMZ DMZ is to specified host PC on the local network to access the Internet without any firewall protection. Some Internet applications, such as interactive games or video conferencing, may not function properly behind the firewall. By specifying a Demilitarized Zone (DMZ) host, the PC's TCP ports are completely exposed to the Internet, allowing open two-way communication. The host PC HYPERCABLE sarl - 74 Avenue Paul Sabatier ZA de la Coupe 11.100 Narbonne Tel : +33 (0) 4 68 70 91 75 - Fax : 04 68 70 91 76 Mail : [email protected] - N° SIRET : 384 007 894 00031 – Code TVA CEE: FR90384007894 - www.hypercable.fr should be assigned a static IP address (which is mapped to its MAC address) and this must be configured as the DMZ IP address. DMZ Settings: Sets the DMZ status. (Default: Disable) DMZ IP Address: Specifies an IP address on the local network allowed unblocked access to the WAN. Content Filtering The 2.4GHz 802.11b/g/n AP/ROUTER provides a variety of options for blocking Internet access based on content, URL and host name. Web URL Filter Settings: By filtering inbound Uniform Resource Locators (URLs) the risk of compromising the network can be reduced. URLs are commonly used to point to websites. By specifying a URL or a keyword contained in a URL traffic from that site may be blocked. Current URL Filters: Displays current URL filter. Add a URL Filter: Adds a URL filter to the settings. Delete a URL Filter: Deletes a URL filter entry from the list. Web Host Filter Settings: Allows Internet content access to be restricted based on web address keywords and web domains. A domain name is the name of a particular web site. For example, for the address www.HOST.com, the domain name is HOST.com. Enter the Keyword then click “Add.” Current Host Filters: Displays current Host filter. Add a Host Filter: Enters the keyword for a host filtering. Delete a Host Filter: Deletes a Host filter entry from the list. HYPERCABLE sarl - 74 Avenue Paul Sabatier ZA de la Coupe 11.100 Narbonne Tel : +33 (0) 4 68 70 91 75 - Fax : 04 68 70 91 76 Mail : [email protected] - N° SIRET : 384 007 894 00031 – Code TVA CEE: FR90384007894 - www.hypercable.fr Network Settings LAN In this section, the LAN settings are configured based on the IP Address and Subnet Mask. The IP address is also used to access this Web-based management interface. It is recommended to use the default settings if you do not have an existing network. IP Address: The IP address of 2.4GHz 802.11b/g/n AP/ROUTER on the local area network. ( Default: 192.168.2.1 ) Subnet Mask: The subnet mask of 2.4GHz 802.11b/g/n AP/ROUTER on the local area network DHCP Server: The DHCP Server is to assign private IP address to the 2.4GHz 802.11b/g/n AP/ROUTER in your local area network(LAN). The default LAN IP address is 192.168.2.1, changing IP address will also change the DHCP server’s IP subnet. HYPERCABLE sarl - 74 Avenue Paul Sabatier ZA de la Coupe 11.100 Narbonne Tel : +33 (0) 4 68 70 91 75 - Fax : 04 68 70 91 76 Mail : [email protected] - N° SIRET : 384 007 894 00031 – Code TVA CEE: FR90384007894 - www.hypercable.fr Wireless Settings BASIC Wireless On/Off: Enables or Disable the radio. (Default: Turn On) Wireless Mode: There are 4 wireless mode, those are Access Point, WDS Access Point, WDS Repeater and WDS Client Note: If WEP authentication is selected for WDS communication, you will then only have one set of encryption for the entire channel. Network Name (SSID): The name of the wireless network service provided by the 2.4GHz 802.11b/g/n AP/ROUTER. Clients that want to connect to the network must set their SSID to the same as that of 2.4GHz 802.11b/g/n AP/ROUTER. (Range: 1-32 characters) Multiple SSID: One additional VAP interface supported on the device. (Default: no name configured; Range: 1-32 characters) Frequency (Channel): The radio channel that the 2.4GHz 802.11b/g/n AP/ROUTER uses to communicate with wireless clients. Network Mode: Defines the radio operating mode.(Default: 11an HT20) Packet Aggregate: The process of joining multiple packets together into a single transmission unit, in order to reduce the overhead associated with each transmission. HYPERCABLE sarl - 74 Avenue Paul Sabatier ZA de la Coupe 11.100 Narbonne Tel : +33 (0) 4 68 70 91 75 - Fax : 04 68 70 91 76 Mail : [email protected] - N° SIRET : 384 007 894 00031 – Code TVA CEE: FR90384007894 - www.hypercable.fr SECURITY WIRED EQUIVALENT PRIVACY (WEP) WEP provides a basic level of security, preventing unauthorized access to the network, and encrypting data transmitted between wireless clients and an access point. WEP uses static shared keys (fixed-length hexadecimal or alphanumeric strings) that are manually distributed to all clients that want to use the network. When you select to use WEP, be sure to define at least one static WEP key for user authentication or data encryption. Also, be sure that the WEP shared keys are the same for each client in the wireless network. WEP-AUTO — Allows wireless clients to connect to the network using Open-WEP (uses WEP for encryption only) or Shared-WEP (uses WEP for authentication and encryption). Encrypt Type — Selects WEP for data encryption (OPEN mode only). Security Key Index — Selects the WEP key number to use for authentication or data encryption. If wireless clients have all four WEP keys configured to the same values, you can change the encryption key to any of the settings without having to update the client keys. (Default: 1; Range: 1~4) WEP Keys — Sets WEP key values. The user must first select ASCII or hexadecimal keys. Each WEP HYPERCABLE sarl - 74 Avenue Paul Sabatier ZA de la Coupe 11.100 Narbonne Tel : +33 (0) 4 68 70 91 75 - Fax : 04 68 70 91 76 Mail : [email protected] - N° SIRET : 384 007 894 00031 – Code TVA CEE: FR90384007894 - www.hypercable.fr key has an index number. Enter key values that match the key type and length settings. Enter 5 alphanumeric characters or 10 hexadecimal digits for 64-bit keys, or enter 13 alphanumeric characters or 26 hexadecimal digits for 128-bit keys. (Default: Hex, no preset value) Note. If WEP authentication is selected for WDS communication, you will then only have one set of encryption for the entire channel. WPA & WPA2 Wi-Fi Protected Access (WPA) was introduced as an interim solution for the vulnerability of WEP pending the adoption of a more robust wireless security standard. WPA2 includes the complete wireless security standard, but also offers backward compatibility with WPA. WPA: Clients using WPA for authentication. WPA2: Clients using WPA2 for authentication. WPA-Auto: Clients using WPA or WPA2 for authentication. WPA Algorithms: Selects the data encryption type to use. (Default is determined by the Security Mode selected.) TKIP — Uses Temporal Key Integrity Protocol (TKIP) keys for encryption. WPA specifies TKIP as the data encryption method to replace WEP. TKIP avoids the problems of WEP static keys by dynamically changing data encryption keys. AES — Uses Advanced Encryption Standard (AES) keys for encryption. WPA2 uses AES Counter-Mode encryption with Cipher Block Chaining Message Authentication Code (CBC-MAC) for message integrity. The AES Counter-Mode/CBCMAC Protocol (AESCCMP) provides extremely robust data confidentiality using a 128- bit key. Use of AES-CCMP encryption is specified as a standard requirement for WPA2. Before implementing WPA2 in the network, be sure client devices are upgraded to WPA2-compliant hardware. Auto — Uses either TKIP or AES keys for encryption. WPA and WPA2 mixed modes allow both WPA and WPA2 clients to associate to a common SSID. In mixed mode, the HYPERCABLE sarl - 74 Avenue Paul Sabatier ZA de la Coupe 11.100 Narbonne Tel : +33 (0) 4 68 70 91 75 - Fax : 04 68 70 91 76 Mail : [email protected] - N° SIRET : 384 007 894 00031 – Code TVA CEE: FR90384007894 - www.hypercable.fr unicast encryption type (TKIP or AES) is negotiated for each client. Key Renewal Interval — Sets the time period for automatically changing data encryption keys and redistributing them to all connected clients. (Default: 3600 seconds) RADIUS Server: Configures RADIUS server settings. IP Address — Specifies the IP address of the RADIUS server. Port — The User Datagram Protocol (UDP) port number used by the RADIUS server for authentication messages. (Range: 1024-65535; Default: 1812) Shared Secret — A shared text string used to encrypt messages between the access point and the RADIUS server. Be sure that the same text string is specified on the RADIUS server. Do not use blank spaces in the string. (Maximum length: 20 characters) WPA-PSK & WPA2-PSK Wi-Fi Protected Access (WPA) was introduced as an interim solution for the vulnerability of WEP pending the adoption of a more robust wireless security standard. WPA2 includes the complete wireless security standard, but also offers backward compatibility with WPA. Both WPA and WPA2 provide an “enterprise” and “personal” mode of operation. For small home or office networks, WPA and WPA2 provide a simple “personal” operating mode that uses just a pre-shared key for network access. The WPA Pre-Shared Key (WPA-PSK) mode uses a common password phrase for user authentication that is manually entered on the access point and all wireless clients. Data encryption keys are automatically generated by the access point and distributed to all clients connected to the network. WPA-PSK — Clients using WPA with a Pre-shared Key are accepted for authentication. The default data encryption type for WPA is TKIP. WPA2-PSK — Clients using WPA2 with a Pre-shared Key are accepted for authentication. The default data encryption type for WPA is AES. WPA- Auto-PSK — Clients using WPA or WPA2 with a Preshared Key are accepted for authentication. The default data encryption type is TKIP/AES. HYPERCABLE sarl - 74 Avenue Paul Sabatier ZA de la Coupe 11.100 Narbonne Tel : +33 (0) 4 68 70 91 75 - Fax : 04 68 70 91 76 Mail : [email protected] - N° SIRET : 384 007 894 00031 – Code TVA CEE: FR90384007894 - www.hypercable.fr WPA Algorithms — Selects the data encryption type to use. (Default is determined by the Security Mode selected.) TKIP — Uses Temporal Key Integrity Protocol (TKIP) keys for encryption. WPA specifies TKIP as the data encryption method to replace WEP. TKIP avoids the problems of WEP static keys by dynamically changing data encryption keys. AES — Uses Advanced Encryption Standard (AES) keys for encryption. WPA2 uses AES Counter-Mode encryption with Cipher Block Chaining Message Authentication Code (CBC-MAC) for message integrity. The AES Counter-Mode/CBCMAC Protocol (AESCCMP) provides extremely robust data confidentiality using a 128- bit key. Use of AES-CCMP encryption is specified as a standard requirement for WPA2. Before implementing WPA2 in the network, be sure client devices are upgraded to WPA2-compliant hardware. Auto — Uses either TKIP or AES keys for encryption. WPA and WPA2 mixed modes allow both WPA and WPA2 clients to associate to a common SSID. In mixed mode, the unicast encryption type (TKIP or AES) is negotiated for each client. Pass Phrase — The WPA Preshared Key can be input as an ASCII string (an easy-to-remember form of letters and numbers that can include spaces) or Hexadecimal format. (Range: 8~63 ASCII characters, or exactly 64 Hexadecimal digits) Key Renewal Interval — Sets the time period for automatically changing data encryption keys and redistributing them to all connected clients. (Default: 3600 seconds) IEEE 802.1X AND RADIUS IEEE 802.1X is a standard framework for network access control that uses a central RADIUS server for user authentication. This control feature prevents unauthorized access to the network by requiring an 802.1X client application to submit user credentials for authentication. The 802.1X standard uses the Extensible Authentication Protocol (EAP) to pass user credentials (either digital certificates, user names and passwords, or other) from the client to the RADIUS server. Client authentication is then verified on the RADIUS server before the client can access the network. Remote Authentication Dial-in User Service (RADIUS) is an authentication protocol that uses software running on a central server to control access to RADIUS-aware devices on the network. An authentication server contains a database of user credentials for each user that requires network access. The WPA and WPA2 enterprise security modes use 802.1X as the method of user authentication. IEEE 802.1X can also be enabled on its own as a security mode for user authentication. When 802.1X is used, a RADIUS server must be configured and be available on the connected wired network. HYPERCABLE sarl - 74 Avenue Paul Sabatier ZA de la Coupe 11.100 Narbonne Tel : +33 (0) 4 68 70 91 75 - Fax : 04 68 70 91 76 Mail : [email protected] - N° SIRET : 384 007 894 00031 – Code TVA CEE: FR90384007894 - www.hypercable.fr 802.1X WEP: Selects WEP keys for data encryption. When enabled, WEP encryption keys are automatically generated by the RADIUS server and distributed to all connected clients. (Default: Disabled) RADIUS Server: Configures RADIUS server settings. IP Address — Specifies the IP address of the RADIUS server. Port — The User Datagram Protocol (UDP) port number used by the RADIUS server for authentication messages. (Range: 1024-65535; Default: 1812) Shared Secret — A shared text string used to encrypt messages between the access point and the RADIUS server. Be sure that the same text string is specified on the RADIUS server. Do not use blank spaces in the string. (Maximum length: 20 characters) Wi-Fi Protected Setup (WPS) Wi-Fi Protected Setup (WPS) is designed to ease installation and activation of security features in wireless networks. WPS has two basic modes of operation, Push-button Configuration (PBC) and Personal Identification Number (PIN). The WPS PIN setup is optional to the PBC setup and provides more security. The WPS button on the 2.4GHz 802.11b/g/n AP/ROUTER can be pressed at any time to allow a single device to easily join the network. The WPS Settings page includes configuration options for setting WPS device PIN codes and activating the virtual WPS button. Click on “Wireless Settings,” followed by “WPS”. HYPERCABLE sarl - 74 Avenue Paul Sabatier ZA de la Coupe 11.100 Narbonne Tel : +33 (0) 4 68 70 91 75 - Fax : 04 68 70 91 76 Mail : [email protected] - N° SIRET : 384 007 894 00031 – Code TVA CEE: FR90384007894 - www.hypercable.fr WPS SSID: The service set identifier for the unit. AP PIN: Displays the PIN Code for the 2.4GHz 802.11b/g/n AP/ROUTER. The default is exclusive for each unit. Device Name: WPS name for connecting to the device. Encryption Settings: Selects between methods of broadcasting the WPS beacon to network clients wanting to join the network: WPA Algorithms: Selects the data encryption type to use. TKIP — Uses Temporal Key Integrity Protocol (TKIP) keys for encryption. WPA specifies TKIP as the data encryption method to replace WEP. TKIP avoids the problems of WEP static keys by dynamically changing data encryption keys. AES — Uses Advanced Encryption Standard (AES) keys for encryption. WPA2 uses AES Counter-Mode encryption with Cipher Block Chaining Message Authentication Code (CBC-MAC) for message integrity. The AES Counter-Mode/CBCMAC Protocol (AESCCMP) provides extremely robust data confidentiality using a 128- bit key. Use of AES-CCMP encryption is specified as a standard requirement for WPA2. Before implementing WPA2 in the network, be sure client devices are upgraded to WPA2-compliant hardware. Auto — Uses either TKIP or AES keys for encryption. WPA and WPA2 mixed modes allow both WPA and WPA2 clients to associate to a common SSID. In mixed mode, the unicast encryption type (TKIP or AES) is negotiated for each client. Key Renewal Interval: Sets the time period for automatically changing data encryption keys and redistributing them to all connected clients. Pass Phrase: The WPA Preshared Key can be input as an ASCII string (an easy-to-remember form of letters and numbers that can include spaces) or Hexadecimal format. (Range: 8~63 ASCII characters, or exactly 64 Hexadecimal digits) HYPERCABLE sarl - 74 Avenue Paul Sabatier ZA de la Coupe 11.100 Narbonne Tel : +33 (0) 4 68 70 91 75 - Fax : 04 68 70 91 76 Mail : [email protected] - N° SIRET : 384 007 894 00031 – Code TVA CEE: FR90384007894 - www.hypercable.fr 3-3 Configurations of 400MHz MESH radio In order to configure the 400MHz MESH Radio, use the web browser and please do the following: 1. Type the IP address http://192.168.2.2 of this radio in the Location (for IE) or Address field and press Enter. 2. Enter the system name (the default setting is “admin”) and password (the default setting is “password”). 3. Click on the “Login” button. After you have logged-in the main page, the About, Basic Setup, Wireless Setup, Status, Statistics, Management and Logout buttons will be shown. The main menu provides links to the whole sections of the web configuration interface. About The About screen describes the product information briefly. Information of the radio includes Device Name, MAC Address, and Firmware Version information. HYPERCABLE sarl - 74 Avenue Paul Sabatier ZA de la Coupe 11.100 Narbonne Tel : +33 (0) 4 68 70 91 75 - Fax : 04 68 70 91 76 Mail : [email protected] - N° SIRET : 384 007 894 00031 – Code TVA CEE: FR90384007894 - www.hypercable.fr Basic Setup / IP Setup The Device Name is used to give a name to your 400MHz MESH Radio. This will enable you to manage it more easily if you have multiple radios on your network. Ethernet Data Rate: you can choose the Ethernet data rate you need Spanning Tree Protocol (STP): To enable spanning tree can prevent undesirable loops in the network, ensuring a smooth running network. This function is enabled by default. VLAN (802.1Q): enable this feature and assign a management Vlan ID to the radio. Those PC without same Vlan ID will not be allowed to connect this radio and configure it. Management VLAN ID: This is used to establish an IP connection to the switch from a workstation that is connected to a port in the VLAN. If not specified, the active management VLAN ID is 0 (default), which allows an IP connection to be established through any port. When the management VLAN is configured, an IP connection can be made only through a port that is part of the management VLAN. It is also mandatory that the port VLAN ID (PVID) of the port to be connected in that management VLAN be the same as the management VLAN ID. 1. Only one management VLAN can be active at a time. 2. When a new management VLAN is configured, connectivity through the existing management VLAN is lost. HYPERCABLE sarl - 74 Avenue Paul Sabatier ZA de la Coupe 11.100 Narbonne Tel : +33 (0) 4 68 70 91 75 - Fax : 04 68 70 91 76 Mail : [email protected] - N° SIRET : 384 007 894 00031 – Code TVA CEE: FR90384007894 - www.hypercable.fr 3. The management station should be reconnected to the port in the new management VLAN. Note: Make sure that the VLAN to be configured as the management VLAN exists. And make sure that the PVID of at least one port that is a port of the VLAN is the same as the management VLAN ID. IP Address: Type the IP address you want to set to your 400MHz MESH Radio. (Default: 192.168.2.2). IP Subnet Mask: The 400MHz MESH Radio’s Subnet Mask must be the same as your Ethernet network. We recommended that you do NOT change the value. (Default: 255.255.255.0). Default Gateway: The 400MHz MESH Radio will use this value for default Gateway. Primary DNS Server: The 400MHz MESH Radio will use this value for primary Domain Name Server. Secondary DNS Server: The 400MHz MESH Radio will use this value for secondary Domain Name Server. Note: If you complete the settings, please click on “Apply” for changes to take effect. HYPERCABLE sarl - 74 Avenue Paul Sabatier ZA de la Coupe 11.100 Narbonne Tel : +33 (0) 4 68 70 91 75 - Fax : 04 68 70 91 76 Mail : [email protected] - N° SIRET : 384 007 894 00031 – Code TVA CEE: FR90384007894 - www.hypercable.fr 3-4 Wireless Setup Wireless Setup / Radio Settings Radio Frequency (RF): You can enable / disable the RF interface. Operating mode: Mesh Wireless Network Name(SSID): The Mesh units can only connect to those other units with same SSID. RSSI Threshold for Association (-92 to -20 dBm): Accept the association from other Mesh unit only when the RSSI is larger than this setting value. RSSI Threshold for kick off (-92 to -20 dBm): Kick off the connected Mesh unit once the RSSI is lower than this setting value. Maximum Mesh Hops(1-50): More Mesh hops settings got lower throughput and higher latency of the whole path. Suggested value is <10 hops. HYPERCABLE sarl - 74 Avenue Paul Sabatier ZA de la Coupe 11.100 Narbonne Tel : +33 (0) 4 68 70 91 75 - Fax : 04 68 70 91 76 Mail : [email protected] - N° SIRET : 384 007 894 00031 – Code TVA CEE: FR90384007894 - www.hypercable.fr OLSR Route Refresh Interval: Optimized Link State Protocol (OLSR) is a proactive routing protocol, wherein routes are discovered and updated continuously and available when required. Here to define the refresh interval to update the new discovered optimized route, and ensure the mesh network with the optimized link state. Basic Parameters: RF Bandwidth: Decide bandwidth of Radio Frequency. There are two options for 400MHz Mesh Radio -- 5 / 10 MHz, default is 5MHz. Channel / Frequency: Configure the channel (frequency) of radio. TX Rate Range: Normally choice transmission rate as “Best”, system will adapt best rate for real environment. Includes: 64QAM 3/4 64QAM 2/3 16QAM 3/4 16QAM 1/2 QPSK 3/4 QPSK 1/2 BPSK 3/4 BPSK 1/2 TX Power : Setting power of TX, default is Full Half: -3 dBm from full Quarter: -6 dBm from full Eighth: -9 dBm from full Min: -12 dBm from full HYPERCABLE sarl - 74 Avenue Paul Sabatier ZA de la Coupe 11.100 Narbonne Tel : +33 (0) 4 68 70 91 75 - Fax : 04 68 70 91 76 Mail : [email protected] - N° SIRET : 384 007 894 00031 – Code TVA CEE: FR90384007894 - www.hypercable.fr Advanced Parameters: Distance (0-100000 meters): Set the proper distance parameter by the actual environment’s distance. RTS Threshold (0-2346): The packet size used to determine whether it should use the CSMA/CD (Carrier Sense Multiple Access with Collision Detection) or the CSMA/CA (Carrier Sense Multiple Access with Collision Avoidance) mechanism for packet transmission. Fragmentation packet length (256-2346): This is the maximum packet size used for fragmentation. Packets larger than the size programmed in this field will be fragmented. The Fragment Threshold value must be larger than the RTS Threshold value. Software Retry Limitation (0-15): Software retry limitation of the RTS Hardware Retry Limitation (1-15): Hardware retry limitation of the RTS Security Settings Here you can select the Network Authentication and related data encryption to enhance the security of the Mesh Network. Access control: The optional Access Control window lets you block the network access privilege of the specified stations through the Access Point. This provides an additional layer of security. There are two kinds of ACL. Only those mesh units in the Trusted Devices list can connect to this radio, so what you should do is to maintain the Available Devices list or key in the MAC address manually into the Trusted Devices. HYPERCABLE sarl - 74 Avenue Paul Sabatier ZA de la Coupe 11.100 Narbonne Tel : +33 (0) 4 68 70 91 75 - Fax : 04 68 70 91 76 Mail : [email protected] - N° SIRET : 384 007 894 00031 – Code TVA CEE: FR90384007894 - www.hypercable.fr Status The status page of Base station mode provides below information from remote CPEs: MAC Address, IP Address, RSSI, Rx rate. HYPERCABLE sarl - 74 Avenue Paul Sabatier ZA de la Coupe 11.100 Narbonne Tel : +33 (0) 4 68 70 91 75 - Fax : 04 68 70 91 76 Mail : [email protected] - N° SIRET : 384 007 894 00031 – Code TVA CEE: FR90384007894 - www.hypercable.fr Statistics The Statistics screen provides various Ethernet and Wireless TX/RX packet statistics. Click the Refresh button to update the statistics on this screen. 3-5 Management Management / Change Password Here allow you to change the password of the 400MHz MESH Radio. To change the password of the 400MHz MESH Radio, do the following: 1. To change the current password, choose the “Change Password” option from the “Management” section in the left page. Key-in the default password “password” in the “Current Password” filed. HYPERCABLE sarl - 74 Avenue Paul Sabatier ZA de la Coupe 11.100 Narbonne Tel : +33 (0) 4 68 70 91 75 - Fax : 04 68 70 91 76 Mail : [email protected] - N° SIRET : 384 007 894 00031 – Code TVA CEE: FR90384007894 - www.hypercable.fr 2. Changing password for the 400MHz MESH Radio is as easy as typing the password into the New Password field. Then, type it again into the Retype New Field to conf 3. Click the “Apply” button to save the setting. 4. You can restore to default password too by check the “yes” option. Note: After you change password, please take note of your new password. Otherwise, you will not able to access the 400MHz MESH Radio setup. Management / Upgrade Firmware The Upgrade Firmware menu will display the Upgrade Firmware window so that you could update the latest firmware on the 400MHz MESH Radio. HYPERCABLE sarl - 74 Avenue Paul Sabatier ZA de la Coupe 11.100 Narbonne Tel : +33 (0) 4 68 70 91 75 - Fax : 04 68 70 91 76 Mail : [email protected] - N° SIRET : 384 007 894 00031 – Code TVA CEE: FR90384007894 - www.hypercable.fr Please make sure that you have downloaded the latest and correct firmware from the website before upgrading the firmware of the 400MHz MESH Radio. To upgrade the latest firmware, complete the following: Using browser to access the main page of the 400MHz MESH Radio. 1. Select “Upgrade Firmware” from the Management section. 2. Input the exact file path and name or select the file by clicking Browse button, then press Upload button to upgrade the firmware. 3. Please wait for few seconds. If download fail, please repeat the step 1~3 to download again. Note! Do not power off the unit when it is being upgraded. Management / Backup / Restore Settings Management / Time Setting The current system settings can be saved into a file as a backup by clicking “Backup”. The saved file can be loaded back on the radio by clicking “Browse”. When you have selected the settings file, click “Retrieve” to begin the process. Furthermore, you may click “Restore” to factory default settings. Time: While you connect this 400MHz MESH Radio to Internet, it could automatically synchronize the current time with the Time Server that you have set. HYPERCABLE sarl - 74 Avenue Paul Sabatier ZA de la Coupe 11.100 Narbonne Tel : +33 (0) 4 68 70 91 75 - Fax : 04 68 70 91 76 Mail : [email protected] - N° SIRET : 384 007 894 00031 – Code TVA CEE: FR90384007894 - www.hypercable.fr Time Server: the central time of the Time Server. Time Server Port: the port of the Time Server. Time Zone: You may select the appropriate local time zone for your radio from a list of all available time zones. Default: GMT. HYPERCABLE sarl - 74 Avenue Paul Sabatier ZA de la Coupe 11.100 Narbonne Tel : +33 (0) 4 68 70 91 75 - Fax : 04 68 70 91 76 Mail : [email protected] - N° SIRET : 384 007 894 00031 – Code TVA CEE: FR90384007894 - www.hypercable.fr Management / Event Log Enable SysLog if you have a Syslog Server on your network environment. If enable, you need to input the Syslog Server IP Address (default is 0.0.0.0) and the port number your Syslog Server is configured to use. The default port number is 514. The Event Log Window lists 400MHz MESH Radio events. Click on “Refresh” to update the network events or “Save As…” to save the event into a file on your computer. Click “Apply” if you made any changes. Management / Reboot The Reboot screen enables you to reboot your 400MHz MESH Radio. If any changes are made and you want them to take effect, you need to reboot the 400MHz MESH Radio. Select the “Yes” check box and click “Apply”. It will take you about 50 seconds to go through reboot. The Web-browser will not be accessible until the 400MHz MESH Radio has finished its reboot process. HYPERCABLE sarl - 74 Avenue Paul Sabatier ZA de la Coupe 11.100 Narbonne Tel : +33 (0) 4 68 70 91 75 - Fax : 04 68 70 91 76 Mail : [email protected] - N° SIRET : 384 007 894 00031 – Code TVA CEE: FR90384007894 - www.hypercable.fr Management / Logout Click log out when you finished all the configurations, if there is anything missed, you can selected “login again” to enter the configuration process again. Hardware reset Once you do the hardware reset to the PWS system, (press the reset button below the RSSI LED display for 5~10 seconds). Both 2.4GHz AP/Router and 400MHz MESH Radio will be back to factory default settings: 2.4GHz AP/Router 400MHz Mesh radio IP address 192.168.2.1 192.168.2.2 User name admin admin Password admin admin Operation mode AP Router AP Bridge Mesh Note: When the 2.4GHz AP/Router back to default operation mode: “AP router”. You will lost the connection to the 400MHz MESH Radio. So please change the “AP router” mode of 2.4GHz AP/Router to “AP bridge” mode first. HYPERCABLE sarl - 74 Avenue Paul Sabatier ZA de la Coupe 11.100 Narbonne Tel : +33 (0) 4 68 70 91 75 - Fax : 04 68 70 91 76 Mail : [email protected] - N° SIRET : 384 007 894 00031 – Code TVA CEE: FR90384007894 - www.hypercable.fr