1
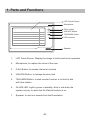
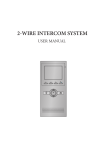
ENGLISH VIDEO INTERCOM SYSTEM USER MANUAL ST-ENG-AT2MTA8R-V2 090S707 - PRECAUTIONS ! ●● Slots or openings in the back of the monitor, are provided for ventilation and to ensure reliable operation of the video monitor or equipment and to protect if from overheating. These openings must not be blocked or covered. The monitor should never be placed near or over a radiator or heat register and should not be placed in a built-in installation such as a bookcase unless proper ventilation is provided. ●● All parts should be protected from violence vibration. And not allow be impacting, knocking and dropping. ●● For clean the LCD screen, using hands or wet cloth is forbidden. ●● Please do the cleanness with soft cotton cloth, please do not use the organic or chemical clean impregnate. If necessary, please use pure water or dilute soap water to clean the dust. ●● Image distortion may occur if the video door phone is mounted too close to magnetic field e. g. Microwaves, TV, computer etc. ●● Please keep away the video door monitor from wet, high temperature, dust, and caustic and oxidation gas in order to avoid any unpredictable damage. ●● Do NOT open the device in any condition, call the administrator for help if there is any problem or mulfunction happens. CONTENT 1. Parts and functions ----------------------------------------2 2. Basic Door Release Operation -------------------------3 3. Intercom Functions-----------------------------------------3 4. Chord Ring Settings ---------------------------------------4 5. Screen Adustments----------------------------------------5 6. Picture Memory Operation(optional)-------------------5 7. Defense Alarm Operation(optional)--------------------6 8. Remote Operations(optional) ---------------------------7 9. Specifications -----------------------------------------------8 The model you purchased may not have all the functions mentioned here, but the operation is similar. -1- 1. Parts and Functions LCD Touch Screen Microphone CALL UNLOCK TALK/MON IN-USE CALL button UNLOCK button TALK/MON button LED indicator Speaker 1. LCD Touch Screen: Display the image of visitor and touch operation 2. Microphone: to capture the voice of the user 3. CALL Button: to access intercom functions 4. UNLOCK Button: to release the door lock 5. TALK/MON Button: to start monitor function or to start to talk with door station 6. IN-USE LED: Light in green in standby; blink in red when the system is busy, or when the No Disturb function is on 7. Speaker: to sent out sounds from the Doorstation -2- 2. Basic Door Release Operation 1. When visitor inputs room numbers in Door Station of the building or main entrance, the Monitor rings, at the same time, the screen displays the visitor image. 2. Press TALK/MON Button(or touch the icon on the screen), you can talk with the visitor for 60 seconds. TALK During talking state, press TALK/MON Button again(or touch EXIT ) to end the conversation. If nobody answers the phone, the screen will be turned off automatically after 30 seconds. 3. During the talking state, touch rec icon) to record the current picture; press UNLOCK Button(or touch for the visitor. icon) to open the door 3. Intercom Functions 1. During the standby, press CALL Button to enter Intercom Function page. Press Call Guard Unit item will sent a call message to the guard center and wait for calling back. Intercom Function Press Direct Call Guard Unit will dail the guard center right Call Guard Unit away. Intercom Call 2. Intercom Call: you can call the other users in the same resident area with you. Use the digital keypad on the screen to input the Building number and the Room number, After 7 digits are input, press TALK/MON Button to confirm the calling, a call message will sent out, if the system is -3- Direct Call Guard Unit Exit free, you will heard the feedback rings, you can begin to talk when the counterpart answers the call. However, if the system is busy(when there is a door station calling in process) the intercom call can not be connected, wait untill the system is free and try again. 1 2 3 4 5 * 4. Chord Ring Settings 1. When the monitor is in standby, touch anywhere on the screen, the date/time page will be dispalyed. The first line shows the current time, the second line shows the current date and weekday.(the date/time page will close in 3 munite if no operation). 2. Touch the screen again to enter the main menu. Touch on the item directly to open the sub menu. Touch to enter the setup page. setup tiem 3. Different ring tones can be selected for different calling sources. Doorstation Tone, Camera Tone and Guard Unit Tone items are for the ring tune selection, touch / icon to switch to the last / next ring tone. (or shift to the next ring tone just by touching the item itseft in sequence) 4. No Disturb Set: If you don't want the visitors to disturb you(for example, at night), set this item is on, then any call from the doorstation will sent to the guard center, and the guard person will tell the visitor that you do not want to accept the visit. Touch the No Disturb Set item to toggle on and off. 5. The Installation...item is use for system configurations, only for the install person. -4- 6 7 8 9 0 # 5. Screen Adjustments 1. During monitoring or talking, touch the screen to enter the Screen Adjust menu. icon on the 2. Touch the + / — icon to change the value of the selected item, touch the icon to shift to the next item. 3. The Scene is Scene mode selection, different mode have the different brigtness and color settings, you can select the mode you like. 4. Ratio can be toggle between 16:9 and 4:3. The Brightness and Colour item is for the image quality setting. The Ring Volume and Talk volume item is for ring tone and talking volume adjust. 5. Touch the icon to exit out the setting. (Note that all settings will be applied immediately) 6. Picture Memory Operation(optional) 1. The picture will be recorded automatically after the visitor calls from the doorstation. The image capacity is about 128 pcs, and the oldest one will be replaced by the new one automatically if the memory is full. 2. Manually record: when the screen is turned on, in monitoring or talking state, touch the current image. rec icon to save 3. Playback the pictures: During the standby, touch the screen to enter the main menu, then touch icon to enter the playback page. The latest picture will be show. IMG 16 DELETE? NEXT play touch NEXT Touch the / DELE? LAST LAST DELE? icon to view forward / backward. icon, a 'DELETE?' hint will show on the uper right of the screen, Touch the DELE? icon again to delete the current picture. Please note that the delete operation is irrepeatable. -5- EXIT 2009/02/14 10:30 H o m e I n t e l l eg e n t S y s t e m 7. Defense Alarm Operation(optional) This system have auto-alarm function to ensure the security for the house owner. Total 4 different sensors were placed to protect different defense area. When the sensor was triggered, the monitor will sent out alarm sound immediately and will sent the alarm signal to the guard center at the same time. Note that your system may not have all the 4 sensors according to the system configuration. Motion Sensor Delay sensor, normally it will be placed on doors or windows. If the sensor is set, when the door or window is opened, the monitor will sent out alarm sound and sent the alarm signal to the guard center. Infrared Sensor Delay sensor, can be placed on living room or bedrooms. When the sensor is set, if some body was invade into the defence area, the monitor will sent out alarm sound and sent the alarm signal to the guard center. You can set this sensor when nobody at home. Smoke Sensor 24-hour sensor, this sensor is opened by the system by default. It can be placed on living room or kitchens. if any fire happened in the area, the monitor will sent out alarm sound and sent the alarm signal to the guard center. Emergency Help Button 24-hour sensor, this sensor is opened by the system by default. It can be placed any where suitable. if any fire happened in the area, the monitor will sent out the emergency help signal to the guard center. 1. When the monitor is in standby, touch the screen twice to enter the main menu. Then touch the 'Alarm' menu, as show on the right. 2. Touch the icon dirctly to turn on and off the alarm. If the current state is Armed, the 'Disarm' icon is selectable, and vice versa. -6- 3. Out-Delay Period: after you arm the system, you will get into Out Delay Period, monitor will sent out short “Di” every 3 seconds; you will hear a long “Di~” at the end of the Out Delay Period, and the system is get into the protecting status. By default, the Out Delay Period is 40 seconds, users must get out off the room within 40 seconds, otherwise the system will treat the user as a invader and sent out the alarm signal. 4. In-Delay Period: When the system is armed, the defence alarm are activated, to disarm the alarms. When you come into the room, you have 40 seconds to deactivate the sensors(by enter MAIN --> ALARM menu, select Disarm item); if you didn’t deactivate the sensors after 40 seconds, the monitor will sent out alarm sound and sent the alarm signal to the Guard Unit. 8. Remote Operations(optional) 1. [A] Button: Work as Emergency Help Button, press and hold this button for 3 seconds, the monitor will sent out the emergency help signal to the guard center. 2. [B] Button: Arm button, press and hold this button for 1 second will arm B D C A the system(same result as enter MAIN --> ALARM menu, select Arm item). 3. [C] Button: Disarm button, press and hold this button for 1 second will disarm the system(same result as enter MAIN --> ALARM menu, select Disarm item). 4. [D] Button: Use this button to open the door when Monitor screen is turned on in calling or monitoring.(same result as press the Unlock button on the monitor). NOTE: 1: Remote control distance is normally up to 30 meters, and will extend if the built-in telescopic antenna is taken out. 2: If the conrollable distance is becoming shorter, or LED isn’t light on when press any button, open the remote control unit and replace the battery with a new one. -7- 9. Specifications ●● Power supply for indoor monitor: DC 15~18V (supplied by system) ●● Power supply for second Door Station: DC 10~12V (Supplied by system) ●● Audio Phone : DC 10~12V (Supplied by Indoor Monitor) ●● Power consumption: Standby 0.5W; Working status 15W ●● Monitor screen: 7 Inch color TFT-LCD ●● Display Resolutions: 1440(R, G, B) x 234 pixels ●● Video signal: 1Vp-p, 75Ω, CCIR standard ●● Wiring: 6 wires, polar ●● Monitor time: 30 seconds ●● Talking time: 60 seconds ●● Dimensions: 155(H)×225(W)×28(D)mm The design and specifications can be changed without notice to the user. Right to interpret and copyright of this manual are preserved. -8- ST-ENG-AT2MTA8R-V2 090S707