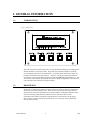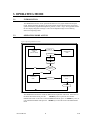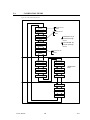
1
ACE
(Advanced Cryogenic Electronics)
USER’S MANUAL
HP-224
March 2013
Notice
HOFFER FLOW CONTROLS, INC. MAKES NO WARRANTY OF ANY KIND
WITH REGARD TO THIS MATERIAL, INCLUDING, BUT NOT LIMITED TO,
THE IMPLIED WARRANTIES OF MERCHANTABILITY AND FITNESS FOR A
PARTICULAR PURPOSE.
This manual has been provided as an aid in installing, connecting, calibrating, operating, and
servicing this unit. Every precaution for accuracy has been taken in the preparation of this
manual; however, HOFFER FLOW CONTROLS, INC. neither assumes responsibility for any
omissions or errors that may appear nor assumes liability for any damages that may result from
the use of the products in accordance with information contained in the manual.
HOFFER FLOW CONTROLS' policy is to provide a user manual for each item supplied.
Therefore, all applicable user manuals should be examined before attempting to install or otherwise
connect a number of related subsystems.
During installation, care must be taken to select the correct interconnecting wiring drawing. The
choice of an incorrect connection drawing may result in damage to the system and/or one of the
components.
Please review the complete model number of each item to be connected and locate the appropriate
manual(s) and/or drawing(s). Identify all model numbers exactly before making any connections.
A number of options and accessories may be added to the main instrument, which are not shown
on the basic user wiring. Consult the appropriate option or accessory user manual before
connecting it to the system. In many cases, a system wiring drawing is available and may be
requested from HOFFER FLOW CONTROLS.
This document contains proprietary information, which is protected by copyright. All rights are
reserved. No part of this document may be photocopied, reproduced, or translated to another
language without the prior written consent of HOFFER FLOW CONTROLS, INC.
HOFFER FLOW CONTROLS’ policy is to make running changes, not model changes,
whenever an improvement is possible. This affords our customers the latest in technology and
engineering. The information contained in this document is subject to change without notice.
RETURN REQUESTS / INQUIRIES
Direct all warranty and repair requests/inquiries to the Hoffer Flow Controls Customer Service Department, telephone
number (252) 331-1997 or 1-800-628-4584. BEFORE RETURNING ANY PRODUCT(S) TO HOFFER FLOW
CONTROLS, PURCHASER MUST OBTAIN A RETURNED MATERIAL AUTHORIZATION (RMA) NUMBER FROM
HOFFER FLOW CONTROLS’ CUSTOMER SERVICE DEPARTMENT (IN ORDER TO AVOID PROCESSING
DELAYS). The assigned RMA number should then be marked on the outside of the return package and on any
correspondence.
FOR WARRANTY RETURNS, please have the
following information available BEFORE contacting
HOFFER FLOW CONTROLS:
1. P.O. number under which the product was
PURCHASED,
2. Model and serial number of the product under
warranty, and
3. Repair instructions and/or specific problems relative
to the product.
HFC 9708
FOR
REPAIRS
OR
NON-WARRANTY
consult
HOFFER
FLOW
CALIBRATIONS,
CONTROLS for current repair/calibration charges. Have
the following information available BEFORE contacting
HOFFER FLOW CONTROLS:
1. P.O. number to cover the COST of the
repair/calibration,
2. Model and serial number of the product, and
3. Repair instructions and/or specific problems relative
to the product.
LIMITED WARRANTY
HOFFER FLOW CONTROLS, INC. (“HFC”) warrants HFC’s products (“goods”) described in the specifications
incorporated in this manual to be free from defects in material and workmanship under normal use and service, but only
if such goods have been properly selected for the service intended, properly installed and properly operated and
maintained. This warranty shall extend for a period of (1) year from the date of delivery to the original purchaser (or
eighteen (18) months if the delivery to the original purchaser occurred outside the continental United States). This
warranty is extended only to the original purchaser (“Purchaser”). Purchaser’s sole and exclusive remedy is the repair
and/or replacement of nonconforming goods as provided in the following paragraphs.
In the event Purchaser believes the goods are defective, the goods must be returned to HFC, transportation prepaid by
Purchaser, within twelve (12) months after delivery of goods (or eighteen (18) months for goods delivered outside the
continental United States) for inspection by HFC. If HFC’s inspection determines that the workmanship or materials
are defective, the goods will be either repaired or replaced, at HFC’s sole determination, free of additional charge, and
the goods will be returned, transportation paid by HFC, using the lowest cost transportation available.
Prior to returning the goods to HFC, Purchaser must obtain a Returned Material Authorization (RMA) Number from
HFC’s Customer Service Department within 30 days after discovery of a purported breach of warranty, but no later than
the warranty period; otherwise, such claims shall be deemed waived. See the Return Requests/Inquiries Section of this
manual.
If HFC’s inspection reveals the goods are free of defects in material and workmanship or such inspection reveals the
goods were improperly used, improperly installed, and/or improperly selected for service intended, HFC will notify the
purchaser in writing and will deliver the goods back to purchaser upon (i) receipt of Purchaser’s written instructions
and (ii) the cost of transportation. If Purchaser does not respond within 30 days after notice from HFC, the goods will
be disposed of in HFC’s discretion.
HFC does not warrant these goods to meet the requirements of any safety code of any state, municipality, or any other
jurisdiction, and purchaser assumes all risk and liability whatsoever resulting from the use thereof, whether used singly
or in combination with other machines or apparatus.
This warranty shall not apply to any HFC goods or parts thereof, which have bee repaired outside HFC’s factory or
altered in any way, or have been subject to misuse, negligence, or accident, or have not been operated in accordance
with HFC’s printed instructions or have been operated under conditions more severe than, or otherwise exceeding, those
set forth in the specifications for such goods.
THIS WARRANTY IS EXPRESSLY IN LIEU OF ALL OTHER WARRANTIES, EXPRESSED OR IMPLIED,
INCLUDING ANY IMPLIED WARRANTLY OF MERCHANTABILITY OR FITNESS FOR A PARTICULAR
PURPOSE. HFC SHALL NOT BE LIABLE FOR ANY LOSS OR DAMAGE RESULTING, DIRECTLY OR INDIRECTLY,
FROM THE USE OF LOSS OF USE OF THE GOODS. WITHOUT LIMITING THE GENERALITY OF THE FOREGOING, THIS
EXCLUSION FROM LIABILITY EMBRACES THE PURCHASER’S EXPENSES FOR DOWNTIME, DAMAGES FOR WHICH
THE PURCHASER MAY BE LIABLE TO OTHER PERSONS, DAMAGES TO PROPERTY, AND INJURY TO OR DEATH OF
ANY PERSON. HFC NEITHER ASSUMES NOR AUTHORIZES ANY PERSON TO ASSUME FOR IT ANY OTHER
LIABILITY IN CONNECTION WITH THE SALE OR USE OF HFC’S GOODS, AND THERE ARE NO AGREEMENTS OR
WARRANTIES COLLATERAL TO OR AFFECTING THE AGREEMENT. PURCHASER’S SOLE AND EXCLUSIVE REMEDY
IS THE REPAIR AND/OR REPLACEMENT OF NONCONFORMING GOODS AS PROVIDED IN THE PRECEDING
PARAGRAPHS. HFC SHALL NOT BE LIABLE FOR ANY OTHER DAMAGES WHATSOEVER INCLUDING INDIRECT,
INCIDENTAL, OR CONSEQUENTIAL DAMAGES.
Disclaimer:
Specifications are subject to change without notice.
Some pages are left intentionally blank.
HFC 9708
TABLE OF CONTENTS
1.
GENERAL INFORMATION..........................................................................................................................1
INTRODUCTION .....................................................................................................................................1
DESCRIPTION .........................................................................................................................................1
PRECAUTIONS........................................................................................................................................2
PREPARATION FOR SHIPMENT...........................................................................................................2
SPECIFICATIONS....................................................................................................................................3
EQUIPMENT ACCESSORIES .................................................................................................................4
2.
OPERATIONS OVERVIEW..........................................................................................................................5
2.1.
INTRODUCTION .....................................................................................................................................5
2.2.
OPERATION KEY FUNCTIONS.............................................................................................................5
2.3.
PROGRAM MODE CONTROL................................................................................................................6
3.
OPERATING MODE .....................................................................................................................................9
3.1.
INTRODUCTION .....................................................................................................................................9
3.2.
OPERATING MODE ACCESS ................................................................................................................9
3.3.
OPERATOR KEY FUNCTIONS ............................................................................................................10
3.4.
DISPLAY FIELDS ..................................................................................................................................11
3.5.
WARNING MESSAGES DURING DELIVERIES.................................................................................13
3.6.
PUMP INTERLOCK (OPTIONAL)........................................................................................................14
3.7.
PRINTING ..............................................................................................................................................17
4.
MAINTENANCE MODE .............................................................................................................................19
4.1.
INTRODUCTION ...................................................................................................................................19
4.2.
MAINTENANCE MODE ACCESS........................................................................................................19
4.3.
KEYBOARD ENTRY .............................................................................................................................20
4.4.
MAINTENANCE MODE FIELDS .........................................................................................................21
5.
CALIBRATION MODE ...............................................................................................................................27
5.1.
INTRODUCTION ...................................................................................................................................27
5.2.
CALIBRATION MODE ACCESS ..........................................................................................................27
5.3.
KEYBOARD ENTRY .............................................................................................................................28
5.4.
CALIBRATION FIELDS ........................................................................................................................29
6.
CONFIGURATION MODE .........................................................................................................................33
6.1.
INTRODUCTION ...................................................................................................................................33
6.2.
CONFIGURATION MODE ACCESS ....................................................................................................33
6.3.
KEYBOARD ENTRY .............................................................................................................................34
6.4.
CONFIGURATION FIELDS ..................................................................................................................35
7.
FIELD COMMISSIONING ..........................................................................................................................41
8.
INSTALLATION GUIDE.............................................................................................................................43
8.1.
ELECTRONICS ENCLOSURE INSTALLATION.................................................................................43
8.2.
INTERCONNECTING CABLE INSTALLATION ................................................................................43
8.3.
FIELD COMMISSIONING ..................................................................................................................... 44
8.4.
WIRING CONNECTIONS OPTIONAL PRINTER................................................................................44
9.
SERVICE GUIDE.........................................................................................................................................45
9.1.
TROUBLE SHOOTING..........................................................................................................................45
9.2.
TROUBLESHOOTING THE MEASUREMENT TRANSDUCER FOR DUAL COIL SYSTEMS .......48
9.3.
CORRECTIVE ACTIONS ......................................................................................................................49
9.4.
TESTING ................................................................................................................................................52
9.5.
WEIGHT SCALE CALIBRATION.........................................................................................................54
9.6.
REPLACEMENT PARTS .......................................................................................................................55
10.
OPERATIONS ..............................................................................................................................................57
10.1.
DELIVERY PROCEDURE .................................................................................................................57
11.
SYSTEM CHECKOUT ................................................................................................................................59
11.1.
SYSTEM CHECKOUT PROCEDURE...............................................................................................59
12.
APPENDIX: DRAWINGS............................................................................................................................63
1.1.
1.2.
1.3.
1.4.
1.5.
1.6.
ACE
i
DocNo HP 224
LIST OF FIGURES
Figure 1: ACE front view...............................................................................................................................................1
Figure 2: ACE Display and Keyboard. ..........................................................................................................................5
Figure 3: Program Mode access flowchart.....................................................................................................................6
Figure 4: Operating Mode Access Chart........................................................................................................................9
Figure 5: Operating Mode flowchart............................................................................................................................11
Figure 6 Pump Interlock Control flowchart .................................................................................................................16
Figure 7: Maintenance Mode access flowchart. ...........................................................................................................19
Figure 8: Maintenance Mode flowchart. ......................................................................................................................21
Figure 9: Calibration Mode access flowchart. .............................................................................................................27
Figure 10: Calibraiton Mode flowchart........................................................................................................................29
Figure 11: Configuration Mode access flowchart. .......................................................................................................33
Figure 12: Configuration Mode flowchart. ..................................................................................................................35
Figure 13: TM-295 Dip Switch Settings ......................................................................................................................38
ACE
ii
DocNo HP 224
1. GENERAL INFORMATION
1.1.
INTRODUCTION
Figure 1: ACE front view.
The ACE, Advanced Cryogenic Electronics, is a truck mounted flow metering system designed to
facilitate the delivery of cryogenic fluids. The system uses an internal computer to accurately
record and display deliveries in the required units. An optional printer allows the system to off
load delivery information and ACE setup pa rameters. ACE has been designed to meet the
requirements of the cryogenic metering section of NIST HANDBOOK 44 and OIML R -81. The
ACE system microcontroller design enables the unit to be firmware upgradeable. This allows the
unit to meet the future needs of the cryogenics industry.
1.2.
DESCRIPTION
The system is composed of a turbine flowmeter, electronics console, a metering run mounted on
the delivery truck, and a optional printer. The electronics portion of the ACE is provided in a
small electronics encl osure with military style electrical fittings. Instantaneous indication of the
flowrate and flowing temperature is provided as well as a total flow indicator and an
accumulative total indicator. Temperature compensation is provided to allow for the proper
delivery totals. Optional versions are available which cover CO2, LH2, LNG, ETHYLENE,
LPG, and other products.
DocNo HP 224
1
ACE
1.3.
PRECAUTIONS
1.3.1. STATIC ELECTRICITY
The ACE uses high speed CMOS circuitry which is sensitive to static damage. User should
observe accepted safety practices for the handling of electronic devices. All spare electronic parts
are shipped in special packages to avoid static damage. Follow these precautions when servicing
the equipment.
Once the ACE is installed, grounded, and interconnected, the odds of static discharge damage are
greatly reduced. Should a malfunction due to static discharge be suspected, it may be necessary to
turn the power OFF and then ON after a 10 seconds delay to restore normal operation.
Low humidity environments increase the po tential for static build up. In these conditions the
operator should touch a grounded conductive surface prior to touching controls on the ACE.
CAUTION- ACE CONTAINS STATIC-SENSITIVE DEVICES.
STANDARD
PRACTICES FOR STATIC-SENSITIVE PARTS SHOULD BE OBSERVED.
1.3.2. WELDING
Welding should not be performed in close proximity to the ACE or its interconnecting cables. If
welding under these conditions must be performed, disconnect all cables from the ACE. Failure
to do so may result in damage to the unit.
1.4.
PREPARATION FOR SHIPMENT
1.4.1. SHIPPING AND HANDLING
In the event of a malfunctioning system, the following guidelines should be observed for the
preparation and shipment of the unit in question. Failure to do so may result in the material
reaching its destination damaged.
1.4.2. COMPLETE ACE UNIT
•
If it is determined that the entire ACE unit needs to be returned for service, follow these
steps:
•
Wrap the complete unit in a cushioning type of material.
•
Secure the wrapped unit in a commercial grade shipping container.
•
Label the exterior container with bold letters stating "HANDLE WITH CARE".
•
Clearly mark the box and paperwork with the RMA number.
•
Ship the material back to HFC using the following address:
Hoffer Flow Controls, Inc
107 Kitty Hawk Lane
Elizabeth City, NC 27909, USA
ACE
2
DocNo HP 224
1.4.3. ELECTRONIC SUBCOMPONENTS
Electronic subcomponent refers to the printed circuit board or any other related electronic
component.
1.5.
•
The electronic component should be wrapped in a material conforming to MIL
-B-81705,
Type II, and packaged in a heat sealed bag conforming to MIL -P-81997. These steps are
necessary to protect the equipment from electrostatic charges that may occur during
handling.
•
The packaged unit should then be marked with a sensitive electronic device caution label
conforming to MIL -STD-129, App endix C. The equipment should then be wrapped in
cushioning material, and placed into a close fitting box conforming to PPP -B-636 Domestic
class.
•
The exterior shipping container should be marked with a sensitive electronic device caution
label conforming to MIL-STD-129, Appendix C.
SPECIFICATIONS
•
Display: 32 -character, alphanumeric, LED backlit, LCD supertwist display, 0.3" character
height.
•
Keypad: 5 key (Explosion Proof version - 4 keys).
•
Optional Printer.
•
Operating temperature: -20 to +70 °C (-4 to +158 °F).
•
Storage temperature: -40 to +90 °C (-40 to +194 °F).
•
Flowmeter input: sensitivity 10 mVrms, RF and bandpass filtered.
•
Temperature probe: 1000 ohm, platinum RTD - compatible.
•
Self test capabilities: Coil failures, RTD failures, low power, computer op eration, memory
test and circuitry failure detection.
•
Compensation range:
Fluid
LIN
LOX
LAR
LH2
LNG
CO2
LPG
Ethylene(C2H4)
Compensation Range
75 to 125 °K
90 to 130 °K
85 to 125 °K
20 to 31 °K
-260 to -160 °F (-162 to -107 °C)
-60 to 30 °F (-51 to -1 °C)
0 to 125 °F (-18 to 52 °C)
158 to 250 °K
•
Power Input: 12 Vdc (9.3 to 15 Vdc) standard. Optional 115/220 Vac with a power pack
converter or 24 Vdc (16 to 30 Vdc).
•
Optional pump interlock output.
•
Optional pulse output.
•
Optional heater for low temperature operation.
DocNo HP 224
3
ACE
1.6.
ACE
EQUIPMENT ACCESSORIES
•
ACC-5A Count Tester.
•
ACC-45V Pressure Transmitter Simulator.
•
ACC-11 Temperature Probe Simulator, LIN/LOX/LAR.
•
ACC-36 Temperature Probe Simulator, LH2.
•
ACC-15 Temperature Probe Simulator, CO2 and Ethylene.
•
ACC-62 Temperature Probe Simulator, LNG.
•
ACC-58 Temperature Probe Simulator, LPG.
•
SCA6CC2-T Temperature Probe Cable.
•
SCA6CC2-S Signal Cable.
•
SCA4CU3-P Power Cable.
4
DocNo HP 224
2. OPERATIONS OVERVIEW
2.1.
INTRODUCTION
The ACE is an advanced flow metering system used in bulk liquid
delivery systems. These
systems are primarily used for the delivery of industrial gases. The ACE uses a turbine
flowmeter input, temperature input, and an optional pressure input to calculate and record the
delivered amount of fluid.
Before and during t he delivery run, the ACE will provide warning messages if there is an
equipment failure or if the unit is operating outside the programmed flow range.
2.2.
OPERATION KEY FUNCTIONS
Figure 2: ACE Display and Keyboard.
Program control keys consist of the MODE (left arrow), SELECT (down arrow), CLEAR
(right arrow), PRINT (up arrow), and CONTROL key.
Data entry and option selection are performed using the CLEAR and PRINT keys. Parameters
are displayed in two forms, ei ther label fields or numeric fields. Numeric fields require the entry
of numbers using a combination of the PRINT and CLEAR keys. The CLEAR key moves the
cursor to the right, one character at a time. The
PRINT key causes the selected number to
increment by one. Label fields display English messages showing the option currently selected
for a setup option or parameter. Alternate selections may be viewed and selected by pressing the
PRINT key.
DocNo HP 224
5
ACE
2.3.
•
MODE - Advances from one mode of operation to another.
•
SELECT - Scrolls down through the selected mode field entries.
•
CONTROL - Scrolls up through the selected mode field entries.
•
PRINT - Changes the selection in label fields. Increments the number when in a numeric
field. At the end of a delivery initiates the
printing of the delivery ticket if the unit has a
printer. Also saves the delivery information in memory.
•
CLEAR - Moves the cursor over one character during numeric data entry.
PROGRAM MODE CONTROL
Figure 3: Program Mode access flowchart.
MODE KEY
OPERATING
MODE
(DEFAULT MODE)
MAINTENANCE
MODE
MODE KEY
ENTER
PASSWORD
MODE KEY
PASSWORD
CORRECT?
NO
YES
CALIBRATION
MODE
MODE KEY
CONFIGURATION
MODE
MODE KEY
ACE
6
DocNo HP 224
2.3.1. OVERVIEW
The ACE has four modes of program control, they are OPERATING, MAINTENANCE,
CALIBRATION, and CONFIGURATION. The OPERATING mode is used during delivery.
MAINTENANCE mode provides clearing of ACCUM TOTAL, self -test, and troubleshooting
features. CALIBRATION mode stores parameters that affect the accuracy of the ACE. The
CONFIGURATION mode stores the parameters that affect the operational status of the ACE.
2.3.2. PASSWORD PROTECTION
The ACCUM TOT AL clearing function, the RESTORE NEW UNIT function, the
CALIBRATION mode, and the CONFIGURATION mode are protected by a password to
prevent unauthorized personnel from modifying system settings. All ACE systems are shipped
from the factory with a passwo rd of 2001. It is recommended that this password be changed
when the unit is received. Any password from 0001 to 9999 is acceptable. The password should
be confidential information shared only by the service technician and his supervisor.
2.3.3. CHANGING MODES
To enter the CALIBRATION mode, press the MODE key twice, "PASSWORD" will appear on
the display. Use the PRINT and CLEAR keys to enter in the password. Upon completion of
entering the password, depress the MODE key to advance to the CALIBRATION mode. If an
incorrect password is entered, the unit will return to the OPERATING mode. Once in the
CALIBRATION mode, use the SELECT or CONTROL keys to scroll through the fields. To
change a field value use the CLEAR and PRINT keys. Pressing the MODE key whil e in the
CALIBRATION mode shifts the unit into the CONFIGURATION mode. In the
CONFIGURATION mode, use the SELECT or CONTROL keys to scroll through the fields
and the PRINT and CLEAR keys to change setup values. Pressing the MODE key while in the
CONFIGURATION mode returns the ACE to the OPERATING mode
WARNING - YOU MUST REMEMBER THE PASSWORD OR YOU WILL NOT
BE ABLE TO CLEAR THE ACCUM-TOTAL or ENTER THE ACE
CALIBRATION AND CONFIGURATION MODES.
DocNo HP 224
7
ACE
THIS PAGE LEFT INTENTIONALLY BLANK.
ACE
8
DocNo HP 224
3. OPERATING MODE
3.1.
INTRODUCTION
The OPERATING mode is used to perform bulk deliveries of cryogenic fluids from transport
trucks. Before and during the delivery the ACE provides warning messages if the unit is being
operated outside the programmed temperature, pressure, or flow range. For equipment failures
the ACE displays diagnostic messages. There are also helpful messages to aid in making
deliveries and printing tickets.
3.2.
OPERATING MODE ACCESS
Figure 4: Operating Mode Access Chart
MODE KEY
OPERATING
MODE
(DEFAULT MODE)
MAINTENANCE
MODE
MODE KEY
ENTER
PASSWORD
MODE KEY
PASSWORD
CORRECT?
NO
YES
CALIBRATION
MODE
MODE KEY
CONFIGURATION
MODE
MODE KEY
The OPERATING mode is the normal or default mode of operation of the ACE. If the unit is in
the MAINTENANCE mode, press the
MODE key twice to place the ACE into the
OPERATING mode. If the unit is in the CALIBRATION mode, press the MODE key twice, or
if in CONFIGURATION mode press the MODE key to return the ACE to the OPERATING
mode.
DocNo HP 224
9
ACE
3.3.
OPERATOR KEY FUNCTIONS
The key functionality is as follows:
ACE
•
MODE - Advances from one mode of operation to another. When in the OPERATING
mode, pressing this key once changes the unit to the MAINTENANCE mode. Pressing the
MODE key twice while in the MAINTENANCE returns the unit to the OPERATING mode.
If the mode key is accidentally pressed in the OPERATING mode, press the key twice to
return back to the OPERATING mode.
•
SELECT - Scrolls down through the display fields.
•
CONTROL - Scrolls up through the display fields.
•
PRINT – Initiates the printing of tickets and logs the delivery information.
•
CLEAR - When pressed twice, clears the most recent deliv
printing function, and clears the internal error log.
10
ery total, resets the ticket
DocNo HP 224
3.4.
DISPLAY FIELDS
The Delivery Total is the default field displayed in the Operatin g Mode. Press the SELECT key
to scroll to other fields in the Operating Mode. The ACE automatically returns to the Delivery
Total field in 30 seconds if no key is pressed.
Figure 5: Operating Mode flowchart.
Use SELECT key to
scroll down through
menus.
DELIVERY
ACCUM
Use CONTROL key
to scroll up through
menus.
VOL. FLOWRATE
MASS
FLOWRATE
TEMPERATURE
PRESSURE
Not displayed on
LPG systems.
DENSITY
Only displayed on
LPG systems.
SPECIFIC
GRAVITY
Only displayed on
LPG systems.
VOLUME
CORRECTION
FACTOR
TIME
DATE
AUDIT TRAIL CAL
AUDIT TRAIL
CON
DocNo HP 224
11
ACE
3.4.1. DELIVERY TOTAL
During a delivery, this field displays the total compensated equi valent delivery based on the units
of measure selected in the CONFIGURATION mode.
3.4.2. ACCUM. TOTAL
This field displays the total compensated amount of product metered since this field was last
cleared.
3.4.3. FLOWRATE
Displays the volumetric flowrate in GAL/MIN or LIT/MIN dependent on the setting of SYS OF
MEASURE.
3.4.4. FLOWRATE
Displays the mass flowrate of the product in LBS/MIN or KG/MIN dependent on the setting of
SYS OF MEASURE.
3.4.5. TEMPERATURE
During a delivery, this field displays the temperature of the fluid. If a temperature probe is not in
use or fails, the unit displays the Default Temperature stored in the CALIBRATION mode.
3.4.6. PRESSURE
This field displays fluid pressure if a pressure transmitter is used. If a pressure transmitter is not
in use or fails, the unit displays the default pressure stored in the CALIBRATION mode.
3.4.7. DENSITY
During a delivery, this field displays the fluid density based on the method of compensation.
3.4.8. TIME
Displays the time of day.
3.4.9. DATE
Displays the date.
3.4.10. AUDIT TRAIL CAL
Displays the audit number last used. This field increments by one whenever the CALIBRATION
mode is entered and settings are changed. Service personnel can not modify this field.
3.4.11. AUDIT TRAIL CONF
Displays the audit number last used. This field increments by one an
ytime that the
CONFIGURATION mode is entered and settings are changed. Service personnel can not modify
this field.
ACE
12
DocNo HP 224
3.5.
WARNING MESSAGES DURING DELIVERIES
ACE has a number of warning messages which may alternately flash when something is wrong
during a delivery. These messages detect both system problems and errors in operation.
3.5.1. LOW FLOW WARNING
The flow rate has fallen below the limits of the LOW FLOW LIMIT set in the CALIBRATION
mode. It is normal to see this error message when cooling down and when sw itching over from
recirculation to product delivery.
3.5.2. HI FLOW WARNING
Means that the flow rate has exceeded the maximum limits of the HIGH FLOW LIMIT, set in the
CALIBRATION MODE. This message may also appear if the meter is being gas spun by cold
gas. This can occur even if the delivery total is inhibited by the gas cutout feature. HI FLOW
WARNING error is reported on the Trip Report.
3.5.3. TWO PHASE WARNING
Means that the liquid is approaching a point where it may contain bubbles which will cause over
registration of the delivery total. Here again, it is normal to see this message while the meter is
being cooled down.
3.5.4. GAS INHIBIT ON
Occurs when the conditions in the delivery reach a point where the meter system determines
there is no longer liquid in th e meter run. This message appears before and during cool down
and after the delivery has been completed. This is a normal part of a delivery. If it happens
during a delivery, it is possible that the pump has lost prime. GAS INHIBIT error is reported on
the Trip Report.
3.5.5. COMP RANGE OUT
Means the fluid is out of accurate measurement range. This occurs if the liquid is too hot or cold.
This message will appear in normal operation during cool down and after the delivery is
complete. The COMP RANGE OUT error message is reported by the Trip Report.
3.5.6. PULSE FAILURE
This error is displayed on PTB approved systems when the dual pulse output of the flowmeter
does not agree in frequency, phase, and amplitude. The PULSE FAILURE error is reported on
the Trip Report.
NOTE: The PRT OUT OF PAPER and PRINTER OFF LINE error messages are
only enable when DEVICE ATTACHED is set to TM-295 ERR. CHK.
3.5.7. PRT OUT OF PAPER
This message is displayed when an attached TM -295 ERR CHK printer runs out of paper during
a print cycle. When this error occurs, insert a form into the printer and depress the PRINT key
to generate the delivery ticket.
DocNo HP 224
13
ACE
3.5.8. PRINTER OFF LINE
This message is displayed when an attached TM -295 ERR CHK printer does not respond to a
print command. To correct this er ror, first check that the printer’s power is on. If the printer is
turned on, then check the wiring from the printer to the ACE.
Please see the SERVICE GUIDE section for other messages that may be
displayed.
3.6.
PUMP INTERLOCK (OPTIONAL)
The ACE uses a cool d own timer and a gas detection function (GAS INHIBIT) to enable or
inhibit the PUMP INTERLOCK. The Interlock Delay Countdown Timer is used to program the
amount of time that should elapse before the pump can be started. Before the pump can be
started, the gas detection feature ensures that liquid exists at the pump. To configure the
Interlock Delay Countdown Timer, use the following settings in the Configuration Mode.
3.6.1. INTERLOCK DELAY
The Interlock Delay setting , sets the amount of time that the ACE allo ws for pump cool down.
After time-out the gas detection function will check for the presence of liquid at the pump before
the pump is energized.. Delay time is adjustable from 0 to 99 minutes, in 1 minute increments.
A value of “0” disables the Interlock countdown timer.
3.6.2. INTER TEMP SETPT (Interlock Temperature Set-point)
This is the temperature that ACE uses to initiate the Interlock Delay Countdown Timer. Enter a
value corresponding to the temperature at which the Interlock Delay Countdown Timer is to start.
The Pump Interlock control operates based on the following conditions:
1.
The Interlock Delay count down timer will be enabled when the fluid temperature reaches
the Interlock Temperature Set-point.
2.
When the Interlock Delay Countdown Timer is enabled
, the Pump Cooling message is
displayed until the delay has timed out. The Interlock delay can be set from 0 to 99 minutes.
For example, if the delay is set to 5 minutes, the following will occur.
A.
The ACE will monitor the fluid temperature.
B. When the fl uid temperature reaches the Interlock Temperature Set -point, the ACE
enables the Interlock Delay Countdown Timer.
C. When the Interlock Delay Countdown Timer is engaged, the “ PUMP CLG mm:ss”
message is displayed. Where mm is the number of minutes left in th e countdown
period and ss is the number of seconds left in the countdown.
D. At the end of the of the Interlock Delay countdown, the system enables the Pump
Interlock relay, if liquid is present. If gas is detected, then the pump will wait until
liquid is detected.
E. If a GAS INHIBIT error occurs, then the system inhibits the Pump Interlock after a
2 second delay and waits until the fluid conditions returns to a liquid state. After
ACE
14
DocNo HP 224
the fluid condition returns to a liquid state, the ACE enables the Pump Int
erlock
relay. During operation, if at any time the temperature exceeds the Interlock
Temperature Set-point, the ACE inhibits the Pump Interlock and resets the Pump
Interlock Control.
3.6.3. Austria Approved ACE Systems.
For Austria approved ACE systems there a
interlock control. They are:
re several additional requirements for the pump
1.
No errors are recorded during the first minute of operation.
2.
The pump interlock is disabled when any monitored error occurs for more than one minute.
See Table 2, Monitored Error Faults.
3.
The pump interlock is disabled when the flowrate is less then
value for more then one minute
4.
The pump interlock is disabled immediately on Probe Open and/or Probe Short errors.
5.
For a Pulse Failure error, the pump inter lock is disabled if the accumulated total of missing
pulses exceeds 5% of the minimum delivery.
½of the Minimum Flowrate
After the pump shuts down due to the conditions above, a ticket must be printed and the CLEAR
key must be pressed twice to reset the ACE to normal operation. See Section 3.7.3.
DocNo HP 224
15
ACE
Figure 6 Pump Interlock Control flowchart
RESET
NO
TEMP<=
Interlock
Temperature
Set-point
NO
Timer = Interlock Delay
Timer = Timer - 1
NO
Interlock Delay
=0
YES
YES
Phase State =
Liquid
Timer = 0
NO
NO
YES
YES
Enable Pump
Interlock
YES
TEMP<=
Interlock
Temperature
Set-point
Delay for 2
Seconds
NO
Phase State =
Liquid
Disable Pump
Interlock
YES
NO
Disable Pump
Interlock
TEMP <=
Interlock
Temperature
Set-point
ACE
16
DocNo HP 224
3.7.
PRINTING
This section only applies to those systems connected to a printer. The ACE records and assigns a
drop number every time the PRINT key is pressed after making a delivery. A delivery occurs
when the display is zeroed at the beginning of the drop and the PRINT key is depressed twice at
the end of the drop.
When a printer not being used on the trailer, a log of the delivery may be maintained by pressing
the PRINT key twice. This holds the delivery information in the ACE memory and allows for
the printing of the Trip Report summary later.
NOTE: The Meter Code requires the ticket to be in the printer prior to the
starting of the delivery.
NOTE: The PRT OUT OF PAPER and PRINTER OFF LINE error messages are
only enabled when DEVICE ATTACHED is set to TM295 ERR. CHK and a TM-295
printer is attached to the ACE.
3.7.1. PRINTING THE DELIVERY TICKET
Use the following procedure to print delivery tickets:
1.
Press the RELEASE key on the printer keypad. Insert the ticket into the slip printer tray
with the ticket face up and the top of the form directed into the printer.
2.
Press the FORWARD or REVERSE key to lock the form in place and to orient t he form in
the print starting position.
3.
Make the delivery.
4.
Press the PRINT key and the RDY DELIVERY FRM message appears on the display.
Press the PRINT key a second time and the ACE initiates the printing of the delivery ticket.
If a PRINTER OFF LINE error appears, this indicates that either the power is not applied to
the printer or that the wiring between the ACE and the printer is defective. If the printer
power switch is turned on and the power light of the printer is off, check the power and
communications wiring between the ACE and the printer. After the printer errors are
corrected, press the PRINT key twice on the ACE to initiate the delivery ticket printing
cycle. If the printer runs out of paper during printing, the PRT OUT OF PAPER error
message is displayed and the printing cycle stops. Insert the paper into the printer and repeat
this step.
5.
After the ticket is printed, the ACE returns to the operating state.
6.
Press the RELEASE key on the printer to remove the ticket.
3.7.2. DUPLICATE PRINTING
•
Should the ticket be illegible, lost, or jammed in the printer, a duplicate ticket may printed by
repeating the previous steps. The words DUPLICATE TICKET are printed at the bottom of
the ticket. Duplicate tickets can be printed until the CLEAR key is pressed twice.
•
If you accidentally turn the ACE off before printing a delivery ticket, return the power and
the ACE will restore the reading at the time the unit was turned off.
DocNo HP 224
17
ACE
3.7.3. AUSTRIA APPROVED ACE SYSTEMS.
For Austria approved ACE systems there are sever
delivery tickets. Those requirements are:
al additional requirements for the printed
1.
If the pump is shut down due to the conditions listed in Section 3.6.3, the asterisks (*) are
removed from the total. See Table 2 Monitored Error Faults.
2.
If the total th at is accumulated when errors occurs during the delivery process exceeds the
Maximum Allowable Error requirements, the asterisks (*) are removed from the total on
the delivery ticket.
3.
If the total that is accumulated during a delivery is less the Minimum D elivery quantity, the
asterisks (*) are removed from the Delivery Ticket.
The Austria approved ACE systems uses the Flowmeter Size setting located in Configuration
Mode to set the values for Minimum Flowrate, Maximum Flowrate, and Minimum Delivery. See
Table 1 Austria Flowmeter Size Selection.
Table 1 Austria Flowmeter Size Selection
Flowmeter Size
Min. Flowrate
Max. Flowrate
Min. Delivery
l/min (gal/min)
l/min (gal/min)
kg (lbs)
DN25
46.0 (12.152)
230 (60.760)
10 (22.046)
DN40
100 (26.417)
500 (132.086)
100 (220)
DN50
170 (44.909)
850 (224.546)
100 (220)
Table 2 Monitored Error Faults
Monitored Error Faults For Austria Approved Systems
Is Error reported on trip
report?
Are the Asterisks printed on the
ticket as define by the fault
conditions listed in Section 3.6.3?
Yes
No
Yes
No
PRES OVERRANGE
Yes
No
PRES SIG LOST
Yes
No
GAS INHIBIT ON
Yes
No
COMP RANGE OUT
Yes
No
HIGH FLOW WARNING
Yes
No
LOW FLOW WARNING
Flow < 50% of Minimum
Flow value.
PULSE FAILURE
No
No
Yes
No
Monitored Errors
PROBE OPEN
PROBE SHORT
3.7.4. PTB APPROVED ACE SYSTEMS.
For PTB approved ACE systems, if a Pulse Failure occurs during a delivery, the asterisks (*) will
be removed from the total on the delivery ticket.
ACE
18
DocNo HP 224
4. MAINTENANCE MODE
4.1.
INTRODUCTION
The service personnel are required to periodically calibrate and adjust the equipment, maintain
records of calibration, perform preventive maintenance, and troubleshoot malfunctions. The
ACE helps to perform these functions.
The ACE has extensive self -test capabilities. The syst em self -tests with each power -up and
continues testing the cables and probes as it is being used. The operator is informed of any
problems by warning messages.
The ACE system has a number of built -in test facilities. These test facilities allow for diagnosing
and correcting meter problems without the need for specialized equipment.
4.2.
MAINTENANCE MODE ACCESS
Figure 7: Maintenance Mode access flowchart.
MODE KEY
OPERATING
MODE
(DEFAULT MODE)
MAINTENANCE
MODE
MODE KEY
ENTER
PASSWORD
MODE KEY
PASSWORD
CORRECT?
NO
YES
CALIBRATION
MODE
MODE KEY
CONFIGURATION
MODE
MODE KEY
DocNo HP 224
19
ACE
To enter the MAINTENANCE mode press the MODE key while in the OPERATING mode.
To exit the MAINTENANCE mode, press the
MODE key twice. Upon reentry into the
MAINTENANCE mode, the ACE displays the last MAINTENANCE field displayed, if power
has not been interrupted. While in the MAINTENANCE mode, if no keys are pressed for a
predetermined amount of time, the ACE automatically returns to the OPERATING mode. This
predetermined amount of time is dependent on the DIS TIME OUT SEC as set in the
CONFIGURATION mode.
4.3.
KEYBOARD ENTRY
Field parameters are presented in two basic forms:
•
NUMERIC FIELDS are used for date and serial number storage. The CLEAR key and the
PRINT key are used for data entry in these fields.
•
TEST FIELDS display messages showing which test is currently selected. Press the PRINT
key to execute the test.
The key functionality is as follows:
ACE
•
MODE - Advances from one mode of operation to another. When in the OPERATING
mode, pressing this key once changes the ACE to the MAINTENANCE mode.
•
SELECT - Scrolls down through the display fields.
•
CONTROL - Scrolls up through the display fields.
•
PRINT - Commands the ACE to print a report, increment a number when in a numeric
field, or execute a test.
•
CLEAR - Moves the cursor to the next digit when in a numeric entry field.
20
DocNo HP 224
4.4.
MAINTENANCE MODE FIELDS
Figure 8: Maintenance Mode flowchart.
CLEAR TOTALIZER
Only displayed on PTB
approved versions of the
ACE LIN LOX LAR
systems. Use PRINT key
to select LIN, LOX, or
LAR.
CLEAR KEY
FLUID TYPE
PRINT TRIP RPT
PRINT SETUP
Enter
Password
MODE KEY
TRIM ADR1
TRIM ADR2
Use SELECT key to
scroll down through
menus.
Password
Correct?
COIL RESISTANCE
Yes
RTD RESISTANCE
Use CONTROL key to
scroll up through menus.
COIL FREQUENCY
SELF TEST
Clear
Accum.
Total and
return to
Operating
Mode.
No
DISPLAY TEST
KEY TEST
PRINTER TEST
PULSE OUT TEST
Return to the
Operating
Mode.
PROVER ON TEST
RS232 ECHO TEST
DocNo HP 224
21
ACE
4.4.1. CLEAR TOTALIZER
This utility is used to reset the Accumulated Total to zero. The operator in the Operating mode
can not clear the ACCUM TOTAL display. To clear the ACCUM TOTAL, follow the steps
listed below.
•
Press the CLEAR key while CLEAR TOTALIZER is displayed in the Maintenance mode
and the Password Entry field will be displayed.
•
Enter the password by using the CLEAR and PRINT keys.
•
Press the MODE key. If the correct password is entered, the system clears the Accumulated
Total, displays the CLEARED TOTAILIZER message momentarily and returns to the
Operating mode. If an incorrect password is entered, the system returns to the
OPERATING mode.
•
Not available on Austrian systems.
4.4.2. FLUID TYPE
On PTB and AUSTRIA approved multi-fluid systems use the PRINT key to select the fluid:
•
•
•
LIN
LOX
LAR
When the Fluid Type is changed in the Maintenance mode, the Audit Trial Con display is
incremented by one.
4.4.3. DELIVERY MODE
On PTB and AUSTRIA approved CO2 systems use the PRINT key to select:
•
SINGLE PIPE: The SINGLE hose delivery counts all product delivered through the meter
on the totalizer. No correction is made for a vapor return or vapor balance line.
•
DUAL PIPE: A DUAL hose delivery occurs when a vapor return or vapor balance line is
used in conjunction with the liquid delivery line. When the DUAL pipe method is selected,
the totalizer automatically deducts the displaced vapor from the delivered total.
When the DELIVERY MODE is changed in the Maintenance mode, the Audit Trial Con display
is incremented by one.
NOTE The PRT OUT OF PAPER and PRINTER OFF LINE error messages are only
enabled when DEVICE ATTACHED is set to TM-295 ERR CHK.
4.4.4. PRINT TRIP RPT
Use the following procedure to print a Trip report.
ACE
1.
Press the RELEASE key on the printer keypad. Insert the Trip report form into the slip
printer tray with the form face up and the top of the form directed into the printer.
2.
Press the FORWARD or REVERSE key to lock the form in place and to orient the form in
the printing starting position.
22
DocNo HP 224
3.
Press the PRINT key and RDY TRIP REPORT appears on the screen. Press the PRINT
key a second time and the system starts printing the Trip Report. If PRINTER OFF LINE
error message a ppears, it indicates that either the power is not applied to the printer or that
the wiring between the ACE and the printer is defective. If the power switch is turned on
and the power light of the printer is off, check the wiring between the ACE, the pri nter, and
the power source. After the printer errors are corrected, depress the
PRINT key on the
ACE to start the Trip Report.
4.
This step only applies to ACE systems that are using the TM
-295 FDW printer. If the
printer runs out of paper before the end of the trip report, press the RELEASE key on the
printer and insert the next Trip Report form into the printer. The ACE continues to print the
trip report. If paper is not inserted into the printer with in 90 seconds, the ACE system
resets the Trip Report printing operation. The “CLR SUMMARY LOG” message does not
appear until a complete trip report is printed.
5.
The trip report consist of the last 20 deliveries or the number of deliveries made since the
delivery log was last cleared, which ever is less. A t the end of the trip report, the ACE also
prints a Maintenance report. The Maintenance report advises the service personnel of any
problems encountered during any of the deliveries. This report prints only those deliveries
where problems were detected.
6.
Following completion of the printing of the delivery log, the ACE displays "CLR
SUMMARY LOG?". Clearing the log is accomplished by depressing the
CLEAR key.
This action erases the old delivery information and resets the delivery drop number to zero.
7.
If there were problems printing the trip report, respond to "CLR SUMMARY LOG?" by
depressing the SELECT key. This action does not alter the contents of the delivery
information log. Then repeat the steps necessary to print a trip report.
NOTE: The PRT OUT OF PAPER and PRINTER OFF LINE error messages are only
enabled when DEVICE ATTACHED is set to TM-295 ERR CHK.
4.4.5. PRINT SETUP
This function initiates the printing of the system Calibration and Configuration parameters. Use
the following procedure to print the Setup Report.
1.
Press the RELEASE key on the printer keypad. Insert the form into the slip printer tray with
the ticket face up and the top of the form directed into the printer.
2.
Press the FORWARD or REVERSE key to lock the form in place and to orient the
the printing starting position.
3.
Press the PRINT key and RDY SETUP RPT appears on the display.. Press the PRINT key
again and the system starts printing the SETUP report. If a PRINTER OFF LINE error
message appears, it indicates that either the po wer is not applied to the printer or that the
wiring between the ACE and the printer is defective. If the power switch is turn on and the
power light of the printer is off, check the wiring between the ACE, the printer, and the
power source. After the p rinter errors are corrected, depress the PRINT key twice on the
ACE to start the Trip Report.
4.
If the printer runs out of paper or the ACE displays PRT OUT OF PAPER error, insert
paper into the printer and repeat step 3.
5.
After the Setup Report has complete d printing, press the RELEASE key on the printer to
release the form.
DocNo HP 224
23
form in
ACE
4.4.6. TRIM ADR1
The TRIM ADR1 TEST utility aids in factory adjustment of the temperature input signal
conditioner. It is not intended for use by field service personnel.
4.4.7. TRIM ADR2
The ADR2 TEST utility aids in factory adjustment of the pressure input signal conditioner. It is
not intended for use by field service personnel.
4.4.8. COIL RESISTANCE
The COIL RESISTANCE TEST displays the resistance in ohms of the flowmeter pickup coil.
Under normal operation, this is the resistance generated by the flowmeter pickup coil and the
signal cable. This option can accurately measure up to approximately 3500 ohms. Therefore, an
open circuit will be designated as any value above this value. This test shou ld be completed with
a warm coil. Normal coil resistance should be in the range of 1600
-2500 ohms. If the coil
resistance reading is higher or lower the coil may need to be replaced.
4.4.9. RTD RESISTANCE
The RTD RESISTANCE TEST displays the resistance in ohms of the temperature probe input.
Under normal operation, this is the resistance generated by the temperature probe. Normal RTD
resistance measurements will be in the range of 175 -1200 ohms depending on the temperature.
If the reading is higher or lower the RTD may need to be replaced.
4.4.10. COIL FREQUENCY
This test displays the frequency being generated by the ACE turbine flowmeter pickup coil.
4.4.11. SELF TEST
This test verifies the counting circuitry of the circuit board. This test runs a circuit loopback test
from the pulse output through the flowmeter signal conditioner back to the flow totalization and
rate detector. If the circuitry is functioning, "LOOP BACK PASSED" is displayed. If the test
fails, "LOOP BACK FAILED" is displayed. Should the test fail, th is indicates a malfunctioning
printed circuit board. Repairs at this level should only be performed at HFC.
4.4.12. DISPLAY TEST
Checks all the display positions and characters for proper operation and appearance. During the
test the display must be monitored f or proper operation. The unit displays from 0 to 9 and from
A to Z. To initiate the test press the PRINT key. To exit this test, depress the SELECT key.
4.4.13. KEY TEST
Verifies keyboard operation and wiring. After initiating this test with the PRINT key, th e unit
displays the information for each key pressed by the operator. The field changing and mode
control keys will be enabled after the test is terminated. To terminate the test, do not press any
keys for 3 seconds.
ACE
24
DocNo HP 224
4.4.14. PRINTER TEST
Verifies proper operati on of the printer connected to the ACE. Proper operation is verified by
printing alphanumeric characters.
4.4.15. PULSE OUT TEST
This test verifies the pulse output option. This test also verifies that any equipment connected to
this output is receiving the co rrect number of pulses. Press the PRINT key and 1000 pulses are
sent out of the pulse output
4.4.16. PROVER IN TEST
Verifies the operation of the prover input and wiring to the remote prover switch. The prover
input controls the pulse accumulator of the ACE s ystem. The ACE displays SWITCH OFF when
the pins of the prover input connector are shorted. With no connection at the prover input
connector SWITCH ON is displayed on the ACE.
4.4.17. RS-232 ECHO TEST
The RS -232 ECHO TEST is currently disabled. Perform the PRI
operation of the RS-232 serial port.
DocNo HP 224
25
NTER TEST to verify the
ACE
THIS PAGE LEFT INTENTIONALLY BLANK.
ACE
26
DocNo HP 224
5. CALIBRATION MODE
5.1.
INTRODUCTION
The CALIBRATION mode is used to set the ACE calibration parameters. The ACE is
preprogrammed from the factory based on u
ser specifications. All numeric calibration
parameters for ACE are entered in U.S. customary units of measure regardless of the unit of
measure selected.
CAUTION - WHEN MAKING CHANGES IN THE CALIBRATION MODE, THE
ACE MUST BE RETURNED TO THE OPERATING MODE BEFORE TURNING
THE POWER OFF. ANY CHANGES WILL NOT BE UPDATED IN MEMORY IF
THE POWER IS REMOVED BEFORE RETURNING THE SYSTEM TO THE
OPERATING MODE.
5.2.
CALIBRATION MODE ACCESS
Figure 9: Calibration Mode access flowchart.
MODE KEY
OPERATING
MODE
(DEFAULT MODE)
MAINTENANCE
MODE
MODE KEY
ENTER
PASSWORD
MODE KEY
PASSWORD
CORRECT?
NO
YES
CALIBRATION
MODE
MODE KEY
CONFIGURATION
MODE
MODE KEY
DocNo HP 224
27
ACE
To enter the CALIBRATION mode from the OPERATING mode, press the MODE key twice.
Upon pressing the MODE key for the second time, the screen prompts for the password. Use
the CLEAR and PRINT key to enter in the password . After the correct password is entered
press the MODE key to enter the CALIBRATION mode. To exit the CALIBRATION mode
and return to the OPERATING mode, press the MODE key twice. To exit the CALIBRATION
mode and move to the CONFIGURATION mode press the MODE key once. After initial power
up, the AVERAGE K -FACTOR field is the default field selected upon entry into the
CALIBRATION mode. For LPG systems METER K -FACTOR is the default entry when the
CALIBRATION mode is enter after initial power -up. If the C ALIBRATION mode is reentered,
assuming no power loss, the unit displays the last CALIBRATION field selected.
5.3.
KEYBOARD ENTRY
Calibration parameters are presented in two forms:
•
NUMERIC FIELDS - are used for calibration data, date, time, and other required
setup data. The CLEAR and PRINT keys are used for data entry in these fields.
•
LABEL FIELDS - shows the currently selected option. To change the option press the
PRINT key.
numeric
Key functions are as follows:
ACE
•
MODE - Advances from one mode of operation to another. When in the CALIBRATION
mode, pressing this key changes the unit to the CONFIGURATION mode. Pressing the
MODE key again returns the program to the OPERATING mode.
•
SELECT - Scrolls down through the selected mode field entries.
•
CONTROL - Scrolls up through the selected mode field entries.
•
PRINT - Changes the selection in label fields. In numeric fields the
the number the cursor is under by one.
•
CLEAR - Moves the cursor over one character during numeric data entry.
28
print key increments
DocNo HP 224
5.4.
CALIBRATION FIELDS
Figure 10: Calibraiton Mode flowchart.
DISPLAYED ON LPG
SYSTEMS.
METER KFACTOR
AVERAGE
K/M--FACTOR
DISPLAYED ON LPG
SYSTEMS.
BLADES
Use SELECT key to
scroll down through
menus.
METER STEEL
TYPE
DEFAULT
TEMPERATURE
Use CONTROL key
to scroll up through
menus.
DEFAULT
PRESSURE
SPECIFIC
GRAVITY
DISPLAYED ON LPG
SYSTEMS.
DEFAULT
DENSITY
FREQUENCY 1
K/M--FACTOR 1
FREQUENCY 2
K/M--FACTOR 2
FREQUENCY 3
K/M--FACTOR 3
FREQUENCY 4
K/M--FACOTR 4
FREQUENCY 5
K/M--FACTOR 5
LINEARIZATION
PAIRS
DATA AVERAGE
PULSE WEIGHT
HIGH FLOW LIMIT
LOW FLOW LIMIT
DocNo HP 224
29
ACE
5.4.1. AVERAGE KFACTOR
Use the CLEAR and PRINT keys to enter the average K -Factor from the flowmeter calibration
data sheet. For LPG ACE units enter the K-FACTOR that is stamped on the flowmeter.
5.4.2. AVERAGE M-FACTOR (LPG VERSION)
For LPG systems use the CLEAR and PRINT key to enter the average M
flowmeter calibration data sheet.
-Factor from the
5.4.3. BLADES
Use the CLEAR and PRINT keys enter the number of num
ber of blades on the turbine
flowmeter rotor. Examine the flowmeter to determine the number of blades.
5.4.4. DEFAULT TEMPERATURE
Use the CLEAR and PRINT keys to enter the default temperature for the ACE to use in the case
of a temperature probe failure. This value is also used when the temperature method is set to
MANUAL.
5.4.5. DEFAULT PRESSURE
The DEFAULT PRESSURE is in PSIA, and is the pressure that the ACE uses if the MANUAL
transmitter method is chosen or if the pressure transmitter fails. This parameter may b e used as
part of the density calculation or in the cavitation warning error messages. It is recommended
that this be set equal to the nominal discharge pressure at the flowmeter.
5.4.6. DEFAULT DENSITY
Enter the default density for the selected fluid. This va
manual density method is chosen.
lue is automatically selected when the
LINEARIZATION: ACE performs flowmeter linearization if the K-factor (M-Factor
for LPG) method is set to linearize. The frequency parameters are entered in units of
Hz. The K-Factor is entered in units of pulses per gallon. M-Factor is the ratio of
meter total to the actual total. This data comes from the factory supplied flowmeter
calibration data sheet or from independent calibration runs. Frequency 1 and
K-factor (M-factor) 1 and other similarly numbered entries, form five table point
pairs. NOTE - THE LINEARIZATION PAIRS MUST BE ENTERED STARTING
WITH THE LOWEST FREQUENCY FIRST.
5.4.7. FREQUENCY 1-5
Frequency 1 -5 are the frequencies at which the five K/M
-Factors are specified. The fiv e
frequencies programmed into the ACE correspond to the five K/M-Factors. respectively. Use the
CLEAR and PRINT key to program the numerical values representing the frequencies. For
proper operation, all frequencies must be programmed with one digit afte r the decimal point (i.e.
234.5).
ACE
30
DocNo HP 224
5.4.8. K/M-FACTORS 1-5
K/M-Factors 1 -5 are the flowmeter characteristics used to calibrate the ACE system when the
system FLOW CAL METHOD is set to LINEARIZE. On non -LPG systems, the K -Factors are
specified in units of PULSES/GALLON. On the LPG system, the M-FACTOR is unit-less.
5.4.9. DATA AVERAGE
The DATA AVERAGE feature is used to smooth out readings for the flow rate, temperature, and
pressure that may fluctuate due to rapidly changing conditions. Valid data average entries are 01
to 99. The unit will average data before displays are updated for the number of times data
average is set. The lower the data average number, the faster the display responds to changing
conditions. The higher the data average number, the slower the A
CE responds to changing
conditions.
5.4.10. PULSE WEIGHT
The pulse weight is the calibration factor used for the pulse output option. It represents the
amount of mass in pounds for pulse out. Use the CLEAR and PRINT keys to enter the desired
pulse weight. The maximum pulse output rate is 123 pulses per second. The pulse weight
determines the amount of delivery total in pounds that each output pulse represents. A pulse
weight of 1.0 makes each pulse equal to a one pound of the delivery total (i.e., 1 pulse = 1
pound). A pulse weight of 0.1 causes each pulse to equal 1/10 pound of a delivery total (1 pulse
= 1/10 pound).
5.4.11. HIGH FLOW LIMIT
HIGH FLOW LIMIT is the flow rate in GPM where the HIGH FLOW WARNING message is
displayed. Enter the maximum flow rate for t he flowmeter in GPM. If the flow rate during a
delivery run is higher than the HIGH FLOW LIMIT, a message is displayed warning of the high
flow condition. The flow rate should be reduced until the message is no longer displayed.
Selected by the flowmeter size in Austrian systems.
WARNING - CONTINUOUS OPERATION OF A TURBINE FLOWMETER
ABOVE THE MANUFACTURER’S SUGGESTED MAXIMUM FLOWRATE
WILL REDUCE THE SERVICE LIFE OF THE FLOWMETER.
5.4.12. LOW FLOW LIMIT
LOW FLOW LIMIT is the flow rate in GPM where the LOW FLO
W WARNING message is
displayed. Enter the minimum flow rate for the flowmeter in GPM. If the flow rate during a
delivery run is lower than the LOW FLOW LIMIT, a message is displayed warning of the low
flow condition. The flow rate should be increased un
til the message is no longer displayed.
Selected by the flowmeter size in Austrian systems.
CAUTION - FOR CALIBRATION AND CONFIGURATION MODE CHANGES
TO BE UPDATED IN THE ACE MEMORY, THE ACE MUST BE PLACED BACK
INTO THE OPERATING MODE.
DocNo HP 224
31
ACE
THIS PAGE LEFT INTENTIONALLY BLANK.
ACE
32
DocNo HP 224
6. CONFIGURATION MODE
6.1.
INTRODUCTION
The configuration mode is used to program the ACE configuration parameters. The ACE is
preprogrammed from the factory based on user specifications. All numeric configuration
parameters for the ACE are entered in U.S. customary units of measure regardless of the unit of
measure selected.
CAUTION - WHEN MAKING CHANGES IN THE CONFIGURATION MODE, IT
IS IMPORTANT THAT YOU RETURN THE ACE TO THE OPERATING MODE
BEFORE TURNING THE ACE OFF. THE CHANGES WILL NOT BE UPDATED
IN MEMORY IF YOU DO NOT LEAVE THE MODE BEFORE TURNING THE
ACE OFF.
6.2.
CONFIGURATION MODE ACCESS
Figure 11: Configuration Mode access flowchart.
MODE KEY
OPERATING
MODE
(DEFAULT MODE)
MAINTENANCE
MODE
MODE KEY
ENTER
PASSWORD
MODE KEY
PASSWORD
CORRECT?
NO
YES
CALIBRATION
MODE
MODE KEY
CONFIGURATION
MODE
MODE KEY
DocNo HP 224
33
ACE
To enter the CONFIGURATION mode from the OPERATING mode, press the MODE key
twice. The next screen prompts for the password. Use the CLEAR and PRINT keys to enter
the password. Press the MODE key to enter the CALIBRATION mode. Press the MODE key
again to gain access to the CONFI GURATION mode. If the CONFIGURATION mode is
reentered, assuming no power loss, the unit displays the last CONFIGURATION field selected.
6.3.
KEYBOARD ENTRY
Configuration parameters are presented in two forms:
•
NUMERIC FIELDS - for calibration data, date, time, and other required setup numeric data.
The CLEAR and PRINT keys are used for data entry in these fields.
•
LABEL FIELDS - displays messages showing the currently selected option. To change the
option, press the PRINT key.
The key functionality is as follows:
ACE
•
MODE - Advances from one mode of operation to another. When in the
CONFIGURATION mode pressing this key once changes the unit to the OPERATING
mode.
•
SELECT - Scrolls down through the selected mode field entries.
•
CONTROL - Scrolls up through the selected mode field entries.
•
PRINT - Changes the selection in label fields. In numeric fields this key increments the
number the cursor is under by one.
•
CLEAR - Moves the cursor over one character during numeric data entry.
34
DocNo HP 224
6.4.
CONFIGURATION FIELDS
Figure 12: Configuration Mode flowchart.
Displayed on LIN LOX LAR
systems. Select LIN, LOX, or
LAR.
FLUID TYPE
DELIVERY MODE
Displayed on CO2 systems.
Select SINGLE PIPE or
DUAL PIPE.
Use SELECT key to
scroll down through
menus.
SYS OF
MEASURE
UNIT OF
MEASURE
INTERLOCK
DELAY
U. S. CUSTOMARY
METRIC
Use CONTROL key to
scroll up through
menus.
MASS
GAS @ NTP
VOL @ NBP
INTER TEMP
SETPT
K/M-FACTOR
METHOD
TEMP METHOD
PRESSURE
METHOD
DENSITY
METHOD
VOL CORR
METHOD
CAL DENS FROM
SG
FLOWMETER SN
TRIALER
NUMBER
NEXT SERVICE
DAY
LINEARIZED K/M
AVERAGE K/M-FACTOR
MANUAL
TRANSMITTER
MANUAL
TRANSMITTER
Display on all systems except
for LPG. Select MANUAL,
TEMPERATURE, or TEMP &
PRESSURE.
Displayed on LPG systems.
Select
NONE,
TEMPERATURE,
TEMP & PRES, or
TEMP, PRES & ST.
Displayed on LPG systems.
Select NO or YES.
DEVICE
ATTACHED
TM-290
TM-295 ERR. CHK.
BAUD RATE
Select 9600, 4800, 2400,
1200, 600, 300, 150, or 75.
HANDSHAKE
PARITY
NONE
HARDWARE DTR
XON/XOFF
OFF
ON
PASSWORD
DIS TIME OUT
SEC
DATE
DAY OF THE
WEEK
MON
TUE
WED
THU
FRI
SAT
SUN
TIME 24 HOUR
CLOCK
RESTORE NEW
UNIT
DocNo HP 224
ENTER
PASSWORD
MODE
PASSWORD
CORRECT?
NO
Stay in
CONFIGURATION
mode and return to
RESTORE NEW
UNIT display.
YES
PRINT
35
Restore system to
factory defaults and
return to OPERATING
mode.
ACE
6.4.1. FLUID TYPE
For multi-fluid systems use the PRINT key to select the fluid type:
•
LIN,
•
LOX
•
LAR.
6.4.2. DELIVERY MODE
For CO2 system use the PRINT key to select:
•
SINGLE PIPE: The SINGLE hose delivery counts all product delivered through the meter
on the totalizer. No correction is made for a vapor return or vapor balance line.
•
DUAL PIPE: A DUAL hose delivery occurs when a vapor return or vapor balance line is
used in conjunction with the liquid delivery line. When the DUAL pipe method is selected,
the totalizer automatically deducts the displaced vapor from the delivered total.
6.4.3. SYSTEM OF MEASUREMENT
Use the PRINT key to select the appropriate system of measurement for the d
flowrate, density, temperature, and pressure.
•
U. S. CUSTOMARY
•
METRIC
isplays of total,
6.4.4. UNIT OF MEASURE
To define the delivery units, use the PRINT key to select:
•
VOL@NBP
•
MASS
•
GAS@NTP
The delivery total displays the following units depending on the SYSTEM
MEASUREMENT and UNIT OF MEASURE settings.
OF
UNITS
U.S. CUSTOMARY
METRIC
GAS@NTP
FT3
M3
VOL@NBP
GALLONS
LITERS
MASS
POUNDS
KILOGRAMS
.
ACE
36
DocNo HP 224
6.4.5. K-FACTOR/M-FACTOR METHOD
The ACE offers two ways of calculating the volumetric flowrate. The first uses the AVE RAGE
K-FACTOR/M-FACTOR from the flowmeter calibration data sheet. The second, LINEARIZED
K/M, uses five Frequency/K -factor or Frequency/M -factor pairs from the flowmeter calibration
data sheet. The computer measures the flowmeter frequency and calculates the K-factor/M-factor
based on the table entries. If the LINEARIZED K/M factor method is chosen, enter valid
frequency and K -factor/M-factor pairs. The LPG unit uses M -factors, all other units uses K factors. Use the PRINT key to select:
•
LINEARIZED K/M
•
AVERAGE K/M-FACTOR
6.4.6. TEMPERATURE METHOD
The ACE requires knowledge of the flowing temperature for density calculations and for proper
operation of the cavitation warning messages. If a temperature transmitter is installed and
functional, set this option t o TRANSMITTER. If no transmitter is present set this option to
MANUAL. Use the PRINT key to select:
•
MANUAL uses Default Temperature.
•
TRANSMITTER
6.4.7. PRESSURE METHOD
The ACE requires knowledge of the flowing pressure density calculations and for proper
operation of the cavitation warning messages. If a pressure transmitter is installed and functional,
set this option to TRANSMITTER. If no pressure transmitter is present set this option to
MANUAL. Use the PRINT key to select:
•
MANUAL uses Default Pressure.
•
TRANSMITTER
6.4.8. DENSITY METHOD
The ACE calculates fluid density based on the fluid selected, temperature, and pressure. Use the
PRINT key to select:
•
MANUAL uses Default Density.
•
TEMPERATURE
•
TEMP & STEEL, only for LPG systems.
•
TEMP & PRESS
•
TEMP PRESS & ST, only for LPG systems.
DocNo HP 224
37
ACE
6.4.9. FLOWMETER SIZE
For Austria approved ACE systems, the Minimum Flowrate, Maximum Flowrate, and Minimum
Delivery settings are dependent on the size of the Flowmeter.
See Table 1 Austria Flowmeter
Size Selection. Use the Print key to select:
•
•
•
DN25
DN40
DN50
6.4.10. FLOWMETER S/N
Use the CLEAR and PRINT keys to enter the flowmeter serial number.
6.4.11. NEXT SERVICE DAY
Use the CLEAR and PRINT keys to enter the next PMS due date.
6.4.12. TRAILER NUMBER
Use the CLEAR and PRINT keys to enter the trailer’s ID number.
6.4.13. DEVICE ATTACHED
This setting selects the type of printer that is connected to the ACE. Select from:
•
TM-290; Use this setting for printers that do not respond to Error Checking commands and
for TM-295 printers that are set to the non -error checking mode. Use this setting for ACE
systems that do not have a printer attached.
•
TM-295 ERR. CHK.; Use this setting if the attached printer responds to the “ESC v”
command. The “ESC v” command returns the paper status of the printer. Check your
printer documentation for the “ESC v” command. The return code for the presence of paper
is hex value 1. Use this setting when the Hoffer supplied printer Epson TM -295 printer is
configured for error checking.
Use the table below to configure the Epson TM-295 printer.
Figure 13: TM-295 Dip Switch Settings
ACE
Switch
1
TM-295 Function
Data reception error
Non-Error checking
ON- Ignored
Error Checking
OFF - Prints “?”
2
Receive buffer capacity
OFF- 512 Bytes
OFF - 512 Bytes
3
Handshaking
OFF - DTR/DSR
ON - XON/XOFF
4
Word Length
OFF - 8 Bits
ON - 7 Bits
5
Parity Check
OFF - Disable
ON - Enable
6
Parity Selection
OFF
ON - Even
7
Transmission Speed (A)
OFF - 9600
OFF - 9600
8
Transmission Speed (B)
OFF - 9600
OFF - 9600
38
DocNo HP 224
6.4.14. BAUD RATE
Baud rate is the speed that data is transferred between the ACE and the attached printer. Both
the ACE and the attached printer must be set for the same baud rate. Use the
PRINT key to
select:
•
•
•
•
•
•
•
•
9600(default)
4800
2400
1200
600
300
150
75
6.4.15. HANDSHAKE
Handshake is a communication protocol used to inform the ACE to pause the transmission of
data to the printer attached to the RS-232 port. Use the PRINT key to select:
•
NONE: Use this setting if there is no printer attached to the ACE.
•
HARDWARE DTR (default): Use HAR
configured for non-error checking.
•
XON/XOFF: Use this setting when the Hoffer supplied Epson TM -295 printer is attached
and the printer is configured for error checking.
DWARE DTR when the attached printer is
6.4.16. PARITY
PARITY setting determines the data f ormat used to transmit DELIVERY, SETUP, and TRIP
REPORT information to the attached printer. Use PRINT key to select:
•
OFF: Use this setting for 8 data bits, no parity check.
•
ON: Use this setting for 7 data bits, even parity.
To use PARITY data format with the attached printer, the printer dip switches must be set to:
•
Word Length = 7 bits,
•
Parity Check = Yes,
•
Parity Selection = Even.
6.4.17. PASSWORD
The ACE is shipped from the factory with the password 2001. A unique password is required to
protect the Accumulat ed Total, Configuration Mode, and Calibration Mode. The password
should be established during the commissioning. Use the CLEAR and PRINT keys to enter a
unique password from 0001 to 9999. This password should be kept confidential. Contact HFC
if the password is misplaced
WARNING - YOU MUST REMEMBER YOUR PASSWORD OR YOU WILL NOT
BE ABLE TO CLEAR THE ACCUMULATED TOTAL AND ENTER THE
CALIBRATION AND CONFIGURATION MODES.
DocNo HP 224
39
ACE
6.4.18. DIS TIME OUT SEC
This setting controls the amount of time that is allowed to elapse be fore the display automatically
returns to the Delivery Total after the SELECT and MODE keys are depressed in the
OPERATING or MAINTENANCE modes. A value of zero disables the automatic return to the
Delivery Total. Valid entries are 0 to 999 seconds.
6.4.19. DATE
The ACE keeps track of the current date. Enter the date in the
prevents you from entering an invalid date such as Feb 30.
mm/dd/yy format. The ACE
6.4.20. DAY OF THE WEEK
The ACE keeps track of the day of the week. Select the appropriate day by pressing th e PRINT
key.
6.4.21. TIME
The ACE has a 24-hour clock. Enter the current time in the format of hh:mm:ss.
6.4.22. RESTORE NEW UNIT
This function restores the ACE to the factory default Calibration and Configuration parameters.
Before restoring to the factory defaults, it is recommended to print out the current setup of the
instrument. Please see the description for Print Setup in the Maintenance section for instructions
on printing the Calibration and Configuration parameters. To restore the system to the factory
default settings, first press the
PRINT key on the ACE when RESTORE NEW UNIT is
displayed in the CONFIGURATION mode. Use the
PRINT and CLEAR keys to enter the
password. After entering the password, press the
MODE key. If the correct password is
entered, the system resets and restores the Calibration and Configuration parameters to the
factory defaults. After the restoring operation, the system returns to the OPERATING mode. If
an incorrect password is entered, the system stays in the CONFIGURATION mode and returns
to the RESTORE NEW UNIT display. This function is not available on PTB approved ACE
systems.
CAUTION - FOR CALIBRATION AND CONFIGURATION MODE CHANGES
TO BE UPDATED IN THE ACE MEMORY, YOU MUST PLACE THE ACE BACK
INTO THE OPERATING MODE.
ACE
40
DocNo HP 224
7. FIELD COMMISSIONING
ACE Systems are setup at the factory. A setup sheet accompanies shipment of each system.
Follow these instructions below to complete this review.
THE CALIBRATION AND CONFIGURATION PARAMETERS MUST BE
REVIEWED PRIOR TO USING ACE FOR CUSTOMER DELIVERY.
1.
Apply power to the ACE system.
2.
Enter the CALIBRATION mode by first pressing the MODE key twice. Next enter the
default factory password of “2001” using the CLEAR and PRINT keys. After entering the
password, press the MODE again and the system enters the CALIBRATION mode.
3.
Press the SELECT key and review each piece of calibration information against the factory
setup sheet to insure accuracy. Correct any discrepancies by using the PRINT and CLEAR
keys to enter the correct calibration settings.
4.
Upon reaching LOW FLOW LIMIT, depress the
CONFIGURATION mode.
5.
Press the SELECT key and review each piece of configuration information against the
factory setup sheet to insure accuracy. Correct any discrepancies by using the PRINT and
CLEAR keys to enter the correct configuration values.
6.
Upon reaching the PASSWORD field in the CONFIGURATION mode, enter a unique
password.
7.
After completing your review, depress the MODE key to return to the OPERATING mode,
then press then the MODE to enter the MAINTENANCE mode.
8.
Press the MODE key twice to return to the OPERATING mode. The system is now ready
to be used in the field.
9.
Using the Maintenance Mode section instructions, scroll through the MAINTENANCE
mode to ensure that the system is operating properly prior to releasing it to service.
DocNo HP 224
41
MODE key to enter the
ACE
THIS PAGE LEFT INTENTIONALLY BLANK.
ACE
42
DocNo HP 224
8. INSTALLATION GUIDE
This section includes information specific to the ACE electronics. For installation information
on the turbine flowmeter, temperature probe, pressure probe, or other equipment refer to the
individual items technical manuals.
8.1.
ELECTRONICS ENCLOSURE INSTALLATION
Please note the following when mounting the ACE system.
•
The ACE should be mounted at eye-level for the best viewing angle.
•
Install the ACE on a horizontal surface near the access door of the trailer. Allow enough
clearance for easy access to the signal cables.
CAUTION!
TRUCK MOUNTED SYSTEMS MUST ENDURE SEVERE VIBRATION ON THE ROAD. THE ACE HAS
BEEN DESIGNED TO WITHSTAND THESE CONDITIONS IF INSTALLED IN THE HORIZONTAL
POSITION. MOUNTING IN THIS POSITION IS CRITICAL TO ALLOW THE SHOCK MOUNTS TO
FUNCTION PROPERLY.
•
Please refer to the installation drawings located in the back of this manual.
WARNING!
DO NOT OVER TIGHTEN MOUNTING BOLTS. RECOMMENDED TIGHTENING TORQUE IS 105 LBS-IN.
OVER TIGHTENING MAY CAUSE SHOCK MOUNTS TO BREAK.
8.2.
DocNo HP-224
INTERCONNECTING CABLE INSTALLATION
•
Install and secure cables to avoid contact with cold pipes.
•
Attach the cables to the appropriate connector on the back of the ACE.
•
The power cable is a three wire cable. Red lead connects to positive (+) battery lead.
Black lead connects to negative (-) lead. White lead connects to chassis ground.
•
The ACE has no power switch. Hoffer recommends providing the electronics with a
direct power lead from the battery. This will reduce interference from other operating
systems. If a switch is required, HFC recommends using the main power switch on the
trailer.
•
Install dust caps on any unused connections.
•
Tighten all cable assemblies.
•
Please refer to the installation drawings located in the back of this manual.
43
ACE
8.3.
FIELD COMMISSIONING
After the installation of components is complete, the setup parameters must be reviewed prior
to using the ACE for customer delivery. See the FIELD COMMISSIONING chapter for
information.
8.4.
ACE
WIRING CONNECTIONS OPTIONAL PRINTER
•
The ACE printer requires two cables for proper operation. One cable is for connection to
the ACE and the other for connection to the DC power supply. Connect both cables to
the printer and to the ACE
•
Please refer to the installation drawings located in the back of this manual.
44
DocNo HP-224
9. SERVICE GUIDE
9.1.
TROUBLE SHOOTING
The ACE provides extensive self -checking capabilities which will assist in troubleshooting and
repairing a malfunctioning system. The following is a troubleshooting guide for corrective action
in the field.
CONDITION
"PROBE OPEN" MESSAGE
POSSIBLE CAUSE
CORRECTIVE
ACTION
Bad cable connection
Reconnect cable
Bad cable
Test cable using an ohm
meter
Bad RTD
Replace temperature probe
Bad PCA-134
Replace/Repair PCA-134
Bad cable
Test cable using an ohm
meter
Bad RTD
Replace temperature probe
Bad PCA-134
Replace/Repair PCA-134
"COIL OPEN" MESSAGE
Bad cable connection
Reconnect cable
Note: Message not displayed on Dual
Bad cable
Replace cable
Coil Systems.
Bad coil
Replace pickup coil
Bad PCA-134
Replace/Repair PCA-134
"COIL SHORT" MESSAGE
Bad cable
Test cable with an ohm meter
Note: Message not displayed on Dual
Bad coil
Replace pickup coil
Coil Systems.
Bad PCA-134
Replace/Repair PCA-134
"TOTAL READ" MESSAGE
Read collision
Maybe self-correcting. If not,
replace
Microcontroller/memory
integrated circuit.
Bad PCA-134
Replace/Repair PCA-134
"FAILED LOOP BACK" MESSAGE
Circuitry Failure
Replace/Repair PCA-134
"COP TIME OUT"
Software/Setup error
Maybe self-correcting. If not,
replace
Microcontroller/memory
integrated circuit.
"PROBE SHORT" MESSAGE
DocNo HP 224
45
ACE
CONDITION
POSSIBLE CAUSE
CORRECTIVE
ACTION
"RATE MALFUNCTION" MESSAGE
Software error
Maybe self-correcting.
Disconnect and re-apply
power.
"EEPROM FAILURE" MESSAGE
Defective IC
Replace Microcontroller
integrated circuit.
"2 PHASE WARNING" MESSAGE
Operator error
Operator allowed pressure
and/or temperature to be
within 25 PSI of the saturated
pressure during a delivery.
Take no action.
"GAS INHIBIT ON" MESSAGE
Operator error
Operator began a delivery
run before the system was
fully cooled down
"HIGH FLOW WARNING" MESSAGE
Operator error
Operator gas spun the meter
during a delivery run
High flow setpoint is set to low
Raise the setpoint in the
setup mode.
Operator error
Operator started the delivery
run at a flow rate that was
outside the meter range or
below the low flow setpoint.
Low flow setpoint is set to low
Raise the low flow setpoint in
the setup mode.
Operator error
Operator began delivery
before the system was fully
cooled down.
Temperature detector error
Test the temperature feature
using simulator.
Occurs when the dual pulse output
of the flowmeter does not agree in
frequency, phase and amplitude.
System has detected noise or
the flowmeter transducer has
failed. See section 9.2,
“TROUBLESHOOTING
THE MEASUREMENT
TRANSDUCER FOR
DUAL COIL SYSTEMS.”
"LOW FLOW WARNING" MESSAGE
"COMP RANGE OUT" MESSAGE
“PULSE FAILURE” MESSAGE
Only displayed on PTB and Austria
approved and Dual Coil systems.
ACE
46
DocNo HP 224
During operation, certain malfunctions may be observed. The following is a troubleshooting
guide for corrective action in the field.
OBSERVED CONDITION
SUGGESTED CORRECTIVE ACTION
ACE not functioning, no lights on front panel lit.
Check power cable
Check fuse F-1 on front panel
Check/Repair ACE internal wiring
No display, printer light on
Check fuse F-2
Check/Repair internal wiring to PCA-134
Check fuse on PCA-134
Check/Repair PCA-134
Garbage on Display
Turn the ACE off then on
If problem persist, contact HFC
Character on display is distorted
Test the keyboard using the keyboard test in the maintenance
mode
Replace display if characters are distorted
Front panel key inoperative
Test the keyboard using the keyboard test in the maintenance
mode
Check the internal cable wiring and connectors
Replace keyboard
Repair/Replace PCA-134
Printer inoperative, but light is on
Press the test key on the printer
If test fails replace printer
Run the printer test from the maintenance
ACE inaccurate
Verify operation using signal simulators. See chapter 9 for
details.
Verify that the setup parameters are correct for the system
configuration.
Inspect the flowmeter internals to ensure proper operation.
Prove meter and recalibrate.
ACE does not keep correct time and date
DocNo HP 224
Replace battery located on PCA-134 board. See section 9.3.2,
“INTERNAL BATTERY REPLACEMENT.”
47
ACE
9.2.
TROUBLESHOOTING THE MEASUREMENT TRANSDUCER FOR
DUAL COIL SYSTEMS
9.2.1. GENERAL
The object of this testing is to verify the checking facility, to verify the presence of the
measurement transducer, its correct operation and the correctness of the data.
9.2.2. TEST EQUIPMENT
The following test equipment is required:
1.
Two ACC5A count testers.
2.
Two Frequency Counters.
3.
DVM (Digital Multimeter)
9.2.3. FLOWMETER CHECK
Use the DVM to check the resistance of the coils on the Flowmeter. The coil resistance of
the Flowmeter coils should be 1800 ± 20% ohms.
9.2.4. TEST SETUP
•
Connect the DC supply to the power connector of ACE. Pin A is the positive supply
voltage, Pin B is the power supply common, and Pin C is the chassis connection.
•
Connect one ACC5A to the signal input and the second ACC5A to the signal 2 input.
•
Set the amplitude of both ACC5As to the 200 mV position.
•
Connect the frequency counters across the ACC5As. Connect the positive lead of the
frequency counter to the white wire and the negative lead of the frequency counter to the
black wire.
9.2.5. TEST PROCEDURE
ACE
•
Turn power on both ACC5As and the ACE unit.
•
Adjust the output frequency of both ACC5As to obtain a frequency of 1000.0 Hz
Hz.
•
Stop both ACC5As from generating a test signal. Clear the displayed total on the ACE
unit. Select 100K counts on the ACC5As
•
Simultaneously start both of the ACC5A. Observe that the ACE unit is counting.
•
Vary the output frequency of one of the ACC5As, while observing the frequency
counter. Observe that the ACE unit stops flow totalization when the differenc e of the
two signals is greater than or equal to 10 Hz ± 2 Hz, and displays the error message
"PULSE FAILURE".
•
Perform the above steps at the test frequency of 150 Hz.
•
With both test signals equal to each other, interrupt one signal by either stopping one
ACC5A or by disconnecting the signal cable. Observe that the ACE unit stops flow
totalization, and displays the error message "PULSE FAILURE". Perform this test with
both cables.
48
±1
DocNo HP 224
9.2.6. ACCEPTANCE CRITERIA
Successful operation will be determined by flow totali zation being stopped upon the following
criteria:
9.3.
•
When the difference in the input frequency is 10 Hz ± 2 Hz.
•
When the input signal is interrupted.
CORRECTIVE ACTIONS
If the ACE can be is powered up, enter the MAINTENANCE mode and use the PRINT SETUP
function to create a setup report of the Calibration and Configuration parameters. After the
corrective actions are completed use this setup report to verify the Calibration and Configuration
parameters. Please see the FIELD COMMISSIONING section of this manual.
CAUTION - THE FOLLOWING PROCEDURES SHOULD BE PERFORMED BY
QUALIFIED SERVICE PERSONNEL ONLY. ACE IS A STATIC-SENSITIVE
DEVICE AND STANDARD PRACTICE FOR STATIC-SENSITIVE PARTS
SHOULD BE OBSERVED.
9.3.1.FUSE REPLACEMENT
The ACE has three fuses, two external and one internal. Should any one of these fuses require
replacement the following procedures should be used.
EXTERNAL FUSE:
•
Disconnect the power.
•
Press in on the fuse cap and twist clockwise.
•
Pull fuse holder out of socket and remove the fuse from the holder.
•
Verify fuse measures a short with an ohm meter.
•
If an open is measured, replace the fuse with a 2amp, AGC.
•
Reinstall the fuse holder by pressing and turning clockwise.
INTERNAL FUSE:
•
Disconnect the power.
•
Remove the front panel screws from the ACE.
•
Remove the internal printed circuit board.
•
Carefully remove the fuse from the holder.
•
Verify fuse measures a short with an ohm meter.
•
If an open is measured, replace the fuse with a 1amp, AGC.
•
Reinstall the internal electronics. Reconnect power.
9.3.2. INTERNAL BATTERY REPLACEMENT
The built in time clock and memory uses a lithium battery to maintain time, date, and calculated
totals when the power supply is turned off. This battery should last approximately four years
under normal operating conditions. If the unit does not maintain the proper time, date, and totals
after power has been restored to the unit, the lithium battery should be replaced. For battery
replacement use the following procedure.
DocNo HP 224
49
ACE
•
Disconnect the power.
•
Remove the front panel screws from the ACE.
•
Disconnect the connectors going to the front panel.
•
Remove the printed circuit board.
•
Carefully remove the battery located in the center of the board.
•
Replace the battery with a compatible new battery.
•
Reinstall the printed circuit board into its slot and attach appropriate connectors.
•
Reassemble the ACE and reconnect power.
•
Go into the CONFIGURATION mode and reset the time and date.
•
Before making the next delivery, clear the error log by pressing the CLEAR key twice.
9.3.3. FIRMWARE UPGRADE INSTALLATION
The firmware of the ACE is stored in a EPROM located on the main board. This replaceable
EPROM allows for periodic upgrades and/or corrective actions to be performed in the field. The
ACE displays an SC code during power up. This SC code is th e firmware configuration code.
When ordering EPROM replacements or upgrades, please give this SC code to the HFC
representative. To replace the EPROM, follow these steps:
1.
Print the current Calibration and Configuration settings by using the Print Setup utility in the
MAINTENANCE mode.
2.
Disconnect power.
3.
Remove front panel and the main PCB board.
4.
Cut the securing tie-down from the U18. Observe the orientation of the EPROM. Carefully
remove integrated circuit U18. U18 is the chip with a label on it.
5.
Carefully, install the revised replacement chip taking care not to damage any of the leads.
Secure U18 using string or cord-tie material.
6.
Reassemble the ACE and reconnect power.
7.
Verify and adjust setup parameters in the Calibration and Configuration modes.
9.3.4. DISPLAY CONTRAST ADJUSTMENT PROCEDURE
The display contrast and viewing angle is factory -adjusted for eye level. However, the display
contrast may be adjusted for optimum viewing angle and contrast after installation.
ACE
1.
Remove power.
2.
Remove the front panel being careful not to strain the interconnecting cables. Using
electrical tape, isolate the rear side of the front panel so that the PCB board or other
electrical connections cannot create an electrical short to the case.
3.
Apply power.
4.
Using a smal l, nonmetallic screwdriver, turn the Display Contrast control clockwise to
darken the display or counterclockwise to lighten the display. Please refer to the drawing in
the back this manual for location of the Display Contrast adjustment.
5.
After completing the adjustments remove power.
6.
Remove the electrical tape applied during step 2 from the front panel and reattach the front
panel to the ACE.
7.
Re-apply power and check the operation of the display. If the Contrast of the display is not
suitable, repeat the steps in this procedure.
50
DocNo HP 224
9.3.5. MICROCONTROLLER/MEMORY REPLACEMENT
If replacement of the Microcontroller/memory chip is necessary, refer to the instructions which
accompany the new chip. An overview of the steps follows.
1.
Print current setup data.
2.
Disconnect power to the ACE.
3.
Remove the front panel of the ACE.
4.
Disconnect the wiring harness going to the front panel from the main PCB.
5.
Remove the main PCB card.
6.
Using a PLCC removal tool, carefully remove the 68HC11 chip being careful not to crack or
damage the socket housing. Please refer to the drawings in the back of the manual for the
location of the 68HC11 Microcontroller.
7.
Install the replacement chip taking care not to bend any of the leads.
8.
Install the main PCB back into the ACE.
9.
Reconnect the wiring harnesses from the front panel to the main PCB board.
10. Attach the front panel back on to the ACE being careful not to pinch the wiring harnesses.
11. Reconnect power. Allow the ACE to perform a boot -up self test. The ACE should perform
a SETUP MEMORY step a s part of the first boot -up sequence. If it does not, go to the
CONFIGURATION mode and perform the RESTORE NEW UNIT function.
12. Using the setup data printed on the first step, enter the CALIBRATION and
CONFIGURATION modes and restore the setup data. Pleas
e see the Calibration and
Configuration sections of the manual for instructions on entering the setup data.
9.3.6. SENSITIVITY ADJUSTMENT PROCEDURE
The SENSITIVITY is a control used to eliminate false pickup by increasing the signal threshold.
This control has been factory adjusted to a level that is satisfactory for the flowmeter size and
pickup coil supplied with the system. The SENSITIVITY adjustment is located on the main
PCB board inside of the ACE. Please refer to drawings in the back of this manual for location of
SENSITIVITY adjustment.
1.
Enter the CONFIGURATION Mode of the ACE and set DIS TIME OUT SEC to “999.”
2.
Remove power.
3.
Remove front panel of the ACE.
4.
Using electrical tape, isolate the rear side of the front panel so that the PCB board and other
electrical connections cannot create an electrical shoot to the case.
5.
Remove the MAIN PCB board.
6.
Turned the SENSITIVITY adjustment CCW (counterclockwise) 1/8 of a turn. CCW
adjustments reduces the ACE flowmeter input sensitivity to noise. CW (clockwise)
adjustments increase the sensitivity of the flowmeter input.
7.
Insert the MAIN PCB board back into the ACE.
8.
Reapply power.
9.
Test the unit to determine if the noise pickup problem has been eliminated. Enter the
MAINTENANCE mode and press the
SELECT key seve ral times until frequency is
displayed. Allow fluid to flow through the flowmeter and observe the frequency displayed
on the ACE. If the noise problem is eliminated continue with Step 10. If the noise problem
is still evident, remove power and return to Step 5.
10. Remove power.
DocNo HP 224
51
ACE
11. Remove the electrical tape applied in Step 4. Attach the front panel back on to the ACE
being carefully not to pinch the wiring harnesses.
12. Reapply power.
13. Enter and CONFIGURATION mode of the ACE and restore the DIS TIME OUT SE
setting.
9.4.
C
TESTING
9.4.1. TEMPERATURE
1.
Remove power from the ACE.
2.
Connect appropriate temperature simulator to the ACE temperature input.
3.
Power up the ACE.
4.
Enter the CONFIGURATION mode and verify TEMPERATURE METHOD is set for
TRANSMITTER.
5.
While in the CONFIGURATION mode and set DIS TIME OUT SEC to “0.”
6.
Return the unit to the OPERATING mode.
7.
Press the SELECT key until the temperature is displayed.
8.
Range the temperature simulator through all selections to verify proper operation of the
ACE. All displayed readings should be within one degree or less.
9.
If this test fails, contact HFC for further instructions.
10. After testing is completed, enter the CONFIGURATION mode and restore the DIS TIME
OUT SEC setting.
11. Remove power and restore the unit to its original condition.
9.4.2. PRESSURE
1.
Remove power from the ACE.
2.
Connect the appropriate pressure simulator to the ACE pressure input.
3.
Power up the ACE.
4.
Verify that the CONFIGURATION mode PRESSURE METHOD is set for
TRANSMITTER.
5.
While in the CONFIGURATION mode and set DIS TIME OUT SEC to “0.”
6.
Return the unit to the OPERATING mode.
7.
Press the SELECT key until the pressure is displayed.
8.
Range the pressure simulator through all selections to verify proper operation of the ACE.
All displayed readings should be within five PSI or less.
9.
If this test fails, contact HFC for further instructions.
10. After testing is completed, enter the CONFIGURATION mode and restore the DIS TIME
OUT SEC setting.
11. Remove power and restore the unit to its original condition.
ACE
52
DocNo HP 224
9.4.3. INPUT PULSE TESTING
1.
Remove power from the ACE.
2.
Connect the ACC-5A count simulator to the ACE signal input.
3.
Power up the ACE.
4.
Enter the COFIGURATION mode set DIS TIME OUT SEC to “999.”
5.
Power up the ACC-5A pulse tester.
6.
Take the appropriate steps listed earlier in this manual to put the ACE
FREQUENCY field of the MAINTENANCE mode.
7.
Set the ACC-5A for 100,000 counts.
8.
Press the ACC-5A start key and observe the ACE frequency displayed.
9.
Adjust the ACC-5A frequency adjust knob to obtain different frequencies.
unit into the
10. The ACE should display a relatively constant reading for each selection. If this test fails,
contact HFC for further instructions.
11. After testing is completed, enter the CONFIGURATION mode and restore the DIS TIME
OUT SEC setting.
12. Remove power and restore the unit to its original condition.
DocNo HP 224
53
ACE
9.5.
WEIGHT SCALE CALIBRATION
The ACE unit is specifically designed to work with individual turbine flowmeter calibration
reports. Turbine flowmeters, when properly used, have been found to be more accurate than
most weight scales in determining the amount of product delivered. For best results, use a Hoffer
portable Transfer Standard SY -14B to perform ACE system calibrations. Only use this
procedure as a last resort. This procedure requires the use of two tankers. One full of fresh cold
product and a empty tanker. Place the full tanker onto the scales. Hook up the piping so that the
full tanker will be pumping off to the empty tanker. Use the following procedure:
1.
Power up the ACE unit and enter the CALIBRATION mode.
2.
Record the AVERAGE K
FACTOR.
3.
Enter the CONFIGURATION mode. Set the K -FACTOR METHOD to AVERAGE K FACTOR. Set UNIT OF MEASURE to MASS. For LPG system set the M
-FACTOR
METHOD to AVERAGE M-FACTOR.
4.
Return the ACE to the OPERATING mode.
5.
Pressurize and cool down the piping and flowmeter.
6.
Press the CLEAR key on the ACE twice to clear the total.
7.
Weigh the tanker and record its
pump.
8.
To determine the TEST SAMPLE SIZE , divide the s cale increment by the accuracy
requirement. For example, if scale increment is 10 pounds and the accuracy requirement is
0.5%, then 10 pounds / 0.005 = 2000 pounds. It is best to use a accuracy requirement equal
to the linearity rating of the flowmeter.
9.
Open the discharge valve and allow the tanker on the scales to pump off an amount of fluid
equal to the TEST SAMPLE SIZE . After the TEST SAMPLE SIZE is pumped, close the
discharge valve. Weigh the tanker again, this is the tanker FINAL WEIGHT. Calculate the
SCALE TOTAL subtracting the FINAL WEIGHT from the INITIAL WEIGHT.
-FACTOR. For LPG systems, record the AVERAGE M
-
INITIAL WEIGHT . After weighing the tanker start the
10. Record the DELIVERY_TOTAL displayed on the ACE.
11. For non LPG systems use the following equation to calculate the new AVERAGE
K-FACTOR:
AVERAGE_ K _ FACTORNEW =
DELIVERY _ TOTAL
× AVERAGE_ K _ FACTOROLD
SCALE _ TOTAL
12. For LPG systems use the equation below to calculate the new AVERAGE M-FACTOR:
AVERAGE_ M _ FACTORNEW =
SCALE _ TOTAL
× AVERAGE_ M _ FACTOROLD
DELIVERY _ TOTAL
12. Enter the ACE CALIBRATION mode and enter the new AVERAGE K -FACTOR on non
LPG systems. For LPG systems. enter the new AVERAGE M-FACTOR.
13. Repeat Steps 6 through 9 to verify the new calibration is within the accuracy re quirements.
If the new calibration is not within the accuracy requirements then repeat Steps 6 through
12.
ACE
54
DocNo HP 224
9.6.
REPLACEMENT PARTS
•
EXTERNAL FUSE, F2, 2A, AGC
•
INTERNAL FUSE, PCB FUSE, 1A, AGC
•
BATTERY, PCB MAIN, PANASONIC BR2330
•
PCA 134-LLL-(*) (LIN,LOX,LAR)
•
PCA 134-CO2-(*) (CO2)
•
PCA 134-LH2-(*) (LH2)
•
ACE-CA101 MAIN CABLE ASSEMBLY
•
ACE-CA102 HEATER CABLE ASSEMBLY
•
ACE-CA103 KEY CABLE ASSEMBLY
•
PCA16-BIJ2 DISPLAY PC BOARD
•
Specify voltage of +12 or +24 VDC when ordering.
DocNo HP 224
55
ACE
THIS PAGE LEFT INTENTIONALLY BLANK.
ACE
56
DocNo HP 224
10. OPERATIONS
10.1.
DELIVERY PROCEDURE
10.1.1. POWERING UP
Apply power to the ACE. This allows the internal heaters to warm the display in order to prevent
fogging in cold weather.
After power is applied, the following messages are displayed:
1. "SELF CHECK"
“SC-AXXXXXXX”: This is the firmware configuration code. When ordering EPROM
replacements or upgrades, please give this SC code to the HFC representative.
2.
"ACE 6.rr.x(C)HFC” “- FLUIDS ----------“
Where:
3.
rr =
Current revision of firmware.
x=
Metrological Control number for type approvals, where;
1=
OIML: Metric references are 15 °C and 101.325 kPa.
2=
USA systems: Metric references are 21 °C and 101.325 kPa.
3=
THAILAND: Metric references are 27 °C and 101.325 kPa.
4=
PTB (Germany): Metric references are 15 °C and 1 BAR.
5=
OIML/DUAL COIL: Metric references are 15 °C and 101.325 kPa.
6=
SIRIM (Indonesia/Singapore) Metric references are 30 °C and 101.325 kPa.
7=
AUSTRIA: Metric references are 15 °C and 1 BAR.
"OPERATING MODE"
The ACE system self -checks when power is first applied. A flashing message indicating the
source of a malfunction is displayed if the system is not functioning properly. It is normal to see
COMP RANGE OUT, GAS INHIBIT, and TWO PHASE WARNING error messages until the
meter run is pressurized and cool down has been completed.
The ACE is fault tolerant. If there is a problem with a sensor, the system will detect the problem
and substitute a suitable value until the problem is corrected. No action by the operator is
required, however, messages indicating the source of the problem are displayed alternately with
"DELIVERY" or other display units. The system may be used to complete deliveries, but the
problem should be corrected as soon as possible.
Certain failures are of such a natur e that the system cannot provide a measurement of the delivery
until the problem is corrected.
10.1.2. COOLING DOWN THE METER
The metering code requires that the piping run to the flowmeter be cooled down prior to
beginning a delivery. The piping arrangement on
your trailer allows this operation to be
performed simultaneously with the cooling down of the pump. The fluid may need to be
DocNo HP 224
57
ACE
recirculated for a short time to complete the meter cool down. For Pump Interlock equipped
systems refer to Section 3.6, “PUMP INTERLOCK (OPTIONAL).”
On compensated ACE systems, proper cool down has been achieved when the ACE unit stops
flashing the COMP RANGE OUT message.
Once cool down is complete, the delivery may begin.
10.1.3. CLEARING THE TOTAL
The metering code requires that the
cooled down.
delivery total be cleared to zero after the meter has been
When power is first applied, the ACE will display the delivery total of the most recent delivery.
To clear the old delivery total, depress the CLEAR key twice.
Pressing the CLEAR key twice, also clears the internal log of equipment malfunctions and
operator errors that occurred during cool down. The only malfunctions which will be recorded
on the maintenance report are those that occur between the time the CLEAR key is depressed
twice and the PRINT key sequence is completed.
10.1.4. MAKING THE DELIVERY
To make a delivery, simply open the appropriate valves on the trailer and on the receiving vessel.
Observe the display to see how much product has been transferred at any time. The display
is
updated every few seconds with the current delivery amount. Use the SELECT key to look at
other variables the system is measuring (See below). Each time the SELECT key is depressed,
the display advances to the next item on the list. The display retur ns to the delivery total if the
ACE is left idle for the value of the DISPLAY TIME OUT parameter set in the
CONFIGURATION mode.
Variables:
•
Delivered mass total
•
Accumulative mass total
•
Volumetric flow rate
•
Mass flow rate
•
Temperature
•
Pressure
•
Density (Non LPG systems)
•
Vol Correction Factor (LPG systems)
•
Specific Gravity (LPG systems)
•
Time and Date
•
Audit Trail Cal (Calibration)
•
Audit Trail Con (Configuration)
10.1.5. DELIVERY COMPLETION
Close the appropriate valves to stop the delivery. The ACE does not allo
w printing and trip
recording if flowrate is present. With the flow stopped, obtain a printed ticket or record the final
delivery total.
ACE
58
DocNo HP 224
11. SYSTEM CHECKOUT
11.1.
SYSTEM CHECKOUT PROCEDURE
The ACE system accuracy may be verified by using flow and temperature
required test equipment is as follows:
simulators. The
FLUID TYPE
REQUIRED EQUIPMENT
LIN,LOX,LAR
•
ACC11 TEMPERATURE SIMULATOR
•
ACC5A COUNT TESTER
•
DIGITAL MULTIMETER
•
ACC36 TEMPERATURE SIMULATOR
•
ACC45V PRESSURE SIMULATOR
•
ACC5A COUNT TESTER
•
DIGITAL MULTIMETER
•
ACC15 TEMPERATURE SIMULATOR
•
ACC5A COUNT TESTER
•
DIGITAL MULTIMETER
•
ACC62 TEMPERATURE SIMULATOR
•
ACC5A COUNT TESTER
•
DIGITAL MULTIMETER
LH2
CO2
LNG
11.1.1. Testing ACE CO2 Systems
Prior to the beginning of testing, for CO2 systems, perform a printout of the s etup information as
testing will require changes to the setup information. Perform the following changes to the unit
setup.
•
Enter the MAINTENANCE mode
Print the setup parameters.
•
Enter the CALIBRATION mode and change the following parameters:
Set AVERAGE K-FACTOR to 100.00
Set DEFAULT PRESSURE to 500 PSIA
•
Enter the CONFIGURATION mode and change the following parameters:
Set SYSTEM OF MEASURE to U.S. CUSTOMARY or METRIC dependent on the
testing requirements.
DocNo HP 224
59
ACE
Set UNIT OF MEASURE to MASS.
Set K-FACTOR METHOD to AVERAGE K-FACTOR.
Set DENSITY METHOD to TEMPERATURE and PRESSURE.
•
Return to the OPERATING mode.
•
Connect the flow and temperature simulators to the ACE unit.
•
The following chart indicates the expected delivery totals, when simulating 10000 pulses
and th e corresponding temperature. All results are given in pounds (LB) and kilograms
(KG).
TEMPERATURE
OF CO2
EXPECTED TOTAL
SINGLE PIPE MODE
EXPECTED TOTAL
DUAL PIPE MODE
°F
LB
KG
LB
KG
-60
971.88
440.84
954.40
432.91
-50
954.61
433.00
931.20
422.39
-40
936.86
424.95
909.30
412.45
-30
918.57
416.66
886.10
401.93
-20
899.42
407.97
861.30
390.68
-10
879.26
398.83
834.80
378.66
0
857.82
389.10
806.00
365.60
10
834.70
378.61
774.60
351.35
20
809.29
367.09
740.00
335.66
30
780.54
354.05
694.90
315.20
11.1.2. Testing ACE LINLOXLAR, LNG, and LH2 systems
Prior to the beginning of testing perform a printout of the setup information as testing will require
changes to the setup information. Perform the following changes to the unit setup.
•
Enter the MAINTENANCE mode: a
Print the setup parameters.
•
Enter the CALIBRATION mode and change the following parameters:
Set AVERAGE K-FACTOR to 100.00.
•
Enter the CONFIGURATION mode and change the following parameters:
Set SYSTEM OF MEASURE to U.S. CUSTOMARY or METRIC dependent o n the
testing requirements.
Set UNIT OF MEASURE to MASS.
Set K-FACTOR METHOD to AVERAGE K-FACTOR.
Set DENSITY METHOD to TEMPERATURE.
ACE
60
DocNo HP 224
•
Return to the OPERATING mode.
•
Connect the flow and temperature simulators to the ACE unit.
•
The following charts indicate t he expected delivery totals, when simulating 10000 pulses
and the corresponding temperature. All results are given in pounds (LB) and kilograms
(KG).
TEMPERATURE
EXPECTED TOTAL
°K
LIN
LOX
LB
KG
LB
80
664.67
301.49
85
644.31
292.25
90
622.64
282.42
953.04
95
599.57
271.96
100
574.75
105
110
LAR
KG
LB
KG
1174.26
532.64
432.29
1148.74
521.06
932.12
422.80
1122.01
508.94
260.70
910.29
412.90
1094.18
496.31
547.62
248.40
887.67
402.64
1065.14
483.14
517.59
234.77
864.10
391.95
1034.59
469.28
115
839.28
380.69
1002.18
454.58
120
812.81
368.68
967.50
438.85
125
784.22
355.72
930.15
421.91
TEMPERATURE OF LH2
DocNo HP 224
EXPECTED TOTAL
°K
LB
KG
20
59.35
26.92
21
58.39
26.49
22
57.36
26.02
23
56.27
25.52
24
55.08
24.98
25
53.80
24.40
26
52.41
23.77
27
50.88
23.08
28
49.18
22.31
29
47.24
21.43
30
44.95
20.39
61
ACE
TEMPERATURE
EXPECTED TOTAL
LNG97
LB
LNG93
KG
LB
KG
LB
KG
-260
365.25
165.67
375.51
170.33
383.04
173.74
-250
358.39
162.56
368.26
167.04
376.56
170.81
-240
350.87
159.15
361.30
163.88
369.28
167.50
-230
343.65
155.88
353.65
160.41
361.30
163.88
-220
335.88
152.35
346.32
157.09
353.65
160.41
-210
328.45
148.98
338.43
153.51
346.32
157.09
-200
319.81
145.06
330.07
149.72
337.58
153.12
-190
310.88
141.01
320.58
145.41
328.45
148.98
-180
299.73
135.96
310.88
141.01
319.05
144.72
-170
289.35
131.25
299.73
135.96
308.02
139.71
-*-
-*-
-*-
-160
-*-
LNG95
-*-
-*-
-*-
Gas Inhibit activated.
ACE
62
DocNo HP 224
12. APPENDIX: DRAWINGS
DocNo HP 224
63
ACE
THIS PAGE LEFT INTENTIONALLY BLANK.
ACE
64
DocNo HP 224