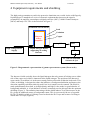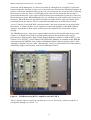
1
Gamma Spectrometry
Laboratory
User manual
Geoscience Resources and Facilities Directorate
Internal Report IR/04/174
BRITISH GEOLOGICAL SURVEY
INTERNAL REPORT IR/04/174
Gamma Spectrometry
Laboratory
User manual
C Emery, M Strutt
Key words
Gamma spectrometry, LabSOCS,
QA.
Bibliographical reference
EMERY, C, STRUTT, M, 2004.
Gamma Spectrometry Laboratory
– User Manual
British Geological Survey
Internal Report, IR/04/174.
28pp.
© NERC 2004
Keyworth, Nottingham British Geological Survey 2004
BRITISH GEOLOGICAL SURVEY
The full range of Survey publications is available from the BGS
Sales Desks at Nottingham and Edinburgh; see contact details
below or shop online at www.thebgs.co.uk
The London Information Office maintains a reference collection
of BGS publications including maps for consultation.
The Survey publishes an annual catalogue of its maps and other
publications; this catalogue is available from any of the BGS Sales
Desks.
The British Geological Survey carries out the geological survey of
Great Britain and Northern Ireland (the latter as an agency
service for the government of Northern Ireland), and of the
surrounding continental shelf, as well as its basic research
projects. It also undertakes programmes of British technical aid in
geology in developing countries as arranged by the Department
for International Development and other agencies.
Keyworth, Nottingham NG12 5GG
0115-936 3241
Fax 0115-936 3488
e-mail: [email protected]
www.bgs.ac.uk
Shop online at: www.thebgs.co.uk
Murchison House, West Mains Road, Edinburgh EH9 3LA
0131-667 1000
Fax 0131-668 2683
e-mail: [email protected]
London Information Office at the Natural History Museum
(Earth Galleries), Exhibition Road, South Kensington, London
SW7 2DE
020-7589 4090
Fax 020-7584 8270
020-7942 5344/45
email: [email protected]
The British Geological Survey is a component body of the Natural
Environment Research Council.
Forde House, Park Five Business Centre, Harrier Way,
Sowton, Exeter, Devon EX2 7HU
01392-445271
Fax 01392-445371
Geological Survey of Northern Ireland, 20 College Gardens,
Belfast BT9 6BS
028-9066 6595
Fax 028-9066 2835
Maclean Building, Crowmarsh Gifford, Wallingford,
Oxfordshire OX10 8BB
01491-838800
Fax 01491-692345
Parent Body
Natural Environment Research Council, Polaris House,
North Star Avenue, Swindon, Wiltshire SN2 1EU
01793-411500
Fax 01793-411501
www.nerc.ac.uk
Foreword
This report intends to inform the reader generically about gamma spectrometry and more
specifically of the system and procedures in place at the British Geological Survey gamma
spectrometry laboratory, Keyworth. It is intended to be used for training of staff, as a reference
document for staff using the laboratory and to formalise the procedures in place.
Acknowledgements
Thanks are due to Canberra Harwell (a Canberra Industries, Inc subsidiary) for their technical
support and advice, in particular to Ian Sinclair who provided training, equipment checks and
freely gave advice on a number of occasions.
David Jones, of BGS, gave not only support whilst the Laboratory was undergoing important
changes, he also helped to review draft chapters of this report.
Thanks also go to Jenny Cook, John Davis and Simon Chenery, all of BGS, for their help and
support.
i
Contents
Foreword ......................................................................................................................................... i
Acknowledgements......................................................................................................................... i
Contents..........................................................................................................................................ii
1
Introduction ............................................................................................................................ 1
2
Gamma Decay......................................................................................................................... 1
3
Semiconductors and detection of gamma rays .................................................................... 2
4
Equipment requirements and shielding ............................................................................... 3
5
Gamma spectrometry laboratory, BGS Keyworth- Detector specific information ......... 5
6
Equipment set-up and power-up .......................................................................................... 9
6.1 Detector set-up and cooling............................................................................................ 9
6.2 Electronics and HVPS .................................................................................................... 9
6.3 Power Up ...................................................................................................................... 10
7
Pulse configuring for analysis ............................................................................................. 10
7.1 Pulse shaping ................................................................................................................ 10
7.2 Pole Zero....................................................................................................................... 11
8
PC and software overview ................................................................................................... 12
8.1 Virtual Data Manager ................................................................................................... 12
8.2 MCA Input definition editor......................................................................................... 12
8.3 MID set-up wizard........................................................................................................ 12
8.4 Gamma acquisition and analysis .................................................................................. 13
8.5 Geometry composer...................................................................................................... 14
8.6 Nuclide Library editor .................................................................................................. 14
8.7 Certificate file editor..................................................................................................... 15
9
Calibration ............................................................................................................................ 16
9.1 Energy Calibration........................................................................................................ 16
9.2 Efficiency Calibration................................................................................................... 17
10 Acquisition and analysis ...................................................................................................... 21
10.1 Sample Geometries....................................................................................................... 21
10.2 Analysis sequences ....................................................................................................... 22
10.3 Reporting and saving .................................................................................................... 22
11 Quality Assurance ................................................................................................................ 23
11.1 QA software basics ....................................................................................................... 23
11.2 QA Databases ............................................................................................................... 24
11.3 Limit Checking ............................................................................................................. 24
11.4 Reporting ...................................................................................................................... 25
ii
12 Further Information ............................................................................................................ 26
12.1 Equipment and software supplier contact details: ........................................................ 26
12.2 Online Information ....................................................................................................... 26
12.3 certificates and detector specifications ......................................................................... 26
12.4 User manuals ................................................................................................................ 26
12.5 BGS Contacts................................................................................................................ 27
References .................................................................................................................................... 28
FIGURES
Figure 1 – Conductor, Semi conductor and Insulator properties…………………………….2
Figure 2- Diagrammatic representation of gamma spectrometer system……………………3
Figure 3- Outer lead shielding…………………………………………………………………..4
Figure 4- Inner cadmium-copper shielding…………………………………………………….4
Figure 5 – Detector 1 (DET_1)…………………………………………………………………..5
Figure 6 – Detector 2 (DET_2)…………………………………………………………………..5
Figure 7- Detector specification for DET_1……………………………………………………6
Figure 8- Detector specification for DET_2……………………………………………………7
Figure 9 – NIM Bin housing HVPS, amplifiers and ADC/MCA……………………………..8
Figure 10 – Pulse shape overshoot, undershoot and correct return to the baseline………..11
Figure 11 – LabSOCS simplified beaker template diagram…………………………………18
Figure 12 – LabSOCS simplified beaker template form……………………………………..18
Figure 13 – MuEditor…………………………………………………………………………..19
Figure 14- Efficiency results display…………………………………………………………..20
Figure 15 – Efficiency calibration curve………………………………………………………20
iii
IR/04/174 Gamma Spectrometry Laboratory – User Manual
Version 1.0
1 Introduction
This document intends to inform the reader both generally about gamma spectrometry and more
specifically of the system and procedures in place at the British Geological Survey gamma
spectrometry laboratory, Keyworth. Gamma decay, equipment specifications, requirements and
set-up are firstly discussed. Calibration for both energy and efficiency are outlined followed by
acquisition and analysis. Quality assurance procedures are then detailed and demonstrated.
2 Gamma Decay
Radioactive decay is a spontaneous process in which an unstable nucleus emits radiation, in the
form of a sub-nuclear particle or a photon of electromagnetic radiation and is converted into a
new nucleus of lower internal energy. Radioactive decay involves a transition between a defined
quantum state of the original nucleus and a defined quantum state of the product nuclide. The
energy difference between the two quantised levels involved in the transition is called the decay
energy and is characteristic of that transition. This decay energy appears as the kinetic energy of
the decay products and electromagnetic radiation. Often, the product nuclide is initially of higher
energy than the ground state and undergoes a transition to a lower energy by the process of
gamma decay. The energy difference between the two states appears as a high-energy photon of
electromagnetic radiation, known as a gamma ray.
e.g.
7
B
7
7
Li*
excited state
Li + γ (477.6 keV)
ground state
Gamma photon energies are typically in the range 20 keV to 2 MeV and they are characteristic
of the nuclide undergoing decay (or strictly the decay product). It is this diagnostic capability
that makes gamma spectrometry a viable technique and makes it the preferred option for the
analysis of gamma emitting radionuclides.
Since gamma photons are uncharged, they have a low efficiency for interaction with electrons,
with the result that gamma radiation is highly penetrating. Unlike alpha and beta particles, which
transfer their energy to absorbers in many interactions, gamma photons transfer their energy in a
single photoelectric event or in a small number of scattering events. Consequently, almost all of
the ionisation produced in the matter by gamma photons is secondary ionisation (i.e. ionisation
caused by the electrons ejected in primary interactions).
1
IR/04/174 Gamma Spectrometry Laboratory – User Manual
Version 1.0
3 Semiconductors and detection of gamma rays
Semiconductor detectors have good absorption characteristics for gamma radiation and produce
very high-resolution spectra. This behaviour occurs because semiconductors have a very small
energy gap between the valence and conduction bands (Figure 1).
ENERGY
Conduction
band
Conduction
band
Valence
band
Conduction
band
Valence
band
Valence
band
Conductor
Semiconductor
Insulator
(Conduction band
permanently occupied)
(Small band gap energy )
(Conduction band
permanently empty)
Figure 1 – Conductor, Semi conductor and Insulator properties
Electrons in the conduction band are mobile and will move under the influence of an applied
potential difference causing an electrical current to flow. Crucial to the conduction process is
whether or not there are electrons in this conduction band. In insulators, the electrons in the
valence band are separated by a large gap from the conduction band; in conductors the valence
band overlaps the conduction band, and in semiconductors there is a small gap between the
valence and conduction bands. This small conduction band gap energy (Eg) in a semiconductor
is in the order of 1 eV, which is small enough for thermal excitation of electrons to result in
transitions from the valence band to the conduction band. Therefore at room temperature, the
conduction band will be occupied and semiconductors will conduct electricity. However, at low
temperatures, the conduction band is effectively empty and semiconductors are insulators.
If a potential difference is applied to a semi conductor at low temperatures, no current will flow.
If however a gamma photon deposits energy in the crystal, the resultant ionisation will result in
promotion of electrons to the conduction band and a transient electrical pulse will be produced,
the magnitude of which will be proportional to the energy deposited in the crystal.
Germanium provides excellent properties for use as a gamma photon detector, since it can be
produced as very high purity intrinsic semiconductors in the form of large crystals. Ion implanted
electrical contacts are formed on the crystal which is contained under vacuum in a protective
aluminium can. The crystal is maintained at low temperature by mounting it on a cryostat
containing liquid nitrogen, with thermal contact between the crystal and the liquid nitrogen being
established by a copper rod (the ‘cold finger’).
2
IR/04/174 Gamma Spectrometry Laboratory – User Manual
Version 1.0
4 Equipment requirements and shielding
The high purity germanium crystal in the protective aluminium can, cooled via the cold finger by
liquid nitrogen, is attached to a series of electronic equipment that processes the signal: a
preamplifier, an amplifier, an analogue to digital converter (ADC), a Multi Channel Analyser
(MCA) and lastly a PC. This is shown below in Figure 2.
Graded Pb-Cd-Cu Shield
Lead
Cadmium
Detector
& PreAmplifier
Copper
Amplifier
High Voltage Power
Supply
Liquid Nitrogen Dewar
supporting & cooling
Detector
ADC
MCA
PC with GENIE 2000
Software & QA
Figure 2- Diagrammatic representation of gamma spectrometer system (Not to scale)
The detector is held vertically above the liquid nitrogen dewar by means of locking screws either
side of the copper rod, which is immersed in the liquid nitrogen. The position of the detector’s
upper surface is such that it is in the most central position achievable within the lead castle. This
castle, or shielding, is designed to reduce the influence of background radiation and improve the
detection capability such that relatively small, low-level samples can be counted. The shield is
made predominantly from lead, as its high density and high z-value make it a good absorber of
background radiation. A 10 cm thickness of lead is commonly used as this provides the optimum
shielding (Figure 3). The radiation interacting with the shield induces X-ray fluorescence in the
Pb, giving an additional source of background counts. This is overcome by the use of a graded
Pb-Cd-Cu shield in which a Cd lining is used to absorb the Pb X-rays and an inner Cu lining to
absorb the Cd X-rays (Figure 4)
3
IR/04/174 Gamma Spectrometry Laboratory – User Manual
Figure 3- Outer lead shielding
Version 1.0
Figure 4- Inner cadmium-copper shielding
The high voltage power supply, the amplifier and the multi channel analyser (MCA) are housed
in and powered by a Nuclear Instrument Module relay rack (NIM Bin). The electrical pulses
produced by the crystal are amplified in the pre-amplifier, and shaped, amplified and noise
filtered in the amplifier. The pulses are then converted to a digital signal by an analogue to
digital converter (ADC) and processed in the MCA, which analyses the pulses according to
amplitude. Proportionality is maintained in all of these processes, so the pulses analysed by the
MCA are proportional in size to the amount of radiation energy deposited in the crystal.
The PC, which is interfaced with this equipment, controls the acquisition, analysis and QA
software.
4
IR/04/174 Gamma Spectrometry Laboratory – User Manual
Version 1.0
5 Gamma spectrometry laboratory, BGS KeyworthDetector specific information
The BGS gamma spectrometry laboratory in Keyworth has 2 high purity germanium Canberra
detectors. Detector one (DET_1) (Figure 5), the newer of the two detectors is a 35% efficiency
detector with a recommended bias voltage of +ve 5000 Vdc (full detector specification in Figure
7). Detector two (DET_2) (Figure 6) has a relative efficiency of 17.4% and a recommended bias
of –ve 4500 Vdc (full detector specification in Figure 8).
Figure 5 – Detector 1 (DET_1)
Figure 6 – Detector 2 (DET_2)
5
IR/04/174 Gamma Spectrometry Laboratory – User Manual
Version 1.0
Figure 7- Detector specification for DET_1
6
IR/04/174 Gamma Spectrometry Laboratory – User Manual
Version 1.0
Figure 8- Detector specification for DET_2
7
IR/04/174 Gamma Spectrometry Laboratory – User Manual
Version 1.0
A detector will be damaged if it is allowed to warm up whilst the bias is applied. It is therefore
imperative that the detectors be kept cool, so the dewars are filled weekly with liquid nitrogen. In
practice a full dewar should last three weeks, but it is not best practice to run the risk of allowing
the detector to warm up. There is a LED light on the outer Al can around the detector that is
green when the detector is cool, and red if the detector has been allowed to warm up. It therefore
should always be green! Whilst filling the lN2, gas will flow out of the outflow pipe at the top of
the dewar. When the dewar is full, liquid will spurt out of this outflow pipe into a small dewar
positioned beside the detector. This is a potential hazard that new users must bear in mind.
A set of 3 cables (2 coax with BNC connectors and a 9 pin serial connector) are provided with
the detector. A further 50 ohm coax is required to connect the amplifier to the Multi Channel
Analyser, and another to hook up the oscilloscope to the amplifier for observation of pulse
shaping.
The NIM Bin provides a large power supply and houses the various modules that may be used
(Figure 9). It should not be used for storing modules that are not needed as noise may be
generated by a faulty module. High Voltage Supply Modules (Canberra 3106D for DET_1 and
Canberra 3105 for DET_2) and Canberra 2022 Amplifier Modules are installed in this NIM Bin.
Also housed in the NIM Bin is the Canberra Multiport II Multi Channel Analyser (MCA) with
Analogue to Digital Converter (ADC) functionality. The PC is loaded with Genie 2000 software,
which fully supports and remotely controls the Multiport II MCA.
Figure 9 – NIM Bin housing HVPS, amplifiers and ADC/MCA
There is also the option to attach an Oscilloscope or to use ‘Picoscope’ software on the PC to
check pulse shaping (see section 7.1).
8
IR/04/174 Gamma Spectrometry Laboratory – User Manual
Version 1.0
6 Equipment set-up and power-up
6.1
DETECTOR SET-UP AND COOLING
Once the copper rod, or ‘cold finger’, is inserted into the dewar and the black collar at the top of
the dewar is tightened, the detector is then in place. The dewar should be positioned beneath the
castle, so that the detector is placed as close to the centre of the castle as possible, the optimum
position for counting. If the set-up is from a ‘warm start’ the dewar should be filled with liquid
nitrogen and left for a minimum of 6 hours. This allows the crystal to cool and stabilise. Once
the detector is cool, and the green LED is visible on the Al can, the detector is ready to have bias
applied.
6.2
ELECTRONICS AND HVPS
With reference to the detector certificate of efficiency supplied at purchase, establish the bias of
the detector (See Figures 7 and 8).
Check that the power to the NIM Bin is off and Place the High Voltage Power Supply (HVPS) in
the NIM Bin without the cabling to the detector. Check the black voltage adjuster is set to 0000v
and switch on the NIM Bin followed by the HVPS. A red LED should light up to indicate either
positive or negative bias. The LEDs are above and below the voltmeter. If the certificate polarity
agrees with the illuminated LED, it is not necessary to change the bias polarity. If however the
polarity is different to the bias stated on the detector certificate, the HVPS must be corrected.
To do this, the HVPS and NIM Bin must be switched off. The HVPS module should be removed
from the NIM Bin and the left hand cover plate from the module should be removed by
unscrewing the 5 screws. With the module on its side, locate the “OUTPUT” label. Between this
and the back of the unit should appear the word “Positive” or “Negative” on a 10 cm long plug
orientated left to right, with the polarity printed on it. To change the polarity rotate the retaining
plate in a clockwise fashion, withdraw the plug away from the “Output” label and replace the
plug with the correct polarity facing upwards. Replace the retaining plate, the cover and the
screws. The polarity should now match the polarity stated in the detector certificate.
Checking the NIM Bin is switched off place the HVPS back into the NIM Bin and connect the
black BNC cable between the “High Voltage – J1” socket at the rear of the module and the BNC
connector on the detector. Only one connector fits and is attached to a black cable from the
preamplifier. Once this is achieved, the connection should be covered with the black plastic
sheath on the detector bias cable.
The Amplifier (2022) should then be placed in the NIM Bin next to the HVPS. Using the other
BNC cable with the female connectors, connect the detector signal output to the Amplifier
ensuring that the LB1500 Cable Transformer is located between the unlabelled detector signal
output and the cable. This will only fit in one direction. Connect the other end of the cable to the
“Input” socket at the rear of the Amplifier module. With the power still off, connect the grey 9
way parallel cable between the detector and the “Pre-amplifier Power” port at the rear of the
Amplifier.
9
IR/04/174 Gamma Spectrometry Laboratory – User Manual
6.3
Version 1.0
POWER UP
Firstly, check all cables are properly connected and that all the connector sheathing is in place.
Observe the amplifier output with an oscilloscope. The noise should be several hundred
millivolts peak to peak, with no detector bias applied. The “Pre-amplifier Test Point Voltage”
from the detector Certificate should be noted (-0.1 or -0.2 Vdc). Locate the detector test point
underneath the detector housing (it is a small hole of approximately 3mm surrounded by a white
plastic rim). Using a multimeter, place one terminal into this and the other to the castle frame. A
voltage close to the ‘Pre-amplifier Test Point Voltage’ should be achieved.
Switch on the NIM Bin at the mains and with the toggle switch on the right hand side of the bin.
Increase bias to 100 volts. The noise at the amplifier output should decrease somewhat, and the
voltmeter should momentarily change, before returning to its initial reading. For detectors using
positive bias, the test point voltage change will go negative and for detectors using negative bias,
the test point voltage will go positive. Increase the bias now to 500 volts. The noise should be
further reduced and the voltmeter should respond exactly as before.
Slowly increase the bias in 500-volt steps to the recommended value (from the detector
certificate), observing the behaviour of the amplifier signal and the voltmeter after each
increment. The noise should remain constant after the depletion voltage is reached. If the
detector has just been cooled, the system should be left to stabilise overnight as spectral drift can
occur.
7 Pulse configuring for analysis
7.1
PULSE SHAPING
Pulse shape, shaping time and best possible return to the baseline of the pulse is vital to achieve
good resolution in the spectrum. These are controlled by the amplifier. Pulse shaping is
important as long pulses would increase pulse pile up, and therefore dead time. A Gaussian
shaped pulse is a good compromise between signal/noise ratio and technical possibilities. To
achieve a pulse as close as possible to a Gaussian shape, most amplifiers have 2 to 3 (or more)
filters.
To asses the pulses produced by the detector, select a source from the point source box (e.g.
60
Co) and place it in the source spacer on the centre of the detector. Close the castle lid.
Connect the amplifier to the Picoscope Oscilloscope using the provided BNC cable, via the
“Unipolar Output” socket on the front of the Amplifier to input “A” on the Picoscope. Select the
appropriate polarity (given on the detector certificate) on the Amplifier controls. Select the
“Pico” icon on the desktop of the PC. The Picoscope front end should display a representation of
an oscilloscope with X and Y-axes, and due to the systems intuitive software, pulses from the
Amplifier should be displayed. Alternatively a stand-alone oscilloscope could be used to assess
the pulses.
If the oscilloscope is observed whilst switching between the various μS settings on the
‘shaping’ control on the amplifier, the step between the ‘leading edge’ of the peak and the
10
IR/04/174 Gamma Spectrometry Laboratory – User Manual
Version 1.0
‘trailing edge’ can be minimised. Adjustment of the shaping time constant to the recommended
shaping time from the detector certificate (4μsec) should achieve best results.
7.2
POLE ZERO
It is also important that the pulse returns to the baseline without ‘over’ or ‘undershoot’. The
correct position (as well as incorrect positions) is shown in Figure 10.
Figure 10 – Pulse shape overshoot, undershoot and correct return to the baseline
This is adjusted by the ‘Pole-Zero’ control, which is below the ‘shaping (μs)’ control on the
Amplifier. It is a recess in the panel marked “PZ”. Observing the shape of the waveform and
rotating the “PZ” adjuster left and right with a precision screwdriver reveals that the pulse can be
exaggerated in a positive and negative manner. When the pulse base assumes as horizontal a
shape as possible, then the Pole-Zero is correctly set. A small change in the fine gain will not
change Pole-Zero but when setting up a new detector, or if the coarse gain on the amplifier is
changed, the Pole-Zero should always be checked.
The pulse has now been optimised and will produce the best possible analyses for the given
equipment.
11
IR/04/174 Gamma Spectrometry Laboratory – User Manual
Version 1.0
8 PC and software overview
Once the pulse has been optimised, the next step is to perform an energy calibration. This is done
through the applications software loaded on the PC: Genie 2000 Version 2.1. Genie 2000 gamma
analysis software allows not only energy calibration, but; gamma spectrum analysis; background
subtraction; reference peak correction; efficiency correction (including the LabSOCS geometry
composer); nuclide identification and quantification; interference correction, weighted mean
activity and Minimum Detectable Activity (MDA) calculations; cascade summing corrections;
parent/daughter decay correction and reporting. Genie 2000 also has an add-in Quality
Assurance package.
Details and step-by-step instructions to using this software can be found in the Genie 2000
Operations Manual, LabSOCS Calibration Software Manual and the QA Software Users Manual.
There are several sub-menus within Genie 2000, found within the start-up menu:
8.1
VIRTUAL DATA MANAGER
The Virtual Data Manager controls the inter-process communication within Genie 2000 and
connects each Genie 2000 functionality. It is automatically booted on PC start up, cannot be
altered and should not be closed, as any acquisition in progress will be lost.
8.2
MCA INPUT DEFINITION EDITOR
The first step in using a Genie 2000 system is to create at least one MCA input definition (MID)
so the system knows what kind of MCA is installed or connected to the system. For most
systems the Input Definition can be set up quickly and easily by using the MID set-up wizard.
For more complex systems, there is a MID editor available to configure the input definition.
Unless a new detector or MCA is being set up, there is no need to edit a MCA file.
8.3
MID SET-UP WIZARD
The MID set-up wizard is adequate in most cases to set up the MCA Input Definition. Step by
step instructions on how to set up a MID can be found in the Genie 2000 Operations manual
pages 23-27. Once the new MID is set up, it will be automatically loaded into the MCA
Runtime Configuration Database and the system is then ready to calibrate.
12
IR/04/174 Gamma Spectrometry Laboratory – User Manual
8.4
Version 1.0
GAMMA ACQUISITION AND ANALYSIS
The gamma acquisition and analysis functionality is the backbone to Genie 2000. It performs
many tasks:
8.4.1
Energy calibration
Using radioactive point sources with energies that span the full range of interest, the relationship
between the channel and the energy of the peaks is established. This gives meaning to the
spectrum and allows for correct identification of energy peaks and therefore of radionuclides.
Full energy calibration as well as quick energy calibration checks can be carried out (see section
9.1).
8.4.2
Efficiency Calibration
Until recently, efficiency calibrations at BGS were carried out using standards spiked with mixed
radionuclides certified by the National Physical Laboratory. They were prepared using similar
matrices to the samples being analysed in the same geometries, in order to maintain geometric
consistency. This was done via the gamma acquisition and analysis functionality by including
the correct efficiency calibration from the certificated mixed radionuclide source within each
analysis sequence. This empirical form of calibration although accurate was time consuming if
new sample matrices or geometries were analysed.
However, BGS has now purchased mathematical efficiency calibration software, LabSOCS. This
is also run through Genie 2000. Gamma spectrometry operates within the bounds of extremely
well constrained radiometric and physical processes such that these may be mathematically
modelled. Each detector has been thoroughly defined and LabSOCS modelled by the
manufacturers so the exact parameters of each detector are known. Each sample geometry and
sample type model is set up in the Geometry Composer and the efficiency correction is then
applied in the gamma acquisition and analysis window (see section 9.2.2).
8.4.3
Data acquisition
Firstly a datasource must be opened. From the ‘Open datasource’ menu, by selecting
‘detector’, a list of the available detectors will be displayed. Selecting, for example DET_1, will
open the control window for DET_1. By selecting ‘Acquire start’ the data acquisition will be
initiated on that current datasource. At any time, ‘Acquire stop’ will stop the acquisition.
Acquisition will also stop when the preset time for the count was reached, if it had been
previously defined.
The pulses analysed by the MCA are proportional in size to the amount of radiation energy
deposited in the crystal. The total number of counts corresponds to the area under the photopeak.
In general the photopeak will lie on top of the Compton continuum, which is generated by back
scattering from higher energy gamma photons (Adams and Dams, 1975).
13
IR/04/174 Gamma Spectrometry Laboratory – User Manual
8.4.4
Version 1.0
Analysis of gamma spectra
In order to analyse spectra, a number of steps are carried out, in this order: detection of peaks;
determination of the energy of peaks; determination of the peak areas; peak area corrections for
background and summing; isotope identification using certified nuclide libraries; activity
calculation of isotopes and calculating of detection limits (MDA). These steps can be carried out
individually or automated into analysis sequences (see section 9.2).
8.4.5
Reporting
The analyst controls which stages of the analysis sequence are to be reported. Again, individual
stages of analysis can be reported, or each stage from an analysis sequence. This is controlled
through the analysis sequence by- ‘edit’/ ‘analysis sequence’/ ‘insert’/ ‘reporting’. By clicking
on ‘Set-up Algorithm’, the stage of the analysis to be reported can be selected from the dropdown box, and output either to the screen or a printer.
8.5
GEOMETRY COMPOSER
The calibration algorithms in the LabSOCS calibration software require an accurate description
of the counting geometry for each sample. The Geometry Composer is a tool allowing the
interactive definition of all geometry-related parameters, such as detector properties, sample
dimensions, composition and densities. Templates are provided within the Geometry Composer
of many standard geometries and the ‘simplified beaker’ template is used here at BGS (see
section 9.2.2).
8.6
NUCLIDE LIBRARY EDITOR
The Nuclide Library editor is for creating and maintaining the nuclide libraries that are used for
both qualitative and quantitative radionuclide analysis. The standard library provided with Genie
2000 (STDLIB.NLB) contains 109 nuclides and 511 energy lines, which covers all of the
commonly determined radionuclides. In addition to this, there are four master libraries
containing about 800 nuclides and 31 000 energy lines.
It is also possible to customise a library from the standard or the master libraries. This is useful
when providing specific analysies to a customer.
14
IR/04/174 Gamma Spectrometry Laboratory – User Manual
8.7
Version 1.0
CERTIFICATE FILE EDITOR
The certificate file editor creates and maintains copies of certificate files from the suppliers of
certified radioactive standard materials (e.g. a certificate file from a mixed radionuclide standard
solution from the National Physical Laboratory). These files are used to program efficiency
calibrations when using the conventional radioactive standard efficiency calibration method.
New certificate files can be made by extracting correct information from nuclide libraries, or
from previous certificate (*.CTF) files.
15
IR/04/174 Gamma Spectrometry Laboratory – User Manual
Version 1.0
9 Calibration
9.1
ENERGY CALIBRATION
The principle of energy calibration is to establish the correct relation between the energy of the
gamma emission and the energy channel it is found in. It is imperative that the system is properly
energy calibrated, to allow correct identification of nuclides.
The amplifier gain and the ADC zero define the final position of the peaks in the spectrum.
DET_1 has 16,381 channels spread over an energy range of 1.5- 2831 keV. DET_2 has 16,370
channels spread over a 1-2916 keV range. The relationship between energy and channel should
always be linear in these systems. Both detectors are not calibrated for energies below
approximately 50 keV due to noise (X-rays) and high self-adsorption at low energies.
With the amplifier shaping time and pole-zero satisfactorily set, the lower and upper energy
ranges of the region of detection can be established and an energy calibration can be performed.
To energy calibrate the system count a multi-line source, or sources, which give a good span
over the energy range of interest. For example, a low energy emitter such as 241Am and in
addition, 60Co and 137Cs would give such a range of energies. These sources are good for
calibration, as they have well defined singlet peaks without interference. Collect a short spectrum
of approximately 60 seconds.
Under the ‘calibration’ menu select ‘energy full’. This option gives a number of ways to energy
calibrate: by certificate file, by nuclide list, by calibration file, or manually. The best way is by
certificate file as an accurate certificate can be created and used repeatedly, so choose the ‘by
certificate file’ option. Choose a certificate file from the list (if there is not one them make one
with the certificate file editor). The calibration box will appear on your screen. On the 60-second
calibration spectrum that was collected, move the two markers to surround one of the easily
identifiable peaks. Click on ‘markers’ and the peak between the two markers will be assessed
and registered in the calibration. Do this to one other easily recognisable peak so that two points
are registered in the calibration. Then click on ‘Auto’ for the rest of the peaks in the spectrum to
be registered. Click next on ‘show’. An energy versus channel number graph will be shown
which should be linear and through the origin. Now the energy calibration is complete.
The ‘Energy recalibration’ option from the ‘calibrate’ menu allows quick recomputation of the
energy vs. channel curve. It is useful to carry out this check regularly to maintain correct energy
calibration.
16
IR/04/174 Gamma Spectrometry Laboratory – User Manual
9.2
9.2.1
Version 1.0
EFFICIENCY CALIBRATION
Efficiency
Efficiency calibration can only be carried out once the energy calibration is complete. The
absolute photopeak efficiency is outlined in the equation below:
Counts per second observed in the spectrum photopeak (Eγ)
Efficiency (Eγ) =
Emitted gamma rays per second by the source (Eγ)
Two factors determine the absolute photopeak efficiency of a system:
1. Geometry
Geometry means the distance between the detector and the sample, the sample shape,
spatial distribution and density.
2. Intrinsic efficiency of the detector
The intrinsic efficiency of the detector is geometry independent, and energy dependant.
Counts per second observed in the detector
Intrinsic efficiency =
Gamma rays which hit the detector
This should not be confused with relative efficiency, which is the efficiency of the Ge detector
when compared to a 3x3 NaI detector (IEEE Standards). This is what is stated in the detector
specifications (see Figures 7 and 8).
9.2.2 LabSOCS efficiency calibration
As was discussed above, geometry is very important when calibrating for efficiency. Previously,
efficiency calibration was performed using standards, which had similar density and z-value
characteristics to the samples and were spiked with mixed radionuclide solutions.
Recently there has been a move away from this approach towards mathematical modelling. The
LabSOCS mathematical efficiency calibration software uses a combination of Monte Carlo
calculations and discrete ordinate attenuation computations. At the factory, the complete
dimensions of each detector, their mounting and hardware were placed into a MCNP (a Monte
Carlo technique) model. A large number of point computations were then run covering the 507000 keV energy range, a 0-50m distance range and the 0-360 degree angular range. This large
set of detector specific data was combined into a series of mathematical equations, which have
been supplied to BGS for each detector. Calibrations can be performed for many different
sample shapes from cylindrical objects viewed from end to Marinelli beakers. The simplified
beaker model is used in the BGS gamma spectrometry laboratory as it best describes the standard
sample geometries used (Figure 11). Validation testing of the laboratory geometries was accurate
to within 4.5% standard deviation at high energies and 7% standard deviation at low energies.
These uncertainties are believed to be consistent with the errors inherent in calibrations with
radioactive sources, when the many variables involved are considered (Bronson et al, 1998).
17
IR/04/174 Gamma Spectrometry Laboratory – User Manual
Version 1.0
Figure 11 – LabSOCS simplified beaker template diagram (© Canberra Industries, Inc,
2002)
Figure 12 – LabSOCS simplified beaker template form (© Canberra Industries, Inc, 2002)
18
IR/04/174 Gamma Spectrometry Laboratory – User Manual
Version 1.0
To set up an efficiency calibration for a spectrum, go to the ‘Calibrate’ menu and select ‘by
ISOCS/ LabSOCS. This will display the select input file box. Click ‘Run Geometry
Composer’ and select the simplified beaker template (Figure 12). Select a detector from the drop
down list and this will build the detector specific information into the model. Enter the physical
dimensions and parameters of the geometry (using the template diagram in Figure 11), which
will describe the source and its relationship to the detector. Enter the density and material of the
beaker and the sample, either using the list of materials or by constructing a chemical formula of
the composition in MuEditor (Figure 13). Double clicking on any of the materials in the Material
Library list will bring up a box containing composition information for that material.
Figure 13 – MuEditor (© Canberra Industries, Inc, 2002)
Sample density can be calculated by: Sample weight/ Sample volume and should be entered in
the sample density box (see figure 12). Give a description of the model in the Geometry
information box, as this will be the file name.
Once this efficiency model is saved and closed, a Geometry Composer report will appear. Click
on the ‘Check geometry validity’ icon and then on the ‘generate efficiency points’ icon. An
efficiency file for that geometry has therefore been created. Save and close the report and the
‘select input file’ box will once again be showing. From the drop down menu, select the file
needed (the last one created will appear at the top of the list) and click ‘next’. The ‘Select
optional efficiency factor’ will be default set at ‘efficiency’, again click ‘next’. The efficiency
results are then displayed (Figure 14).
19
IR/04/174 Gamma Spectrometry Laboratory – User Manual
Version 1.0
Figure 14- Efficiency results display (© Canberra Industries, Inc, 2002)
To see the efficiency curve (Figure 15), click ‘show’.
Figure 15 – Efficiency calibration curve (© Canberra Industries, Inc, 2002)
To further check the efficiency points are well fitted, click on ‘List Pks’. This will list the energy
of each peak and the percentage deviation from the efficiency curve. Ideally the percentage
deviation should be zero, or close to it. If this is not the case go back to the efficiency results and
insert a crossover point at around 150- 200 keV. This should improve the fit of the curve and
reduce the percentage deviation. Once this is saved, that efficiency will apply to the spectrum
open in Genie 2000. It is also saved as an efficiency calibration file, so can be loaded for analysis
of another similar sample of that geometry.
20
IR/04/174 Gamma Spectrometry Laboratory – User Manual
Version 1.0
10 Acquisition and analysis
Once the amplifier shaping time and pole-zero are satisfactorily set and the energy and efficiency
calibration is complete, analysis can begin.
To acquire a spectrum, under the ‘Edit’ menu, click ‘Sample info’. This will allow sample
name, ID, weight and assay date to be edited. The weight is important, as the analysis results will
be reported in Becquerels per gram of sample. The assay date is also important, as the software
will decay correct back to the original sample date. Once the sample information has been added,
an efficiency calibration can be loaded. This is achieved by clicking the ‘Load’ icon in the ‘Edit
sample information’ box. The efficiency calibration file can be chosen from the list of existing
calibrations, or a new calibration can be made via the Geometry Composer (see Section 9.2.2).
10.1
SAMPLE GEOMETRIES
Each sample type is counted in standard geometries, and the correct efficiency calibration for
this geometry, sample type and sample weight is applied. The standard geometries used are:
•
Soil, sediment and vegetation are analysed in 150 ml squat polystyrene pots with
polyethylene snap lids. These are ordered by the sample preparation facility at BGS,
Keyworth.
•
Water is analysed in 250 ml polycarbonate pots with a screw lid, to avoid leakage.
These pots are supplied by:
Lab 3
1 Dragon Court
Crofts End
St. George Road
St. George
Bristol
BS5 7XX
Tel: (0870) 4445553
And manufactured by:
Bibby Sterilin Ltd.
Stone
Staffs
ST15 0SA
Each sample pot is placed in the appropriate sample holder and placed over the detector. The
sample holder merely holds the sample in the centre of the detector, so that the pot is placed in
exactly the same place each time. This is particularly important when using the LabSOCS
calibration. The sample container still lies directly on the detector.
21
IR/04/174 Gamma Spectrometry Laboratory – User Manual
10.2
Version 1.0
ANALYSIS SEQUENCES
Analysis sequences are used to automate each stage of the analysis and are very useful when
running batches of samples. Under the ‘Execute’, ‘Analysis sequence’, there are several
analysis sequences for different sample geometry, different detectors, the QA source and
standards for each matrix.
For example there is the‘RR_water_DET_1’ analysis sequence, which is matrix specific to
250ml pots of water and detector specific to DET_1. By selecting this, you will be prompted to
‘edit the sample information’ and ‘select an efficiency' file. Once these have been completed
the ‘acquisition acquire’ ‘start’ button can be hit. The acquisition runs until it reaches the
preset live time, or until it is manually stopped. The analysis sequence will then go through these
stages:
•
‘Peak locate- unidentified second difference’
•
Peak area- Sum/ Non-linear LSQ fit
•
Efficiency correction- standard
•
Nuclide identification- NID with interference correction
•
Detection limits- Currie MDA
•
Reporting of each stage with header of sample information
Analysis can also be carried out during acquire, for example to check if a sample has reached a
required MDA without disturbing the counting. Analysis sequences are detector specific, as the
correct background from each detector should be subtracted from each spectrum. There are also
separate sequences for each geometry, be it sediment, vegetation or water to ensure the results
are fed into the correct QA database.
Sample information is recorded both in Genie 2000 gamma acquisition and analysis and in a
hard-backed book in the laboratory. There is one book per detector and it is vital that it is kept up
to date.
10.3
REPORTING AND SAVING
Each spectrum collected is saved as raw data as a *.CAM File on the PC hard drive. The report
generated by each analysis is copied from the report window in Microsoft Word and saved. Both
the *.CAM file and the Word document from each sample are backed up onto the BGS network
(W:\GRF\GammSpecLab).
22
IR/04/174 Gamma Spectrometry Laboratory – User Manual
Version 1.0
11 Quality Assurance
Standards and certified reference materials are analysed at regular intervals to ensure good
quality control. Sample duplicates and blanks are also analysed within sample batches from
customers, these are quality control (QC) samples. In addition, Quality Assurance (QA) software
is run on the system that can use the generated QC data, and data directly from sample analysis.
11.1
QA SOFTWARE BASICS
The Quality Assurance (QA) package is compatible with Genie-2000 and allows you to
interactively establish a database of key system performance parameters. It warns you if, over
time the parameters drift outside the allowable warning and error limits that are set. A
comprehensive statistical analysis, reporting and plotting facility is provided for tracking system
performance and stability over time. The software's audit trail allows verification of the systems
performance.
Firstly, System gain and the energy calibration are monitored by tracking the peak centroid
location of one or more peaks commonly found in the samples or calibration standards. This is
done at BGS by counting a specially designed ‘QA source’ consisting of point sources of 241Am,
137
Cs and 60Co once a week on each detector. The spectra collected are then fed into the QA
software, and the peak centroids and Full Width Half Maximum (FWHM) are tracked. The
spectra collected from these 600 second QA source counts should be analysed using the analysis
sequence DET_1_QA_Count or DET_2_QA_Count for analysis on DET_1 and DET_2,
respectively.
System efficiency is monitored by periodically counting a certified mixed radionuclide standard
of known activity and monitoring the activity values for selected peaks. A standard for each
sample matrix is analyzed at the start and end of each sample batch, or as often as the workload
on the detectors allows. The analysis sequences for DET_1 are as follows: SED_STD_DET_1,
VEG_STD_DET_1, Dilute_Water_DET_1, Full_Water_DET_1 for the sediment, vegetation,
dilute and full water standards, respectively. Each analysis sequence sends the data from each
analysis to the correct QA database. An identical set of analysis sequences and QA databases are
set up for DET_2.
System background can also be tracked. This is unlikely to be an issue in the Keyworth
laboratory as the background should be low and should not change much. It is, however, still
worth analyzing the background regularly to check, for example that no contamination event has
occurred, and also so that the most contemporary background is being subtracted from the
sample counts. A background spectrum for each detector is subtracted during analysis.
Temperature and humidity at the time of analysis can also be tracked, but this must be
manually input into QA and at present is not done in the BGS laboratory.
23
IR/04/174 Gamma Spectrometry Laboratory – User Manual
11.2
Version 1.0
QA DATABASES
A database is set up to track each detector and each sample type separately. A new QA database
will automatically be created on starting the QA software. The definitions of the items to be
tracked can be specified through the ‘Add-defs’ menu. These definitions include: peak search,
Nuclide, Energy line, Generic, background or manual options. ‘Extract’ is also under the Adddefs menu and can be used to extract the definitions and set-up of a current database to create an
identical database. This would be useful, for example, when making up three databases for
different sample matrices on the same detector.
For the QA source there is a database to monitor FWHM, Activity and peak energy of Am-241,
Cs-137 and Co-60 on each detector. Likewise, the water, sediment and vegetation standards each
have a database for each detector and are monitored in a similar way. Databases for each sample
matrix on each detector monitor the 60Co Minimum Detectable Activity, as this is the main
nuclide of interest for our most significant current customer. These QA databases for standards
and the QA source can be found in W:\GRF\GammSpecLab\QA.
Once these databases have been established, every analysis is automatically transferred during
the analysis sequence to the correct QA database. This therefore collates the data, runs the QA
algorithms and flags up warnings if the data fails the pre-determined criteria.
11.3
LIMIT CHECKING
There are broadly two types of limit checking in the QA software: Boundary tests or Statistical
tests. Boundary tests issue a warning if a value, such as the centroid of a peak, drifts by more
than X channels from where is should be located. Statistical tests issue an ‘investigate’ warning
if a value varies by more than 2 sigma and an ‘action’ warning if a value varies by more than 3
sigma from its historical norm, from a normal value that you have specified, or in the case of
certified standards, from certified value.
There are five types of test that can be performed:
Sample Driven Test
This test specifies that the mean value used in the limit testing is to be based on historical values
of the parameter being tested. The calculation of the mean can also be limited to a specific time
period, if need be.
User Driven Test
This test uses user-defined mean and standard deviation entries for the statistical test.
Bias Value Test
This is the type of testing to use when the parameter being measured has a known certified value,
for example standards and certified reference materials. The known values are entered into the
True Value text input field.
Boundary Test
This test allows the establishment of absolute limits on the amount of variation acceptable in the
parameter being tracked. For example, in the case of peak centroid, more than plus or minus 2
24
IR/04/174 Gamma Spectrometry Laboratory – User Manual
Version 1.0
channels from the expected location is not acceptable, so Lower and Upper limits of 2 channels
either side of the MCA expected channel number are entered.
Trend Test
These tests interrogate the data values for bias and monotonic trends.
11.4
REPORTING
There are several reporting options including ‘results from last test’ reports, visual data plots
and summaries of a variable’s values over time, deviation from the norm and alarm conditions.
Under the ‘Results’ menu there are three reporting options: ‘Last measurement’ reports, ‘Full
report’ or a ‘bias summary’, which looks for a trend in the data (of course, there shouldn’t be a
trend).
Report templates can be customized through modification of an ASCII template.
25
IR/04/174 Gamma Spectrometry Laboratory – User Manual
Version 1.0
12 Further Information
12.1
EQUIPMENT AND SOFTWARE SUPPLIER CONTACT DETAILS:
Canberra Harwell
Building 528.10 Unit 1
Harwell International Business Centre
Didcot
Oxfordshire
OX11 OTA
Telephone: 01235 838 319
12.2
ONLINE INFORMATION
Online product information and search facilities can be found at:
www.canberra-harwell.com
12.3
CERTIFICATES AND DETECTOR SPECIFICATIONS
All source certificates, mixed radionuclide standard solution certificates, detector specifications
etc are filed in the top drawer of the cabinet in the laboratory.
12.4
USER MANUALS
The Canberra Harwell *.pdf user manuals are stored on the PC in the laboratory under:
D:\Genie2k\pdfs\docs.
The following paper copies of the user manuals are in labelled box files on the shelves in the
laboratory E008:
Equipment manuals:
•
Canberra Germanium Detectors – Users Manual.
Contains technical information about equipment, start-up and running the system.
•
Multiport II Multichannel Analyser – Users Manual
26
IR/04/174 Gamma Spectrometry Laboratory – User Manual
Version 1.0
Software Manuals:
•
Genie 2000 Read Me First
•
Genie 2000 Operations Manual
•
Genie 2000 Customisation tools manual
•
Genie 2000 Canberra Harwell Training Course Notes
•
QA Software – Users Manual
LabSOCS Manuals:
•
LabSOCS Calibration Software – Users Manual
•
ISOCS/LabSOCS Validation and Verification Manual
•
ISOCS/LabSOCS Detector characterisation report. Detector S/N B02146
(DET_1)
•
ISOCS/LabSOCS Detector characterisation report. ACK# 84038 Detector S/N
B 85535 (DET_2)
•
Verification of the ISOCS characterisation of the Canberra LabSOCS system
for Harwell (DET_1)
12.5 BGS CONTACTS
Dave Jones
[email protected]
KW Room D007
Extn: 3576
Cathy Emery
[email protected]
KW Room D008
Extn: 3038
Mick Strutt
[email protected]
KW Room D002
Extn: 3304 (currently overseas)
John Davis
[email protected]
KW Room E205
Extn: 3592
27
IR/04/174 Gamma Spectrometry Laboratory – User Manual
Version 1.0
References
ADAMS, F AND DAMS, R, 1975. APPLIED GAMMA-RAY SPECTROMETRY. SECOND EDTITION. PERGAMON PRESS. ISBN 0 08 006888 X
BRONSON, F, L, YOUNG, B, VENKATARAMAN, R, 1998. MATHEMATICAL
LABORATORY SAMPLE GAMMA SPECTROSCOPY.
PRESENTED
AT THE
TH
44
EFFICIENCY CALIBRATION OF
ANNUAL CONFERENCE
ON
GE
DETECTORS FOR
BIOASSAY, ANALYTICAL,
AND
ENVIRONMENTAL RADIOCHEMISTRY, NOVEMBER 15-19, 1998; ALBUQERQUE NM.
BRONSON, F, L, VENKATARAMAN, R, YOUNG, B, 1998. OPTIMUM
SPECTROSCOPY WITH VARIOUS SIZE AND SHAPE
GE
DETECTORS.
SIZE AND SHAPE OF LABORATORY SAMPLES FOR GAMMA
PRESENTED
AT THE
44TH ANNUAL CONFERENCE
ON
BIOASSAY,
ANALYTICAL, AND ENVIRONMENTAL RADIOCHEMISTRY, NOVEMBER 15-19, 1998; ALBUQERQUE NM.
BRONSON, F, L, VENKATARAMAN, R, 2000. VALIDATION
CALIBRATION FOR TYPICAL LABORATORY SAMPLES.
AND ENVIRONMENTAL RADIOCHEMISTRY,
OF THE ACCURACY OF THE LABSOCS MATHEMATICAL EFFICIENCY
PRESENTED
AT THE
46TH ANNUAL CONFERENCE
ON
BIOASSAY, ANALYTICAL,
NOVEMBER 12-17, 2000; SEATTLE, WASHINGTON.
CANBERRA INDUSTRIES, 2001. CANBERRA GERMANIUM DETECTORS – USERS MANUAL
CANBERRA INDUSTRIES, 2002. MODEL S505 QA SOFTWARE – USERS MANUAL
CANBERRA INDUSTRIES, 2002. GENIE 2000 OPERATIONS MANUAL
CANBERRA INDUSTRIES, 2002. GENIE 2000 CUSTOMISATION TOOLS MANUAL
CANBERRA INDUSTRIES, 2002. MODEL S574 LABSOCS CALIBRATION SOFTWARE – USERS MANUAL
CANBERRA INDUSTRIES, 2002. MODEL S573/S574 ISOCS/LABSOCS VALIDATION & VERIFICATION MANUAL
DEBERTIN, K AND HELMER, R, G, 1998. GAMMA- AND X-RAY SPECTROMETRY WITH SEMI-CONDUCTOR DETECTORS. P51-60
(NORTH HOLLAND).
GEHRKE, R, J, AND DAVIDSON, J, R, 2005. ACQUISITION OF QUALITY GAMMA-RAY SPECTRA WITH HPGE SPECTROMETERS. APPLIED
RADIATION AND ISOTOPES, VOLUME 62, MARCH 2005, PAGES 479-499 (AVAILABLE ONLINE OCTOBER 2004).
28