1
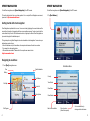
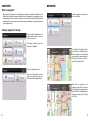
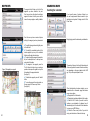
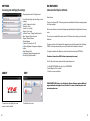
TM
GPS Navigation User Guide
CONTENTS
NAVIGATION
NAVIGATION
Selecting on or off road modes..............................................................................
3
STREET NAVIGATION
Getting started with street navigation....................................................................
Navigating to an address.......................................................................................
Using the on-screen keyboard...............................................................................
Map View...............................................................................................................
Settings overview...................................................................................................
4
4
7
8
10
OFF-ROAD NAVIGATION (Available to street and off-road units only)
Your choice of off-road software............................................................................
11
MAIN MENU
Main Menu Options...............................................................................................
12
VIEW MAP SCREEN
Viewing the map....................................................................................................
On screen controls................................................................................................
13
13-14
ROUTES
15
15-16
17
19
What is a route?....................................................................................................
Creating a route....................................................................................................
Viewing and Navigating along a route..................................................................
Modifying a route..................................................................................................
WAYPOINTS
What is a waypoint?..............................................................................................
Adding a waypoint on the map..............................................................................
Adding a waypoint by coordinates........................................................................
Adding a waypoint at the current location...................................................................
Selecting on or off-road modes
To start any of the navigation applications, turn on your GPS and select the navigation or GPS icon.
VMS Portable GPS
Select the following options
a
b
20
21-22
22
23-24
SEARCHING MAPS
Searching for a location........................................................................................
25
TRACKLOGS
What is a tracklog?................................................................................................
Creating a tracklog................................................................................................
Accessing and modifying a tracklog......................................................................
26
26-27
28
MAP LIST
Browsing the Map list............................................................................................
29
SETTINGS
Accessing and modifying the settings...................................................................
30
ABOUT
Accessing About...............................................
....................................................
30
EXIT
Exiting VMS OFF ROAD GPS................................................................................
30
VMS In Dash GPS
c
(a) Street navigation
(b) Off-road GPS
The default Off Road application is
VMS Off Road.
(c) Change Off road GPS software.
If you wish to select another Off Road
application, you can do so here (d).
d
3
STREET NAVIGATION
STREET NAVIGATION
To start Street navigation, select [Street Navigation] in the GPS console.
To start Street navigation, select [Street Navigation] in the GPS console.
This quick start guide will only cover basic operation. For a complete Street Navigation user manual,
please visit: http://www.vms4x4.com/
2. Tap [Find Address]
Getting started with street navigation
Street Navigation is optimised for in-car use. You can use it easily by tapping the screen buttons and the
map with your fingertips or fingernails, which have a more positive response. You do not need to tap the
screen twice for any function. With buttons and controls, a single tap is sufficient. Street Navigation can
plan routes throughout the installed map set.
The typical way of using Street Navigation is to enter a destination to start navigation. You can enter your
destination a number of ways:
• Enter a full address or a part of an address, for example a street name without a house number
• The names of two intersecting streets.
• Other methods are available. Please refer to the complete user manual online:
http://www.vms4x4.com/
Navigating to an address
1: Touch [Find] in navigation menu
Time
Find Address Menu:
Satelite Indication
Battery
Find Address
Town/Suburb
Goto Map
Route Info
More Options
Exit Program
4
Country
Street Name
Street Number
Back to Previous Menu
Go to city centre
(if street not required)
Go to an intersection by
entering another street name
5
STREET NAVIGATION
By default, Street Navigation displays the country, state and suburb of where you are. If needed, tap the
button with the name of the country, and select a different one from the list. If you select a new country,
you also need to select the state, or tap to search for a suburb regardless of the state it is in. If you have
not changed the country, you can still change the state. Tap the button with the name of the state and
select from the list.
3. To change the suburb tap on the [Suburb] field.
4. Start entering the suburb name using the on screen keyboard. As you begin entering the characters,
a result will appear, if it is the correct result, press the green tick, alternatively click results to view more
options.
5. Select the desired suburb from the list. To navigate to this suburb without entering a street name,
press [City Centre]
6. To enter a street name, tap on the [Street Name] field.
7. Start entering the street name using the on screen keyboard. As you begin entering the characters,
a result will appear, if it is the correct result, press the green tick, alternatively click results to view more
options.
8. Select the desired street from the list. To navigate to this street without entering a House number, press
[Street Midpoint]
9. To enter a house number, tap on the [House Number] field.
STREET NAVIGATION
Using the on-screen keyboard
You can enter letters or numbers in Street Navigation with your fingertips on the full-screen keyboards
and you can switch between various keyboard layouts, for example
Switching to another keyboard
layout, for example from a Latin
QWERTY keyboard to a Greek
keyboard
Tap
, and select from the list of available
keyboard types.
Street Navigation remembers your last keyboard
choice and offers it the next time you need to enter
data.
Correcting your entry on the
keyboard
Remove the unwanted character(s): tap .
Tap and hold the button to delete the entire input string.
Entering a space, for example
between a first name and a family
name or in multi-word street names
Tap
Entering small or capital letters
Tap to cycle through entering lower case letters,
capital initials or all capitals.
Entering symbols
Tap
Finalising the keyboard entry
Tap
.
10. Start entering the house number using the keyboard and press [DONE].
11. The destination screen will appear and display the found location on the map. If this location is
correct, press the [Next] button.
12. You will now have the option to create a [New Route], add this address as a [Waypoint] on an
existing route, or add this address as the [Final Destination] of your current route.
to switch to a keyboard of symbol characters.
13. Select [New Route] to begin a new route and start navigating to your designated address.
14. Once your route has been calculated, an overview screen will appear. Select [Go] to begin
navigating. If nothing is selected you will automatically be re-directed to your navigation screen.
6
7
STREET NAVIGATION
Map View
STREET NAVIGATION
Next Road Name
Tilt up and down
Changes the vertical view angle of the
map in 3D mode.
Next Turn
Indicator
Changes the horizontal view angle of the
map in 3D mode. When GPS position
is available, Street Nav always rotates
the map so its top faces your direction
of travel (Track-up orientation). You
can turn away from track up with these
buttons if GPS position is available and
you have rotated the map, the button
appears. Tap this button to re-enable the
automatic map rotation.
Distance to
destination
Time lieft to
destination
Menu
Arrival time at
destination
Current Position
Action
Activate map controls
Zoom in and out
8
Button (s)
Smart Zoom
Street Navigation can automatically
rotate, scale and tilt the map and give
you the optimal view:
• When you are approaching a turn,
street navigation zooms in and raises
the view angle to let you easily recognise your manoeuvre at the next
junction.
• If the next turn is at a distance, Street
Navgation zooms out and lowers the
view angle to show you the road in front
of you. Tap this button once to enable
Smart Zoom.
Returning to normal
navigation (back to the
GPS position with
automatic map
rotation)
Tap this button to move the map back to
the current GPS position. If the map has
been rotated in 3D mode, automatic map
rotation is also re-enabled.
Tilt and zoom preset
buttons (available in
Advanced mode only)
Tap one of the preset buttons to set the
tilt and zoom levels to fix, predefined
values. Smart Zoom is disabled. These
buttons are available in 3D mode. Tap &
hold any of the buttons to set its value
to the current tilt and zoom levels, or to
reset it to its original value.
Current Road Name
Description
Tap this button to show or hide the following
map control buttons:
• Zoom in/out
• Rotate left / right (3D view only)
• Tilt up/down (3D view only)
• Zoom preset buttons (2D view only)
• Tilt and zoom preset buttons (3D view only)
• Return to GPS position button
• Smart Zoom Button
Changes how much of the map is displayed
on the screen. Street Nav uses high-quality
vector maps that let you see the map at various zoom levels, always with optimised content. It always displays street names and other text with the same font size, never upside
down, and you only see the streets and objects that you need. Map scaling has different limits in 2D and in 3D map view modes.
9
STREET NAVIGATION
Settings overview
OFF-ROAD NAVIGATION
Your choice of off-road navigation software
To change any of the following settings, press [settings] in the main menu.
The VMS Touring range is preloaded with two Off-Road GPS apps
Settings Category
Settings sub category
Map Screen:
• 3D settings
• Colour Profiles
• Elevation on 2D map
• Street names during navigation
• Land information
Sound
• Master Volume (Street Nav)
• Voice Guidance Volume
• Key Sounds
• Dynamic Volume
Route Settings
• Vehicle Type
• Road types used for route planning
• Route calculation method
Regional Settings
• Program language
• Voice profile
• Units (km/mile etc)
• Set Date & Time Format
• Time and Time Zone settings
Navigation Settings
• Keep position on road
• Off route Recalculation
• Restore lock to position
• Automatic Overview
Warnings
• Warn when speeding
• Speed Camera warning
Menu Settings
• Animation
• Background
Device Settings
• Power Management
About Street Navigation
• Maps
• Credits
• Safety
• Legal
VMS Off Road GPS
OR
OziExplorer CE (demo version)
Both apps perform the same job, that is to aid in Navigation in Off-road conditions. This Quick Navigation
Manual is compact and portable. It focuses on the VMS app, which is the recommended Off-road
App. If you prefer to use Ozi CE, sales, help & support is provided by OziExplorer directly from www.
oziexplorer.com
VMS Off Road GPS
The VMS app is developed in Australia with easy of use and great features in mind. Therefor, it performs
very well on touch screen enabled devices which is a popular feature on all VMS GPS products. The
app is great for novice and experienced operators of Off-road software. It provides a no fuss, intuitive
user experience and is packed with great features.
VMS Off-road GPS app technical support
Tutorials, Hints & Tips: can be found on our website http://kb.vms4x4.com
Ozi Explorer CE
A demo version of Ozi Explorer CE is preloaded on this device for convenience and by request from
customers who are experienced with the software, and are familiar with operations. OziExplorer iVMS
does not provide technical support Ozi Explorer CE. For help and support, please contact Ozi Explorer
directly.
The demo version does require an activation key. Although all features can be accessed in the demo
version, the application will time out after 30 minuntes of use. To register Ozi Explorer, a registration
code can be purchased through the Ozi Explorer website. www.oziexplorer3.com/eng/aussiepurchase.
html
Ozi Explorer technical support & user guides
www.oziexplorer.com
A detailed Street Navigation User Manual is available online:
10
www.vms4x4.com
11
MAIN MENU
Main Menu Options
VIEW MAP SCREEN
Viewing the map
When you launch the VMS app you will
be presented with the main menu. To start
tracking your current position, the simplest
way is to tap on the “View Map” button.
View Map
Displays the map screen with the last open map and position. See pages 5-6 for more information.
Routes
Create a new route or modify an existing route. See pages 7-11 for more information.
Waypoints
Create a new waypoint or modify an existing waypoint. See pages 12-16 for more information.
On screen controls
Zoom Out
Speed
Heading
Find Place
Key in the name of place or destination to then go to or view on the map. See page 17 for more
information.
Position
Altitude
Map Name
Zoom In
Tracklogs
Track where you have been. Start / stop or view your track log. See pages 18-20 for more
information.
Map List
Easy access to a complete list of maps. See page 21 for more information.
Settings
Access to a variety of common settings that can help tailor the application to suit your needs.
See pages 22 for more information.
About
Check the current version and build of the app. See pages 23 for more information.
Exit
Exits the app.
12
Menu
Map
Current GPS Position
Lock GPS Position
13
VIEW MAP SCREEN
ROUTES
What is a route?
Current GPS position
Only if you have acquired a GPS position will you see this current position arrow. The current position
arrow pinpoints your location precisely on the map. The arrow points in the direction you are heading
and rotates accordingly as you change your course.
A route is a series of waypoints linked together to provide more accurate navigation information along
a route. Each waypoint on the route is a via point. When each via point is reached, the next waypoint in
the route is automatically called.
Heading
Heading displays the angle of the direction in which you are travelling. 0 (true north) to 360 degrees.
Lock position
Use the “Lock GPS” button to display your current GPS position centred on the map. This can be
helpful for when you are browsing around any map and wish to quickly revert back to your current
position.
Map
Shows the current map on screen. To browse around the map, simply tap and drag the map in the
desired direction you wish to move the map.
Creating a route
Prior to accessing the routes menu, please
locate the region or map you wish to plot the
route.
When ready, access the main menu and
press on “Routes”
Menu
Brings up the main menu options (see page 4)
Position / Altitude / Map Name
By tapping in this location you can rotate between the three different displays available to you, they are:
Position: Displays your current / live GPS position in a coordinate format.
Formats available are: longitude latitude: Degrees, Minutes, Seconds. Decimal Minutes, Decimal Degrees.
Altitude: Displays current altitude in metres.
Map Name: Displays the name of the current visible maps.
Press the “New Route” button
Speed
Displays your current speed. Formats available: Metric, Imperial or Nautical.
Zoom in
Tap the “Zoom in” button to view the current map in more detail. When the maximum zoom
level has been reached for a map, the next tap of the “Zoom In” button will automatically load the next
available map scale.
Zoom out
Tap the “Zoom out” button to view the current map in less detail. When the maximum zoom
level has been reached for a map, the next tap of the “Zoom In” button will automatically load the next
available map scale.
14
15
ROUTES
ROUTES
Viewing and Navigating along a route
A crosshair will be displayed on the centre
of the map. Position the map so that the
crosshair is in the position you wish the
begin route from. Press the icon with the A+
symbol to drop the first point.
If you plan to navigate along the route
you have just created, please return to
the main menu, select “Routes”, and
select “Route” list.
The beginning of the route will be labelled
with an (A) marker. (As in going from point
A to B.)
Here we can see the route we have
just created. We can see the title of the
route with its date, the distance of the
route, and starting coordinates. Please
select the route for more information
and options.
After the starter point has been placed,
continue to add as many more points as you
desire to draw your route. Again simply move
the map to line up the position of the next
checkpoint and press the A+ symbol to drop
each via point as illustrated.
When you have finished the route press the
green tick button. Your last via point dropped
will become the end of the route and be
labelled by a (b) marker.
a
b
16
From this screen here we have a large
range of options to choose from.
(a) If you wish to simply get going and
navigate to this route, simply press the
“Follow Route” button.
This will bring take you to your current
position on the map and create a
heading guidance line to assist in
navigating you to the beginning of the
route, or the nearest via point.
(b) If you wish to start from the other
end, select “Reverse route”
17
ROUTES
In this instance the first checkpoint is
closer then the beginning position (A),
so the guidance line has automatically
locked on to whatever point is closest.
ROUTES
Modifying a route
By accessing the route information page
of a desired route, you will have the ability
to modify the routes title, via points,
route description or delete the route all
together.
a
b
d
c
a
You also have the option of choosing
which via point you wish to navigate to.
To do this access the Route Information
page on the route you are interested in.
(a) Select the via point you are interested
in and select “Go to”.
b
(b) You even have the option of simply
viewing this via point on the map by
pressing “View on Map”.
When you have selected a via point of
choice, it is here you will have the ability
to modify the via points title, coordinates,
description or simply deleting the current
via point.
a
If you selected “Go to” a particular via
point, the map screen will display and a
guidance line will point in the direction of
the selected via point.
b
d
c
18
(a) To modify the title of a route, select on
the title of the route, by default the route
title will be labelled with the date, and the
route number.
(b) To modify the position or title of each
via point, select on the title of the via point,
by default the via point tile will be labelled
via point X, and display the longitude and
latitude coordinates
(c) To add a description to the route tap
on the description box to add your own
notes about this route.
(d) To delete the whole route including all
it’s via points, press the “delete” button.
(a) To modify the title of a via point, select
on the title of the via point, by default the
via point title will be labelled as Via point
X, x being the number order from which
that via point was created.
(b) To modify the position of the selected
via point, you can modify the coordinates
of the Longitude and Latitude.
(c) To add a description to the via point
tap on the description box to add your
own notes about this via point.
(d) To delete this single via point, press
the “delete” button.
19
WAYPOINTS
WAYPOINTS
What is a waypoint?
Waypoints are used to mark points of interest such as locations or landmarks for later reference. The
Waypoint can be stored in memory and loaded for later use. Examples of using waypoints could be
marking a camp site, vehicle’s location, a hazard or even your favourite fishing spot. Waypoints can be
marked prior to or during your trip either by manually entering coordinates or simply by marking them
on the navigator’s map.
To add a waypoint on the map, press
the “on map” button.
Adding a waypoint on the map
Prior to accessing the Waypoints menu,
please locate the region or map you
wish to plot the route.
When ready, access the main menu
and press on “Waypoints”.
A crosshair will be displayed on the
centre of the map. Position the map so
as the crosshair is in the position with
where you want to place your waypoint.
Press the icon with the “pin and +
symbol” to drop the first point.
Press the “Add waypoint” button.
Next you will be prompted to select a
method for creating your way point.
Each method will be explained below.
More than one waypoint can be
placed on the map while in this mode.
Continue adding as many waypoints as
desired. When you are happy with your
placements, please press the “green
tick” button.
20
21
WAYPOINTS
Adding a waypoint by coordinates
WAYPOINTS
Adding a waypoint at current location
To add a waypoint by coordinate press
the “By Coordinates button”
a
d
b
c
22
e
f
If you know the coordinates of a
location of interest, this is the page
you will enter them in.
(a) If required, title your waypoint by
pressing into this box here. If you
leave the waypoint untitled it will
automatically title your waypoint with
the date and waypoint number.
(b) To enter in your coordinate
information, tap in each individual box
to modify the value.
(c) To add a description to the waypoint
tap on the description box to add your
own notes about this location.
(d) To navigate to the waypoint, press
the “Go to” button to be taken to your
current GPS position on the map with
a guide line to your in the heading of
the waypoint selected.
(e) To delete the waypoint, press the
“delete” button.
(f) To place the waypoint and view it’s
current position on the map, press the
“View on map” button.
To add a waypoint at your current GPS
location simple press the “At location”
button.
A waypoint will be placed at your
current GPS position as illustrated.
To access a waypoint previously
placed on the map, select the
“Waypoint list” button from the
waypoints menu.
23
WAYPOINTS
The waypoint list will bring up a list of all the
waypoints you have created in the past.
From here you have the option of selecting a
waypoint of interest, of which you are able to
view on the map, navigate or modify its details.
d
a
b
c
(Figure 1) Navigating to a waypoint
e
f
SEARCHING MAPS
Searching for a location
If you know the name of a place of interest, you
can use the app’s search feature to search for your
destination via a keyboard. To begin, select the “Find
Place” button.
From this menu you have a series of options
relating to the waypoint you have just selected.
Begin typing in part or the whole word your destination.
(a) To modify the waypoints existing title, press
on the title itself.
(b) To modify the coordinate location of this
current waypoint, tap in any of the individual
fields to modify each individual value.
(c) To add or modify the waypoint’s description,
tap on the description box to add your own
notes about this location.
(d) To navigate to the waypoint, press the
“Go to” button to be taken to your current gps
position on the map with a guide line to your in
the heading of the waypoint selected.
(See figure 1)
(e) To delete the waypoint, press the “delete”
button.
(f) To view the waypoint’s current position on
the map, press the “View on map” button.
(See figure 2)
(Figure 2) Viewing a waypoint
The search will return a list of results that contain part
of the word typed into the search. Search results may
vary depending on the maps loaded into the VMS
app. Tap on the required place of choice.
a
c
b
d
24
When the destination has been selected, you are
presented with an information page that contains
some various options.
(a) Displays the title of the location
(b) Displays the longitude and latitude of the location
(c) Select the “Go to” button if you wish to set this
location as your destination. A guidance line will
automatically point in the direction of the destination
from your current GPS Position.
(d) Select the “View on map” button if you wish to
simply view the location of interest on the map.
25
TRACKLOGS
TRACKLOGS
Your tracklog will be marked out by a
yellow line as indicated on the map. If
you wish to modify or stop the current
tracklog, press the track button with
the (i) symbol to bring up the Tracklog
information page.
What is a tracklog?
A tracklog, also known as a ‘bread-crumb’ trail is simply a record of your previous GPS positions
displayed as a “trail” on the map.
Creating a tracklog
All the tracklog features can be accessed
via the main menu by tapping on “Tracklog
“button.
e
a
Press the “New tracklog” button to begin
creating your new track log.
b
d
As soon as you select the “New tracklog”
button, the map screen will be displayed
and your tracklog will begin tracking from
your current GPS position.
26
c
f
g
The tracklog information page will be
displayed containing some various
modification options relating to that
tracklog file created.
(a) If required, title your tracklog
by pressing into this box here. If
you leave the tracklog untitled it will
automatically title your tracklog with
the date and tracklog number.
(b) Start Time/ Date: The Time and
Date of the tracklog are recorded.
(c) Travel Time: A timer records the
time that the tracklog has been active
for.
(d) To add a description to the track
log tap on the description box to add
your own notes about this track log.
(e) Press the “Stop” button to stop the
tracklog from recording your footsteps.
(f) Press the “Delete” button to delete
this tracklog.
(g) Press the “view on map” button to
view the current status of your track
log.
27
TRACKLOGS
Accessing and modifying a tracklog
MAP LIST
Browsing the Map list
To access a tracklog previously recorded on
the map, select the “Tracklog list” button from
the tracklogs menu.
Get a list of all maps available with the
“Map List” Button.
The tracklog list will bring up a list of all the
tracklogs you have created in the past, from
here you have the option of selecting a track
log of interest which you wish to view on the
map or modify it’s details.
By Selecting all maps, you can browse
alphabetically through every single
map loaded in VMS format.
See Figure 1
By selecting Publisher, your maps
will be filtered according to the map
publisher.
See Figure 2
a
b
d
28
e
c
f
g
The tracklog information page will be displayed
containing some various modification options
relating to that tracklog file created.
(a) If required, modify the title of your tracklog
by pressing into this box here.
(b) Start Time/ Date: The Time and Date of the
tracklog are recorded.
(c) Travel Time: A timer records the time that
the tracklog has been active for.
(d) To modify of add a description to the track
log tap on the description box to add your own
notes about this track log.
(e) Press the “Stop” button to stop the track
log from recording your footsteps.
(f) Press the “Delete” button to delete this
tracklog.
(g) Press the view on map button to view the
tracklog.
To open the map, simply tap on the
map you wish to open.
(Figure 1) Shows all maps available
(Figure 2) Maps sorted by map publishers
29
SETTINGS
Accessing and modifying the settings
OZI EXPLORER
Note about Ozi Explorer Software
Change preferences via the “Settings” screen.
a
b
c
d
e
From within the settings, tap the setting you wish
to change.
(a) Units: Change units to either:
- Metric (km - km/h)
- Imperial - (mi - mi/h ph)
- Nautical - (nm - knots)
(b) Position Format: Change Position Format to
either:- Degrees, Minutes, Seconds
- Degrees, Decimal Minutes
- Decimal Degrees
(c) Sound: Turn sound to On / Off
(d) Screen Brightness: Change screen brightness
to either:
- Bright- Medium- Dark
(e) Language: Change the language format
(Currently only English available)
Dear Customer,
Thank you for choosing VMS. This touring system accommodates the Ozi Explorer mapping program
for off road navigation.
We have done this due to customers had having issues with adding the Ozi application to the touring
series.
The unit is now pre-loaded with the demo version of Ozi Explorer and is ready to go, and should be
hassle free.
The demo version has all the features of the registered version, with the exception that it will display
“DEMO” on the map screen and will warn every 30 minutes that the software is unlicensed.
To register this software with OziExplorer, please follow the instructions below (OPTIONAL)
Purchase a license from D&L Software (www.oziexplorer.com)
On a PC with internet access, please visit: http://www.oziexplorer.com
ABOUT
EXIT
- On the NAVIGATION BAR to the right, click on PURCHASING
- Select OziExplorer CE for Australia
- Follow the on screen instructions.
PLEASE NOTE: OZI Explorer is a third party software that may require additional
support material not supplied in our literature. For more information please visit
www.oziexplorer.com
The about menu will display the current
version, as well as the build.
30
Tap the Exit button to exit.
31
TM
www.vms4x4.com
March 2013 / Rev 1.5
VMS ®, VMS Serious 4WD Navigation ®, VMS Touring ® are registered trademark of CREO INTERNATIONAL
PTY LTD, registered in Australia and other countries and may not be used without the express permission of
CREO INTERNATIONAL PTY LTD.
Copyright © 2013