1
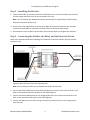
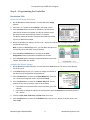
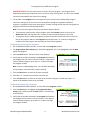
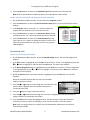
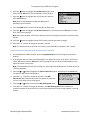
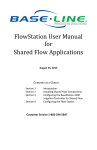
Turning Electricity On/Off with a Program With the correct materials, you can set up your Baseline irrigation controller to have a connected 110V electrical circuit turn on/off based on the settings in a program. You could set up this system to control landscape lighting at your site, to operate a pump in a water feature, or to turn electricity on/off at a remote location. Baseline has tested this system and found it to be reliable with the materials listed below. We cannot guarantee success if you use different materials. Required Materials • Baseline irrigation controller, either the BaseStation 1000 or BaseStation 3200 • Two-wire path • Dayton 5X826N relay • Dayton 5X82N socket • Baseline 5201 biCoder Overview of the Steps Step 1 – Connect the Dayton relay to the socket and install the relay in the area where the electrical circuit is located. Step 2 – Connect the biCoder to the two-wire path. Step 3 – Make the electrical connections between the biCoder, the relay, and the electrical circuit. Step 4 – Program the controller. Step 1 – Installing the Dayton Relay 1. Align the pins on the Dayton relay with the ports on the socket and push the two pieces together securely. Note: The socket has two banks of screw terminals. The terminals on the side with the red/orange tab are used for power out. The terminals on the other side are for power in and the biCoder wires. 2. Install the relay in a waterproof location where there is access to the electrical circuit that you want to turn on/off. Baseline Support: 866-294-5847 1 www.baselinesystems.com Turning Electricity On/Off with a Program Step 2 – Installing the biCoder 1. Position the biCoder in a location where the red and black wires can be connected to the two-wire and the orange and white wires can be connected to the relay. Note: You can add two-wire between the biCoder and the two-wire path and up to 250 ft of wire between the biCoder and the relay. 2. Connect the red and black wires to the two-wire. Make all connections with wire nuts, and then replace them with DBR/Y or equivalent connectors after the device has been tested. 3. Write down the serial number of the biCoder. You will need it when you program the controller. Step 3 – Connecting the biCoder, the Relay, and the Electrical Circuit Refer to the schematic below while following the instructions to wire the biCoder, the relay, and the electrical circuit. 1. Connect the orange and white wires from the biCoder to the outer terminals in the bank on the opposite side of the socket from the red/orange tab. Note: You can add up to 250 ft of wire between the biCoder and the relay. 2. Connect the black and white wires from the incoming electrical circuit to the inner terminals in the bank on the opposite side of the socket from the red/orange tab. 3. Connect the black and white wires for the outgoing electrical circuit to the outer terminals in the bank on the same side of the socket as the red/orange tab. 4. Connect the lighting circuit or other wiring circuit that you want to control to the outgoing wires from the relay. Baseline Support: 866-294-5847 2 www.baselinesystems.com Turning Electricity On/Off with a Program Step 4 – Programming the Controller BaseStation 3200 Search For and Assign the biCoder 1. On the BaseStation 3200 controller, turn the dial to the Assign position. 2. Press the + or – button to select Search in the Assign screen. 3. Press the Enter button to search for biCoders. The search may take several minutes to complete. You will see a status screen like the one shown here while the search is in progress. The display shows the number of devices found and the number of ports or addresses available. 4. When the biCoders list displays, press the + or – button to select the serial number biCoder that is connected to the relay. Note: If you are a BaseManager user, you can add a description to the biCoder, which will make it easy to identify. 5. Press the Next or Previous button to move to the Zone Assignments column and select an available zone number. 6. Press the Enter button to assign the selected biCoder to that zone number. Remember this number. Configure the biCoder Settings 1. On the BaseStation 3200 controller, turn the dial to the Zones position. The Zones screen displays for the first zone. 2. In the Zone field press the + or – button to change the number to the zone that you assigned the relay biCoder to. 3. Press the Next button to move to the Zone Mode field. Press the + or – button to change the value in the field to Timed. 4. Press the Next button to move to the Water Time field. Set the amount of time that you want to relay to be turned on. If you want to increase the value in the hours place, press the + button. If you want to change the value in the minutes place, press the Next button, and then press the + or – button. 5. Leave the Cycle Time, Soak Time, and Flow fields set to zero. 6. Press the Next button to move to the Enabled field. Press the + or – button to set the value in the field to YES. Baseline Support: 866-294-5847 3 www.baselinesystems.com Turning Electricity On/Off with a Program IMPORTANT NOTE! This zone must have a run time in only one program – the program that is dedicated to operating the electrical circuit. It’s best to make this Program 1, so it will run as needed and not be restricted by zone concurrency settings. 7. The number in the Program field in the upper-left corner of the screen indicates what program these zone settings are for. A zone can be removed from a program, assigned to a different program, or assigned to more than one program. To make a change to how the zone is assigned to a program, perform one of the following actions: Note: To move to the Program field, press the Next or Previous button. To remove the zone from the current program, press the Previous button to return to the Water Time field, and then press the – button to remove the watering time in the field. To assign the zone to a different program, perform the previous task to remove the zone from the current program. Move to the Program field, and press the + or – button to change the number to the new program that you want the zone to be assigned to. Set Up the Start Times for the Program 1. On the BaseStation 3200 controller, turn the dial to the Programs position. 2. The Program Start Times Setup option should be highlighted. If it is not highlighted, press the Next button to highlight it. 3. Press the Enter button. The Start Times screen displays. 4. Verify that the number displayed in the Program field matches the program that you want to set start times for. If you want to select a different program, press the + or – button to change the program number. Note: If you are a BaseManager user, you can add a description to the program, which will make it easy to identify. 5. Press the Next button to move to the start times grid. 6. Press the + or – button to set the time in the first cell. 7. Press the Next button to move to the next cell in the start times grid, and then press the + or – button to set additional start times as needed. Set Up the Start Days for a Program 1. On the BaseStation 3200 controller, turn the dial to the Programs position. 2. Press the Next button to highlight the Program Start Days Setup option, and then press the Enter button. The Start Days screen displays. 3. Verify that the number displayed in the Program field matches the program that you want to set start days for. If you want to select a different program, press the + or – button to change the program number. Baseline Support: 866-294-5847 4 www.baselinesystems.com Turning Electricity On/Off with a Program 4. Press the Next button to move to the Schedule Type field and select one of the intervals. Note: Refer to the BaseStation 3200 User Manual for a description of the intervals. Set the Concurrent Zones for the Program and the Controller 1. On the BaseStation 3200 controller, turn the dial to the Programs position. 2. Press the Next button to select the Concurrent Zones Setup option. The Concurrent Zones screen displays. 3. In the Program column, press the + or – button to select the program that you want to set up concurrent zones for. 4. Press the Next button to move to the Concurrent Zones column, and then press the + or – button to change the value in the field. 5. Press the Next button to move to the Total Allowed field, and then press the + or – button to change the value in the field. This field indicates the number of concurrent zones for all programs added together. BaseStation 1000 Search For and Assign the biCoder 1. On the BaseStation 1000 controller, press the Search & Assign button. The Search & Assign menu displays. 2. If the Zone option is highlighted, press the OK button to select it. If Zone is not highlighted, press the or button to highlight it, and then press the OK button. The Zone screen displays. 3. If the Device Assignment option is highlighted, press the OK button to select it. If Device Assignment is not highlighted, press the or button to highlight it, and then press the OK button. The Zone Assignment screen displays. 4. When the Search option in the Action column is highlighted, press the OK button to search for biCoders. When the controller finds the devices, their serial numbers display in the Action column. 5. Press the or button to move through the list of devices in the Action column. Highlight the serial number biCoder that is connected to the relay. 6. Press the button to move to the Zone column. 7. Press the or button to move through the list of zones. Highlight the zone that you want to assign the device to. Remember this number. 8. Press the OK button to select the highlighted zone. The serial number of the device that you selected in the Action column now displays next to the zone number in the Zone column. Note: After you assign a device to a specific use in the BaseStation 1000 system, the device is automatically enabled. Baseline Support: 866-294-5847 5 www.baselinesystems.com Turning Electricity On/Off with a Program Set Up the Zone Runtime for the Program IMPORTANT NOTE! This zone must have a runtime in only one program – the program that is dedicated to operating the electrical circuit. It’s best to make this Program 1, so it will run as needed and not be restricted by zone concurrency settings. 1. On the BaseStation 1000 controller, press the Program Setup button. The Program Setup menu displays. 2. If the program that you want to modify displays in the upper-left corner of the screen, continue to step 3. Otherwise, press the PRG button until the program that you want to modify displays in the upper-left corner of the screen. Note: To move backwards in the list of programs, press and hold the PRG button, and then press the – button repeatedly. 3. The Zone Runtimes option should be highlighted. If it is not highlighted, press the or button to highlight it, and then press the OK button. The Zone Runtimes screen displays. Zones are identified with a sequential number and by the serial number of the attached biCoder. 4. Make sure that the runtimes for all zones except the one that is assigned to the relay are set to zero. To move to the hour placeholder, press the button. To move to the seconds placeholder, press the button. To change the time, press the + or – button. Note: To rapidly increase or decrease the value, press and hold the + button or the – button. 5. Set the runtime for the zone that is assigned to the relay for the length of time that you want the electrical circuit to be active. Set Up the Start Day and Start Times for the Program 1. On the BaseStation 1000 controller, press the Program Setup button. The Program Setup menu displays. 2. If the program that you want to modify displays in the upper-left corner of the screen, continue to step 3. Otherwise, press the PRG button until the program that you want to modify displays in the upper-left corner of the screen. Note: To move backwards in the list of programs, press and hold the PRG button, and then press the – button repeatedly. 3. Press the button to highlight the Setup Prg. Start option, and then press the OK button. The Setup Prg. Start screen displays the list of start conditions. 4. Press the button to highlight the Day & Time Start option, and then press the OK button. A checkmark displays next to the Day & Time Start option. 5. Press the button to go to the Day & Time Start menu. Baseline Support: 866-294-5847 6 www.baselinesystems.com Turning Electricity On/Off with a Program 6. Press the button to highlight the Set Start Days option, and then press the OK button. The Set Start Days screen displays. 7. Press the button to highlight one of the intervals, and then press the OK button. Note: Refer to the BaseStation 1000 User Manual for a description of the intervals. 8. Press the BACK button to return to the Day & Time Start menu. 9. Press the button to highlight the Set Start Times option, and then press the OK button. The Set Start Times screen displays. Note: Each active program must have at least one start time. Programs that have no start times will not run. 10. Press the button to highlight the box for the start time that you want to change. 11. Press the + or – button to change the number in the box. Note: To rapidly increase or decrease the number, press and hold the + button or the – button. Set the Concurrent Zones for the Program and the Controller 1. On the BaseStation 1000 controller, press the Program Setup button. The Program Setup menu displays. 2. If the program that you want to modify displays in the upper-left corner of the screen, continue to step 3. Otherwise, press the PRG button until the program that you want to modify displays in the upper-left corner of the screen. Note: To move backwards in the list of programs, press and hold the PRG button, and then press the – button repeatedly. 3. Press the or button to highlight the Zones at One Time option, and then press the OK button. The Zones at One Time screen displays. 4. Press the + or – button to change the number in the Max Concurrent field to indicate the maximum number of zones that can run at the same time in this program. 5. Press the or button to move to the Max All Programs field. 6. Press the + or – button to change the number in the Max All Programs field to indicate the maximum number of zones that can run at the same time when more than one program is running at once. Baseline Support: 866-294-5847 7 www.baselinesystems.com