1
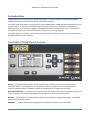
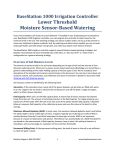
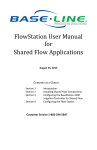
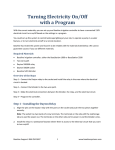
BaseStation 1000 Irrigation Controller Quick Start Guide March 30, 2015 Customer Service 1-866-294-5847 Baseline Inc. www.baselinesystems.com Phone 208-323-1634 FAX 208-323-1834 Toll Free 866-294-5847 ©2015 Baseline Inc. All Rights Reserved. BaseStation 1000 Quick Start Guide Table of Contents INTRODUCTION .......................................................................................................................................1 CONTROLLER FRONT PANEL LAYOUT...............................................................................................1 ON-SCREEN HELP.....................................................................................................................................2 ZONE STATUS REPORT ..........................................................................................................................2 Understanding Zone Statuses ............................................................................................. 3 QUICK START YOUR CONTROLLER.....................................................................................................3 STEP 1 – Install and Connect Devices ................................................................................... 3 STEP 2 – Search For and Assign Devices ............................................................................... 3 STEP 3 – Set the Date and Time on the Controller................................................................ 4 STEP 4 – Set Zone Runtimes ................................................................................................ 4 STEP 5 – Set Watering Start Conditions ............................................................................... 4 STEP 6 – Set the Water Windows ........................................................................................ 5 STEP 7 – Set Soak Cycles ..................................................................................................... 5 STEP 8 – Set the Controller to RUN ...................................................................................... 6 Controller Off ..................................................................................................................... 6 Page i BaseStation 1000 Quick Start Guide Page ii BaseStation 1000 Quick Start Guide Introduction Congratulations on purchasing the BaseStation 1000 – a smart irrigation controller designed to provide the features that are essential for intelligent watering. This quick start guide helps you get familiar with the BaseStation 1000 interface and the buttons on the front panel. It walks you through the basic steps for getting your controller configured for watering. Keep in mind that this guide is intended as a basic overview of the setup – you will find complete instructions for all of the controller’s features in the User Manual. This quick start also includes a structured list of all menus and options in the controller along with a brief description of those options. Controller Front Panel Layout Display – The display indicates the current state of the controller and is used to program the controller. Refer to Setting Up the Screen Display in the User Manual for information about improving image quality in outdoor conditions including direct sunlight and low light. Main Menu Buttons – The buttons are used to select the various operating or programming menus of the controller. An indicator light glows on the button for the menu that is active. Buttons – The buttons are used to select programming elements, change their values, and initiate operations like testing a zone. ENG/ESP Switch between the English and the Spanish interface on the controller Page 1 BaseStation 1000 Quick Start Guide ? Display help for any screen + Increase the value of the highlighted field, or sequences through the available options in the selected field - Decrease the value of the selected field, or sequences through the available options in the selected field PRG Select the program that you want to modify Arrow Buttons Move within a screen OK Select an option or perform an action BACK Return to a previous screen or cancel an action On-Screen Help Press the ? button at any time to display the On-Screen Help. When the help displays, press the button to scroll through the text. When you have finished using the help, press the ? button or the BACK button to return to the previous screen. Zone Status Report When the controller is in the Run menu, the Zone Status report typically displays on the screen. If you do not see “ZONE STATUS” and the list of zones, press the RUN button to make sure that the controller is in the Run menu, and then press the BACK button to display the Status Report menu. Select the Zone Status option from the menu. Page 2 BaseStation 1000 Quick Start Guide Understanding Zone Statuses The following icons identify the status of the zones: Icon Status Description Unassigned The zone does not have a biCoder assigned to it Done The complete cycle has finished for this zone – including watering and soaking Waiting The zone is scheduled to run, but currently it is not watering or soaking Watering Watering is in progress Soaking The zone has watered and is now soaking Paused A pause condition is in effect for this zone Disabled The zone is marked as being disabled Message There is a message associated with this zone Quick Start Your Controller These instructions walk you through the basic steps for getting your controller configured for watering. Refer to the User Manual for complete instructions for all of the controller’s features. STEP 1 – Install and Connect Devices Install all of your irrigation devices and connect them to the controller according to the instructions that came with the devices. STEP 2 – Search For and Assign Devices Press the Search & Assign button on the controller and go through each option to find the devices that you connected to the controller. Assign biCoders to zone numbers and other devices to their ID numbers. Page 3 BaseStation 1000 Quick Start Guide STEP 3 – Set the Date and Time on the Controller Press the System Setup button. Highlight the Time & Date Setup option, and then press OK. Change all the fields to reflect the current time and date. Note: If the controller is connected to BaseManager, the time will be automatically set by the server. STEP 4 – Set Zone Runtimes Press the Program Setup button. Highlight the Zone Runtimes option, and then press OK. Verify that the correct program number displays in the upper-left corner. Press PRG to change if necessary. Press the or button to move to the zone that you want to set the runtime for. Press the or button to move to the digits that you want to change. Press the + or – button to change the time. STEP 5 – Set Watering Start Conditions A program is not active until you select a start condition for it. Press the Program Setup button. Highlight the Setup Prg. Start option, and then press OK. For the initial system configuration, we recommend that you set up a Day & Time Start. After you verify that your system is watering as expected, you can add other start conditions or switch to a different start condition. Verify that the correct program number displays in the upper-left corner. Press PRG to change if necessary. Press the button to highlight the Day & Time Start option, and then press the + button to select the option. Press the OK button to go to the next menu level. Press the button to highlight the Set Start Days option, and then press the OK button to go to the Set Start Days screen. Again, for the initial system configuration, we recommend that you set up the Weekday option. After you verify your system is watering as expected, you can change to another start day option. Page 4 BaseStation 1000 Quick Start Guide In the Set Weekdays screen, press the button to set up the weekdays when you want the program to start. By default, the boxes for the days of the week are marked with a checkmark, which indicates that the program will start every day. If you want to change a start day setting, press the button to select the day, and then press the OK button to change the setting. Press the BACK button to return to the Day & Time Start menu. Press the button to highlight the Set Start Times option, and then press the OK button. The Set Start Times screen displays. Note: Each active program must have at least one start time. Programs that have no start times will not run. Press the button to highlight the box for the start time that you want to change. Press the + or – button to change the number in the box. STEP 6 – Set the Water Windows Water windows are used to indicate when watering will or will not be allowed. Press the Program Setup button. Highlight the Water Windows option, and then press OK. Verify that the correct program number displays in the upper-left corner. Press PRG to change if necessary. By default, watering is allowed during all hours of the week. Unless you need to comply with water restrictions or set aside a time for mowing, we recommend that you leave the default settings for the water windows. STEP 7 – Set Soak Cycles Because each type of soil has a different rate at which it can absorb water, you should set up the cycle time and soak time (“soak cycles”) for your zones to ensure that water soaks into the soil instead of being wasted. Soak Cycle Example: If your zone runtime is 60 minutes and you set up 3 soak cycles with a 40 minute soak time, the zone waters for 20 minutes, and then allows that water to soak in for 40 minutes. While this zone is soaking, other zones can run. After the 40 minute soak time, the zone will be allowed to run another 20 minutes after any zone that is currently running finishes. Press the Program Setup button. Highlight the Soak Cycles option, and then press OK. Verify that the correct program number displays in the upper-left corner. Press PRG to change if necessary. Page 5 BaseStation 1000 Quick Start Guide If Soak Cycles are set to Off, press the + button to replace that setting with a number. Press the + or – button to set the appropriate number of soak cycles. Press the button to move to the Soak Time field and then press the button to move to the digits that you want to change. Press the + or – button to set the time. Press the button to highlight the Intelligent Soak field. If you want to enable Intelligent Soak for this program, press the OK button to display a checkmark in the field. When you enable the Intelligent Soak™ feature, the BaseStation 1000 uses intelligent watering algorithms that apply cycles in the optimal order to maximize water penetration and minimize evaporation loss. If there are many zones in a program, zones will be cycled and soaked until all have been completed. Zones that have completed their soak cycles are prioritized higher that zones that are still waiting to water so the first zones to start watering will be the first to complete. STEP 8 – Set the Controller to RUN Press the RUN button to put the controller in the Run menu. Watering will start when the next start day and time is reached. If you want to manually start a program, press the MANUAL RUN button. Press the button to highlight the Start/Stop Program option. If the program is idle, the Start? option displays on the right side of the screen. To start the program, highlight the Start? option, and then press the OK button. The label to the right of the program number changes to “Running.” If the program is running, the Stop? option displays on the right side of the screen. To stop the program, highlight the Stop? option, and then press the OK button. The label to the right of the program number changes to “Done.” Controller Off Press the OFF button when you want to halt all watering for an indefinite period of time. All current watering cycles will be stopped. No watering cycles will be started. Use this button for seasonal shutdown. DO NOT power down the BaseStation. When the controller is off, the status “SYSTEM OFF” displays in the upper-left corner of the screen, and the screen displays the Zone Status report. Page 6