1
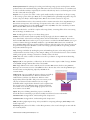
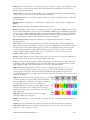
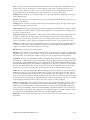
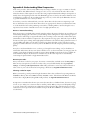
MassArt Studio Foundation Department An Introduction to Final Cut Express v.3e by David Tamés and Zak Ray This document provides a brief introduction to editing with Final Cut Express 4. It is a work-inprogress, therefore, please provide feedback on how it can evolve into a more useful document, especially in terms of what’s missing and what you find confusing. Please send comments and/or corrections, to: David Tamés via email to [email protected] or call 617.879.7298. Special thanks to Nomi Lawn for detailed proofreading of a previous version. Table of Contents What is Final Cut Express?.......................................................................................................................................3 Getting Started ...........................................................................................................................................................3 1. Plug in your external hard drive 2. Gather your media 3. Set your System Settings 4. Set your preferences 5. Create a new project 3 3 3 4 4 The Final Cut Express Interface .............................................................................................................................4 Capturing Video from a Tape-Based Camera....................................................................................................5 1. Easy Setup 2. Capture 5 6 Transferring Video from a Tapeless Camera .....................................................................................................6 1. Easy Setup 2. Transfer 6 6 Importing Files ............................................................................................................................................................6 1. Put your media in your project folder 2. Convert Incompatible Media 3. Import 6 7 7 Basic Editing.................................................................................................................................................................7 1. Organize your media 2. Trim your clip 3. Put your clip in a sequence 4. Practice timeline editing 5. Practice three-point editing 7 7 7 8 8 Advanced Editing & Effects ....................................................................................................................................8 Adding filters and transitions Adding motion effects Color Correcting Adding keyframes Working with keyframes from the timeline Working with audio Keyframing audio changes Adding titles 8 8 9 9 9 10 10 10 Exporting ....................................................................................................................................................................10 1. Render and final check 2. Export edit master 3. Convert to distribution formats 10 10 10 Resources....................................................................................................................................................................11 Documentation Web Pages Books 11 11 11 Classes 11 Glossary.......................................................................................................................................................................12 Appendix A: Understanding Video Compression ........................................................................................16 Native vs. intermediate editing Maintain your codec Choosing a codec for export Video codecs to know for Final Cut Express 16 16 16 17 Appendix B: Media Management......................................................................................................................18 Appendix C: Media Conversion ..........................................................................................................................19 Converting audio for import Converting video for import Converting images for import Converting video for export 19 19 19 19 Fine Print.....................................................................................................................................................................20 Colophon Copyright Acknowledgments Trademarks A Brief Introduction to Editing with Final Cut Express v.3e 20 20 20 20 2 / 20 What is Final Cut Express? Apple includes iMovie with every new Mac, providing easy-to-use video editing for everyone. Some media makers, however, require the creative flexibility provided by a more advanced application; this is where Final Cut Express comes in. Reasonably priced (compared to Final Cut Pro), Express is sophisticated enough for doing high-end work, flexible enough for demanding artists, yet basic enough for those who are new to editing. e most significant difference between Final Cut Express and Final Cut Pro is that the latter comes with six other applications designed for professional color, sound and graphics work, whereas Express relies on iDVD, GarageBand and other bundled Mac apps to complement it. It also has several limitations in terms of effects and other high-end aspects, such as format limitations-- DV, HDV and AVCHD are the only formats you can work with (and only in the 60i frame-rate)-- but for editors just starting out, it provides a rich set of capabilities. If in the future you need the power and flexibility of Final Cut Pro, the upgrade experience will be relatively seamless, as the Express and Pro interfaces are for the most part identical. Pro can import Express projects, however, there is no going back from Pro to Express. So be careful to make sure you’re editing with Express when working in non-Studio Foundation labs on campus. Like most sophisticated applications, Final Cut Express carries a learning curve for new users, but if you focus on the fundamentals, you can get started and get a lot done in just a few steps. is document is designed to take you step by step though your first experience with Final Cut Express and will also provide some suggestions for further study. Getting Started 1. Plug in your external hard drive You must use an external FireWire hard drive to store your project files and related media files (USBonly drives are strongly discouraged). Keep in mind that the computers in shared lab environments are not backed up, so it’s very important that you save everything to your external drive. If you absolutely cannot afford an external drive, create a folder on the desktop and use this folder instead. External Triple-Interface Drive LaCie Rugged ($129-169), G-Drive Mini ($99-169) and Elite-AL Pro Mini ($109-154) hard drives with FireWire 800, FireWire 400 and USB 2.0 are good to use when you need portability and versatile connectivity. They don’t require a separate power supply (ideal for video storage and data exchange on the go), and while hard drives are delicate devices and should be treated as such, the aluminum shell and shock-resistant rubber bumper of the LaCie Rugged offer good protection for student use. There are two models: 5400rpm or 7200rpm; the faster 7200rpm drives are recommended for video editing, and cost only $10-20 more. If your computer has a FireWire 800 port, this drive will allow you to take advantage of it. 2. Gather your media You should already have some video that was recorded on a tape-based or tapeless camera, or alternatively, a Quicktime video file. You may also have audio files (from a sound recorder or the web), and still images to work with. Before opening Final Cut, you should organize any files into a folder made just for this project on your external drive (see Appendix B: Media Management). Video from a camera will be captured inside Final Cut. 3. Set your System Settings When Final Cut captures video from a camera, it places it in a location called the “scratch disk”. Setting the location of the scratch disk, where your video and other Final Cutcreated files are stored, is necessary so as not to lose track of your media. Open Final Cut, and choose Final Cut Express > System Settings. e default location will be in your user Documents folder; click the uppermost Set... button to change it. It’s usually best to just make a “Final Cut Files” folder in your project folder from Step 2 (don’t make it the project folder itself, so you don’t confuse your own files with those Final Cut creates). If you don’t follow this step, you risk losing your video, as it will be kept on the computer where anything can happen to it. A Brief Introduction to Editing with Final Cut Express v.3e 3 / 20 Get into the habit of setting the System Settings every time you start up Final Cut Express, otherwise, you may lose critical data. You have been warned! This is the number one cause of problems that students encounter when using Final Cut in a shared laboratory environment. Anything saved to your user folder on the internal hard drive of the lab computers is here today, but may be gone tomorrow. You should never have to go inside or modify the folders Final Cut creates in your scratch disk location (Audio Render Files, Autosave Vault, Capture Scratch, Render Files, umbnail Cache, and Waveform Cache) until you are finished with your project and have exported your finished video, and even then, you might want to back it up first. You never know when you might want to go back and change something! 4. Set your preferences Final Cut lets you adjust many of the things it does and how it does them. Go to Final Cut Express > User Preferences. One preference you may want to change is the time between “autosaves”, as well as the level of undos (note that the higher you make this number, the slower your computer may respond. 15-20 is reasonable). Make sure you make a backup of your project file as well as any files that you don’t capture from tape. In the event of a hard drive failure, you can recover your work by retrieving your project file from the backup, along with related files that were not captured from tape. Then you can have Final Cut recapture the video from your tapes. Refer to the Final Cut Express Reference Manual for details on how to recapture a project. 5. Create a new project When you launch Final Cut, either a new project will be created or the last user’s project will open. If it’s a new project, before you do anything else, save it (File > Save Project As) in the folder you have created in Step 2. If it’s another user’s project, choose File > Close Project, then choose File > New Project and then save it in your folder. Again, this folder must be on your external drive, or you risk losing everything when you log off. The Final Cut Express Interface e Final Cut interface contains several windows. If your windows are not arranged as shown, you can reset them to their default by choosing Window > Arrange > Standard from the menu. Windows in Final Cut can be shown or hidden using the Window menu, or you can move and resize them as you wish by dragging. Clicking anywhere in a window makes it active (commands like Zoom In can change based on the active window). Type to enter text A Brief Introduction to Editing with Final Cut Express v.3e 4 / 20 A - Browser e Browser is where you organize your media (video clips, audio clips, images) and sequences (the groups of clips that make up your movie). It also displays information about your media, such as how long a clip is. B - Viewer e viewer is for playing and trimming down clips. Double-click a clip in the Browser or the Timeline to open it in the Viewer. It’s also for adjusting sound levels and audio/video effects. Notice the playhead located directly above the playback controls—drag it around to quickly navigate to any point in your clip. Keep in mind that if the playback line below the image has dotted lines, you’re looking at the version of the clip that is in the Timeline, not the original clip from the Browser. Once you start editing, you’ll see the difference. C - Timeline e Timeline displays your sequences (groups of clips). You can have more than one sequence in the same project; people often use multiple sequences to try variations on their movie, or build sections of their movie separately and assemble them later. To put a clip into the open sequence, simply drag and drop from the Browser or the Viewer. To play clips in the Timeline, use the space bar on the keyboard to start and stop, or click the ‘play’ icon on the Canvas window (the controls, including the playhead, are the same as the Viewer). e ‘Home’ key will take you back to the start of the sequence. Note that if there is no open sequence, the timeline window will not appear. Playhead Browser Views Reset Scrub Track Lock Track Visibility Track Size Zoom Canvas Zoom Wireframe When you open Final Cut, you might also want to make sure the Snapping and Linking functions are enabled; just make sure “chain link” and “double-arrow” icons in the top-left of the timeline are Depending on which tool you select green. If not, just click them. in the Tool Palette, Final Cut may behave differently. If Final Cut is ever not doing something you expect, or doing something you don’t expect, check to see what tool is selected in the Tool Palette. You can always “reset” back to the default Selection Tool by clicking on the Selection Tool in the Tool Palette or by using the shortcut ‘a’ (for arrow). D - Canvas e Canvas provides a preview of the sequence currently open; the playback controls are linked to those of the Timeline’s. E - Tool Palette and Audio Meters Final Cut uses different “tools” to help you edit; although many functions can be accomplished with the default Arrow Tool, the Tool Palette offers other tools that can greatly speed up your work. An audio level meter is located next to the Tool Palette, so you can keep track of how loud your audio is getting. Make sure your clips never “peak” (setting off the red lights at the top), or your audio will distort when played back. It’s best to keep most of your audio peaks in the -12 to -6 dB range, perhaps allowing -3 every once and a while. Capturing Video from a Tape-Based Camera 1. Easy Setup Final Cut needs to know what kind of camera you’re working with before you start capturing. Go to Final Cut Express > Easy Setup and choose “DV NTSC” if you shot in 4:3 (standard), or “DV NTSC Anamorphic” if you’re working in 16:9 (widescreen). Note that these settings apply to MiniDV cameras like the ones in Studio Foundation; if you shot with your own HDV camera, you’ll need to use the appropriate HDV setting. If you shot with your own tapeless camera, skip ahead to the Capturing Video from a Tapeless Camera section. A Brief Introduction to Editing with Final Cut Express v.3e 5 / 20 2. Capture Use your FireWire cable to connect your camera to the computer and choose File > Capture (if your camera uses a dock, place the camera on the dock and connect the dock to the computer). It’s good to enter descriptive information about the video you’re capturing so you can find it later more easily (use the Scene, Shot/Take, etc. fields). Keep in mind if you don’t give your clips a name in the Capture window, they will be given a generic name like “Untitled 1”, “Untitled 2” etc. (see Appendix B: Media Management for tips on naming your video). ere are two ways to capture; to Capture Now, use the controls below the preview window to navigate to the spot on the tape you want to capture, and click play. en click the Now button (lower right of the dialog). To stop capturing, press the “esc” key on the keyboard, and the new clip appears in the Browser window. Repeat this process for each clip you need to capture. To Capture Clip, use the controls below the preview window to navigate to the spot on the tape where you want to begin capture. Click the Set In button (to the left of the VTR OK display). Now navigate to where you want your clip to end, click the Set Out button, and click Clip. Final Cut will rewind and capture the section you asked for. Repeat this process for each clip you need to capture. Transferring Video from a Tapeless Camera 1. Easy Setup If you’re using the Studio Foundation Canon HF300 or a similar tapeless camera, go to Final Cut Express > Easy Setup and choose the appropriate AVCHD setting (probably 1920x1080i60). Your camera must be able to shoot in the AVCHD video format (check your camera’s manual if you’re unsure) to work with Final Cut; if it doesn’t, see Appendix C: Media Conversion for instructions on how to convert it. 2. Transfer Use your FireWire or USB cable to connect your camera to the computer and choose File > Log and Transfer. It’s good to enter descriptive information about the video you’re transferring so you can easily find it later (use the Scene, Shot/Take etc. fields). Your clips will show up in the Browser-like window on the left; to transfer a clip, select it and click the Add to Queue button. You can also trim clips down before transferring them by setting in and out points; select the clip you want to trim, drag the playhead below the image to where you want the clip to begin, and click the Mark In button (or press “i”). en do the same for where you want it to end and click the Mark Out button (or press “o”). Keep in mind if you don’t give your clips a name in the Log and Transfer window, they will be given a generic name like “Clip #1”, “Clip #2” etc. See Appendix B: Media Management for tips on naming your video. Importing Files 1. Put your media in your project folder Again, all your media must be put in the project folder on your external drive before import. is includes music from iTunes, and sound files from the Roland audio recorder: just copy them from their original locations into your folder. A Final Cut project file “keeps track” of what media goes where and how things are arranged, but the project file itself doesn’t contain any media; for a project to work, you need both the project A Brief Introduction to Editing with Final Cut Express v.3e 6 / 20 file and the media it uses. Importing is just a way of telling Final Cut to “look” in a certain place for your media, and if that place isn’t in your project folder, it becomes easy to lose track of. 2. Convert Incompatible Media You may need to convert your audio or video before bringing it into Final Cut. MPEG Streamclip is a free application you can find on the web to do this (see Appendix C: Media Conversion). If you import media and are given an “Unknown File” error, or you hear beeps/see an “Unrendered” message in the Canvas and you haven’t applied any effects, your media should be converted before import. If you change the name or location of a file, you’ll have to reconnect it. When Final Cut can’t find a file it links to, it will appear with a “Media Offline” message. When this happens, select all the offline files in the Browser, right click and choose “Reconnect Media”. Click Search if you don’t know where it is, or Locate if you do. If you changed the name, uncheck Matched Name and Reel Only. 3. Import Choose File > Import > Files, browse to the location of your files, and click Import; or simply drag and drop files into the Browser. If your media doesn’t have good names, it’s best to assign some. Basic Editing 1. Organize your media Sequence Organization is necessary so as not to get lost in the editing process-- it can take ten minutes to find the clip you’re looking for when they’re all named “Untitled” and aren’t organized in any way. e best way to do this is to create “bins” (folders) which in turn can hold other bins, clips, or sequences. Bins are good for organizing your types of media (a bin for audio, a bin for b-roll, a bin for images, etc), or for sections of your movie (a bin for scene 1, a bin for scene 2, etc). Choose File > New > Bin to create a new bin. Note the small icons next to each item in the Browser; these change based on the media type, and are a good way to see what’s in your Browser at a glance. You can also change the appearance of the Browser by using the little icons on the upper right hand side. Image 2. Trim your clip Audio Video Offline Clip Bin If you double-click a clip in the Browser, it will appear in the Viewer. To look through a clip, drag on the playhead, use the playback controls, or press the arrow keys to move frame by frame. Once you’ve got to the point of a clip where you want it to begin, click the Mark In button (or press “i”). en do the same for where you want it to end and click the Mark Out button (or press “o”). If you want to use the entire clip, don’t add in/out marks. 3. Put your clip in a sequence When you’re ready to move a clip to a sequence, simply drag and drop it from the Viewer to the Timeline. You’ll notice that while you are dragging the clip onto the timeline, Final Cut will change the pointer to either a downpointing arrow or a right-pointing arrow. e down-arrow indicates that, if you have other clips already present where you’re putting the new one, the new one will take their place; this is known as an “overwrite edit”. e right-pointing arrow indicates that any of those clips will be pushed aside to accommodate your new one (known as an “insert edit”). Experiment with this-- the best way to get a feel for the interface is to drive it. A Brief Introduction to Editing with Final Cut Express v.3e 7 / 20 4. Practice timeline editing Choose some clips to work with in your Browser, open them in the Viewer, set in and out points, and then drag them to the timeline. Practice doing the following with the clips: • using the default pointer tool (shortcut ‘a’), change the in and out by dragging the edges of clips • using the razor blade tool (shortcut ‘b’) to make cuts, allowing you to change the location, or get rid, of certain parts of your clips • closing the gap between two clips: choose Sequence > Close Gap (shortcut ‘^G’) or click on the gap and hit the delete key. • using the Ripple, Roll, Slip and Slide tools in the Tool Palette. Experiment and you will quickly get a feel for their use. Keep track of linking. By default, the video and audio tracks of a clip are ‘linked’ together, so when you drag one in the timeline, the other is dragged with it. To unlink them, select the clip with the pointer tool and then choose Modify > Link, (shortcut ‘⌘L’), or to turn off the linking behavior for the whole timeline, choose Edit > Linked Selection (shortcut ‘⇧L’). 5. Practice three-point editing Experienced video editors use a quick way to insert or replace clips in the Final Cut timeline without the hassle of moving and removing other clips like you’ve been doing. e way to do this is to set “three out of four” in/out points on the source clip and the Timeline. en drag a clip from the Browser to the Canvas window. A colorful pop-up clip tool appears giving you some choices of what to do. Use this in tandem with the playhead on the Timeline or in and out points on the Timeline to insert a clip between two others, overwrite or replace a selected clip in the Timeline, superimpose clips, or perform a fit-to-fill in an empty area between clips. Experiment with this to get a feel for it. Some people prefer the click-drag-cut-resize approach (which is like the good old days of splicing film and the tactile experience that goes with that), and others prefer this approach. Final Cut lets you work either way. Advanced Editing & Effects Adding filters and transitions If you want to add effects (or “filters”) to a clip, double-click it in the timeline and browse to the filter you want by going to Effects > Video Filters. You can modify your filters by clicking the Filters tab in the Viewer, and reset your modifications at any time by clicking the red “X” next to the filter name. To add a transition, click the line at the start or end of a clip, or between two clips, and go to Effects > Video Transitions. Try adding a cross-dissolve. Most filters and transitions require that the clips be rendered (shortcut ‘R’ or choose Sequence > Render) prior to playback, depending on the speed of your computer. To avoid constantly rendering, you can click the RT button in the upper left of the Timeline and change it to Unlimited RT; this allows you to see a lower-quality preview of your timeline without the need to render, though you’ll still need to do so to view it in full quality. Adding motion effects Double click a clip in the timeline and select the Motion tab of the Viewer. Here, you can adjust the scale, rotation, and other parameters to achieve different effects. You can also enable the Wireframe in either the Viewer or the Canvas windows by clicking on the wireframe icon on the top right. e wireframe provides a graphic way to move, re-size, crop and rotate clips directly in the Canvas. A Brief Introduction to Editing with Final Cut Express v.3e 8 / 20 Color Correcting e Color Corrector is one of the most useful filters in the Final Cut toolset; you can add it by double-clicking a clip in the timeline and choosing Effects > Video Filters > Color Correction > Color Corrector. When it appears in the Viewer, click the Visual button to access it, or click the Color Correct tab that appears after the Motion tab. e look of your video can be greatly improved simply by working with these parameters (try subtly lowering the Blacks, raising the Whites, and dragging the Balance around to get a light color cast). You can also correct improper white balance by finding a frame of your video that has a white object, clicking the eyedropper to the lower left of the Balance wheel, then clicking the white object. You can disable your adjustments you’ve made with the checkbox next to the eye icon in the upper left of the Color Corrector, or reset by clicking the red “X” in the Filters tab. Adding keyframes You can create effects in which filters are gradually applied, or change, over a certain period of time with keyframing. For example, suppose you wanted to apply a blur filter and, over the course of five seconds, transform an image from crisp to blurry. First, double-click to select the clip in the Timeline and apply the filter by choosing Effects > Video Filters > Blur> Gaussian Blur. en, click the Filter tab in the Viewer to reveal the filter’s control panel. Notice the “diamond” button directly next to the Radius slider. In the Timeline, move your playhead to where you want the animation to begin. en, back up in the Viewer, click the diamond button. A dot appears in the Filters tab -- this is the keyframe. Move the Amount slider down to ‘0.’ en, back in the Timeline, move the playhead to where you want the animation to end, and add another Keyframe. Move the slider back up to 100. Play back the portion of the Timeline containing the image, and you should see the image gradually change from sharp to blurry. Many facets of Final Cut can be keyframed, from filters to audio levels to parameters in the Motion tab of the Viewer. Working with keyframes from the timeline On the Final Cut Timeline, notice the series of buttons located in the far lower-left corner of the Timeline window (see illustration on the right). ese can be used to enlarge the Timeline and show/hide items such as keyframes in the timeline. is can be handy for making minor keyframe adjustments, as the user can simply perform edits in the Timeline instead of using the Filters tab. e easiest thing to keyframe in the timeline is Opacity, represented by the black bar along the top of a video clip. A Brief Introduction to Editing with Final Cut Express v.3e 9 / 20 Working with audio When you double-click on an audio clip in the Timeline, it appears in the Viewer. Here you can modify the two basic parameters of audio; Level (loudness) and Pan, which determines where in the stereo field the sound is placed. Pan a clip all the way to the left and it will only come out the left speaker, pan to the right and it will only come out the right. Note that with stereo audio, the two audio tracks travel together. You can change this by selecting a clip and choosing Modify > Stereo Pair (shortcut ‘L’) which will either unlink an existing stereo pair or link together as a stereo pair two independent audio clips. Remember to always be looking at your meters when adjusting audio. Make sure your clips never “peak” (setting off the red lights at the top), or your audio will distort when played back. It’s best to keep most of your audio peaks in the -12 to -6 dB range, with very occasional -3 peaks. Keyframing audio changes Audio can be keyframed just as with filters; while it’s possible to do this with the diamond button (see Adding Keyframes), it’s much easier to use the Pen tool. To do so, first double-click on an audio clip to open it in the Viewer, then select the Pen tool from the Tool Palette. Click on a few points where you want to change the audio level. As you do so, you’re creating new keyframes. Just click and drag the keyframes up or down to raise or lower the level. Note that the pen tool has multiple modes: you can select the + mode to add control points and the - mode to delete control points. Adding titles You can add titles or other text to your movie by clicking the Generators button in the lower left of the the Viewer, and choosing Text > Text. Navigate in the Timeline to where you want the text to be placed, drag it from the Viewer to the Canvas, and choose Superimpose (you can then treat it like any other clip in the Timeline). Double-click it and choose the Controls tab in the Viewer to edit it. Exporting 1. Render and final check Choose Sequence > Render All > Both to render any video or audio that hasn’t been rendered already. It’s also good practice to watch through your movie one last time before exporting; you never know what you might have missed, and it’s better to fix it now than discover it when it’s playing in front of an audience. 2. Export edit master Choose File > Export > Quicktime Movie... (not Quicktime Conversion), include Audio and Video, and make sure the Self-Contained checkbox is checked. is creates a “master file” that can be taken anywhere without having to worry about where your original media and project file is. 3. Convert to distribution formats To play your video on places other than the computer (i.e. DVDs, iPhones, and the web), you’ll need to convert your master file to a distribution format. See Appendix C: Media Conversion for instructions. A Brief Introduction to Editing with Final Cut Express v.3e 10 / 20 Resources is introduction only scratches the surface. ere is no better teacher than hands-on experience and practice. e following books and websites will provide you with guidance to help you get the most out of your time exploring the art and craft of editing, as well as dealing with Final Cut Express’ specific issues. Documentation e Final Cut Express Reference Manual can be accessed through Help > Final Cut Express User Manual. Final Cut Express Quick Reference, given out as a handout in class, is available for download from: http:// sf.massart.edu/docs/vl2/FinalCutExpressHD_QuickRef.pdf Web Pages Listing of camcorders and formats supported by Final Cut Express: http://support.apple.com/kb/HT2948 Apple Final Cut Express Support Page: http://www.info.apple.com/usen/finalcutexpress/ Apple Final Cut Express Discussion Forum: http://discussions.apple.com/forum.jspa?forumID=936 DVinfo.net Nonlinear editing on the Mac forum: http://dvinfo.net/conf/forumdisplay.php?f=30 Shane’s Stock Answers: http://library.creativecow.net/articles/ross_shane/fcp_faq.php Ken Stone’s Final Cut Pro: http://www.kenstone.net/fcp_homepage/fcp_homepage_index.html Books Final Cut Express 4: Movie Making For Everyone, by Diana Weyland. Apple Pro Training Series, Peachpit Press, 2008. is book provides a good introduction to editing techniques with Final Cut Express 4. e book consists of a series of hands-on lessons, about 20 hours worth, with all the files you need on a DVD. e lessons cover capture, editing, transitions, compositing, audio, titles, speed effects, motion effects, and colorcorrection. Several copies of this book are available for same-day check-out from the cage. Editing Techniques with Final Cut Pro, second edition, by Michael Wohl. Peachpit Press, 2003. Used copies of the second edition are pretty easy to find at a good price. What I like about this book, unlike most of the other training books on editing, is it combines both practical Final Cut instruction with the craft of editing from a practical perspective. Even though you’re editing with Final Cut Express, everything in this book is relevant. The Craft of Editing with Final Cut Pro: A Comprehensive Curriculum for Video Editing Technique, by Michael Wohl. Apple Pro Training Series, Peachpit Press, 2008. Once you’ve mastered the basics, this book provides a good tutorial for taking your video editing technique to the next level. e book covers techniques for editing dialogue, action, documentaries, comedy, music videos, multi-camera, and more. Includes two DVDs chock full of footage and project files so you have a variety of material to work with. Classes MassArt Professional and Continuing Education offers a variety of film/video courses taught by working artists and professionals, check out their website for current offerings: http://pce.massart.edu/courses/index.shtml A Brief Introduction to Editing with Final Cut Express v.3e 11 / 20 Glossary Here are some terms you will encounter when editing digital video. While most terms are universal, some apply specifically to working with Final Cut. 4:3. e aspect ratio of early film and video, as opposed to the 16:9 ratio of high definition video and many modern film releases. Also known as fullscreen. See aspect ratio. 16:9. e aspect ratio of most widescreen video (may be either standard or high definition), and many modern film releases, as opposed to the classic 4:3. See aspect ratio. Alpha Channel. e ability of an image or video clip to become semi- or fully transparent, allowing the clips on the tracks below to show through. Anamorphic. Refers to widescreen video that has been “squeezed” to fit into a 4:3 aspect ratio. It must be unsqueezed for playback in the proper aspect ratio (done automatically in Final Cut). See aspect ratio. Aspect ratio. e ratio of the horizontal dimension to the vertical dimension of a picture. Most widescreen video is 1.78:1 (a.k.a. 16:9), and standard-definition video / early film is 1.33:1 (4:3). Wider aspect ratios can occur in theatrical film and video, such as 1.85:1 (35mm widescreen standard) and 2.35:1 (”CinemaScope”). AVCHD. A modern, high definition video codec used for consumer cameras that shoot to some variation of tapeless media (flash card, hard drive, etc). Seen by many as the successor to HDV. Audio Meters. Displays the dB level of current playing audio. See also Decibel. Bin. A Browser folder in which to organize clips and sequences. Byte (B). Unit of binary data storage, technically 8 binary bits (each bit is a binary digit, either 1 or 0). ink of it as the equivalent of a single character in a word processing document. Typically a single pixel (dot on the screen) of video requires three bytes of storage. See Megabyte, Gigabyte. B-roll. Shots in a documentary that are used to illustrate what an interviewee is talking about, or to cover breaks in an interview. Often used to refer to the footage that is shot for the purpose of using later as cutaway shots. Capture. e process of transferring digital video tape material from a camera into a non-linear editing system. See also Import and Log and Transfer. Capture Scratch. Location where Final Cut stores captured or transferred footage from a camera. Part of the Scratch Disk. Canvas. Displays the open sequence in the Timeline. Clip. A portion of video or audio. Codec. Compressor/Decompressor. See Appendix A: Understanding Video Compression, and Compression. Compression. e process of reducing the amount of digital information required to store a file. Cutaway. A shot of an image or action in a film which is not part of the main action, sometimes used to cover breaks in a scene’s continuity. In documentary often called “B-roll.” Cutting on action. Editing two shots at a point where the movement in the first one is not yet completed and where the movement in the second one has already begun. Along with an angle change can be a very seamless edit providing the viewer with the impression that the action is continuous and uninterrupted. Dailies (Rushes). In film production, all the processed footage that was shot yesterday (or on video productions, the same day), usually watched by the director and other crew to make sure everything came out as intended. Decibel (dB). A measurement of sound level. Our ears respond to changes in volume in a non-linear manner. A decibel is a logarithmic scale of loudness. A difference of 1 decibel is the minimum change in volume that we can perceive, 3 dB is a modest change, and 6 decibels perceived as a doubling of volume. Decibels are used in two ways: audio signal levels while editing (e.g. if you increase the level from 0dB to 6dB in Final Cut Express you are doubling the loudness of a sound), or to measure sound pressure levels in the environment. Digitizing. e act of taking analog video and converting it to digital form. e term is incorrectly used interchangeably with ingest or capture, which is the process of transferring a digital video format into a nonlinear editing system (it’s already digital, so you are simply capturing or ingesting, you’re not actually digitizing). A Brief Introduction to Editing with Final Cut Express v.3e 12 / 20 Double-system sound. e technique of recording sound and image using separate recording devices. In film production this is the normal methodology since film camera can’t record sound, however, it is sometimes used in video as well when mobility is required by the sound recordist who may want to avoid running wires to feed the video camera with the audio signal. Dropout. Loss of a portion of an audio or video signal, usually caused by an imperfection in the tape’s coating or dirt covering a portion of the tape. HDV, due to its long-GOP format is particularly susceptible to dropouts because a dropout is likely to affect multiple frames. Hi8 was also a format notorious for drop outs. DV. A standard definition video codec commonly used for consumer cameras that shoot using MiniDV tapes. DV cameras are inexpensive, and a wide range of computers can be used to edit it, as it’s both standarddefinition and intra-frame (see Codec). Wildly popular in the early 2000s, it has been overtaken by consumer HD formats like HDV, and more recently, AVCHD. Field. In interlaced video, one half of a complete video image (frame), containing all the odd or even scanning lines of the image. See Interlace Scan. Filter. An effect applied to a clip in a non-linear editing system. FireWire. A fast data transfer standard originally developed by Apple (also known as IEEE 1394 or i.Link, Sony’s brand name), often used for connecting cameras and external hard disks to a computer. ere are two flavors: FireWire 400 that uses either a 4-pin or a 6-pin connector, and the faster FireWire 800 that uses a 9-pin connector. Cameras that support FireWire usually have a 4-pin FireWire 400 connector. For external hard drives, FireWire 800 provides improved data transfer performance and is favored by video editors who want the best performance. Despite this, FireWire is at risk of soon being replaced by USB 3.0, an upcoming standard that promises much faster speeds. Foley. Creating sound effects by watching the picture and mimicking the action, often with props that do not exactly match the action but sound good. For example, walking on a bed of crushed stones in order to simulate walking on the ground, or hitting a watermelon to simulate a blow to the head. Format. e video codec, resolution, and frame rate used for a production. See Appendix A: Understanding Video Compression. Gigabyte (GB). A unit equivalent to 1 billion bytes. An hour of DV video requires 12 GB of storage, AVCHD around 10GB, and Apple Intermediate Codec around 23GB. HDV. A high definition video codec commonly used for consumer HD cameras that shoot using MiniDV / HDV tapes. It is innovative in its use of the MPEG-2 codec to fit more data on the same cheap MiniDV tapes that DV cameras use. Rapidly being eclipsed by AVCHD in the consumer market. Interlace Scan. A process in which the picture is split into two fields by sending all the odd numbered lines to field one, and all the even numbered lines to field two (see illustration). Field one is then displayed first, followed by field 2. is process was necessary in the early days of television broadcast when there was not enough bandwidth within a single television channel to send a complete frame fast enough to create a non-flickering image, and has unfortunately been carried over to modern systems, though progressive scan is now more common. See also Field. Import. e process of linking a Final Cut project to a media file, so that the file exists in a Final Cut project but isn’t actually moved from it’s location in the Finder. Intra-frame codec. See Appendix A, “Understanding Video Compression”. Inter-frame codec. See Appendix A, “Understanding Video Compression”. JPEG. Joint Photographic Experts Group. A lossy standard for compressing still images. JPEG-2000 provides lossless compression. Keyframing. Setting the level of a filter, or other effect’s parameter, so that it can be changed over time with the use of other keyframes. A Brief Introduction to Editing with Final Cut Express v.3e 13 / 20 Kilobyte (K). One thousand bytes, or 1,024 bytes depending on whether a computer system displays size values in base 2 (binary) or base 10. Today, Macs and most external hard drive manufacturers use base 10, where Windows computers utilize base 2. Letterbox. Placing a wide screen image (typically 16:9) in a conventional 4:3 video frame by placing black bars at the top and bottom of the screen. See also Aspect Ratio and Pillarbox. Log and Transfer. e process of transferring digital video from a tapeless source (flash memory, hard drive disk, etc.) into Final Cut. Megabyte (MB). A unit equivalent to 1 million bytes, or 1,048,576 bytes (1,024 squared). See Gigabyte and Kilobyte. MOS. Minus Optical Storage. Shooting image without recording sound. MPEG. Moving Picture Experts Group. A standard for compressing moving pictures. MPEG-1 video uses a bit rate of 1.2 Mbps (Mega Bits per Second), the speed of CD-ROM. MPEG-2 supports much higher quality with a bit rate from 2 to 10 Mbps. MPEG-2 is the format specified in the DVD standard and is also used in HDTV broadcast. MPEG-4 is the modern, highly efficient equivalent, intended for a range of applications from web video and mobile devices to Blu-ray discs and HDTV broadcast. See also H.264. Non-synchronous sound (non-diegetic). Sound that is not clearly matched to the image or something happening offscreen. Paper edit. e process of creating a preliminary edit (usually an assembly edit) of your documentary using paper transcripts. Some people actually cut out pieces of paper, others highlight key text and pull from that. In the old days of linear video off-line editing, paper edits saved lots of painful video editing time. Today with non-linear editing with all their tempting bells and whistles, paper edits can help you focus on ideas and concepts rather than editing rigamarole. Paper edits are a wonderful way to work towards the rough cut. Petabyte. 1,000 Terabytes, or 1 million Gigabytes. Pillarbox (curtain). Placing an image in a frame with a greater aspect ratio than it’s own by placing black bars at the left and right sides of the screen. See also Aspect Ratio and Letterbox. Pixel. Picture Element. e basic unit from which a digital image is made. Essentially a dot with a given color and brightness value. Standard Definition images are usually 720 x 480 pixels, and High Definition is usually 1920 x 1080 pixels. High-end professional cameras can record up to 4K (4096 x 2048). Progressive scan. An image scanning system where each line is displayed progressively (1, 2, 3, 4, 5 ...) in contrast to interlaced scanning. Computer monitors use progressive scan, and most HD formats includes several progressive scan variants. Video has historically been 60i (60 interlaced fields, a.k.a 30 frames per second). Progressive scan offers an image that is well suited for web video and for display on computer monitors and flat-screen displays. Pulldown. Video is often shot at 24 progressive frames per second (to mimic the “film look”), but recorded at 30 interlaced frames per second. Pulldown is a method for recovering the “embedded 24” and putting it back into a native 24 (see illustration). Resolution. e amount of detail in an image. Higher resolution means more detail. Also used to describe the size of an image, usually expressed in pixels, e.g. a high definition video frame of 1920 x 1080 pixels. Ripple Edit. A ripple edit changes the duration of a clip by extending/trimming the in/out points. Roll Edit. A roll edit allows you to move the edit point between two clips, extending/trimming the in/out points of the clips. Sequence. A group of audio/video clips, images, text, and any other elements that make up your movie. Single system sound. A method of recording sound and picture on the same device, often used in video production. See also double system sound. A Brief Introduction to Editing with Final Cut Express v.3e 14 / 20 Slate. 1. A device used to place an identifier in front of the camera at the beginning of a take. When shooting double system sound, the clapping motion and the clapping sound is used to synchronize the audio to the picture in post production. 2. A shot or portion of a shot in which a slate or other identifying information appears. Often master tapes will include a slate and countdown prior to the start of the show. Slide Edit. A slide edit allows you to change the location of a clip in the timeline by changing the in/out points of the neighboring clips. Slip Edit. A slip edit allows you to change the in/out points of the clip itself without changing it’s position or in/ out points in the timeline. Snapping. Allows easy moving around of timeline clips by automatically “snapping” the edges of clips together when they are brought close to each other. Stock footage. Motion picture footage from previously existing films, filed in film libraries or archives, which is incorporated into a new film, usually to provide scenic background or for stock situations and settings, such as war scenes or foreign locations. Synchronous sound (sync sound, diegetic). 1. Recording sound in synchronization with recording image. Can be single- or double-system. In single-system sound recording the camera records sound and image, with double-system sound recording, the camera is used to record images and a separate sound recorder is used for sound. 2. Sound whose source is apparent and matches the action in a scene. See non-synchronous sound. Terabyte. One trillion bytes. An hour of high-definition video at a resolution of 1920 x 1280 might take about one terabyte to store in an uncompressed format. Acquisition formats like HDV involve significant levels of compression in order to reduce the data required to store video. Timeline. Displays sequences, plays through Canvas. Timecode. A time reference used to identify each frame of video, typically written or displayed as “02:23:43:02” designating hours : minutes : seconds : frames. A semi-colon between the seconds and frames typically indicates drop-frame time code (in which some numbers are skipped in order to align time code with real time). Tool Palette. e group of tools that facilitate timeline editing and image manipulation, including the Selection Tool (shortcut ‘a’), Edit Selection Tool (g), Group Selection Tool (gg), Range Selection Tool (ggg), Select Track Forward Tool (t), Select Track Backward Tool (tt), Select Track Tool (ttt), Select All Tracks Forward Tool (tttt), Select All Tracks Backward Tool (ttttt), Roll Tool (r), Ripple Tool (rr), Slip Tool (s), Slide Tool (ss), Razor Blade Tool (b), Razor Blade All Tool (bb), Zoom In Tool (z), Zoom Out Tool (zz), Hand Tool (h), Scrub Tool (hh), Crop Tool (c), Distort Tool (d, cc), Pen Tool (p), Delete Point Tool (pp), and Smooth Point Tool (ppp). TV Safe. e area of the video image which will normally appear on a home television set. Due to the design of CRT monitors, they “over-scan” the image, which means the edges of your video will not be visible. You can’t be sure that something that appears in the frame on your computer screen will actually be seen by “viewers at home”, so it has become standard to keep titles within an area called “title safe” and the rest of the action within “action safe.” Non-linear editing system and DVD authoring systems have guidelines you can turn on and off to see these margins. Many flat-screen TVs still overscan video so this is not a thing of the past. USB (Universal Serial Bus). A data transfer standard used to connect computers, hard drives, cameras, scanners, printers, etc. While USB 1.0 is a comparatively slow standard, USB 2.0 (a.k.a. Hi-Speed USB) is fast and is widely used for connecting cameras and external hard drives to a computer. Even though USB 2.0 appears on paper to be faster than FireWire, the manner in which FireWire is implemented makes it a better interface for external hard drives (especially for video editing purposes). USB 3.0, though not yet widely available, promises to be faster than both (though the implementation may still make FireWire desirable). Widescreen. A general term for presentation using a screen with an aspect ratio greater than 1.33:1 (4:3). See Aspect Ratio. A Brief Introduction to Editing with Final Cut Express v.3e 15 / 20 Appendix A: Understanding Video Compression Video is not just video-- there are many different ways of storing it, whether on a tape, on a DVD, on the web, or on an iPhone. e different formats of storage are codecs, as in to code and decode the video. ese codecs reduce the amount of data required to store the video using complex mathematical techniques. Compression is usually done at the beginning and the end of the filmmaking process; it’s done by the camera, which tries to fit as much video as possible onto the recording media (tape, card, etc.), and it’s done by the filmmaker, who tries to get their finished video onto a variety of devices. As an editor, you need to understand both; you need to know what codec the camera is compressing to and how to deal with it, and you need to know what codec(s) are appropriate for whatever your destination format is. Codec should be a factor when purchasing a new camera or deciding which to use/rent (though it’s not as important as lens, amount of manual control, color / low-light performance, etc). Native vs. intermediate editing ere are two ways to work with video; natively (using the media in the same codec that it was recorded in) and intermediately (changing the codec before you start editing). Native editing has two major advantages: capture/ transfer speed (it takes longer to ingest media when you’re converting it at the same time), and hard drive space (intermediate codecs are much less compressed, so they require more storage space). at said, if you can afford the time and drive space, working with a high-quality intermediate codec is almost always preferable in terms of ease of workflow and quality; it won’t make your raw footage better than what you shot, but when you start applying lots of filters and color corrections, you’ll see the difference in both computer performance and image quality. Your job is to understand whether or not a codec is good enough for native editing, or if you should use an intermediate. Often times, this can come down to whether or not a codec is intra-frame (see next page); DV, for example, is intra-frame and therefore suitable for native editing; AVCHD is inter-frame and is not suitable. In terms of Final Cut Express, the discussion is somewhat moot, as all codecs except DV are automatically converted upon capture/transfer to Apple Intermediate Codec. Maintain your codec Once you’ve chosen a codec for your project, be it native or intermediate, stick with it. Use the Easy Setup to make sure any new sequences you create are in that codec; you can double-check by choosing Sequence > Settings... and clicking Load Sequence Preset. Additionally, you’ll want to convert any video from the web or other sources to your codec of choice before importing to Final Cut (see Appendix C: Media Conversion). Choosing a codec for export Where you intend to go with your movie largely determines what codecs you’ll want for exporting; DVDs are all MPEG-2, Blu-ray discs can be MPEG-2, H.264, AVCHD or VC-1, mobile devices like iPhones are H.264, and web video is largely H.264 (though VP6 is still prevalent). See Appendix C: Media Conversion. It’s important to remember that the more you convert the same video to a different format, the worse it’s going to look, so try to make your “conversion chain” as small as possible. When you export, use full-quality settings to get your “master” file, and perform any additional conversions from that file, rather than from your newly converted ones; don’t export the master to H.264 and export the H.264 to MPEG-2, use the master to export to both formats. A Brief Introduction to Editing with Final Cut Express v.3e 16 / 20 Video codecs to know for Final Cut Express ! ! C A M E R A S! ! AVCHD DV HDV APPLE INTERMEDIATE CODEC H.264 UNCOMPRESSED ! ! ! E D I T I N G! RESOLUTION FILE SIZE ESTIMATION 1280x720 6.3 GB/hr 1440x1080 8-10 GB/hr 1920x1080 8-10 GB/hr 720x480 11.2 GB/hr 1280x720 8.5 GB/hr 1440x1080 11.2 GB/hr Up to 1920x1080 Up to 4K ! ! ! DISTRIBUTION EDIT WITHOUT INTERMEDIATE? MEDIA Inter-frame (No) Hard Drive Disk, SDHC Card, DVD Intra-frame (Yes) MiniDV Tape, HDV Tape Inter-frame (No) HDV Tape, MiniDV Tape 23.3 GB/hr Intra-frame (Yes) MOV File 9 GB/hr Inter-frame (No) Web, Portable Devices, HDTV, Blu-ray Disc 720x486 (NTSC) 141.6 (29.97fps) Uncompressed Undefined 720x576 (PAL) 139.8 (25fps) Uncompressed Undefined 1280x720 372.6 (29.97fps) Uncompressed Undefined 1920x1080 838.8 (29.97fps) Uncompressed Undefined Blu-ray Disc Compact Flash PA L S P E C I F I C AT I O N S N O T I N C L U D E D!! R E S O L U T I O N S I N “ U N C O M P R E S S E D ” A R E F O R R E F E R E N C E ; U N C O M P R E S S E D V I D E O D O E S N O T C A R R Y N AT I V E LY D E F I N E D R E S O L U T I O N S . A D D I T I O N A L H E L P I N M A K I N G T H I S G U I D E F R O M J U S T I N K WA N . T H E I N F O R M AT I O N I N T H I S G U I D E WA S C O M P I L E D F R O M VA R I O U S O U T L E T S O F I N F O R M AT I O N ; I T I S N O T A L L G U A R A N T E E D T O B E A C C U R AT E . C O N TA C T M E W I T H A N Y E R R O R S / S U G G E S T I O N S : H T T P : / / W O R L D W I D E - S T U D I O S . C O M / W O R L D W I D E _ S T U D I O S / C O N TA C T . H T M L . T H E L AT E S T V E R S I O N S O F T H I S , A N D O T H E R R E S O U R C E S , M AY B E F O U N D H E R E : H T T P : / / W O R L D W I D E - S T U D I O S . C O M / W O R L D W I D E _ S T U D I O S / R E S O U R C E S . H T M L Resolution. e measure of pixels in the frame. Common resolutions include 720 x 480 (standard definition), and 1280 x 720 / 1920 x 1080 (high definition). Target Bit Rate. How much of the video information can be conveyed over a period of time. Codecs can range from just a few Mbps to hundreds. Frame Rate. e number of frames per second the codec can store; 23.98 and 29.97 are most common. Audio Channels. e number of audio channels a codec can contain, along with the audio bit rate (the higher, the better; 16 and 24 are common) of those channels. Compression: Intra-frame. is means that each frame (the individual pictures that make up a movie) is compressed separately. e codec basically sees the video as a series of still pictures, and deals with each one independently of the ones around it. Intra-frame is usually preferable to inter-frame, as it’s easier for the computer to work with while editing, but it also produces bigger file sizes and thus requires more hard drive storage to work with. Examples of intra-frame formats include DV and Apple Intermediate Codec. Compression: Inter-frame. is means that the frames are not only compressed individually, but also rely on each other to determine the best method of compression. e codec looks at one frame, then looks at the next to see what’s changed, and records only the changes instead of the whole frame. Inter-frame is often used by cameras to fit more footage onto the recording media, but is more difficult to edit with, as the computer has to work harder at decoding the frames. While you don’t need as much storage space, you do need more computational power, and therefore newer, faster computers are required for inter-frame editing. Examples of inter-frame codecs include: HDV (part of MPEG-2) and AVCHD / H.264 (part of MPEG-4). is is a highly condensed list; for a more complete one, including professional video codecs, visit http:// worldwide-studios.com/Worldwide_Studios/Resources.html A Brief Introduction to Editing with Final Cut Express v.3e 17 / 20 Appendix B: Media Management Does the illustration on the right resemble your computer? Maybe your Documents folder, or your external hard drive? Being disorganized with your files may not seem to have big consequences, but this is not always the case. ere are a few good reasons to keep your files organized: It’s easier to find things. How many times have you spent an hour looking for a file, because you saved it as “Untitled” in “Untitled Folder”? Proper organization can save you from unnecessary searching and headaches. It can save you from losing files. How many times have you spent an hour looking for a file, only to realize you left in on another computer? e computers in shared lab environments are periodically wiped-- if you leave something behind, there’s no telling if it will still be there the next time you return. Here are some specific tips and things to know when working with media: Consolidate your media. Keep all the files you’re using for a project in one folder. is way, if you need to move the project to another computer, you know everything you need is in one place. Understand what the application is doing. Documents from Photoshop, iWork (Pages, Keynote), and Office (Word, PowerPoint) carry the media you import with them, so you don’t have to keep the original files of images that you import (though you may find it useful to do so anyways, in case you ever need to go back the original version of something). Documents from Final Cut and iDVD do not carry media with them-- they simply link to it. Any project files you make with these applications are useless without the video clips, audio clips, pictures, and any other media that you use inside of it. Keep track of your media. Final Cut media is stored in one of two places, depending on how you import it. Media that you import yourself, like pictures and music, is kept wherever you imported it from. is includes audio files from an audio recorder and images from a still camera, so if you import directly from one of these devices and disconnect the device, your media will go offline. is is why you must copy your media off a device to your own location before importing. Additionally, media that you import from a camcorder is stored in your scratch disk location (determined in System Settings), which you must also take with you for your project to function on another computer. Keep your media off the computer. e more you keep your media off the computer, the less likely you are to accidently leave it behind. Get in the habit of moving new media to your project folder before importing it to your document. ere are two exceptions to this rule; the first is using a USB-only drive, in which case it’s best to copy everything to the computer to work, and copy it back when leaving. e second is that certain applications, like Final Cut, can perform faster by having your project file on the computer while editing it (leaving the media on the external). If you can remember to copy it back to your external when you’re done, and avoid confusing different copies of your project file, this method is good practice. Name your media. “Untitled 1” and “Untitled 2” don’t do you much good when you need to find your files. Name your media based on what it is; for example, I might have a song that I’m using-- I could leave it as “Track 01” and import it straight from the CD, or I could name it “Bohemian Rhapsody (Queen)” 1 and copy it to a folder called “Music” inside my project folder. 1 is method still works if your track is not “Bohemian Rhapsody” by Queen A Brief Introduction to Editing with Final Cut Express v.3e 18 / 20 Appendix C: Media Conversion You may need to convert your media before bringing it into Final Cut. First, of course, make sure that this is the case: attempt to import your media, and if you’re given an “Unknown File” error, hear beeps as you play, or see an “Unrendered” message in the Canvas and you haven’t applied any effects, then your media should be converted before import. You may also need to convert your exported master to various formats to distribute it. Converting audio for import Converting audio is easy, as there’s only one format you want to use, and it can be done inside Quicktime. Open your file in Quicktime Player 7 (not regular Quicktime) by going to Applications > Utilities > Quicktime Player 7, then choose File > Open File.... Next, choose File > Export... and choose “Sound to AIFF” and “Default Settings”. Click the Options button, and change the format to Linear PCM, the rate to 48 kHz, and the sample size to 16 bit. en save the audio to your project folder. Converting video for import Converting video can be a little more difficult. While Quicktime can convert some video formats, third-party applications like MPEG Streamclip (www.squared5.com) and Perian (http://perian.org), both pre-installed on Studio Foundation computers, offer more functionality. Open your file in MPEG Streamclip by choosing File > Open Files... or just dragging your video into the application window. If you’re working in standard definition, choose File > Export to Quicktime. For Compression, choose Apple DV/DVCPRO NTSC and for quality choose 100%. If your video is 16:9 as (widescreen) opposed to 4:3 (fullscreen), change the Frame Size to Other and enter 720 x 405. Save the movie in your project folder. If you’re working in high definition, choose File > Export to Quicktime. For Compression, choose Apple Intermediate Codec, and for quality choose 100%. Frame size depends on your Final Cut sequence preset (the Easy Setup based on your source footage); it should be either 1920 x 1080, 1440 x 1080, or 1280 x 720. Converting images for import Most image types will import without issue, but for those that don’t, you’ll need to open them in Preview (or the application they were created in), and Export or Save As to a different format. Good choices include PSD and TIFF (lossless and support layers) and PNG (lossy and does not support layers, but still excellent quality). Converting video for export Where you intend to go with your movie determines what codec you’ll want for exporting; DVDs are all MPEG-2, Blu-ray discs can be MPEG-2, H.264, AVCHD or VC-1, mobile devices like iPhones are H.264, and web video is largely H.264 (though VP6 is still prevalent). Some of these conversions can be done inside MPEG Streamclip (note that reducing the quality and frame size will help reduce file size), and some are best done inside applications specifically made for it; iDVD, for example, will automatically convert to MPEG-2 when making a disc, and Quicktime’s Share function makes it easy to convert for iPhones, iPads and the web. If you’re uploading to the web, beware of what the site is doing; YouTube converts your file no matter what (so it’s best to upload your master rather than compressing, assuming it’s small enough), and blip.tv accepts H.264 video without converting it if you change the file extension to “.flv”. A Brief Introduction to Editing with Final Cut Express v.3e 19 / 20 Fine Print Colophon is document was produced on a MacBook Pro using Pages and set in Adobe Myriad Pro and Adobe Garamond. Some of the music David played while writing this document include Brian Eno, Philip Glass, Yo La Tengo, Colin Owens, Tangerine Dream, Erik Satie, e Talking Heads, Blonde Readhead, Radiohead, Gato Loco de Bajo, R.E.M., Spoon, Underworld, Stereolab. Revisions by Zak Ray were accompanied by e National, Arcade Fire, John Frusciante, Portugal. e Man, Beck, Keane, e Flaming Lips, and Wilco. Copyright © 2010 by Massachusetts College of Art and Design, some rights reserved. e content of this document is licensed under the terms of the GNU Free Documentation License 1.2. Copy as you wish, provide credit where credit is due. e GNU Free Documentation License text may be found at http://www.gnu.org/licenses/ fdl-1.2.txt. e Creative Commons Share-Alike Attribution license may be found at http:// creativecommons.org/licenses/by-sa/2.5/legalcode, the terms of the GNU Free Documentation License and Creative Commons Share-Alike Attribution license may conflict in some situations. Acknowledgments Some portions were derived from the document “Final Cut Pro” at https://php.radford.edu/~tlc/ru_mac/ index.php?title=Final_Cut_Pro Final Cut Pro and Final Cut Express interface images Copyright by Apple. Images of e System Copyright © 2010 by Zak Ray and Worldwide Studios. All rights reserved. “Digital Video Formats Explained” and the included chart by Zak Ray (http://worldwide-studios.com) used under the terms of a Creative Commons Share-Alike Attribution License. 24P conversion diagram courtesy of Adam Wilt. Trademarks Apple, Pages, MacBook Pro, Macintosh, Final Cut Pro, and Final Cut Express are registered trademarks of Apple, Inc. Photoshop, Myriad Pro and Adobe Garamond are registered trademarks of Adobe. Any other trademarks are the property of their respective owners. A Brief Introduction to Editing with Final Cut Express v.3e 20 / 20