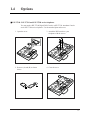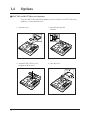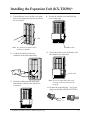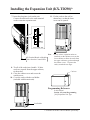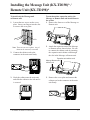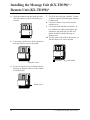
1
Digital Super Hybrid System
KX-TD816CE
KX-TD1232CE
Added and Changed Features for
Installation Manual and Programming Tables
Vol. 4
In this manual, the last letters, “CE”, of each model number are omitted.
ROM Version: KX-TD816CE — P341E, P342E or later
KX-TD1232CE — P241E, P242E or later
Attention
● The ISDN Line Unit (KX-TD280 / KX-TD286) is in accordance with the European
Telecommunication Standards (ETS).
If your telephone company provides an ISDN service which follows standards other than
ETS, some ISDN features may not work properly.
(E.g. Charge Fee Reference, CLIP, COLP, etc.)
● To use the point-to-multi-point configuration with the KX-TD286, the number on the name
plate, which is on the back of the unit, must be ➃ or later.
2
Table of Contents
Additions to the KX-TD816/1232
Section 1.3 Proprietary Telephones .................................................................................6
Section 1.4 Options
Message Unit (KX-TD190).................................................................................................7
Remote Unit (KX-TD198) ..................................................................................................7
Primary Rate Interface ISDN Expansion Unit (KX-TD290) ..............................................8
Remote Card (KX-TD197)..................................................................................................8
DSS Console (KX-T7440 / KX-T7441 / KX-T7540 / KX-T7541) ....................................9
Add-on Key Module (KX-T7545) ......................................................................................9
Connection ................................................................................................................10
Section 2.4 Optional Cards and Units Installation
Primary Rate Interface ISDN Expansion Unit Connection ................................................13
2.4.1 Location of Optional Cards and Units ...................................................................14
Installing the Expansion Unit (KX-TD290)........................................................................15
Installing the Message Unit (KX-TD190) / Remote Unit (KX-TD198) .............................17
Remote Card (KX-TD197) Installation...............................................................................19
Section 3 Features
Calling / Connected Line Identification Presentation (CLIP / COLP)................................20
Connected Line Identification Presentation (COLR)..........................................................21
Integrated Services Digital Network (ISDN) ......................................................................22
Multiple Subscriber Number (MSN) Ringing Service........................................................25
Off-Hook Monitor ...............................................................................................................26
Ring Group ..........................................................................................................................27
Section 4 System Programming
[148] Off-Hook Monitor.....................................................................................................28
[150] ISDN DDI Translation Table ....................................................................................29
[151]-[152] ISDN DDI Ringing Assignment — Day / Night ............................................30
[421] ISDN DDI / MSN Removed Digit / Added Number Assignment............................32
[447] MSN Assignment......................................................................................................34
[448]-[449] Extension Ringing Assignment — Day / Night for ISDN .............................35
[450] PRI Configuration.....................................................................................................37
[451] PRI Reference CO ....................................................................................................38
[452]-[453] ISDN Ring Service Assignment — Day / Night ............................................40
[509] Off-Hook Call Announcement (OHCA)...................................................................41
[617] CLIP / COLP Number Assignment for Extension ...................................................42
[618] CLIP / COLP Number Assignment for ISDN Extension .........................................43
[817] KX-TD197 Baud Rate Setting..................................................................................44
Changes
Section 2 Installation
2.4.9 System Connection........................................................................................................46
Section 3 Features
Automatic Route Selection (ARS) ......................................................................................46
Call Forwarding – to CO Line.............................................................................................46
Call Transfer; Unscreened – to Extension...........................................................................46
Direct Dialling In (DDI)......................................................................................................46, 49
Direct Inward System Access (DISA).................................................................................46
Flexible Numbering.............................................................................................................47
Floating Station ...................................................................................................................47, 50
Module Expansion...............................................................................................................47, 52
3
Table of Contents
Outgoing Message (OGM)..................................................................................................47
Station Hunting....................................................................................................................47, 53
Station Message Detail Recording (SMDR) .......................................................................47
System Programming and Diagnosis with Personal Computer...........................................47
Section 4 System Programming
4.1.3 Entering Characters.................................................................................................47, 54
[005] Flexible CO Button Assignment...............................................................................48, 58
[100] Flexible Numbering ..................................................................................................48
[106] Station Hunting Type ................................................................................................48, 59
[109] Expansion Unit Type ................................................................................................48, 61
[127] UCD Time Table.......................................................................................................48
[131] ISDN DDI Number / Phantom Extension Number Transformation.........................48
[213] DISA Delayed Answer Time ....................................................................................48
[214] DISA Prolong Time ..................................................................................................48
[215] Outgoing Message Time ...........................................................................................48
[401] CO Line Group Assignment .....................................................................................48, 63
[417] CO Line Name Assignment......................................................................................48, 64
[418] ISDN Line Number Assignment ..............................................................................48, 65
[420] ISDN DDI Service Assignment................................................................................48
[610] ISDN DDI Number / Extension Number Transformation........................................48
[611] ISDN DDI Number / Floating Number Transformation...........................................48
[809] DISA Security Type..................................................................................................48
[810] DISA Tone Detection................................................................................................48
[811] DISA / TIE User Codes ............................................................................................48
[812] DISA DTMF Repeat.................................................................................................48
[813] Floating Number Assignment ...................................................................................48, 67
[814] Modem Standard.......................................................................................................48
[990] System Additional Information.................................................................................48, 69
Programming Tables for Added and Changed Features
[100] Flexible Numbering ..................................................................................................78
[106] Station Hunting Type ................................................................................................78
[109] Expansion Unit Type ................................................................................................78
[148] Off-Hook Monitor.....................................................................................................78
[150] ISDN DDI Translation Table ....................................................................................79
[151]-[152] ISDN DDI Ringing Assignment — Day / Night ............................................79
[401] CO Line Group Assignment .....................................................................................87
[417] CO Line Name Assignment......................................................................................88
[418] ISDN Line Number Assignment ..............................................................................88
[421] ISDN DDI / MSN Removed Digit / Added Number Assignment............................89
[447] MSN Assignment......................................................................................................90
[448]-[449] Extension Ringing Assignment — Day / Night for ISDN .............................90
[450] PRI Configuration.....................................................................................................96
[451] PRI Reference CO ....................................................................................................96
[452]-[453] ISDN Ring Service Assignment — Day / Night ............................................97
[509] Off-Hook Call Announcement (OHCA)...................................................................97
[617] CLIP / COLP Number Assignment for Extension ...................................................98
[618] CLIP / COLP Number Assignment for ISDN Extension .........................................99
[813] Floating Number Assignment ...................................................................................99
[817] KX-TD197 Baud Rate Setting..................................................................................99
[990] System Additional Information ................................................................................100
4
Additions to the KX-TD816/1232
1.3
Proprietary Telephones
The following Panasonic proprietary telephones have become
available for the KX-TD816 and KX-TD1232.
Proprietary
Telephone
KX-T7425
KX-T7433
KX-T7436
KX-T7450
KX-T7520
KX-T7531
KX-T7533
KX-T7536
KX-T7550
6
Description
Digital, jog dial, speakerphone,
24 CO
Digital, 3-line LCD, jog dial,
speakerphone, 24 CO
Digital, 6-line LCD, jog dial,
speakerphone, 24 CO
Digital, jog dial, monitor, 12 CO
Digital, jog dial, speakerphone,
12 CO
Digital, 1-line LCD, jog dial,
speakerphone, 12 CO
Digital, 3-line LCD, jog dial,
speakerphone, 12 CO
Digital, 6-line LCD, jog dial,
speakerphone, 12 CO
Digital, jog dial, monitor, 12 CO
1.4
Options
Message Unit (KX-TD190)*1
This unit requires using the Direct Inward System Access (DISA)
feature and recording an Outgoing Message for the KX-TD816.
DISA allows you to access a desired destination in the system
directly from an external telephone. Once you have accessed the
DISA line, just dial the extension number. If necessary, the
Outgoing Messages (OGM) for external callers and /or an OGM
for Timed Reminder can be recorded.
D816
DIGITAL SUPER HYBRID SYSTEM
Central
Office
Panasonic
Telephone Line
Remote Unit (KX-TD198)*1
The Remote unit allows system programming and maintenance
from a remote location for the KX-TD816.
D816
DIGITAL SUPER HYBRID SYSTEM
Panasonic
Central
Office
Telephone Line
Personal Computer
with Modem
*1: Available for the KX-TD816 only.
7
1.4
Options
Primary Rate Interface ISDN Expansion Unit (KX-TD290)*2
D1232
DIGITAL SUPER HYBRID SYSTEM
The KX-TD290 Primary Rate Interface (PRI) ISDN Expansion
Unit adds one PRI ISDN line.
This unit can be only installed to the KX-TD1232 Master system.
When this unit is installed, CO lines 13 through 24 will become
unavailable if the Slave system is operating.
Panasonic
1 PRI ISDN line can be added.
Note
This unit can be installed with the KX-TD280 or KX-TD286, but not with the KX-TD180
or KX-TD184.
Remote Card (KX-TD197)*2
The Remote card allows system programming and maintenance
from a remote location for the KX-TD1232.
D1232
DIGITAL SUPER
HYBRID SYSTEM
Panasonic
Central
Office
Telephone Line
Personal Computer
with Modem
8
*2: Available for the KX-TD1232 only.
1.4
Options
DSS Console (KX-T7440 / KX-T7441 / KX-T7540 / KX-T7541)
D1232
DIGITAL SUPER
HYBRID SYSTEM
KX-T7
540
Panasonic
6
12
5
1
11
2
4
4
3
5
7
8
10
3
9
6
2
8
1
9
0
7
Paired Telephone
(Proprietary
Telephone)
DSS Console
Pair
Note
The KX-T7536 and KX-T7540 are illustrared as an example.
Add-on Key Module (KX-T7545)
Adds 12 CO buttons to a KX-T7500 series telephone.
SELE
CT
CON
F
INTE
MODE
RCO
M PR
OGR
AM
FLASH
FWD/DN
D
PAU
SE
MESS
AGE
TRAN
6
SFER
24
12
5
1
ABC
4
DEF
S
10
8
WXY
9
0
REDIA
Z
22
3
MNO
9
6
TUV
23
4
3
JKL
5
PQR
7
11
2
GHI
21
2
8
20
1
7
AUTO
AN
MUTE S/ AUTO
STOR DIAL/
E
19
18
L
HOLD
SP-P
17
HON
E
16
15
14
13
Add-on Key Module
9
1.4
Options
Connection
■ KX-T7440 / KX-T7441 and KX-T7400 series telephones
You can attach a KX-T7440 Digital DSS Console or KX-T7441 Attendant Console
and a KX-T7400 series telephone. Use the attached plate and screws.
10
1.4
Options
■ KX-T7540 / KX-T7541 and KX-T7500 series telephones
You can attach a KX-T7540 Digital DSS Console or KX-T7541 Attendant Console
and a KX-T7500 series telephone. Use the attached plate and screws.
1. Open the cover.
3. Attach the DSS console to your
telephone with the screws.
2. Remove (A) and (B) as shown
below.
4. Close the cover.
B
A
11
1.4
Options
■ KX-T7545 and KX-T7500 series telephones
To use the KX-T7545 Add-on Key Module, you must connect it to a KX-T7500 series
telephone. Use the attached screw.
1. Open the cover.
3. Insert the cable into the
connector.
2. Attach the KX-T7545 to your
telephone with the screw.
4. Close the cover.
Remove A as
shown.
A
12
2.4
Optional Cards and Units Installation
Primary Rate Interface ISDN Expansion Unit Connection
The KX-TD290 Primary Rate Interface (PRI) ISDN Expansion
Unit adds one PRI ISDN line.
When this unit is installed to the system, the maximum number of
available CO lines is limited to 42. CO lines 13 through 24 will
become unavailable if the Slave system is operating.
One PRI ISDN line adds 30 CO lines (CO 25 through CO 54) to the
system.
This unit can be only installed to the KX-TD1232 Master system.
The following procedures can be used to install either an 8-Station
Line Unit (KX-TD170), 16 SLT Line Circuit Unit (KX-TD174),
4-CO Line Unit (KX-TD180), E&M (TIE) Line Unit (KX-TD184),
ISDN 2-S0 Line Unit (KX-TD280), ISDN 6-S0 Line Unit (KXTD286) or Primary Rate Interface ISDN Expansion Unit (KXTD290). System programming is required for unit location
identification.
Default KX-TD816: bottom = 4-CO Line Unit,
top = 8-Station Line Unit
KX-TD1232: bottom = 4-CO Line Unit,
middle and top = 8-Station Line Unit
Programming Reference
Section 4, System Programming — in this manual
[109] Expansion Unit Type
Feature Reference
Section 3, Features — in this manual
Module Expansion
13
2.4.1 Location of Optional Cards and Units
The locations of the optional units are shown below.
Precautions
To protect the printed circuit boards (P-boards) from static electricity, do
not touch parts on the P-boards in the main unit and on the optional units.
ISDN unit (KX-TD280, KX-TD286, KX-TD290) installation;
The ISDN unit should not be installed only to the Slave system.
Expansion Unit for KX-TD1232
A maximum of two 8-Station Line Units (KX-TD170) or 16 SLT
Line Circuit Units and/or one CO Line/E&M (TIE) Line/ISDN
Line Unit (KX-TD180, KX-TD184, KX-TD280, KX-TD286) can
be installed to any expansion area. The PRI ISDN Line Unit (KXTD290) can be installed with the KX-TD280 or KX-TD286, but
not with the KX-TD180 or KX-TD184. You must use the KXTD170/174-② when you install the KX-TD290. The former KXTD170/174 does not work properly with the KX-TD290.
Please see the back of the unit and check “②” is marked.
②
Example
MODEL NO.KX-TD170
Max. 2 units
8-Station Line Unit,
KX-TD170
or
16 SLT Line Circuit
Unit, KX-TD174
Unit Connectors
One of the following units
• 4-CO Line Unit,
KX-TD180
• E&M (TIE) Line Unit,
KX-TD184
• 2-ISDN S0 Line Unit,
KX-TD280
• 6-ISDN S0 Line Unit,
KX-TD286
Area 3
Area 2
Area 1
Panasonic
D1232
Remove the front
cover plate(s).
Note
14
1-PRI ISDN Line Unit,
KX-TD290
This unit can be
installed with the KXTD280 or KX-TD286,
or individually.
• When starting the system for the first time or performing System Data
Clear, the location application will use the actual installation settings
instead of the system default settings.
• System Programming is required for location identification.
Refer to [109] “Expansion Card/Unit Type” in this manual.
Default:
KX-TD1232:Area 1= 4-CO Line Unit, Area 2, 3= 8-Station Line Unit
Installing the Expansion Unit (KX-TD290)*
1. Loosen the two screws on the cover plate.
Insert your fingers into the slits to remove
the cover plate.
4. Loosen the outside screw and slide the
cover to the right.
D1232
DIGITAL SUPER HYBRID SYSTEM
D1232
DIGITAL SUPER
HYBRID SYSTE
M
Slit
Slit
Panasonic
Panaso
nic
Note Any of the cover plates can be
removed, as needed.
2. Connect the cabinet cord to the
connector in the main unit firmly.
Outside screw
5. Secure the inside screw (included) to fix
the cabinet to the main unit.
D1232
D1232
DIGITAL SUPER HYBRID SYSTEM
DIGITAL SUPER HYBRID SYSTEM
Inside screw
Panasonic
Panasonic
3. Hook the cabinet onto the main unit
and slide the cabinet to the left until it
is secured.
D1232
DEGITAL SUPER HYBRID SYSTEM
Note Be sure to attach the inside screw
securely, or the unit will not work
properly.
6. Prepare the required plugs. Two 4-pin
plugs are included with the KX-TD290.
RB TB
or
RA TA
Panasonic
*: Available for the KX-TD1232 Master system only.
15
Installing the Expansion Unit (KX-TD290)*
7. Insert the plug into a jack on the unit.
Connect an earth wire to the earth terminal
on the extension expansion unit.
11. Fix the cords to the wall as
shown here, so that the front
cover can be opened.
D1232
DIGITAL SUPER HYBRID SYSTEM
8
7
6
IS
D
N
P
D
5
R
IG
RB
RA
I
IT
A
L
S
U
P
E
R
H
Y
B
R
ID
S
Y
S
TE
M
2C
O
4
3
2
1
TB
TA
P
an
as
on
ic
View of TEL Jack
Panasonic
Note
To Terminal Board or Modular
Jacks from the Central Office
• If two or three expansion units are
installed, cut the cabinet covers on the
lower cabinets to allow the cords from
the upper cabinets to go down through
the cabinet covers. To protect the
cords, smooth the cut edges.
8. Tie all of the cords into a bundle. If other
cords are exposed from the upper cabinets,
tie them also.
9. Close the cabinet cover and secure the
outside screw.
10. Cover the cords with the cord holder
(included with the main unit).
Cut here
D1232
DIGITAL SUPER HYBRID SYSTEM
Programming Reference
In this manual
Section 4, System Programming
[109] Expansion Unit Type
Cord holder
Panasonic
16
*: Available for the KX-TD1232 Master system only.
Installing the Message Unit (KX-TD190)* /
Remote Unit (KX-TD198)*
To install only the Message unit
or Remote unit
1. Loosen the two screws on the cover
plate. Insert your fingers into the slits
to remove the cover plate.
To attach another expansion unit to the
Message or Remote unit and install them to
the system
1. Remove the front cover of the Message or
Remote unit.
D816
DIGITAL SUPER
HYBRID SYSTE
M
Slit
Slit
Panaso
nic
Note There are two cover plates. Any of
them can be removed, as needed.
2. Connect the cabinet cord to the
connector in the main unit firmly.
D816
DIGITAL SUPER HYBRID SYSTEM
2. Attach the expansion unit to the Message
or Remote unit as shown below. Be sure
to connect the cabinet cords by inserting
the expansion unit cabinet cord through
the slot in the Message or Remote unit.
Expansion unit cabinet cord
Message/Remote unit
cabinet cord
Panasonic
3. Hook the cabinet onto the main unit
and slide the cabinet to the left until it
is secured.
D816
DIGITAL SUPER HYBRID SYSTEM
Panasonic
*: Available for the KX-TD816 only.
3. Remove the cover plate and connect the
cabinet cord to the connector in the main
unit firmly.
D816
DIGITAL SUPER HYBRID SYSTEM
Panasonic
17
Installing the Message Unit (KX-TD190)* /
Remote Unit (KX-TD198)*
4. Hook the cabinets onto the main unit and
slide the cabinets to the left until they are
secured.
D816
DIGITAL SUPER HYBRID SYSTEM
Panasonic
7. Tie all of the cords into a bundle. If other
cords are exposed from the upper cabinets,
tie them also.
8. Close the cabinet cover and secure the
outside screw.
9. Cover the cords with the cord holder. If
two cabinets are connected together and
attached to the main unit, use the cord
holder included with the Message or
Remote unit.
10. Fix the cords to the wall as shown here, so
that the front cover can be opened.
5. Loosen the outside screw of the expansion
unit and slide the cover to the right.
D816
DIGITAL SUPER HYBRID SYSTEM
D816
DIGITAL SUPER HYBRID SYSTEM
Panasonic
Panasonic
Outside screw
Cord holder
6. Secure the inside screw (included with the
Message or Remote unit) to fix the cabinet
to the main unit.
D816
DIGITAL SUPER HYBRID SYSTEM
Inside screw
Panasonic
18
*: Available for the KX-TD816 only.
Remote Card (KX-TD197) Installation*
To perform system programming and maintenance from a remote
location using a personal computer (PC), install the Remote card
(KX-TD197).
1. Open the front cover.
2. Insert the top side of the Remote card into
the two hooks on the main unit.
3. Press down on the two corners of the
bottom side of the Remote card.
4. Connect the cord to the Remote card
connector.
KX-TD196
REMOTE
Remote Card
Programming Reference
Section 4, System Programming – in this manual
[817] KX-TD197 Baud Rate Setting
Feature Reference
Section 3, Features – in this manual
System Programming and Diagnosis with Personal Computer
*: Available for the KX-TD1232 only.
19
C
3
Features
Calling / Connected Line Identification Presentation (CLIP / COLP)
Description
Calling Line Identification Presentation (CLIP) enables showing
the calling party’s number on the display of the called party’s
telephone when a call is received.
Connected Line Identification Presentation (COLP) enables
showing the called party’s number on the display of the calling
party’s telephone when the called party answers a call.
These features are one of ISDN’s services.
To use the CLIP or COLP service, number assignments are required
as follows:
• CLIP/COLP number for each outside line
• CLIP/COLP number for each extension
Conditions
• The CLIP service for outgoing CO calls can be restricted by System
Programming (CLIR: Calling Line Identification Restriction).
• The number actually sent to the calling or called party may be different
from the system programmed number. It depends on the contract with
your ISDN supplier.
Programming References
Section 4, System Programming
— Added and Changed Features for Installation Manual and Programming Tables
[418] ISDN Line Number Assignment
[419] ISDN Outgoing CLIR Service Assignment
— In this manual
[617] CLIP / COLP Number Assignment for Extension
[618] CLIP / COLP Number Assignment for ISDN Extension
[990] System Additional Information, Field (46)
Feature References
Section 3, Features
– Added and Changed Features for Installation Manual and Programming Tables
Calling Line Identification Restriction (CLIR)
— In this manual
Connected Line Identification Restriction (COLR)
Operation Reference
DPT Features
—Added and Changed Calling / Connected Line Identification Presentation (CLIP / COLP)
Features for
User Manual Vol. 5
20
3
Features
C
Connected Line Identification Restriction (COLR)
Description
Allows the extension user to restrict displaying the called party’s
number to the calling party when the calling party is making a call.
This feature is one of ISDN services.
Conditions
If displaying is enabled, the calling party can check the called party’s
number before the called party answers it (Connected Line Identification
Presentation).
Programming References
Section 4, System Programming
— Added and Changed Features for Installation Manual and Programming Tables
[418] ISDN Line Number Assignment
— In this manual
[617] CLIP / COLP Number Assignment for Extension
[618] CLIP / COLP Number Assignment for ISDN Extension
[990] System Additional Information, Field (46)
Feature Reference
Section 3, Features — in this manual
Calling / Connected Line Identification Presentation (CLIP/COLP)
Operation Reference
Not applicable.
21
I
3
Features
Integrated Services Digital Network (ISDN)
Description
The system can manage a call received from the ISDN line by
point-to-point or point-to-multi-point configuration.
An optional ISDN Line Unit, KX-TD280, KX-TD286, or KXTD290 is required. The KX-TD290 can only use “point-to point”
configuration.
Point-to-point
A call received through one ISDN port is sent directly to a specific
extension using a Direct Dialling In (DDI) service.
Point-to-multi-point
One ISDN port can support a maximum of ten Multiple Subscriber
Numbers (MSN). A call received through an ISDN port is sent
directly to the pre-assigned extension if the dialled number matches
the stored MSN.
Flow chart of required programs for ISDN
Disable
Select the ISDN ring service, DDI, MSN,
or Disable in programs [452]-[453] “ISDN
Ring Service Assignment — Day / Night”.
MSN
DDI
The extensions which are
assigned in program
[407]–[408] “DIL 1:1
Extension – Day / Night”
receive calls.
A received number is converted as program
[421] “ISDN DDI / MSN Removed Digit
/Added Number Assignment”.
DDI
The system searches for the
converted number in program
[150] “ISDN DDI Translation
Table”.
DDI
A call is received at a
specific extension,
assigned in programs
[151]-[152] “ISDN DDI
Ringing Assignment —
Day / Night”, directly
using the DDI service.
(Refer to the DDI feature.)
22
MSN
The system searches for the
converted number in program
[447] “MSN Assignment”.
MSN
A call is received at the
pre-assigned extension, assigned
in programs [448]-[449]
“Extension Ringing Assignment
— Day / Night for ISDN”,
directly using the MSN ringing
service. (Refer to the MSN
Ringing Service feature.)
3
Features
Conditions
I
• If “Disable”is assigned in programs [452]-[453] “ISDN Ring Service
Assignment — Day / Night” and an extension is not assigned in
programs [407]-[408] “DIL 1:1 Extension — Day / Night”, the call will
be received by DIL 1:N.
• If the destination is in the Do Not Disturb mode, or has disabled the
Call Waiting mode and is busy, the following may occur:
1) The call is sent to the IRNA destination.
2) The call is received only at a flashing corresponding CO button.
(Default)
3) The system sends a busy tone to the network.
Connection References
Section 2, Installation
— Added and Changed Features for Installation Manual and Programming Tables
ISDN 2-S0 Line Unit Connection —
— Added and Changed Features for Installation Manual and Programming Tables Vol. 2
ISDN 6-S0 Line Unit Connection
— In this manual
Primary Rate Interface ISDN Expansion Unit Connection
Programming References
Section 4, System Programming
— Installation Manual
[407]–[408] DIL 1:1 Extension – Day / Night
— Added and Changed Features for Installation Manual and Programming Tables Vol. 2
[424] ISDN Port Type
[425] ISDN Layer 1 Active Mode
[426] ISDN Configuration
[427] ISDN Data Link Mode
[428] ISDN TEI Mode
[429] ISDN Extension Multiple Subscriber Number
— In this manual
[150] ISDN DDI Translation Table
[151]-[152] ISDN DDI Ringing Assignment — Day / Night
[421] ISDN DDI / MSN Removed Digit / Added Number Assignment
[447] MSN Assignment
[448]-[449] Extension Ringing Assignment — Day / Night for ISDN
[452]-[453] ISDN Ring Service Assignment — Day / Night
[990] System Additional Information, Fields (31), (32)
23
I
3
Features
• The recommended parameter combinations are listed below. The
underlined selections are recommended. The selections marked with
“*” are activated automatically, regardless of the assignment.
[424] ISDN [425] ISDN [426] ISDN [427] ISDN
Program Port Type Layer 1 Active Configuration Data Link
Mode
Mode
Permanent
Fixed/
Automatic
(not available)
Call
Automatic
Call/
Permanent
P–P
Call/
Permanent
Fixed*
Call/
Permanent
P–M
Call*
Automatic*
Permanent
P–P
Call
CO
Parameter
Extension
[428] ISDN
TEI Mode
P–M
Feature References
Section 3, Features — in this manual
Direct Dialling In (DDI)
Multiple Subscriber Number
(MSN) Ringing Service
Operation Reference
Not Applicable.
24
3
M
Features
Multiple Subscriber Number (MSN) Ringing Service
Description
Provides automatic direction of an incoming ISDN line call to a
pre-assigned extension. One ISDN port can support a maximum of
ten Multiple Subscriber Numbers (MSN).
Assignable destinations are: (1) Operator, (2) extension,
(3) Hunting Group, (4) TAFAS, (5) DISA (6) modem, (7) Phantom
extension, (8) Voice Mail extension, and (9) ISDN extension.
The extensions which are assigned in programs [448]–[449]
“Extension Ringing Assignment – Day / Night for ISDN” receive a
call if the dialled number matches the stored MSN.
<Example>
ISDN Port Location
No.
No.
1
Conditions
-1
-2
:
-10
[447]
MSN Assignment
2011111
2012222
[448] Extension
[449] Extension
Ringing Assignment – Ringing Assignment –
Night for ISDN
Day for ISDN
101
102
201
202
• An incoming MSN number is converted as programmed in [421] ISDN
DDI / MSN Removed Digit / Added Number Assignment.
• To use the MSN ringing service, “MSN” must be selected in program
[452]-[453] “ISDN Ring Service Assignment — Day / Night”.
• If an MSN number through the ISDN line does not match the number
assigned in program [447] “MSN Assignment”, the call will not be
received. If no MSN numbers are assigned in program [447], the call
will be sent to an extension according to DIL 1:1 or DIL 1:N.
• When using point-to-multi-point configuration with a Basic Rate
Interface (BRI), we recommend not connecting another ISDN
equipment in parallel with your system. As only two channels can be
used at one time with the BRI, other ISDN equipment may monopolize
the channels.
Programming References
Section 4, System Programming
[407]–[408] DIL 1:1 Extension – Day / Night — Installation Manual
— in this manual
[421] ISDN DDI / MSN Removed Digit / Added Number Assignment
[447] MSN Assignment
[448]–[449] Extension Ringing Assignment — Day / Night for ISDN
[452]–[453] ISDN Ring Service Assignment — Day / Night
[990] System Additional Information, Fields (31), (32)
Feature Reference
Section 3, Features — in this manual
Integrated Services Digital Network (ISDN)
Operation Reference
Not Applicable.
25
O
3
Features
Off-Hook Monitor
Description
Allows KX-T7433, KX-T7436, KX-T7531, KX-T7533, and KXT7536 digital proprietary telephone users to let other users listen to
the conversation through the built-in speaker, while continuing the
same call using the handset.
Condition
This is effective for a handset conversation.
Programming Reference
Section 4, System Programming — in this manual
[148] Off-Hook Monitor
Feature References
None
Operation Reference
DPT Features
—Added and Changed Off-Hook Monitor
Features for
User Manual Vol. 5
26
3
Features
R
Ring Group
Description
All extensions in a ring group ring simultaneously by dialling the
floating number of the extension group. A ring group can be a
Station Hunting type.
Conditions
• Types of calls whose destination can be the ring group are:
Outside calls – Direct Dialling In (DDI); Direct In Lines (DIL) 1:1;
Direct Inward System Access (DISA);
Intercept Routing – No Answer (IRNA);
Uniform Call Distribution (UCD)-Overflow
Intercom calls – Extension; Transfer
• The floating number of the extension group is used for all other hunting
types, Circular, Termination, Voice Mail (VM), Automated Attendant
(AA) and Uniform Call Distribution (UCD).
Programming References
Section 4, System Programming
— Installation Manual
[602] Extension Group Assignment
— In this manual
[106] Station Hunting Type
[813] Floating Number Assignment
Feature References
Section 3, Features — in this manual
Floating Station
Station Hunting
Operation Reference
Not applicable.
27
4.3
148
System Programming
Off-Hook Monitor
Description
Enables or disables the Off-Hook Monitor.
Selection
Enable / Disable
Default
Enable
Programming
1.
Enter 148.
Display: Off-Hook Monitor
2.
Press NEXT.
Display example: Monitor:Enable
3.
Keep pressing SELECT until the desired selection is
displayed.
4.
Press STORE.
5.
Press END.
Condition
The Off-Hook Monitor is only available for KX-T7433, KX-T7436,
KX-T7531, KX-T7533 and KX-T7536 telephone users.
Feature Reference
Section 3, Features
Off-Hook Monitor
28
4.3
System Programming
150
ISDN DDI Translation Table
Description
Assigns a destination location of incoming DDI numbers.
Incoming DDI numbers are received at extensions assigned to each
location number.
Selection
• Location number: 000 through 399
• DDI number: 16 digits max.
Default
All locations – Not stored
Programming
1.
Enter 150.
Display: DDI Assign
2.
Press NEXT.
Display: Location No?→
3.
Enter a location number.
To enter location number 000, you can also press NEXT.
Display example: 000:Not Stored
4.
Enter a DDI number.
To delete the current entry, press CLEAR.
To change the current entry, press CLEAR and enter the new number
5.
Press STORE.
6.
To program another location number, press NEXT or
PREV, or SELECT and the desired location number.
7.
Repeat steps 4 through 6.
8.
Press END.
Conditions
• The DDI number can be a maximum of 16 digits.
Valid numbers are from 0 to 9.
• Programs [151]-[152] “ISDN DDI Ringing Assignment — Day /
Night” are used to assign an extension to each location number in the
day and night modes.
• This program becomes available when “DDI” is selected in program
[452]-[453] “ISDN Ring Service Assignment — Day / Night”.
Feature References
Section 3, Features — in this manual
Direct Dialling In (DDI)
Integrated Services Digital Network (ISDN)
29
4.3
151-152
System Programming
ISDN DDI Ringing Assignment — Day / Night
Description
Assigns the destination of each DDI number in the day and night
modes.
Selection
• Location number: 000 through 399
• Extension number: 2 to 4 digits /
0 (the same as [990] fields (31) and (32)
assignments)
Default
All locations – Not stored
Programming
1.
Enter a program address (151 for day or 152 for night).
Display example: DDI Ring Day
2.
Press NEXT.
Display: Location No?→
3.
Enter a location number.
To enter location number 000, you can also press NEXT.
Display example: 000:Not Stored
4.
Enter an extension number or 0.
Display example:000:EXT
201
To change the current entry, press CLEAR and enter the new number.
Conditions
30
5.
Press STORE.
6.
To program another location number, press NEXT or
PREV, or SELECT and the desired location number.
7.
Repeat steps 4 through 6.
8.
Press END.
• Each extension number can be 2 to 4 digits, consisting of 0 through 9.
• When “0” is assigned, the incoming DDI number is sent to the
destination assigned in program [990] “System Additional Information,
Fields (31) and (32).
• These programs become available when “DDI” is selected in program
[452]-[453] “ISDN Ring Service Assignment — Day / Night”.
4.3
System Programming
151-152
ISDN DDI Ringing Assignment — Day / Night (contd.)
• Assignable numbers are programmed in the following programs.
Extension numbers – [003] “Extension Number Set”
ISDN extension numbers – [012] “ISDN Extension Number Set”
Voice Mail numbers – [118] “Voice Mail Extension Number Assignment”
Phantom numbers – [130] “Phantom Extension Number Assignment”
Floating numbers – [813] “Floating Number Assignment”
Feature References
Section 3, Features — in this manual
Direct Dialling In (DDI)
Integrated Services Digital Network (ISDN)
31
4.6
421
CO Line Programming
ISDN DDI / MSN Removed Digit / Added Number Assignment
Description
Assigns the removed digits and added number to a subscriber’s
number, and a DDI number sent from the network.
Selection
• ISDN port number: KX-TD816 – 01 through 04,
KX-TD1232 – 01 through 12,
( =all ISDN ports)
• Removed digits: 0 to 16 (0=no deleting)
• Added number: 4 digits (max.)
Default
All ISDN ports – Removed digit=0; Added number=Not stored
Programming
1.
Enter 421.
Display: DDI/MSN RMV/Add
2.
Press NEXT.
Display: Port NO?→
3.
Enter an ISDN port number.
To enter ISDN port number 01, you can also press NEXT.
Display example: 01: 0,
4.
Enter the digit(s) to be deleted.
To change the current entry, press CLEAR and enter the new number.
5.
Press
.
Display example: 01: 3,
6.
Enter the number(s) to be added.
To change the current entry, press CLEAR and enter the new number.
Conditions
32
7.
To program another port, press NEXT or PREV, or
SELECT and the desired CO line number.
8.
Press STORE.
9.
Press END.
• For the KX-TD1232, port numbers 01 through 06 are for the Master
System and port numbers 07 through 12 are for the Slave, if available.
• Each added number has a maximum of four digits, consisting of
0 through 9.
4.6
CO Line Programming
421
ISDN DDI / MSN Removed Digit / Added Number Assignment (contd.)
• To assign all ISDN ports to the same number, press the key
in step 3. In this case, the display will show the contents programmed
for Port 01.
• Example:
If the removed digits are assigned as “6” and the added number is
assigned as “ 2”, the number sent from the network will be changed as
follows: 85492603
Six digits are deleted and “2” is added, and the number becomes “203”.
Feature References
Section 3, Features — in this manual
Direct Dialling In (DDI)
Multiple Subscriber Number (MSN)
33
4.6
447
CO Line Programming
MSN Assignment
Description
Assigns a maximum of ten Multiple Subscriber Numbers (MSN) on
an ISDN port basis.
Selection
• Port number: KX-TD816 – 01 through 04
KX-TD1232 – 01 through 12
• Location number: 1 through 10
• MSN: 16 digits (max.)
Default
All ports – All locations – Not stored
Programming
1.
Enter 447.
Display: MSN Assign
2.
Press NEXT.
Display: Port NO?→
3.
Enter a port number.
To enter port number 01, you can also press NEXT.
Display example: 01:01 :Not Stored
Location number
Port number
4.
Enter a MSN.
To delete the current entry, press CLEAR.
To change the current entry, press CLEAR and enter the new number.
5.
Press STORE.
6.
To program another location, press NEXT or PREV.
7.
Repeat steps 4 through 6.
8.
To program another port, press SELECT and the desired
port number.
9.
Repeat steps 4 through 8.
10.
Press END.
Conditions
• Each MSN can be 16 digits, consisting of 0 through 9.
• For the KX-TD1232, port numbers 01 through 06 are for the Master
System and 07 through 12 are for the Slave, if available.
• This program becomes available when “MSN” is selected in program
[452]-[453] “ISDN Ring Service Assignment — Day / Night”.
Feature Reference
Section 3, Features — in this manual
Integrated Services Digital Network (ISDN)
Multiple Subscriber Number (MSN)
34
4.6
CO Line Programming
448-449
Extension Ringing Assignment — Day / Night for ISDN
Description
Determines which extension receives a call on a MSN basis for the
ISDN port in both the day and night modes.
Selection
• Port number: KX-TD816 – 01 through 04
KX-TD1232 – 01 through 12
• Location number: 1 through 10
• Extension number: 2 to 4 digits / 0 (the same as [990] fields (31)
and (32) assignments) / Disable
Default
All ports – All locations – Disable – Day / Night
Programming
1.
Enter a program address (448 for day or 449 for night).
Display example: MSN Ring Day
2.
Press NEXT.
Display: Port NO?→
3.
Enter a port number.
To enter port number 01, you can also press NEXT.
Display example: 01:01 :Disable
Location number
Port number
4.
Enter an extension number or 0.
To change the current entry, press CLEAR and the new number.
To select “Disable”, press CLEAR.
Conditions
5.
Press STORE.
6.
To program another location, press NEXT or PREV.
7.
Repeat steps 4 through 6.
8.
To program another port, press SELECT and the desired
port number.
9.
Repeat steps 4 through 8.
10.
Press END.
• Each extension number can be 2 to 4 digits, consisting of 0 through 9.
• When “0” is assigned, the incoming MSN number is sent to the
destination assigned in program [990] “System Additional Information,
Fields (31) and (32).
35
448-449
4.6
CO Line Programming
Extension Ringing Assignment — Day / Night for ISDN (contd.)
• For the KX-TD1232, port numbers 01 through 06 are for the Master
System and 07 through 12 are for the Slave, if available.
• These programs become available when “MSN” is selected in program
[452]-[453] “ISDN Ring Service Assignment — Day / Night”.
• Assignable numbers are programmed in the following programs.
Extension numbers – [003] “Extension Number Set”
ISDN extension numbers – [012] “ISDN Extension Number Set”
Voice Mail numbers – [118] “Voice Mail Extension Number
Assignment”
Phantom numbers – [130] “Phantom Extension Number Assignment”
Floating numbers – [813] “Floating Number Assignment”
Feature References
36
Section 3, Features — in this manual
Integrated Services Digital Network (ISDN)
Multiple Subscriber Number (MSN)
4.6
CO Line Programming
450
PRI Configuration*
Description
Assigns the number of B channels which are actually used out of
the 30 PRI line channels. The CRC4 mode can be also assigned.
Selection
• B channel number: 0 through 30
• CRC4: Disable/Enable
Default
B channel number – 0 line/CRC4 – Enable
Programming
1.
Enter 450.
Display: PRI Config.
2.
Press NEXT.
Display example:Use: 0 Line
3.
Enter the number of B channels.
4.
Press STORE.
5.
Press NEXT to assign the CRC4 mode.
Display example:CRC4:Disable
6.
Keep pressing SELECT until the desired selection is
displayed.
7.
Press STORE.
8.
Press END.
Condition
If the available number of B channels are not assigned as “0 Line”,
CO 13 through 24 will become “No Connect”, and the assigned
B channel numbers of CO lines starting from CO 25 will
become “Connect” automatically in program [400] “CO Line Connection
Assignment”.
For example, if the B channel number is assigned as “3”, CO 25 through
27 will become “Connect”.
Feature References
None
*: Available for KX-TD1232 only.
37
4.6
451
CO Line Programming
PRI Reference CO*
Description
Assigns which CO line number system data each PRI line uses
except for the following programs:
• [401] CO Line Group Assignment
• [417] CO Line Name Assignment
• [418] ISDN Line Number Assignment
After assigning this program, the following program data will
become available for PRI lines CO 25 through 54.
• [407]-[408] DIL 1:1 Extension — Day / Night
• [419] ISDN Outgoing CLIR Service Assignment
• [421] ISDN DDI / MSN Removed Digit / Added Number
Assignment
• [452]-[453] ISDN Ring Service Assignment — Day / Night
• [603]-[604] DIL 1:N Extension and Delayed ringing
— Day / Night
• [605]-[606] Outgoing Permitted CO Line Assignment
— Day / Night
• [614]-[615] Outgoing Permitted CO Line Assignment
— Day / Night for ISDN Extension
Selection
• PRI CO line number: 25 through 54,
• CO line number: 01 through 24
Default
All CO lines (PRI line) – CO 13
Programming
1.
( =all CO lines)
Enter 451.
Display: PRI Reference CO
2.
Press NEXT.
Display: CO NO?–>
3.
Enter the PRI CO line number (25 through 54).
Display example:CO25 : CO 13
Conditions
38
4.
Enter the desired CO line number (01 through 24).
5.
Press STORE.
• For the KX-TD1232, CO 01 through CO 12 are for the Master system
and CO 13 through CO 24 are for the Slave, if available.
• CO 25 through CO 54 become available when the KX-TD290
expansion unit is installed in the Master System.
*: Available for KX-TD1232 only.
4.6
CO Line Programming
PRI Reference CO*
451
(contd.)
• To assign all CO lines to the same selection, press the key in step 3.
In this case, the display shows the contents programmed for CO 25.
Feature References
None
*: Available for KX-TD1232 only.
39
4.6
452-453
CO Line Programming
ISDN Ring Service Assignment — Day / Night
Description
Assigns the ISDN service type for each ISDN port.
Selection
• Port number: KX-TD816 – 01 through 04,
KX-TD1232 – 01 through 12,
( =all ISDN ports)
• DDI / MSN / Disable
Default
All ports – Disable – Day / Night
Programming
1.
Enter a program address (452 for day or 453 for night).
Display example: ISDN Ring Day
2.
Press NEXT.
Display: Port NO?→
3.
Enter a port number.
To enter port number 01, you can also press NEXT.
Display example: 01:Disable
4.
Keep pressing SELECT until the desired selection is
displayed.
5.
Press STORE.
6.
To program another port, press SELECT and the desired
port number.
7.
Repeat steps 4 through 6.
8.
Press END.
Conditions
• This assignment depends on the contract with your ISDN supplier.
• For the KX-TD1232, port numbers 01 through 06 are for the Master
System and 07 through 12 are for the Slave, if available.
• To assign all ISDN ports to the same number, press the key in step 3.
In this case, the display shows the contents programmed for Port 01.
Feature References
Section 3, Features — in this manual
Direct Dialling In (DDI)
Multiple Subscriber Number (MSN)
40
4.7
COS Programming
509
Off-Hook Call Announcement (OHCA)
Description
Enables or disables the Off-Hook Call Announcement (OHCA) on
a Class of Service (COS) basis.
Selection
• COS number: 1 through 8,
• Enable / Disable
Default
All COS – Enable
Programming
1.
( =all COS)
Enter 509.
Display: OHCA
2.
Press NEXT.
Display: COS NO?→
3.
Enter a COS number.
To enter COS number 1, you can also press NEXT.
Display example: COS1:Enable
4.
Keep pressing SELECT until the desired selection is
displayed.
5.
Press STORE.
6.
To program another COS, press NEXT or PREV, or
SELECT and the desired COS number.
7.
Repeat steps 4 through 6.
8.
Press END.
Conditions
• To assign all COS to one selection, press the key in step 3. In this
case, the display shows the contents programmed for COS 1.
• Program [601] “Class of Service” assigns a Class of Service to each
extension.
Feature References
Section 3, Features — in this manual
Off-hook Call Announcement (OHCA)
Whisper OHCA
41
4.8
617
Extension Programming
CLIP / COLP Number Assignment for Extension
Description
Assigns a CLIP/COLP number for each extension.
Selection
• Jack number: KX-TD816 – 01 through 16, (-1 / -2),
KX-TD1232 – 01 through 64, (-1 / -2),
( =all jacks, -1 = first part, -2 = second part)
• CLIP/COLP number: 16 digits max.
Default
All jacks – Not stored
Programming
1.
Enter 617.
Display:
2.
CLIP for EXT
Press NEXT.
Display: Jack NO? →
3.
Enter a jack number.
To enter jack number 01, you can also press NEXT.
To select the second part (-2), press NEXT after entering the jack
number.
Display example: #01-1:Not Stored
4.
Enter a CLIP/COLP number.
To change the current entry, press CLEAR and enter the new number.
5.
Press STORE.
6.
To program another jack, press NEXT or PREV, or
SELECT and the desired jack number.
7.
Repeat steps 4 through 6.
8.
Press END.
Conditions
• A CLIP/COLP number consists of a maximum of sixteen digits,
0 through 9.
• For the KX-TD1232, jack numbers 01 through 32 are for the Master
System and 33 through 64 are for the Slave, if available.
• To assign all jacks to the same selection, press the key in step 3.
In this case, the display shows the contents programmed for Jack 01.
Feature Reference
Section 3, Features
Added and Changed Features for the Installation Manual and Programming Tables
Calling Line Identification Restriction (CLIR)
In this manual
Calling / Connected Line Identification Presentation (CLIP / COLP)
Connected Line Identification Restriction (COLR)
42
4.8
Extension Programming
618
CLIP / COLP Number Assignment for ISDN Extension
Description
Assigns a CLIP/COLP number for an ISDN extension.
Selection
• Port number: KX-TD816 – 01 through 06,
KX-TD1232 – 01 through 12,
( =all ISDN ports)
• CLIP/COLP number: 16 digits max.
Default
All ports – Not stored
Programming
1.
Enter 618.
Display: CLIP for I-EXT
2.
Press NEXT.
Display: Port NO? →
3.
Enter a port number.
To enter port number 01, you can also press NEXT.
Display example: #01:Not Stored
4.
Enter a CLIP/COLP number.
To change the current entry, press CLEAR and enter the new number.
5.
Press STORE.
6.
To program another port, press NEXT or PREV, or SELECT
and the desired port number.
7.
Repeat steps 4 through 6.
8.
Press END.
Conditions
• A CLIP/COLP number consists of a maximum of sixteen digits, 0
through 9.
• For the KX-TD1232, port numbers 01 through 06 are for the Master
System and 07 through 12 are for the Slave, if available.
• To assign all ISDN ports to the same number, press the key in step 3.
In this case, the display will show the contents programmed for
Port 01.
Feature Reference
Section 3, Features
Added and Changed Features for the Installation Manual and Programming Tables
Calling Line Identification Restriction (CLIR)
In this manual
Calling / Connected Line Identification Presentation (CLIP / COLP)
Connected Line Identification Restriction (COLR)
43
817
4.9
Resource Programming
KX-TD197 Baud Rate Setting
Description
Assigns the KX-TD197 standard. There are two standards
available – BELL and CCITT-V.34.
Selection
BELL / V.34-9600 / V.34-14400 / V.34-19200 / V.34-28800 /
V.34-33600
Default
V.34-33600
Programming
1.
Enter 817.
Display: TD197 TYPE
2.
Press NEXT.
Display example: Mast.:V.34-33600
3.
Keep pressing SELECT until the desired selection is
displayed.
4.
Press NEXT.
Display example: Slave:V.34-33600
5.
Keep pressing SELECT until the desired selection is
displayed.
6.
Press STORE.
7.
Press END.
Conditions
• Select the standard used by your modem.
• This assignment is effective for both the Master and Slave systems.
Feature Reference
Section 3, Features — in this manual
System Programming and Diagnosis with Personal Computer
44
Changes
FEATURE TITLE
MANUAL
SECTION
2.4.9
System Connection
(Installation Manual)
Automatic Route
Selection (ARS)
(Installation Manual)
Call Forwarding – to
CO Line
(Installation Manual)
Call Transfer;
Unscreened – to
Extension
(Installation Manual)
Direct Dialling In
(DDI)
Direct Inward System
Access (DISA)
(Installation Manual)
46
Section 2
Section 3
Section 3
Section 3
Section 3
(Installation Manual)
Section 3
REVISION
The first note has been changed as follows.
• System Connection may take a while (5 to 15 minutes
depending on your software version) to be completed
after the power is turned on.
Confirm the connection between the systems by
making a call from a Master Unit Ext. to a Slave Unit
Ext.
The following condition has been added.
• ARS with DTMF: When making a call to an ISDN
line using the memory dialing, and the number has a
pause in it, the number after the pause will be sent to
the line as DTMF signals. This function is useful when
accessing a special network service which can be
accessed only by the DTMF signaling. This function is
enabled or disabled in program [990], “System
Additional Information, Field (42).”
The first condition has been changed as follows:
• Types of calls which are forwarded by this function are:
CO calls – DIL 1:1; DISA; Intercept
Intercom calls – Extension; Transfer
The following condition has been added to the
Conditions section.
• An outside call can be transferred directly to a Uniform
Call Distribution (UCD) group so that an idle
extension is automatically hunted by UCD. If all
extensions in a UCD group are busy, the incoming
outside call will be handled by the UCD Time Table.
This feature has been changed to the new one. See page
49.
This feature has become available for KX-TD816 users.
Please ignore “*: Available for the KX-TD1232 only”
marked for “DISA”, “modem” and other related items in
the main Installation Manual and other additional
manuals.
In the Conditions section, the sixth condition has been
changed as follows.
• This system can store up to 32 programmable DISA
user codes. Each code should be unique. It is
possible to assign a Class of Service number to each
code. The Class of Service of the code defines Toll
Restriction level.
FEATURE TITLE
Flexible Numbering
MANUAL
SECTION
(Installation Manual)
Section 3
REVISION
The following number has been added to the table.
Flexible Feature Numbers
Number Feature
87
CLIP/COLP
Floating Station
Default
711
This feature has been changed to a new one.
See pages 50 and 51.
(Installation Manual) The Description section has been changed to a new one.
Section 3
See page 52.
(Installation Manual) This feature has been become available for KX-TD816
Section 3
users. Please ignore “*: Available for the KX-TD1232
only” marked for “Outgoing Message” in the main
Installation Manual and other additional manuals.
(Installation Manual) The Description section has been changed to a new one.
Section 3
See page 53.
(Installation Manual)
Section 3
Module Expansion
Outgoing Message
(OGM)
Station Hunting
Station Message Detail
Recording (SMDR)
System Programming
and Diagnosis with
Personal Computer
Entering Characters
In the Example of SMDR printout format:
Explanation section, “(8) CD (Condition Code)” has
Section 3
been changed as shown below.
(8) CD (Condition Code): shows call handling type
with the following codes:
TR: Transfer
FW: Call Forwarding to CO Line
D0: Non Security CO Line Access using DISA
D1 through D32: DISA User Codes 1 through 32
RM: Remote access to a modem
To print out the record of System Programming
items that have been assigned, use the program
[802] “System Data Printout”.
(Installation Manual) The Remote Programming has become available for the
Section 3
KX-TD816.
The following program has been added to the
Programming References section.
Section 4, System Programming
[817] KX-TD197 Baud Rate Setting
(Installation Manual) This section has been changed as shown on pages 54 to
Section 4
57.
(Installation Manual)
47
FEATURE TITLE
[005]
Flexible CO Button
Assignment
[100]
Flexible Numbering
MANUAL
SECTION
(Installation Manual)
Section 4
(Installation Manual)
The Selection section has been changed as shown on
page 58.
Feature Number List — Additional numbers
Section 4
Number Feature
87
CLIP/COLP
[106]
Station Hunting Type
(Installation Manual)
[109]
Expansion Unit Type
[401] CO Line Group
Assignment
[417] CO Line Name
Assignment
[418] ISDN Line
Number Assignment
Programs [131], [420],
[610], and [611]
(Installation Manual)
Programs [127],
[213]-[215],
[809]-[812], and [814]
[813] Floating
Number Assignment
(Installation Manual)
[990] System
Additional
Information
(Installation Manual)
48
REVISION
Section 4
Default
711
This program has been changed as shown on pages 59
to 60.
Section 4
This program has been changed as shown on pages 61
to 62.
(Installation Manual)
This program has been changed as shown on page 63.
Section 4
(Installation Manual)
This program has been changed as shown on page 64.
Section 4
(Installation Manual)
Section 4
(Installation Manual)
Section 4
Section 4
(Installation Manual)
Section 4
Section 4
This program has been changed as shown on pages 65
to 66.
These programs have become unavailable. Please
disregard any descriptions about them.
These programs have become available for KX-TD816
users.
This program has been changed as shown on pages 67
to 68.
This program has been changed as shown on pages 69
to 76.
3
D
Features
Direct Dialling In (DDI)
Description
Provides automatic direction of an incoming ISDN line call to a
specific extension. Assignable destinations are: Assignable
destinations are: (1) Operator, (2) extension, (3) Hunting Group,
(4) TAFAS, (5) DISA (6) modem, (7) Phantom extension, (8) Voice
Mail extension, and (9) ISDN extension. This requires a number
received from the ISDN network. The number is converted to a
specific extension number by using a pre-programmed conversion
table.
[150]
Location
ISDN DDI Translation
No.
Table
000
001
[152]
ISDN DDI Ringing
Assignment — Night
101
102
201
202
…
…
…
…
Conditions
2011111
2012222
[151]
ISDN DDI Ringing
Assignment — Day
399
2019999
109
109
• To use the DDI service, “DDI” must be selected in program [452]-[453]
“ISDN Ringing Service Assignment — Day / Night”.
• An incoming DDI call is converted as programmed in [421] “ISDN
DDI / MSN Removed Digit / Added Number Assignment”.
• If an incoming DDI call cannot be sent to a specific extension, it will be
sent to an operator or extension according to DIL 1:N. Selecting an
operator or extension depends on program [990] “System Additional
Information, Fields (31), (32)”.
Programming References
Section 4, System Programming — in this manual
[150] ISDN DDI Translation Table
[151]-[152] ISDN DDI Ringing Assignment — Day / Night
[421] ISDN DDI / MSN Removed Digit / Added Number Assignment
[452]-[453] ISDN Ring Service Assignment — Day / Night
[990] System Additional Information, Fields (31), (32)
Feature Reference
Section 3, Features — in this manual
Integrated Services Digital Network (ISDN)
Operation References
Not applicable.
49
F
3
Features
Floating Station
Description
You can assign virtual extension numbers for items to make them
appear to be extensions. These numbers are defined as floating
numbers (FN). The following items can have floating numbers:
(1) External paging instruments: used for the TAFAS feature.
One FN is available for the KX-TD816.
Four FNs are available for the KX-TD1232.
These FNs can be assigned as:
a) DIL 1:1 destination
b) DISA destination
c) Intercept Routing destination
(2) DISA messages: used for the DISA feature.
Two FNs are available.
These FNs can be assigned as:
a) DIL 1:1 destination
b) Intercept Routing destination
(3) Modem: used for system administration. One FN is
available.
This can be assigned as
a) DIL 1:1 destination
b) DISA destination can also be used as an extension
number to call the modem.
(4) Extension group: used for the Station Hunting feature.
Eight FNs are available. These FNs can be assigned as :
a) DIL 1:1 destination
b) Extension
c) Intercept Routing destination
(5) Digital Test Access: used for testing.
One DTA is available.
The FN can be used as an extension.
Conditions
Floating numbers cannot be used for setting a feature such as Call
Forwarding, etc.
Connection References
Section 2, Installation
— Installation Manual
2.4.5 DISA Card Installation*
2.4.6 Remote Card Installation*
— In this manual
Installing the Message Unit (KX-TD190) / Remote Unit (KX-TD198)
50
*: Available for the KX-TD1232 only.
3
Features
F
Programming References
Section 4, System Programming
— Installation Manual
[100] Flexible Numbering, 1st through 16th hundred extension blocks
— In this manual
[813] Floating Number Assignment
Feature References
None
Operation Reference
Not applicable.
51
M
3
Features
Module Expansion
Description
The KX-TD816 starts with 4 CO line and 8 extension jacks.
The KX-TD1232 starts with 8 CO line and 16 extension jacks.
They can be expanded by installing optional units.
• An 8-Station Line Unit adds 8 extension jacks.
• A 16-SLT Line Circuit Unit adds 8 extension jacks containing
two single line telephones.
• A 4-CO Line Unit adds 4 CO line jacks.
• An E&M (TIE) Line Unit adds 4 E&M (TIE) lines.
• An ISDN 2-S0 Line Unit adds 2 ISDN S0 lines.
• An ISDN 6-S0 Line Unit adds 6 ISDN S0 lines.
• A Primary Rate Interface (PRI) ISDN Expansion Unit adds one
PRI ISDN line.
The KX-TD816 can have either one 8-Station Line Unit or 16-SLT
Line Circuit Unit, and either one 4-CO Line Unit, E&M (TIE) Line
Unit, 2-ISDN S0 Line Unit or 6-ISDN S0 Line Unit. The KXTD1232 can have a maximum of two 8-Station Line Units or 16SLT Line Circuit Units, and either one 4-CO Line Unit, E&M (TIE)
Line Unit, 2-ISDN S0 Line Unit or 6-ISDN S0 Line Unit. One
Primary Rate Interface (PRI) ISDN Expansion Unit can be installed
to the Master system with a 2-ISDN S0 Line Unit or 6-ISDN S0
Line Unit, or individually.
Conditions
• The number of extension jacks may be different from the number of
telephones if the Paralleled Telephone or the eXtra Device port feature
is enabled. These features allow one extension jack to have two
telephones.
• When an expansion unit is installed, the unit identification is set by
System Programming.
Connection References
Section 2, Installation
— Installation Manual
2.4.2 4-CO Line Unit Connection
2.4.3 8-Station Line Unit Connection
— Added and Changed Features for Installation Manual and Programming Tables
2-ISDN S0 Line Connection
— Added and Changed Features for Installation Manual and Programming Tables Vol. 2
6-ISDN S0 Line Connection
— In this manual
Primary Rate Interface ISDN Expansion Unit Connection
Programming References
Section 4, System Programming — in this manual
[109] Expansion Unit Type
Feature References
Section 3, Features — Installation Manual
EXtra Device Port (XDP)
Paralleled Telephone
Operation Reference
Not applicable.
52
3
Features
S
Station Hunting
Description
If a called extension is busy, Station Hunting redirects the
incoming call to an idle member of the extension group. Idle
extensions are automatically hunted according to the programmed
type. There are six hunting types available – Circular, Termination,
Voice Mail (VM), Automated Attendant (AA), Ring Group, and
UCD (Uniform Call Distribution).
Circular hunting: The extensions are hunted until an idle
one is found, regardless of jack number.
Termination hunting: The extensions are hunted until an
extension which has the highest jack number in the group is
reached.
VM hunting: All the VM ports are hunted until an idle one
which allows VM Service is found.
AA hunting: All the AA ports are hunted until an idle one
which allows AA Service is found.
UCD: Refer to “Uniform Call Distribution (UCD)” in the
Added and Changed Features for Installation Manual and
Programming Tables Vol. 3.
Ring Group: All extensions in a ring group ring
simultaneously.
One hunting type is selected for each extension group.
To leave the hunting group temporarily, use the Log-Out function.
To re-join, use the Log-In function.
Conditions
• If all the searched extensions are busy, a busy tone is sent to the caller.
• If the called extension has set Do Not Disturb or Call Forwarding,
Station Hunting skips the extension.
Programming References
Section 4, System Programming
— Installation Manual
[602] Extension Group Assignment
— In this manual
[106] Station Hunting Type
Feature Reference
Section 3, Features
— Installation Manual
Extension Group
Voice Mail Integration
— Added and Changed Features for Installation Manual and Programming Tables Vol. 3
Log-In / Log-Out
Uniform Call Distribution (UCD)
— In this manual
Ring Group
Operation Reference
Not Applicable.
53
4.1.3 Entering Characters
You can enter characters to store names or messages in the following
programs by using the dial key pad, buttons or the Jog Dial.
[002] System Speed Dialling Name Set [013] ISDN Extension Name Set
[004] Extension Name Set
[417] CO Line Name Assignment
[008] Absent Message
See the Combination Tables below.
Combination Tables
SHIFT & Soft
Combination
S1
SHIFT +
S1
S2
SHIFT +
S2
S3
2
q
a
d
g
j
m
p
t
w
.
+
%
3
Z
B
E
H
K
N
Q
U
X
,
–
&
4
z
b
e
h
k
n
q
u
x
’
=
@
5
!
C
F
I
L
O
R
V
Y
:
<
(
SHIFT +
SHIFT + SHIFT +
SHIFT +S1 SHIFT +S2
S3
Pressing
SELECT
(Times)
Keys
1
2
3
4
5
6
7
8
9
0
0
1
2
3
4
5
6
7
8
9
0
1
Q
A
D
G
J
M
P
T
W
#
*
#
/
$
6
?
c
f
i
l
o
r
v
y
;
>
)
7
8
S
s
Z
z
Combination Table 1
Rotating
Jog Dial
(Pulses)
Keys
1
2
3
4
5
6
7
8
9
0
0
1
2
3
4
5
6
7
8
9
0
1
Q
A
D
G
J
M
P
T
W
#
*
#
/
$
2
q
a
d
g
j
m
p
t
w
!
+
%
3
R
B
E
H
K
N
Q
U
X
?
–
&
4
r
b
e
h
k
n
q
u
x
.
=
@
5
S
C
F
I
L
O
R
V
Y
,
<
(
Combination Table 2
54
6
s
c
f
i
l
o
r
v
y
’
>
)
7
T
D
G
J
M
P
S
W
Z
:
#
A
8
t
d
g
j
m
p
s
w
z
;
$
a
Note
• The alphabet characters
correspond to the letters shown
on the twelve dial keys on a
proprietary telephone (except
symbols).
• In Combination Table 1:
If your telephone is a KX-T7531,
do not use the SELECT button.
Use the AUTO ANSWER/MUTE
button which becomes the
SELECT button when using the
overlay.
• In Combination Table 2:
If you continue rotating the Jog
Dial, all of the characters in the
table will be displayed.
4.1.3 Entering Characters
The following example shows how to select a desired character.
For example, to select the letter “M”:
Select either of the following three methods:
(1) Using the SHIFT and Soft buttons
(for KX-T7433 / KX-T7436 / KX-T7533 / KX-T7536 /
KX-T7230 / KX-T7235 only)
* See Combination Table 1.
1. Press 6. (“M” is “6”.)
• The Function Line shows: M N O
2. Press the Soft 1 (M) button.
(Press SHIFT to display the lower case letters.)
(2) Using the SELECT button
* See Combination Table 1.
1. Press 6. (“M” is “6”.)
2. Press the SELECT button once.
• Pressing the SELECT button the appropriate number of
times displays you the desired letter. Pressing SELECT
twice displays the letter “m”, pressing three times displays
“N”, and so on.
(3) Using the Jog Dial
(for KX-T7433 / KX-T7436 / KX-T7531 / KX-T7533 /
KX-T7536 only)
* See Combination Table 2.
1. Press 6. (“M” is “6”.)
2. Rotate the Jog Dial one pulse.
• Rotating the Jog Dial the appropriate number of pulses
displays you the desired letter. Rotating the Jog Dial two
pulses displays the letter “m”, rotating three pulses
displays “N”, and so on.
OR
1. Press any dial key pad.
2. Rotate the Jog Dial until the desired character appears.
• If you keep rotating the Jog Dial, all of the characters will
be displayed. For example, if you rotate the Jog Dial after
pressing 2, characters will appear in the following order:
A a B b ···· Z z (space) ! ? . , ’ : ; * / + – = < >
# $ % & @ ( ) A a B b ····
55
4.1.3 Entering Characters
To enter “Mike”:
Using method (1)
* See Combination Table 1.
The display shows:
1.
Enter 6.
2.
6
M
N
M
N
G
H
g
h
g
h
j
k
j
k
d
Mik3
e
f
d
Mike
e
f
Press Soft 1 (M).
O
3.
M
Enter 4.
O
4.
M4
Press SHIFT.
I
5.
M4
Press Soft 3 (i).
i
6.
Mi
Enter 5.
i
7.
Mi5
Press Soft 2 (k).
l
8.
Mik
Enter 3.
9.
Press Soft 2 (e).
l
Using method (2)
* See Combination Table 2.
1.
2.
3.
4.
5.
6.
7.
8.
56
Enter 6.
Press SELECT.
Enter 4.
Press SELECT six times.
Enter 5.
Press SELECT four times.
Enter 3.
Press SELECT four times.
The display shows:
6
M
M4
Mi
Mi5
Mik
Mik3
Mike
4.1.3 Entering Characters
Using method (3)
* See Combination Table 2.
1.
2.
3.
4.
5.
6.
7.
8.
The display shows:
Enter 6.
6
Rotate the Jog Dial one pulse.
M
Enter 4.
M4
Rotate the Jog Dial six pulses.
Mi
Enter 5.
Mi5
Rotate the Jog Dial four pulses.
Mik
Enter 3.
Mik3
Rotate the Jog Dial four pulses.
Mike
OR
1.
2.
3.
4.
5.
6.
7.
8.
Note
Enter 2.
Rotate the Jog Dial until “M” appears.
Enter 2.
Rotate the Jog Dial until “i” appears.
Enter 2.
Rotate the Jog Dial until “k” appears.
Enter 2.
Rotate the Jog Dial until “e” appears.
2
M
M2
Mi
Mi2
Mik
Mik2
Mike
• To erase all of the letters, press CLEAR.
• To erase the last letter, press
.
57
4.2
005
Manager Programming
Flexible CO Button Assignment
Selection
• Jack number: KX-TD816 – 01 through 16
KX-TD1232 – 01 through 64
• Button Code (plus parameter, if required):
Button Code
0 (Single-CO)
1 (DSS)
2 (One-Touch)
3 (Message Waiting)
4 (FWD/DND)
5 (Save)
6 (Account)
7 (Conference)
80 (Log-In/Log-Out)
82 (Voice Mail Transfer)
83 (Two-Way Record)†
84(Two-Way Transfer)†
85 (Live Call Screening)†
86 (Live Call Screening Cancel)†
87 (Alert)
88 (Phantom)
(Loop-CO)
# (Group-CO)
CO (ringer frequency)
Parameter
KX-TD816: 01 through 08 (CO line number)
KX-TD1232: 01 through 54 (CO line number)
2 to 4 digits (Extension number)
16 digits max. (Telephone number)
None
None
None
None
None
None
2 to 4 digits (Extension number)
2 to 4 digits (Extension number)
2 to 4 digits (Extension number)
None
None
None
2 to 4 digits (Phantom extension number)
None
1 through 8 (CO line group number)
1 through 8 (ring tone type number)
For more information about this programming, refer to program [005] “Flexible CO Button
Assignment” in the main Installation Manual.
58
†
: Available when the Digital Super Hybrid System is connected to a Digital
Proprietary Telephone capable Panasonic Voice Processing System
(one that supports digital proprietary telephone integration; e.g. KX-TVP200).
4.3
System Programming
106
Station Hunting Type
Description
Used to enable or disable hunting and set the Station Hunting type
for each extension group. There are six Station Hunting types
available: Circular, Terminating, Voice Mail (VM), Automated
Attendant (AA), Ring Group and Uniform Call Distribution (UCD).
If circular hunting is assigned for a group, all of the extensions in
the group are searched until an idle one is found. If terminating
hunting is assigned, searching stops at the extension which has the
largest jack number in the group. If VM hunting is assigned, all of
the VM ports in an extension group are searched until an idle one is
found which allows Voice Mail Service. If AA hunting is assigned,
all of the AA ports of an extension group are searched until an idle
one is found which allows AA Service. If Ring Group is assigned,
all of the extensions in the ring group ring simultaneously. If UCD
is assigned, group members are hunted in a circular way.
Selection
• Extension group number: 1 through 8,
( =all extension groups)
• Disable (no hunting) / Terminate (terminating) / Circular / VM
(voice mail) / AA (automated attendant) / RING / UCD
Default
All extension groups – Disable
Programming
1.
Enter 106.
Display: Call Hunting
2.
Press NEXT.
Display: EXT GRP NO?→
3.
Enter an extension group number.
To enter extension group number 1, you can also press NEXT.
Display example: Group1:Disable
4.
Keep pressing SELECT until the desired selection is
displayed.
5.
Press STORE.
6.
To program another extension group, press NEXT or PREV,
or SELECT and the desired extension group number.
7.
Repeat steps 4 through 6.
8.
Press END.
59
106
4.3
System Programming
Station Hunting Type (contd.)
Conditions
• Program [602] “Extension Group Assignment” assigns the extension
group members.
• The system supports a maximum of eight jacks (16 jacks during System
Connection*) to connect a Voice Processing System as VM or AA
ports.
• To assign all extension groups to one selection, press the key in step
3. In this case, the display shows the contents programmed for
extension group 1.
Feature References
Section 3, Features
Ring Group — in this manual
Station Hunting — in this manual
Uniform Call Distribution (UCD) — Added and Changed Features for
Installation Manual Vol. 3
Voice Mail Integration— Installation Manual
60
*: Available for the KX-TD1232 only.
4.3
System Programming
109
Expansion Unit Type
Description
Assigns the type of expansion units to be used in the system.
This allows the system to identify the unit in each expansion unit
location.
Selection
KX-TD816
• Areas 1; 2 = C (4 CO) / S1 (2 S0) / S2 (6 S0) / EM(4 E&M) /
E (EXT) / A (16 SLT)
KX-TD1232
• Master / Slave
• Areas 1; 2; 3 = C (4 CO) / S1 (2 S0) / S2 (6 S0) / S3 (1 PRI) /
EM(4 E&M) / E1 (EXT1) / E2 (EXT2) /
A1 (16 SLT1) /A2 (16 SLT2)
S3 is for the Master system only.
Default
KX-TD816: C;E
KX-TD1232: Master and Slave – C;E1;E2
Programming
KX-TD816
Enter 109.
1.
Display: Expansion Card
2.
Press NEXT.
Display example: Master:C ;E
3.
Keep pressing SELECT until the desired selection of Area 1
is displayed.
4.
Press
5.
Keep pressing SELECT until the desired selection of Area 2
is displayed.
6.
Press STORE.
7.
Press END.
to program Area 2, if required.
KX-TD1232
Enter 109.
1.
Display: Expansion Card
2.
Press NEXT to program the Master System.
To program the “Slave”, press NEXT again.
Display example: Master:C ;E1;E2
61
4.3
109
System Programming
Expansion Unit Type (contd.)
3.
Keep pressing SELECT until the desired selection of Area 1
is displayed.
4.
Press
5.
Keep pressing SELECT until the desired selection of the
Area is displayed.
6.
Repeat steps 4 and 5 until all of the required entries are
completed, if required.
7.
Press STORE.
to program another Area, if required.
If only one system is in operation, go to step 10.
8.
Press NEXT to program the Slave System.
Display example: Slave :C ;E1;E2
9.
Repeat steps 3 through 7, if required.
10.
Press END.
Conditions
• Each parameter corresponds to an expansion unit as follows:
C=KX-TD180, S1=KX-TD280, S2=KX-TD286, S3=KX-TD290
E, E1 and E2=KX-TD170, A, A1 and A2=KX-TD174,
EM=KX-TD184
• There are two expansion areas in the KX-TD816, areas 1 and 2 from
bottom to top. Either one 8-Station Line Unit or 16-SLT Line Unit and
either one 4-CO Line Unit, 4-E&M Line Unit, 2-ISDN S0 Line Unit or
6-ISDN S0 Line Unit can be installed.
• There are three expansion areas in each system for the KX-TD1232,
areas 1, 2 and 3 from bottom to top. Either up to two 8-Station Line
Units or 16-SLT Line Units and either one 4-CO Line Unit, 4-E&M
Line Unit, 2-ISDN S0 Line Unit or 6-ISDN S0 Line Unit can be
installed in each system. The PRI ISDN Expansion Unit can be
installed with the 2-ISDN S0 Line Unit or 6-ISDN S0 Line Unit or
individually.
• An out-of-service system is unassignable. In this case, skip steps 8 and
9 for the KX-TD1232.
• For the KX-TD1232, if only the Slave System is in operation, the
display shows “Slave” in step 2.
• After changing the setting, turn the Power Switch off and on once.
Otherwise, the previous setting will remain.
Feature References
Section 3, Features — in this manual
Module Expansion
62
4.6
CO Line Programming
401
CO Line Group Assignment
Description
Each CO line must be assigned to a CO line group. This program
defines the CO line group assignment for each CO line. For
example, if there are multiple telephone service companies
available, the CO lines can be grouped by company.
Selection
• CO line number: KX-TD816 – 01 through 08,
KX-TD1232 – 01 through 54,
( =all CO lines))
• CO line group (TRG) number: 1 through 8
Default
CO01 – TRG 1; CO05 – TRG 5; (for KX-TD816/1232)
CO02 – TRG 2; CO06 – TRG 6; (for KX-TD816/1232)
CO03 – TRG 3; CO07 – TRG 7; (for KX-TD816/1232)
CO04 – TRG 4; CO08 – TRG 8; (for KX-TD816)
CO08 through CO54 – TRG 8 (for KX-TD1232)
Programming
1.
Enter 401.
Display : Trunk Group Asn
2.
Press NEXT.
Display: CO Line NO?–>
3.
Enter a CO line number.
To enter CO line number 01, you can also press NEXT.
Display example: CO01:TRG1
4.
Enter the CO line group number.
To change the current entry, enter the new CO line group number.
5.
Press STORE.
6.
To program another CO line, press NEXT or PREV, or
SELECT and the desired CO line number.
7.
Repeat steps 4 through 6.
8.
Press END.
Conditions
• For the KX-TD1232, CO 01 through CO 12 are for the Master system
and CO 13 through CO 24 are for the Slave, if available.
• CO 25 through CO 54 become available when the KX-TD290
expansion unit is installed in the KX-TD1232.
• To assign all CO lines to the same CO line group, press the key in
step 3. In this case, the display shows the contents programmed for
CO 01.
Feature Reference
Section 3, Features — Installation Manual
CO Line Group
63
4.6
417
CO Line Programming
CO Line Name Assignment
Description
Assigns company or customer names to each CO line so that the
operator or extension user can view the destination the caller is trying to
reach before answering.
Selection
• CO line number: KX-TD816 – 01 through 08,
KX-TD1232 – 01 through 54,
( =all CO lines)
• Name: 10 characters (max.)
Default
All CO lines – Not Stored
Programming
1.
Enter 417.
Display: CO Line Name
2.
Press NEXT.
Display: CO Line NO?→
3.
Enter a CO line number.
To enter CO line number 01, you can also press NEXT.
Display example: CO01:Not Stored
4.
Enter a name.
For entering characters, see Section 4.1.3 “Entering Characters” in this
manual.
To delete the current entry, press CLEAR.
To change the current entry, press CLEAR and enter the new name.
5.
Press STORE.
6.
To program another CO line, press NEXT or PREV, or
SELECT and the desired CO line number.
7.
Repeat steps 4 through 6.
8.
Press END.
Conditions
• For the KX-TD1232, CO 01 through CO 12 are for the Master System
and CO 13 through CO 24 are for the Slave, if available.
• CO 25 through CO 54 become available when the KX-TD290
expansion unit is installed in the KX-TD1232.
• To assign all CO lines to the same selection, press the key in step 3.
In this case, the display shows the contents programmed for CO 01.
Feature References
Section 3, Features — Added and Changed Features for
Installation Manual
CO Incoming Call Information Display
Display, Call Information
64
4.6
CO Line Programming
418
ISDN Line Number Assignment
Description
Assigns your ISDN network line telephone number. Your
telephone number is sent to the called party with the CLIP (Calling
Line Identification Presentation) feature and to the calling party
with the COLP (Connected Line Identification Presentation) feature
offered by the ISDN network service.
Selection
• CO line number: KX-TD816 – 01 through 08
KX-TD1232 – 01 through 54
• Telephone number: 16 digits (max.)
Default
All CO lines – Not stored
Programming
1.
Enter 418.
Display: ISDN CO NO.
2.
Press NEXT.
Display: CO Line NO?→
3.
Enter a CO line number.
To enter CO line number 01, you can also press NEXT.
Display example: CO01:Not Stored
4.
Enter a telephone number.
To delete the current entry, press CLEAR.
To change the current entry, press CLEAR and enter the new number.
Conditions
5.
Press STORE.
6.
To program another CO line, press NEXT or PREV, or
SELECT and the desired CO line number.
7.
Repeat steps 4 through 6.
8.
Press END.
• Each number has a maximum of 16 digits, consisting of 0 through 9.
• For the KX-TD1232, CO 01 through CO 12 are for the Master System
and CO 13 through CO 24 are for the Slave, if available.
• To display parts of the number which have scrolled off the display,
press
or
.
• CO 25 through CO 54 become available when the KX-TD290
expansion unit is installed in the KX-TD1232.
• Your telephone number will be informed to the called party if the
outgoing CLIR feature is disabled for the ISDN line in program [419]
“ISDN Outgoing CLIR Service Assignment”.
65
4.6
418
CO Line Programming
ISDN Line Number Assignment
(contd.)
• Your telephone number will be informed to the calling party if the
COLR feature is disabled for the ISDN line in program [990] “System
Additional Information, Field (46).”
Feature References
66
Section 3, Features
Added and Changed Features for the Installation Manual and
Programming Tables
CO Incoming Call Information Display
CO Incoming Call Information Log
Calling Line Identification Restriction (CLIR)
In this manual
Calling / Connected Line Identification Presentation (CLIP / COLP)
Connected Line Identification Restriction (COLR)
4.9
Resource Programming
813
Floating Number Assignment
Description
Assigns the floating numbers for External Pagers, DISA messages,
modem and extension groups. These numbers can be used in the
same way extension numbers are used for station access.
Selection
• Floating station: KX-TD816 – Pager1 / DISA1 / DISA2 /
MODEM / DTA /
EXT Grp 1 through 8
KX-TD1232 – Pager1 through 4 / DISA1 /
DISA2 / MODEM / DTA /
EXT Grp 1 through 8
• Floating number: 2 to 4 digits
Default
KX-TD816 – Pager 1=196; DISA 1=198; DISA 2=298;
MODEM=299; DTA=199;
EXT Grp 1=191; EXT Grp 2=192;
EXT Grp 3=193; EXT Grp 4=194;
EXT Grp 5=291; EXT Grp 6=292;
EXT Grp 7=293; EXT Grp 8=294;
KX-TD1232 – Pager 1=196; Pager 2=197; Pager 3=296;
Pager 4=297; DISA 1=198; DISA 2=298;
MODEM=299; DTA=199;
EXT Grp 1=191; EXT Grp 2=192;
EXT Grp 3=193; EXT Grp 4=194;
EXT Grp 5=291; EXT Grp 6=292;
EXT Grp 7=293; EXT Grp 8=294;
Programming
1.
Enter 813.
Display: FLT EXT NO.
2.
Press NEXT to program Pager 1.
Display example: Pager1:EXT196
To program another floating station for the KX-TD1232, keep pressing
NEXT or PREV until the desired floating station is displayed.
3.
Enter a floating number.
To change the current entry, press CLEAR and enter the new floating
number.
4.
Press STORE.
5.
To program another floating station, keep pressing NEXT or
PREV until the desired floating station is displayed.
67
4.9
813
Resource Programming
Floating Number Assignment (contd.)
Conditions
6.
Repeat steps 3 through 5.
7.
Press END.
• A floating number is composed of two to four numerical digits, 0
through 9.
• The first one or two digits of the floating numbers are subject to
program [100] “Flexible Numbering, (01) through (16) 1st through 16th
hundred extension blocks”.
• Floating numbers and extension numbers should be different. Double
entry and incompatible entry for these numbers are invalid. Valid entry
example: 10 and 11, 10 and 110; Invalid entry example: 10 and 106,
210 and 21.
In order not to make an invalid entry, check the other extension
numbers in programs [003] “Extension Number Set,” [012] “ISDN
Extension Number Set, [118] “VM Extension Number Assignment” and
[130] “Phantom Extension Number Assignment.” The default of each
extension number as follows:
[003] Extension Number Set
KX-TD816 – 101 through 116, 201 through 216
KX-TD1232 – 101 through 164, 201 through 264
[012] ISDN Extension Number Set
Not stored
[118] VM Extension Number Assignment
165 through 180
[130] Phantom Extension Number Assignment
Not stored
• You cannot leave an entry empty.
• Floating numbers of extension groups are available for the UCD and
ring group features.
Feature Reference
68
Section 3, Features — in this manual
Floating Station
4.10
Option Programming
990
System Additional Information
Description
Adds the following programming items, if required:
Area 01
Display
example
Field number
0010100011000001
↓ ↓
↓
↓
↓ ↓ ↓
↓
↓ ↓ ↓
(10) (9)
(8)
(7)
(6) (5) (4)
unused
(3) (2) (1)
Area 02
Display
example
1000010000101100
Field number
unused(37)(26)(22) (21) (20)(19)(18)(17)(16)(15)(14)(13)(12)(11)
↓ ↓ ↓ ↓
Area 03
↓
↓ ↓ ↓ ↓ ↓ ↓ ↓ ↓ ↓ ↓
KX-TD816 – [1] through [8] below match CO lines 1 through 8.
KX-TD1232 – [1] through [16] below match CO lines 1 through 16.
Display
example
0000000000000000
CO number
↓ ↓ ↓ ↓ ↓ ↓ ↓ ↓ ↓ ↓ ↓ ↓ ↓ ↓ ↓ ↓
[16] [15][14][13][12][11][10] [9] [8] [7] [6] [5] [4] [3] [2] [1]
↓
(23)*
Field number
Area 04
KX-TD1232 – [17] through [24] below match CO lines 17 through 24.
Display
example
1111101100000000
↓ ↓ ↓ ↓ ↓ ↓ ↓ ↓
CO number
[24][23][22] [21][20][19][18][17]
↓
Field number
↓
↓
↓ ↓
reserved (27) unused (25)(24)
*: CO numbers [9] through [24] in the field number (23) are
available for the KX-TD1232 only.
↓
(23)*
69
4.10
990
Option Programming
System Additional Information
Area 05
Display
example
Field number
1111111011101011
↓
↓ ↓ (↓ ↓ ↓ ↓ ↓ ↓ ↓ ↓ ↓
unused
(46)(36) (33)(32)(31)unused(34)unused (30)(29)(28)
Area 06
Display
example
1111100111111111
↓ ↓ ↓ ↓ ↓
Field number
70
reserved unused(45)(44)unused
↓
↓ ↓ ↓ ↓
(43) (42) (41)(40)(39)
↓
↓ ↓
unused
(38)(35)
4.10
Option Programming
990
System Additional Information (contd.)
Explanation for Areas 01 and 02
Field
Description
Selection
Default
Reference
• CALL
TRANSFER
FEATURES
• Music on Hold
Consultation
Hold
(1)
Sound source during transfer.
0 : ringback tone
1 : Music on Hold
1
(2)
Result of pressing the hookswitch lightly
and then replacing the handset (during a CO
line call; single line telephones only).
Result of pressing the FLASH button on
proprietary telephones (during a CO line
call).
0 : Consultation
Hold
1 : disconnection
0 : disconnection
signal
1 : External
Feature Access
0 : disable
1 : enable
0
(3)
(4)
(5)
(6)
(7)
(8)
(9)
(10)
Enables or disables the dial tone between
obtaining a CO line and dialling the phone
number when using the one-touch dial,
redial or speed dial function.
Result of pressing the hookswitch lightly
(single line telephones only).
0 : Consultation
Hold
1 : disconnection
Sets the duration of the DTMF signals sent 0 : 80 ms
to the Voice Processing System (VPS) ports. 1 : 160 ms
00 : 0.5 s
Sets the time the system waits before
01 : 1.0 s
sending DTMF signals (such as a mailbox
number) to the VPS after the VPS answers a 10 : 1.5 s
11 : 2.0 s
call.
00 : 0.5 s
Sets the time the system waits before
01 : 1.0 s
sending DTMF signals (programmed in
10 : 1.5 s
[113]) to the VPS after the VPS calls an
11 : 2.0 s
extension.
0 : system
Assigns whether the system or the VPS
1 : VPS
turns off the Message Waiting lamp when
the user hears a message recorded in a
mailbox.
—
Unused
0
• External
Feature Access
• Flash
1
None
0
Consultation
Hold
0
Voice Mail
Integration
Voice Mail
Integration
10
10
Voice Mail
Integration
0
• Message
Waiting
• Voice Mail
Integration
—
—
71
4.10
990
Option Programming
System Additional Information (contd.)
Field
Description
(11)
If an outside party is transferred and not
answered, assigns whether Transfer Recall
occurs at the originating transfer extension
or at Operator 1.
If Limited Call Duration is enabled in
program [502] “Extension-to-CO Line Call
Duration Limit,” assigns if Limited Call
Duration is done for both outgoing and
incoming calls or outgoing calls only.
Allows you to remove confirmation tone 4.
By default, a beep tone sounds when a
three-party conference is started / ended.
Determines if the dialled “ ” and “#” will
be checked by Toll Restriction. This
assignment is required for certain central
offices (CO) to prevent toll fraud. Some
COs ignore the user-dialled “ ” and “#”.
If your CO is such a type, select “0” (no
check).
Enables or disables the Flash function when
a CO call is received at a locked or tollrestricted station. Flash, if enabled, allows
the user to make a CO call using the same
line. If “0” (disconnection signal) is
selected in field (3) above, this is also
allowed for those extensions that have the
Account Code – Verified – All Calls mode
assigned.
Allows you to remove Confirmation Tone 3.
This tone is sent when a conversation is
established just after dialling the feature
number for accessing one of the following
features: Call Pickup, Paging, Paging
Answer, TAFAS Answer, Hold Retrieve and
Call Park Retrieve.
A CO line set to pulse or call blocking mode
in program [402] “Dial Mode Selection” can
have two settings. This assigns the pulse
break ratio during dial pulsing. Select an
appropriate ratio depending on the standard
in your country.
(12)
(13)
(14)
(15)
(16)
(17)
72
Selection
Default
Reference
0 : extension
1 : Operator 1
0
Call Transfer,
Unscreened – to
Extension
0 : both calls
1 : outgoing calls
only
0
Limited Call
Duration
0 : disable
1 : enable
1
Confirmation
Tone
0 : no check
1 : check
1
Toll Restriction
0 : disable
1 : enable
0
Flash
0 : disable
1 : enable
1
Confirmation
Tone
0 : 60 %
1 : 67 %
0
Dial Type
Selection
4.10
Option Programming
990
System Additional Information (contd.)
Field
Description
(18)
Assigns if an extension’s mailbox number is
substituted by the extension number or is
programmable (free). If a call is forwarded
or rerouted to the VPS, this system
automatically transmits the mailbox number
to the VPS to specify the user’s mailbox.
To make it programmable, select “1 (free),”
then assign the number in program [609]
“Voice Mail Access Codes”.
Assigns the first display of a digital display
proprietary telephone (except for KXT7230) in Station Speed Dialling.
(19)
(20)
(21)
Unused
Selects the inter-digit pause for pulse
dialling.
(22)
Selects intercom dial tone frequency.
(26)
(37)
Unused
Sets the maximum time for detecting a
hooking signal from an SLT.
Selection
Default
Reference
0 : extension
number
1 : free
0
Voice Mail
Integration
0 : names
1 : numbers
0
—
Special Features
for KX-T7235
— Station Speed
Dialling
—
01
None
0
None
—
00 : 630 ms
01 : 830 ms
10 : 1030 ms
0 : normal
1 : distinctive
—
0 : 1000ms
1 : 136ms
—
0
—
None
Explanation for Areas 03 and 04
Field
Description
(23)
This field is provided to assign the PAD
Switch Control (volume control of received
calls on a CO line). This can be assigned per
CO line. The CO numbers [1] through [8]
correspond to CO lines 1 through 8 for the
KX-TD816, and CO numbers [1] through [24]
correspond to CO lines 1 through 24 for the
KX-TD1232 respectively.
Prevents or allows a call originated by a VPS
AA port to another AA port.
Prevents or allows sending pulse dialling
signals during a CO call.
Enables or disables the pulse feedback sound
when a dialled number is sent to a CO line.
(24)
(25)
(27)
Selection
Default
Reference
0 : 0 dB
1 : -3 dB
0
None
0 : prevent
1 : allow
0 : prevent
1 : allow
0 : disable
1 : enable
1
1
Voice Mail
Integration
None
1
None
73
4.10
990
Option Programming
System Additional Information (contd.)
Explanation for Area 05
Field
Description
Selection
Default
Reference
—
—
—
• Direct Dialling In
(DDI)
• Multiple
Subscriber
Number (MSN)
Ringing Service
• Direct Dialling In
(DDI)
• Multiple
Subscriber
Number (MSN)
Ringing Service
Hotel
Application
(28)
(29)
(30)
(31)
Unused
Unused
Unused
In the day mode, selects the destination of
incoming DDI numbers or MSN numbers
when “0” is assigned in programs
[151]-[152] and [448]-[449].
—
—
—
0 : DIL 1:N
1 : Operator
—
—
—
1
(32)
In the night mode,selects the destination of
incoming DDI numbers or MSN numbers
when “0” is assigned in programs
[151]-[152] and [448]-[449].
0 : DIL 1:N
1 : Operator
1
(33)
Assigns whether a new page is ejected or
not when the Hotel Application is printed
out by SMDR.
Unused
When Timed Reminder starts and is not
answered, this program enables or disables
the SMDR printout for Timed Reminder.
Enables or disables to send a COLP number.
0 : Disable
1 : Enable
0
—
0 : Disable
1 : Enable
—
1
—
SMDR for
Timed Reminder
0 : Enable
1 : Disable
1
CLIP/COLP
COLR
(34)
(36)
(46)
Explanation for Area 06
Field
(35)
(38)
(39)
74
Description
Selection
0 : 0 sec.
1 : 5 sec.
Programs whether or not the account code is 0 : not printed out
1 : printed out
printed out on the SMDR.
0 : Disable
Selects the result when a CO call is routed
1 : Enable
by Call Forwarding to a voice mail port
which is in the AA service mode. (For both
Inband and DPT Integration)
disable: AA service mode
enable: The mode will change to the VM
service mode and a Follow-On ID is
sent.
When the voice mail port is in the VM
service mode, this program will not be
affected.
Sets the time after terminating the OGM.
Default
1
1
1
Reference
DISA
OGM
SMDR
Voice Mail
Integration
4.10
Option Programming
990
System Additional Information (contd.)
Field
Description
(40)
Selects the result when a CO call is routed to
a voice mail port by IRNA (For both Inband
and DPT Integration). When the voice mail
port is in the VM service mode;
enable: VM service mode
disable: The mode will change to the AA
service mode (Only when Inband).
When the voice mail port is in the AA
service mode;
enable: The mode will change to the VM
service mode and a Follow-On ID is
sent.
disable: AA service mode
Enables or disables sending CO line access
code “9” to a TIE line. When you dial CO
line access code “9” and the CO line is busy,
the system can automatically send CO line
access code “9” to a TIE line so that you can
access the CO line through another PBX.
Enables or disables the ARS with DTMF
function.
Assigns the source of Music Source 1 for
Music on Hold and BGM.
0 : Enable
1 : Disable
1
Voice Mail
Integration
0 : Enable
1 : Disable
1
None
0 : Enable
1 : Disable
00: internal music
source
01: external
music source
11: tone
1
Enables or disables dial tone 2 when an
extension sets programmable extension
features such as Call Waiting.
Enables or disables the Whisper OHCA
feature.
0 : Disable
1 : Enable
1
Automatic Route
Selection (ARS)
• Background
Music
(BGM)
• Background
Music (BGM)
— External
• Music on Hold
None
0 : any telephone
1 : KX-T7500
series
telephones only
1
Whisper OHCA
(41)
(42)
(43)
(44)
(45)
Selection
Default
00
Reference
75
4.10
990
Option Programming
System Additional Information (contd.)
Selection
• Area code: 01 through 06
• Field number : 1 through 46
• Selection: See “Selection” shown for each field in the
corresponding area explanation table.
Default
See “Default” shown for each field in the corresponding area
explanation table.
Programming
1.
Enter 990.
Display: System Add Inf.
2.
Press NEXT.
Display: Area NO?→
3.
Enter an area code (01 through 06).
Display example: 0010100011000001
4.
Keep pressing
field.
or
to move the cursor to the desired
5.
Enter your selection (0 or 1).
To change the current entry, press STORE and the new selection.
6.
To program another field, repeat steps 4 and 5.
7.
Press STORE.
8.
To program another area, press SELECT and the desired
area code.
9.
Repeat steps 4 through 8.
10.
Press END.
Conditions
None
Feature References
See “Reference” shown for each field in the corresponding area
explanation table.
76