1
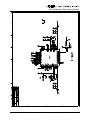
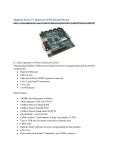
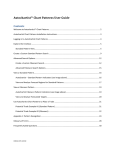
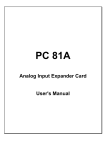
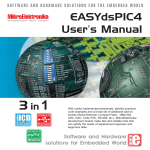
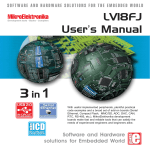
DRS4 Evaluation Board User’s Manual
DRS4 Evaluation Board
User’s Manual
Board Revision 1.1
as of Dec. 2008
Last revised: Dec. 15, 08
Stefan Ritt
Paul Scherrer Institute
CH-5232 Villigen PSI
Switzerland
Email: [email protected]
Phone: +41 56 310 3728
Please check for possible updates of this manual under http://drs.web.psi.ch/datasheets
DRS4 Evaluation Board User’s Manual
Revision History
Date
Modification
12 Dec. 08
Initial Revision
15 Dec. 08
Added firmware register mapping
Page 2 of 21
DRS4 Evaluation Board User’s Manual
Table of Contents
Revision History......................................................................................................................... 2
Table of Contents ....................................................................................................................... 3
1.
2.
3.
4.
Introduction ....................................................................................................................... 4
1.1.
Board description ..................................................................................................... 4
1.2.
Firmware Description............................................................................................... 5
Installation......................................................................................................................... 7
2.1.
Windows XP ............................................................................................................ 7
2.2.
Linux ...................................................................................................................... 11
Development Hints.......................................................................................................... 14
3.1.
Power Supply ......................................................................................................... 14
3.2.
Analog Input........................................................................................................... 15
3.3.
Control Voltages .................................................................................................... 15
3.4.
ADC Clock............................................................................................................. 15
DRS4 Evaluation Board Schematics............................................................................... 16
Please check for possible updates of this manual under http://drs.web.psi.ch/datasheets
DRS4 Evaluation Board User’s Manual
1. Introduction
The DRS4 chip, which has been designed at the Paul Scherrer Institute, Switzerland by Stefan
Ritt and Roberto Dinapoli is a Switched Capacitor Array (SCA) capable of digitizing eight
channels at sampling speeds up to 6 GSPS. This chip is available through the PSI technology
transfer program for other institutes and organizations. In order to simplify the design process
to integrate the DRS4 chip into custom electronics, an evaluation board has been designed,
which demonstrates the basic operation of the chip. It has SMA connectors for four input
channels CH1 to CH4, an USB 2.0 connector and a LEMO trigger input (Figure 1). The board
is powered through the USB port and contains an on-board trigger logic. It comes with MS
Windows® and Linux drivers and two application programs. It is basically equivalent to a four
channel 5 GSPS digital oscilloscope.
This manual describes the software installation, the usage of the application programs, and
gives hints for developers seeking to build new electronics around the DRS4 chip.
1.1.
Board description
Since the DRS4 chip has differential inputs, the board uses four transformers (ADT1-1WT
from Mini-Circuits®) to converted the 50-Ohm terminated single ended inputs into differential
signals. The transformers are followed by analog switches (ADG936 form Analog Devices®).
These switches allow the multiplexing of the DRS4 inputs between the input connectors and a
reference voltage generated by the on-board 16-bit DAC for calibration purposes. The DRS4
is read out by a 14-bit ADC (AD9245 from Analog Devices®) and a FPGA (Xilinx® Spartan
3). The USB connection is implemented with a micro controller (Cypress® CY2C68013A).
The high speed modus of the USB 2.0 bus allows for data transfer rates of more than 20
MB/sec.
Figure 1: Picture of the DRS4 Evaluation Board with different components
Page 4 of 21
DRS4 Evaluation Board User’s Manual
For trigger purposes, a 50-Ohm terminated TTL compatible input is implemented (Lemo
connector). A on-board discriminator with programmable level allows for self triggering on
any of the four input channels. An 1 MBit EEPROM (25LC1025 from Microchip®) is used to
store the board serial number and calibration information. Two 14-pin headers carry all
important logical signals which allow easy debugging with a logic analyzer or oscilloscope. A
JTAG adapter can be used to update the FPGA firmware through a Xilinx® Platform Cable
Adapter.
1.2.
Firmware Description
Both the Windows and the Linux distribution contain a subdirectory “firmware” which
contains the FPGA and Microcontroller firmware for the DRS4 Evaluation Board. The FPGA
firmware is written in pure VHDL, thus making it easy to port it to other FPGA devices such
as Altera® or Lattice®. Only a few Xilinx® basic components such as clock managers and I/O
blocks have been instantiated and must be adapted when another FPGA manufacturer than
Xilinx® is chosen. The FPGA source code is contained in several files with following
contents:
src/drs4_eval1.vhd
Top level entity. Routing of clock signals, global reset signal,
LEDs and LEMO input
src/drs4_eval1_app.vhd
Main file containing state machines for DRS4 readout, serial
interface to DAC, EEPROM and temperature sensor, trigger
logic and reference clock generation
src/usb_dpram.vhd
Instantiates block ram for waveform storage
src/usb_racc.vhd
Interface to CY2C68013A microcontroller in slave FIFO mode.
Implements a set of status and control registers through which
the main application can be controlled
src/usr_clocks.vhd
Generates 66 MHz, 132 MHz, 264 MHz and a phase shifted 66
MHz clock out of the 33 MHz quartz input frequency via the
Xilinx® Digital Clock Managers (DCM)
ucf/drs4_eval1.ucf
Constraint file. Assigns package pins and defines clock
constraints
3s400/drs4_eval1.ise
Xilinx® ISE 9.2i project file
3s400/drs4_eval1.bit
Compiled firmware image directly for Spartan 3s400 FPGA
3s400/drs4_eval1.mcs
Compiled firmware image for FPGA EEPROM XCF02S
3s400/drs4_eval1.ipf
Xilinx® Impact project file to program FPGA via download
cable
The firmware for the USB microcontroller from Cypress® is written in C and must be
compiled with the Keil® 8051 C compiler. It contains the standard include and library files
from the Cypress EZ-USB® development kit plus some DRS specific files:
CY7C68013A/drs_eval.c
Main micro controller firmware file
CY7C68013A/dscr.a51
USB descriptor tables
CY7C68013A/drs_eval.hex
Compiled firmware file (Intel HEX format)
Please check for possible updates of this manual under http://drs.web.psi.ch/datasheets
DRS4 Evaluation Board User’s Manual
CY7C68013A/drs_eval1.iic
Compiled firmware file (For Cypress EZ-USB Console
download)
CY7C68014A/*
Remaining files are standard files from EZ-USB development
kit
The FPGA firmware implements a set of control and status registers, through which the DRS4
can be controlled and read out. The mapping of the control registers is as follows:
#
0
0
0
0
0
0
0
0
0
0
0
0
0
1
1
2
2
3
3
4
4
5
5
5
5
6
6
Ofs.
0x00
0x00
0x00
0x00
0x02
0x02
0x02
0x02
0x02
0x02
0x02
0x02
0x02
0x04
0x06
0x08
0x0A
0x0C
0x0E
0x10
0x12
0x14
0x14
0x16
0x16
0x18
0x1A
Bit
0
1
2
3
18
19
21
22
23
24
25
27
28
31..16
15..0
31..16
15..0
31..16
15..0
31..16
15..0
31..24
23..16
7..4
3..0
31..16
15..0
Name
start_trig
reinit_trig
soft_trig
flash_trig
led
tcal_en
transp_mode
enable_trigger
readout_mode
neg_trigger
acalib
dactive
standby
DAC0
DAC1
DAC2
DAC3
DAC4
DAC5
DAC6
DAC7
configuration
channel_config
first_chn
last_chn
trigger_delay
sampling_freq
Comment
write a "1" to start the domino wave
write a "1" to stop & reset the DRS chip
write a "1" to stop the DRS chip & read the data to RAM
Flash contents of RAM into EEPROM
1=on, 0=blinks once at beginning of DRS chip readout
switch on (1) / off (0) 264 MHz calib. sig. for DRS chips
1=send DRS inputs to outputs ("transparent mode")
write a "1" to enable hardware trigger
0:start from first bin, 1:start from domino stop
1=trigger on high to low transition
write "1" to enable amplitude calibration
0:stop domino wave during readout, 1:keep it running
1: put chip in standby mode
Set DAC 0 (=A, ROFS)
Set DAC 1 (=B, CMOFS)
Set DAC 2 (=C, CAL-)
Set DAC 3 (=D, CAL+)
Set DAC 4 (=E, BIAS)
Set DAC 5 (=F, TLEVEL)
Set DAC 6 (=G, O-OFS)
Set DAC 7 (=H, -)
Bit0: DMODE, Bit1: PLLEN, Bit2: WSRLOOP
1=1x8k,0x11=2x4k,0x33=4x2k,0xFF=8x1k
first channel address to read out (0..9)
last channel address to read out (1..9)
trigger delay in ticks of roughly 0.56 ns
sampling frequency in ticks (=1024/fsamp*0.120-2)
While the mapping of the status registers is like this:
#
Ofs.
Bits
0
0
0
1
2
8
9
9
0x00
0x02
0x02
0x04
0x08
0x20
0x24
0x26
31..16
15..8
7..0
0
31..16
31..16
31..16
15..0
Page 6 of 21
Name
board_magic
board_type
drs_type
running
stop_cell
temperature
serial_cmc
version_fw
Comment
0xC0DE, Magic number for DRS board identification
5 for DRS4 USB Evaluation Board 1.1
4 for DRS4
"1" while domino wave running or readout in progress
position of cell where sampling stopped at last trigger
temperature in 0.0625 deg. C units
Serial number CMC board
firmware version (SVN revision)
DRS4 Evaluation Board User’s Manual
All registers are implemented as 32-bit registers, so they can be mapped easily into some
VME address space for example if one decides to build a VME board containing the DRS4.
2. Installation
2.1.
Windows XP
Under MS Windows® it is important to install the necessary driver before connection the
DRS4 Evaluation Board with the PC. The current distribution can be downloaded from
http://drs.web.psi.ch/download . The Windows version contains a single program drsxx.exe (where xx is the version) which can be executed to install the driver, applications,
documentation and source code. Executing this file starts the installer:
You can select which components to be installed:
Please check for possible updates of this manual under http://drs.web.psi.ch/datasheets
DRS4 Evaluation Board User’s Manual
Then you can select the installation directory:
After the installer has finished, you can connect the DRS4 Evaluation Board to the Computer:
Now you will see the “Found New Hardware” dialog:
Where you can click “Install the software automatically” and then click “Next”.
Page 8 of 21
DRS4 Evaluation Board User’s Manual
After successful installation of the driver, you will see the following window:
And a new group in your Start Menu:
Clicking on „DRS Command Line Interface“ will start a simple application which connects to
the DRS4 Evaluation Board. If it finds the board, it displays the board serial number and the
firmware revision as on the following screen shot:
Now you are ready to issue your first command “info” which shows some more information,
like the current board temperature. The temperature sensor is on the bottom side just below
the DRS4 chip. If you keep issuing “info” commands and touch that sensor with your finger,
you should see the temperature increase.
Please check for possible updates of this manual under http://drs.web.psi.ch/datasheets
DRS4 Evaluation Board User’s Manual
The second application is an oscilloscope-like program, which connects to the DRS4 board
and works pretty much like a normal oscilloscope. You can select the trigger mode, trigger
level and trigger source. On Rev. 1.1 of the DRS4 evaluation board, only CH1 can be selected
as trigger source. You enable a channel by clicking on the number “1” to “4”. There are two
cursors and a few utilities. You can save a waveform in an ASCII format. After you opened a
file, each trigger will write the waveform of the active channel(s) to that file. When you are
continuously running, the file will grow very quickly.
The picture above shows an un-calibrated evaluation board, which shows a noise level of
about 7 mV RMS. Future version of the firmware and drivers will contain calibration routines,
which bring down the noise by more than one order of magnitude.
Page 10 of 21
DRS4 Evaluation Board User’s Manual
For test purposes, an internal 240 MHz referenc clock signal can be connected to channel #4
via the “Config” menu:
This application will be constantly updated, so please check for updates regularly on the DRS
web site.
2.2.
Linux
The drivers and applications are distributed for Linux in source code and must be compiled on
each system. First untar the tar ball:
[/usr/local]$ tar -xzvf drs-1.0.tar.gz
drs-1.0/
drs-1.0/doc/
drs-1.0/doc/DRS4_rev06.pdf
drs-1.0/doc/manual.pdf
drs-1.0/include/
drs-1.0/include/ConfigDialog.h
drs-1.0/include/DOFrame.h
drs-1.0/include/DOScreen.h
. . .
Then change the directory and do a „make“. Note that to compile the oscilloscope application
it is necessary to have the wxWidgets package version 2.8.9 or later installed. You can obtain
this package in source form from http://www.wxwidgets.org/downloads/. If this package is
present, you can change to the drs directory and issue a make:
[/usr/local]$ cd drs-1.0
[/usr/local/drs-1.0]$ make
g++ -g -O2 -Wall -Wuninitialized -fno-strict-aliasing -Iinclude -DOS_LINUX
Please check for possible updates of this manual under http://drs.web.psi.ch/datasheets
DRS4 Evaluation Board User’s Manual
-DHAVE_LIBUSB -c src/musbstd.c
g++ -g -O2 -Wall -Wuninitialized -fno-strict-aliasing -Iinclude -DOS_LINUX
-DHAVE_LIBUSB -c src/mxml.c
...
Now you can connect the DRS4 board to the PC. On systems where the “lsusb” tool is
installed, one should be able to find the DRS4 evaluation board after connecting it with
following command:
[/usr/local/drs-1.0]$ /sbin/lsusb -d 04b4:1175 –v
Bus 005 Device 005: ID 04b4:1175 Cypress Semiconductor Corp.
Device Descriptor:
bLength
18
bDescriptorType
1
bcdUSB
2.00
bDeviceClass
0 (Defined at Interface level)
bDeviceSubClass
0
bDeviceProtocol
1
bMaxPacketSize0
64
idVendor
0x04b4 Cypress Semiconductor Corp.
idProduct
0x1175
bcdDevice
0.01
iManufacturer
1 S. Ritt PSI
iProduct
2 DRS4 Evaluation Board
iSerial
3 REV1
bNumConfigurations
1
Configuration Descriptor:
bLength
9
bDescriptorType
2
wTotalLength
46
bNumInterfaces
1
bConfigurationValue
1
iConfiguration
0
bmAttributes
0x80
MaxPower
500mA
...
If the board is correctly recognized, one can access it with the command line program. Under
most Linux distributions however, only the “root” user can directly access USB devices.
Some systems can be configured to allow non-root access via the “udev” system, but the exact
instructions vary from distribution to distribution and can therefore not be given here.
[/usr/local/drs-1.0]$ ./drscl
DRS command line tool, Revision 12949
Type 'help' for a list of available commands.
Found mezz. board
0 on USB, serial #2006, firmware revision 10901
B0>
The same commands as in the Windows version can now be entered such as the “info”
command:
B0> info
==============================
Mezz. Board index:
0
DRS type:
DRS4
Board type:
5
Serial number:
2006
Firmware revision:
10901
Page 12 of 21
DRS4 Evaluation Board User’s Manual
Temperature:
Status reg.:
PLL locked
Control reg.:
DMODE single shot
Frequency:
30.8 C
00000002
00000000
0.000 GHz
If this works, the oscilloscope application “drsosc” can be started. It will open a X window
and show exactly the same functionality as its Windows counterpart:
Please check for possible updates of this manual under http://drs.web.psi.ch/datasheets
DRS4 Evaluation Board User’s Manual
3. Development Hints
The idea behind the evaluation board is to make first steps in using the DRS4 chip, but then
develop your own custom electronics around the chip. The first thing to do there is to study
carefully the DRS4 data sheet, which can be obtained from http://drs.web.psi.ch/datasheets.
Then have a look at the DRS4 Evaluation Board Reference Design, which schematics is
supplied at the end of this document. When you start to design your own electronics, there are
however some important points, which are not necessarily obvious from the data sheet or
from the reference design. These points together with some design tips are explained in this
section.
3.1.
Power Supply
As with any analog design, the quality of the power supply is very important, since it has an
influence of the noise level measured by the DRS4 chip. Low noise linear regulators together
with the usual decoupling capacitors are recommended for all power supplies. The analog
power supply AVDD powers only the domino circuit of the DRS4 chip and directly influences
the jitter of the sampling frequency. Long term variations in this power supply (seconds…)
are regulated by the on-chip PLL, but high frequency noise in the MHz region leads directly
to an increase of the PLL jitter. Therefore the evaluation board contains two separate 2.5V
linear regulators for the DRS4 chip, one for the AVDD power and one for the DVDD power.
Although the DVDD power is called “digital power”, it powers also the analog output buffers
of the DRS4 chip and needs the same good quality than the AVDD power in order to minimize
the noise of the board.
The DRS4 chip also contains two grounds AGND and DGND. They can be either routed
separately on the board and be connected at the power source, or they can be directly
connected to an overall dedicated ground plane of the PCB. Tests have been shown that the
latter choice gives slightly less noise.
The bottom of the QFN76 package of the DRS4 has an exposed paddle connected to the
internal DGND. It is recommended that this paddle is matched by a PCB pad of similar size
connected to analog ground to achieve the best electrical and thermal performance of the
DRS4. The copper plane should have several vias to achieve a good heat dissipation to flow
through the PCB as shown in Figure 2:
Figure 2: PCB pad under the DRS4 chip
Page 14 of 21
DRS4 Evaluation Board User’s Manual
These vias should be solder-filled or plugged. The maximum power dissipation of the DRS4
chip is not critical (350 mW), but an improved thermal stability helps the performance of any
analog chip. To maximize the coverage and adhesion between the DRS4 and the PCB, the
copper plane could be partitioned into several uniform sections, providing several tie points
during the reflow process.
3.2.
Analog Input
If non-differential signals should be digitized with the DRS4 chip, they must be converted
into differential signals for the DRS4 inputs. The simplest solution is to connect the IN- inputs
to AGND and to connect the signals directly to the IN+ inputs. This method has however the
disadvantage that the crosstalk and noise immunity of the DRS4 chip are worsened. The
evaluation board uses passive transformers ADT1-1WT from Mini-Circuits® for this purpose.
While this is a good solution to reduce the power consumption of the board, such that it can
be powered from the USB power (500 mA @ 5V), it has the disadvantage that it reduces the
analog bandwidth of the system to about 200 MHz (-3 dB). The reason for this is the dynamic
capacitive load of the DRS4 inputs, which must be driven by the signal source. Since the
input impedance of the DRS4 becomes very small at high frequencies, the signal height drops
if only driven passively. Better performance is achieved with active differential drivers. Tests
have been made with the THS4513 from Texas Instruments® giving a bandwidth of 450 MHz
and the ADA4937 from Analog Devices® giving 700 MHz. A small bypass capacitor (1pF) in
the feedback loop of the buffer adds a high frequency pole, which shows up as a peak in the
response function, but then pushes the bandwidth to 750 MHz. The peaking can be reduced
by adding a series resistor of a few Ohm between the buffer output and the DRS4 input.
The usual design rules like proper termination and matched impedance PCB traces apply as in
any high frequency analog design.
3.3.
Control Voltages
The DRS4 chip requires certain control voltages: ROFS, O-OFS and BIAS. The latter two are
generated internally with some default voltage, but can be “overwritten” by an external low
impedance source. It is recommended to connect these lines to an external 16-bit DAC, so
that the DRS4 input range can be fine-tuned on a board-by-board basis, to compensate for
chip variations. The ROFS signal should be driven by a high speed low noise buffer. If this
signal would be directly connected to the DAC output, the signal height would change
slightly during the chip readout and the measurement would show a varying baseline level.
3.4.
ADC Clock
There is a very strict relation between the DRS4 output shift register clock SRCLK and the
ADC clock (see DRS4 data sheet WAVEFORM READOUT). In order to reduce the noise
due to aperture jitter, the phase shift between these two clocks must be fixed and contain very
small jitter (~10ps). The easiest way to generate this phase shift is to use the digital clock
managers (DCM) in the FPGA, as it is done on the evaluation board Rev. 1.1. Since the
DCMs have however an inherent phase jitter of ~150ps, this introduces some noise in form of
a baseline variation when sampling a DC signal in the order of up to a few mV. If this
becomes a problem, it is recommended to generate the phase shift between these two clocks
with a low jitter delay circuit.
Please check for possible updates of this manual under http://drs.web.psi.ch/datasheets
DRS4 Evaluation Board User’s Manual
4. DRS4 Evaluation Board Schematics
6
3
6
2
4
3
1
2
4
4
2
1
1
6
1Y 6
3
1 1A
2Y 4
VCC 5
6
2
4
2 GND
3
1
3 2A
Paul Scherrer Institut
Department TEM
Lab for Electronics (1414)
5232 Villigen PSI
Page 16 of 21
DRS4 Evaluation Board User’s Manual
1
2
5
4
3
Paul Scherrer Institut
Department TEM
Lab for Electronics (1414)
5232 Villigen PSI
Please check for possible updates of this manual under http://drs.web.psi.ch/datasheets
DRS4 Evaluation Board User’s Manual
4
3
4
3
4
3
4
3
1
1
1
1
1
2
3
4
CS
SO
6
WP SCK 5
VSS
SI
Paul Scherrer Institut
Department TEM
Lab for Electronics (1414)
5232 Villigen PSI
Page 18 of 21
5
5
5
5
2
2
2
2
DRS4 Evaluation Board User’s Manual
Paul Scherrer Institut
Department TEM
Lab for Electronics (1414)
5232 Villigen PSI
Please check for possible updates of this manual under http://drs.web.psi.ch/datasheets
DRS4 Evaluation Board User’s Manual
1
2
3
4
A0
A1
6
SCL
A2
5
VSS SDA
1
2
3
4
5
6
7
8
9
10
11
12
13
14
15
16
17
18
19
20
21
22
23
24
25
26
27
28
29
30
31
32
33
34
35
36
I/O
I/O
VCCO
I/O
I/O
I/O
I/O
I/O
GND
I/O
I/O
I/O
I/O
I/O
I/O
GND
I/O
I/O
VCCO
I/O
I/O
GND
I/O
I/O
I/O
I/O
I/O
I/O
GND
I/O
I/O
I/O
I/O
VCCO
I/O
I/O
1
2
3
4
5
6
7
8
9
10
DO
VCCJ
(NC)
VCCO
CLK
VCCINT
TDI
TDO
TMS
(NC)
TCK
(NC)
CF
(NC)
OE/RESET CEO
(NC)
(NC)
CE
GND
20
19
18
17
16
15
14
13
12
11
108
I/O 107
I/O 106
VCCO 105
I/O 104
I/O 103
I/O 102
I/O 101
GND 100
I/O 99
I/O 98
I/O 97
I/O 96
I/O 95
I/O 94
GND 93
I/O 92
I/O 91
VCCO 90
I/O 89
I/O 88
GND 87
I/O 86
I/O 85
I/O 84
I/O 83
I/O 82
I/O 81
GND 80
I/O 79
I/O 78
I/O 77
I/O 76
I/O
VCCO 75
I/O 74
I/O 73
Paul Scherrer Institut
Department TEM
Lab for Electronics (1414)
5232 Villigen PSI
Page 20 of 21
144
TDI 143
PROG_B 142
HSWAP_EN 141
I/O 140
I/O 139
GND 138
VCCO 137
I/O 136
GND 135
I/O 134
VCCAUX 133
VCCINT 132
I/O 131
I/O 130
I/O 129
I/O 128
I/O-CLK7 127
I/O-CLK6 126
VCCO 125
I/O-CLK5 124
I/O-CLK4 123
I/O
122
I/O 121
VCCINT 120
VCCAUX 119
I/O 118
I/O 117
GND 116
I/O 115
VCCO 114
GND 113
I/O 112
I/O
TMS 111
TCK 110
TDO 109
M1
M0
M2
I/O
I/O
GND
VCCO
I/O
GND
I/O
I/O
VCCAUX
VCCINT
I/O
I/O
I/O-CLK2
I/O-CLK3
VCCO
I/O-CLK0
I/O-CLK1
I/O
I/O/INIT_B
I/O
I/O
VCCINT
VCCAUX
I/O
GND
I/O/DIN
VCCO
GND
I/O
I/O
I/O
DONE
CCLK
37
38
39
40
41
42
43
44
45
46
47
48
49
50
51
52
53
54
55
56
57
58
59
60
61
62
63
64
65
66
67
68
69
70
71
72
DRS4 Evaluation Board User’s Manual
3 IN
1 GND
OUT 2
OUT 4
1 VIN VOUT 5
2 GND
3 ON/OFF BYP 4
3 IN
1 GND
OUT 2
OUT 4
OUT 2
OUT 4
1 VIN VOUT 5
2 GND
3 ON/OFF BYP 4
3 IN
1 GND
Paul Scherrer Institut
Department TEM
Lab for Electronics (1414)
5232 Villigen PSI
Please check for possible updates of this manual under http://drs.web.psi.ch/datasheets